As a seasoned tech enthusiast with years of experience under my belt, I can’t help but be excited about the latest security features introduced in Windows 11. One such feature that has caught my eye is the Passkey technology, which offers a passwordless sign-in experience while enhancing the overall security of your account.
Experience the multitude of productivity-boosting, creativity-enhancing, and user-friendly upgrades in Windows 11! Although some popular features may be familiar, there are lesser-known treasures tucked away that many users often miss.
In this tutorial, I’ll introduce (or reacquaint you with) some underutilized but practical functions to maximize your operating system’s potential. From the advanced clipboard that synchronizes content across devices, to writing tools that may have slipped your mind, and new safety measures, as well as features designed to streamline your experience like “End Task.”
In this step-by-step tutorial, I’ll draw your attention to some lesser-known functions that you might find useful when working with Windows 11.
Windows 11 lesser features you should try out on your computer
Here are twenty intriguing details about various topics that might be new to you, or perhaps familiar but forgotten. They’re presented in no specific sequence.
1. Clipboard history
Even though you’ve been able to duplicate text and visuals via cutting and pasting for quite some time, the process has been rather restrictive as it allows for storing only a single item at a time, and lacks a user-friendly interface to preview the clipboard content.
As a tech-savvy individual, I’m excited about the enhanced clipboard functionality known as clipboard history. Instead of just pasting the last item you copied, this feature allows me to store multiple pieces of content in my clipboard for later use. It also provides an intuitive interface where I can preview and select the content I want to paste. Plus, I can pin frequently used items for quick access, making my digital workflow more efficient!
Furthermore, this function is compatible with your Microsoft account, allowing the content saved on the clipboard to synchronize across various devices.
To get started with the clipboard history on Windows 11, use these steps:
- Open Settings.
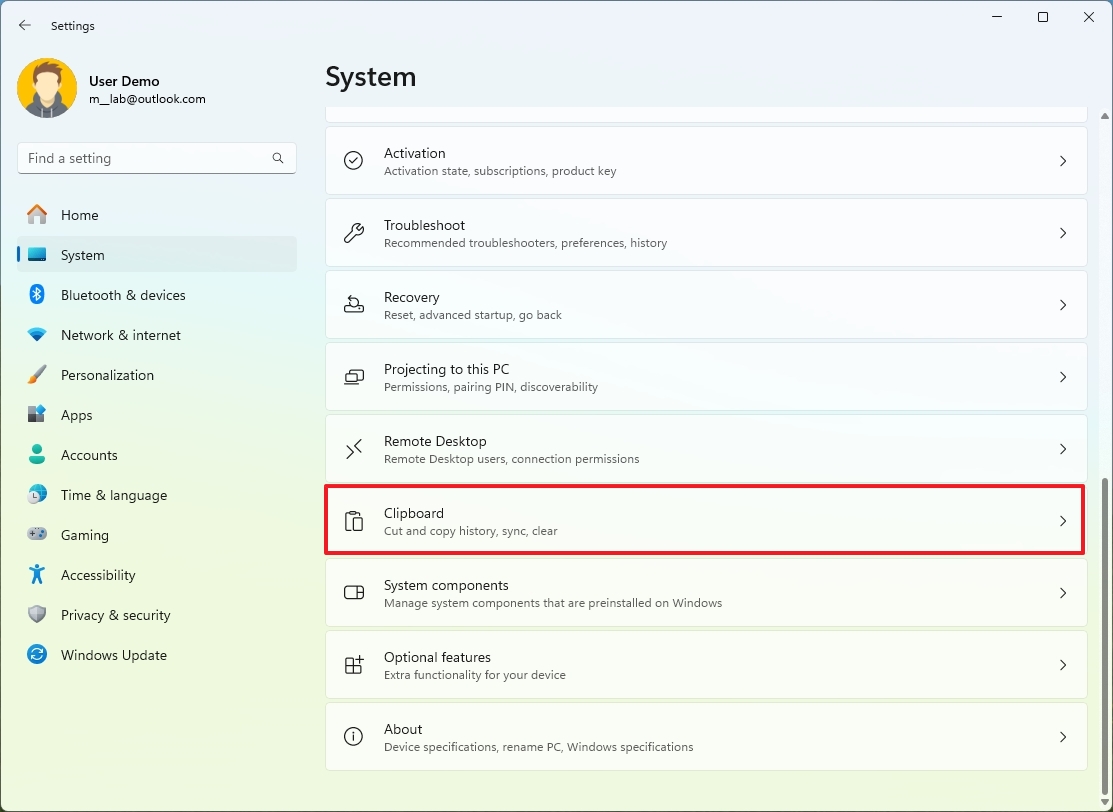
- Click on System.
- Click the Clipboard page on the right side.
- Turn on the “Clipboard history” toggle switch.
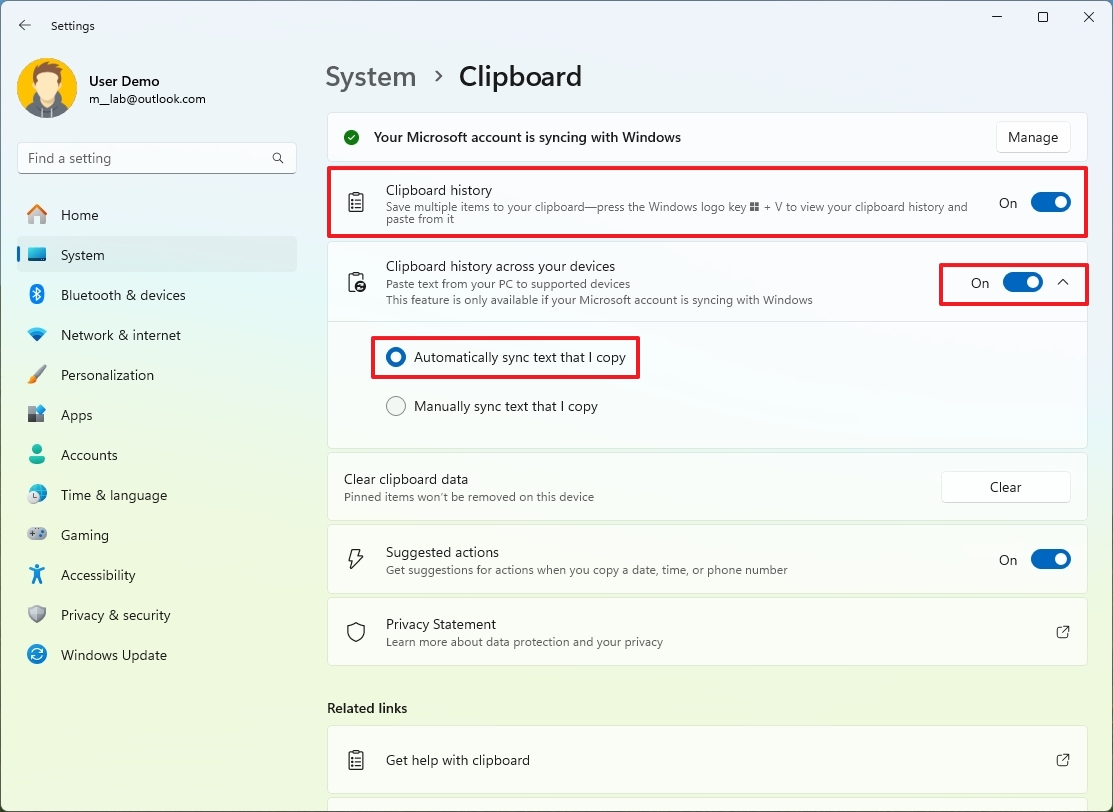
- (Optional) Turn on the “Clipboard history across devices” toggle switch.
- Choose the option to automatically or manually sync text across devices.
After finishing the steps, you can choose to either copy or remove text or pictures by using keyboard shortcuts like “Ctrl + C” for copying and “Ctrl + X” for cutting, or by selecting the “Copy” or “Cut” options from the menu, followed by pressing “Windows key + V” to access the clipboard window.
On your clipboard history, you have the option to select from the latest entries to paste into your program, and you can also save specific items for repeated usage.
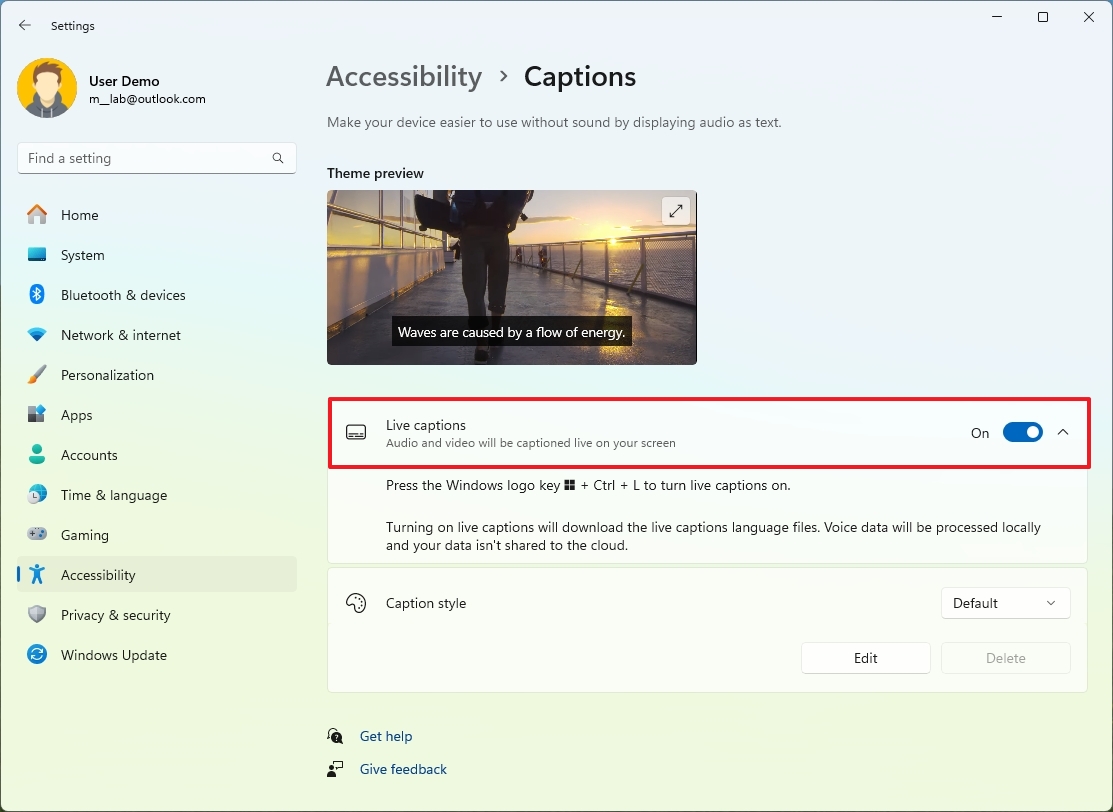
2. Live Captions
The Live Captions tool is a handy accessibility feature that generates captions instantly from almost any audio source, such as internet videos, enabling people to comprehend audio more easily by reading the captions of spoken content.
To enable Live Captions on Windows 11, use these steps:
- Open Settings.
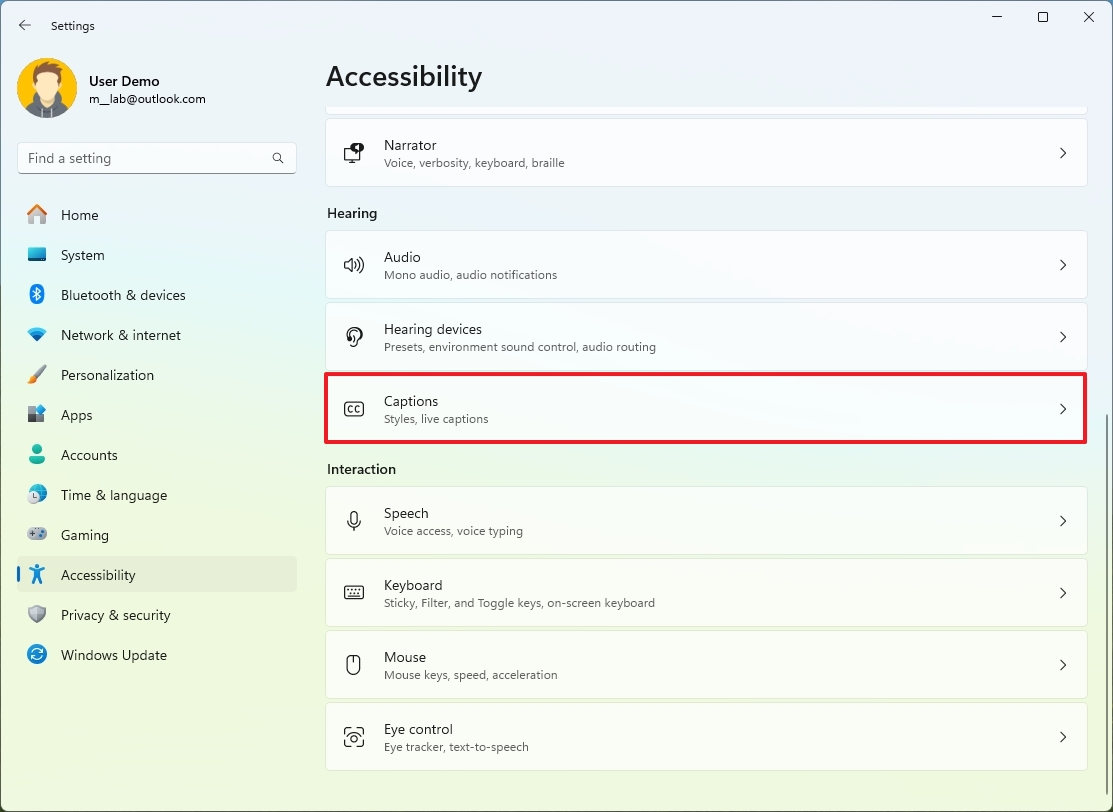
- Click on Accessibility.
- Click the Captions page on the right side.
- Turn on the Live Captions toggle switch.
- Quick note: If this is the first time loading the feature, you may be prompted to download an additional package.
- (Optional) Click the Settings (gear) button to access the menu and change the position, caption language, style, and filters.
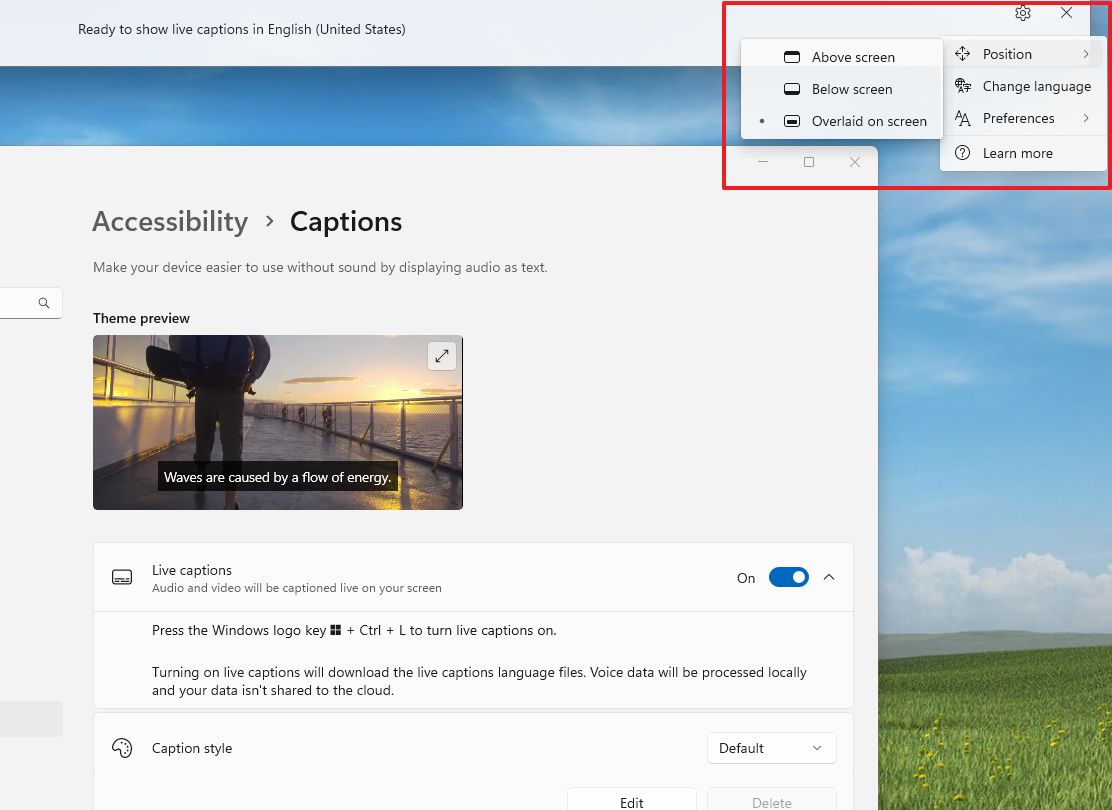
After finishing the process, captions will show up at the bottom of your screen. You can try this function with any content that has an audio track, such as YouTube videos, although it’s worth noting that the video streaming platform itself offers captions too.
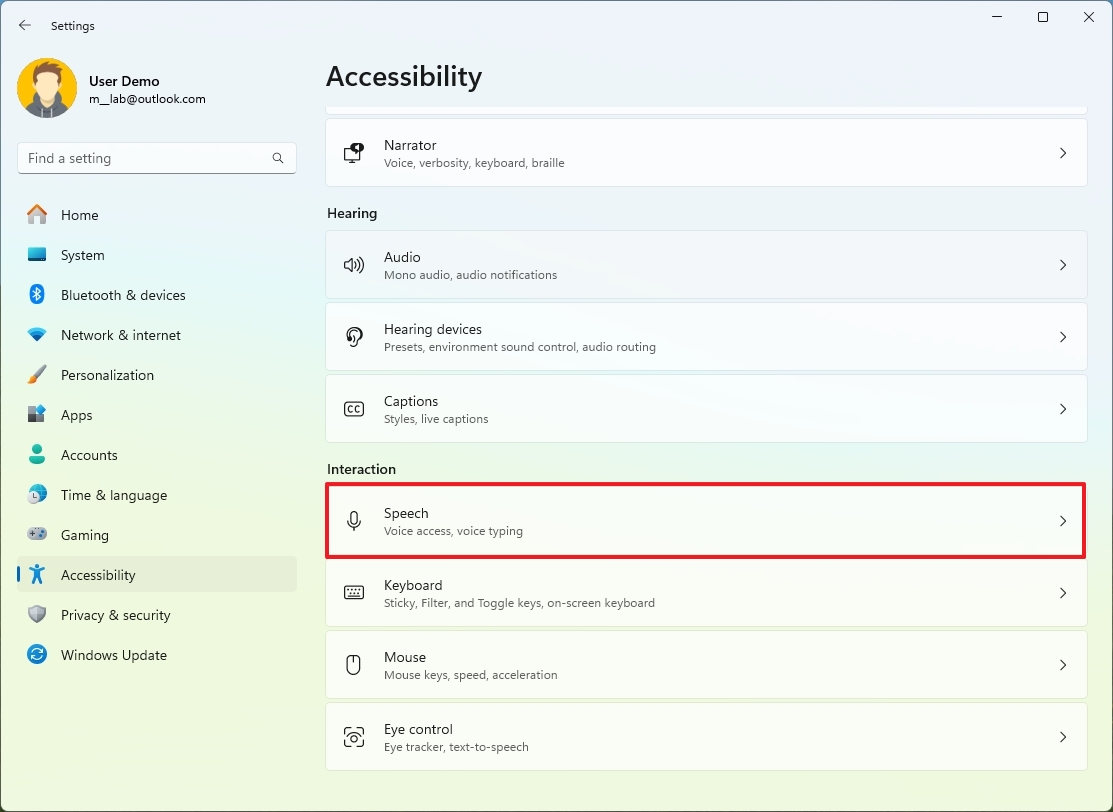
3. Voice Access
As a tech enthusiast, I’m absolutely smitten by Voice Access – a nifty accessibility tool that empowers me to navigate my digital world solely through vocal commands! It’s brilliant because it operates using built-in voice recognition technology, making it independent of internet connectivity.
To enable Voice Access on Windows 11, use these steps:
- Open Settings.
- Click on Accessibility.
- Click the Speech page on the right side.
- Turn on the Voice Access toggle switch.
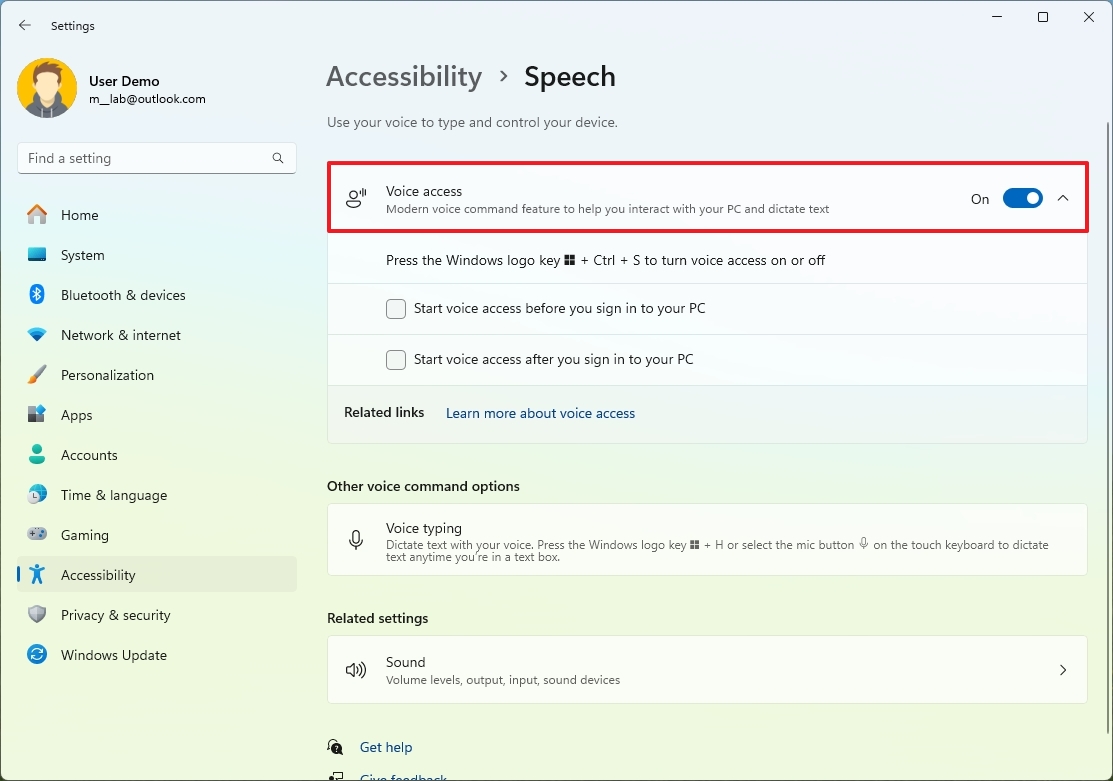
- (Optional) Check the “Start voice access before you sign in to your PC” option.
- (Optional) Check the “Start voice access after you sign in to your PC” option.
Once you’ve finished the necessary steps, feel free to utilize the “Voice Access” command by voice or tap the microphone icon situated in the upper left corner to manage the feature.
As a researcher exploring Voice Access, I strongly advise you to delve deeper into the “Voice Access Commands” app for comprehensive knowledge on the available commands. That said, kickstart your journey by utilizing the “‘Activate Voice Access’” command to awaken the feature in listen mode. To pause it, employ the “‘Deactivate Voice Access’” command. Additionally, you can prompt the feature with “‘What are my options?’” for assistance on the array of commands at your disposal.
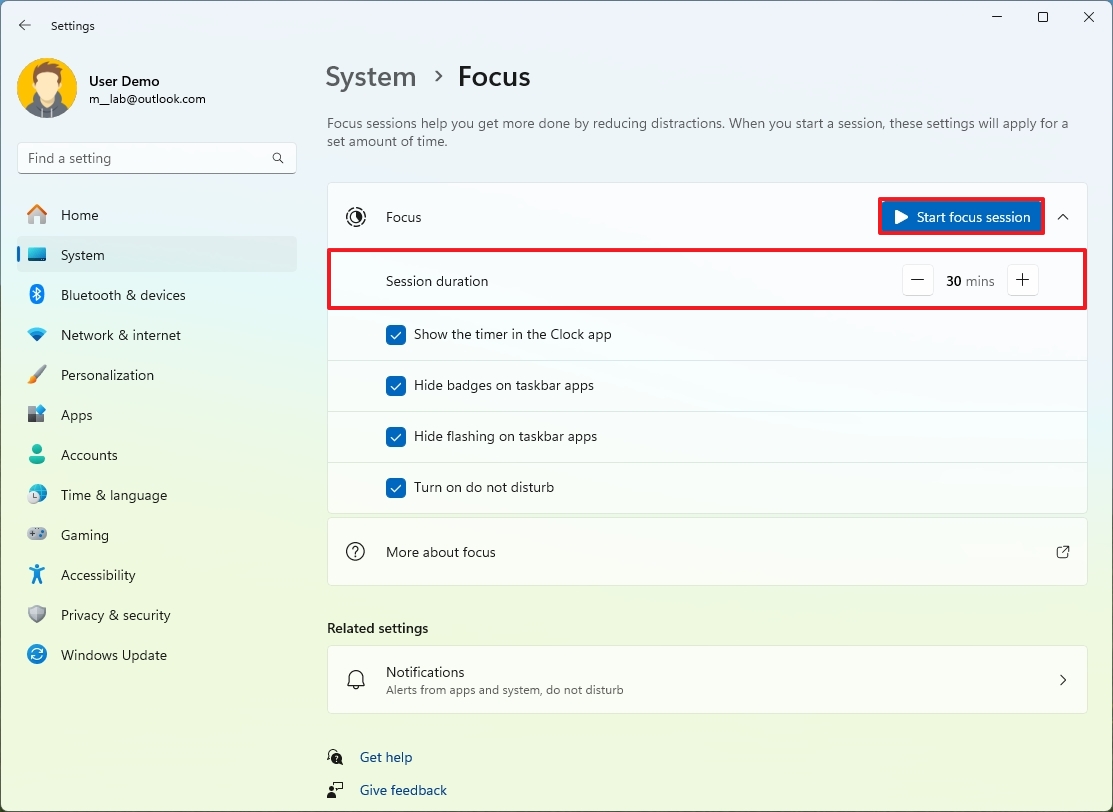
4. Focus sessions
Dedicated Work Periods: This tool assists you in concentrating on particular jobs by minimizing disruptions like pop-up notifications from badges and apps flashing in your taskbar. Furthermore, it syncs with the Clock app to set a timer and the Microsoft To-Do app for task management.
To get started with Focus sessions on Windows 11, use these steps:
- Open Settings.
- Click on System.
- Click the Focus page on the right side.

- Set the time for the session using the “Session duration” setting.
- Click the “Start focus session” button.
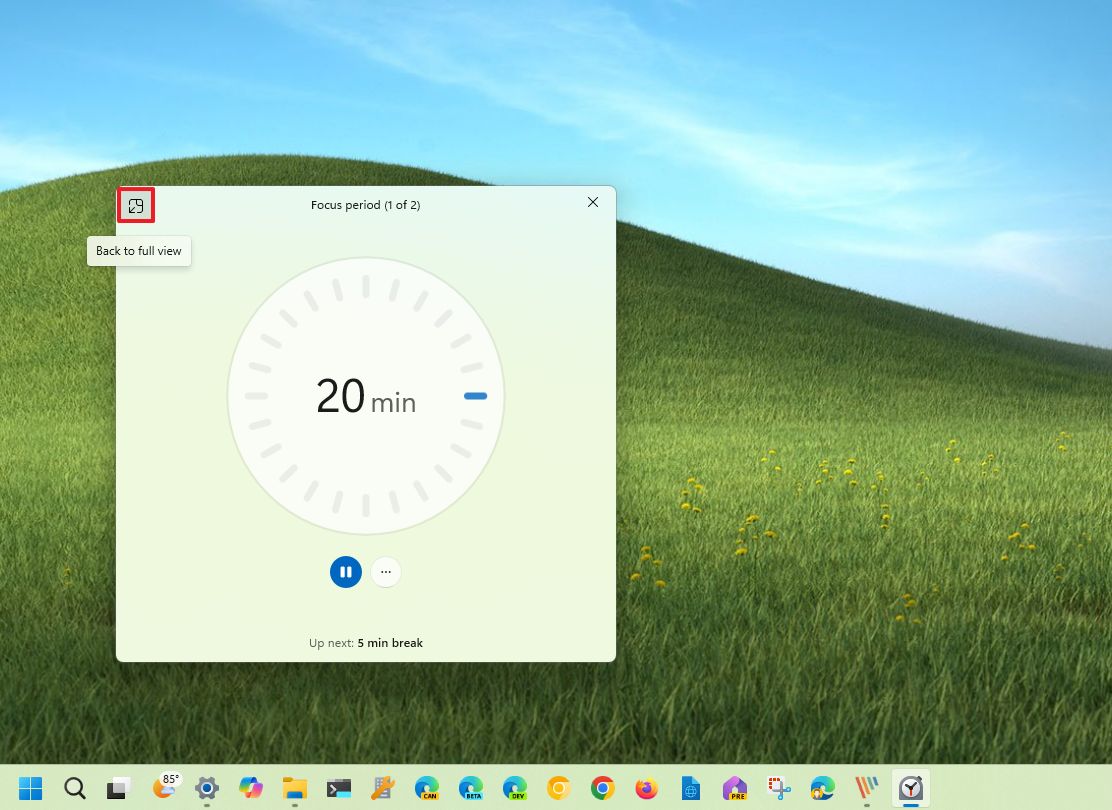
After finishing the given steps, the session will begin, and a condensed form of the Clock application will show up on your screen.
It’s worth mentioning that within the “Focus” settings, you have the ability to manage which features will be activated during your session to help maintain your concentration. For instance, by default, the feature will initiate a timer on the screen, suppress badges and pop-up notifications, and enable the “Do Not Disturb” mode.
Whenever you need to adjust settings in the Clock app, simply click the “Expand to Full Screen” button for access to various options.
On the “Focus Sessions” page within the Clock app, you can link up with the Microsoft To Do app to choose a task for your focus period.
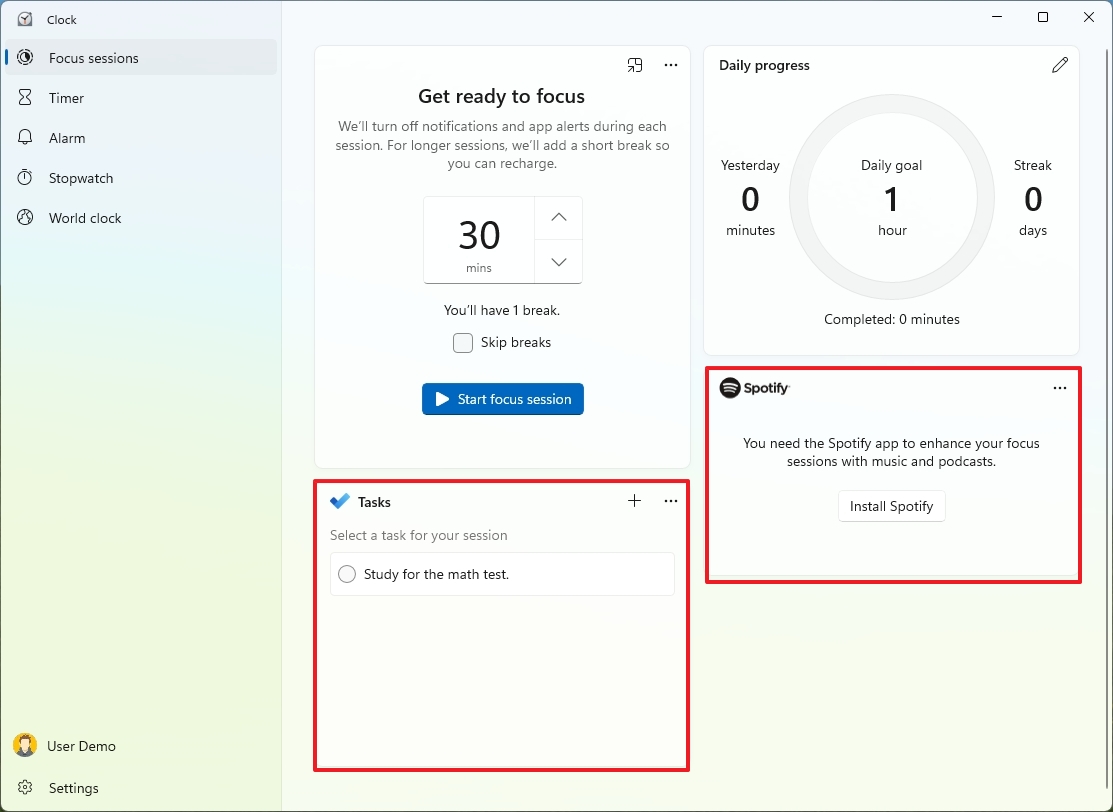
Additionally, should you utilize Spotify, linking it to this feature will allow you to kickstart your session with some tunes. For those who don’t currently have the Spotify app, simply click the “Install” button to download it onto your computer. Afterward, connect your account for seamless integration.
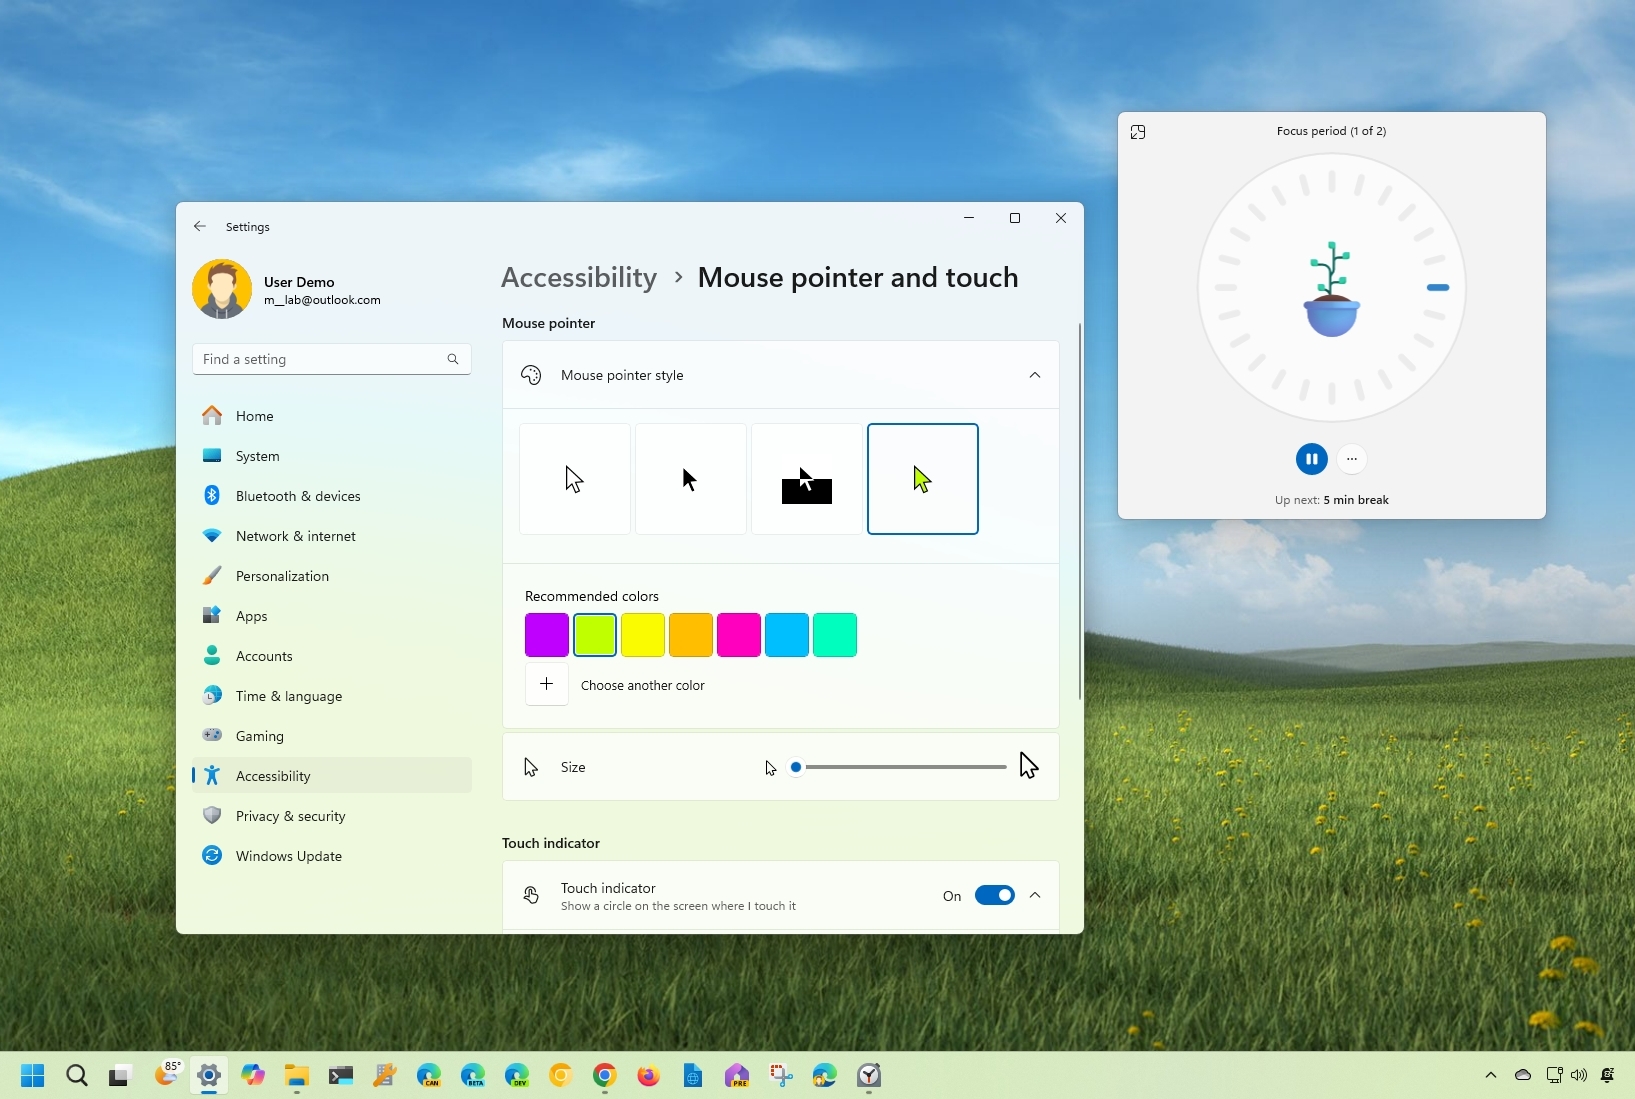
5. Mouse Pointer Color
If you’re still employing the traditional white cursor, be aware that Windows 11 offers a customization option allowing you to modify the color scheme for better visibility of your cursor on the screen.
To change the mouse pointer color, use these steps:
- Open Settings.
- Click on Accessibility.
- Click the “Mouse pointer and touch” page on the right side.
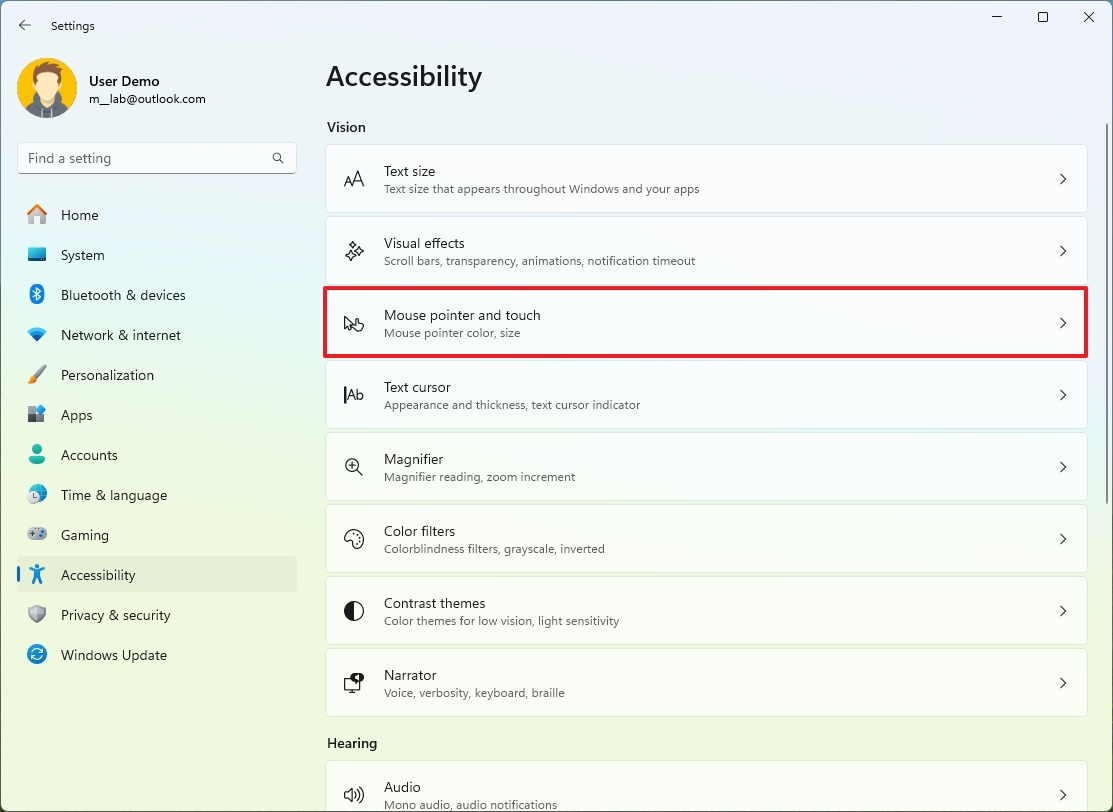
- Click the Custom option inside the “Mouse pointer style” setting.
- Choose the color scheme for the pointer.
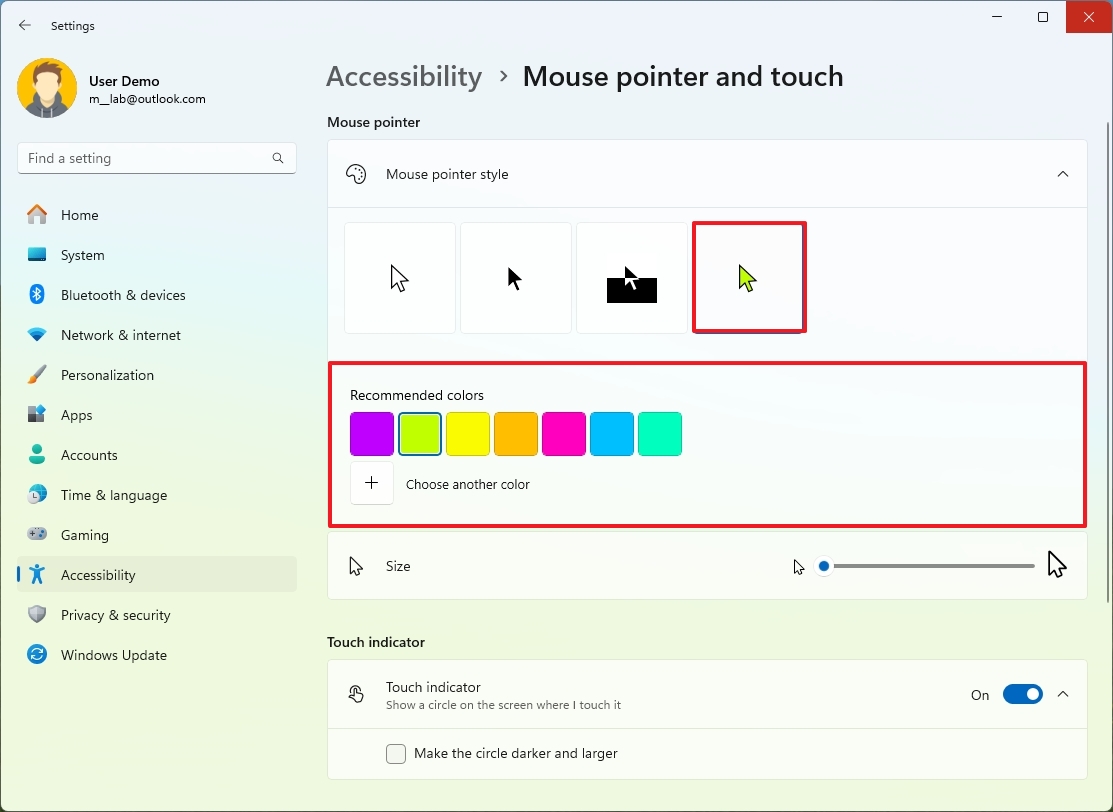
- Quick tip: You can also choose the “Black” and “Inverted” schemes from this setting.
- (Optional) Click the “Choose another color” option to create a custom color.
After you complete the steps, the new scheme will apply to the pointer and text cursor.
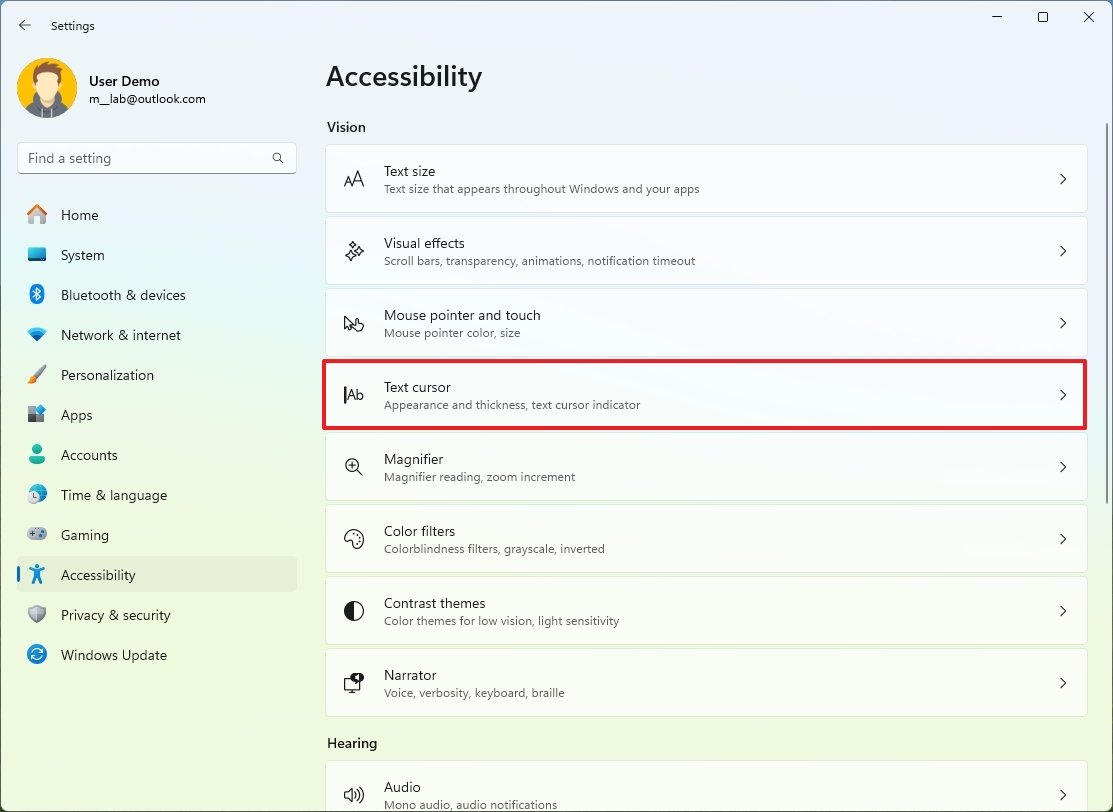
6. Text cursor color
If you sometimes struggle to locate your text cursor easily on the screen, consider enabling the text cursor indicator. This feature makes the cursor more prominent within the text box for easier visibility.
To enable the text cursor indicator, use these steps:
- Open Settings.
- Click on Accessibility.
- Click the Text cursor page on the right side.
- Turn on the “Text cursor indicator” toggle switch.
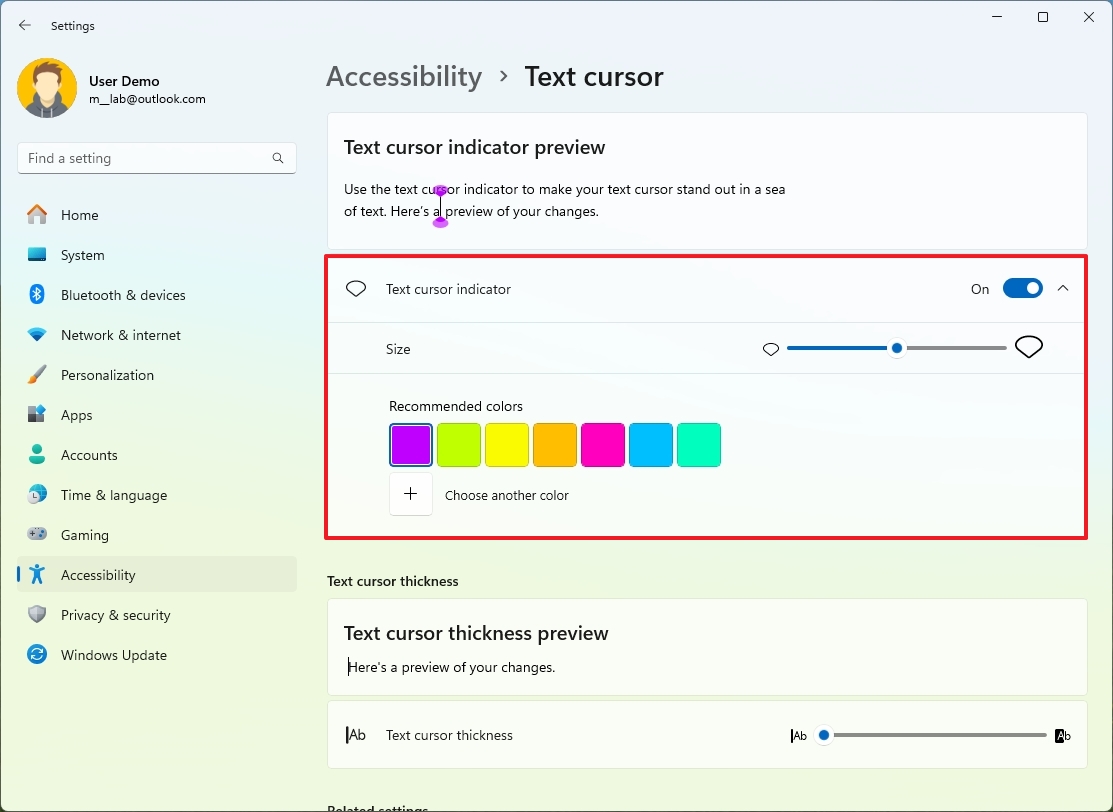
- Choose the color scheme for the cursor.
- (Optional) Use the Size slider to change the size of the text cursor.
- (Optional) Click the “Choose another color” option to create a custom color.
Once you’ve finished the procedures, clicking on a text box or utilizing an application will be accompanied by an indicator that helps locate the cursor more easily.
7. Random MAC address
As a seasoned traveler who has encountered more than a few sketchy Wi-Fi hotspots during my journeys, I can attest to the potential dangers of broadcasting your device’s MAC address when not connected to a network. In my experience, it’s always better to be cautious and secure your privacy whenever possible. Even in seemingly safe environments like coffee shops or hotels, malicious individuals might be lurking, waiting for unsuspecting victims to expose their personal information. To avoid such risks, I make sure to disable the automatic discovery of nearby networks on my devices when not in use, especially when I’m out and about. Staying vigilant in our digital world is essential if we want to protect ourselves from potential threats.
As a tech-savvy individual, I often leverage the random MAC address function to shroud my device’s true identity. This nifty feature generates unique hardware addresses, effectively disguising my actual MAC address and making it trickier for others to trace my electronic footsteps.
To enable random MAC feature for a Wi-Fi connection, use these steps:
- Open Settings.
- Click on Network & internet.
- Click the Wi-Fi page on the right side.
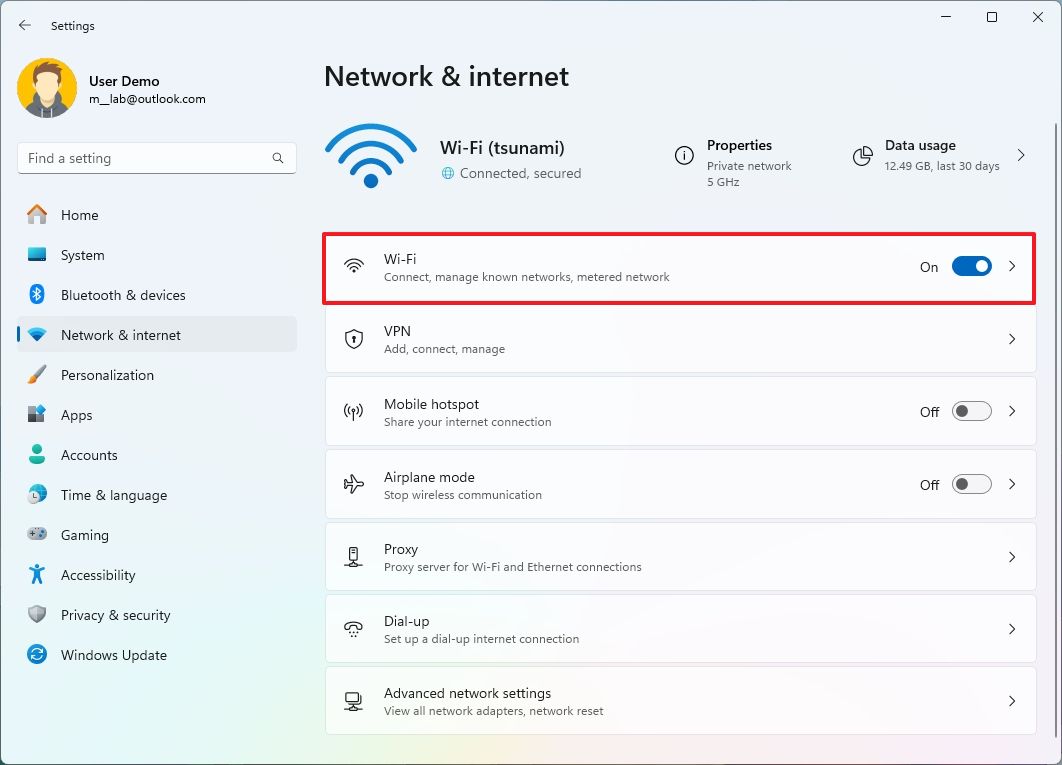
- Turn on the “Random hardware addresses” toggle switch (if applicable).
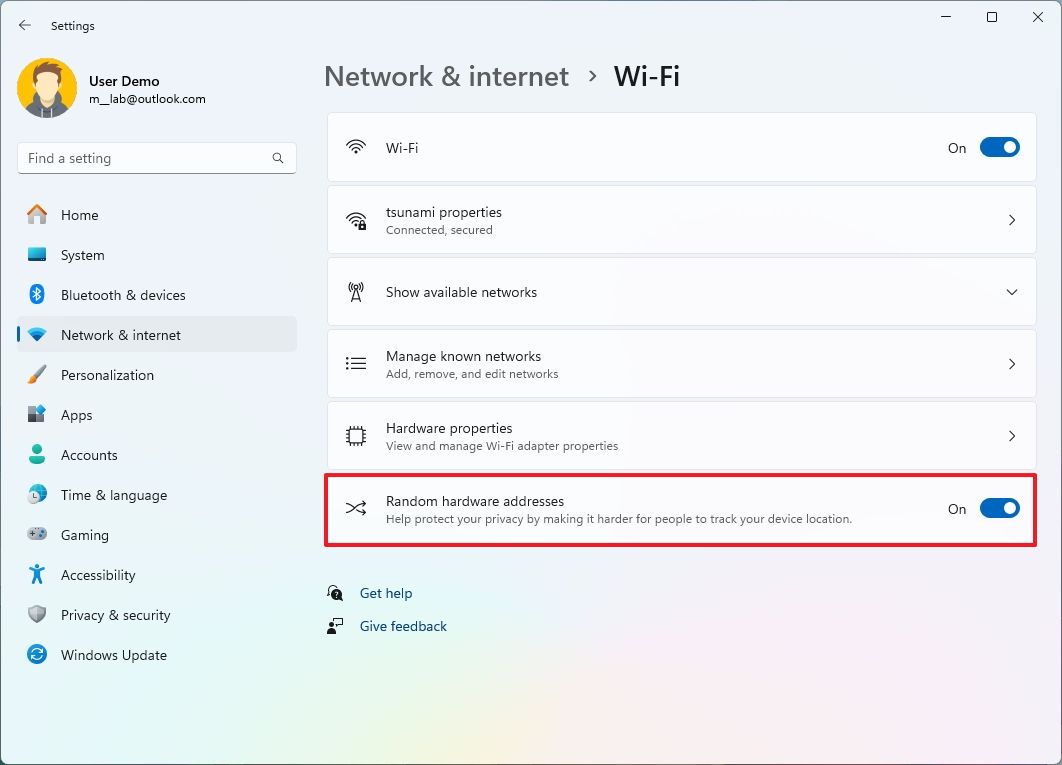
After following the provided instructions, the wireless adapter will provide enhanced privacy protection by frequently changing its MAC address, making it harder for others to trace your device’s location.
If you don’t have the option, the network adapter doesn’t support this feature.
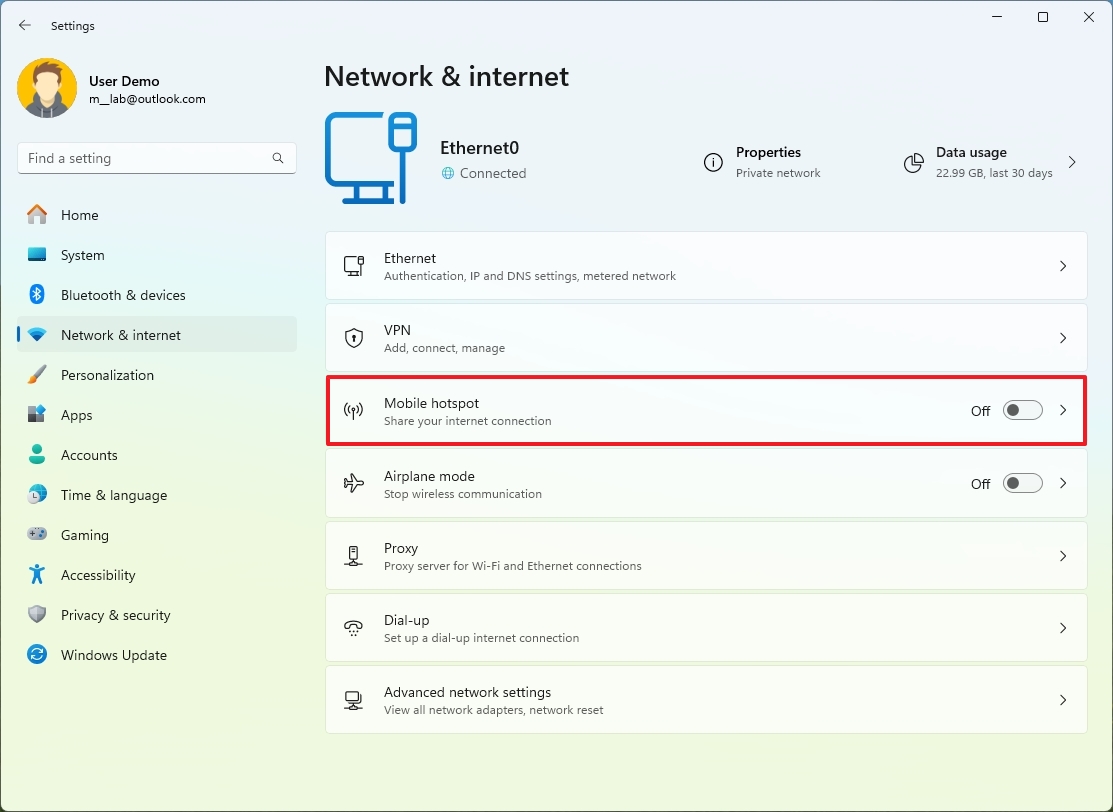
8. Mobile Hotspot
On Windows 11, you can easily share your internet connection with other devices by utilizing the built-in mobile hotspot function, eliminating the need for any extra applications.
To create a Wi-Fi hotspot on Windows 11 to share the internet with other devices, use these steps:
- Open Settings.
- Click on Network & internet.
- Click the Mobile hotspot page on the right side.
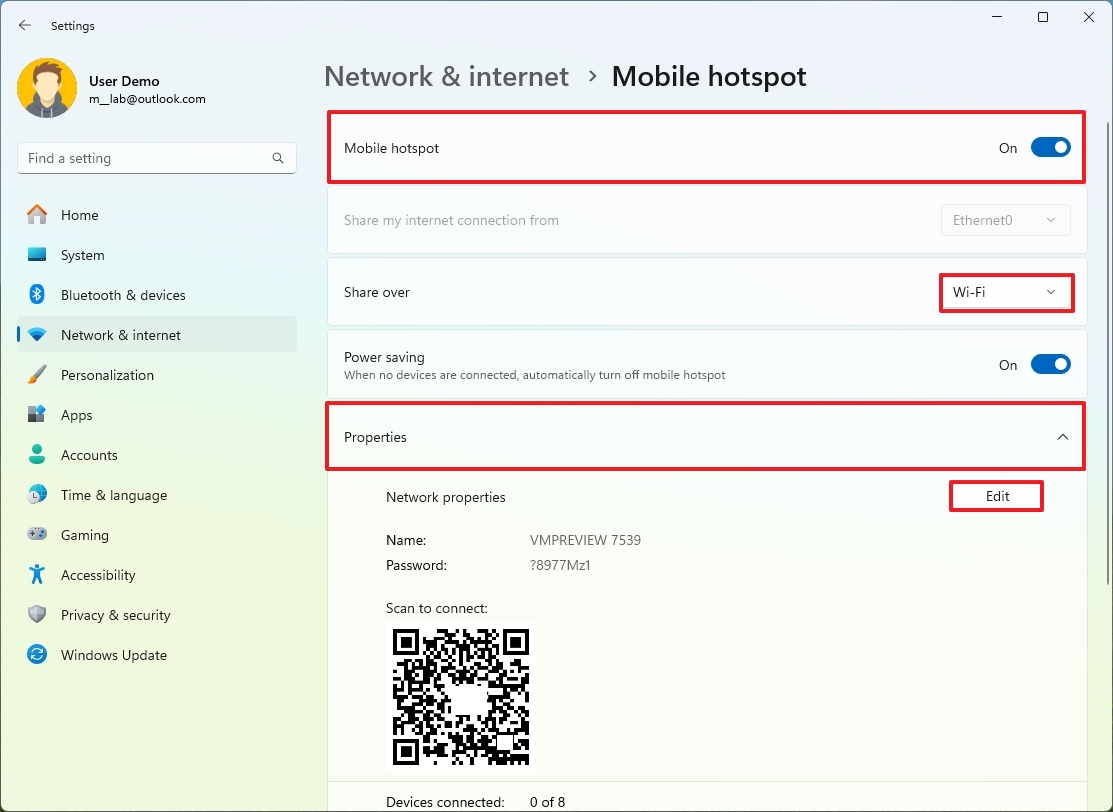
- Select the network adapter connected to the internet to share the connection from the “Share my internet connection from” setting (if applicable).
- Choose the Wi-Fi option in the “Share over” setting.
- Turn on the Mobile hotspot toggle switch to start sharing the internet.
- Click the Properties setting.
- (Optional) Click the Edit button.
- Confirm a new name for the mobile hotspot.
- Create a new password that other devices will use to access the connection.
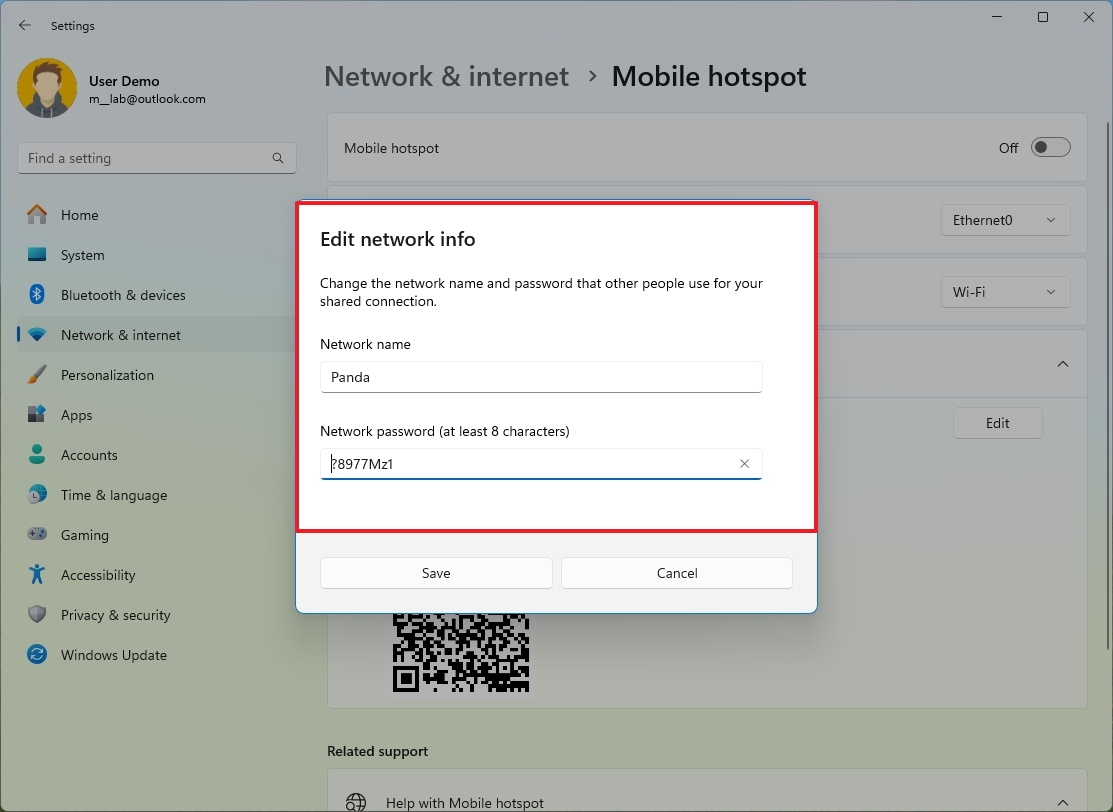
- Click the Save button.
Once you’ve finished the process, please provide the network name and password so that the devices you wish to link to the internet via your computer can access them.
9. Night light
The “Night Light” function in Windows 11 aims to minimize eye strain and aid sleep after prolonged nighttime computer use, by adjusting the screen’s light to be easier on the eyes.
To enable the Night light feature, use these steps:
- Open Settings.
- Click on System.
- Click the Display page on the right side.
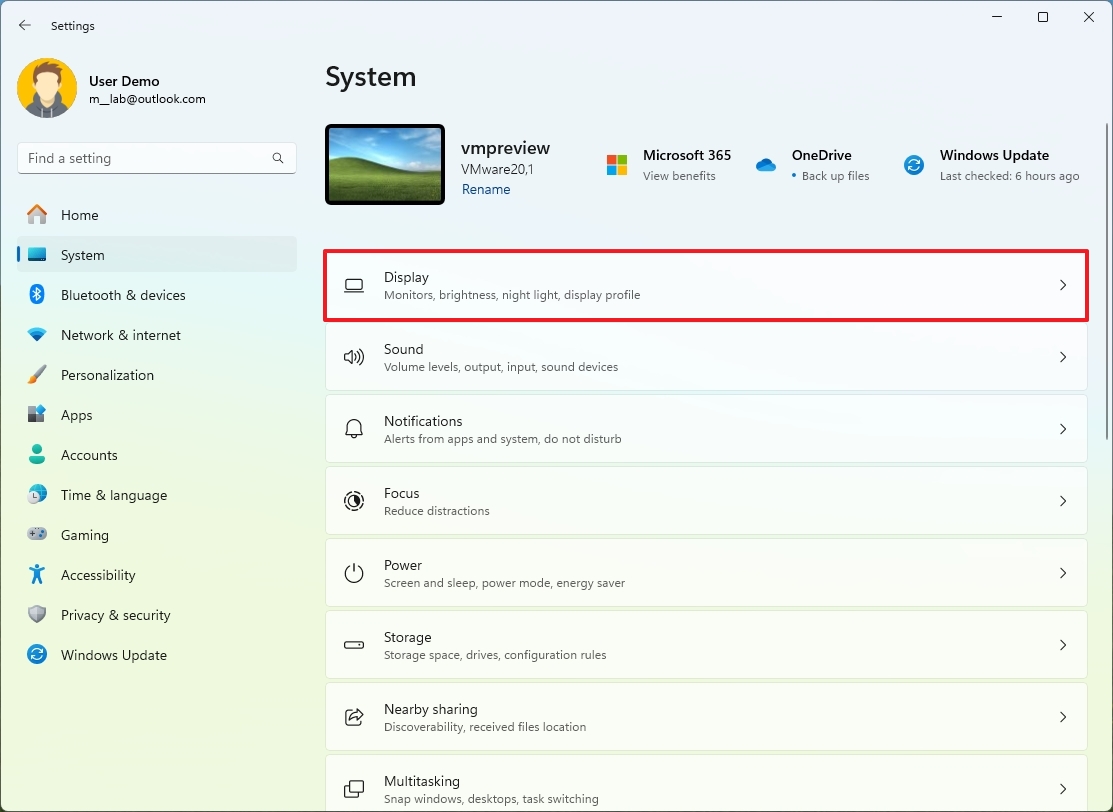
- Turn on the Night light toggle switch to enable the feature under the “Brightness & color” section.
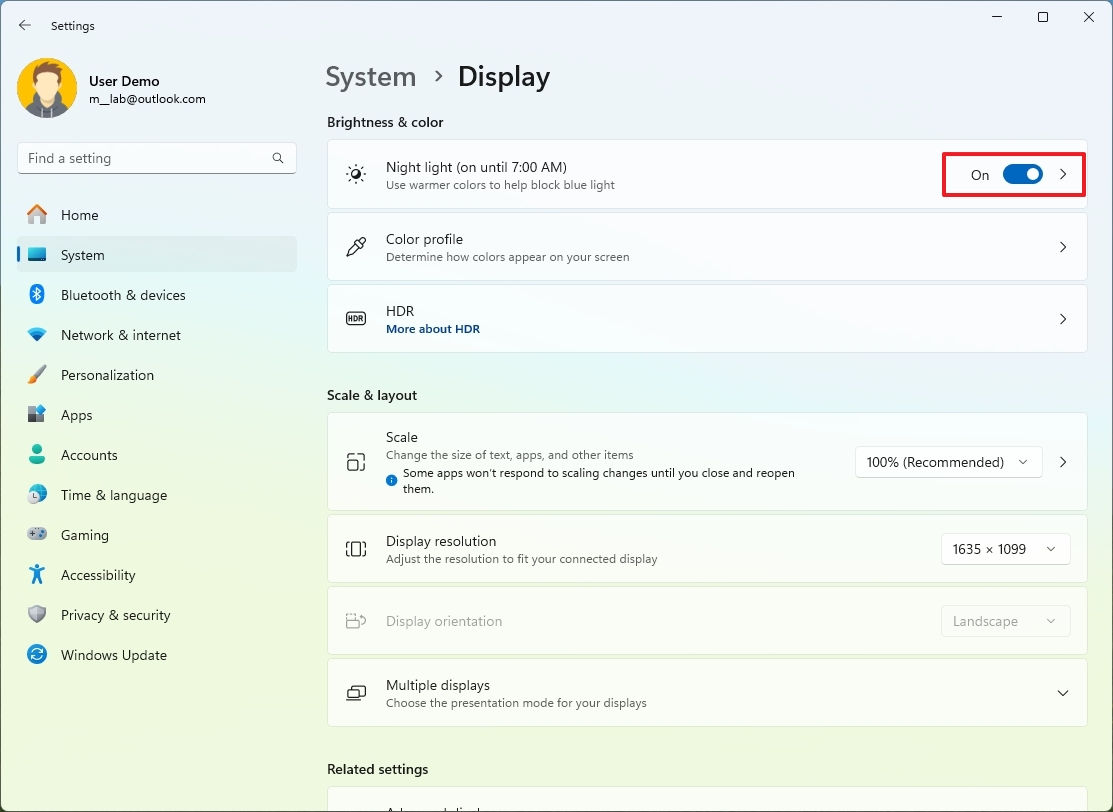
- (Optional) Click the Night Light page on the right side.
- Configure the strength with the slider.
- Turn on the Schedule night light toggle switch to configure the feature schedule.
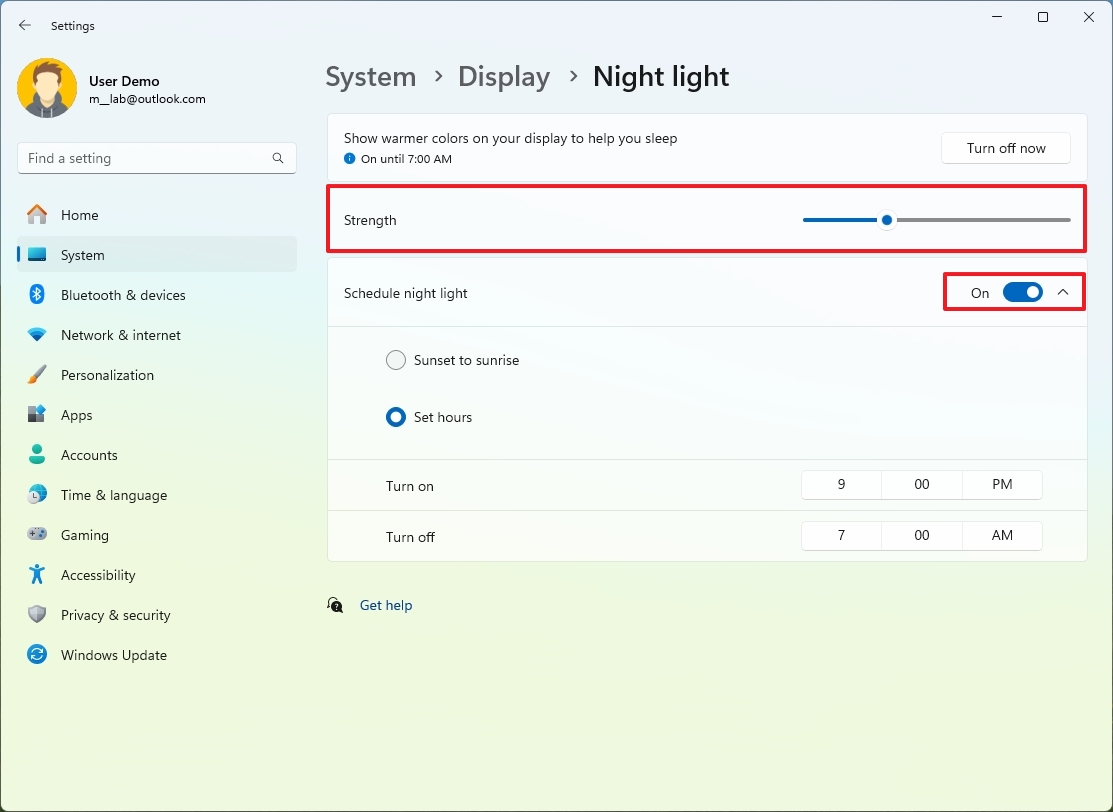
After finishing the given procedures, the screen will display softer, warm hues to reduce visual fatigue during nighttime work.
10. Find my device
Windows 11 offers a tool for locating your computer in case it gets lost or stolen. This feature is turned off initially, but once activated, it enables the system to transmit its location to your Microsoft account at regular intervals. If your device goes missing, you can trace its last known position through your Microsoft account online using another computer.
To enable the “Find my device” feature, use these steps:
- Open Settings.
- Click on Privacy & security.
- Click the Find my device page under the “Security” section.
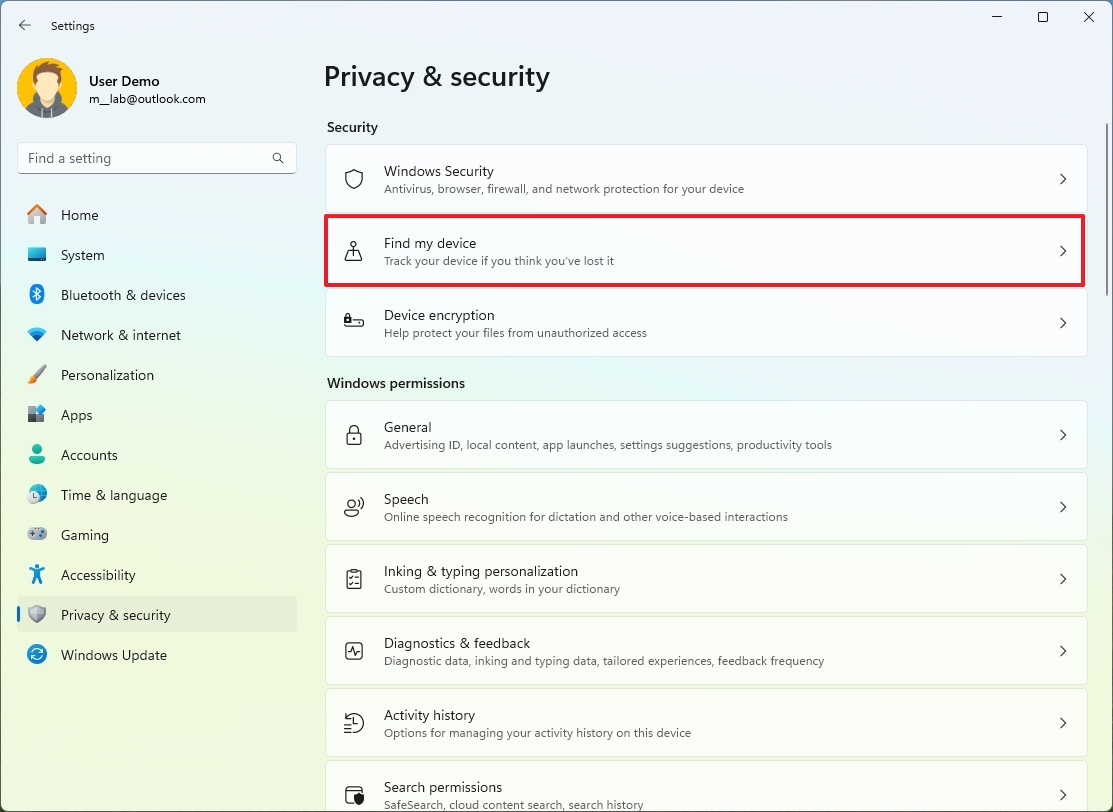
- Quick note: You must have the location turned on for the feature to work. You can always confirm the feature status on Settings > Location and turn on “Location services.”
- Turn on the “Find my device” toggle switch.
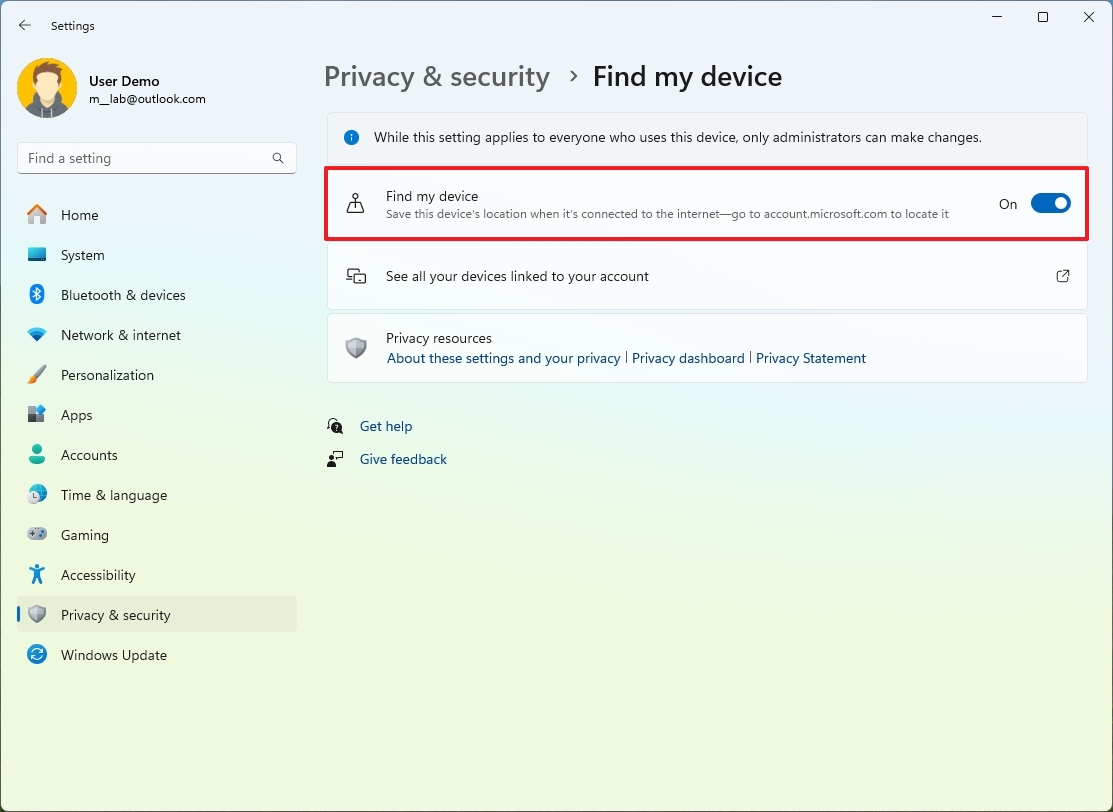
After finishing the process, the system automatically shares an approximation of the computer’s location with your Microsoft account.
From your Microsoft account’s “Devices” page, you can locate and monitor your devices. Simply select the device and hit the “Locate Device” button.
11. Taskbar ungroup apps
In Windows 11, you have the option to display individual app labels instead of grouping them together on the Taskbar. This way, each instance of an application has its own visible label.
To ungroup apps and show labels in the Taskbar, use these steps:
- Open Settings.
- Click on Personalization.
- Click the Tasbkar page on the right side.
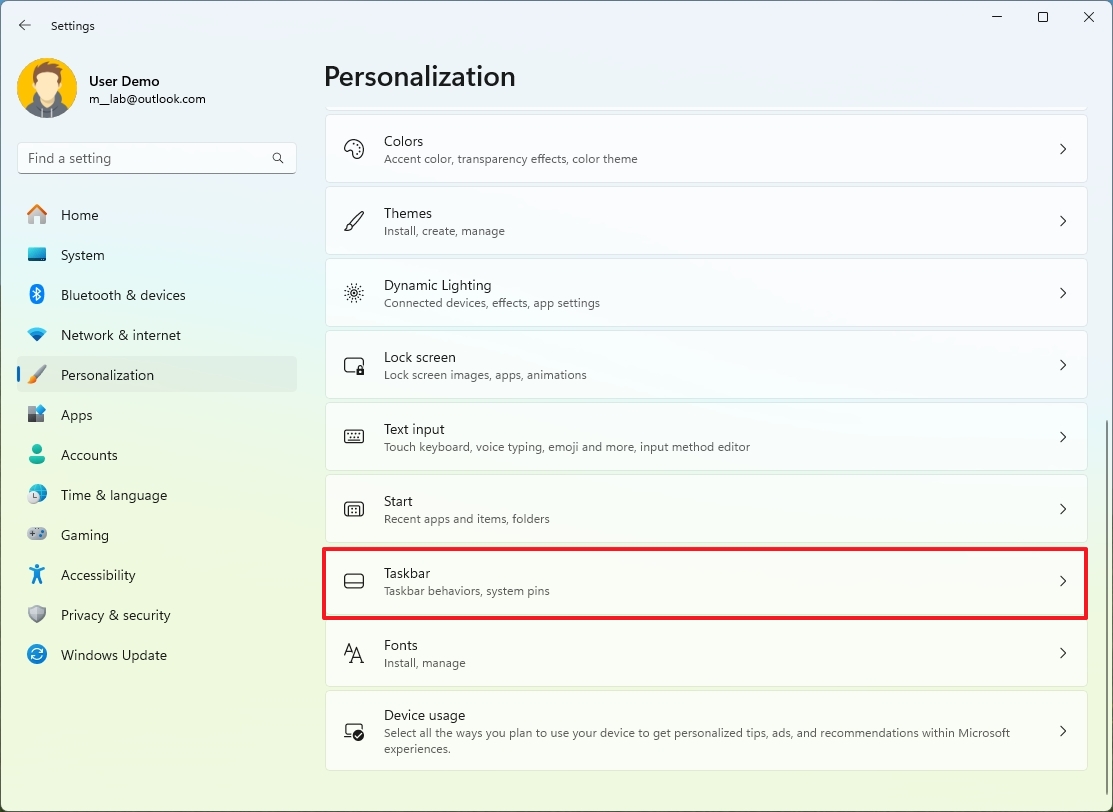
- Click the Taskbar behaviors setting.
- Choose the Never option for the “Combine taskbar buttons and hide labels” setting.
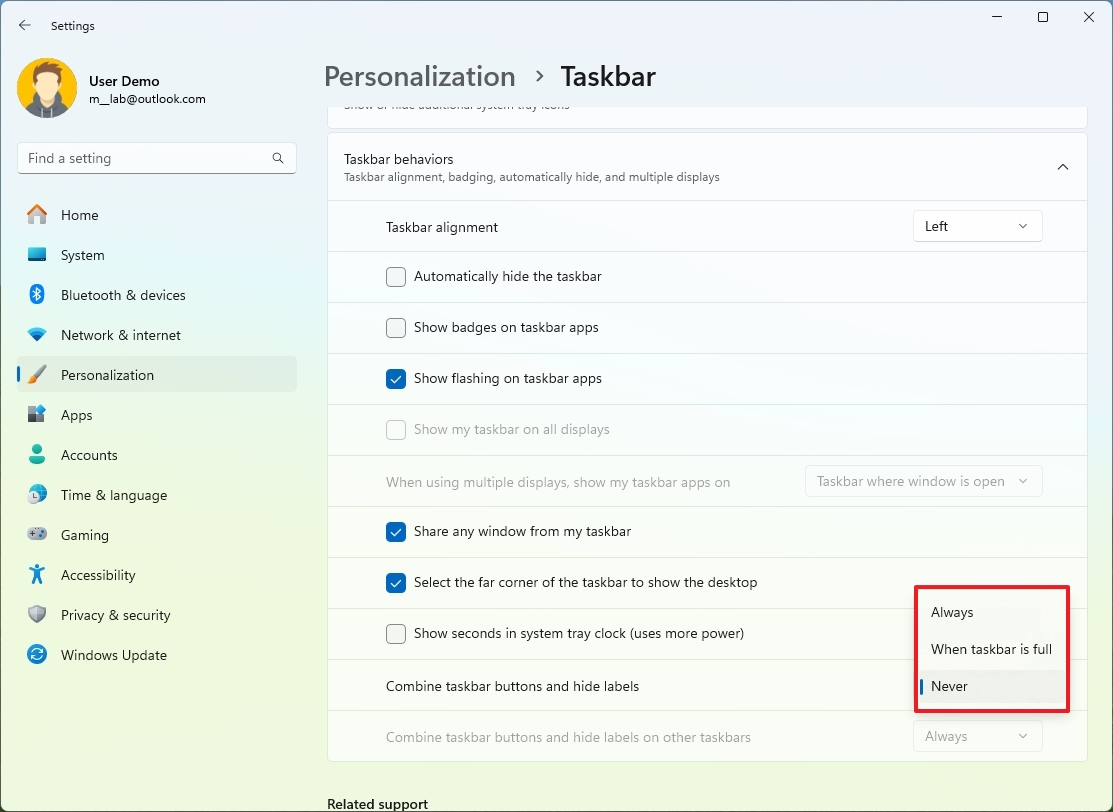
- (Optional) Choose the Never option for the “Combine taskbar buttons and hide labels for other taskbars” setting.
Once you’ve finished the procedures, applications will become visible with identifiers, and every occurrence of the application will display a unique task within the Taskbar.
12. Multilanguage text suggestions
Using multiple languages, you can customize the system to offer text recommendations according to your preferred linguistic settings.
To enable multilingual text suggestions on Windows 11, use these steps:
- Open Settings.
- Click on Time & language.
- Click the Typing page on the right side.
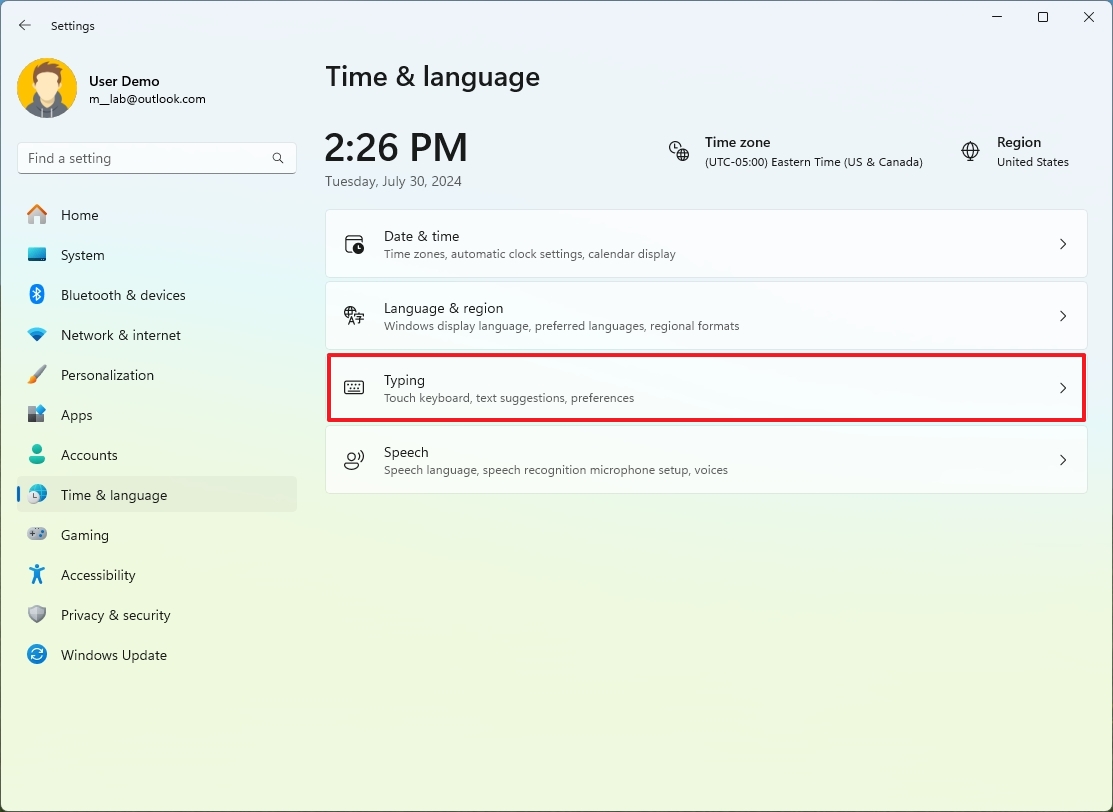
- Turn on the “Show text suggestions when typing on the physical keyboard” toggle switch.
- Turn on the “Multilingual text suggestions” toggle switch.
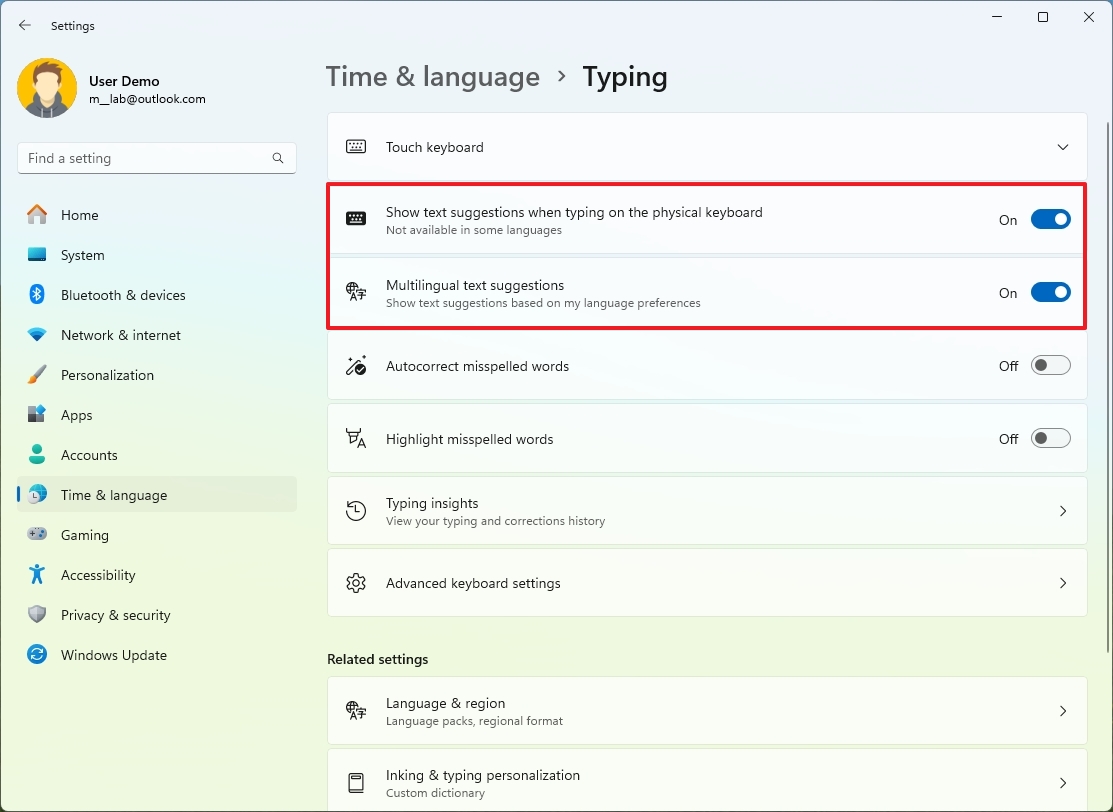
After finishing the steps, you’ll find recommendations popping up as you type within a support application like Microsoft Word or Teams.
As a bystander, I notice that there’s an option for offering suggestions. You can do this by pointing at the specific word using a mouse, touching it on a touchscreen, or even navigating to it using the arrow keys: up, left, and right.
13. Autocorrect misspelled words
In a similar vein, Windows 11 offers a feature that automatically underlines and suggests corrections for any incorrectly spelled words while typing, aiming to enhance the quality of your text.
To enable autocorrect (and highlight) misspelled words on Windows 11, use these steps:
- Open Settings.
- Click on Time & language.
- Click the Typing page on the right side.
- Turn on the “Autocorrect misspelled words” toggle switch.
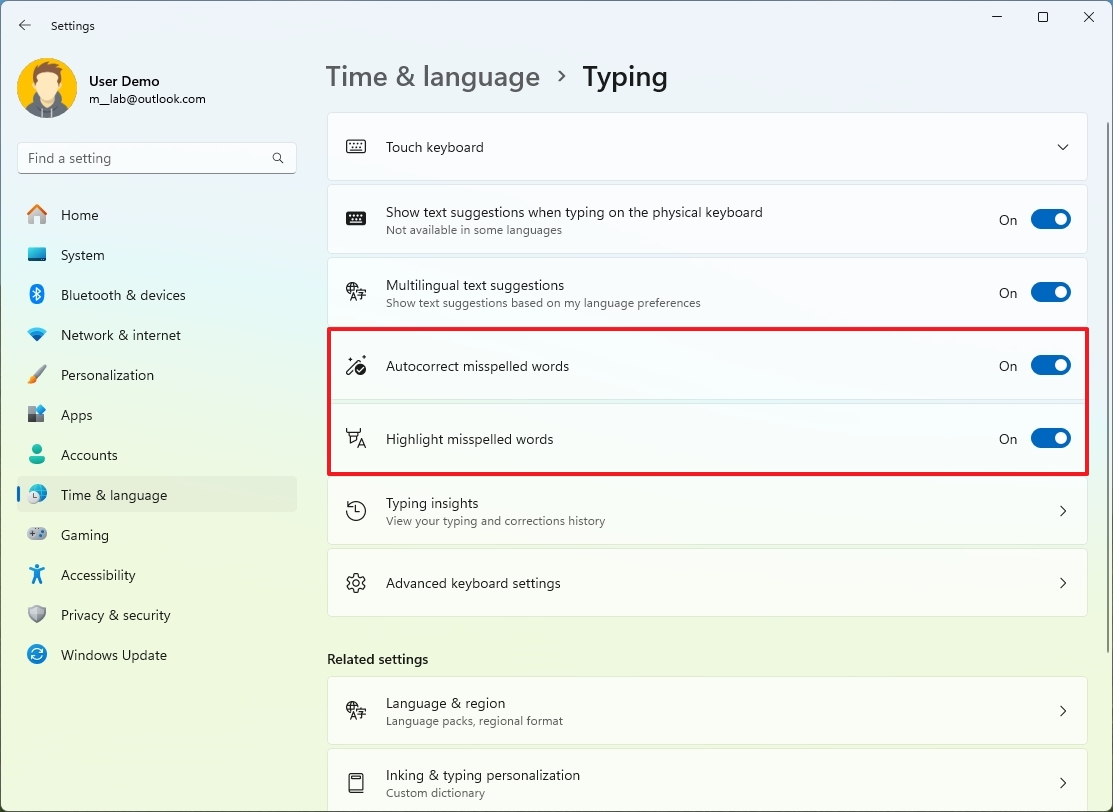
- (Optional) Turn on the “Highlight misspelled words” toggle switch.
Upon finishing the procedures, based on your chosen settings, Windows 11 will automatically rectify any misspellings and underline the words it couldn’t correct for you.
14. End Task
On Windows 11, you can easily end unresponsive applications directly from the Taskbar without needing to open the Device Manager, thanks to the “End Task” feature. While this function was initially created with developers in mind, given that apps may become frozen for any user at any time, it’s beneficial for all users to have access to this helpful tool.
To enable the End Task option on Windows 11, use these steps:
- Open Settings.
- Click on System.
- Click the For developers page on the right side.

- Turn on the End Task toggle switch.
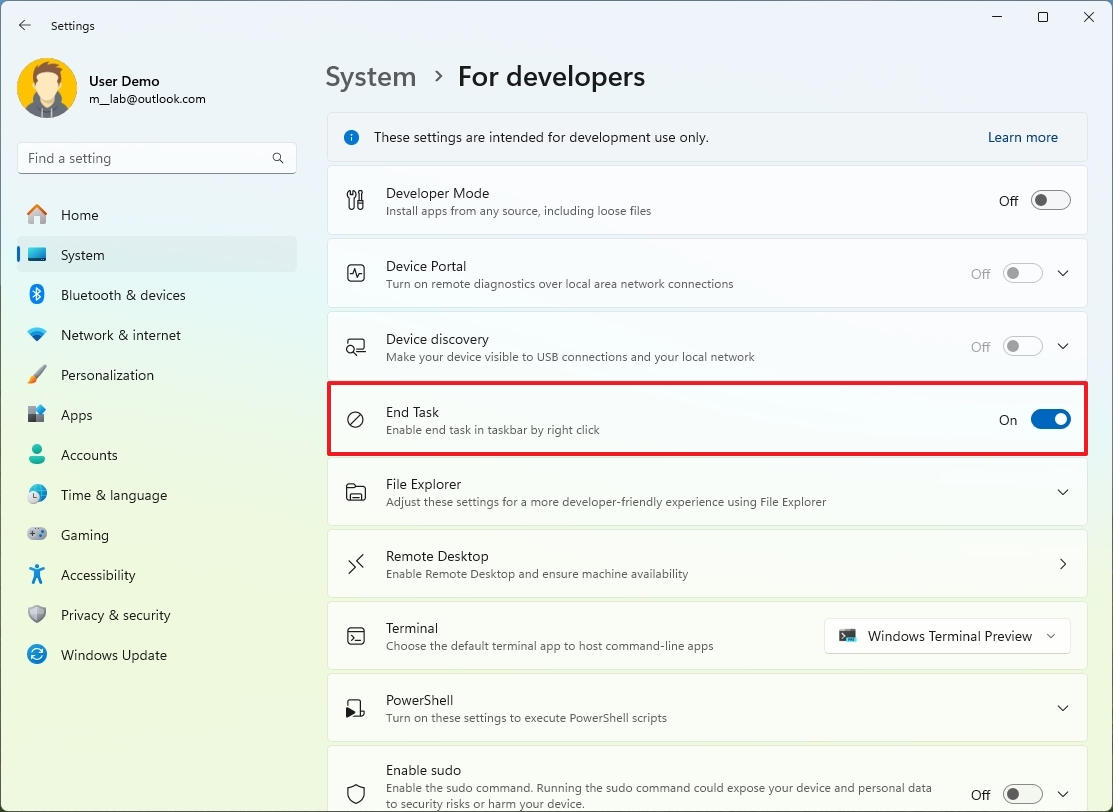
When encountering a laggy app, as a tech enthusiast, here’s what I do: Right-click the unresponsive app on my taskbar and select ‘End Task’. This action gracefully shuts down the app’s processes, allowing me to move on with my work or play smoothly.
It’s important to note that forcibly exiting an app will not save any work that wasn’t already saved before the app stopped responding.
15. Title bar window shake
In older versions of Windows, like Windows 10, you could simply drag and jiggle the title bar of a window to automatically hide or minimize all other open windows. However, with the introduction of Windows 11, Microsoft changed this functionality so that it’s now an optional feature, making it less well-known among users.
To enable title bar window share on Windows 11, use these steps:
- Open Settings.
- Click on System.
- Click the Multitasking page on the right side.
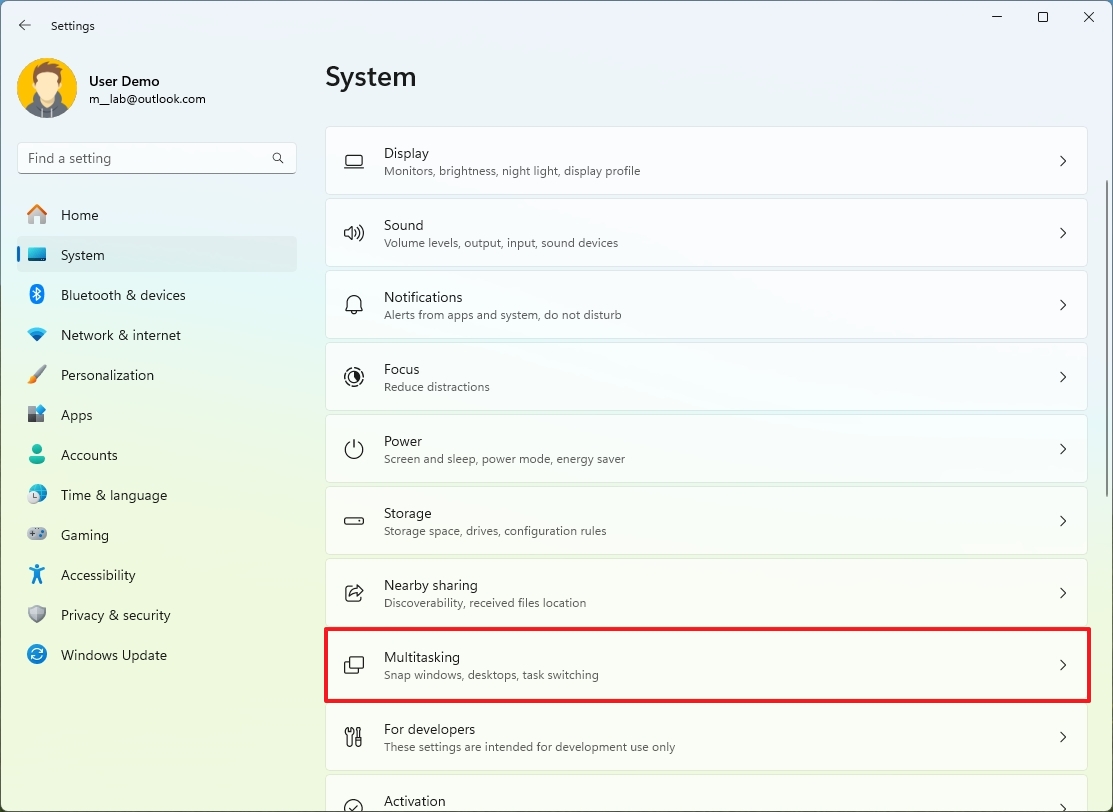
- Turn on the “Title bar window share” toggle switch.
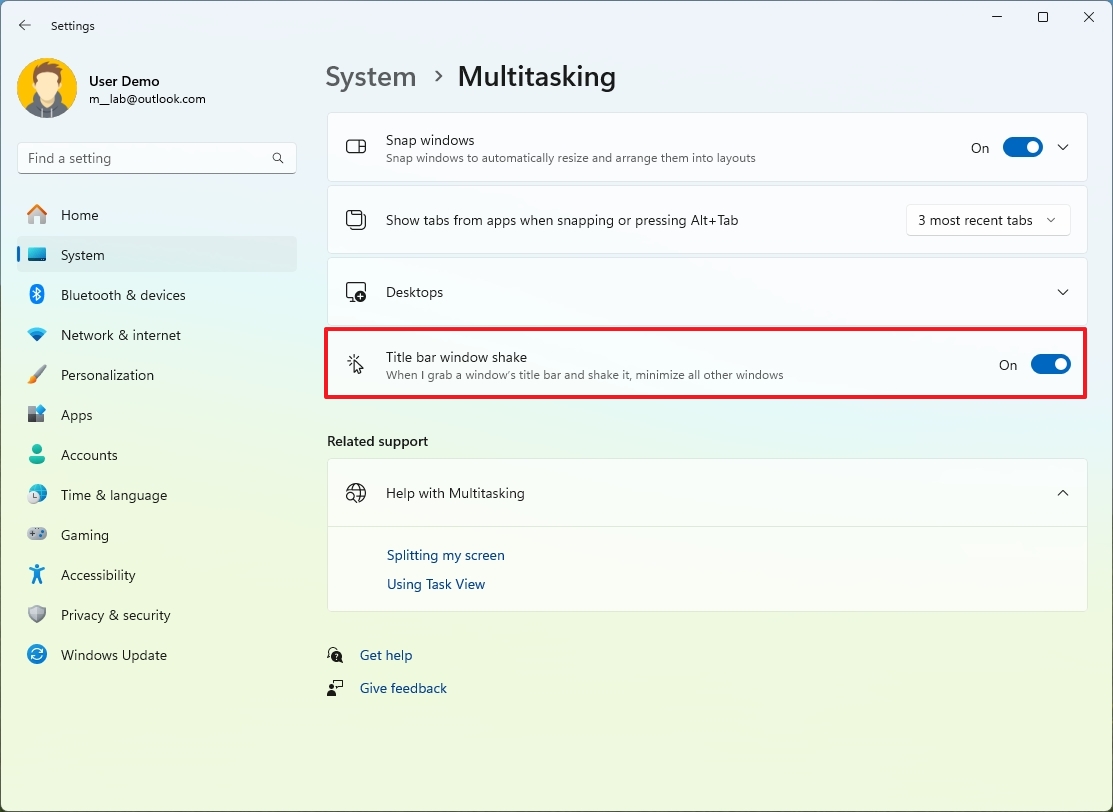
Once you’ve finished your tasks, here’s a handy trick I often use: If you have several windows open, simply click and wiggle (shake) the title bar of the window you wish to focus on. This will minimize all other windows automatically. Enjoy!
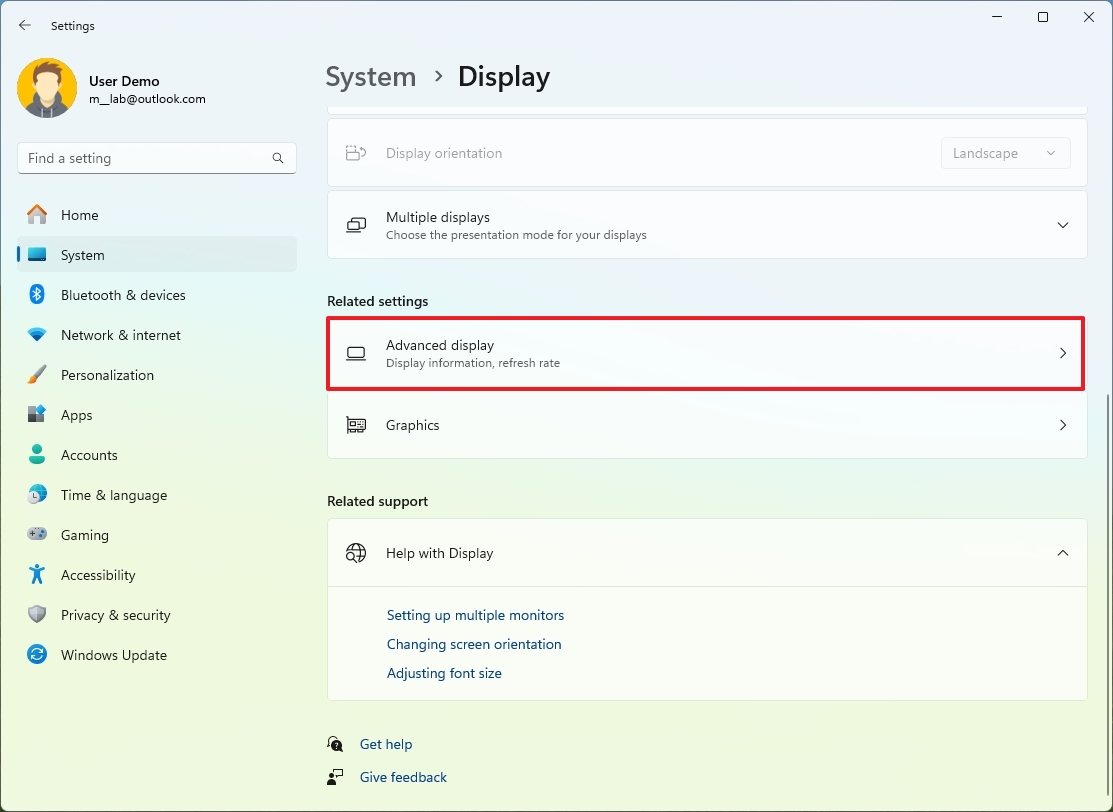
16. Dynamic Refresh Rate
Using a gadget equipped with a screen compatible with variable refresh rates, you can leverage the “Dynamic Refresh Rate” (DRR) option to adjust the refresh rate dynamically, either reducing or boosting it based on the screen’s content. This way, you can conserve energy more efficiently.
As a tech enthusiast, I’m excited to share that this amazing feature is exclusively compatible with top-tier displays boasting Variable Refresh Rates (VRR) and a minimum refresh rate of 120Hz. So, if your screen meets these requirements, get ready to experience an unparalleled gaming or visual experience!
To turn on the Dynamic Refresh Rate feature on Windows 11, use these steps:
- Open Settings.
- Click on System.
- Click the Display page on the right side.
- Click the Advanced display setting under the “Related settings” section.
- Select the “Dynamic” option in the “Choose a refresh rate” setting.
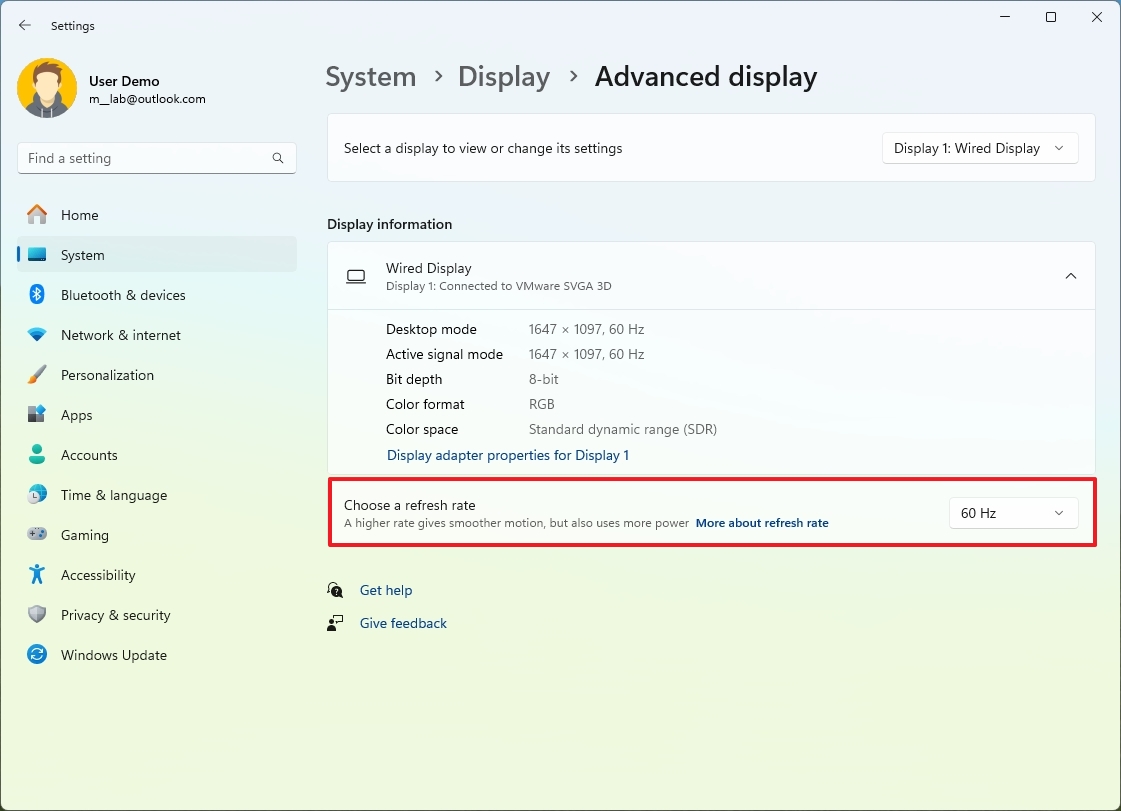
After finishing the procedures, the system will adjust the refresh rate up or down according to the type of task you are currently engaged in.
One important thing to note about this function is that it may lower the image’s clarity in order to conserve power and prolong battery usage.
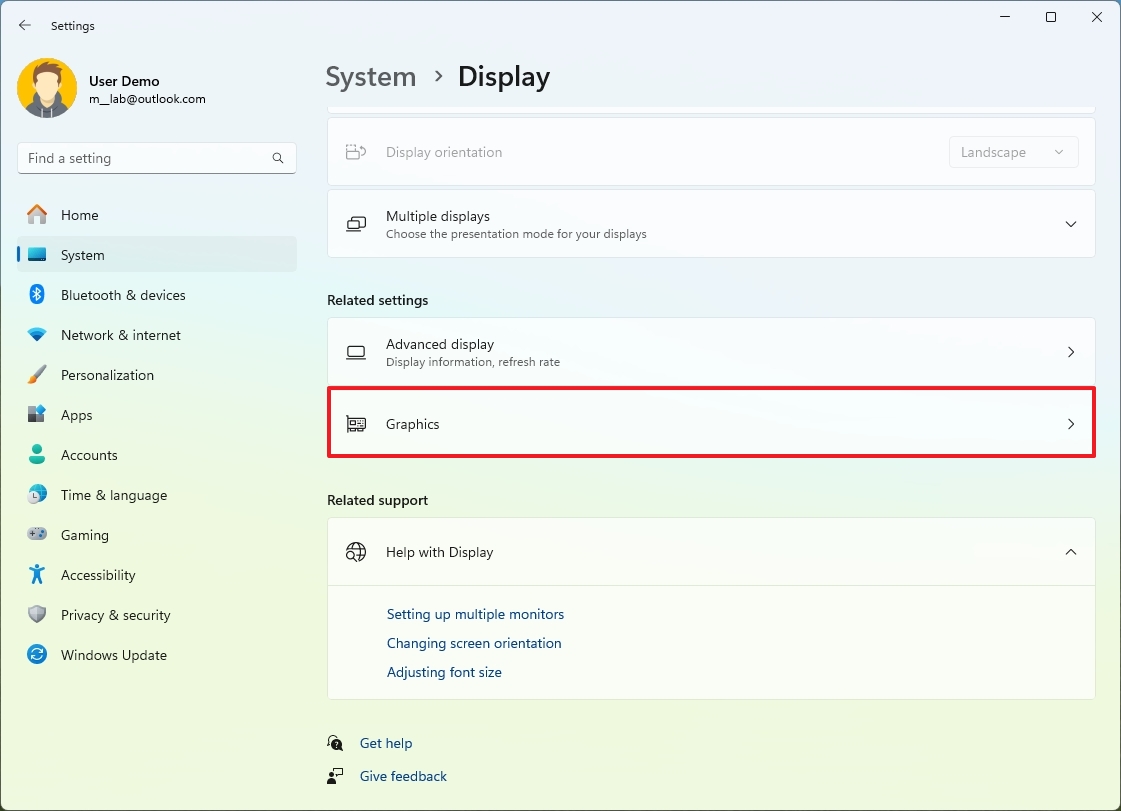
17. Manage default GPU per application
In contemporary times, I notice that many devices, particularly laptops, come equipped with multiple graphics cards. Typically, these systems house a less potent integrated graphics card in conjunction with a more robust discrete video hardware. While the system itself can determine which graphics card an application or game should utilize, it’s feasible to customize this default setting for each app or game individually.
To manage the graphics card preferences on Windows 11, use these steps:
- Open Settings.
- Click on System.
- Click the Display page on the right side.
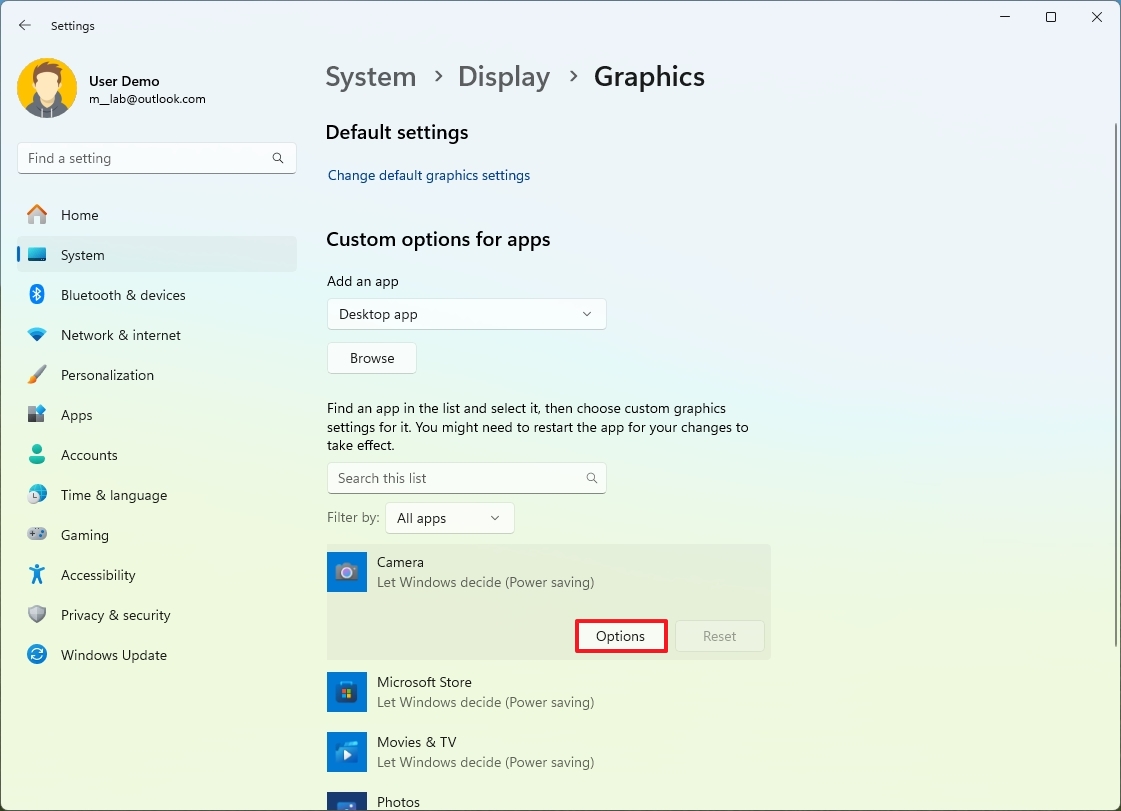
- Click the Graphics setting under the “Related settings” section.
- Click on the app or game to expand the settings.
- Click the Options button.
- Choose the “Power Saving” or “High performance” graphics card accordingly.
- Click the Save button.
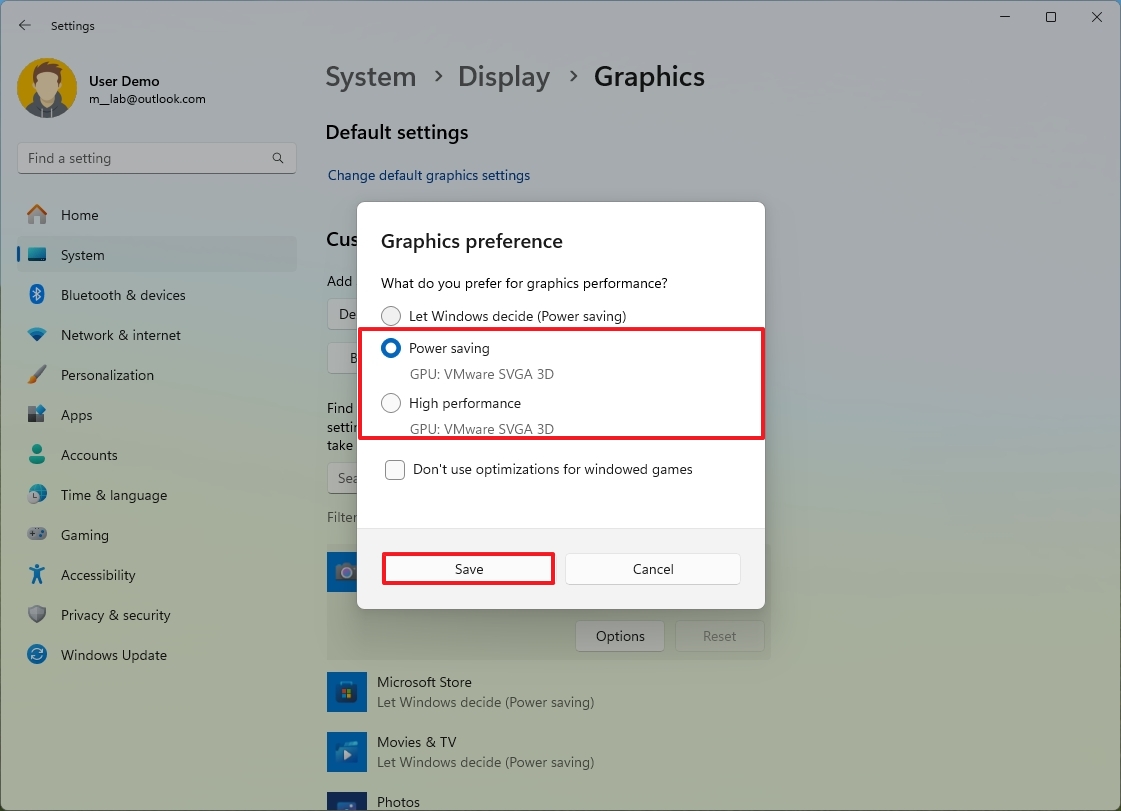
Once all the procedures are finished, the system will automatically launch the application, utilizing the graphics card that has been specifically chosen.
As a long-time Windows user with years of experience tweaking and optimizing my computer systems, I must emphasize that relying solely on Windows settings can be beneficial in managing your graphics card preferences. While it’s possible to manually adjust settings for AMD or Nvidia control panels, the system often makes its own decisions about which graphics card to utilize, based on factors like the application you’re using and your current system requirements. In my personal experience, sticking with Windows settings has saved me from potential conflicts and ensured smooth performance across various applications. However, it’s essential to monitor your system closely and adjust settings as needed for optimal results.
18. Set time and zone automatically
As a tech-savvy individual who often encounters the hassle of adjusting clock settings due to frequent time zone hopping or repetitive corrections, let me guide you on how to streamline this process in Windows 11. By enabling a few handy features, you can not only set your system’s time automatically but also ensure it adapts to the correct timezone. Here’s how:
To set the time automatically on Windows 11, use these steps:
- Open Settings.
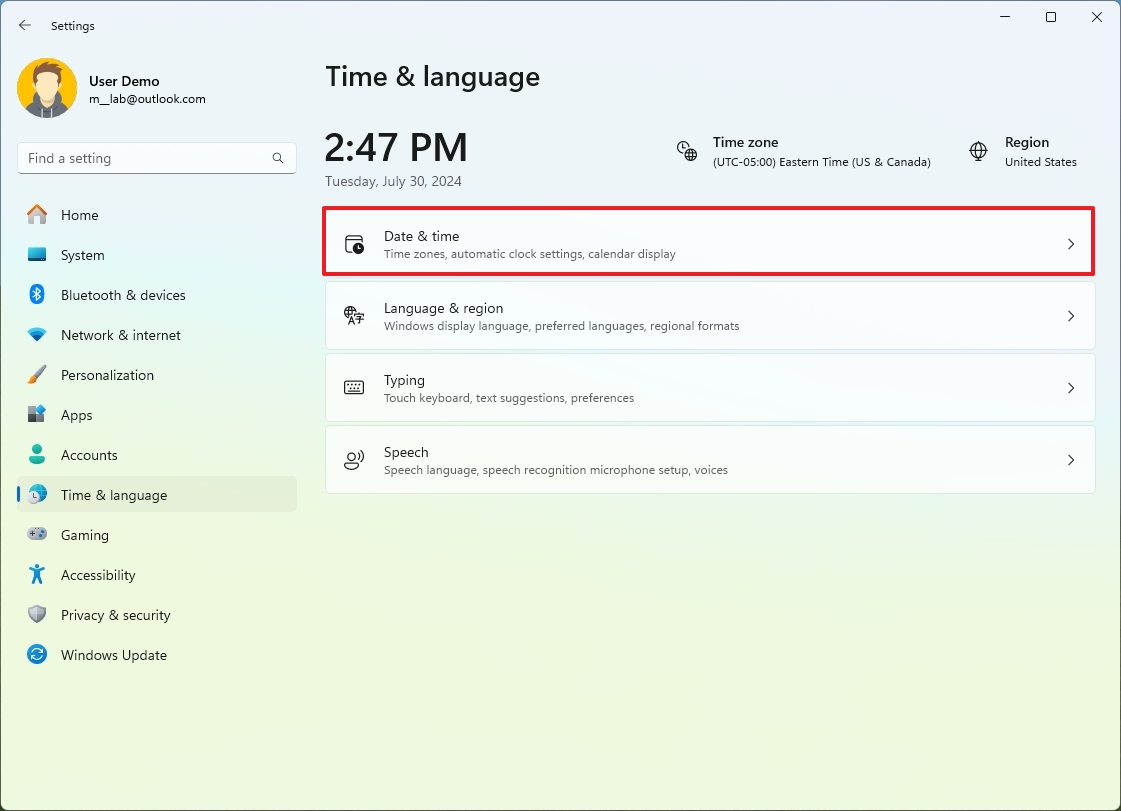
- Click on Time & language.
- Click the Date & time page on the right side.
- Turn on the “Set time zone automatically” toggle switch.
- Turn on the “Set time automatically” toggle switch.
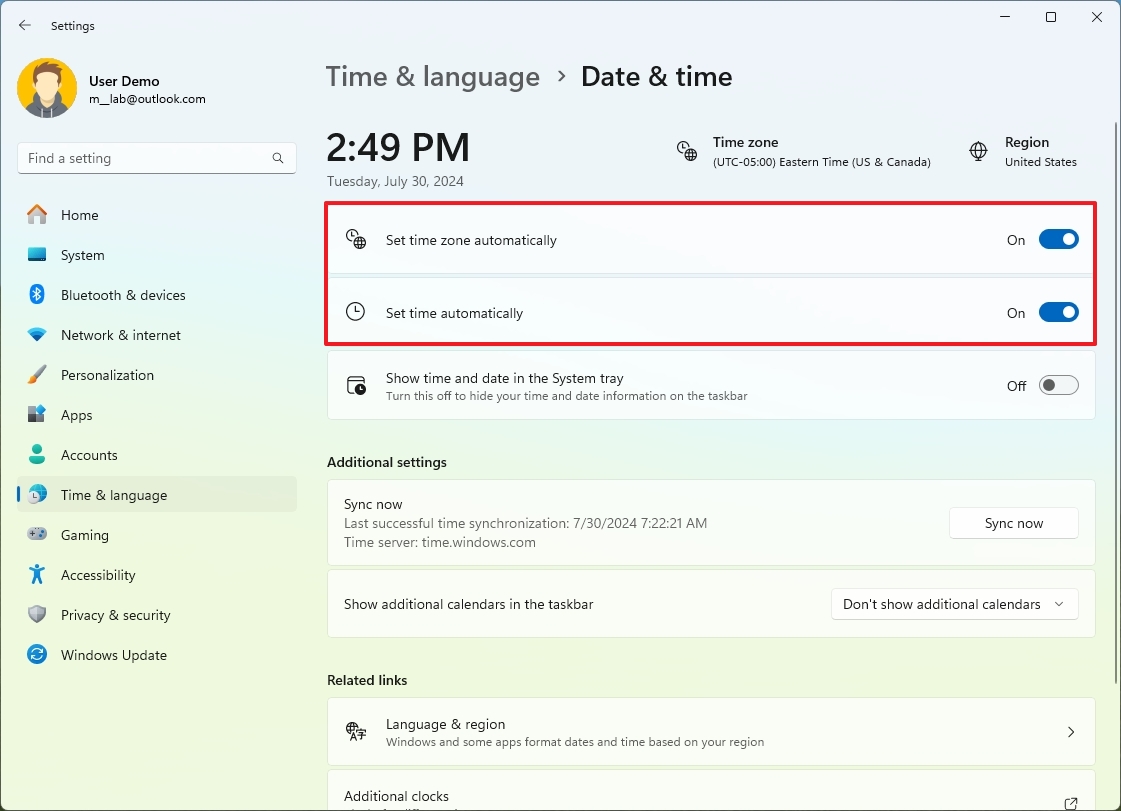
- (Optional) Click the “Sync now” button to update the time immediately.
Once you complete the steps, the system will automatically configure the time and timezone.
It’s worth mentioning that if the clock appears to be running incorrectly, it might not just be an issue with the time setting; there could potentially be a problem with the battery or firmware as well.
19. Passkeys
On Windows 11, “Passkeys” is a security enhancement that empowers you to generate and store an authentication token for a web service or app using Windows Hello. Once you establish a passkey within the app or service, it will be automatically saved on your computer. This means that during subsequent logins, you can authenticate using Windows Hello PIN, facial recognition, or fingerprint scanning, thus avoiding the need to re-enter the password.
A passkey is unique to a device, meaning you’ll have to create another unique key to use the same feature on another device. Also, you can still access your account with a password, even when you have created a passkey.
As someone who has dealt with countless forgotten passwords and frustrating security measures, I can confidently say that this technology is a game-changer. No longer do I have to remember an endless string of complex passwords or worry about hackers stealing my personal information. This innovation not only simplifies my daily digital life but also enhances my online safety. It’s a relief knowing that my apps and services are more secure, making it harder for malicious individuals to cause harm.
On Windows 11, to generate a password key, you’ll initially require a service or application that conforms to this protocol, for instance, Google. Additionally, you need a compatible web browser like Chrome or Microsoft Edge. Then, follow the below instructions:
- Open Chrome or Edge browser.
- Open the Google account page.
- Sign in with your credentials (if applicable).
- Click on Security from the left navigation page.
- Click the “Passkeys and security keys” option under the “How you sign in to Google”
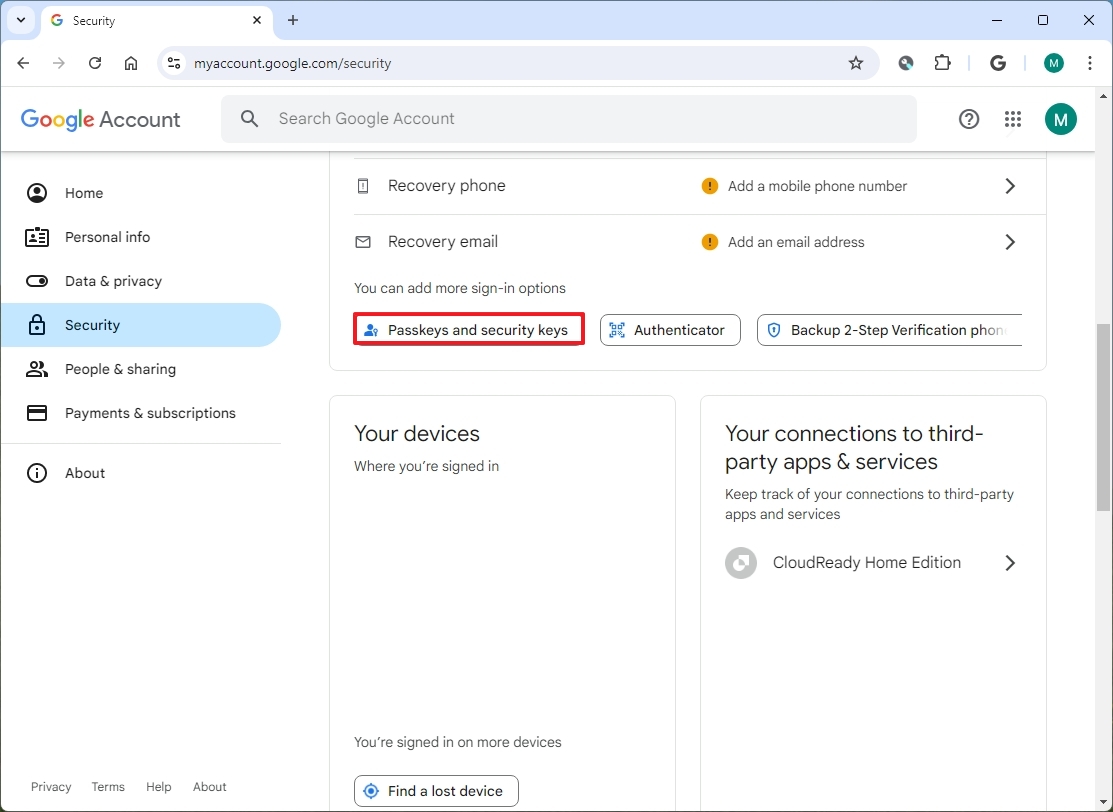
- Confirm your account credentials.
- Click the “Create a passkey” button.

- Confirm your Windows Hello credentials.
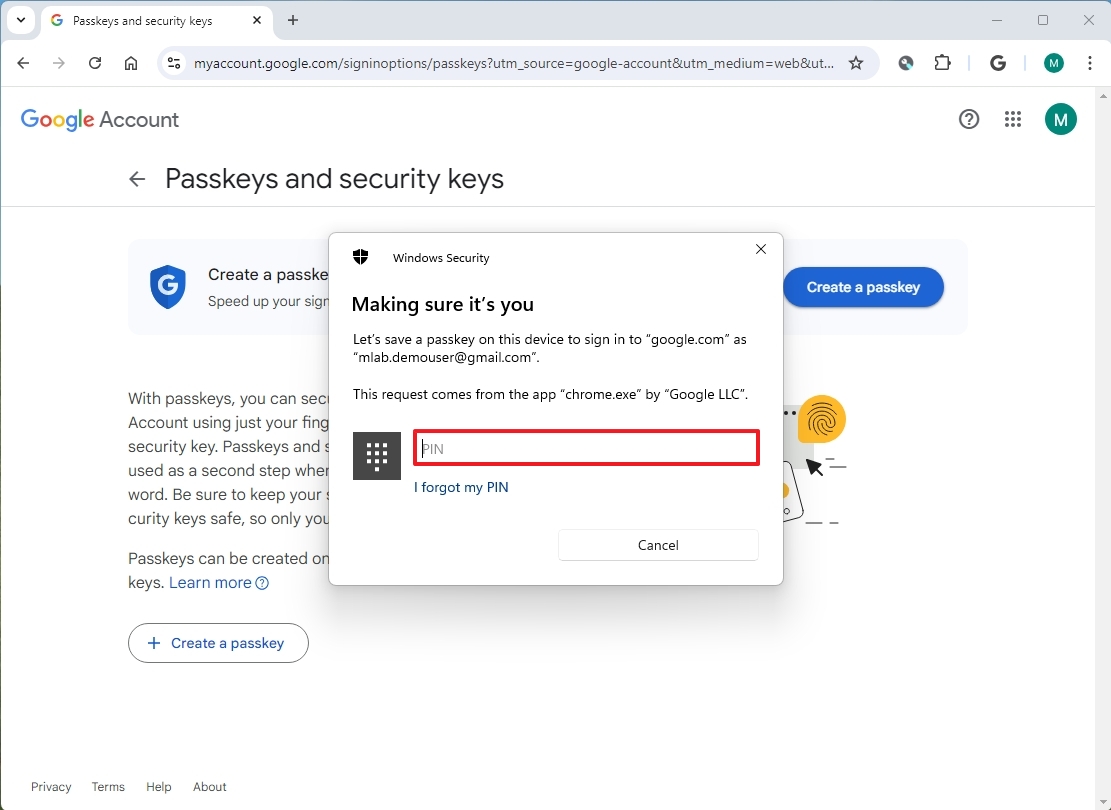
- Quick note: You may need to confirm the credentials more than once.
- Click the OK button.

- Click the Done button.
Once you finish the process, Windows will store your passkey on your device for future use. This means that when you need to log in again, you can utilize Windows Hello for verification purposes.
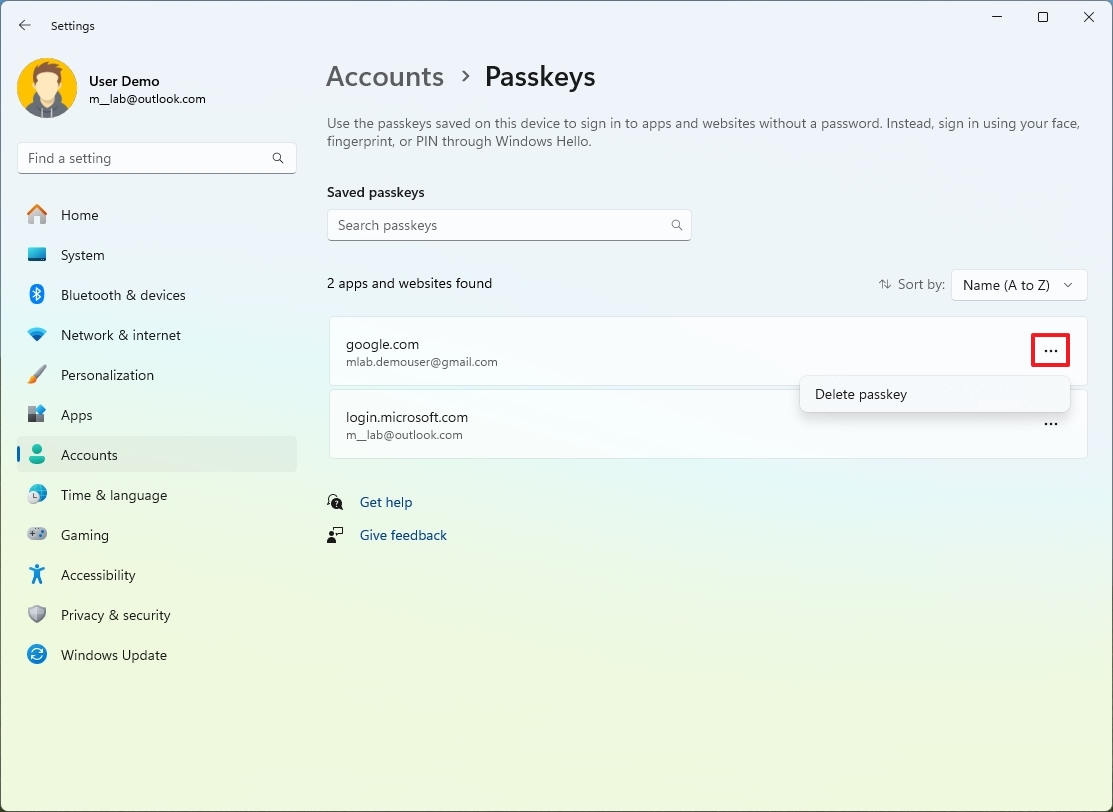
To access and remove passwordless keys (passkeys) on Windows 11, navigate to Settings > Accounts > Sign-in options, then select the account with the passkey you wish to delete or click on the menu next to that account.
20. Dynamic Lock
The Dynamic Lock function on Windows 11 keeps your computer safe by automatically locking when you leave the room. It connects to Bluetooth devices like your smartphone or wearable for this purpose. If you’re away from your PC for about 30 seconds, it will lock itself without any action required on your part.
To enable Dynamic Lock on Windows 11, use these steps:
- Open Settings.
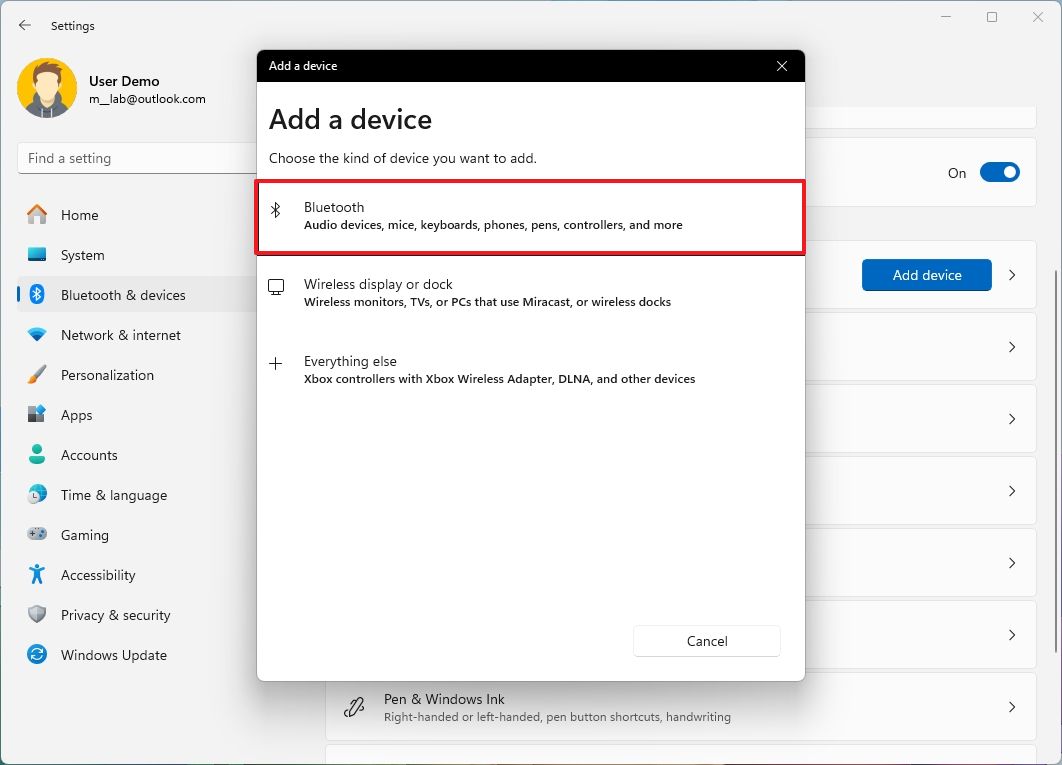
- Click on Bluetooth & devices.
- Click on Add device button.
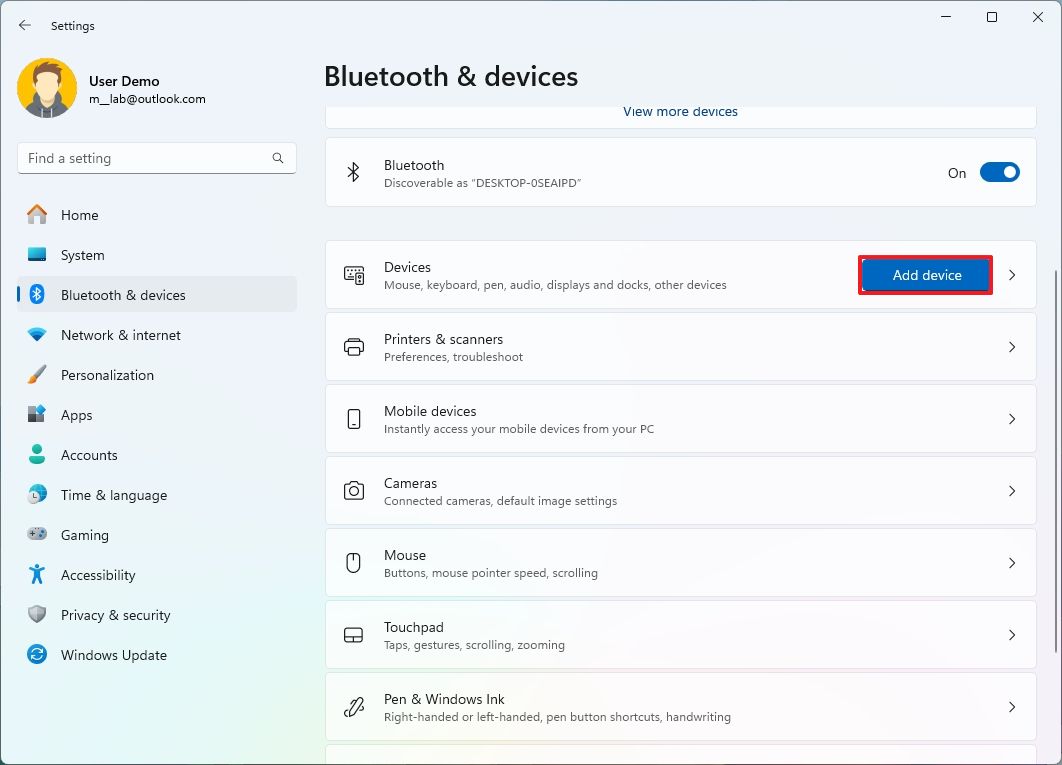
- Choose the Bluetooth option.
- Turn on Bluetooth on the device you want to pair.
- Select the device from the list.
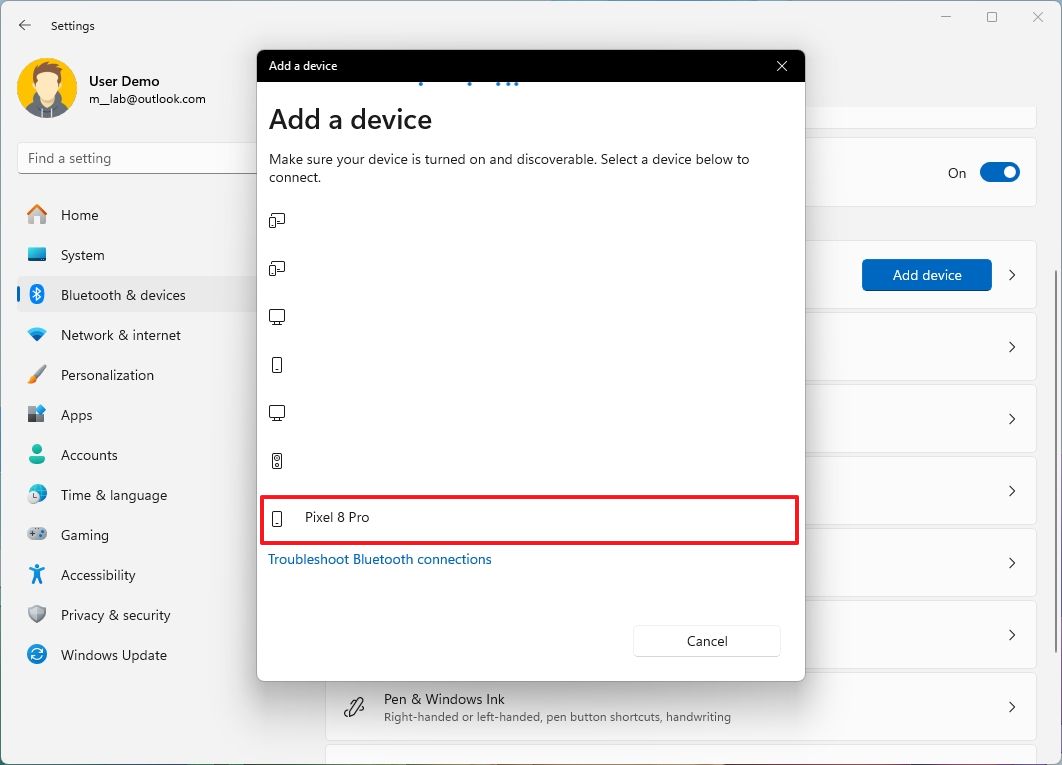
- Continue with the on-screen directions to complete the pairing.
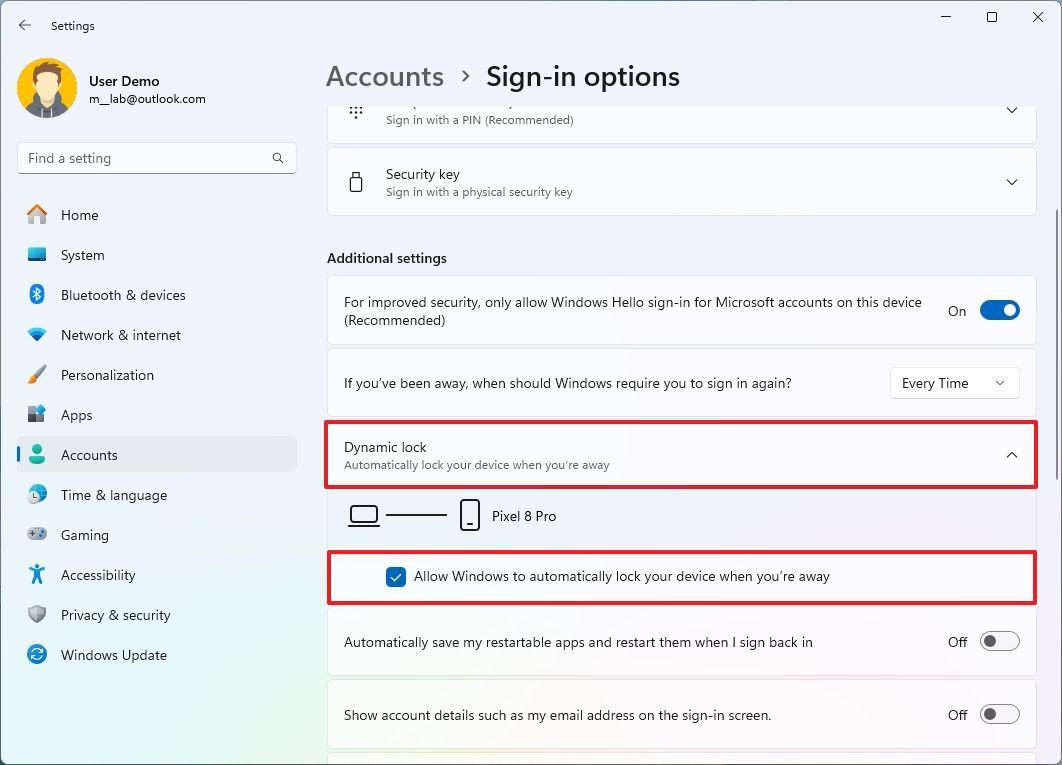
- Click on Accounts.
- Click the Sign-in options page on the right side.
- Under the “Additional settings” section, click the Dynamic lock setting.
- Check the “Allow Windows to automatically lock the device when you’re away” option.
After finishing the tasks, please disconnect the Bluetooth device from your computer and wait for about 30 seconds. The system will automatically lock itself during this time.
More resources
Read More
2024-07-31 17:42