Even though Windows 11 offers several options for personalizing your system through apps like Settings, Control Panel, and Group Policy Editor, power users typically prefer the Registry Editor for fine-tuned, detailed adjustments to the operating system’s inner workings.
Gradually, I’ve come to realize that I frequently perform around half a dozen modifications on the Registry to enhance the user experience consistently across my devices. These alterations transcend superficial tweaks, instead focusing on optimizing the performance and functionality.
I frequently disable the “Home” page in the Settings app to keep things tidy and minimize distractions. Additionally, instead of letting Windows Update automatically install patches, I opt for manual installation only when it aligns with my schedule. Furthermore, since the Lock Screen tends to add an unnecessary extra click for me, I prefer to eliminate it entirely.
One adjustment I always make is disabling web searches within Windows Search, particularly on systems where I prefer to concentrate solely on local search results. To achieve this setup, you’ll need to modify a particular Registry value to disable the integration with Bing.
Here, I’ll share essential Registry adjustments for Windows 11 that seasoned users like you might find useful.
Or, let me break it down this way: This tutorial highlights vital Registry modifications recommended for skilled Windows 11 users.
As Your Trusted Researcher: I would like to kindly draw your attention to the fact that modifying the system registry is a potentially risky endeavor, as it could lead to permanent harm for your system installation if not handled appropriately. To ensure safety, it’s essential to create a complete backup of your computer prior to any editing process in the Registry.
Registry tweaks you should use on Windows 11
The following Registry mods to apply on Windows 11 are not listed in any particular order.
1. Disable the Home page in Settings
Initially, the Settings application used to go straight to the “System” part. But later on, the development team thought of adding a “Home” page. This page, intended to make it easier for users to access their frequently used and suggested settings, also serves as a platform where the company showcases recommendations for various products they’re promoting.
If your operating system doesn’t allow you to personalize this particular page, you can switch off the feature and return to the standard “System” page instead.
To turn off the Settings’ Home page on Windows 11, use these steps:
- Open Start.
- Search for regedit and click the top result to open the Registry Editor.
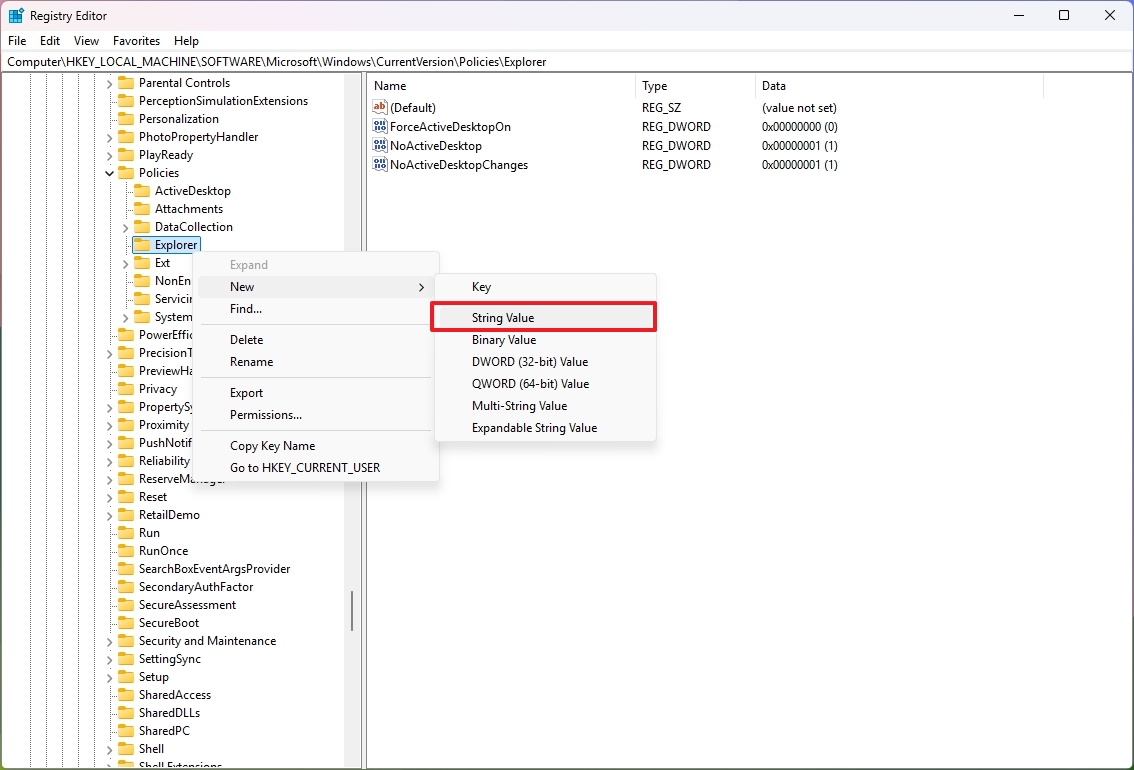
- Open the following location: HKEY_LOCAL_MACHINE\SOFTWARE\Microsoft\Windows\CurrentVersion\Policies\Explorer
- Right-click the Explorer key, select New, and choose the String Value option.
- Confirm the SettingsPageVisibility for the string and press Enter.
- Right-click the newly created string and choose the Modify option
- Change the string value to hide:home.
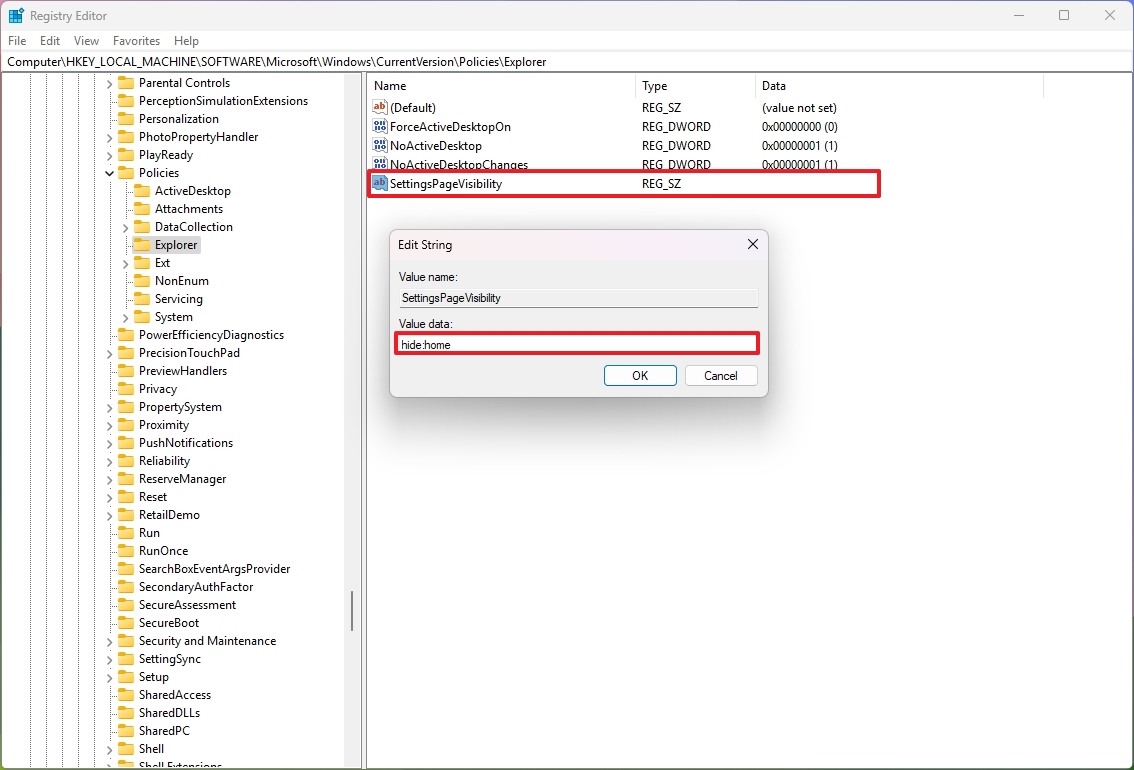
- Click the OK button.
- Restart the device.
After finishing the procedures, upon reopening the Settings app, the initial or “Home” screen will no longer appear, instead, you’ll be taken directly to the “Settings” page.
As an analyst, I’d suggest this: To get the page back to its original state, follow the same set of instructions. However, when you reach step 4, right-click on the “SettingsPageVisibility” string, select “Delete,” and then reboot your device for the changes to take effect.
You can also use the Registry or Group Policy to remove virtually every page in the Settings app.
2. Disable automatic Windows Update
Among the contentious aspects of Windows 11 lies its update mechanism, as while updates are crucial for fixing security loopholes, enhancing system efficiency, and granting access to novel features, they can sometimes lead to operational issues.
Even though the operating system seems to have a built-in mechanism that almost prevents disabling the update system, you can edit the Registry to stop the system from automatically downloading and installing updates.
From my perspective, you’re able to verify and retrieve updates directly through the “Windows Update” settings with this methodology.
To disable Windows Update on Windows 11, use these steps:
- Open Start.
- Search for regedit and click the top result to launch the Registry Editor.
- Open the following location: HKEY_LOCAL_MACHINE\SOFTWARE\Policies\Microsoft\Windows
- Right-click the Windows (folder) key, select New, and choose the Key option.
- Name the key WindowsUpdate and press Enter.
- Right-click the newly created key, select New, and choose the Key option.
- Name the key AU and press Enter.
- Right-click the AU key, select New, and choose the “DWORD (32-bit) Value” option.
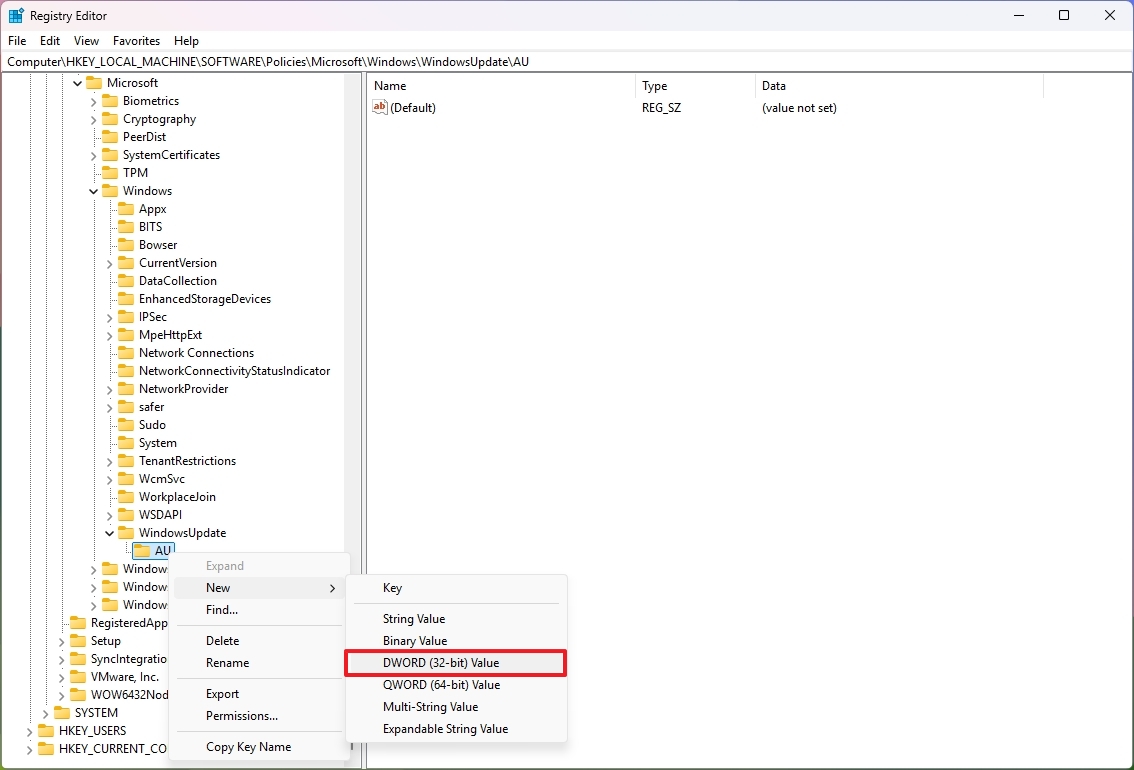
- Name the new key NoAutoUpdate and press Enter.
- Right-click the newly created key and choose the Modify option.
- Change its value from 0 to 1.
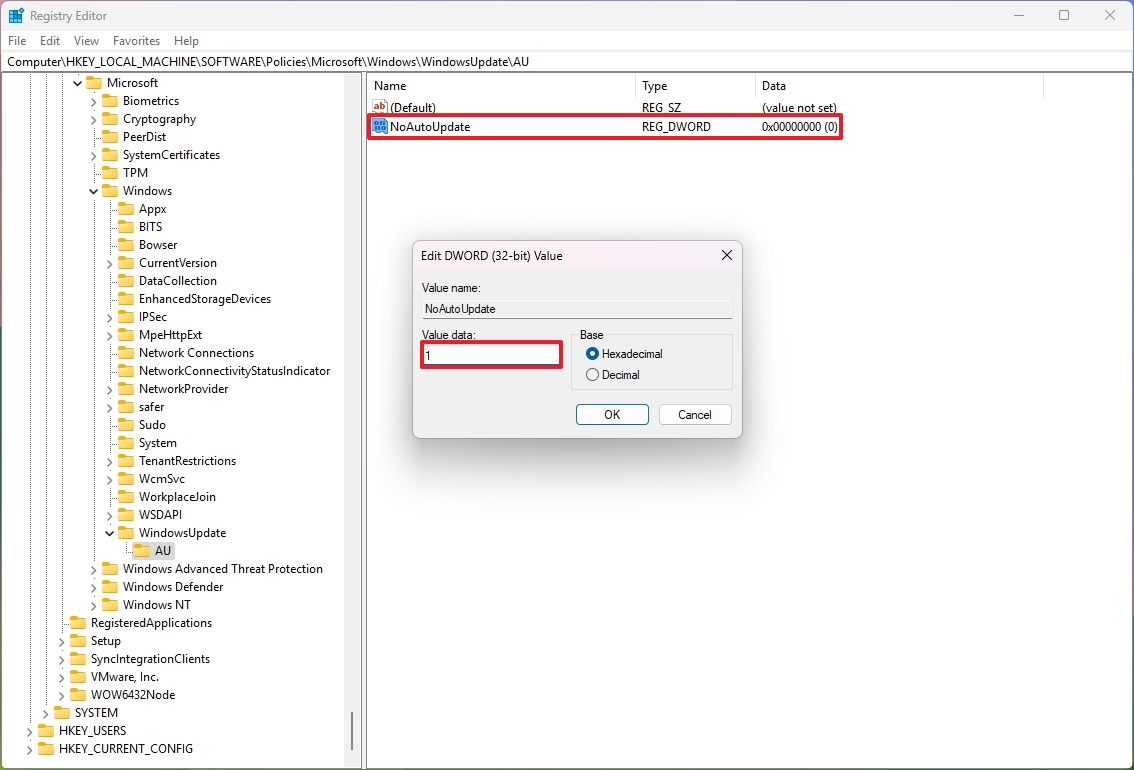
- Click the OK button.
- Restart the device.
Once you finish the process, the computer will stop downloading and installing updates on its own. But should you wish to manually update your device, simply click the “‘Check for updates’” button found on the “‘Windows Update’” page when you’re ready.
To revert the modifications, follow the same steps, but at step 4, right-click the “WindowsUpdate” key, choose the “Delete” option, then restart your device.
3. Disable the Lock Screen experience
In Windows 11, the Lock Screen is the initial display that pops up once you turn on your device, prior to the Sign-in screen.
To expedite your login procedure, consider disabling the Lock Screen feature by utilizing various techniques such as modifying the system registry.
To disable the Lock Screen on Windows 11 through the Registry, use these steps:
- Open Start.
- Search for regedit, and select the top result to open the Registry.
- Open the following location: HKEY_LOCAL_MACHINE\SOFTWARE\Policies\Microsoft\Windows
- Right-click the Windows key (folder), select the New submenu, and choose the Key option.
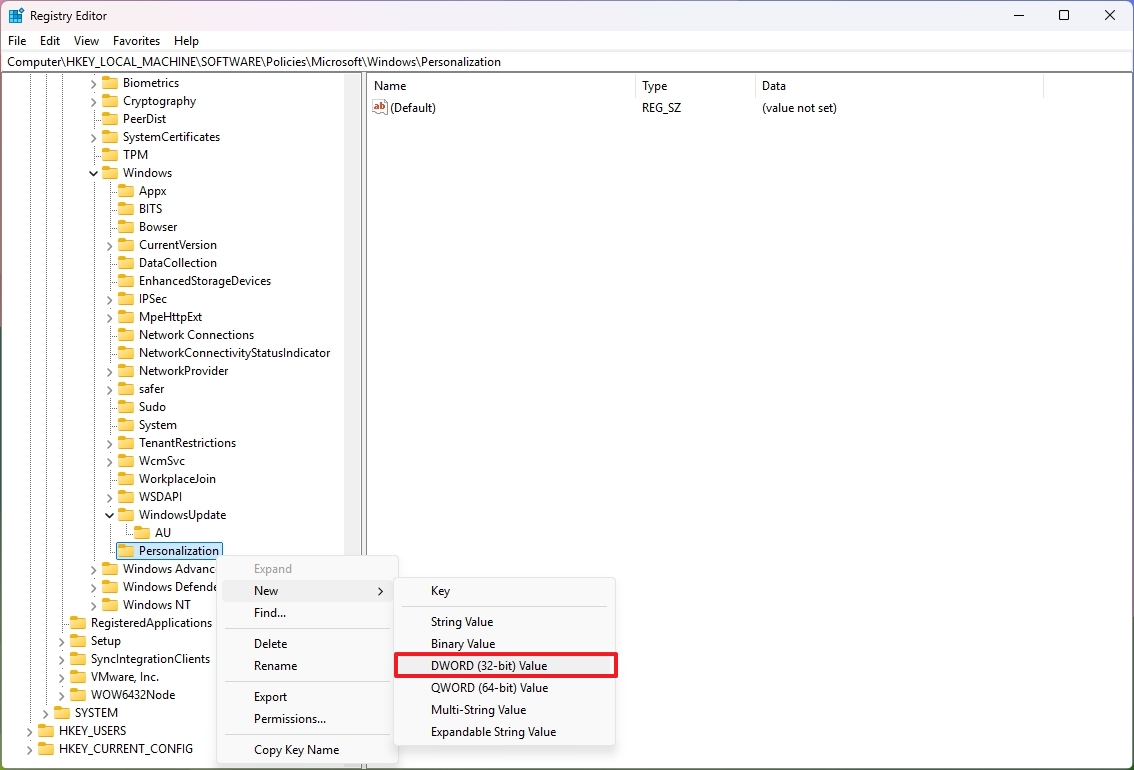
- Name the key Personalization and press Enter.
- Right-click the Personalization folder, select the New submenu, and choose the “DWORD (32-bit) Value” option.
- Name the key Nolockscreen and press Enter.
- Right-click the “Nolockscreen” key and select the Modify option.
- Change the value data from 0 to 1.
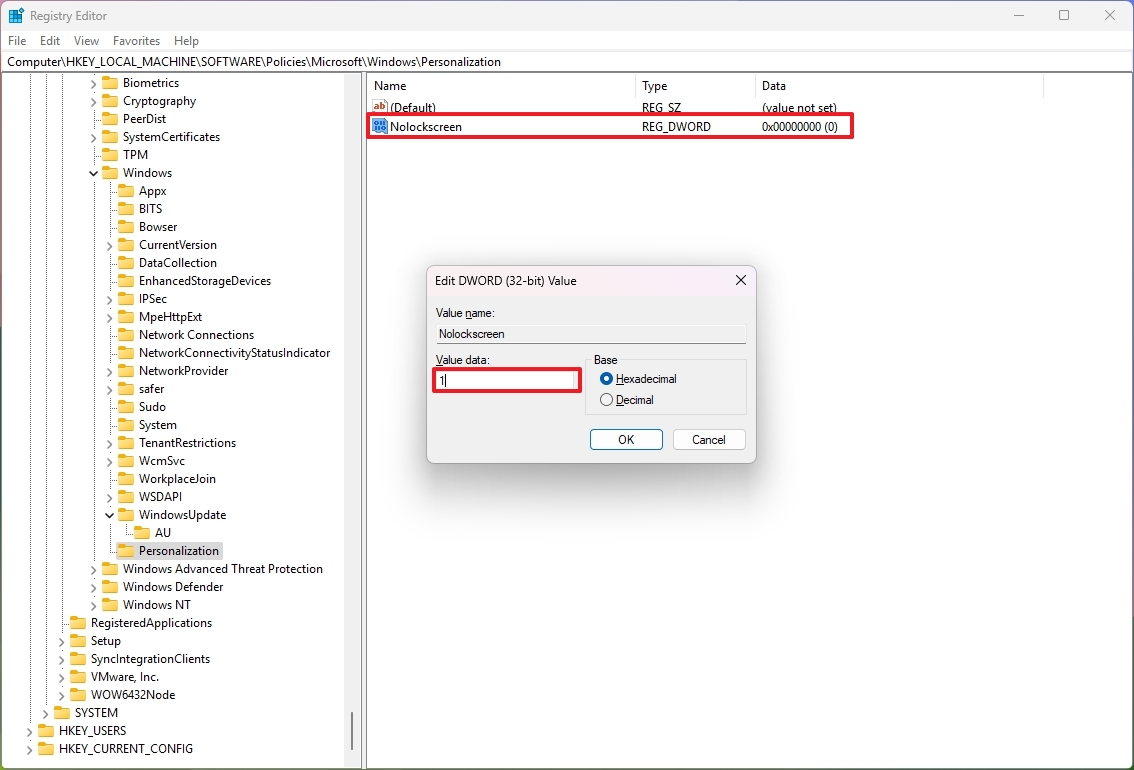
- Click the OK button.
- Restart the device.
After finishing the procedures, the next time you start up your computer, it will immediately go to the Login Screen.
To restart the modifications, simply follow the guidelines provided earlier, but on step 8, modify the value of “Nolockscreen” to 0, or remove the Registry key altogether.
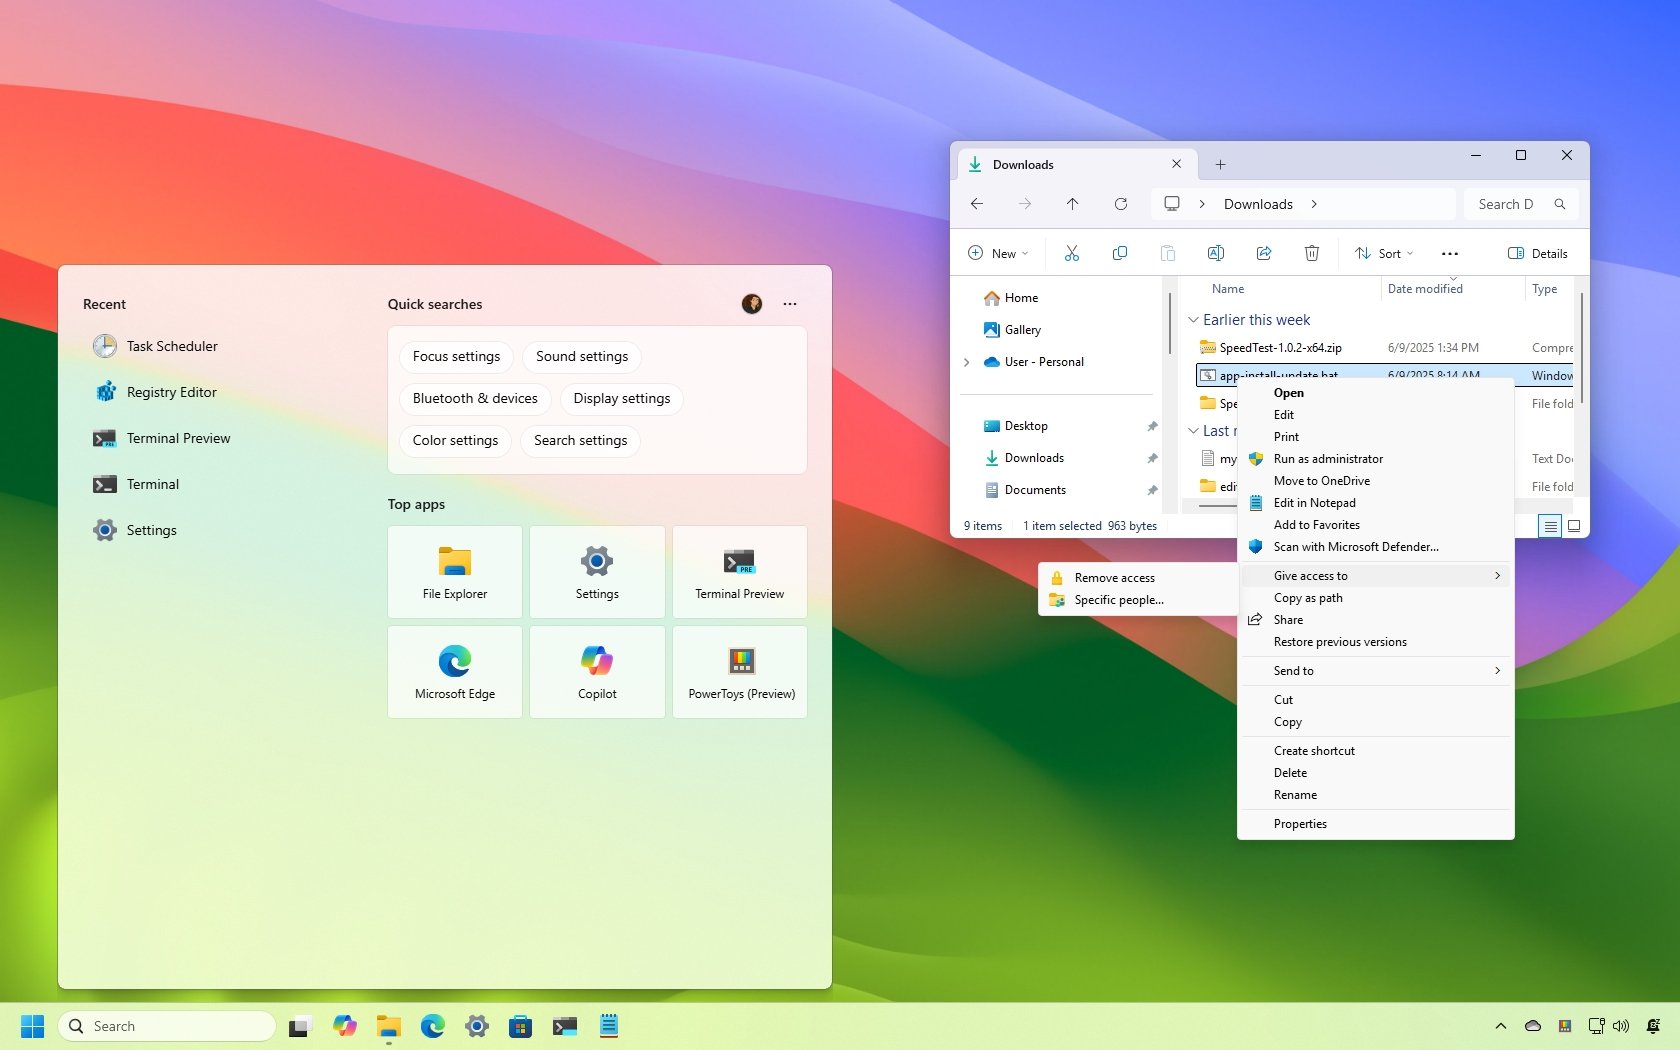
4. Disable Bing results in the Start menu
Whenever I’m searching within Windows 11 using the Taskbar, not only does it show me results from apps, settings, and files, but it also offers relevant web results as part of my enhanced search experience.
If you want to see only local search results and there’s no built-in way to turn off this function in your operating system, you can disable it through the Registry instead.
To disable the Bing search results from the Windows Search experience, use these steps:
- Open Start.
- Search for regedit and click the top result to open the Registry Editor.
- Open the following location: HKEY_CURRENT_USER\SOFTWARE\Policies\Microsoft\Windows
- Right-click the Windows key, select the New menu, and choose the Key option.
- Name the key Explorer and press Enter.
- Right-click the newly created key, select the New menu, and choose the “DWORD (32-bit) Value” option.
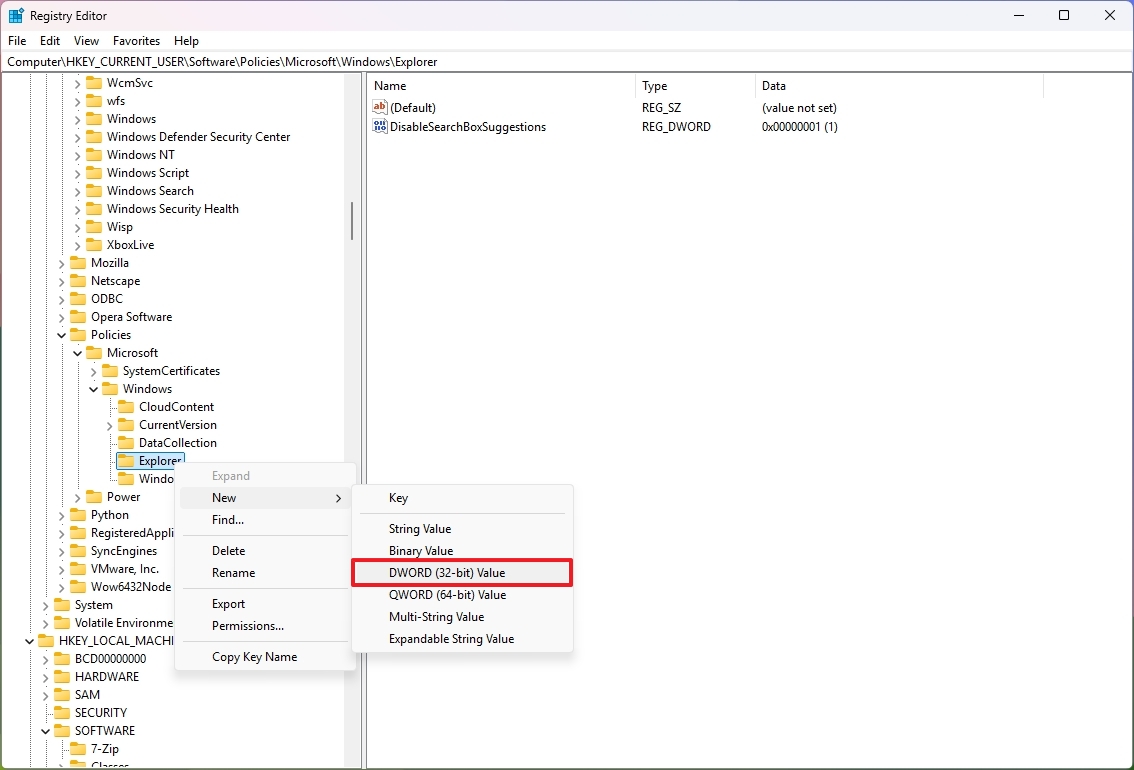
- Name the DWORD DisableSearchBoxSuggestions and press Enter.
- Right-click the newly created key and choose the Modify option.
- Change its value from 0 to 1.
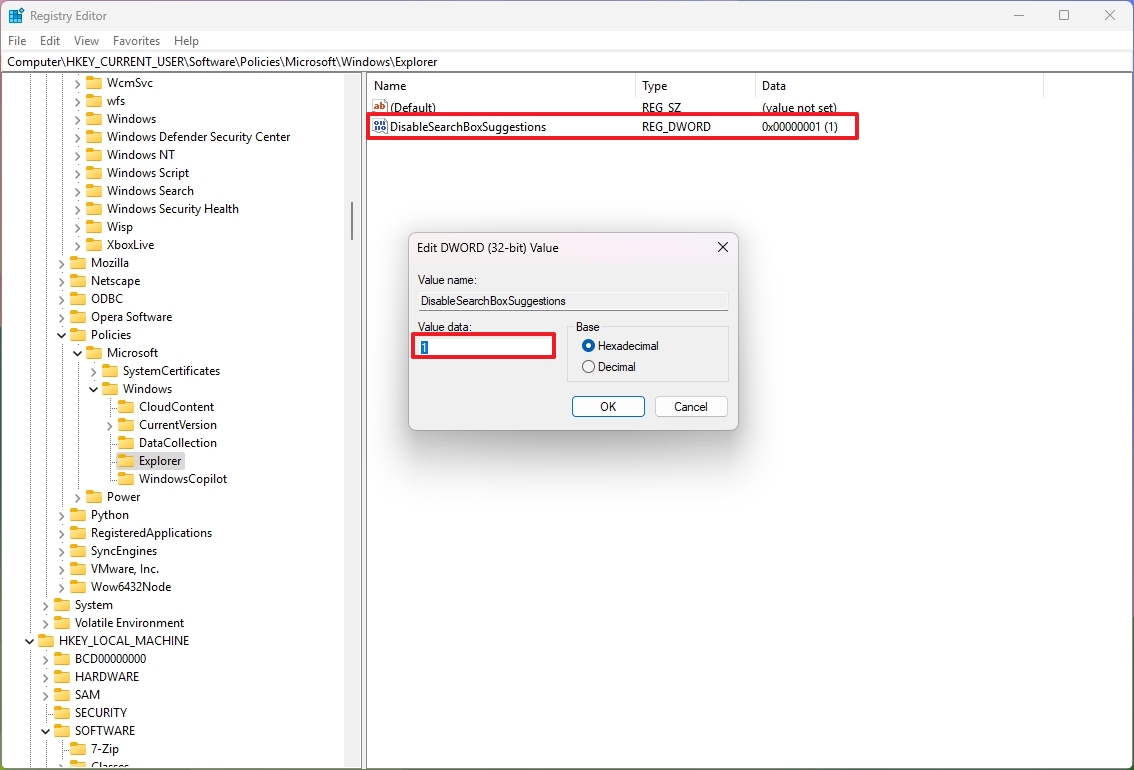
- Click the OK button.
- Restart the device.
Once you’ve finished the process, the Windows Search functionality will display outcomes solely from applications, settings, and files.
To undo the changes you’ve made, follow the instructions given earlier, but on step 6 (inside the “Explorer” key), right-click the “DisableSearchBoxSuggestions” DWORD and choose the “Delete” option instead.
5. Enable the classic context menu
Observing here, I notice that the context menu in Windows 11 has undergone a fresh design, however, it appears to have fewer options compared to its predecessor. Fortunately, the classic menu is still accessible, albeit with some extra procedures involved.
As someone who appreciates the traditional look, here’s how you can revert to the old-style context menu by tweaking the Registry: If you’d rather stick with the classic, more densely packed context menu, you can disable the modern design and set the legacy design as your new default.
To enable the classic context menu on Windows 11, use these steps:
- Open Start.
- Search for regedit and click the top result to open the Registry.
- Open the following location: HKEY_CURRENT_USER\SOFTWARE\CLASSES\CLSID
- Right-click the CLSID key, select the New menu, and select the Key option.
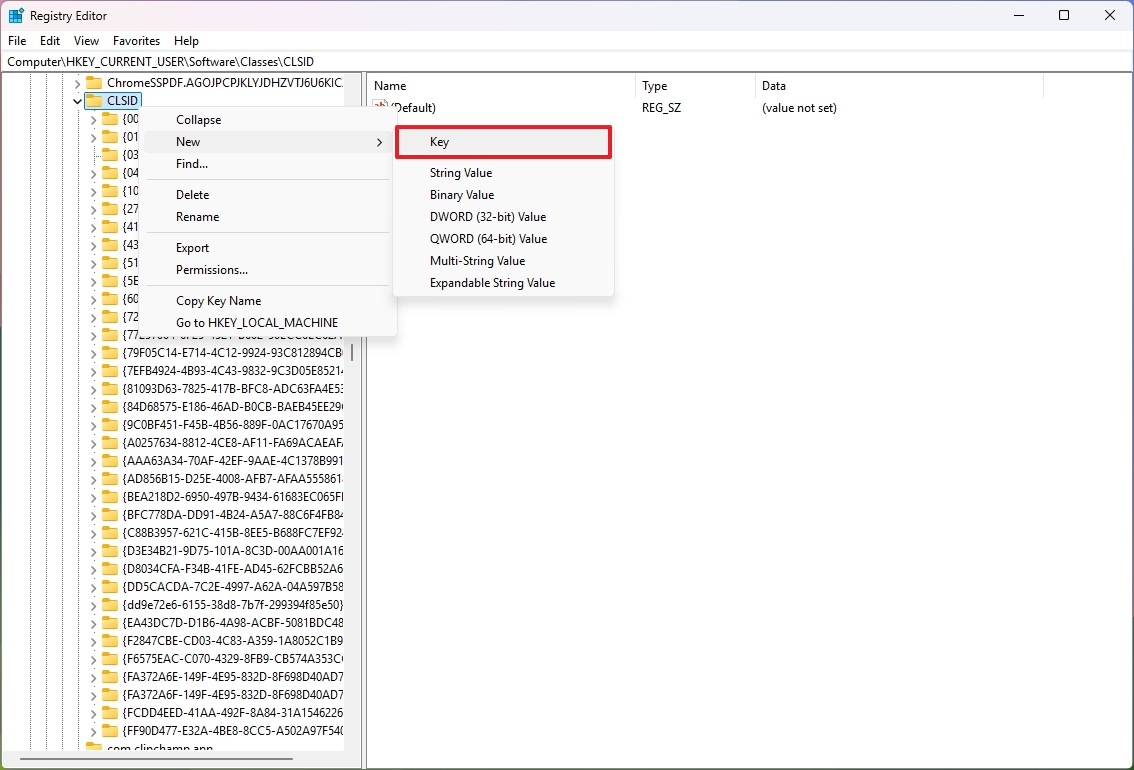
- Name the key {86ca1aa0-34aa-4e8b-a509-50c905bae2a2} and press Enter.
- Right-click the newly created key, select the New menu, and select the Key option.
- Name the key InprocServer32 and press Enter.
- Right-click the default string key and choose the Modify option.
- Set its value to nothing (blank).
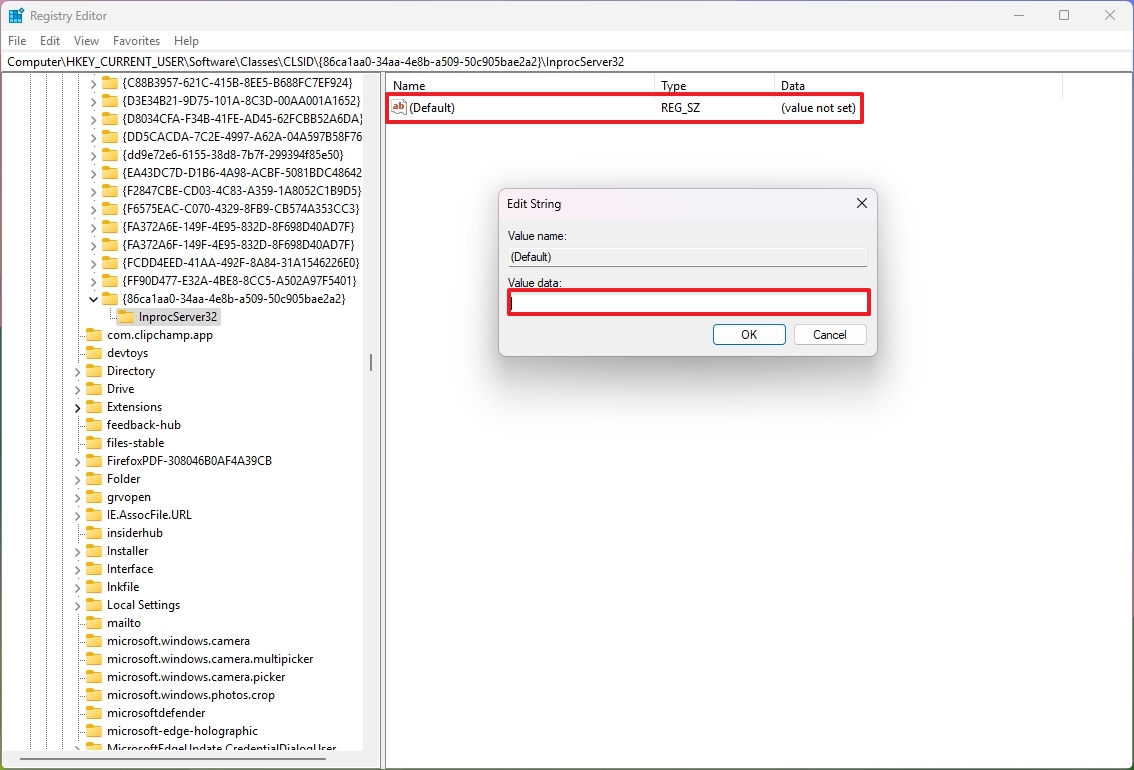
- Click the OK button.
- Restart the device.
After finishing the process, when you right-click an item within File Explorer in the future, you’ll see the old-style context menu that includes all the compatible options.
To bring back the contemporary context menu, follow the instructions provided earlier, but on step 4, right-click the specific key labeled “{86ca1aa0-34aa-4e8b-a509-50c905bae2a2}” and select the “Remove” or “Delete” option instead.
As an analyst, I’d rephrase it this way: I’ve noticed that Microsoft has given the traditional context menu a total makeover. Over time, it had accumulated numerous commands and extensions, making it cumbersome to navigate. Now, they’ve introduced a fresh, ribbon-style “modern” menu to highlight essential actions like Cut, Copy, Paste, Rename, and Delete. This streamlined design offers a smooth, efficient interaction experience that harmonizes with the Windows 11 aesthetic.
Even though it prioritizes compatibility, the operating system continues to display the complete legacy menu via the “Show more options” or the keyboard shortcut “Shift + F10”. This way, users can still utilize every command, even those from third-party applications that haven’t adapted to the new context menu API.
The funny thing is, as the new menu expands with more choices, it’s only a matter of time until it gets overcrowded once more.
6. Enable automatic Registry backup
Prior to Windows 11 version 1803, the system would create a backup of the Registry each time the computer booted up successfully and save it in a folder called “‘RegBack’“. This feature aimed at safeguarding system data was later eliminated from the setup to optimize storage space.
Even though most users weren’t familiar with this function, it turned out to be very useful in resolving issues after a faulty system update or when system modifications caused the operating system to fail starting up properly. Remarkably, you can re-enable this feature by manipulating the system registry.
To enable automatic Registry backups on Windows 11, use these steps:
- Open Start.
- Search for regedit and click the top result to open the Registry.
- Open the following location: HKLM\System\CurrentControlSet\Control\Session Manager\Configuration Manager
- Right-click the Configuration Manager key, select New, and click the “DWORD (32-bit) Value” option.
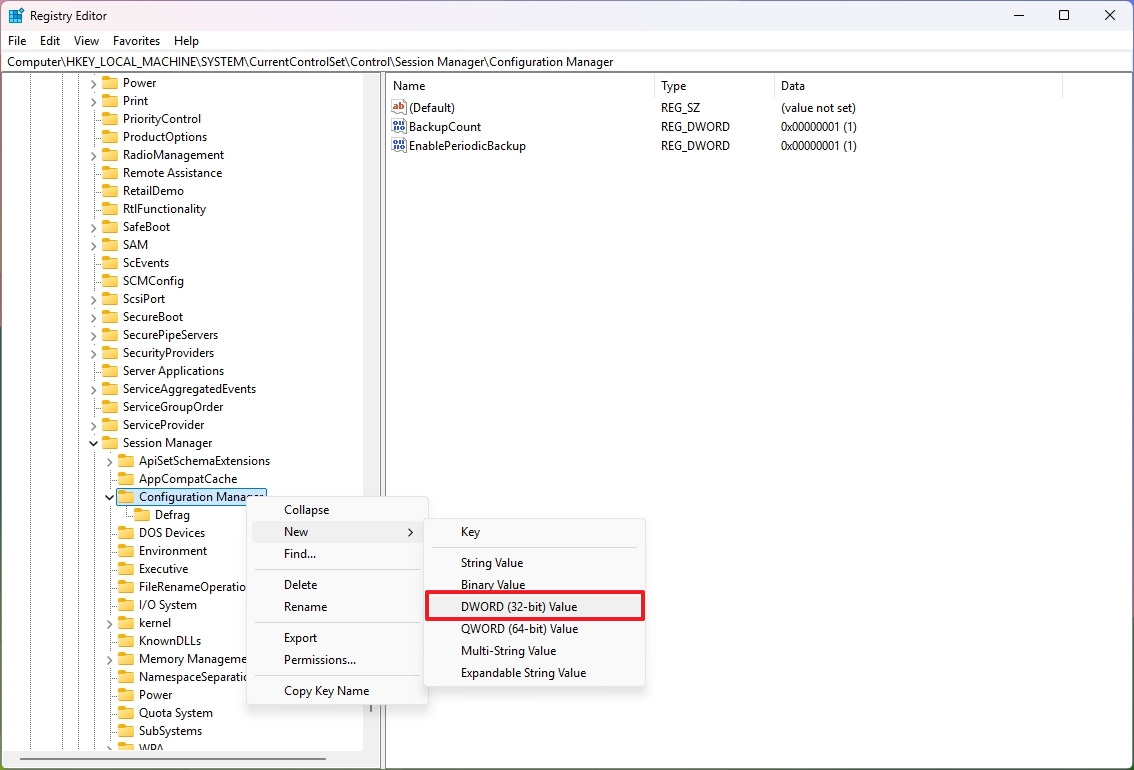
- Confirm the key EnablePeriodicBackup name and press Enter.
- Right-click the newly created key and choose the Modify option.
- Set the value from 0 to 1.
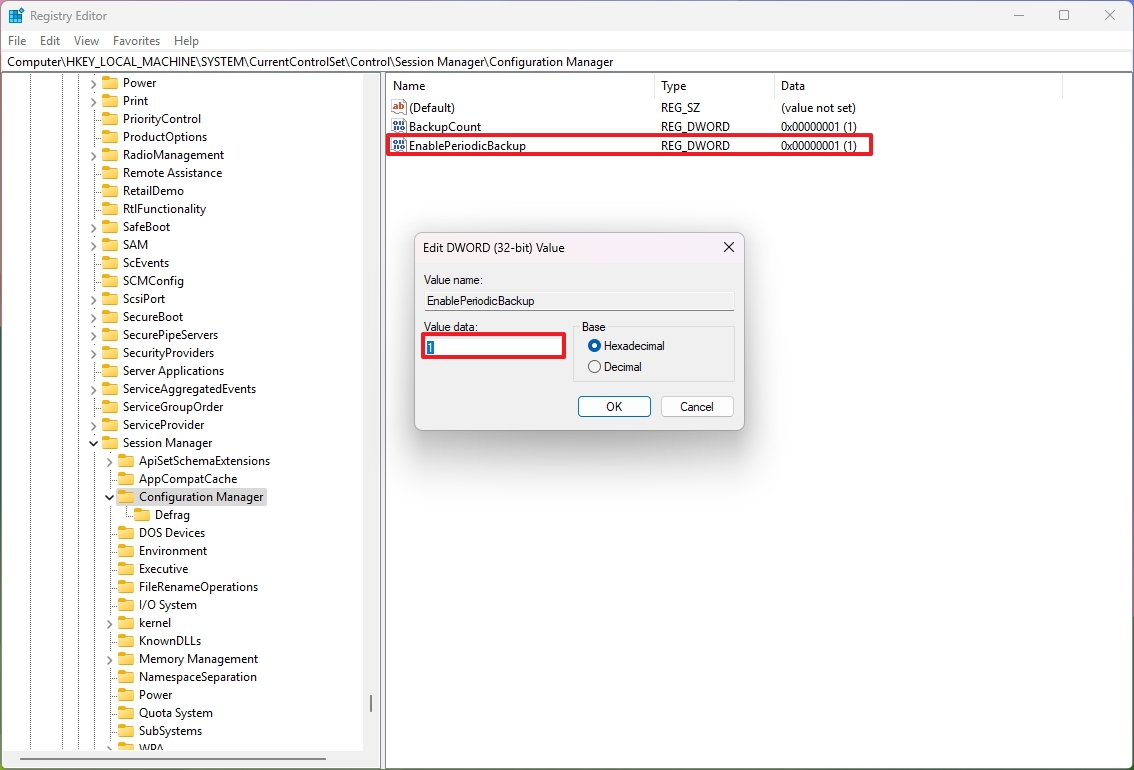
- Click the OK button.
- Open Start.
- Search for Command Prompt, right-click the top result, and choose the Run as administrator option.
- Type the following command to create a task that will run the backup and press Enter: schtasks /Create /TN “\MyTasks\MyRegistryBackup” /TR “schtasks /run /i /tn \”\Microsoft\Windows\Registry\RegIdleBackup\”” /SC DAILY /ST 12:00 /RU “SYSTEM” /RL HIGHEST /F
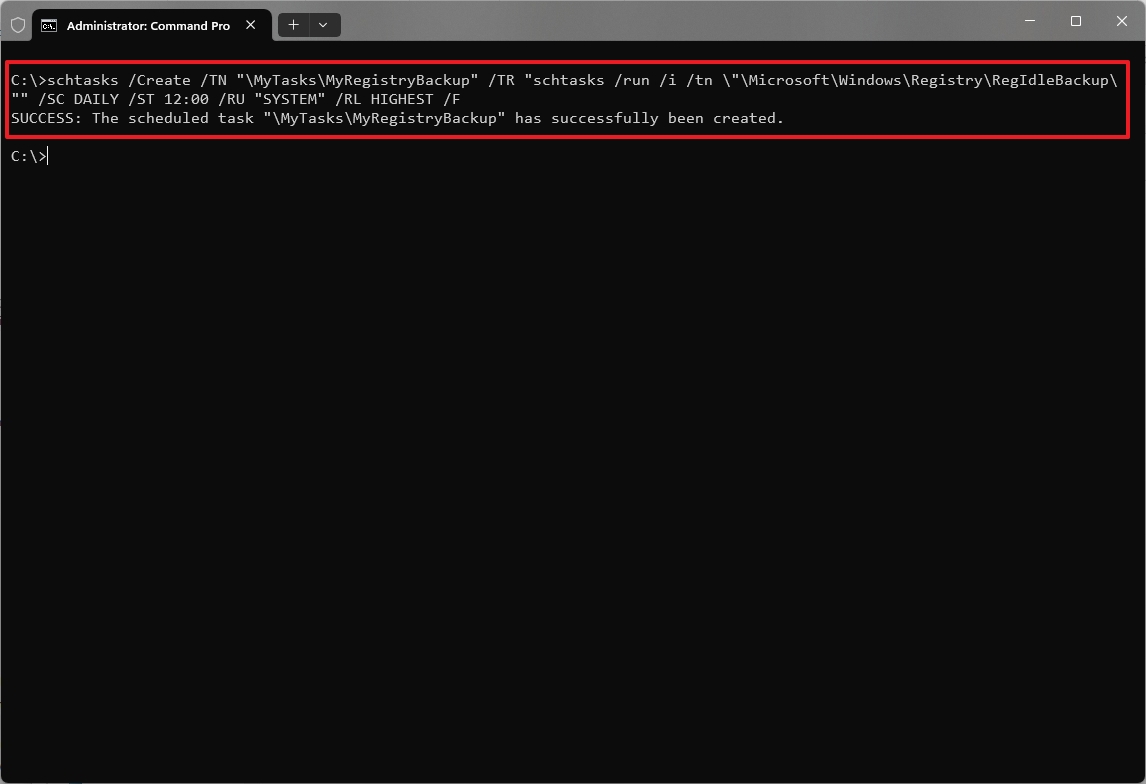
Once you’ve finished the given procedures, Windows 11 will automatically set up a Registry backup for you when you arrange for it to be done at a scheduled time.
The command given here will establish a fresh “MyTasks” folder and arrange for a daily task titled “MyRegistryBackup” in the Task Scheduler, which will run at exactly noon. Feel free to modify the name, location, and timing according to your personal preferences whenever you see fit.
As a researcher, I understand that certain adjustments can be handled differently, like via the Group Policy Editor. Nevertheless, understanding how to modify these settings directly through the Registry proves beneficial, especially when devising a script for making system alterations across several machines.
Are there any additional registry modifications that you usually make when setting up a new system? Feel free to share your suggestions below.
More resources
Read More
2025-06-14 15:10