On Windows 11, you can start playing games right away, but there are several adjustments you can make to enhance your PC’s gaming experience even more.
Here’s a more conversational way of expressing that: “You have the option to toggle specific system settings to enhance your gaming performance and ensure a smooth experience. This includes features like ‘Game Mode’, GPU prioritization, Variable Refresh Rate (VRR), Memory Stability, and Virtualization.
Using Auto HDR and Super Resolution can significantly improve image quality, assuming your system has the necessary hardware capabilities to support these features.
Furthermore, you might want to carry out certain maintenance procedures like clearing up storage, streamlining the system, updating both the system and drivers, adjusting power plans, and making various adjustments to enhance your gaming experience by optimizing your computer’s performance.
Ultimately, I understood that no hardware upgrades are necessary. Yet, it’s worth noting that if you already have an NVMe SSD, Windows 11 will automatically leverage the “DirectStorage” function. This can significantly reduce loading times for assets, making game world loads seem almost instantaneous in compatible games.
Here, I’ll walk you through the best adjustments you can make on your Windows 11 system to boost its gaming capabilities.
Tweaks to boost gaming performance on Windows 11
The suggestions detailed in this manual aren’t arranged sequentially, and certain techniques might necessitate specialized equipment, making them applicable only to specific gadgets.
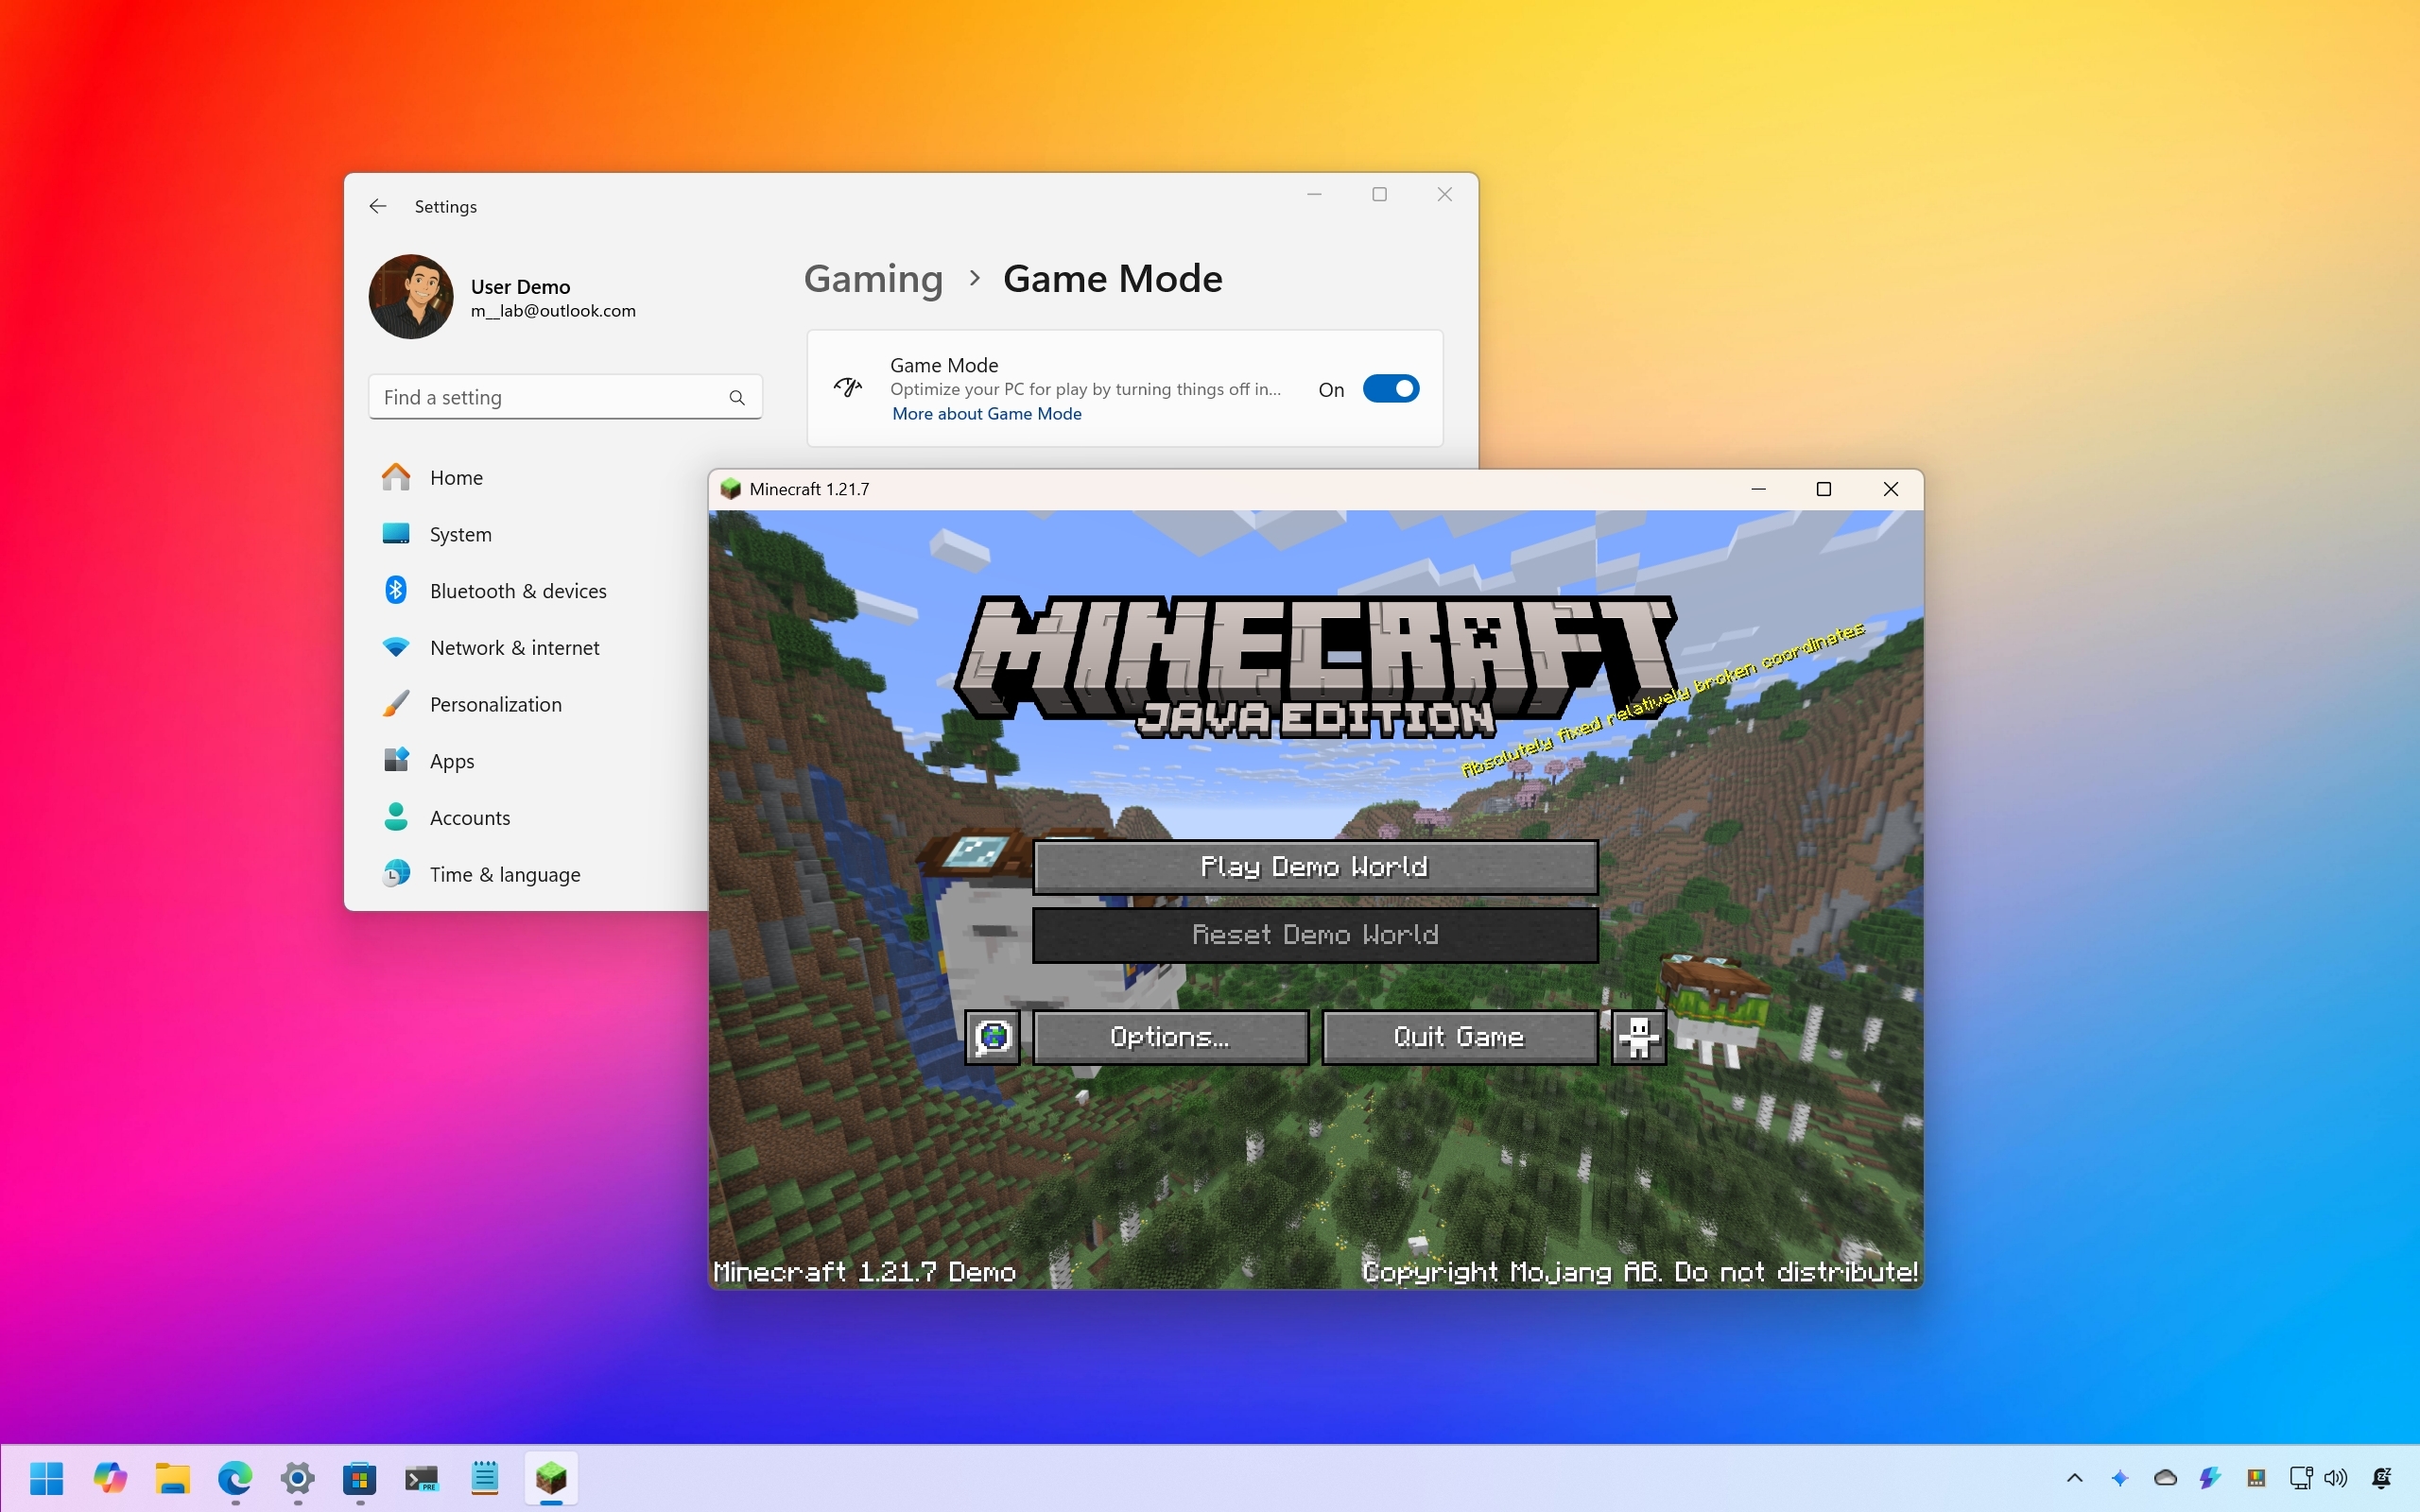
1. Enable Game Mode
The Game Mode, a feature developed by Microsoft, is designed with the purpose of enhancing your computer’s performance for gaming. It does this by giving priority to gaming tasks while reducing distractions from background activities.
In most cases, the specific function is automatically activated in Windows 11. But if you want to verify its status or switch it on/off, here’s a simple guide:
1. Navigate to your system settings by clicking on the Start button and selecting Settings.
2. Once in Settings, look for the option related to the feature you’re interested in.
3. Click on it to open its settings page, where you can easily check its current status.
4. If you wish to turn it on or off, simply toggle the switch accordingly.
- Open Settings.
- Click on Gaming.
- Click the Game Mode page on the right side.
- Turn on the Game Mode toggle switch.
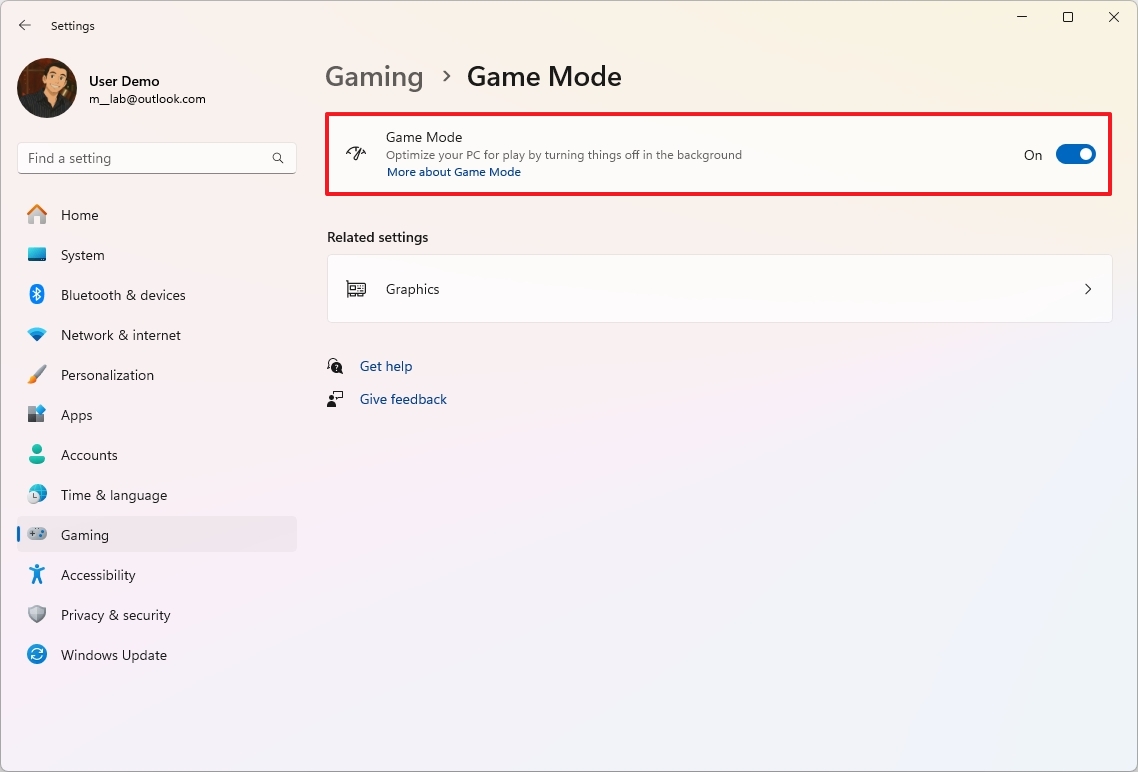
After finishing the process, the effect may differ based on your device’s hardware and the particular game being played. Nevertheless, this function tends to enhance performance significantly, particularly on systems that typically encounter issues with concurrent tasks.
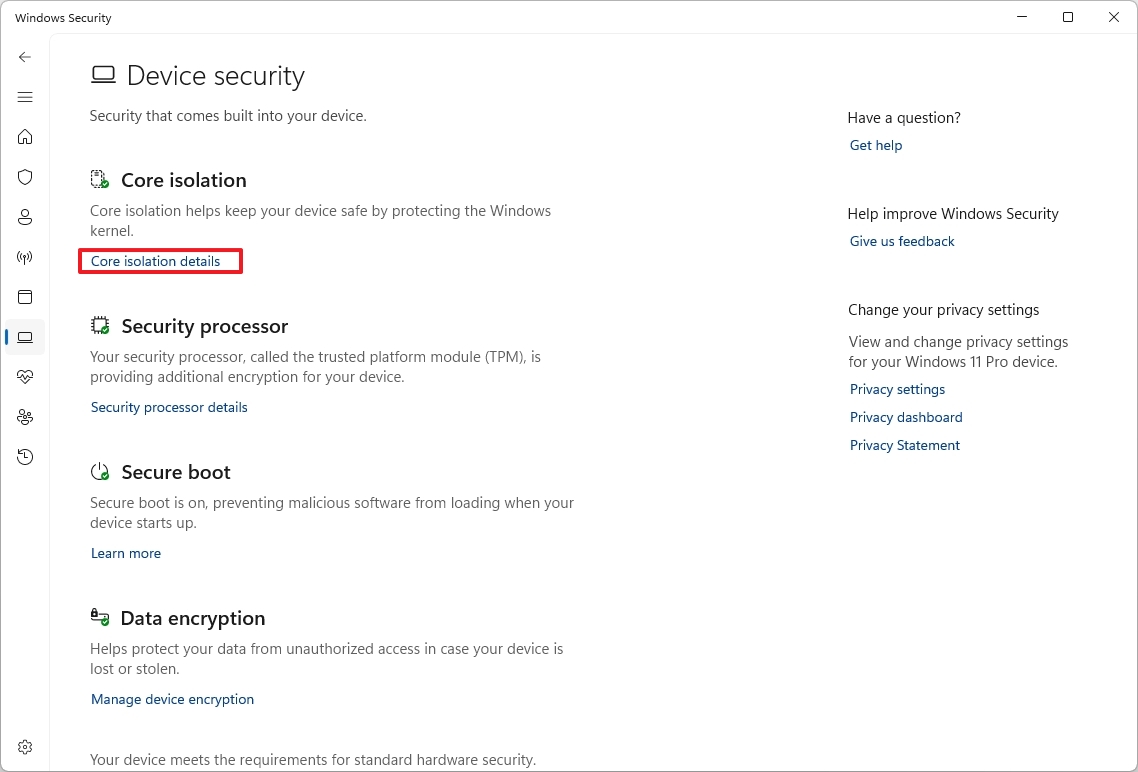
2. Disable Memory Integrity
Based on Microsoft’s explanation, potential performance problems when gaming on Windows 11 could stem from the Memory Integrity and Virtual Machine Platform security features.
To get the best gaming experience from your computer, consider disabling this feature during your gaming sessions, and then re-enable it once you’re done playing.
To disable Memory Integrity on Windows 11, use these steps:
- Open Windows Security.
- Click on Device Security.
- Click the “Core isolation details” option on the right.
- (Option 1) Turn off the Memory Integrity toggle switch to disable the feature
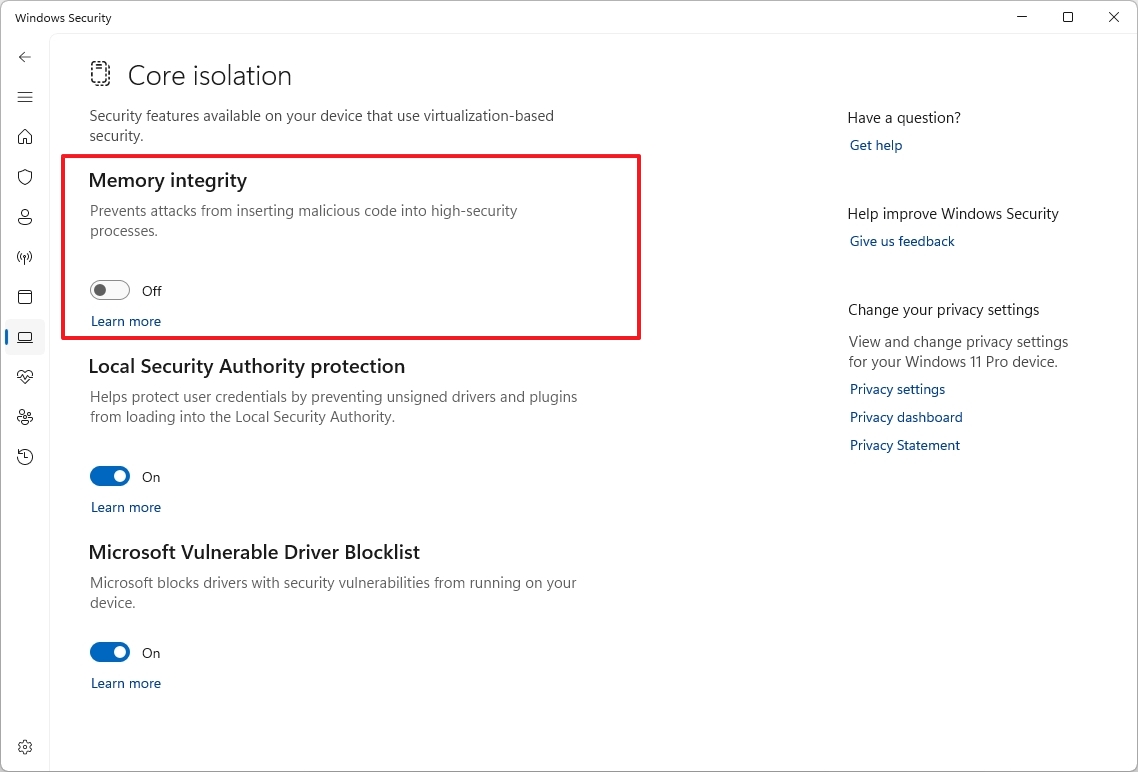
- (Option 2) Turn on the Memory Integrity toggle switch to enable the feature.
- Restart the computer.
Once you’re done playing games, Microsoft recommends re-enabling the feature.
3. Disable Virtual Machine Platform
To turn off virtualization on Windows 11, use these steps:
- Open Settings.
- Click on System.
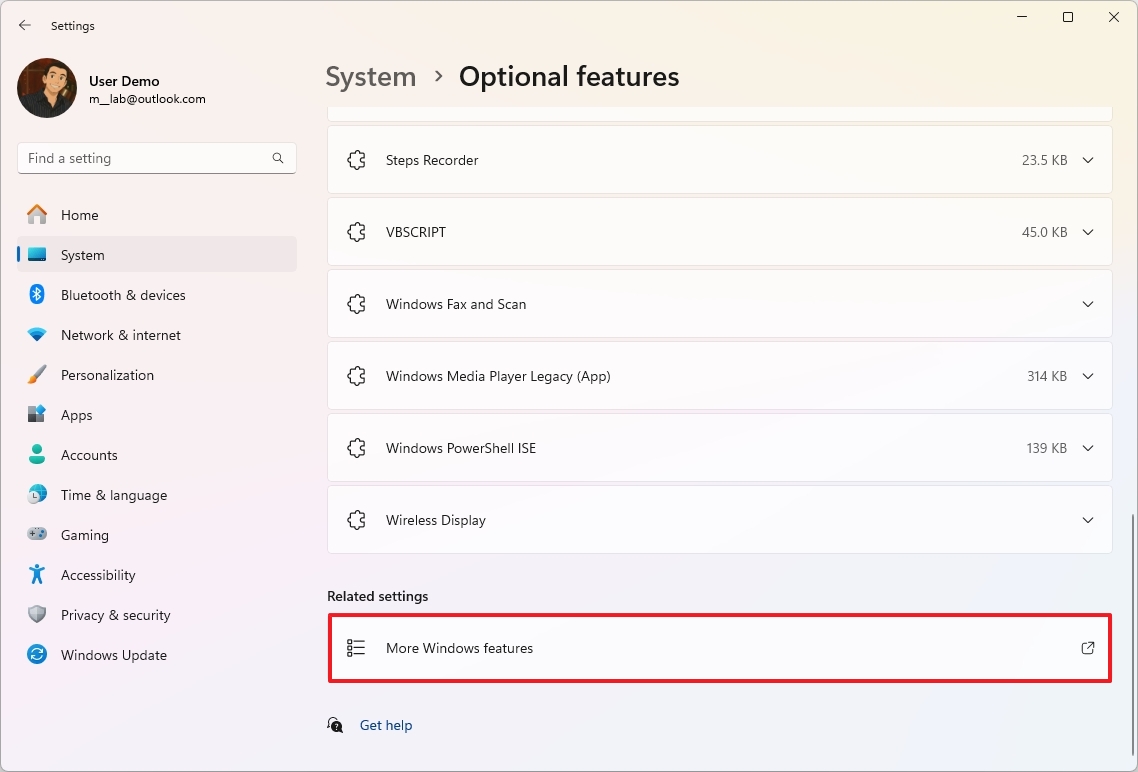
- Click the Optional features page on the right side.
- Click the “More Windows features” setting.
- (Option 1) Clear the “Virtual Machine Platform” option to disable the feature.
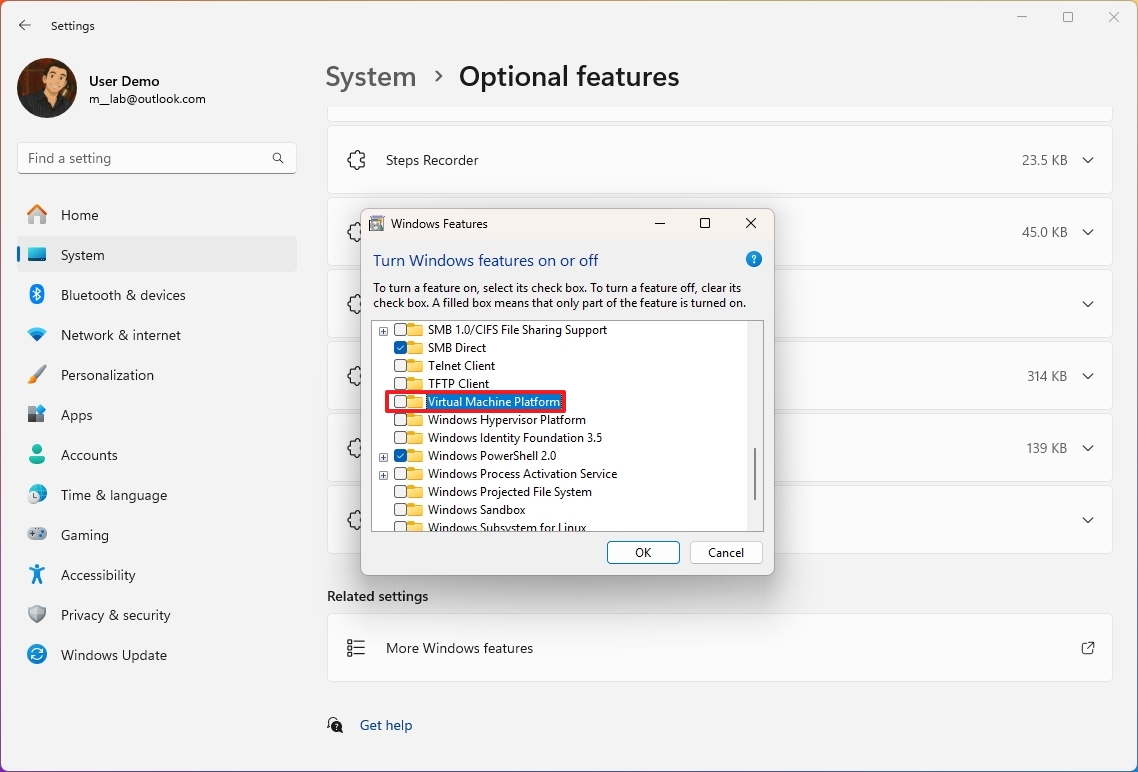
- (Option 2) Check the “Virtual Machine Platform” option to enable the feature.
- Click the OK button.
- Restart the computer.
After you’re done playing games, Microsoft recommends re-enabling the feature.
4. Change power mode
For optimal gaming performance on Windows 11, it’s usually advised to set the power mode to “High Performance”, as this configuration helps your system utilize its resources effectively for an exceptional gaming experience.
Absolutely, for optimal gaming experience on your laptop, it is best to keep the machine connected to a power source while playing games.
To change the power mode on Windows 11, use these steps:
- Open Settings.
- Click on System.
- Click the “Power & battery” (or Power) page on the right side.
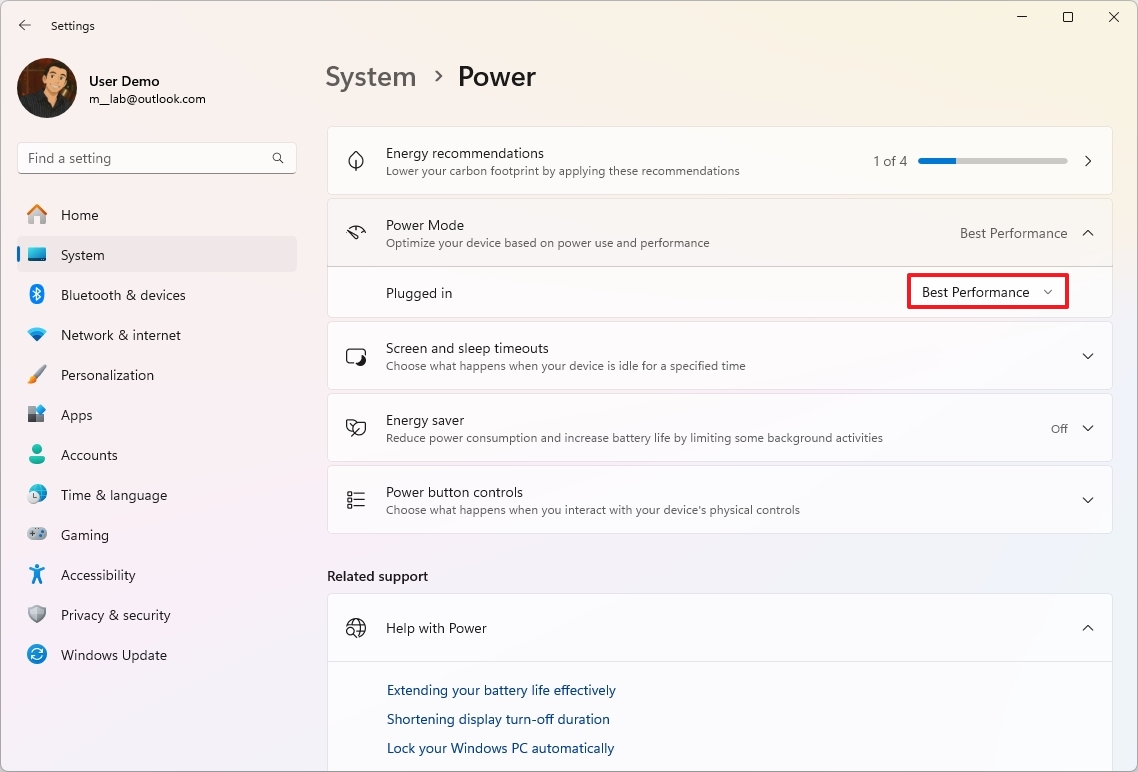
- Click the Power Mode setting.
- Choose the Best Performance option for the “Plugged in” and “On battery” settings.
After finishing the procedures, the processor, graphics cards, and additional hardware will gain extra power, thereby enhancing your gaming experience.
5. Enable Auto HDR
The Auto HDR function boosts the color and contrast in standard dynamic range (SDR) video games for high dynamic range (HDR) compatible screens, offering a more captivating visual experience without affecting performance or necessitating updates from developers.
To enable Auto HDR on Windows 11, use these steps:
- Open Settings.
- Click on System.
- Click the Display page on the right side.
- Turn on the HDR toggle switch.

- Click the Graphics setting at the bottom of the page.
- Turn on the Auto HDR toggle switch.
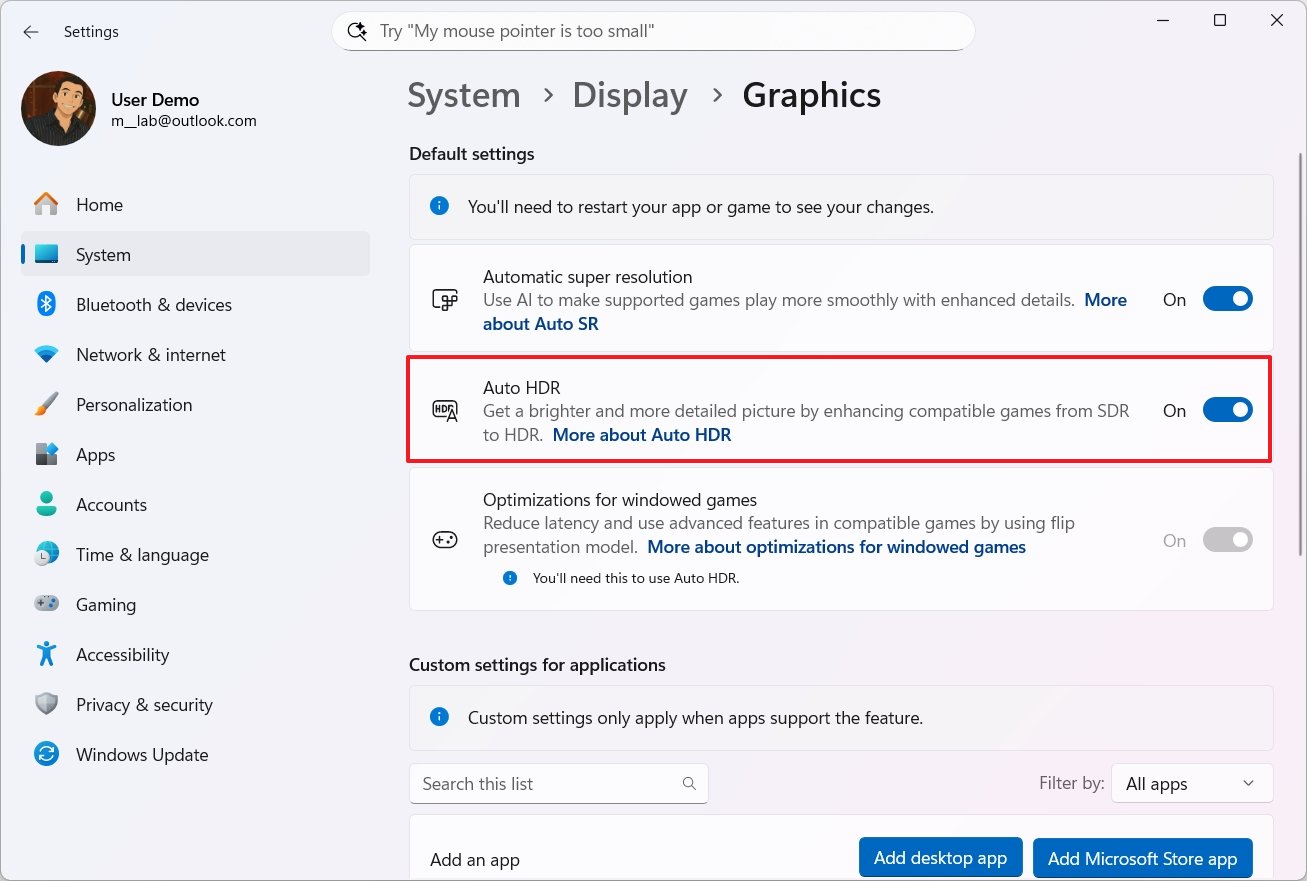
The function of Auto HDR lies in utilizing the system’s High Dynamic Range (HDR) features, ensuring they are activated, as well as the “Game Optimization for Windows” setting.
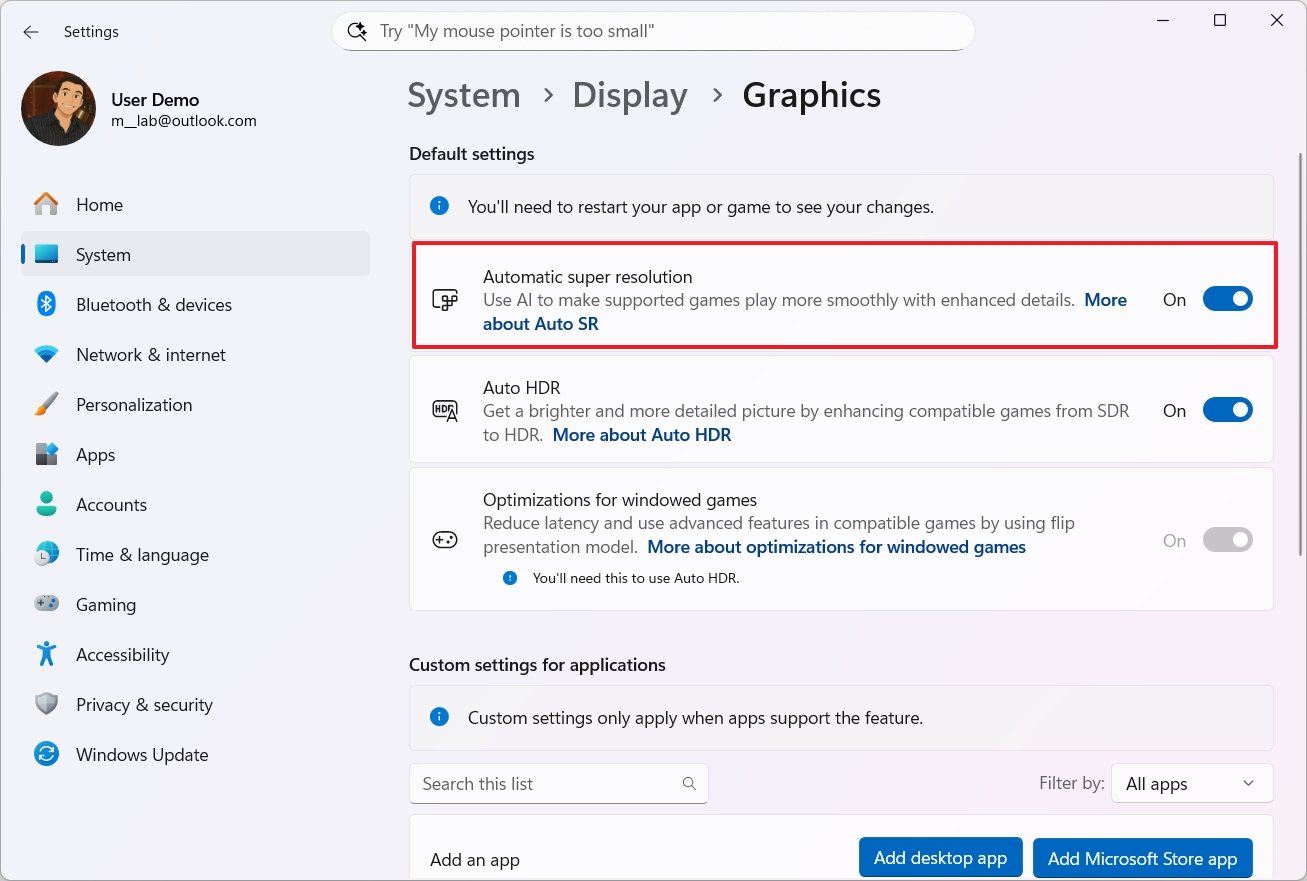
6. Enable Automatic Super Resolution
Auto SR, or Automatic Super Resolution, is a built-in Windows 11 function that leverages artificial intelligence to enhance game resolutions, thus boosting frames per second and visual clarity.
This function enhances the gameplay, making it more fluid and engaging, but keep in mind that Auto SR is exclusive to Copilot+ computers and works with a limited selection of games.
To enable Auto SR on Windows 11, use these steps:
- Open Settings.
- Click on System.
- Click the Graphics page on the right side.
- Turn on the “Automatic super resolution” toggle switch.
To address problems with a particular game due to the Super Resolution feature, yet still utilize it in other games, navigate to the “Custom settings for applications” section within your settings and disable the Super Resolution feature for that specific game.
7. Change game default GPU
While it’s generally advisable to let the operating system choose the dedicated graphics card for optimal performance, you do have the flexibility to select a different GPU on a game-by-game basis if desired.
- Open Settings.
- Click on System.
- Click the Graphics page on the right side.
- Select the game from the list.
- Choose the High Performance option in the “GPU preference” setting.
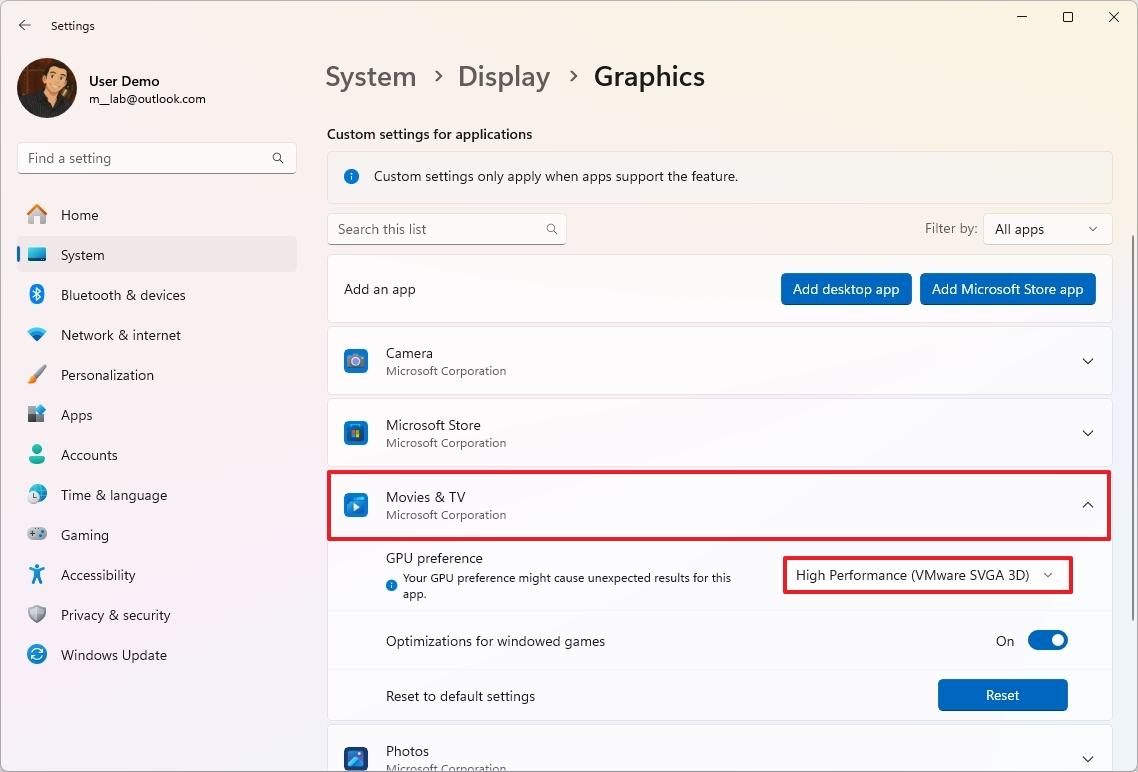
In some cases, even if you select a particular graphics card for a certain game, the system might override your choice and utilize another card based on its own needs.
8. Install games on secondary drive
It could be beneficial to transfer your video games from your primary computer to a secondary drive if you own one, as this may enhance your gaming experience on Windows 11. However, keep in mind that the improvement can vary based on the kind of drive you’re using.
The problem lies with frequent access of the primary storage (the location where Windows 11 is installed), as the operating system tends to do so often. Consequently, if you also keep your games on this same storage, they might experience slower loading times for levels and assets.
Installing games onto a faster drive like an SSD, instead of your main hard drive, allows that drive to prioritize the game’s resources, thereby lessening the strain between the game and your operating system, resulting in smoother gameplay.
Microsoft Store
To install new games directly into a secondary drive from the Microsoft Store, use these steps:
- Open Microsoft Store.
- Open the game page.
- Click the Get (or Install) button.
- Choose the secondary drive to download the game.
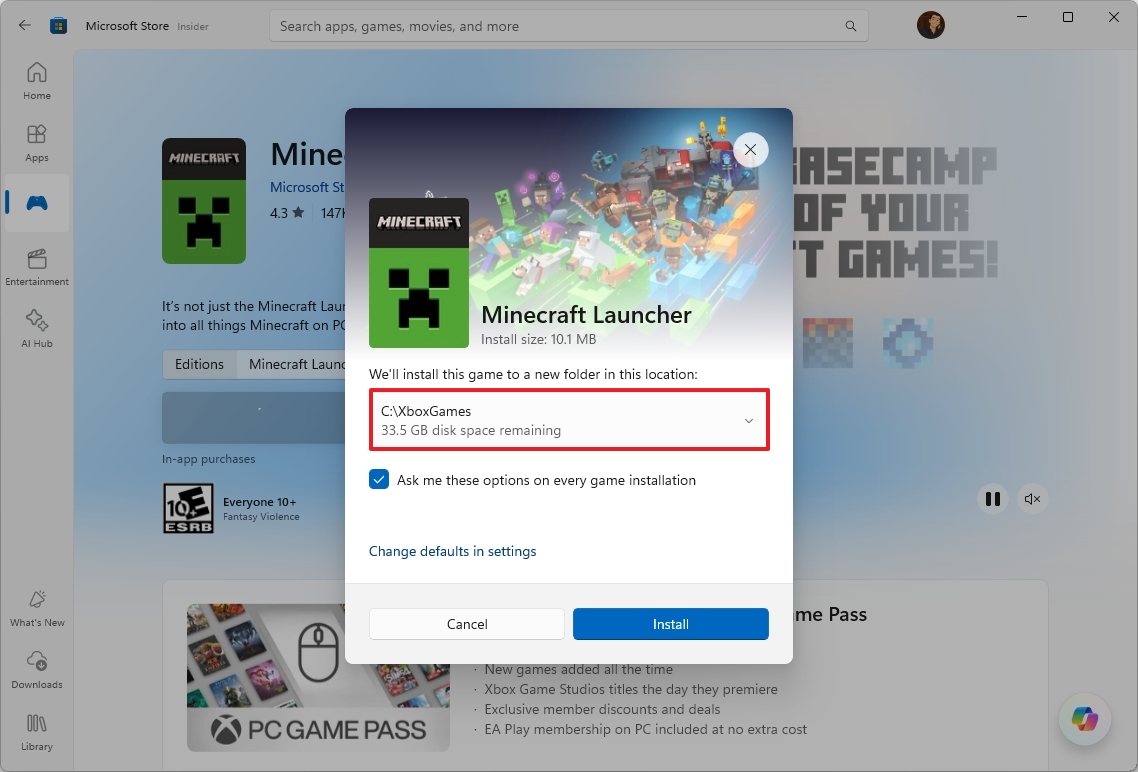
- Click the Install button.
In your setup, it seemed like you couldn’t modify the default location for installing games from the Microsoft Store Settings page because the necessary option was missing. However, upon clicking the “Adjust defaults in settings” option available on the game page itself, the option magically appeared on the Settings page.
Xbox app
To install new games directly into a secondary drive from the Xbox app, use these steps:
- Open Xbox.
- Click the profile menu and choose the Settings option.
- Click on Install options.
- Select the secondary drive in the “Change where this app installs games by default” setting.

After finishing the process, the following game installation will automatically download the selected title onto the drive you designated.
Transfer existing games
You can transfer games that are currently installed on your primary hard drive to a secondary drive using the Settings app. Here’s how it works:
1. Open the Settings app.
2. Navigate to the ‘Storage’ section.
3. Select the game you wish to move from the list of installed apps.
4. Choose ‘Move to another drive’.
5. Select your secondary drive as the new location for the game.
6. Confirm the action and wait for the process to complete.
- Open Settings.
- Click on Apps.
- Click the Installed apps page on the right side.
- Select the game from the list and click the menu (three dots) on the right.
- Choose the Move option.

- Select the drive to offload the game.
- Click the Move option.
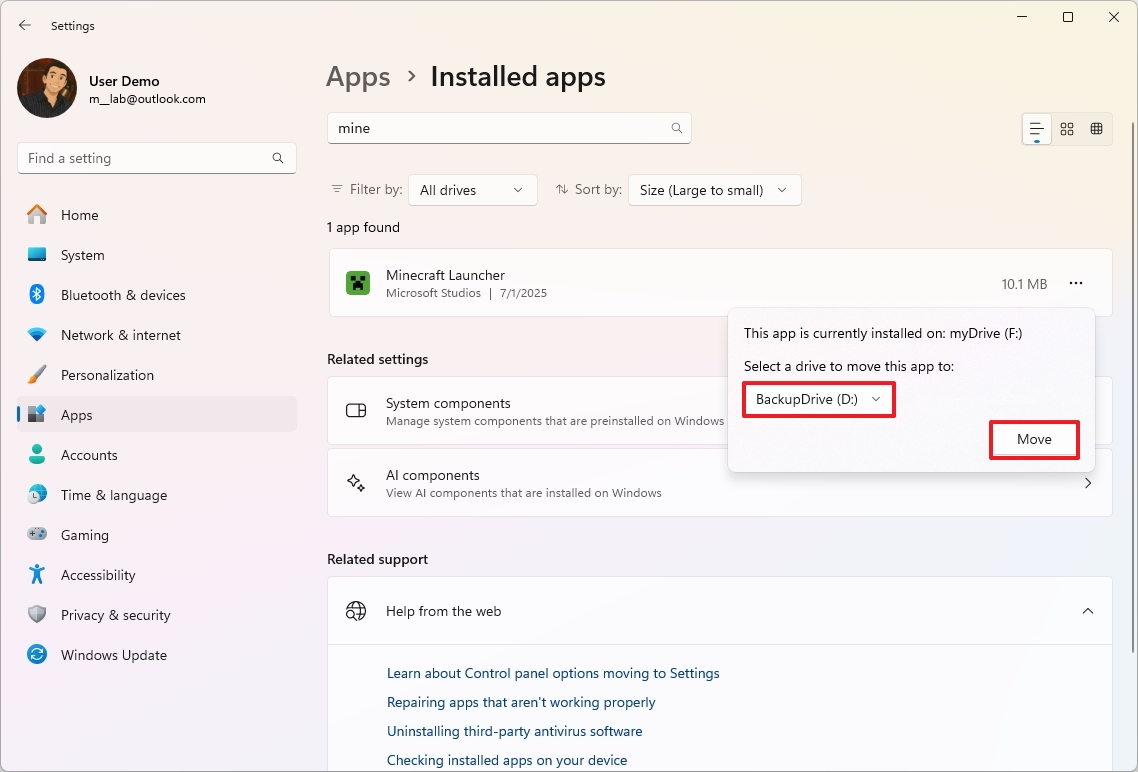
You may have to repeat the steps to transfer any other remaining game.
9. Optimization for windowed games
In simpler terms, Windows 11 comes with an enhancement called “Performance Optimization for Windowed Games.” This feature aims to boost the speed and efficiency of games played in windowed or borderless windowed settings. Typically, these settings have experienced higher input delays and lower performance when compared to exclusive full-screen mode.
This optimization switches games from using outdated display models like DirectX 10 and 11’s “blt-model” to a more advanced “flip-model”. This change enables games to circumvent the Desktop Window Manager (DWM) for direct output, just as exclusive fullscreen mode does.
To use optimizations for windowed games in the operating system, use these steps:
- Open Settings.
- Click on System.
- Click the Graphics page on the right side.
- Turn on the “Optimizations for windowed games” toggle switch.
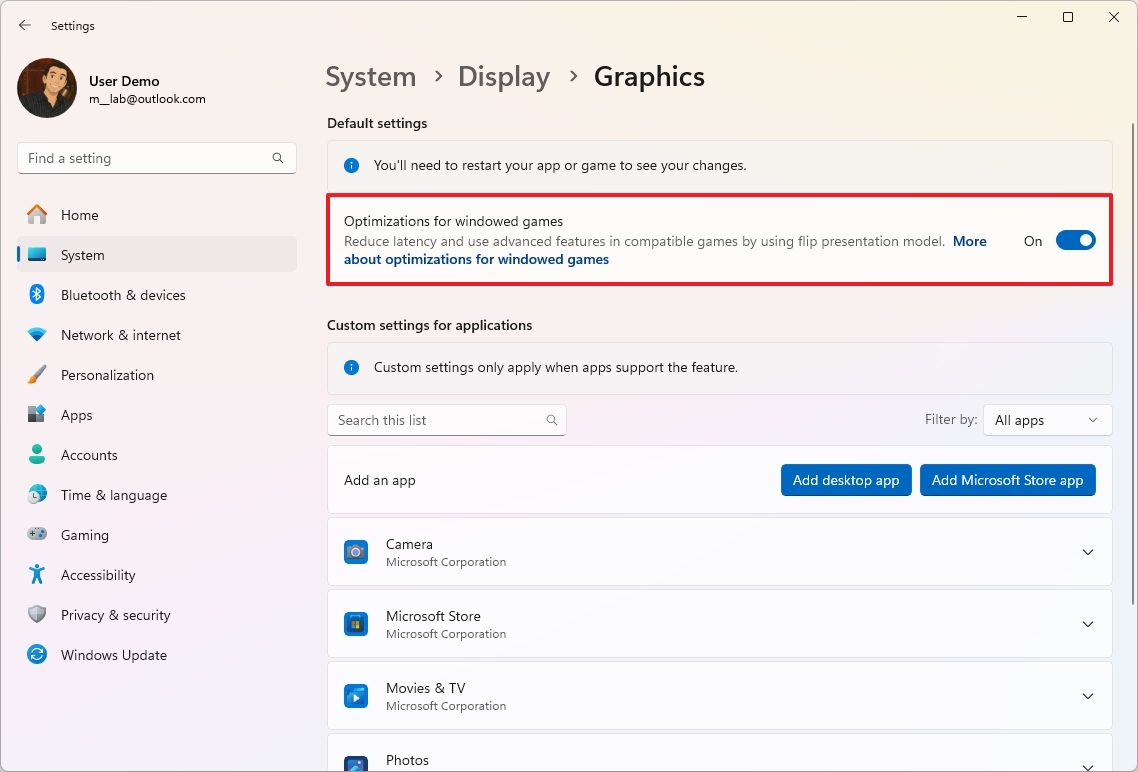
After finishing the given procedures, you can expect improved gameplay for titles that don’t run in full-screen display.
10. Change refresh rate
Improving your gaming performance on Windows 11 can be significantly boosted by changing your monitor’s refresh rate. However, keep in mind that this requires a monitor with higher refresh capabilities and a graphics card strong enough to generate frames at those speeds.
The refresh rate, expressed in Hertz (Hz), signifies how often your display updates or redraws the image you see on the screen. For instance, a 60Hz monitor refreshes the image 60 times every second, while a 144Hz monitor does it an impressive 144 times per second, and so forth.
If a monitor updates its display more quickly, it shows new images more frequently, leading to a noticeably smoother movement, particularly in high-speed games. This quicker refresh rate additionally minimizes input delay, resulting in fewer instances of screen splitting or tearing.
To set your system to the highest refresh rate, use these steps:
- Open Settings.
- Click on System.
- Click the Display page on the right side.
- Click the Advanced display setting at the bottom of the page.
- Select the highest rate using the “Choose a refresh rate” setting.

- (Optional) Turn off the “Dynamic refresh rate” toggle switch.
After you complete the steps, games should play at higher refresh rates.
It’s important to understand that simply setting your monitor to its maximum refresh rate won’t necessarily mean your games will play at that speed. This is due to the fact that your monitor can only show the frames that your computer generates. If your computer isn’t fast enough to create frames as quickly as your monitor refreshes, then it can only display the number of frames that were sent.
11. Disable apps at startup
Having numerous apps opening automatically at startup can lead to a slower boot-up time for your computer, as well as increased usage of its background resources. This increased consumption can potentially impact the smoothness of your gaming experience.
To enhance your computer’s efficiency for gaming and various tasks, it’s advisable to limit the number of apps that start up automatically. Here’s one way to do it:
1. Click on the Start button or press the Windows key on your keyboard.
2. Type ‘Task Manager’ into the search bar and hit Enter.
3. In the Task Manager window, click on the ‘Startup’ tab.
4. You’ll see a list of apps that start up automatically when you boot your computer. To manage these apps, right-click on each one, then select ‘Disable’.
5. Repeat this process for all apps you don’t need to start with Windows.
6. Restart your computer to apply the changes.
By following these steps, you can help optimize your computer’s performance for smoother gaming and other tasks.
- Open Settings.
- Click on Apps.
- Click the Startup page on the right side.
- Choose the Startup impact option in the “Sort by” menu.
- Turn off the most impactful apps running on your system.
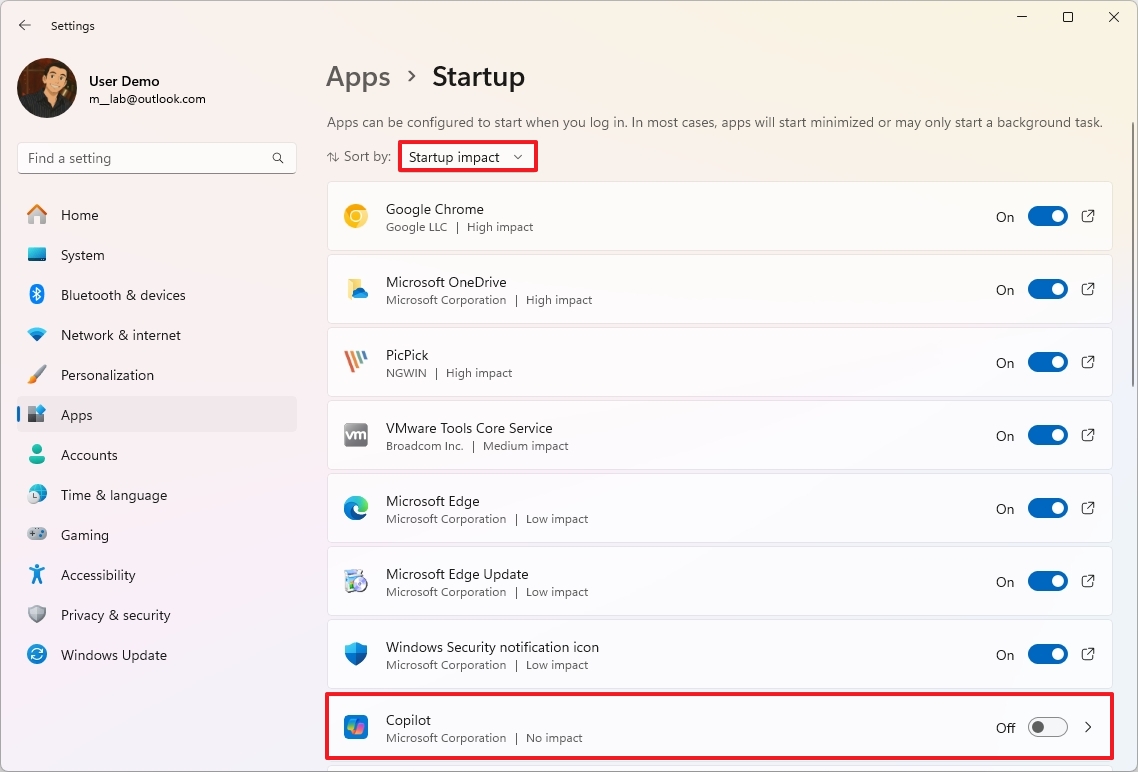
- Quick note: Although you can turn off any application, be careful with the app. For instance, do not turn off things like the Windows Security notification icon, Microsoft Defender, and other system services, as they can affect performance.
After finishing the given tasks, you might observe an improvement in gaming speed based on the app settings you established during system boot-up.
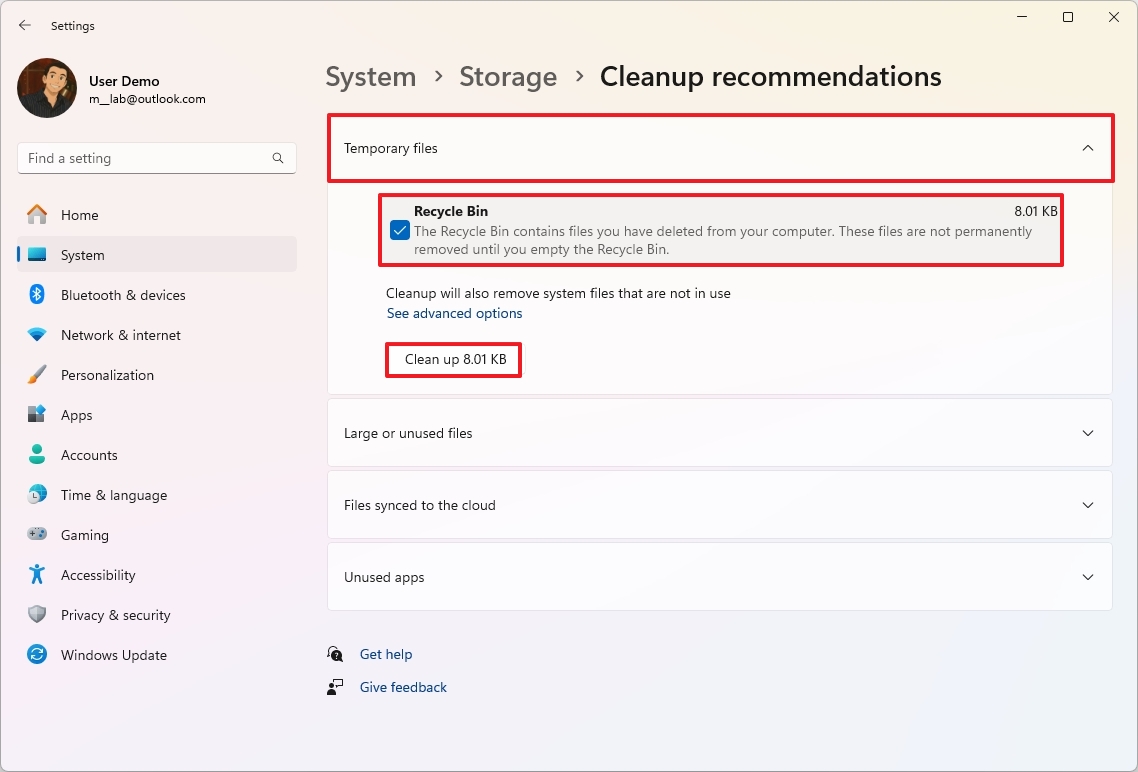
12. Free up storage space
It’s generally not wise to operate a computer when its storage is running low since this could lead to reduced system efficiency. Ideally, it’s best to avoid using a device when its storage capacity exceeds 70%.
To enhance both the general system’s speed and your gaming experience, try to clear up as much room as you can on your primary storage device. Additionally, consider moving any previously installed games onto a secondary drive, as discussed before.
To free up space on Windows 11, use these steps:
- Open Settings.
- Click on System.
- Click the Storage page on the right side.
- Click on Clean recommendations.

- Click the Temporary files setting.
- Select the items to clear.
- Quick tip: You can also click the “See advanced options” button to access the Temporary Files settings and delete additional junk files.
- Click the “Clean up” button.
- Click the “Large or unused files” setting.
- Select the files to clear from the hard drive.
- Click the “Clean up” button.
- Click the “Files synced to the cloud” setting.
- Select the files already synced to the cloud.
- Click the “Clean up” button.
- Click the Unused apps setting.
- Select and remove the apps you rarely use to free up more space.
Following the outlined procedures should lead to enhanced general performance across Windows 11, even during gaming sessions.
On Windows 11, there are multiple methods to clear up storage space on your device. For further suggestions, take a look at the guide I provided earlier.
13. Install system updates
While regularly updating your computer enhances its overall functionality, it’s crucial to be aware that certain updates might introduce compatibility or performance problems, especially when it comes to gaming. Therefore, it’s advisable to investigate an update thoroughly prior to installing it on your system if you aim for superior gaming performance.
To install system updates manually, use these steps:
- Open Settings.
- Click on Windows Update.
- Turn on the “Get the latest updates as soon as they’re available” toggle switch.
- Click the Check for updates button.
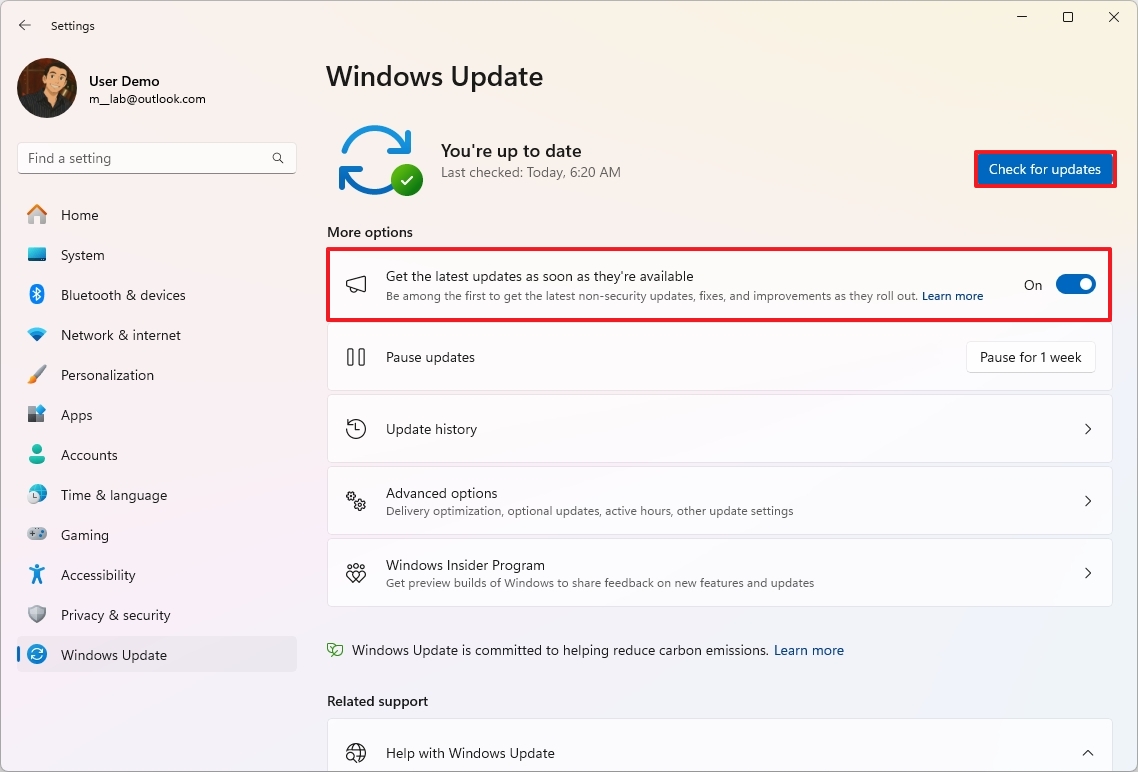
Upon finishing the given procedures, I might observe a boost in gaming efficiency, provided that the update is aimed at resolving particular challenges within the games themselves.
Furthermore, maintaining the latest versions of your games is beneficial, since they often provide enhanced performance and resolve any existing issues.
14. Update graphic drivers
Employing the drivers supplied by the manufacturer could mean that you’ve got a Control Panel at your disposal, which enables you to verify and download updates for your graphics card.
Update drivers from GPU app
To update your graphics driver on Windows 11, like with the Nvidia application, follow these simple instructions:
1. Launch the Nvidia app.
2. Navigate to the section where updates are available.
3. If an update is found, click “Update” or “Install” to download and apply the latest driver version.
- Open the Nvidia app.
- Click on Drivers from the left pane.
- Click the Download button.
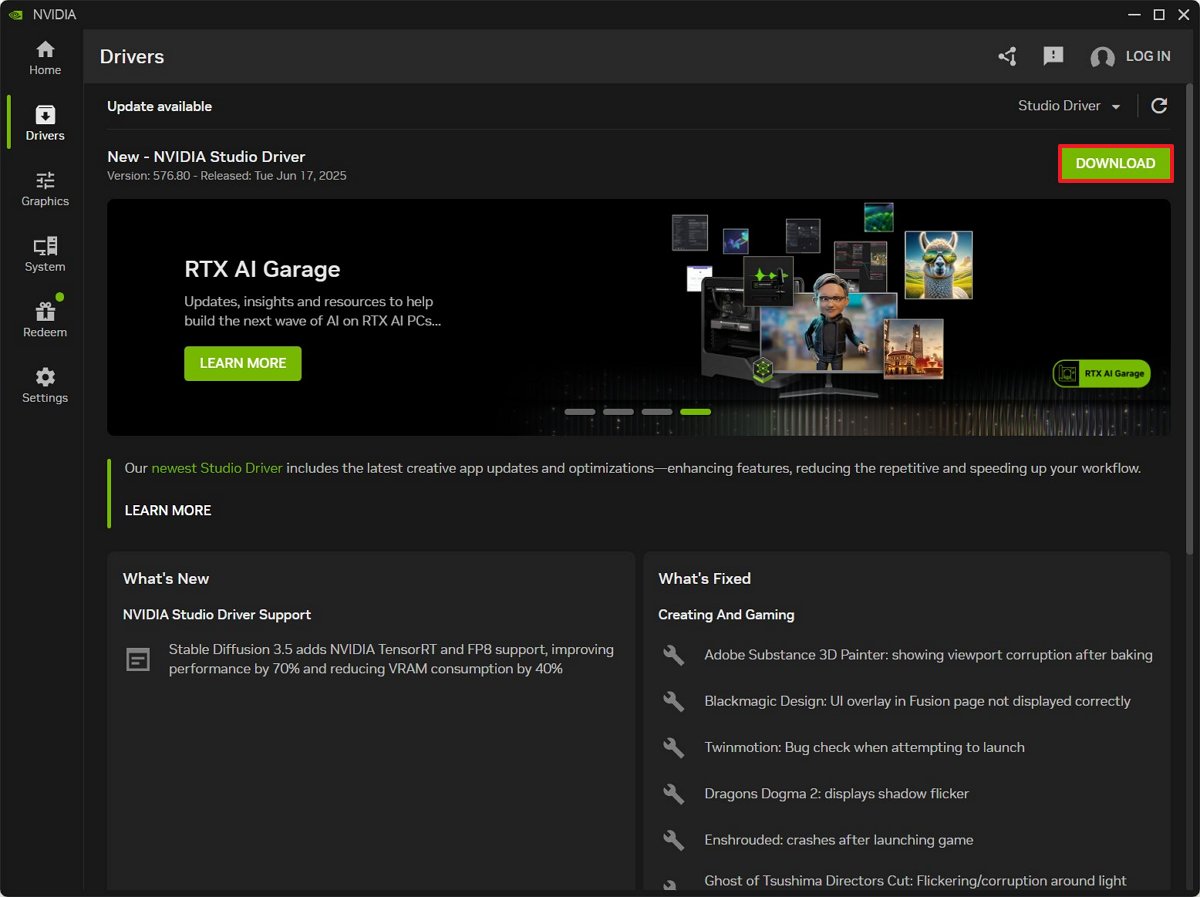
- Continue with the on-screen directions.
Once you complete the steps, you may have to restart your computer to apply the changes.
For those with an AMD system, it’s important to note that the methods vary when utilizing the Adrenalin Edition application, yet the fundamental principle remains consistent.
Reinstall GPU drivers
If you’re getting your graphics drivers through Windows Update, there’s a chance they’re not the latest ones. To ensure you have the newest version, consider uninstalling the present drivers first, followed by installing the updated drivers directly from the manufacturer.
Instead, consider utilizing Display Driver Uninstaller (DDU) for a thorough removal of the existing drivers before installing a fresh version of the graphics card drivers, as there might be complications during the uninstallation and reinstallation process.
As a tech enthusiast, I’ve found myself appreciating the usefulness of the DDU (Display Driver Uninstaller) tool during hardware upgrades like switching my graphics card, and especially when I encounter pesky driver issues that might be causing trouble on my computer.
In this example, I’ll outline the steps to install the NVIDIA drivers:
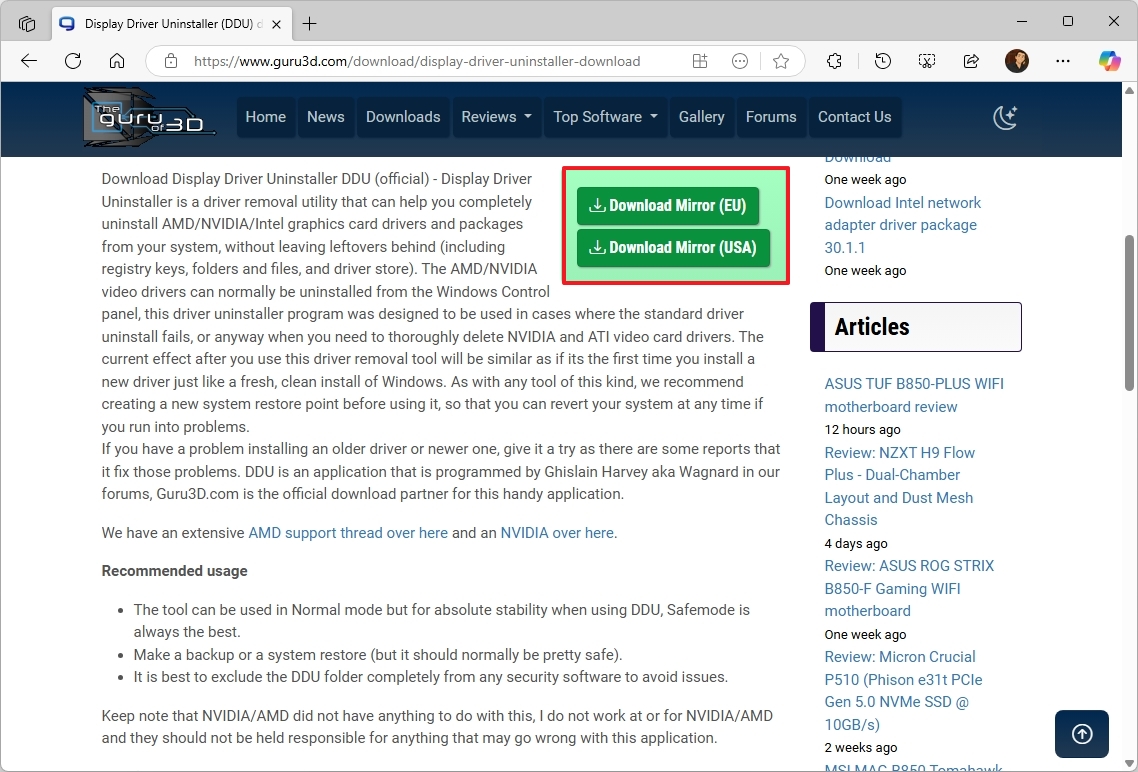
- Open the Guru3d website.
- Click the Download button nearest to your region.
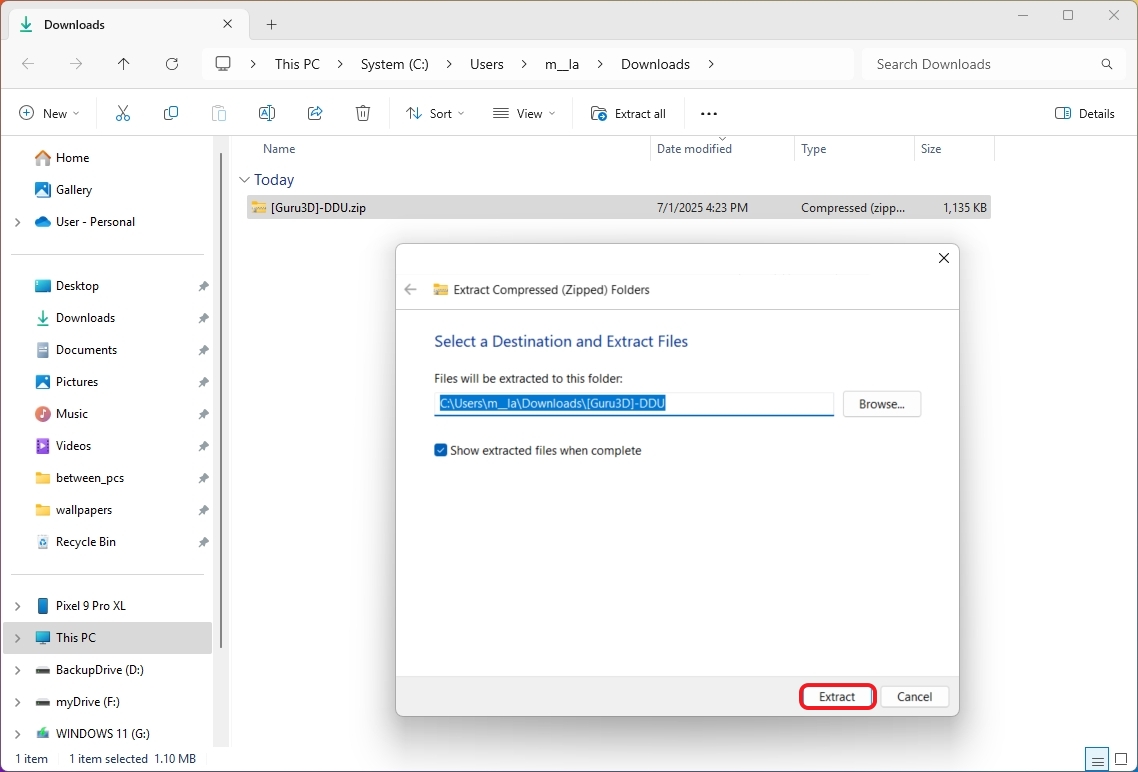
- Right-click the Zip file and choose the Extract All option.
- Click the Extract button.
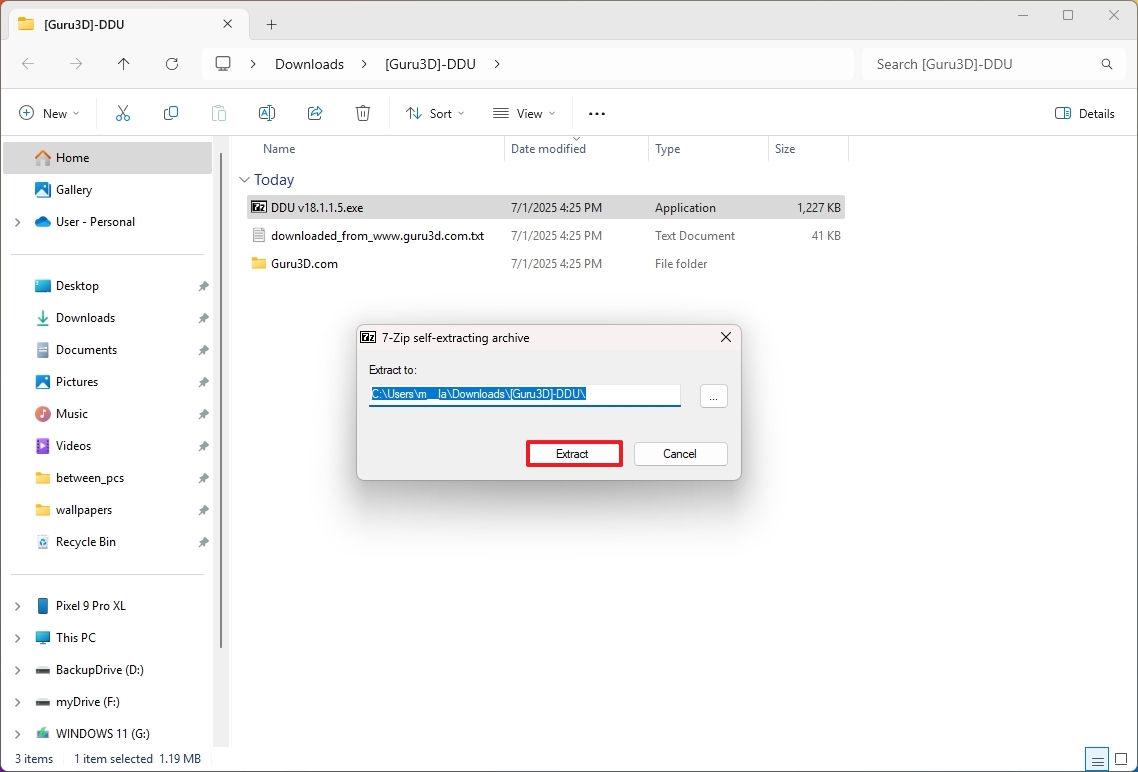
- Right-click the DDU “.exe” file and choose the Open option.
- Click the Extract button.
- Close running applications and save your work.
- Open Settings.
- Click on System.
- Click the Recovery page on the right side.
- Click the Restart now button for the “Advanced startup” feature.

- Click the Restart now button one more time.
- Click on Troubleshoot.
- Click on Advanced options.
- Click on Startup Settings.
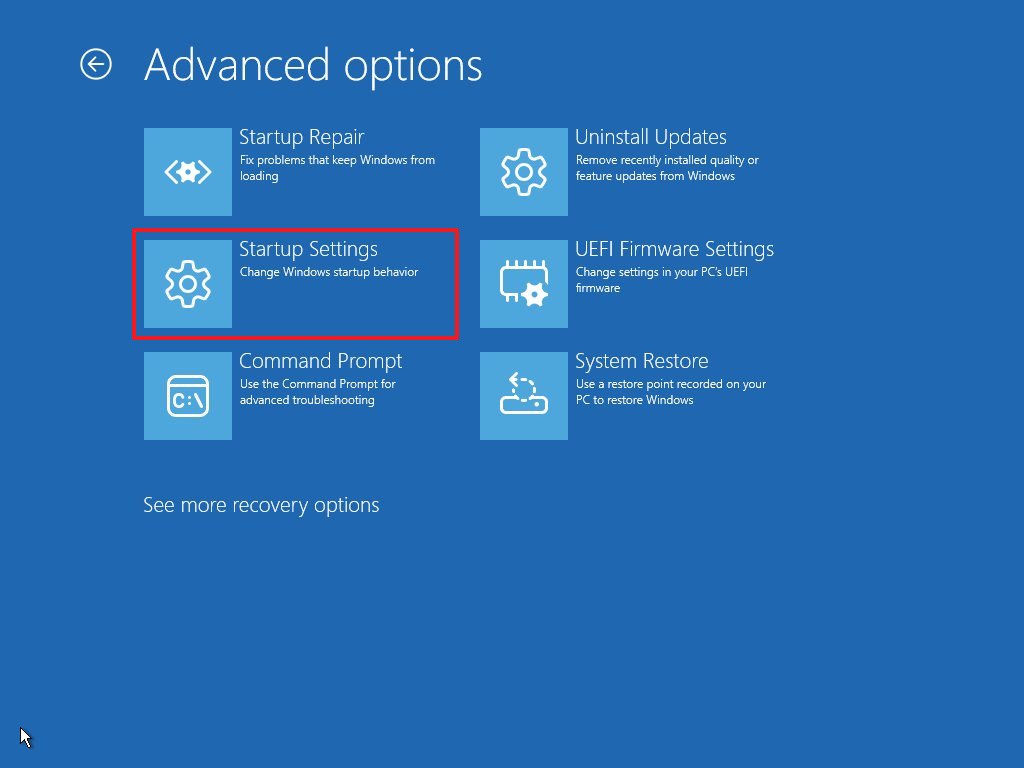
- Click the Restart button.
- Select the “Enable Safe Mode” option using the “F4” key.
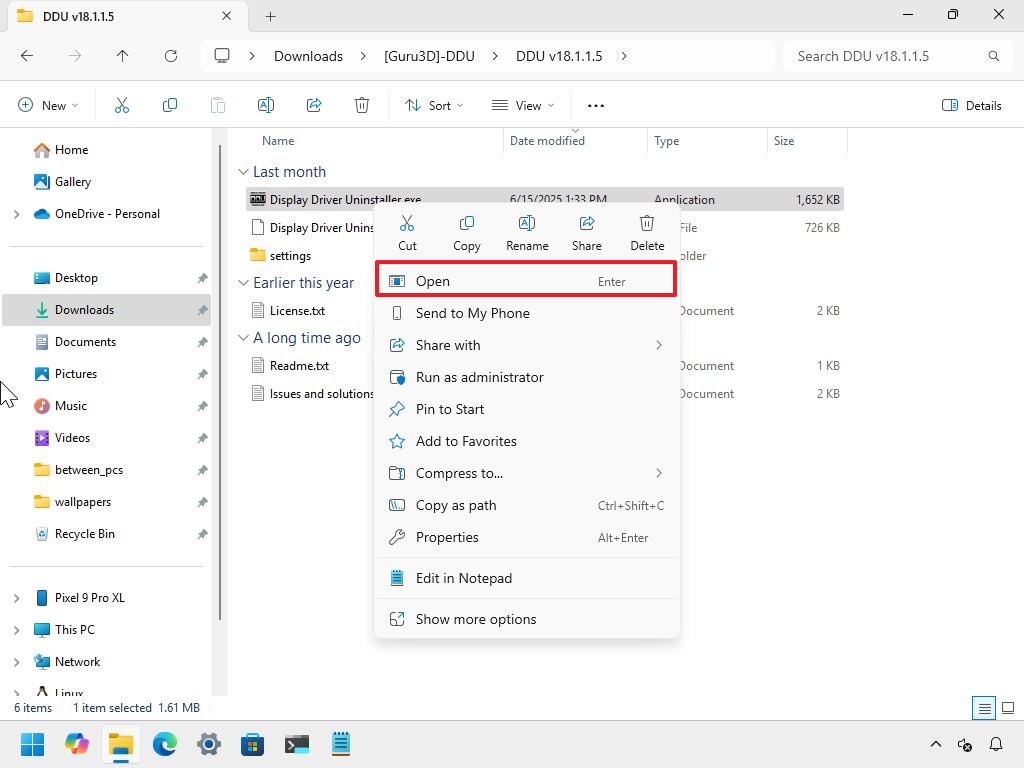
- Open the Display Driver Uninstaller extraction folder.
- Right-click the “Display Driver Uninstaller.exe” file and choose the Open option.
- Select the settings to use for uninstalling Nvidia or AMD drivers.
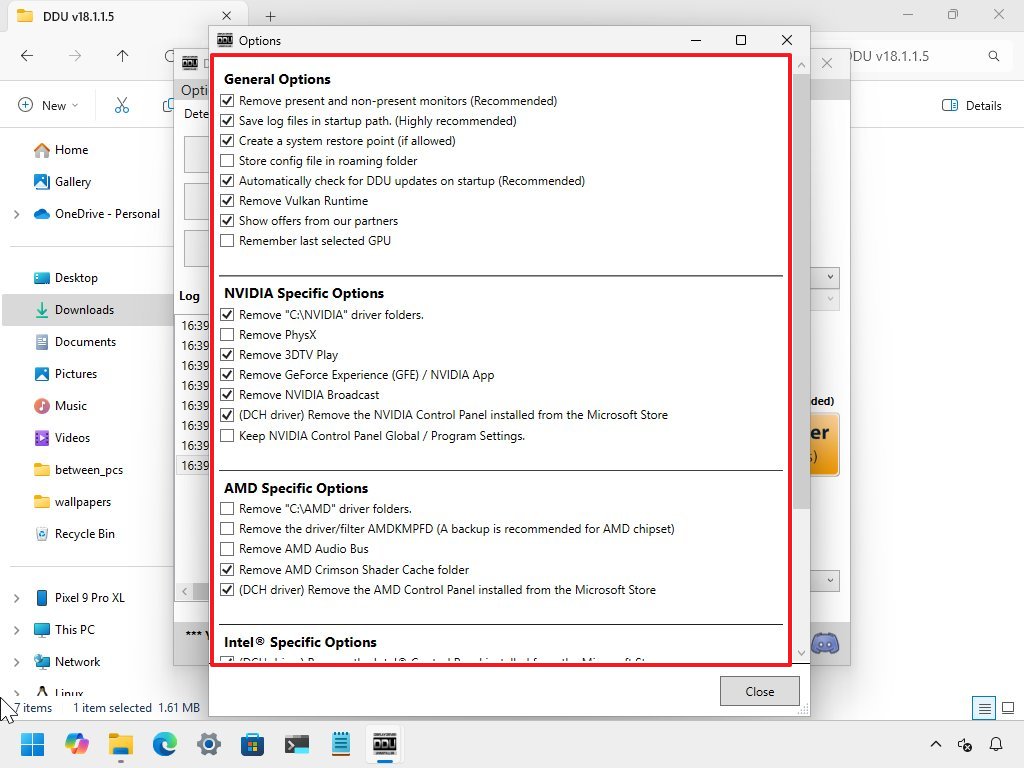
- Quick tip: If you don’t understand the settings, the default configuration should work in most cases.
- Click the Close button.
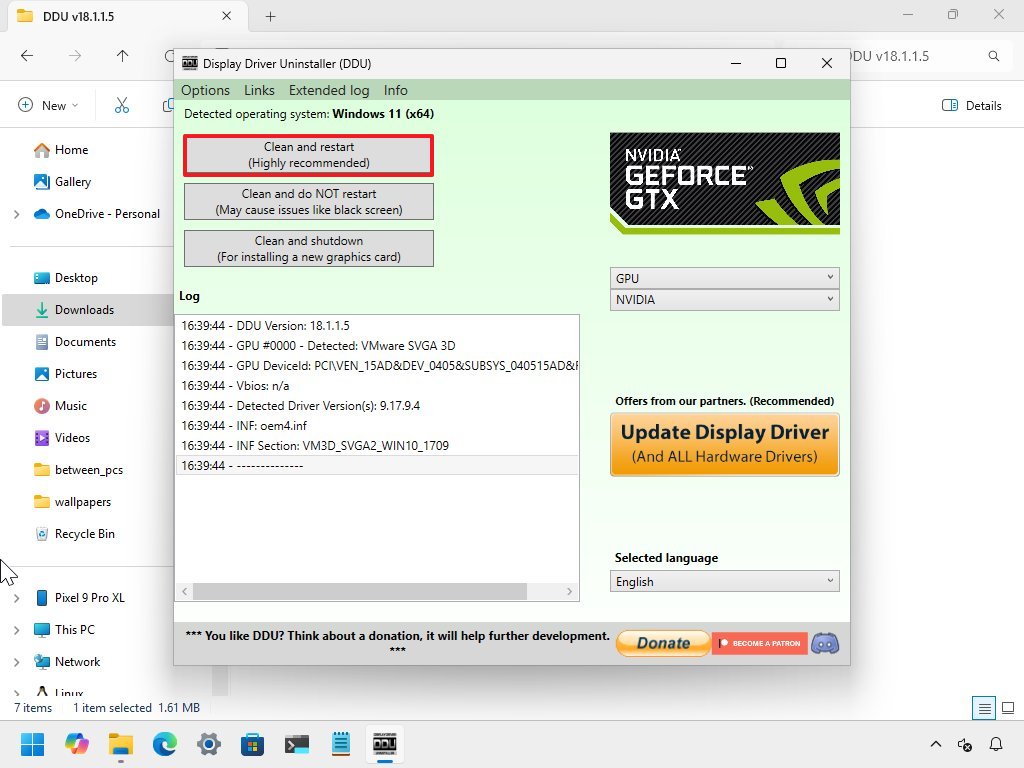
- Select the GPU option.
- Select the Nvidia or AMD graphics card using the setting on the right.
- Click the “Clean and restart” button.
Once you’ve finished the given tasks, you may then move on to installing the most recent edition of the graphics card driver software.
To put it another way, if you’re swapping out your graphics card, first make sure your computer is turned off. Then, insert the new graphics processing unit (GPU) and turn the device back on. Lastly, follow through with installing the required drivers for the GPU.
Install GPU driver
To install the graphics card’s latest drivers for optimal gaming performance, use these steps:
- Open the Nvidia website.
- Click the Download Now button and save the file to your computer.
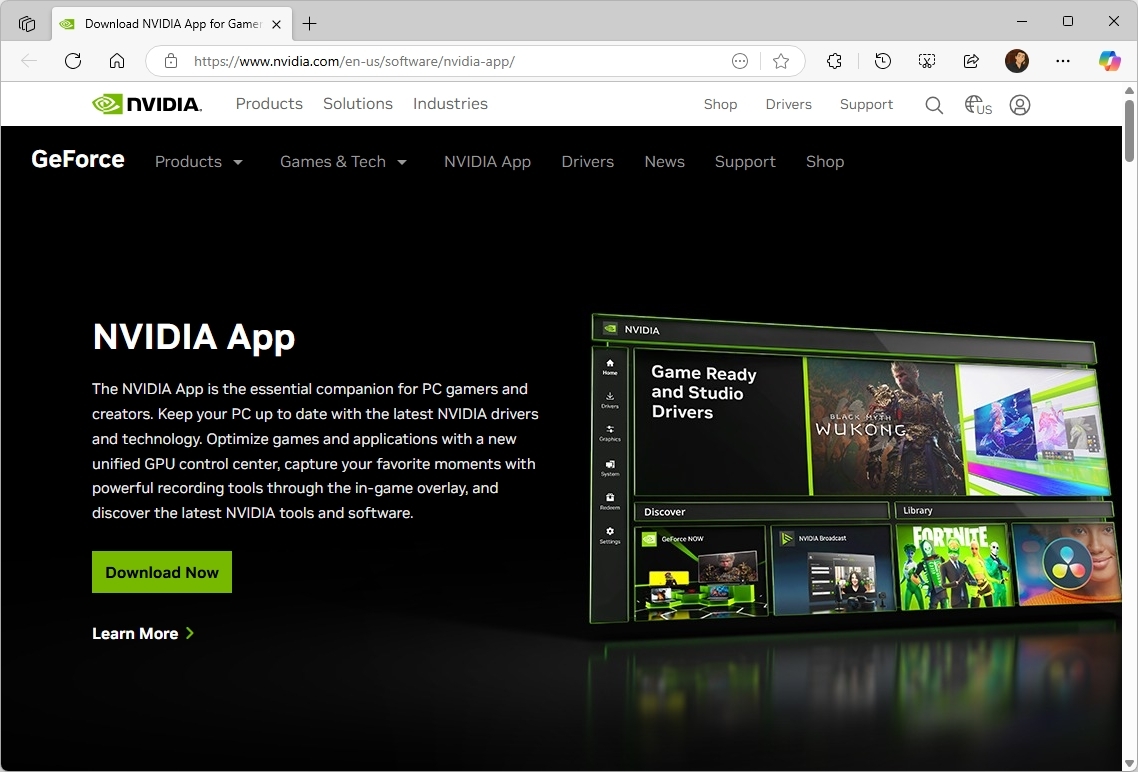
- Right-click the Nvidia App installer and choose the Open option.
- Continue with the screen to complete the installation.
If you have an AMD GPU, use these steps:
- Open the AMD website.
- Click the Download Software button and save the file to your computer.
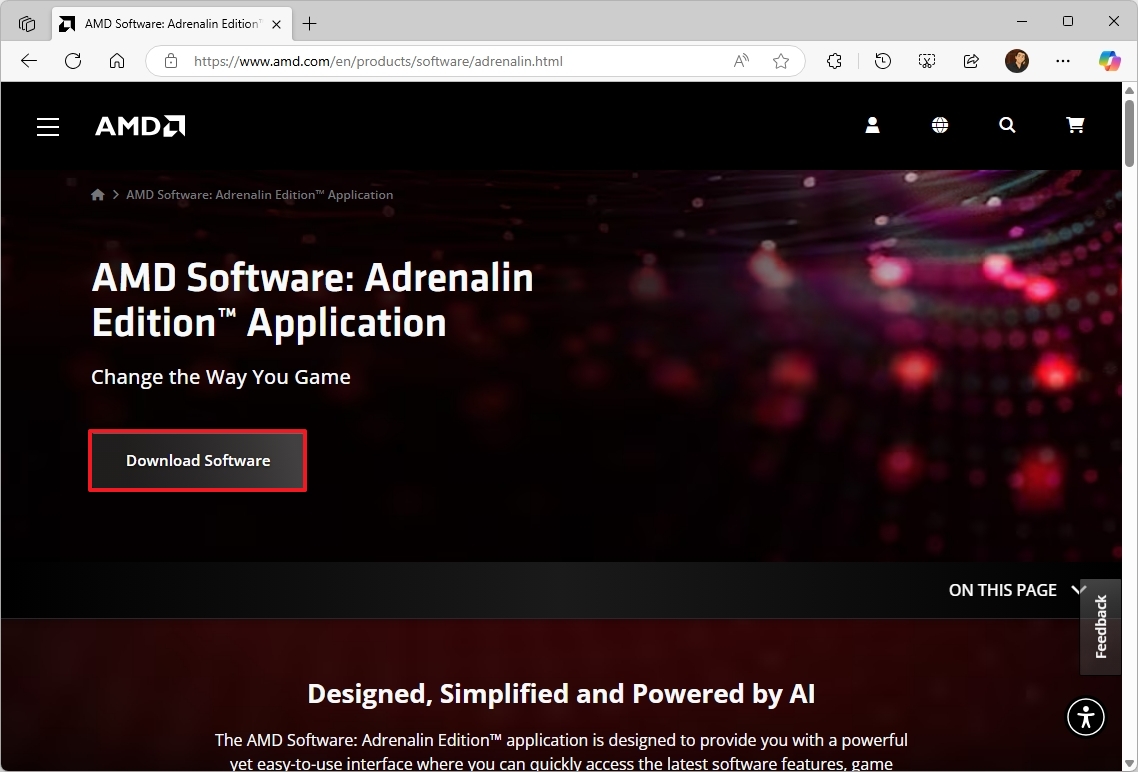
- Right-click the Adrenalin Edition installer and choose the Open option.
- Continue with the screen to complete the installation.
It’s always recommended that you follow the instructions from the manufacturer.
16. Debloat setup
As a tech-savvy gamer, I always strive to optimize my gaming experience. To achieve this, it’s crucial for me to keep the number of non-essential apps on my PC to a minimum. This helps ensure that system resources are dedicated primarily to running my games smoothly.
To start, software may clash with your system settings, which could affect its speed and efficiency. Furthermore, numerous applications operate concurrently running tasks in the background, vying for CPU and GPU power alongside your games, thus possibly reducing frame rates.
If your system is engaged in backstage operations, it might lead to response delays (the time gap between your actions and their visual representation on the screen), resulting in a gaming experience that feels less immediate or interactive.
Leaving unused applications and services active might eat into your device’s memory, potentially causing a shortage that could affect your gaming experience. In such situations, your system might resort to slower storage methods like paging or swapping, which could lead to lag or stuttering while playing games.
Additionally, having a larger number of applications starting up automatically during system start-up may prolong your computer’s boot time and potentially cause extra background disk input/output (I/O). This can have a noticeable impact on game load times and the streaming of in-game resources, particularly on systems equipped with traditional hard drives.
To uninstall unused apps from Windows 11, use these steps:
- Open Settings.
- Click on Apps.
- Click the “Installed apps” page on the right side.
- Select the app, click the menu (three dots) button, and choose the Uninstall option.
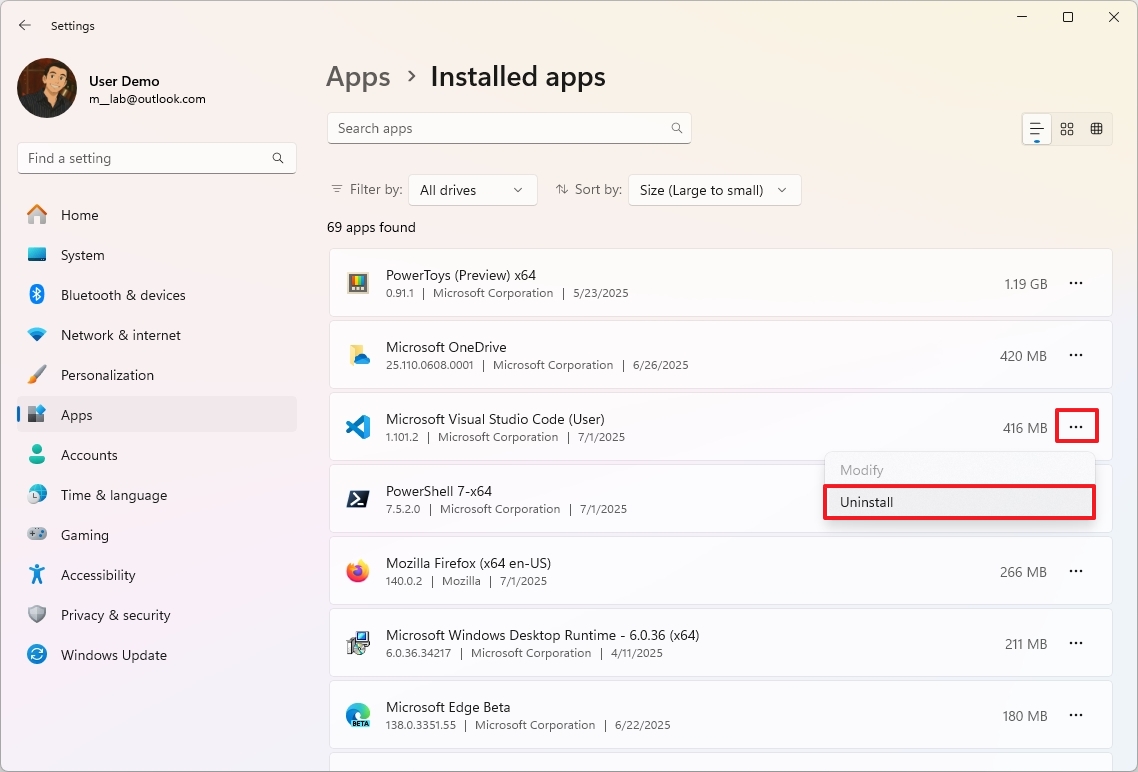
- Click the Uninstall button again to confirm.
- Continue with the on-screen directions (if applicable).
After completing the steps, you may need to repeat them to remove any additional applications.
Furthermore, it’s advisable to steer clear of utilizing external scripting or tools because they may potentially cause more damage to your computer than they offer benefits.
17. Enable GPU scheduling
In Windows 11, the hardware-accelerated GPU scheduling is a useful feature that enhances system performance and minimizes delays. It does this by shifting certain graphical task management responsibilities from the CPU to the graphics card directly.
Typically, this particular feature is turned on automatically when you start using it. However, if you ever need to verify or activate it, here’s a guide on how to do so:
1. Navigate to the settings menu.
2. Look for the option related to the feature.
3. If it’s not already activated, click or toggle the switch to enable it.
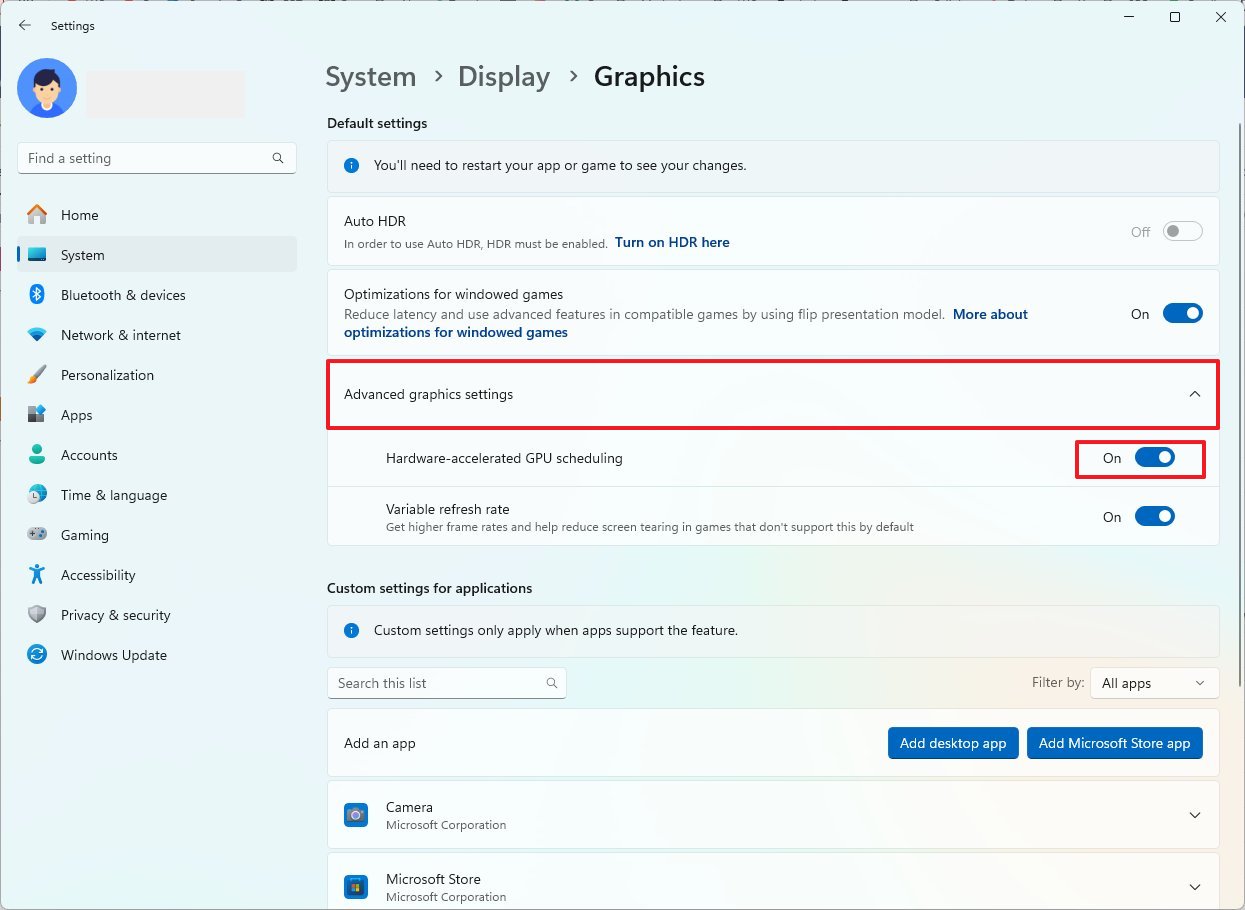
- Open Settings.
- Click on System.
- Click the Display page on the right side.
- Click the Graphics setting.
- Click on Advanced graphics settings at the bottom of the page.
- Turn on the “Hardware-accelerated GPU scheduling” toggle switch.
After finishing the given procedures, the system will shift graphic-intensive tasks from the main processor to the dedicated graphics processor.
18. Use DirectStorage
Microsoft’s DirectStorage is an innovative technology that was first introduced for the Xbox Series X and Xbox Series S gaming consoles, but has since been extended to Windows 11 as well. Its main role is to minimize the time required for loading game assets, thereby enabling larger, more intricate game environments.
In simpler terms, the reason why traditional game loading is sluggish is that the processor acts like a traffic jam, hindering the game’s speed and efficiency. Even with swift Solid State Drives (SSDs), the processor needs to unpack compressed game data, then transfer it over to the Graphics Processing Unit (GPU). This entire sequence restricts how swiftly games can load resources, particularly when modern NVMe drives can move data faster than the CPU can manage in this conventional approach.
DirectStorage streamlines the gaming experience by allowing games to pull data directly from an NVMe SSD straight to the graphics processing unit (GPU), thereby reducing the amount of time the processor needs to handle asset loading tasks.
This function operates independently, so there’s no need for manual setup, however, it necessitates that your computer is equipped with an NVMe Solid State Drive (SSD).
Additionally, it’s worth noting that DirectStorage isn’t compatible with every game; instead, it works with a specific group of titles. To find out if your game supports this feature, please visit the official support site for more information.
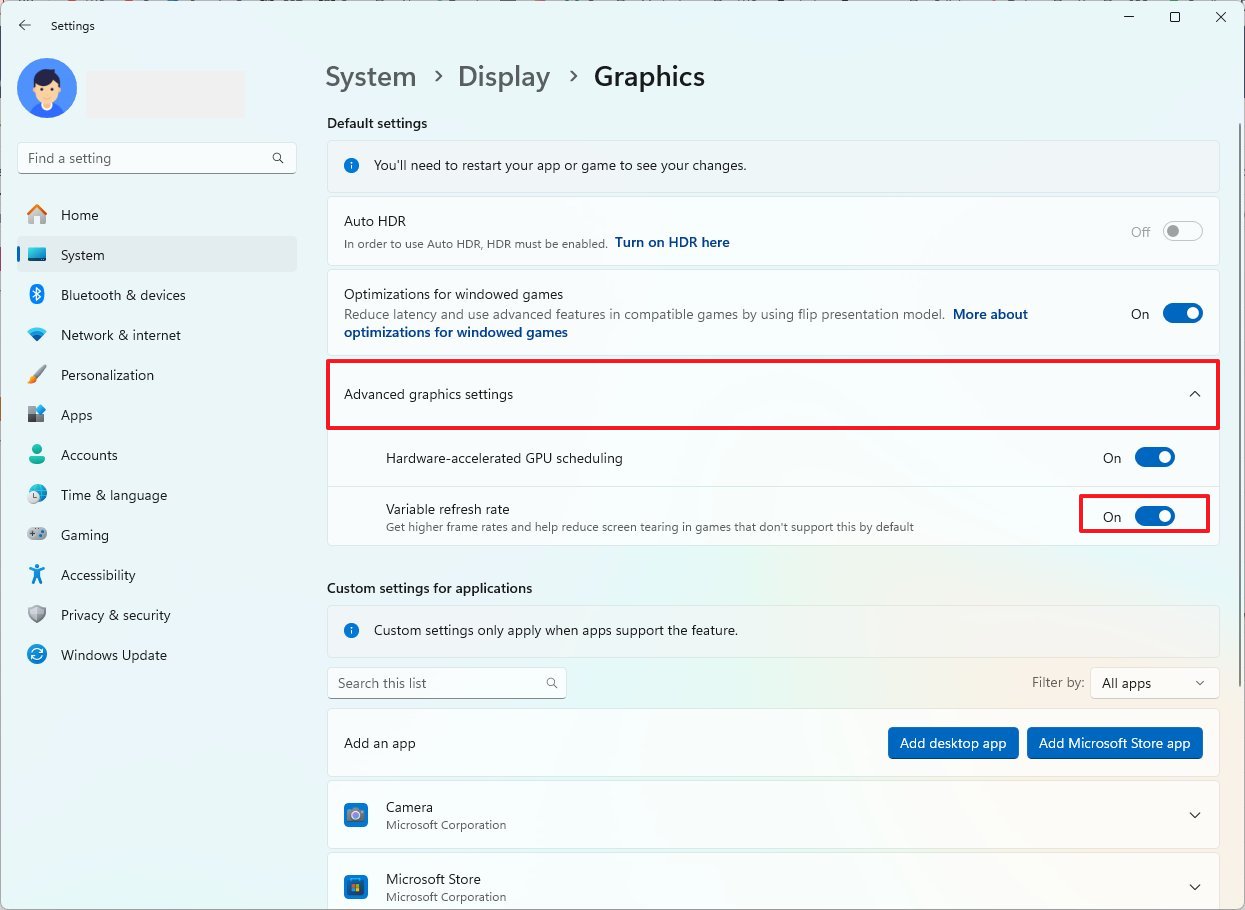
19. Enable Variable Refresh Rate
The Variable Refresh Rate (VRR) function allows compatible screens to dynamically modify their refresh rate according to the frames produced by the graphics card. This results in smoother and faster visuals, as it minimizes screen tearing.
For monitors equipped with Nvidia G-SYNC, AMD FreeSync, or VESA DisplayPort Adaptive-Sync technology, follow these steps to verify and activate the feature:
1. Navigate to your graphics card’s control panel (NVIDIA Control Panel for Nvidia users, AMD Radeon Software for AMD users).
2. Locate the settings related to your monitor and display options.
3. Find the section where you can enable G-SYNC, FreeSync, or Adaptive-Sync and toggle it on.
4. Save changes and exit the control panel.
5. Restart your computer for the changes to take effect.
- Open Settings.
- Click on System.
- Click the Display page on the right side.
- Click on Graphics.
- Click on Advanced graphics settings at the bottom of the page.
- Turn on the “Variable Refresh Rate” toggle switch.
To find out if your monitor supports Variable Refresh Rate (VRR), follow these steps:
1. Navigate to the ‘Settings’ menu.
2. Then, click on ‘System’.
3. Next, select ‘Display’.
4. In the sub-menu, choose ‘Advanced display’.
The display information section will show whether VRR is supported or not. If it’s not supported, you can enable Nvidia G-SYNC (if using an Nvidia graphics card), AMD FreeSync (for AMD graphics cards), or VESA DisplayPort Adaptive-Sync on your monitor through the graphics control panel application.
20. Change settings in games
Enhancing your gaming experience on Windows 11 can also be achieved by customizing the settings within your graphics card and the specific game you’re playing.
To clarify, it’s important to understand that altering things in this manner may have considerable effects on how well they function or operate.
For example, if you have the Nvidia application installed, within the “System” section, you’ll discover a tab labeled “‘Performance’“. This tab enables you to modify settings like voltage and power limitations for your GPU. Improper adjustments to these settings may lead to several issues.

Should you ever find yourself puzzled about a specific setup, feel free to consult our forums or employ the help of your preferred search engine like Bing for additional insights and clarity.
Within the game, you have the ability to manage various settings such as screen resolution, fullscreen/windowed mode, vertical synchronization, anti-aliasing, among others, during your pre-game customization.
Additionally, maximizing your game settings to their highest levels doesn’t guarantee superior performance. Instead, it’s often recommended to experiment with different settings in order to achieve a balanced and smooth gaming experience that aligns with your system’s capabilities.
21. Reset your computer
If your games feel slow or unresponsive because you’ve been using the same system setup for a while, consider performing a fresh installation of your operating system as a potential solution. This action can help enhance performance, address existing system issues, and bring about a smoother gaming experience.
There are several approaches you could take, but the simplest one would be to resort to the recovery settings on your system. Here’s how to go about it:
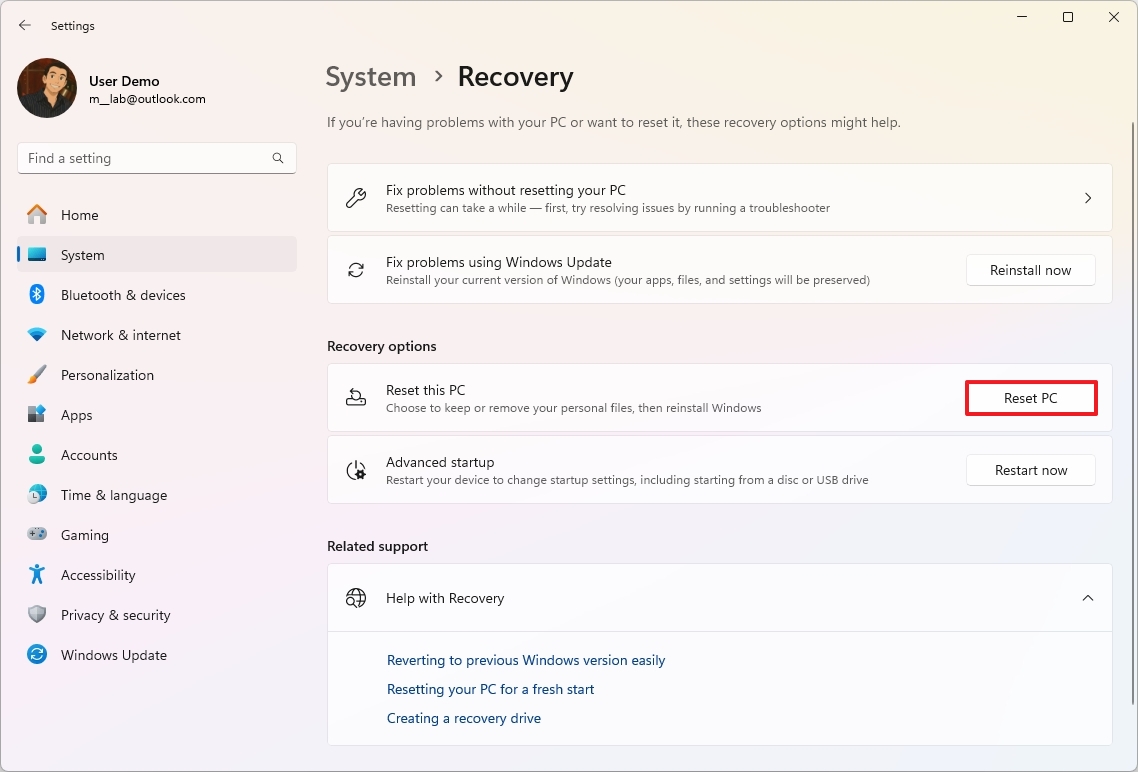
- Open Settings.
- Click on System.
- Click the Recovery page on the right side.
- Click the “Reset this PC” button for the “Reset this PC” feature under the “Recovery options” section.
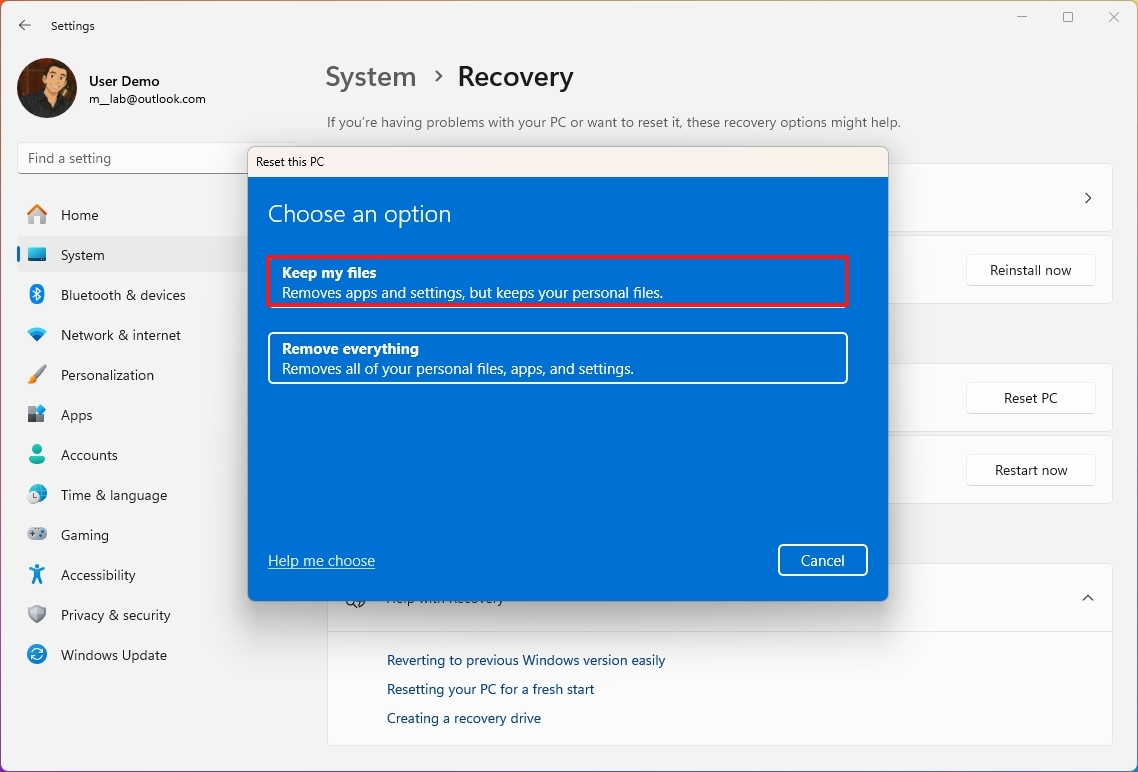
- Click the “Keep my files” option.
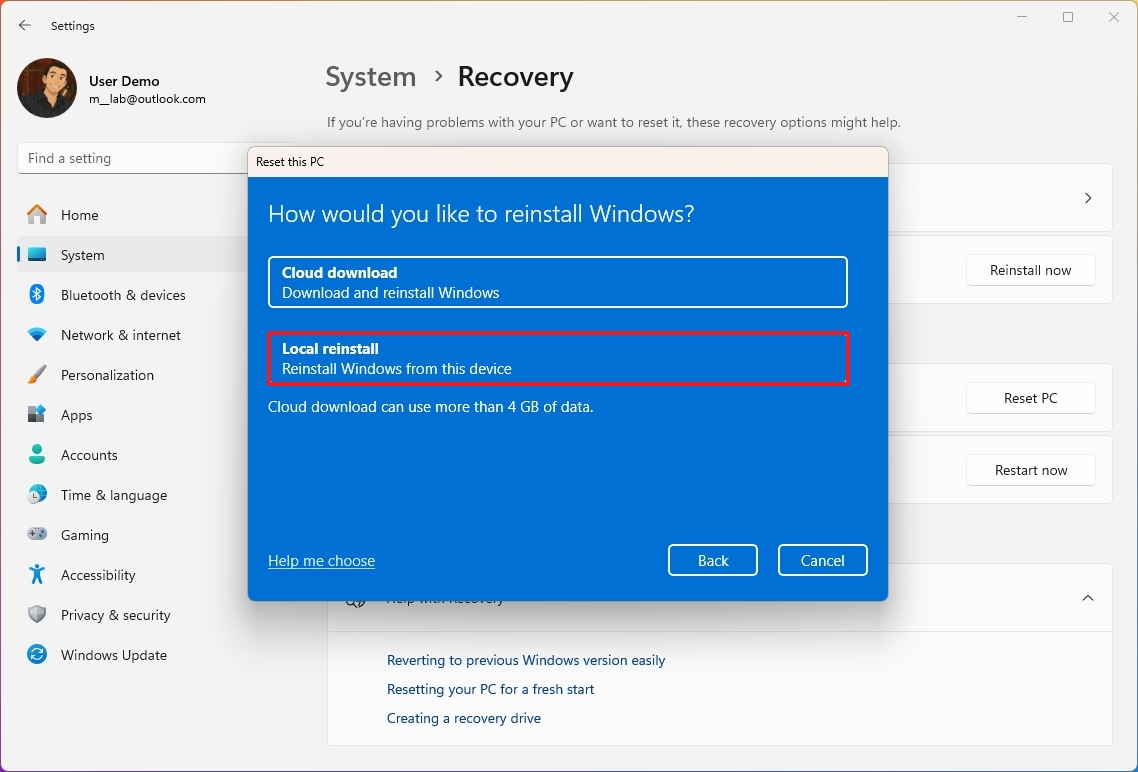
- Select the reset method:
- Cloud download: Downloads a fresh copy of the installation from the Microsoft servers and reinstalls Windows 11. However, this option will not restore the tools, apps, custom drivers, and configuration that came with the original image provided by the manufacturer.
- Local reinstall: Uses the files already available to reset the computer. This process will restore the factory drivers, settings, and tools if the device is branded (for example, Dell, ASUS, Lenovo).
- Review the apps to reinstall after the reset to factory settings.
- Click the Next button.
- Click the Reset button.
Upon finishing the specified procedures, my system will revert back to its original factory settings, safeguarding your data in the process. Post-reset, it is crucial for you to restore your custom configurations and reinstall any software applications and video games that were previously installed.
In addition, you might want to take a look at this comprehensive guide that outlines the entire procedure, along with the necessary steps to follow after installing Windows 11.
If your computer seems slow or unresponsive, it might have been contaminated by harmful software such as malware. In that scenario, performing a comprehensive system scan for viruses could potentially resolve the issue.
More resources
Read More
- Adam Levine Looks So Different After Shaving His Beard Off
- Gold Rate Forecast
- Tekken 8 Fans Furious as Tifa Tipped for Street Fighter 6 Instead
- Welcome to Demon School! Iruma-kun season 4 release schedule: When are new episodes on Crunchyroll?
- 10 Movies That Were Banned in Different Countries For Random Reasons
- Dialoop coming to Switch on June 17
- Nintendo Switch 2 Reportedly Getting Remake of One of the Best PS3 and Xbox 360 Games
- Steam Makes Sci-Fi Game 100% Free for 72 Hours
- See Kaia Gerber & Lewis Pullman’s Vanity Fair Oscars Party Date Night
- Crimson Desert Guide – How To Unlock All Elemental Skills
2025-07-02 14:13