Even though Command Prompt has been in use for quite some time, predating Windows 11, a lot of users tend to overlook it. Despite the fact that the graphical user interface of the operating system manages almost every task with ease, Command Prompt provides an unmatched level of control, efficiency, and problem-solving capabilities.
If you aim to speed up your file system navigation, detect network problems, or manage tasks more effectively, becoming proficient in essential commands will help you save valuable time and energy.
In this step-by-step tutorial, I’ll emphasize 20 key commands for organizing files, resolving problems, and executing diverse system operations within Windows 11. Notably, these commands are compatible with Windows 10 as well.
Command Prompt essential commands for Windows 11
This collection covers essential commands every user needs to be familiar with. You won’t find these commands listed in any particular sequence.
To run these commands, first, open your computer’s Start menu. Next, find and start the Windows Terminal application, and if necessary, initiate a Command Prompt window as well.
1. cd (Change Directory)
The “cd” command, which stands for “change directory,” is an essential command-line tool that allows you to navigate between various folders (directories) and even switch between drives (such as C:, D:, etc.).
Usage:
- cd DIRECTORY-NAME
- Example: cd C:\Users\YourName – Moves to your account folder.
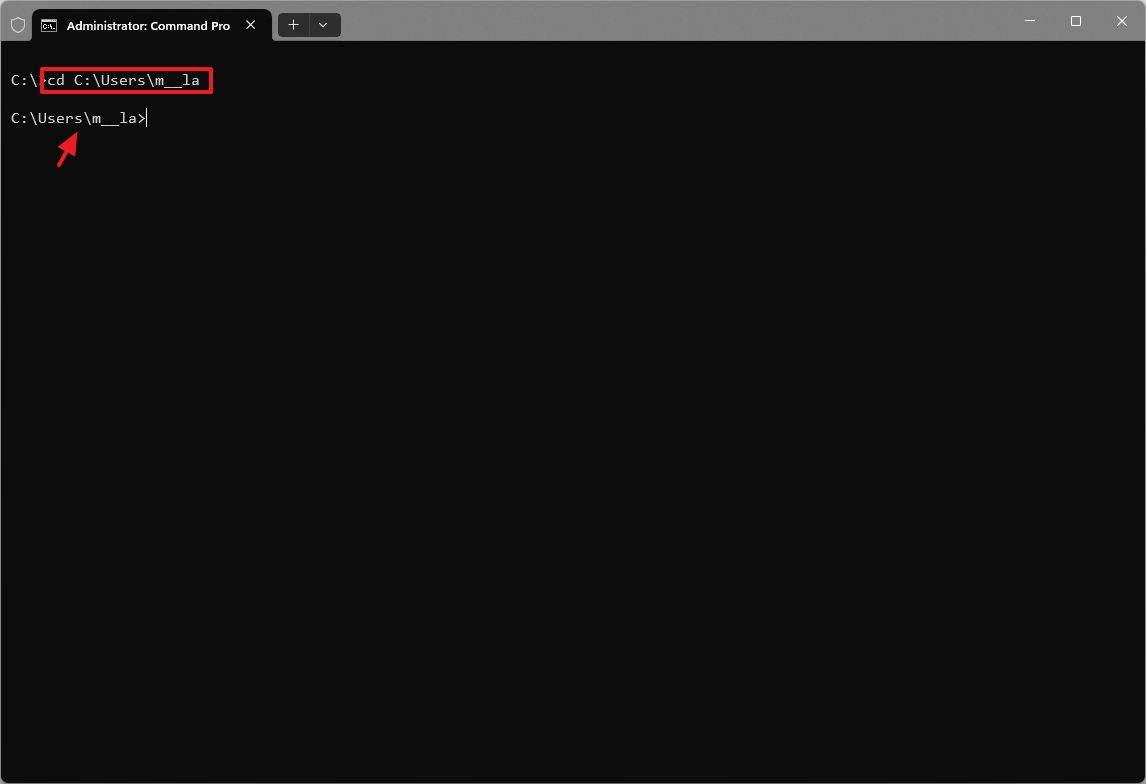
Replace “directory-name” with the name and path of the folder you want to navigate.
Special cases:
- cd .. – Moves you one level “up” in the directory tree (to the parent folder).
- cd \ – Takes you to the root directory of the current drive (for example, C:\).
- cd / – (In some systems) Also takes you to the root directory.
2. dir (Directory)
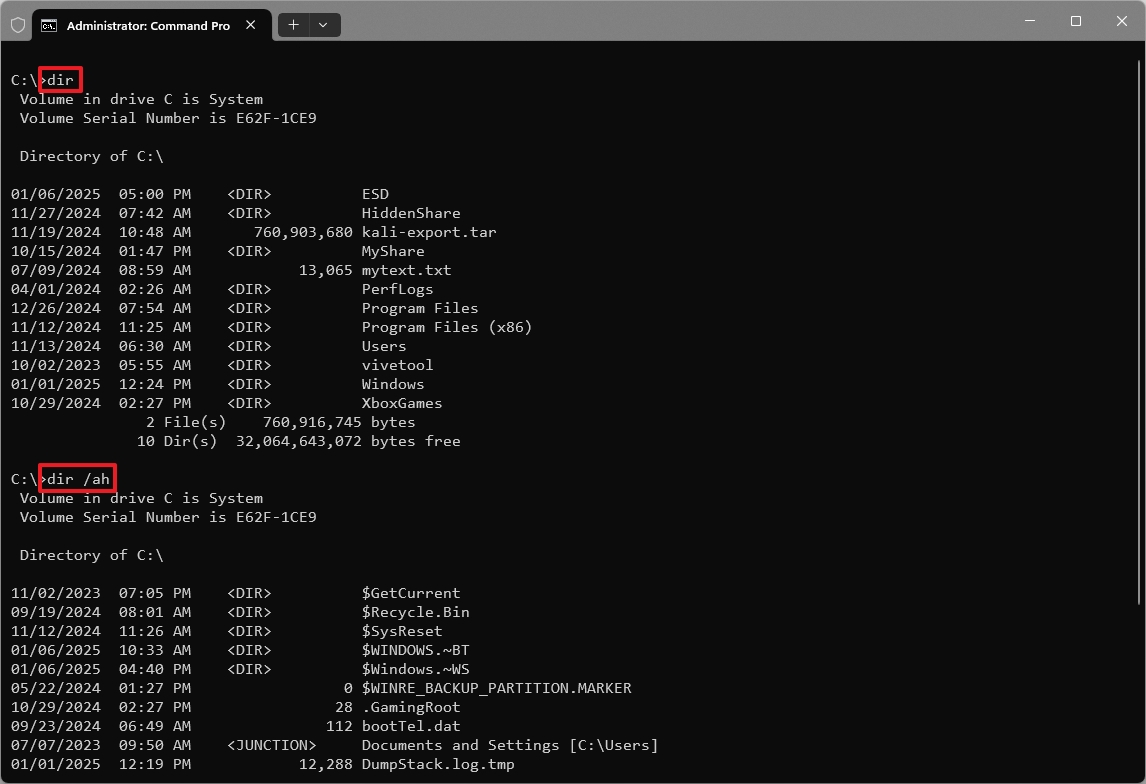
The “dir” command in the Command Prompt is a tool for viewing the contents of a directory (folder).
Usage:
- dir – This command alone lists the contents of the current location.
- Example 1: dir /P – Lists the contents of the current directory, pausing after each screenful.
- Example 2: dir /AH – Lists all hidden files in the current directory.
Special cases:
- /P: Pauses the output after each screenful, allowing you to read it more easily.
- /W: Displays the output in a wide format, showing more files per line.
- /A: Displays files with specific attributes. For example, /A:D shows directories only, /A:H shows hidden files, /A:R shows read-only files, and /A:S displays system files.
- /O: Sorts the output by various criteria. For example, /O:N sorts by name (alphabetical), /O:D sorts by date/time, and /O:S sorts by size.
- /S: Displays a list of all files and subdirectories in the specified directory and all subdirectories below it.
3. mkdir (Make Directory)
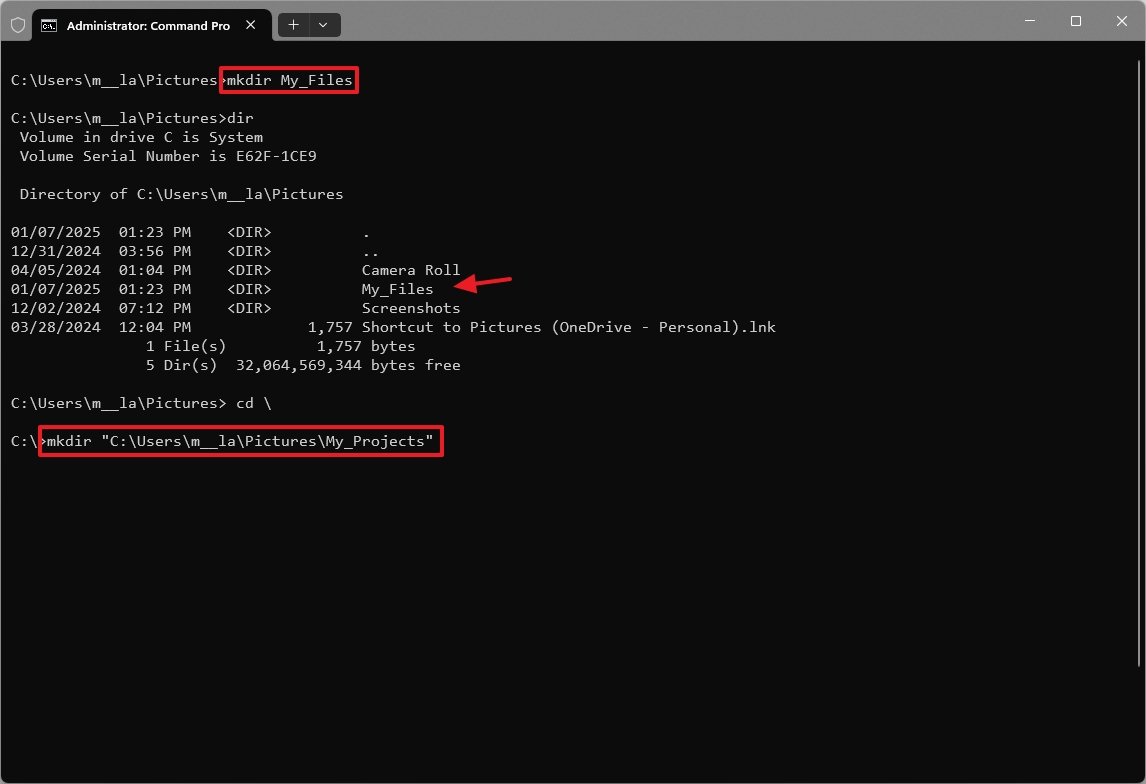
The “mkdir” command allows you to create new directories on a specific location.
Usage:
- mkdir DIRECTORY-NAME
- Example 1: mkdir “My_Files” – This will create a new folder named “My Files” in the current directory.
- Emaple 2: mkdir “C:\Users\YourName\Documents\My_Projects” – This creates the “My_Projects” folder inside the “Documents” folder.
4. rmdir (Remove Directory)
The “rmdir” command allows you to delete empty directories.
Usage:
- rmdir DIRCTORY-NAME
- Example 1: rmdir “My_Files” – This will delete the folder named “My_Files” if it is empty.
- Example 2: rd /s /q “My_Files” – This will delete the folder named “My_Files” and its content.
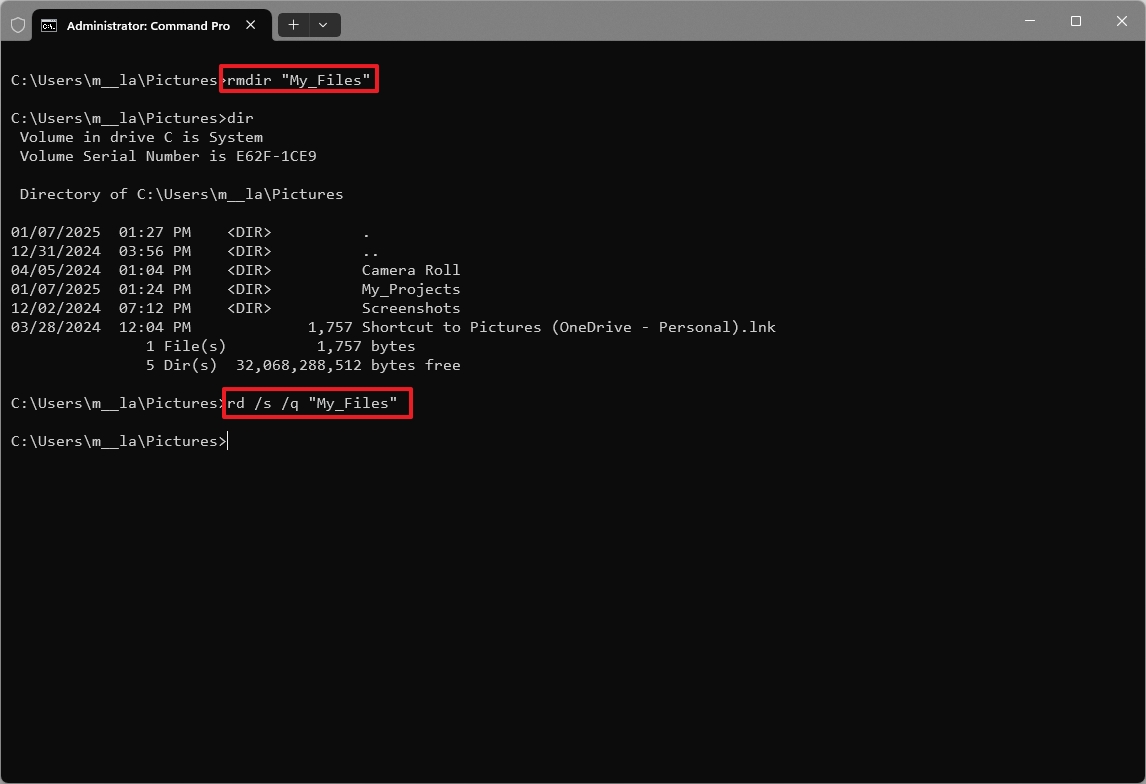
Keep in mind that the ‘rmdir’ command is designed to erase empty folders solely. If there are any files or subdirectories within the folder, the command won’t work successfully.
To remove a non-empty directory, you should employ the “rd /s /q” command. But, exercise extreme caution when using this command, as it will delete both the directory and all of its contents instantly, without seeking any confirmation.
5. copy
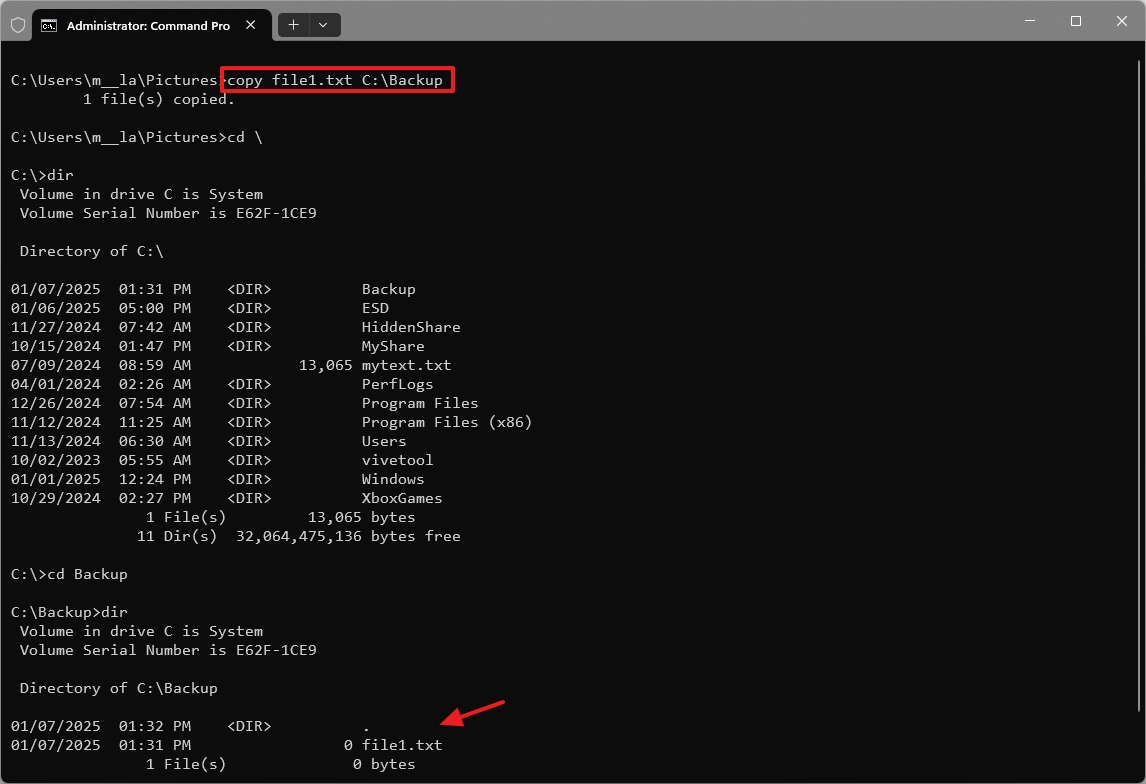
The “copy” command allows you to copy files from one location to another.
Usage:
- copy SOURCE/PATH DESTINATION/PATH
- Example 1: copy file1.txt C:\Backup – This will copy a file named “file1.txt” from the current directory to the “Backup” folder on the C: drive.
- Example 2: copy *.jpg C:\Backup – This will copy all files with the “.jpg” extension from the current directory to the “Backup” folder.
- Example 3: copy D:\My_Files\Report.docx C:\Users\YourName\Documents – This will copy the file from the source to the destination location.
- Example 4: copy file1.txt C:\Backup /Y – This will copy the file from the source, overwriting existing files in the destination.
6. del (Delete)
The “del” command allows you to delete files (not directories).
Usage:
- del FILENAME
- Example 1: del file1.txt – This will delete the file named “my_file.txt” from the current directory.
- Example 2: del *.jpg – This will delete all files with the “.jpg” extension in the current directory.
- Example 3: del *.jpg /f – This can be used to force the deletion of read-only files.
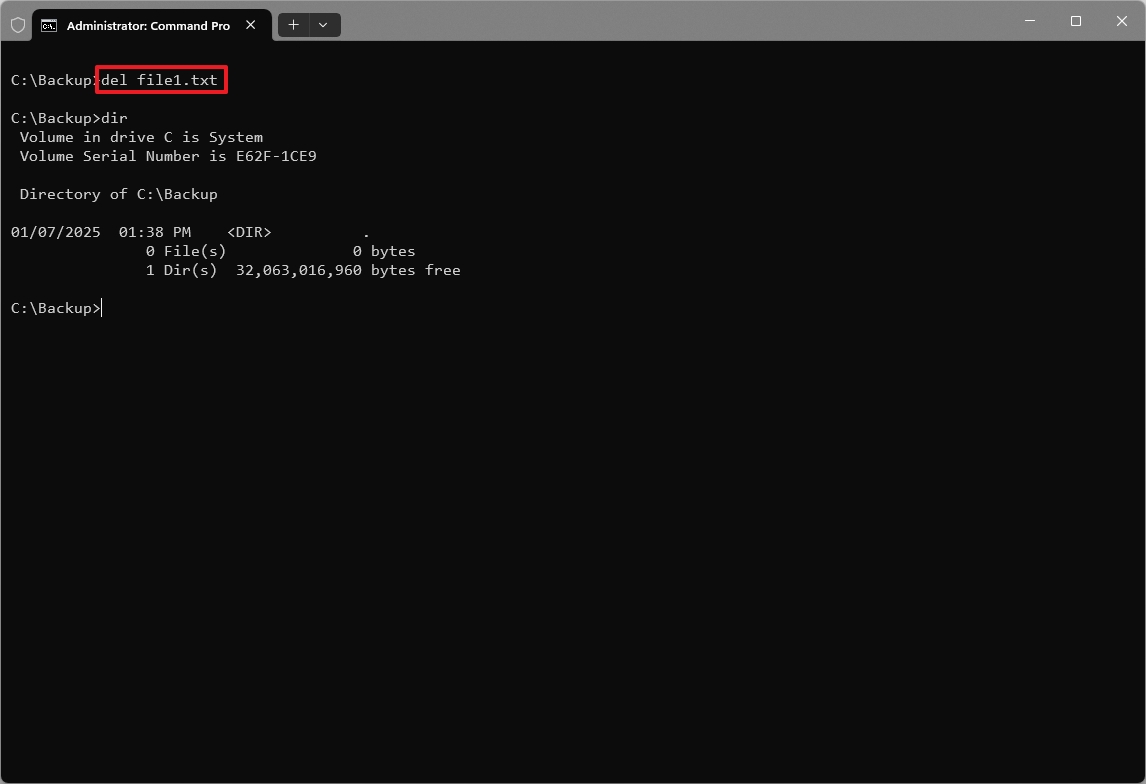
Keep in mind that when you erase a file, it usually gets completely eliminated without visiting the Recycling Bin first.
7. ren (Rename)
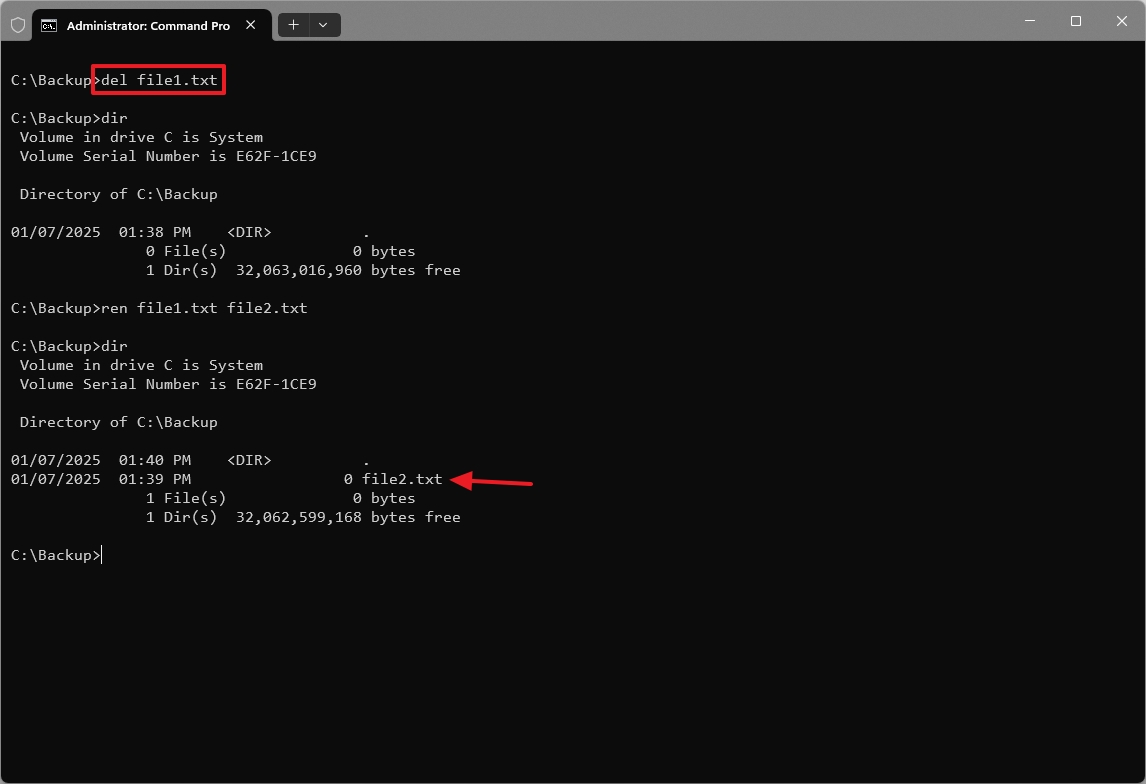
The “ren” command allows you to rename files or folders.
Usage:
- ren OLD_FILENAME NEW_FILENAME
- Example 1: ren old_file.txt new_file.txt – This will rename the file “old_file.txt” to “new_file.txt”.
- Example 2: ren “old_folder” “new_folder” – This will rename the folder “old_folder” to “new_folder.”
8. cls (Clear Screen)
The “‘cls’” command wipes clean the content on the screen, thereby enhancing the readability of the Command Prompt, particularly following a prolonged sequence of commands or outputs.
Usage:
- cls
9. ipconfig (Internet Protocol Configuration)
As an analyst, I frequently find myself relying on the “ipconfig” command to gain insights into my computer’s network setup. This handy tool is indispensable when it comes to troubleshooting basic network issues and delving into more complex network configurations.
Usage:
- ipconfig
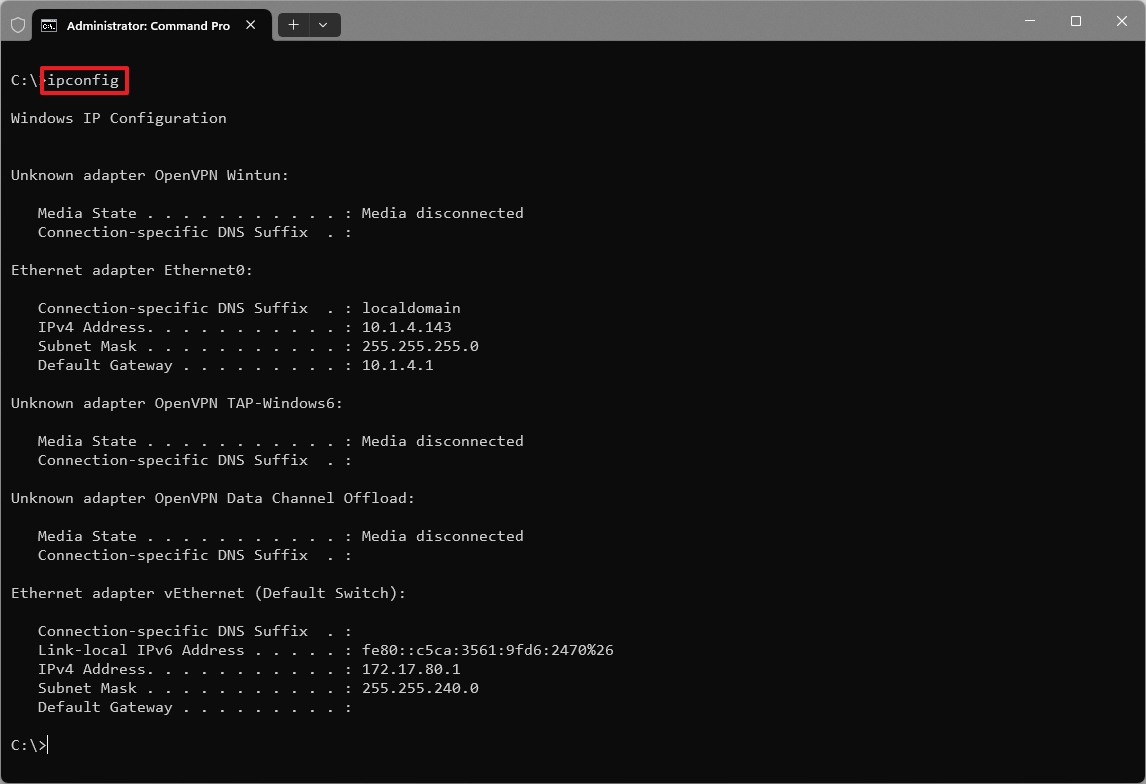
The command outputs essential network information, for example:
- IP Address: Your computer’s unique identifier on the network.
- Subnet Mask: Defines the network segment your computer belongs to.
- Default Gateway: The address of your router (or modem).
- DNS Server: The address of the Domain Name System server that translates domain names (like google.com) into IP addresses.
Alternative usage:
Type ipconfig /all and press Enter to display a more detailed view, including:
- MAC Address (Physical Address): A unique hardware identifier for your network adapter.
- DHCP Server: If your IP address is assigned by a DHCP server, this shows the server’s address.
- DNS Server addresses.
Special cases:
- ipconfig /release: Releases the IP address configuration obtained from a DHCP server.
- ipconfig /renew: Requests a new IP address configuration from the DHCP server.
- ipconfig /flushdns: Clears the DNS resolver cache store on your computer when troubleshooting DNS name resolution problems.
Generally speaking, to refresh your network settings, you’d typically start by executing the commands `ipconfig /release` followed by `ipconfig /renew`.
10. ping
The “ping” command serves as a quick, straightforward method for testing network accessibility and troubleshooting fundamental network issues.
This device transmits tiny chunks of data (referred to as “query responses”) towards a designated location (either an IP address or a domain name), then shows the information returned (known as a “response” or “reply”) by that location.
The duration taken for a packet to be sent out, received back, and a response is given in return is referred to as “two-way travel time” or simply “time for round trip”.
Typically, this tool helps check whether a particular device or server can be accessed within the network and assists in resolving various connection problems.
Usage:
- ping DNSNAME-OR-IP
- Example: ping google.com or ping 8.8.8.8 (Google Public DNS server)
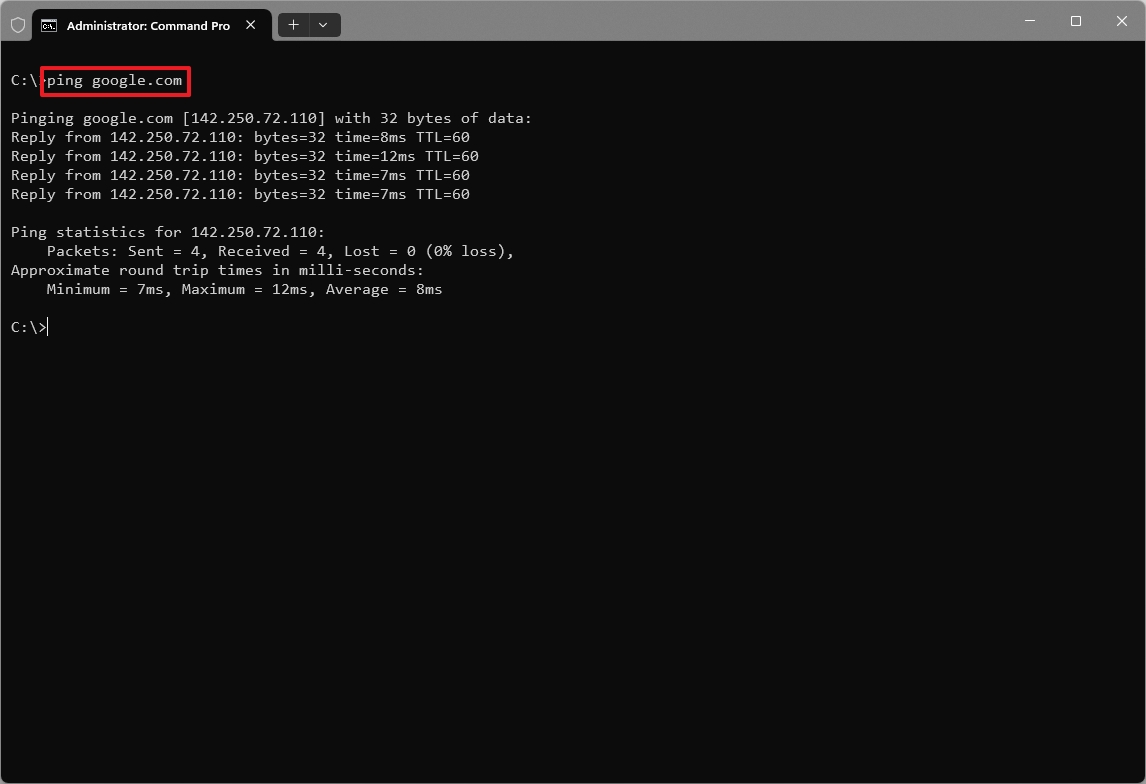
Should the ping operation be carried out effectively, it will display the target’s IP address, show the travel time back and forth for each packet, and signal that the responses were successful.
If the command isn’t completed successfully, the output will display as “Request timed out.”
11. tracert (Trace Route)
The “tracert” command, short for “traceroute,” serves as a useful network troubleshooting tool by detailing the route that data packages follow to get to a particular online destination.
As I dispatch packets towards the target destination, each one is tagged with an initial “Time-to-Live” (TTL) value of 1. On its journey through the network, each router it encounters decrements the TTL by 1. If, during this travel, the TTL hits zero, the router discards the packet and in turn sends an “ICMP Time Exceeded” message back to the origin.
Through examination of these replies, the “tracert” command figures out the order of the routers (or “stages” or “steps”) that the data packets travel through during transit.
The results from the command show a series of routers that were traversed during the communication path, displaying their respective IP addresses as well as the duration it takes for a data packet to travel to each router and come back (Round-Trip Time or RTT).
Usage:
- tracert google.com
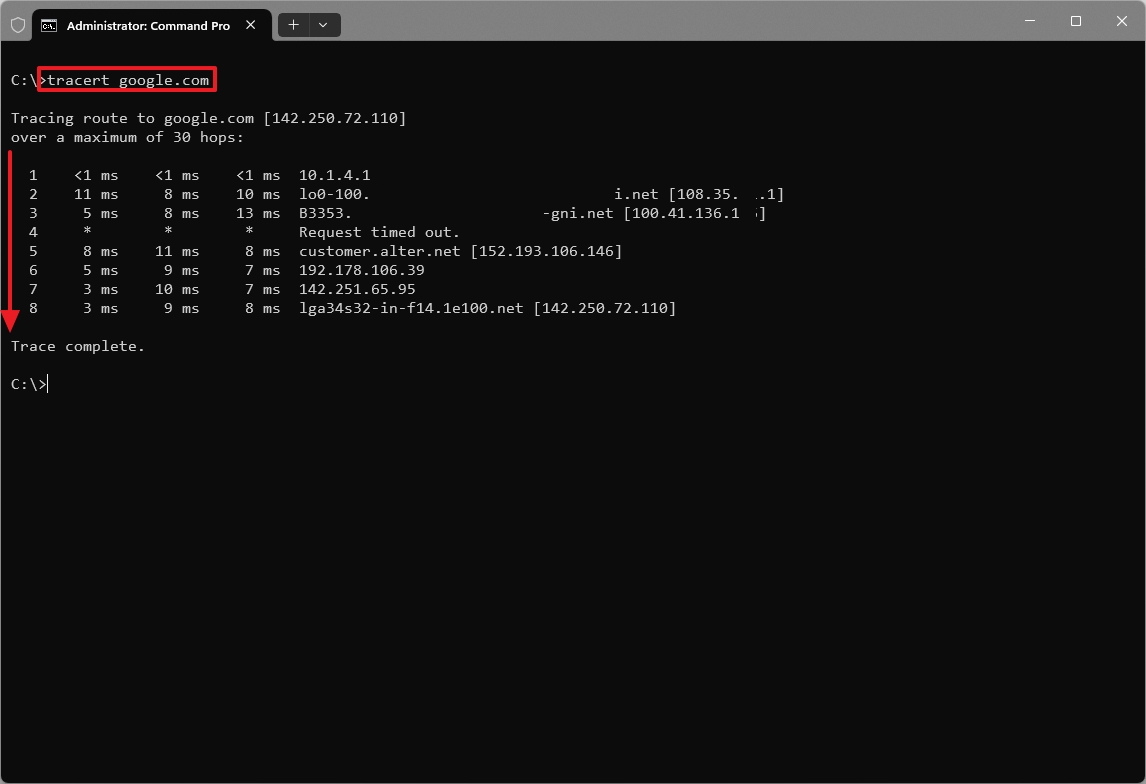
This instruction will display the path to Google’s servers, including the routers that facilitate the connection.
12. shutdown
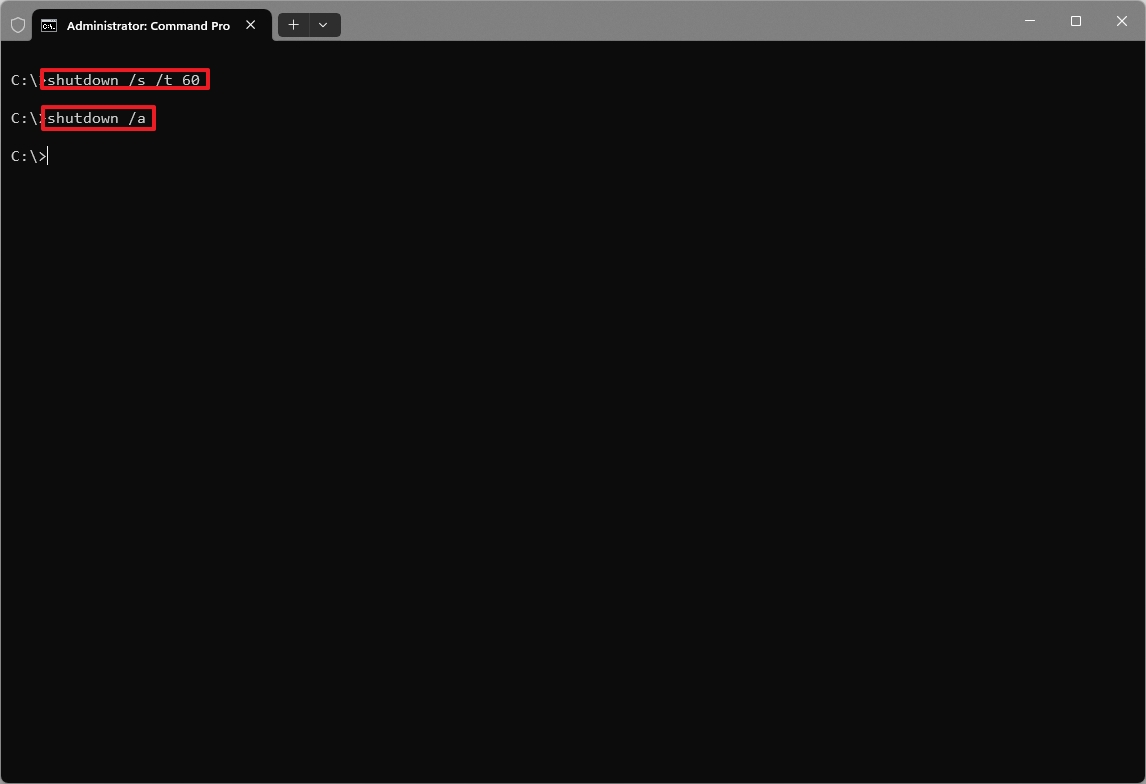
The “shutdown” command allows you to control your computer’s shutdown and restart behavior.
Usage:
- shutdown /s: Shuts down the computer immediately.
- shutdown /s /t 60: Shuts down the computer after a 60-second delay.
- shutdown /r: Restarts the computer immediately.
- shutdown /r /t 30: Restarts the computer after a 30-second delay.
- shutdown /L: Logs off the current user.
- shutdown /a: Cancels a pending shutdown or restart.
13. tasklist
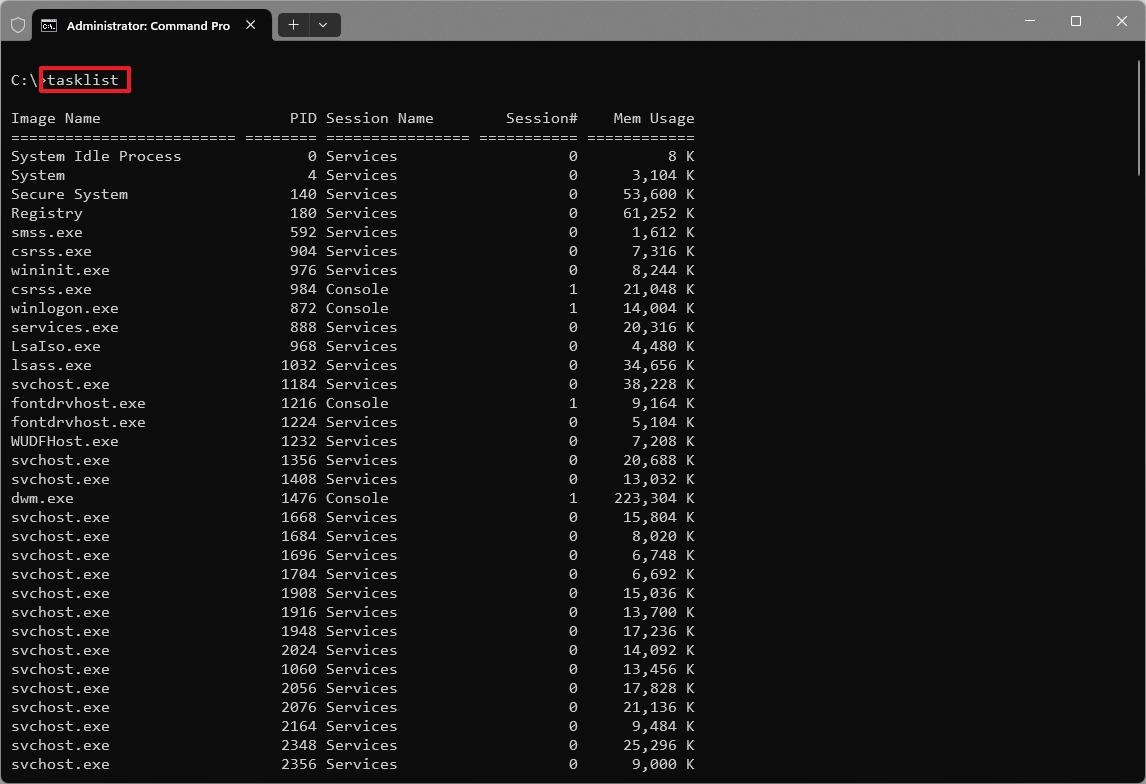
The “tasklist” command serves as a useful utility in Windows 11, allowing you to inspect and control the active processes. It offers a swift and convenient method to capture an overview of system activity, much like the functionality of the Task Manager.
Usage:
- tasklist: Shows all processes and details, such as process name, ID, session name, and memory usage.
- tasklist /V: The verbose option shows more details like priority, user account, and description.
- tasklist /M MODULE-NAME: Lists all processes currently using the specified module (for example, a DLL file) after changing “MODULE-NAME” in the command.
- tasklist /SVC: Displays services hosted in each process.
- tasklist /FI FILTER: Filters the output based on specific criteria (for example, image name, status) when you change “FILTER” in the command.
14. taskkill
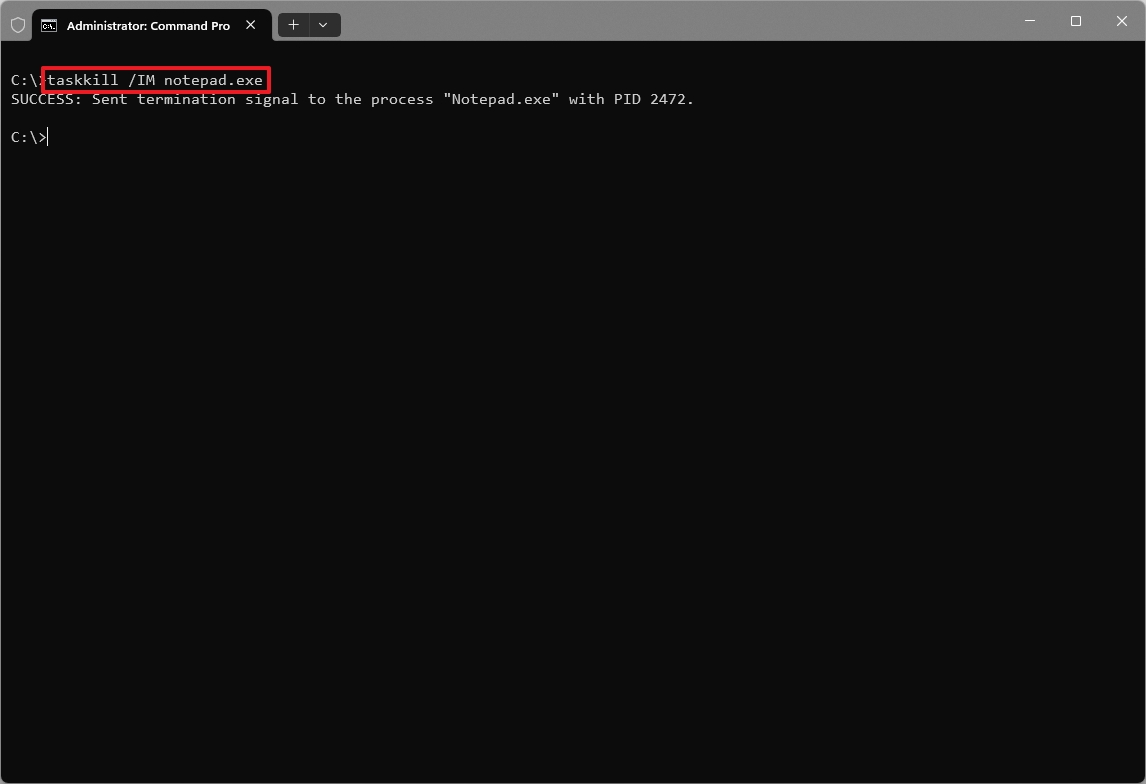
The “taskkill” command is a tool that enables you to terminate ongoing tasks or processes. Typically, it’s employed to tackle problems with frozen applications, thus restoring the control over your system.
Usage:
- taskkill /IM PROCESS-NAME: Ends a specific process by its name.
- Exmaple: taskkill /IM notepad.exe
- taskkill /PID PROCESS-ID: Ends a specific process ID.
- Example: taskkill /PID 1237
- taskkill /F: forcefully ends the Explorer process.
- Example: taskkill /F /IM explorer.exe
15. chkdsk (Check Disk)
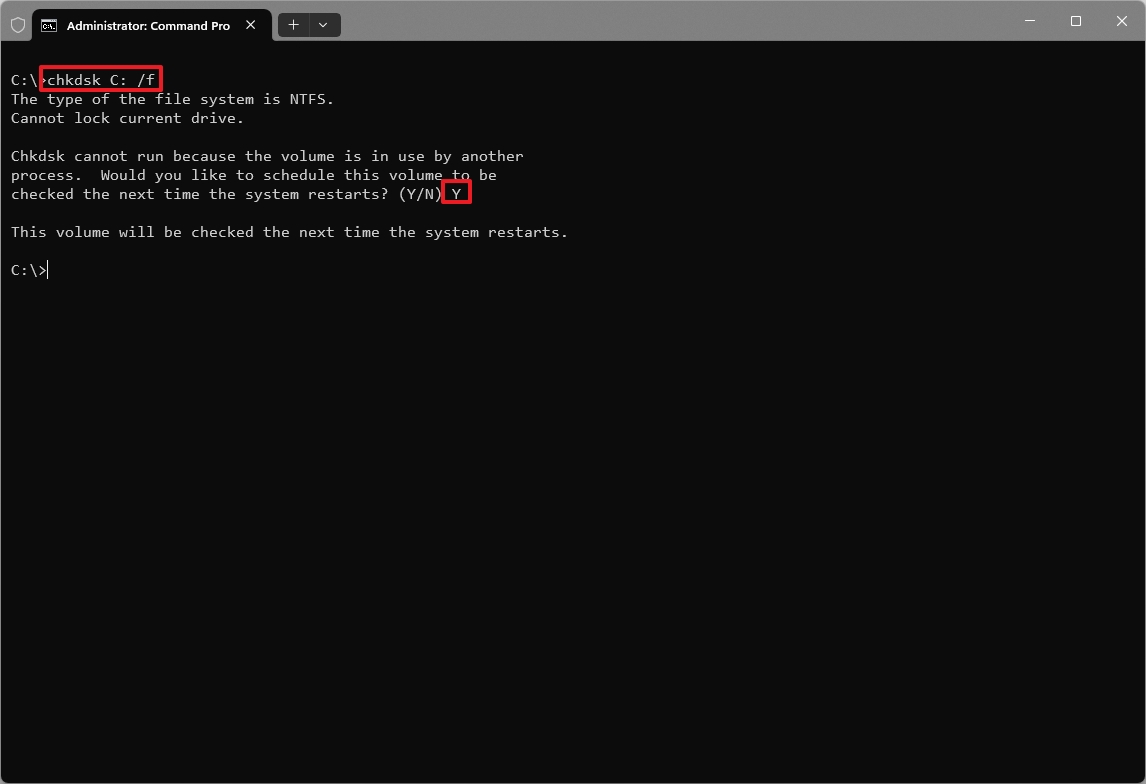
The “chkdsk” command serves as a utility, scrutinizing the system for potential issues and damaged parts, then attempts to rectify them.
Usage:
- chkdsk /f: fixes errors on the drive.
- Example: chkdsk C: /f – Checks the “C:” drive for errors and attempts to fix them.
- chkdsk /r: Locates bad sectors and recovers readable information.
- Example: chkdsk C: /r – Checks the “C:” drive for errors, attempts to fix them, and locates bad sectors.
- chkdsk /x: Disconnects the drive before running the tool.
- Example: chkdsk C: – Checks the “C:” drive for errors but does not attempt to fix them.
Running the Check Disk command can take significant time, especially if you use the “/r” option.
16. sfc /scannow (System File Checker)
As a tech enthusiast, I often rely on the System File Checker (SFC) tool to keep my system running smoothly. This powerful ally scans for and repairs any corrupted system files using the operating system’s local image as a reference. Typically, I utilize this tool in conjunction with “Deployment Image Servicing and Management” (DISM), ensuring my system remains in top shape.
Usage:
- sfc /scannow
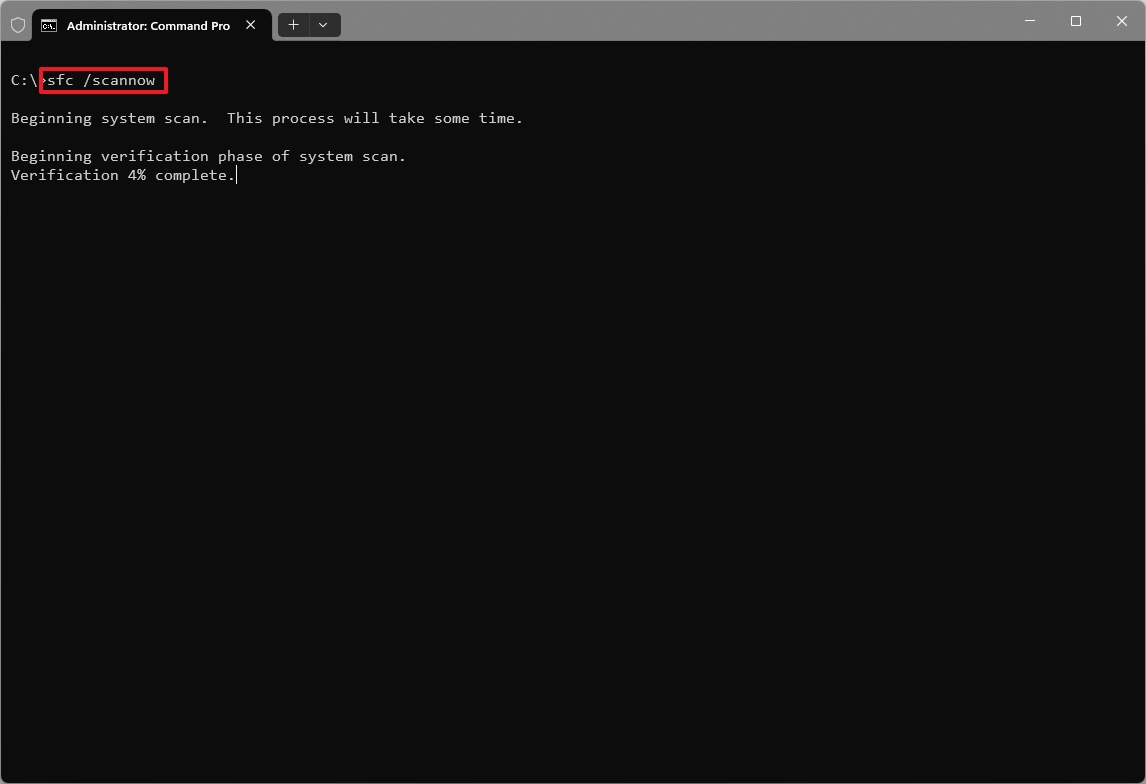
When you execute the command, the tool performs a scan over all safeguarded system files on your computer, then it checks these against a reliable backup stored locally as an image.
Should Small File Controller (SFC) discover any inconsistencies, like absent or damaged files, it marks those as problems and tries to swap them out with the accurate ones instead.
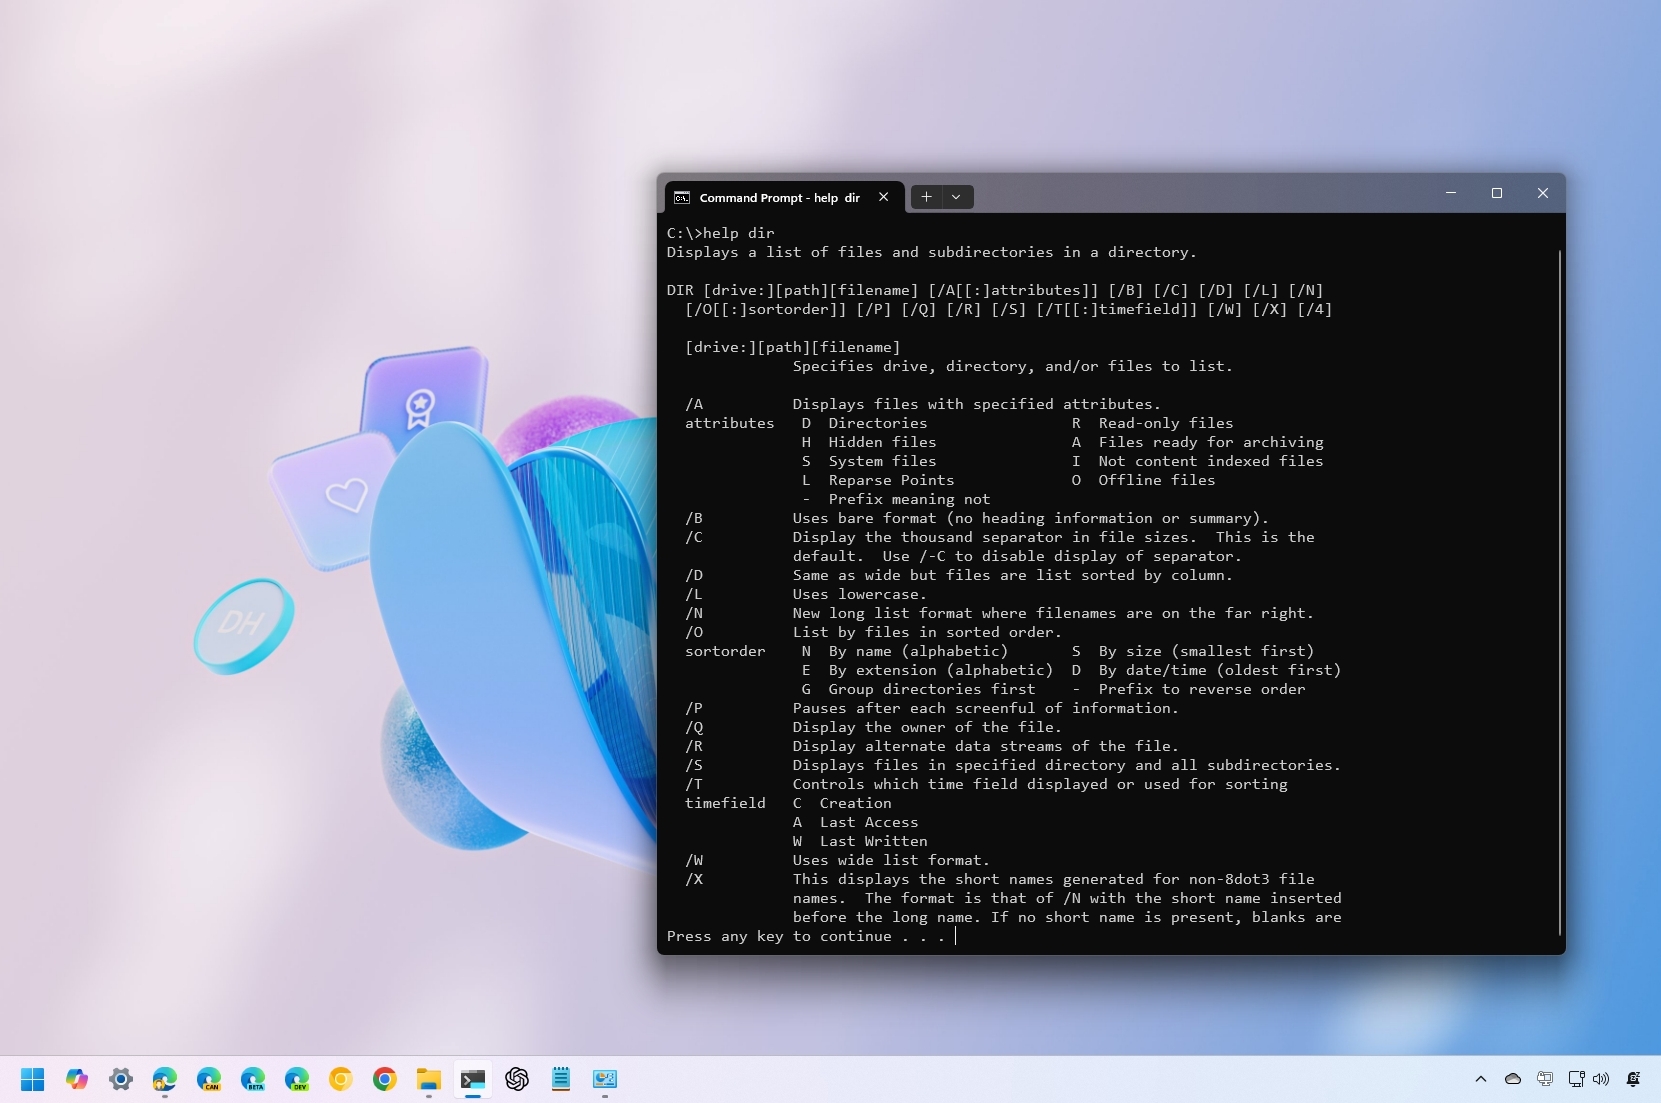
17. help
The “help” command gives you resources for learning about other commands.
Usage:
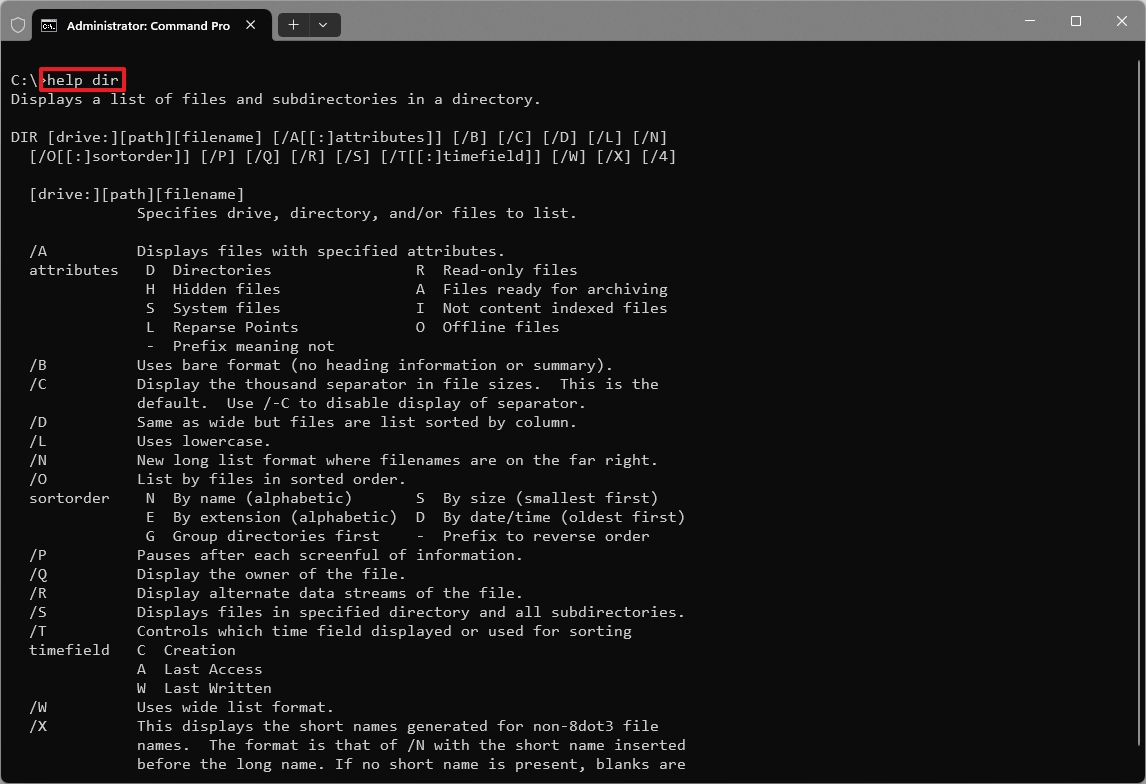
- help COMMAND-NAME
- Example 1: help dir – Shows information about the “dir” command, including its syntax, options, and usage.
- Example 2: help – Shows a list of commands available for use in Command Prompt.
18. exit
In simpler terms, using the “‘exit’” command will close the active Command Prompt window you’re currently working on. Additionally, this command is useful for ending scripts or batch files that are being executed within the Command Prompt as well.
Usage:
- exit
19. winget (Windows Package Manager)
In summary, the “winget” command serves as a helpful tool for simplifying the installation, upgrading, and maintenance of applications.
To get the most out of the Windows Package Manager, it’s essential for users to be aware of a handful of key features, which will enable them to carry out fundamental tasks.
Usage:
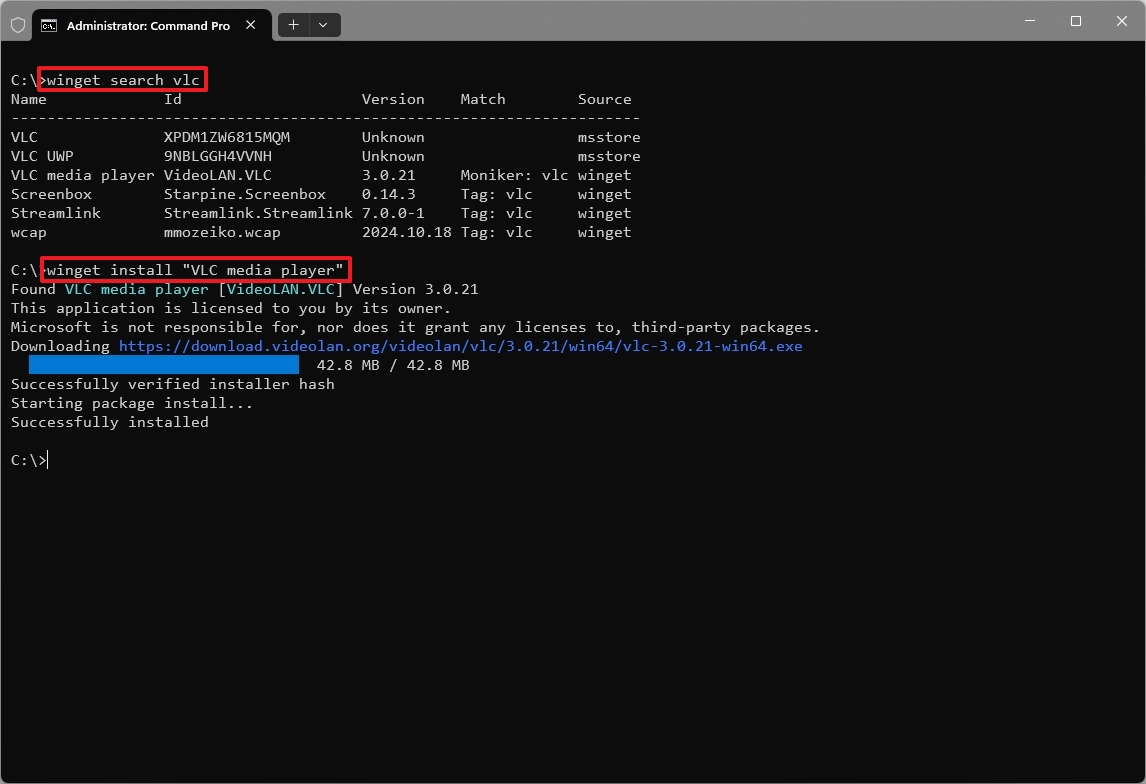
- winget search APP-NAME
- Example: winget search firefox – Searches the Microsoft repositories and outputs the information of all the apps that match the query.
- winget install APP-NAME – Downloads and installs the specified application.
- Example: winget install “Mozilla Firefox” – Install the Mozilla Firefox browser on your computer.
- winget upgrade APP-NAME – Updates the installed app to the latest version.
- Example: winget upgrade “Mozilla Firefox” – Updates the Mozilla Firefox browser.
- winget uninstall APP-NAME – Removes the application from your computer.
- Example: winget uninstall “Mozilla Firefox” – Uninstalls the Mozilla Firefox browser.
20. sudo (Superuser Do)
The “sudo” (Superuser Do) command is a utility that enables you to execute commands with administrative privileges directly from the Command Prompt, bypassing the need for separate elevation.
If you find this tool reminiscent of something, it’s likely because it bears resemblance to the Sudo command used in Unix-based systems such as Linux and macOS. However, it’s important to note that the Sudo command on Windows 11 operates differently compared to its counterparts for Linux and macOS. Instead, this tool offers a restricted set of functionalities, enabling you to execute elevated commands either inline or in a separate window, without the option to input anything.
Usage:
- sudo COMMAND
- Example: sudo del file.txt
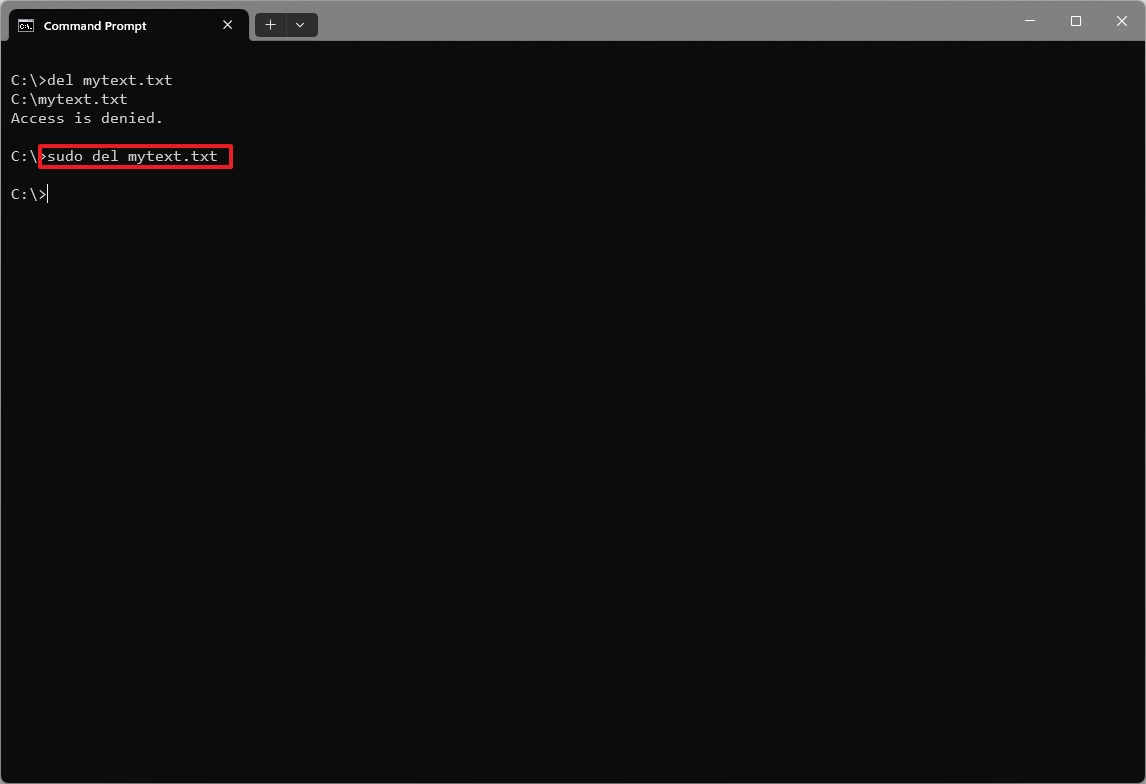
In Windows 11, this functionality is initially set inactive. To activate it, navigate to “Settings > System > Developer mode“, flip on the “Enable sudo” switch, and then opt for the “Inline” option to execute elevated commands within the same window, similar to Linux and macOS.
More resources
Read More
- Gold Rate Forecast
- PI PREDICTION. PI cryptocurrency
- Masters Toronto 2025: Everything You Need to Know
- We Loved Both of These Classic Sci-Fi Films (But They’re Pretty Much the Same Movie)
- Mission: Impossible 8 Reveals Shocking Truth But Leaves Fans with Unanswered Questions!
- SteelSeries reveals new Arctis Nova 3 Wireless headset series for Xbox, PlayStation, Nintendo Switch, and PC
- Eddie Murphy Reveals the Role That Defines His Hollywood Career
- LPT PREDICTION. LPT cryptocurrency
- Rick and Morty Season 8: Release Date SHOCK!
- WCT PREDICTION. WCT cryptocurrency
2025-01-09 20:15