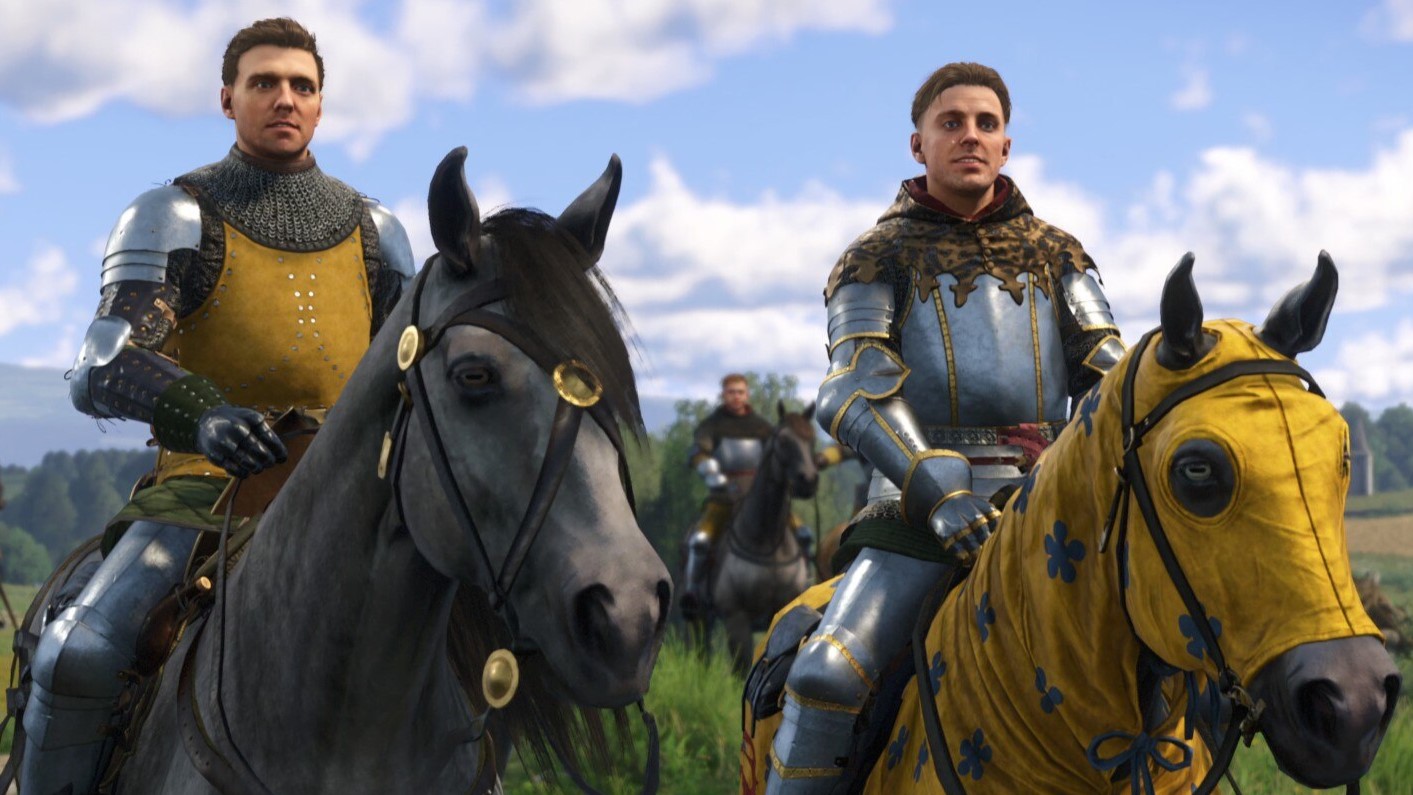
Finally, Kingdom Come: Deliverance 2 has been released, and countless players are diving into it now, discovering for themselves how immense this game truly is. The medieval open world of this title is not only vast in size but also overflowing with content, yet beyond a few signposts for the main story, you’re left to your own devices once you move past the prologue and embark on your journey in earnest.
Here are some tips, tricks, and suggestions for beginners in this epic RPG that can help you navigate through the game more smoothly:
1. Explore every nook and cranny to find hidden items and quests.
2. Prioritize quests with higher rewards or those that unlock new areas.
3. Don’t be afraid to grind for experience points and level up your character.
4. Equip yourself with the best weapons and armor you can find.
5. Make use of potions, spells, and abilities when needed.
6. Team up with other players or NPCs for tough battles.
7. Don’t forget to rest at inns or campsites to regain health and stamina.
8. Save often to avoid losing progress.
9. Take the time to read books and talk to villagers to learn useful information.
10. Have fun and enjoy exploring the vast world of Bohemia!
Get hired by the blacksmith and miller

After completing Kingdom Come: Deliverance 2’s prologue and conversing with Bara, a woman in red who approaches you once you’re free to traverse the world, she offers some useful advice. You then have the option to travel either north towards Tachov to meet the blacksmith or south to Nebakov Mill to speak with the miller. The main plot will guide you to both locations, and visiting one or both of them early on before delving into exploration around Trosky is advantageous due to potential valuable rewards they offer.
Beyond the first character instructing you on blacksmithing and the second group demonstrating pickpocketing and lockpicking, both characters will additionally provide you with a personal sleeping bed and an option to save your game, as well as your own chest for storing loot (the contents of which can be accessed from any chest within a room you own). Furthermore, they will offer some steps towards obtaining decent equipment through quests. Sleeping beds are particularly beneficial to acquire early since it eliminates the need for paying for inn rooms or facing the risk of trespassing while sleeping in hay bales. However, learning profitable skills should not be dismissed either.
As a fellow enthusiast, I strongly advise you to interact with both characters for your main quest advancement. It’s beneficial because you’ll find sanctuaries to heal and rest, one in the north and another in the south. Trust me, these spots will prove useful as you delve deeper into your gaming experience. However, if you must choose only one at the outset, prioritize the blacksmith. He’s a regular you’ll encounter often since he’s one of the few merchants in Trosky who purchases unwanted armor and weapons, items that can fetch a good price in the marketplace.
… And pick up this free bow, on the way
As you journey towards Tachov to consult with the blacksmith, an unexpected bonus awaits – a complimentary bow and a stockpile of arrows. Although archery may not be your primary focus in Kingdom Come, it’s crucial to master this skill as there are numerous instances where it proves beneficial. From taking down enemies from stealthy vantage points to procuring game for sustenance (more on that later, I’ll explain how to find your canine companion), a well-honed archery skillset will undoubtedly serve you well during your adventure.
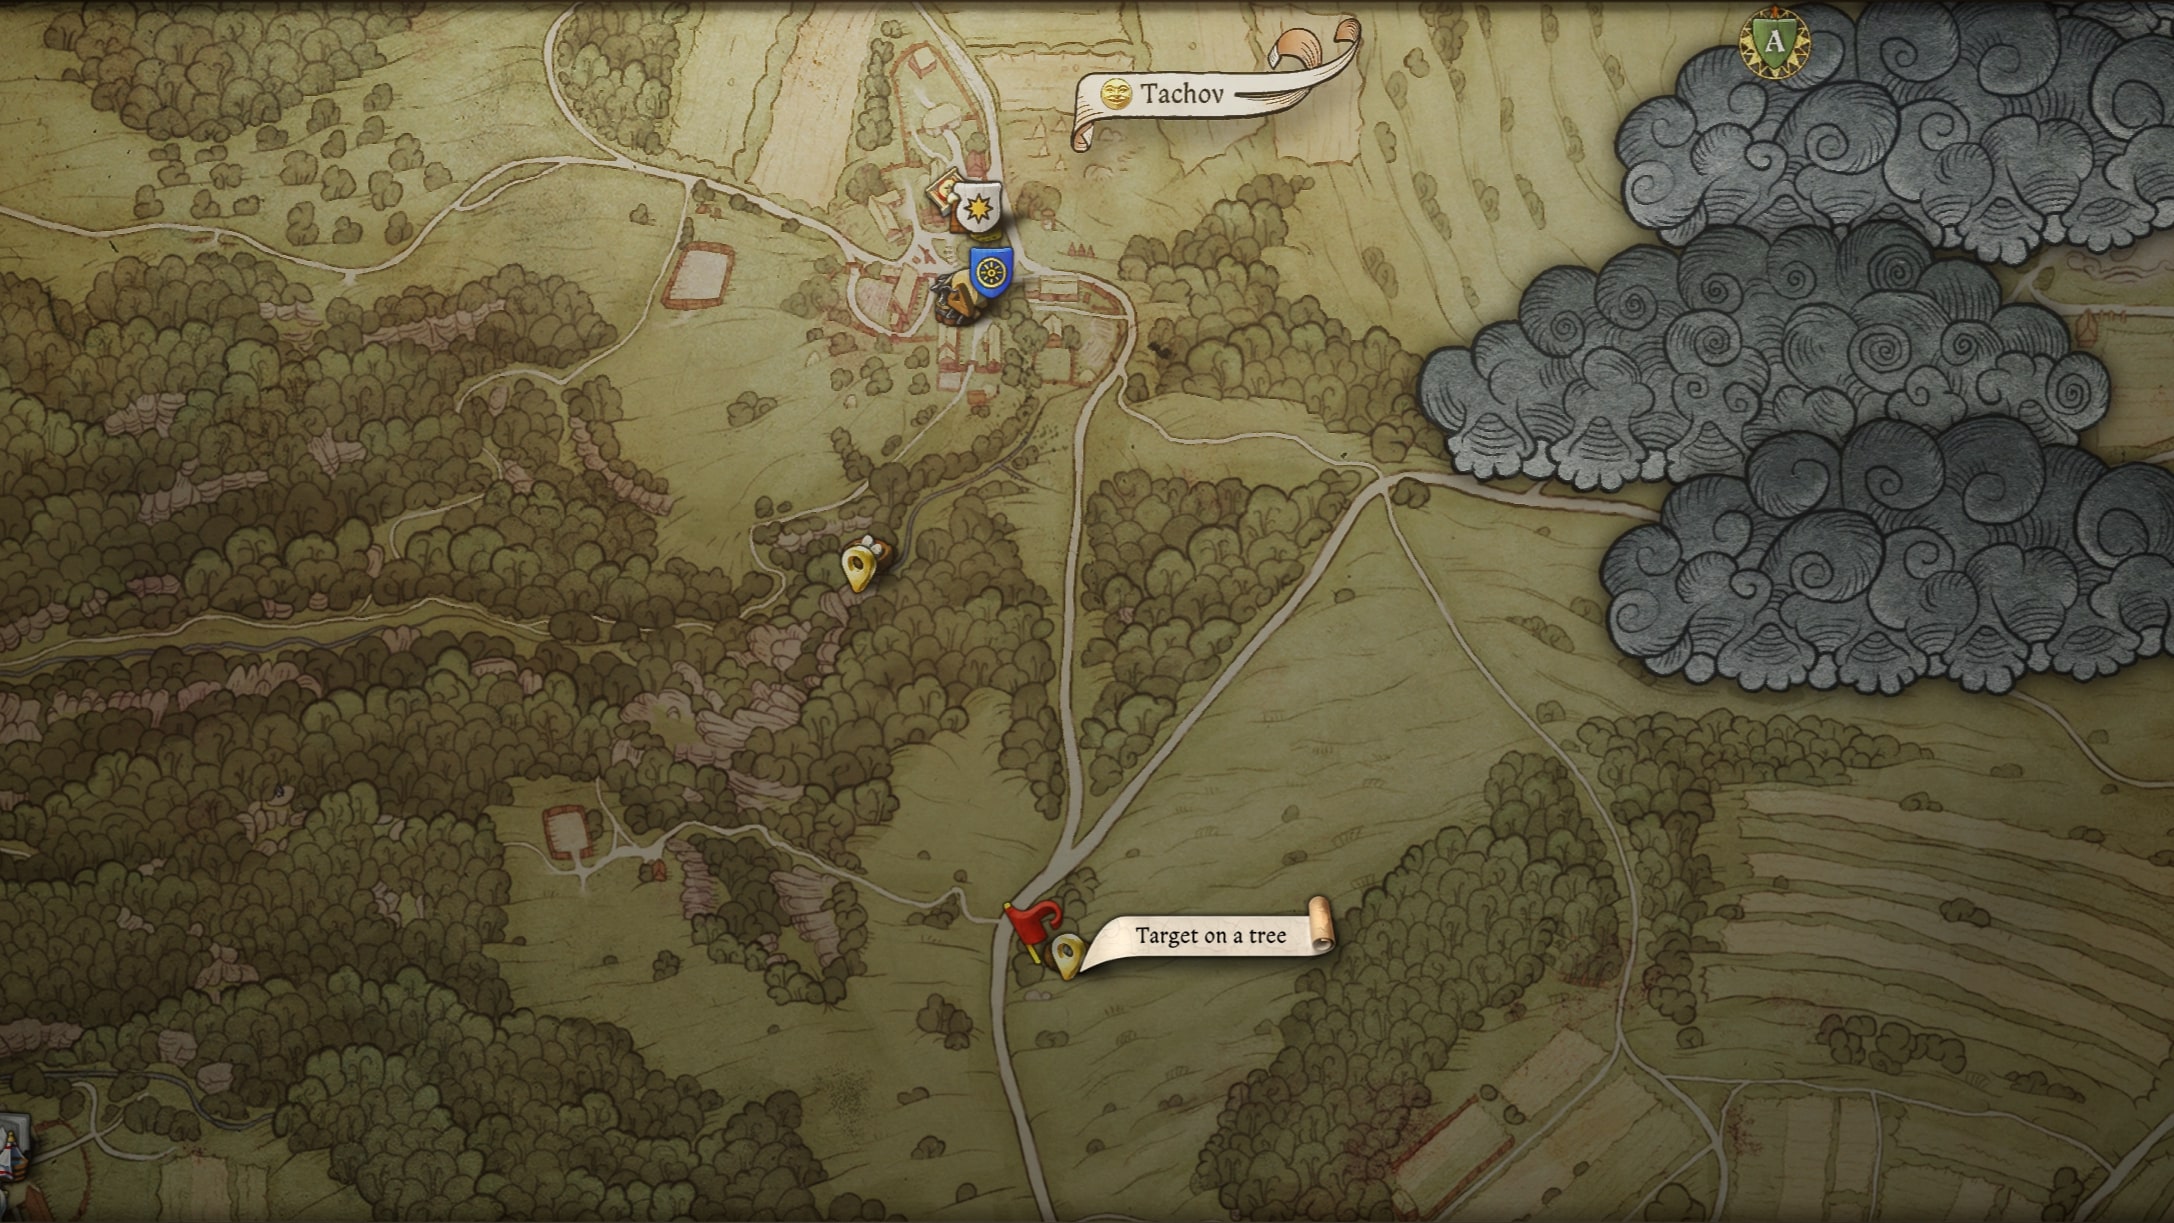
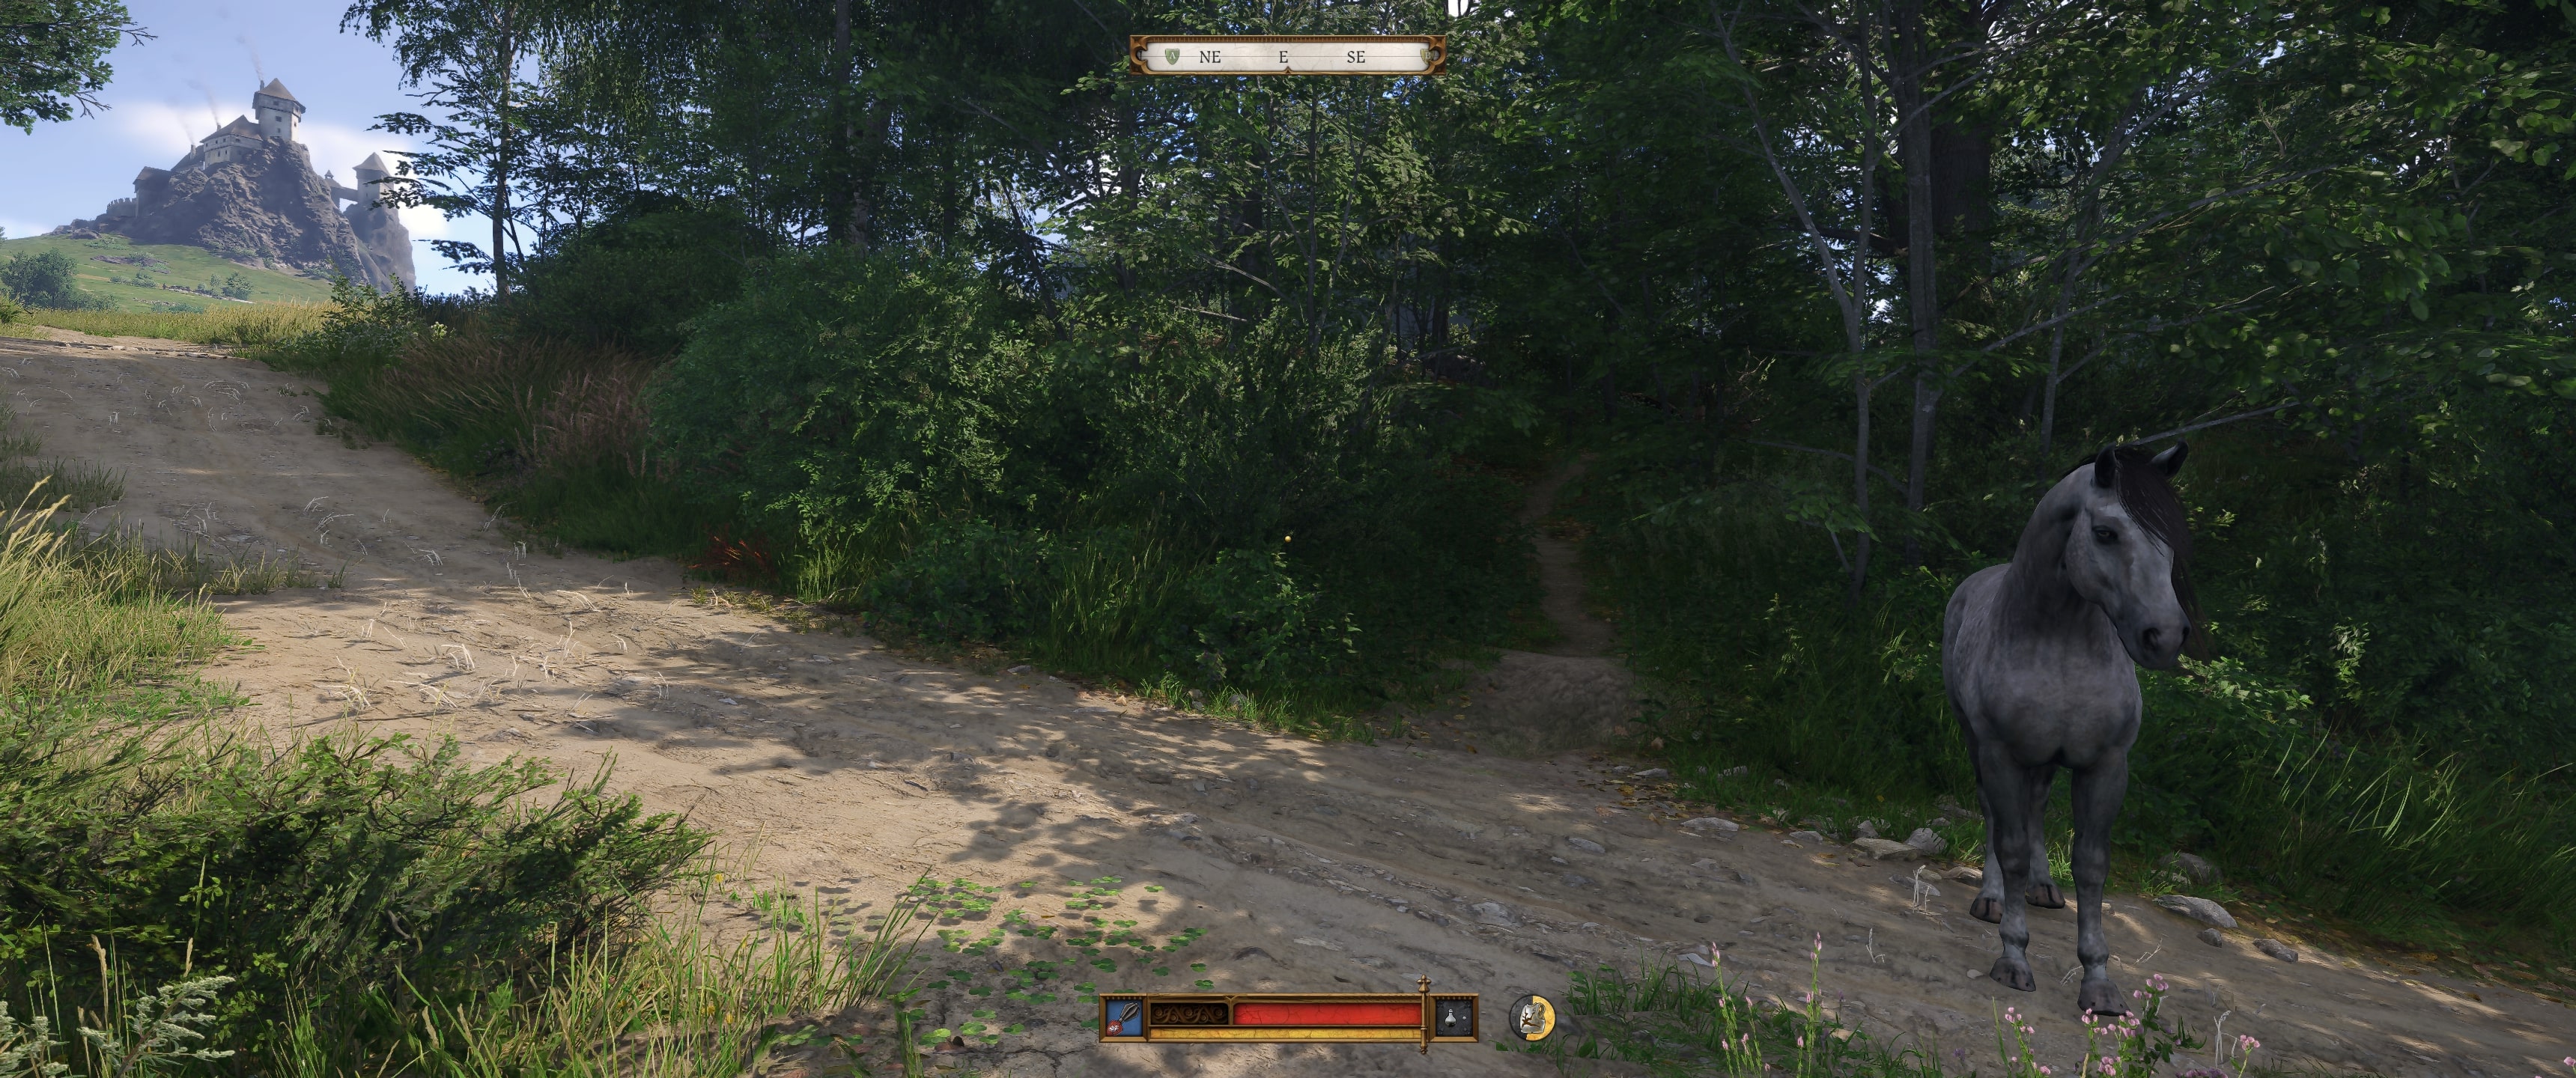
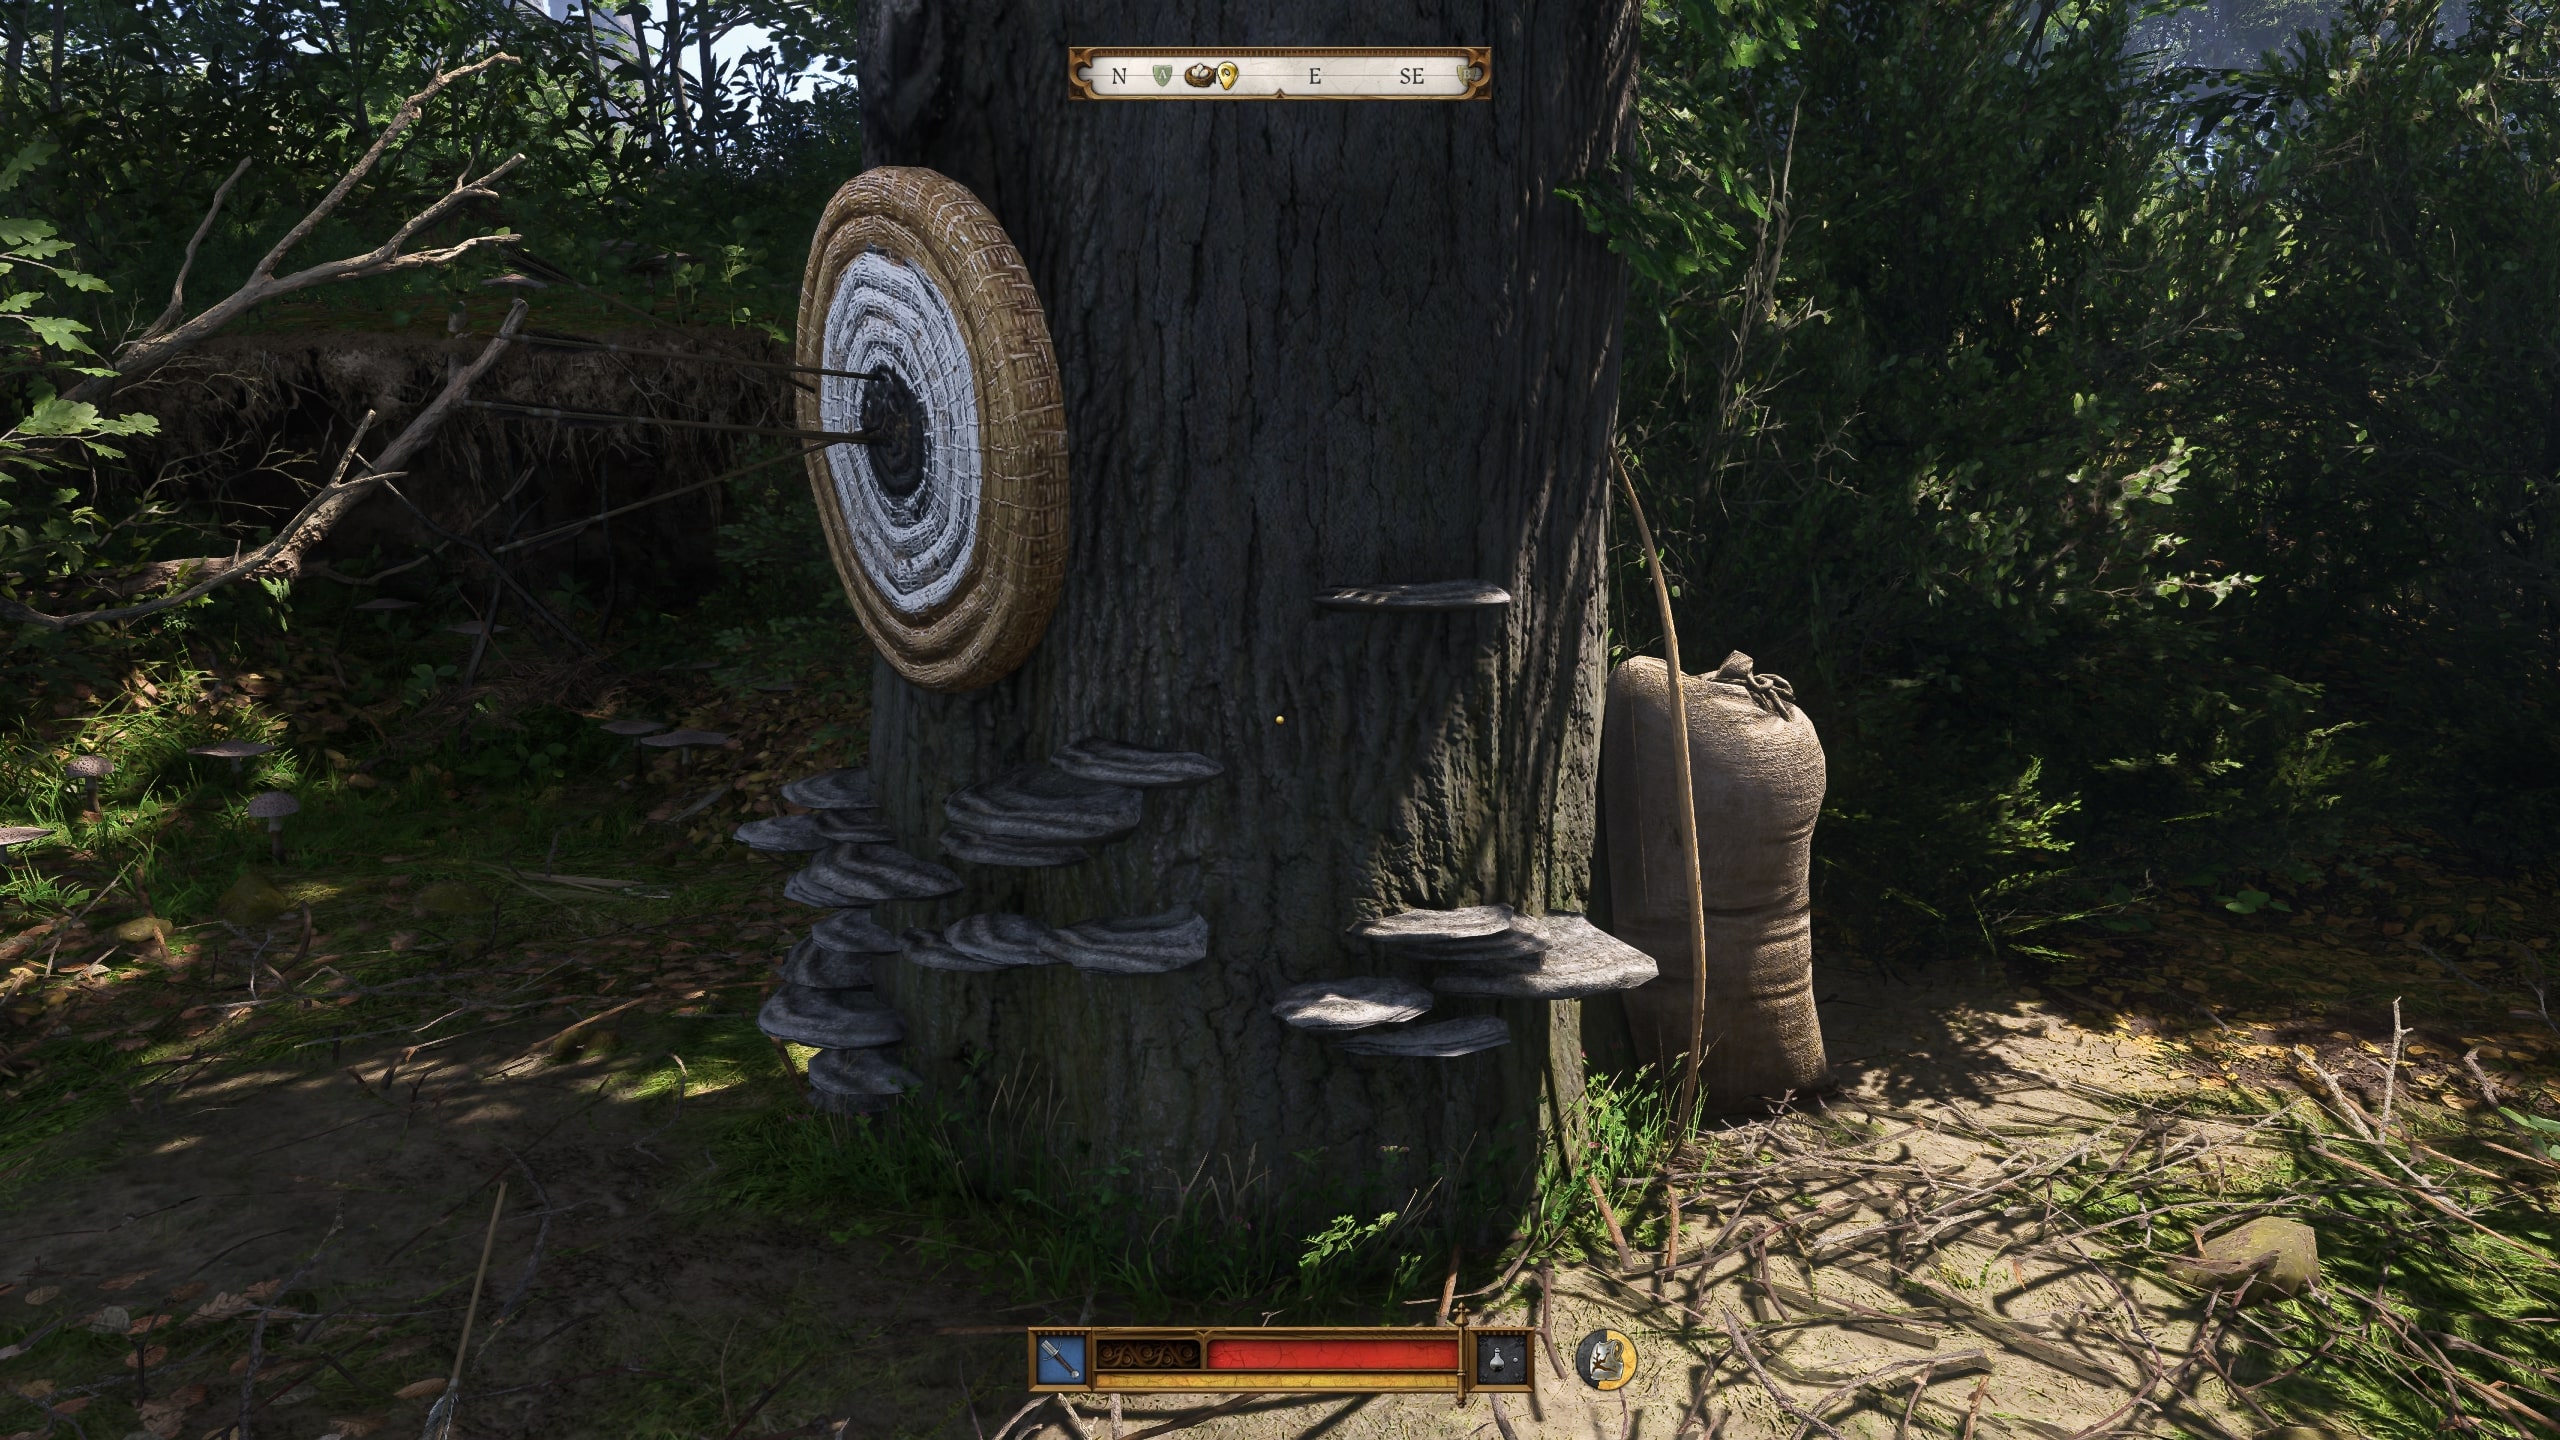
As you approach the crossroads from Troskowitz en route to Tachov, look out for an eastward-leading dirt track into a forest. Take this path and you’ll find a target on a tree with numerous arrows stuck in it (as shown). Nearby, you’ll discover a Dogwood village bow, as well as a sack containing two dozen arrows, a Bowman’s brew potion to enhance your Marksmanship skill temporarily, an archery skill book for long-term improvement of the skill, and a Marksman’s kit to mend bows. Don’t forget to grab the arrows from the target too.
Get yourself a free horse, too — without stealing
In Kingdom Come: Deliverance 2, the expansive medieval Bohemian landscape can take quite some time to traverse on foot if you’re starting from the town of Troskowitz. However, there’s a convenient method for obtaining a horse without any cost at the game’s inception—and no, it’s not about stealing one!
In Troskowitz, if you travel along the southwestern road, you’ll eventually reach the sizable village of Semine. Later in the narrative, you’ll find yourself back here for significant events, but for now, your focus should be on locating a horse dealer situated near the town’s fortress to the southwest. Among his stock, there will be a gray mare that Henry will be signaled to recognize. This mare is none other than Pebbles, Henry’s faithful steed from the initial game, which he loses in the prologue. It seems someone found her and sold her here without knowing she was owned.
Approach the horse trader and discuss the matter of ownership regarding the horse named Pebbles. Mention that she is already yours, and ask if he would be willing to give her to you for free, considering he didn’t pay much for her. The speech check here should be straightforward as he may not have a strong emotional attachment to her. If the conversation doesn’t go well, you can always buy Pebbles for around 100 groschen or more. After either convincing him or buying her, she will be yours.
Apart from accelerating your journeys significantly, Pebbles is also designed to carry heavy items such as weapons and armor from defeated enemies, which would otherwise slow you down. Moreover, what sets Pebbles apart from other horses you might consider purchasing is a distinctive feature that boosts her abilities as she is ridden more frequently over time.
Train your fighting skills with Tomcat
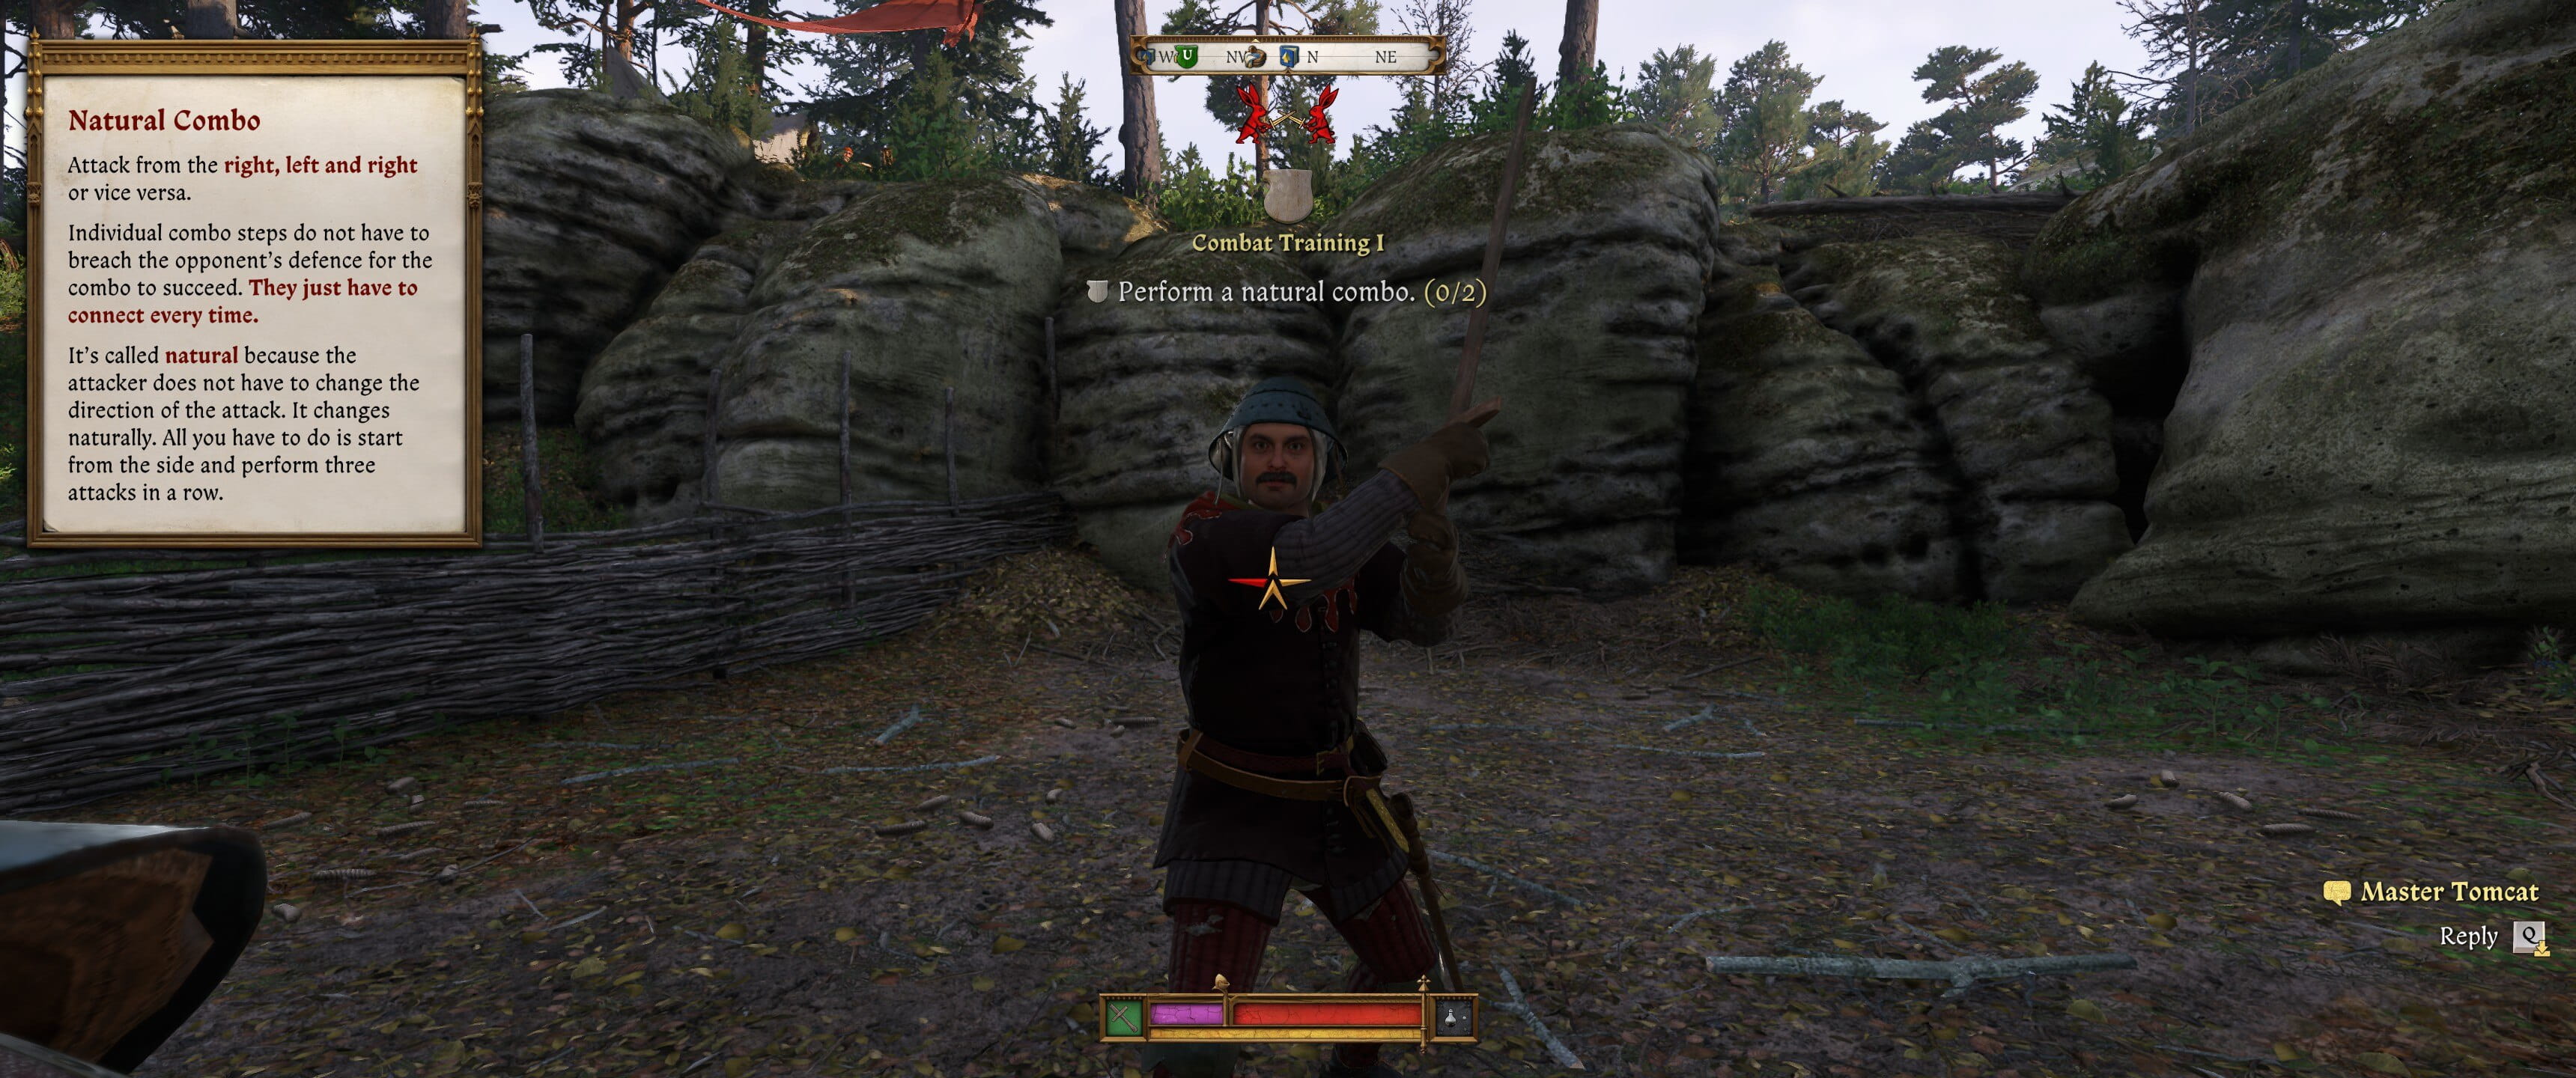
After arranging swift transportation, I suggest you should consider one of Bara’s top recommendations next: visit Tomcat, a skilled strongman, to hone your swordplay for the Combat Training questline. You can find him at a distance to the west in a Nomad camp. The trek may seem long, but it will be time well spent; not only will he teach you effective melee combinations that will serve you throughout the game, but training with him will significantly improve several combat skills such as Warfare and Swordsmanship.
As a fan, I’d share this: If you manage to best him in a proper sparring match, Tomcat will pass on to you the formidable Master Strike – an exceptional sword technique where you counterattack by striking from the opposite direction of your opponent’s approaching blow. Though it may prove challenging at first, mastering it brings immense power, making it worth the effort. However, be warned that the sparring with Tomcat might be too tough initially; but don’t worry, you can always give it another go once Henry has gained more experience in combat.
… And while you’re there, find your dog Mutt

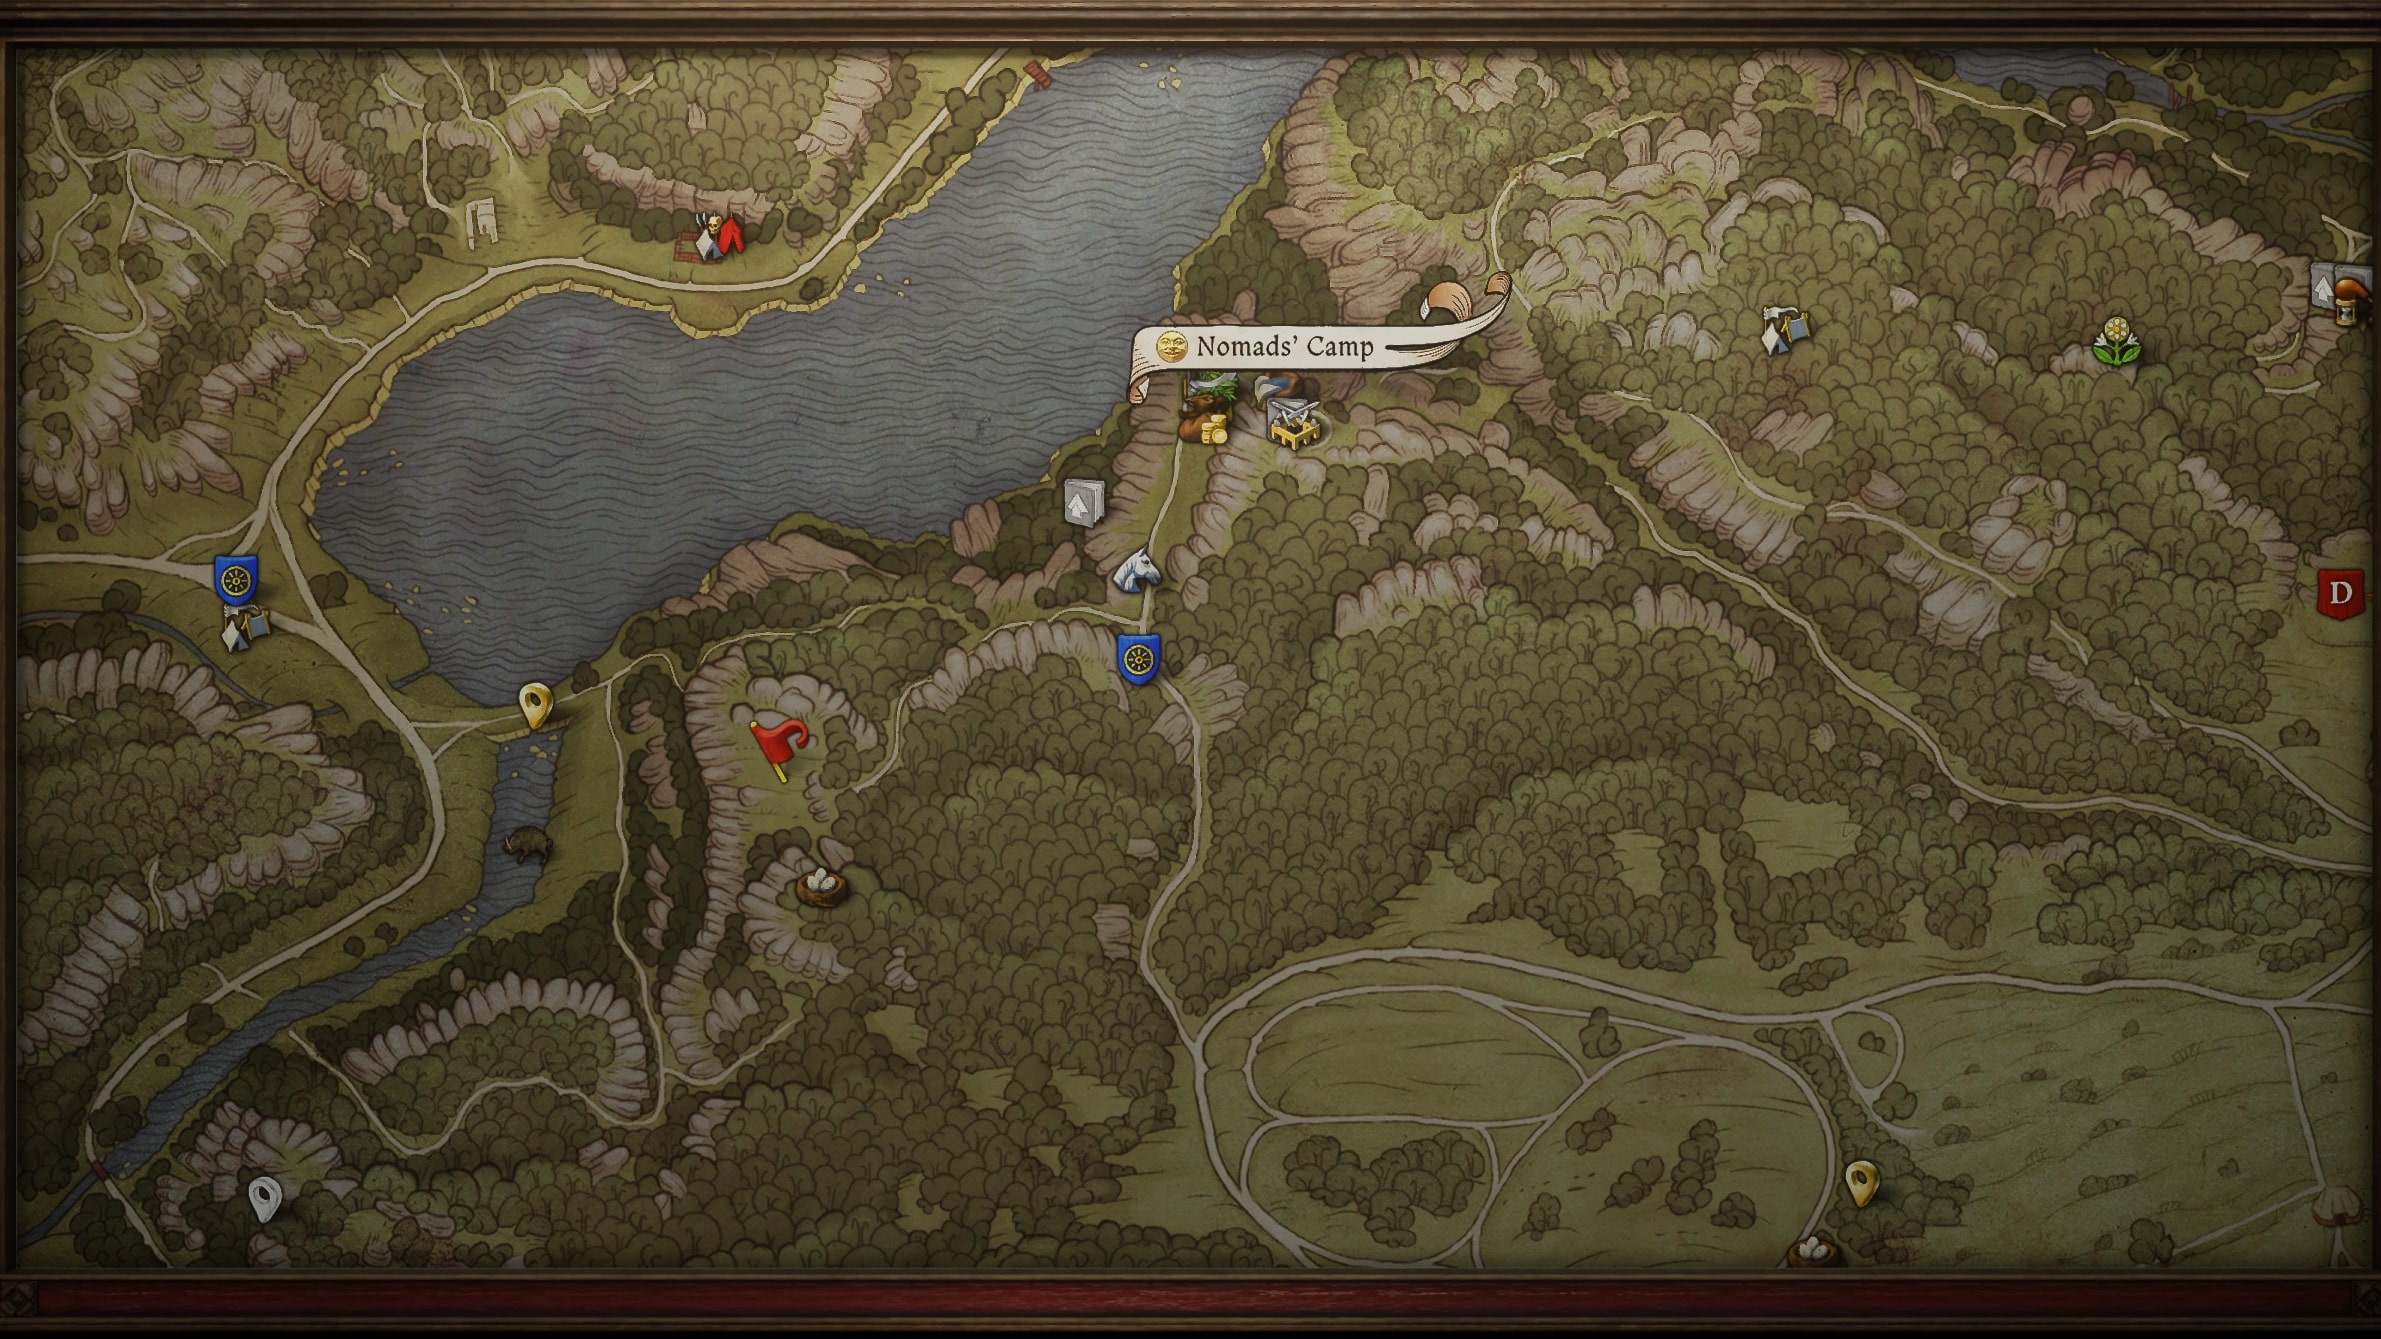
Searching for your lost dog, Mutt, is a lengthy and challenging journey that takes you across various parts of the map and chasing down any clues you can find – unfortunately, many of these leads don’t pan out. But here’s something surprising: You might just find Mutt southwest of the Nomad’s camp in a clearing (marked with a red flag in the gallery above).
At this location, it starts feeling like a lair for wolves. Upon arrival, you’ll witness a cinematic scene where a group of wolves assaults you and Mutt. This battle isn’t overly challenging if you have robust leg armor for bite protection. However, I advise adopting a defensive playstyle and counterattacking only after successfully blocking an enemy attack with perfect timing since they are elusive and hard to defeat without such opportunities.
After the wolves depart or are defeated, you’ll gain control over Mutt, a dog with special skills. As your companion, you can command him to hunt game, bite and divert adversaries to create opportunities for you to strike unhindered, and even follow scents to assist you in locating items or people during specific side missions. Remember to frequently feed and pet him to maintain his obedience.
By the way, I wouldn’t go ahead and abandon the wolf den just now. You see, there are some valuable treasures hidden there. For instance, in a nook on the cliffside close by, you’ll find a Broadsword, a Patched cuirass, and a collection of jewelry worth approximately 850 groschen. This equipment and money will prove incredibly useful at the start, so be sure not to overlook it.
Find the best early game weapon and armor
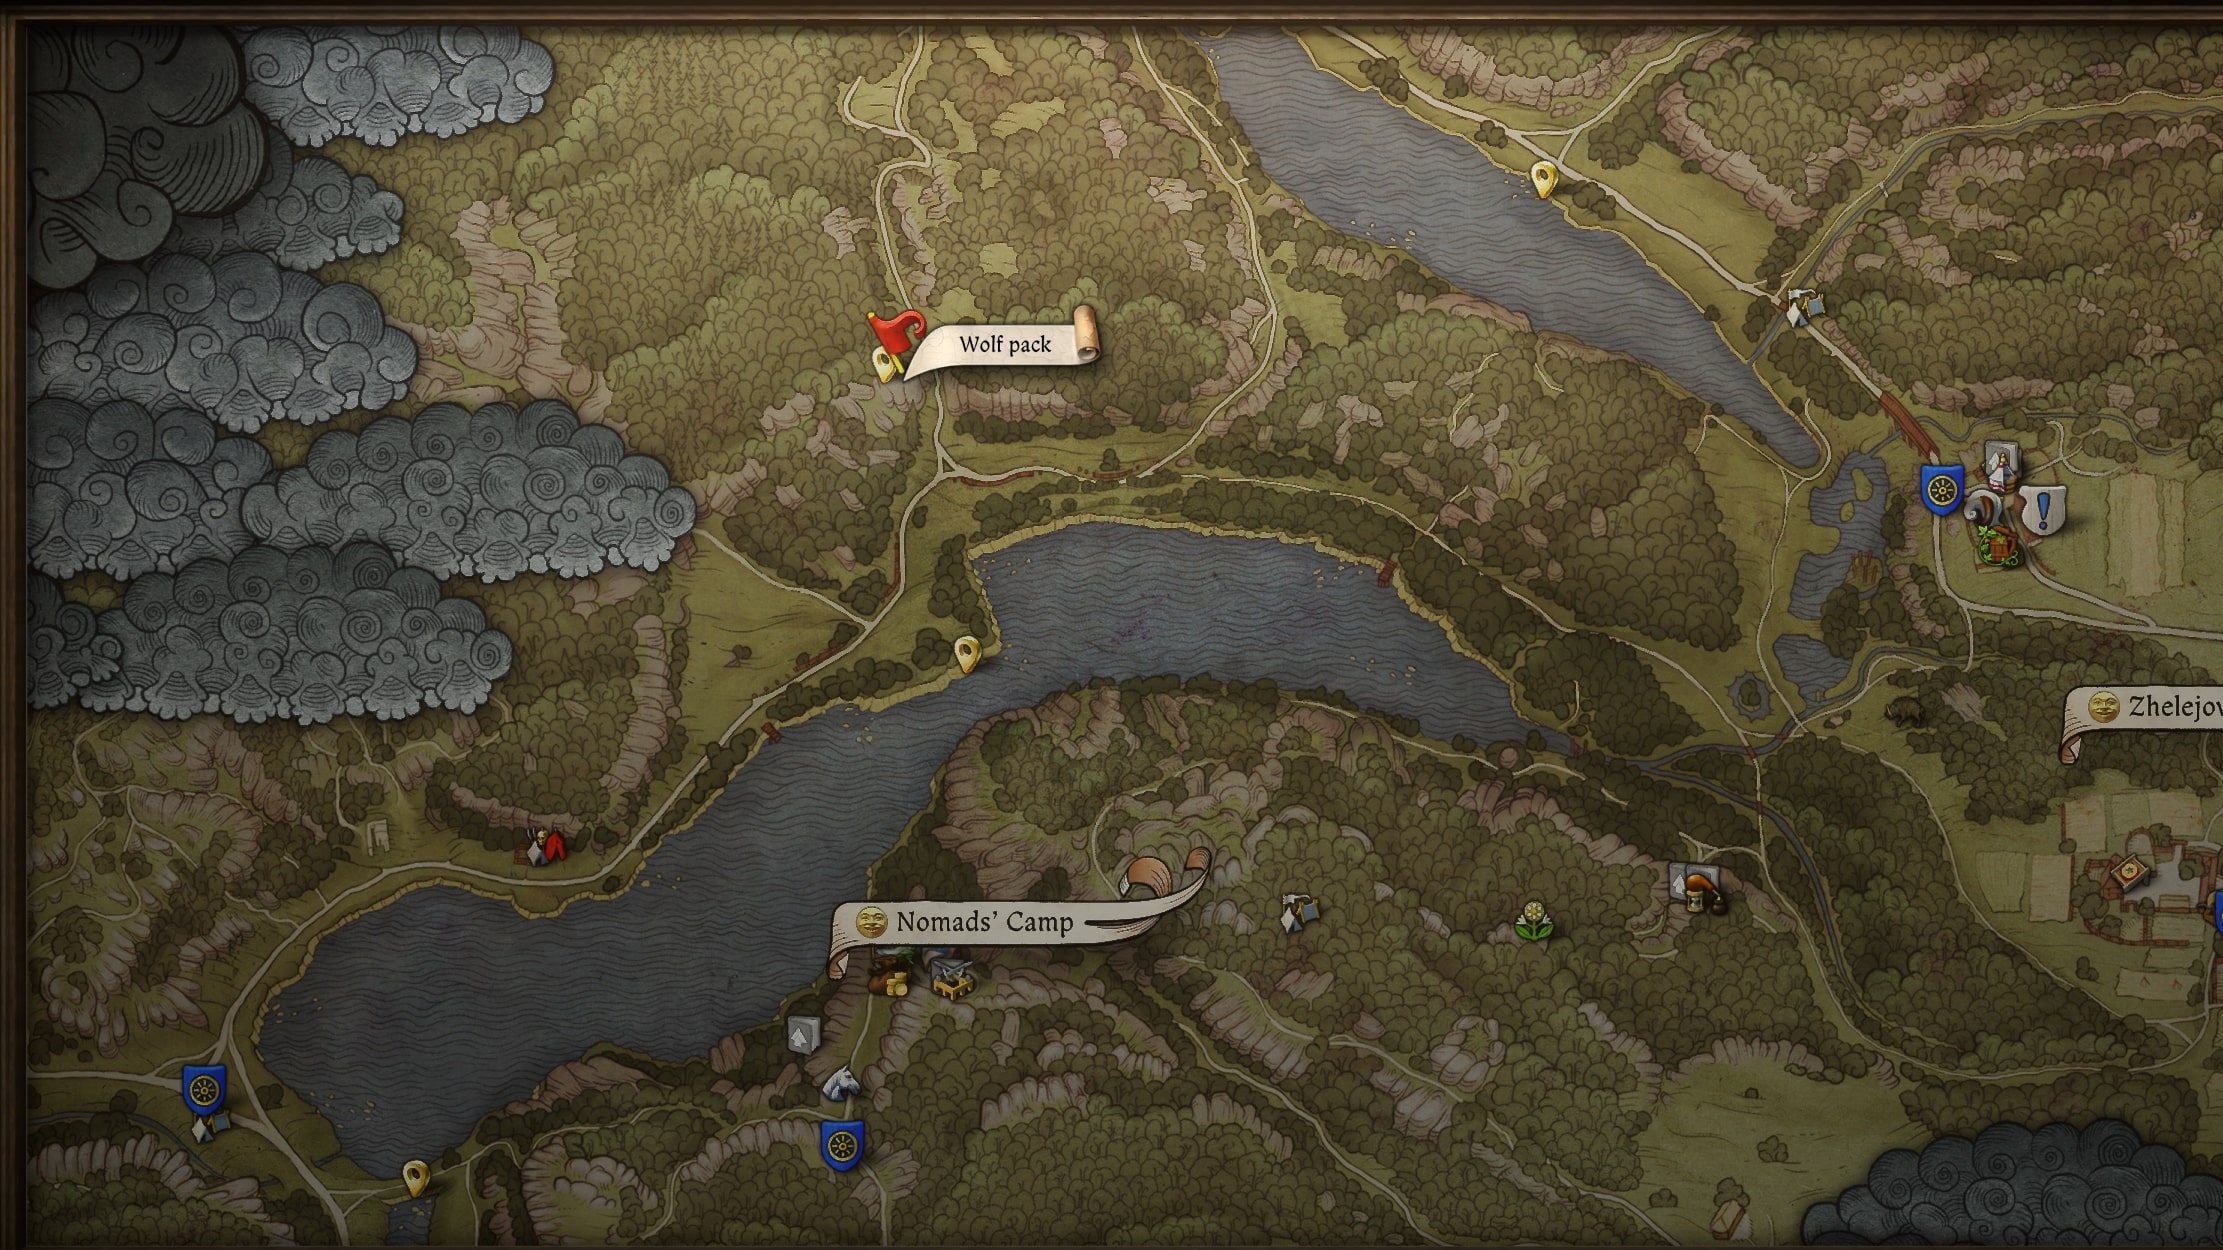
As a tech enthusiast, I’d highly recommend grabbing the Patched Cuirass from the Wolf Den early on. However, there are even better armors to be discovered nearby! Heading around and north of Rockwater Pond, you can stumble upon a group of wolves near two excavated graves a short distance west of the road (marked in the image above with a red flag).
As I’ve successfully dealt with the wolves, you’ll find yourself in possession of a Battle Longsword, Von Bergow Shield, and a Saxon Bascinet with visor helmet – all tucked away within their graves. These items are among the finest equipment available for the early stages of Kingdom Come: Deliverance 2, and coupled with the cuirass you discovered in the wolf den, they’ll equip you admirably for the trials that lie ahead.
Loot this lucrative treasure hunter’s camp
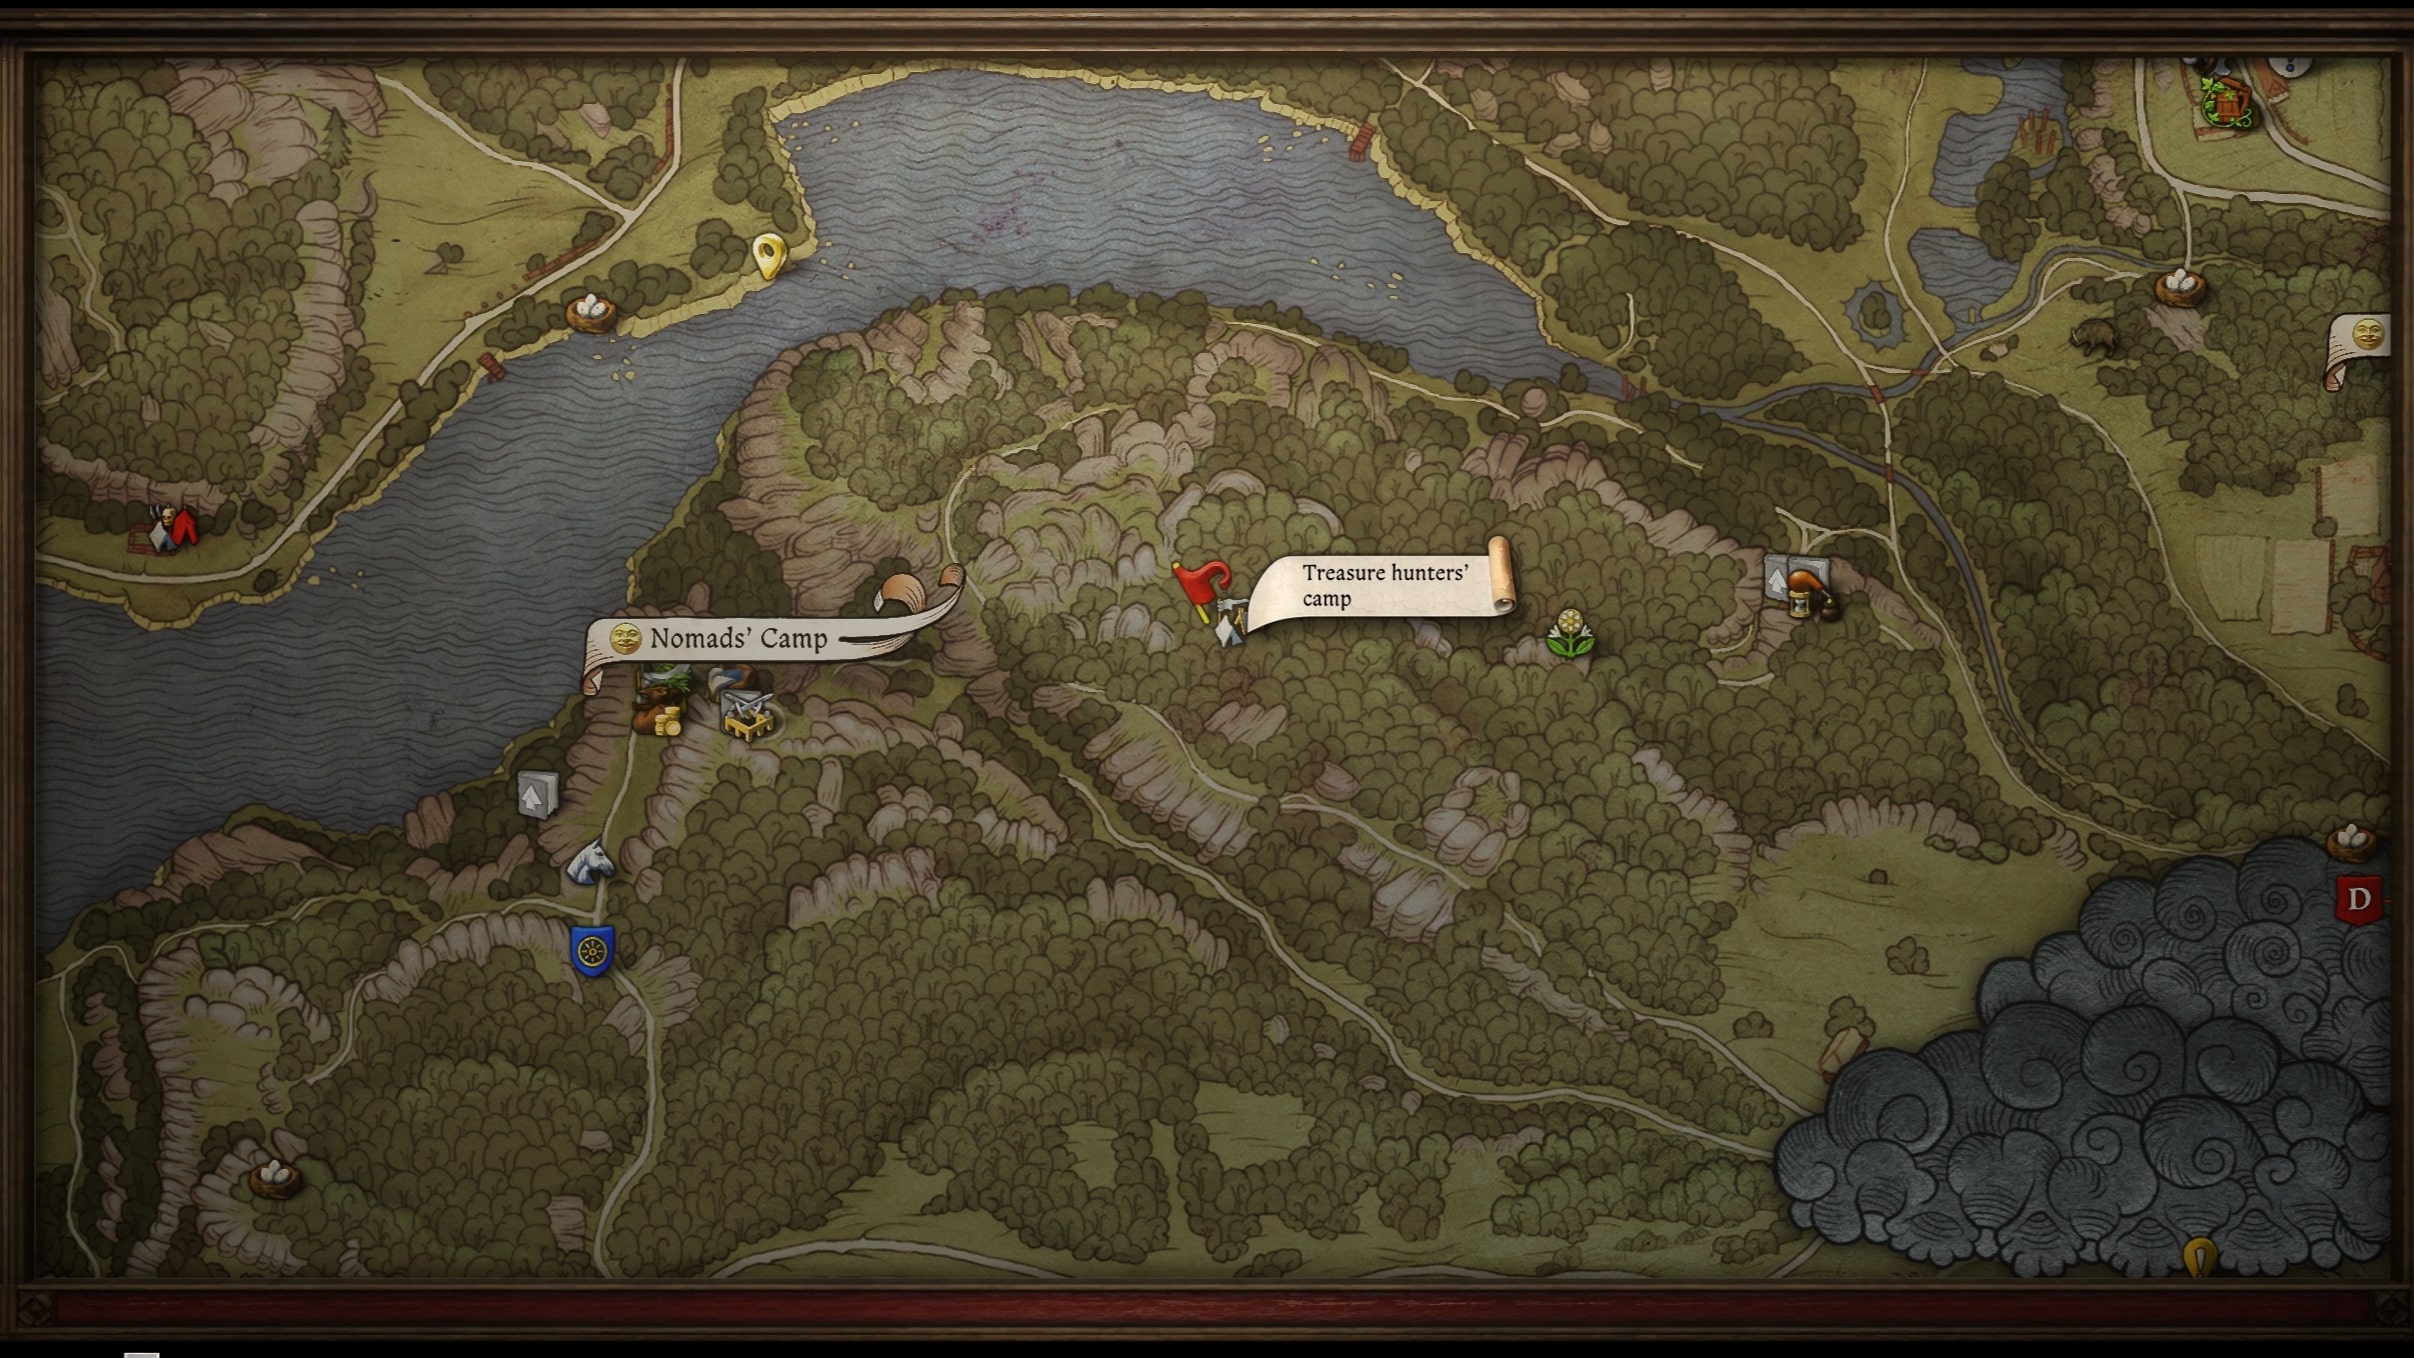
As I traverse this expansive landscape in search of hidden riches, I can’t help but point out a significant spot: a covert treasure hunters’ encampment perched atop the hills to the east of the Nomad camp, nestled within the vast forest west of Zhelejov (as indicated by the red flag on your map). Here, you’ll encounter three individuals engaged in the art of graverobbing.
Without hesitation, they’ll attack when spotted, making negotiation impossible. However, given that they are not heavily armored and their numbers don’t significantly exceed yours, the fight should be manageable. If you’re proficient with a bow, consider taking out one or two of them from a distance before they get too close.
There’s some pretty useful items scattered around here. Near the cooking pot, there’s a sack containing a dagger – perfect for covert assassinations from behind. If you fancy a spot of grave-digging, a spade is leaning against a tree next to a locked chest. Over by the chest to its left, you’ll find an open sack with a pricey golden cup inside.
The chest itself can be opened using a key taken from one of the defeated bandits. Inside, you’ll discover a Saxon chainmail hauberk that would pair nicely with your recently acquired patched cuirass, as well as a piece of jewelry valued at around 100 groschen or so. Additionally, there’s a broadsword and a grimey skullcap that can be sold.
How you can get lots of Saviour Schnapps
Without a doubt, one item you should accumulate is Saviour Schnapps – the liquor that functionally lets you save your game. Unlike sleeping in owned beds, this is the sole method for saving outside of that. Developers Warhorse aim to have players face the repercussions of their choices rather than repeatedly saving and reloading when things go awry, a practice known as “save scumming”. However, it’s wise to keep a decent supply of these handy (but remember not to overindulge, or you could find yourself quite drunk, with some hefty stat penalties to show for it).
In the game Kingdom Come: Deliverance 2, there are primarily two methods to acquire Saviour Schnapps. One method involves concocting it through alchemy, a recipe that Pavlena provides you in the prologue. To brew this potion, you’ll need a cauldron filled with Wine, one Nettle, and two Belladona. Here are the steps to follow:
1. Gather your ingredients: Wine, Nettle, and Belladona.
2. Find or purchase a suitable cauldron.
3. Pour the wine into the cauldron.
4. Add the nettle and belladona to the wine.
5. Stir the mixture thoroughly.
6. Follow the recipe provided by Pavlena for the specific instructions on how to complete the brewing process.
7. Once completed, you should have Saviour Schnapps ready to consume!
- Add the Nettle to the cauldron and boil for two hourglass turns.
- Grind the Belladonna.
- Add the Belladonna to the cauldron and boil for one hourglass turn.
- Finally, pour into a phial.
Brewing a high-quality Savior Schnapps effectively enhances your Strength, Vitality, and Agility, in addition to saving your game. However, if the brewing process is less than perfect or you’re using fewer Belladonna, you’ll end up with a Weak Savior Schnapps that only saves your game. Since Nettle is abundant, but Belladonna bushes are scarce, it’s more practical to make the weak version of this elixir if you prioritize having as many game-saving Savior Schnapps as possible. Remember, you can also purchase both herbs from apothecary vendors.
If crafting your own Savior Schnapps seems too much of a hassle, you can always purchase it directly from apothecaries or general traders within the game. For instance, both the apothecary and trader in Troskowitz regularly stock and replenish Savior Schnapps. While buying it this way may cost more, it saves you time.
The sequel to Kingdom Come: Deliverance, titled Kingdom Come: Deliverance 2, has been released on platforms including Xbox Series X|S, Windows PC (through Steam, the Epic Games Store, and GOG), and PS5. This game is widely recognized as one of the top games of the year for both Xbox and PC, making it a must-play if you’re a fan of RPGs. At an affordable price of $44.99 on CDKeys, this is an excellent opportunity to add it to your collection.
Read More
- Gold Rate Forecast
- PI PREDICTION. PI cryptocurrency
- Masters Toronto 2025: Everything You Need to Know
- SteelSeries reveals new Arctis Nova 3 Wireless headset series for Xbox, PlayStation, Nintendo Switch, and PC
- Mission: Impossible 8 Reveals Shocking Truth But Leaves Fans with Unanswered Questions!
- WCT PREDICTION. WCT cryptocurrency
- Guide: 18 PS5, PS4 Games You Should Buy in PS Store’s Extended Play Sale
- LPT PREDICTION. LPT cryptocurrency
- Elden Ring Nightreign Recluse guide and abilities explained
- Solo Leveling Arise Tawata Kanae Guide
2025-02-05 01:40