Are you searching for all the Declared Totems? Do you possess a mysterious hint for the Totem of Just Rule and aren’t sure where to search? We can help you out. Each location in Avowed contains a Totem base, and six items to position within it for some impressive character and companion boosts.
Once you’ve gathered all parts of the Divine Totems, you can assemble them at your camp, but you must discover them first.
PSA: Enable ‘Compass – God Shrine Totem Pieces’ in your UI settings. This is deactivated by default, which we unfortunately learned after finding all the pieces. Don’t be like us!
How do I find all the totems in Avowed?
Throughout your gameplay, you might stumble upon Totem fragments at random locations. However, obtaining clues from vendors in each region can make this process much smoother. These clues are like riddles to solve, but if you get stuck, don’t worry, we’ve got all the Totem locations listed below for your convenience.
If you prefer the thrill of discovery, navigate to your UI settings and enable ‘Compass – God Shrine Totem Pieces’. Unfortunately, we learned this feature is turned off by default only after finding all the pieces ourselves. This compass function will help you focus your search on specific areas, so don’t make the same mistake we did!
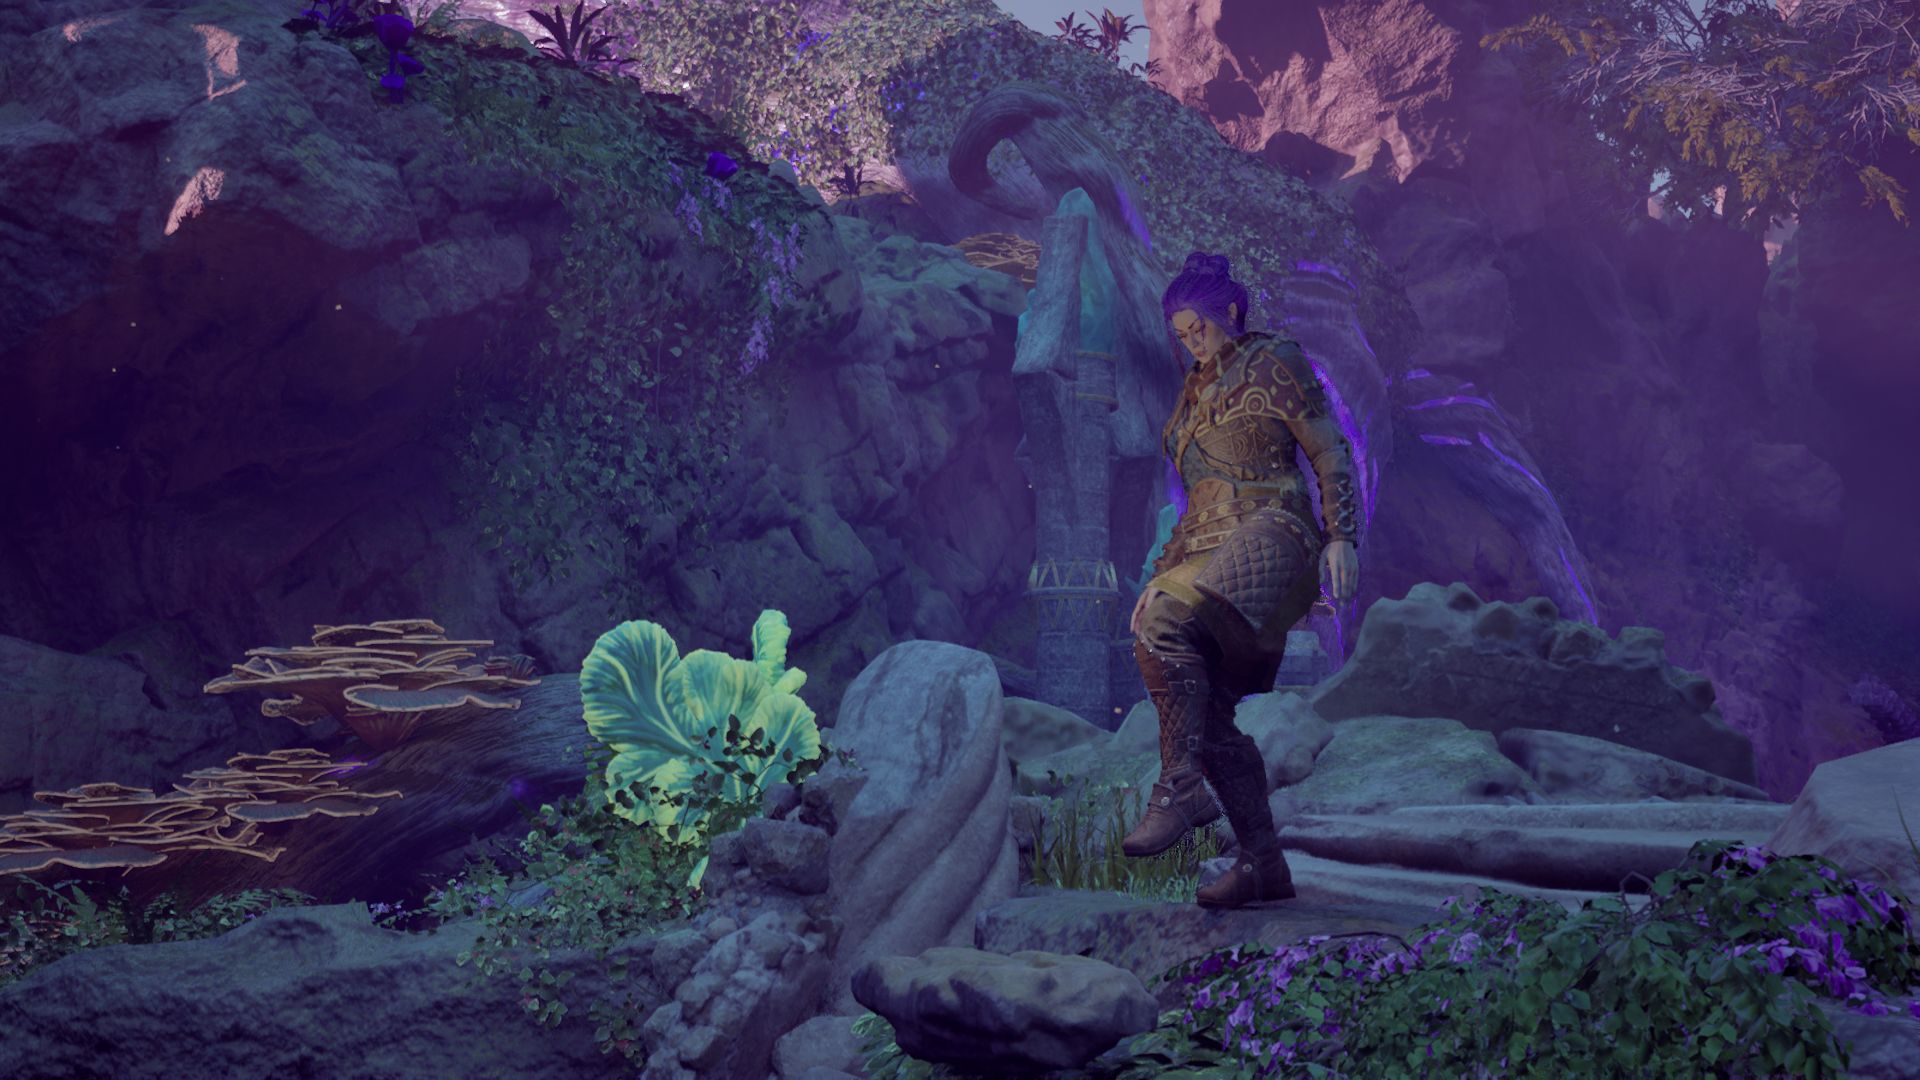
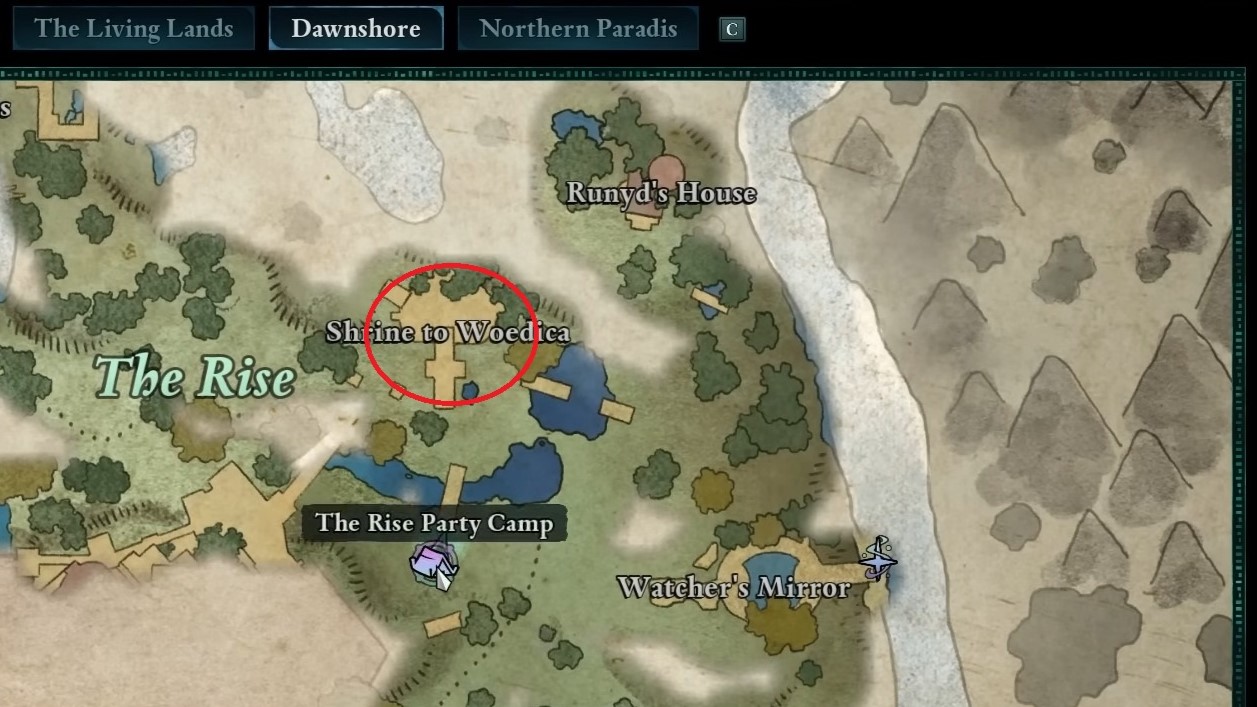
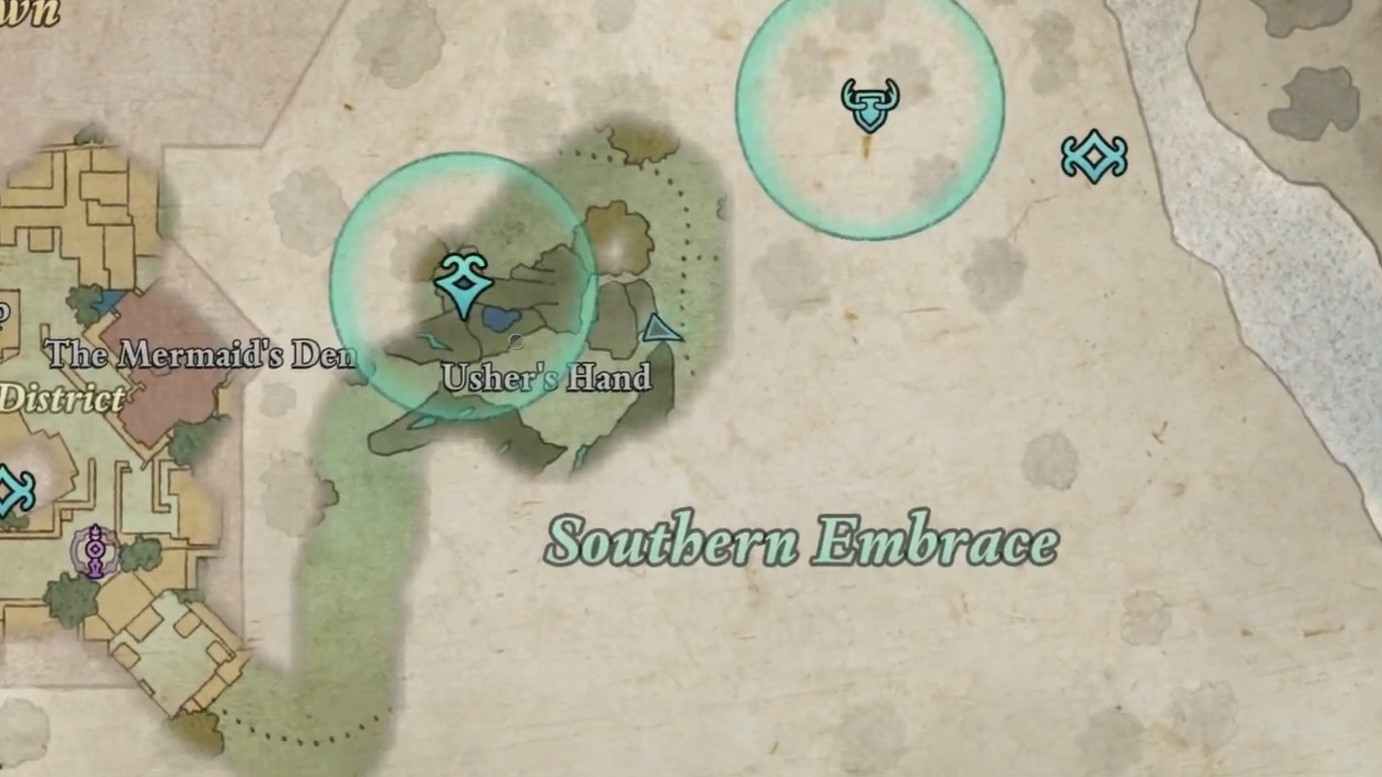
Dawnshore Totem – Totem of Rightful Rulership
How to find all of the pieces for Totem of Rightful Rulership in Dawnshore
To obtain the hints needed to finish the first Totem, visit Sansa in High Paradis and head to her Emporium. Here, you can buy the required hints. In all, there are 7 pieces to find for the Totem of Rightful Rulership; one is hidden in a room behind him.
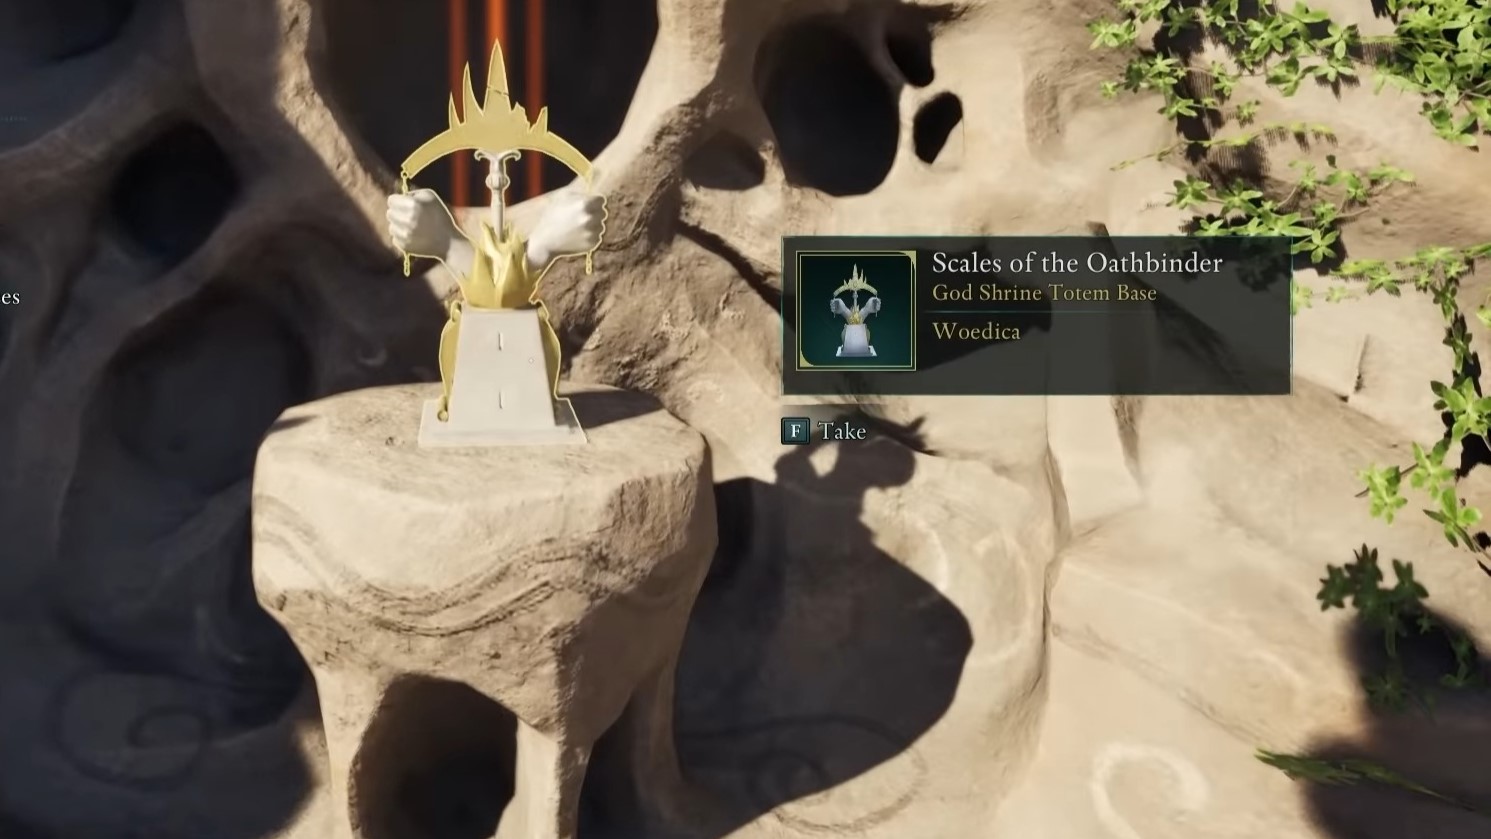
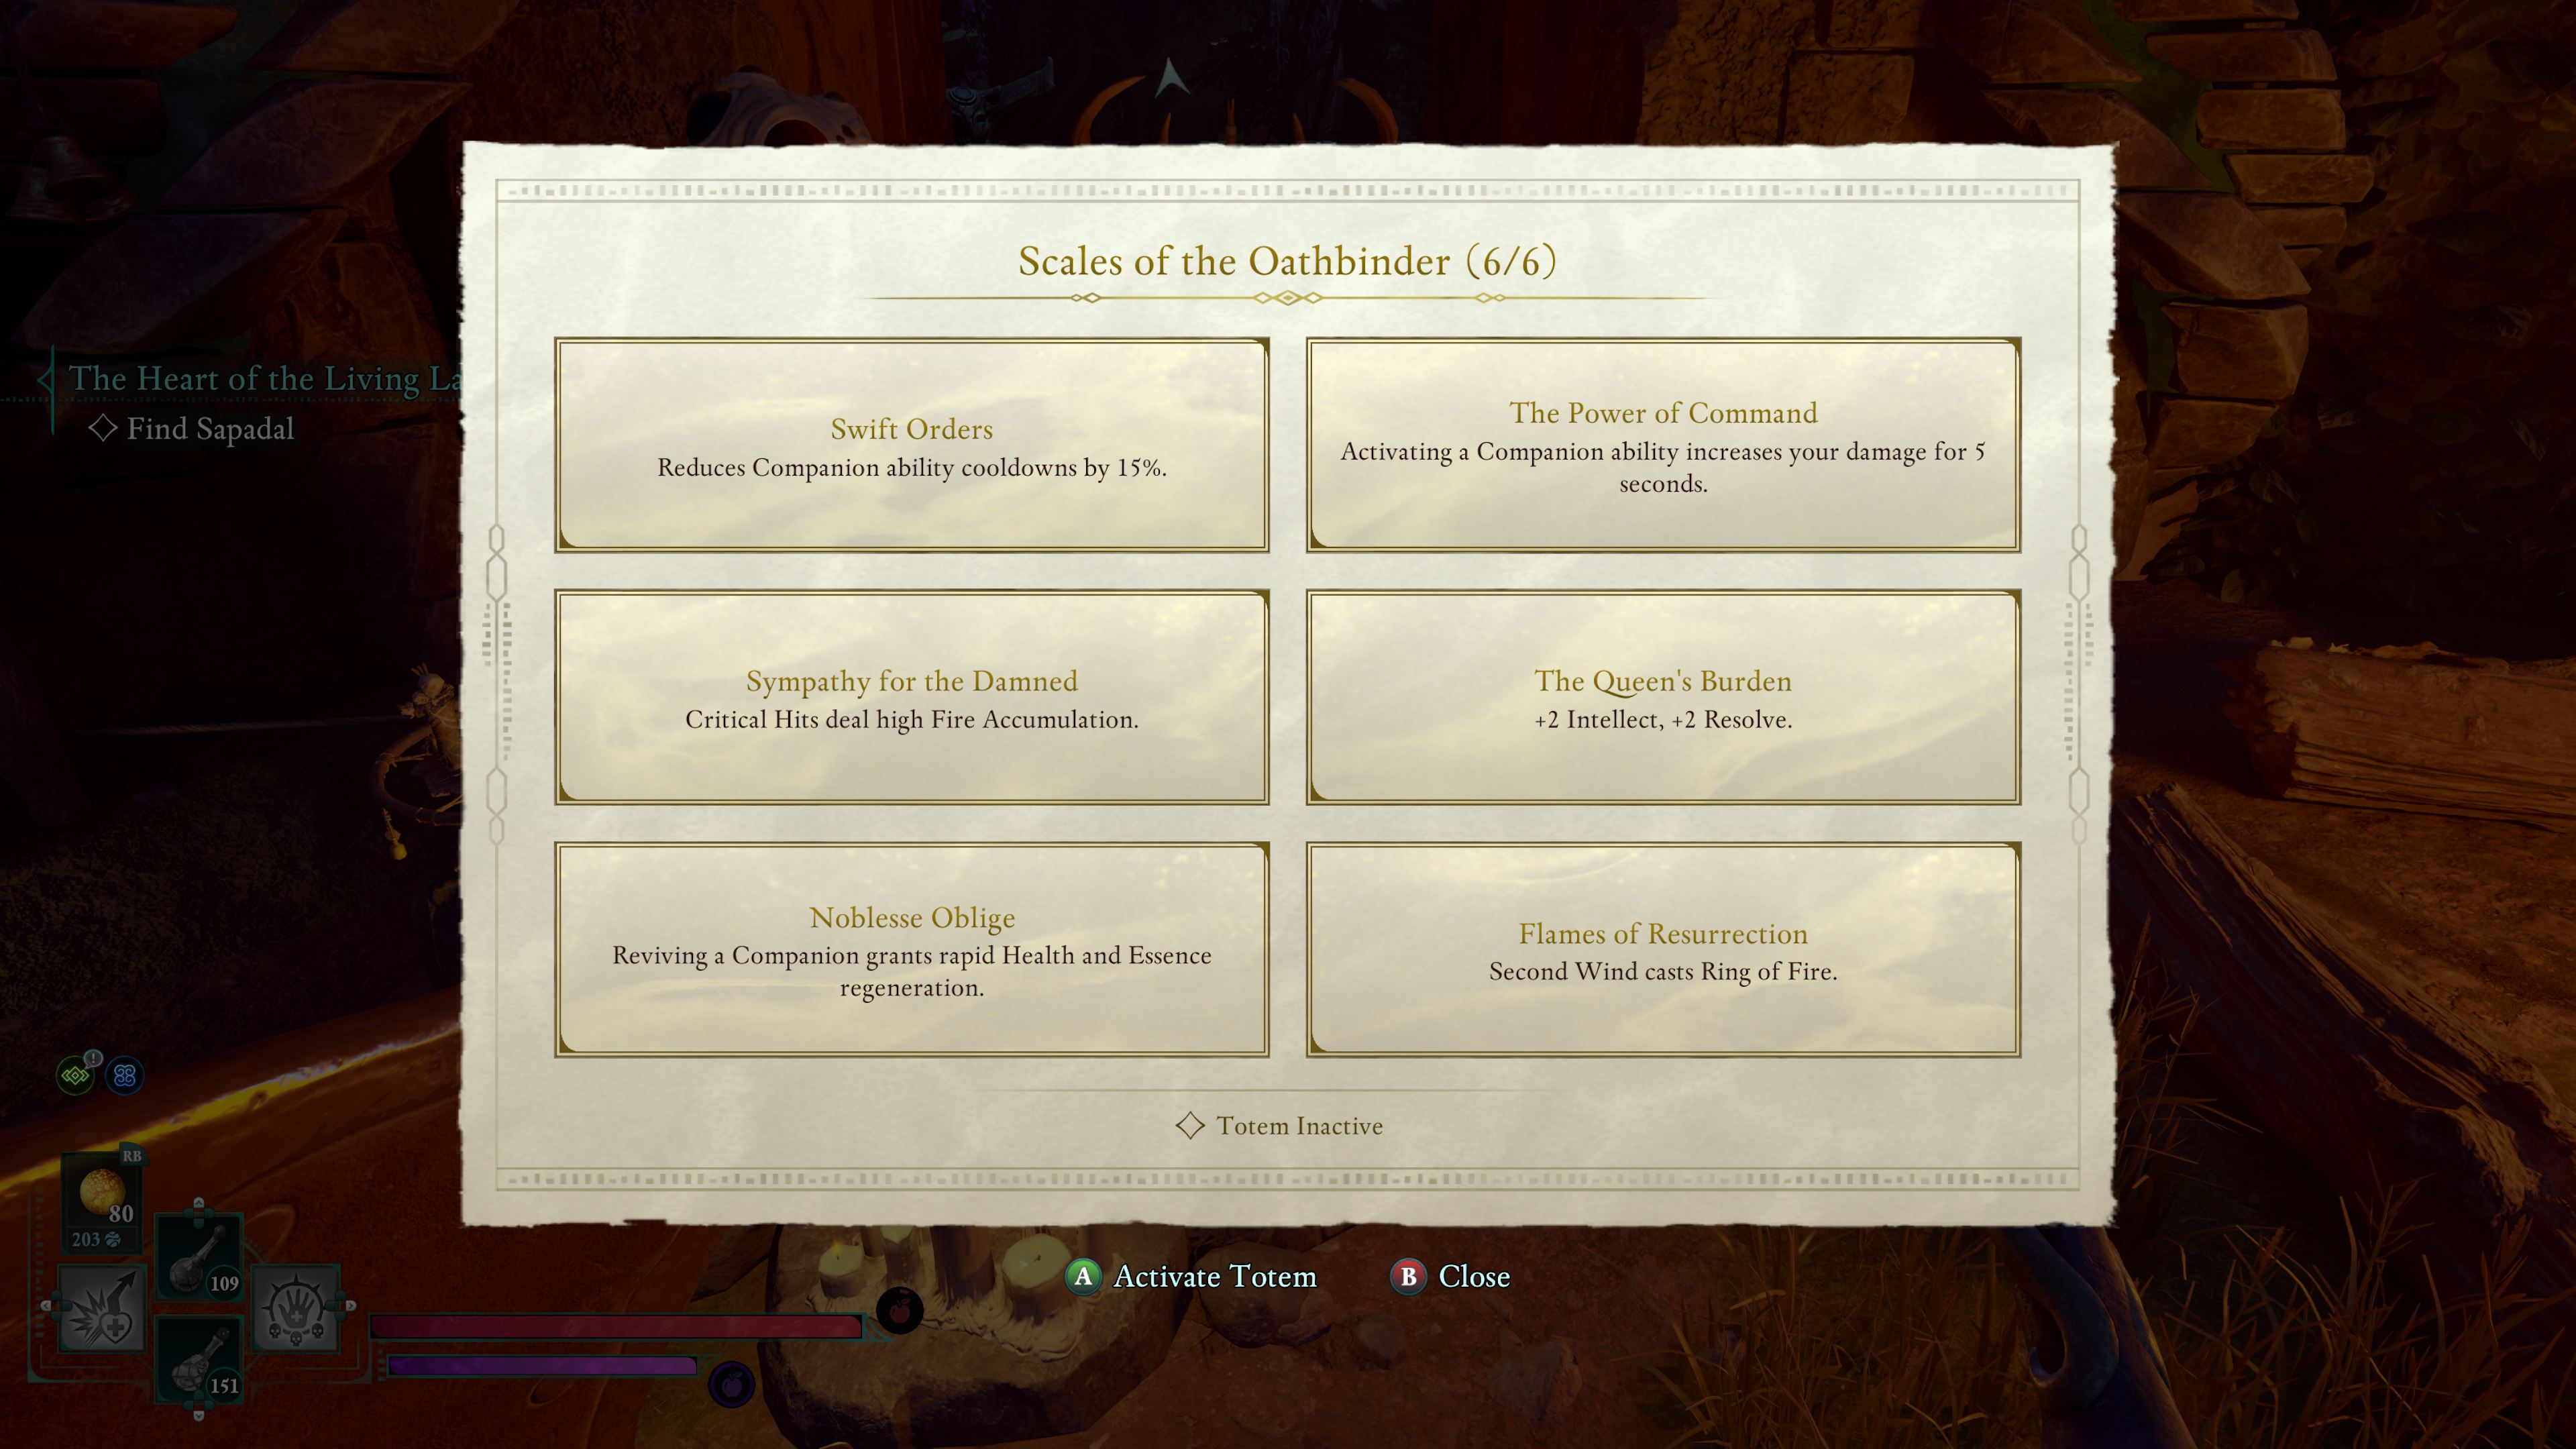
Avowed – The Scales of the Oathbinder – Totem Base
“The Burned Queen’s totem patiently waits amidst ruins of the heathens she hates.”
Avowed – Broken Crown Jewel location
“This golden crown’s stolen gem, can be found in the emporium”
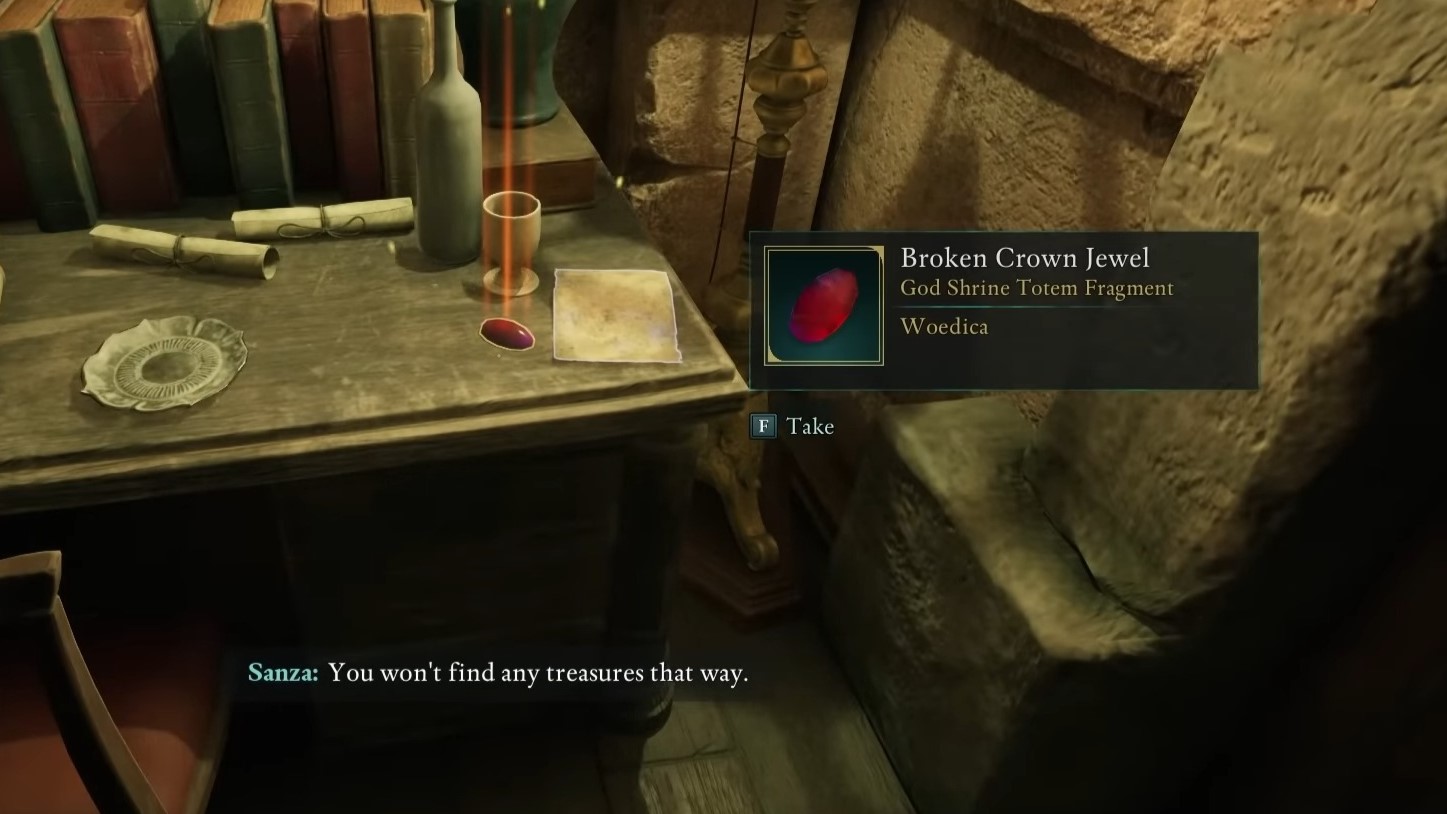
You can find this talisman in Sansa’s store located in High Paradise. Be sure to pick it up immediately following your purchase of the hints.
Avowed – Golden Scale of Order location
“In Dwarven halls ‘neath mountain shroud, the Strangler’s justice can still be found.”
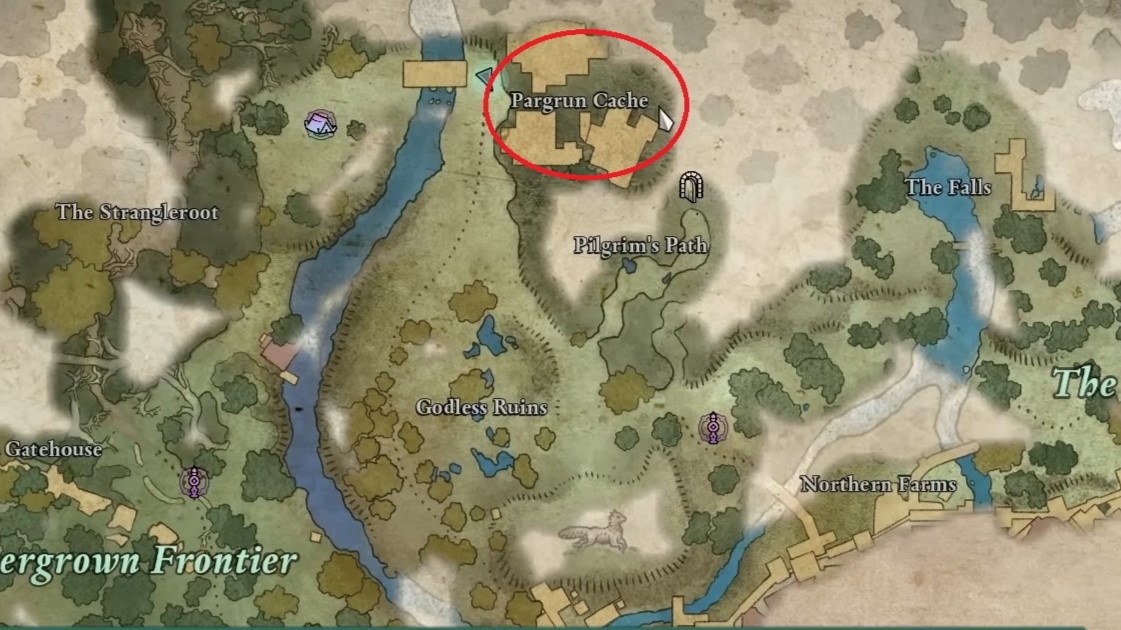
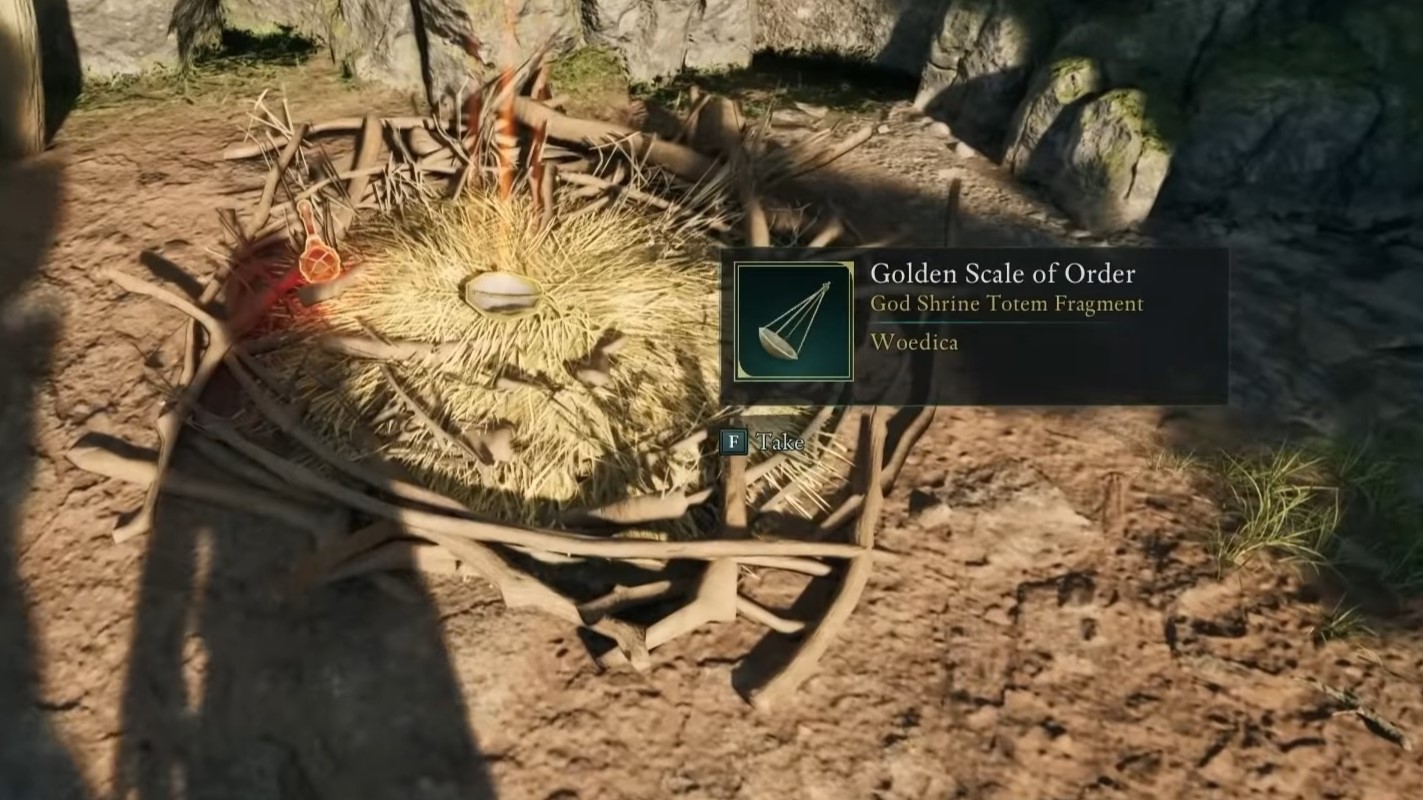
The Pargrun Vault is overflowing with riches, among them this totemic fragment! Ascend the ancient ruins and seek out a fragile-looking wall, blast it open with a grenade. Then proceed up some makeshift scaffolding and over some boulders to uncover the Golden Balance of Harmony.
Avowed – Golden Scale of Justice location
“Overlooking booths where goods are sold, this balcony leads to order’s hold.”
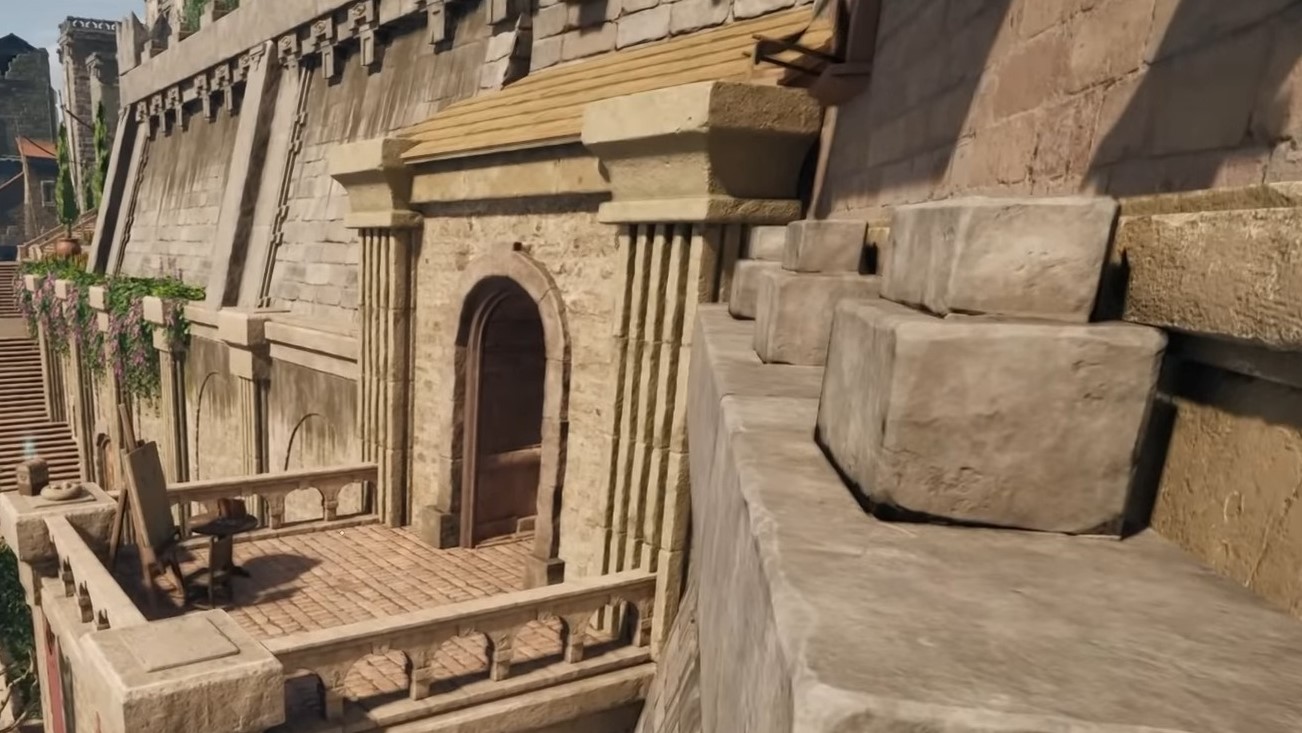
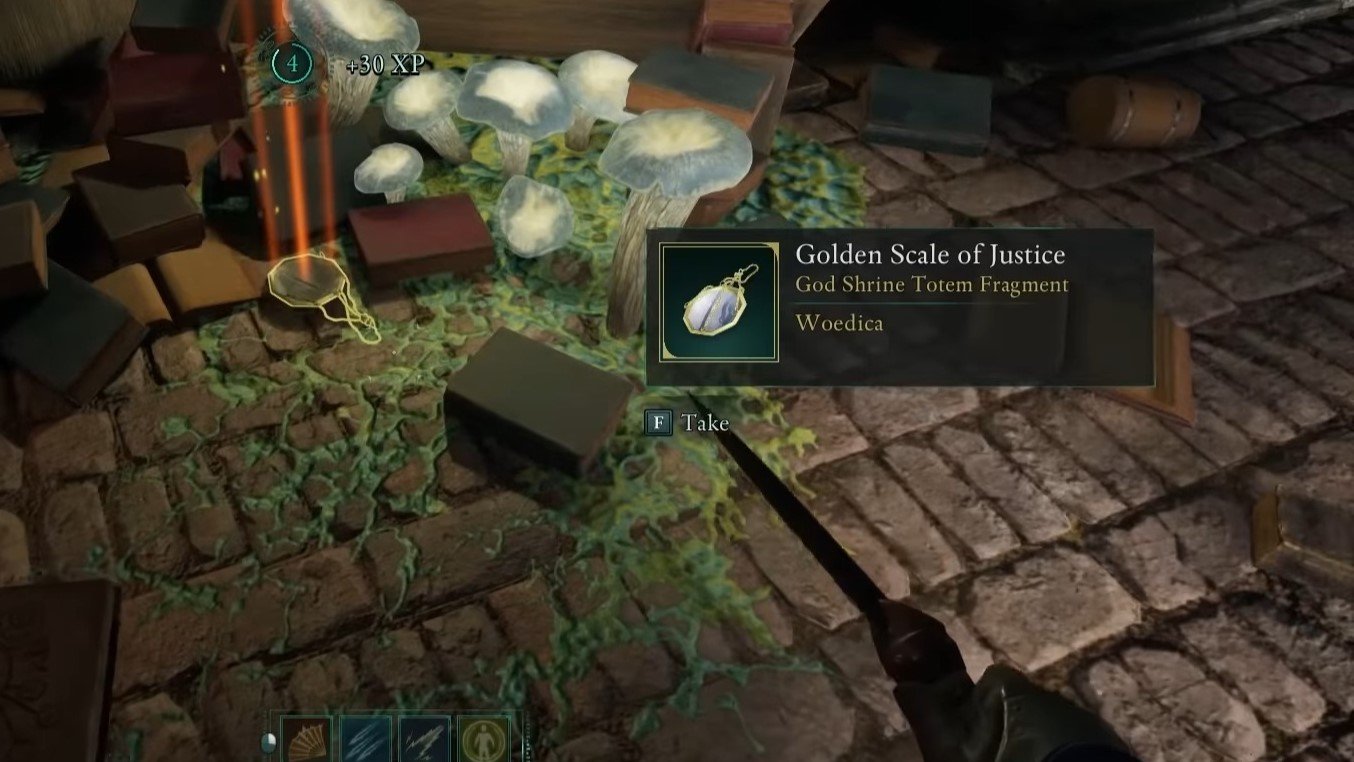
In the Market District, search for a balcony located at a great height, similar to the one depicted in the image. Jump from the adjacent rooftop to gain entry through the door below. The totem piece can be found on a lower level; you’ll have to clear some spider webs by setting them ablaze to reach it.
Avowed – Golden Plaque of Oaths location
“Below death’s grip so icy and cold, await ancient oaths cast in gold.”

Make your way to the indicated spot on the map and search for a vent or opening that you can shatter using an ice block. After doing so, carefully descend and retrieve the Pledge of Allegiance.
Avowed – Golden Plaque of Promises location
“Beneath an amethyst light on high, this shining plaque draws sailors’ eyes.”

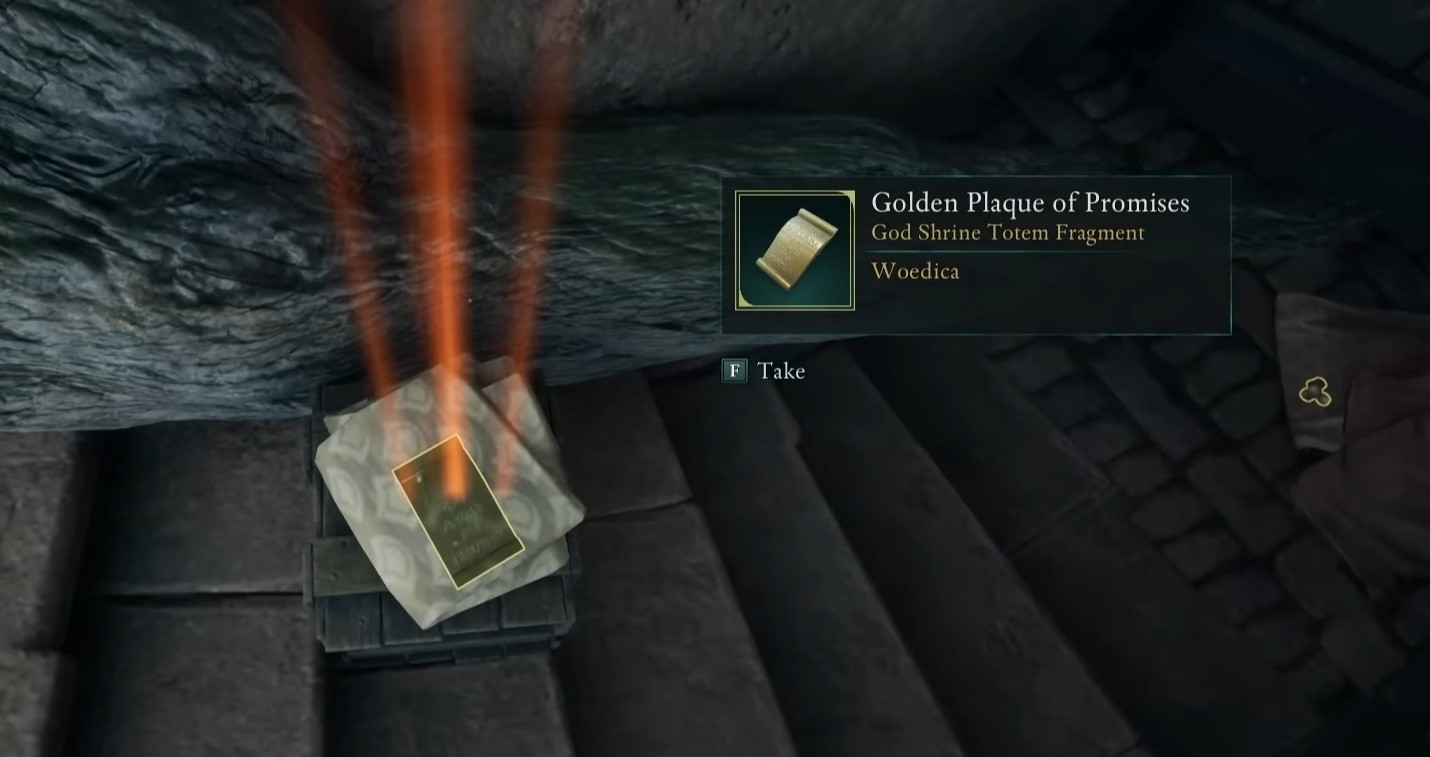
The hint strongly suggests the large lighthouse visible from various viewpoints in Dawnshore. It stands to the left of Claviger’s Landing docks. Ascend to its peak to secure not only a totem fragment but also Captain Henqua’s Spoils treasure map, and don’t forget that thrilling leap at the summit – you can’t resist it!
Avowed – Golden Flames location
“Atop the isle of wicked outlaws, flicker golden flames of glorious cause.”
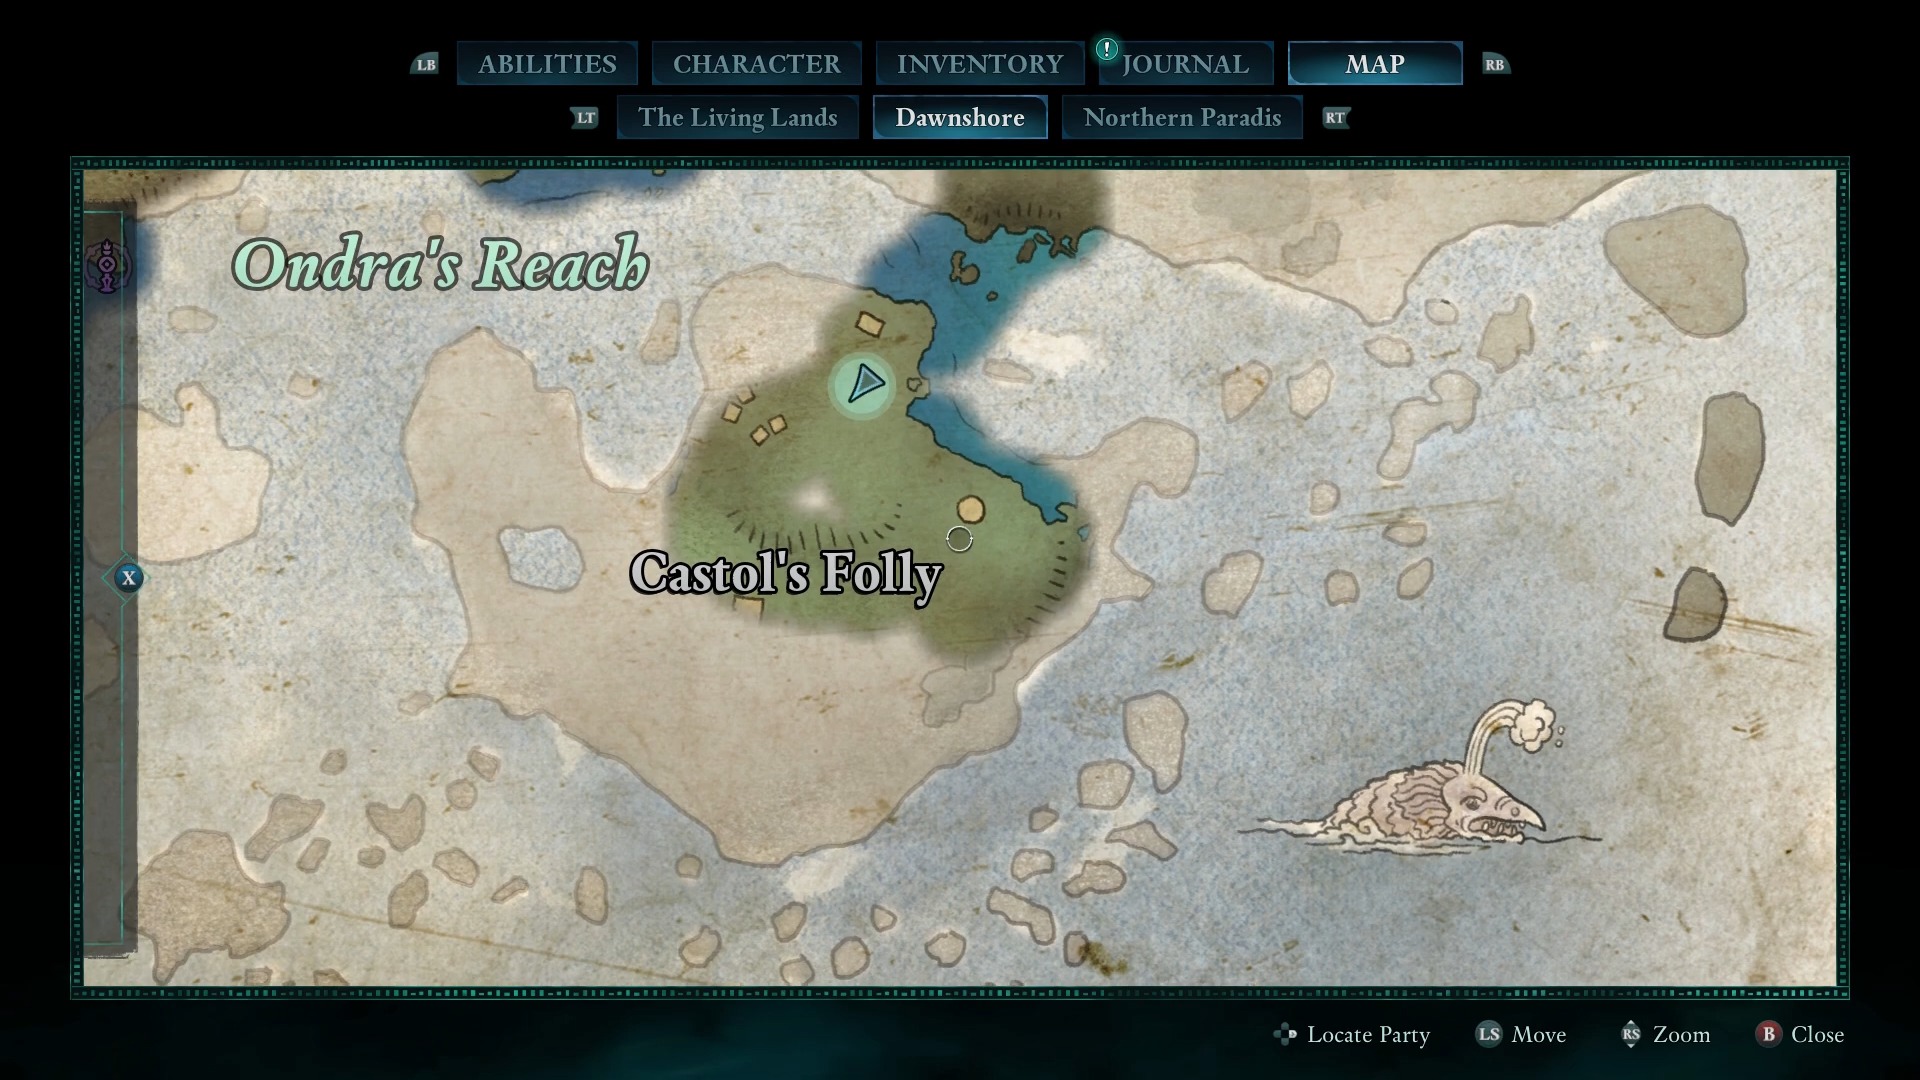
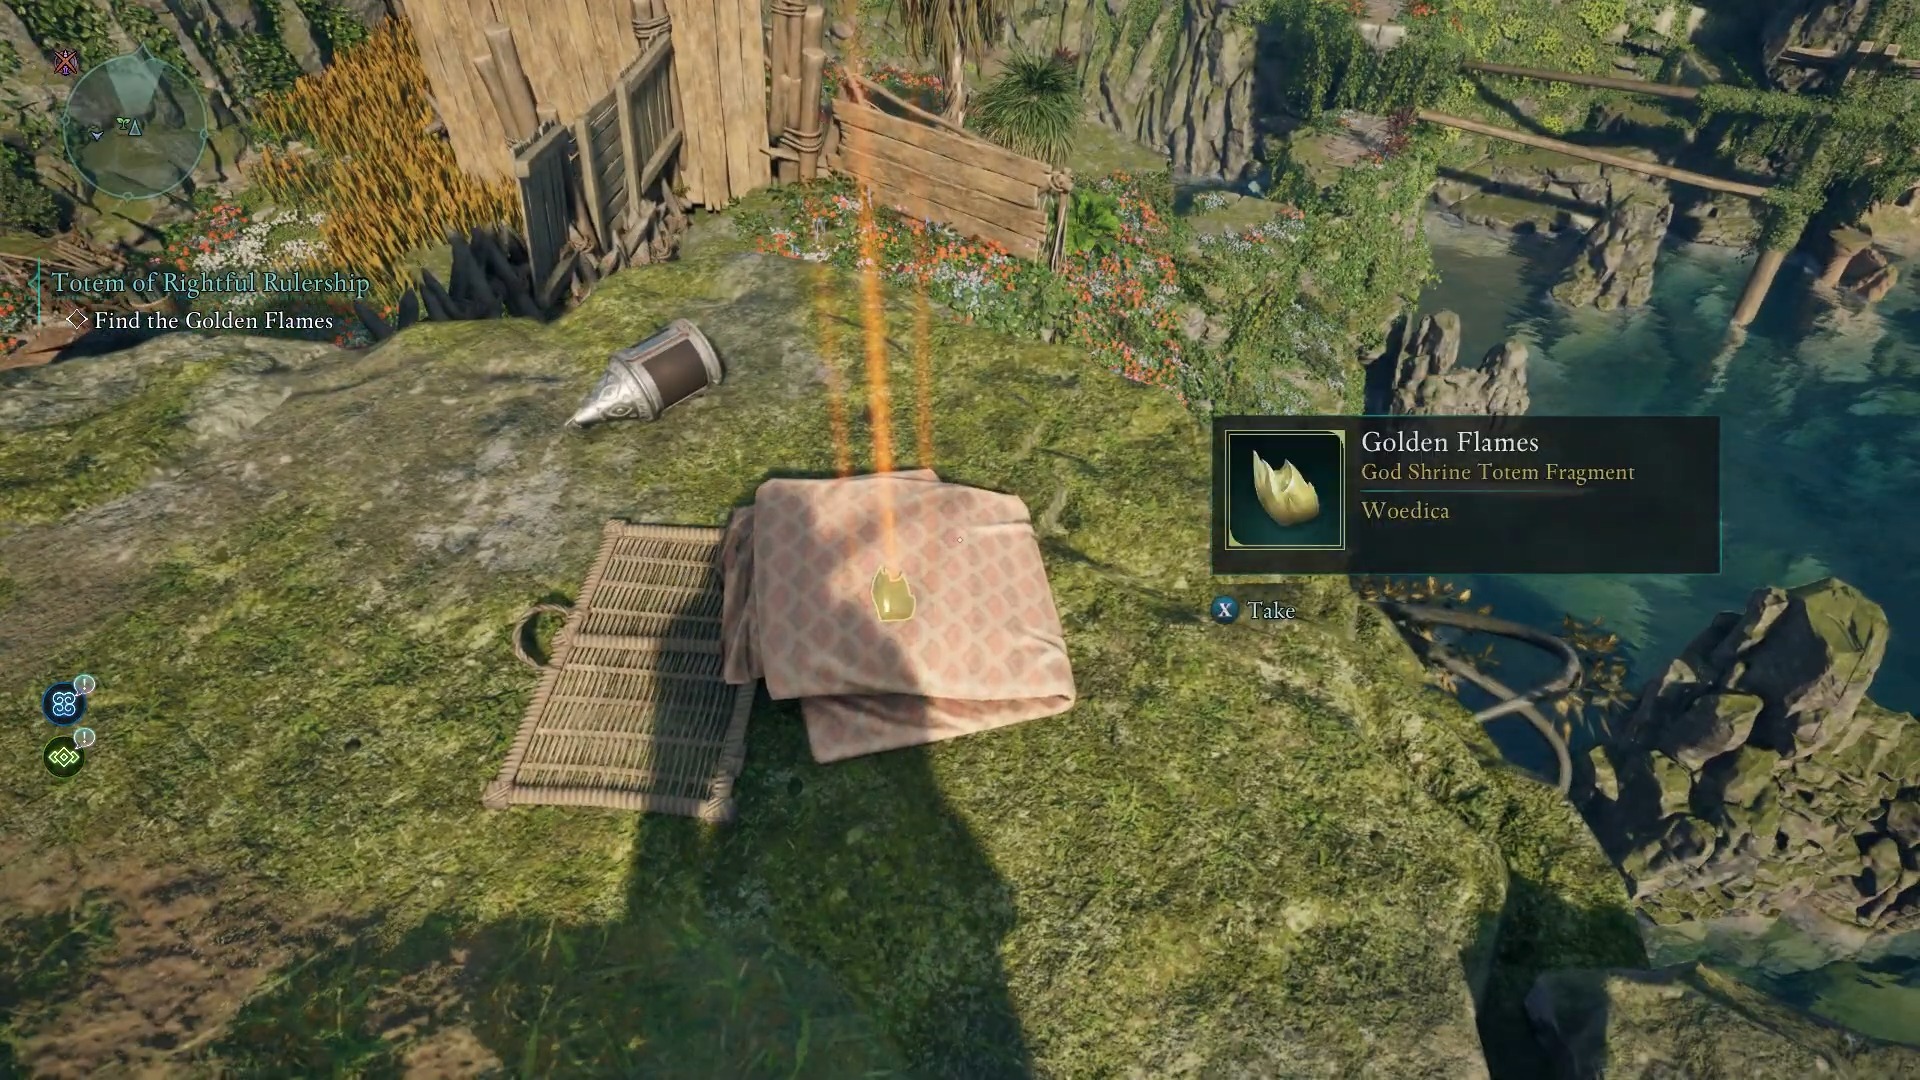
As you venture to apprehend the smugglers in that region, where a reward is offered, keep an eye out for the Golden Flames emblem. It’s hidden within a narrow passage beneath some scaffolding, with boulders along the mountain side as stepping stones. By locating this totem, you will achieve the Totem of Rightful Leadership.
Avowed Totem of Rightful Rulership buffs (Scales of the Oathbinder)
Emerald Stair Totem – Totem of Defiance
How to find all of the pieces for Totem of Defiance in Emerald Stair
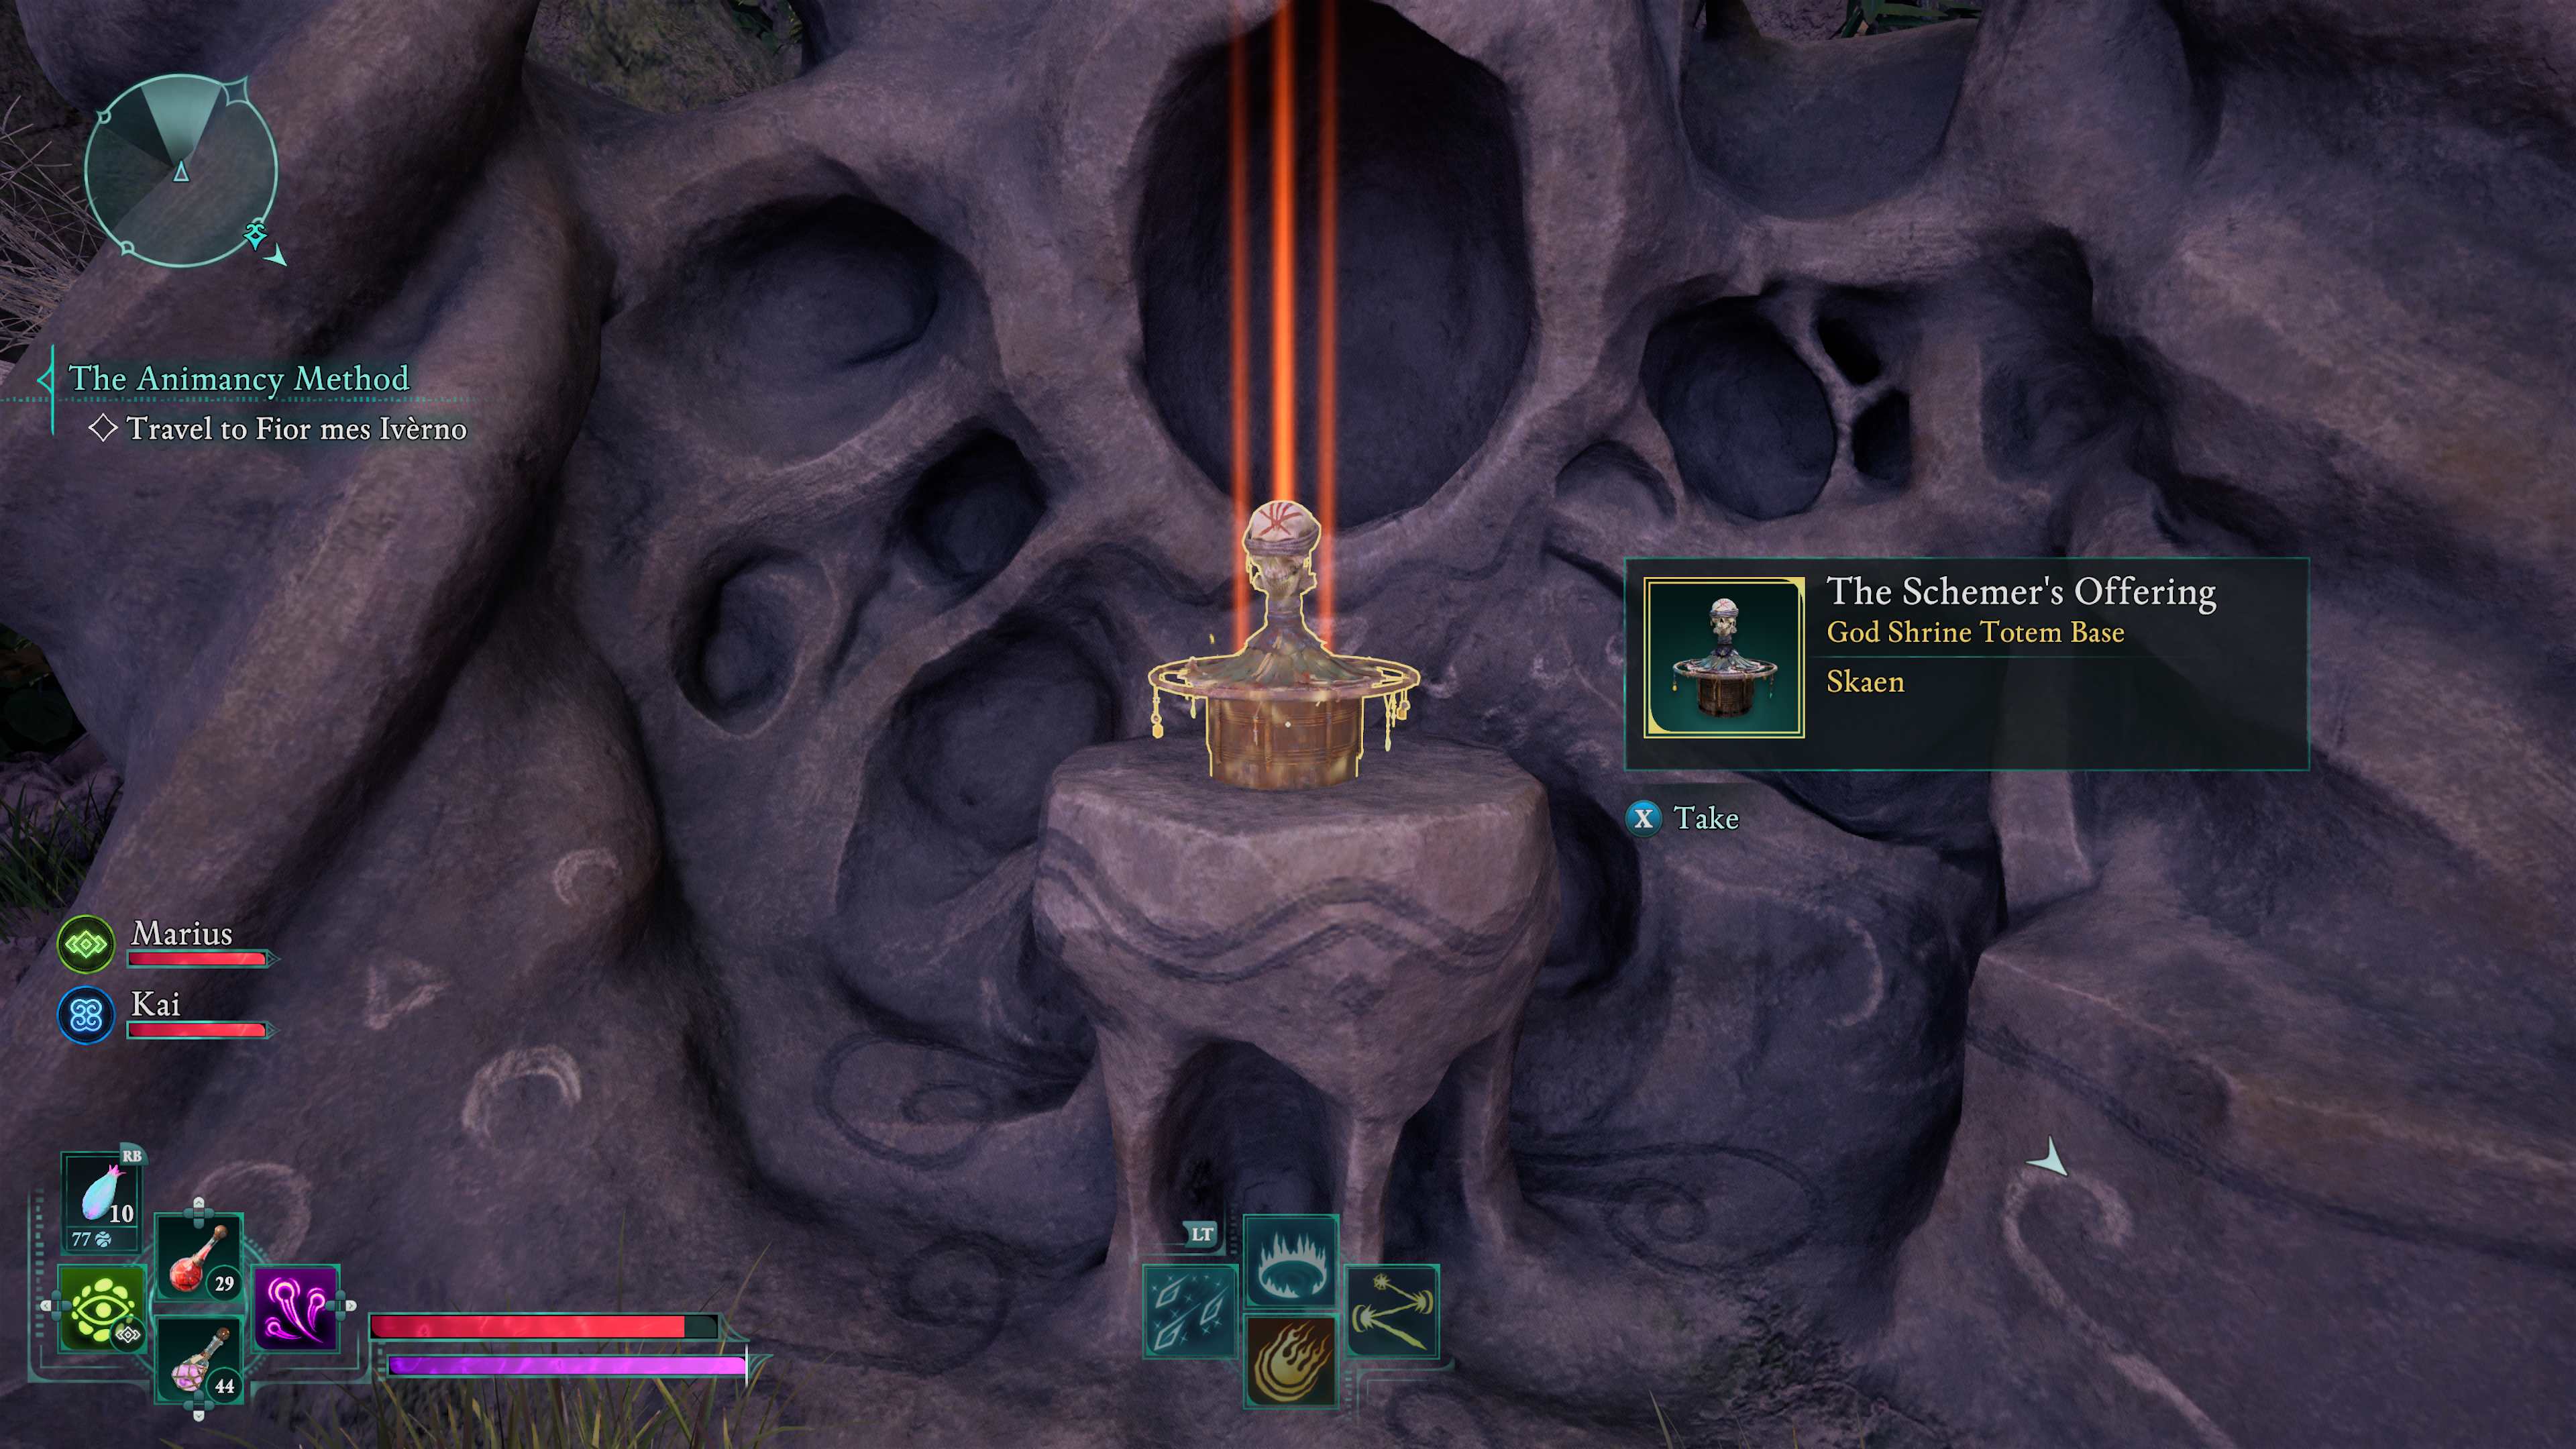
At the Farmer’s Market, you’ll encounter a merchant named Lluisa Meleer. She sells hints for the Emerald Stair Totem puzzle. While these clues aren’t essential for gathering the pieces, they can certainly be useful! Initially, your objective is to discover ‘The Schemer’s Offering’, which serves as the base.
Avowed – The Schemer’s Offering – Totem Base
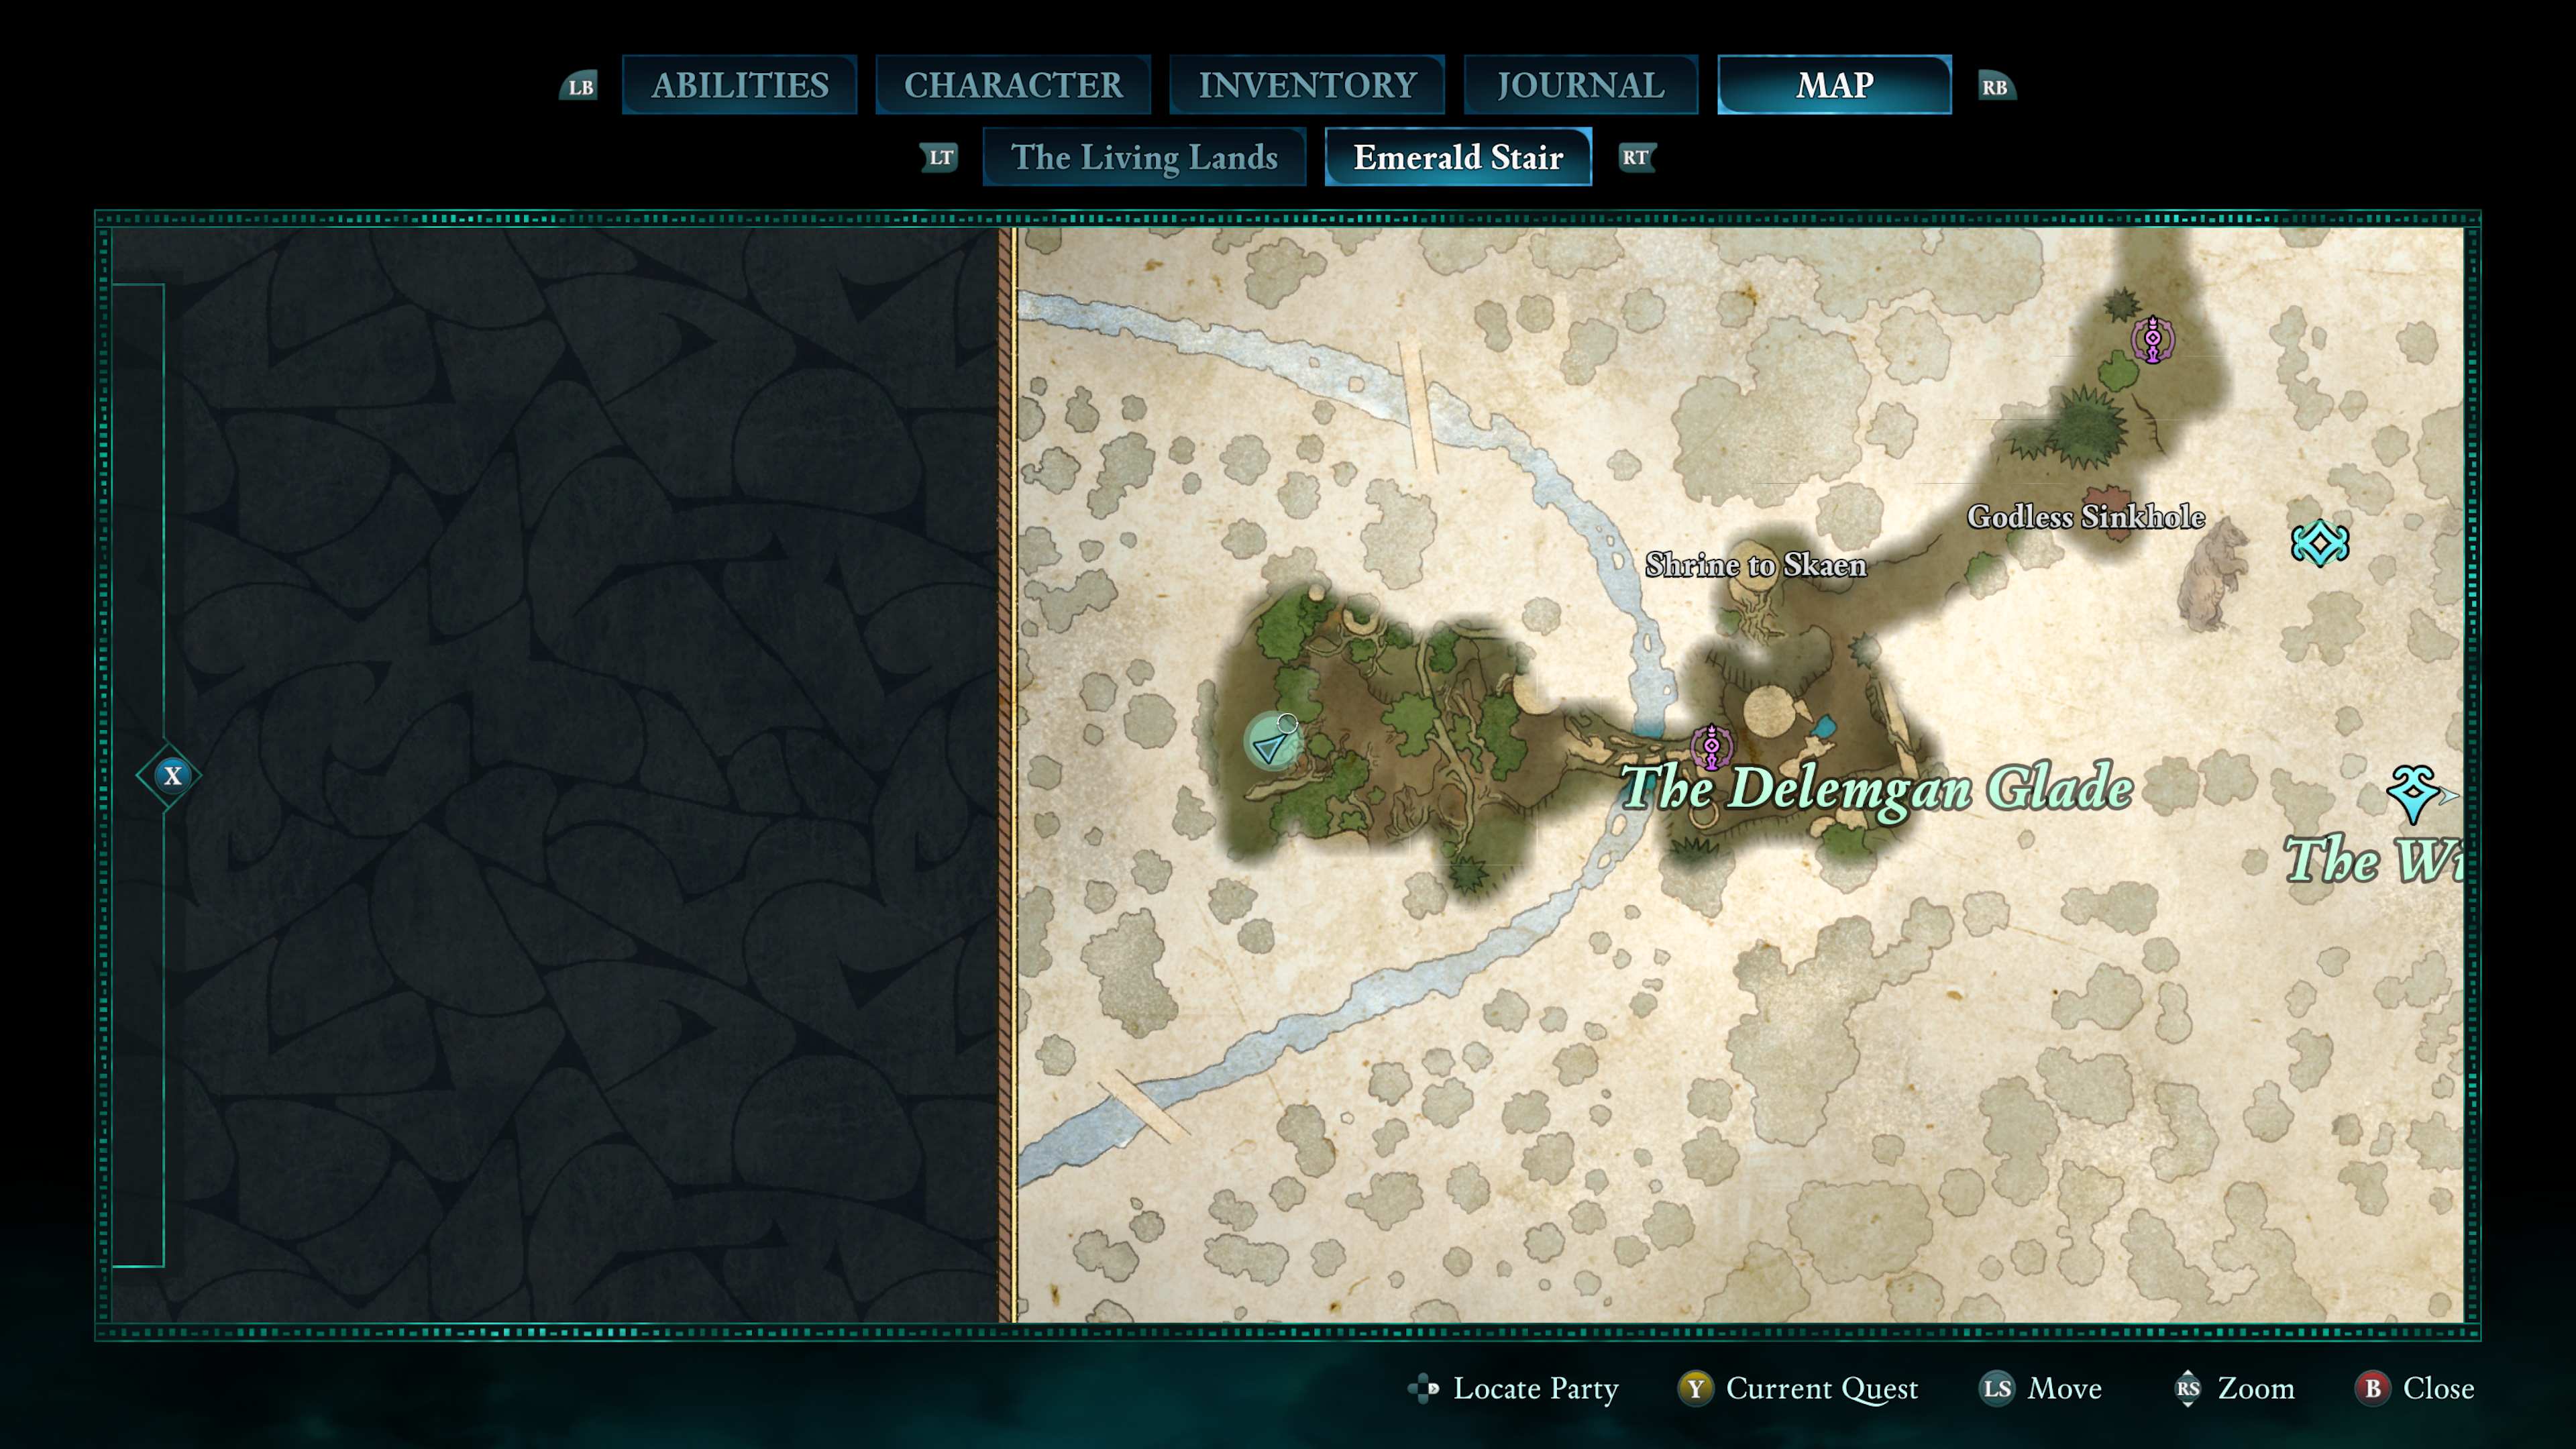
To find the totem of the Quiet Slave, an ancient tower you must brave.
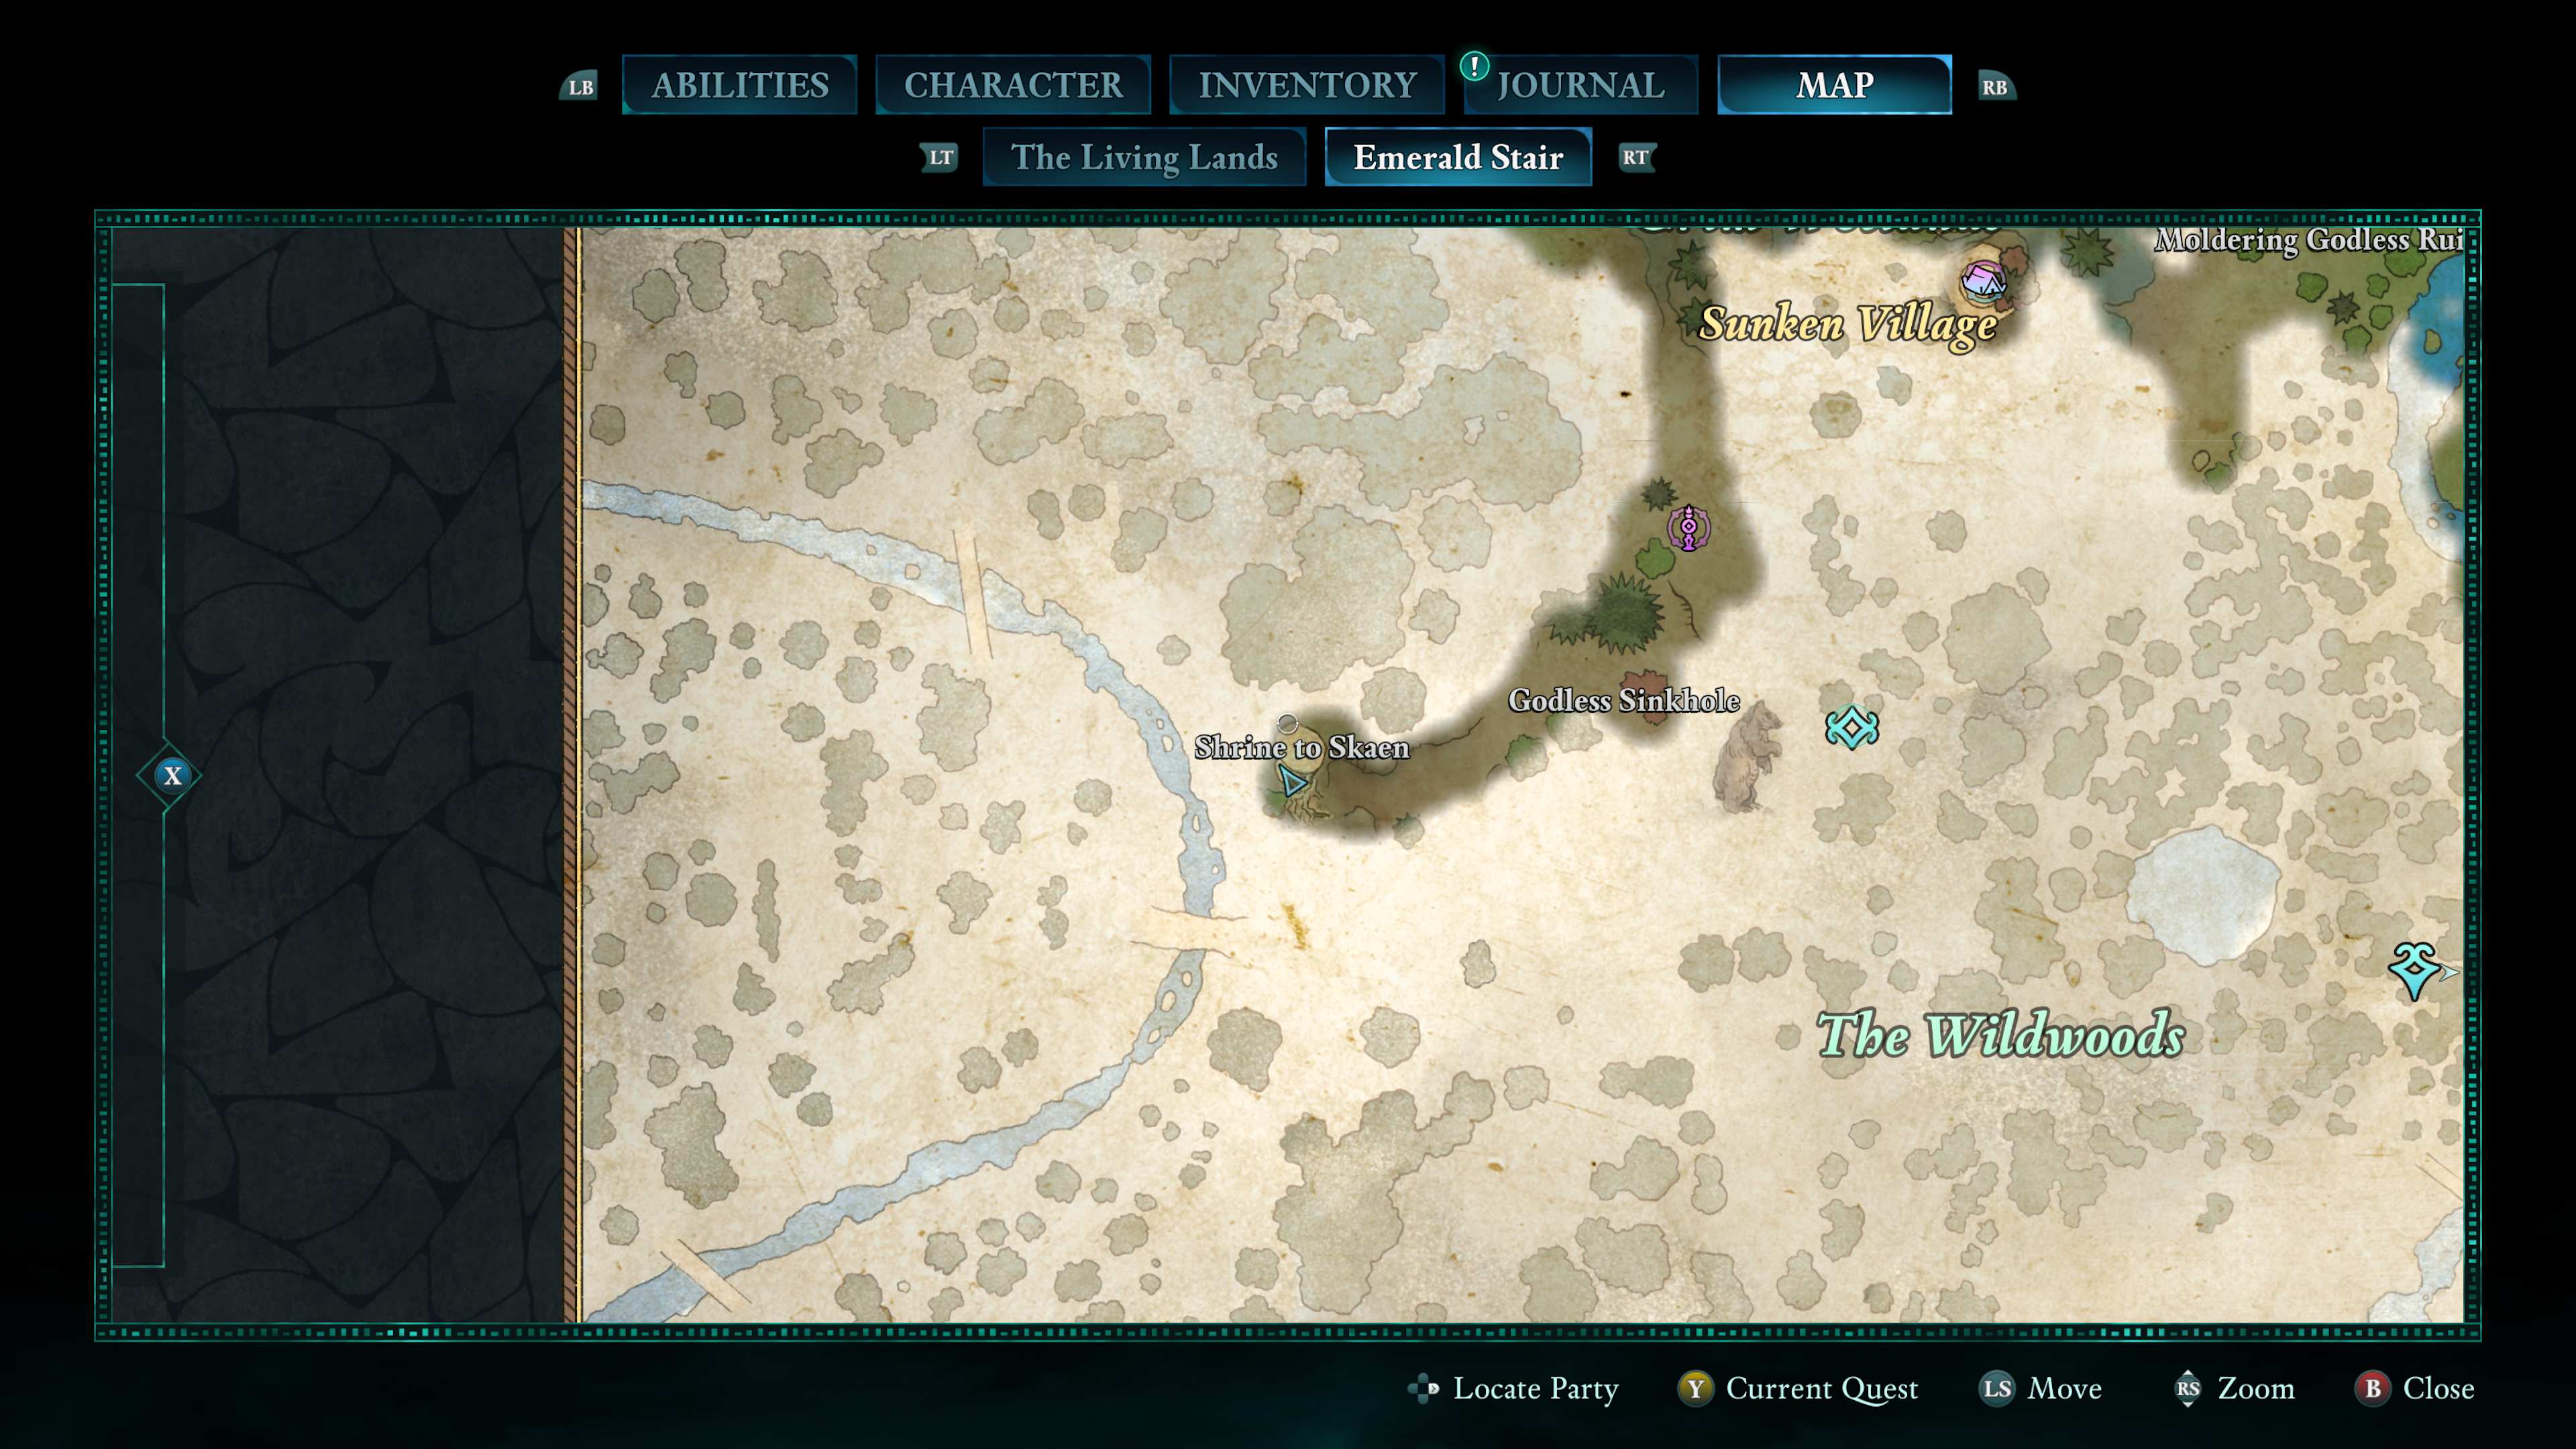
The Delemgan Glade houses the location you seek, denoted by the map marker overhead. You should aim for the Shrine of Skaen, and make use of the nearby platforms to ascend to its peak.
Avowed – Obsidian Prayer Beads location
In a verdant glade where old ruins crumble, you will find beads dark and umbral.
The Obsidian Prayer Beads are conveniently located, not too far from The Schemer’s Offering base. You can find them on a raised platform, situated right across the river from the Delemgan Glade.
Avowed – Effigy necklace location
Hidden in ruins of heathens long gone, the octet of skulls sings its silent song.

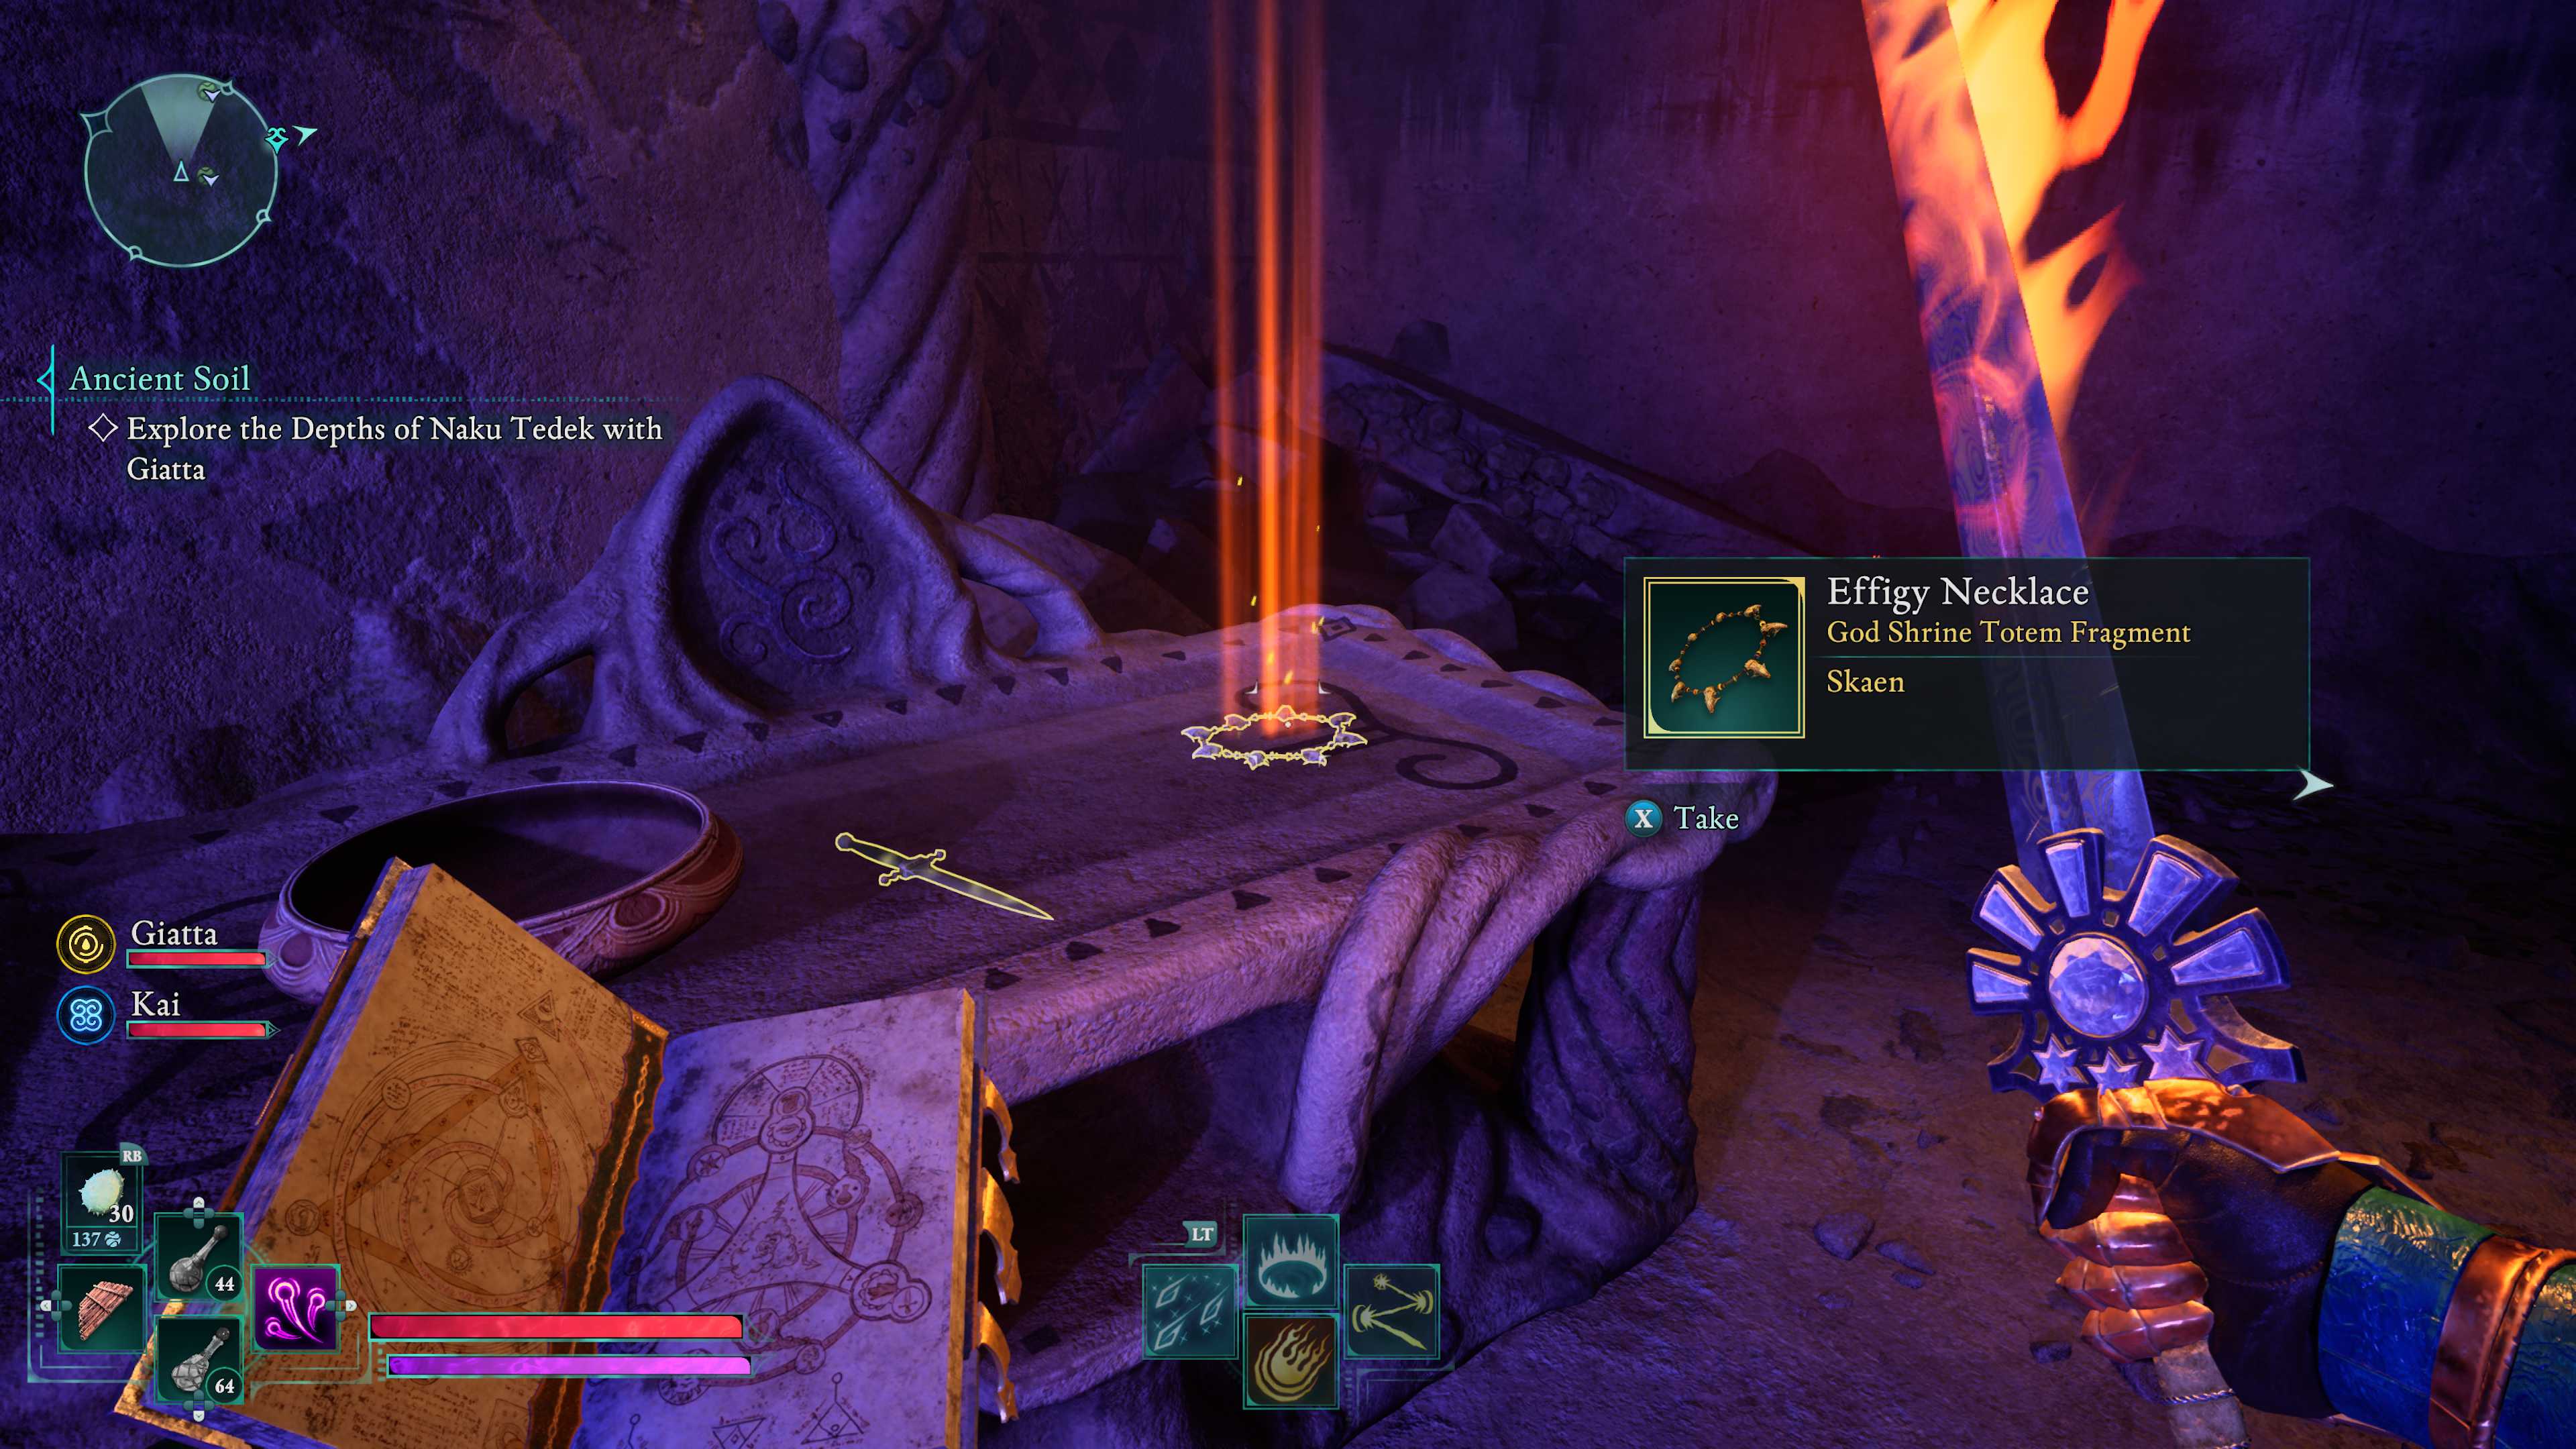
We almost missed it because Naku Tedek is a labyrinth of various passageways. Make your way to the temple’s rear and trigger the essence generator to open a door. In the first water-filled chamber you encounter, solidify the water to climb onto a branch and traverse to a table where the Effigy Necklace is hidden.
I tried to keep the original meaning while using simpler language and a more conversational tone.
Avowed – Idol of Violent Rebellion location
From on high the third surveys the land, sewing the seeds of revolt near at hand.
MISSING
Avowed – Idol of Secret Hatred location
In a damp hollow its sibling waits full of rage, while its previous owner decays with age.
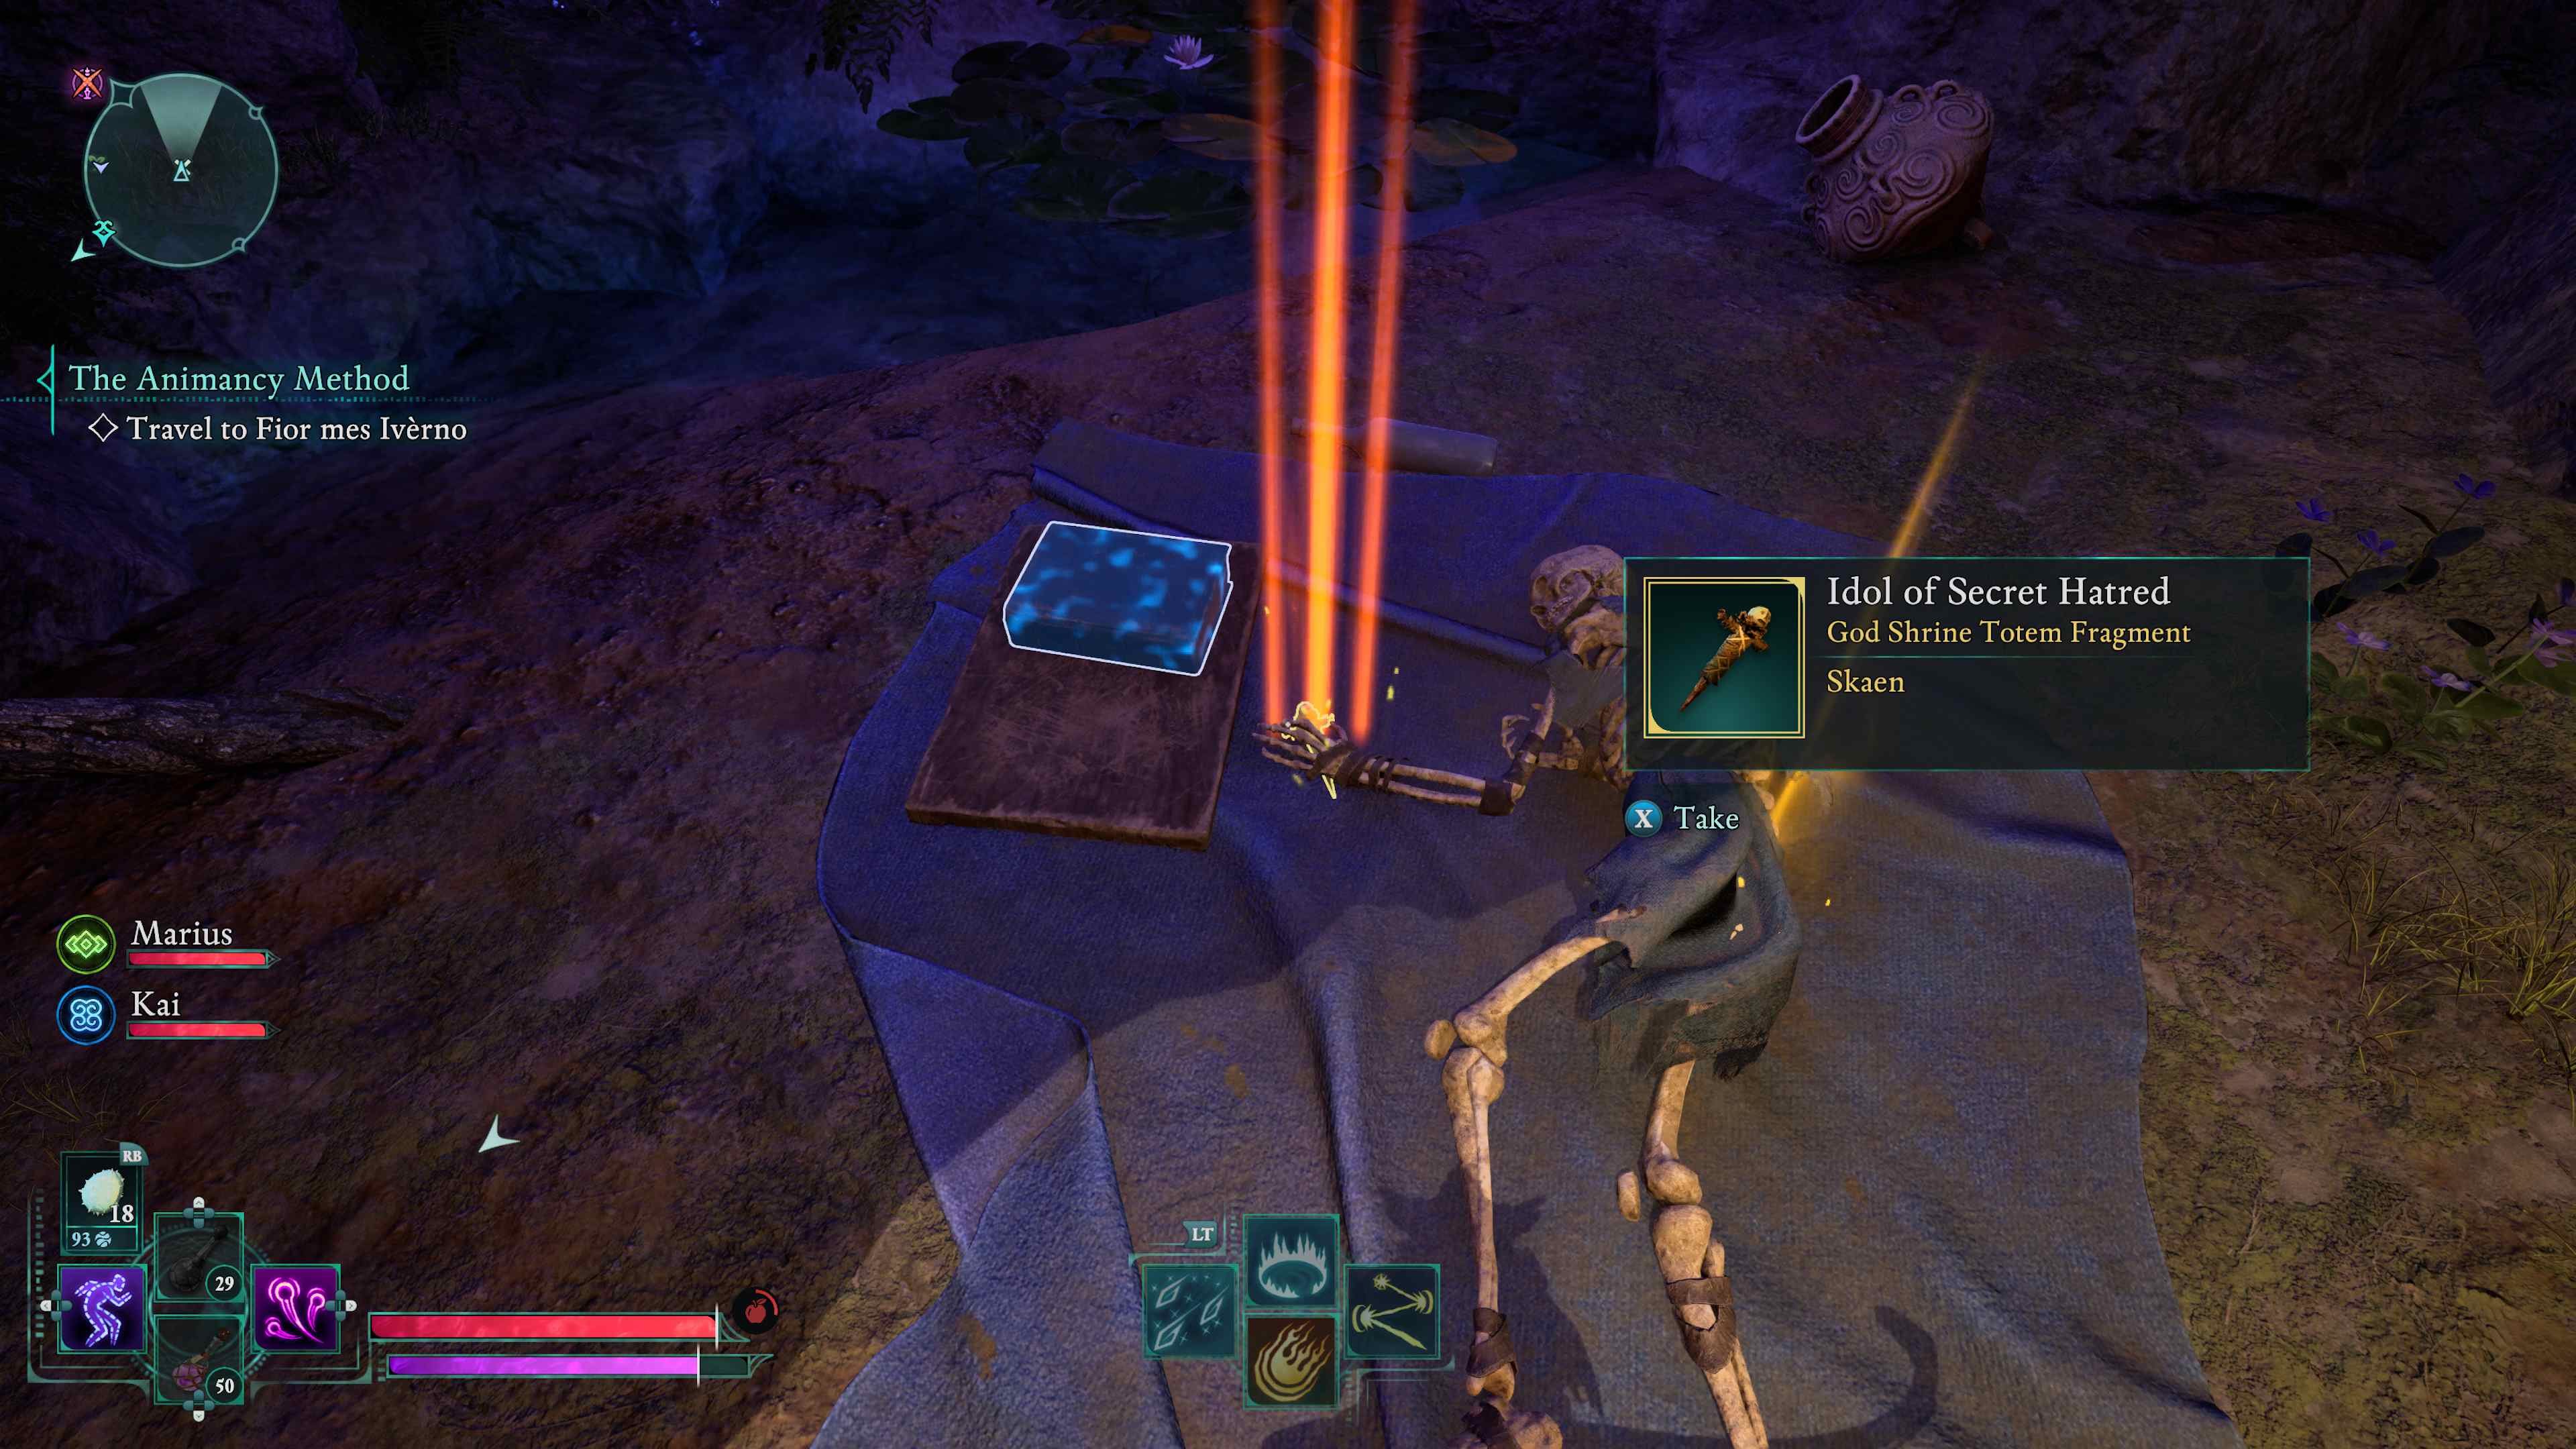
You can easily locate The Ancient Grotto if you’re searching for the Old Nuna Bounty. It’s not too far from the Naku Tedek Grounds, though. Inside the cave, you’ll need to create an icy bridge to cross the dangerous water safely. As you explore one of the narrow tunnel openings, you’ll discover the Idol of Secret Hatred.
Avowed – Idol of Covert Plots location
In a place of worship amidst moldering rot, this idol continues to scheme and plot.
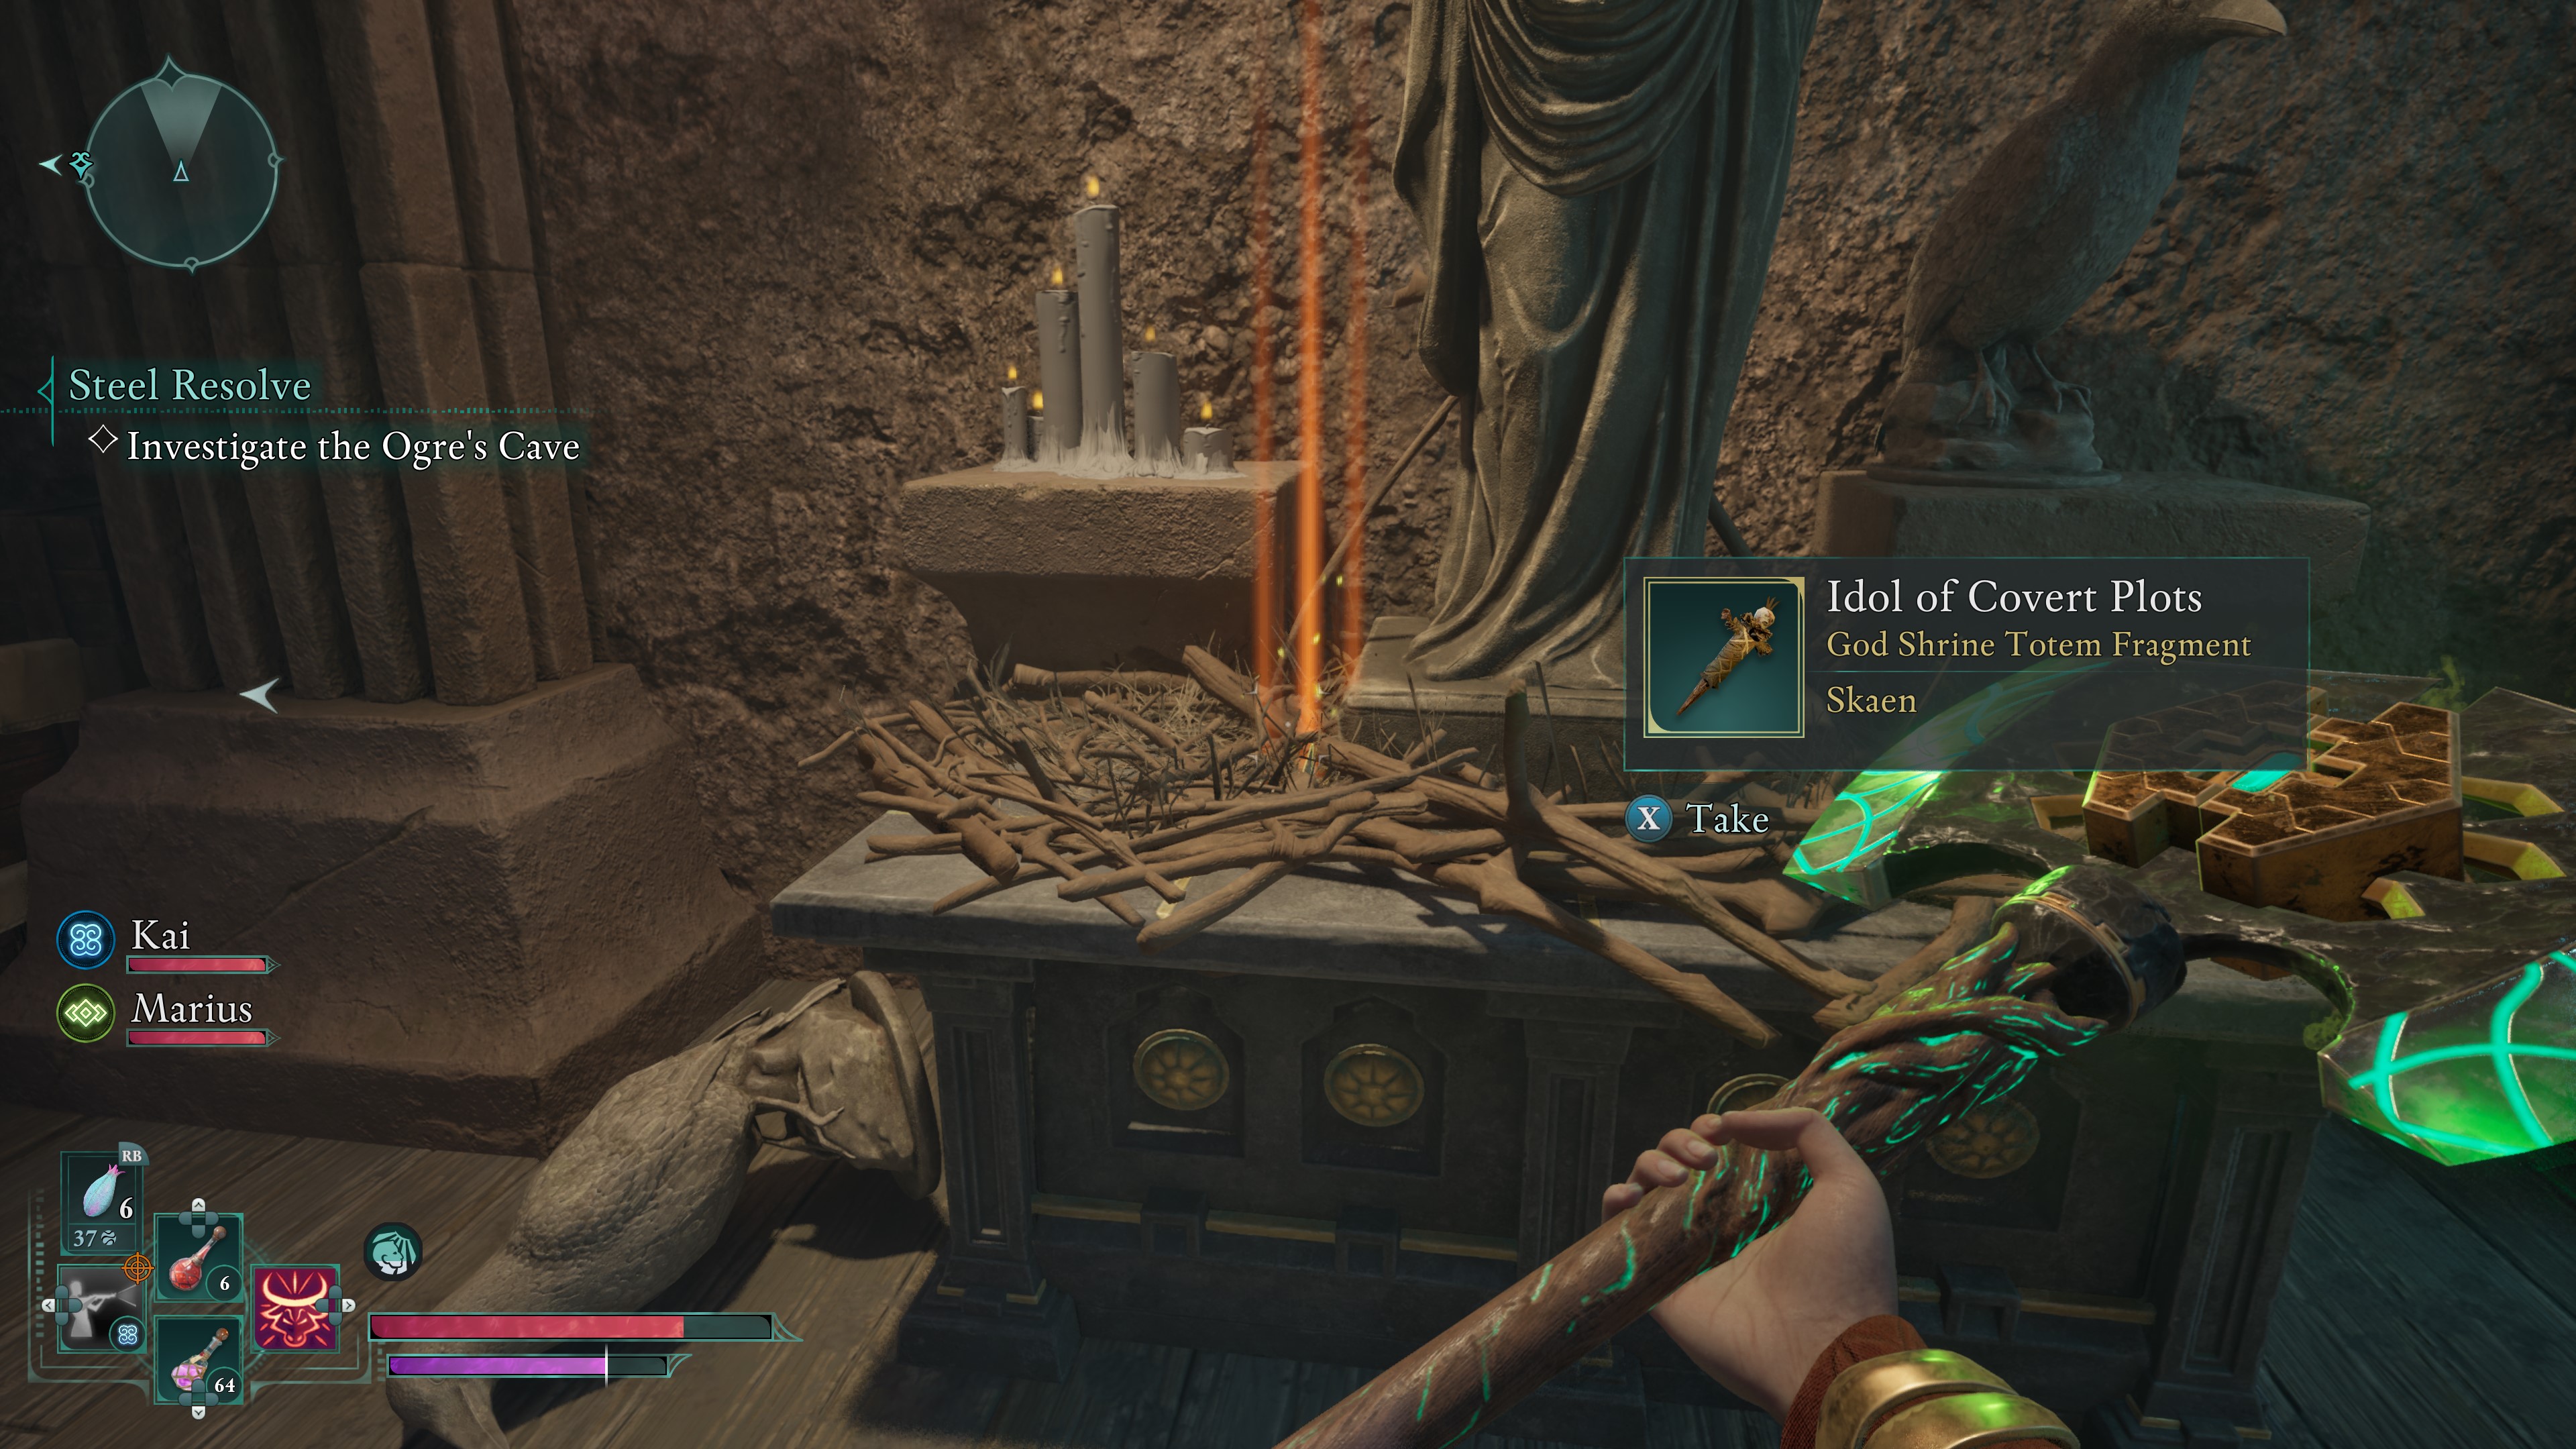
Search for a ruined structure within the Infected Encampment. To gain entry, you should descend from above by way of the roof.
Avowed – Sacrificial Dagger Location
Left alone in fallow fields, the ritual blade thirsts for skin freshly peeled.
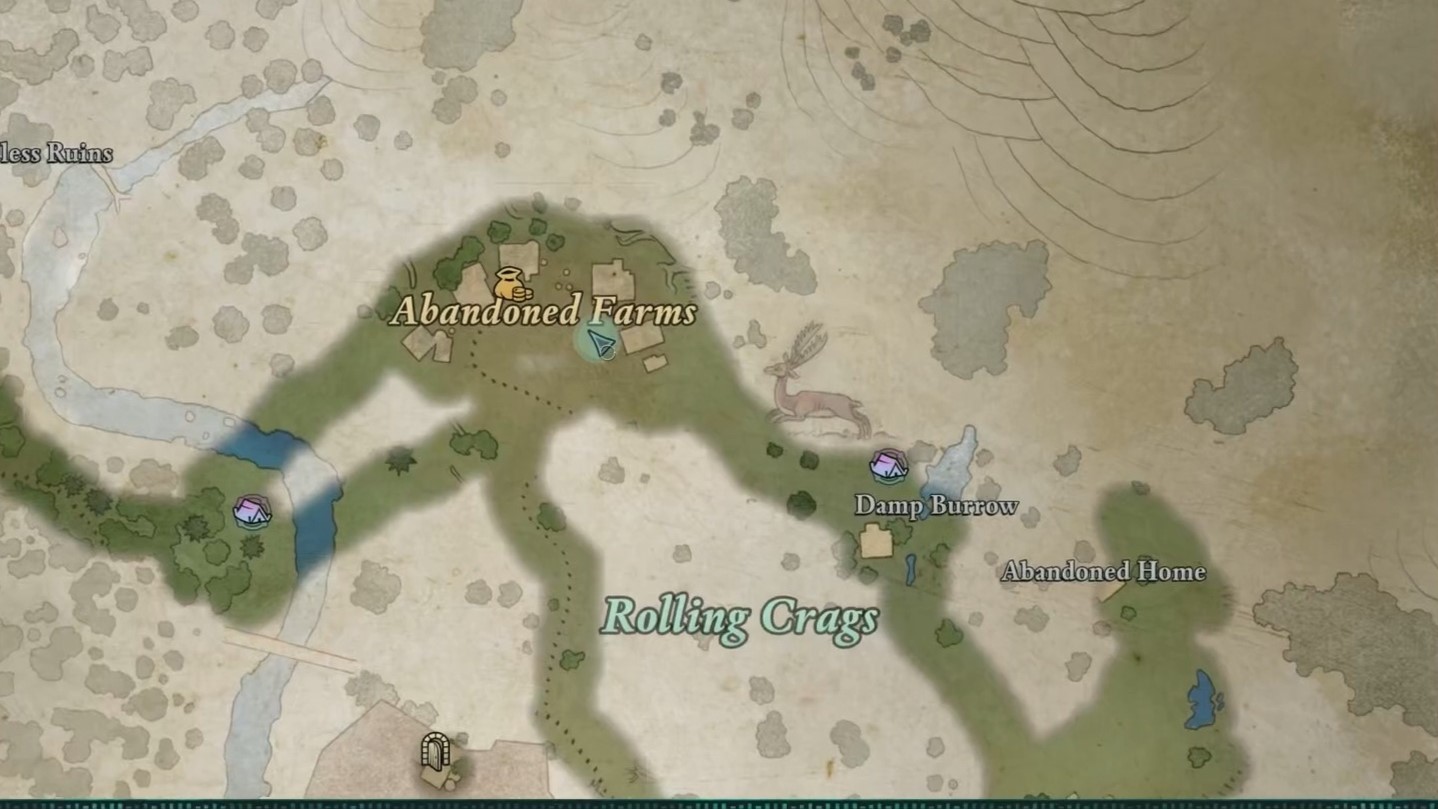
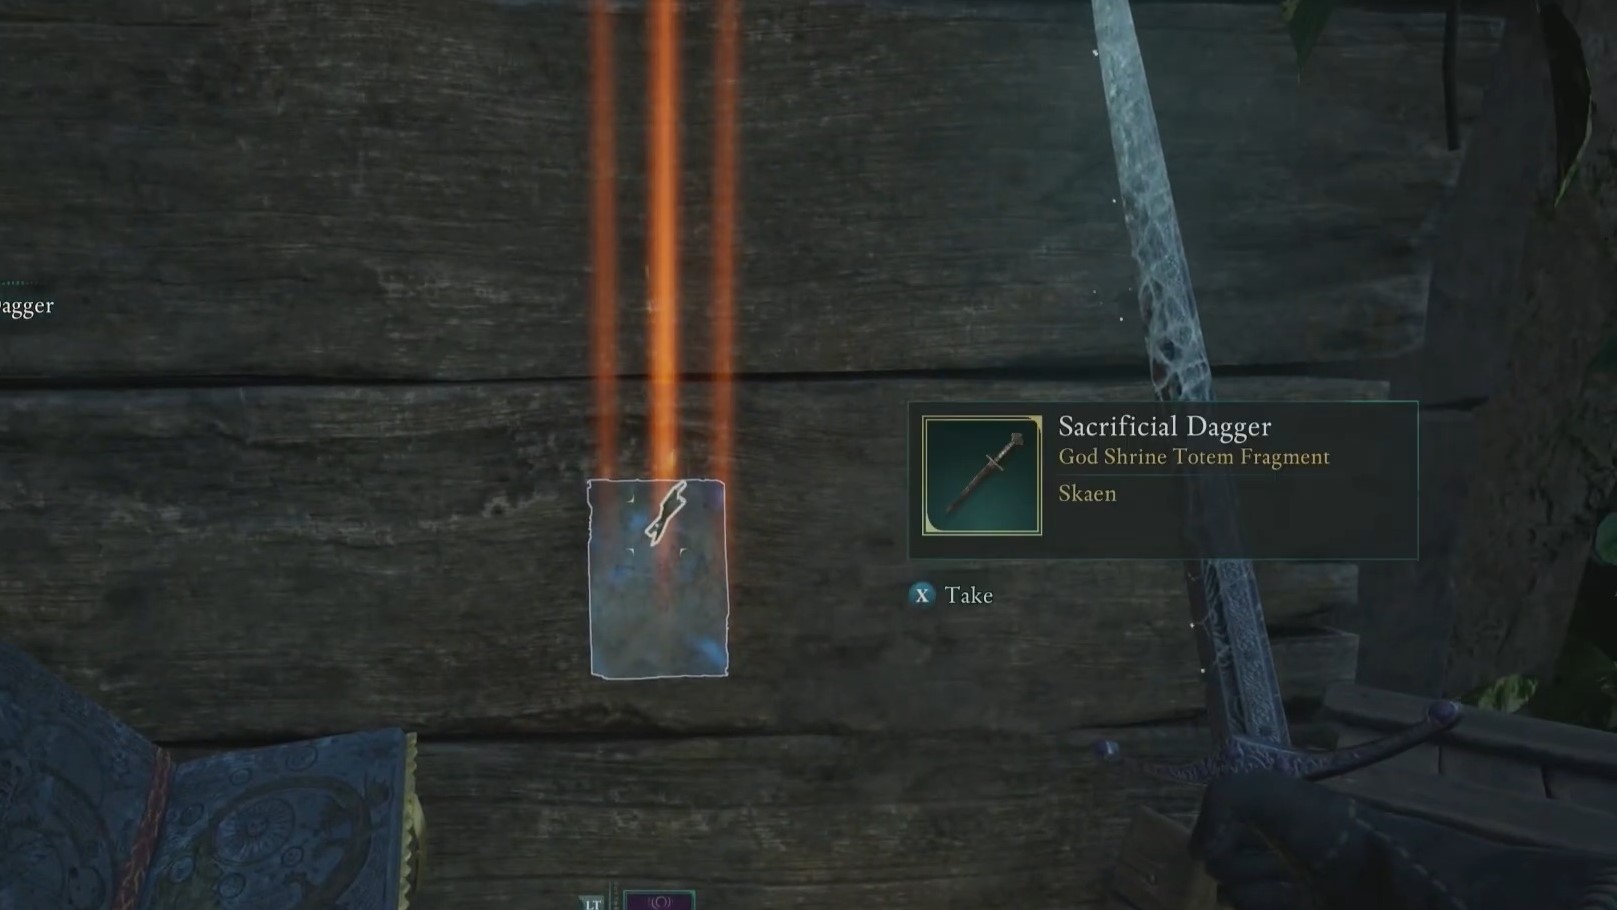
*In one of the deserted farm buildings, you’ll find The Sacrificial Dagger on the wall, specifically in the upper left corner. Keep an eye out for a radiant parchment.*
*Once found, this item will provide you with all the components necessary to assemble the Totem of Defiance.*
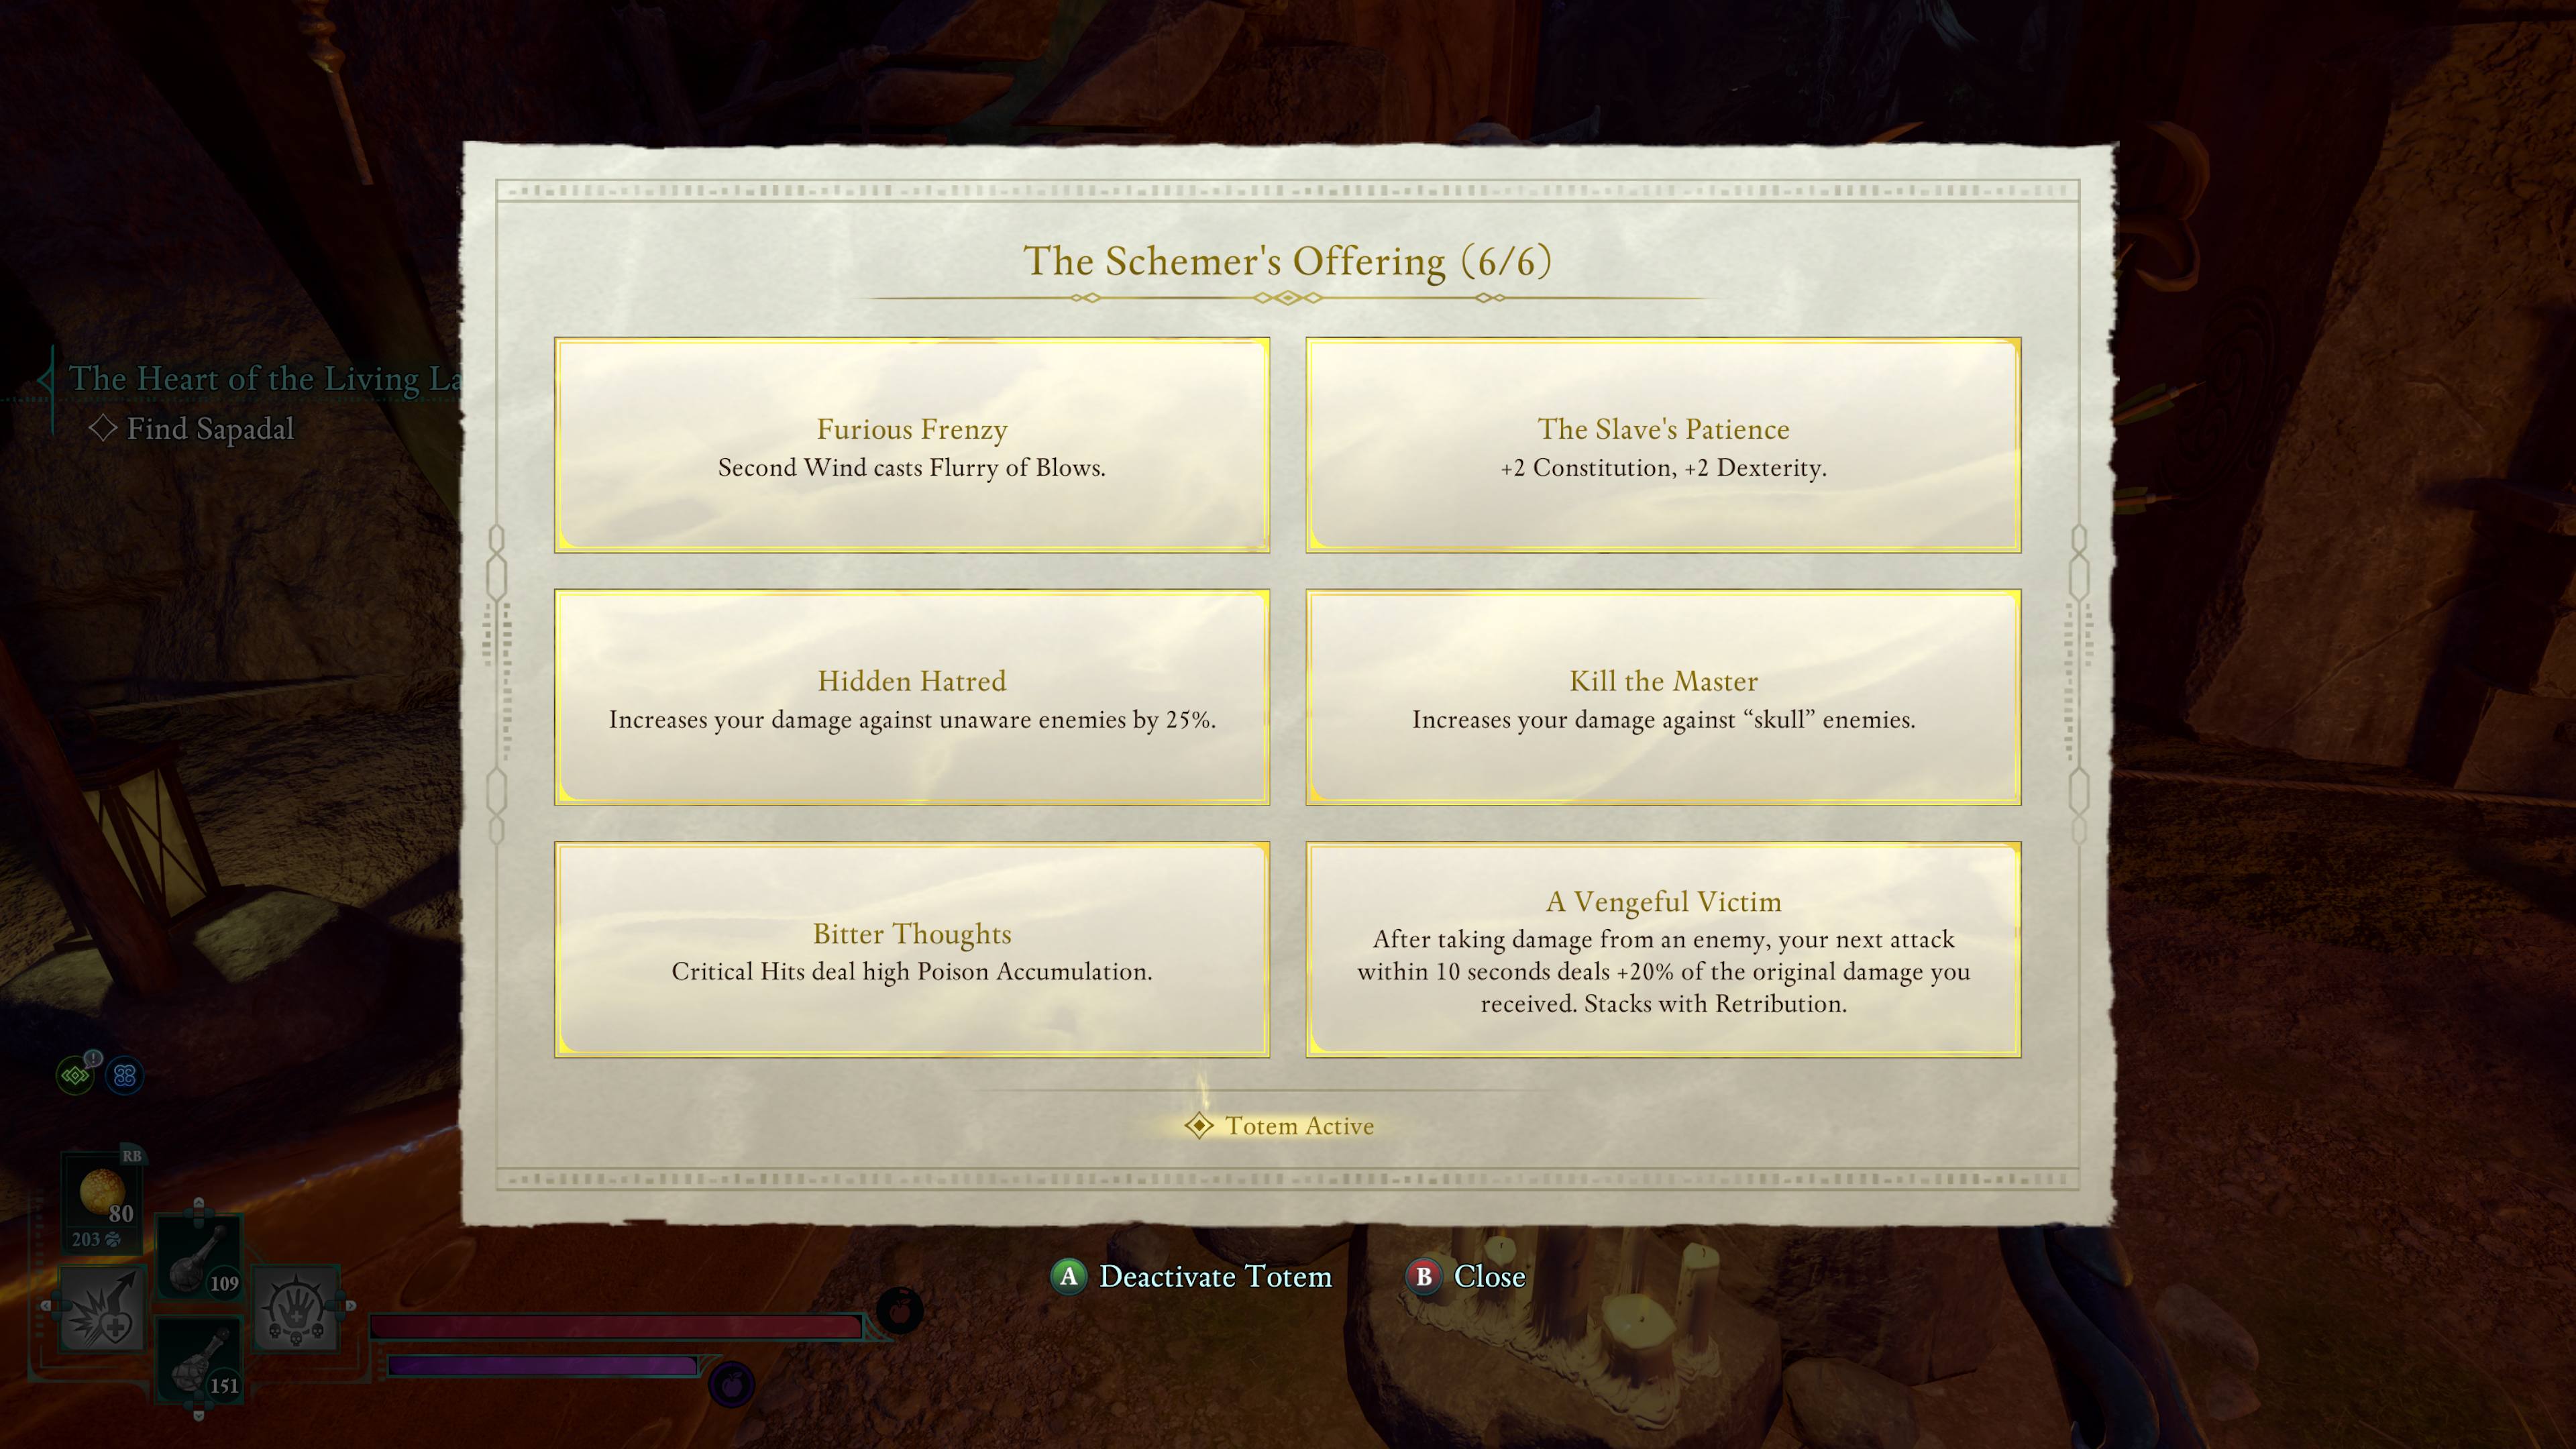
Avowed Totem of Defiance buffs (The Schema’s Offering)
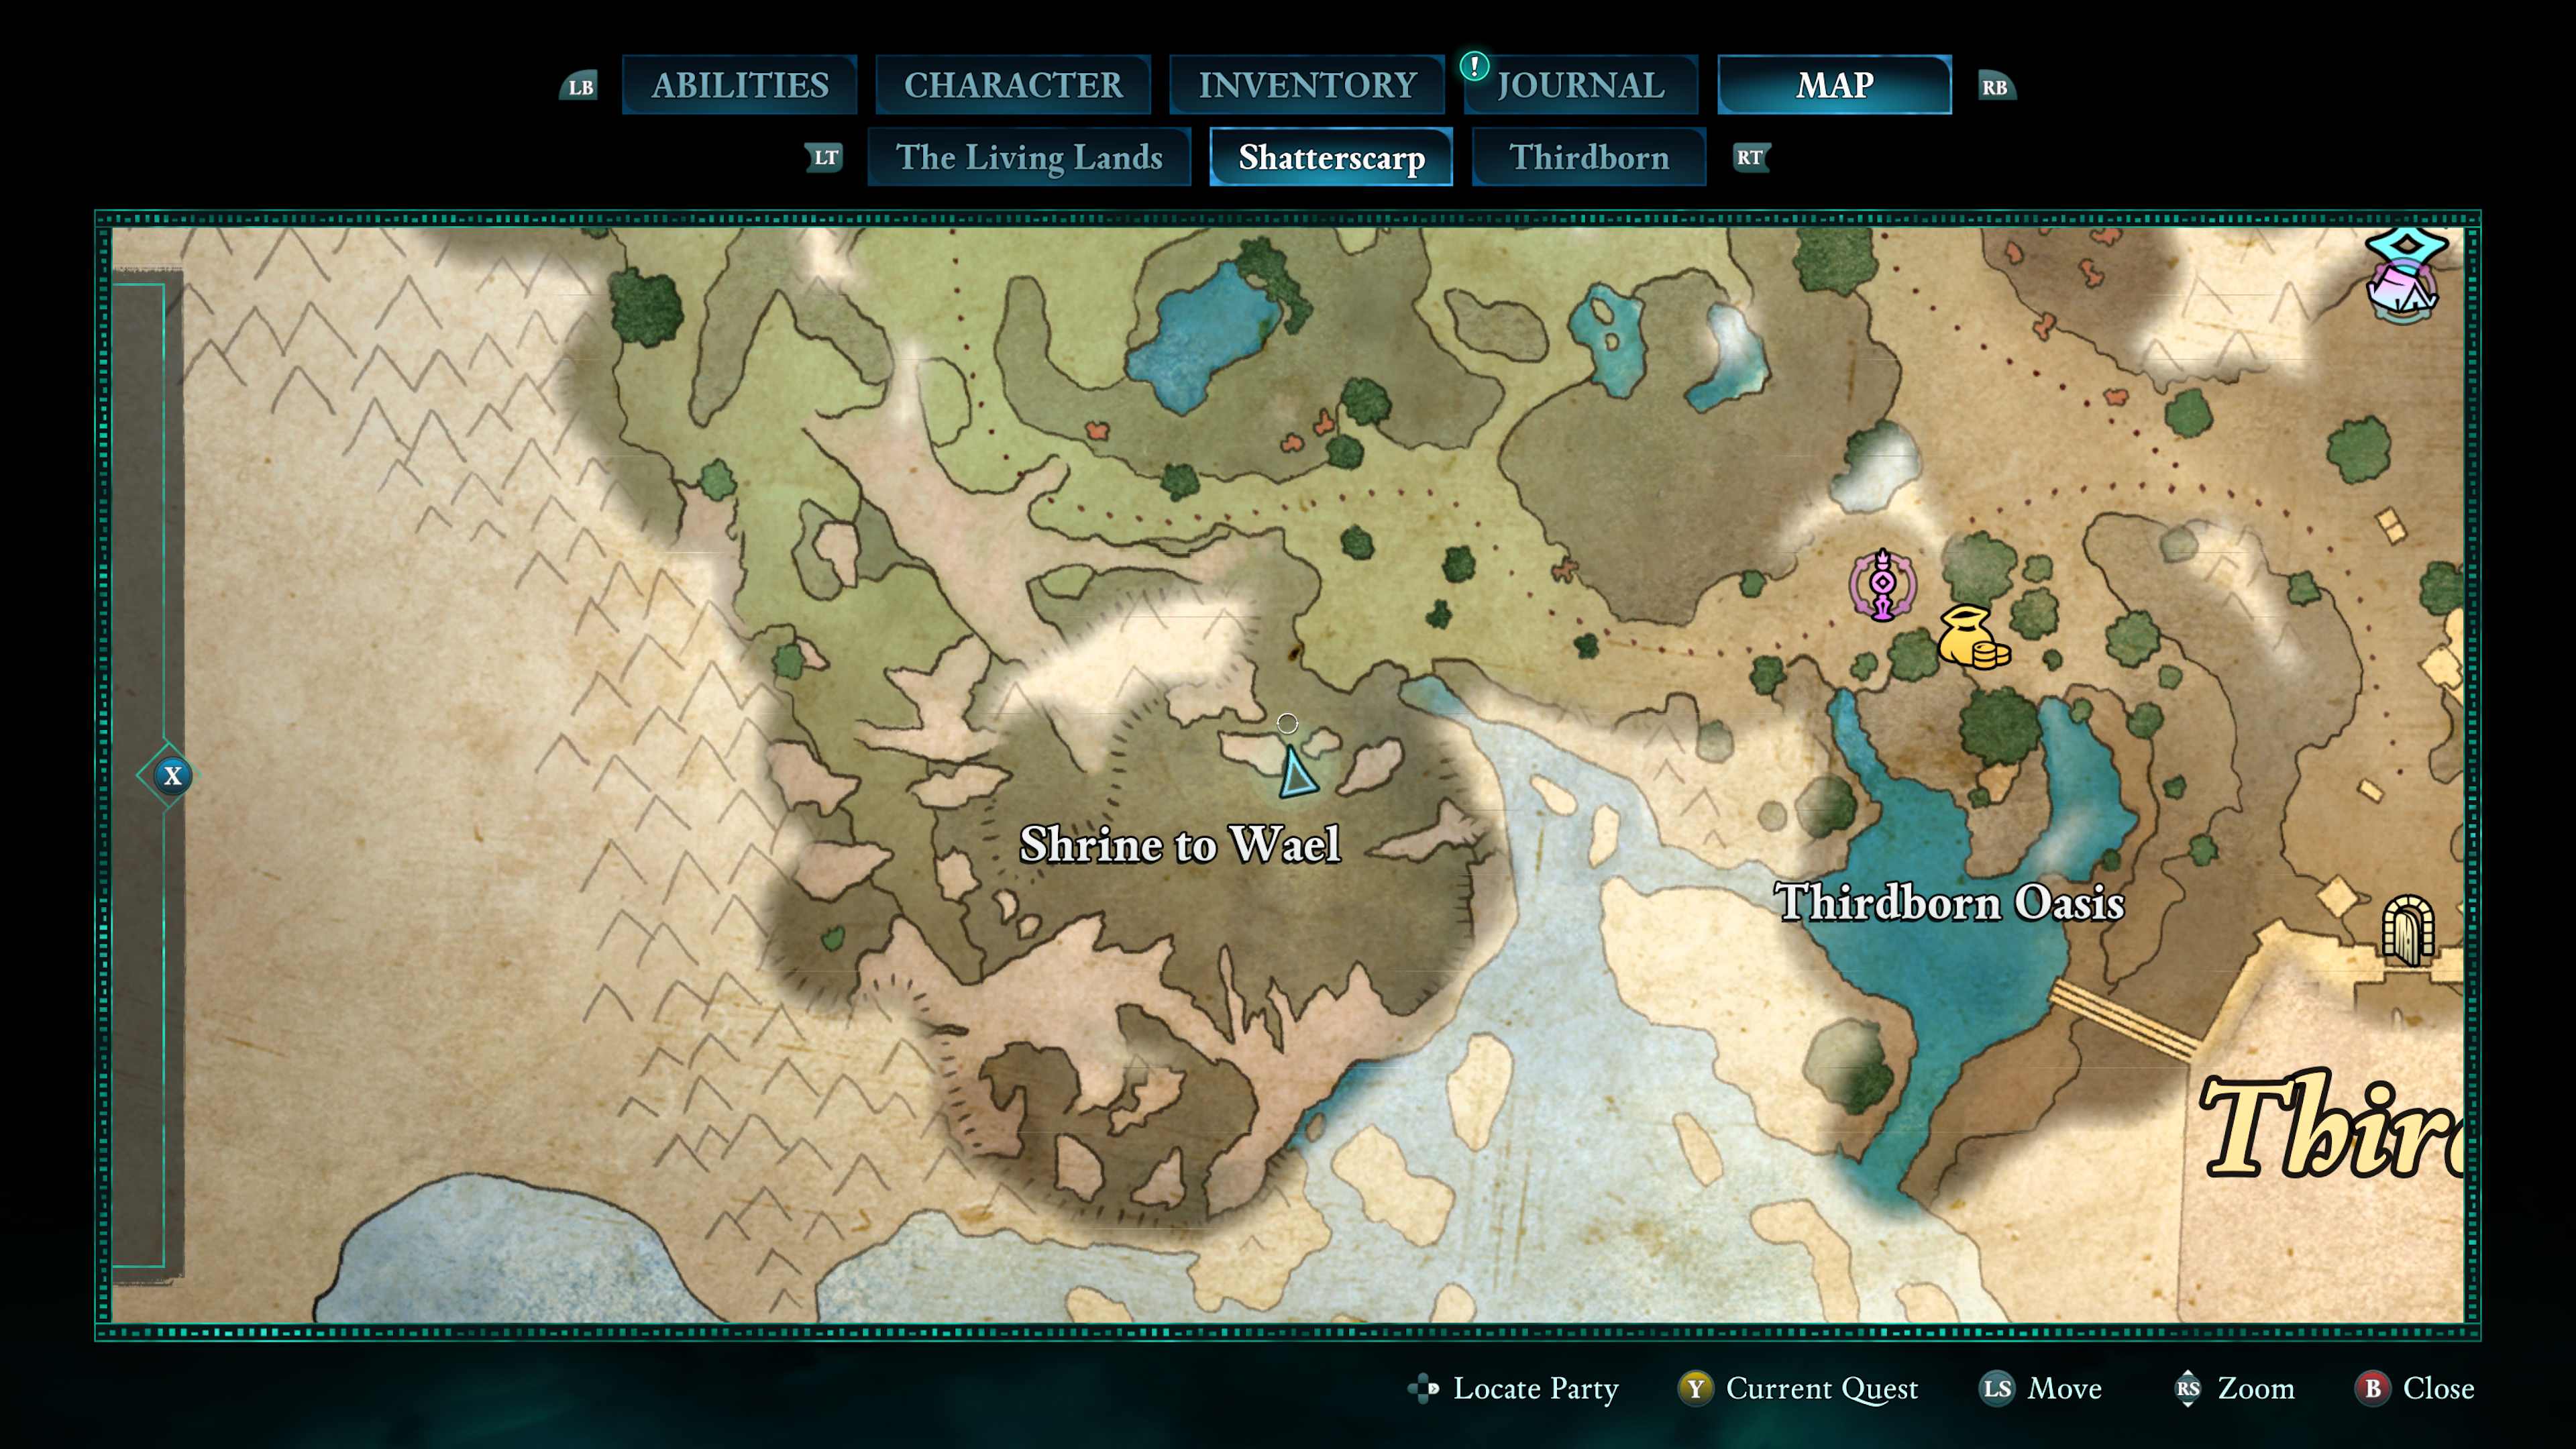
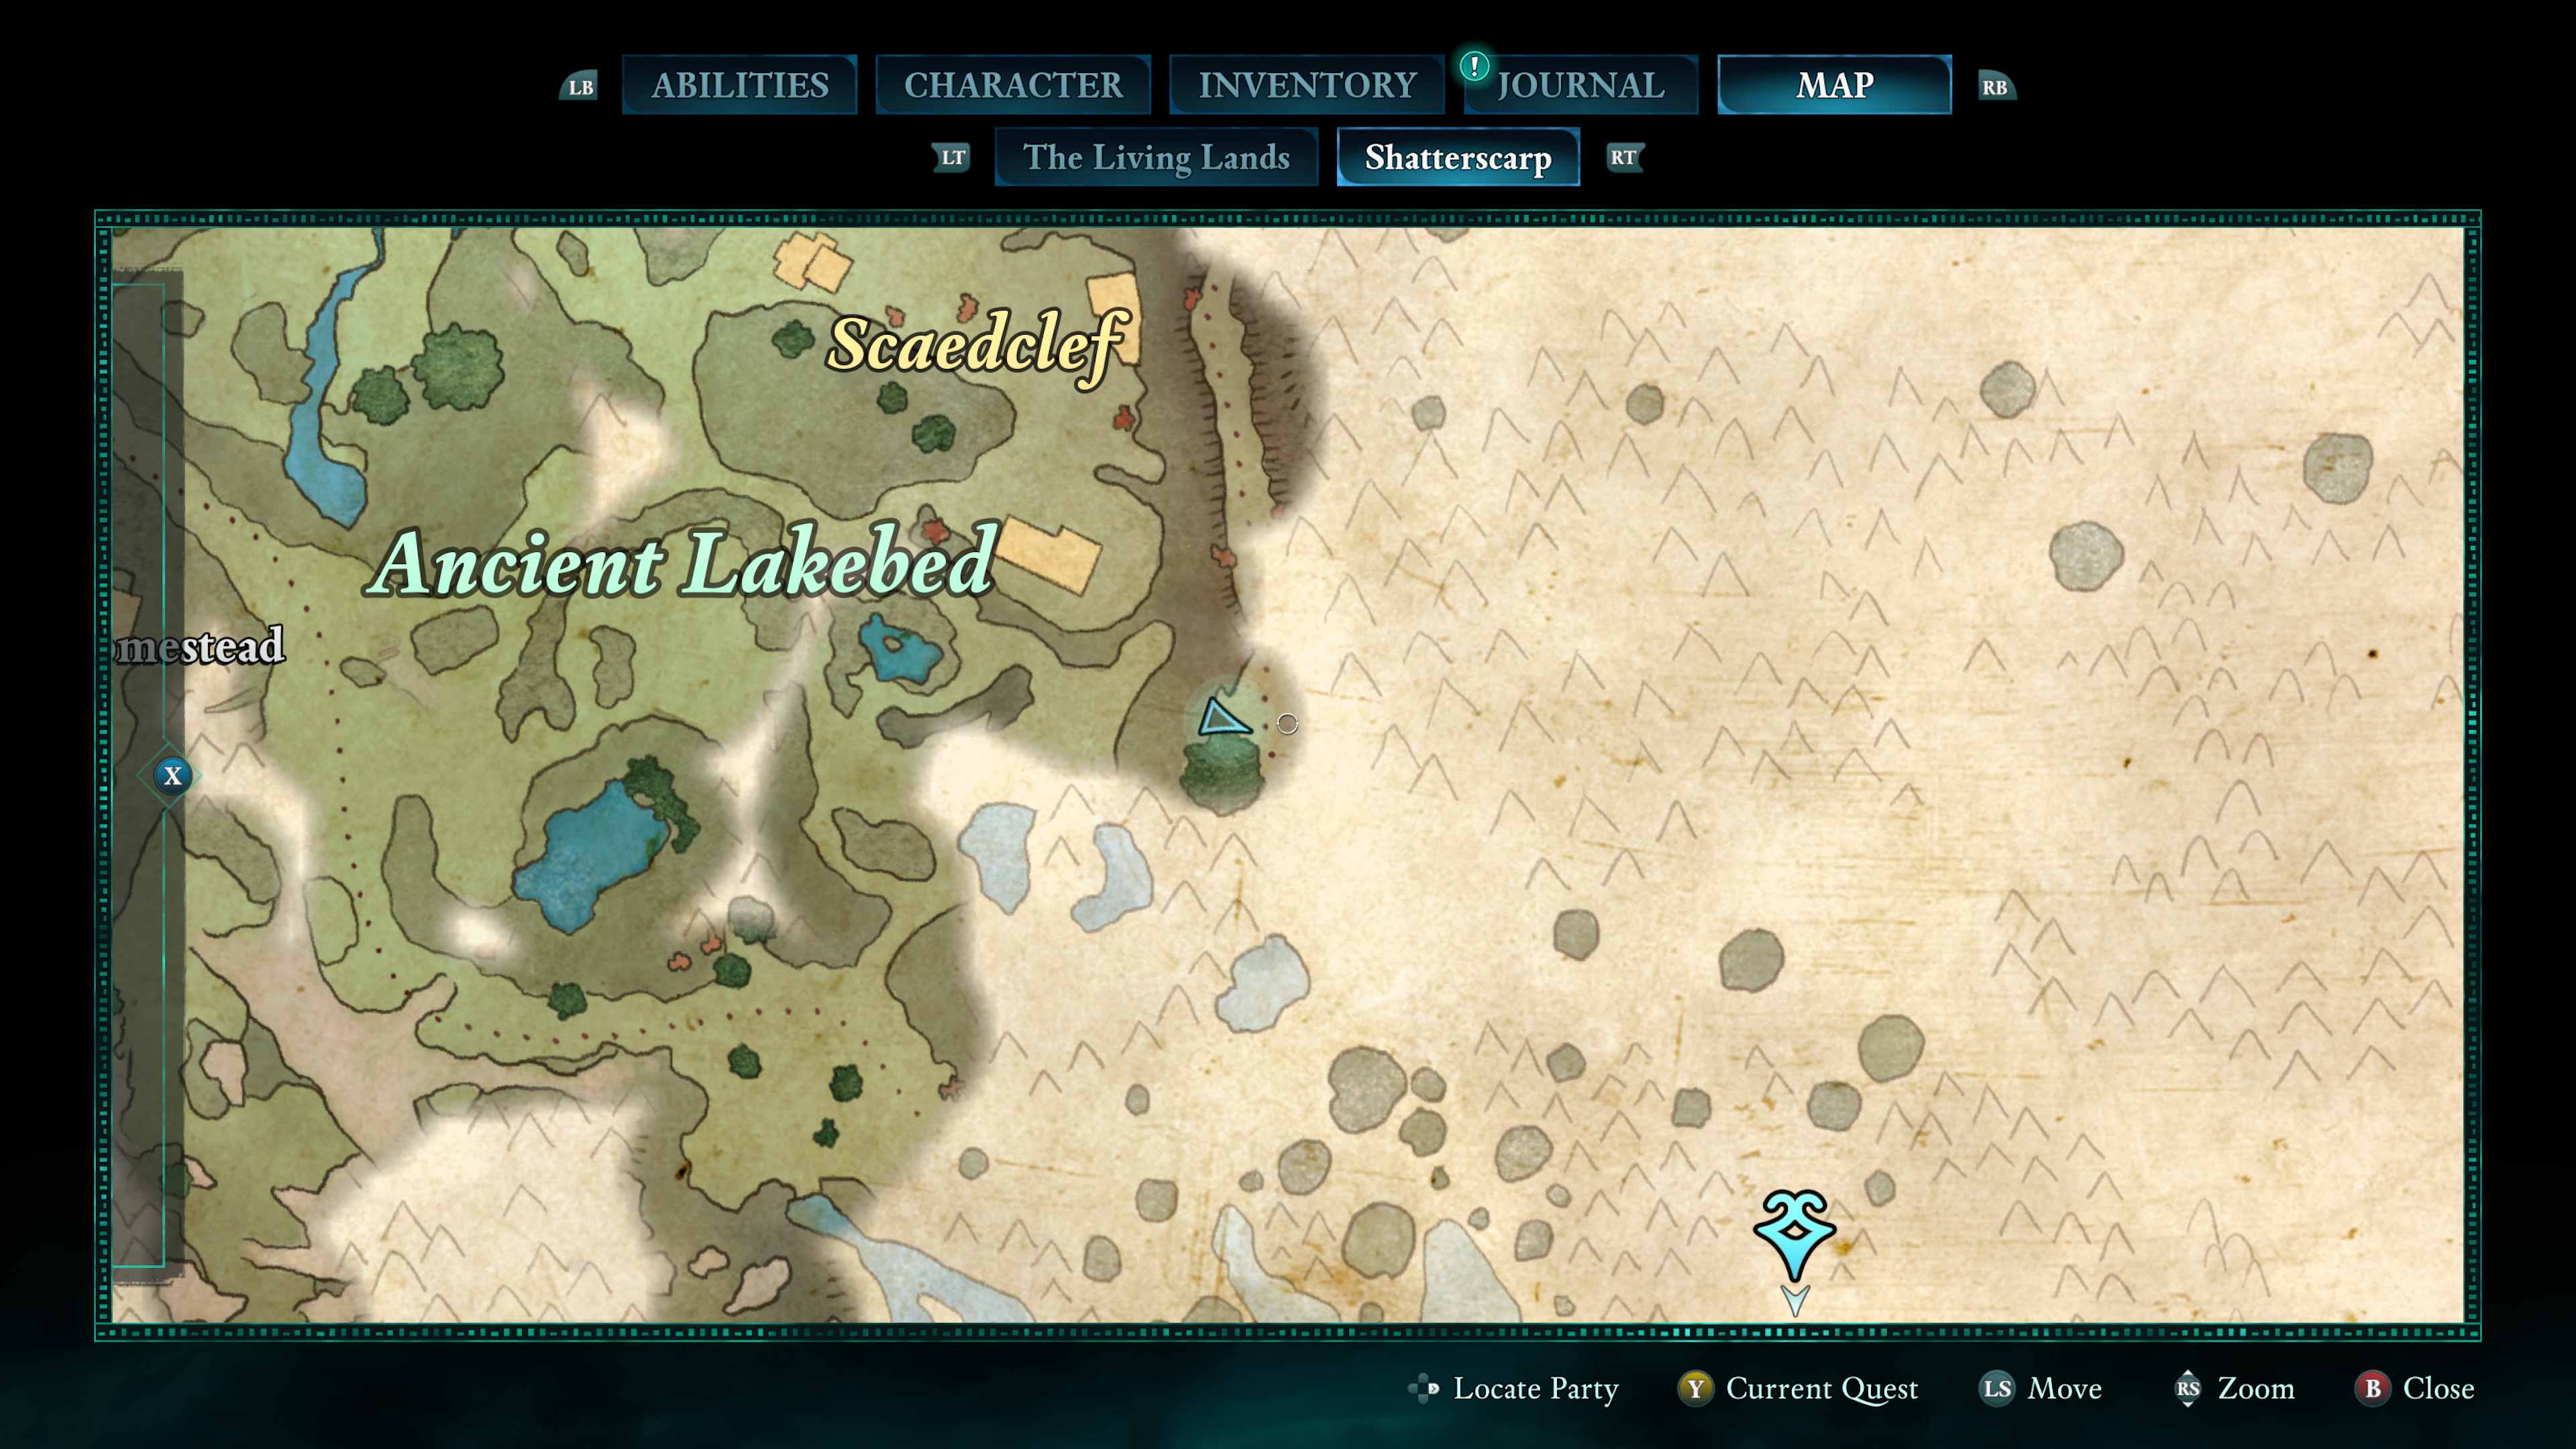
Shatterscarp Totem – Totem of Revelations
How to find all of the pieces for Totem of Revelations in Shatterscarp
In Thirdborn, you can buy the hints for the Shatterscarp totem from a vendor named Cinzia. However, before reaching her, you must have successfully navigated past the Dreamthralls at the city’s entrance. She can be found tending bar in the heart of the city. Although these clues aren’t necessary to find the totem pieces, they can certainly aid your search! The main structure is known as the Shrine of Wael.
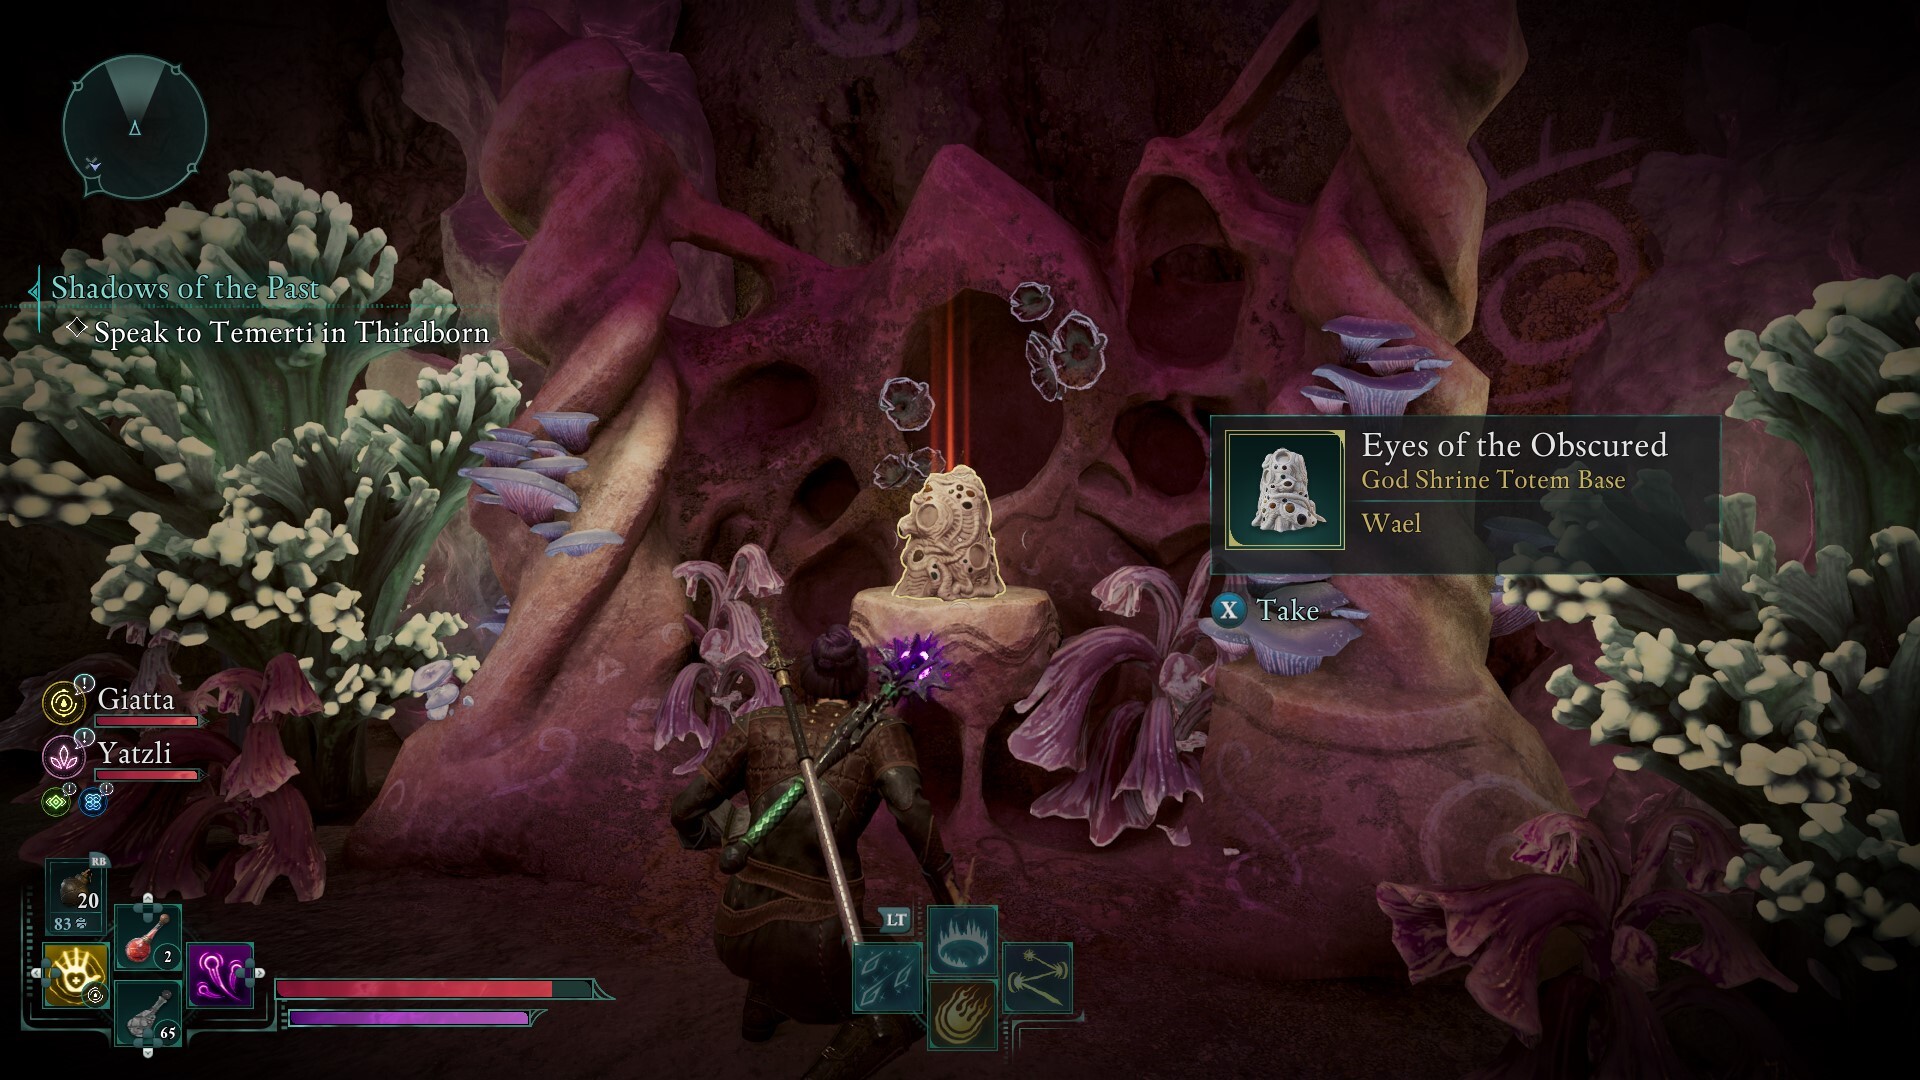
Avowed – Shrine of Wael – Totem Base
The Hundred Visions’ totem lies in a seaside cavern overrun with eyes.
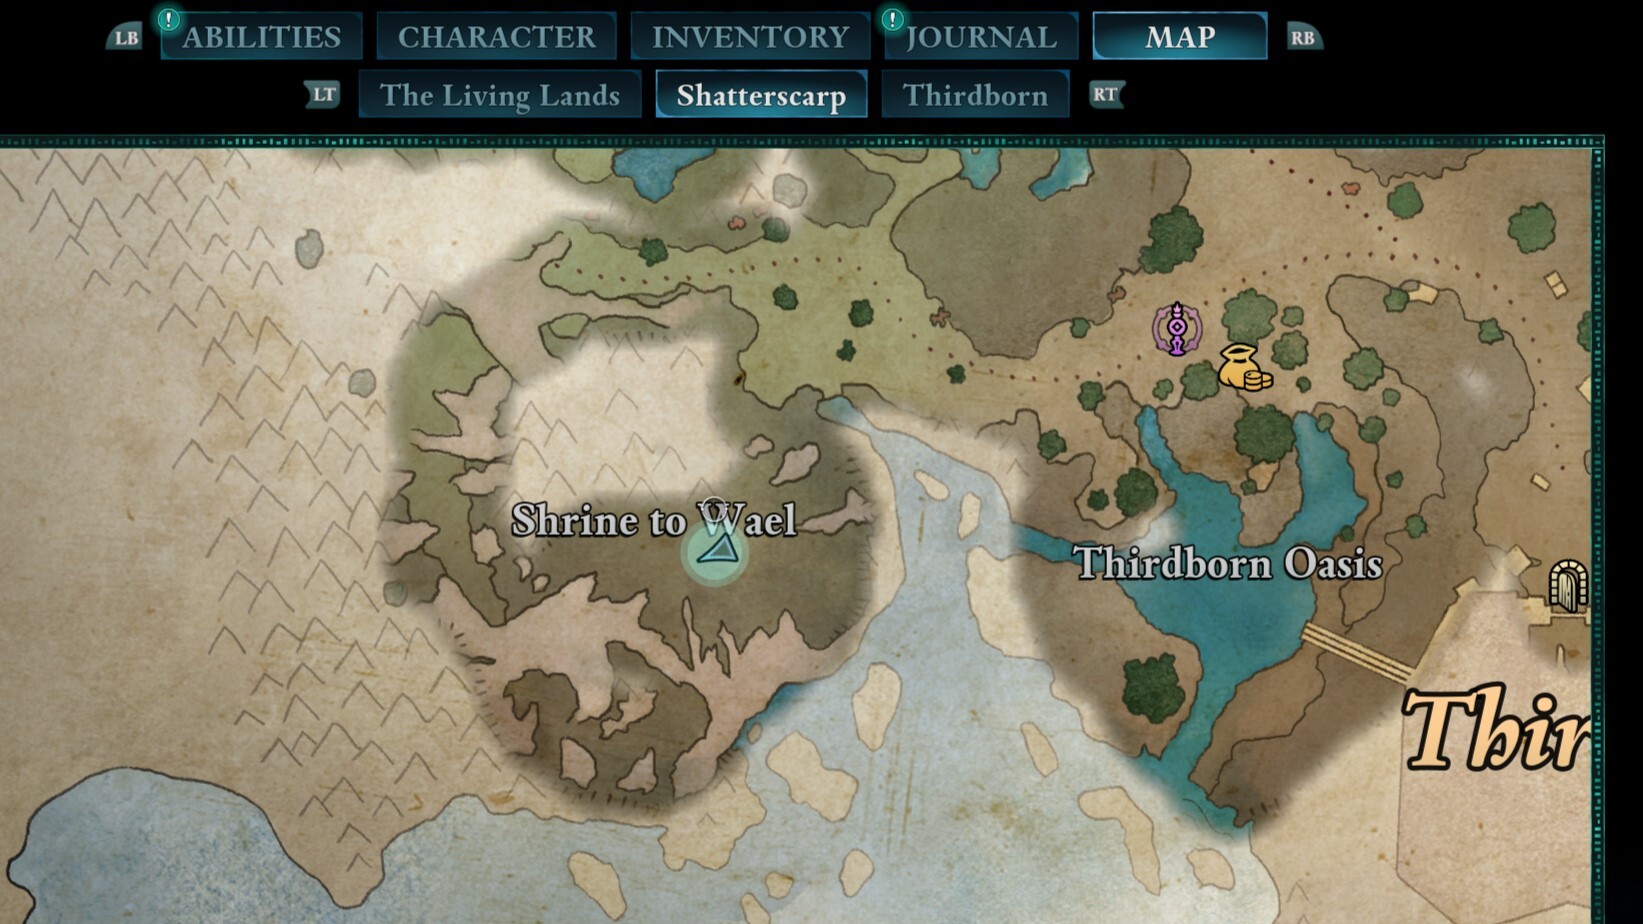
The location you’re referring to, known as the Shrine of Wael, can be found where you see it marked on the map. Navigate towards the distinctive pink rock formations and venture through the passages they lead to.
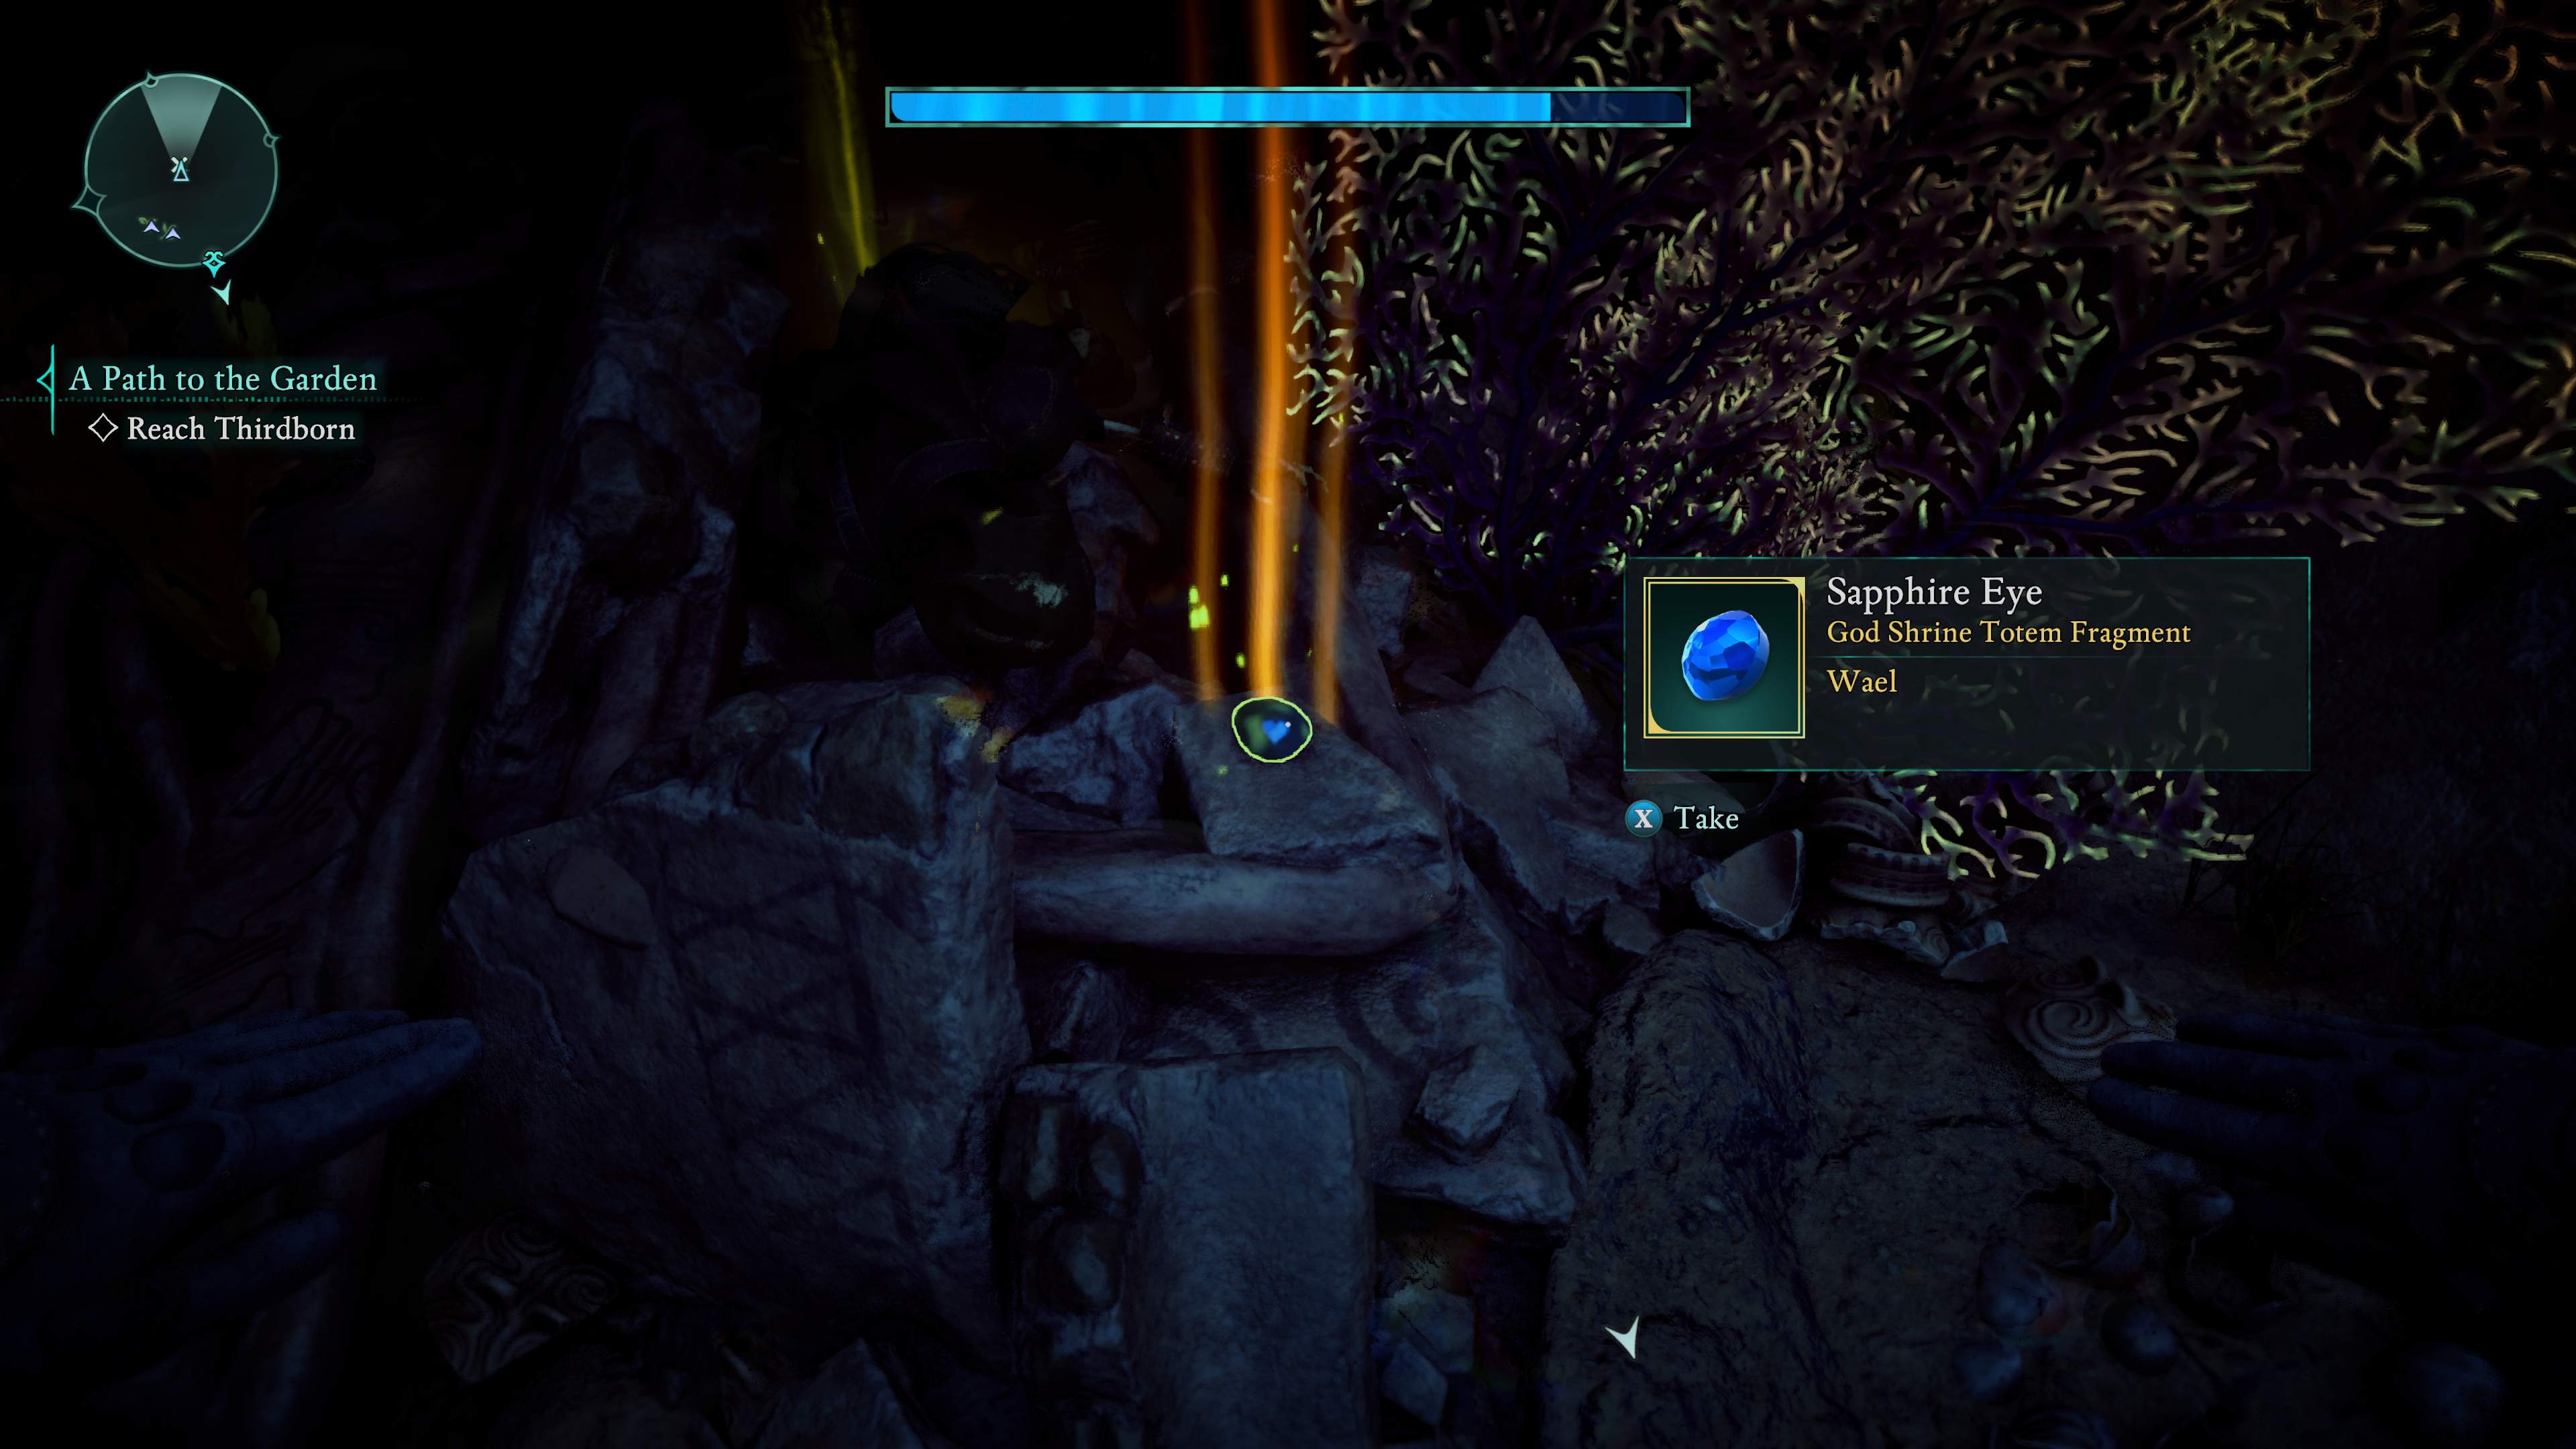
Avowed – Ruby Eye location
On the ancient lakebed’s edge, to the ruby eye your words you will pledge.
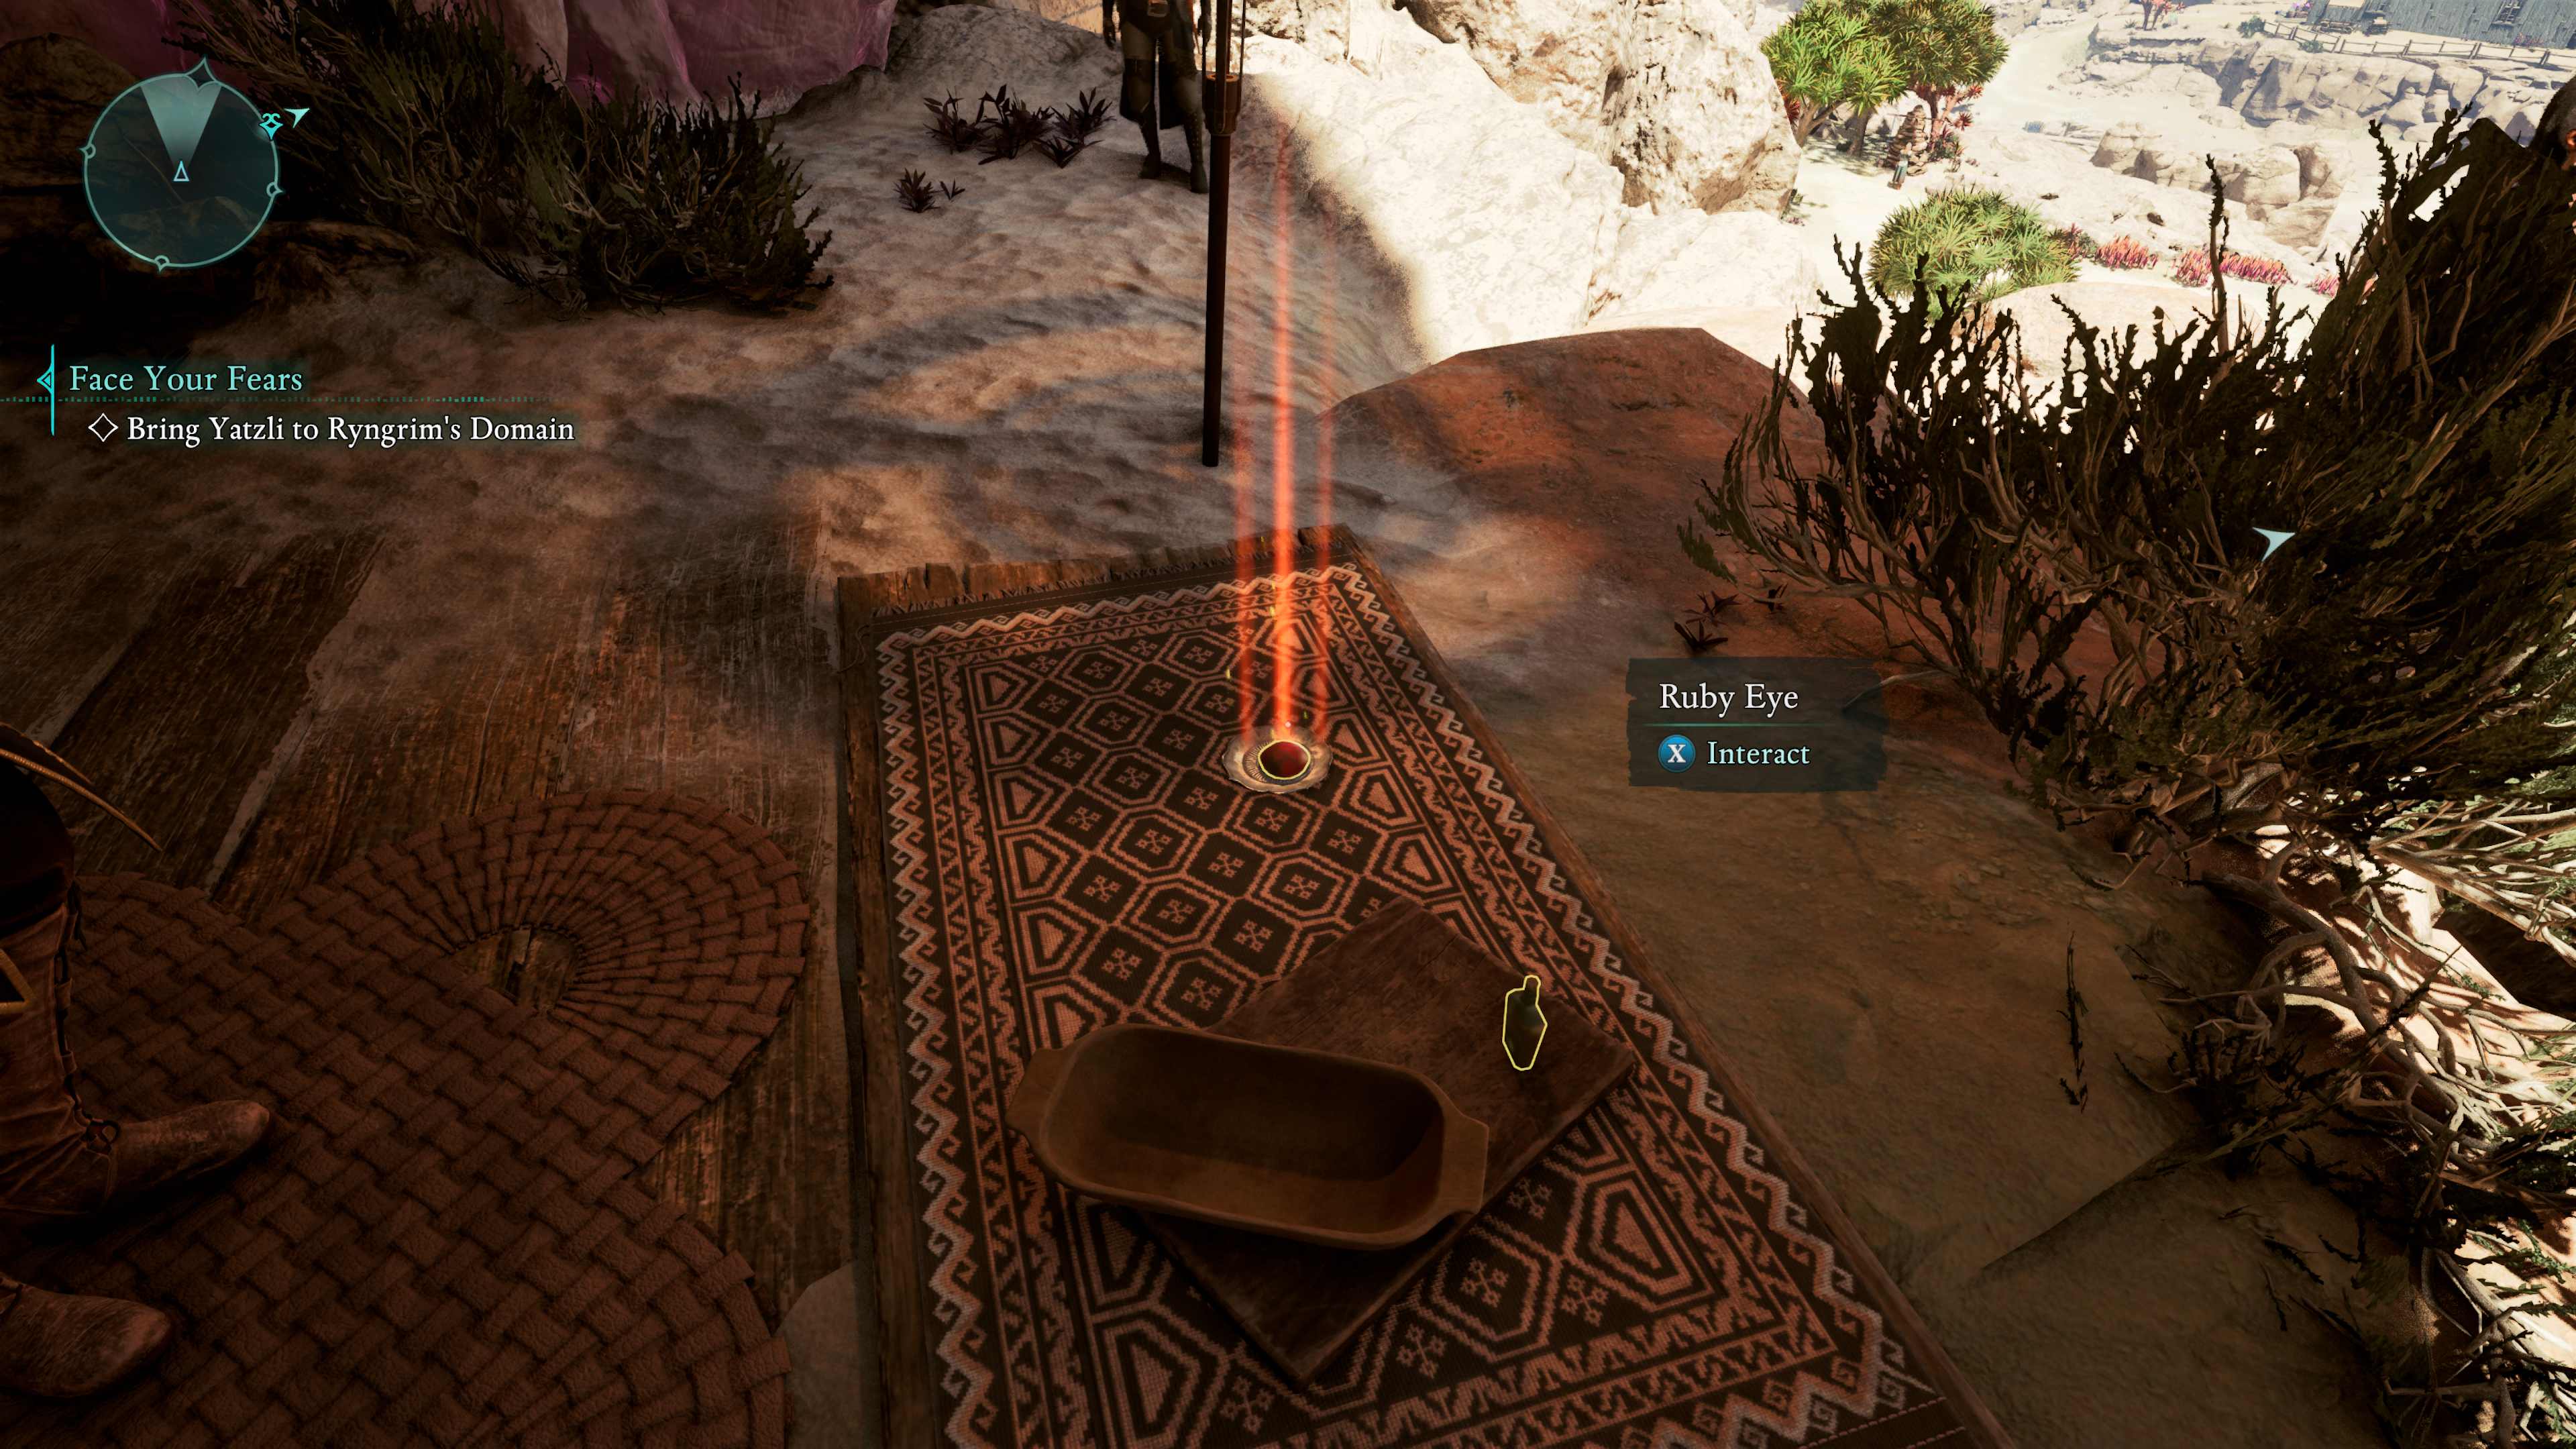
Hold off on leaving the Shrine of Wael for now, as there’s another fragment of the Totem of Revelations still here. Instead, seek out a different passageway leading to a cave illuminated with lights that appear like ‘eyes’. Follow this path and you’ll come across a woman gazing out towards the sea. This woman, the Guardian of the Eye, is safeguarding the totem. Respond to her queries and she will give you the Ruby Eye.
Avowed – Sapphire Eye location
At the bottom of an oasis deep, the Sapphire eye is yours to keep.
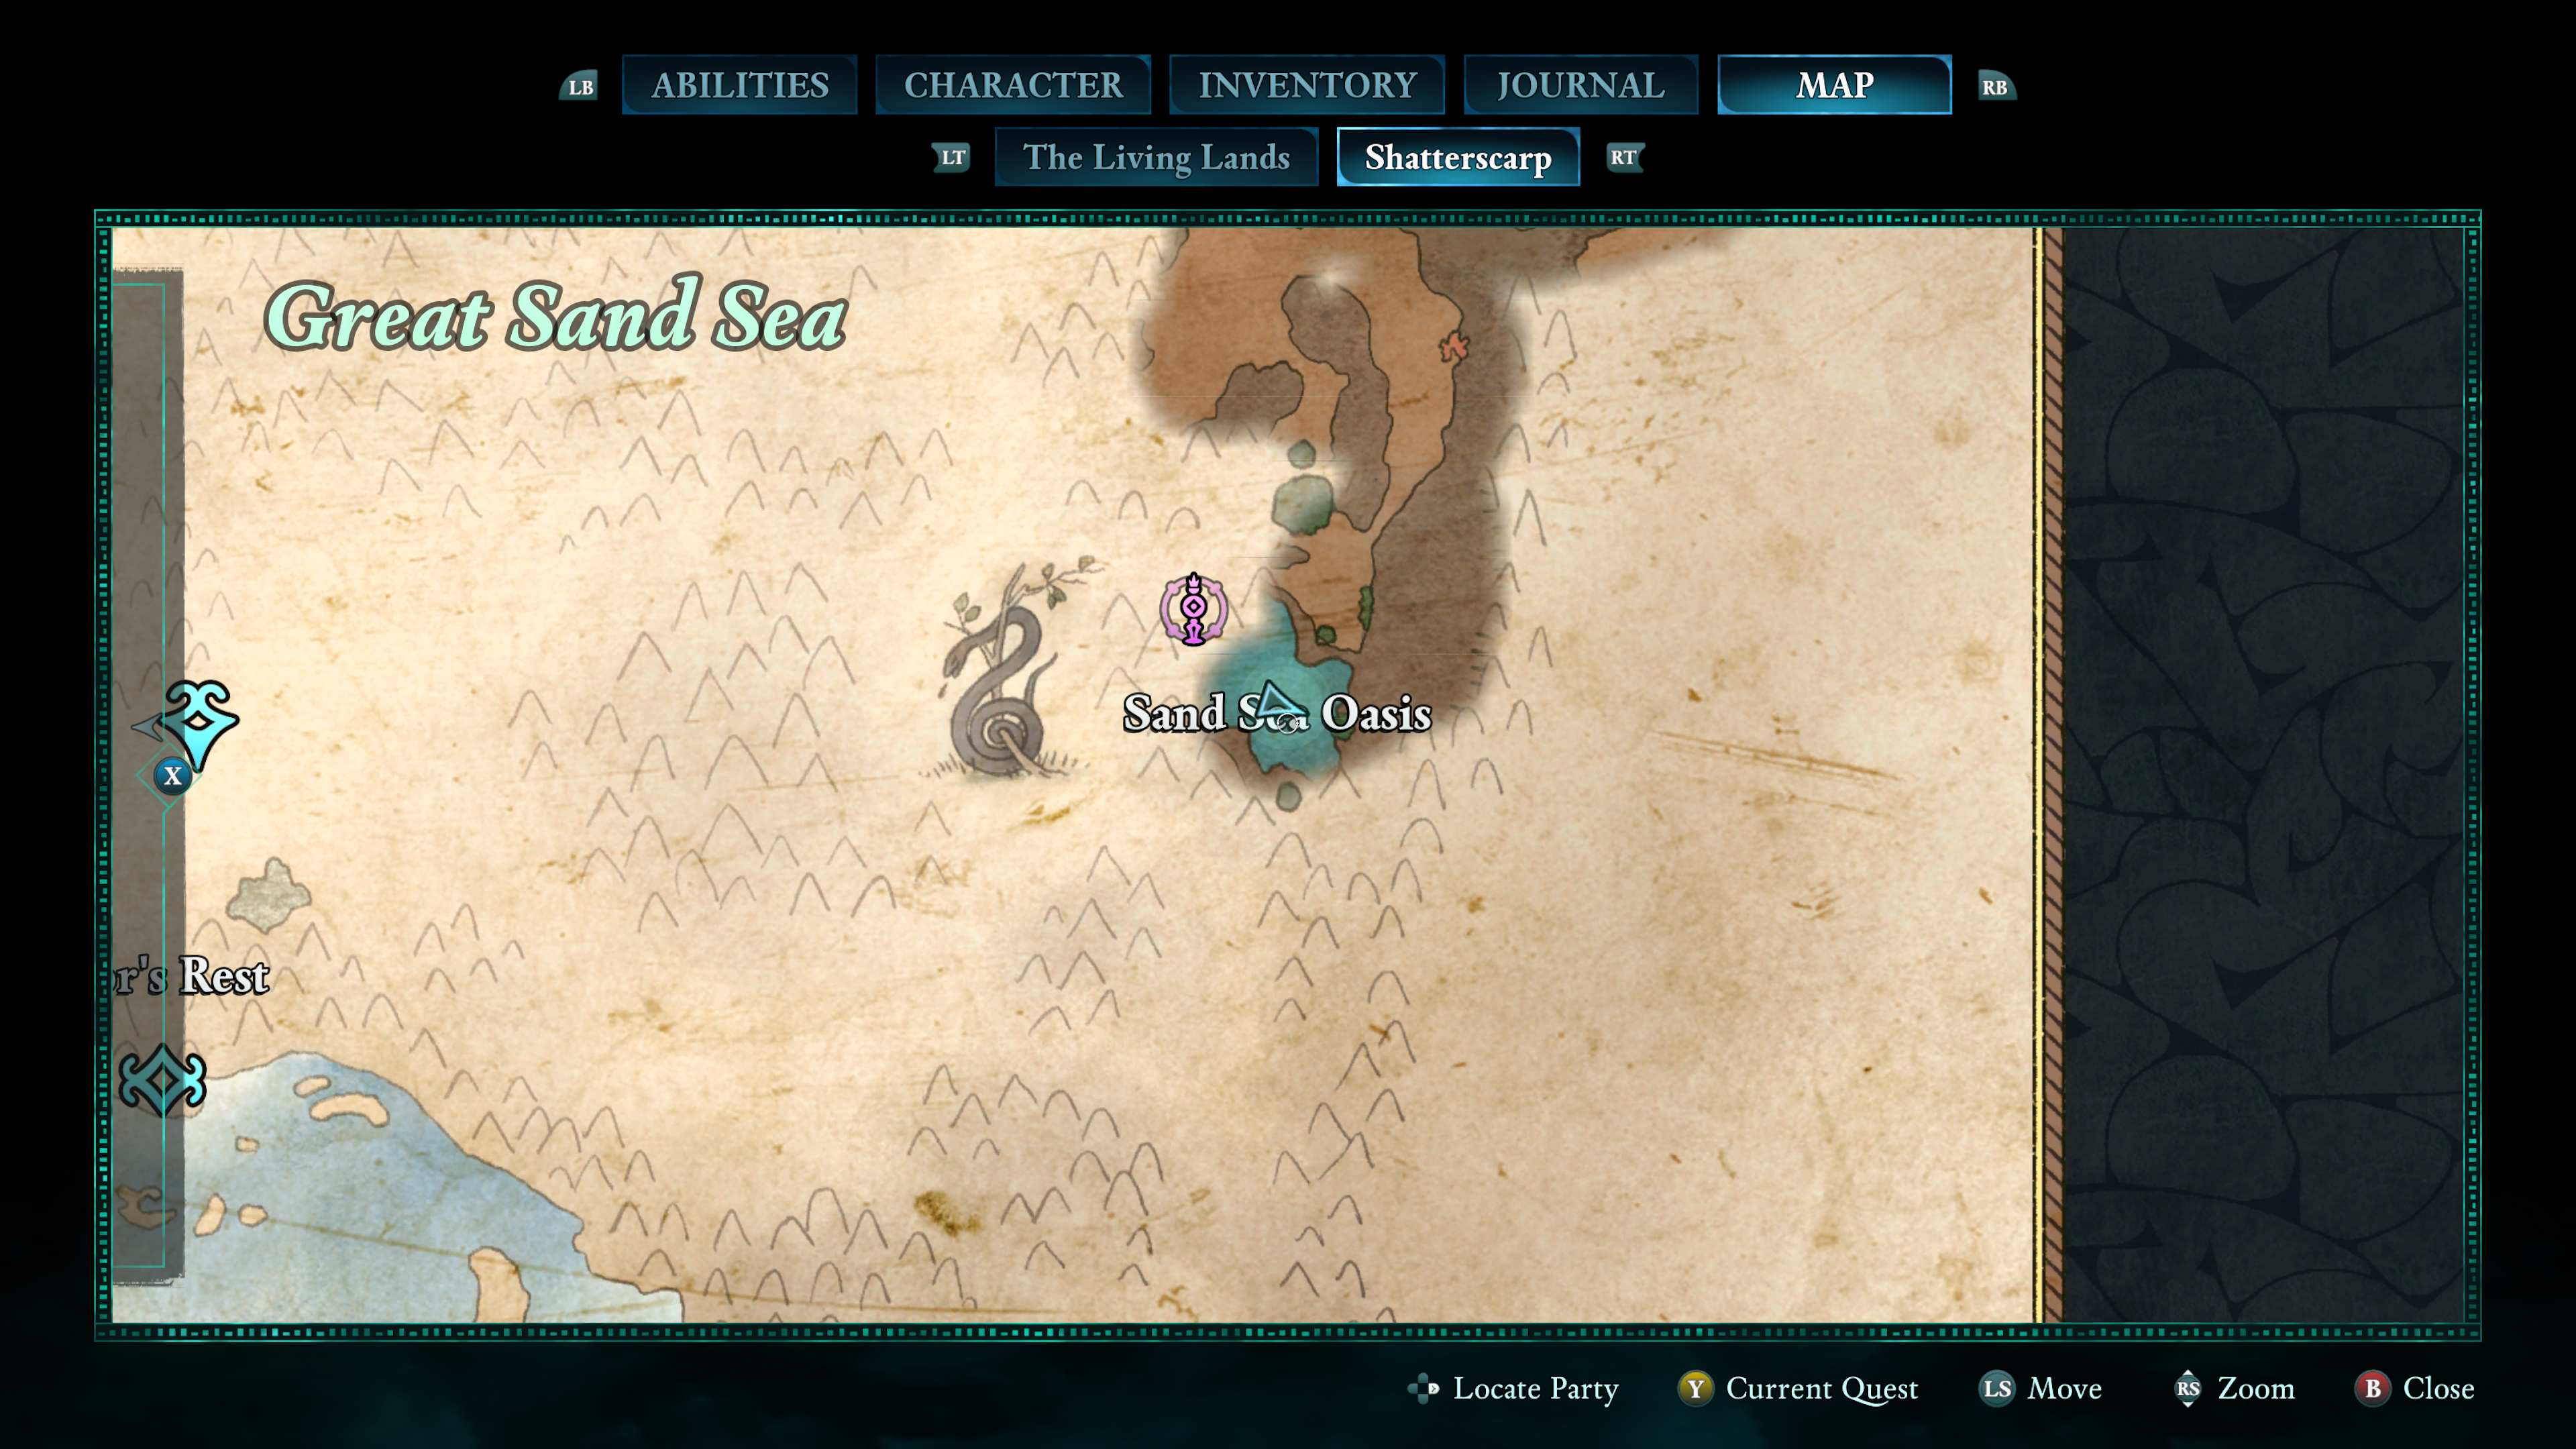
For this task, you’ll have to swim since it’s located southeast from the ‘Great Sand Sea’ marked on your map. Swim towards the center of the pool to discover the Sapphire Eye.
Avowed – Topaz Eye location
Beneath a watery behemoth’s ancient bones, the topaz eye awaits all alone.
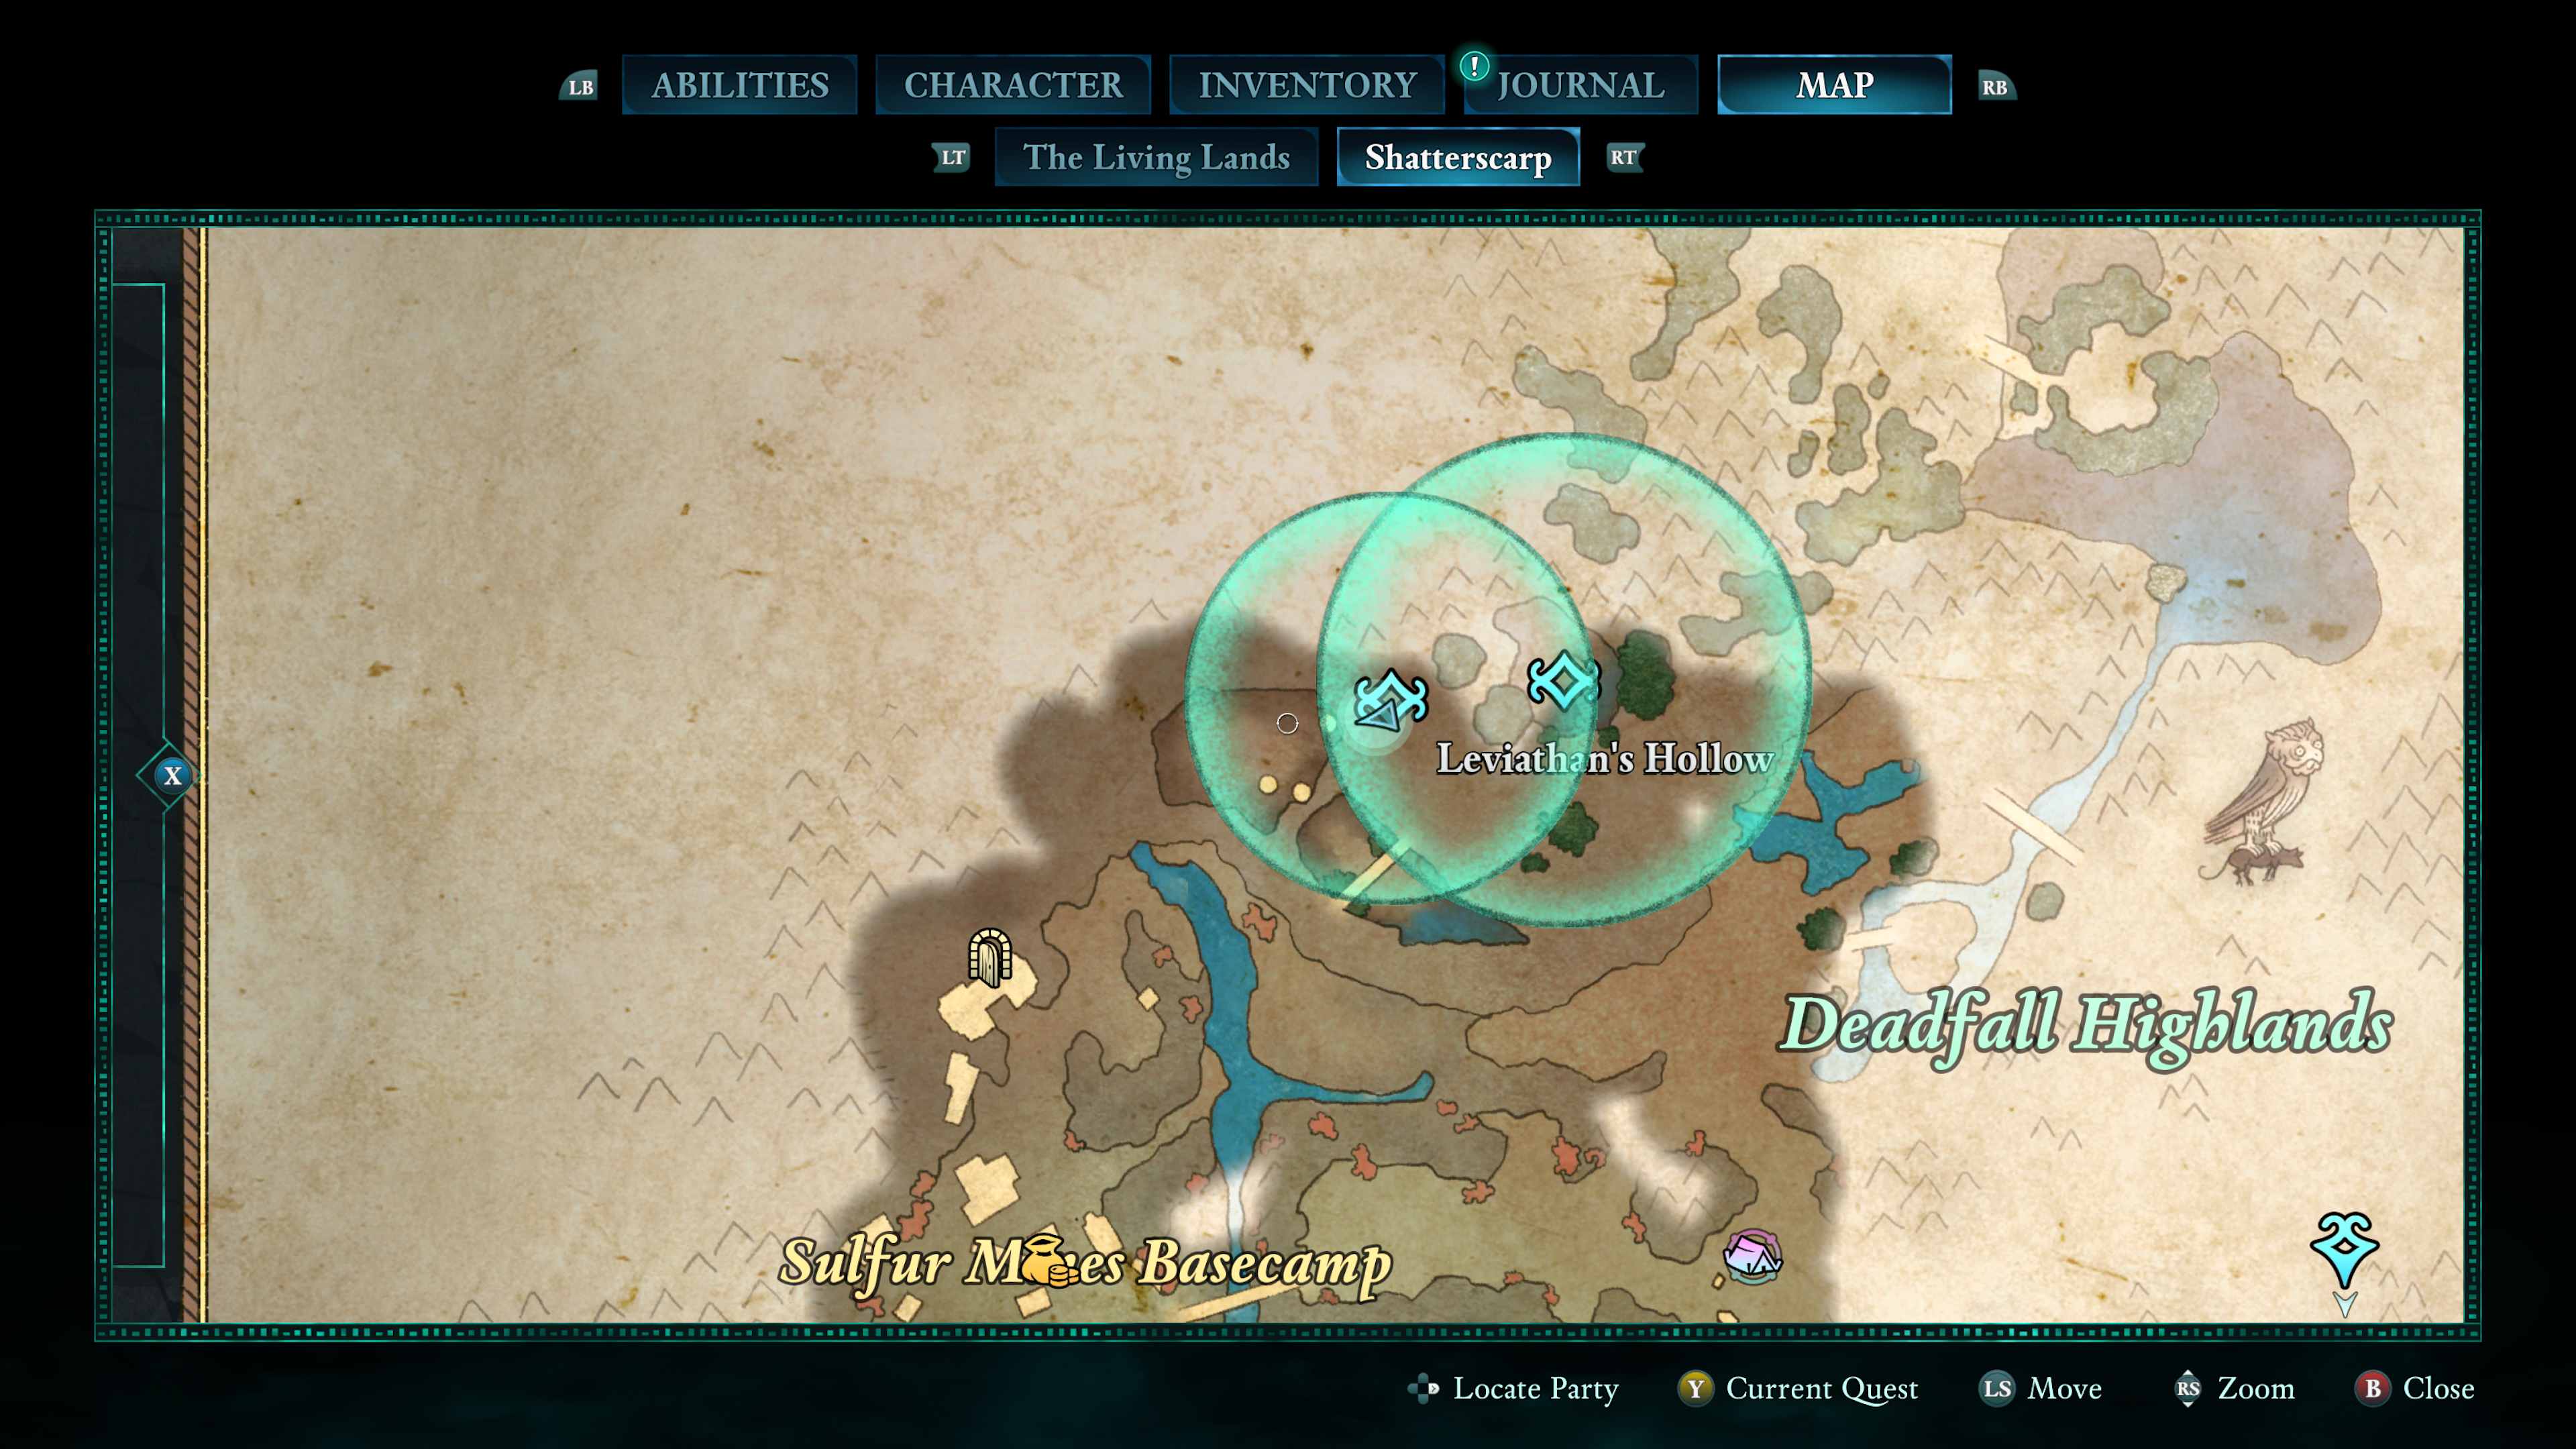
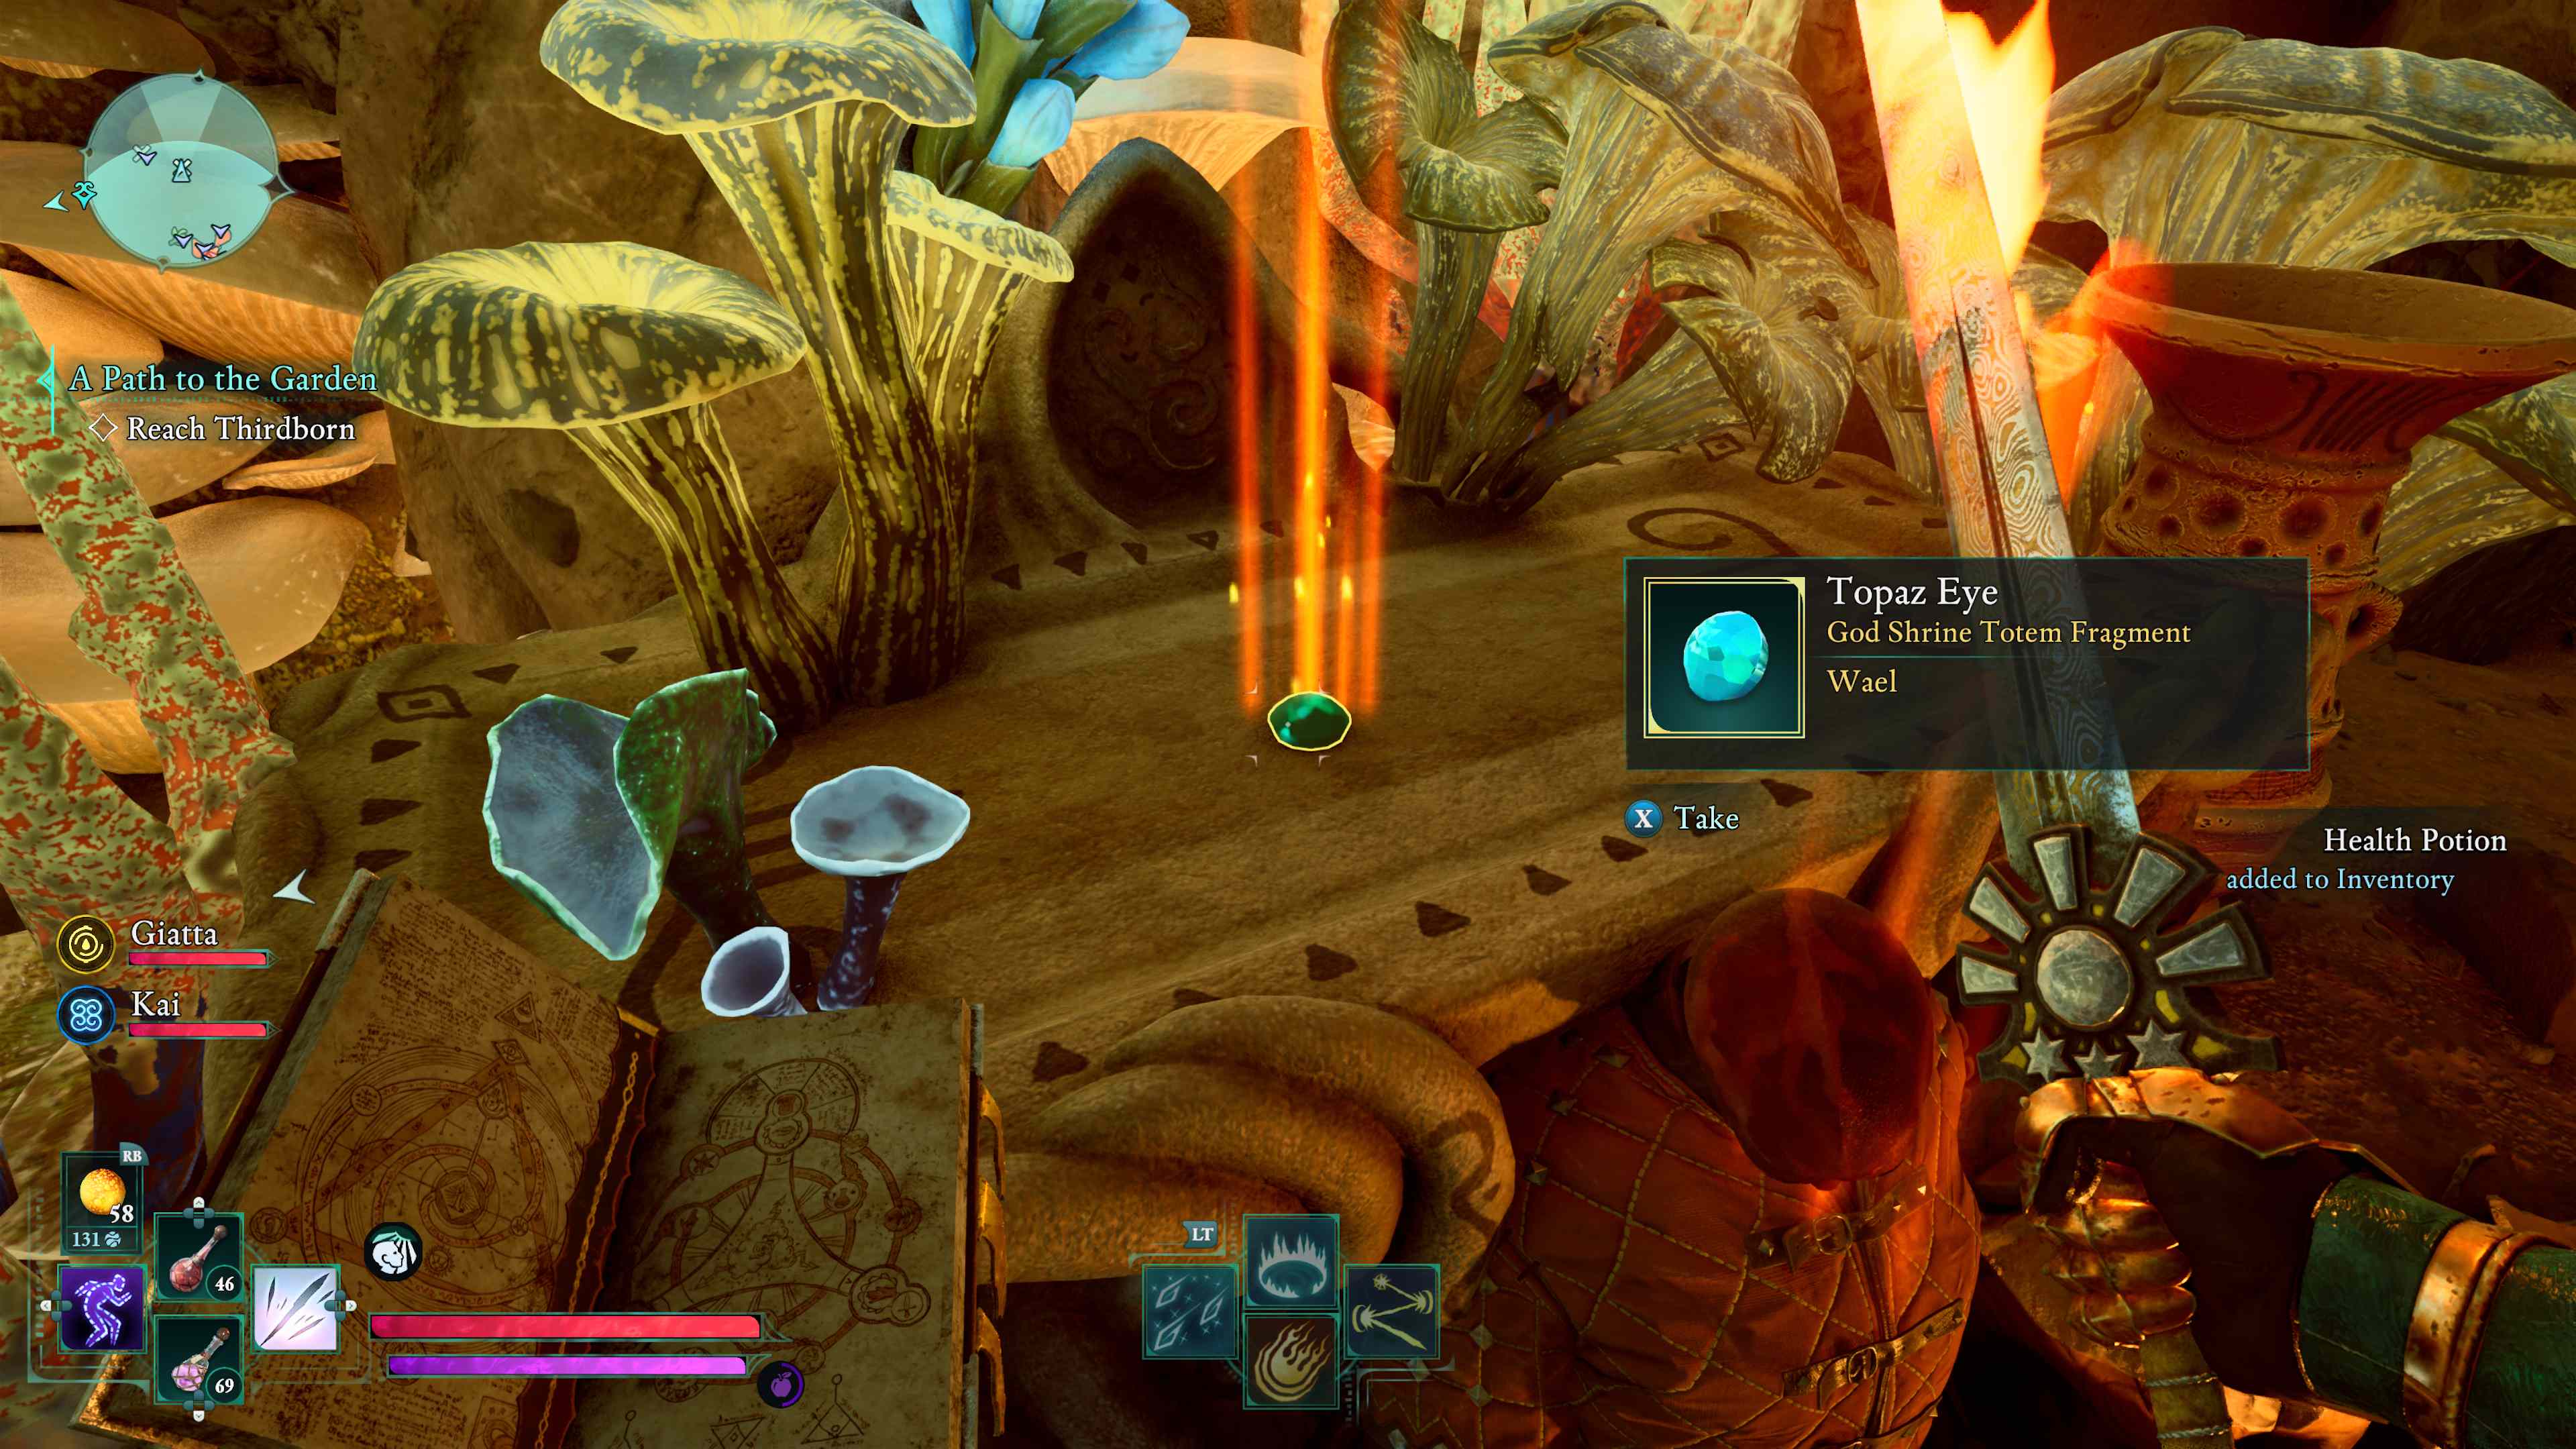
During your journeys, you’ll encounter Leviathan’s Cavern, marked by an enormous, terrifying skull leading into a cave. Dive into the beast’s maw, and on the upper level of these ancient remains, you’ll discover the Topaz Eye.
Avowed – Amethyst Eye location
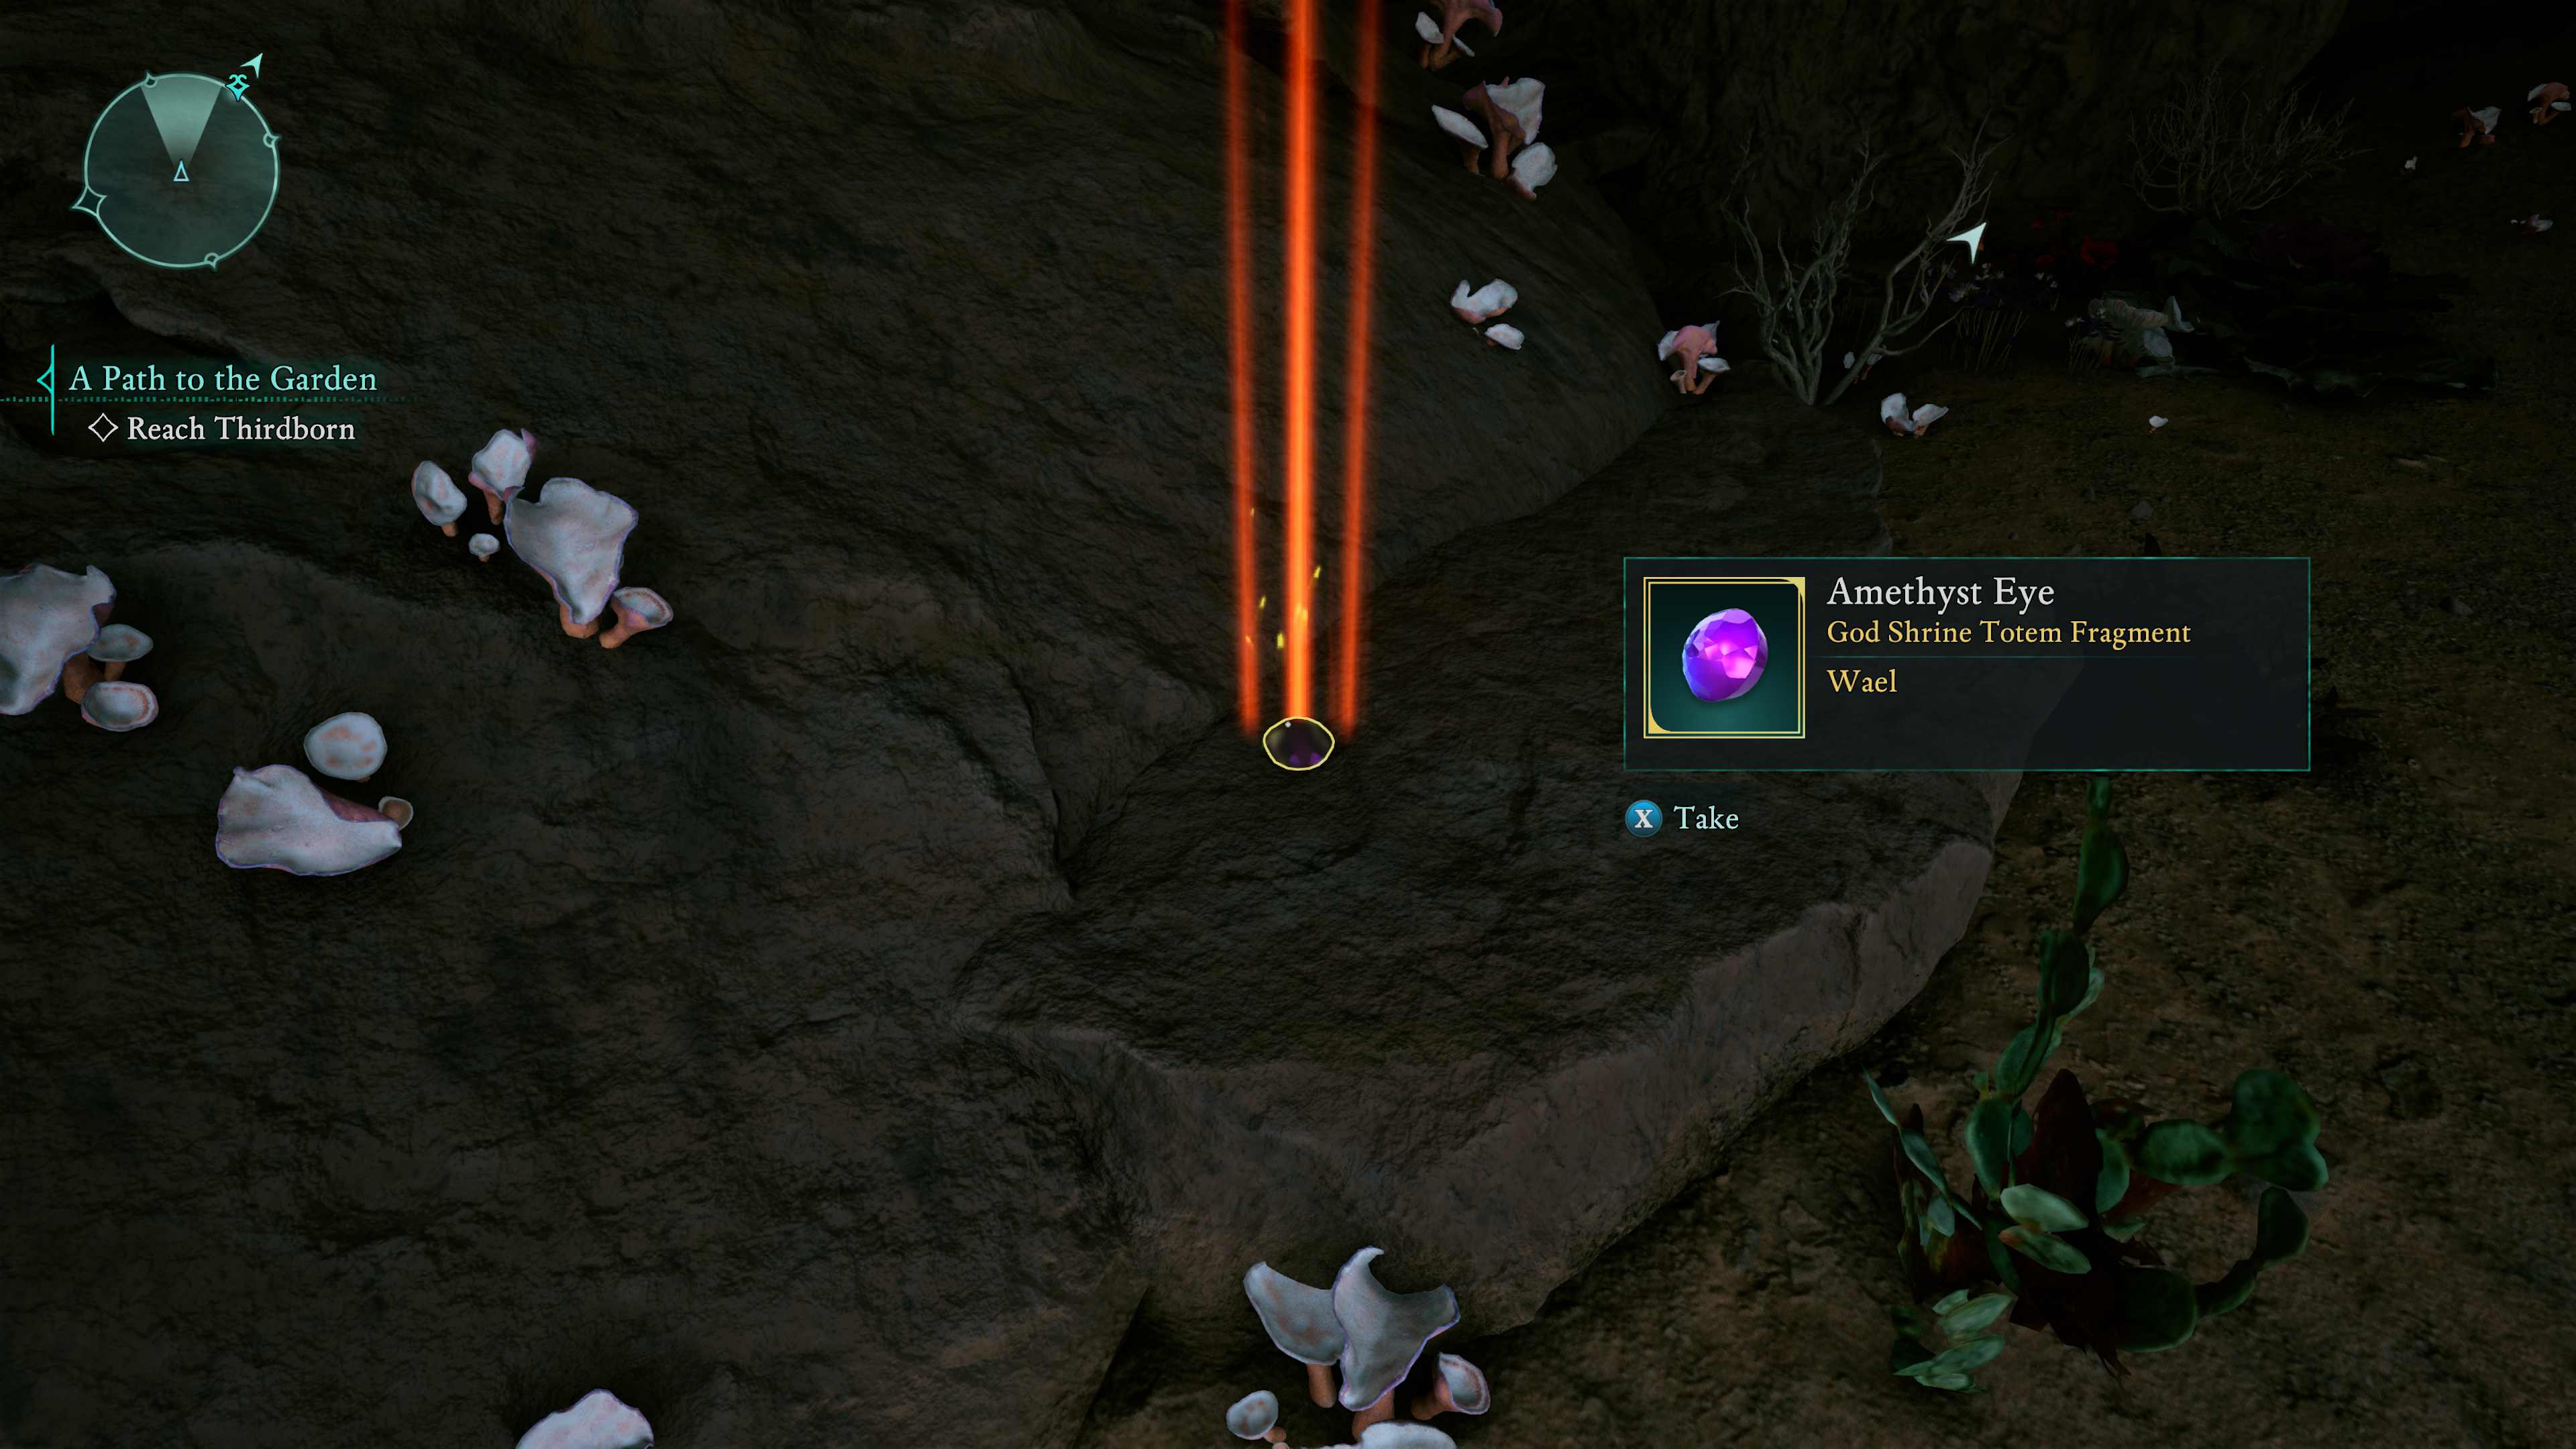
The Amethyst Eye is located within the ruins of a town situated on the eastern edge of the old lakebed. Seek out a mourning woman who tends to the deceased, as the Amethyst Eye can be found in her vicinity.
Avowed – Agate Eye location
Amidst sprawling ruins of the faithless of old, the agate eye has waited for years untold.
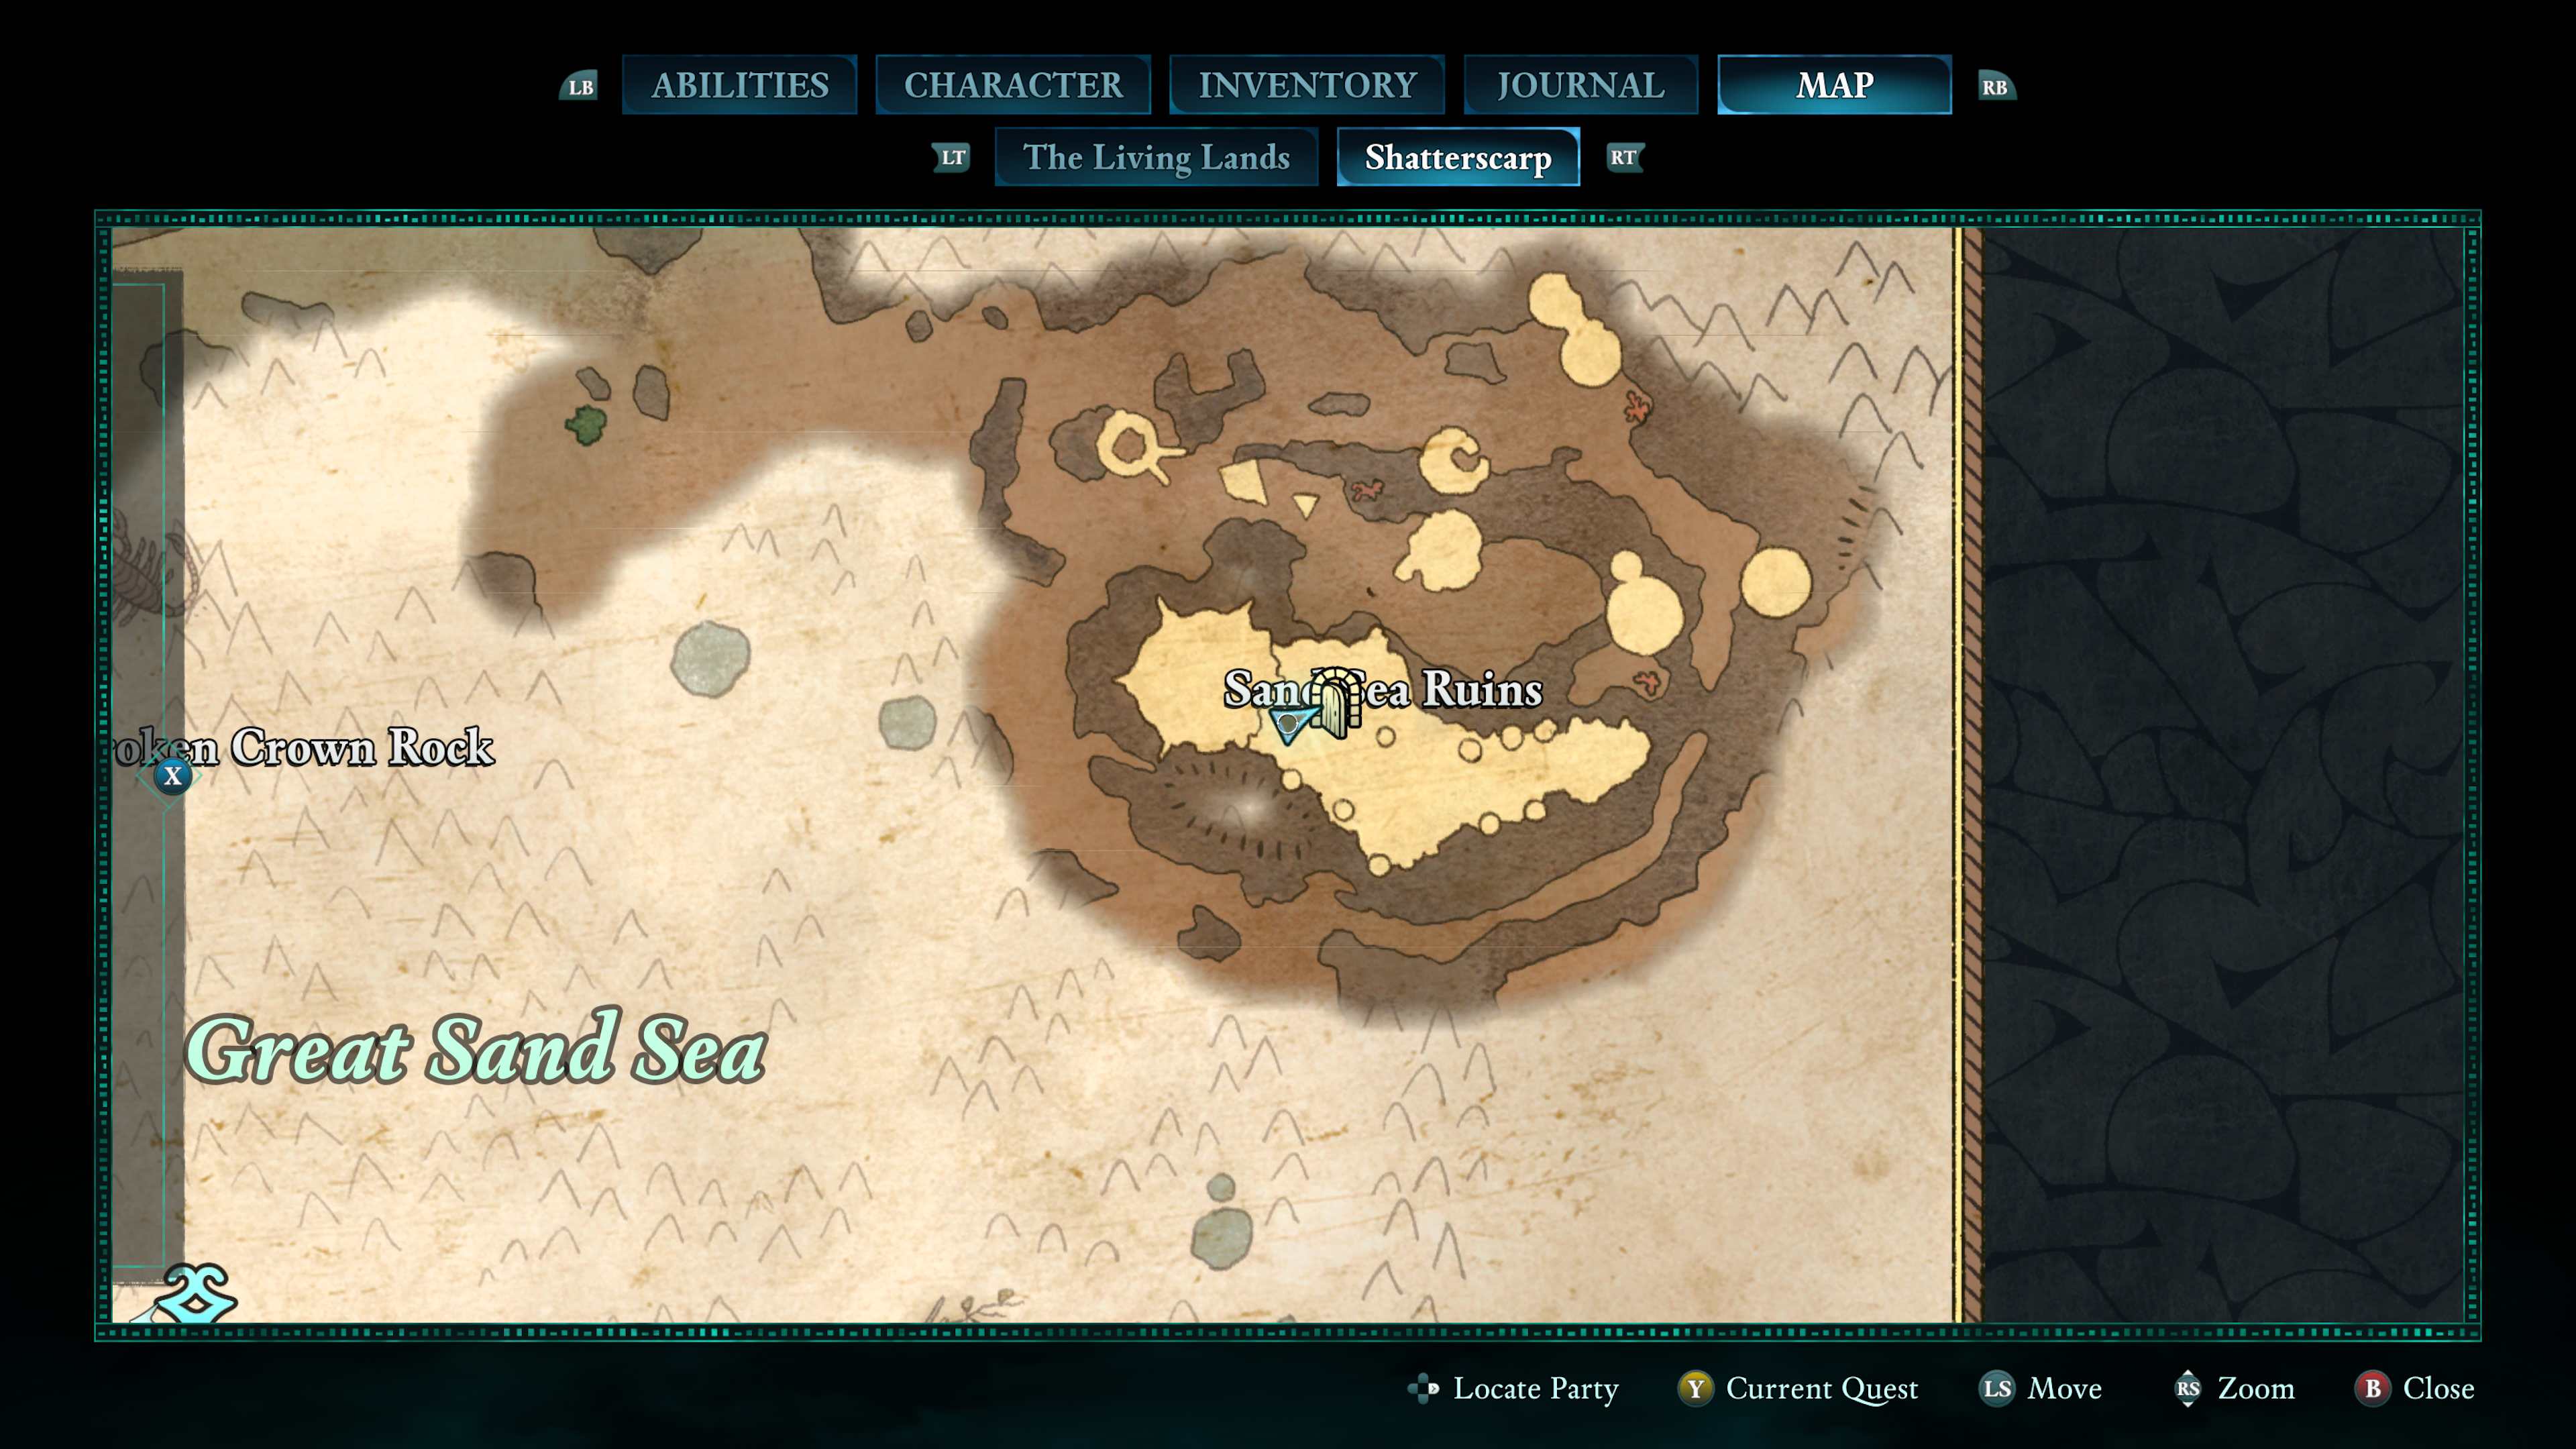
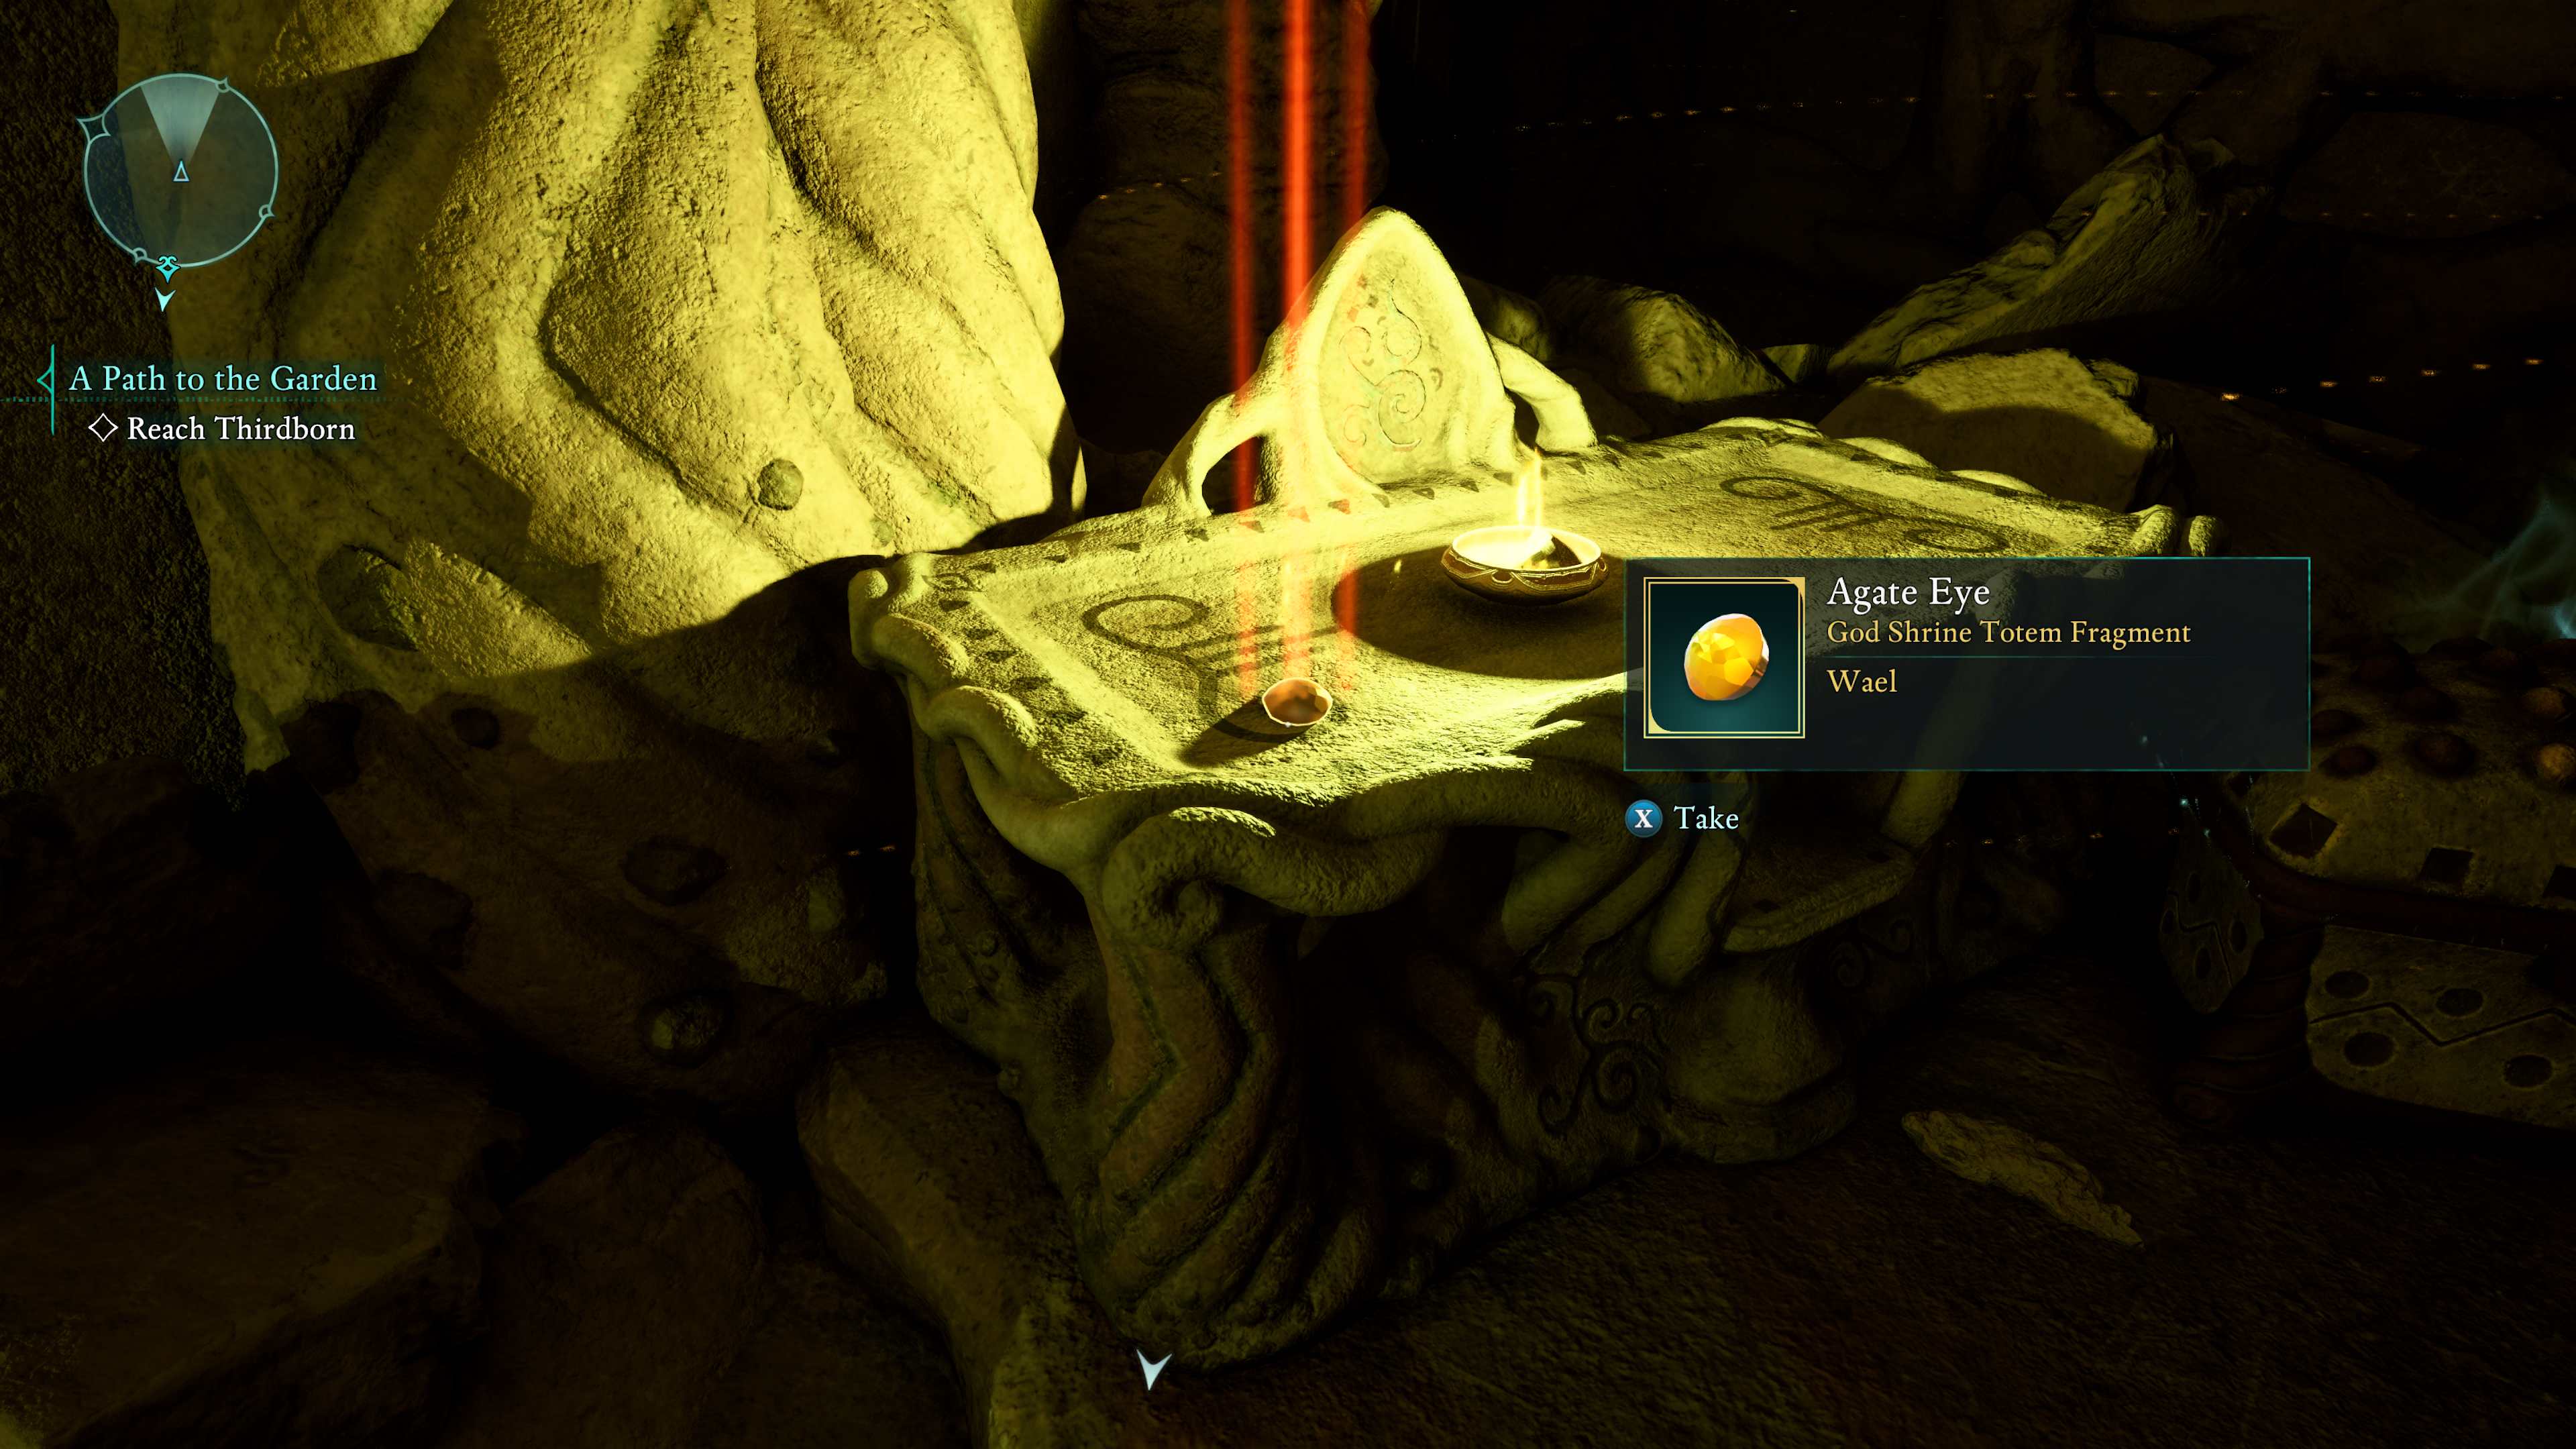
In a game overflowing with ruins, a hint guiding us to more ruins may seem redundant. However, we managed to locate it hidden deep within the Sand Sea Ruins’ labyrinth.
Avowed – Emerald Eye location
The emerald eye rests on an unfinished likeness, not far from unnatural iciness.
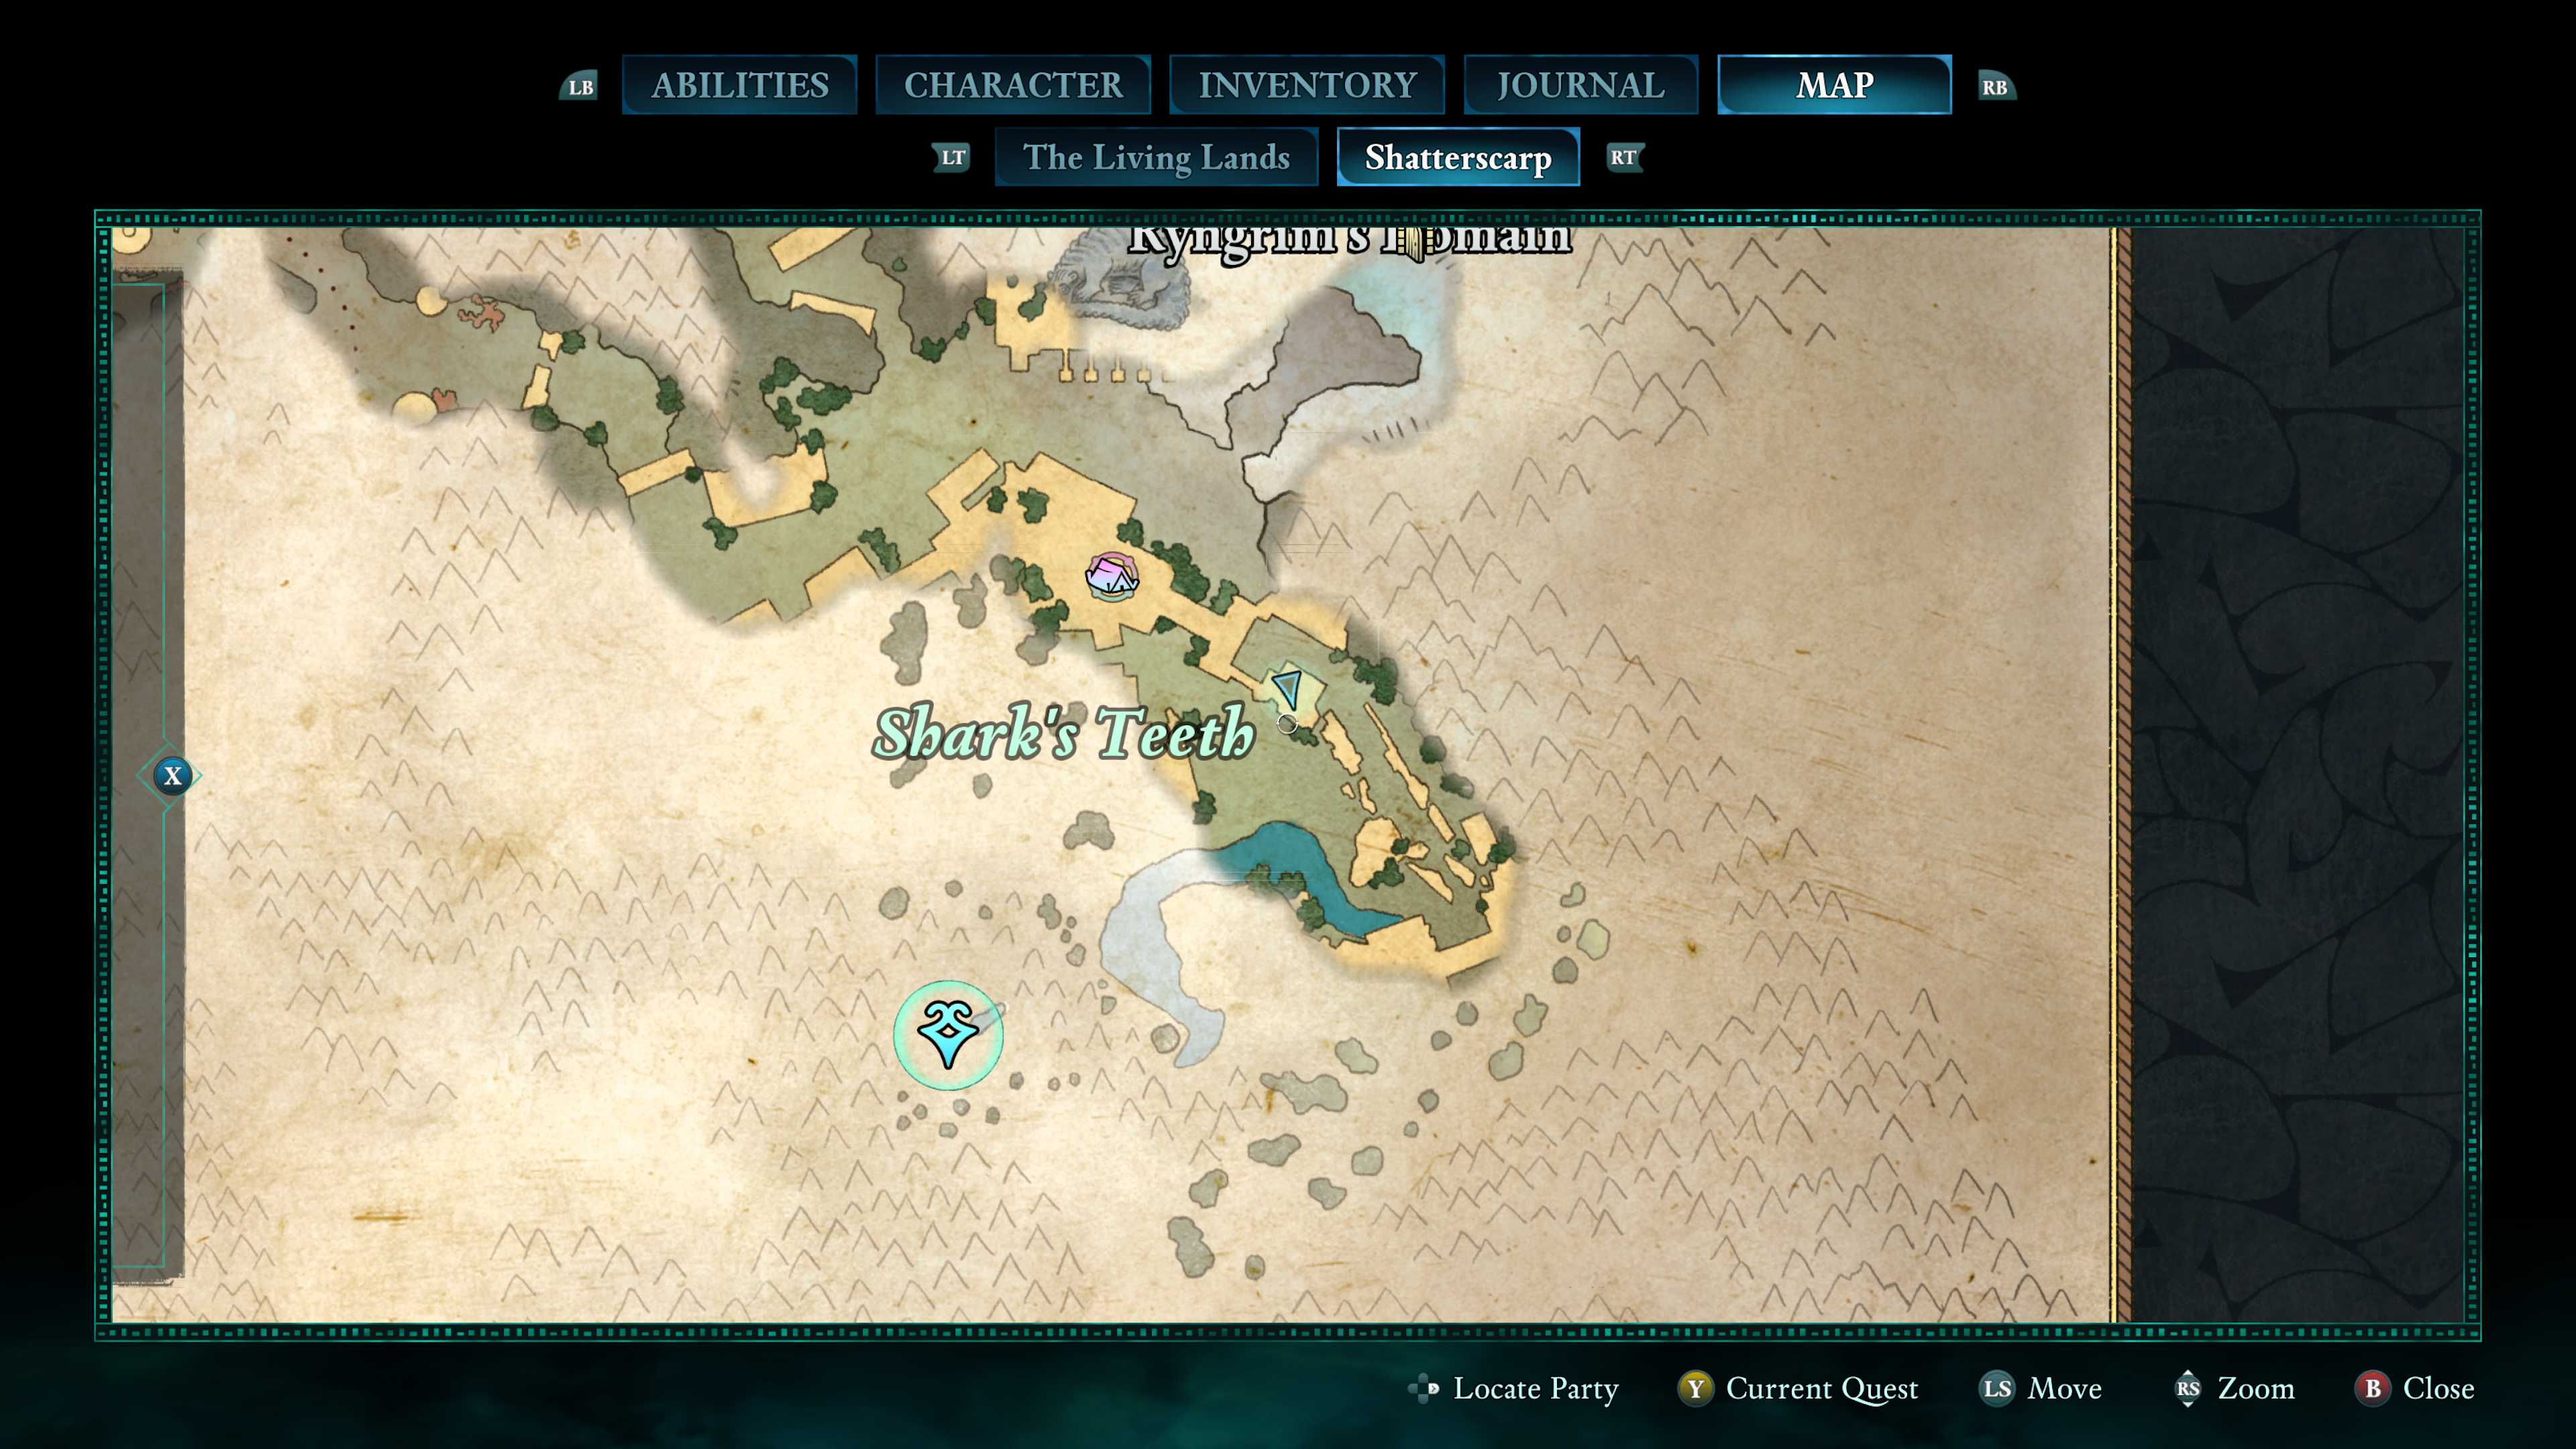
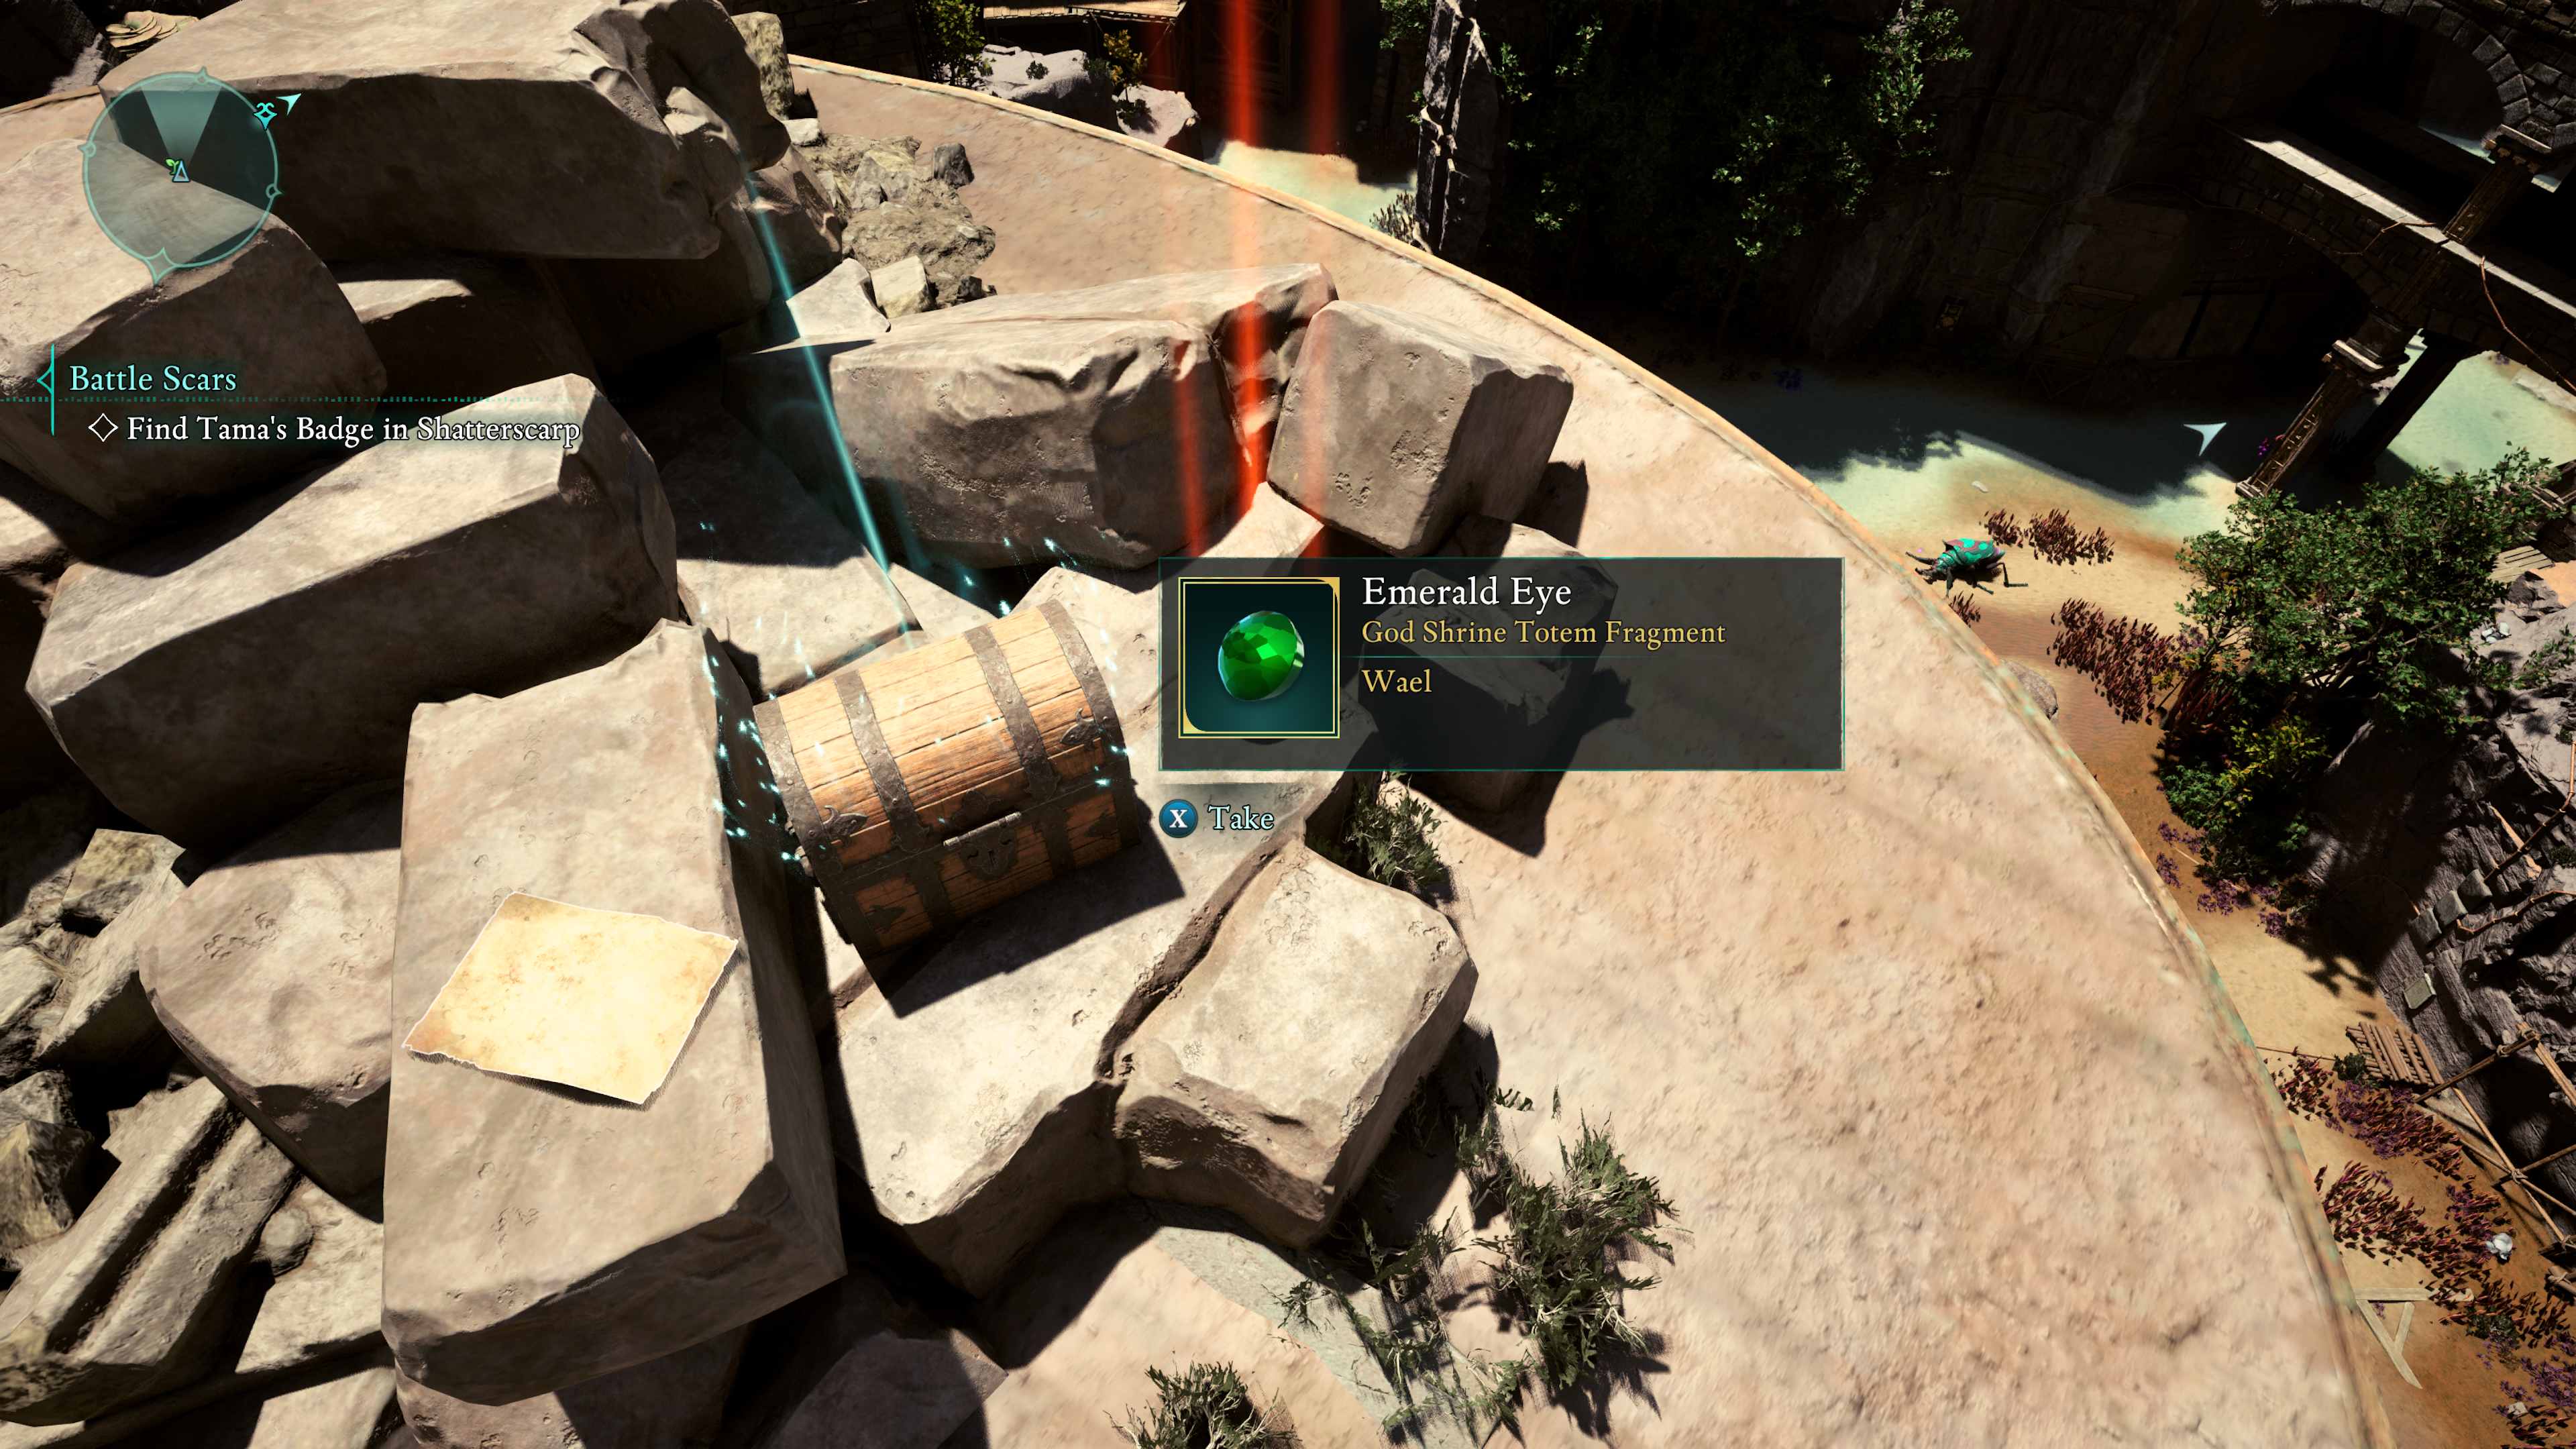
You’ll discover The Emerald Eye hidden within some Shark Teeth. Simply navigate to the indicated location on your map, then scale the tall scaffolding structure to snatch it up. Once you do, you’ll have completed the Totem of Revelations.
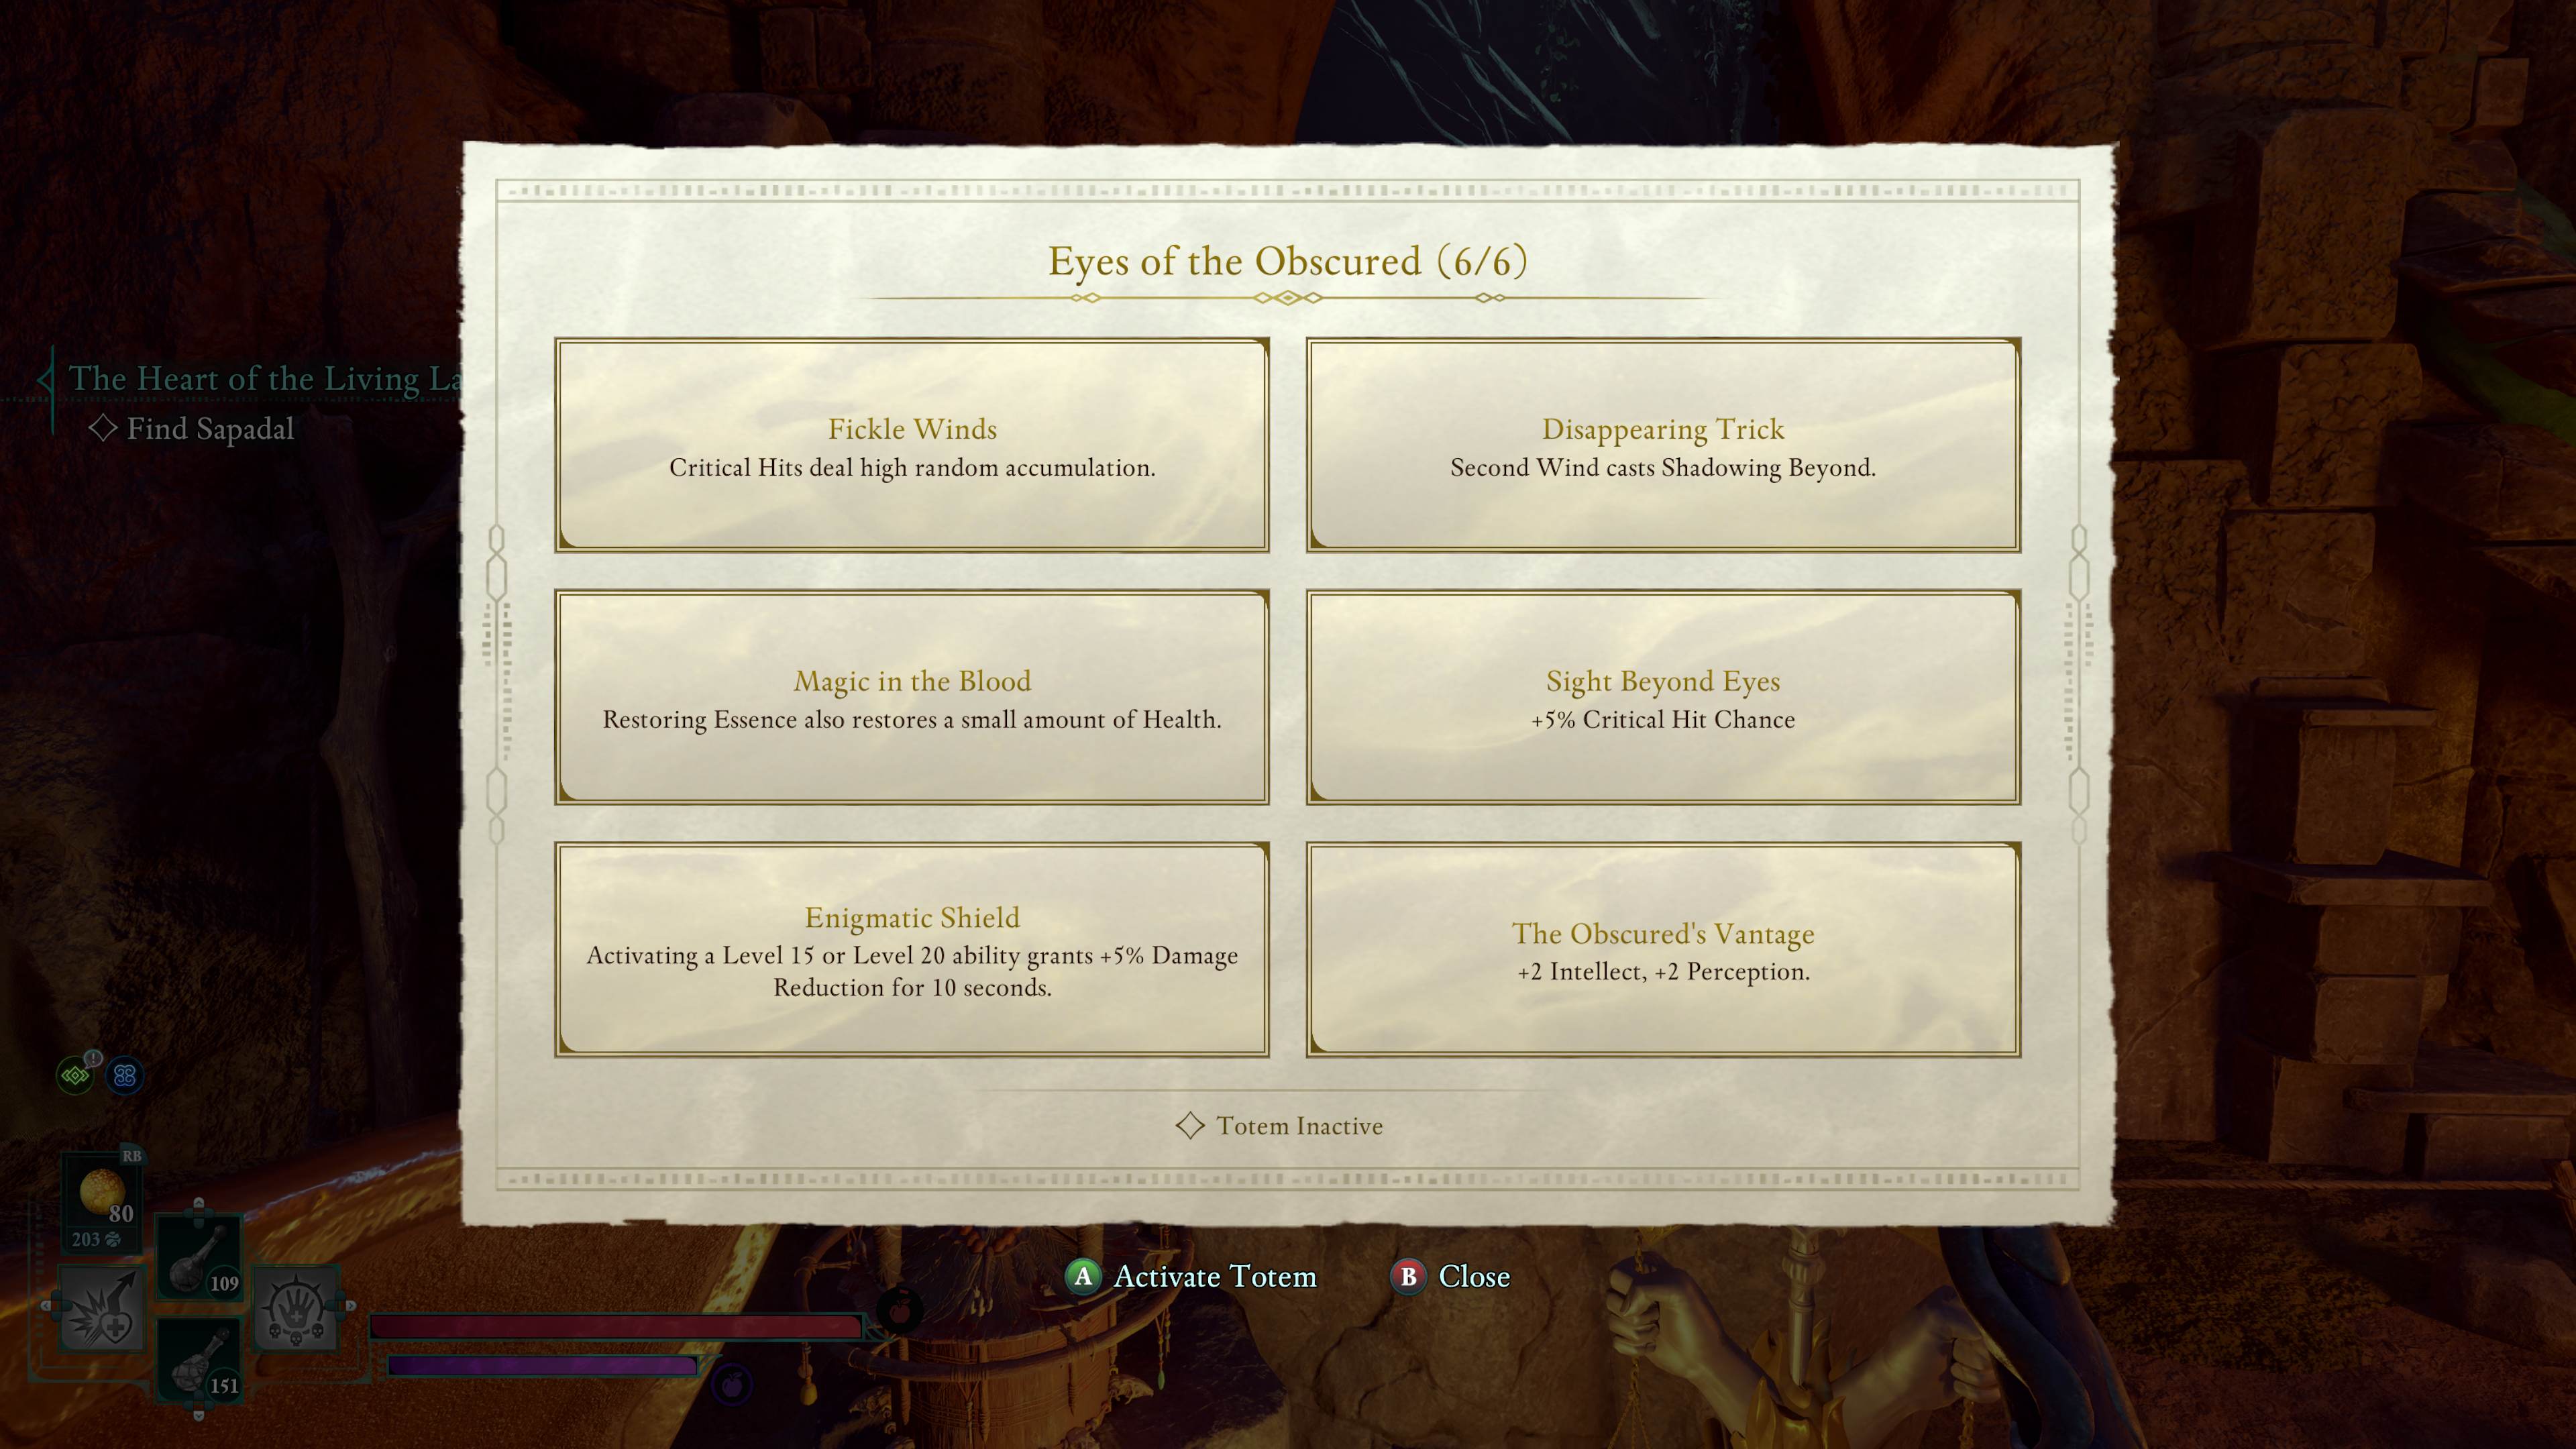
Avowed Totem of Revelations buff (Eyes of the Obscured)
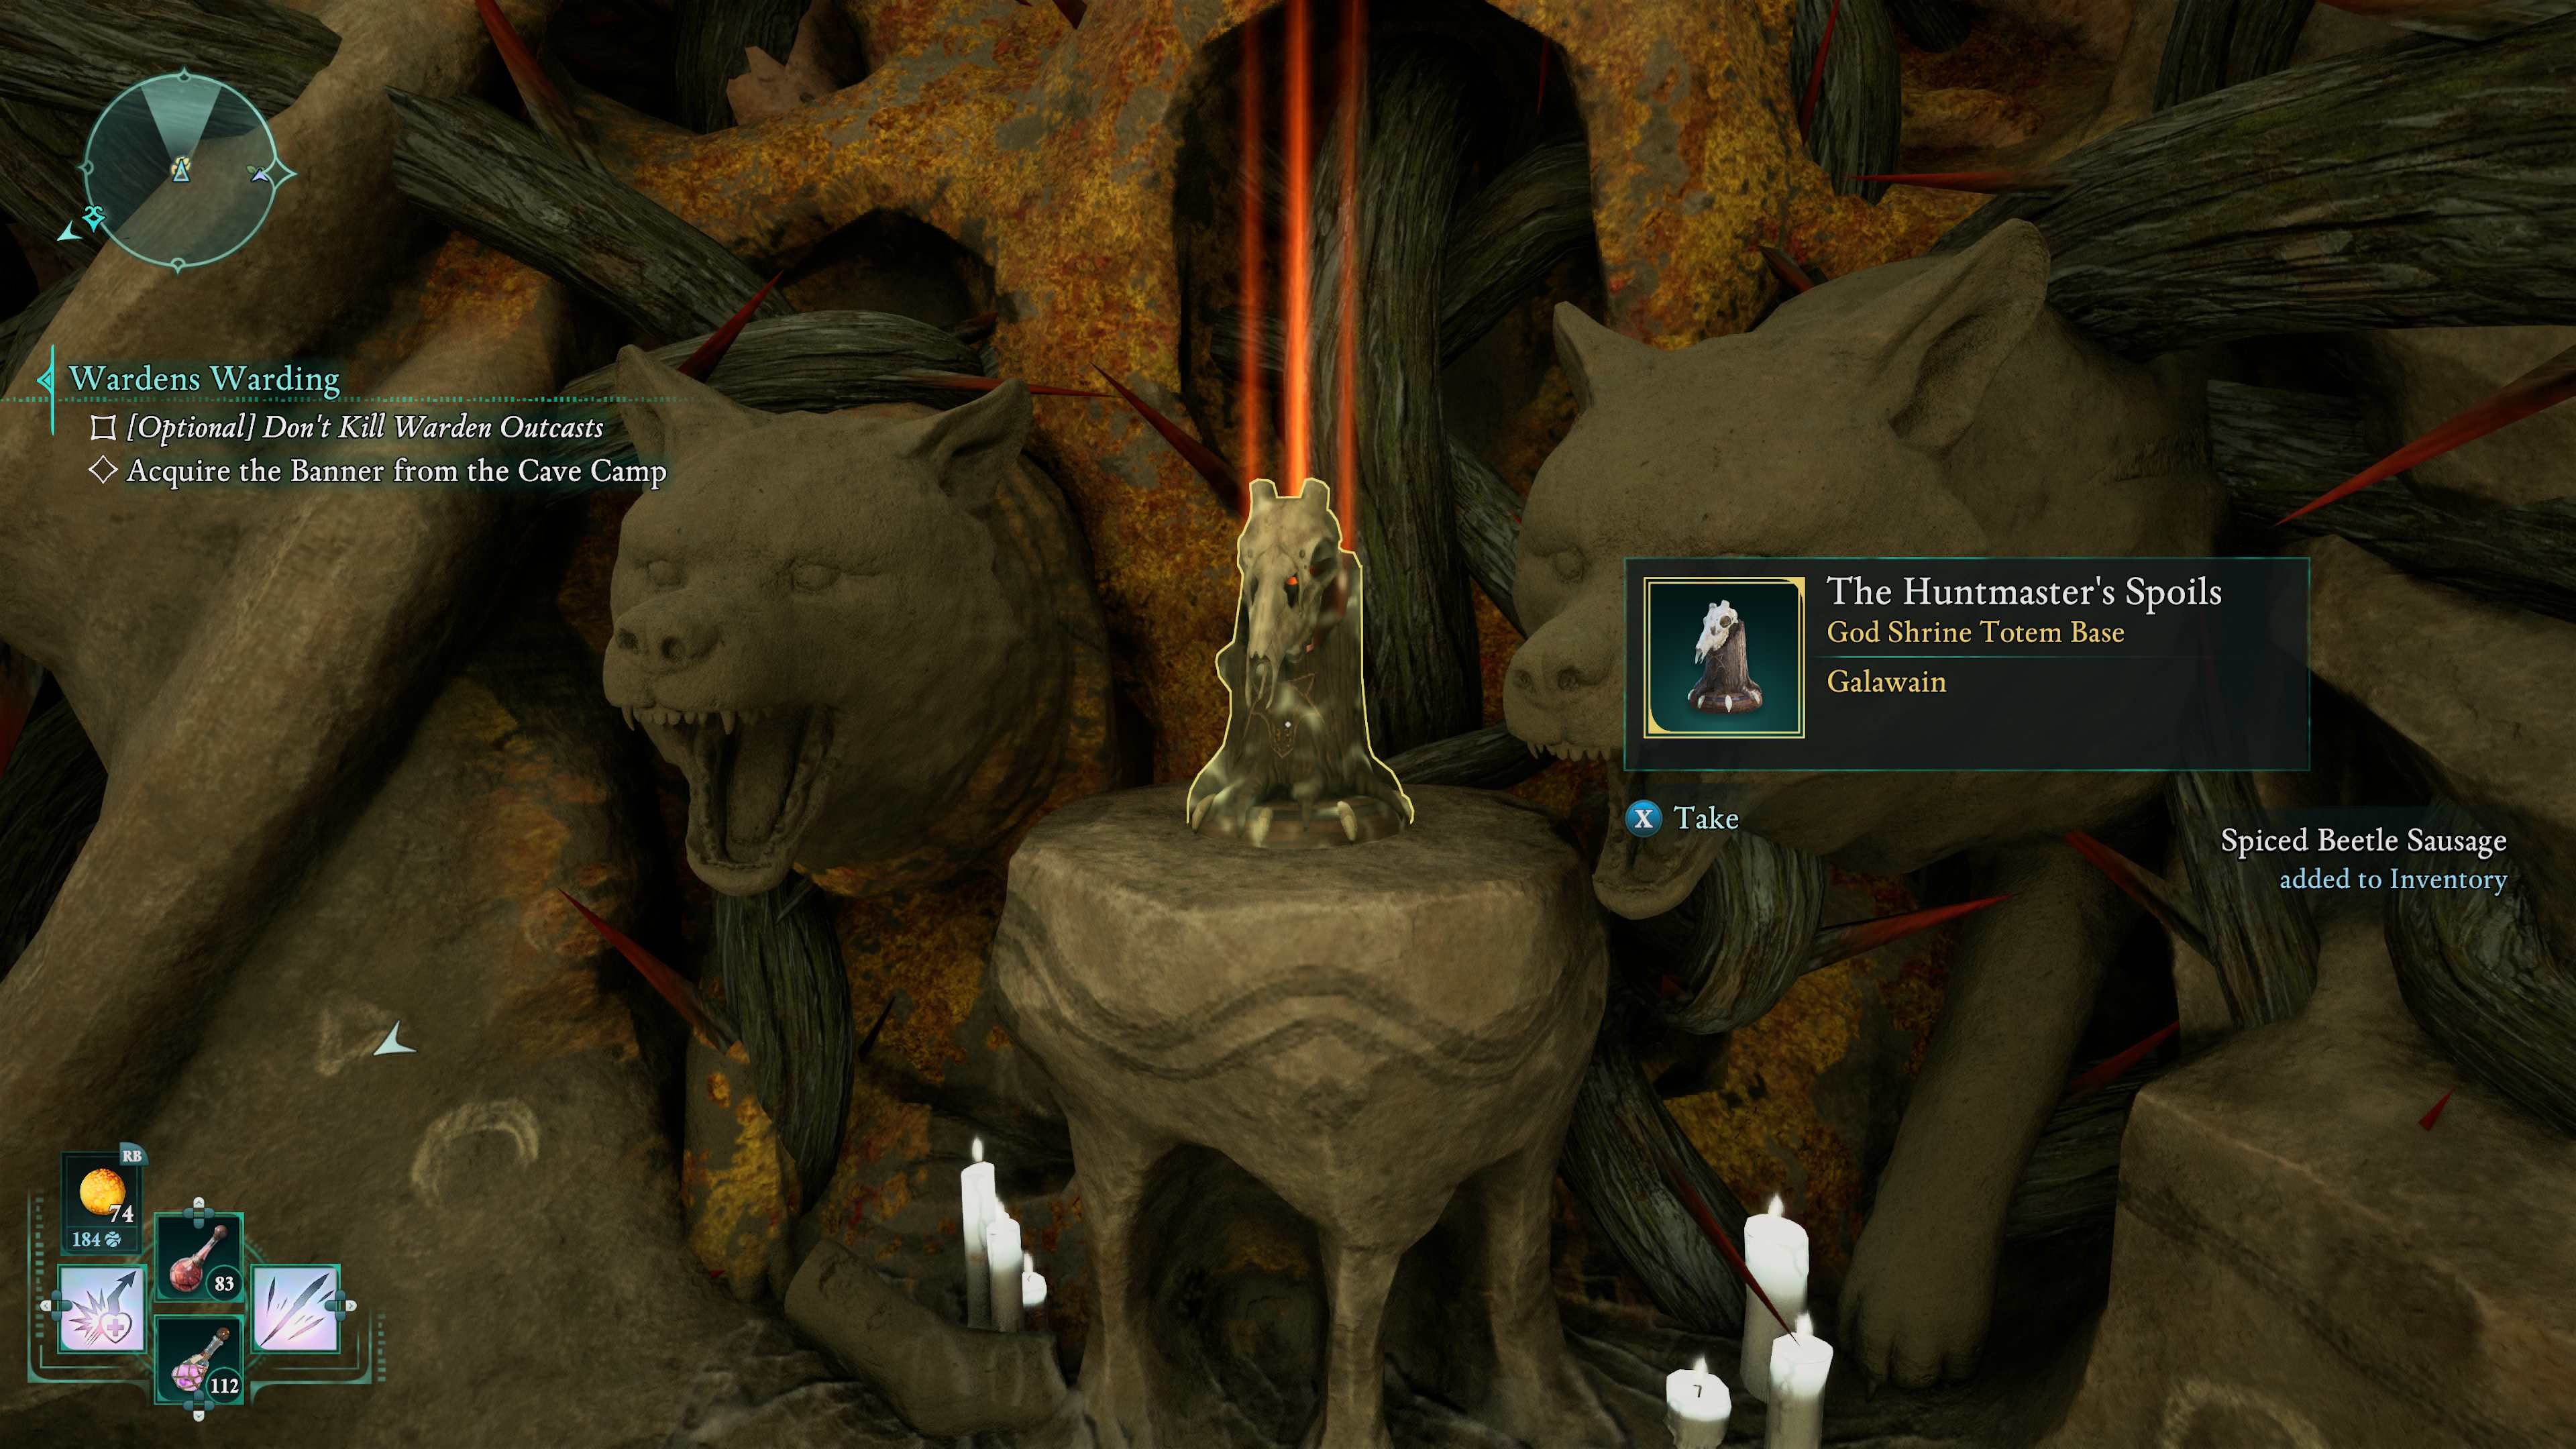
Galawain’s Tusks Totem – Totem of Perserverance
How to find all of the pieces for Totem of Perserverance in Galawain’s Tusks
In Solace Keep, located within the initial room, you can acquire the hints for the Galawain’s Tusks totem from a merchant. If you haven’t stumbled upon The Huntmaster’s Spoils (which serves as the Totem Base) on your way to the keep, don’t worry, it’s explained further in the text.
Avowed – Shrine to Galwain – Totem Base
Where the fungal forest halts, among the ruins the Changeling’s totem exalts.

Avowed – Antler of the Preserving Stag
Below a bridge above the acid sea, the first of the elk’s remains shall be.

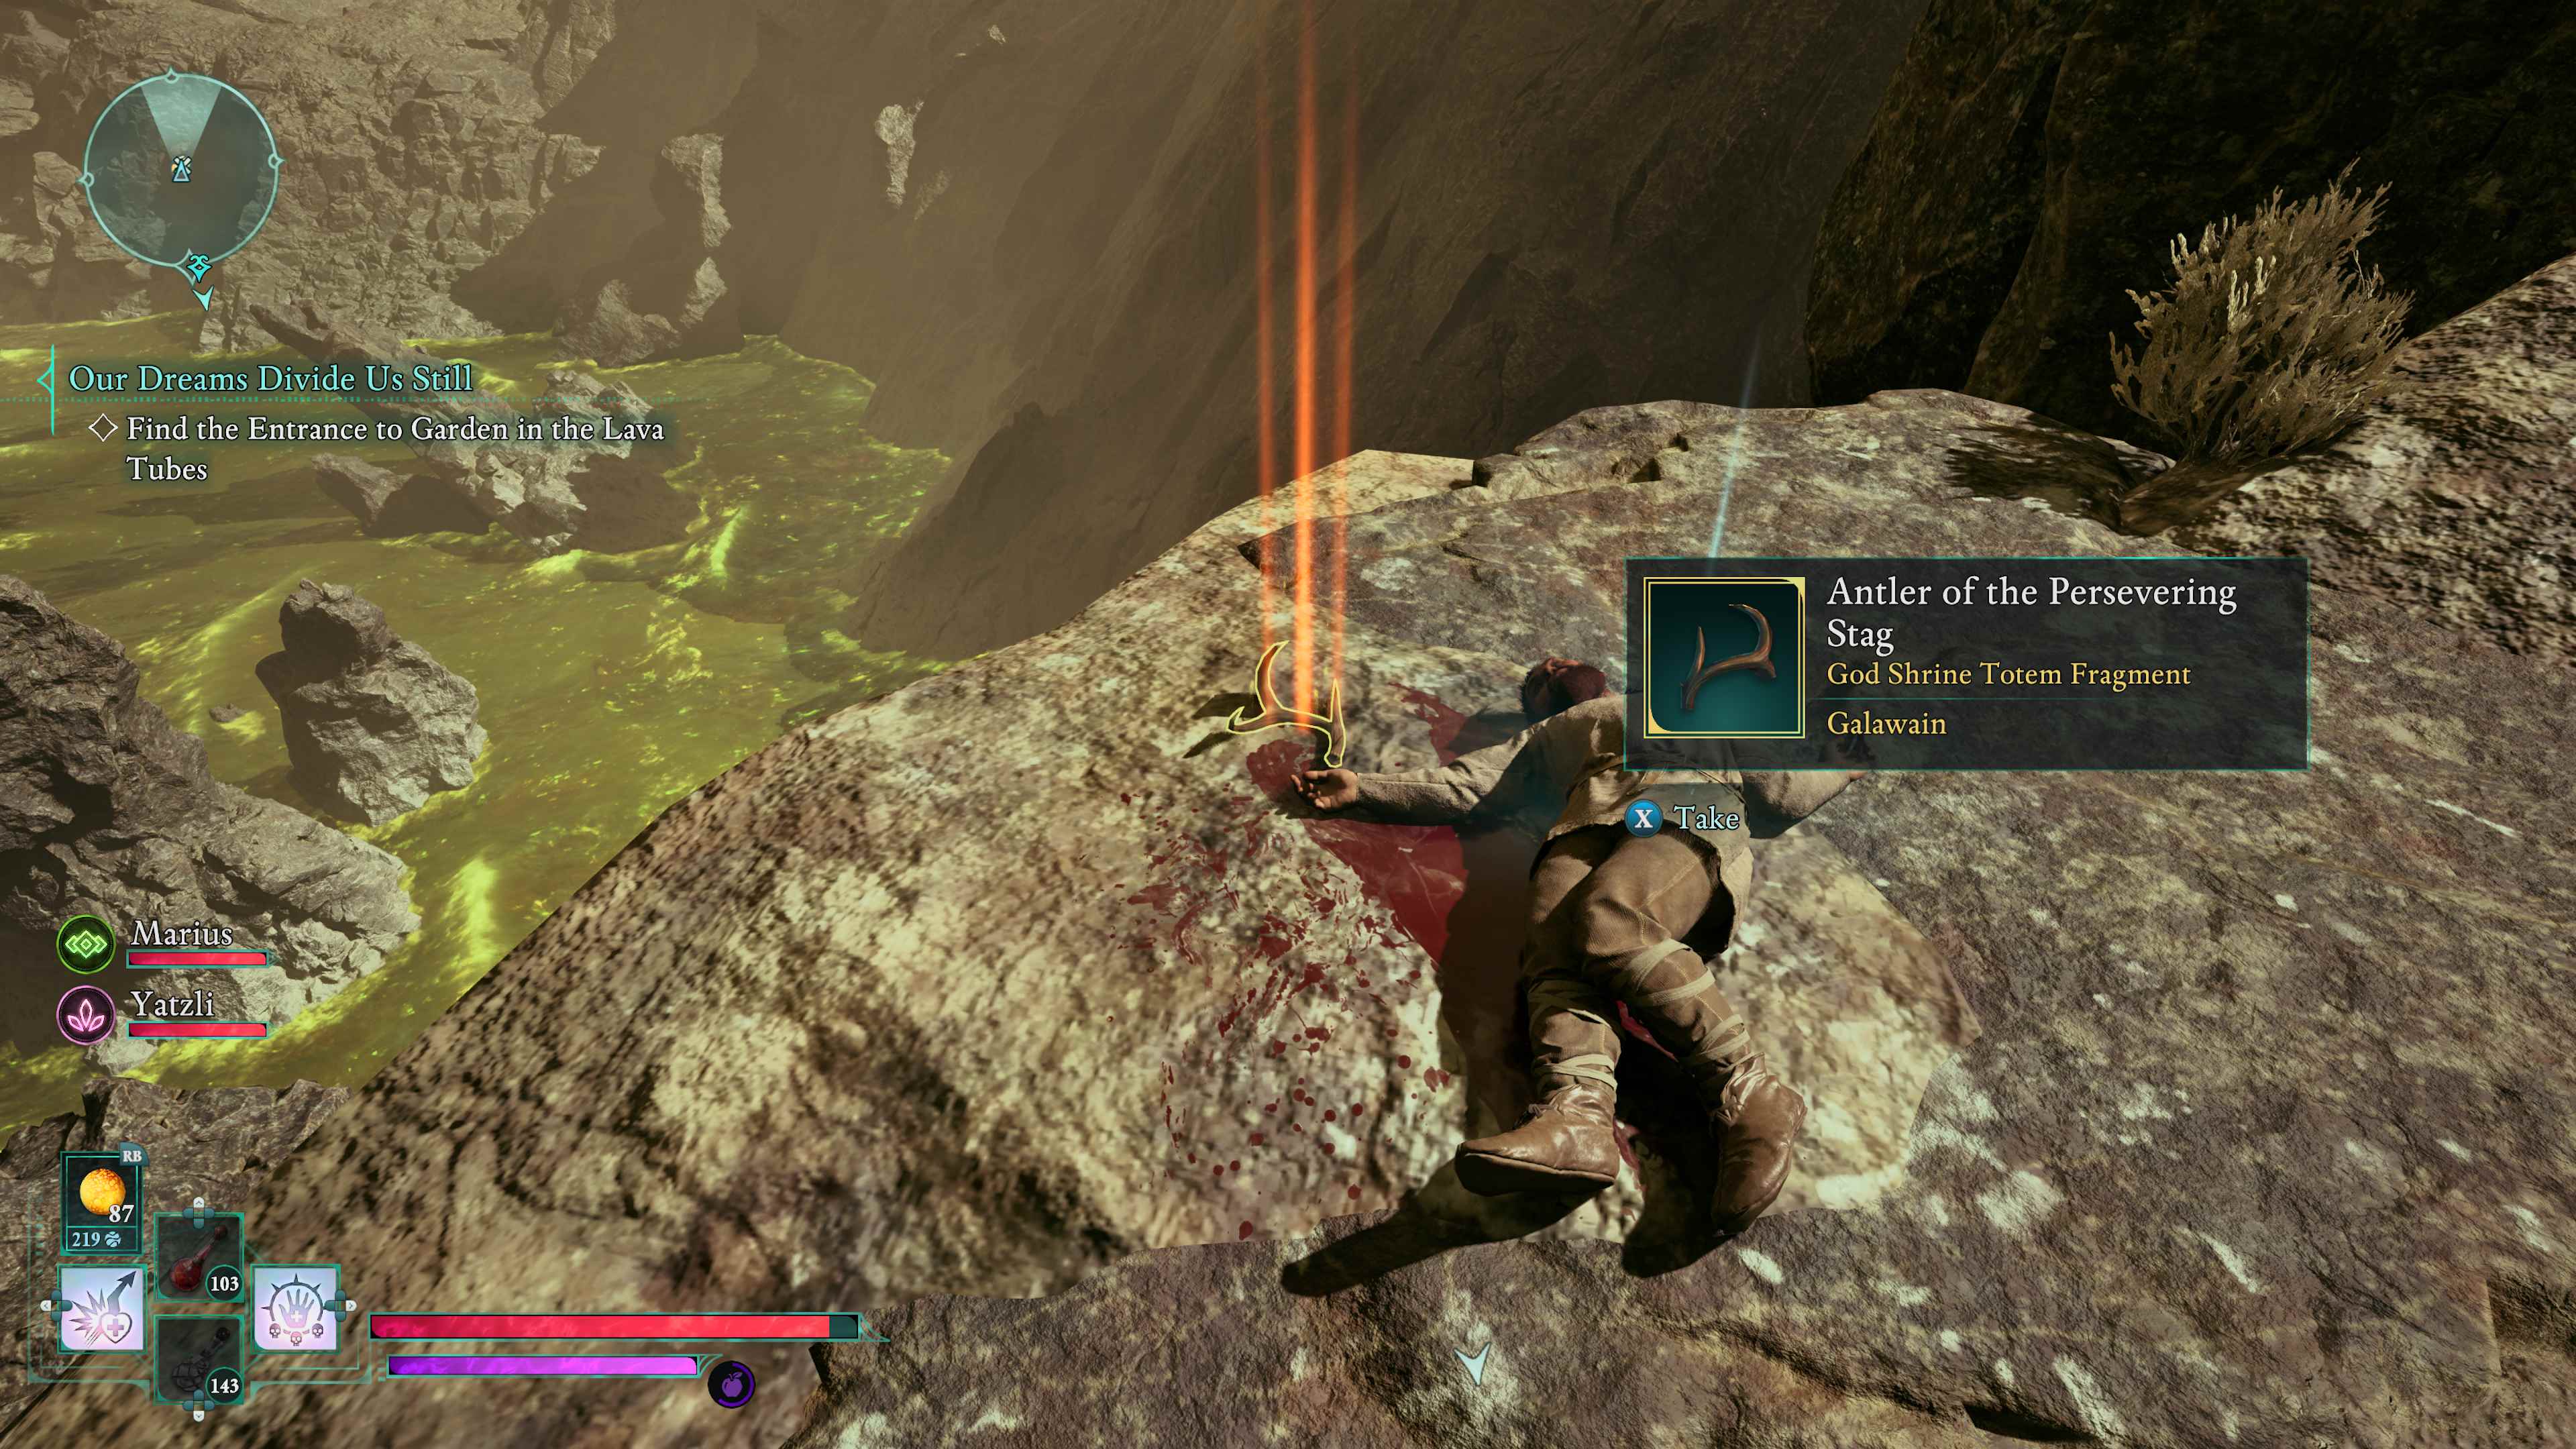
Make your way towards the map symbol to locate the bridge leading to The Garden (you can’t enter it now, but stick with the story to gain access later). On your right, as you approach the bridge, there’s a fragment of the Totem waiting to be picked up.
Avowed – Antler of the Pursued Stag
Past disused tower guarding lava fields, by stone and bramble this antler is sealed.

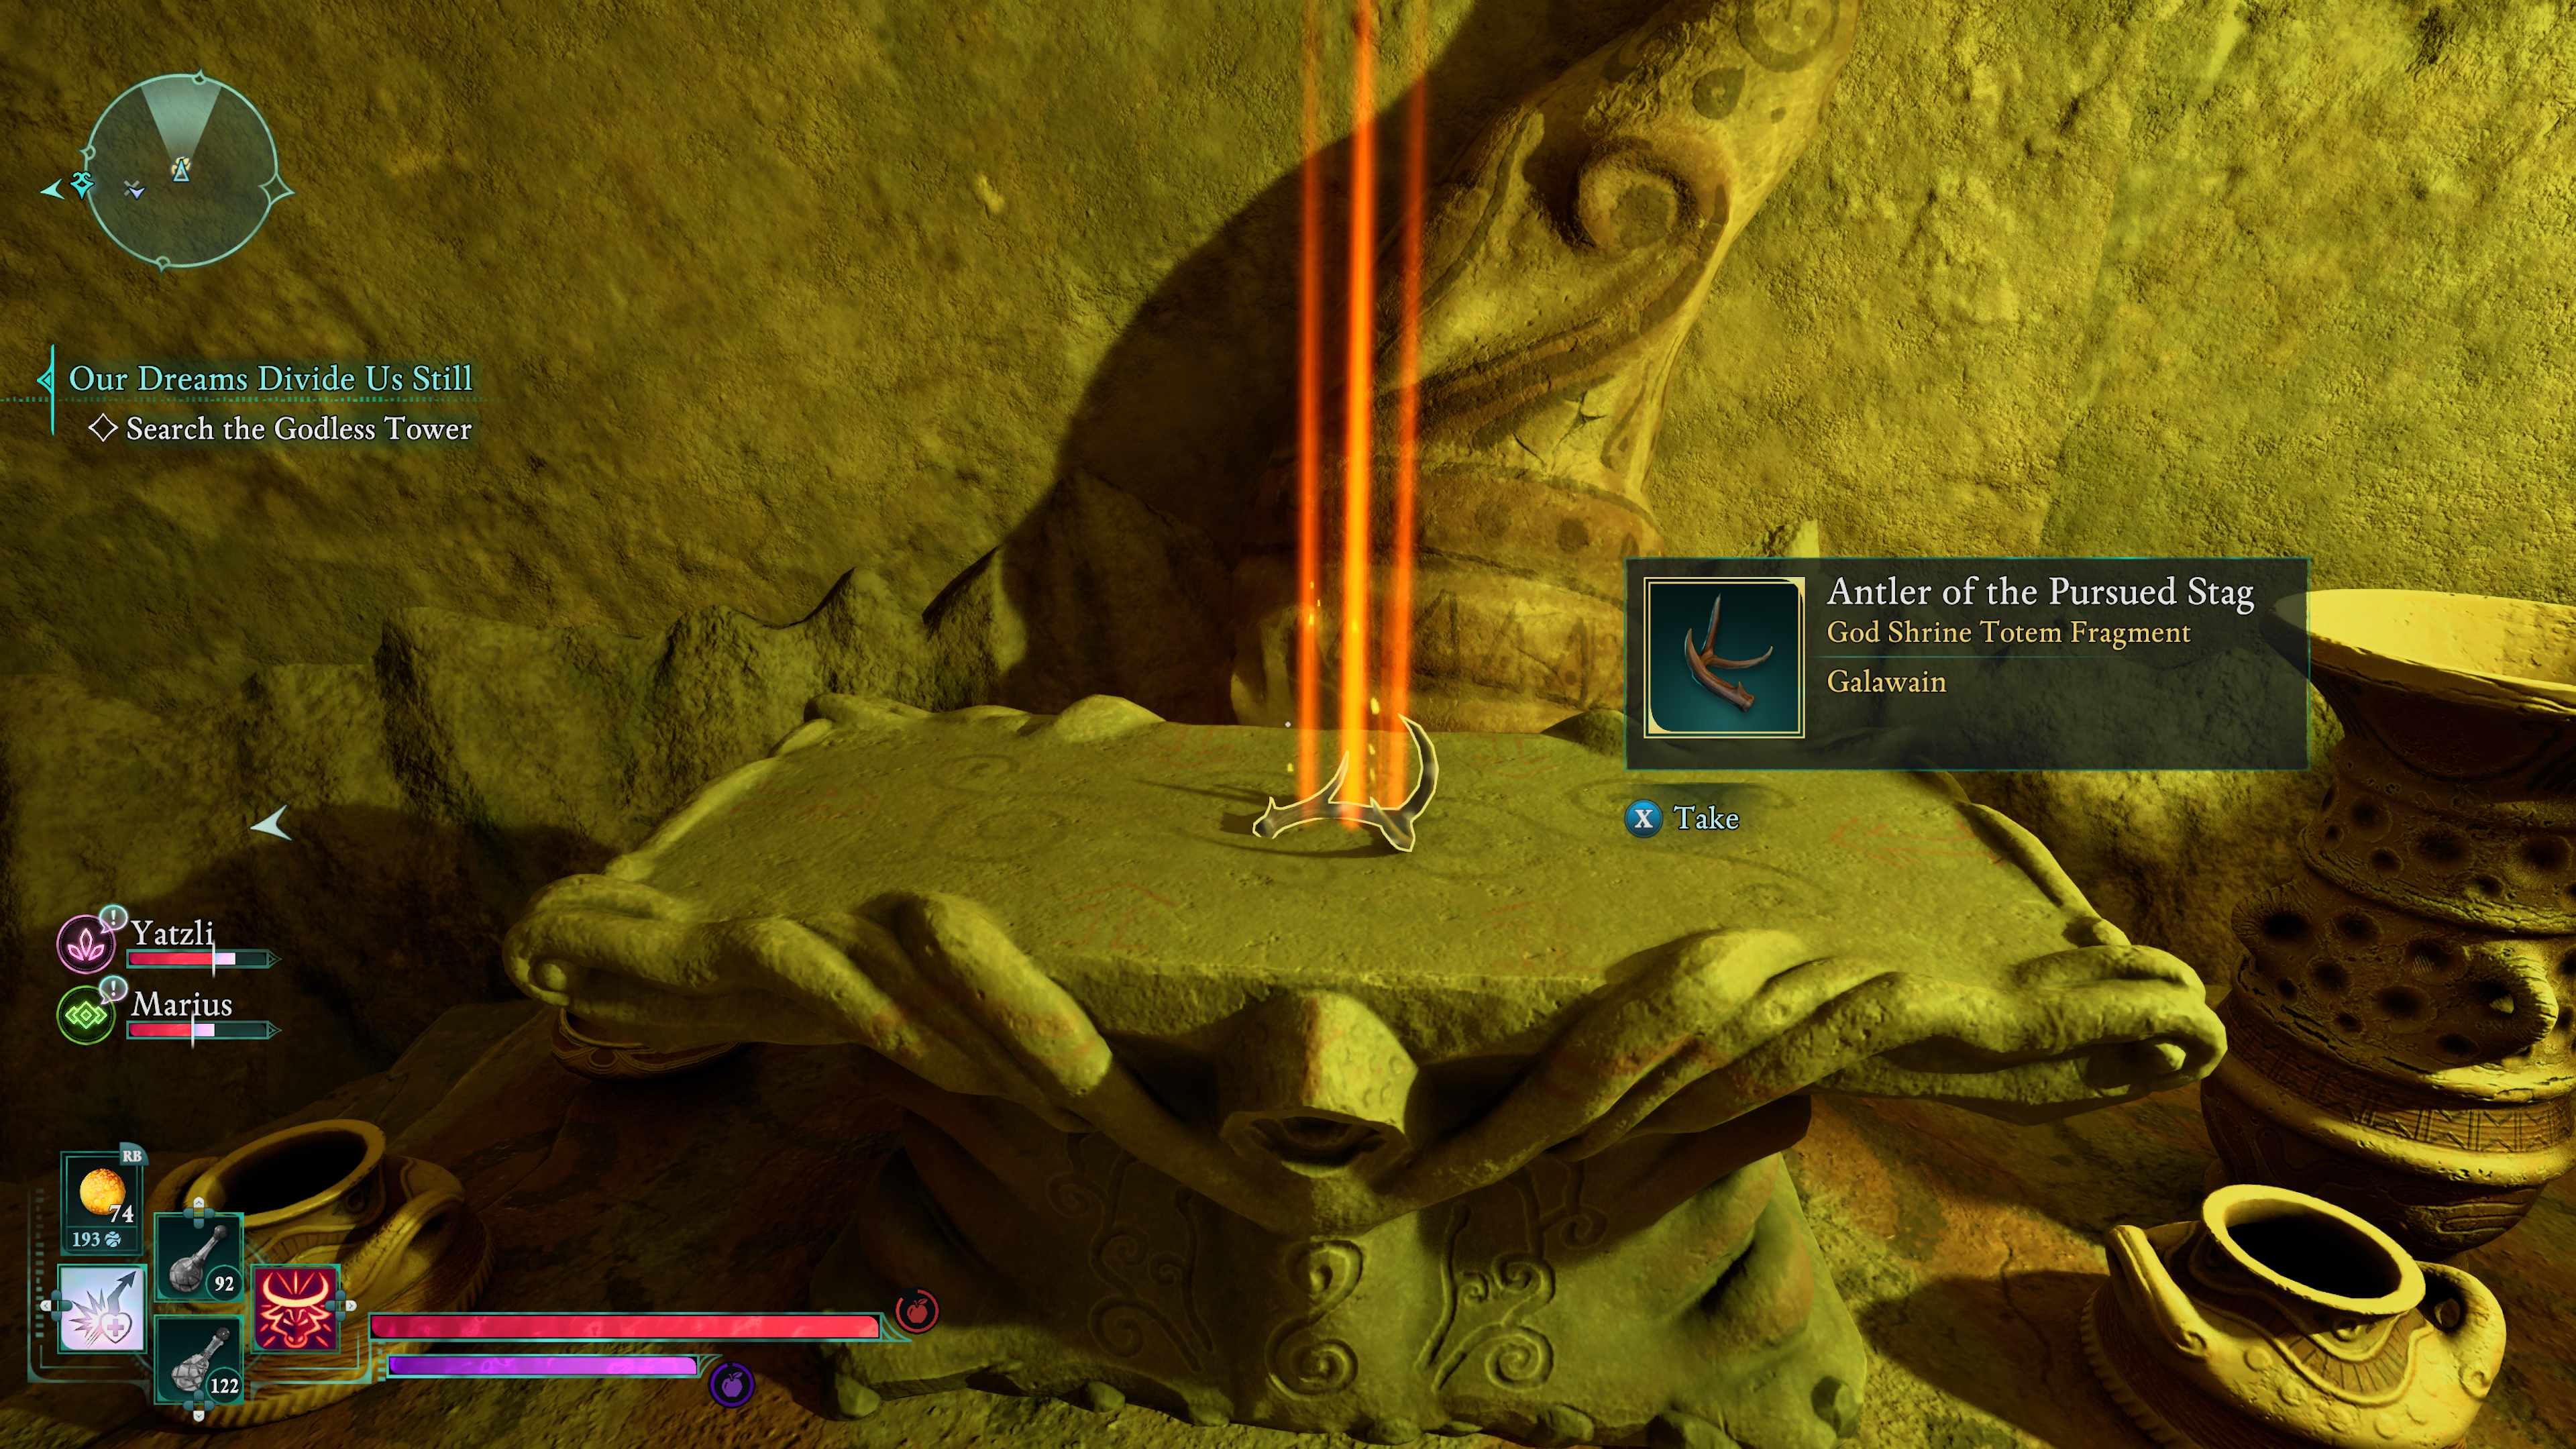
Search for a web-enshrouded spider lair, and make sure Yatzli accompanies you. You’ll need him to dispel an illusory stone barrier to retrieve the hidden totem fragment within.
Avowed – Wolf’s Pelt Trophy
The lupine pelt will heed your call, on ashen tower where the sky did fall.
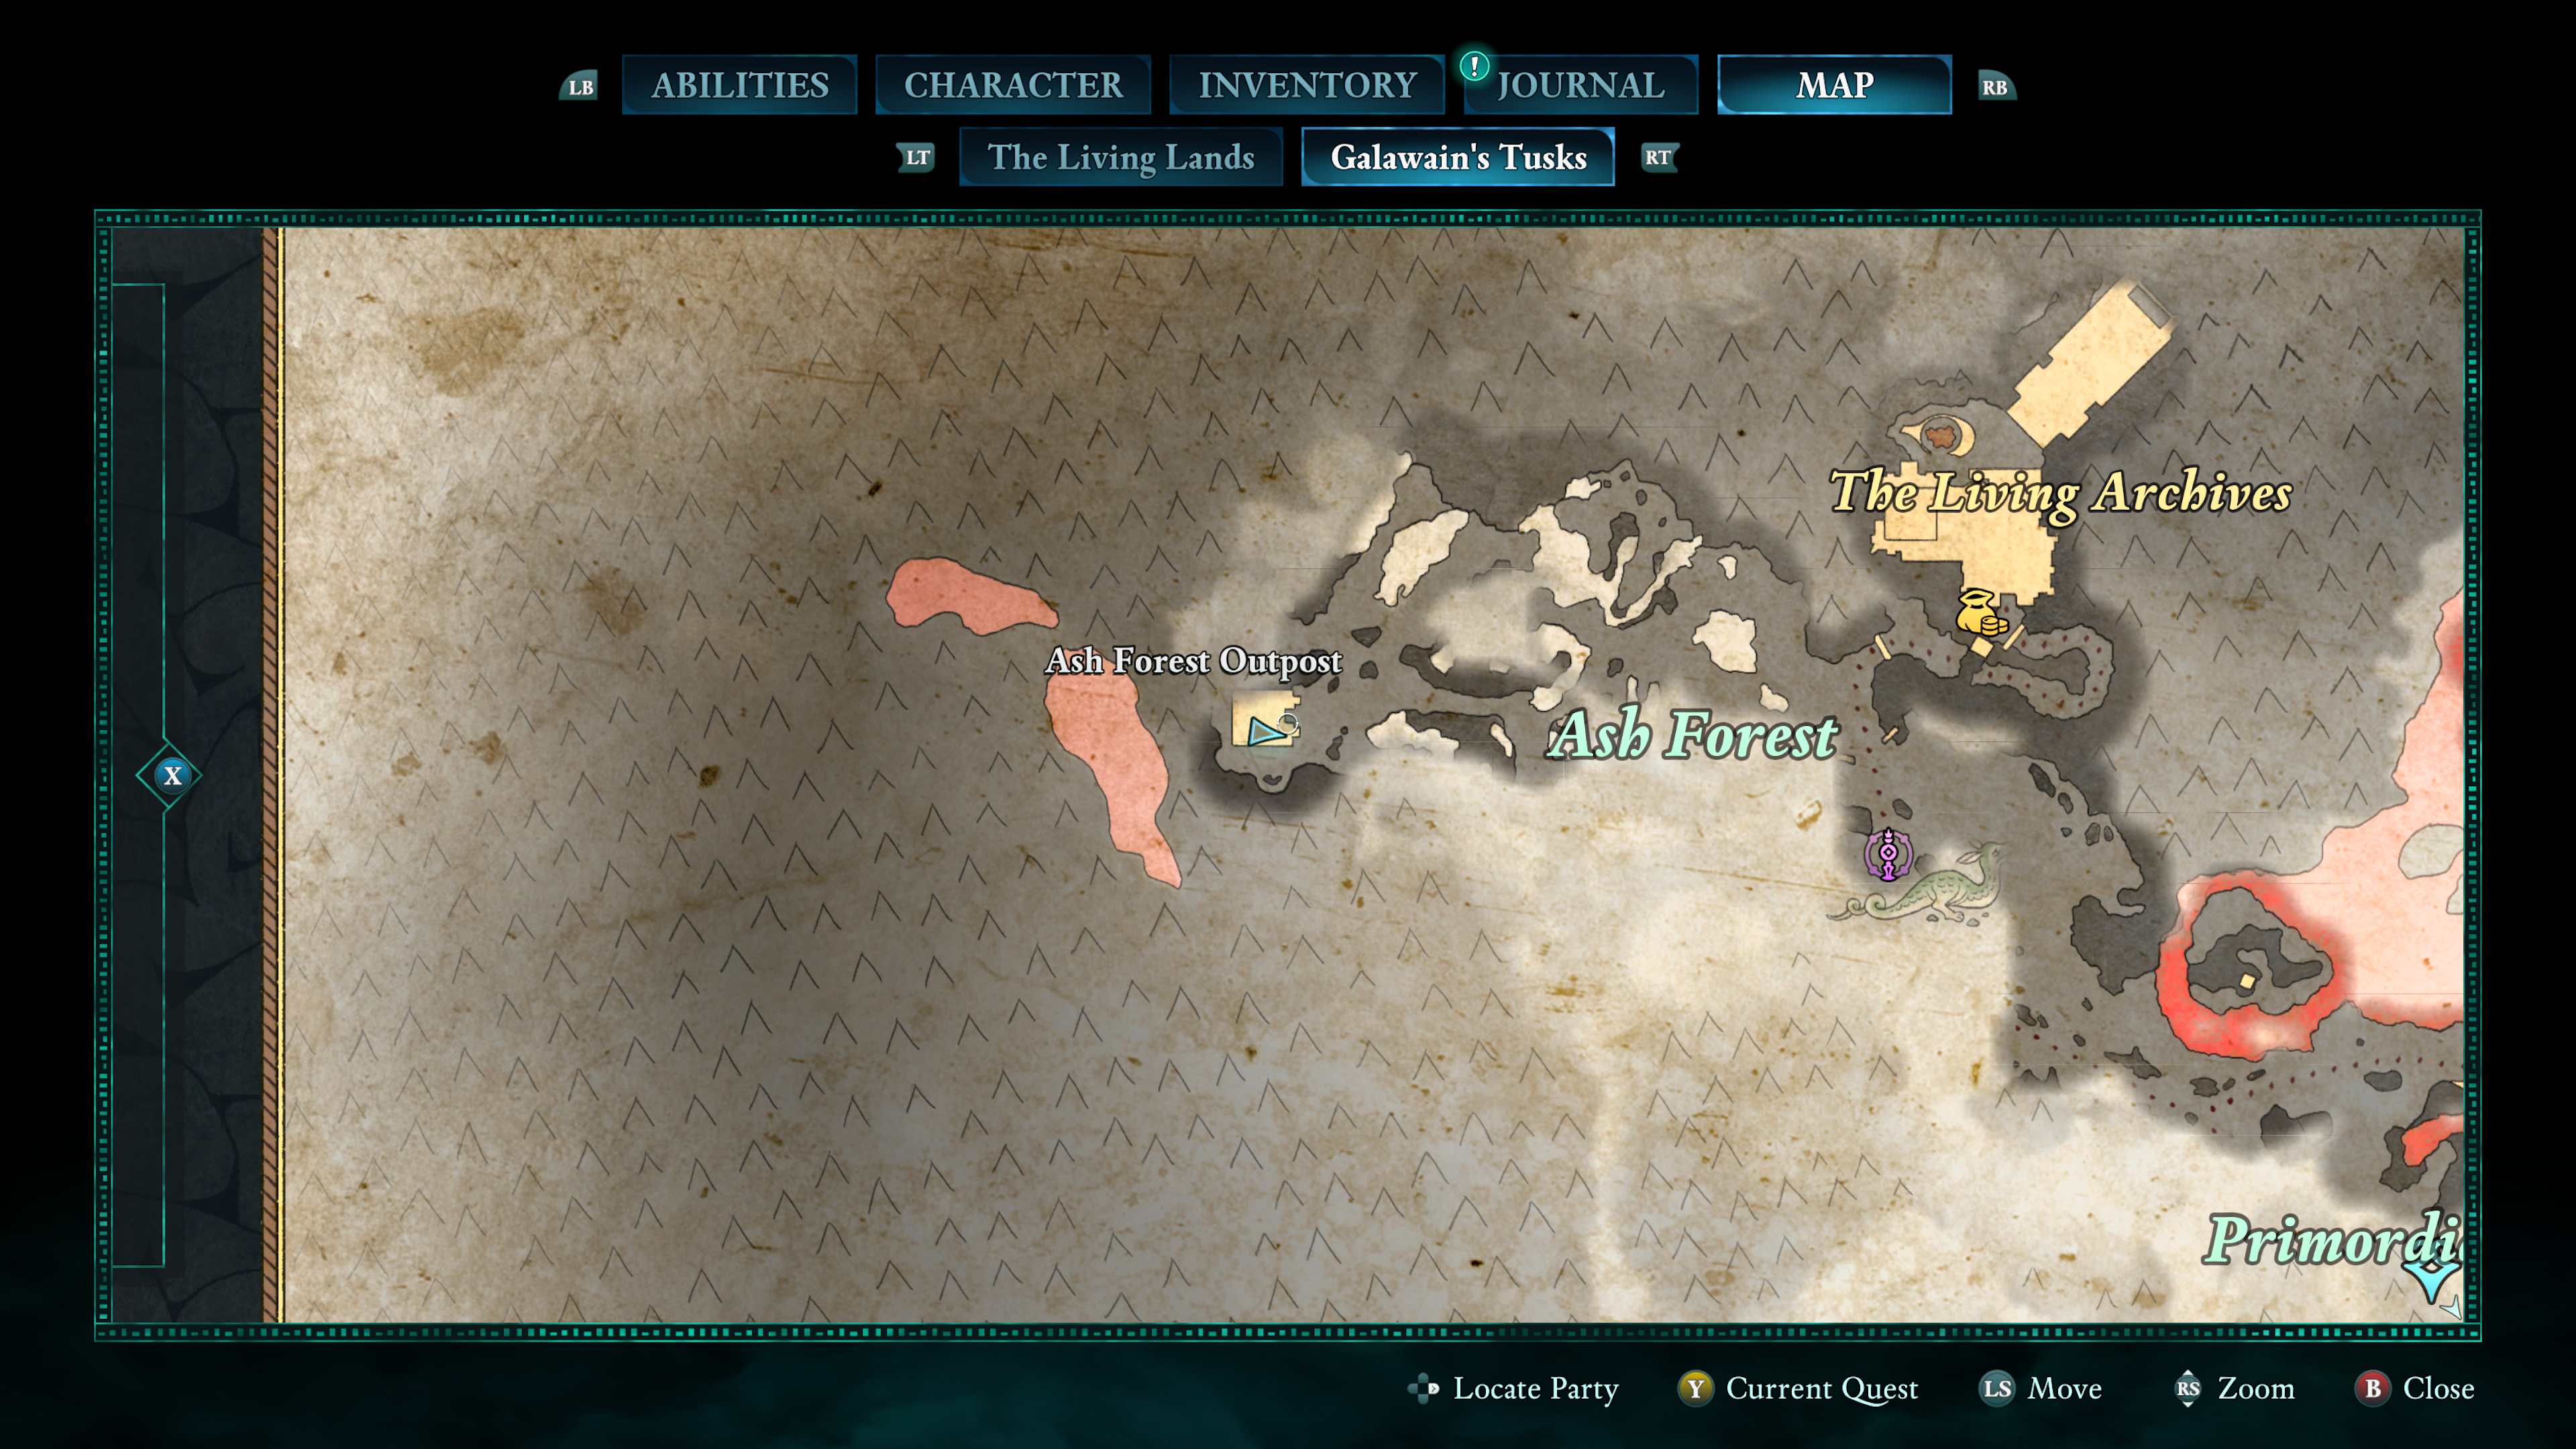
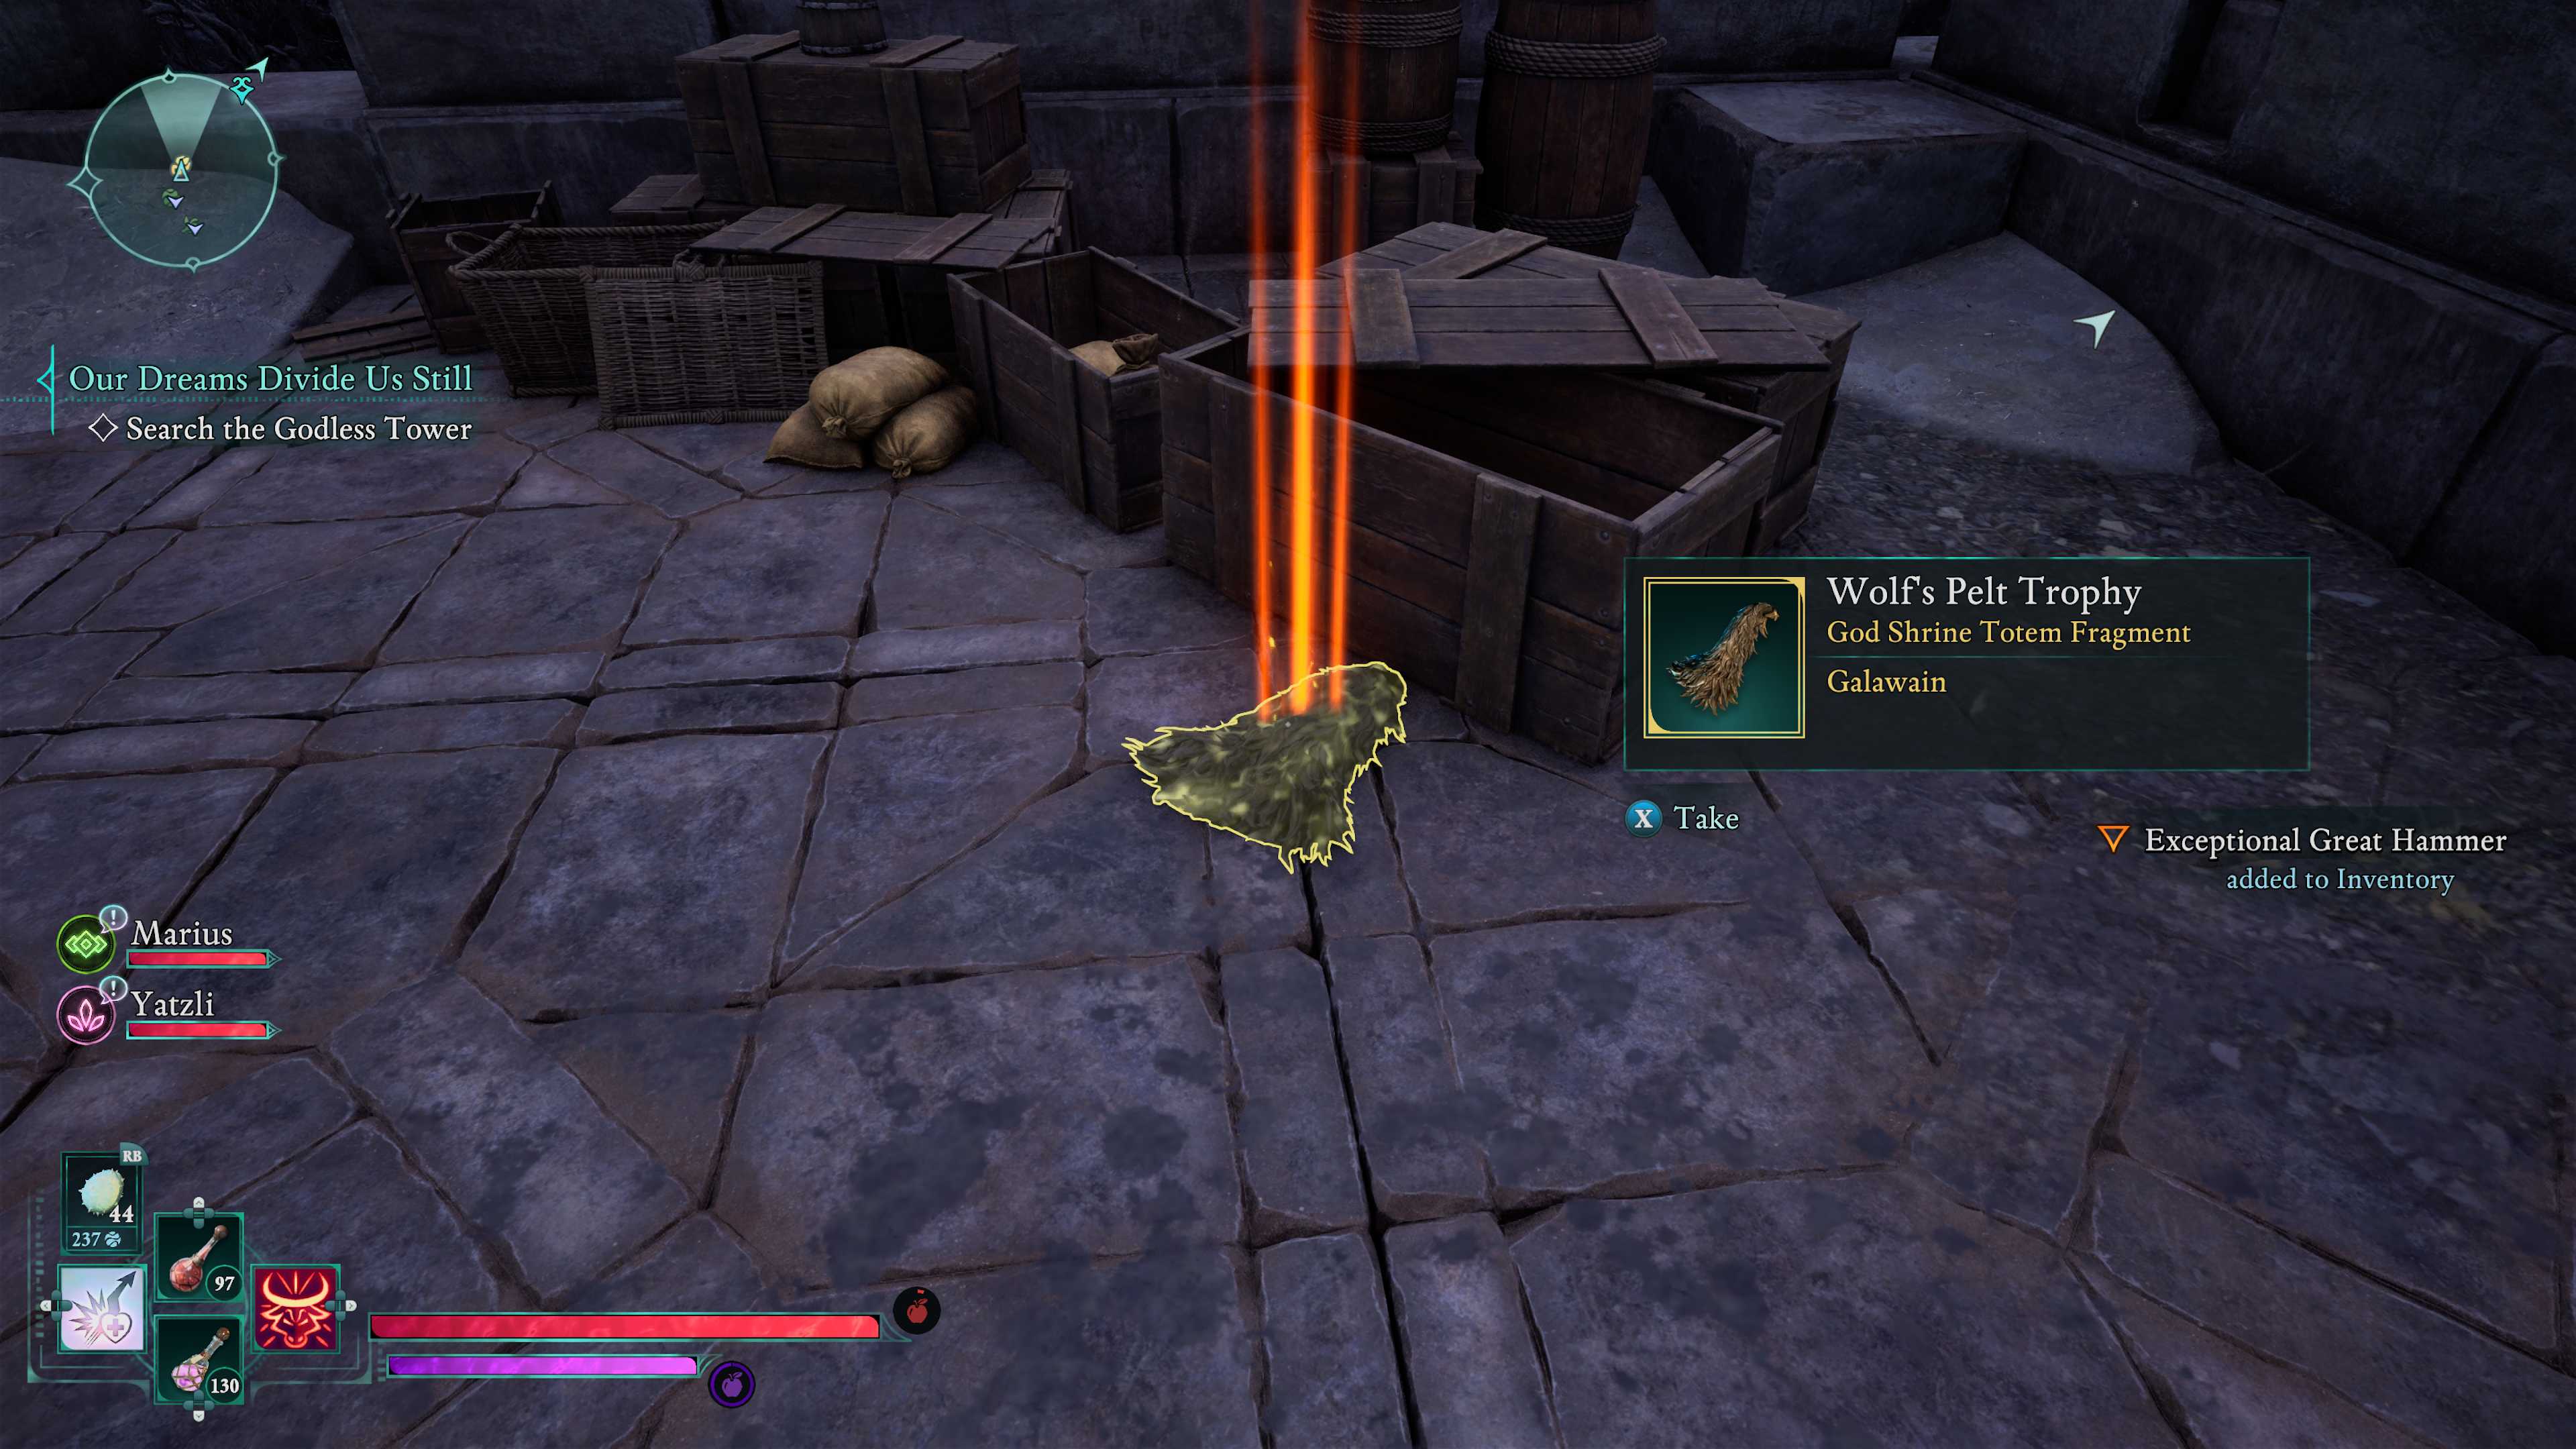
At the summit of Ash Forest, not too distant from a spot indicated on one of the Treasure Maps, you’ll find what you’re looking for – an observation tower. Ascend this tower to retrieve your totem fragment.
Avowed – Hunters Arrows of Seeking
Near the founder’s head these arrows find, out of view where he is blind.
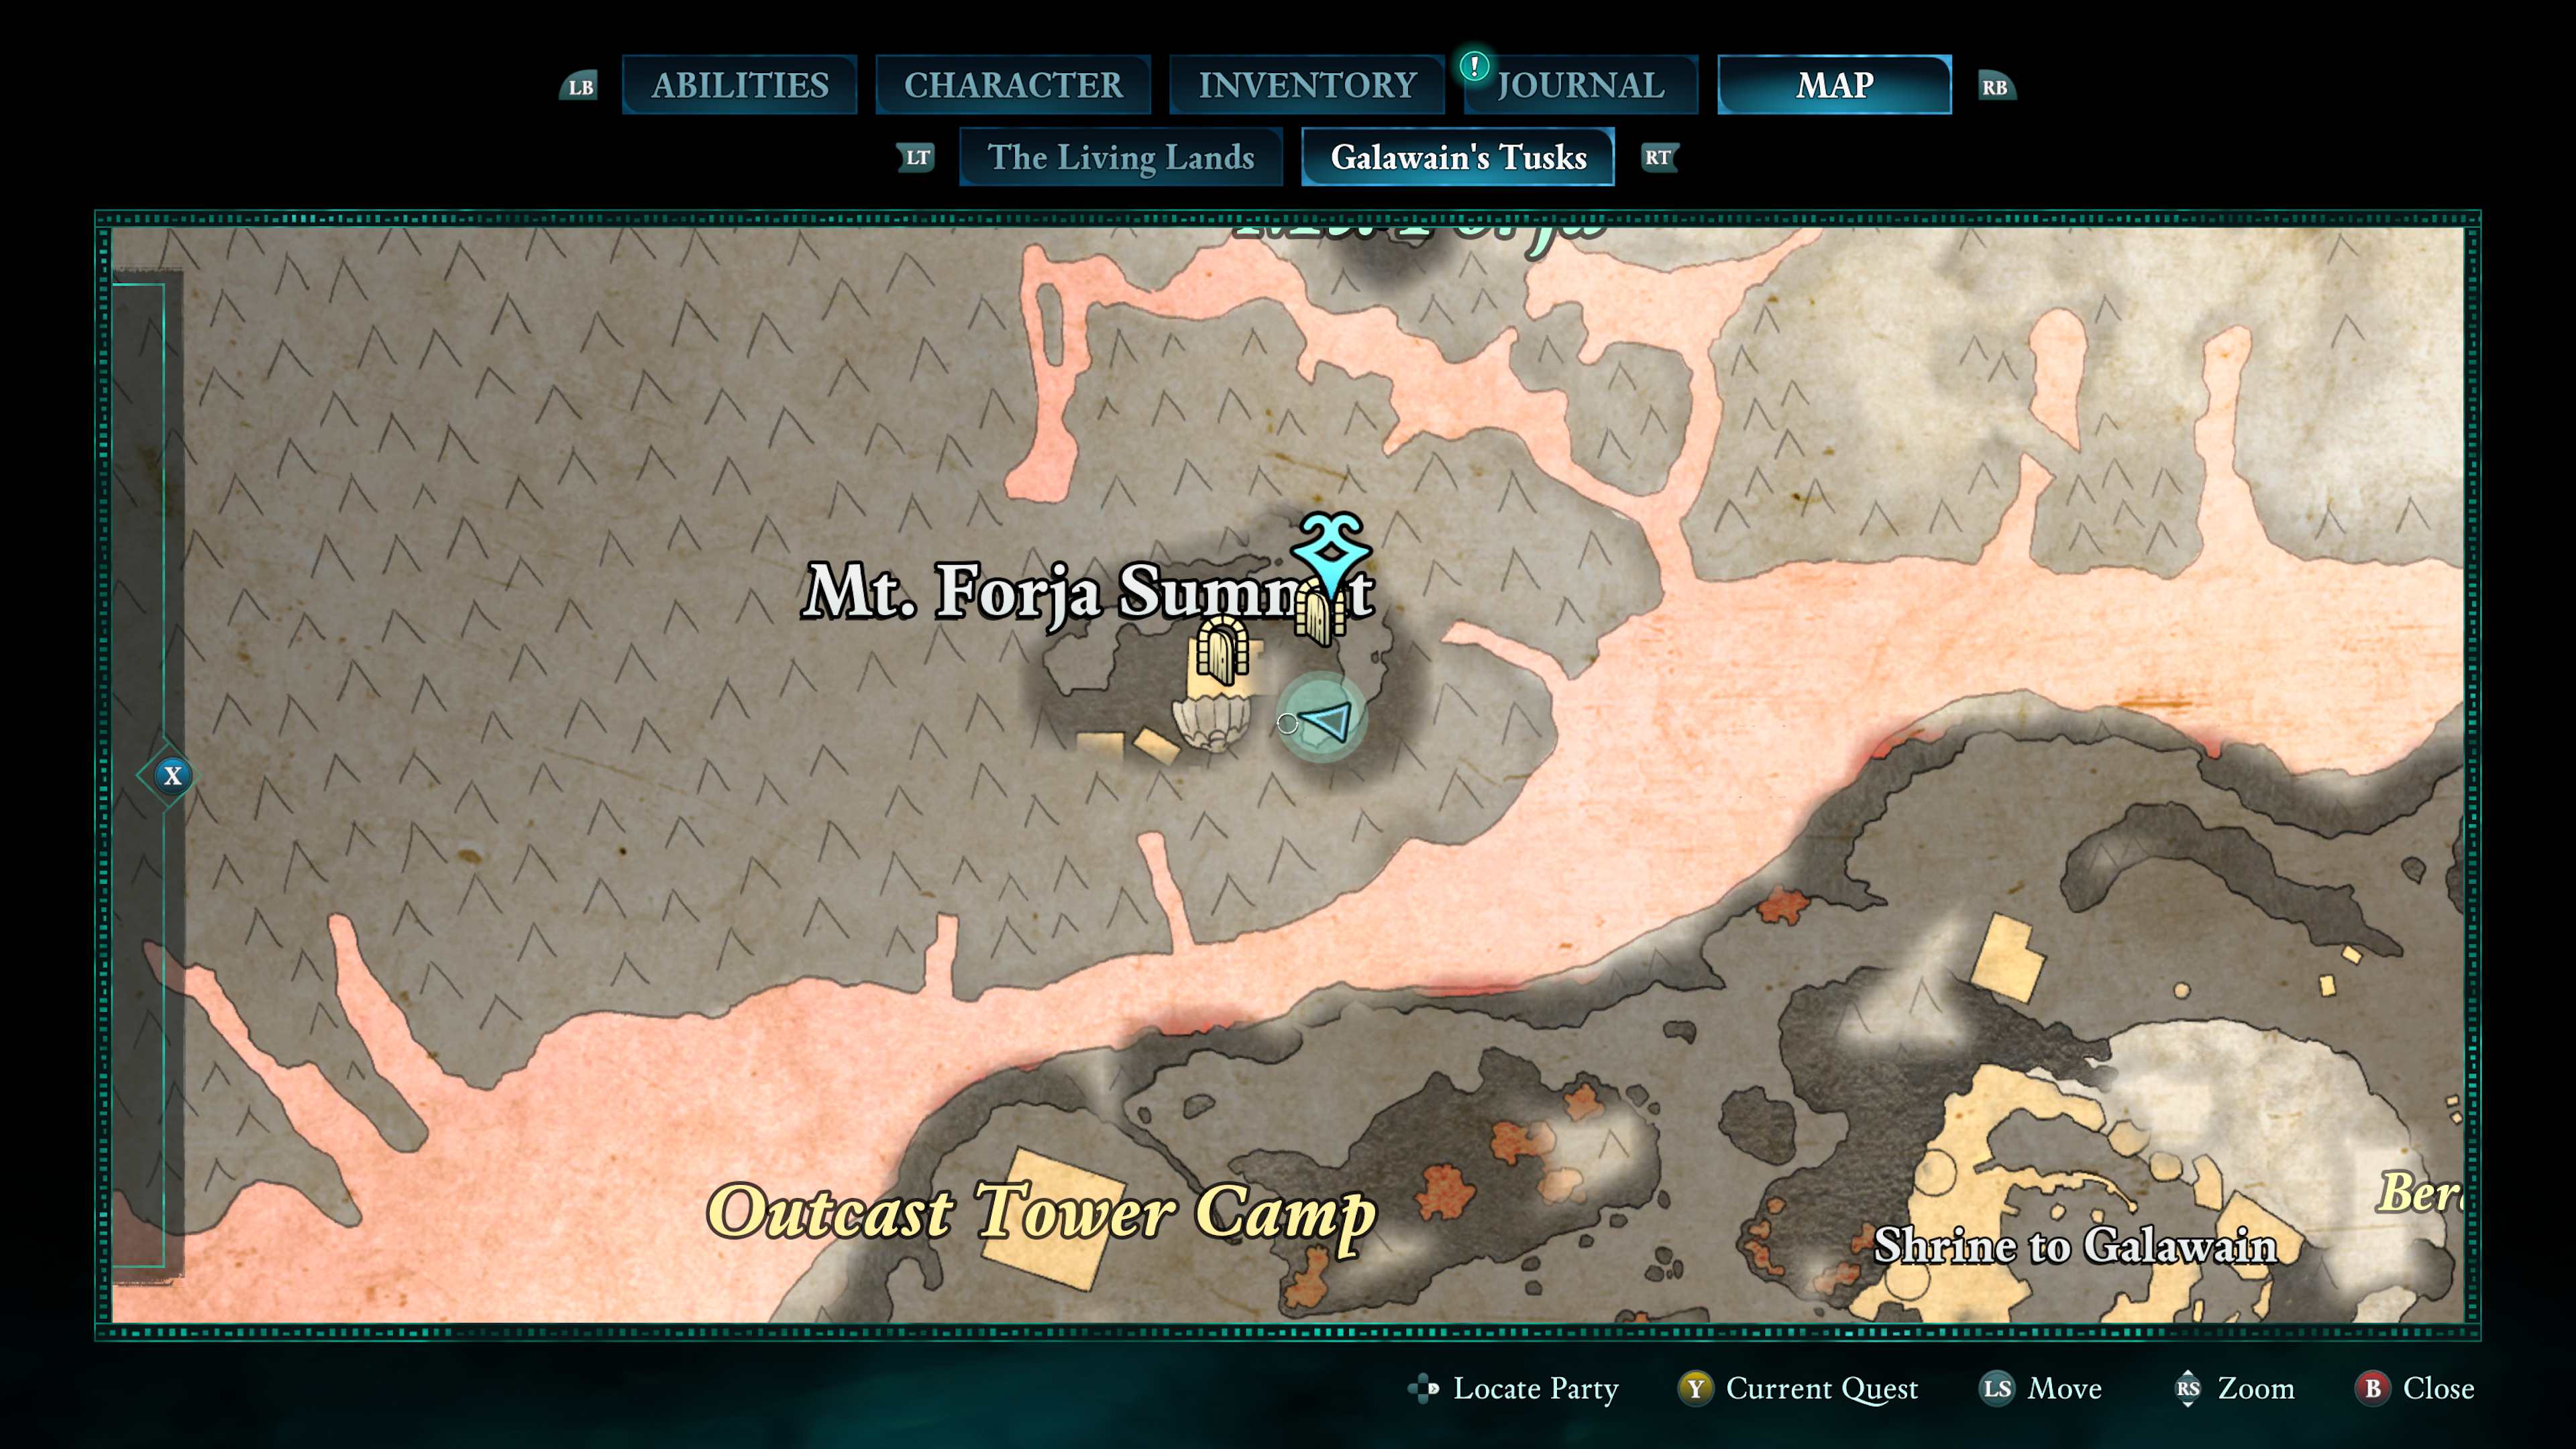
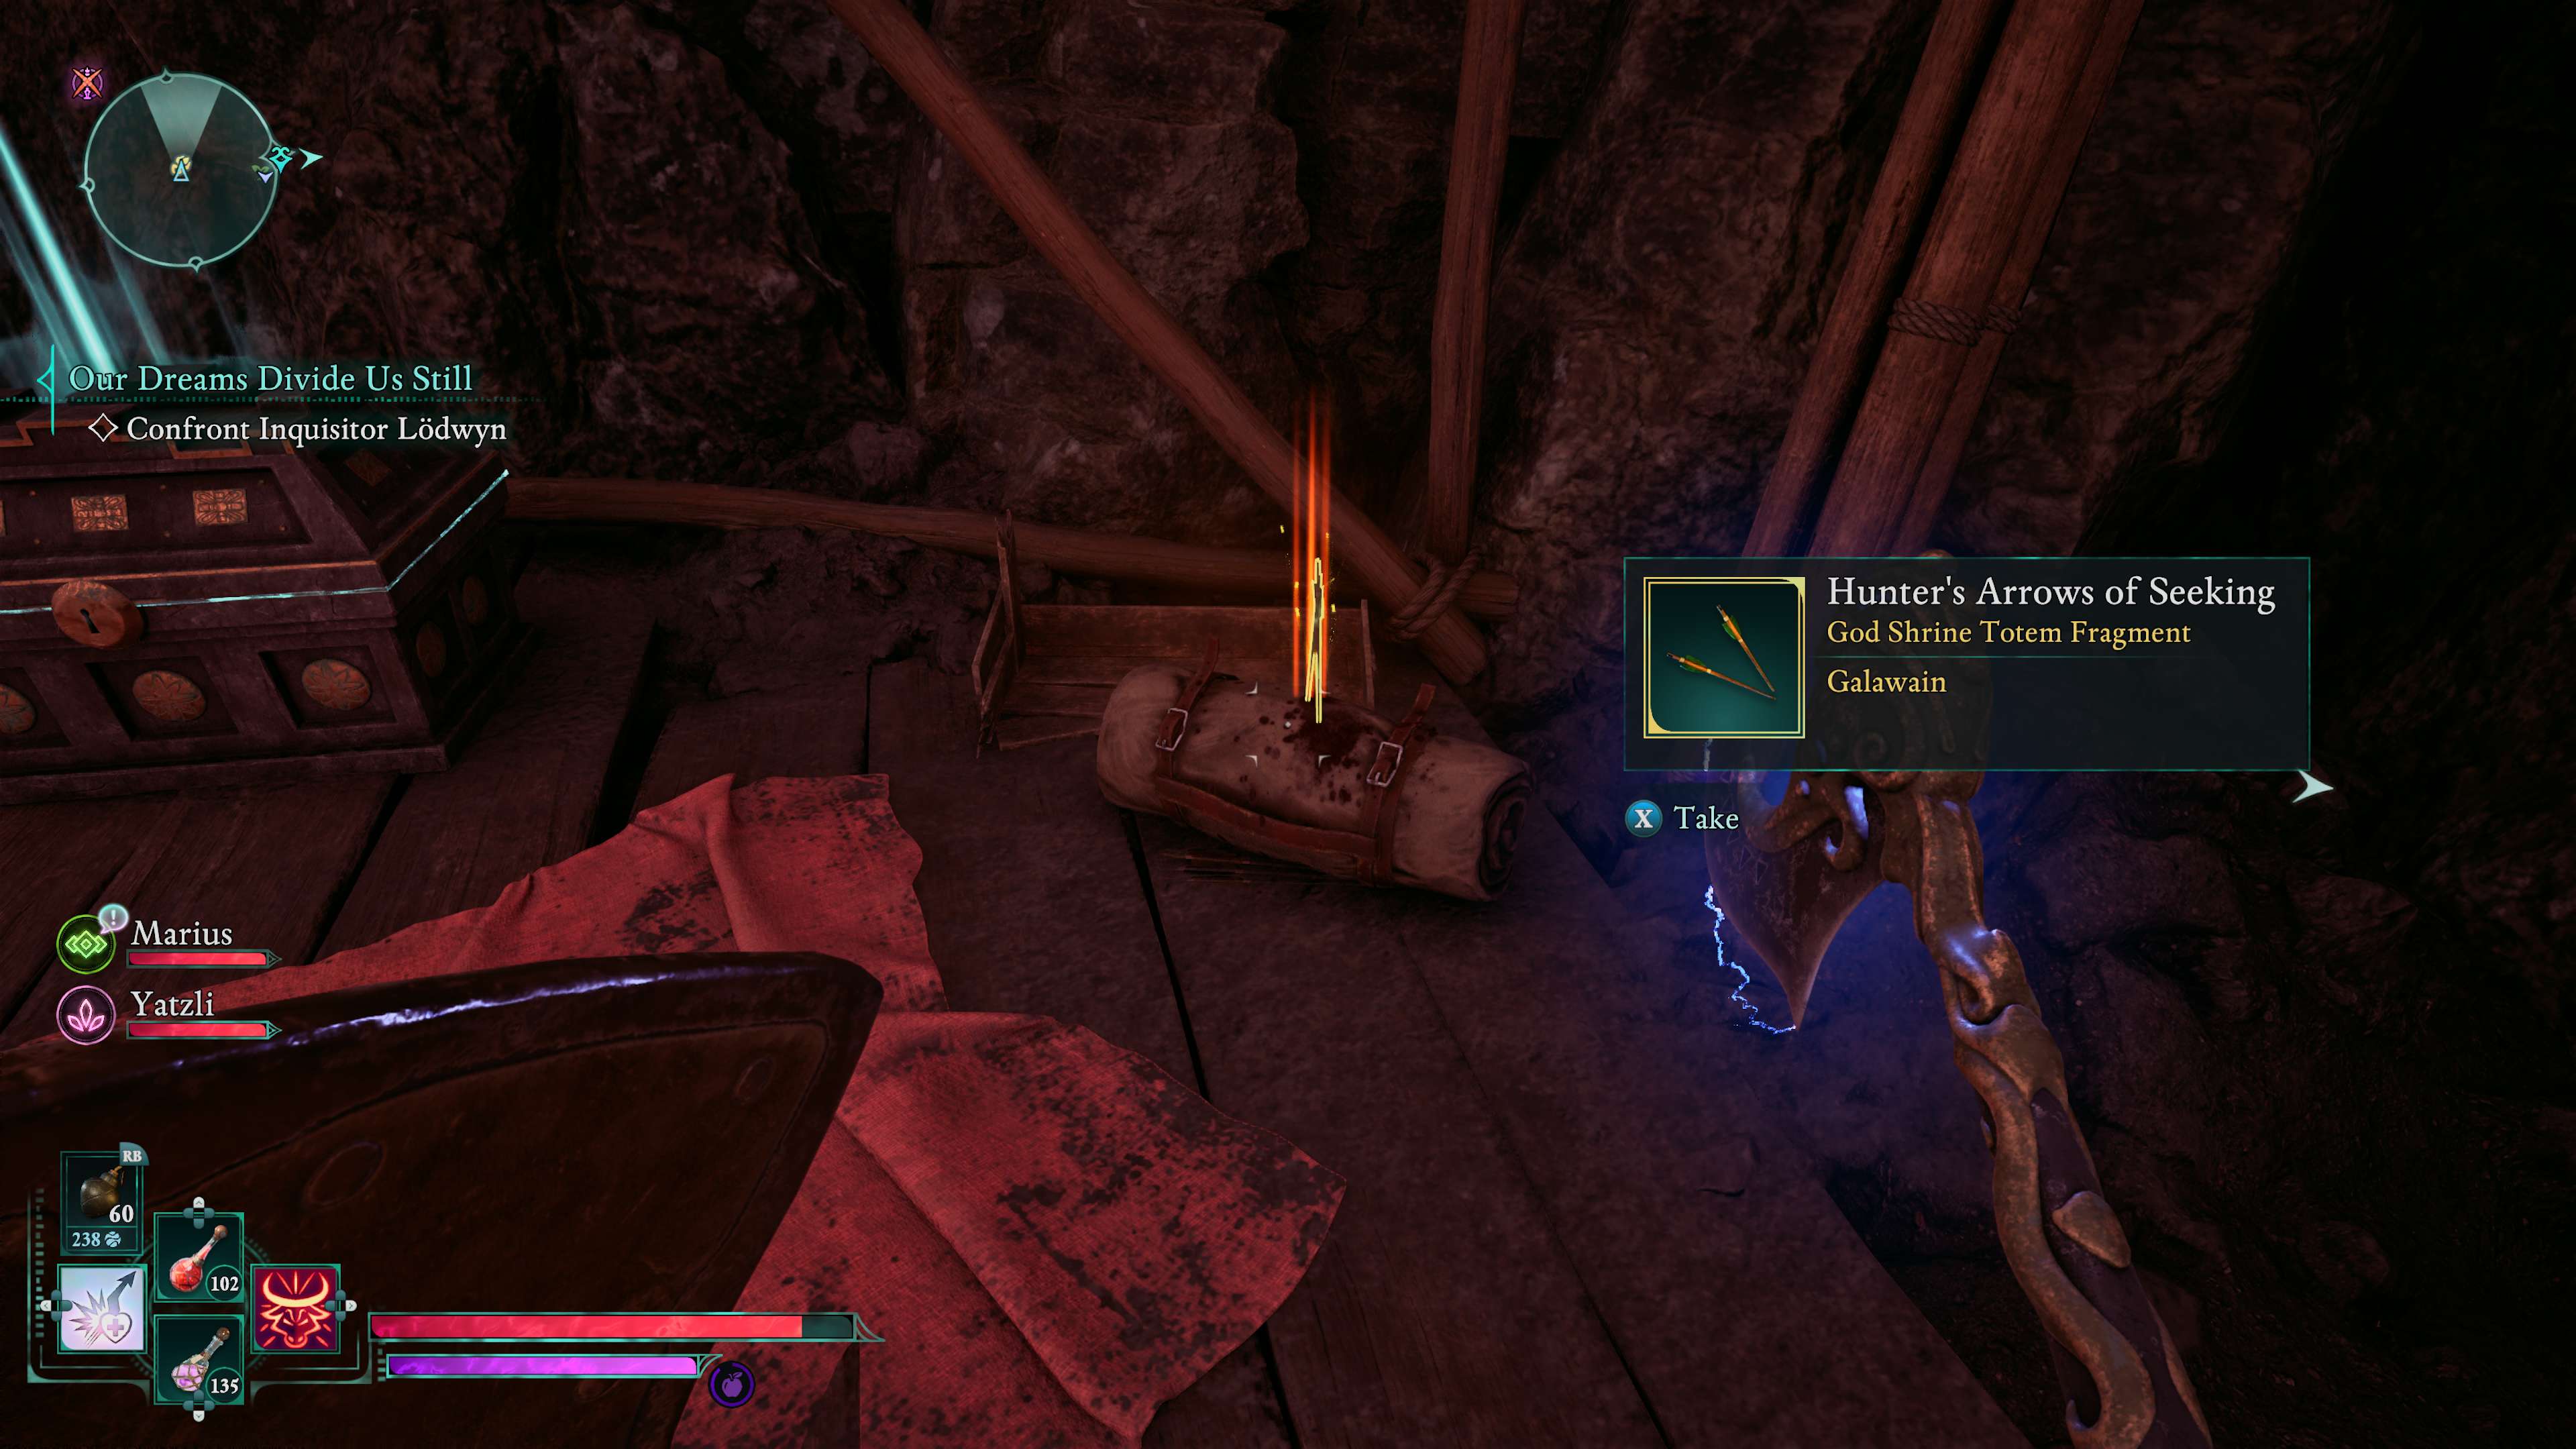
As an analyst, I’d advise you: Embark on your journey to Mount Forja in pursuit of Lodwyn as part of the narrative quest. It would be best to defer your search for this totem piece until you have that specific quest active. However, don’t forget to collect the totem fragment from the ledges nearby where your story quest concludes, before you depart from the area.
Avowed – Hunter’s Arrows of Slaying
In fallen spire amidst fields of slumber, a wooden trio waits to be discovered.

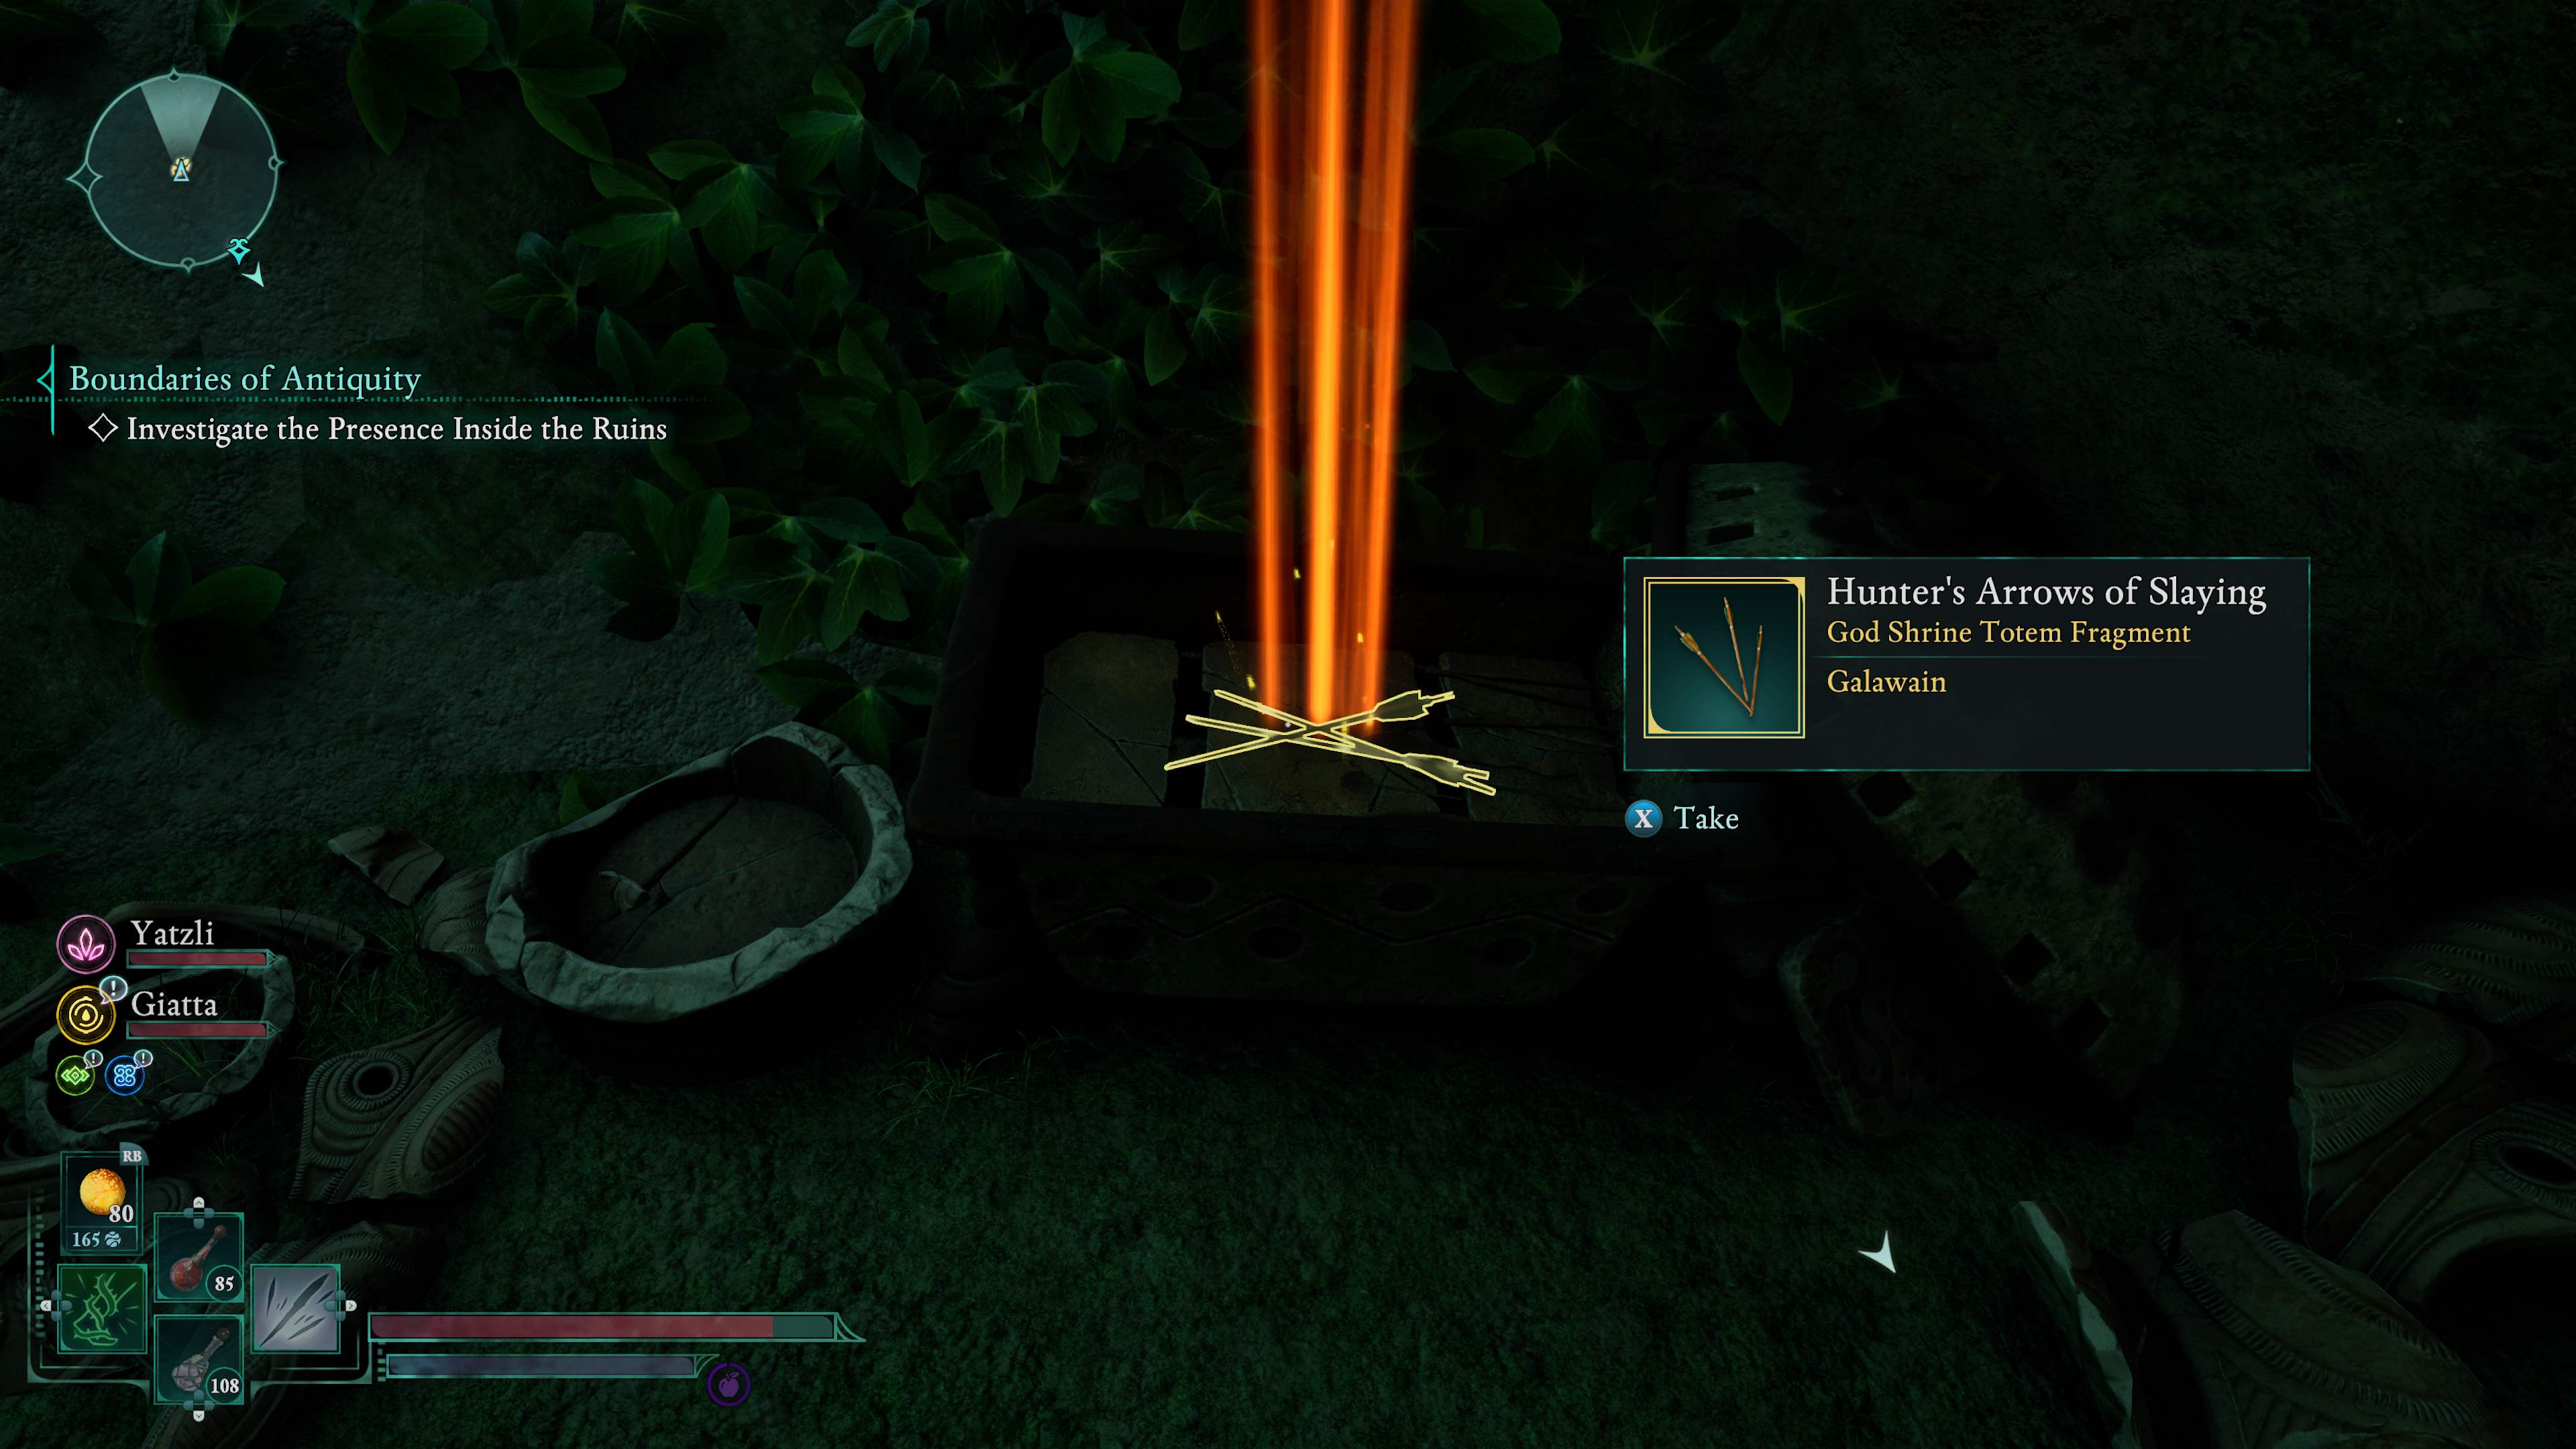
This totem can be found within a crumbling tower not far from the Spore King Bounty.
Hunter’s Arrows of Surviving
The final shafts you shall seek in a silent village where spirits still shriek.
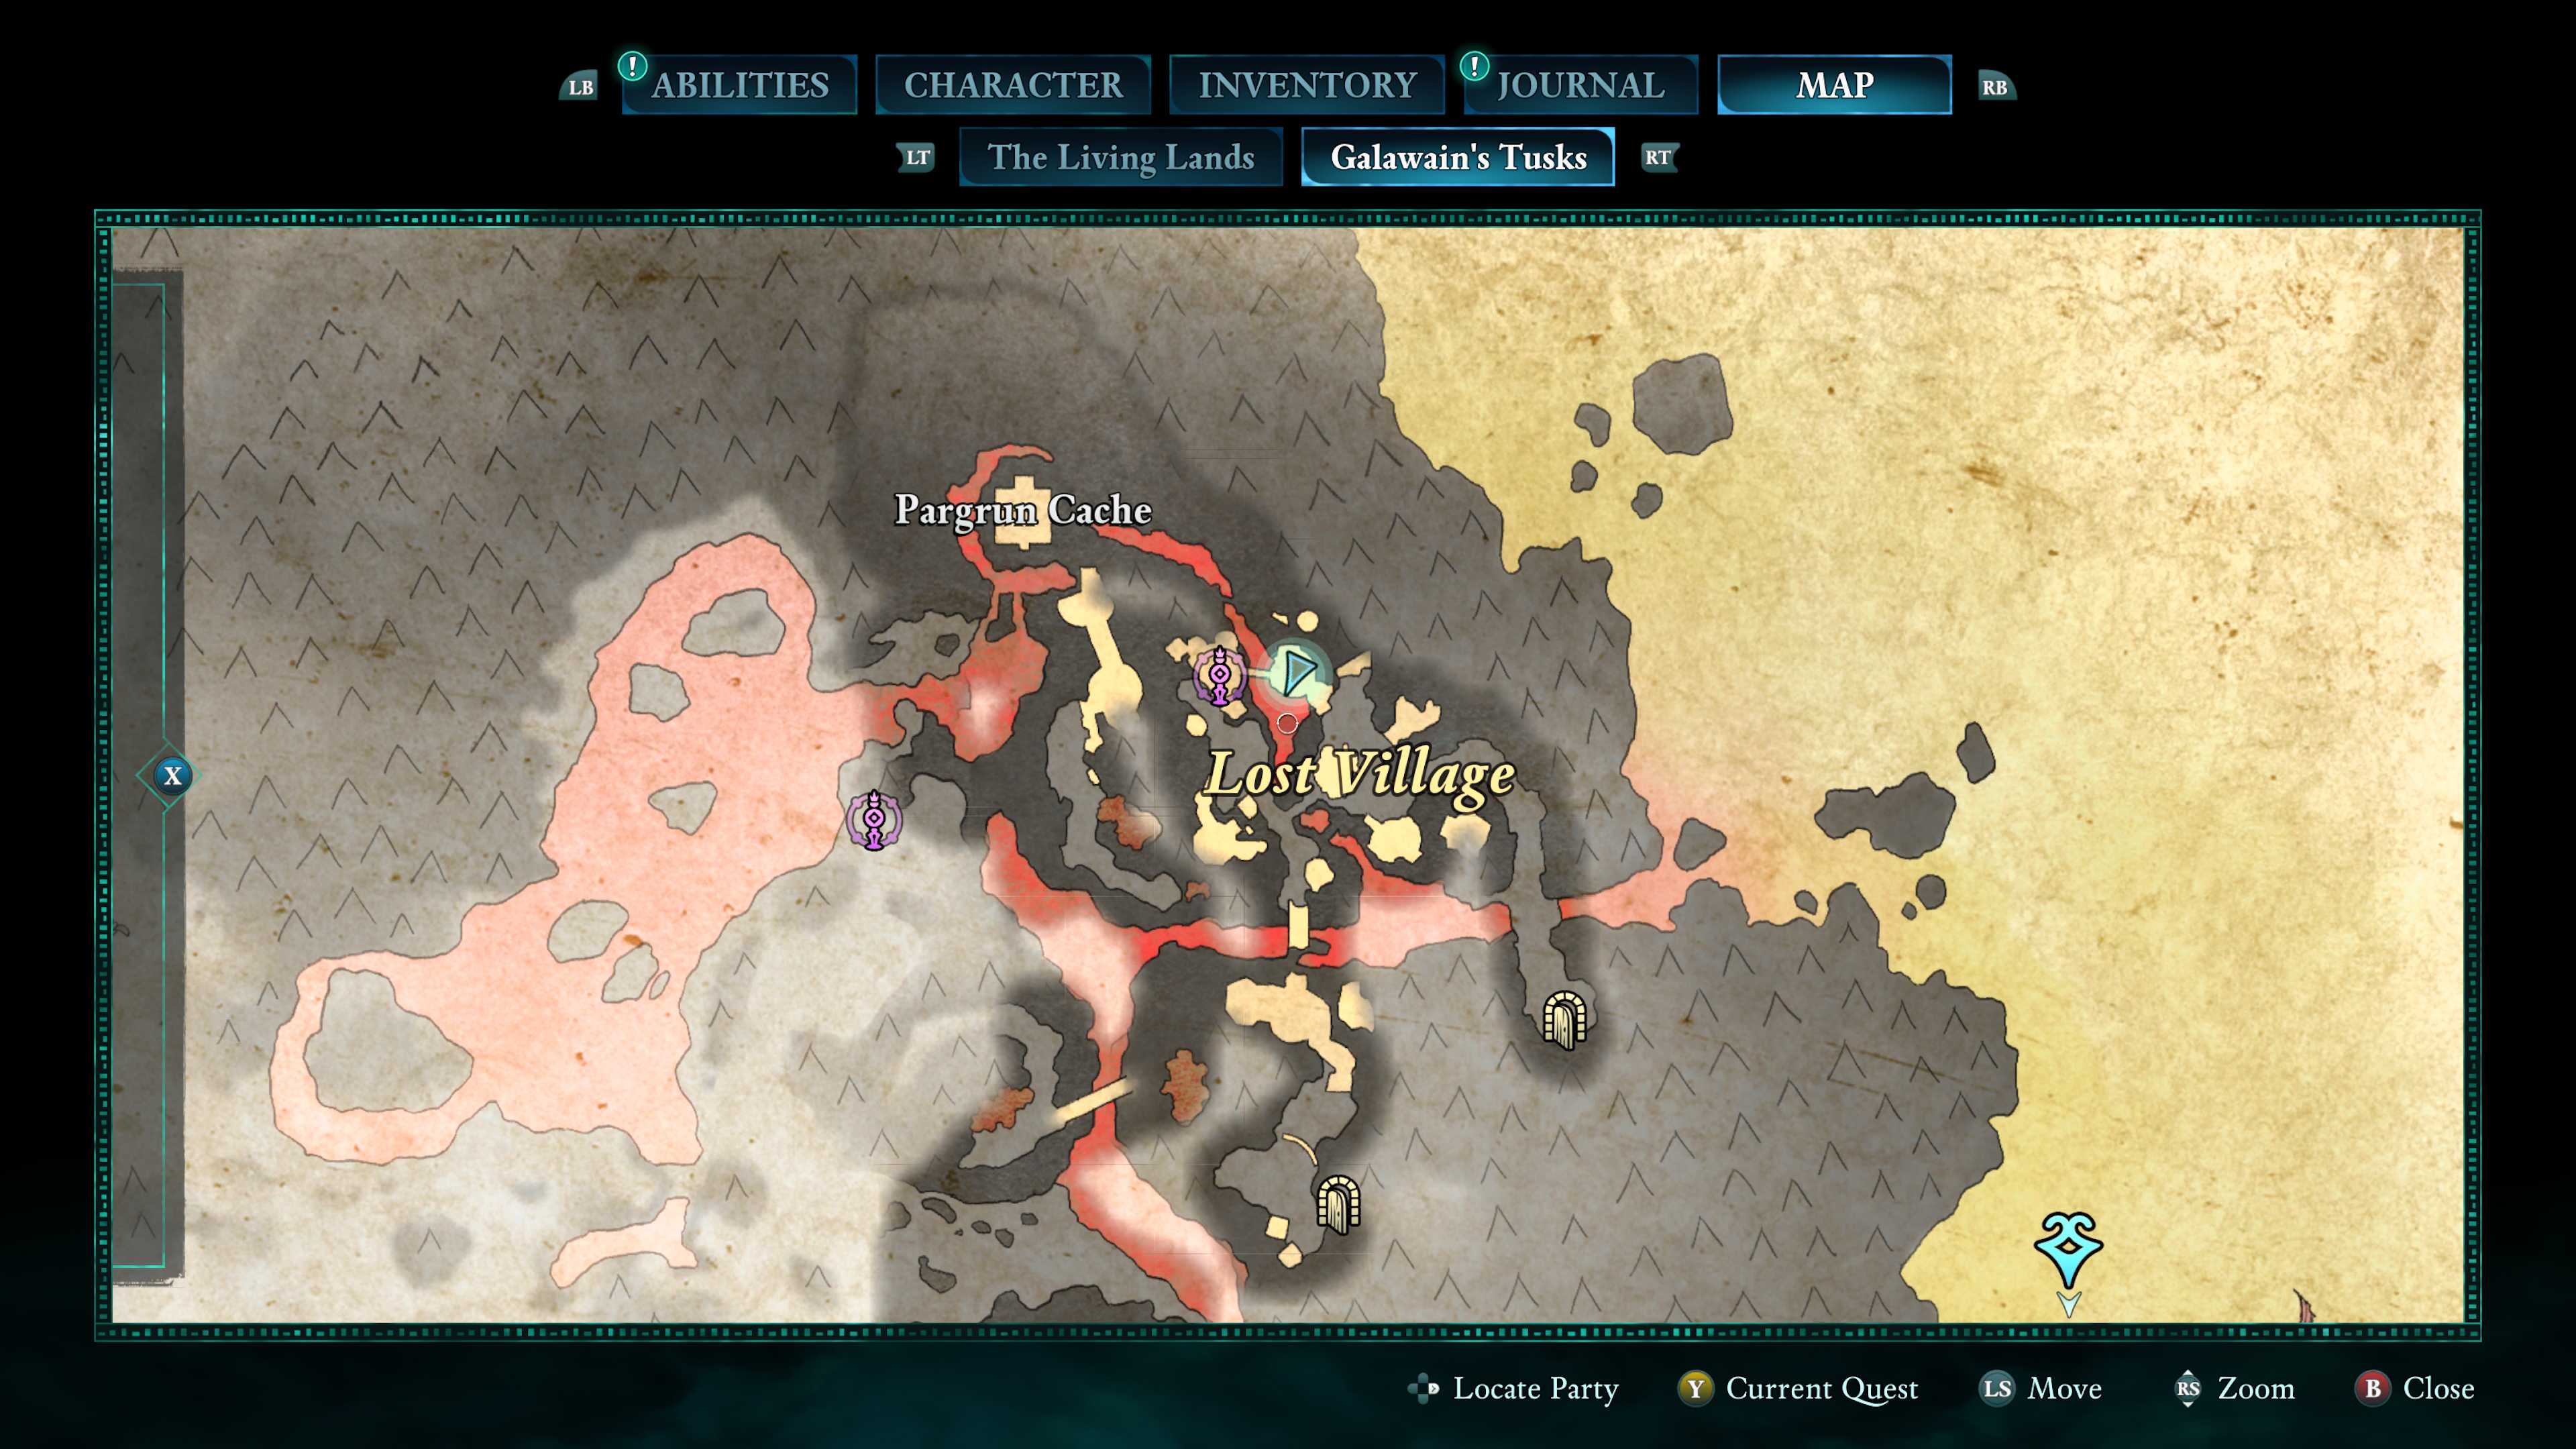
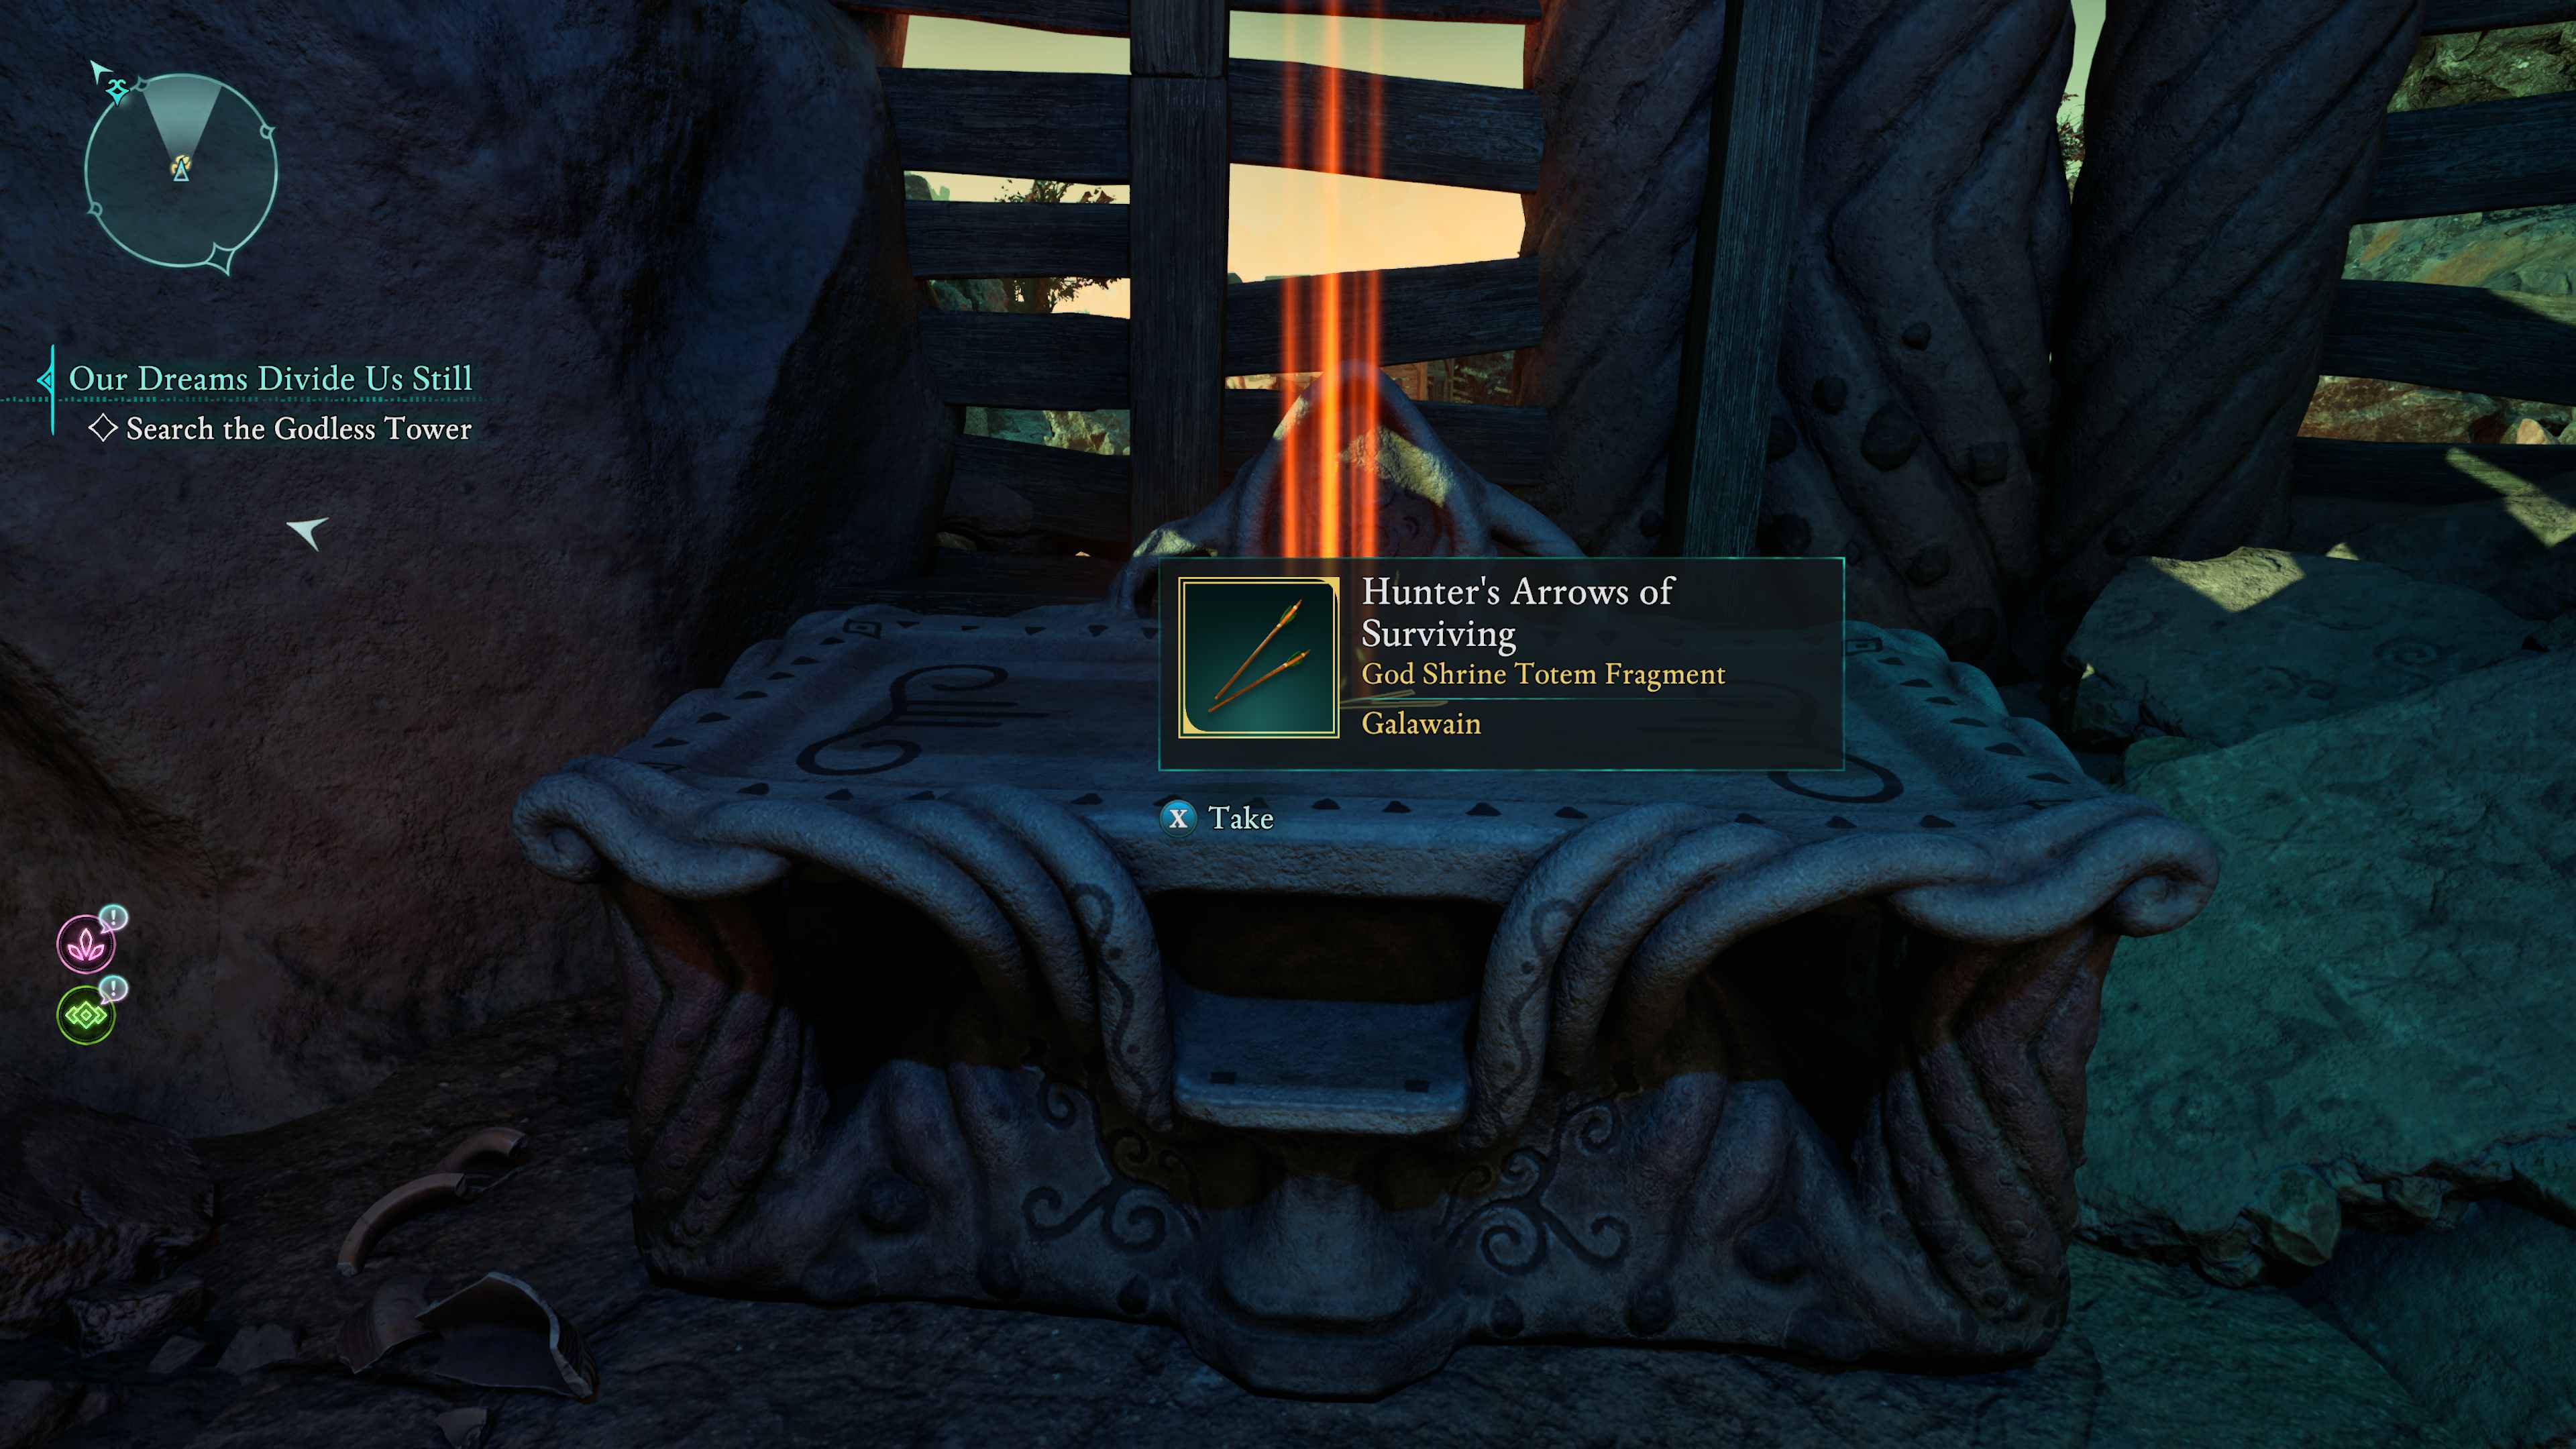
To reach the Pargrun Cache, it would be wise to use the fast travel spot for the Primordial Depths North Beacon as your starting point. From there, you’ll have to navigate across some flowing lava to discover some intriguing spiders. Keep following the path through their lair and eventually, you’ll find the pieces you need. Once gathered, return to camp where you can craft the Totem of Perseverance.
This version maintains the original meaning while using more conversational language and a simpler sentence structure.
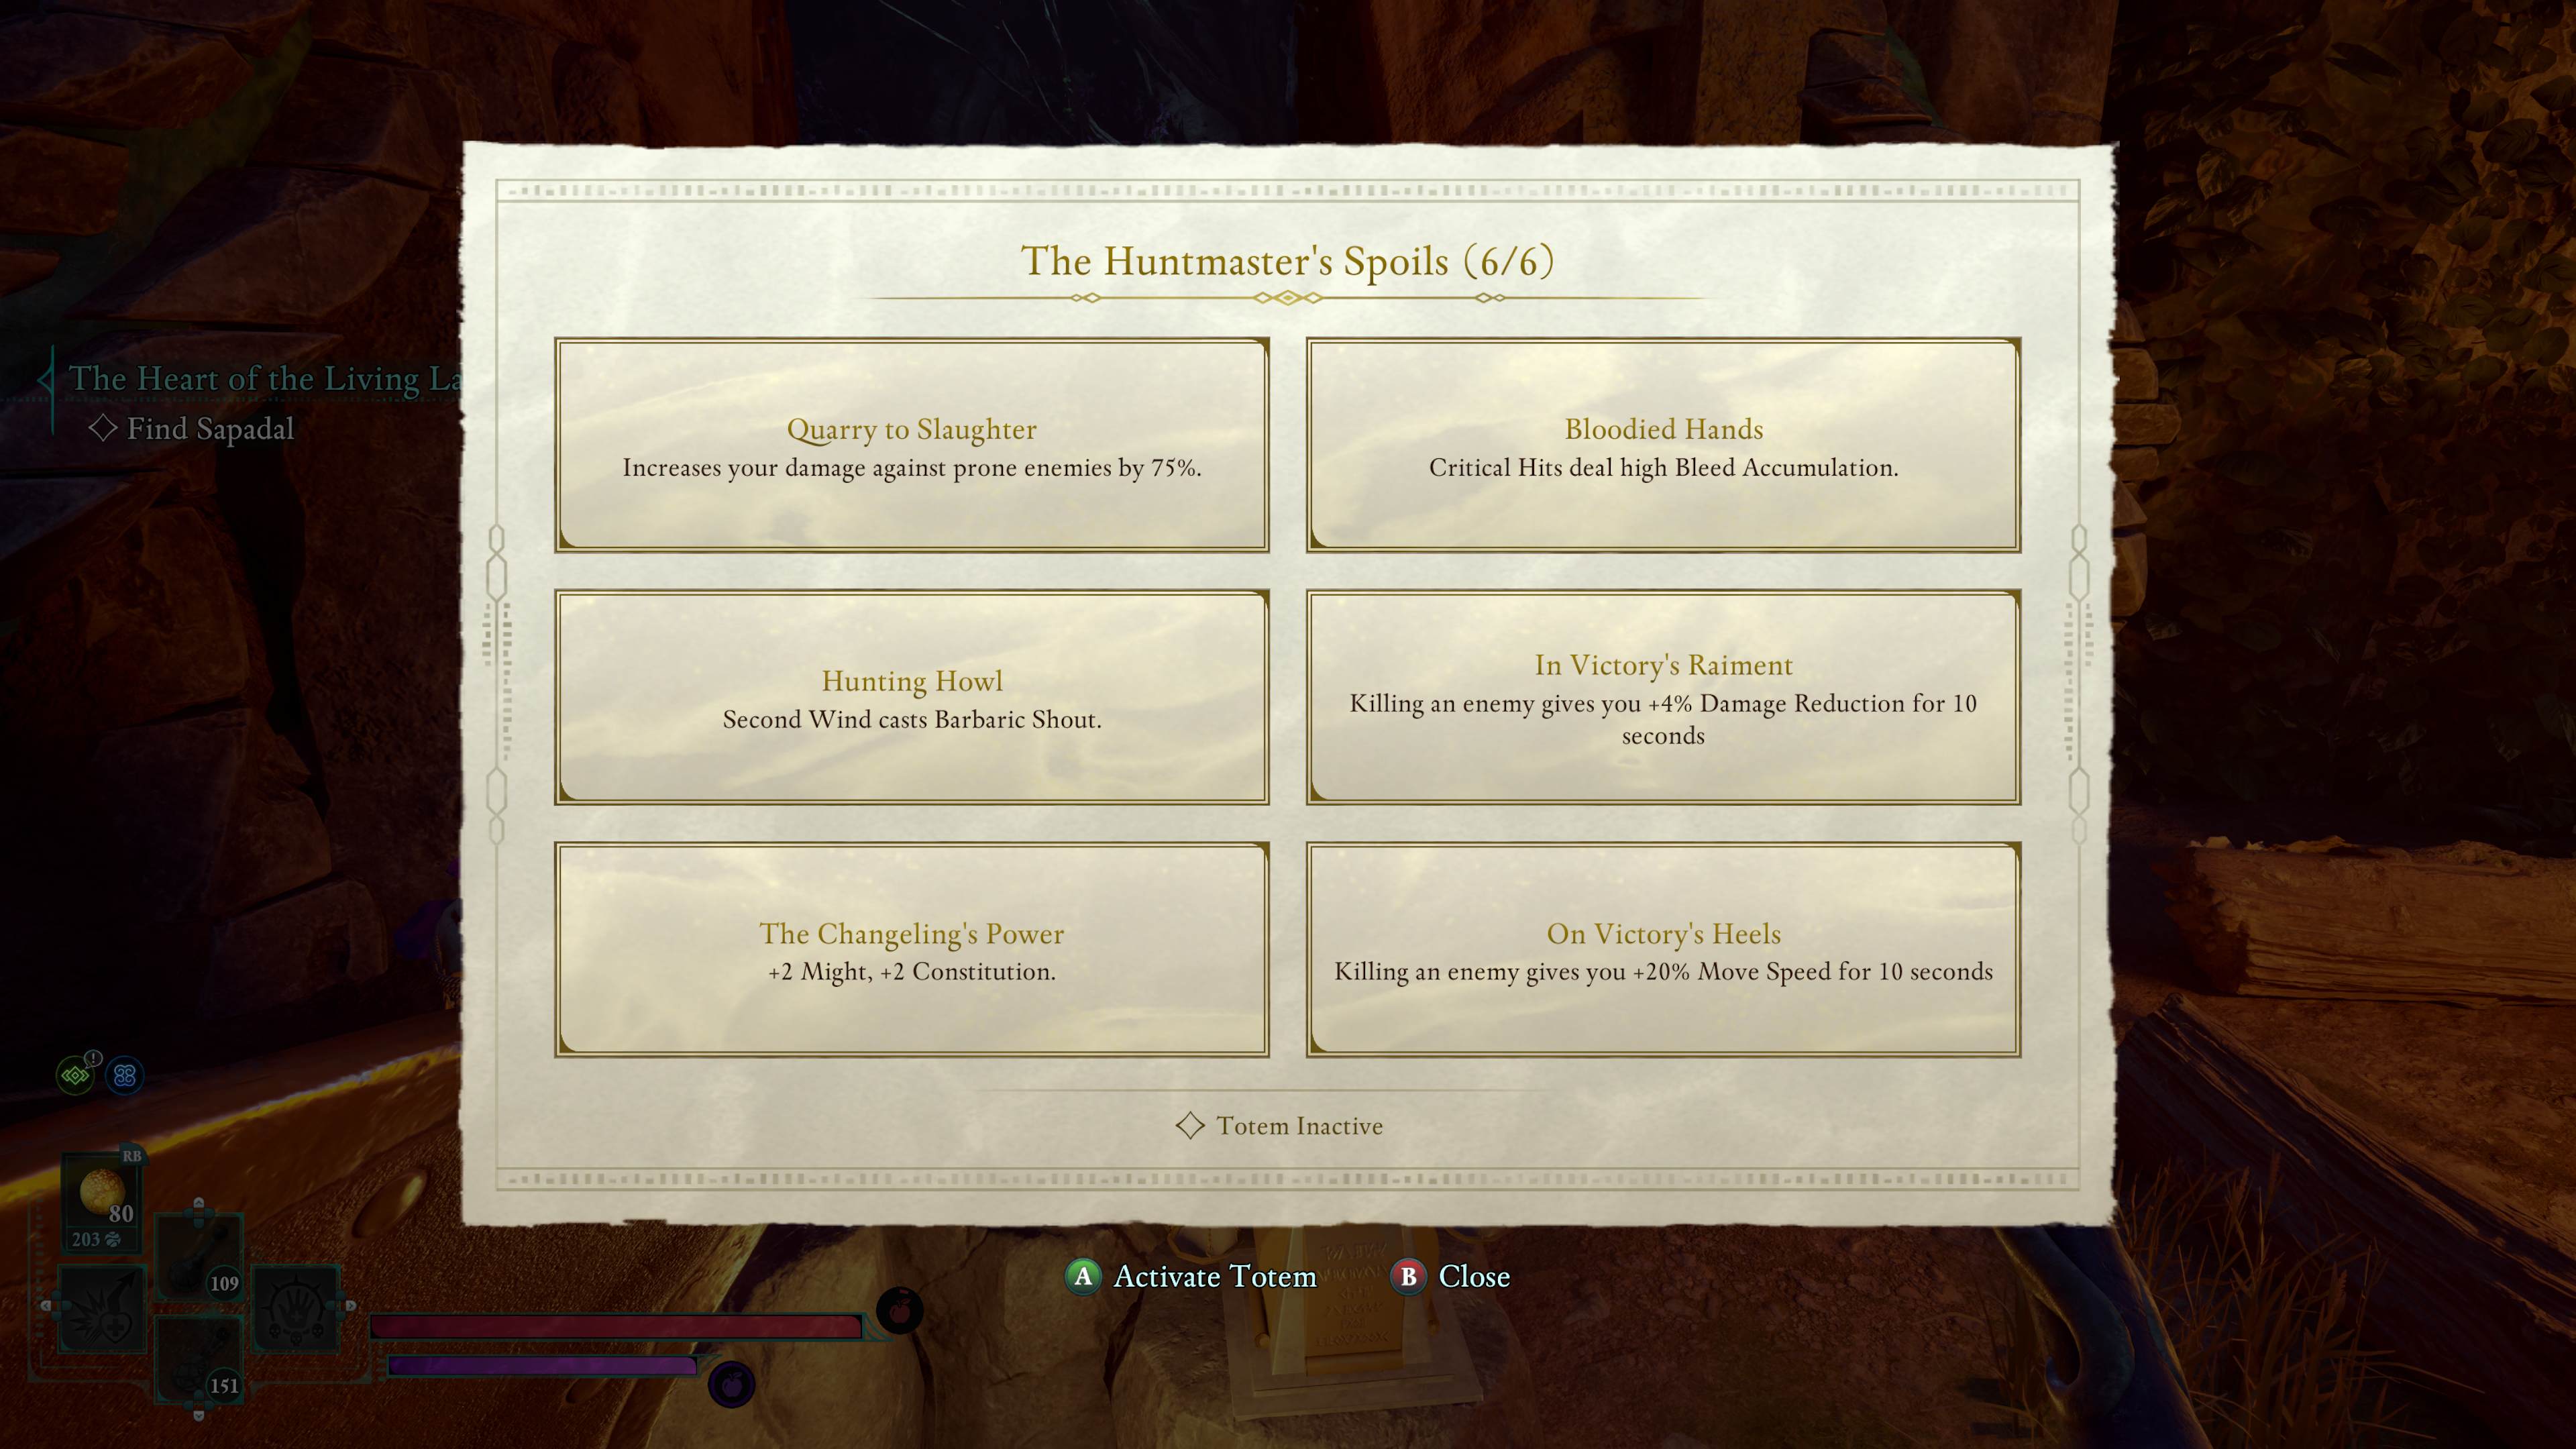
Totem of Perserverance buff (The Huntmaster’s Spoils)
Read More
- ‘The budget card to beat right now’ — Radeon RX 9060 XT reviews are in, and it looks like a win for AMD
- Forza Horizon 5 Update Available Now, Includes Several PS5-Specific Fixes
- Masters Toronto 2025: Everything You Need to Know
- We Loved Both of These Classic Sci-Fi Films (But They’re Pretty Much the Same Movie)
- Gold Rate Forecast
- Valorant Champions 2025: Paris Set to Host Esports’ Premier Event Across Two Iconic Venues
- Karate Kid: Legends Hits Important Global Box Office Milestone, Showing Promise Despite 59% RT Score
- Street Fighter 6 Game-Key Card on Switch 2 is Considered to be a Digital Copy by Capcom
- The Lowdown on Labubu: What to Know About the Viral Toy
- Eddie Murphy Reveals the Role That Defines His Hollywood Career
2025-02-18 03:11