
On both Windows 11 and 10, the tool called MSConfig or System Configuration is an inbuilt feature that assists you in diagnosing issues and controlling the startup sequence of your operating system.
This tool enables you to switch on/off various programs, device functions, and system services that initiate during system startup. It also lets you adjust boot settings, such as enabling access to Safe Mode. This utility proves quite handy when troubleshooting performance problems and resolving software inconsistencies within the operating system.
System Configuration, as you know, isn’t a recent addition. It’s been part of the Windows family since Windows 98. Over time, it has undergone changes, but the basic user experience hasn’t seen significant transformation. That being said, there have been some new features introduced and others phased out, for instance, the functionality to manage startup applications.
In this step-by-step tutorial, I’ll walk you through the process of using the System Configuration tool on Windows 11. Notably, the same steps can be used for Windows 10 as well.
How to access the msconfig on Windows 11
To open the System Configuration utility, you have at least two options:
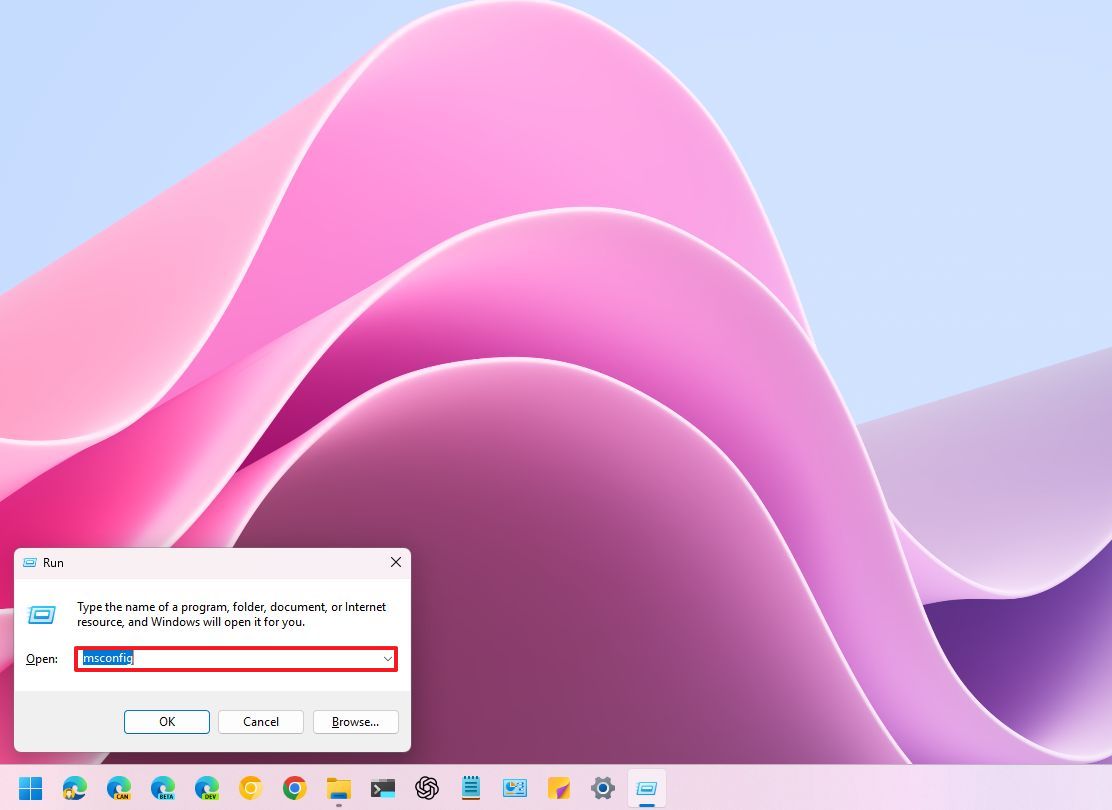
From the Run dialog:
To open msconfig from Run, use these steps:
- Use the “Windows + R” keyboard shortcut to open the Run dialog box.
- Type msconfig and press Enter (or click the OK button).
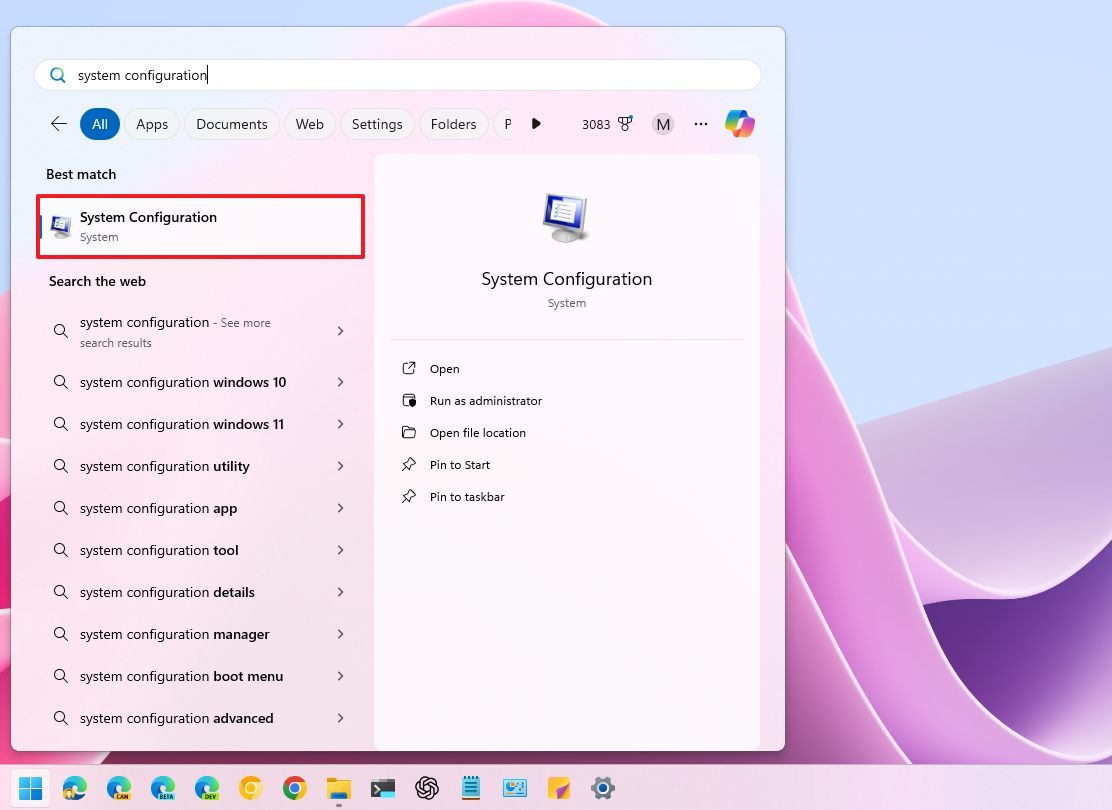
From the Start menu:
To open msconfig from the Start menu, use these steps:
- Open Start.
- (Option 1) Search for msconfig and click the top result to open the app.
- (Option 2) Search for System Configuration and click the top result to open the app.
How to navigate the msconfig on Windows 11
When you open the System Configuration app, you’ll find multiple tabs, each with its unique purpose.
General tab
In the “General” tab, it’s possible to change startup behavior.
- Normal Startup (default): This is the default mode where all startup programs and services are loaded.
- Diagnostic Startup: This mode starts the operating system with only essential services and drivers, helping to identify conflicts or issues.
- Selective Startup: This lets you choose which programs and services to load at startup. You can turn off non-essential items to speed up boot times and resolve conflicts.

It’s worth noting that the “Selective Startup” option has three settings, as described below.
Load System Services:
- Checked: This option loads all essential system services required for the operating system to function correctly.
- Unchecked: Disables most built-in services. Although this option can significantly speed up startup, it may cause instability or prevent some programs from working correctly. Only uncheck this if you know what you’re doing.
Load Startup items:
- Checked: This option loads programs set to launch automatically during sign-in. This includes apps you’ve installed, as well as some system utilities.
- Unchecked: Prevents all startup programs from running. This can speed up boot times but means you’ll have to manually launch any applications you need.
The “Original Boot Configuration” option instructs the operating system to disregard any adjustments made to the startup setup within System Configuration, and instead, employ the initial boot settings that were in place at the time of the system’s installation.
Choosing that option will make the “Selective Startup” unavailable, and it will automatically select the “‘Normal startup’” option for you instead.
Boot tab
The “Boot” section enables you to control various boot settings, including activating Safe Boot, enabling boot logging, and determining the default system in multiple-system configurations.
At the upper part of your screen, you can see a list of the operating systems that are installed on your computer. Typically, there is just one operating system setup, but if your computer is a dual-boot system, additional setups will be displayed in this area as well.
If your computer has several editions of Windows installed, you can also choose one particular setup and hit the “‘Make Default’” button. This version will automatically launch once the specified time-out period ends.
As a fan, I’d say: If, by any chance, the changes you made to your boot system (like getting rid of the dual-boot) don’t seem to have taken effect in the boot menu, then you can always choose to select and delete that specific entry for proper reflection.
Safe Start-up: With this feature, you can initiate your computer in Diagnostic Mode (also known as Safe Mode), which runs with only essential drivers and services active. This mode is beneficial when trying to resolve issues within the system. You may select from various options for this purpose.
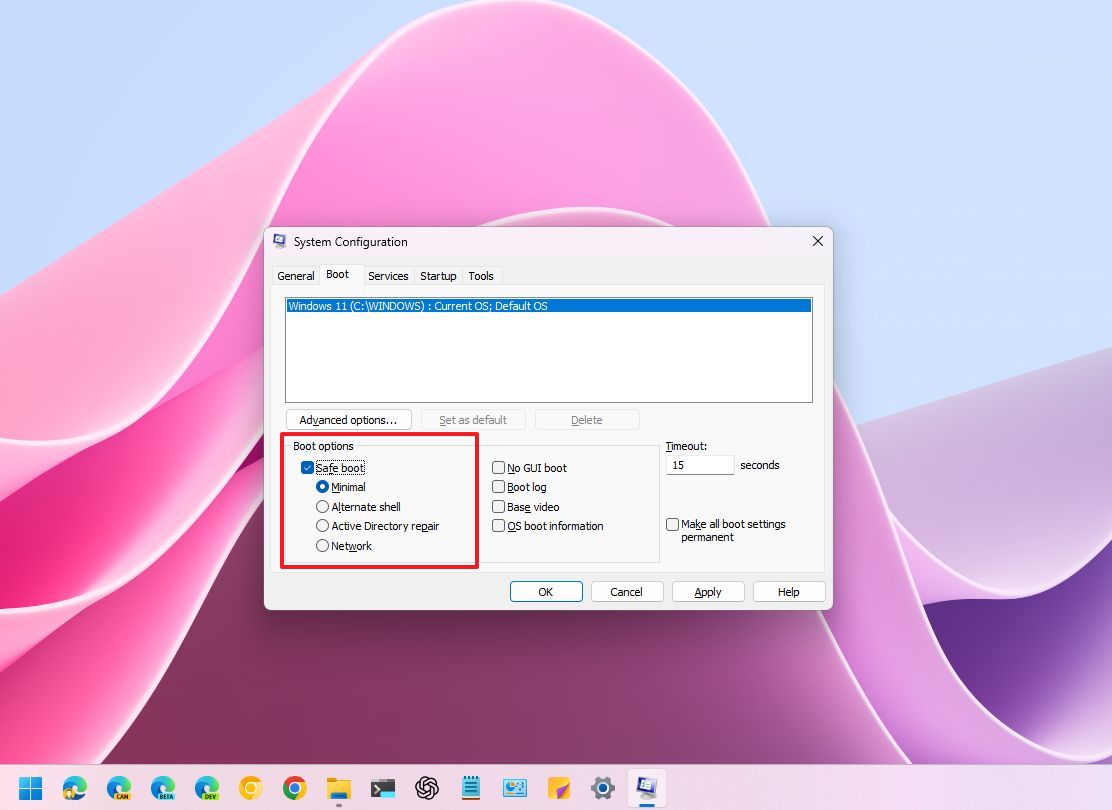
- Minimal: Safe Mode experience with the standard graphical user interface.
- Alternate shell: Safe Mode with a command prompt instead of the graphical experience.
- Active Directory repair: Safe Mode with Active Directory services for repairing network connectivity issues with Active Directory.
- Network: Safe Mode with network support and graphical interface.
As part of the boot option, you can also choose:
- No GUI boot: Disables the startup splash screen during startup, showing a black screen instead.
- Boot log: Creates a log file (Ntbtlog.txt) that records the startup process, which can help identify driver issues. The file will be available inside the “Windows” folder on the “C:” drive.
- Base video: Forces the system to use the basic video driver, which is helpful if you have display problems.
- OS boot information: Displays driver loading details on the screen during startup, which is useful for debugging.
The “Timeout” setting dictates the duration that the boot menu stays visible when using a dual-boot setup. You’re able to modify this duration by seconds, causing your default OS to launch automatically after the specified elapsed time during system startup.
Lastly, you might want to consider selecting the “Persist Boot Settings” option. Once chosen, your boot settings will remain unchanged.
If you choose not to select this option, it will be simple for you to navigate among various startup modes such as Normal, Diagnostic, and Selective, which are all located within the General tab.
If you select that option, you won’t be able to effortlessly revert to the “Regular Startup” setting in the future. Regardless of your desire to pick the “Regular Startup” option once more, the system will not acknowledge your choice because it essentially no longer remembers this option is available.
In each mode, the preferences are permanently stored. However, the key factor lies in how convenient it is for you to switch to a different mode.
On the “‘Advanced Settings’” page, you can adjust certain intricate settings related to the system startup process, primarily meant for specialized problem-solving or testing situations.
Keep in mind that changing these settings could impact your computer’s boot-up procedure, potentially leading to stability problems.

Number of processors
This option lets you limit the number of processor cores that the system uses during startup.
In simpler terms, while Windows 11 acknowledges all the cores within your processor, it will only activate the number of cores you initially chose during the startup process.
It’s mainly intended for troubleshooting and experimentation purposes; therefore, it’s best to keep it turned off so that the operating system can utilize all its accessible processors.
Maximum memory
This option restricts the amount of memory that the operating system uses during startup.
Much like the processor setting, this one is primarily used for testing or mimicking low memory scenarios. If you don’t need to restrict memory during system startup for a particular purpose, it’s recommended that you keep this option untouched.
PCI lock
Choosing this option ensures that the PCI bus’s I/O and IRQ resources for input/output and interrupt requests won’t be reassigned by the operating system during the start-up process.
In most situations, this highly specialized setup isn’t required. It’s primarily useful when dealing with hardware clashes or compatibility problems between older equipment parts.
Debug
Activating this feature enables kernel-mode debugging, a tool primarily utilized by developers for diagnosing and resolving problems related to device drivers.
It’s not something you’d typically need for regular use.
Services tab
The “Services” tab offers a user-friendly control panel for managing different backstage services that are active within the operating system.
List of services
Here, you can find a comprehensive rundown of the services running on your system. Each entry provides information such as the service’s name, its manufacturer details, its present status (whether it’s active or paused), and whether it automatically starts up upon system boot.
In this area, you’ll find a checkbox for every service. When it’s ticked, the service gets activated and initiates on its own when the system reboots. Conversely, if the box remains unticked, the service remains deactivated and won’t start up automatically during boot.
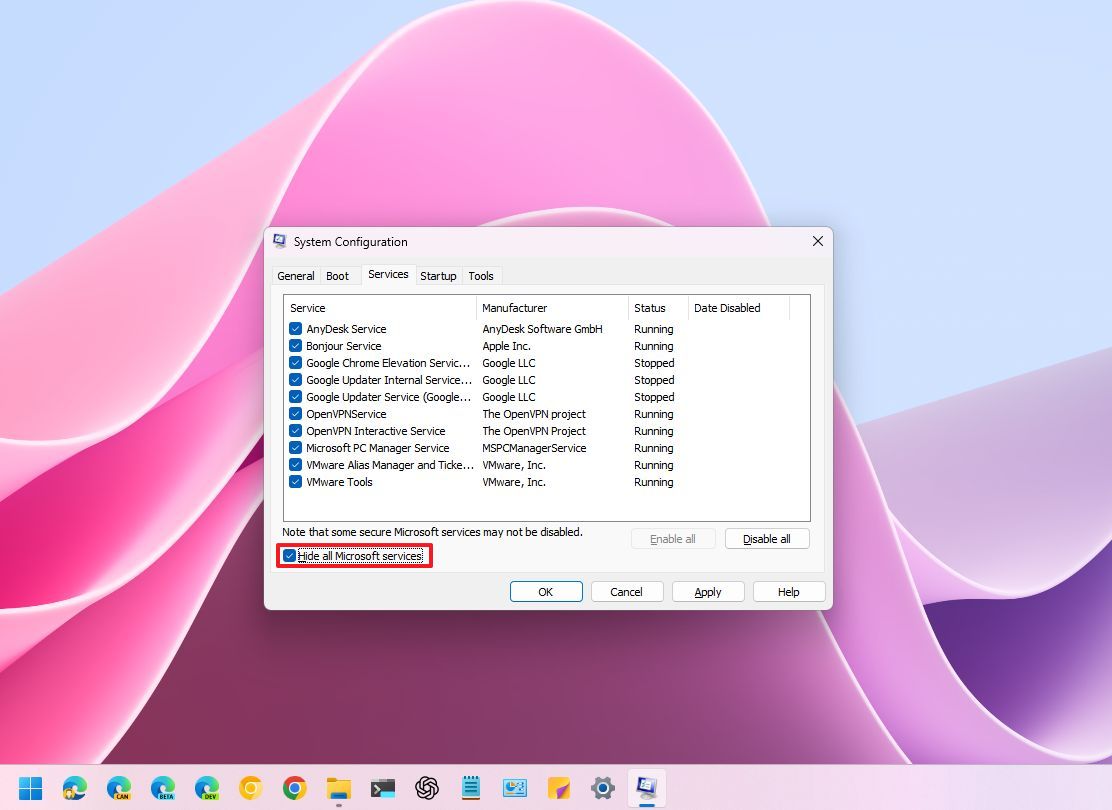
The “Conceal All Essential Microsoft Services” setting conceals all necessary services required for the proper functioning of the operating system.
This choice is advantageous since it lets you concentrate on external services (services installed from apps you’ve added), which can typically be safely disabled when you’re aiming to optimize startup or diagnose issues on your computer.
Furthermore, this tab offers switches for activating or deactivating all services, a feature that can be useful when diagnosing various issues.
For instance, if you need to carry out a clean boot for troubleshooting software issues, you should select the “ ‘Hide all Microsoft services’” option and press the “ ‘Disable all’“. Additionally, from the Task Manager’s “ Startup ” tab, it would be wise to disable every application that has been set up to launch at startup.
The ‘Services’ feature offers a means to control back-end operations, though it’s important to handle it with care. It’s always wise to investigate unknown services prior to disabling any, as many of them are crucial for Windows 11 to function properly.
As a tech enthusiast, I can tell you that diving into the “Services” section offers me a user-friendly platform to oversee and control the diverse set of background operations that keep my operating system humming smoothly behind the scenes.
List of services
Here you’ll find a comprehensive rundown of the services running on your computer. The list includes the service’s title, details from the manufacturer, its status (whether it’s currently active or paused), and whether it starts up automatically upon system boot.
Here, you’ll find a checkbox for every service. When checked, that service gets activated and runs on its own when your system boots up. Conversely, if left unchecked, the service remains inactive and won’t start by itself during the boot process.
The “Conceal all Microsoft System Services” option masks all the crucial services necessary for the proper functioning of the operating system.
As an analyst, I find it beneficial to concentrate on third-party services, primarily those associated with applications I’ve explicitly installed, as they tend to be safer to deactivate when aiming to optimize the startup process or diagnose issues on my computer.
Furthermore, this tab features buttons that allow you to activate or deactivate all services, a useful tool for diagnosing various issues as well.
To effectively troubleshoot software issues, you can choose the “Hide all Microsoft services” option and hit the “Disable all” button for a clean boot. Additionally, from the Startup tab in Task Manager, it’s advisable to deactivate all applications that are set to launch during system startup.
The ‘Services’ feature offers the ability to control backstage operations, however, be mindful when utilizing it. It’s advisable to investigate any unknown services prior to disabling them, as many are vital for Windows 11 to function smoothly and efficiently.
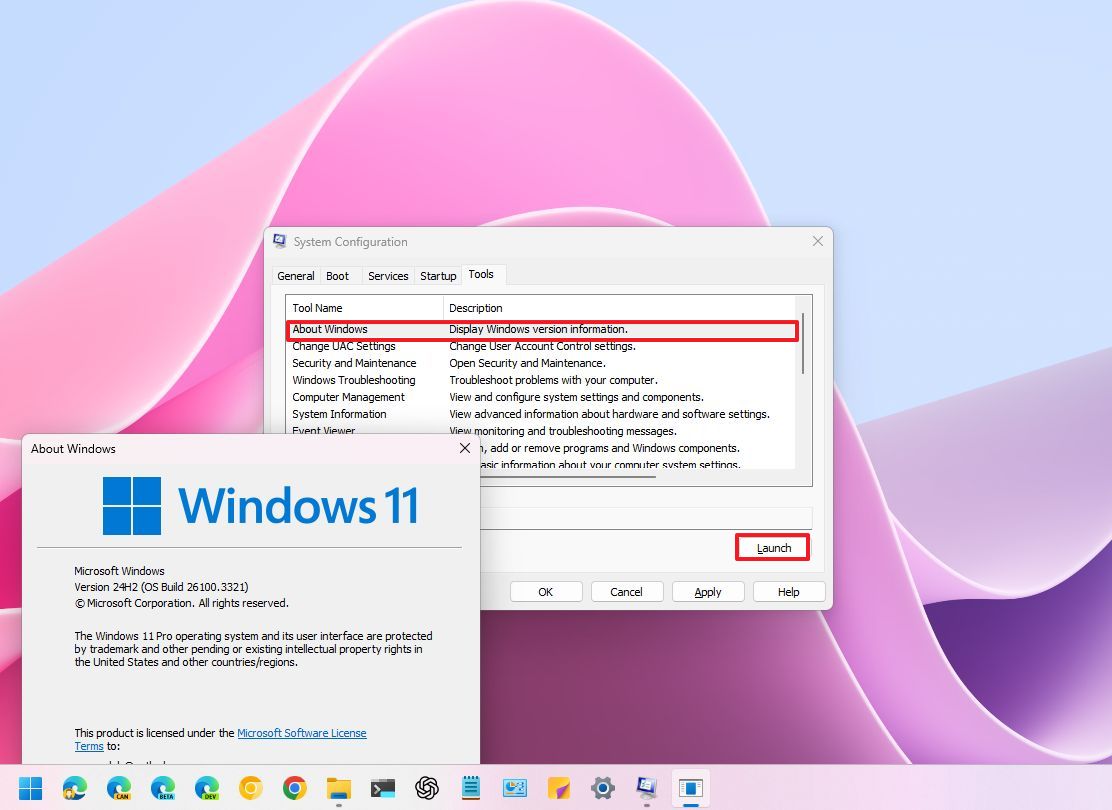
Tools tab
The “Tools” tab provides easy access to diverse system utilities and diagnostic tools. Effectively, it serves as a handy shortcut to run these applications, sparing you from having to browse through the Start menu or search for them within the System Configuration application.
From this tab, you can launch:
- About Windows.
- Change UAC Settings.
- Security and Maintenance.
- Windows Troubleshooting.
- Computer Management.
- System Information.
- Event Viewer.
- Programs.
- System Properties.
- Internet Options.
- Internet Protocol Configuration.
- Performance Monitor.
- Resource Monitor.
- Task Manager.
- Command Prompt.
- Registry Editor.
- Remove Assistance.
- System Restore.
The “Tools” tab is mainly for quick access to pre-existing system tools, however, it’s seldom utilized as these tools can also be reached through the Start menu, the Settings app, or directly via Windows Tools.
The System Configuration additionally encompasses what was previously known as the “Startup” tab, however, the settings are now found within the Task Manager.
More resources
Read More
- Solo Leveling Season 3: What You NEED to Know!
- OM PREDICTION. OM cryptocurrency
- Rachel Zegler Claps Back at Critics While Ignoring Snow White Controversies!
- Oblivion Remastered: The Ultimate Race Guide & Tier List
- How to Get to Frostcrag Spire in Oblivion Remastered
- Captain America: Brave New World’s Shocking Leader Design Change Explained!
- Oshi no Ko Season 3: Release Date, Cast, and What to Expect!
- Daredevil’s Wilson Bethel Wants to “Out-Crazy” Colin Farrell as Bullseye in Born Again
- tWitch’s Legacy Sparks Family Feud: Mom vs. Widow in Explosive Claims
- Moana 3: Release Date, Plot, and What to Expect
2025-02-20 16:11