On Windows 11, it’s possible that a specific application might be consuming all the power, leading to rapid battery drain. This issue may not necessarily be related to your laptop’s battery itself.
Hey there, fellow tech aficionado! When you’re unsure about why your battery life is draining so fast, here’s a simple solution: Dive into the Settings app and use the Task Manager to find out which apps are consuming the most energy. This way, you can identify and tackle any potential battery hogs. Happy troubleshooting!
In this step-by-step tutorial, I’ll show you how to identify power-consuming apps in Windows 11, aiming to enhance your battery performance. Furthermore, I will provide useful suggestions to address excessive battery drain on your device.
How to determine app draining battery on Windows 11
On Windows 11, there are two convenient methods for identifying apps consuming the most battery life. You can utilize the Settings application or the Task Manager for this purpose.
Check battery usage history from Settings
To determine the apps using the most battery on Windows 11, use these steps:
- Open Settings.
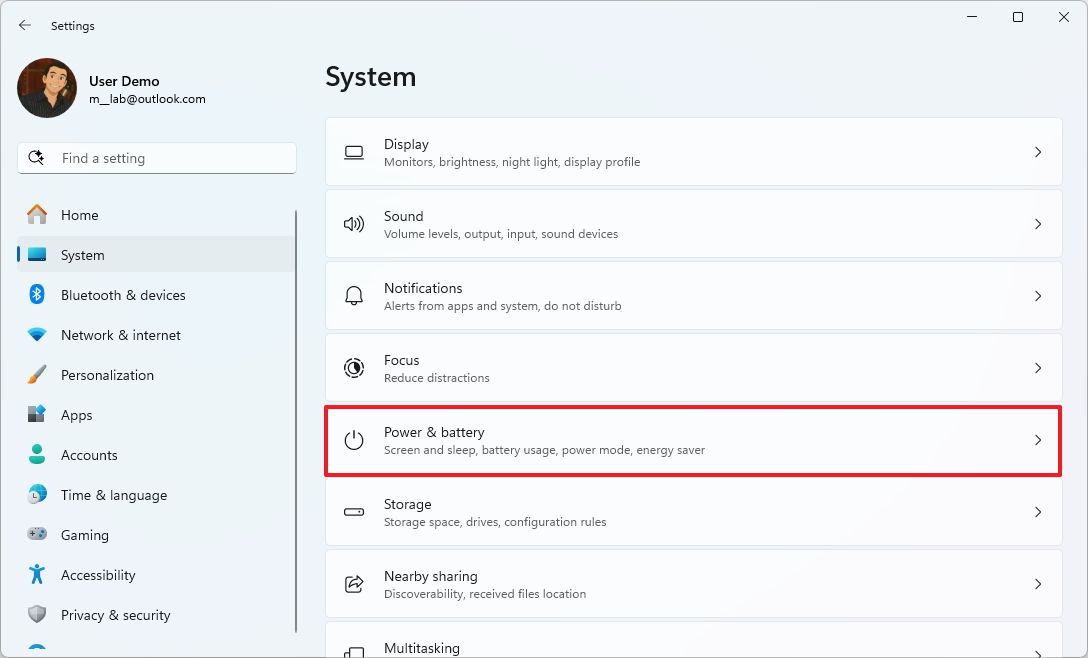
- Click on System.
- Click the Power & battery page.
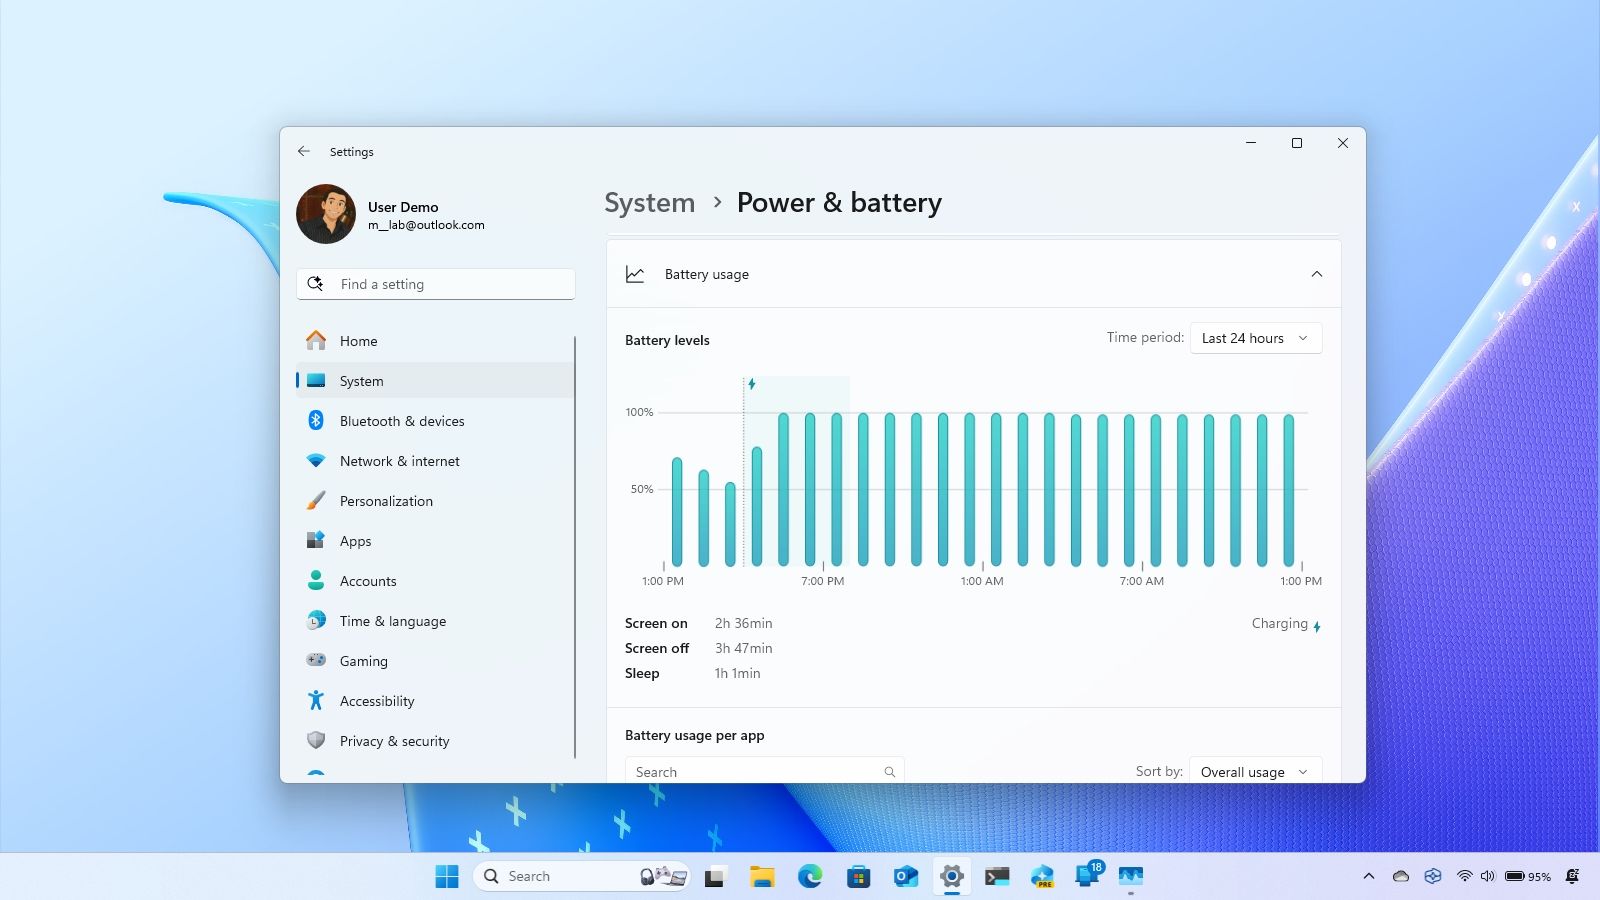
- Click the Battery usage setting.
- Set the time period to “Last 24 hours” or “Last 7 days.”
- Select a portion from the graph to see the apps using battery from a more specific period.

- Choose the Overall usage from the “Sort by” menu.
- Confirm the app that is draining the most battery.

Once you complete the steps, you will have an understanding of the apps draining the most battery.
Check battery usage history from Task Manager
To identify the apps draining your laptop’s battery on Windows 11, use these steps:
- Open Start.
- Search for Task Manager and click the top result to open the app.
- Click on Processes.
- Right-click one of the column headers and choose the “Power usage” and “Power usage trend” options.

- Confirm the app drains the most battery.

Once you’ve finished the steps, the Task Manager will provide you with information about the applications using the most power.
To fully grasp the benefits of employing this approach, make sure you comprehend the distinction between the specifics of “Power Consumption” versus “Power Consumption Pattern.
The “Power Consumption” column shows the present, live power usage of a process. Conversely, the “Power Consumption Trend” column displays the historical or typical power usage pattern of a process over time.
At a specific instance, a process could exhibit an unusually high energy consumption level because of a sudden surge in activity. Nevertheless, if this process typically consumes less power overall, we can describe its energy consumption pattern as being relatively low.
Instead, a process with a “moderately” high energy consumption rate could be showing a “significantly increasing” pattern in its energy use, suggesting it regularly uses a substantial amount of power.
How to improve battery life on Windows 11
To get the most out of your Windows 11 laptop’s battery life, here’s a simplified approach:
1. Uninstall any apps that are consuming excessive power.
2. Activate the Energy Saver mode for improved efficiency.
3. Adjust your Power Mode settings as per your needs.
4. Limit background processes to conserve energy.
5. Utilize the Energy Recommendations feature for tailored tips.
By following these steps, you can enhance your laptop’s battery performance on Windows 11.
Change Power Mode
To enable Energy Saver on Windows 11, use these steps:
- Open Settings.
- Click on System.
- Click the Power & battery page.
- Click the Power Mode setting.
- Choose the “Best Power Efficiency” option for the “On battery” setting.

After finishing the process, the system will prioritize energy efficiency over performance by adjusting power usage accordingly.
Enable Energy Saver
To enable Energy Saver on Windows 11, use these steps:
- Open Settings.
- Click on System.
- Click the Power & battery page.
- Click the Energy Saver setting.
- (Option 1) Turn on the “Always use energy saver” toggle switch.

- (Option 2) Change the battery level to turn the feature on automatically to a higher level.
Once you’ve finished the process, Windows 11 will automatically adjust certain functionalities to extend battery life. This includes turning off background synchronization for specific tasks, managing power-consuming processes, and disabling system effects that tend to use more energy.
Furthermore, the screen’s brightness will be dimmed, and the system will prioritize battery life over speedy operations.
Energy Recommendations
To apply Windows 11 suggestions to preserve battery life, use these steps:
- Open Settings.
- Click on System.
- Click the Power & battery page.
- Click the Energy Recommendations setting.

- (Option 1) Click the Apply button for the energy recommendations you want to use.

- (Option 2) Click the Apply all button to use every recommendation.
After finishing the process, the system will automatically implement suggestions to enhance the battery life on your computer.
Restrict background permissions
To address battery drainage problems due to an app’s operations, consider limiting its background access permissions.
- Open Settings.
- Click on System.
- Click the Power & battery page.
- Click the Battery usage setting.
- Set the time period to “Last 24 hours” or “Last 7 days.”
- Select a portion from the graph to see the apps using battery from a more specific period.
- Choose the Overall usage from the “Sort by” menu.
- Select the app you want to control.
- Click the menu (three dots) button and choose the “Manage background activity” option.

- Quick note: This option isn’t available for every application.
- Select the Never option under the “Background app permissions” setting.

Once you’ve finished the process, apps that you’ve previously set to “Never” will no longer operate in the background.
Uninstall app
Should an app be consuming excessive battery power, consider removing it by following these steps:
1. Locate the app on your device.
2. Tap and hold the app icon until it jiggles.
3. Tap the ‘X’ that appears at the top-left corner of the app icon.
4. Confirm the removal by tapping ‘Delete’ or ‘Uninstall’.
5. The app will be uninstalled from your device, potentially reducing battery consumption.
- Open Settings.
- Click on Apps.
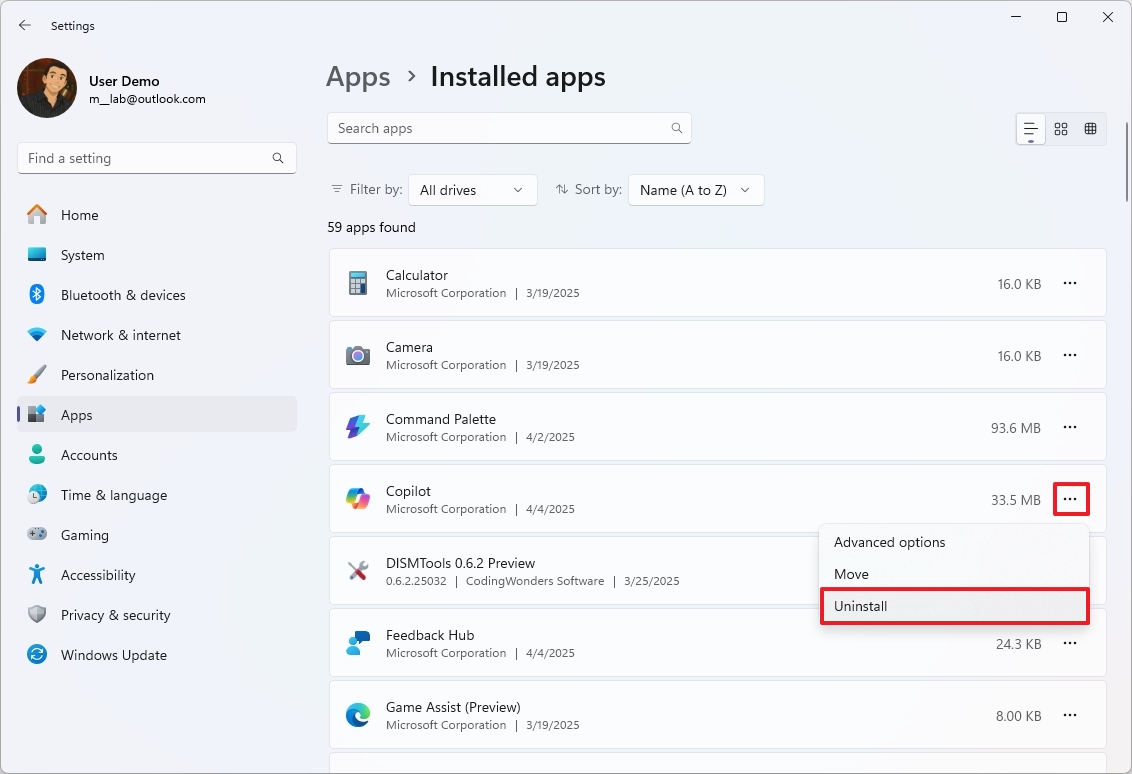
- Click the Installed apps page.

- Select the app you want to uninstall.
- Click the menu (three dots) button and choose the Uninstall option.
- Continue with the on-directions to complete the process.
After following the given steps, the system automatically removes the application, ensuring it no longer consumes your system’s valuable resources.
More resources
Read More
- PI PREDICTION. PI cryptocurrency
- Gold Rate Forecast
- WCT PREDICTION. WCT cryptocurrency
- Guide: 18 PS5, PS4 Games You Should Buy in PS Store’s Extended Play Sale
- LPT PREDICTION. LPT cryptocurrency
- FANTASY LIFE i: The Girl Who Steals Time digital pre-orders now available for PS5, PS4, Xbox Series, and PC
- Playmates’ Power Rangers Toyline Teaser Reveals First Lineup of Figures
- Shrek Fans Have Mixed Feelings About New Shrek 5 Character Designs (And There’s A Good Reason)
- SOL PREDICTION. SOL cryptocurrency
- Solo Leveling Arise Tawata Kanae Guide
2025-04-07 12:10