Installing a brand new version of Windows 11 will set up the system with standard configurations that Microsoft considers ideal for many people by default.
Instead, a significant number of these default settings are tailored more towards endorsing the company’s own goods (like Microsoft 365, PC Game Pass, and Microsoft Edge), rather than enhancing the user experience across the board.
As a researcher delving into the intricacies of Windows 11, I’ve observed that while it offers attractive promotional features, it also automatically adjusts several system settings by default, which might not always optimize performance, security, or productivity to my specific preferences.
For example, unlike previous versions where System Protection, a tool that permits you to revert unwanted system modifications, was automatically activated on the primary drive, in current releases, it’s turned off for all drives by default. Similarly, automatic Registry backups, crucial for recovery purposes, are no longer created automatically as they were in earlier editions.
In simple terms, File Explorer still conceals the file extensions of familiar file types, making it more challenging to spot potentially hazardous files and perform intricate file management tasks.
In Windows 11, you’ll find some fresh additions such as the “Sudo” command and the ability to “End Task” directly from the taskbar. However, these features are initially inactive and are mainly intended for use by developers.
In this step-by-step tutorial, I will emphasize seven essential settings that ideally get activated automatically during the setup of Windows 11.
Windows 11 features that should be enabled by default
These seven features should be enabled on Windows 11 by default.
System Protection
In the context of Windows 11, System Protection serves as a protective recovery tool that helps shield your system files, applications, registry, and system settings. It operates by generating and maintaining restore points, which can be thought of as images capturing your computer’s configuration at a particular moment.
This helpful aspect of the setup has rescued my installation multiple times, but to make the setup smaller, Microsoft chose to deactivate it automatically. However, you often won’t recall to activate it until it’s already needed, which is why I wish the company would include this feature as active by default in every installation.
To check and enable the System Protection feature on Windows 11, use these steps:
- Open Start.
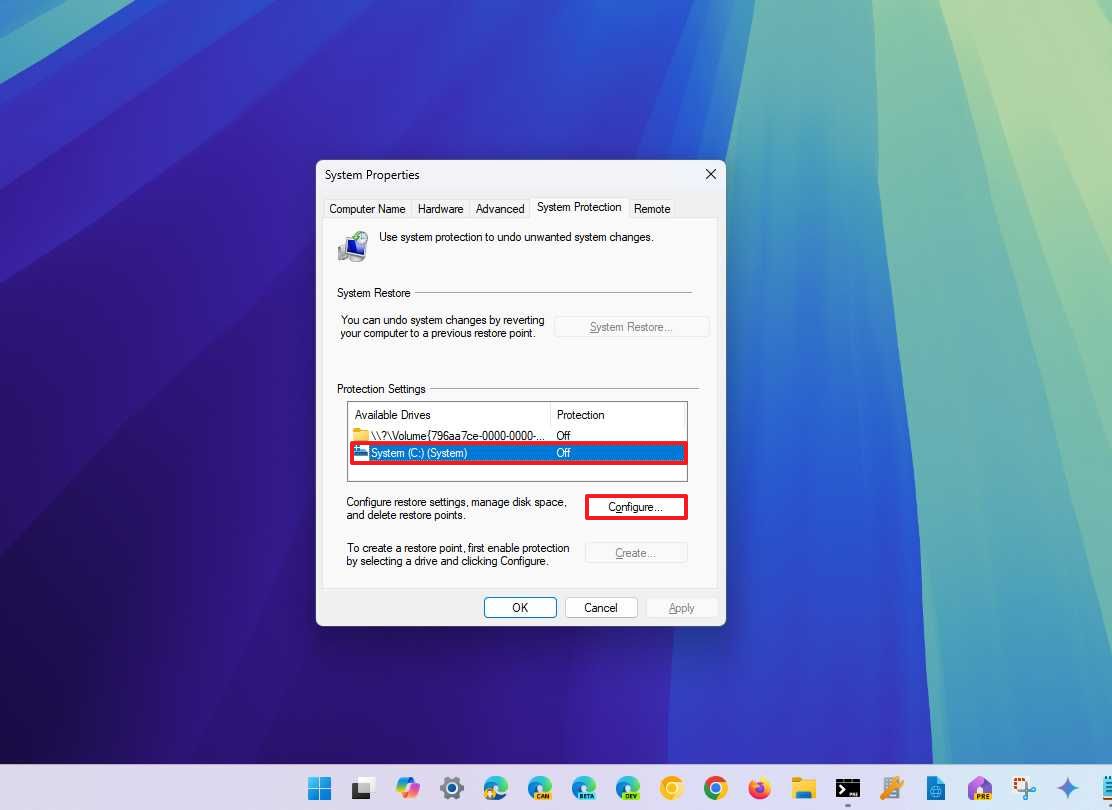
- Search for Create a restore point and click the top result to open the System Properties page.
- Select the main “System” drive under the “Protection Settings” section.
- Click the Configure button.
- Select the “Turn on system protection” option.
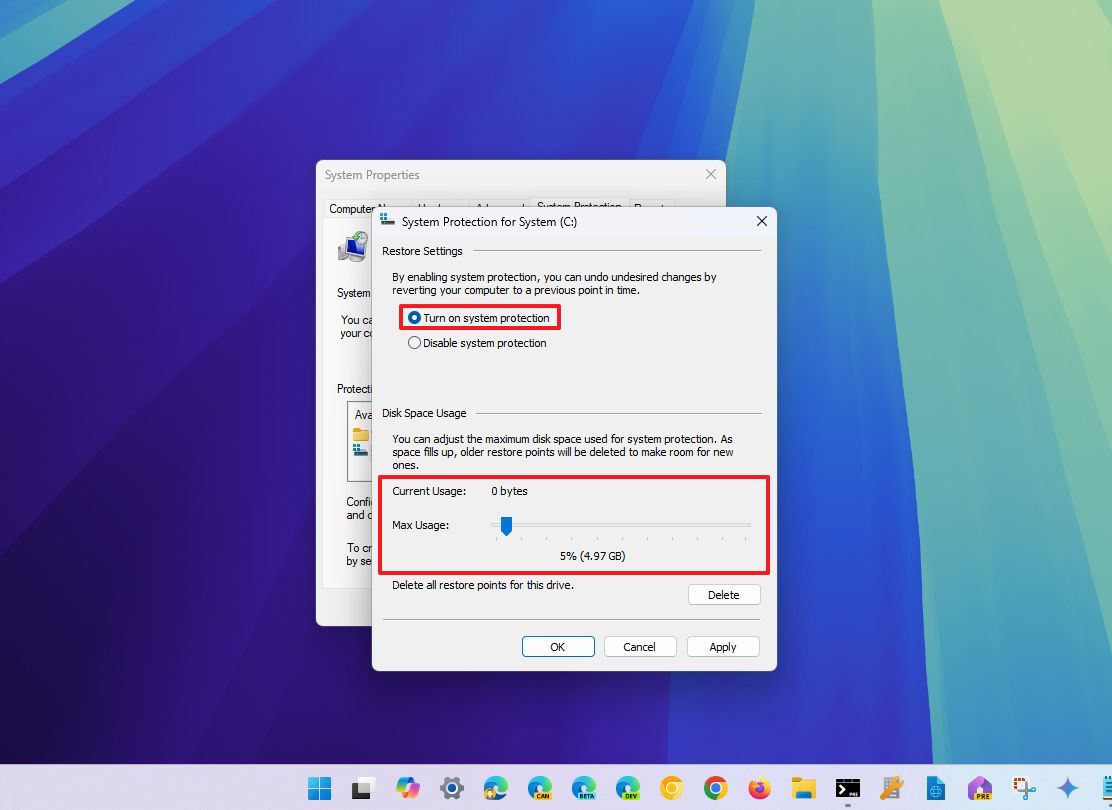
- (Optional) Use the “Max Usage” slider and select how much space the system should reserve to store restore points.
- Click the Apply button.
- Click the OK button.
After following the given steps, the system will automatically generate a restoration point at particular occurrences like when updating, installing a new driver or application, or making alterations to the Registry.
Nevertheless, remember to manually set up a system restore point prior to implementing substantial system modifications for safety reasons.
As a researcher, here’s how I might rephrase that: “I recommend you walk through these steps to establish, configure, and restore your computer using System Image Backup.
Sudo command
Instead of running the command-line console as an administrator, Sudo (short for “superuser do”) provides a means to execute commands with enhanced privileges by temporarily granting user access to administrative rights.
As a tech enthusiast, you might recognize a hint of the sudo command from Unix-based operating systems like Linux and macOS. However, it’s crucial to understand that I’m talking about a version of the command, not an exact replica, as its functionality may differ slightly on other platforms.
While users can control this function through the Settings application in Windows 11, it would be more convenient for them if Microsoft automatically enabled the sudo command during every installation, thus eliminating the need to raise the console privileges when running commands.
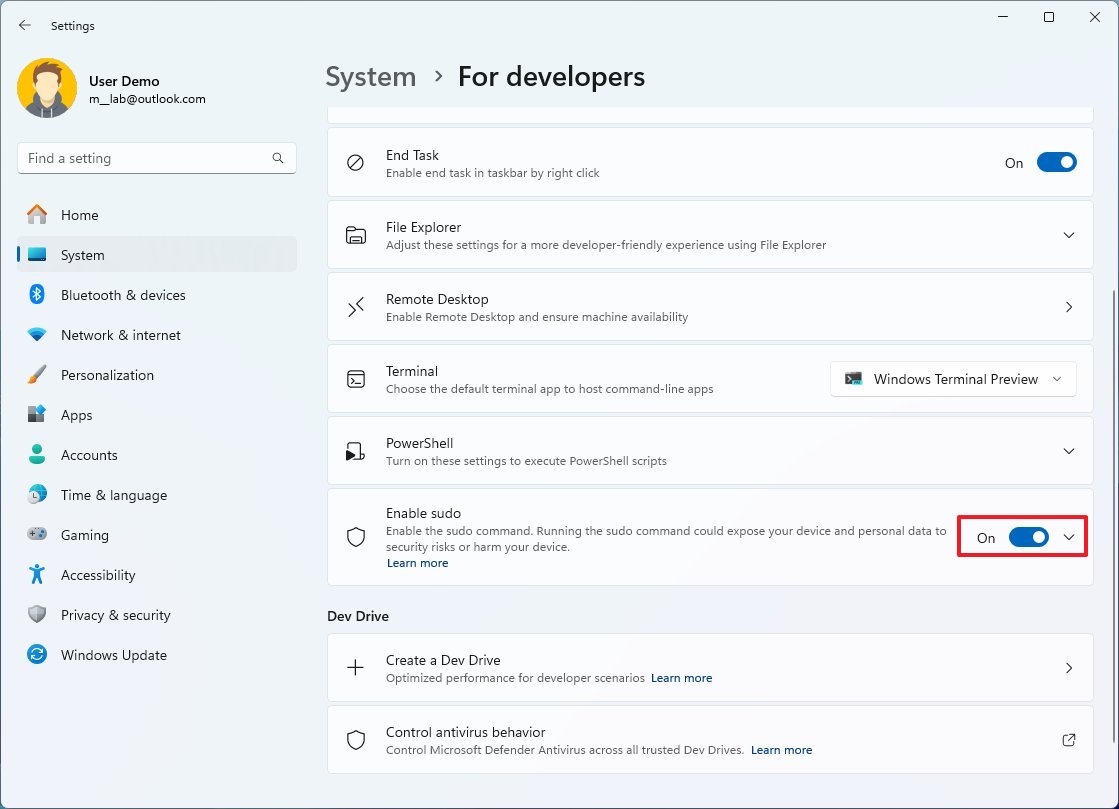
To check and enable the Sudo command on Windows 11, use these steps:
- Open Settings.
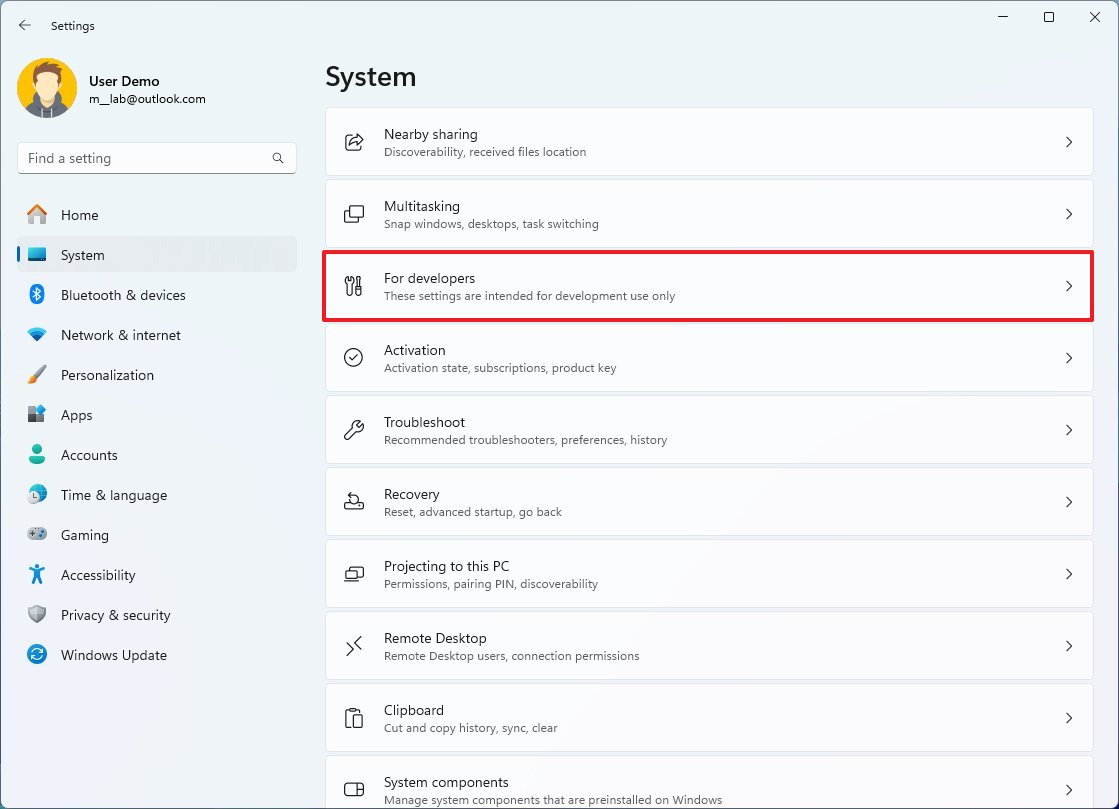
- Click on System.
- Click the For developers page on the right side.
- Turn on the Enable sudo toggle switch.
- Click the sudo setting to reveal the available option.
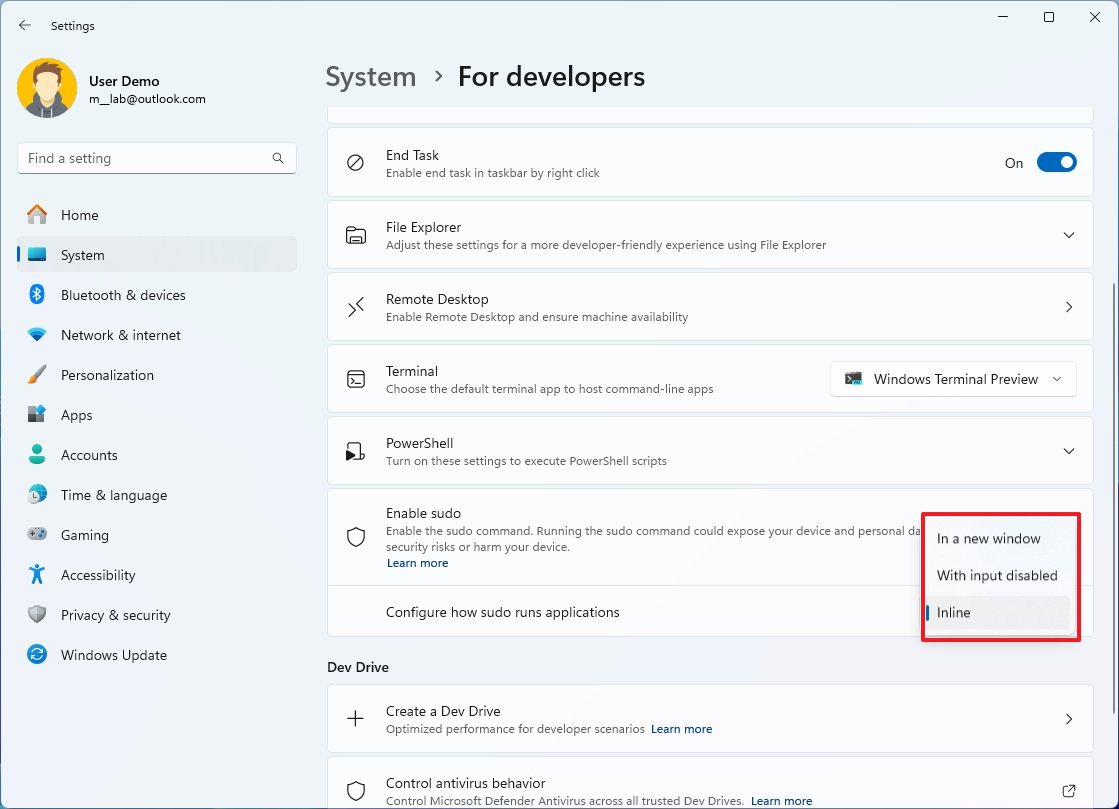
- Select the sudo behavior with the “Configure how sudo runs applications” setting:
- Inline: The command runs in the same window, identical to Linux and macOS.
- With input disabled: The command runs in a new window but doesn’t accept additional inputs.
- In a new window: The command triggers a new, elevated window.
Once you’ve followed the given instructions, you’ll have the ability to execute elevated commands directly, without needing to open the command console with administrative privileges.
For a comprehensive understanding on maximizing the use of the Sudo command, you might want to refer to this Windows 11 tutorial.
End Task option
On Windows 11, when you’ve finished with an application, you typically press the “Close” button. However, if the application becomes unresponsive, clicking the “X” (or close) button might not have any effect.
If the app becomes unresponsive, you usually end up opening the Task Manager, pick the app and forcefully shut it down. Yet, your operating system also has an “End Task” feature to instantly terminate frozen applications without needing to open Task Manager. This option is typically disabled by default as Microsoft designed it more for developers’ use.
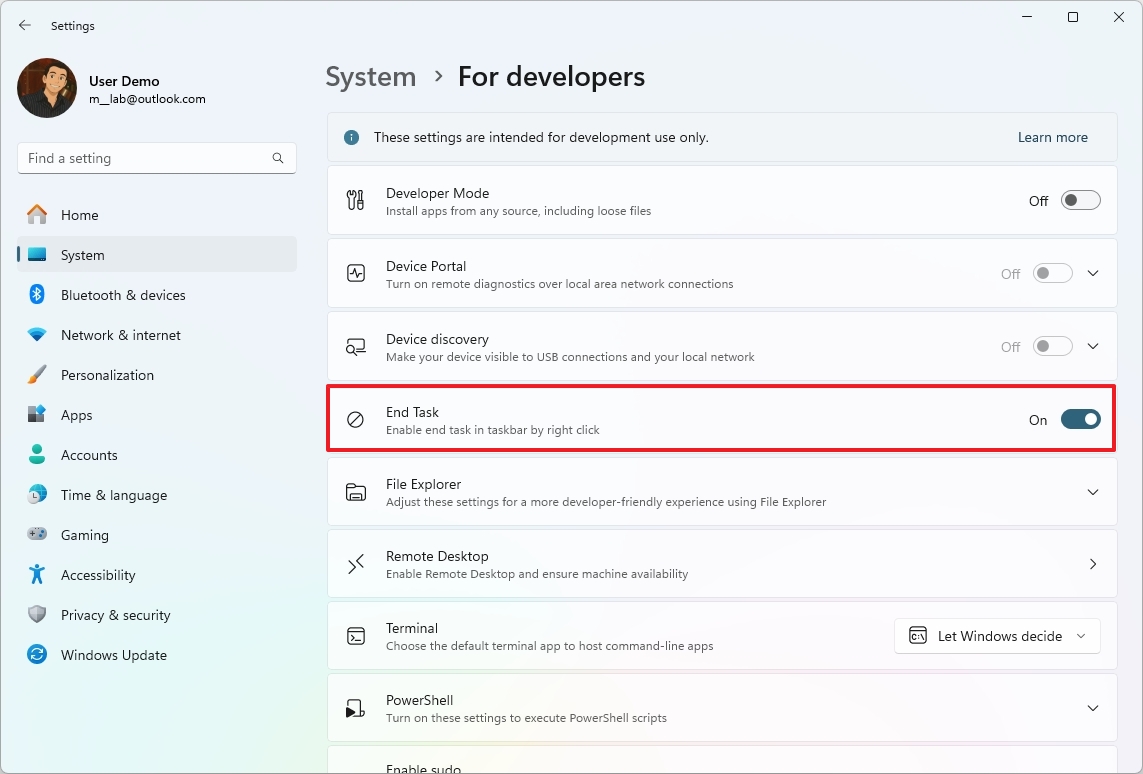
If you want to have quick access to the End Task feature, use these steps:
- Open Settings.
- Click on System.
- Click the For developers page on the right side.
- Turn on the End Task toggle switch.
After finishing the given procedures, you’ll be able to do a right-click on an app in the Taskbar, which will display a context menu that contains the “Close Application” option, allowing you to shut down the program.
Automatic Registry backup
Previously, across various operating system versions, the system would autonomously save a copy of the Registry each time the computer booted up successfully in a folder named “REgBack”. Nevertheless, in Windows 10 (version 1803), Microsoft eliminated this feature as part of their efforts to minimize the setup’s overall size.
As an analyst, I’ve come to appreciate a less-known yet valuable aspect of our system: its ability to recover itself following a problematic update or system modifications that led to boot failures. This feature has proven invaluable in restoring the system to proper functioning.
You should keep in mind that you can indeed activate this function, but it calls for some adjustments to your system registry and setting up a personalized task using the Task Scheduler.
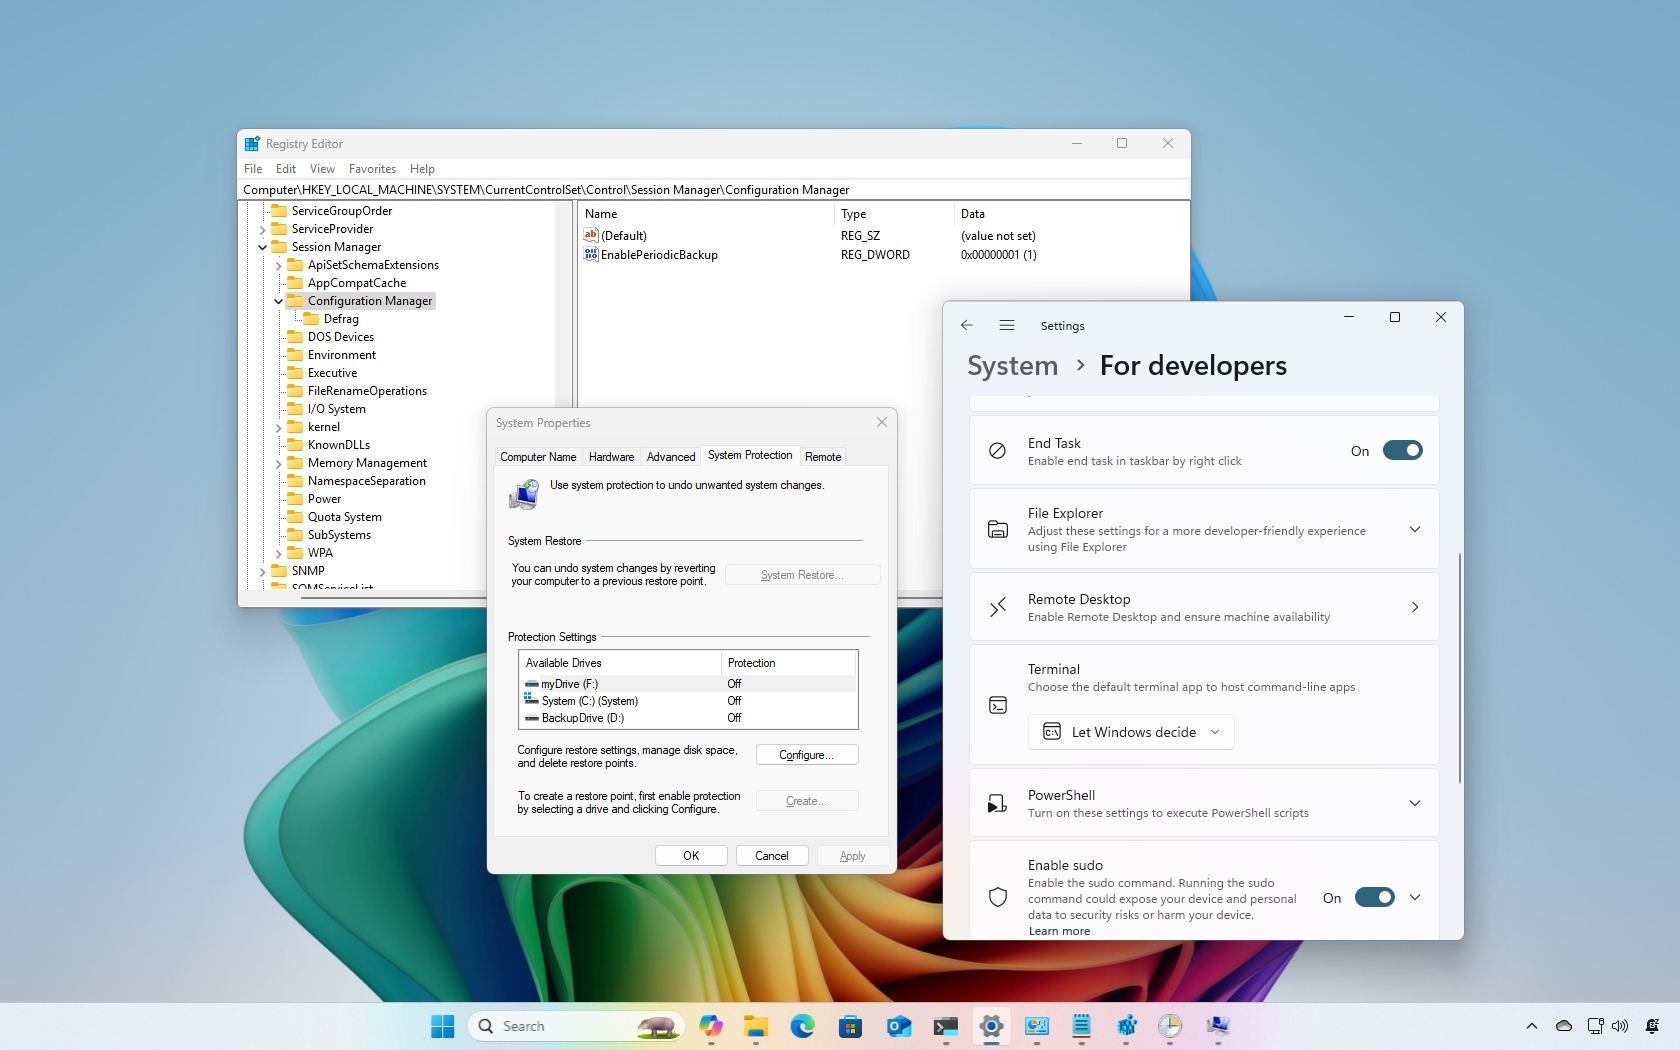
To enable Registry backups on Windows 11, use these steps:
- Open Start.
- Search for regedit and click the top result to open the Registry.
- Browse the following path: HKLM\System\CurrentControlSet\Control\Session Manager\Configuration Manager
- Right-click the Configuration Manager key, select New, and click the “DWORD (32-bit) Value” option.
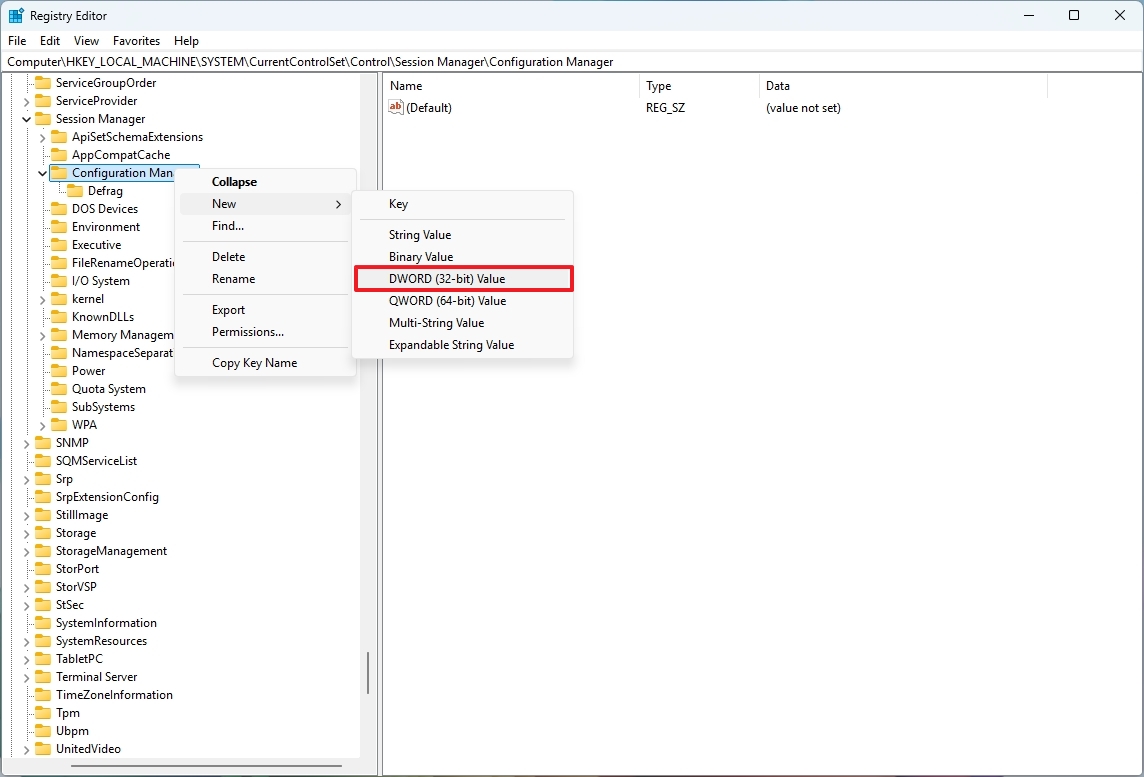
- Confirm the key EnablePeriodicBackup name and press Enter.
- Right-click the newly created DWORD and choose the Modify option.
- Set the value to 1.
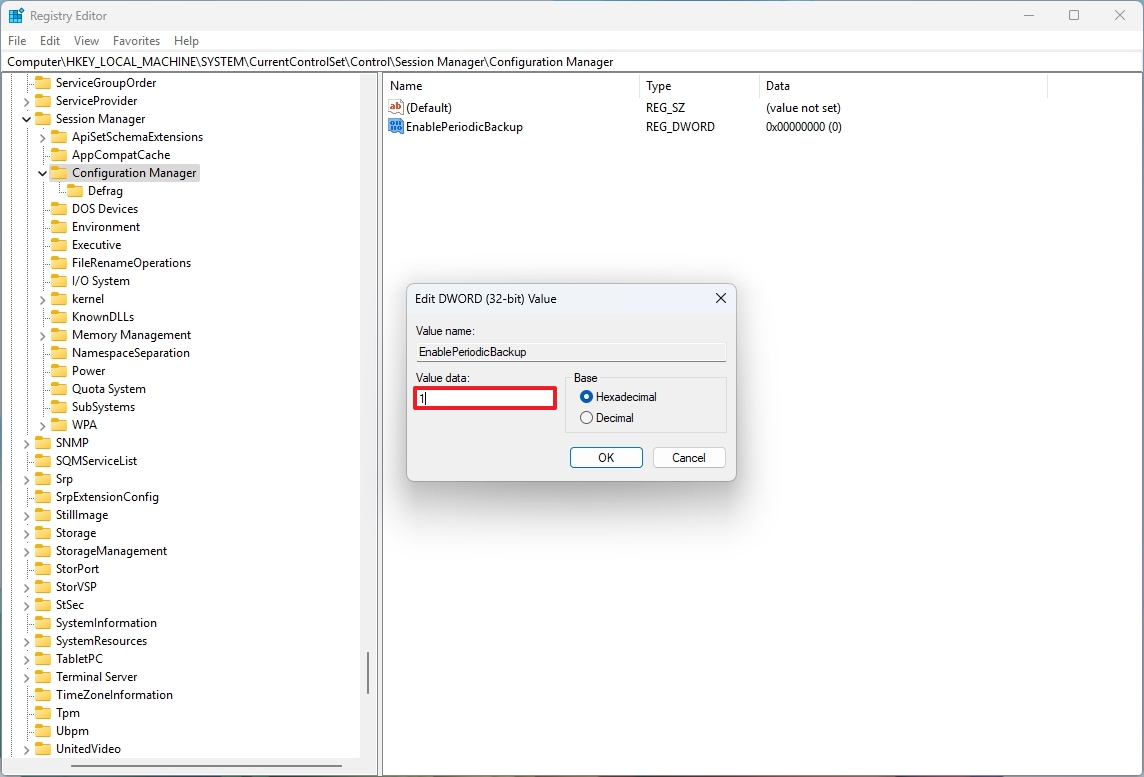
- Click the OK button.
- Open Start.
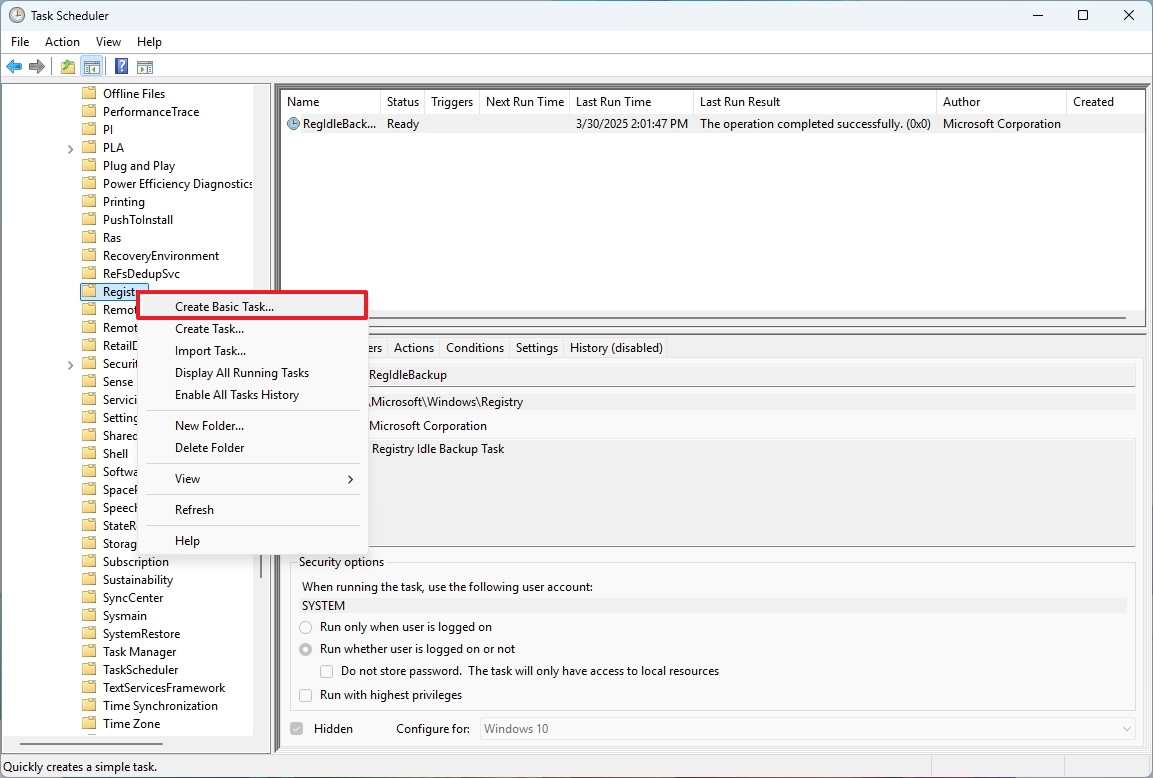
- Search for Task Scheduler and click the top result to open the console.
- Browse the following path: Task Scheduler Library > Microsoft > Windows > Registry
- Right-click the Registry key and choose the “Create Basic Task” option.
- Confirm a name for the task.
- Click the Next button.
- Choose the Daily option for the “Trigger” setting.
- Click the Next button.
- Configure the schedule of the task.
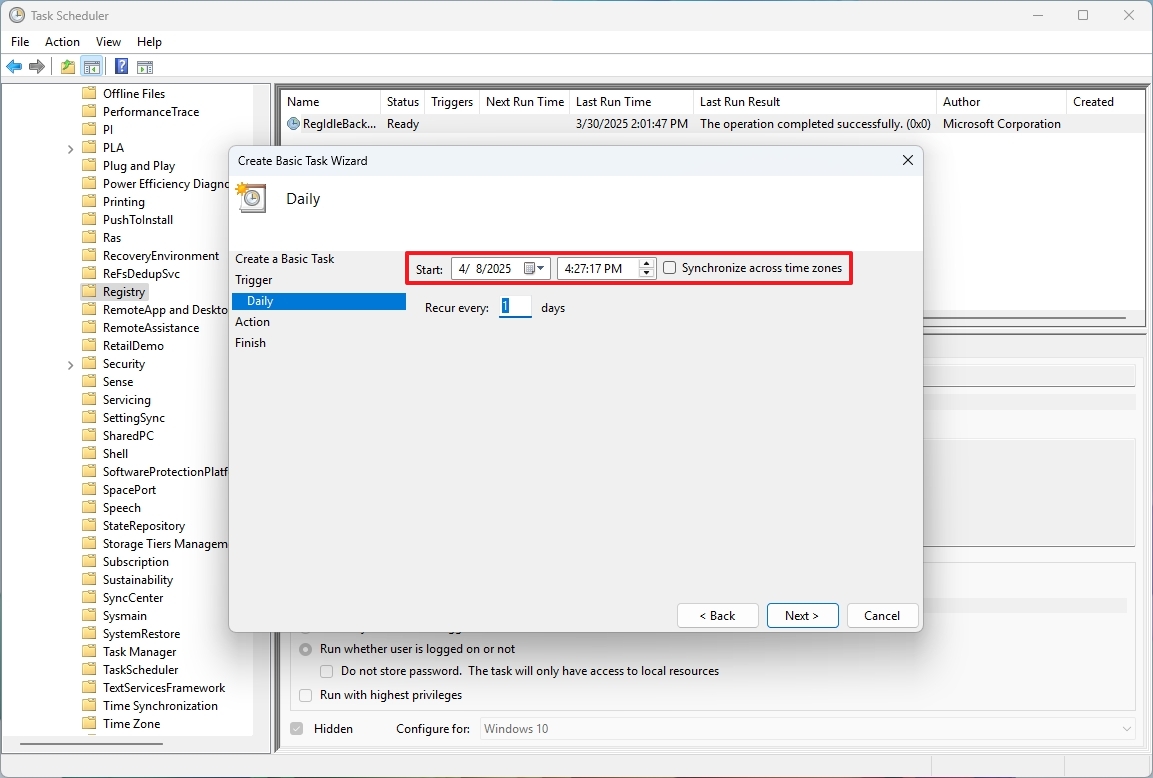
- Click the Next button.
- Select the “Start a program” for the “Action” setting.
- Click the Next button.
- Type the schtasks command in the “Program/script” setting.
- Type the /run /i /tn “\Microsoft\Windows\Registry\RegIdleBackup” command in the “Add argument” setting.
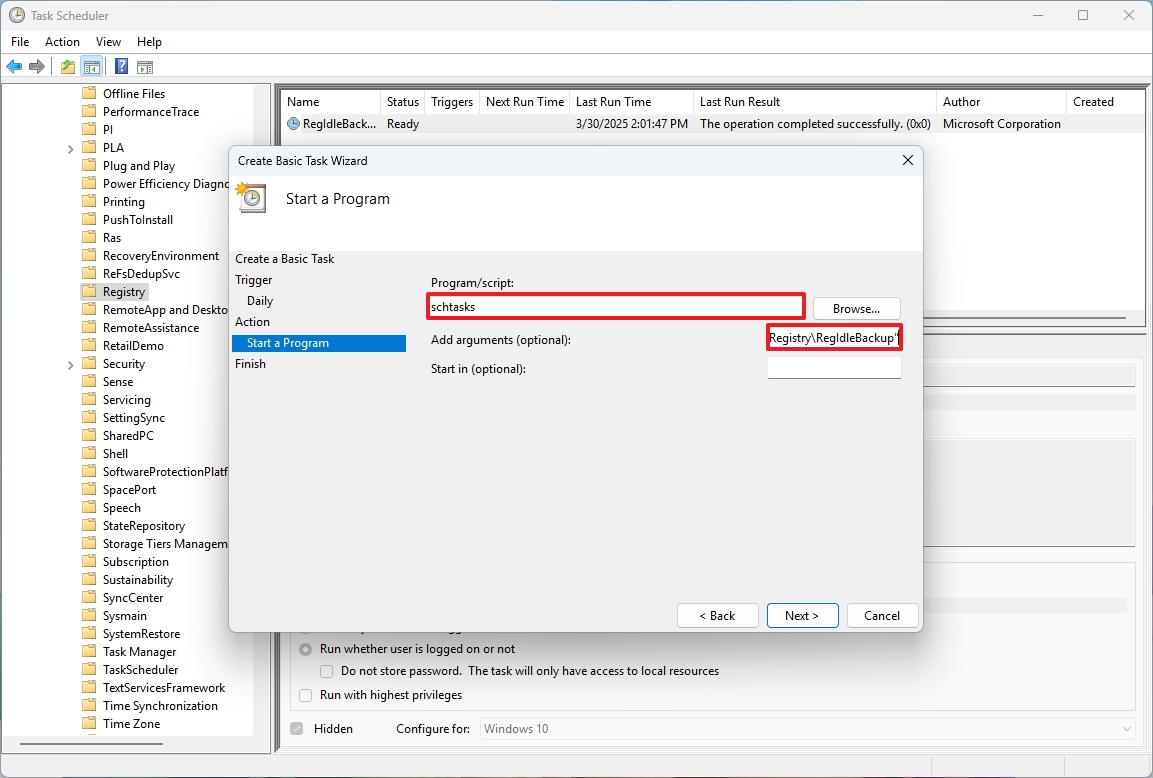
- Click the Next button.
- Check the “Open the Properties dialog for this task when I click Finish” option.
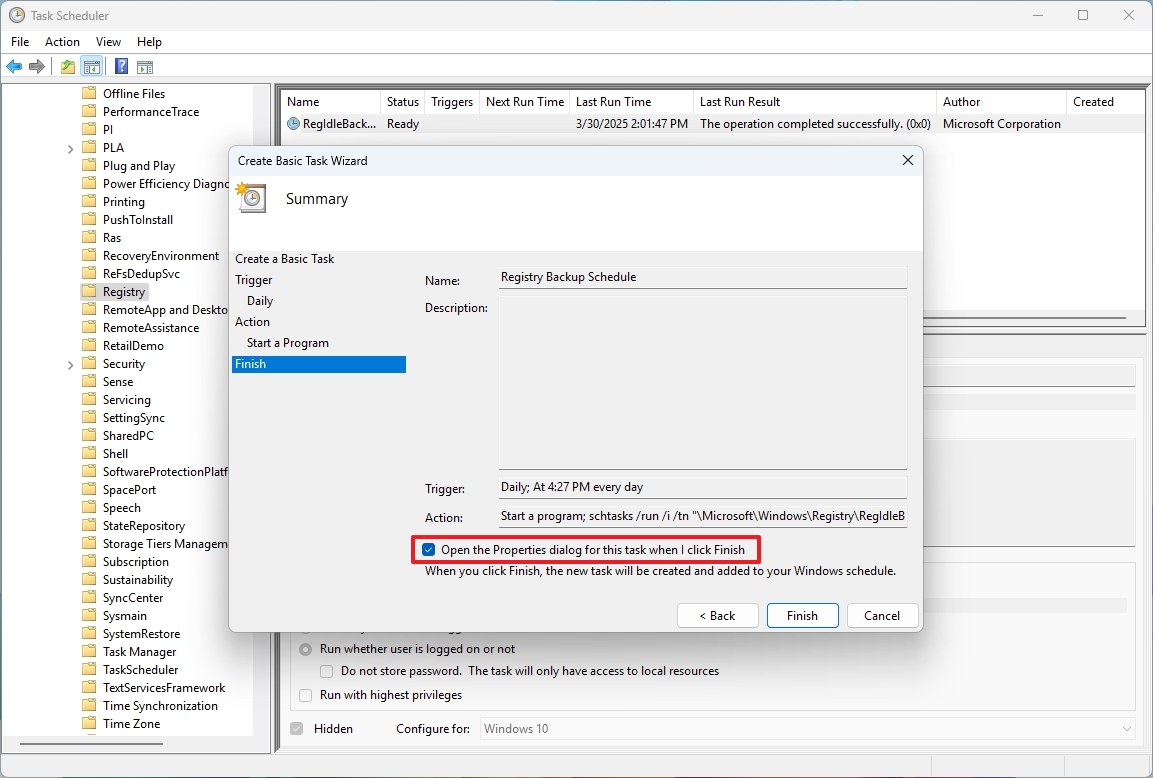
- Click the Finish button.
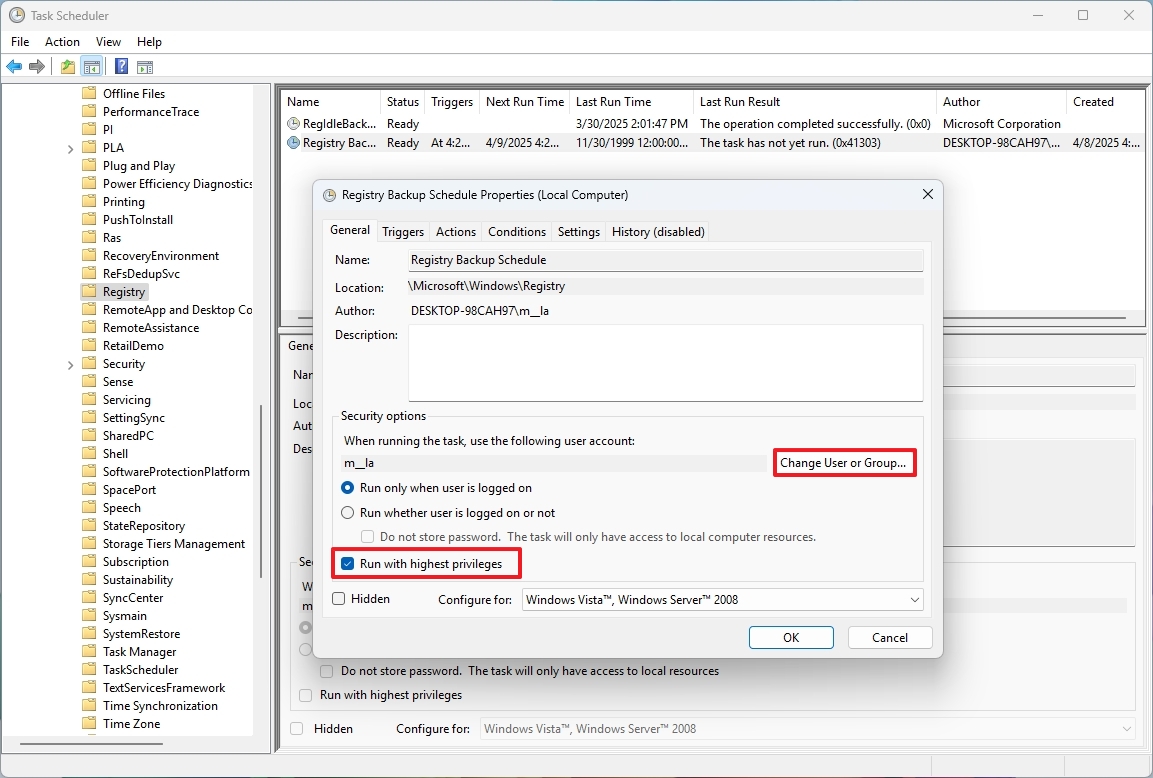
- Click the “Change User or Group” button.
- Click the Advanced button.
- Click the Find Now button.
- Select the SYSTEM group.
- Click the OK button.
- Click the OK button again.
- Check the “Run with highest privileges” option.
- Click the OK button.
Once you’ve finished the tasks, you can arrange for the system to automatically make a copy (backup) of the Registry at your convenience.
File Explorer with file extensions
By standard, File Explorer organizes files within folders and subfolders while hiding file extensions like “.txt” or “.docx”, but it’s recommended that upon every installation, the default setting is configured to display these extensions for better understanding of the file types.
While concealing file extensions for common formats might create a tidier appearance and minimize the risk of unintentional extension changes, it’s worth considering the advantages of displaying them by default as well.
By default displaying extensions for familiar files can aid in identifying them more swiftly. This also facilitates renaming a file and altering its extension, like transforming a “.txt” to “.bat” or changing a “.ps1” to create a script.
To show file extensions on Windows 11, use these steps:
- Open File Explorer.
- Click on View.
- Select the Show menu and choose the “File name extensions” option.
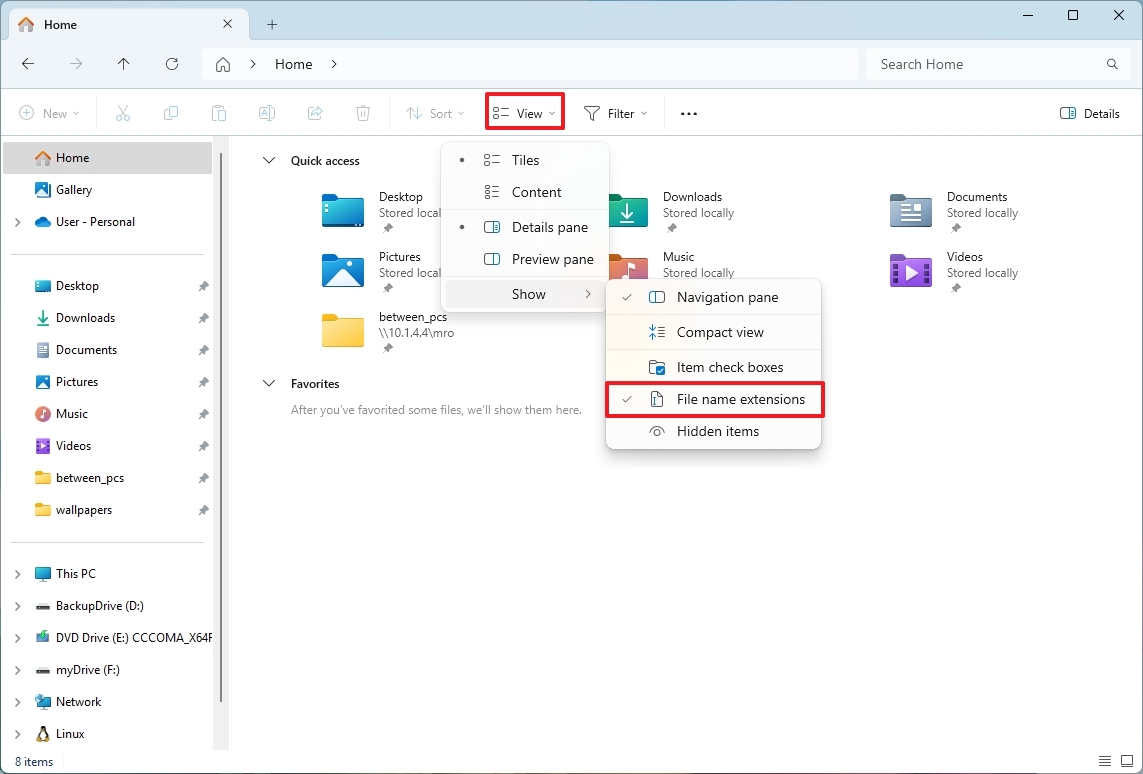
Once you complete the steps, File Explorer will show extensions after the file name.
Hibernate in Power menu
As a tech-savvy individual, I’m always excited about the functionalities of my Windows 11 system. One such feature that I find particularly useful is Hibernate. Instead of closing my active session entirely, Hibernate saves it onto my main drive. This way, when I restart my device, I can pick up right where I left off! It’s like taking a quick break and coming back to the same game or document without having to load everything again.
This function often proves useful for conserving power on your desktop or laptop computer. If your laptop’s battery level gets low, you can utilize the Hibernation feature to put the device into a sleep-like state, retaining your current session. Once you locate a power source, the device will resume where it left off.
No matter what the cause, the system ought to identify and activate the related function, and present it as an option within the “Power” settings menu without any user intervention, provided the hardware supports it.
To enable Hibernate on Windows 11, use these steps:
- Open Start.
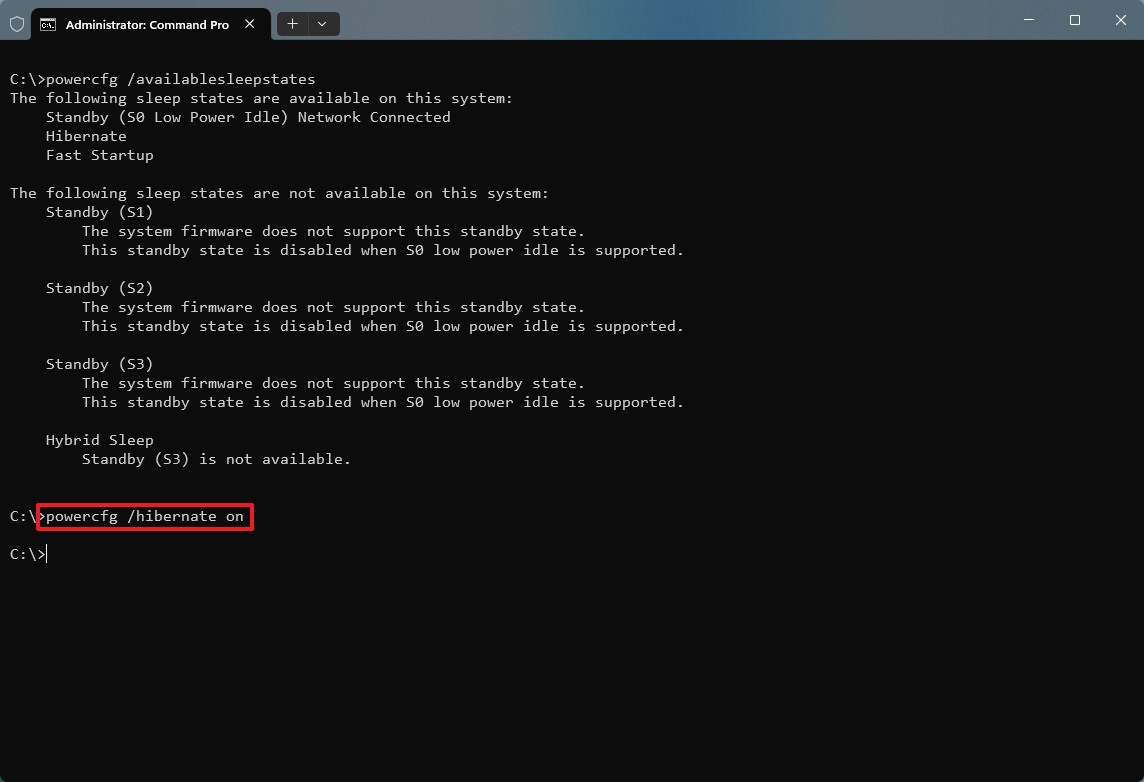
- Search for Command Prompt, right-click the top result, and select the Run as administrator option.
- Type the following command to confirm the hibernation status and press Enter: powercfg /availablesleepstates

- Confirm whether Hibernate appears disabled.
- Type the following command to enable the Windows 11 Hibernate feature and press Enter: powercfg /hibernate on
- Open Start.
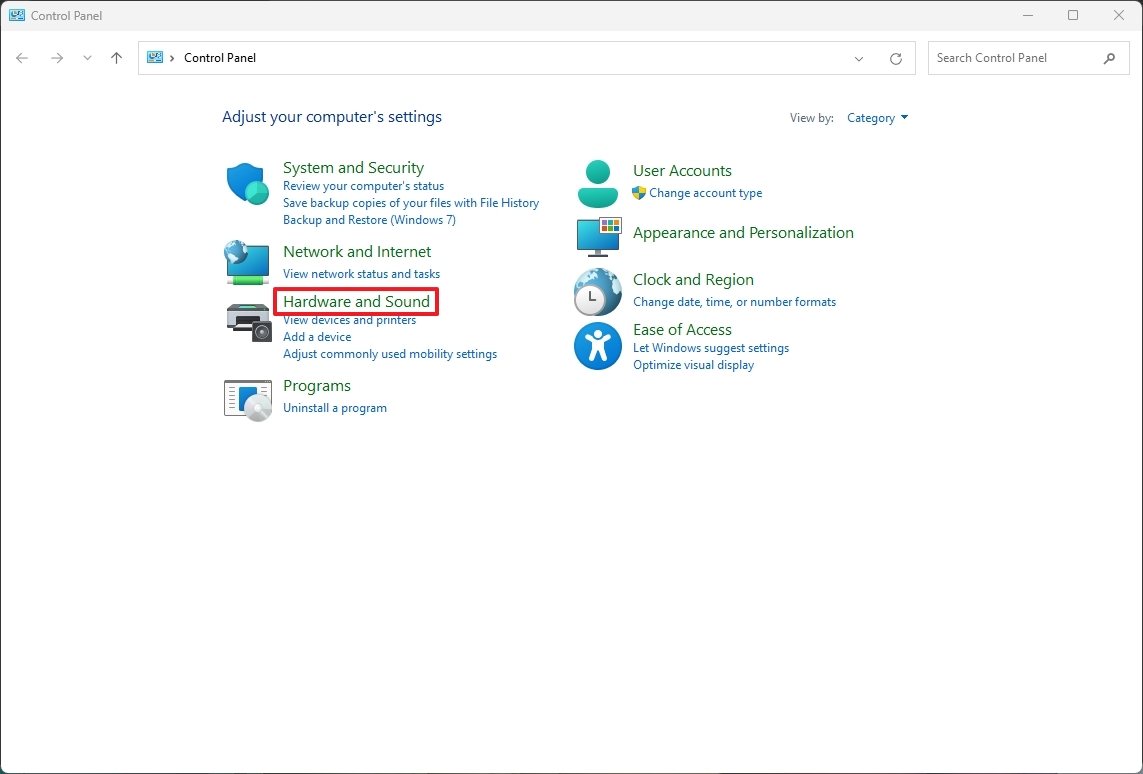
- Search for Control Panel and click the top result to open the app.
- Click on Hardware and Sound.
- Click on Power Options.
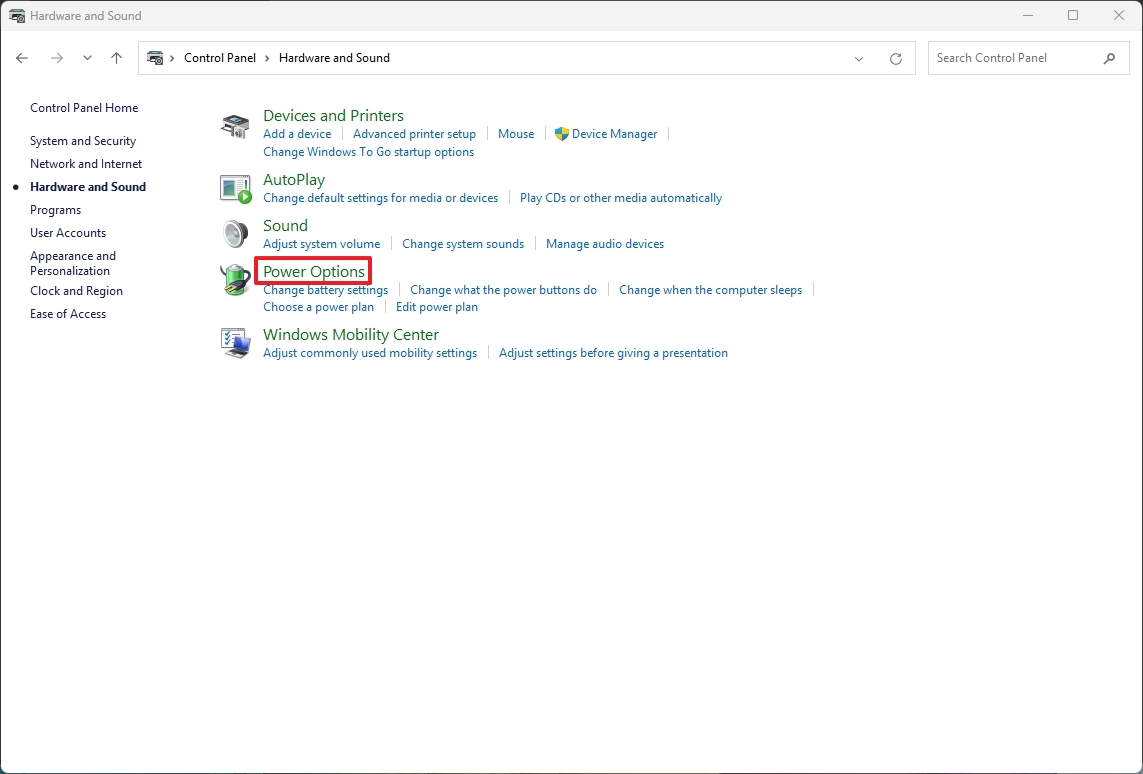
- Click the “Choose what closing the lid does” option from the left pane.
- Quick tip: If you’re using a desktop computer, you can select the “Choose what the power button does” option to get to the settings.

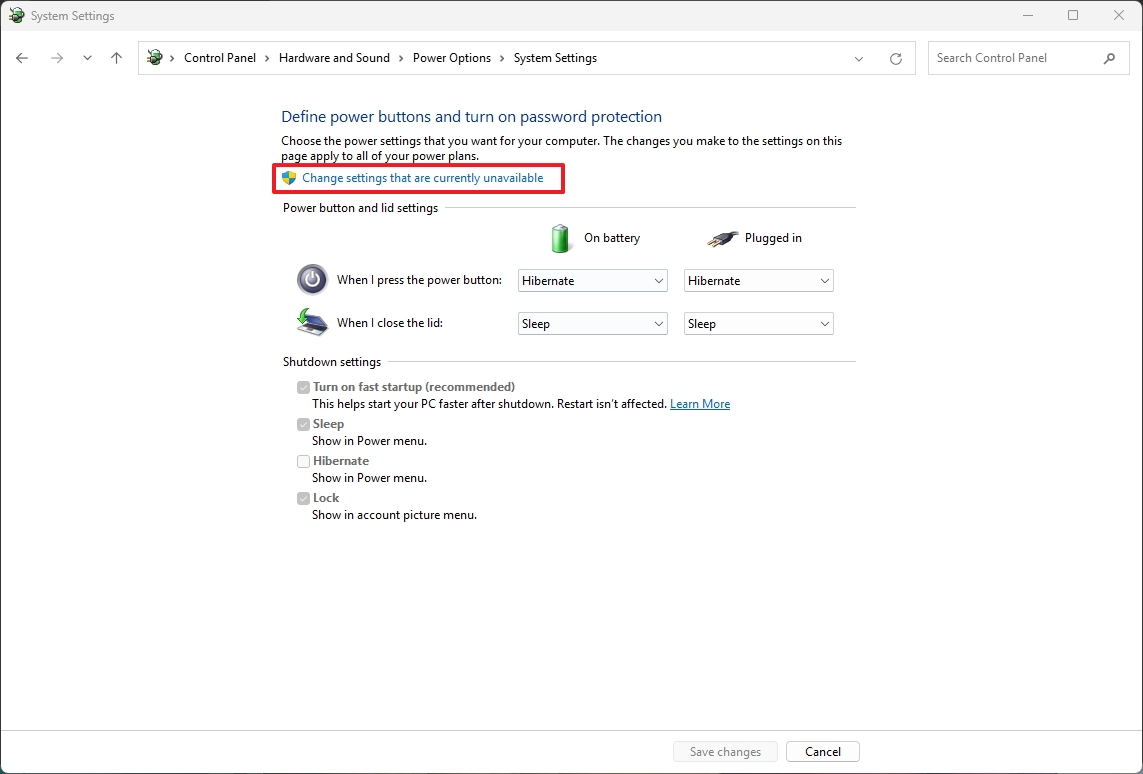
- Click the “Change settings that are currently unavailable” option to modify the Shutdown settings.
- Check the Hibernate option.
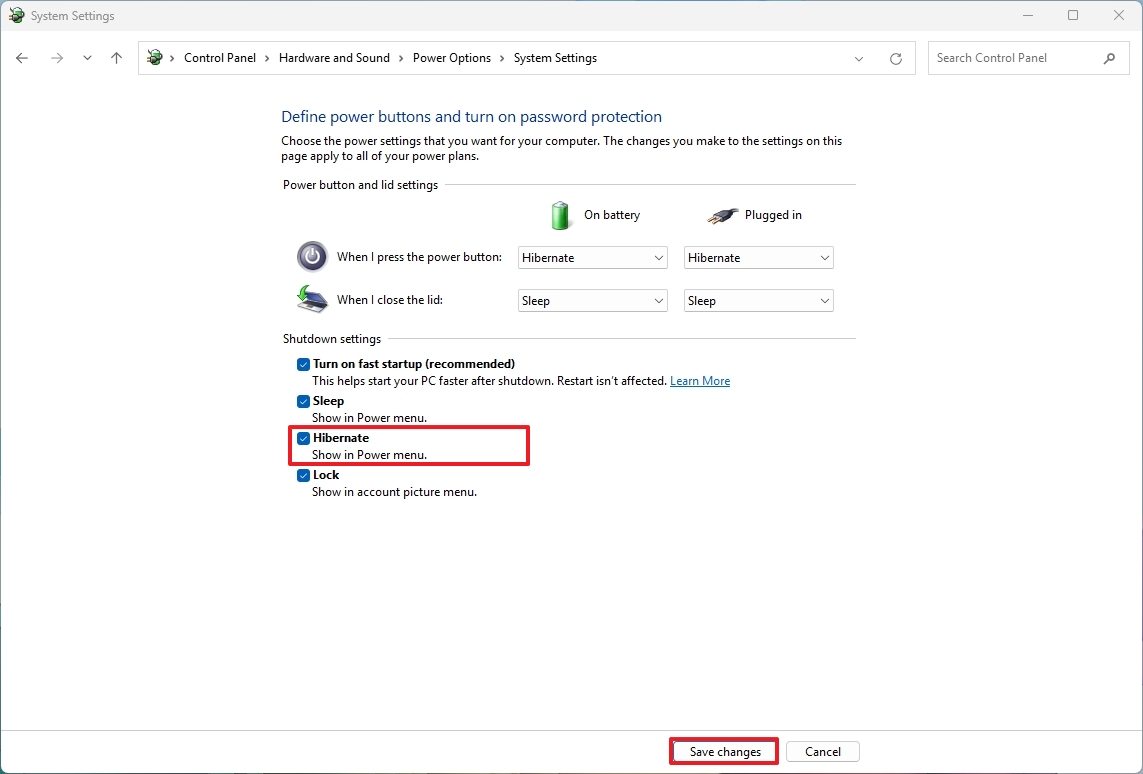
- Click the Save changes button.
After finishing the given instructions, your computer’s hibernation mode will become active, and you’ll find the “Hibernate” option within the Power settings menu.
Taskbar with left alignment
With the debut of Windows 11, Microsoft unveiled a revamped desktop interface featuring a refreshed layout for the Taskbar and Start menu. Notably, these elements are now centered by default as part of their new design.
Instead of giving you the choice to adjust alignment to the left, it might be more familiar and convenient for users if the operating system automatically set the left alignment, while still providing an option to switch to centered alignment, as many individuals are accustomed to the former layout.
If you’re a beginner with Windows 11, here’s how you can adjust the positioning of your Taskbar on your PC:
1. Right-click on an empty area of the Taskbar.
2. From the menu that appears, select “Taskbar settings.”
3. In the new window, locate the “Taskbar behaviors” section.
4. Under this section, you’ll find an option labeled “Taskbar alignment.” Click on it.
5. Choose your preferred alignment option: Left, Center, or Right.
6. Press “Apply” to save your changes.
- Open Settings.
- Click on Personalization.
- Click the Taskbar page on the right side.
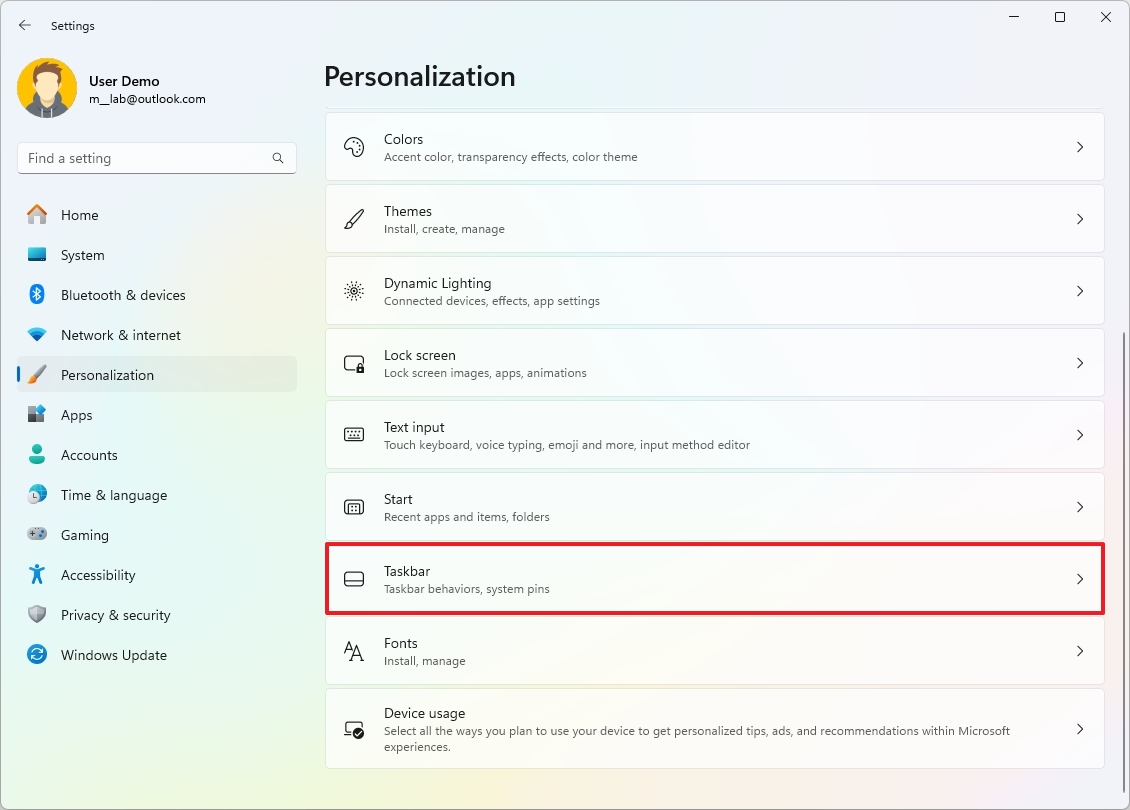
- Click the Taskbar behaviors settings.
- Select the Left option for the “Taskbar alignment” setting.
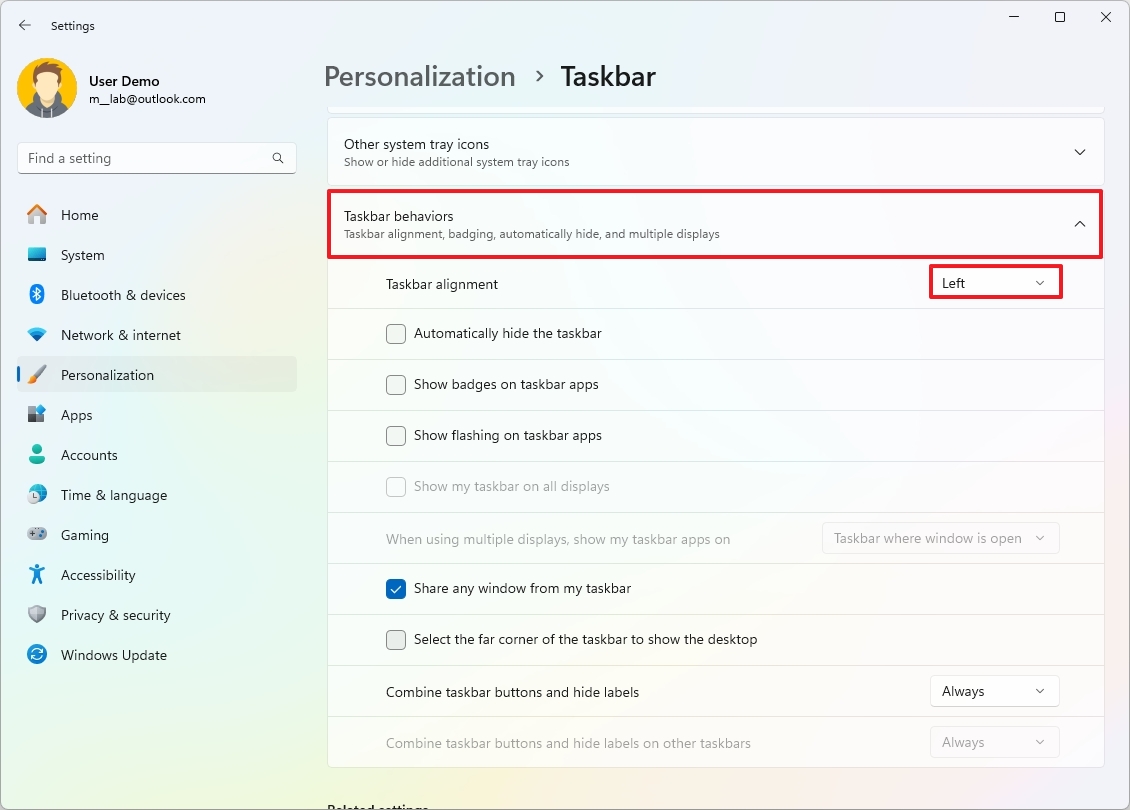
Once you’ve finished the steps, both the Taskbar icon and Start menu will be moved to the left side, similar to their placement in older versions.
It’s worth pointing out that this manual proposes characteristics which ought to be reactivated by default, as well as those that were activated by default initially, but need to be.
What additional setting do you think Microsoft should turn on automatically in Windows 11?”
Feel free to share your thoughts below!
More resources
Read More
- OM PREDICTION. OM cryptocurrency
- Jellyrolls Exits Disney’s Boardwalk: Another Icon Bites the Dust?
- Carmen Baldwin: My Parents? Just Folks in Z and Y
- Despite Strong Criticism, Days Gone PS5 Is Climbing Up the PS Store Pre-Order Charts
- Solo Leveling Season 3: What You NEED to Know!
- Jelly Roll’s 120-Lb. Weight Loss Leads to Unexpected Body Changes
- Beyond Paradise Season 3 Release Date Revealed – Fans Can’t Wait!
- Disney’s ‘Snow White’ Bombs at Box Office, Worse Than Expected
- Lisa Rinna’s RHOBH Return: What She Really Said About Coming Back
- The Perfect Couple season 2 is in the works at Netflix – but the cast will be different
2025-04-09 16:16