While out and about, whether it’s at a café, airport, or hotel, you might find yourself needing to connect your Windows 11 laptop to a public Wi-Fi network. Yet, be aware that these networks can potentially put your device and private data at risk of various security issues, particularly when dealing with confidential information.
Open public Wi-Fi networks are available for anyone to use, which makes it tricky to guarantee that potentially harmful users aren’t also connected. Such users might take advantage of any weaknesses to seize your information, spread viruses, or illegally access your devices without permission.
To ensure the safety of your Windows 11 device when connected to public Wi-Fi, it’s important to apply certain security practices such as:
1. Activating a random MAC address setting.
2. Changing your network profile to ‘public’.
3. Setting up a custom DNS service for better protection.
4. Utilizing a VPN connection or accessing the internet via a mobile hotspot.
Here, I will offer you five valuable suggestions for enhancing the security of your device and data using tailored Windows 11 features. This step-by-step guide aims to provide maximum protection.
How to make a secure connection to a public Wi-Fi on Windows 11
As a tech-savvy individual, here’s what I do to beef up my security when linking to public Wi-Fi networks:
1. Use a Virtual Private Network (VPN): This encrypts your internet connection, ensuring that any data you send or receive can’t be intercepted by unwanted parties.
2. Keep Your Devices Updated: Regularly updating the software on your devices helps patch up security vulnerabilities that could be exploited.
3. Avoid Accessing Sensitive Information: Public Wi-Fi networks are not always secure, so it’s best to avoid accessing sensitive data like bank accounts or personal emails while connected.
4. Disable File Sharing: If your device automatically shares files, disable this feature when on public Wi-Fi to prevent unauthorized access.
5. Use Two-Factor Authentication (2FA): This adds an extra layer of security by requiring a second form of identification beyond just a password.
1. Enable random MAC address
In simpler terms, the process of generating a unique, arbitrary MAC (Media Access Control) address, also known as a hardware address, is mainly implemented to boost your privacy when using Wi-Fi connections.
Activating this function will cause your device’s distinctive identification number to change whenever it connects or on a daily basis, making it significantly more challenging for networks and others to monitor your activities and whereabouts.
To utilize this function, your network adapter must possess the necessary compatibility. Furthermore, certain networks might demand the employment of a static MAC address. Therefore, if you’re experiencing difficulties in connecting to a specific network, it could be that this feature is turned off.
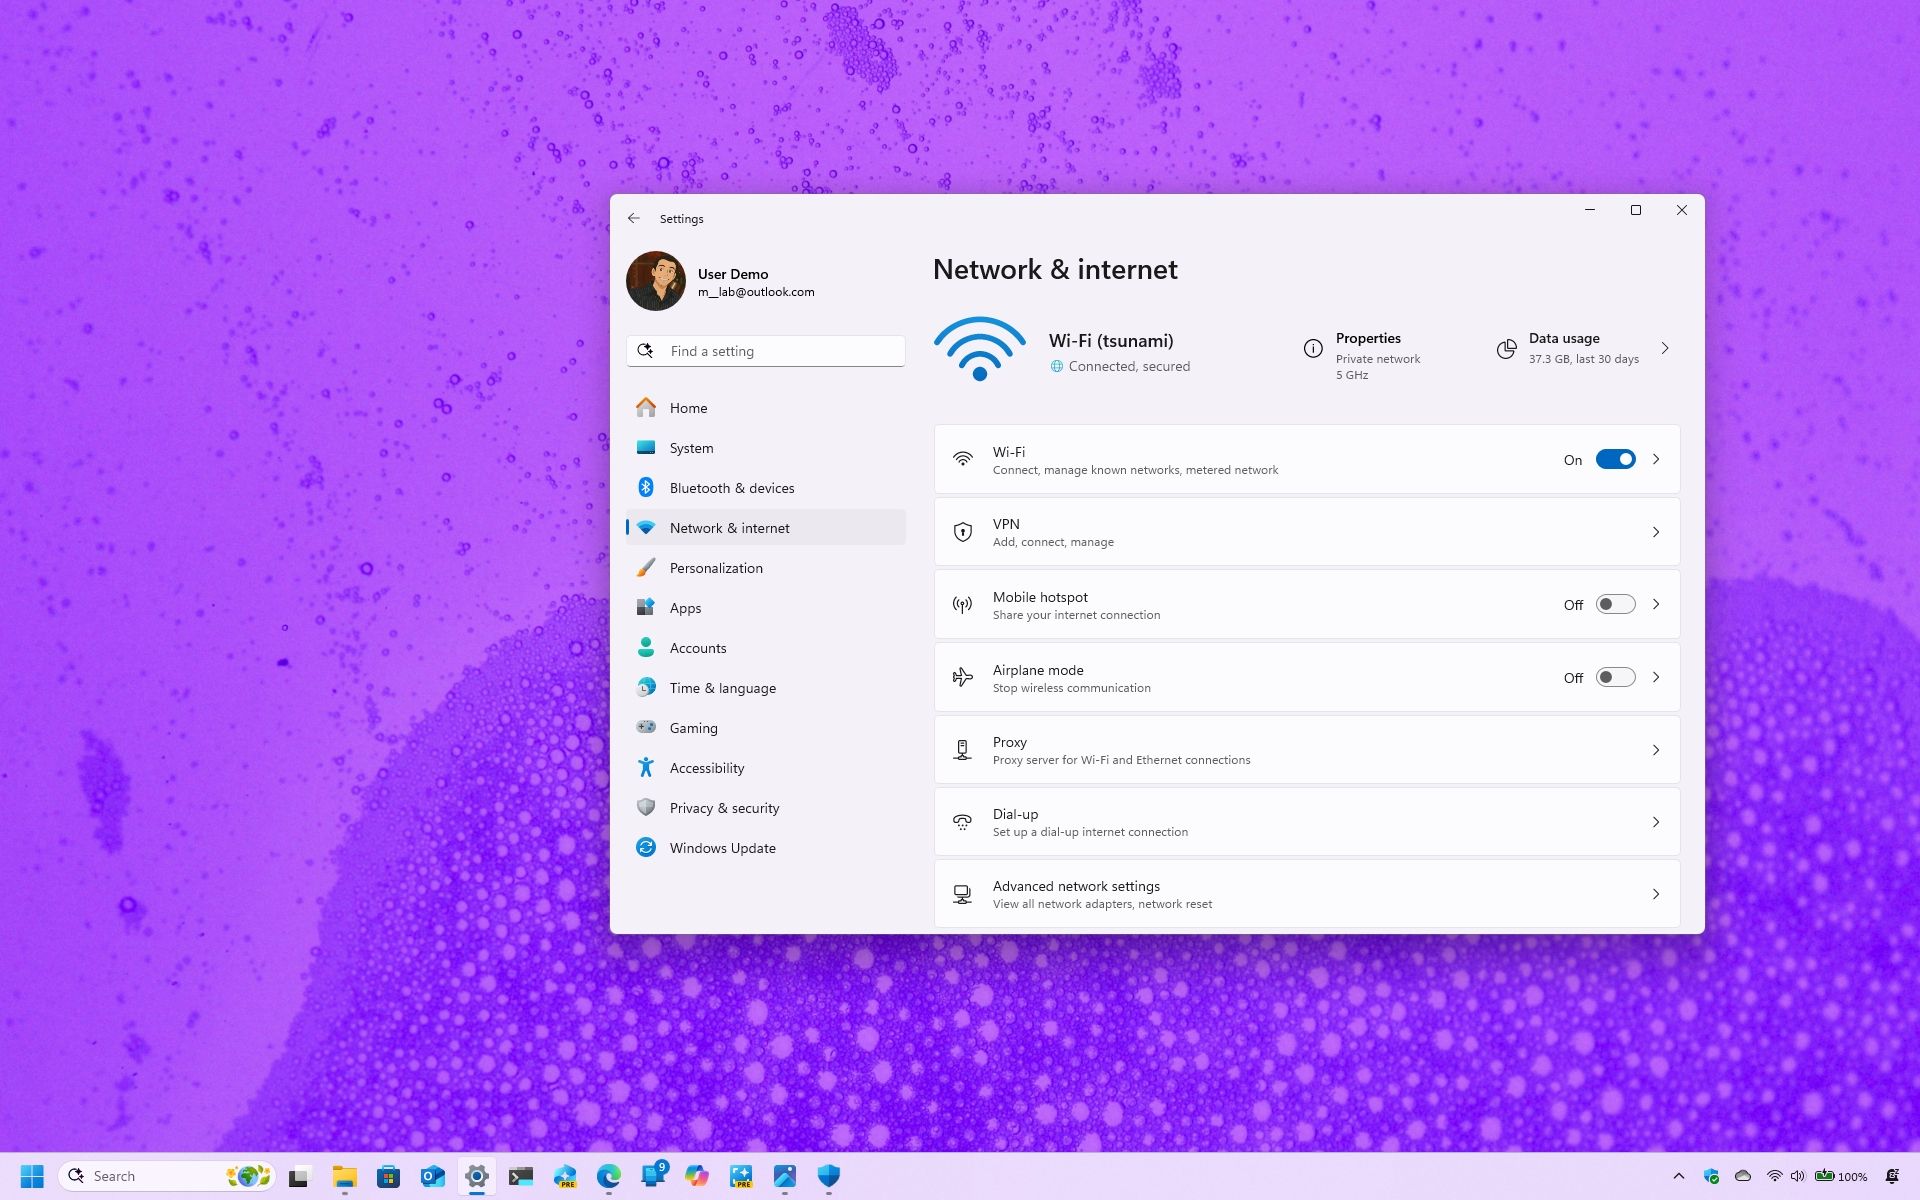
To enable the random MAC address feature on Windows 11, use these steps:
- Open Settings.
- Click on Network & Internet.
- Click the Wi-Fi page.
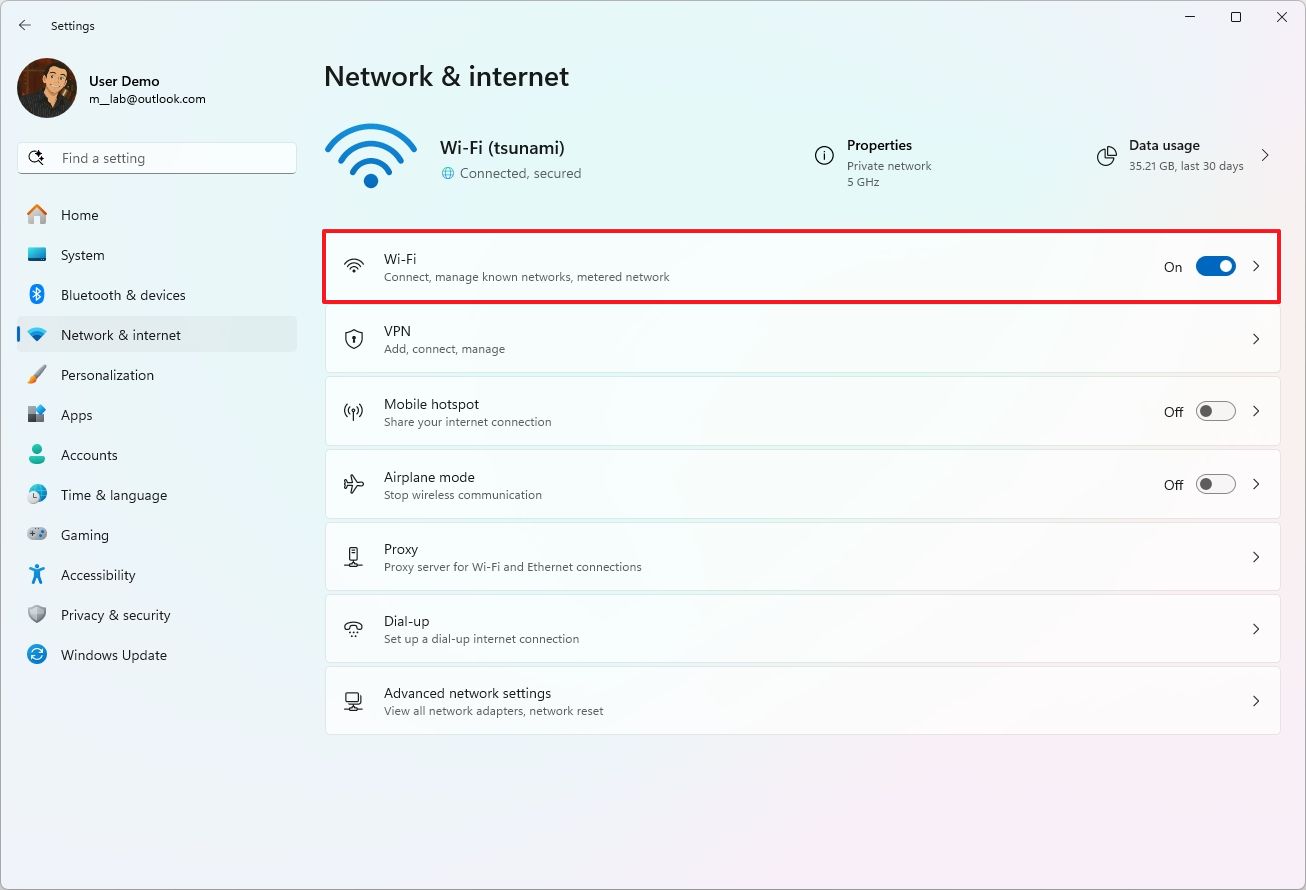
- Turn on the “Random hardware addresses” toggle switch.
Every time you link to a wireless network with your device, the hardware address will alter due to your setup, as each connection triggers a new assignment of the address.
2. Switch to the Public network profile
On Windows 11, adjusting the network profile type enables you to instruct your computer on its behavior when it’s linked to a particular network. In essence, this determines the degree of trust and visibility for that specific network connection.
The operating system categorizes networks into three main profiles: Private, Public, and Domain.
When dealing with networks that you’re unsure about, opting for the “Public” profile is advisable since it offers enhanced security measures designed to shield your device from potential hazards commonly found in public areas like cafes, airports, and hotels, such as public Wi-Fi hotspots. Networks labeled as “Trusted Private” or “Domain” typically have less stringent settings, so it’s best to switch to the “Public” mode in these instances for added protection.
To change the network profile to Public on Windows 11, use these steps:
- Open Settings.
- Click on Network & Internet.
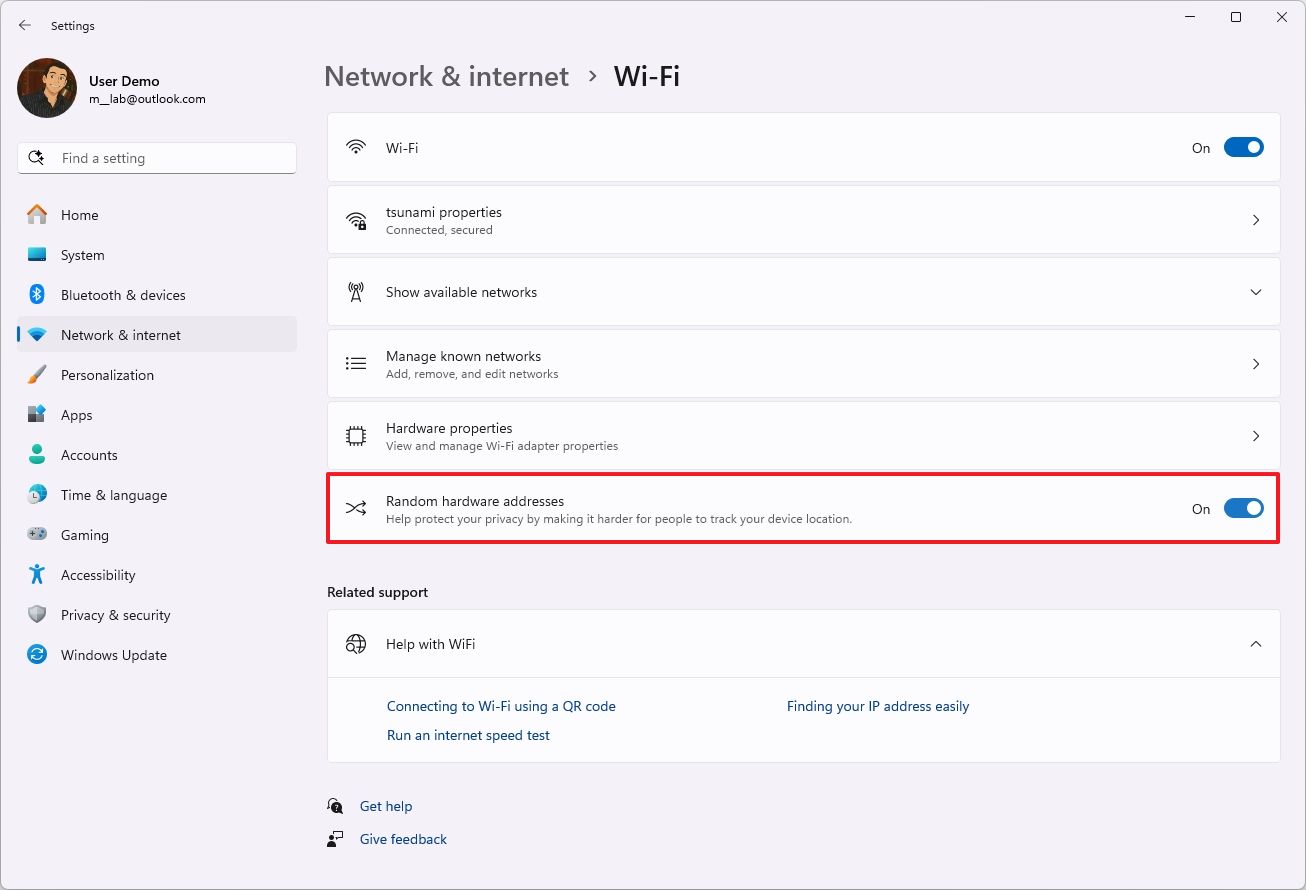
- Click the Wi-Fi page.
- Select the network you want to modify.
- Choose the Public network option.
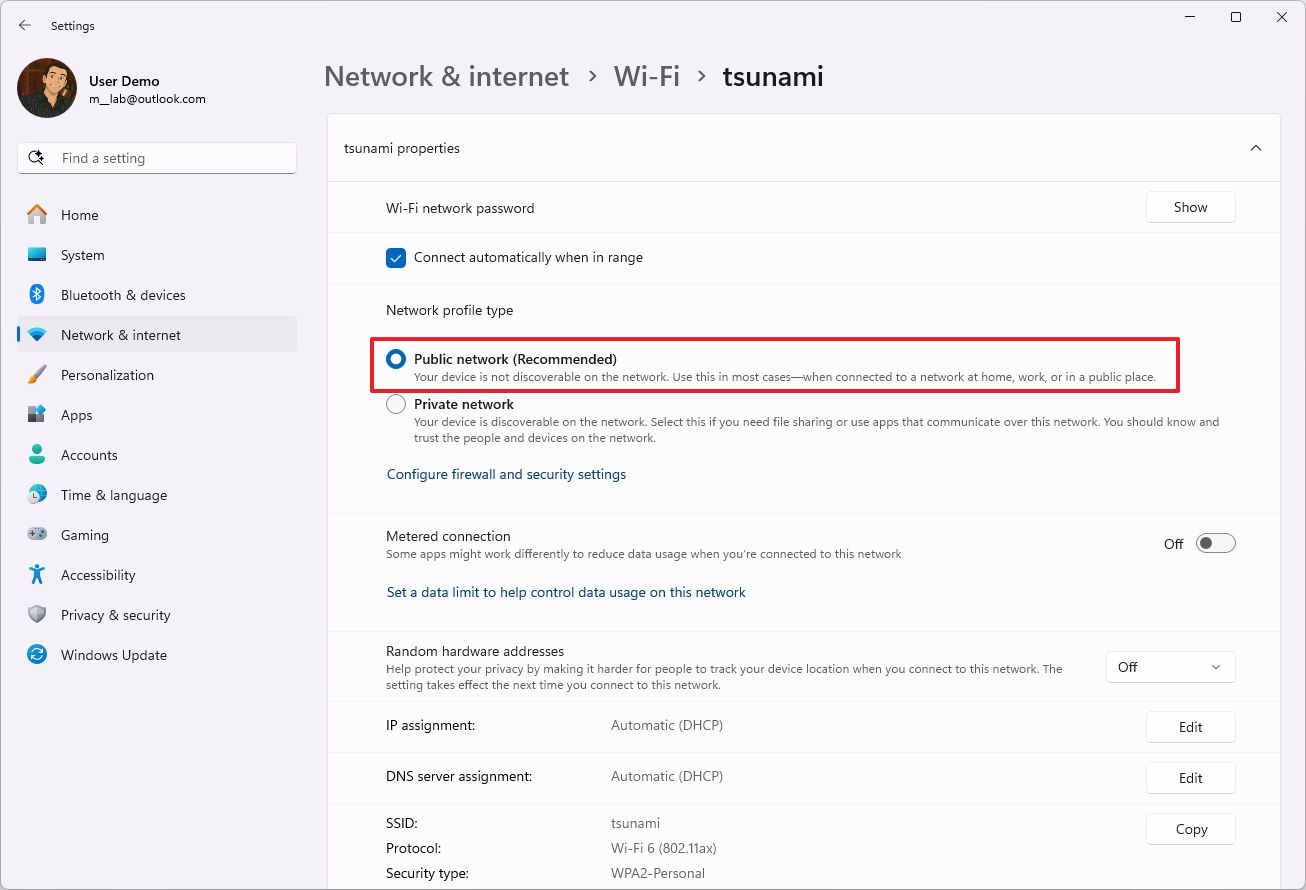
Once you finish the procedures, the “Public network” setting gets activated across the system, ensuring your device remains invisible to other devices. In this mode, Windows 11 disables network discovery, prevents the automatic configuration of network devices and services, and fortifies the firewall with stricter regulations to bar incoming connections.
3. Configure custom DNS settings
Modifying DNS settings on a Windows 11 system while utilizing public Wi-Fi could potentially boost your web browsing performance, strengthen security measures, and expand your access to content online.
Typically, when you join a public Wi-Fi network, the location or internet service provider usually assigns DNS (Domain Name System) services automatically. But these servers might not always offer the fastest response times for DNS lookups, and every query needs to pass through their servers, which could slow down your connection speed and potentially compromise security.
Adjusting your device to employ different Domain Name System (DNS) servers, like Google’s (8.8.8.8), Cloudflare’s (1.1.1.1), or Cisco OpenDNS (208.67.222.222), might allow you to circumvent certain settings and provide a quicker and more secure web browsing experience in the process.
On the other hand, many public networks employ DNS (Domain Name System) filtering to restrict access to specific sites. This means that when using a custom configuration, it might not always be effective, and you may need to conform to their network settings in order to browse the internet.
To use a custom DNS configuration to connect to the public wireless network, use these steps:
- Open Settings.
- Click on Network & internet.
- Click the Wi-Fi page.
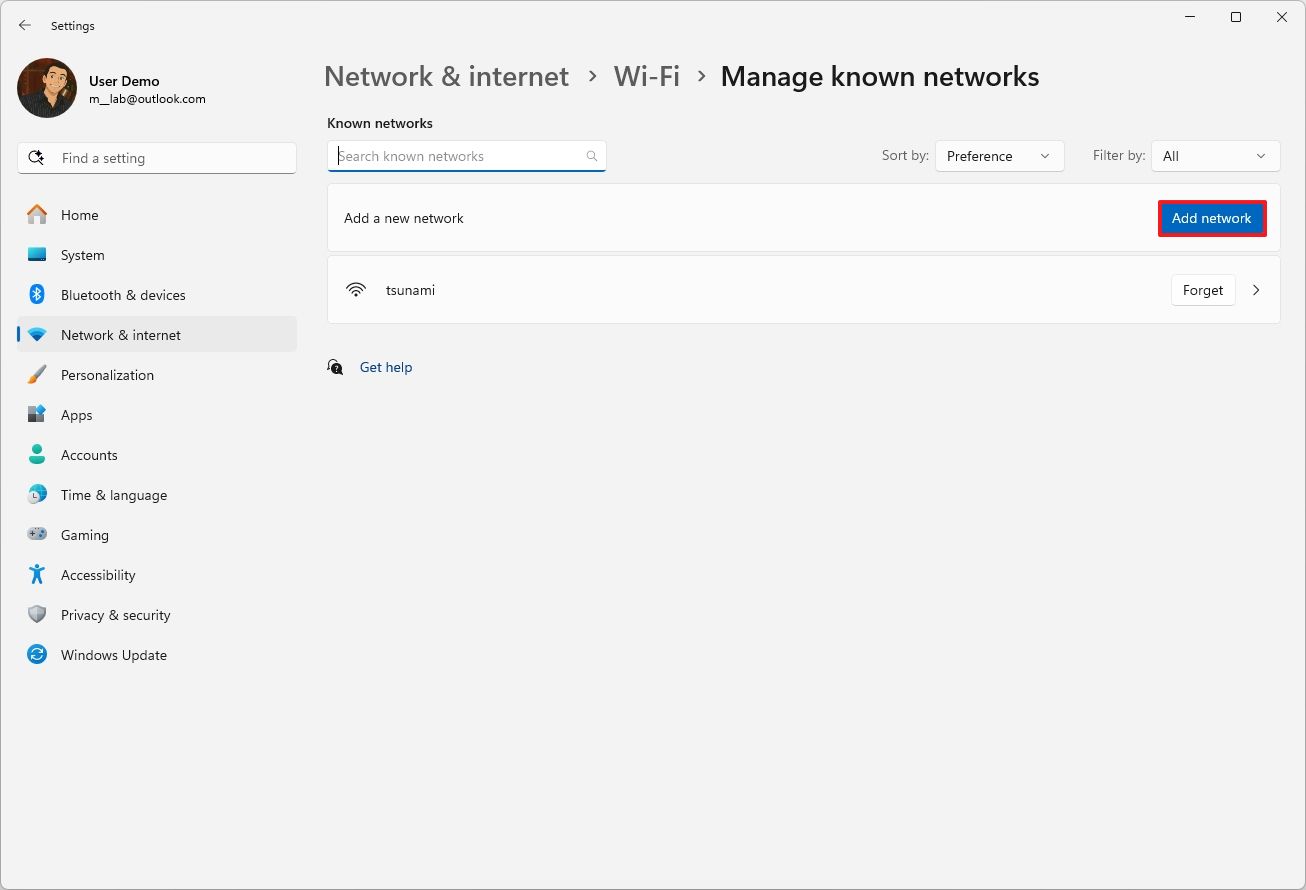
- Click on the “Manage known networks” setting.

- Click the Add network button.
- Confirm the wireless name in the “Network name” setting.
- Choose the security type (such as WPA2-Personal AES) in the “Security type” setting.
- Quick tip: If you can’t complete this configuration, it’s best to connect to the access point and then open the network properties for that connection and change the DNS settings from the “Manage known networks” page.
- Confirm the connection password.
- (Optional) Clear the Connect automatically option.
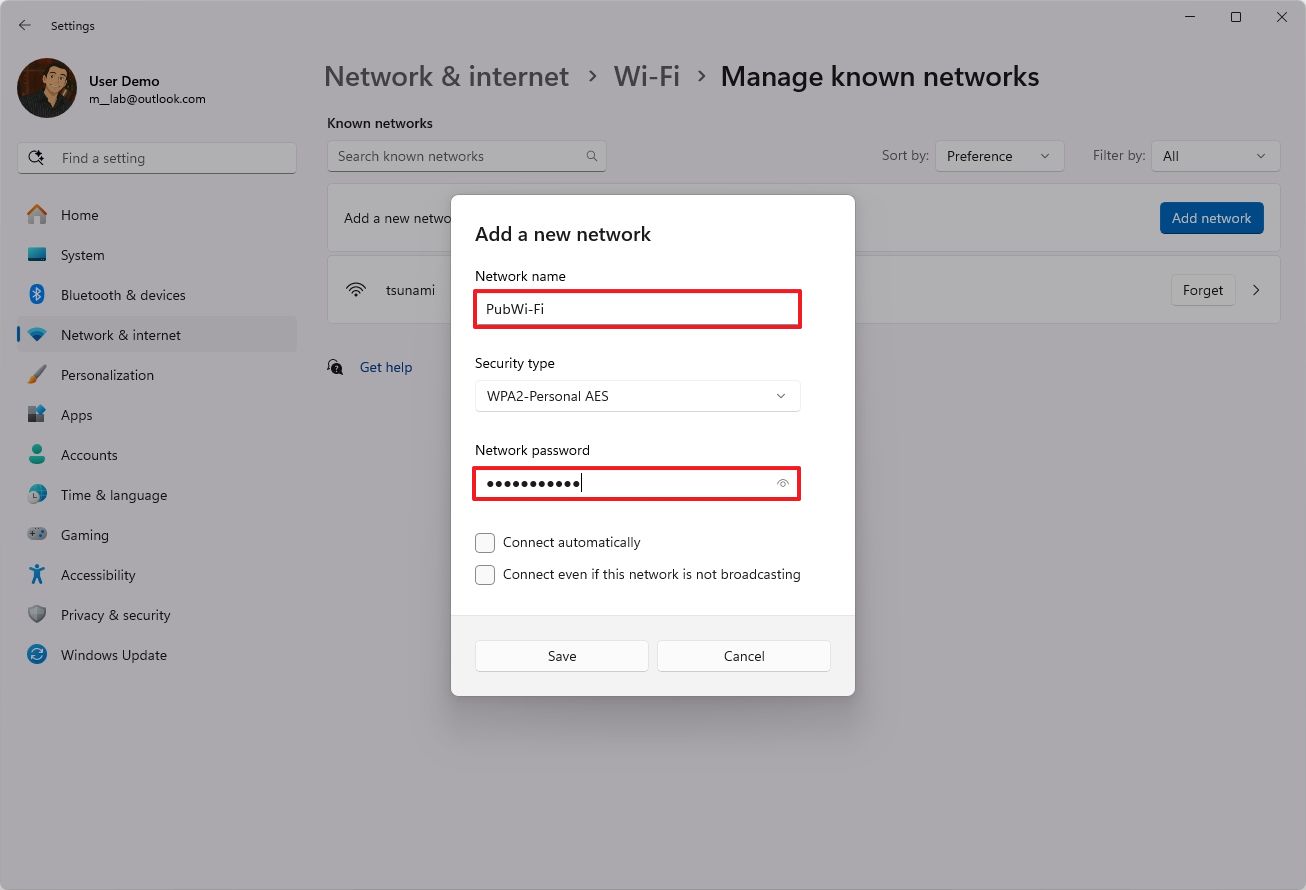
- Click the Save button.
- Click on the newly added network.
- Click the Edit button for the “DNS server assignment” setting.
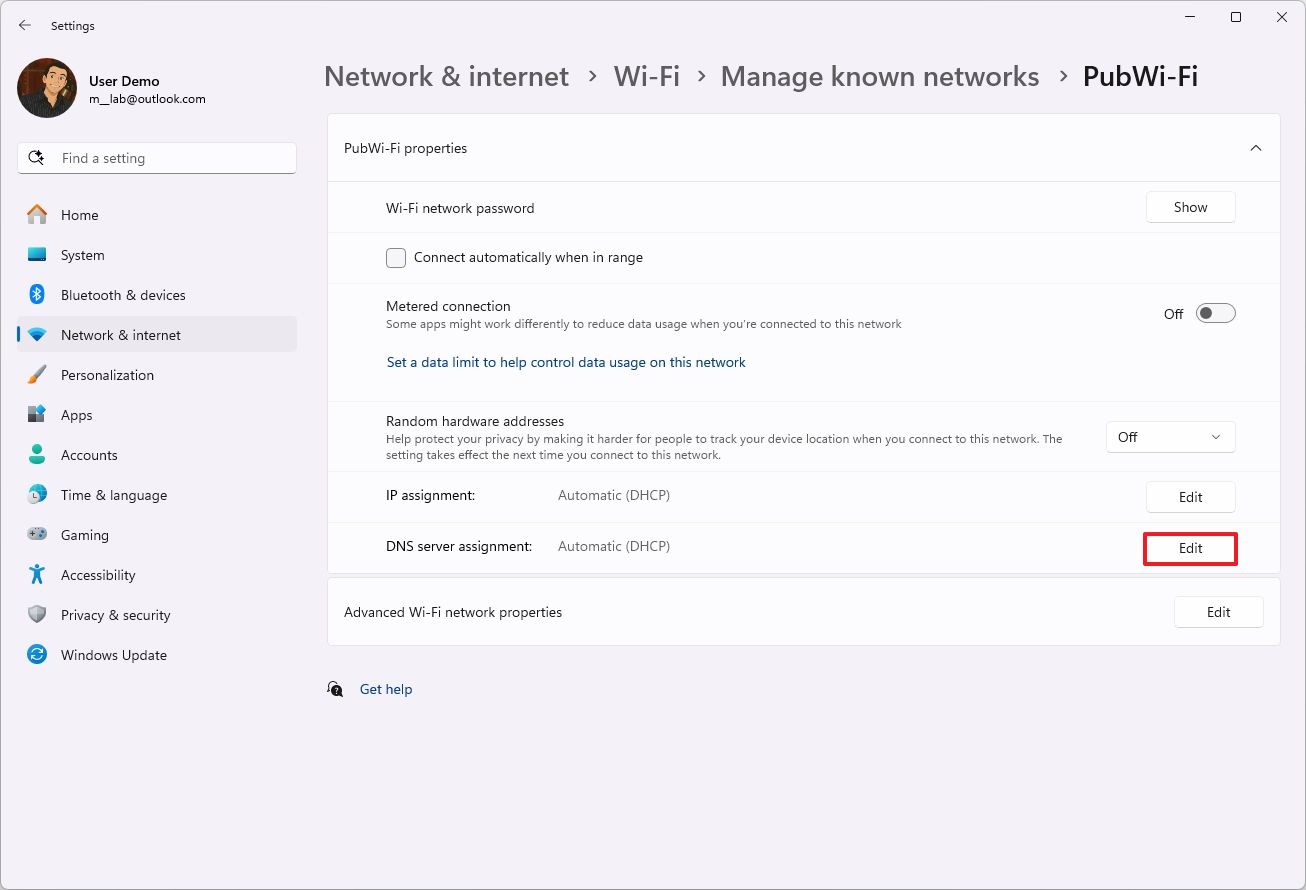
- Select the Manual option from the drop-down menu.
- Turn on the IPv4 toggle switch.
- Confirm the primary DNS address in the “Preferred DNS” setting. For example, to use Cloudflare, Google Public DNS, or Cisco OpenDNS, use these settings:
- Cloudflare: 1.1.1.1
- Google Public DNS: 8.8.8.8
- OpenDNS: 208.67.222.222
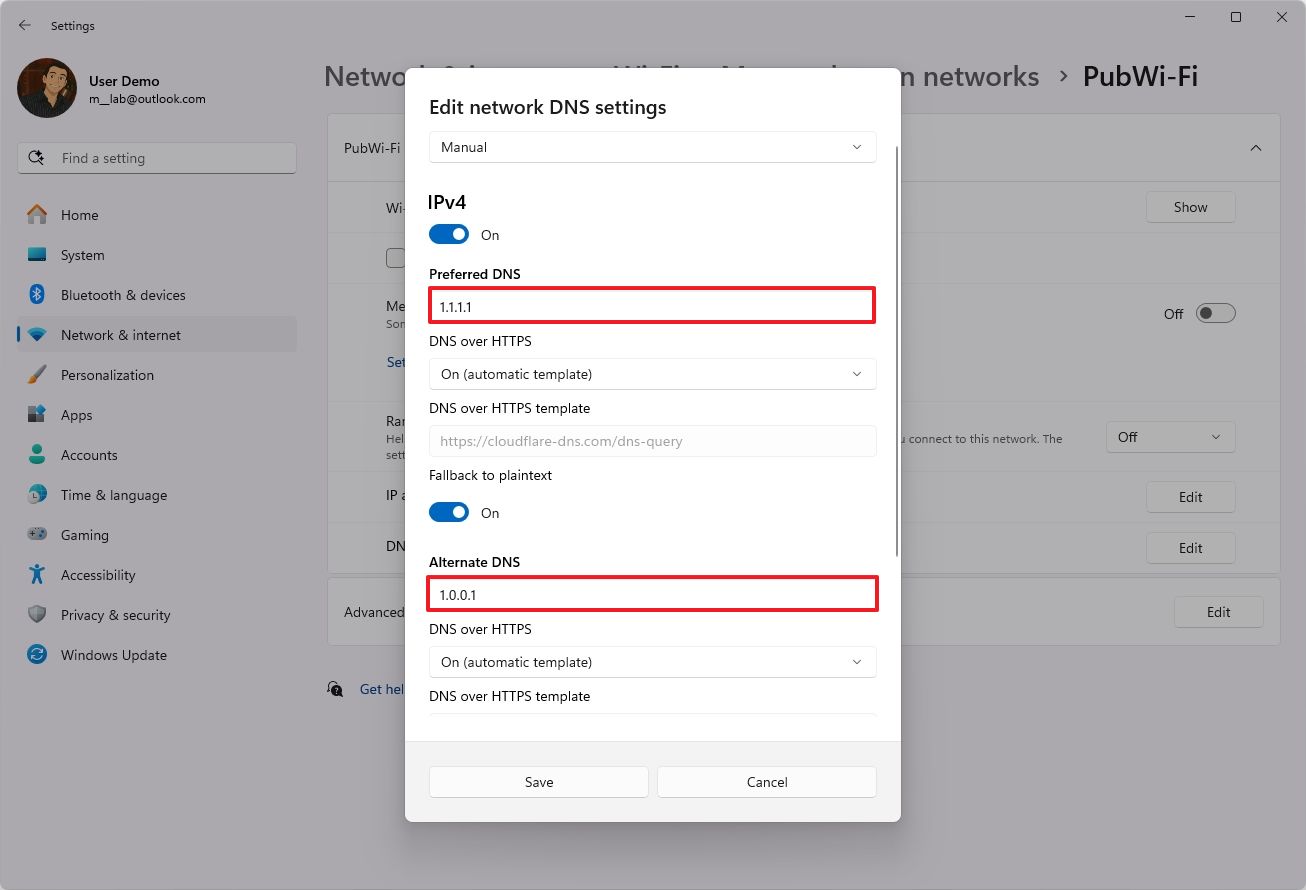
- (Optional) Select the encryption option in the “On (automatic template)” setting.
- (Optional) Turn on the “Fallback to plaintext” toggle switch.
- Quick note: DNS over HTTPS (DoH) is a network protocol that encrypts DNS queries using the standard Hypertext Transfer Protocol Secure (HTTPS) protocol to protect DNS queries, resulting in better security and privacy while browsing the web. You will only be able to enable this feature if you have specified a DNS address that supports encryption.
- Confirm the secondary DNS address in the “Alternate DNS” setting. You can use one of the secondary addresses:
- Cloudflare: 1.0.0.1
- Google Public DNS: 8.8.4.4
- OpenDNS: 208.67.220.220
- (Optional) Select the encryption option in the “Alternative DNS encryption” setting.
- Click the Save button.
After following the instructions, your computer will utilize personalized DNS addresses for its queries, enhancing your online experience by adding a touch of privacy.
4. Connect to the internet via VPN
An alternative method to enhance the security of your device while using a public Wi-Fi network on Windows 11 is by employing a Virtual Private Network (VPN).
Using a VPN establishes a secure, encrypted pathway for your online data. In simple terms, this means any information you send or receive is jumbled up, rendering it indecipherable to anyone who might be monitoring a shared Wi-Fi connection.
Leaving your data unencrypted makes it simple for others to seize confidential info like passwords, banking details, and private communications, since they won’t have any protection against being accessed without authorization.
In most cases, you have at least two methods to establish a VPN connection. Firstly, you might link up with your organization’s VPN system, which is often tailored for remote access. Secondly, there are numerous paid VPN services available on the internet, like NordVPN, ExpressVPN, and Surfshark. Lastly, if you’re on a budget, you can explore free options too, such as the complimentary VPN service provided by Opera browser.
To configure a VPN connection, use these steps:
- Open Settings.
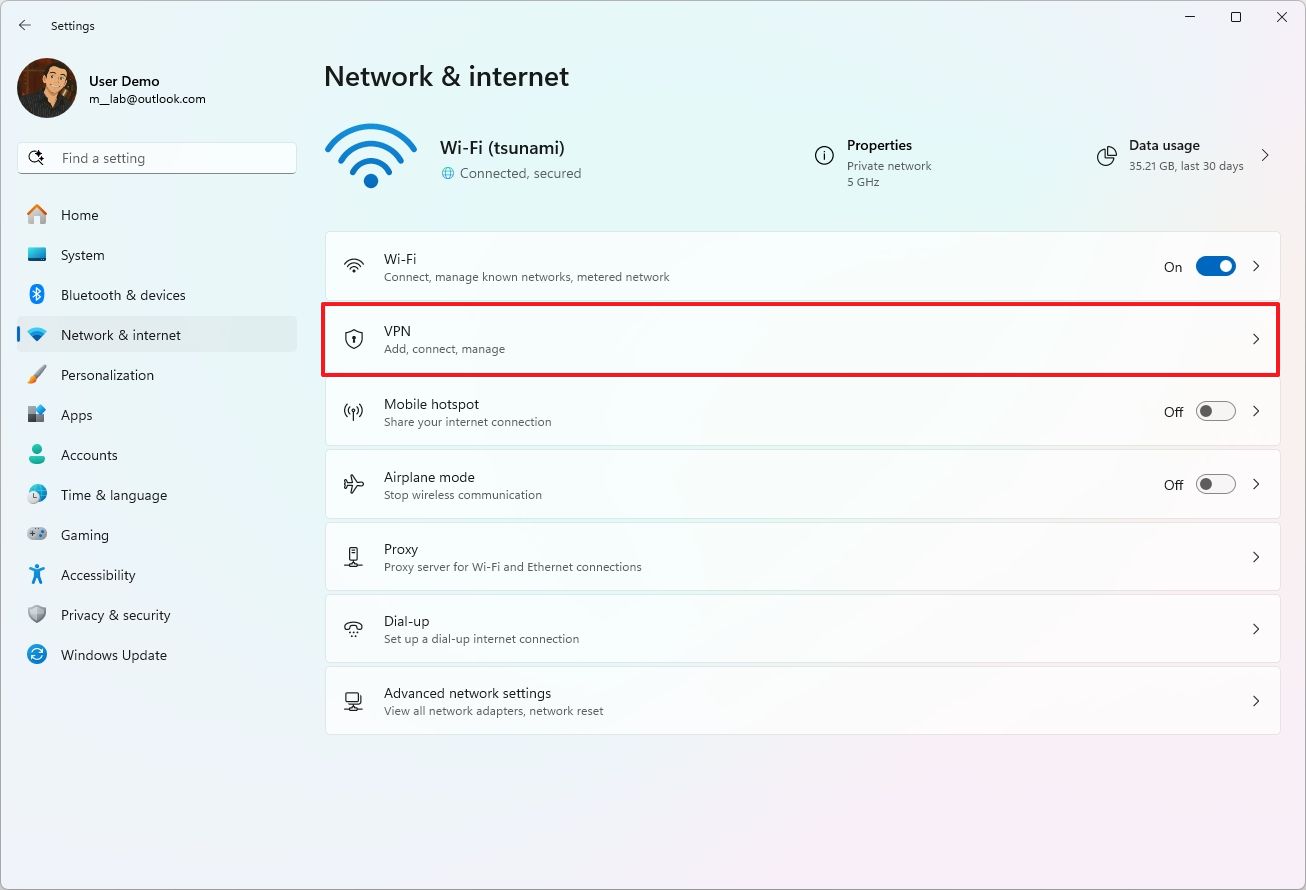
- Click on Network & internet.
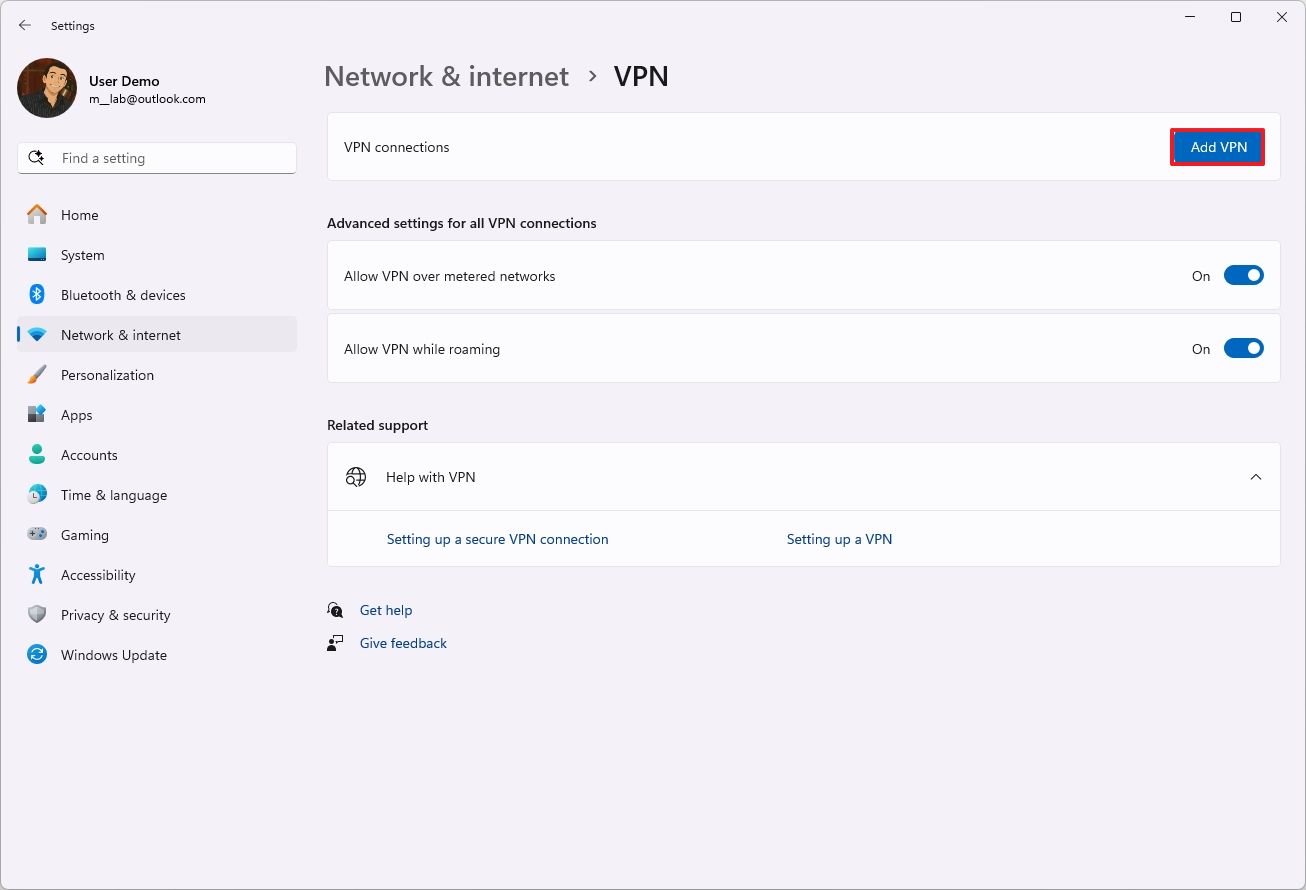
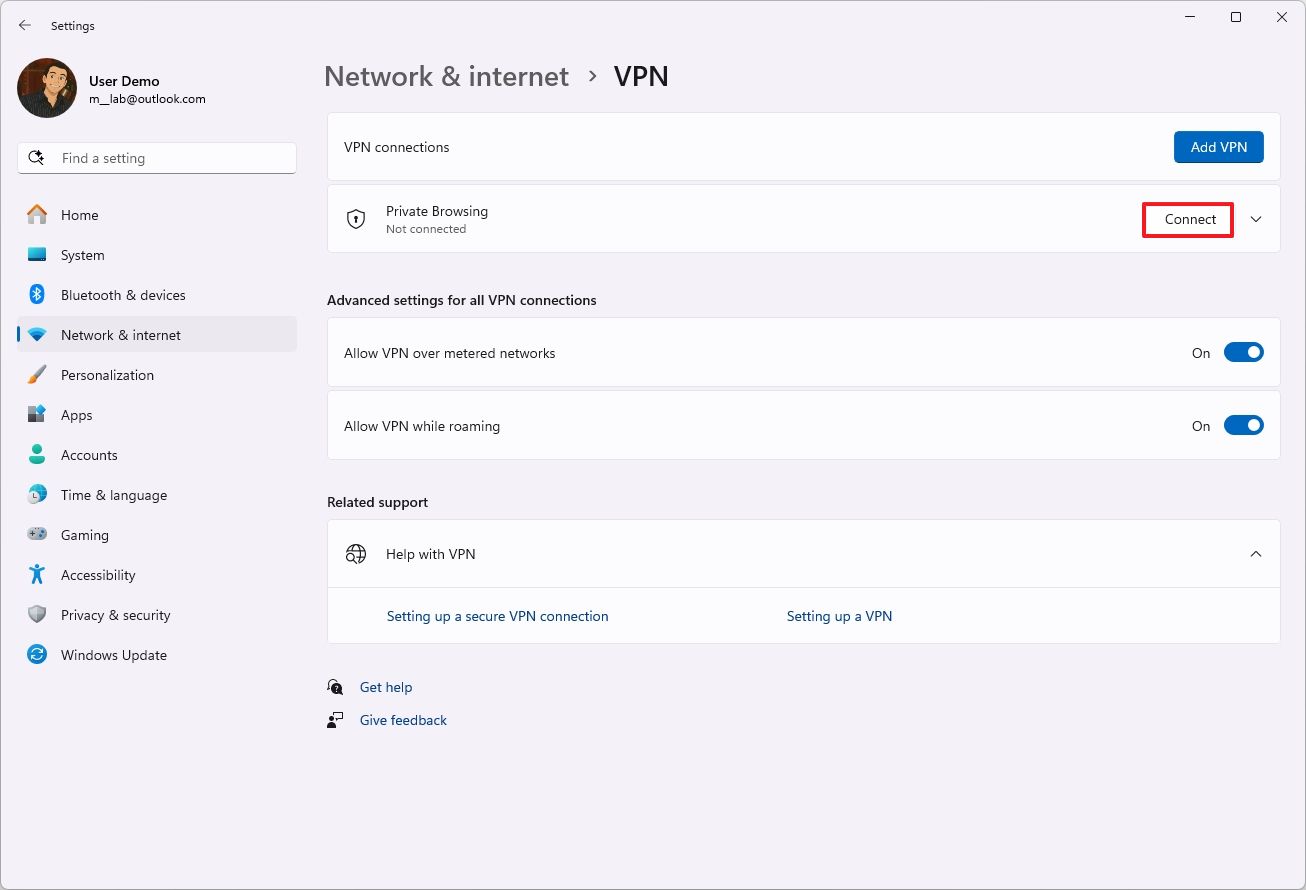
- Click the VPN page.
- Click the Add VPN button.
- Select the Windows (built-in) option using the “VPN provider” setting.
- In the “Connection name” setting, enter a name to identify the connection — for example, you can use a service name like IPVanish, Private Internet Access, etc.
- In the “Server name or address” setting, enter the address of the VPN server — for example, vpnserver.com or 134.123.123.24.
- Use the “VPN type” drop-down menu and select the Automatic option or the protocol required to connect to the particular VPN server.
- Select the authentication method using the “Type of sign-in info” drop-down menu.
- Confirm the username and password if you select the “Username and password” option.
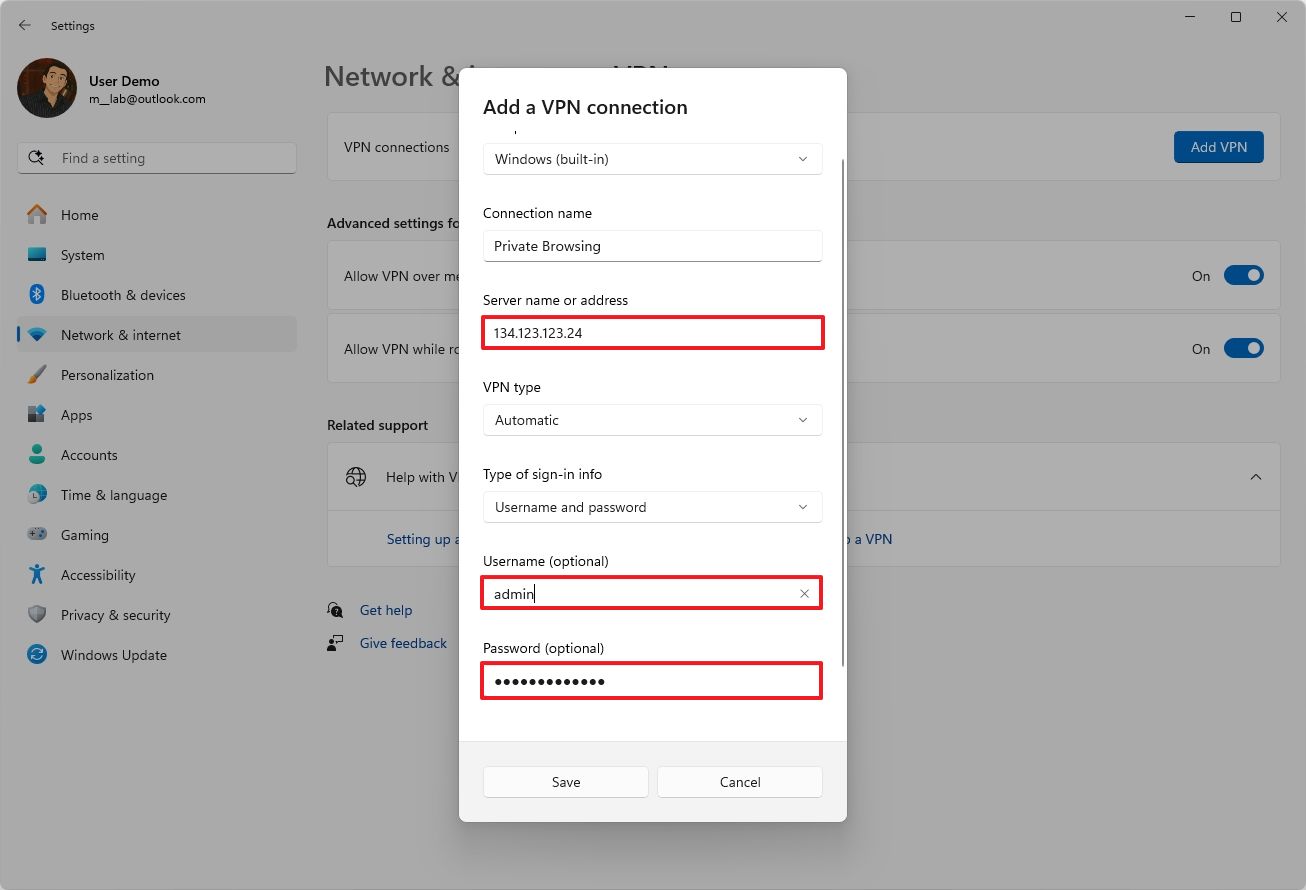
- Click the Save button.
After finishing the given steps, you should link up with the public Wi-Fi network and a VPN server to ensure your web browser remains confidential.
From the “Settings” menu, navigate to “Network & Internet” and then locate the “VPN” section. Simply hit the “Connect” button there to establish a VPN connection.
As an alternative, you can find the VPN button in the Taskbar’s network icon, pick a connection thereafter, and then tap on “Connect”.

As an enthusiast, I’d recommend you download the Opera installer if you’re seeking a free VPN service. Follow the straightforward on-screen instructions to proceed smoothly.
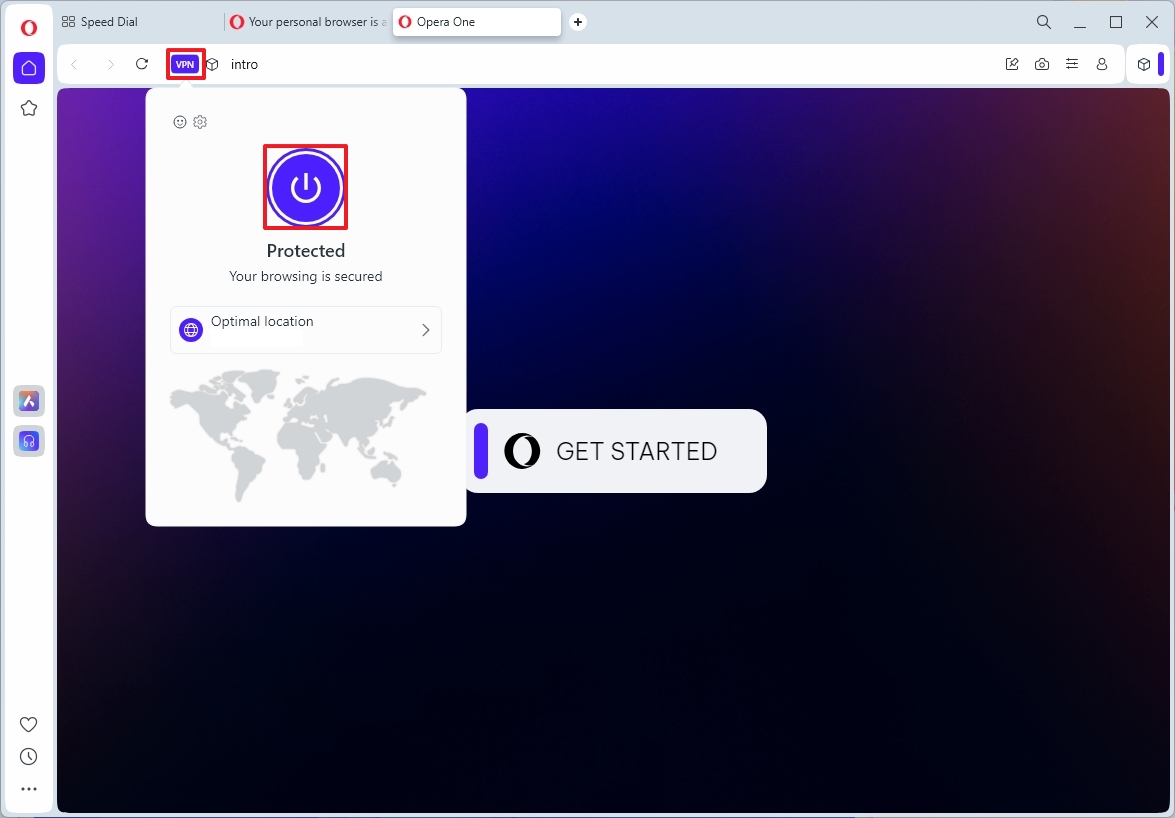
Once you’ve completed the setup, open the browser, find the “VPN” button, press it to turn on, and then commence browsing with an added layer of privacy.
5. Set up a mobile hotspot instead
To maintain optimal online privacy when you’re out and about, it’s advisable to rely on a personal mobile hotspot.
Sharing your internet connection with other devices, such as computers and smartphones, can be done effortlessly via a mobile hotspot – this functionality doesn’t require the installation of extra software or any special setup actions.
Instead of using the built-in hotspot function on Windows 11, you might prefer to utilize the tethering option from your iPhone or Android device for this particular instance.
Typically, mobile providers offer a certain amount of data for their hotspot feature, but on certain plans, you might need to pay extra for it. So, always remember to confirm with your service provider before utilizing this feature.
As a tech-savvy individual, let me walk you through the straightforward steps to establish a mobile hotspot via my Android device and connect it with my Windows 11 PC. Here’s how I do it:
1. First, access the settings on your Android device by tapping the gear icon in the notification panel or going to the Settings app.
2. Navigate to the Network & Internet section, then select Hotspot & tethering.
3. Enable the mobile hotspot by toggling the switch at the top of the screen.
4. Give your hotspot a name and password for security purposes.
5. On your Windows 11 computer, click on the Wi-Fi icon in the taskbar and choose the newly created network from the list of available networks.
6. Enter the password you set up on your Android device to complete the connection.
7. Once connected, you’ll be able to browse the internet using your Android data plan through your Windows 11 PC!
- Open your Android phone.
- Open the Settings app.
- Tap on Network & internet.
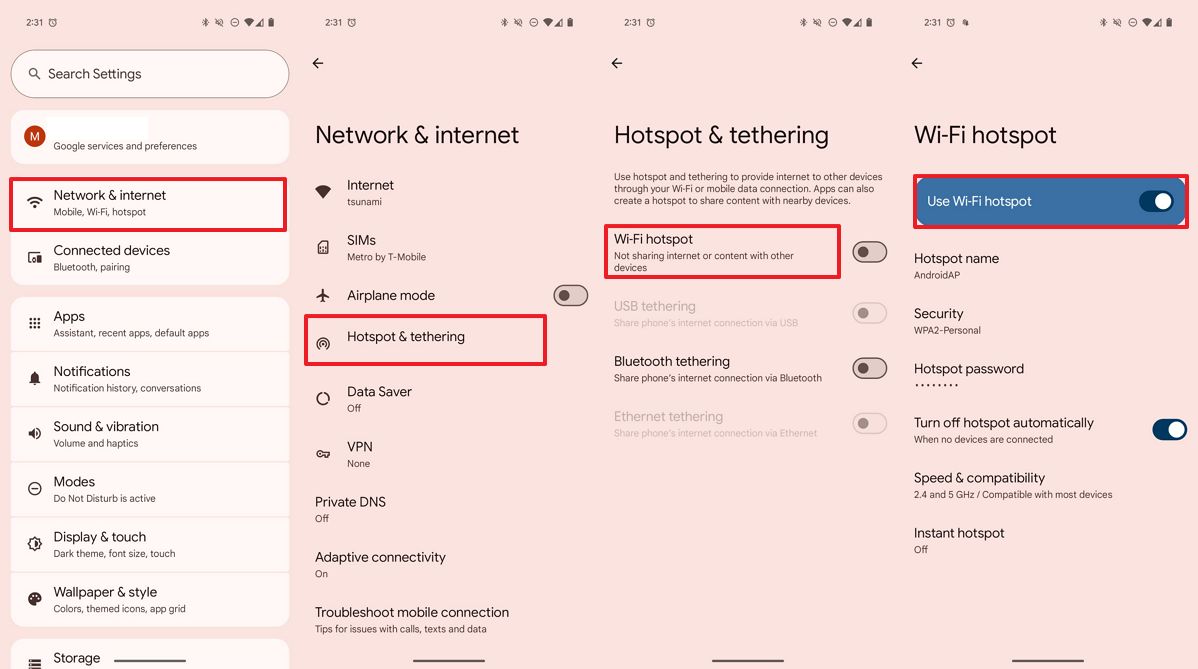
- Tap on Hotspot & tethering.
- Tap on the Wi-Fi hotspot setting.
- (Optional) Tap on the Hotspot name setting.
- Confirm the name of the wireless access point.
- Tap on OK.
- Tap the Hotspot password setting.
- Confirm a password for the access point.
- Tap on OK.
- Turn on the “Use Wi-Fi hotspot” toggle switch.
After finishing the given steps, you’ll be able to link up with the hotspot directly from the Quick Settings dropdown menu, similar to how you usually connect to any Wi-Fi network.
You can accomplish this by following these steps:
1. Locate the network icon in your System Tray, or use the keyboard shortcut ‘Windows key + A’.
2. Click on the button next to the wireless icon that appears.
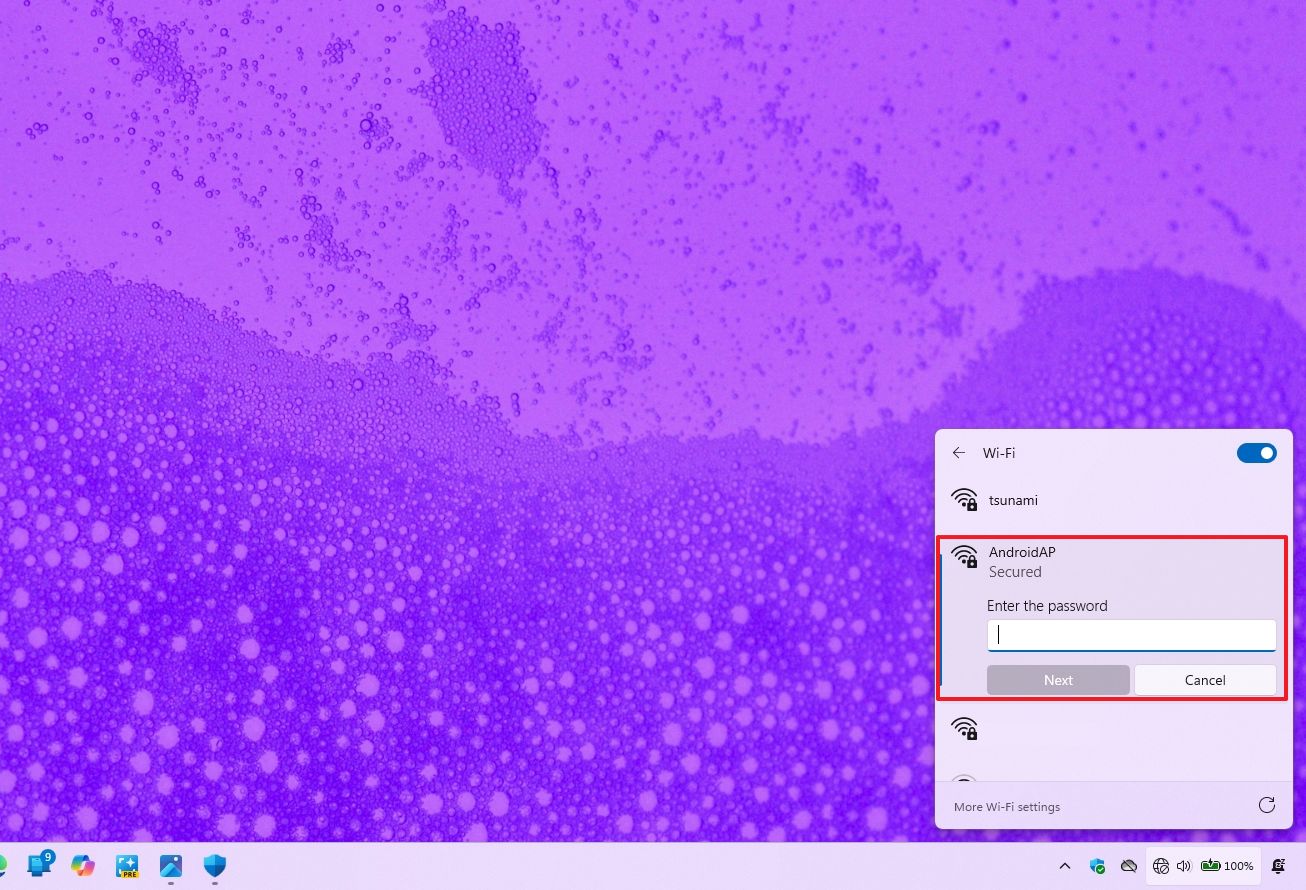
3. Select your hotspot network from the list of available networks.
4. Click the ‘Connect’ button.
5. Enter your password when prompted.
6. Finally, click the ‘Next’ button to complete the connection process.
In addition to these recommendations, remember to regularly update your system software, create robust passwords for your accounts, and if feasible, abstain from handling confidential data over public networks as much as you can.
More resources
Read More
- Best Race Tier List In Elder Scrolls Oblivion
- Becky G Shares Game-Changing Tips for Tyla’s Coachella Debut!
- Elder Scrolls Oblivion: Best Pilgrim Build
- Jelly Roll’s 120-Lb. Weight Loss Leads to Unexpected Body Changes
- Gold Rate Forecast
- Carmen Baldwin: My Parents? Just Folks in Z and Y
- Yvette Nicole Brown Confirms She’s Returning For the Community Movie
- Rachel Zegler Claps Back at Critics While Ignoring Snow White Controversies!
- Meet Tayme Thapthimthong: The Rising Star of The White Lotus!
- Elder Scrolls Oblivion: Best Thief Build
2025-04-23 17:12