As a seasoned Outlook user with years of scheduling under my belt, I must say that customizing your calendar to fit your lifestyle is like tailoring a suit to perfection. Here’s a step-by-step guide on how to do just that:
On Windows 11, Microsoft is saying goodbye to the traditional Mail and Calendar apps from Windows 10 and moving towards a single, integrated interface for managing emails and calendars instead. This new interface is intended to eventually supersede the desktop version of Outlook that comes with Microsoft 365 (Office) applications.
As a long-time user of Outlook, I’ve always appreciated its convenience for managing my digital communications across multiple platforms. However, I often found myself switching between the web version and other applications to access my emails when offline or to manage various accounts simultaneously. That’s why I am genuinely excited about the new desktop app that offers an identical experience to Outlook online but with a dedicated application wrapper for seamless desktop use.
With the latest Outlook for Windows 11, the goal is to provide a unified user experience across all devices and online platforms. This approach enables the company to streamline the development process and roll out improvements and new features faster.
Moreover, this application is designed to assist you in writing more effective emails by leveraging AI capabilities, and by incorporating the Microsoft Editor, it provides advanced editing, spell checking, and autocomplete suggestions for a smoother writing experience.
The enhanced calendar functionality brings about several upgrades, including integration with Google Calendar, handling of multiple time zones, weather forecasts, and options for sharing calendars. Furthermore, the application provides you with the ability to access your contacts via the People service, as well as online use of Microsoft 365 tools such as Word, Excel, To Do, and additional resources.
In this step-by-step tutorial, I will provide you with a summary of the latest email application designed for Windows 11, along with instructions to set up essential preferences.
Beginner’s guide to the Outlook app for Windows 11g
As someone who has gone through countless software updates over the years, I can confidently say that this guide is a game-changer. It provides step-by-step instructions for transitioning to the latest version of the program, offers an in-depth tour of the revamped interface, and highlights essential settings for Accounts, General, Mail, and Calendar. With my past experiences in mind, I highly recommend following these instructions to make the most of this upgrade, streamline your workflow, and take advantage of all the new features this software has to offer.
To adjust the settings for an account linked with the app, it’s essential to choose the specific account first before proceeding with any configurations.
Switch to the new version
To switch to the new experience, use these steps:
- Open the Mail or Outlook app.
- Click the “Try the New Outlook” toggle switch.
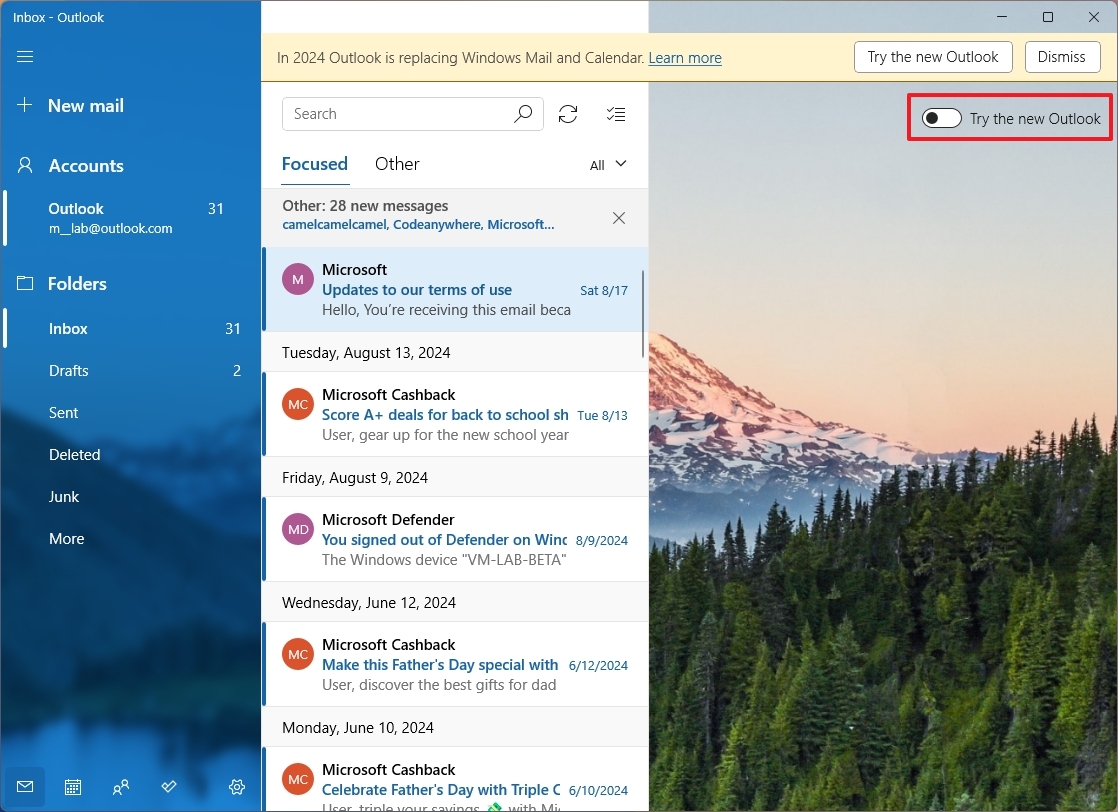
- Click the Next button.
- Select the “No, don’t send optional data” option (if applicable).
- Click the Accept button.
- Click the Continue button.
- Click the Open Outlook button.
Once you complete the steps, you will have access to the new Outlook experience.
Navigating Outlook for Windows 11
If you’ve been utilizing the web-based Outlook or the desktop software from your Microsoft 365 membership, you’re already familiar with the new app for Windows 11. But if you’re transitioning from older Mail & Calendar apps, you might need to spend some time learning how it works.
After switching to the updated application, you’ll find a navigational panel on the left side which allows you to move between various services. These include Email, Calendar, Contacts, Tasks, and some applications from Microsoft 365 like Word, Excel, and PowerPoint.
The only issue with this page is that the Microsoft 365 apps open on the web version instead of the desktop version. (This makes no sense to me because if I have installed the Microsoft 365 apps, it can be assumed that I want to use those apps.)
On the top, you have the ribbon with the different tabs, including “Home,” “View,” and “Help.”
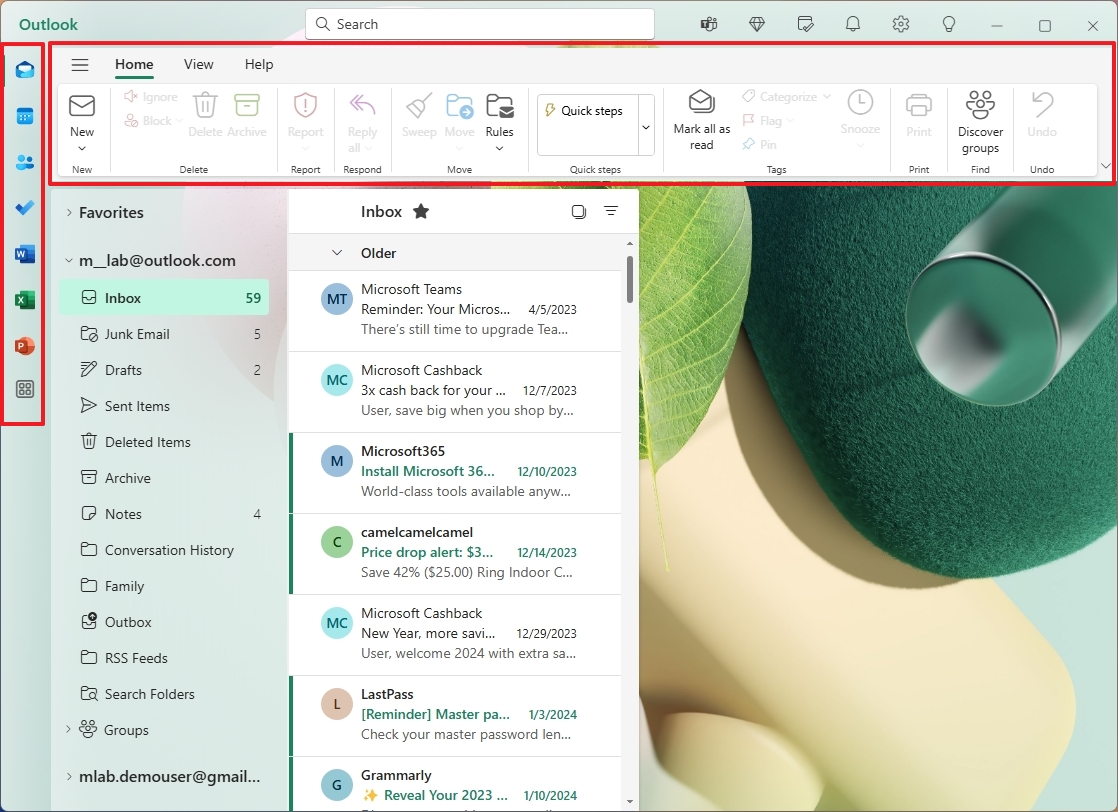
The main “Home” tab provides the essential functions for composing a fresh email and also offers the choices to delete, flag, respond, forward, or adjust settings.
Other options include “Quick steps,” “Mark all as read,” “Print,” “Undo,” and more.
In the “View” tab, you can locate various settings to customize message preferences, arrangement, and other aspects.
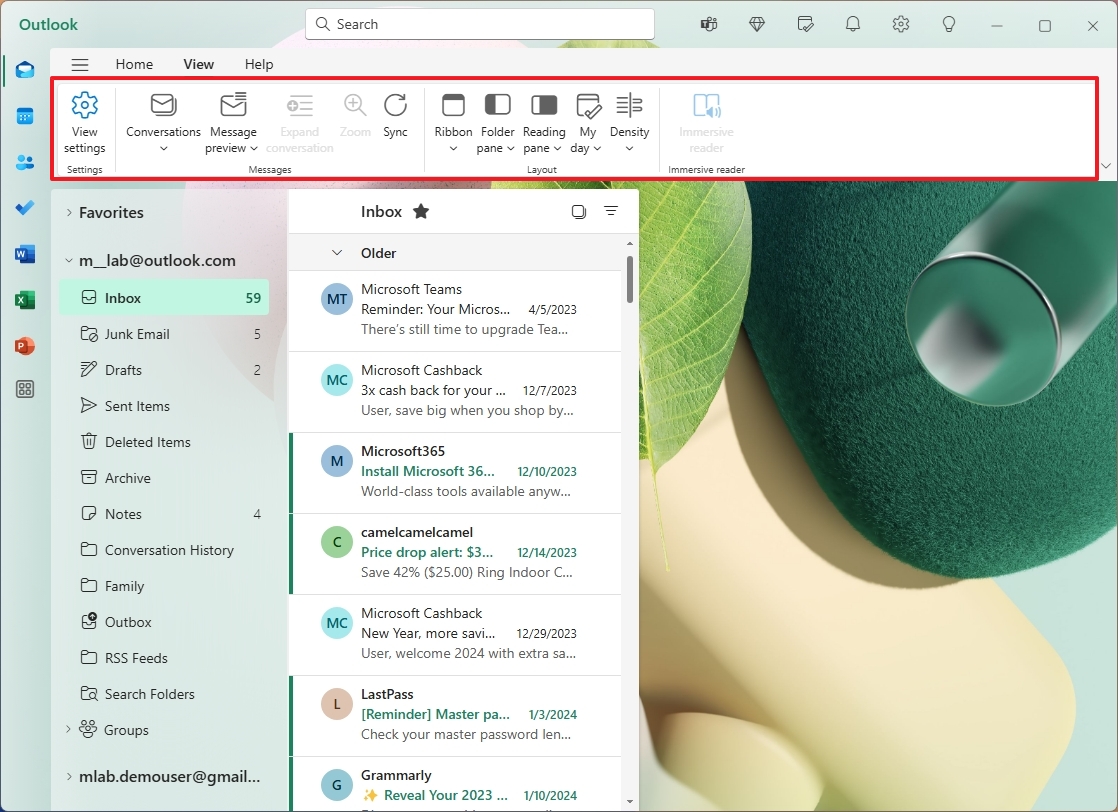
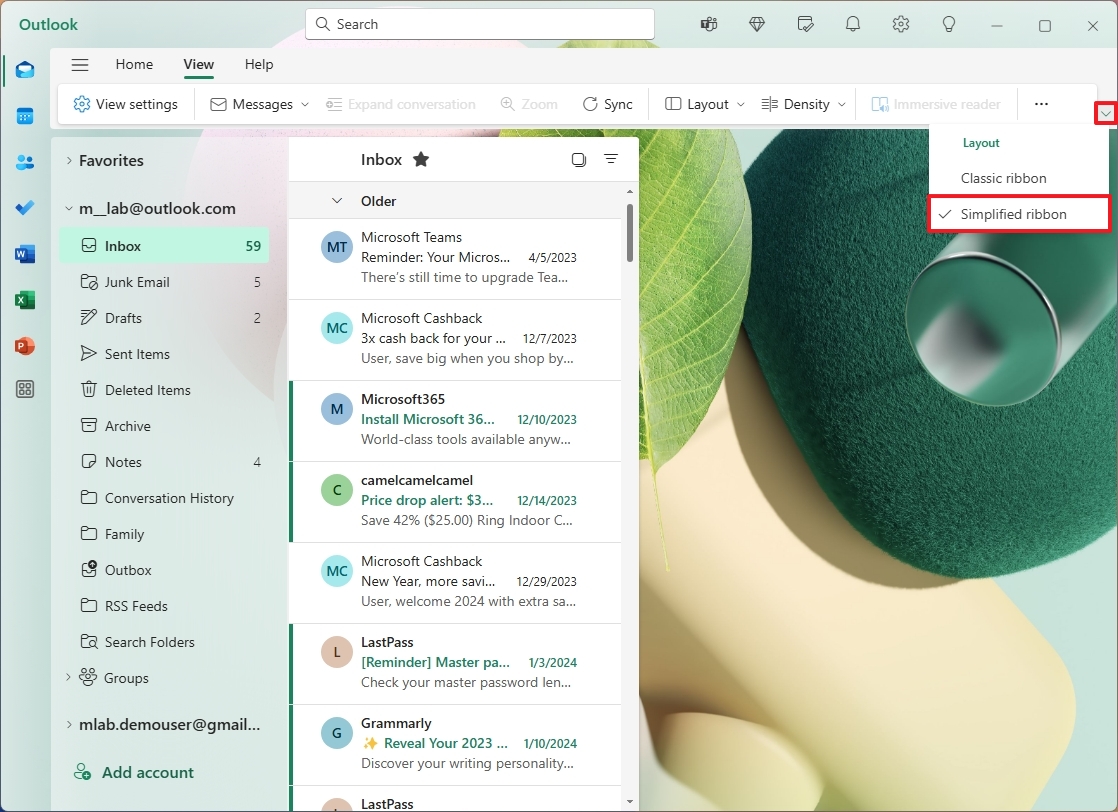
To activate the streamlined version of the ribbon, simply click on the menu located on the right side, then choose the “Simplified Ribbon” option.
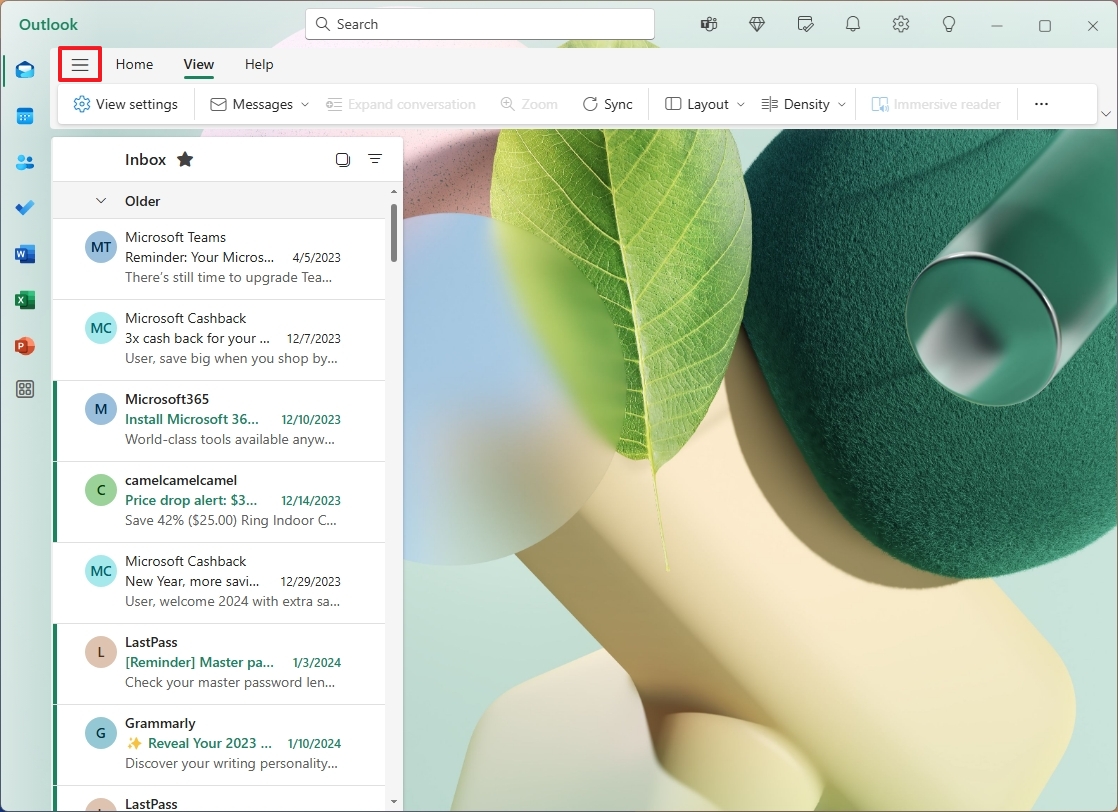
As a user, I can effortlessly switch between my various accounts by checking out the side menu. In case it’s not visible, I might need to click on the hamburger icon located beside the “Home” tab to reveal the hidden menu.
On the left, you can choose a folder which determines what items appear on the right side. When you pick an email, its details will show up in the main area on the right.
Keep in mind that the choices you have will vary depending on whether you’re using the free or premium version of Outlook. Additionally, having a Microsoft 365 subscription won’t grant you access to the Outlook Copilot feature as it requires a separate subscription.
Accounts settings
In the “Accounts” area, you’re able to create or delete accounts, set up auto-responses, customize signatures, categorize emails, and monitor the storage consumption of Microsoft-linked accounts and devices syncing your inbox.
Connect multiple accounts
If you were using an older version of Mail or Outlook on your desktop, it’ll switch to the new version automatically, but only if your account is with Microsoft (like Outlook, Hotmail, and Live). If you use Google or another service, you’ll need to log in again.
To connect additional accounts, use these steps:
- Click the Settings (gear) button.
- Click on Accounts.
- Click the Email accounts setting.
- Click the Add account option.
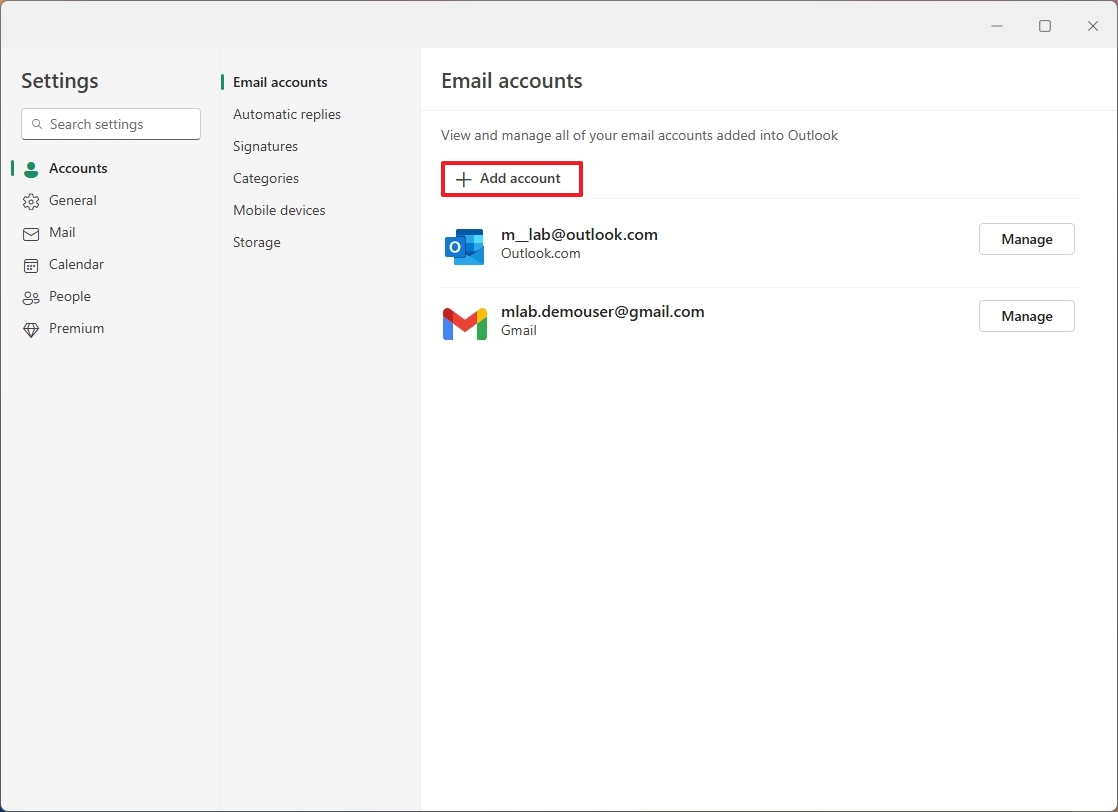
- Confirm your Outlook, Google, Yahoo, iCloud, or IMAP account.
- Click the Continue button.

- Continue with the on-screen directions to complete the setup.
After completing the steps, you must repeat the instructions to connect additional accounts.
Remove email account
To connect additional accounts, use these steps:
- Click the Settings (gear) button.
- Click on Accounts.
- Click the Email accounts setting.
- Click the Manage button for the account.
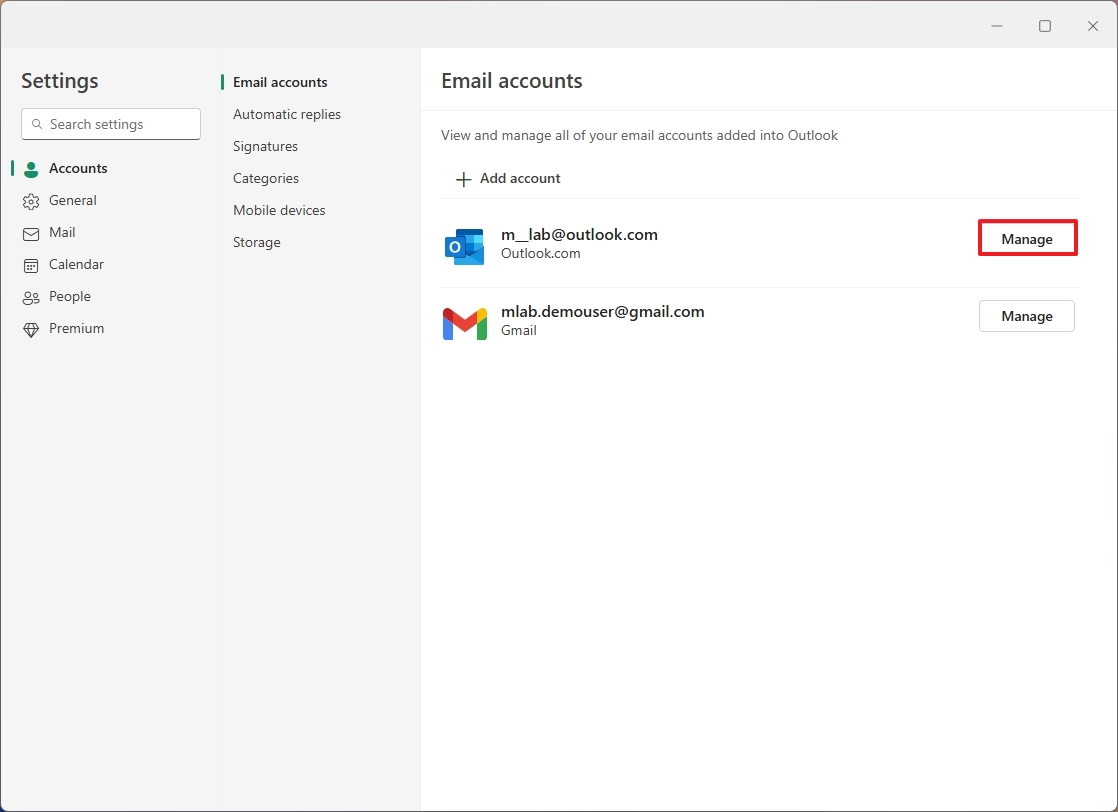
- Click the Remove button.
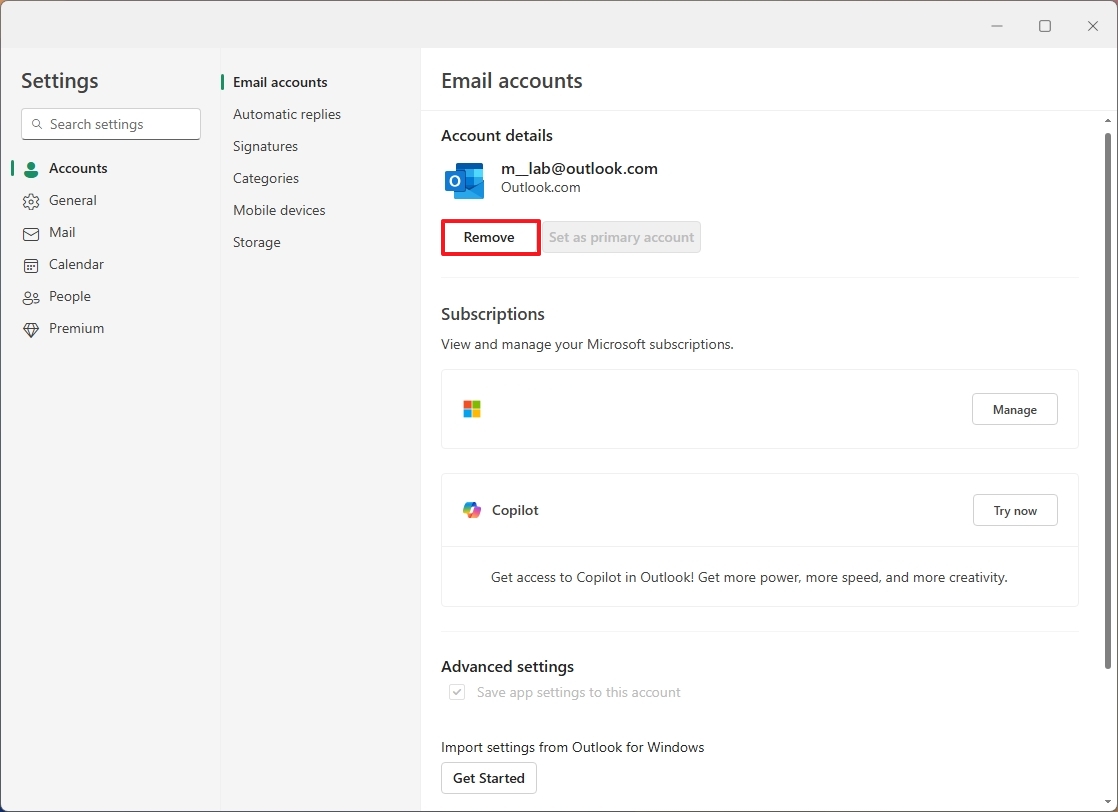
Once you complete the steps, the account will be removed from the app.
Set up automatic replies
To set up automatic replies, use these steps:
- Click the Settings (gear) button.
- Click on Accounts.
- Click the Automatic replies setting.
- Turn on the “Turn on automatic replies” toggle switch.
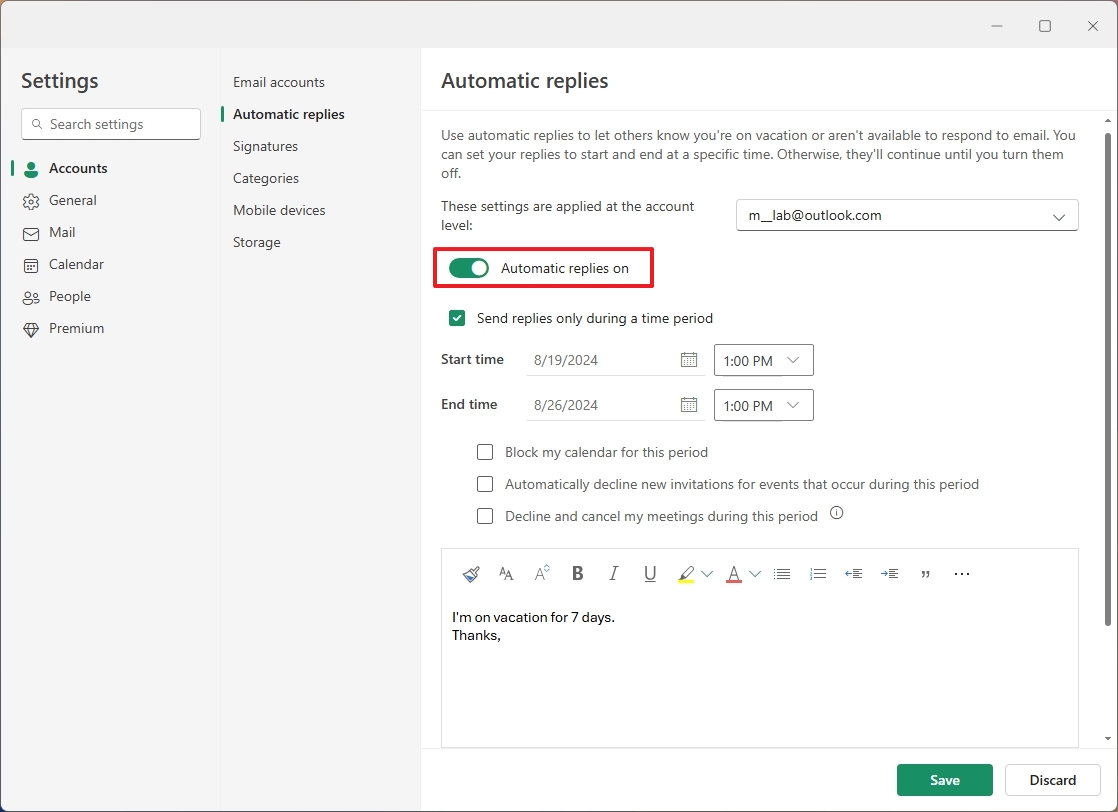
- Check the “Send replies only during a time period” option.
- Confirm the start and end times for sending automatic replies.
- Compose the message to send during the time period.
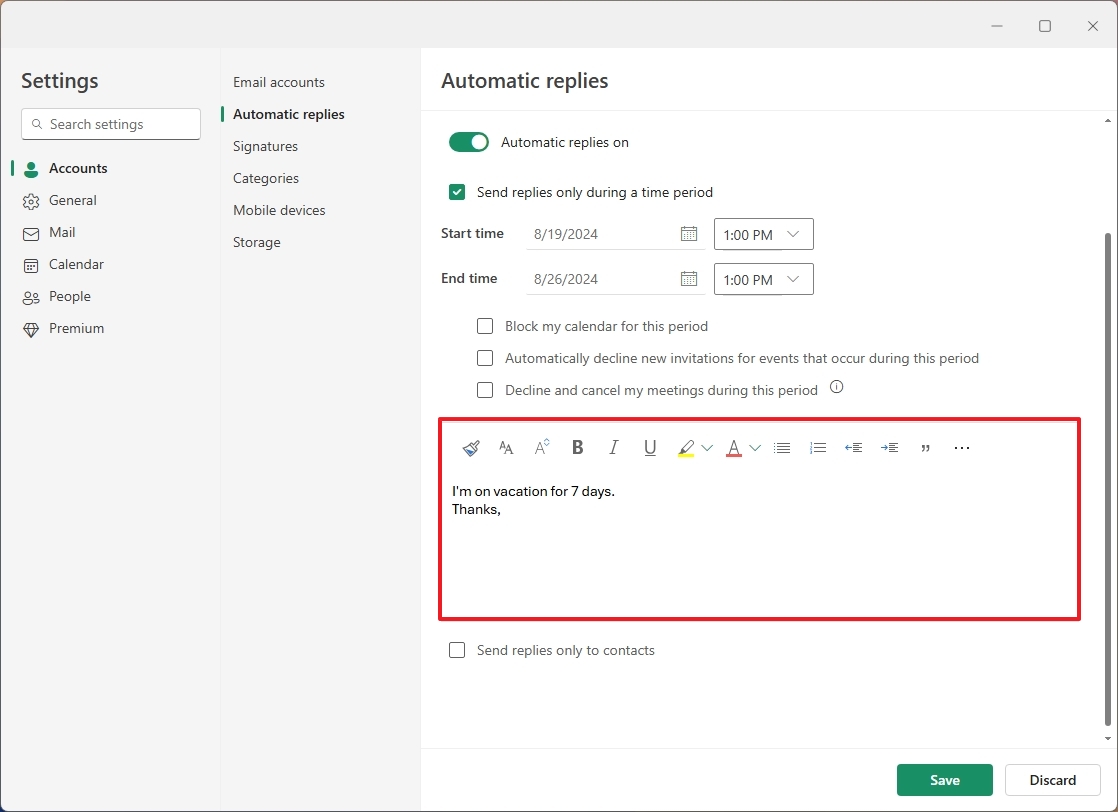
- (Optional) Check the “Send replies only to contacts” option.
- Click the Save button.
Once you’ve finished the required tasks, the application will autonomously respond to any emails you receive.
When setting up your schedule, remember you have the ability to reserve time on your calendar, reject invitations, and even cancel meetings autonomously.
As a long-time user of various digital platforms, I can confidently say that one feature I appreciate immensely is when apps operate seamlessly with my Microsoft account online. This means I don’t have to constantly keep the app running for it to function, which has been a game-changer in my busy life. It allows me to multitask more efficiently and stay connected without being tethered to one device or application. It’s a small convenience, but one that greatly improves my overall digital experience.
Configure email signature
To set up automatic replies, use these steps:
- Click the Settings (gear) button.
- Click on Accounts.
- Click the Signatures setting.
- Click the New Signature option.
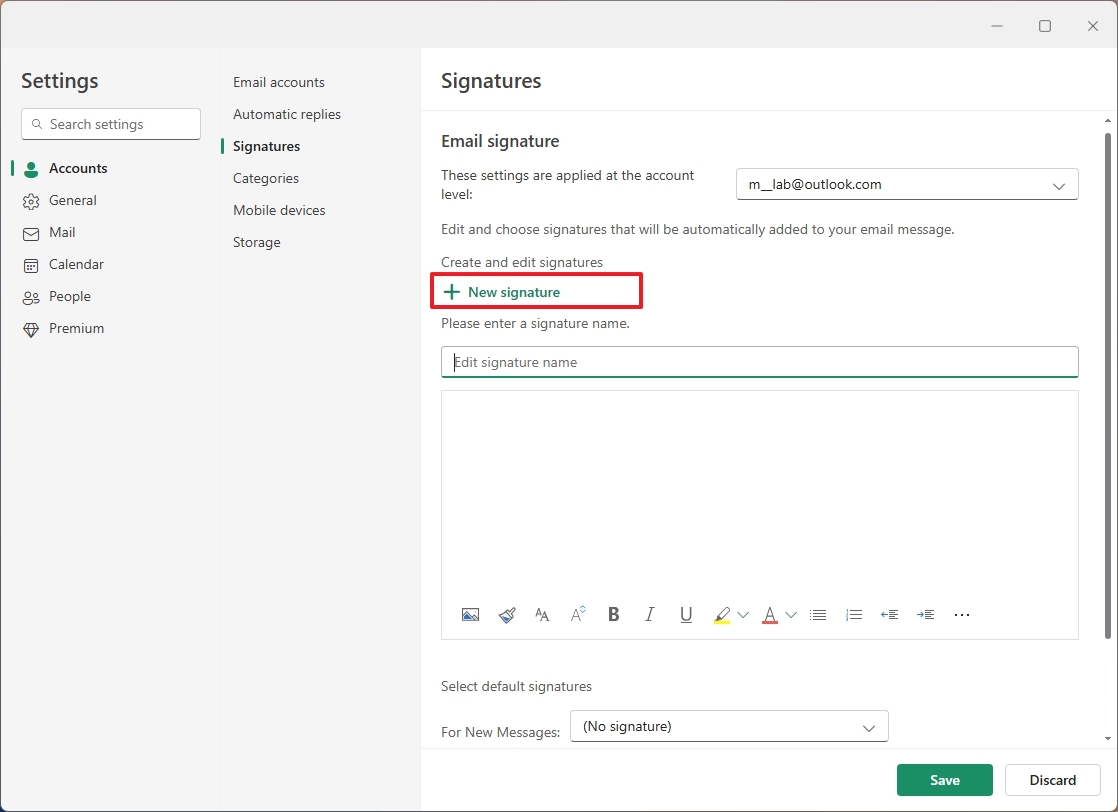
- Confirm a name for the signature.
- Compose your custom signature.
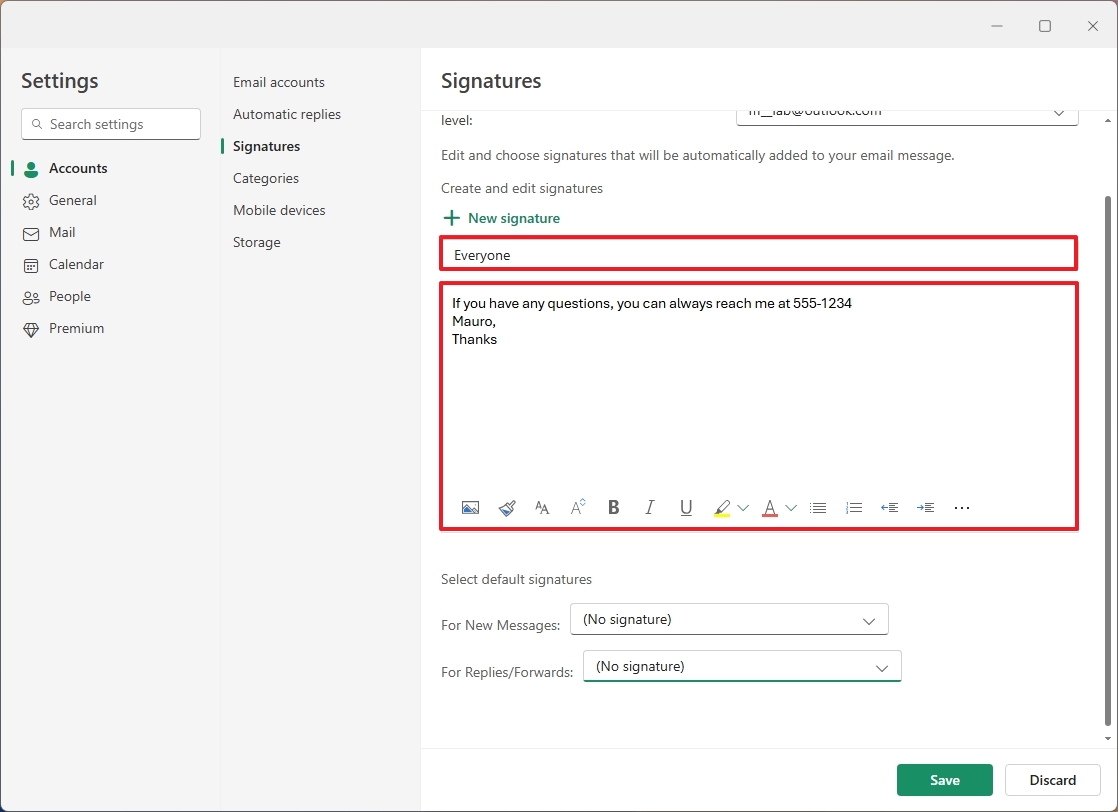
- Choose the default signature for new, replay, and forward messages (if applicable).
- Click the Save button.
After following the given instructions, my custom signature gets automatically attached whenever I compose a new message hereafter.
Check email account storage
Based on my personal experience as a long-time user of Microsoft services, I can confidently guide you through the process of checking the storage usage of your account linked to the Outlook app. Here’s how:
- Click the Settings (gear) button.
- Click on Accounts.
- Click the Storage setting.
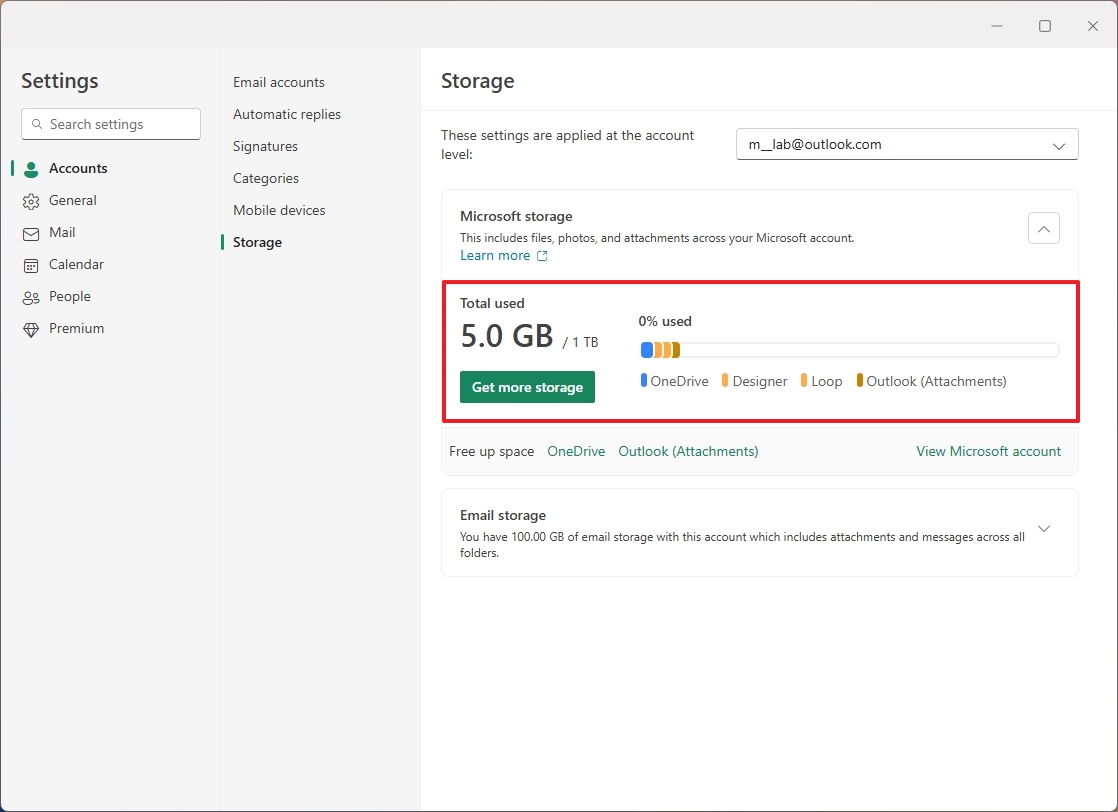
- Review your storage usage.
On the displayed screen, you’ll find information about the entire storage you have at your disposal, along with how much of it is being used. It’s worth mentioning for Outlook that messages and their attachments contribute to the total storage consumption.
For users with a Microsoft 365 subscription, you’ll enjoy access to store or send up to 100 gigabytes of data, whether it’s messages or files. In contrast, those using the free service version will have up to 15 gigabytes at their disposal for similar purposes.
General settings
In the “General” area of the Outlook application, you can find options to customize language, time preferences, notification settings, search functionality, and offline features.
As an analyst, I find that our application offers several customization options across different pages:
Here, you can adjust various aspects of the look and feel, including color options, backdrop images, and theme selections.
Configure language and time
As a tech-savvy individual, you’d typically set your preferred language and time zone during the process of creating an email account. However, if by chance you find that these settings aren’t quite right for you, here’s how to adjust them:
- Click the Settings (gear) button.
- Click on General.
- Click the “Language and time” setting.
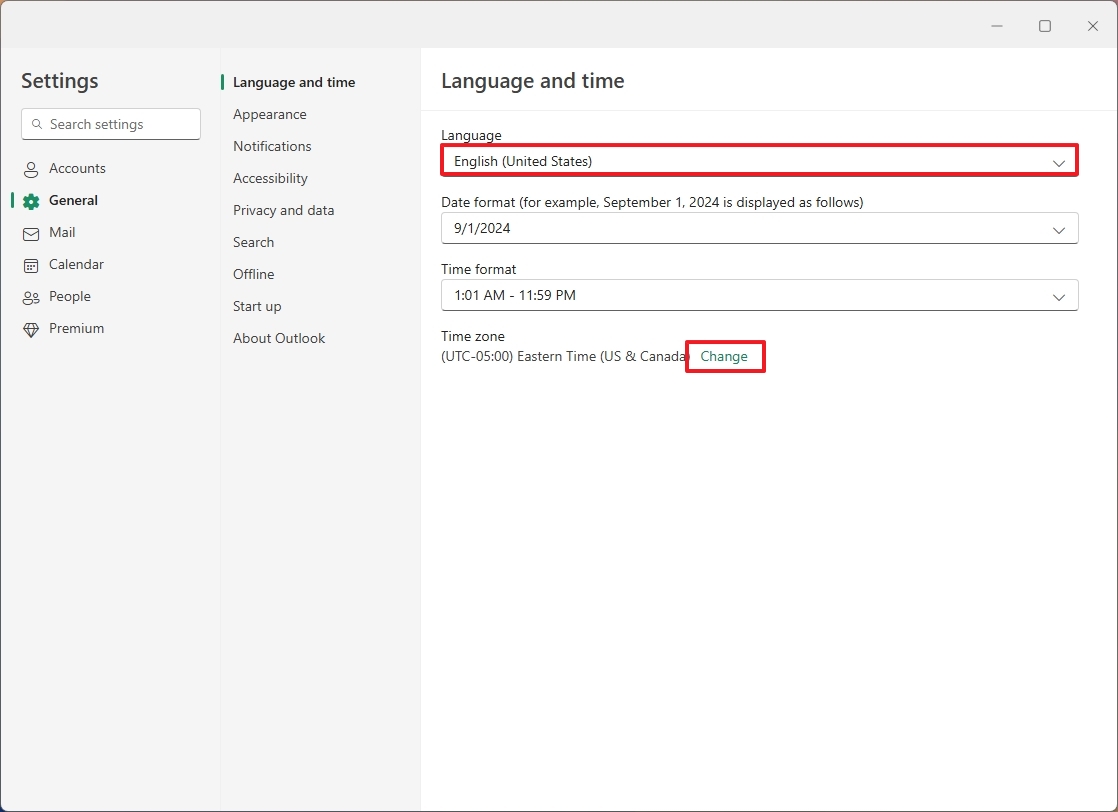
On the page, you can set the correct language, date format, time format, and time zone.
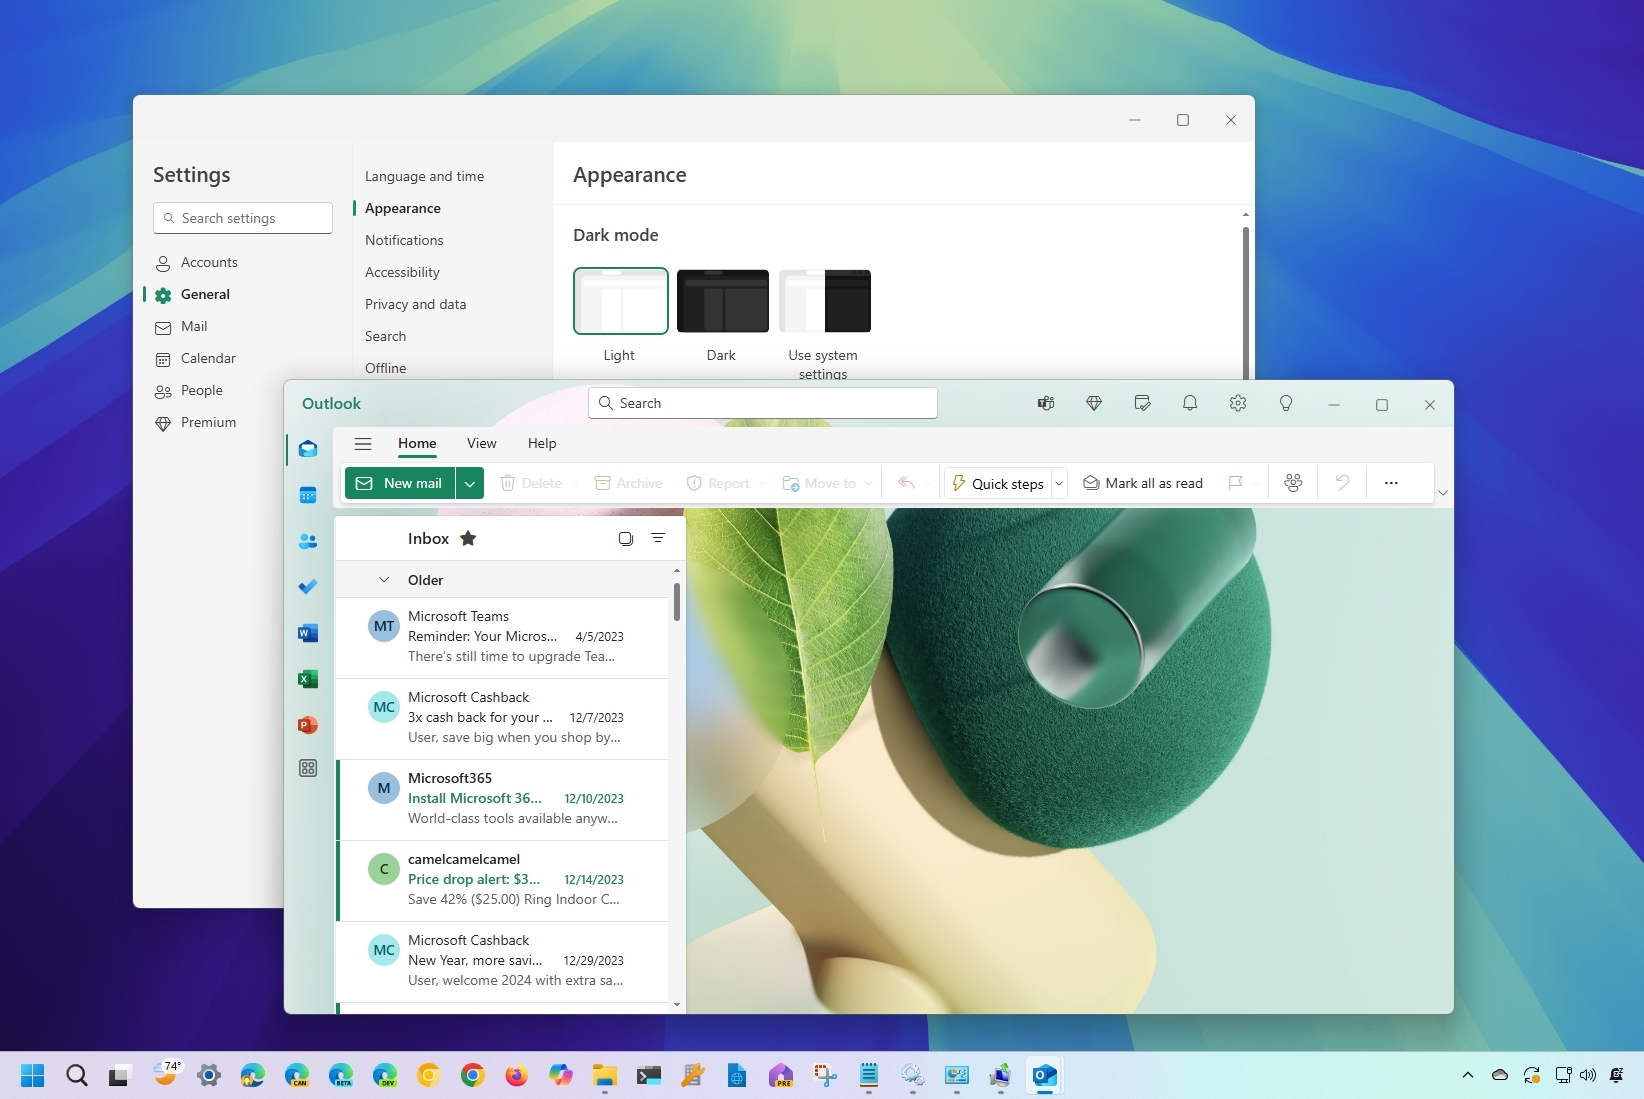
Switch between light and dark mode
In simpler terms, the updated Outlook application designed for Windows 11 offers two distinct color schemes – dark and light. You have the flexibility to change these themes either at your discretion or allow the app to adjust them automatically.
To change the Outlook app color mode, use these steps:
- Click the Settings (gear) button.
- Click on General.
- Click the “Appearance” setting.
- (Option 1) Choose the Light or Dark mode.
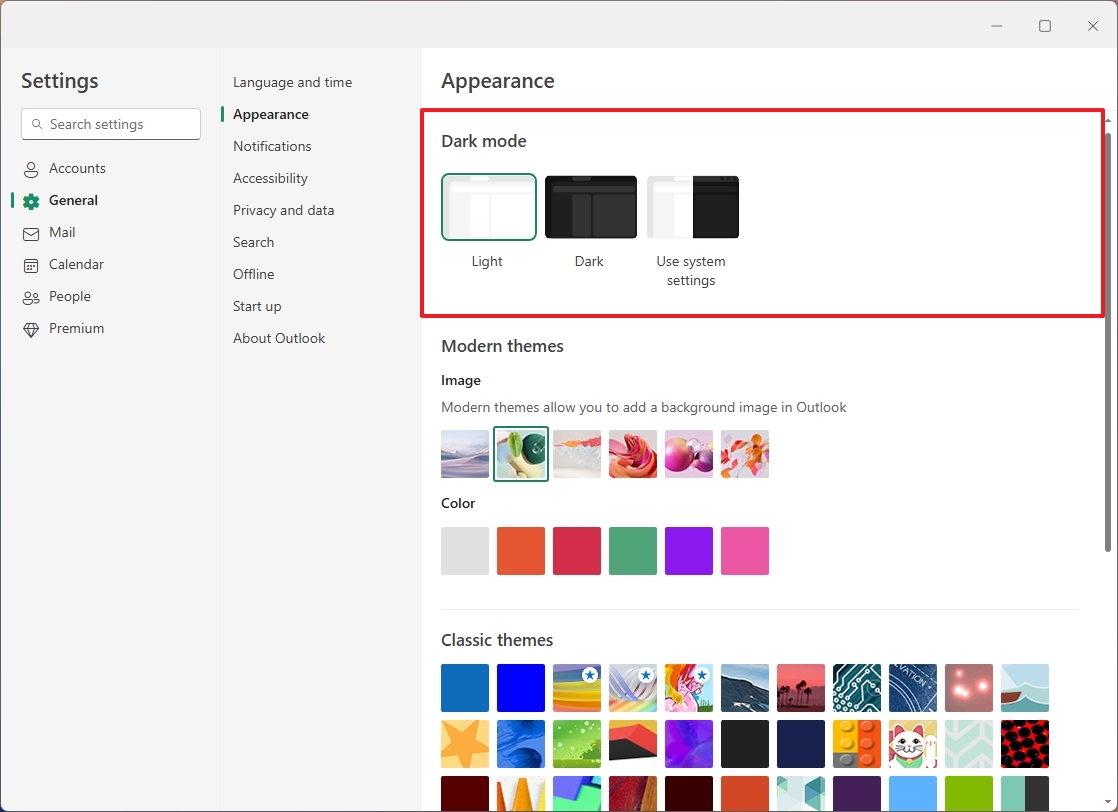
- (Option 2) Choose the “Use system settings” option to change the mode automatically when changing the Windows 11 color mode.
Once you complete the steps, the app will apply the color mode, according to your configuration.
Change Outlook background image
Just like the old version of the Windows-based email client, it’s still feasible to alter the background image; however, your options are limited to a modest selection of images.
To change the background image for the Outlook app, use these steps:
- Click the Settings (gear) button.
- Click on General.
- Click the “Appearance” setting.
- Select the image background for the Outlook app in the “Image” section.
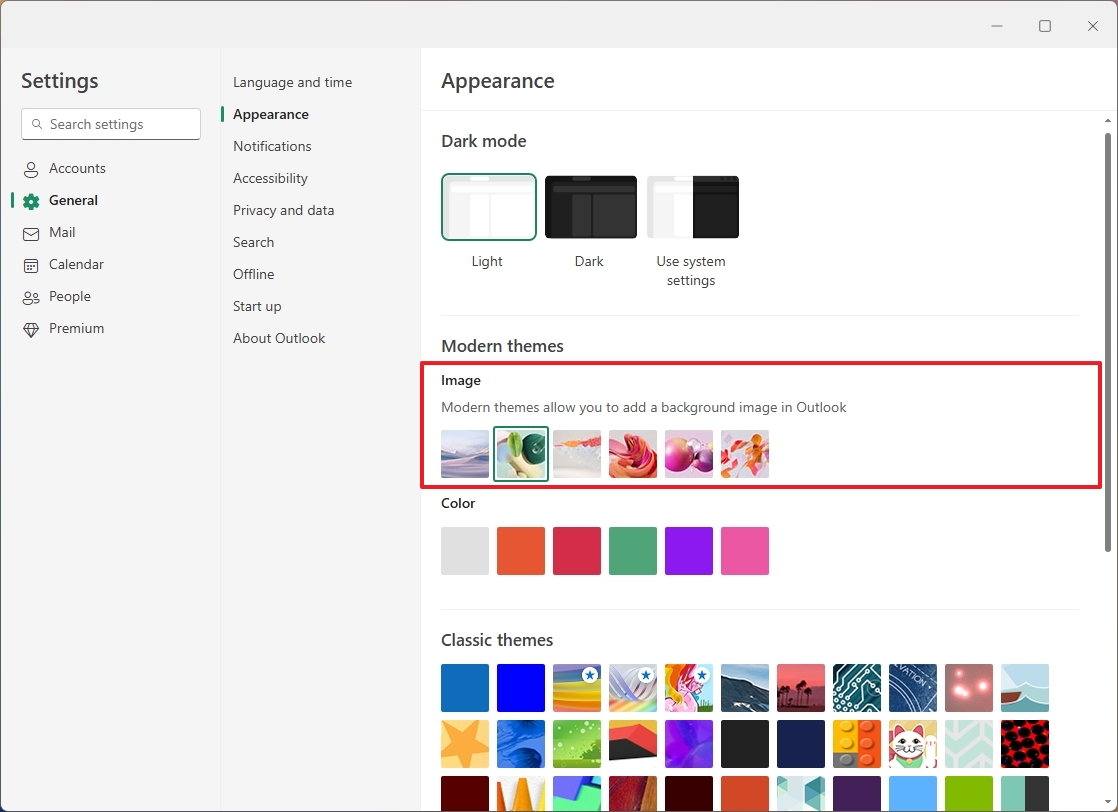
- (Optional) Choose from one of the available colors in the “Color” settings.
It’s important to note that you can only choose from one of the available images. At the time of this writing, it’s not possible to choose a custom background.
Change Outlook app theme
Besides selecting the color scheme and backdrop, you can also customize the app’s look by modifying its theme, which allows for a variety of color patterns and design features.
To change the Outlook app theme, use these steps:
- Click the Settings (gear) button.
- Click on General.
- Click the “Appearance” setting.
- Select the theme for the Outlook app under the “Classic themes” section.
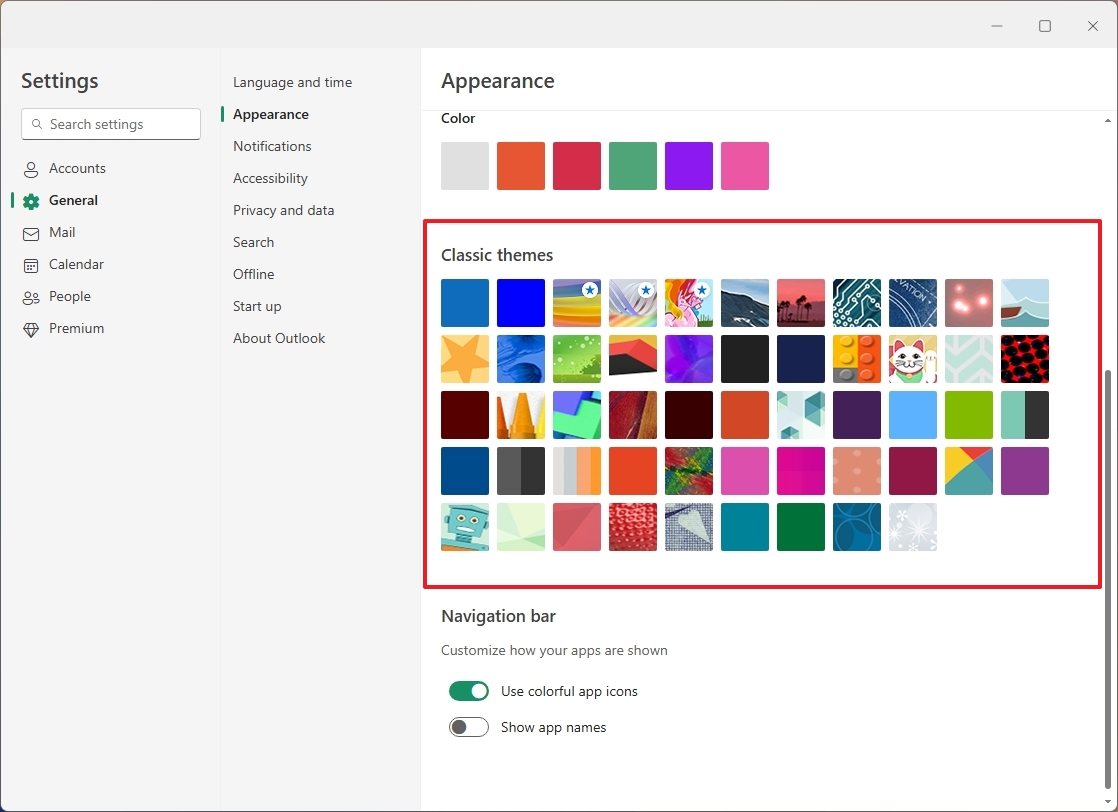
- (Optional) Turn the “Use colorful app icons” toggle switch on or off to control the icons from the left pane.
- (Optional) Turn the “Show app names” toggle switch on or off to show or hide the apps’ names in the left pane.
After you finish the given procedures, the selected theme will be reflected not only within the mobile application but also in the web version of Outlook.
Configure Outlook notifications
Email applications such as Outlook are capable of delivering alerts for incoming emails, calendar updates, and tasks. While the standard settings typically suffice for many users, you have the option to customize it according to your preferences.
To change the notification settings for Outlook, use these steps:
- Click the Settings (gear) button.
- Click on General.
- Click the “Notifications” setting.
- Turn on the “Notifications in Outlook” toggle switch to enable the feature within the
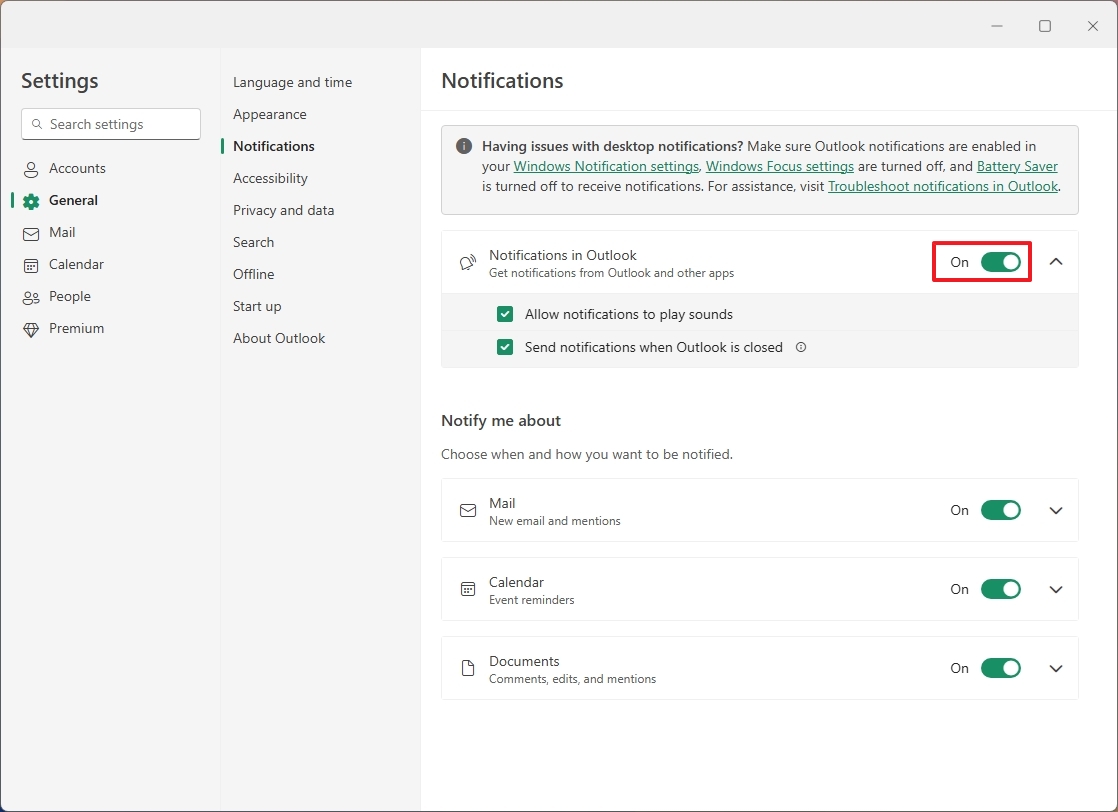
- Click the “Notifications in Outlook” setting.
- Check the “Allow notifications to play sounds” option. (If you clear the option, you will receive notifications, but they will not play sound.)
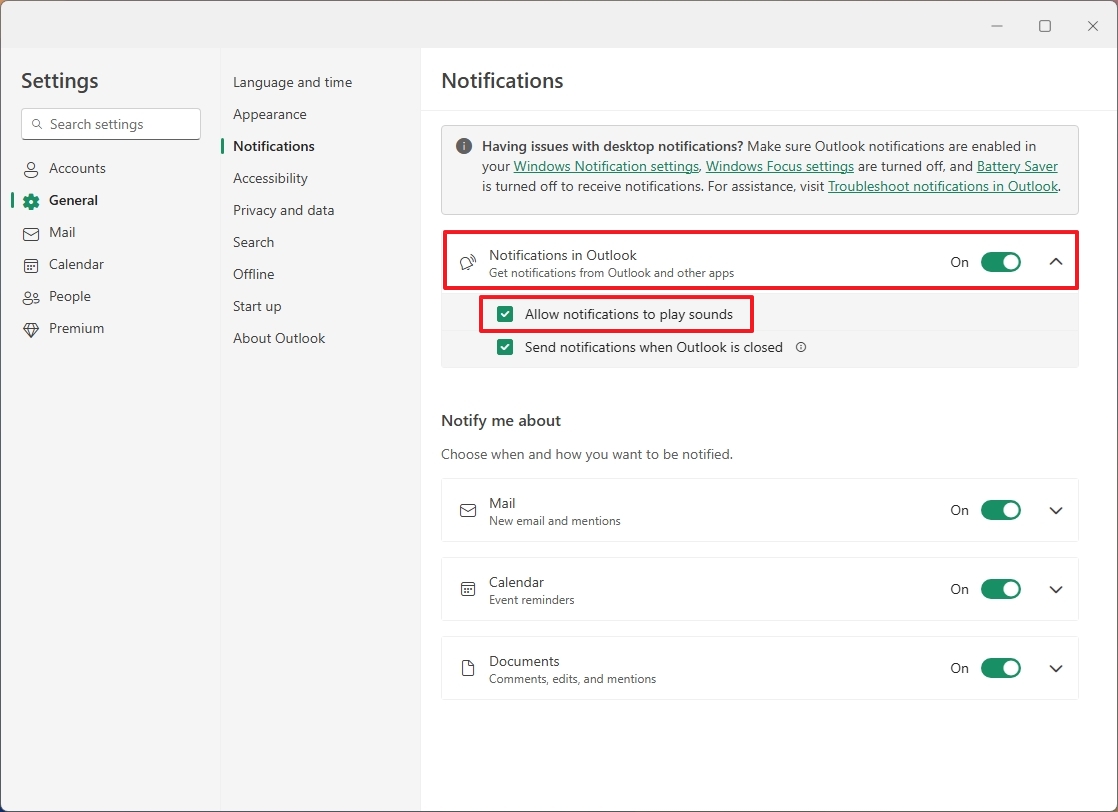
- (Optional) Check the “Send notifications when Outlook is closed” option.
- Turn on the “Mail” toggle switch to receive toast notifications for new emails on Windows 11.
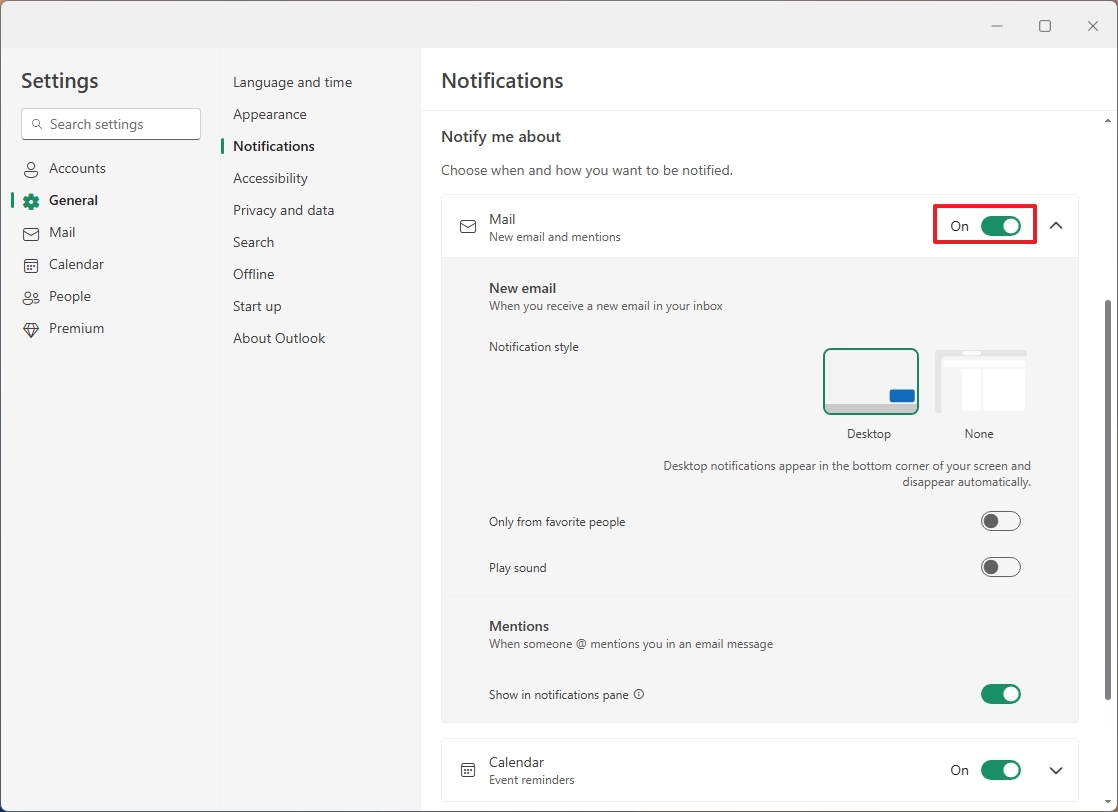
- Quick tip: You can open the “Mail” settings and further customize how notifications should appear.
- Turn on the “Calendar” toggle switch to enable toast notifications for calendar events.
- Turn on the “Documents” toggle switch to enable toast notifications for comments, edits, and mentions.
- Click the Save button.
After you complete the steps, the notification settings will apply to the application.
Enable Outlook offline mode
To turn offline mode on or off in the Outlook app, use these steps:
- Click the Settings (gear) button.
- Click on General.
- Click the “Offline” setting.
- Turn the “Enable offline email, calendar, and people” toggle switch on or off. If you turn off the feature, you won’t be able to use the app without an internet connection.
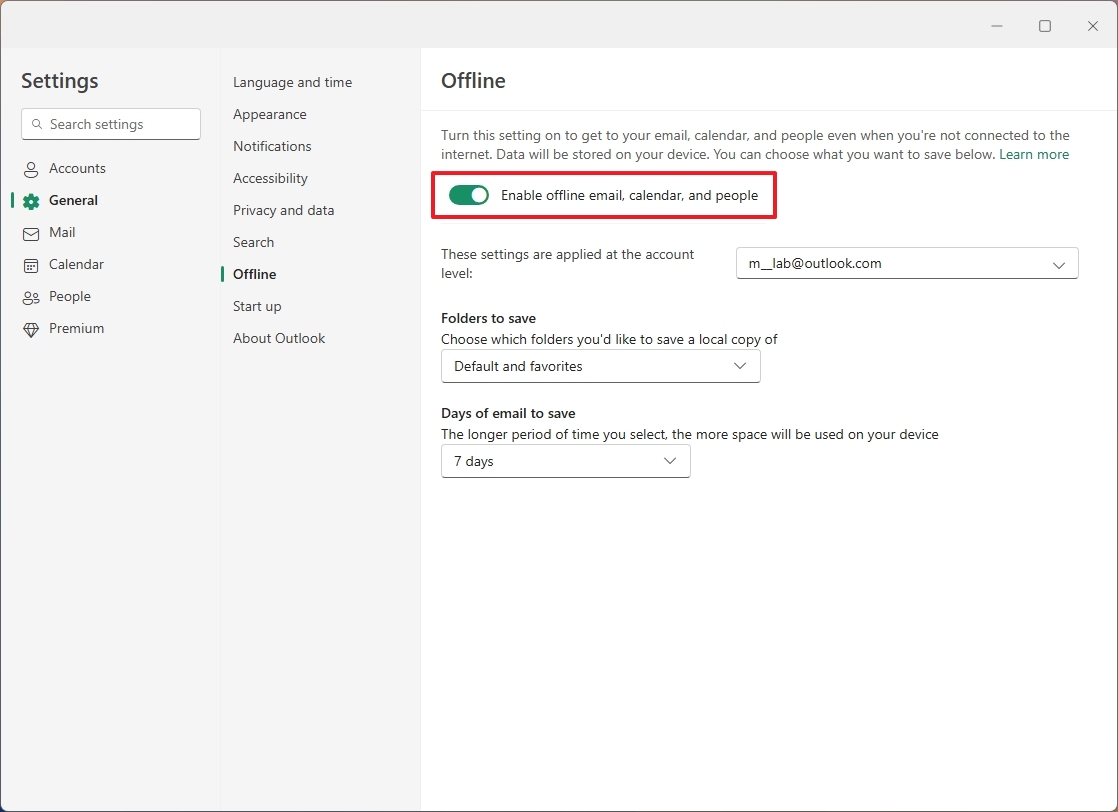
- (Optional) Select which folders to save a local copy, including “Default,” “Default and favorites,” or “Default, favorites, and recently used” option.
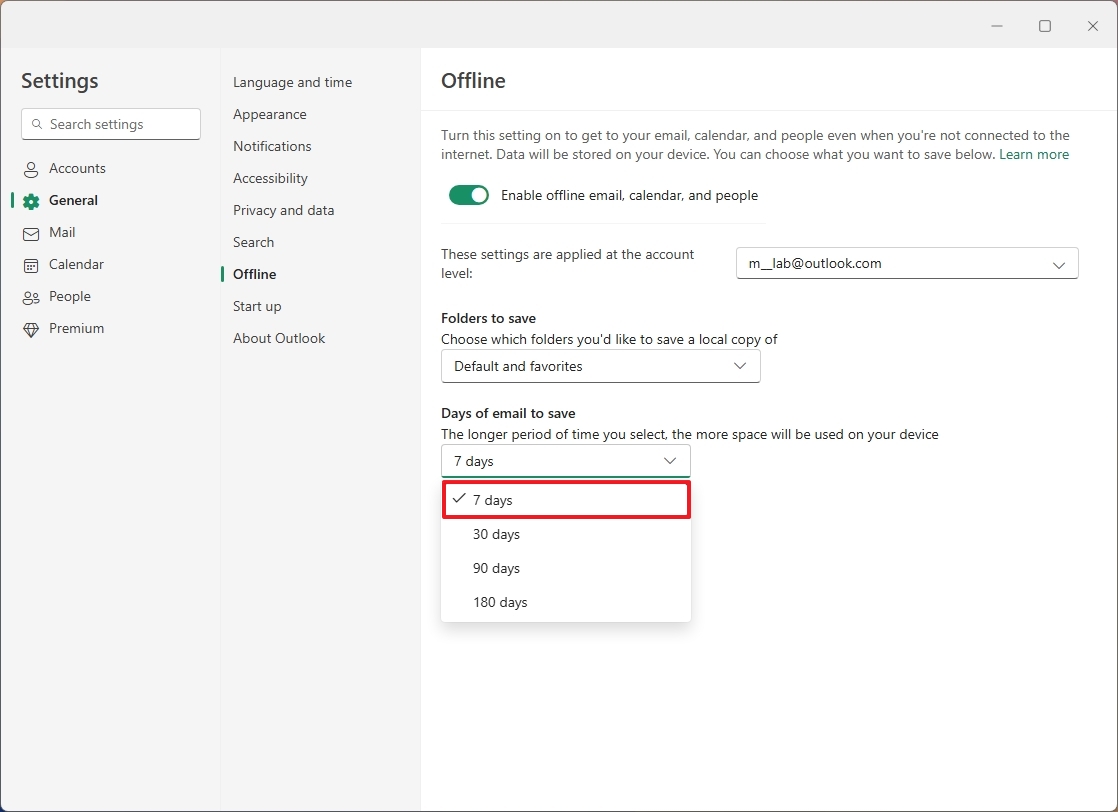
- Choose the days of emails to save, including 7, 30, 90, or 180 days.
- Click the Save button.
After following the given instructions, the Outlook application will carry on functioning, even in the absence of an active email connection. Yet, it won’t send out any new messages, nor receive any fresh ones, until you are back online.
Mail settings
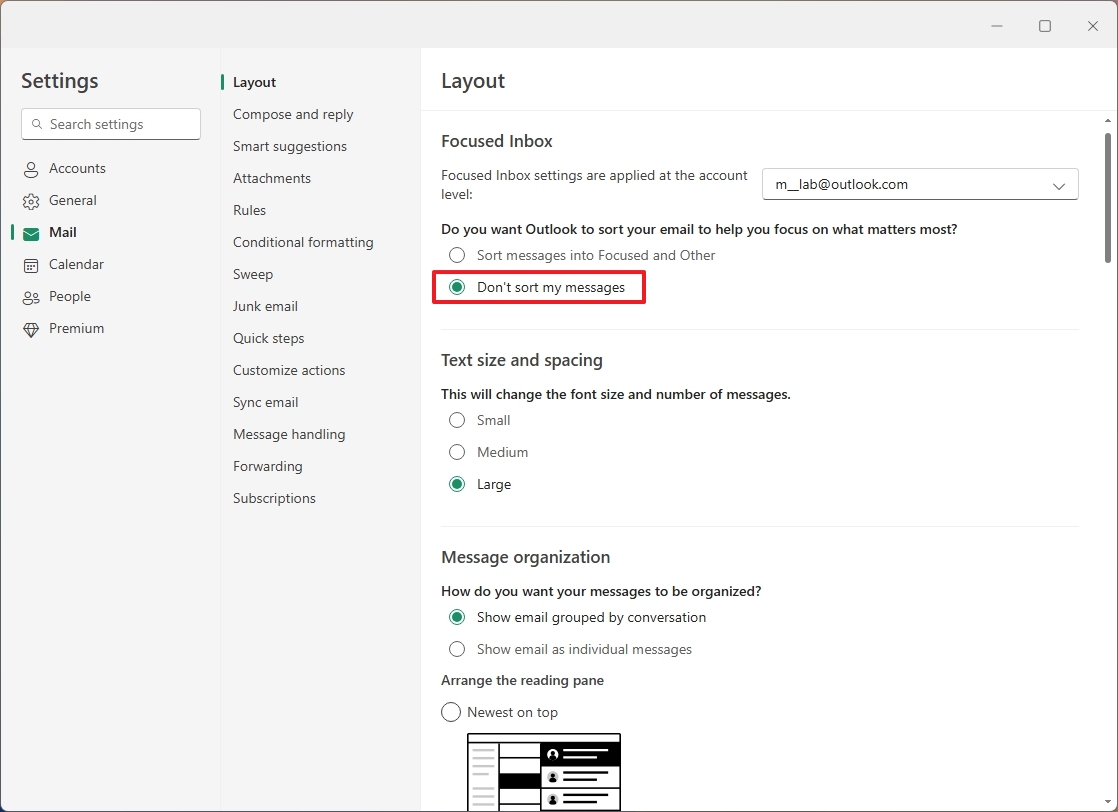
In the “Mail” section of this application, you’ll find most of the settings associated with each of your connected mailboxes. For instance, the “Layout” page houses the options to customize the “Focused Inbox,” a feature that could be beneficial for many users, but I personally don’t utilize it as I often overlook and consequently miss important emails since I rarely check this setting.
On the “Write and Respond” page, you have the ability to adjust various options such as message layout, automated responses, showing previews of linked content, a feature to recall sent messages, and additional settings.
Customize Outlook layout
Customizing different aspects within the Outlook application is made possible through the adjustable layout options, which encompass elements like the “Focused Inbox”, email formatting, message arrangement, sender’s picture, reading area, among other features.
To change the layout settings in Outlook, use these steps:
- Click the Settings (gear) button.
- Click on Mail.
- Click the “Layout” setting.
- Choose the “Don’t sort my messages” option to disable the Focused inbox on the account.
- (Optional) Choose the “Small,” “Medium,” or “Large” option in the “Text size and spacing” section.
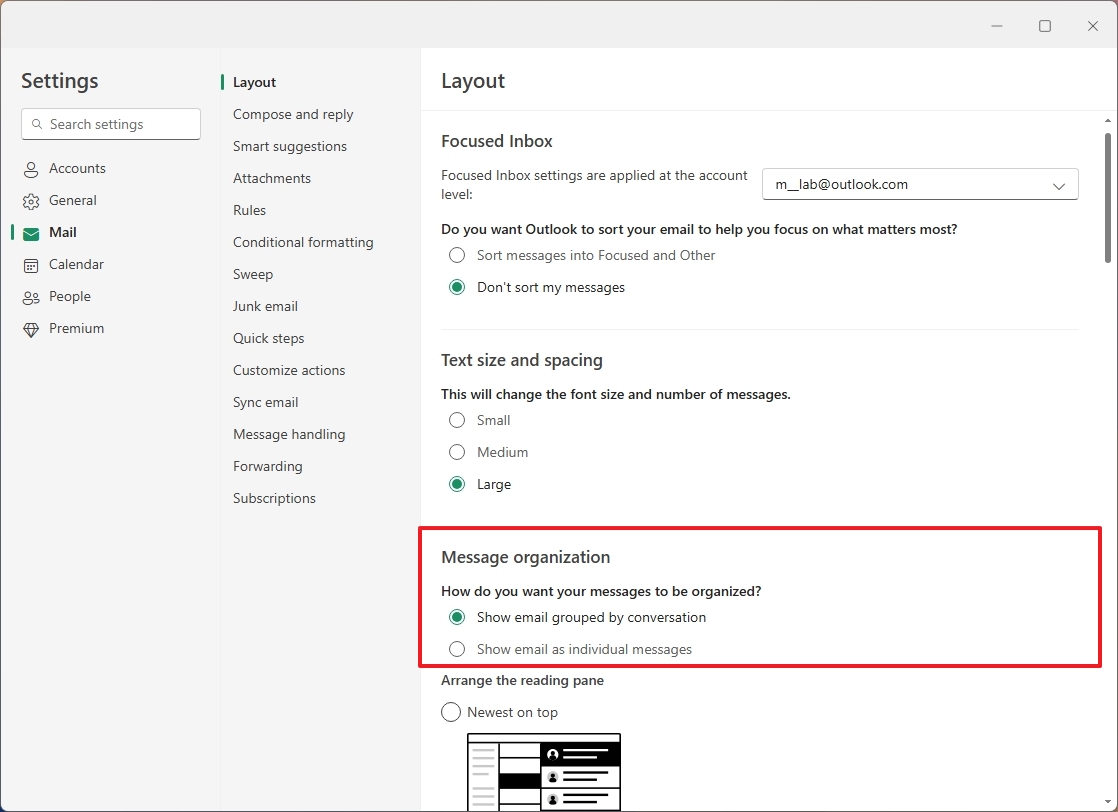
- Select the “Show email grouped by conversation” or “Show email as individual message” option under the “Manage Organization” section.
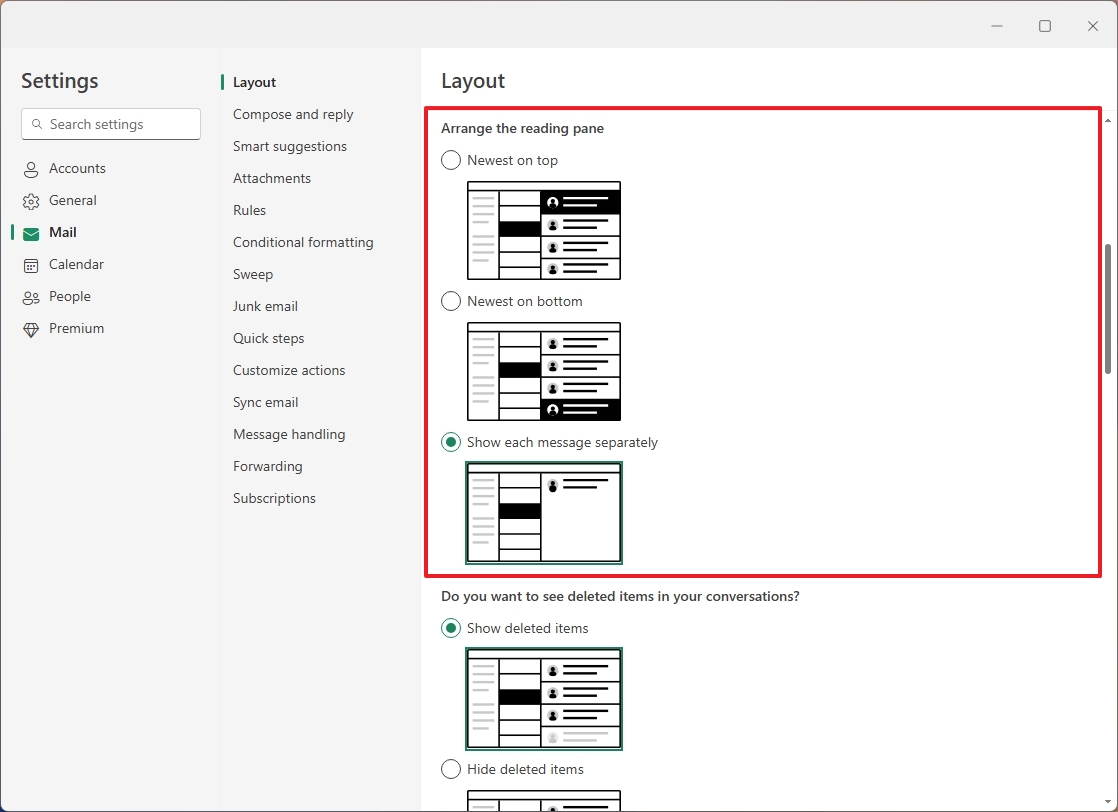
- Choose the “Newest at the top,” “Newest at the bottom,” or “Show each message separately” in the “Arrange the reading pane” section to change the layout of emails.
As a keen user, I’m thrilled to share that the “Layout” section offers me the flexibility to tweak various preferences, including adjusting the format of my message list, customizing preview texts, and managing date headers. It even lets me make decisions like whether to display inline attachments or regulate animations, adding a personal touch to my experience.
Customize messages format
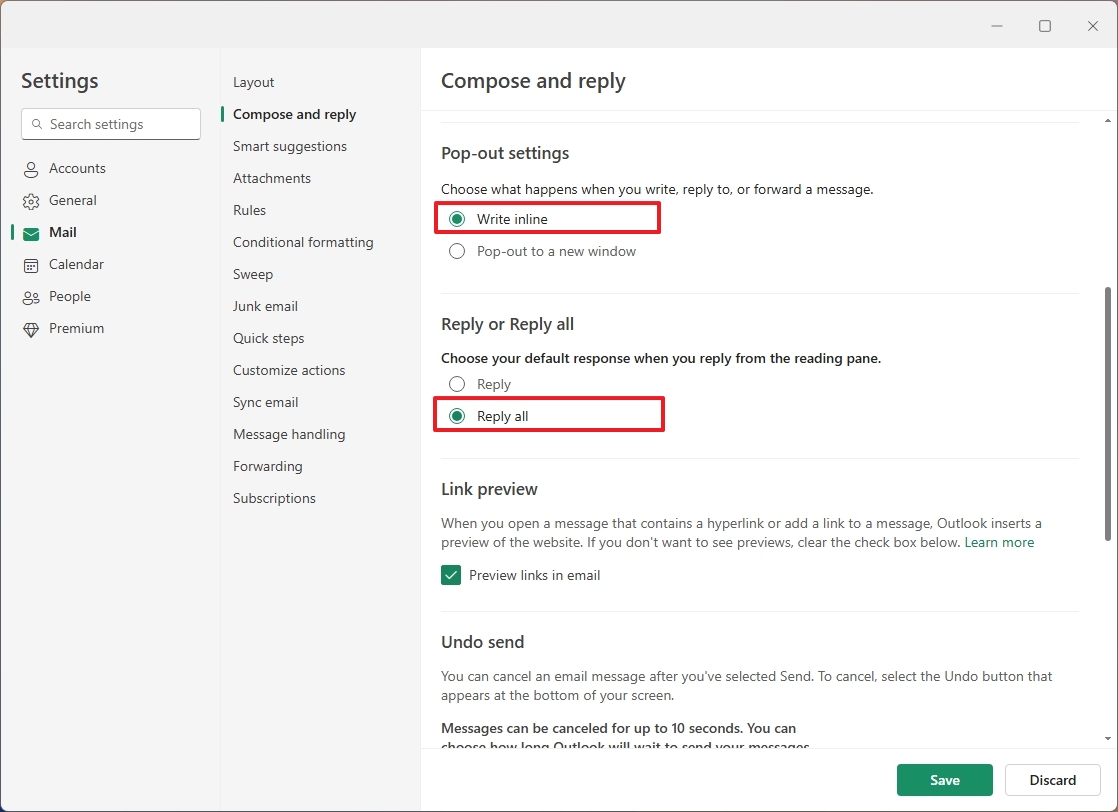
Apart from using the standard message format, you also have the option to personalize it according to your preferences. This includes options like writing messages in HTML or plain text format. Additionally, you can adjust features such as font size and style, customize reply settings, enable link previews, undo send functionality, and many more to enhance your messaging experience.
To change the format of the message for Outlook, use these steps:
- Click the Settings (gear) button.
- Click on Mail.
- Click the “Compose and reply” setting.
- Change the default font family and size under the “Message format” section.
- Select the HTML or Plain text option for the “Compose message in (…) format” setting.
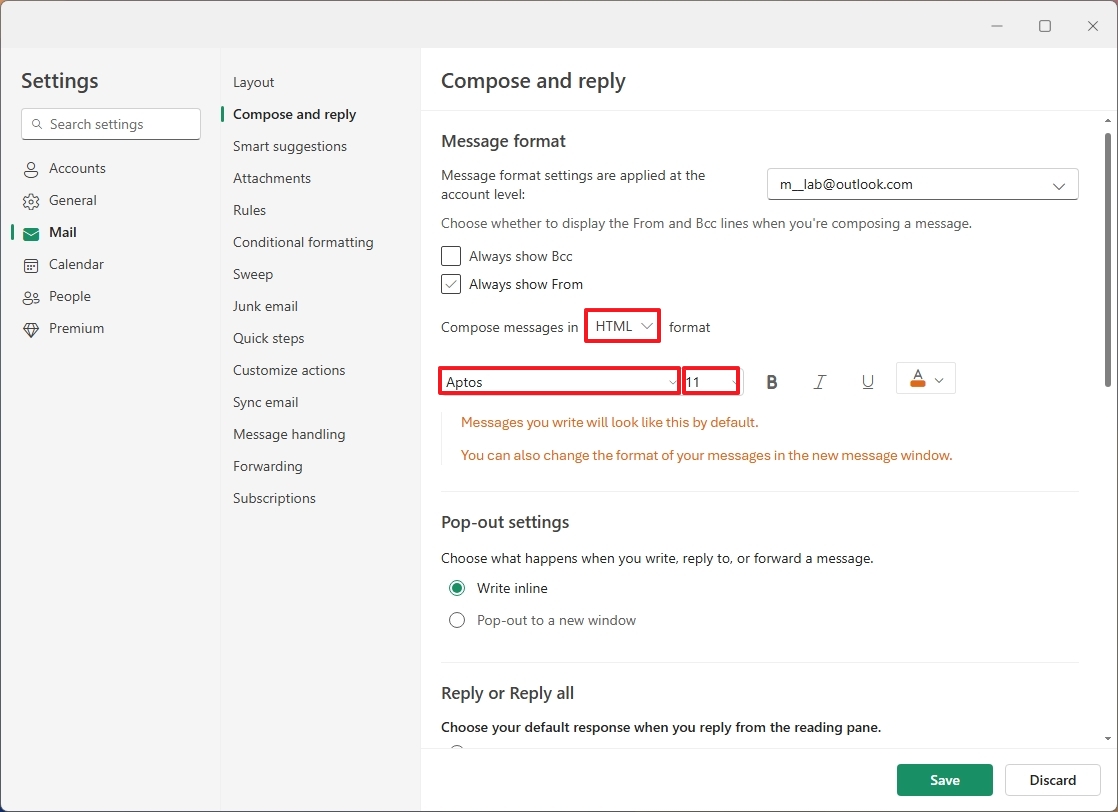
- Quick tip: You can also change the default color for the font.
- Choose the “Write inline” or “Pop-out to a new window” option in the “Pop-out settings” section to select the action when you compose an email.
- Select the “Reply” or “Replay all” option for the default action when responding to an email under the “Reply or Replay all” section.
- (Optional) Clear the “Preview links in email” option to prevent the app from embedding a preview of the link you’re inserting into an email.
- Use the slider to choose how long (up to 10 seconds) to cancel an email sent using the “Undo Send” setting.
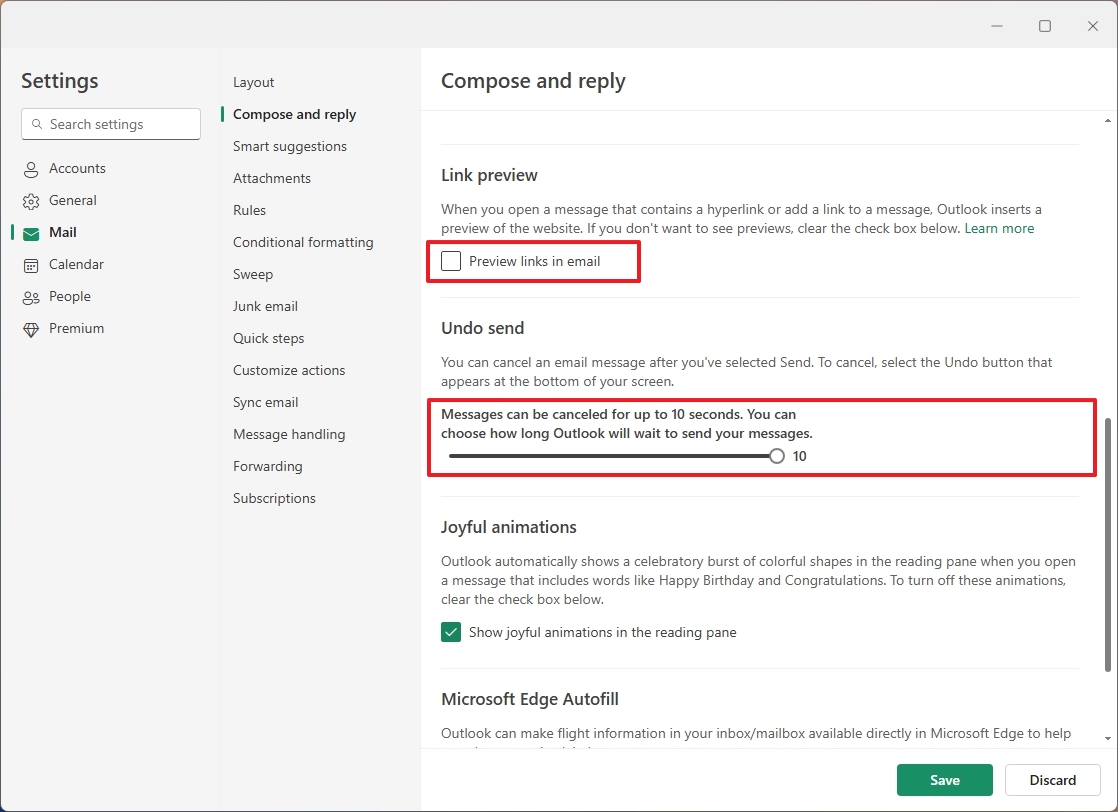
- Click the Save button.
Here, you can adjust the time for cancelling an already-sent email, enjoy delightful visuals, and receive flight updates.
Configure smart suggestions
In Outlook, the “Smart Suggestions” function facilitates two useful email features. Initially, it allows Outlook to propose possible responses for your emails. Additionally, while typing, it displays suggested text predictions to aid in composition.
To turn smart suggestions in Outlook on or off, use these steps:
- Click the Settings (gear) button.
- Click on Mail.
- Click the “Start suggestions” setting.
- Check or clear the “Show suggested replies” option to turn reply suggestions on or off.
- Check or clear the “Suggest words or phrases as I type” option to turn text prediction on or off.
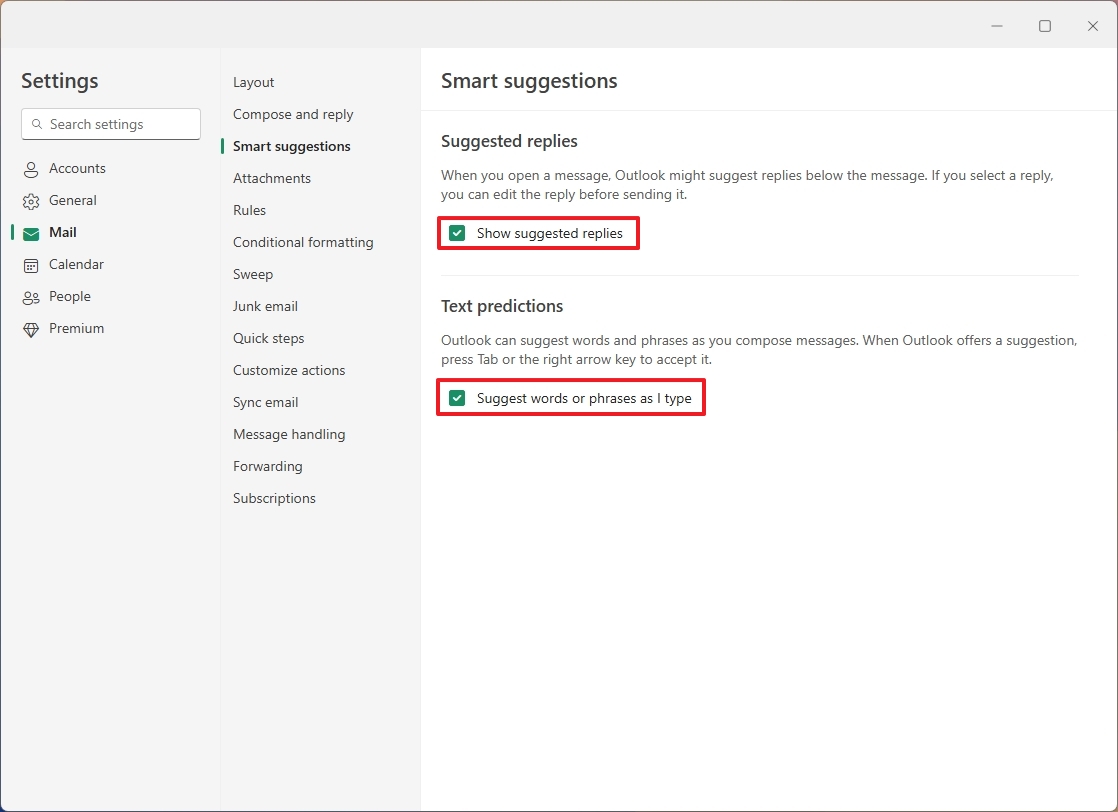
- Click the Save button.
Once you complete the steps, the new configuration will apply to the email client.
Set up Outlook rules
Using Outlook rules, you have the ability to manage how the application processes incoming emails. For instance, you can establish a rule that identifies an email from a particular sender and relocates it to a designated folder. However, there are numerous options for customizing the conditions according to your preference.
To set up Outlook rules, use these steps:
- Click the Settings (gear) button.
- Click on Mail.
- Click the “Rules” setting.
- Click the “Add new rule” option.
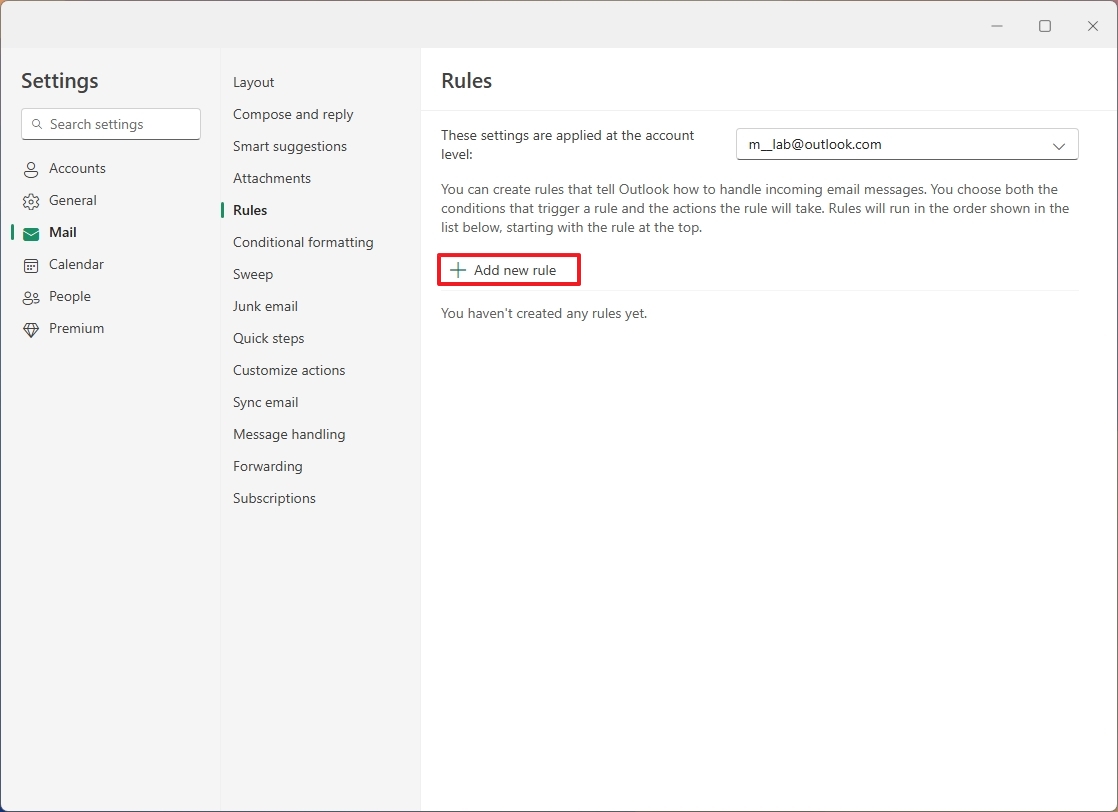
- Confirm a descriptive name for the condition.
- Choose the condition.
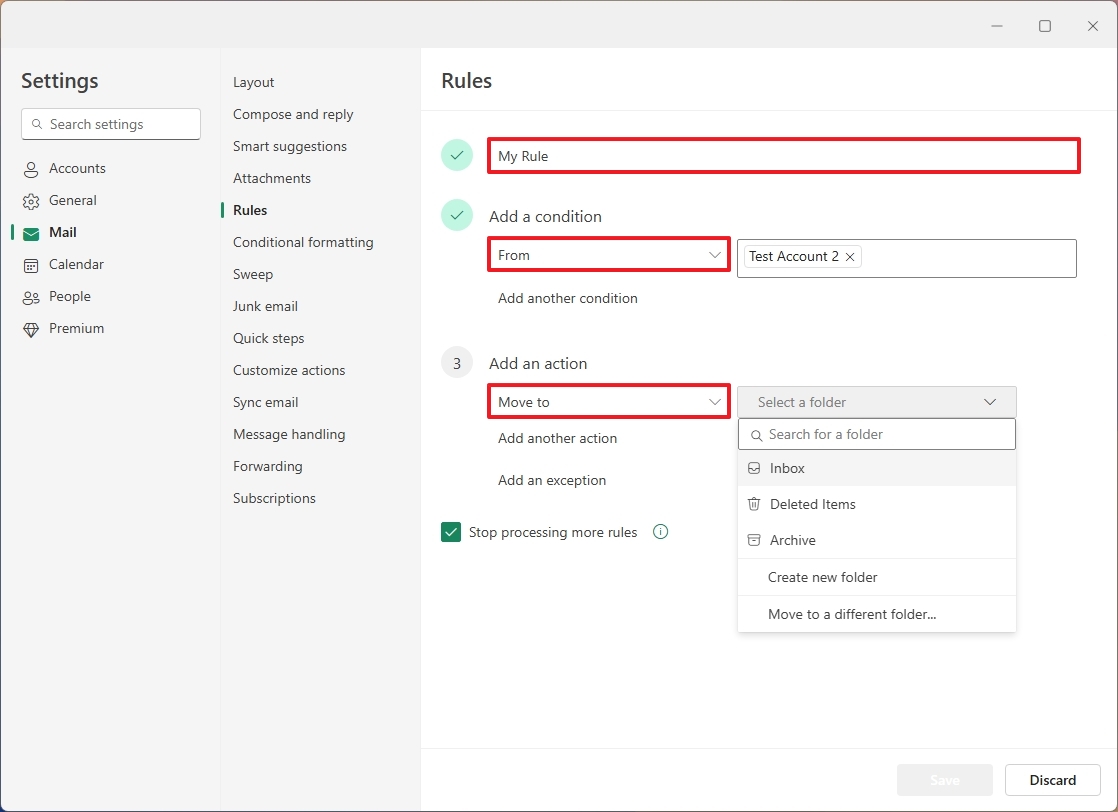
- Quick note: Outlook offers many conditions, and some of the categories include “People,” “Names,” “Subjects,” “Keywords,” “Marked with,” “Message includes,” “Message size,” “Received,” and “All messages.”
- Select the action (“Organize,” “Mark message,” and “Route”) for the condition.
- Click the Save button.
Once you’ve finished the steps, the rule will be executed, and from then on, any incoming emails will be processed according to your set rules in order to apply the appropriate conditions.
Set up Outlook conditional formatting
In simpler terms, conditional formatting functions much like rules do, but instead of following certain conditions, they highlight or modify an email based on those conditions.
To configure conditional formatting in Outlook, use these steps:
- Click the Settings (gear) button.
- Click on Mail.
- Click the “Conditional formatting” setting.
- Click the “Create a new conditional formatting rule” option.
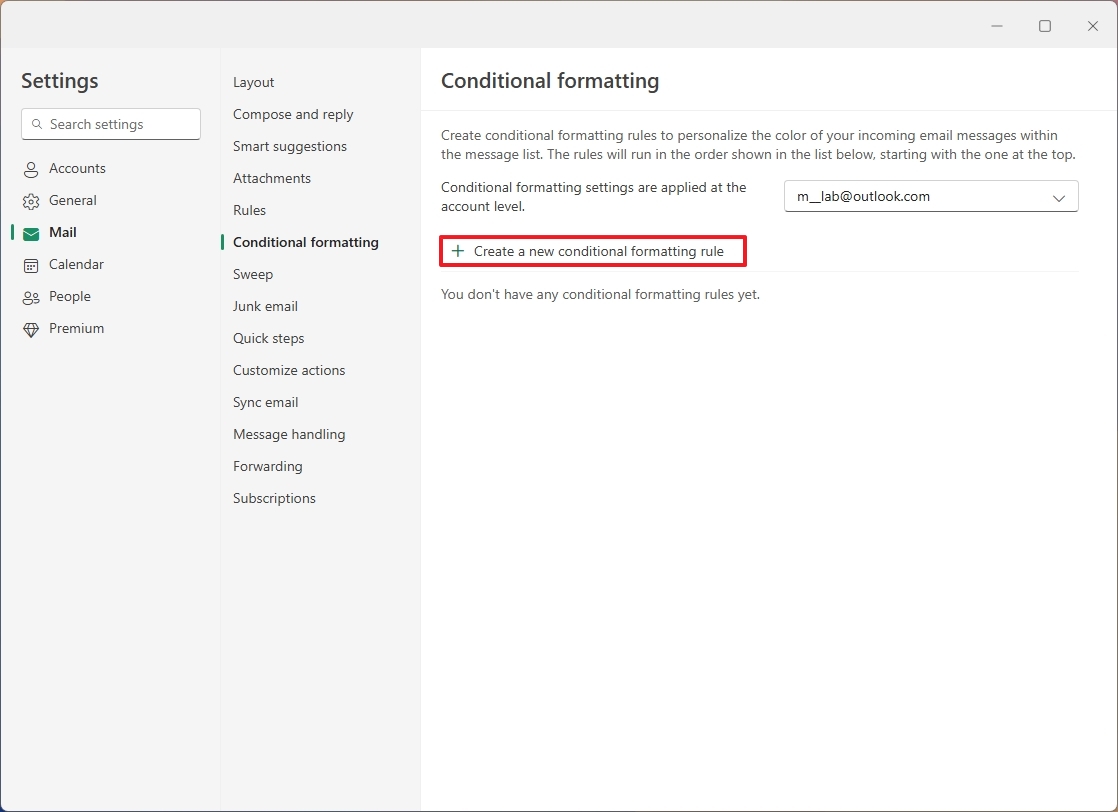
- Confirm a descriptive name for the rule.
- Choose a condition from the people, my name is, and subject categories.
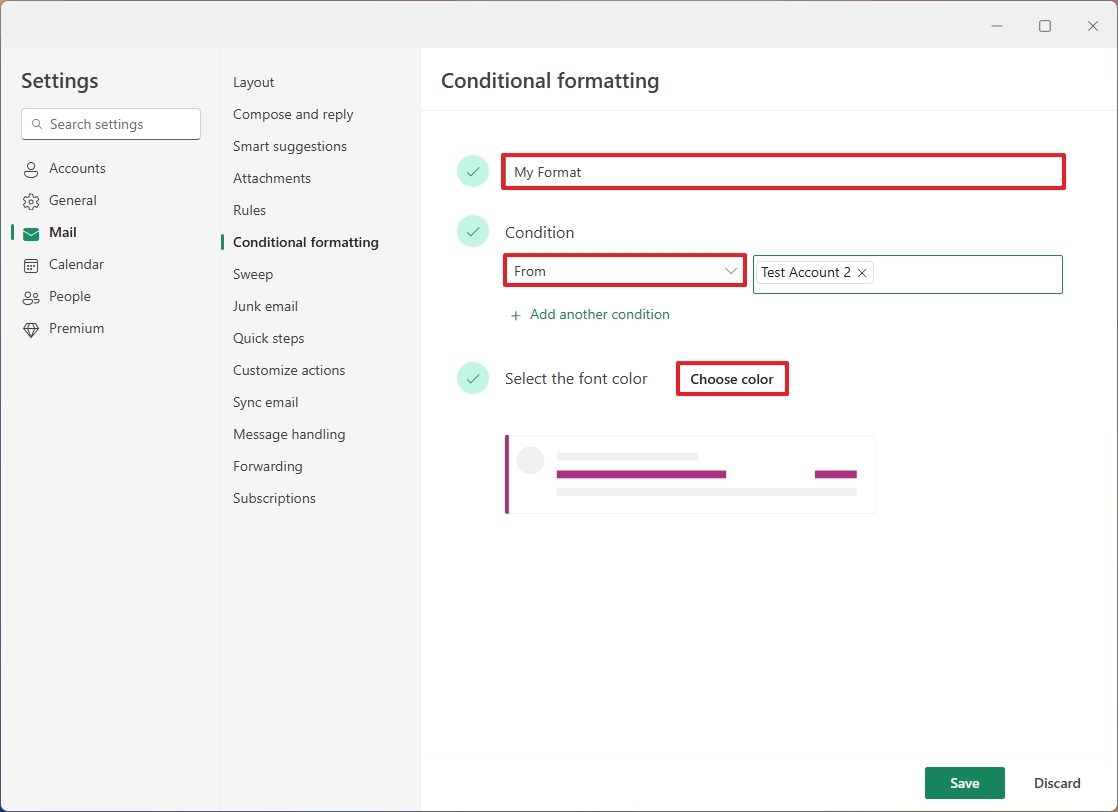
- Click the Choose color button.
- Select the color to format the email.
- Click the OK button.
- Click the Save button.
After finishing the steps, any emails that meet your specified criteria will automatically adjust their formatting based on your preferences.
Configure junk email settings
As a tech-savvy individual, I appreciate that most email services automatically filter out spam. Yet, what sets Outlook apart is its option to customize this spam filter right on my computer.
To configure junk email settings in Outlook, use these steps:
- Click the Settings (gear) button.
- Click on Mail.
- Click the “Junk email” setting.
- Choose the “Standard” or “Strict” option in the “Incoming mail handling” section.
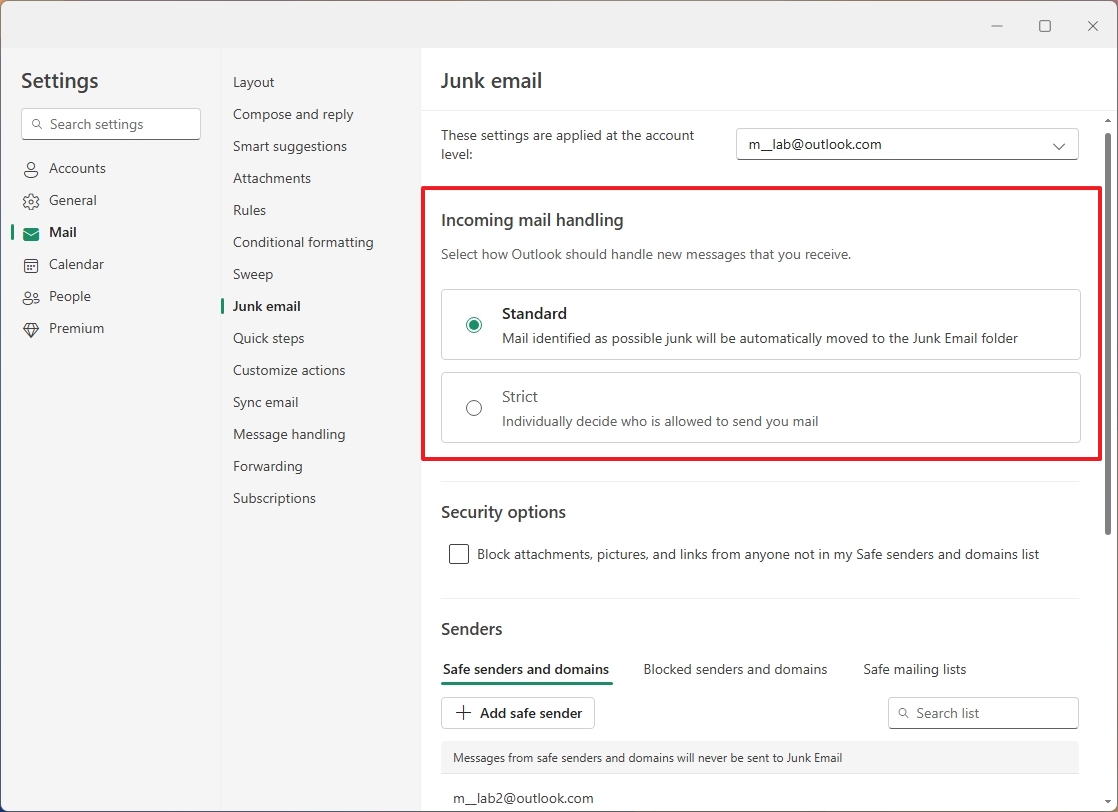
- Quick note: I usually recommend using the “Standard” option since the “Strict” option requires you to set the email address allowed to send you emails.
- Click the “Safe senders and domains” tab under the “Senders” section.
- Click the “Add safe sender” button.
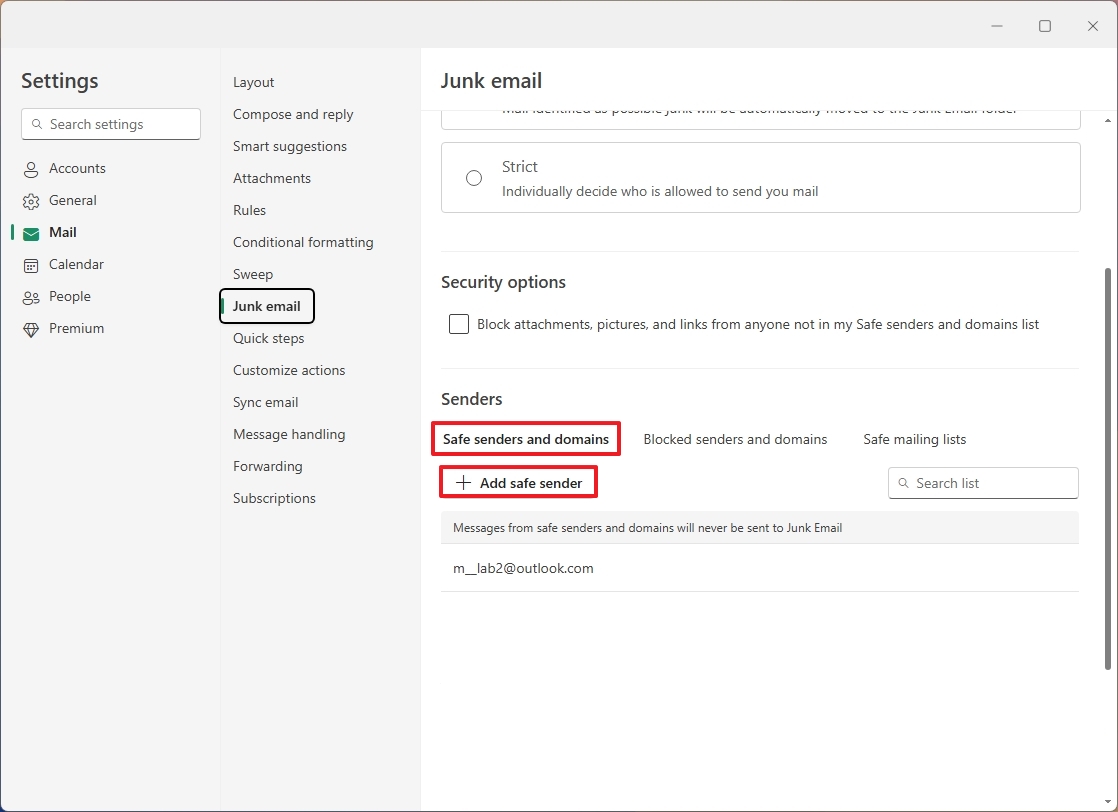
- Confirm the email or domain allowed to send you emails.
- Click the OK button.
- Quick tip: To add more filters, you may need to repeat steps 6 through 8.
- (Optional) Click the “Blocked senders and domains” tab.
- Click the “Add blocked sender” button.
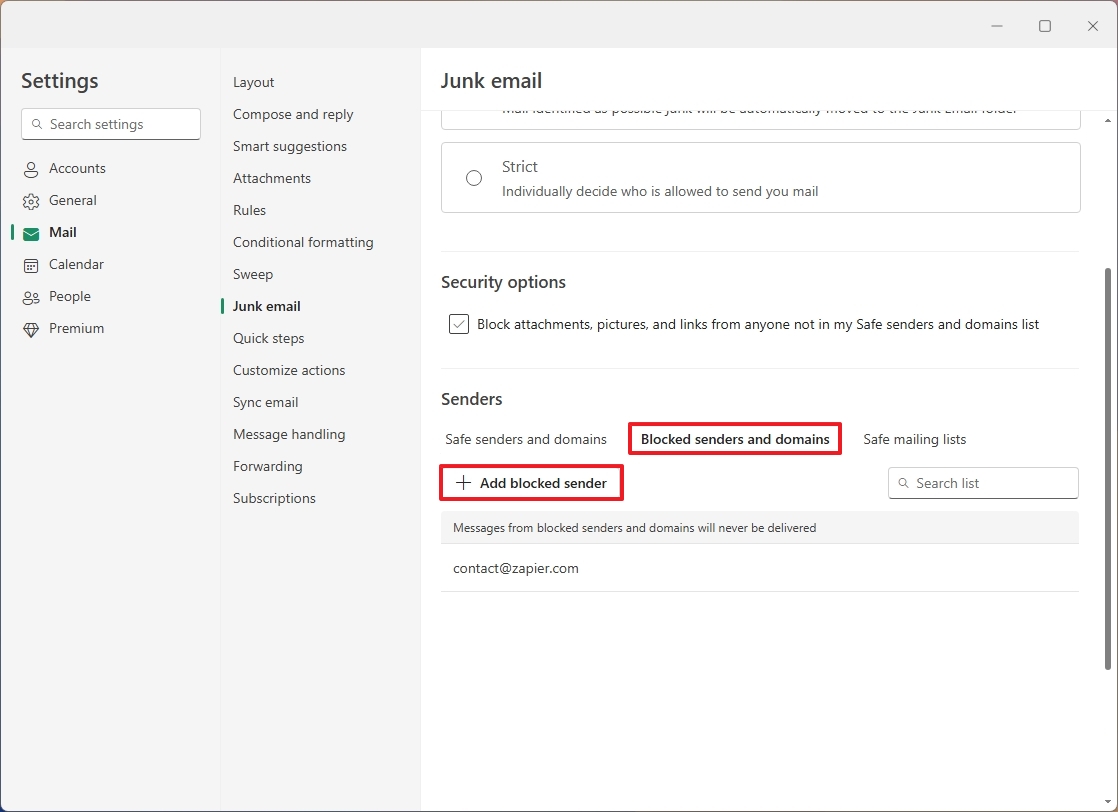
- Confirm the email or domain is not allowed to send you emails.
- Click the OK button.
- Check the “Block attachments, pictures, and links […]” option under the “Security options” section.

- Click the Save button.
After you complete the steps, the number of junk mail should now be reduced.
Customize email quick actions
To customize the quick options that appear when hovering over an email in Outlook, follow these steps:
- Click the Settings (gear) button.
- Click on Mail.
- Click the “Customize actions” setting.
- Check only the quick actions you want to use, such as “Delete,” “Archive,” “Pin,” “Mark as read or unread,” “Flag,” and “Move to a folder.”
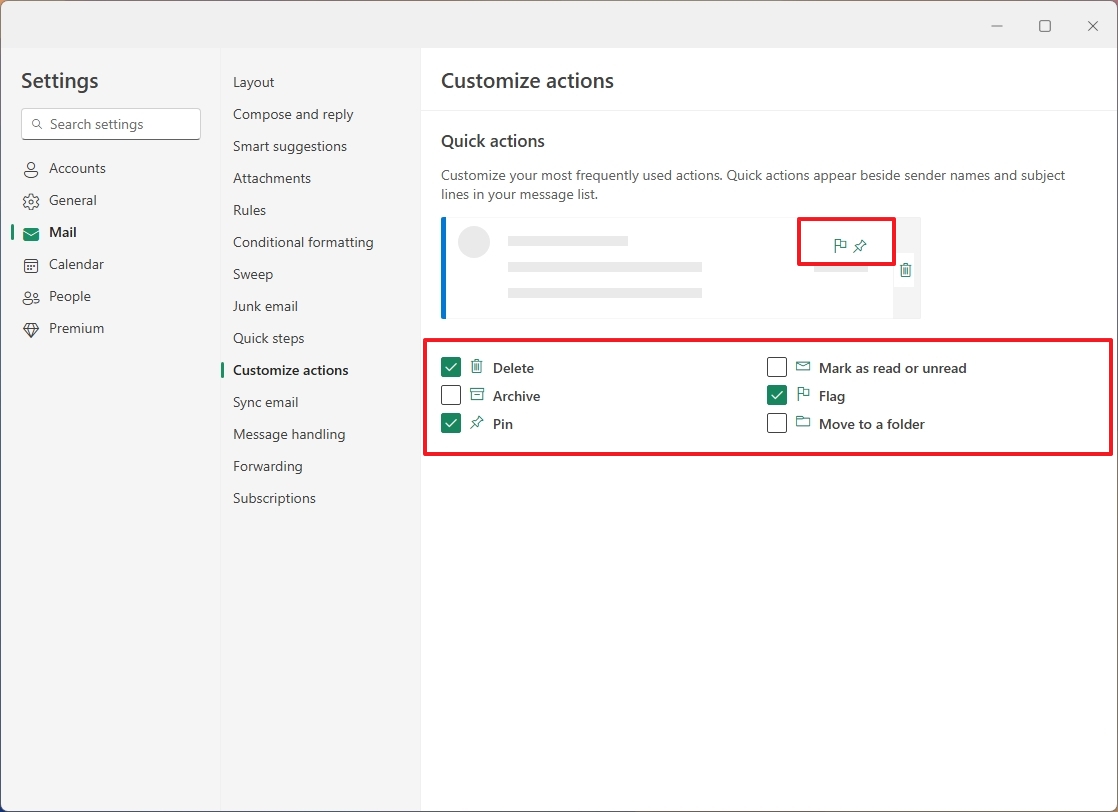
- Click the Save button.
After finishing the given steps, when your cursor hovers over emails from the side panel, you’ll notice the quick action buttons you set up in the settings will appear.
Change message handling settings
While the pre-set message handling options in Outlook typically work well for many users, it offers additional flexibility for customization too. For instance, you can specify what happens to deleted emails, decide whether messages are automatically marked as read, enable or disable read receipts, manage shopping-related notifications, adjust action confirmations, and even set translation preferences.
To change the message handling settings, use these (optional) steps:
- Click the Settings (gear) button.
- Click on Mail.
- Click the “Message handling” setting.
- Check the “Empty my deleted items folder” option under the “Message options” section to remove deleted items when you sign out of the app.
- Check the “Mark displayed items as read when the selection changes” option under the “Mark as read” section.
- Choose the “Never send a response” option in the “Read receipts” section to prevent others from knowing when you open their message.
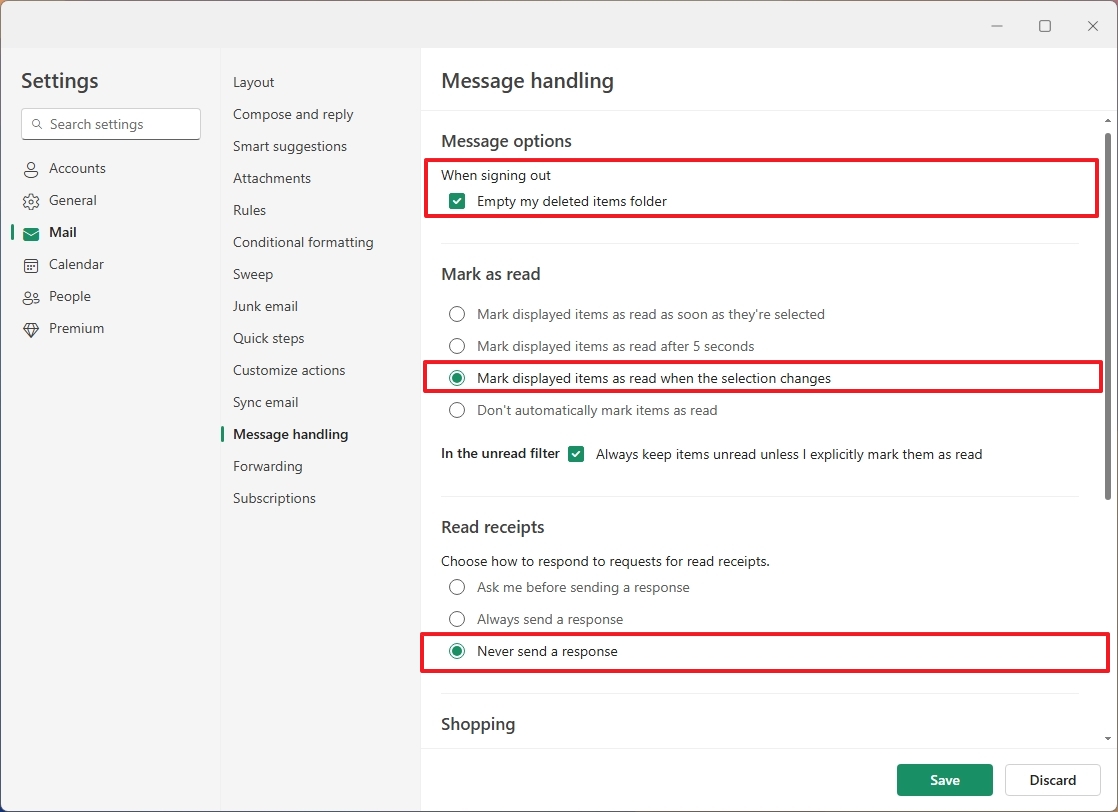
- Quick note: Alternatively, you can choose the “Ask me before sending a response” option, but I would always recommend never sending a response automatically.
- Clear the Shopping option.
- If you receive emails in other languages, you can choose the “Always translate” option.
- Quick tip: If you’re bilingual, you can choose the “Never translate” option.
- Choose the language to which to translate the message.
- Select the languages you don’t want to be translated.
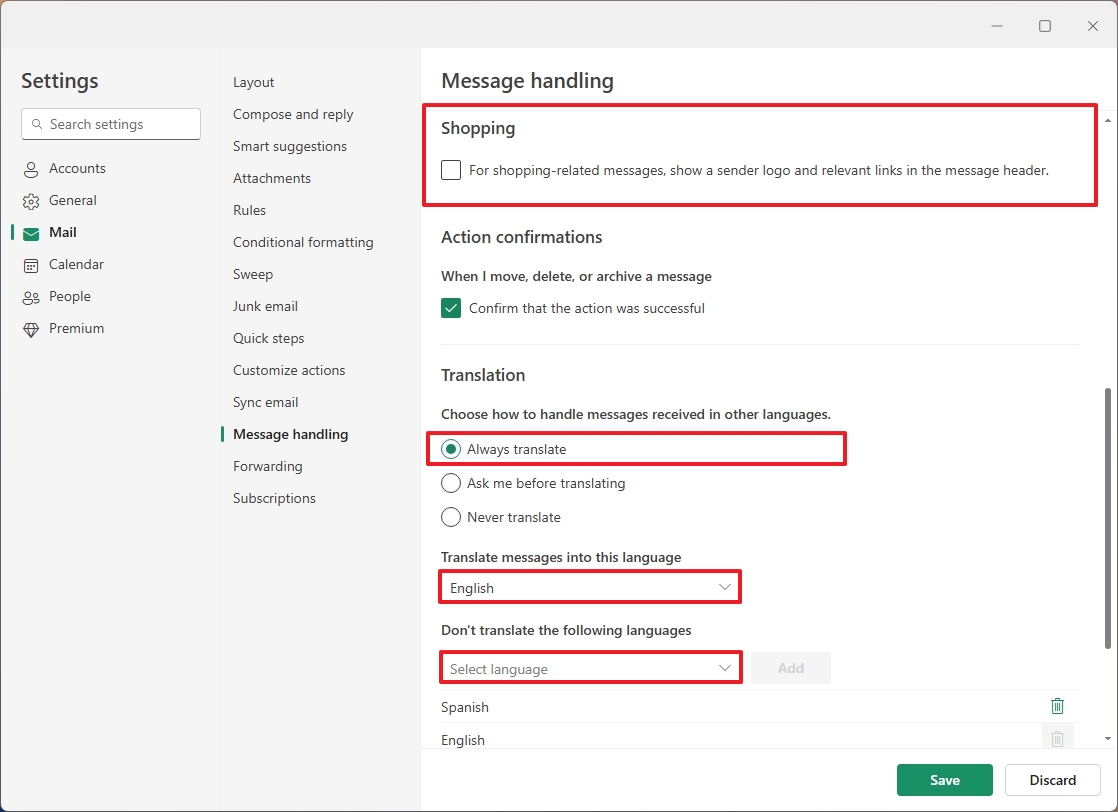
- Click the Add button.
- Click the Save button.
Once you’ve finished the steps, the fresh settings will take effect right away, as per your setup.
Configure Outlook forwarding
Ultimately, it’s worth noting that the Outlook app offers an automated email-forwarding feature. Here’s a simple guide on how to do it:
- Click the Settings (gear) button.
- Click on Mail.
- Click the “Forwarding” setting.
- Turn on the “Enable forwarding” option.
- Confirm the email address to which to forward emails.
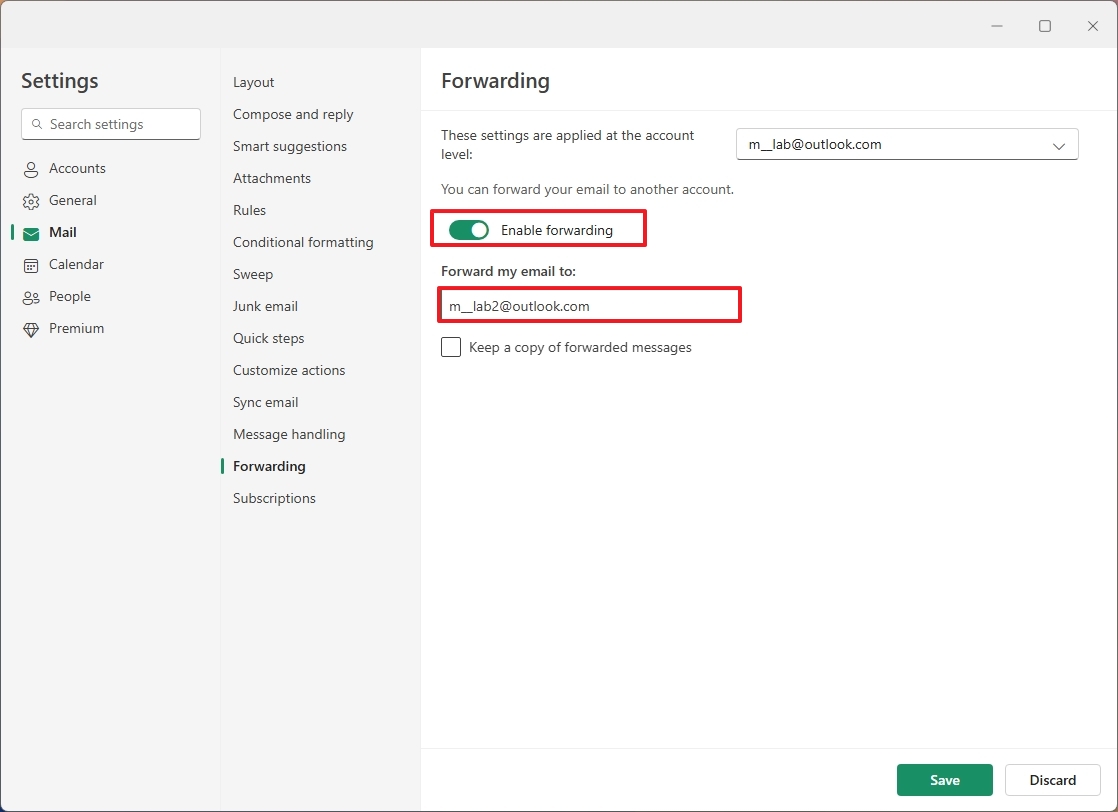
- (Optional) Check the “Keep a copy of forwarded messages” option.
- Click the Save button.
After finishing the outlined procedures, I’ll be responsible for setting up email forwarding from my current address to the newly designated one within Outlook.
Calendar settings
In the “Calendar” area, you’ll find various ways to customize your view and additional functionalities designed specifically for calendars.
As a tech-savvy individual, I’m absolutely thrilled about the versatility of my digital calendar! I can customize its look, manage events, gather weather updates, automate tasks, and even decide who gets access to my calendars. It’s like having a personal assistant at my fingertips!
Customize calendar basic settings
The Outlook app offers a calendar feature with standard functions that most users are familiar with. While the default settings may suffice for many, there’s also an option to tailor various aspects of the application to your preferences. For instance, you can define work days, display weather forecasts in your calendar, adjust event specifications, and much more.
To change the basic calendar settings in the calendar experience for Outlook, use these steps:
- Click the Settings (gear) button.
- Click on Calendar.
- Click the “View” setting.
- Choose the first day of the week.
- Select the work weekdays.
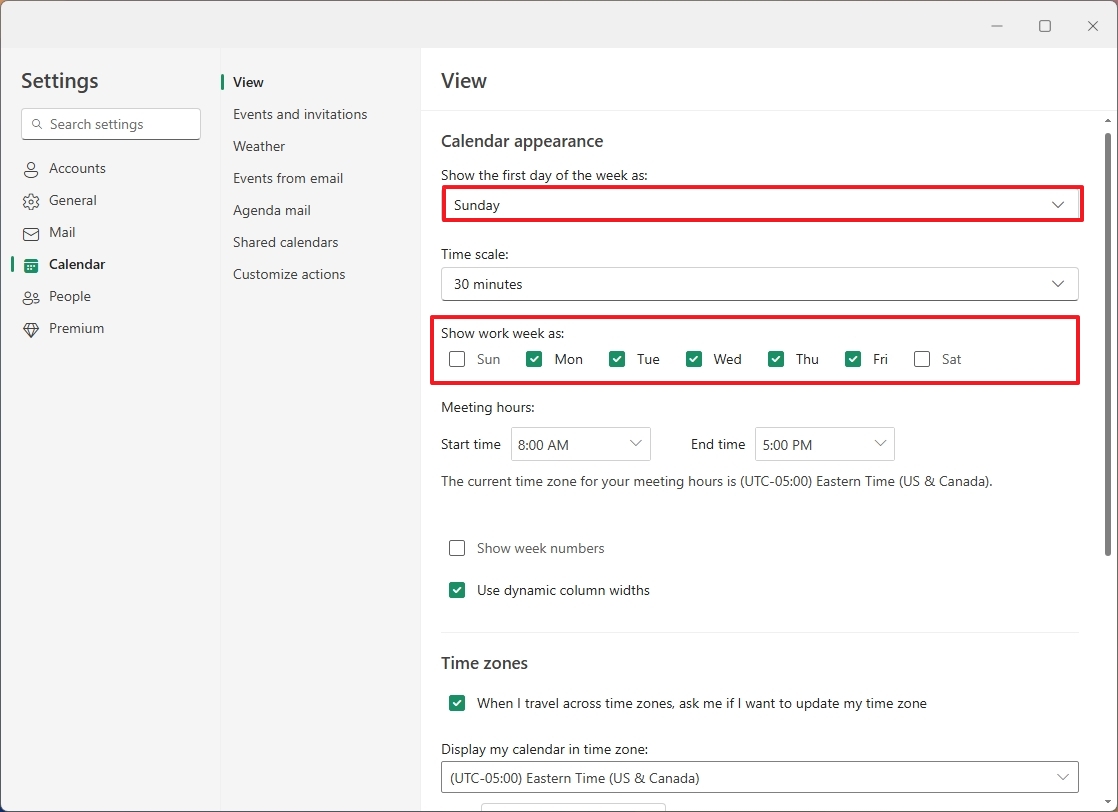
- (Optional) Check the “Show week numbers” option to view the week numbers in the calendar.
- Click the Save button.
- Click on Events and invitations.
- Change the default reminder for events you create.
- Click the Save button.
- Click on Weather.
- Turn the Weather feature on or off for the calendar.
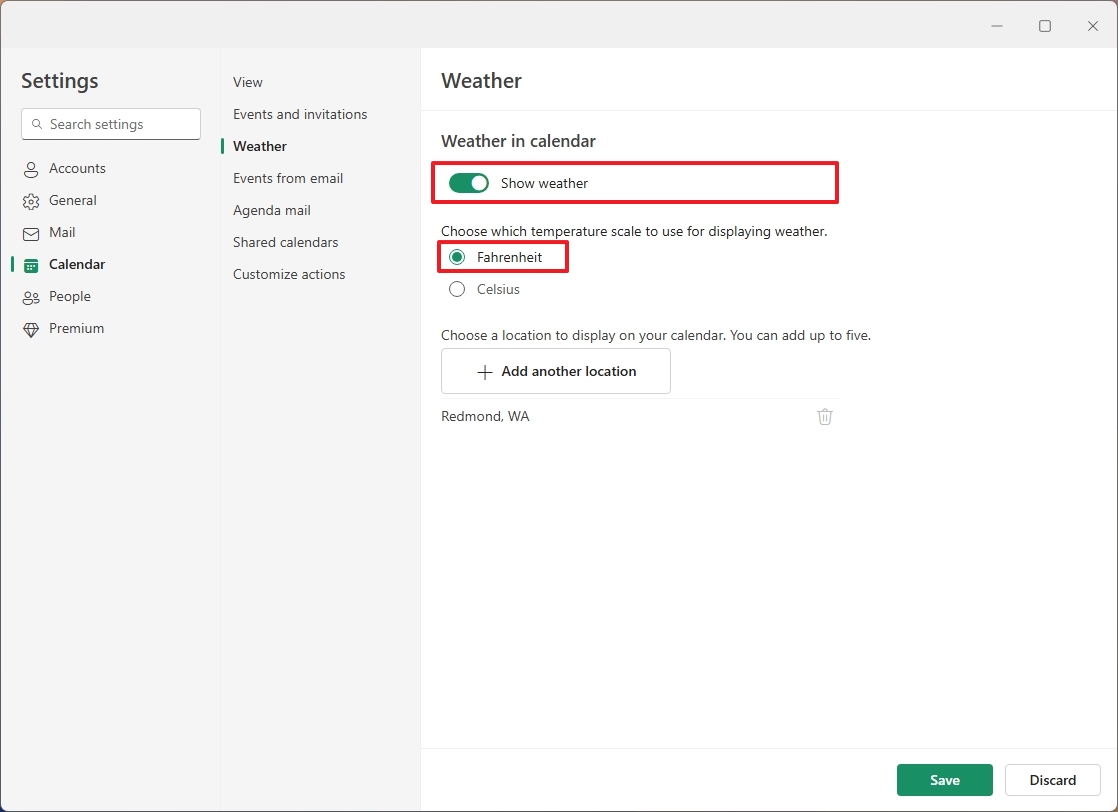
- Choose Fahrenheit or Celsius.
- Click the “Add another location” button to set your weather location for the calendar.
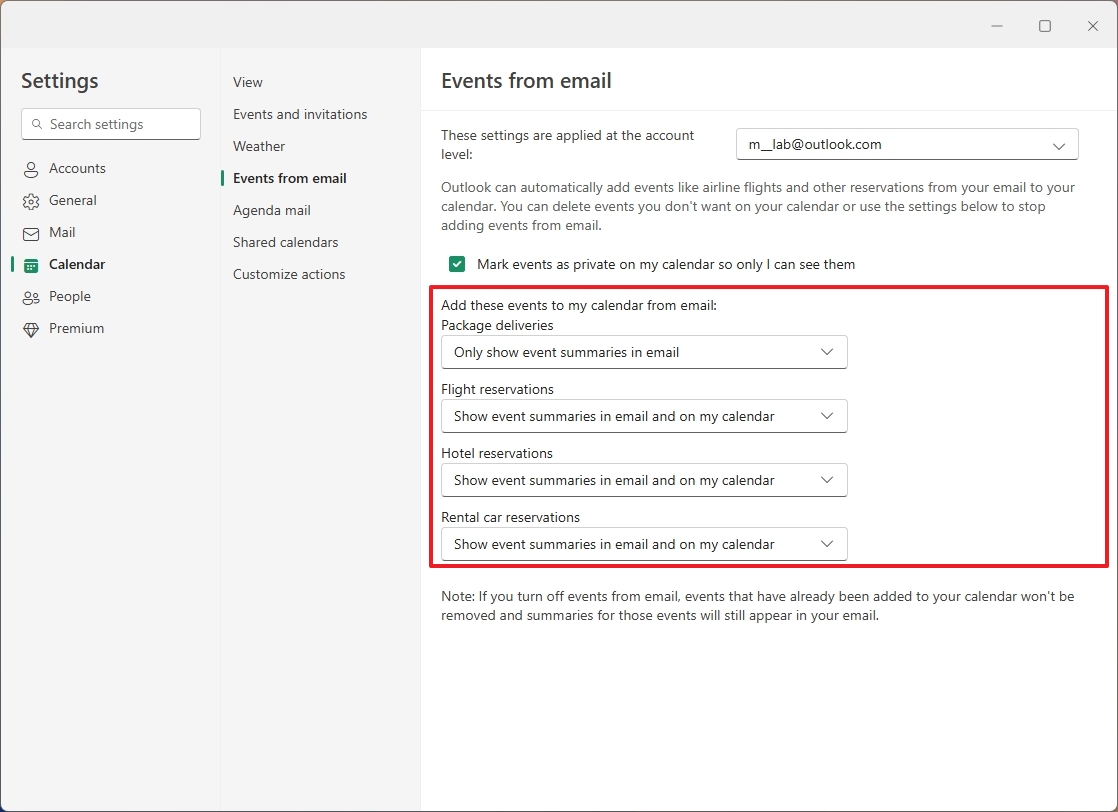
- Click on Events from email.
- Choose whether to add package delivery, flight, hotels, and car rental reservations to the calendar.
- Click on Agenda mail.
- (Optional) Turn off the “Send me a daily agenda mail” option to prevent the app from sending you daily emails with events and tasks.
After you complete the steps, the new settings will apply to the calendar.
Share an Outlook calendar
If you want, it’s also possible to share the calendar with other people, and here’s how:
- Click the Settings (gear) button.
- Click on Calendar.
- Click the “Shared calendars” setting.
- Choose the calendar under the “Share a calendar” section.
- Click the Share button.
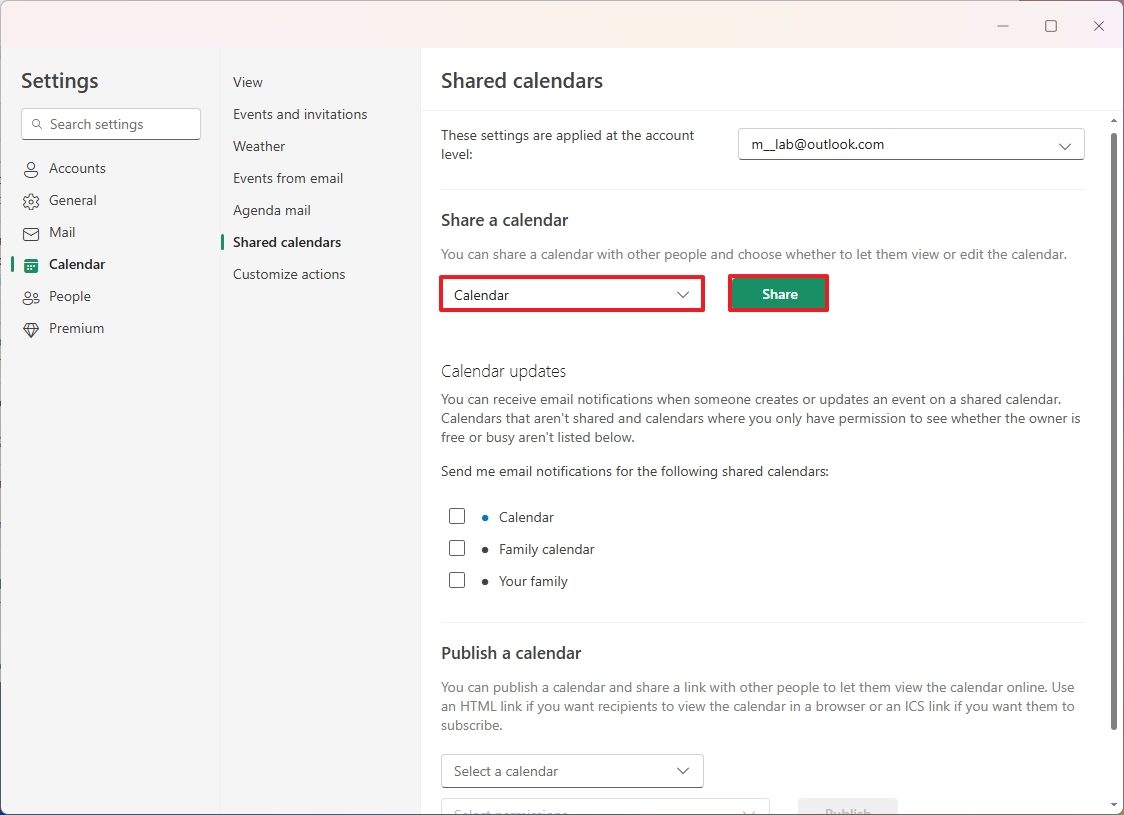
- Confirm the email address to share the calendar.
- Click the Share button.
Once you complete the steps, the calendar should be available for the recipients.
More resources
- Confirm a name for the signature.
- Compose your custom signature.
- Choose the default signature for new, replay, and forward messages.
- Click the Save button.
- Click the Settings (gear) button.
- Click on Accounts.
- Click the Storage setting.
- Review your storage usage.
- Click the Settings (gear) button.
- Click on General.
- Click the “Appearance” setting.
- (Option 1) Choose the Light or Dark mode.
- (Option 2) Choose the “Use system settings” option to change the mode automatically when changing the Windows 11 color mode.
Read More
- WCT PREDICTION. WCT cryptocurrency
- The Bachelor’s Ben Higgins and Jessica Clarke Welcome Baby Girl with Heartfelt Instagram Post
- The Elder Scrolls IV: Oblivion Remastered – How to Complete Canvas the Castle Quest
- Chrishell Stause’s Dig at Ex-Husband Justin Hartley Sparks Backlash
- Guide: 18 PS5, PS4 Games You Should Buy in PS Store’s Extended Play Sale
- AMD’s RDNA 4 GPUs Reinvigorate the Mid-Range Market
- Royal Baby Alert: Princess Beatrice Welcomes Second Child!
- New Mickey 17 Trailer Highlights Robert Pattinson in the Sci-Fi “Masterpiece”
- Studio Ghibli Creates Live-Action Anime Adaptation For Theme Park’s Anniversary: Watch
- SOL PREDICTION. SOL cryptocurrency
2024-08-20 16:42