Microsoft is gradually releasing Windows Recall and associated AI functionalities like Click to Do and Semantic Indexing for enhanced Windows Search, on modern PCs equipped with the most current version of Windows 11. This rollout follows nearly a year of postponements and addressing security issues.
Initially, Windows Recall was planned for launch together with Copilot+ PCs and Windows 11 version 24H2 in June 2024. However, due to issues concerning privacy and security, the company was forced to push back the release until October 2024. As the feature wasn’t yet ready, it required an additional delay.
Microsoft has been diligently enhancing the security of Recall over several months, and they are now progressively releasing it alongside Click to Do and Semantic Indexing for devices that are compatible.
Here, you’ll find a step-by-step walkthrough for initiating the use of the latest AI functionalities available on Windows 11.
What’s new for Windows Recall
In the realm of Windows 11, there’s a unique functionality called Recall. This feature automatically captures snapshots of your ongoing activities at regular intervals. Next, it employs artificial intelligence to decipher the data, enabling you to find what you need by simply using conversational language for search purposes.
During this release, the system will automatically download and set up the essential elements (if they’re not already present), such as the Windows Copilot Runtime, the Recall application, Click to Do feature, and Semantic Indexing.
The Windows Copilot Runtime serves as the foundation for over 40 artificial intelligence tools (such as a Screen Region Detector, Text Recognizer, Language Analyzer, and Image Processor), which drive various functionalities. These smaller AI modules operate simultaneously to identify text, images, videos, audio, and more.
Recall is an app that offers an interface that allows you to find and interact with the snapshots.
The “Click to Do” function operates both within and beyond the boundaries of the Recall app, serving as the tool that manages the artificial intelligence tasks you can execute on highlighted text and various items.
Ultimately, Semantic Indexing is a technology that employs Artificial Intelligence, particularly Natural Language Processing (NLP), to enable the system to comprehend and interpret queries effectively.
Enable Recall
If the system doesn’t yet prompt you to activate the feature, here’s how you can subscribe to Windows Recall manually.
Or simply:
If it hasn’t asked you to turn on the feature, follow these steps to join Windows Recall.
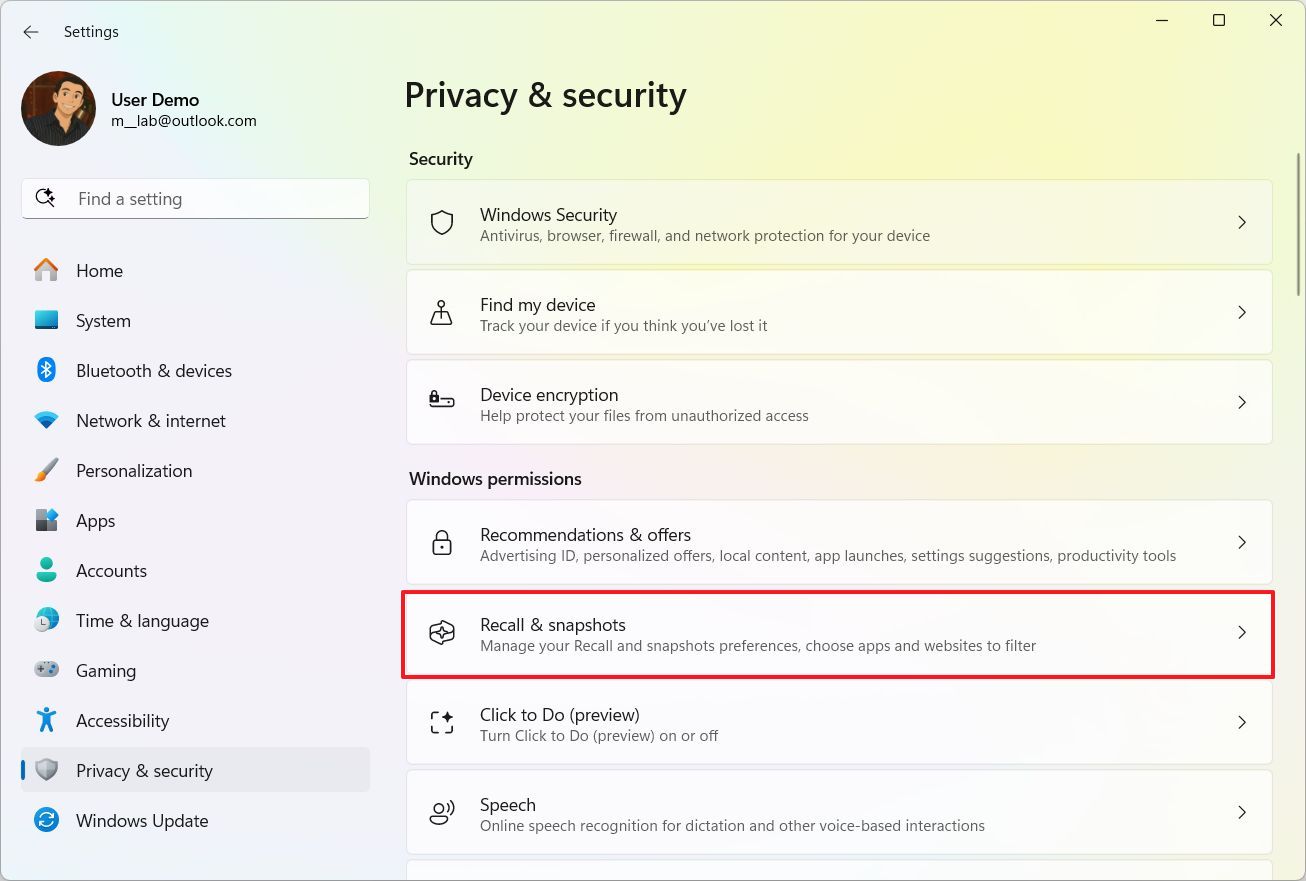
- Open Settings.
- Click on Privacy & security.
- Click the Recall & snapshots page on the right side.
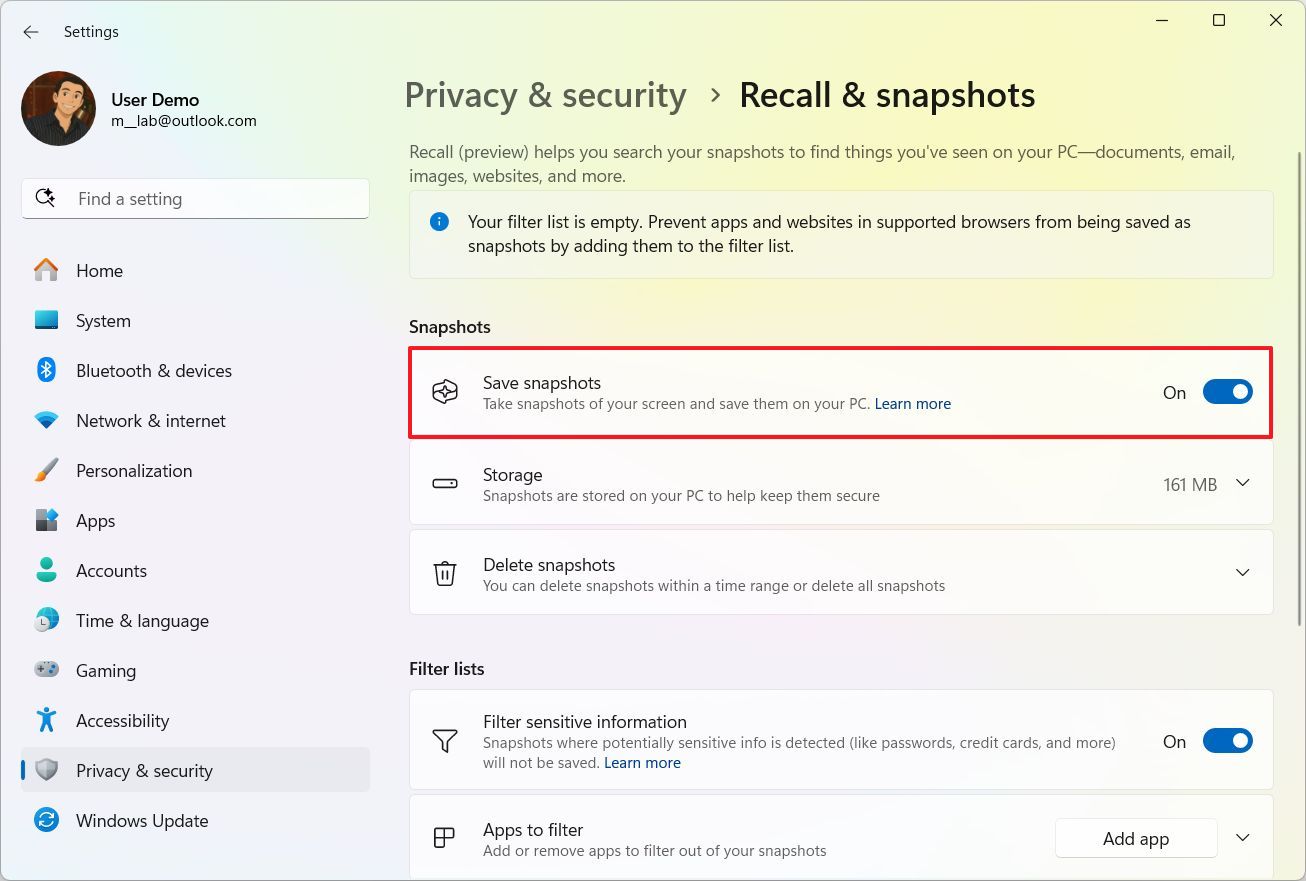
- Turn on the “Save snapshots” toggle switch to enable Recall.
As an alternative, you can activate the AI feature by opening the “Recall” application and choosing to save snapshots on your computer.
Access Recall
To get started with the Windows Recall app, use these steps:
- Open Start.
- Search for Recall and click the top result to launch the app.
- Quick tip: You can use the “Windows key + J” keyboard shortcut or open the Recall flyout in the Taskbar and click “Open Recall” to launch the app.
- Continue by authenticating using Windows Hello.
- (Option 1) Use the search box to search for a snapshot using natural language.
- Quick tip: You can also click the “microphone” button and perform a voice search.
- Click on the snapshot from the search result.
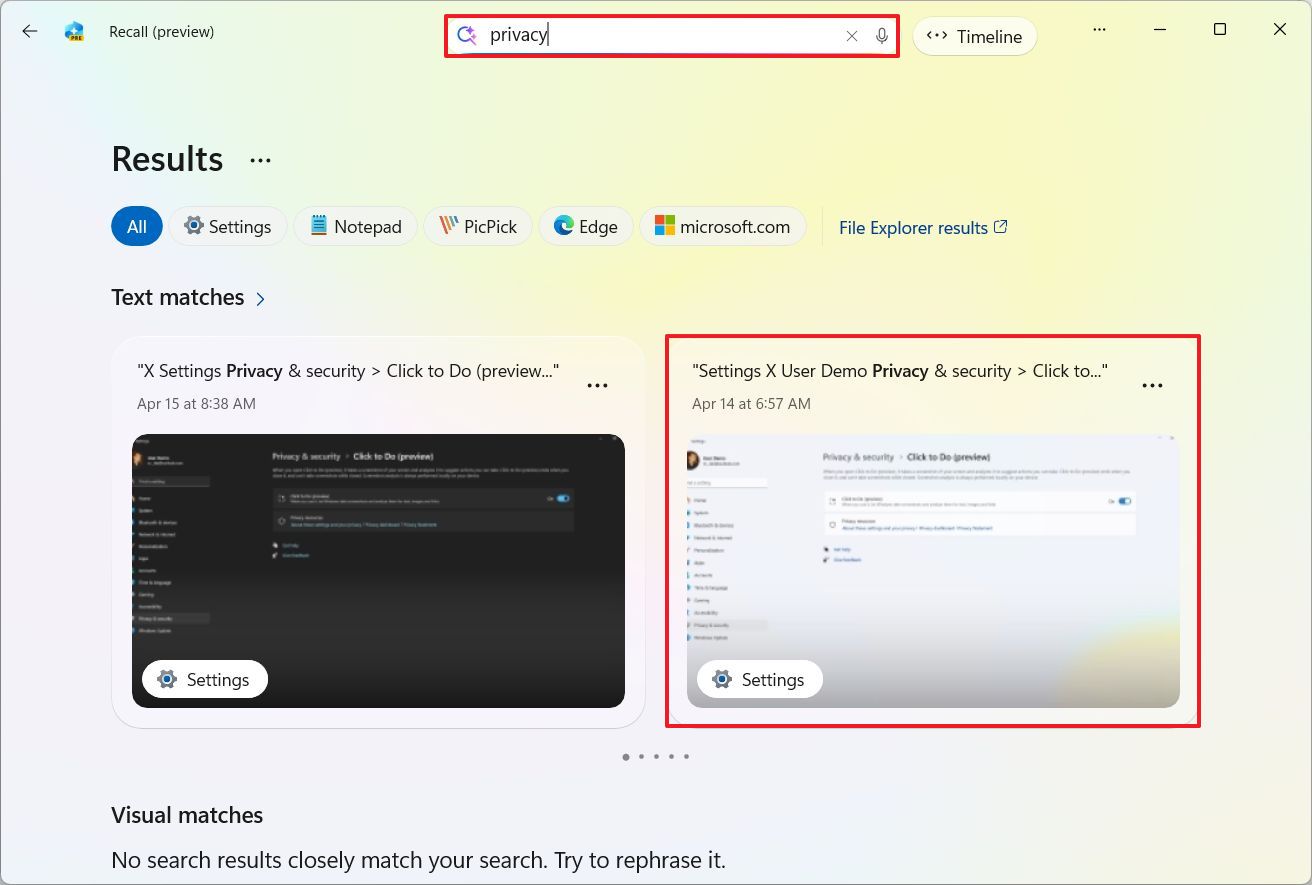
- Quick tip: If the feature can’t find any matches, you can click the “File Explorer results” option to perform a traditional Windows Search.
- (Option 2) Use the slider to scroll through the timeline and find a specific snapshot.
- Choose the snapshot with the activity you want to analyze.
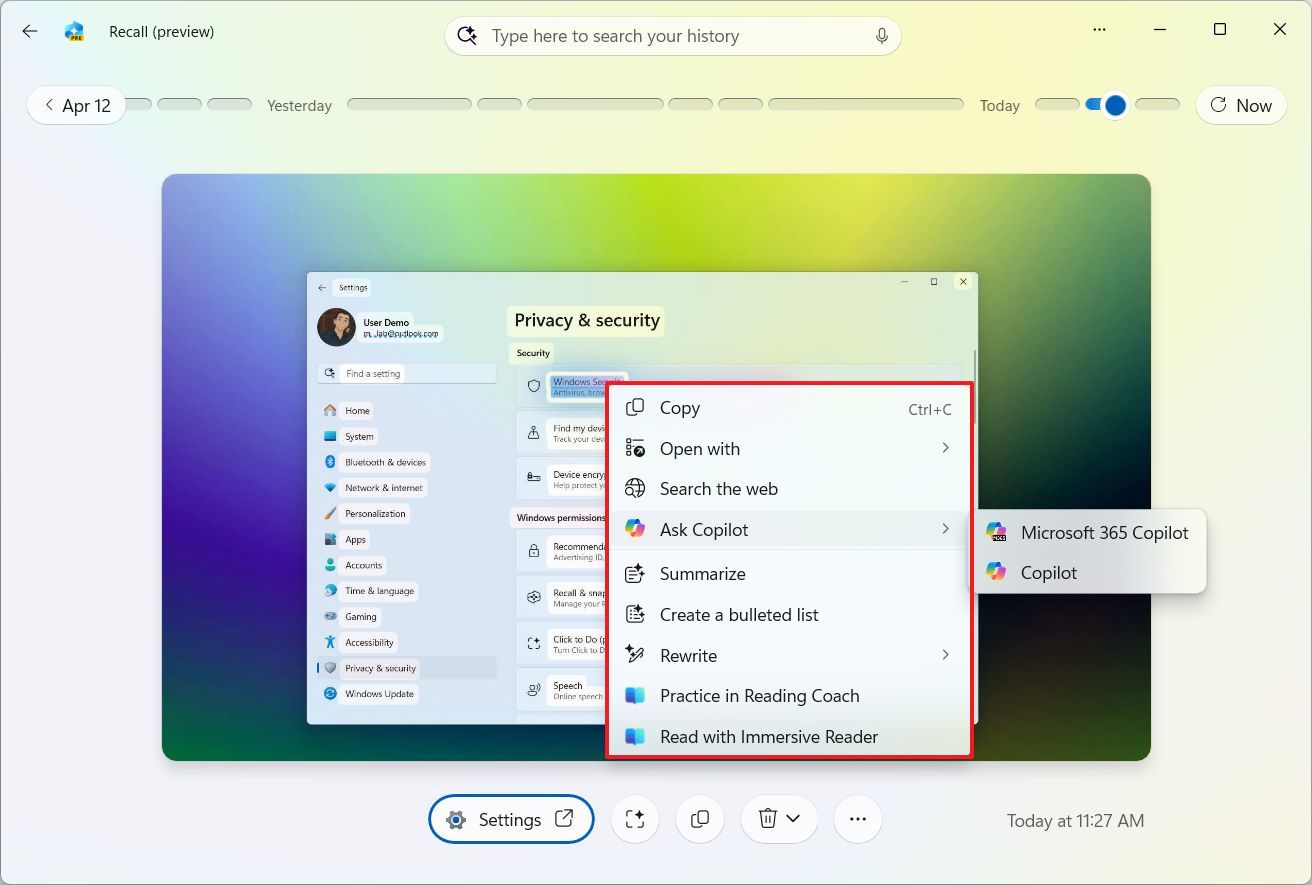
- Select the text or object of interest and right-click the selection to access the different actions using Click to Do.
- (Optional) Click the app button to launch the program in the snapshot.
- Quick note: This option only opens the app, not the contents on the snapshot.
- (Optional) Click the Copy button to copy the snapshot as a screenshot to the clipboard.
- (Optional) Click the Delete button to remove the snapshot from your computer.
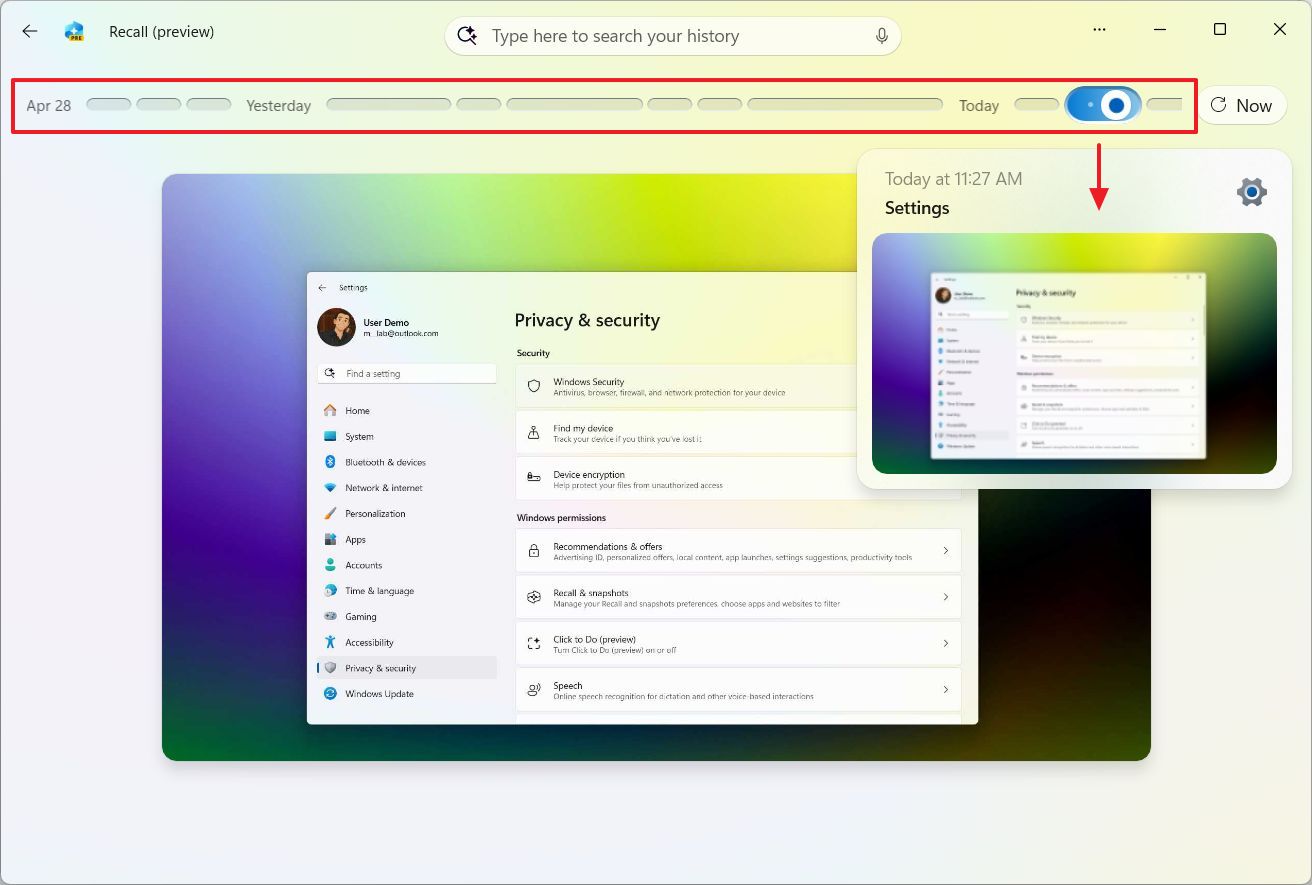
Additionally, you have the option to click on the “‘Recall’ button” located in the System Tray. This action will display a flyout containing a peek at the current screenshot, an option to launch the application, and a choice to momentarily halt the feature.
The flyout also includes an option to access the settings to manage Windows Recall.
Configure Recall
To configure the Windows Recall features, use these steps:
- Open Settings.
- Click on Privacy & security.
- Click the Recall & snapshots page from the right side.
Using the “Recall & snapshots” settings page, you can control various aspects of the feature.
The toggle switch labeled “‘Save snapshots’” lets you enable or disable this feature. Turning off the Recall feature won’t erase the snapshots that have been stored on your computer previously.
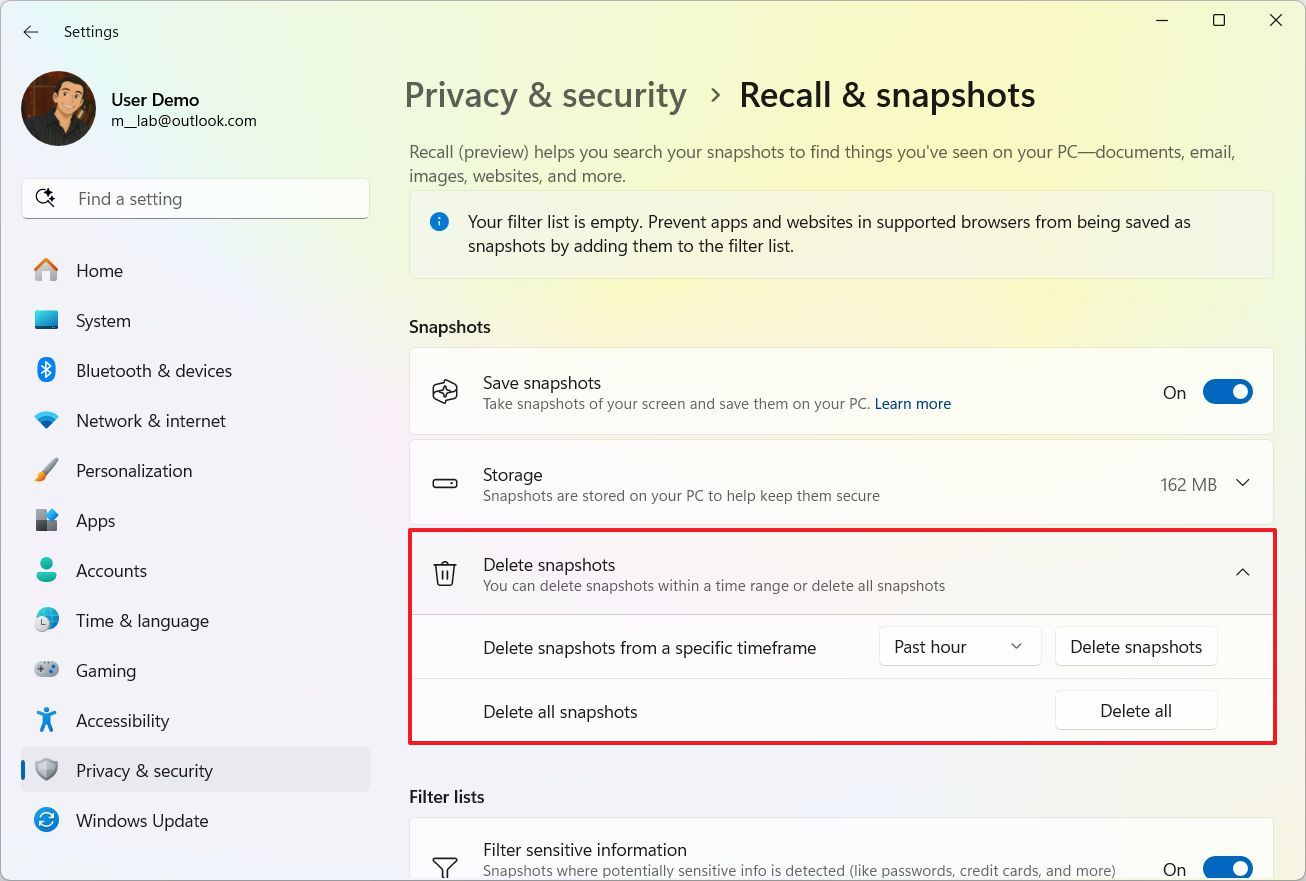
To remove the snapshots, navigate to the “Delete snapshots” option, select your desired timeframe, then hit the “Delete snapshots” button within the “Delete snapshots from a specific timeframe” settings.
Click the “‘Clear all’” button in the ‘Delete all snapshots’ section to erase all the data saved on your computer.
By setting, the system automatically allocates 25GB on devices featuring a 256GB solid-state drive (SSD), 75GB on devices boasting a 512GB SSD, and 150GB on those equipped with a 1TB SSD. Nonetheless, you have the option to adjust this allocation using the following guidelines.
To adjust your storage settings, simply tap on the “Storage” option and select your preferred storage allocation size by modifying the “Maximum storage for snapshots” setting.
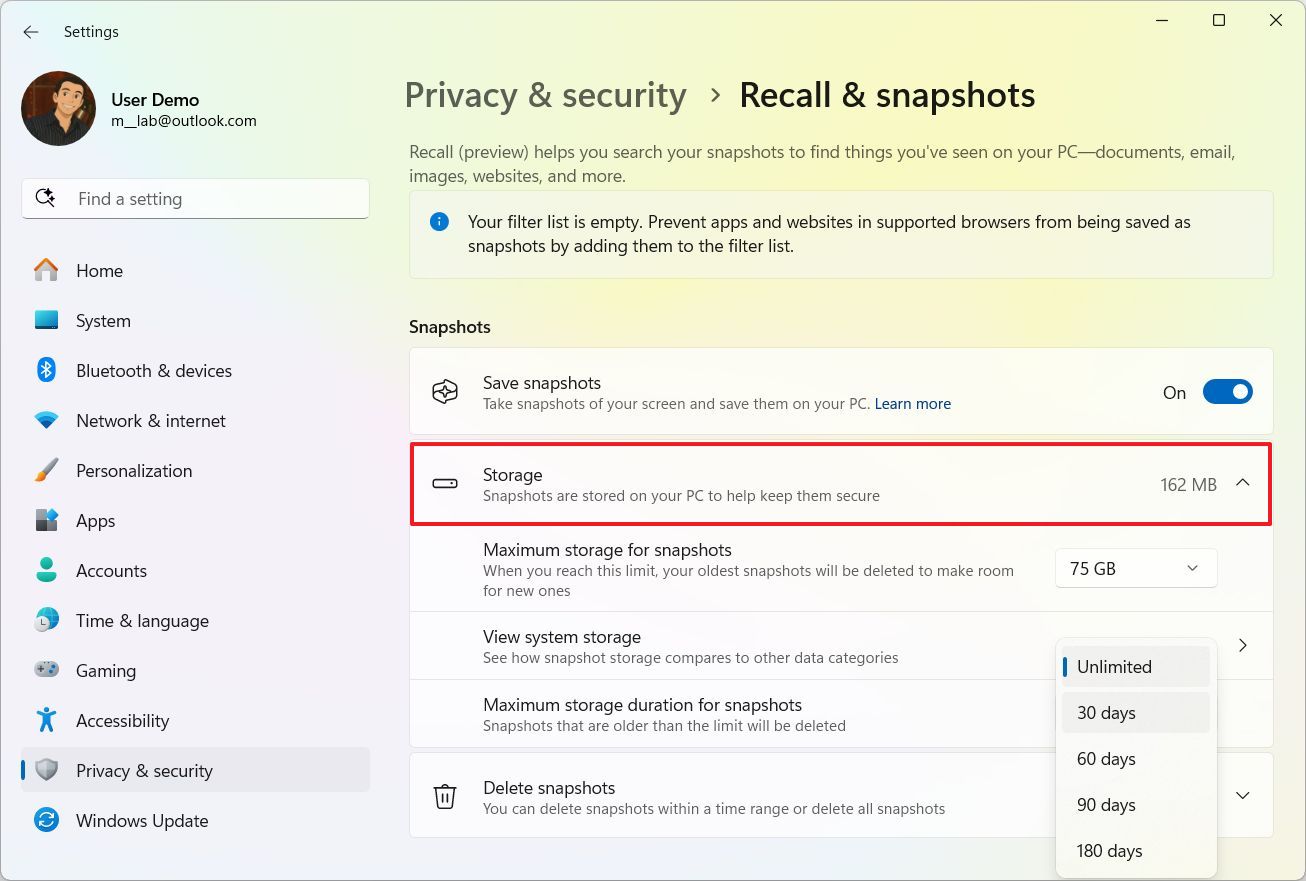
Additionally, you can set the “Maximum retention period for snapshots” to automatically delete old snapshots following a certain timeframe.
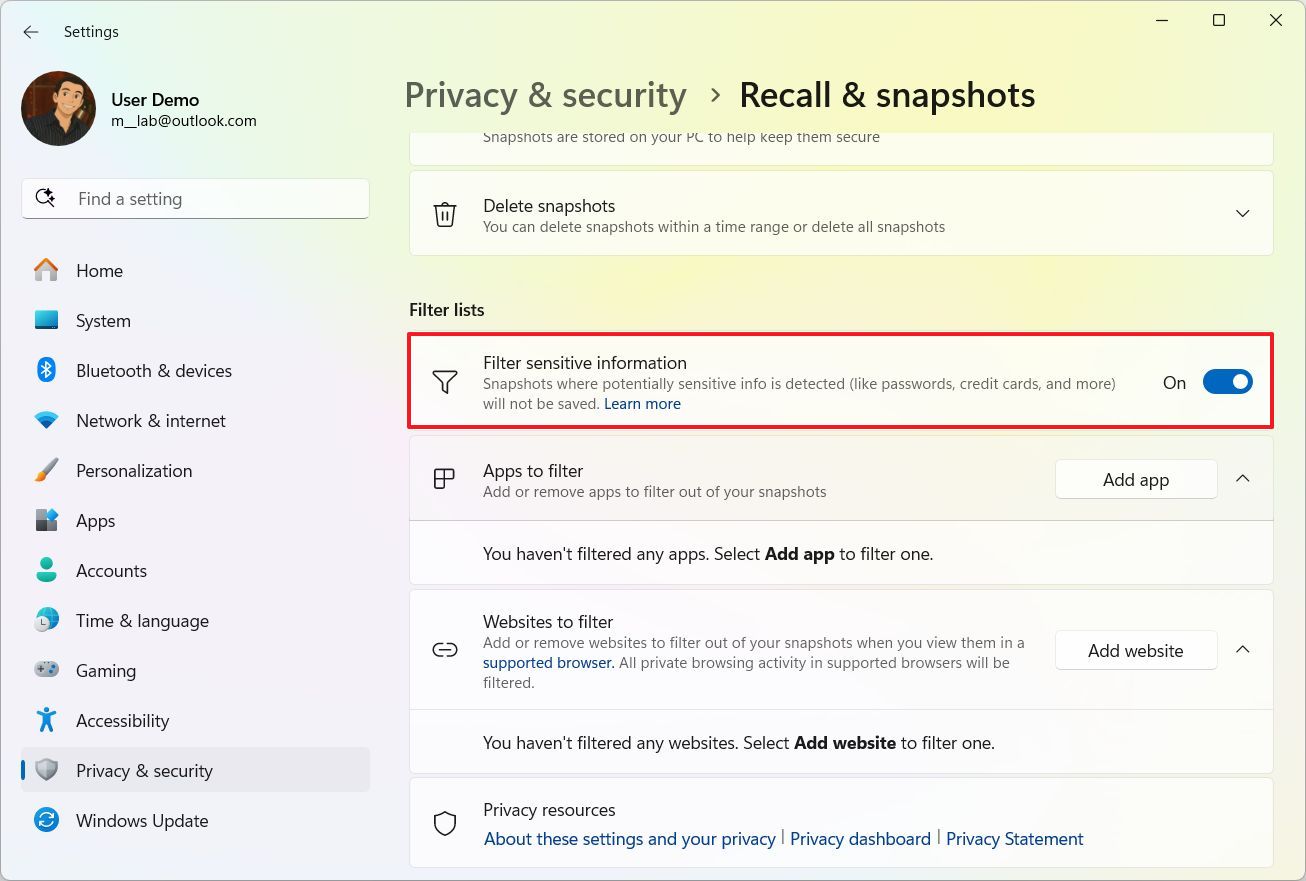
The “Filter lists” settings enable you to stop the Recall function from storing confidential data. In its standard state, this function filters passwords, credit card details, among other sensitive information. Yet, you also have the option to exempt specific apps and websites from this filtration process.
If you decide not to include a particular site, please be aware that this function is compatible with Microsoft Edge, Google Chrome, Opera, Mozilla Firefox, as well as other browsers based on the Chromium platform.
You can learn more about Windows Recall in my more in-depth guide.
Additionally, you can configure the “‘Maximum retention period for snapshots’” option to automatically remove snapshots after a defined timeframe.
The “Filter lists” settings enable you to stop the Recall function from storing confidential data. Initially, this function filters passwords, credit card details, and similar info. Yet, you have the option to exempt specific apps and websites as well.
Should you opt to disregard a particular site, remember that this functionality is compatible with Microsoft Edge, Google Chrome, Opera, Mozilla Firefox, and any browser based on the Chromium platform.
You can learn more about Windows Recall in my more in-depth guide.
What’s new for Click to Do
In Windows 11, there’s a new AI-powered tool called “Click to Do” which offers various suggestions for performing specific tasks, all based on the context shown on the screen. Notably, this function operates both within and beyond the scope of Windows Recall.
One intriguing point about this tool is its ability to capture screenshots and subsequently analyze them for text and images using artificial intelligence; however, it fails to understand or identify the content of the images or text.
With Click to Do, all operations take place on your device, keeping your data local. However, if you perform a web search or seek assistance from Copilot, that’s when data might be sent to the cloud.
Turn Click to Do on or off
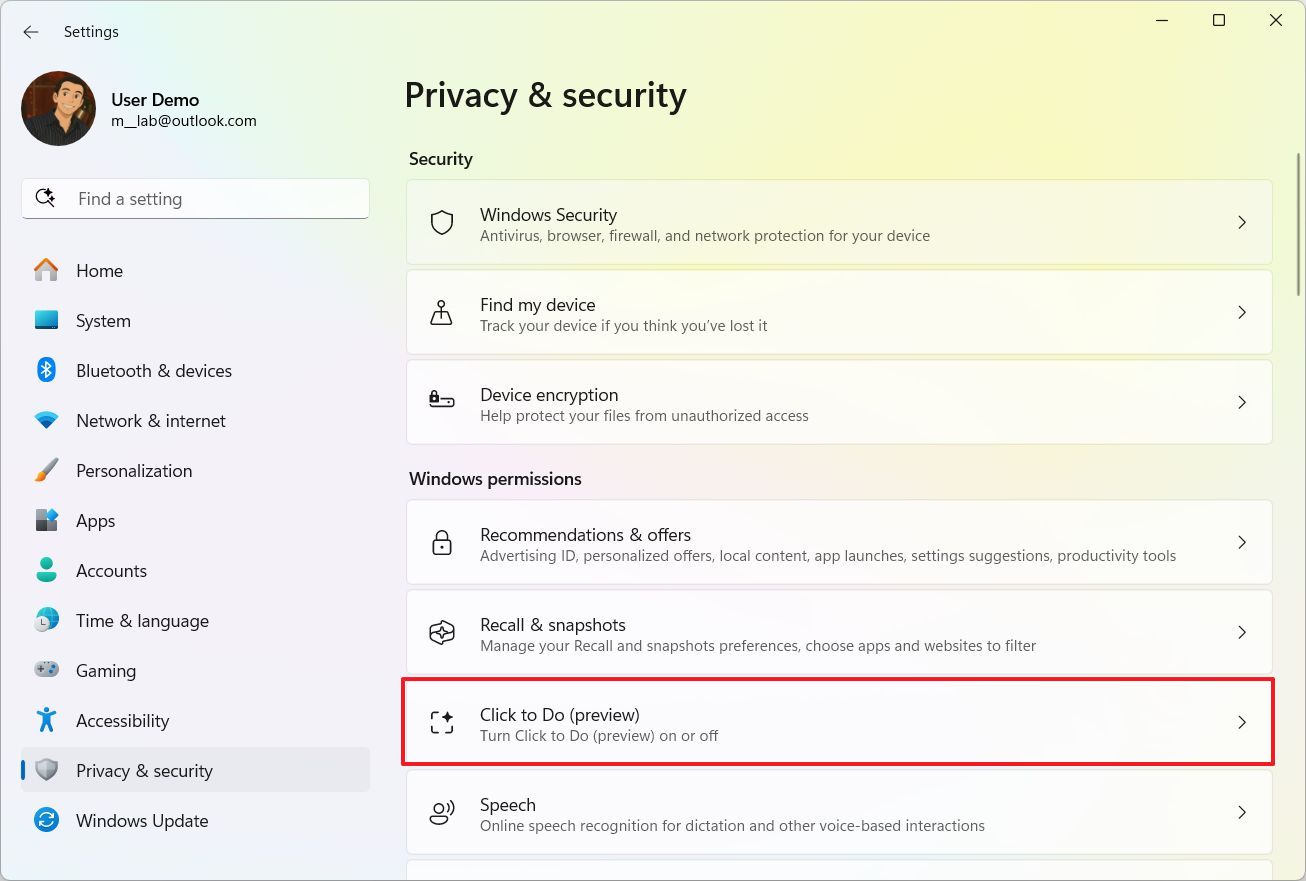
To turn Click to Do on or off on Windows 11, use these steps:
- Open Settings.
- Click on Privacy & security.
- Click the Click to Do page on the right side.
- (Option 1) Turn on the “Click to Do” toggle switch to enable it.
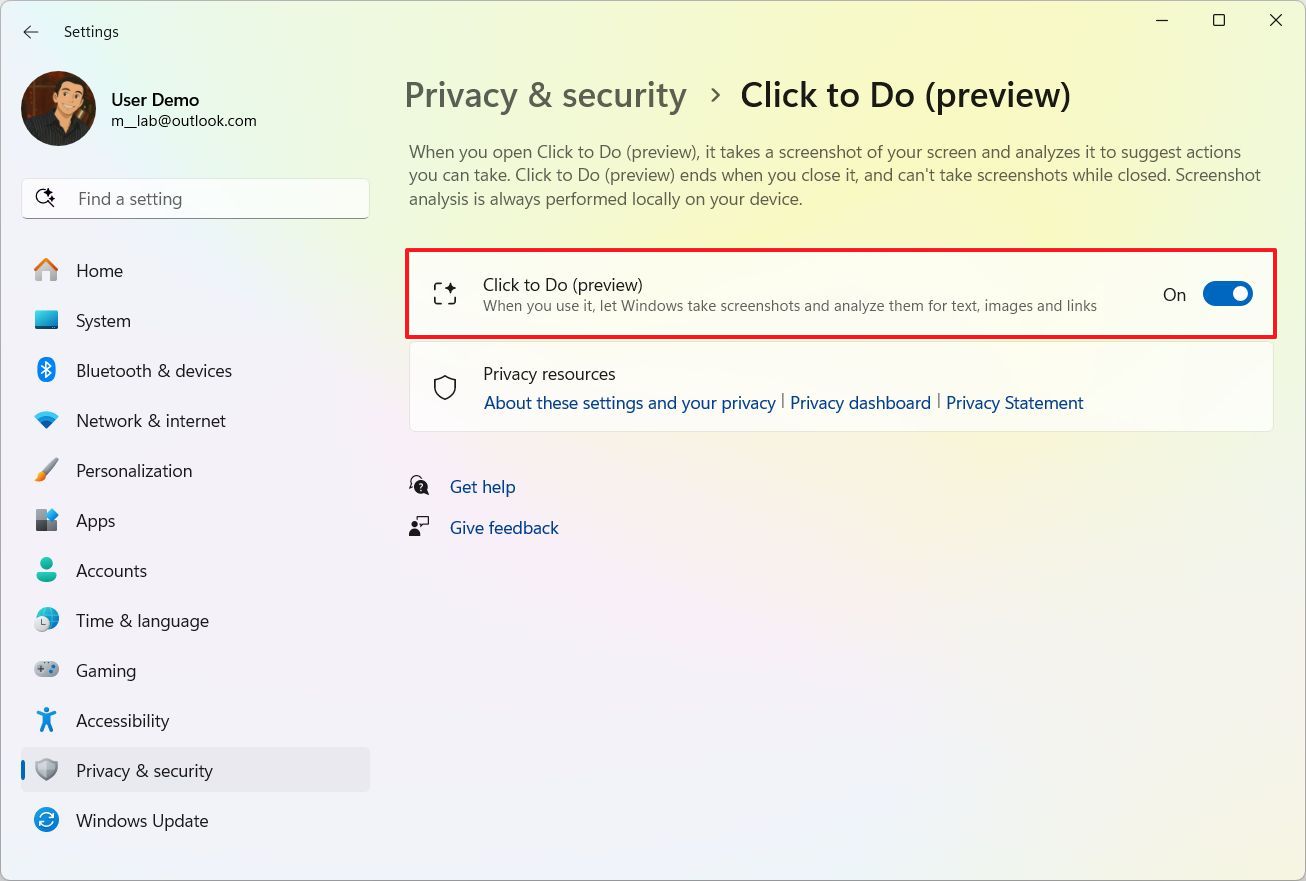
- (Option 2) Turn off the “Click to Do” toggle switch to disable it.
Access Click to Do
To access Click to Do from outside of Recall, use these steps:
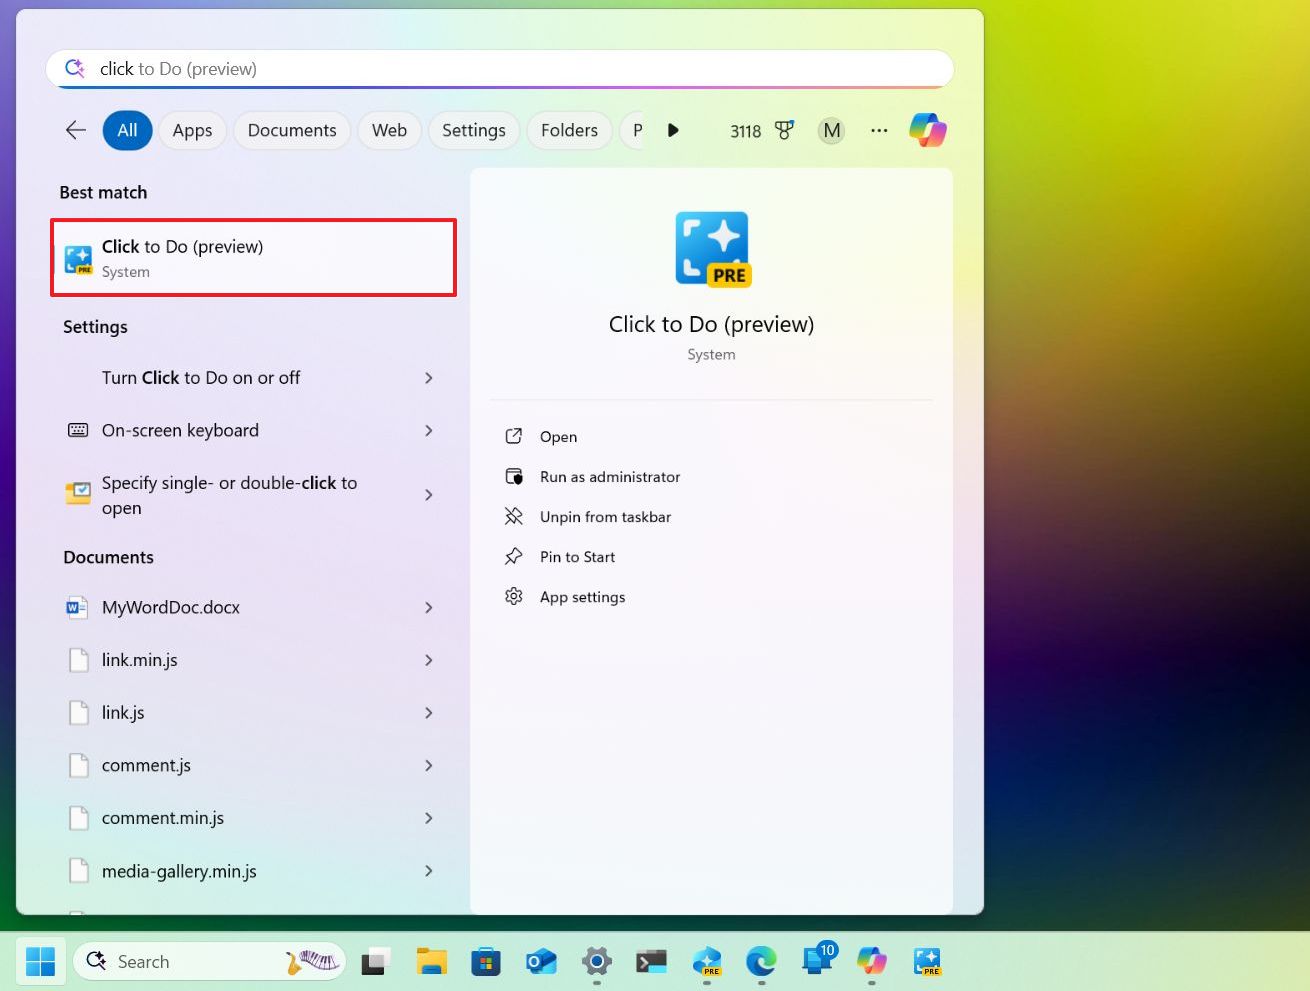
- (Option 1) Open Start, search for Click to Do, and click the top result.
- (Option 2) Invoke the “Windows key + Mouse click” shortcut anywhere on the screen to open the app.
- (Option 3) Invoke the “Windows key + Q” shortcut to launch the app.
- (Option 4) Open Click to Do from the Snipping Tool toolbar.
As you initiate the experience, the feature will create a shimmering visual impact on your screen, followed by the emergence of the toolbar.
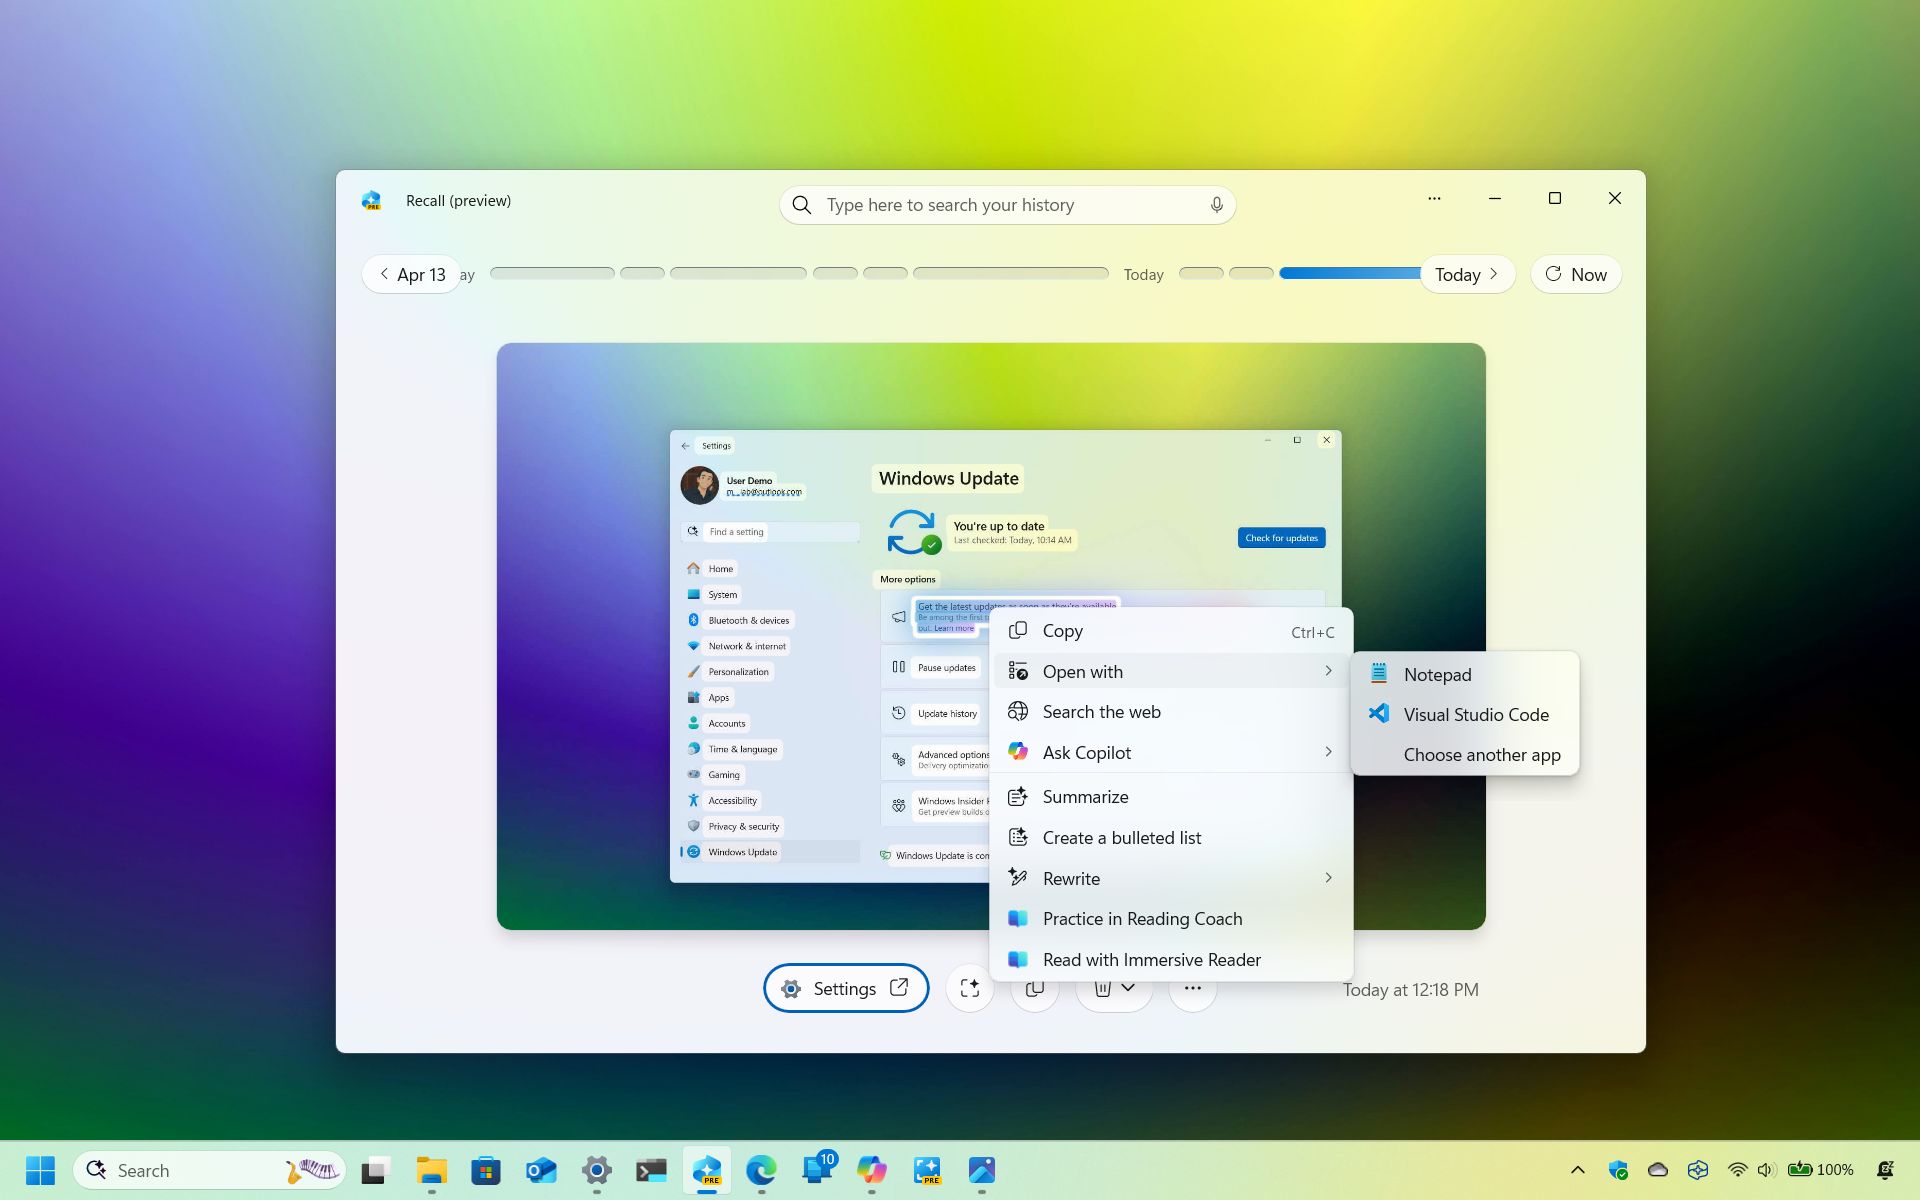
Using the search bar, you can locate a particular piece of text or image by utilizing natural language. Alternatively, if you find something interesting, simply select it and then right-click for a variety of options to appear.
For example, if you select text, the context menu will include the following options:
- Copy.
- Open with.
- Search the web.
- Ask Copilot.
- Summarize.
- Create a bulleted list.
- Rewrite.
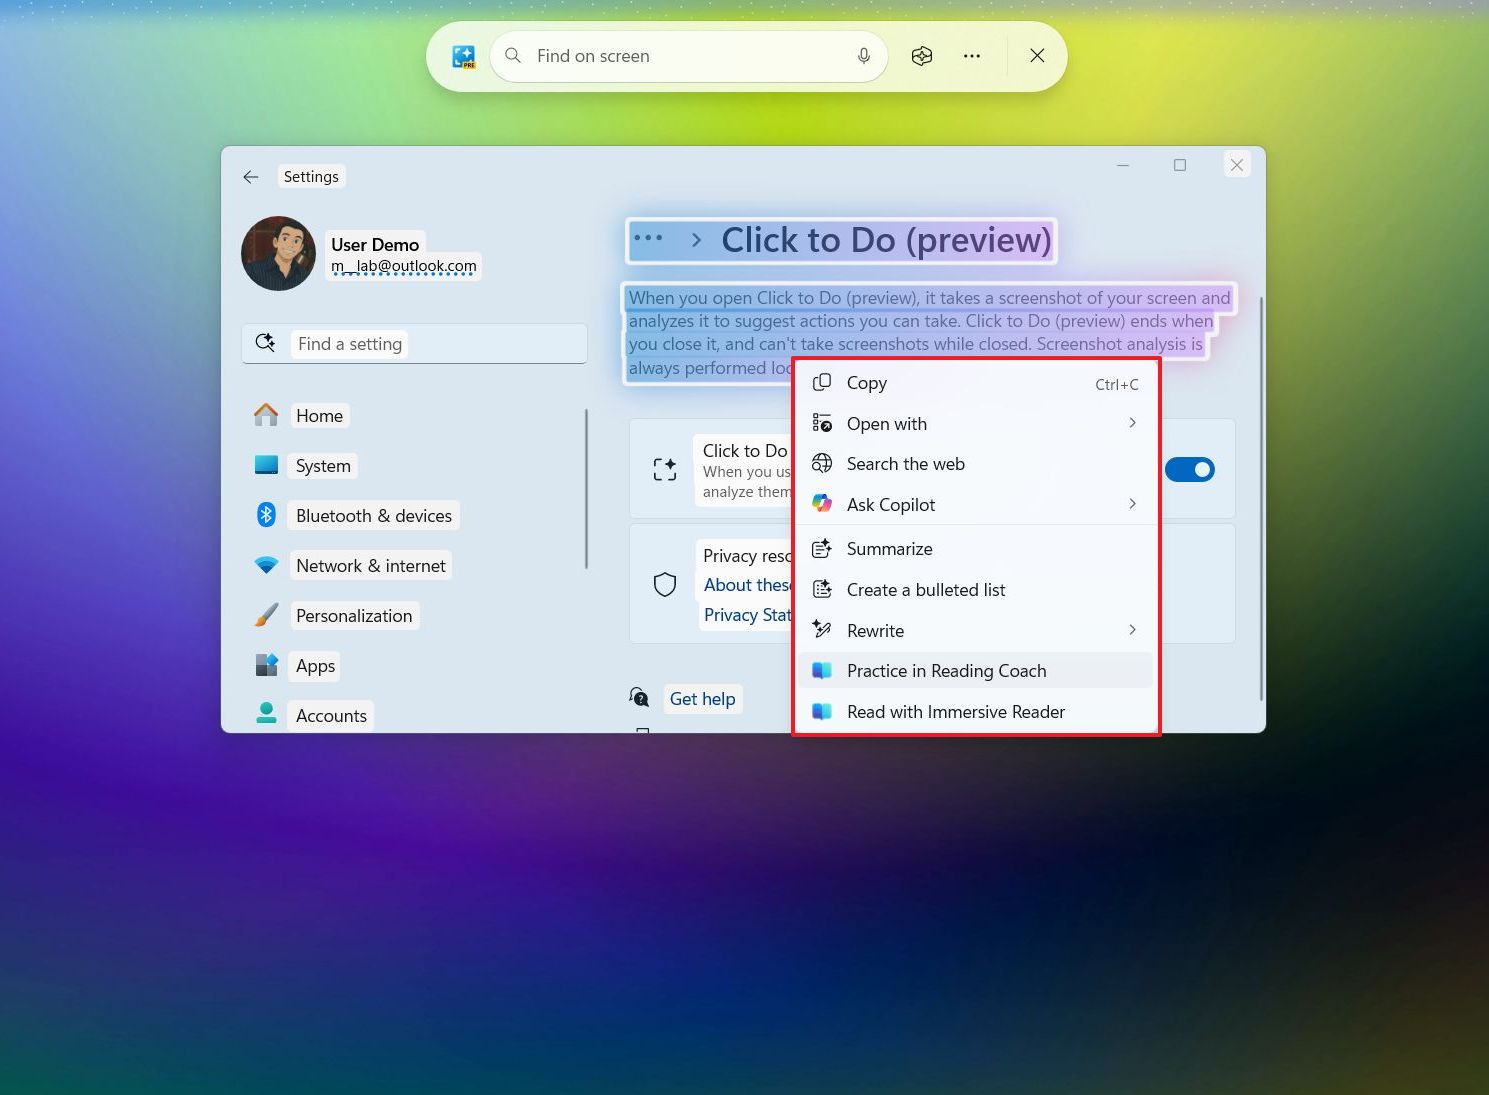
As a tech-savvy reader, if you’ve got the “Reading Coach” application on your device, you’re all set to dive into the world of “Immersive Reader” and enhance your reading skills with the handy “Reading Coach” features!
If you’re selecting a web link, then you’ll find the “Open website” option.
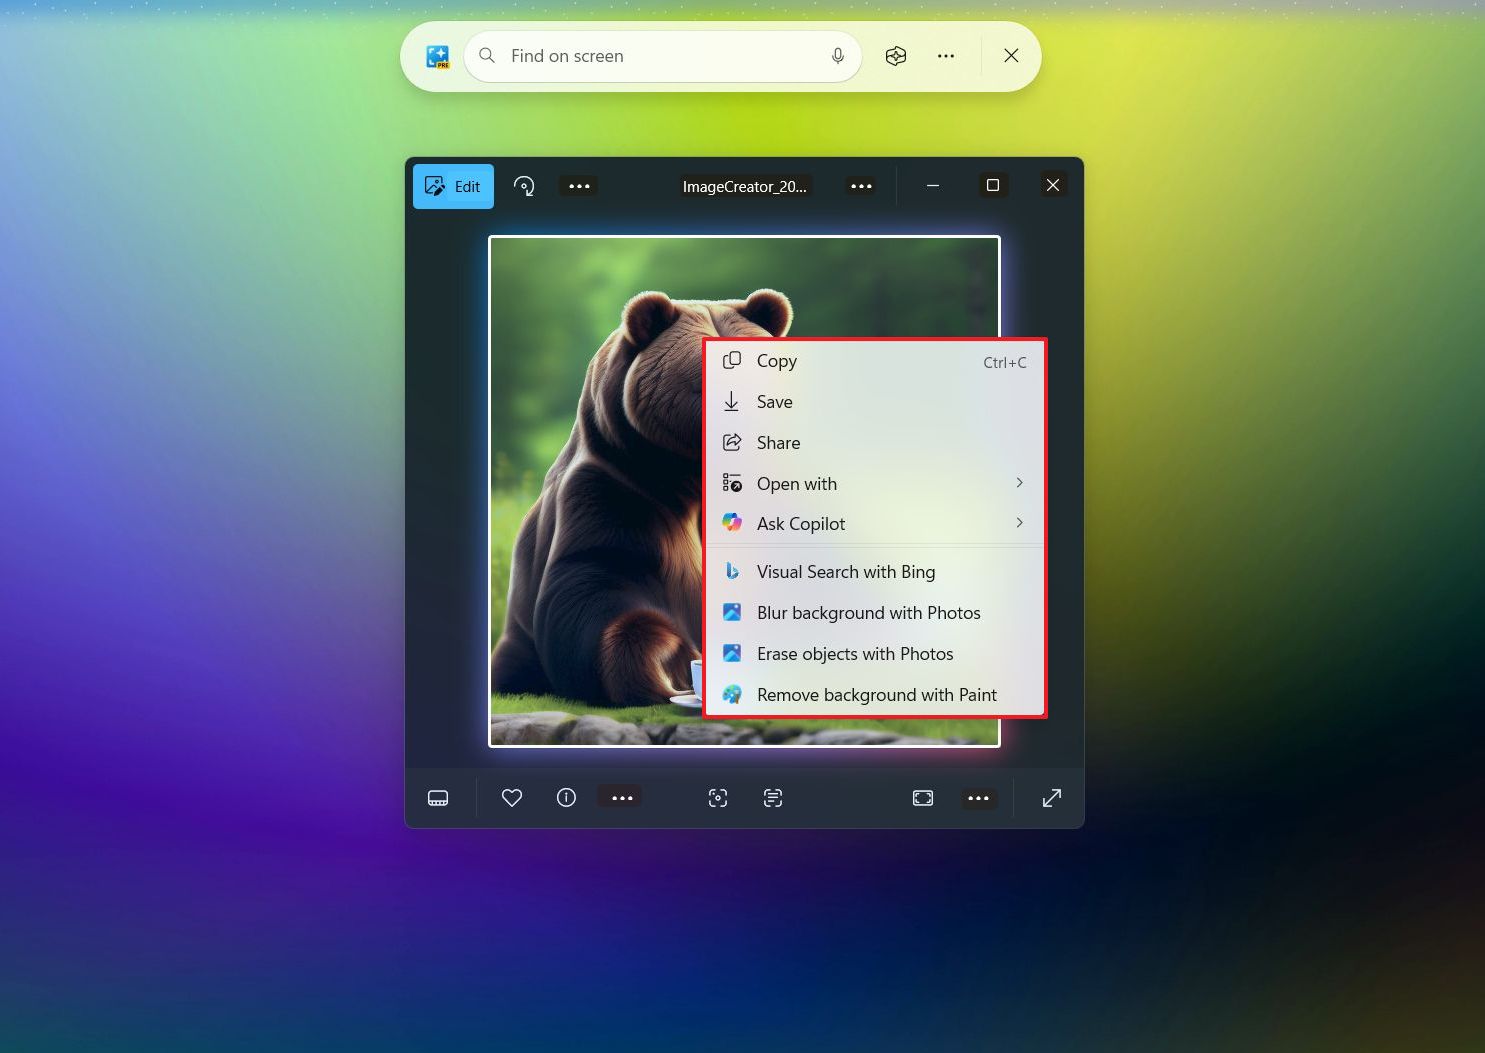
In the case that you right-click on an object, the context menu will include these options:
- Copy.
- Save as.
- Share.
- Open with.
- Ask Copilot.
- Visual search with Bing.
- Blur background with Photos.
- Erase objects with Photos.
- Remove background with Paint.
In the Recall app, you have the option to utilize “Click to Do.” To find this feature, simply follow the steps you’ve learned before.
What’s new for Windows Search
Microsoft is also introducing Semantic Indexing to bring AI to the Windows Search feature.
Semantic Indexing in Windows Search utilizes Natural Language Processing (NLP) and artificial intelligence to understand your queries like a person would, enabling you to search for files, settings, and content using everyday, conversational language.
As a dedicated enthusiast, let me clarify that Semantic Indexing isn’t here to oust Windows Search. Rather, it’s an additional facet enriching the overall search experience.
Now, you can carry on searching by using keywords, yet you have the additional ability to explain in detail what you’re trying to find, without needing to specify any particular details about the file.
Access Semantic Indexing
To use Windows Search with Semantic Indexing, use these steps:
- Open Start or Windows Search from File Explorer.
- Click on the search box.
- Compose your search query using natural language. For example, show me the picture I created with AI about a bear drinking coffee.

It’s worth mentioning that Semantic Indexing can display image results not only from those saved in the cloud, but also from images stored directly on your computer.
In addition, any texts containing your specified keywords from the cloud documents will also show up when you conduct a search.
You can find Semantic Indexing in several places throughout your Windows system: the search box within the Start menu, on the main page of Windows Search, the search boxes found on the Taskbar, in File Explorer, and even within the search experience of the Settings app.
The vibrant, updated search icon featuring two stars and an eye-catching underline in the search box interface indicates that the AI functionality for Windows Search is now accessible.
Change search settings
To improve the search experience, Microsoft recommends to enable the “Enhanced” option:
- Open Settings.
- Click on Privacy & security.
- Click the Searching Windows page on the right side.
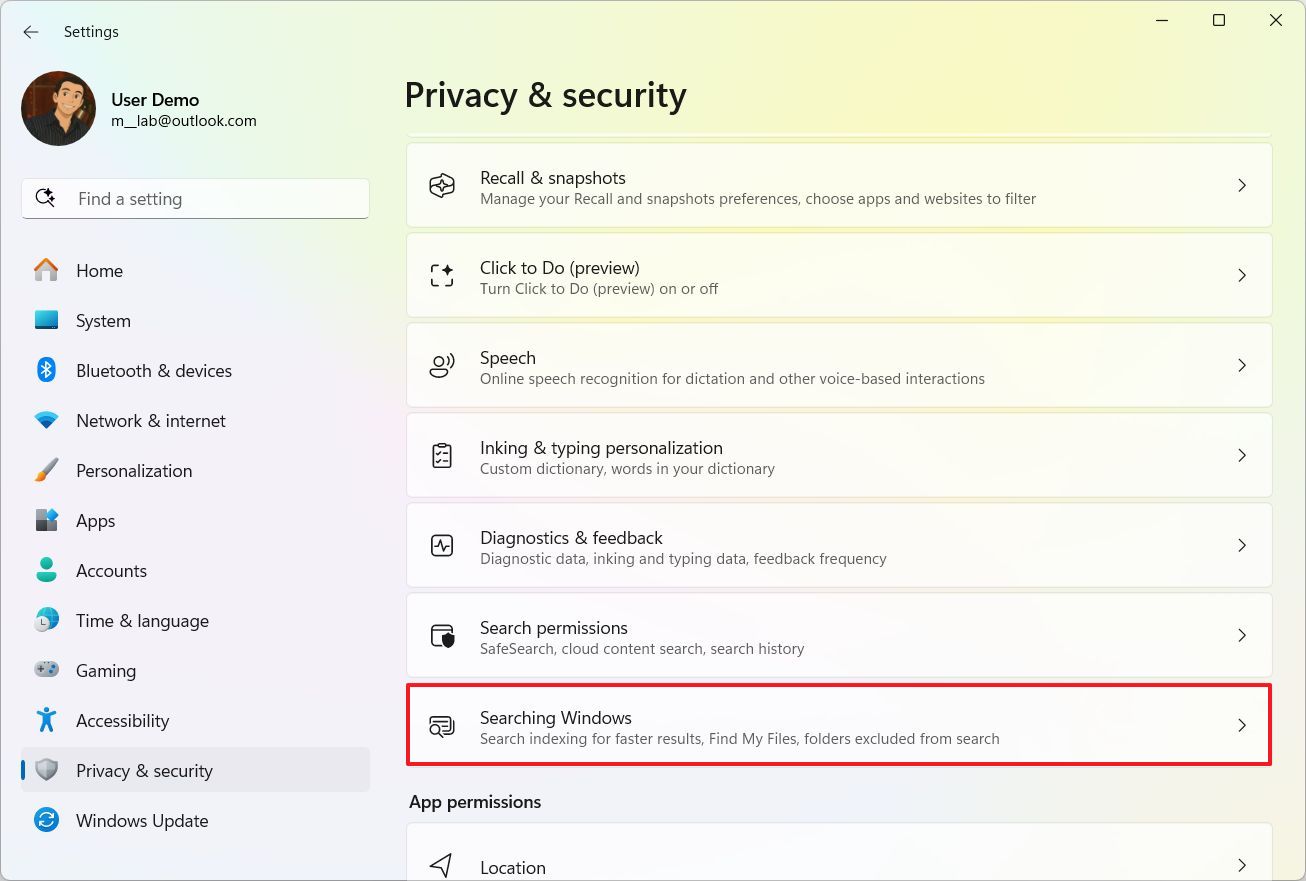
- Click the “Find my files” setting.
- Select the Enhanced option.
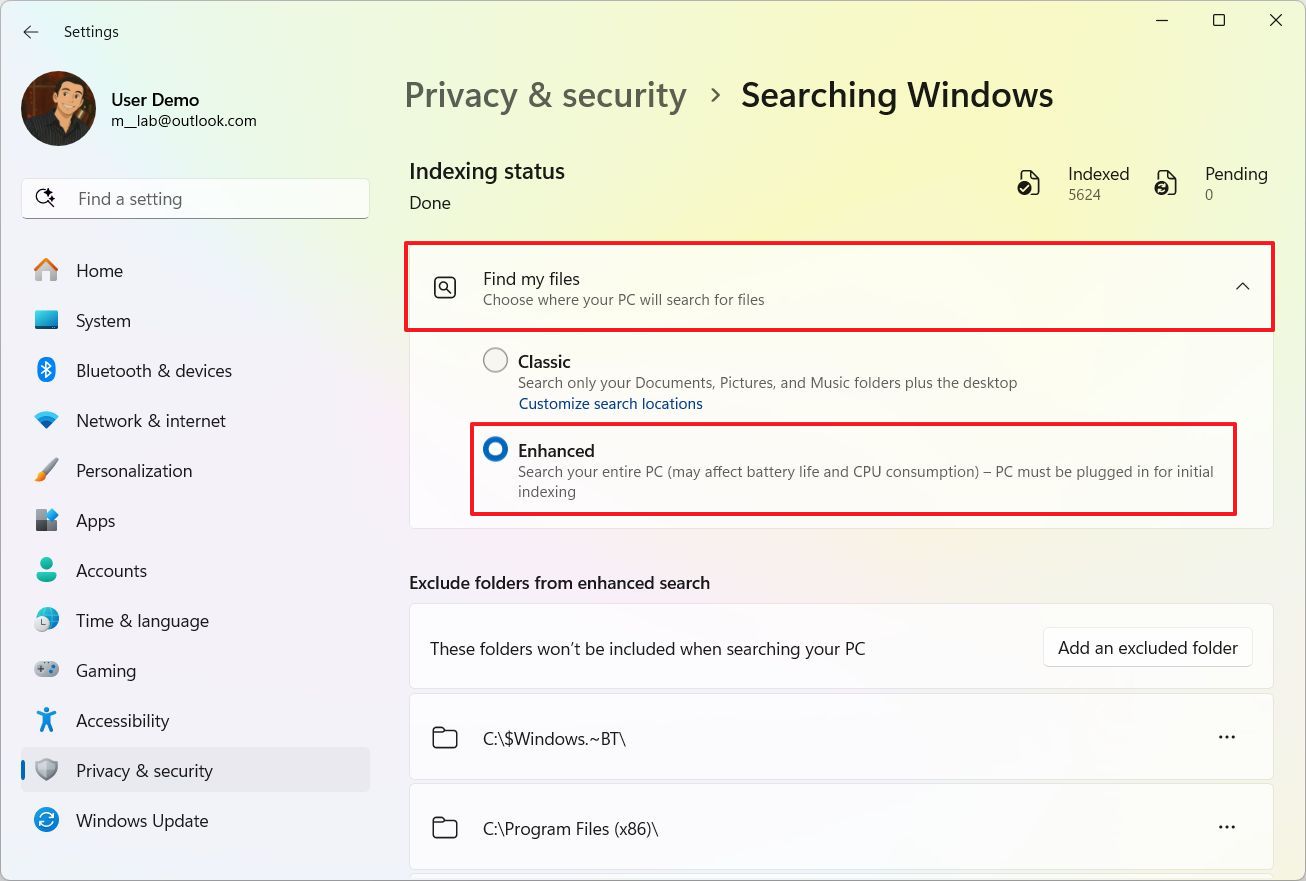
Once you complete the steps, the search results should be more accurate.
System requirements
These features, specifically Windows Recall, Click to Do, and Semantic Indexing for Windows Search, are only accessible on Copilot+ computers which have a built-in Neural Processing Unit (NPU), implying they’re not compatible with standard laptops or desktops without this component.
A Copilot+ PC usually includes these minimum hardware requirements:
- Processor: ARM or x86 CPU with NPU (40 or more TOPS).
- Memory: 16GB or more.
- Storage: 256GB or more of SSD.
- Security: TPM (Trusted Platform Module) 2.0.
For an ARM device to meet our requirements, it should be equipped with any of the latest Snapdragon X Series processors from Qualcomm. If you’re using an AMD or Intel system, you’ll need either a Ryzen AI 300 Series chip, a Ryzen AI PRO 300 or AI Max PRO Series chip (for AMD), or one of the Core Ultra 200V Series processors (for Intel) to ensure compatibility.
Get the AI features
For users with Copilot+ PCs, you’re now able to download and activate Windows Recall, Click to Do, and Semantic Indexing straight away using the pre-release version of the May 2025 Security Update. This update, as Microsoft terms it, is essentially the April 2025 non-security update at the moment.
To update your system manually, use these steps:
- Open Settings.
- Click on Windows Update.
- Turn on the “Get the latest updates as soon as they’re available” toggle switch.
- Click the “Check for updates” button.
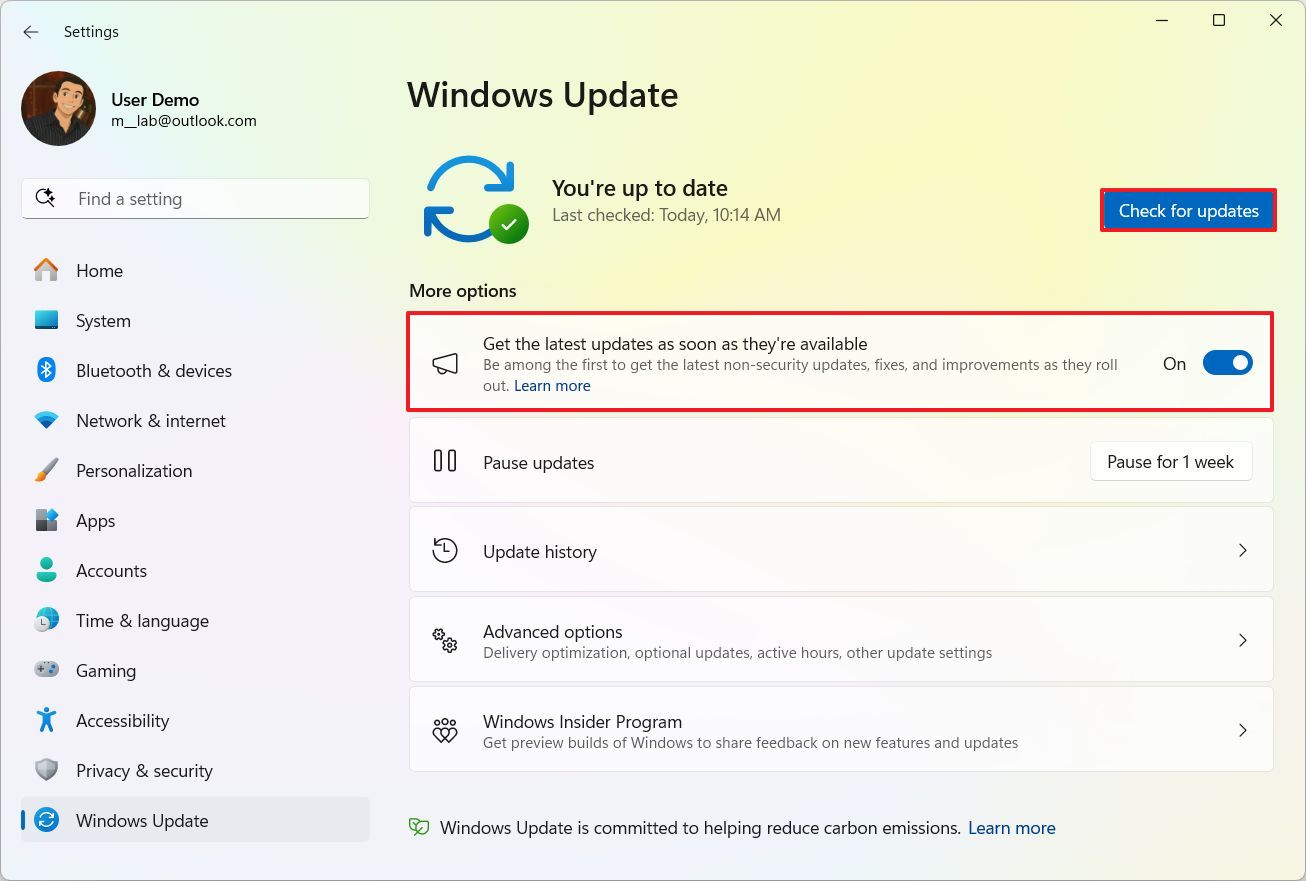
After finishing the given steps, the system will automatically download and install the latest update for KB5055627, which incorporates the newly introduced features.
Keep in mind that Microsoft is introducing these new features progressively, so there might be a delay before you can utilize them following an update installation.
Initially, these features will roll out in select markets. Meanwhile, the Rollback and Click-to-Action options might not reach the European Economic Area until towards the end of 2025.
At the moment, these three characteristics are primarily optimized for English, Simplified Chinese, French, German, Japanese, and Spanish languages.
More resources
Read More
- Masters Toronto 2025: Everything You Need to Know
- We Loved Both of These Classic Sci-Fi Films (But They’re Pretty Much the Same Movie)
- ‘The budget card to beat right now’ — Radeon RX 9060 XT reviews are in, and it looks like a win for AMD
- Forza Horizon 5 Update Available Now, Includes Several PS5-Specific Fixes
- Gold Rate Forecast
- Valorant Champions 2025: Paris Set to Host Esports’ Premier Event Across Two Iconic Venues
- The Lowdown on Labubu: What to Know About the Viral Toy
- Karate Kid: Legends Hits Important Global Box Office Milestone, Showing Promise Despite 59% RT Score
- Street Fighter 6 Game-Key Card on Switch 2 is Considered to be a Digital Copy by Capcom
- Mario Kart World Sold More Than 780,000 Physical Copies in Japan in First Three Days
2025-05-01 14:11