While Windows 11 has a built-in search function that works for many people, it can be slow, especially when looking in folders it hasn’t indexed or when you have lots of files. The search results page also feels messy with ads and isn’t as refined as you’d expect from Microsoft.
If you’re looking for a quicker, more streamlined, or highly personalized search experience, many excellent alternatives are available. Some popular choices include PowerToys’ Command Palette, Fluent Search, Everything, Listary, Flow Launcher, and RayCast.
As an analyst, I’ve put together a rundown of six tools that offer alternatives to the built-in Windows 11 search feature. I’ll be walking you through each one to help you find a better search experience.
Although these apps work as advertised, they are third-party tools. Use them at your own risk.
Windows Search alternatives for Windows 11
These are six tools you can use to replace or improve the default Windows Search experience.
1. Command Palette

I’ve been exploring the PowerToys suite from Microsoft, and I’m really impressed with the Command Palette. It’s designed for people who like to get things done quickly – it lets you launch applications, run commands, and access tools all from one central place. It reminds me a lot of Spotlight search on macOS, and a lot of users feel the same way – they’re quite similar in how they work.
It is also intended to be the successor to the popular PowerToys Run utility.
This tool lets you open applications quickly using keyboard shortcuts. It’s almost instantaneous, making it much faster than searching with Windows Search or browsing through File Explorer.
A key benefit of the Command Palette is that you can easily expand what it does. It already includes many useful features, but you can install even more directly from within the palette itself.
This tool lets you do more than just open apps. You can also use it to run system commands, which means you won’t need to bother with Command Prompt or PowerShell for quick, simple things.
The Command Palette mainly lets you open apps and adjust settings. However, with an add-on, it can also search for almost anything on your computer. The only downside is that when you start a search, you’ll need to quickly confirm what kind of search you want to do.
Install Command Palette
You can download and install Command Palette with PowerToys using one of the following methods:
- WinGet: Open Command Prompt or PowerShell and run:winget install –id Microsoft.PowerToys
- Download: Visit the official PowerToys page and download the appropriate installer for your system.
Get started with Command Palette
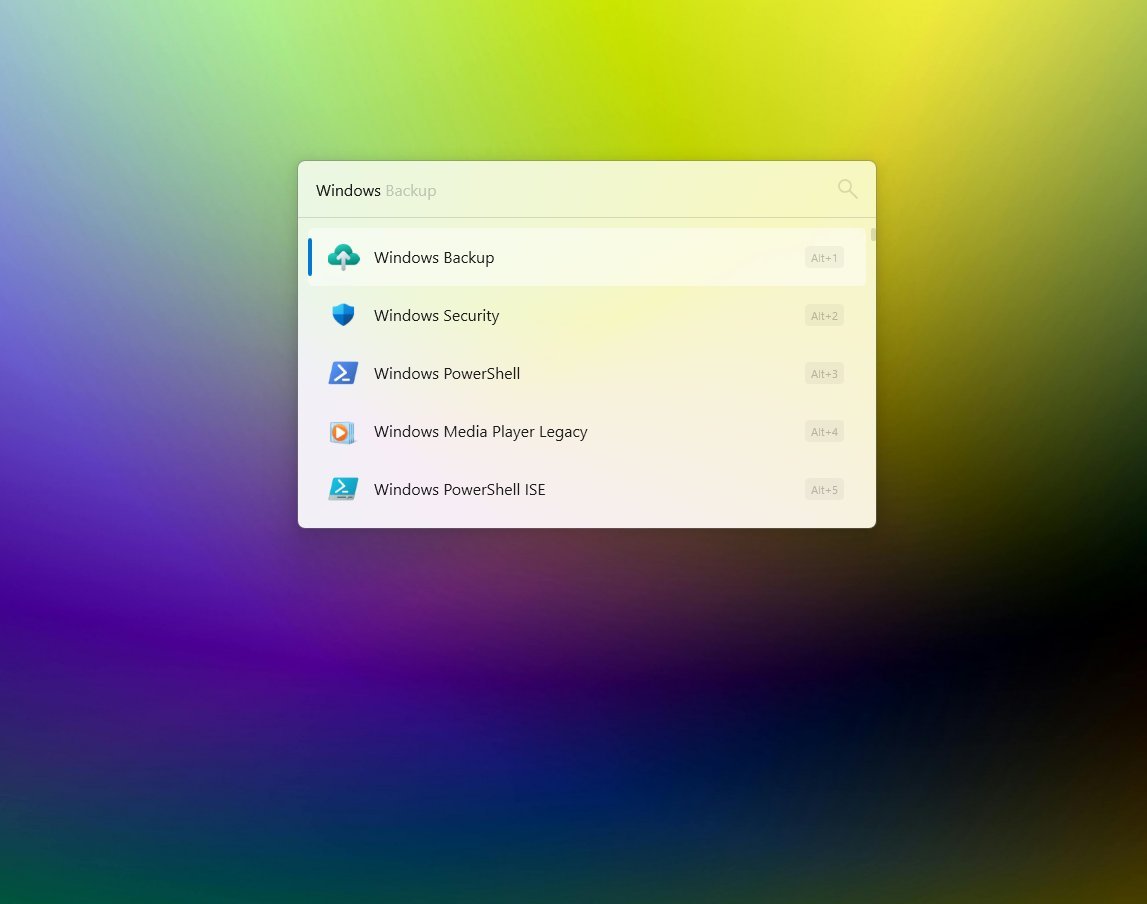
After installing PowerToys, you can open Command Palette either from the Start menu, just like any other app, or by pressing the keyboard shortcut Windows key + Alt + Space.
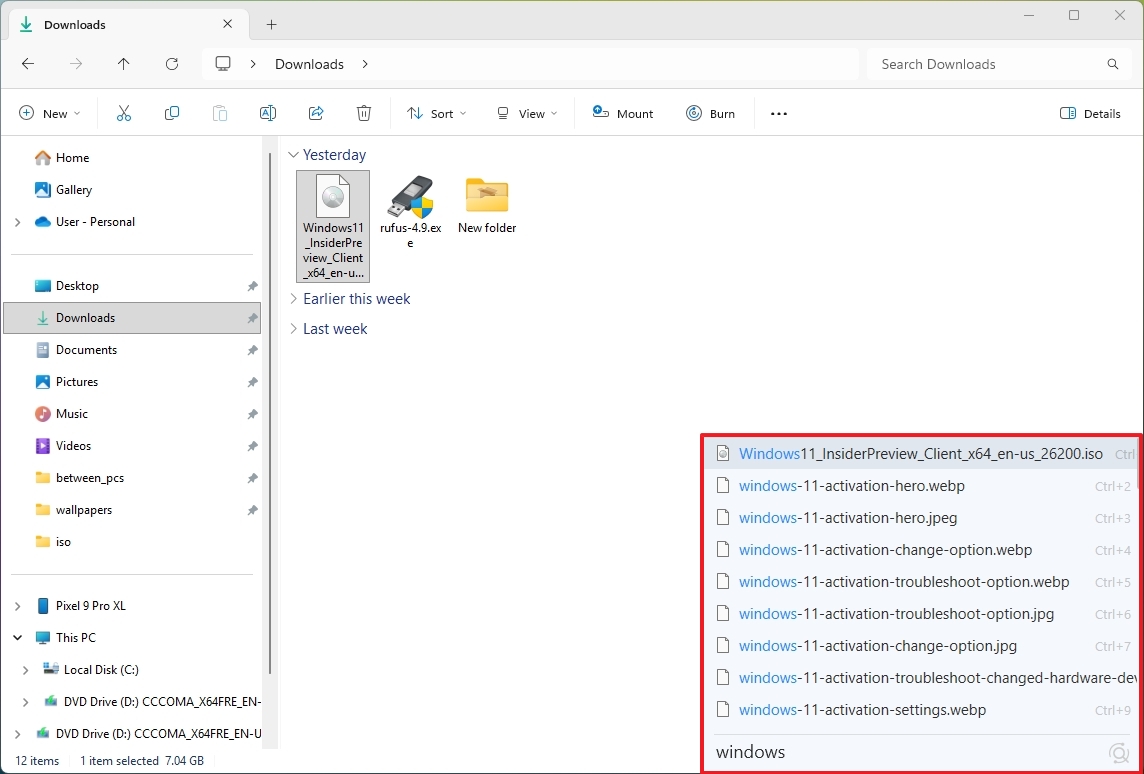
You can type your search request directly into the search box, and results will show up as you type. If you’re looking for a specific file or folder, either double-click the item or press Enter while it’s highlighted.
The action will take you to another page to view the results for files and folders.
To quickly run a command without leaving the Command Palette, simply type a greater-than symbol (>) followed by the command itself. For instance, you can type > ping bing.com or > Shell:startup.
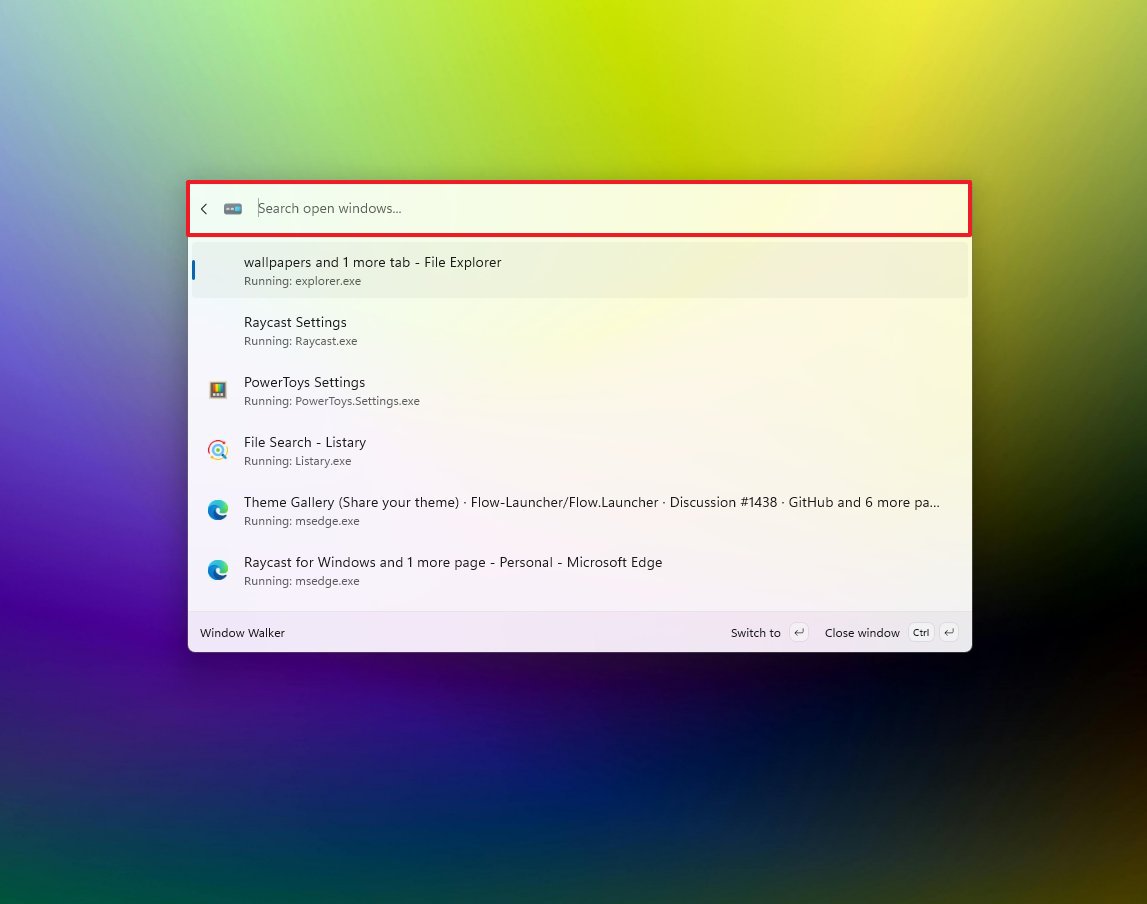
To quickly move between open windows, you can use the “Switch between open windows” feature in the “Window Walker” extension, or simply type the less than symbol (<) on your keyboard.
If you enter a basic math problem like ‘2+2’ into the Command Palette, it will display the answer directly. But more complex calculations, such as ‘10% of 20’, won’t be calculated.
As an analyst, I’ve found that this system lets you do more than just internal tasks. You can actually open webpages and search the internet directly within the interface. Plus, it has a really useful bookmarking feature. To save a file, location, or web address, all you do is type ‘Add bookmark,’ choose the option, and then fill in the name and where it’s located. You can even give bookmarks nicknames and set up quick keyboard shortcuts to access them – it really speeds things up.
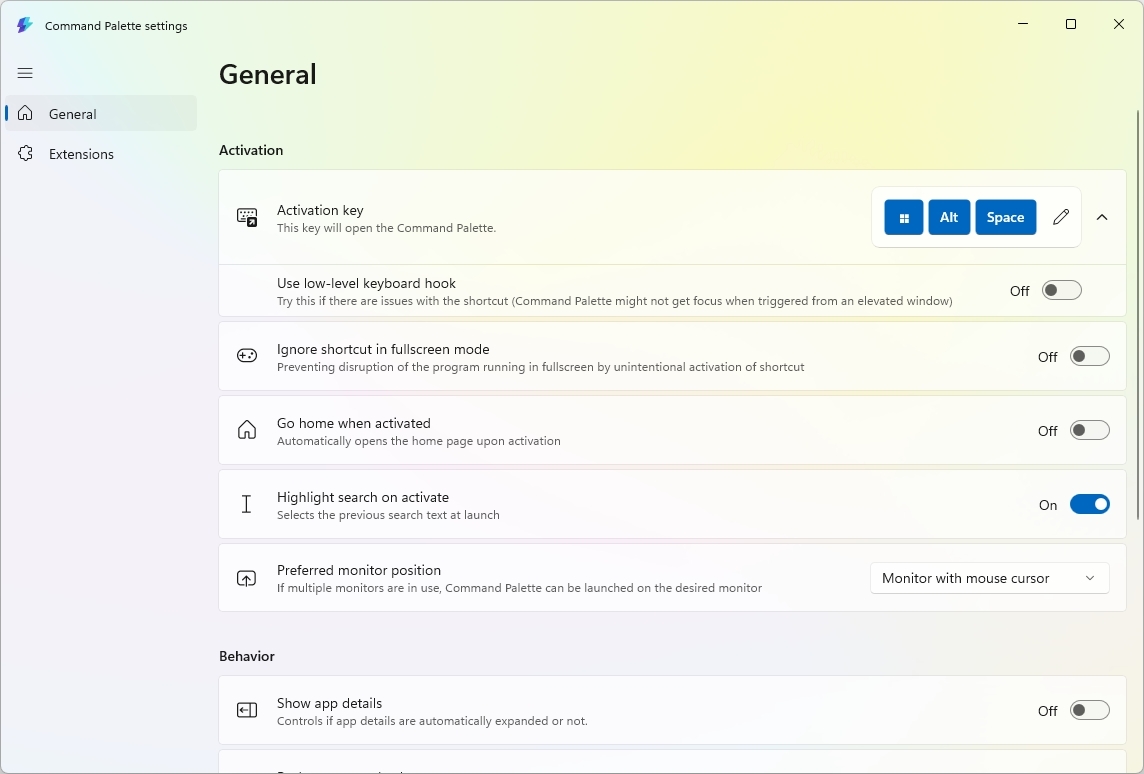
As a researcher, I’ve found you can really tailor the Command Palette to your liking through the settings. You can get there by launching the palette and then clicking the “Settings” button in the bottom left corner.
The “General” page lets you adjust how the tool is activated and how search results behave. You can choose things like whether to display extra information about apps, use the backspace key to go back, or activate results with a single click – and there are many other options to customize.
On the Extensions page, you can turn extensions on or off – including those that came with the tool and any others you’ve installed.
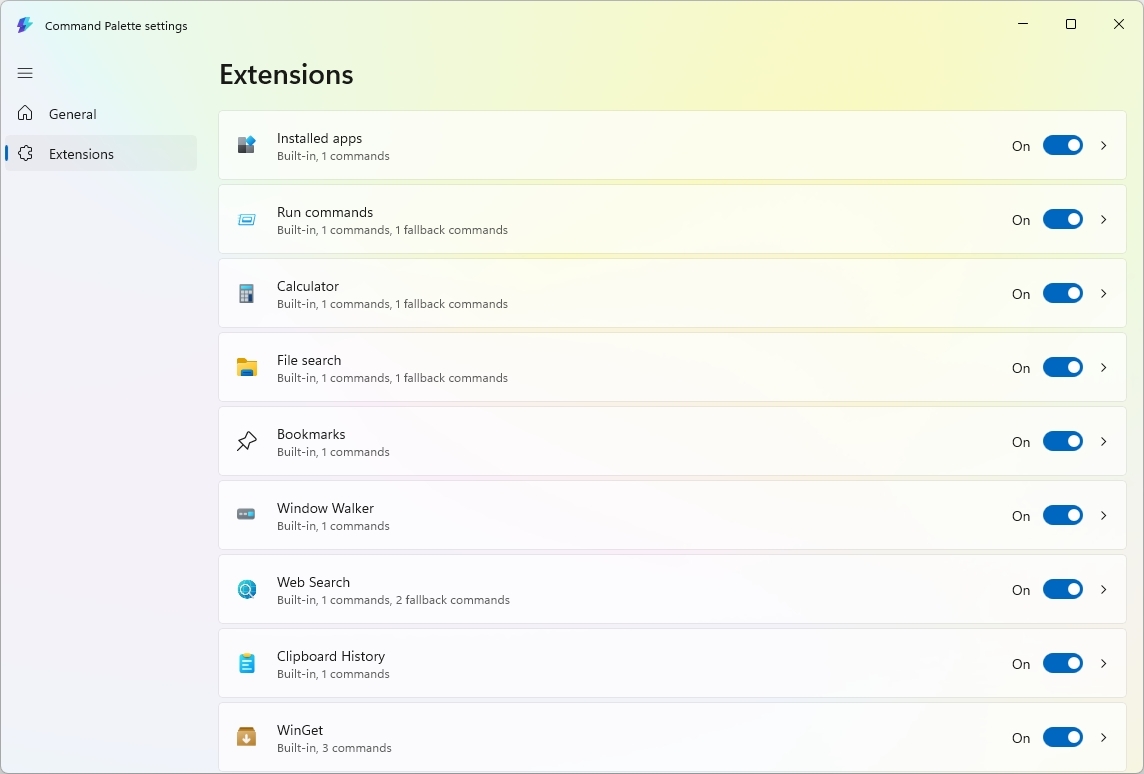
I’ve found you can actually install extensions right from the Command Palette. Just type “Install Command Palette extensions” and choose the first option that appears. From there, you can search for the extension you want and click the “Install” button to add it.
I recently discovered that Windows has this really handy tool called winget, and it makes finding and installing apps super easy! All I have to do is search for “Search WinGet” in the Windows search bar, click the first result, then search for the app I want. After that, I just select it and click ‘install’ – it’s that simple!

Bottom line
The Command Palette mainly helps you quickly open applications and access system settings. While it’s excellent for finding files and folders, it takes an extra click to actually display those file results.
This tool is highly adaptable and can be expanded with add-ons. It’s perfect for existing PowerToys users, or anyone looking for a macOS Spotlight-like search experience without complicated setup.
Command Palette is available for free when installing the PowerToys tool on x64 or ARM64 devices.
2. Fluent Search

Fluent Search is a powerful search tool for Windows 11, offering a faster and more thorough way to find things compared to the standard Windows Search feature.
This tool can quickly find and open applications, search for files on your computer, and browse the web. It can also locate open browser tabs and your browsing history, and even find specific items within open windows and apps – like tabs, buttons, and links.
As an analyst, I’ve been really impressed with Fluent Search. It’s incredibly fast because it builds a direct index of your files – meaning it scans them efficiently without bogging down your computer. The best part is how quickly it delivers accurate results, appearing almost instantly as you type your search query.
This search tool helps keyboard users work much faster. With the “Screen Search” feature – similar to Click to Do – you can use text recognition to find anything displayed on your screen.
This tool is also expandable with extensions, letting you add new features easily. You can find and install these extensions directly in the tool’s settings.
As a researcher working with Fluent Search, I’ve also found a lot of helpful customization options. You can really tailor the interface to your preferences, adjust numerous search and app settings, use hotkeys for faster navigation, and even customize how previews look – it’s quite flexible!
Install Fluent Search
You can download and install Fluent Search using one of the following methods:
- WinGet: Open Command Prompt or PowerShell and run:winget install –id BlastApps.FluentSearch
- Download: Visit the official Fluent Search page and download the appropriate installer for your system.
Get started with Fluent Search
When you open the app for the first time, you might be asked to download and install the newest update. Once the update is finished, close and reopen the app. Then, right-click the app’s icon in the bottom-right corner of your screen (the System Tray) and select “Settings”.
As a researcher, I’ve found that to get the tool working with your files, you need to go to its settings. Specifically, navigate to Apps, then Files, and finally File indexing. Once there, look for the ‘Fluent search’ option under the File indexer settings and click the ‘Install service’ button. This installs the necessary service to allow the tool to quickly find your files and folders.
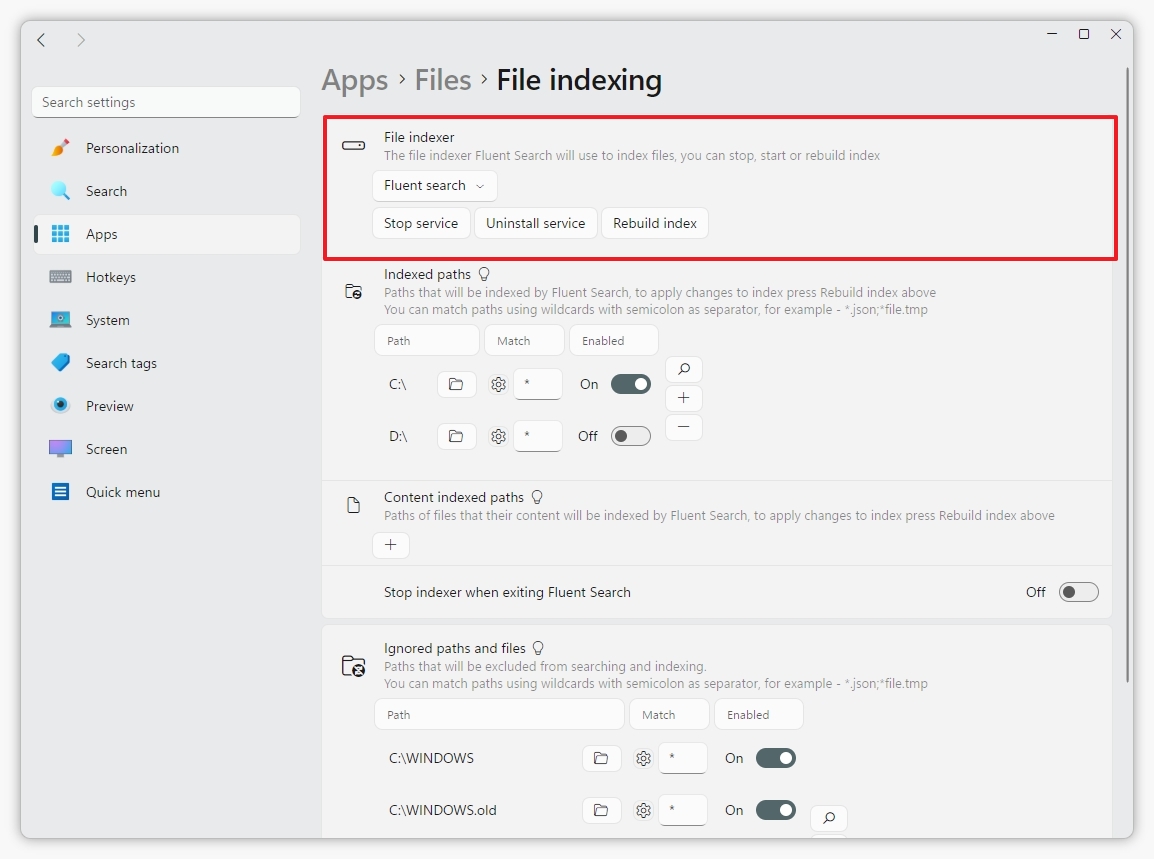
I’ve noticed that Fluent Search is pretty flexible – it can actually tap into your computer’s existing index to find things. If you’d rather not have *another* program constantly indexing your files, you can just choose the “Windows Search” option – it’ll use that instead.
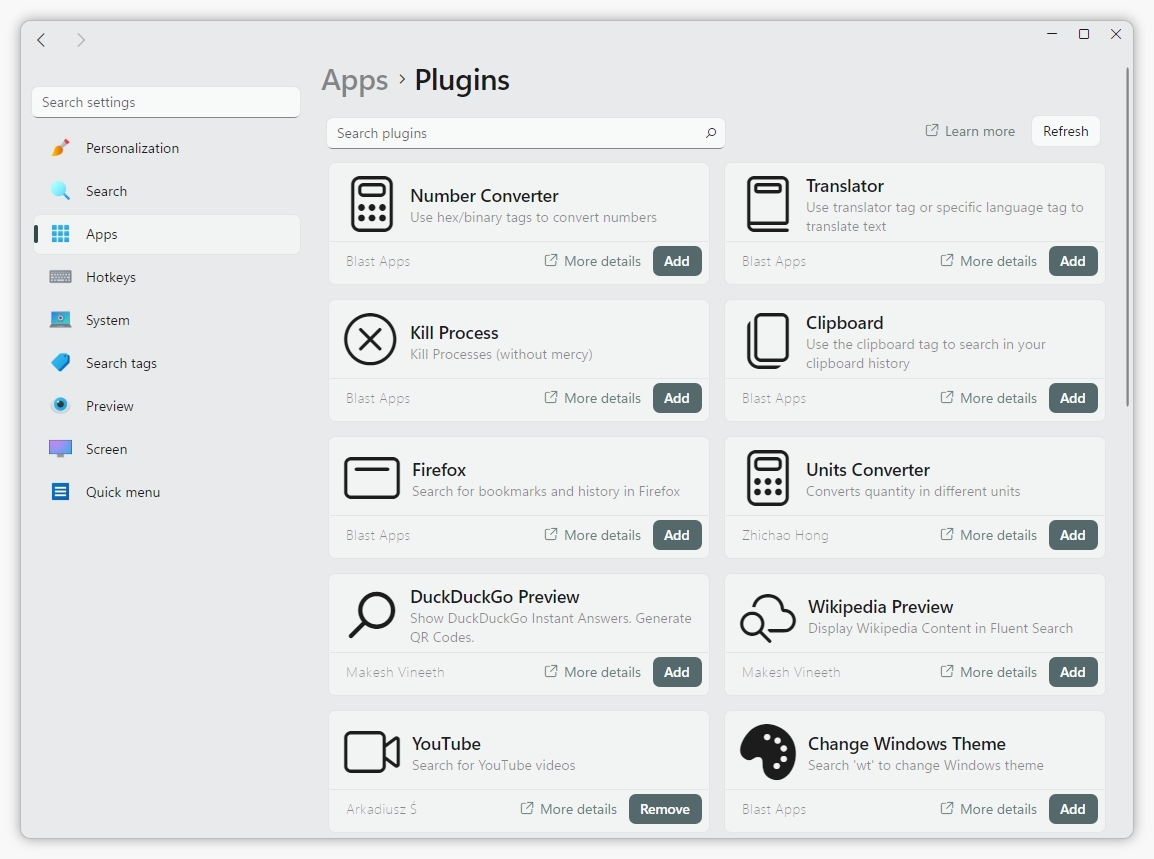
You can expand the functionality of your application by going to Apps then Plugins. Here, you’ll find various extensions to add, such as tools for converting numbers, currencies, and units, a color preview feature, clipboard management, a dictionary, and previews from YouTube and DuckDuckGo, among others.
Unlike the Command Palette, this search feature displays *all* matching results at once, regardless of what they are. This means you’ll see files, folders, settings, and apps all in the same list when you search.
A helpful feature is the ability to see quick options – like open, copy, rename, or delete – directly in the search results, much like how Windows Search works.
As a researcher, I’ve found that running commands is simple: just type what you need into the search box and then choose the tool – like Command Prompt or PowerShell – to actually make it happen.
Bottom line
Fluent Search is a powerful replacement for Windows Search, packed with more features than most people would ever use.
I’ve found that while this tool works great right out of the box for most people, it’s really designed for those who like to tinker. It has a lot of powerful, advanced options – you can customize how it analyzes content, fine-tune its performance, and even use optical character recognition, just to name a few. It gives you a lot of control if you want it.
Fluent Search is available for free, and if you find it useful, you can support the creator. You can install it traditionally, or use the portable version for 64-bit and ARM64 computers. It’s also available directly from the Microsoft Store.
3. Everything
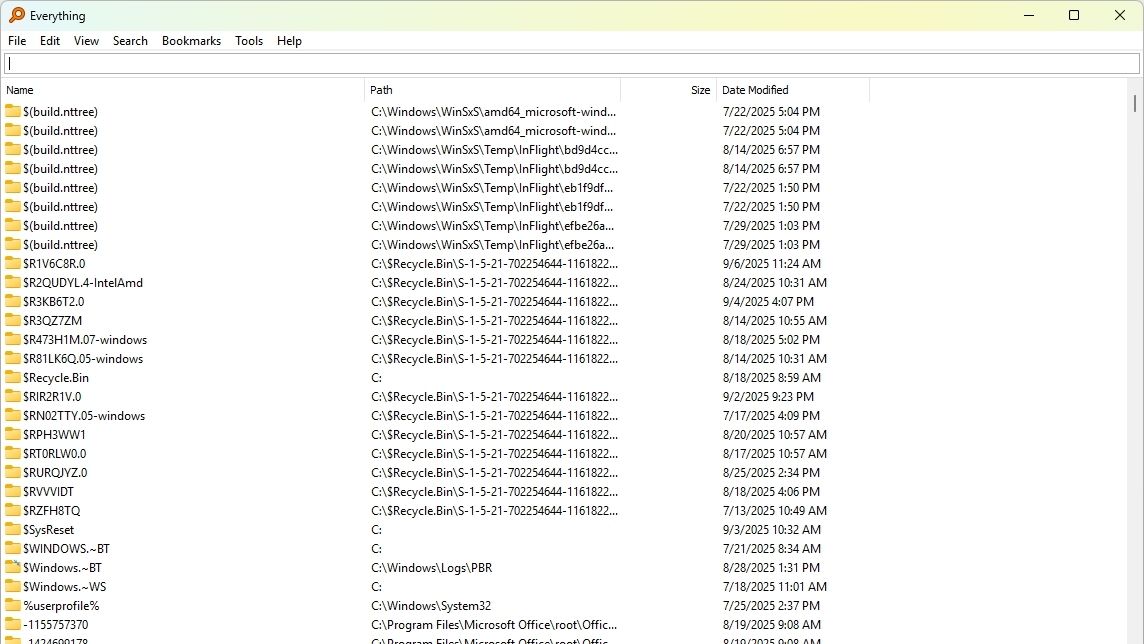
The Everything app isn’t the prettiest, but it’s incredibly useful and gets the job done.
As an analyst, I’ve been testing out ‘Everything’ by Voidtools, and I’m really impressed with its speed. It’s a free tool that quickly indexes all the files and folders on your computer, letting you find what you need almost instantly. The secret is it only indexes the names of files and folders, and the initial indexing process is surprisingly fast – it only takes a few minutes.
The tool can search within files, but turning this feature on can make it run slower. Normally, search results show up almost instantly – usually within milliseconds – even if you have a lot of data.
The software can find files on your network by connecting to network drives through its settings. Even though it thoroughly searches for content, it’s designed to use minimal memory and storage space, ensuring your computer stays fast and efficient.
You have two options: a traditional installed version, or a portable version that runs directly from a USB drive or other external storage. The portable version is great for fixing problems or quickly finding files on different computers without needing to install anything.
Just so you know, Everything is designed purely for finding files. Unlike tools like Command Palette or Fluent Search that also offer things like app launching, calculations, or quick website access, Everything focuses solely on search. However, you *can* still find and open programs by searching for their program files within Everything.
Install Everything
You can download and install Everything using one of the following methods:
- WinGet: Open Command Prompt or PowerShell and run:winget install –id voidtools.Everything
- Download: Visit the official Everything page and download the appropriate installer for your system.
Get started with Everything
After installing the tool, you can open it from the Start menu just like any other program. Then, use the search box at the top to find what you need.
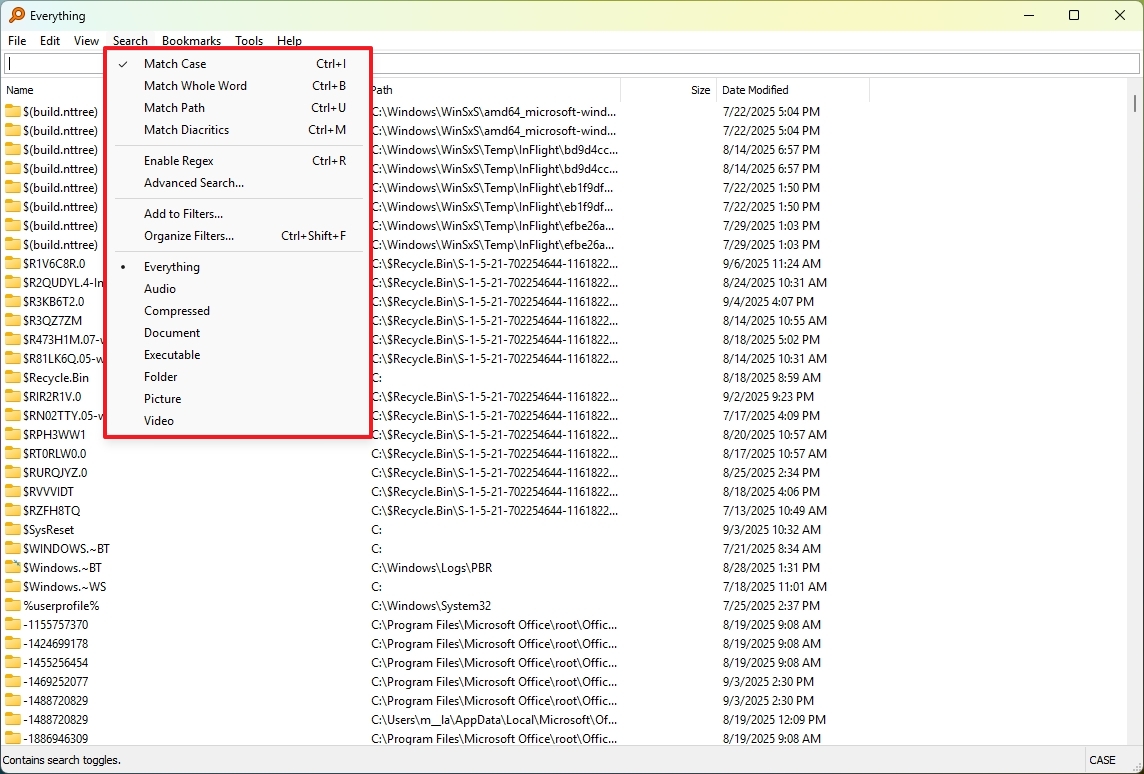
You can refine your searches using options like case sensitivity, whole word matching, and specific file paths, all found in the “Search” menu. The tool also supports regular expressions and content filtering for more precise results.
It also includes a powerful search feature that lets you find exactly what you’re looking for with detailed options.
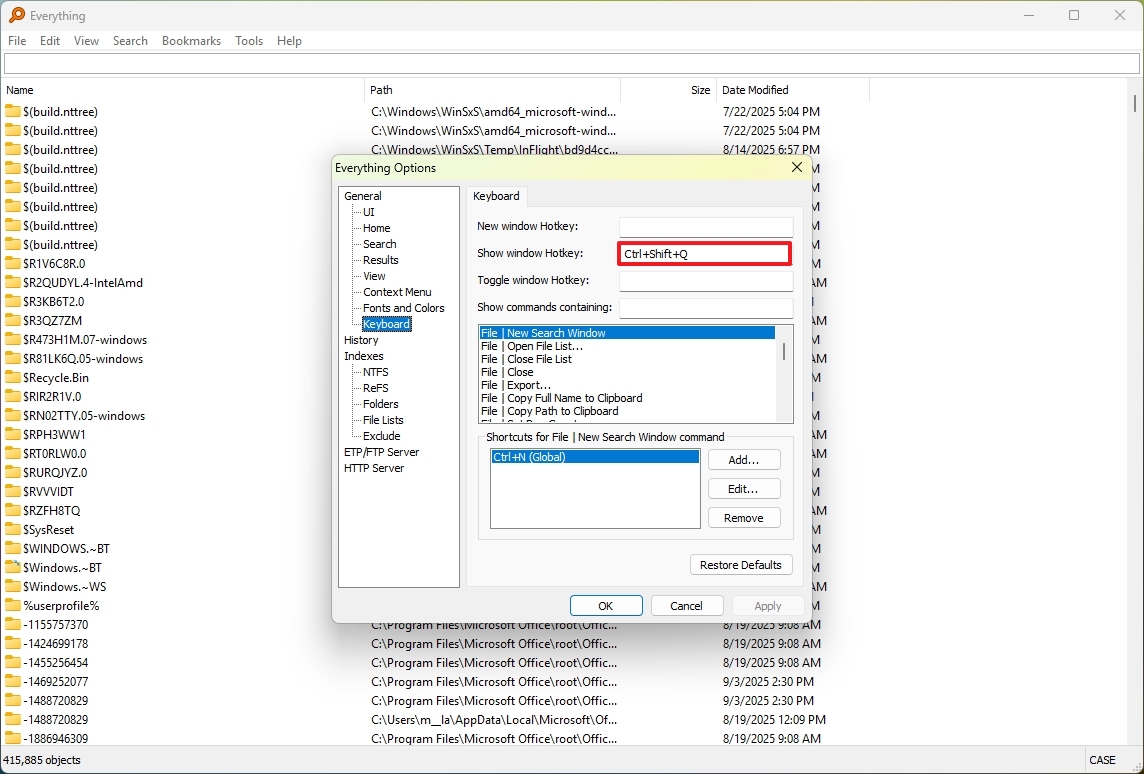
After starting Everything, it will shrink to the system tray for easy access. If you prefer using a keyboard shortcut, you can set one up in the program’s settings. Go to Tools > Options > Keyboard and configure the “Show window Hotkey” to your desired shortcut.
Bottom line
As a tech person, I really appreciate how simple this is to get up and running – seriously, it just works right out of the box! No fiddling with complicated settings needed. But, if you *want* to tweak things and make it exactly how you like, you totally can. It’s a nice balance of easy and customizable.
The primary focus is file and folder search, and it does a good job of it.
This option is ideal for those who want something simple, where design isn’t a concern.
Everything is free, and the developer offers an installer and a portable version for x64 devices.
4. Listary

Listary is a powerful search tool for your computer that works seamlessly with Windows, especially when browsing files. It can launch applications, but it really shines when helping you manage your files. Keep in mind, though, that it’s not open source software and doesn’t support extensions.
One of the best things about this search tool is how it lets you quickly find files and folders. You can start typing your search right inside File Explorer and in “Open” or “Save” windows, which means you don’t have to click through lots of folders – saving you time in the process.
Listary can also launch applications and commands quickly. Just type a keyword – for example, ‘g’ followed by what you want to search for – to open apps, run system commands, or even search the web on Google.
Even though Listary doesn’t have traditional extensions, it’s very flexible. You can set up custom commands and actions to automate things like launching apps with specific settings or running scripts from the command line.
Install Listary
You can download and install Listary using one of the following methods:
- WinGet: Open Command Prompt or PowerShell and run:winget install –id Bopsoft.Listary
- Download: Visit the official Listary page and download the appropriate installer for your system.
Get started with Listary
After installation, you can usually open the tool from the Start menu, similar to other applications. Alternatively, you can often launch it by double-clicking the Ctrl key.
When you use the search bar at the top, just start typing the name of what you’re looking for – a file, folder, or app – and the results will show up right away.

You can find more files by clicking the “Show more file results” button in the upper-right corner. This opens a file manager with helpful features like filters, and lists of recently changed or used files.
What I really like about Listary is how seamlessly it works with Windows. I’ve found that when I’m using File Explorer, I can just start typing, and Listary instantly kicks in to search for anything on my computer. It feels like a natural extension of the operating system itself.
You can also begin typing to search from within dialog boxes, directly on your desktop, and in applications like AutoCAD and Files.
To search the web, simply type commands like “G” or “YouTube”, then a space, and finally what you’re looking for. You won’t see previews of the results, but clicking on any search result will open the webpage in your usual browser.
The launcher includes some pre-set commands like shutting down, restarting, or putting the device to sleep. But unlike Command Palette, you can’t directly type and run any command you want – for example, you can’t simply type “ping bing.com” and have it execute. However, you *can* create your own custom commands to add functionality.
To customize the experience, right-click the Listary icon in the System Tray and select “Options.”
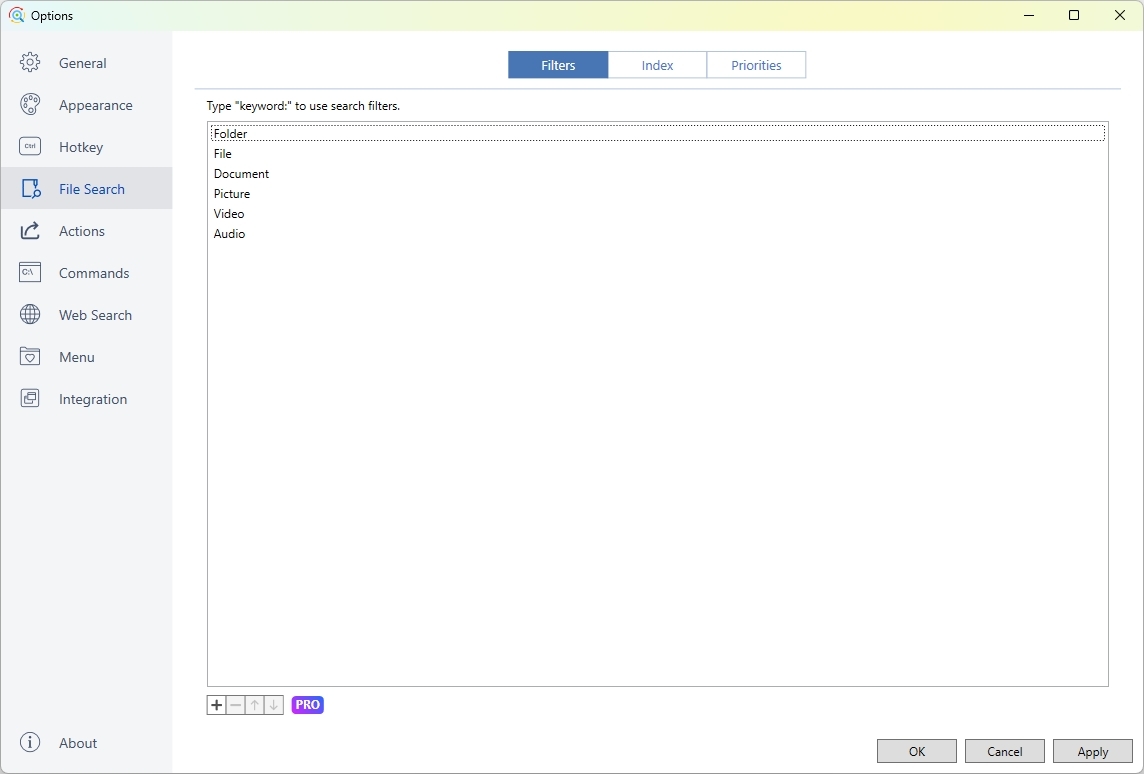
The “Options” page lets you change how the program looks and works, but this feature is only for paying users. You can also set up keyboard shortcuts, including the main key to open the tool.
Within the “Fil Search” settings, you can control your search filters, manage the data index, and adjust various properties.
You can also customize what happens when you use the tool, create quick commands, set up web search shortcuts, and manage how it works with your computer’s operating system.
Bottom line
Listary is a powerful search tool that works as a great alternative to the built-in Windows 11 search. It’s best for users who want a search function that fully integrates with their operating system and offers detailed control over how searches are performed.
This tool offers both a free version and a paid version. The free version has a lot to offer, but some features are only available if you purchase it for a one-time fee of $19.95 (as of today).
5. Flow Launcher
Flow Launcher is a free program for Windows 11 that lets you quickly find and open apps and files. It’s designed to be a faster and more user-friendly alternative to the standard Windows search tool.
This is for people who like to use a keyboard instead of a mouse, and who want to speed up their work and personalize how they use their device.
Like other similar programs, this tool lets you open almost any application on your computer and quickly locate files and folders. However, instead of creating its own search database, it uses the existing Windows Search index or integrates smoothly with the Everything search tool.
You can also use the search bar to quickly do things like shut down, restart, or lock your computer.
Flow Launcher comes with several handy plugins already installed, like a calculator, web search, the ability to run commands, settings search, and quick access to your browser bookmarks.
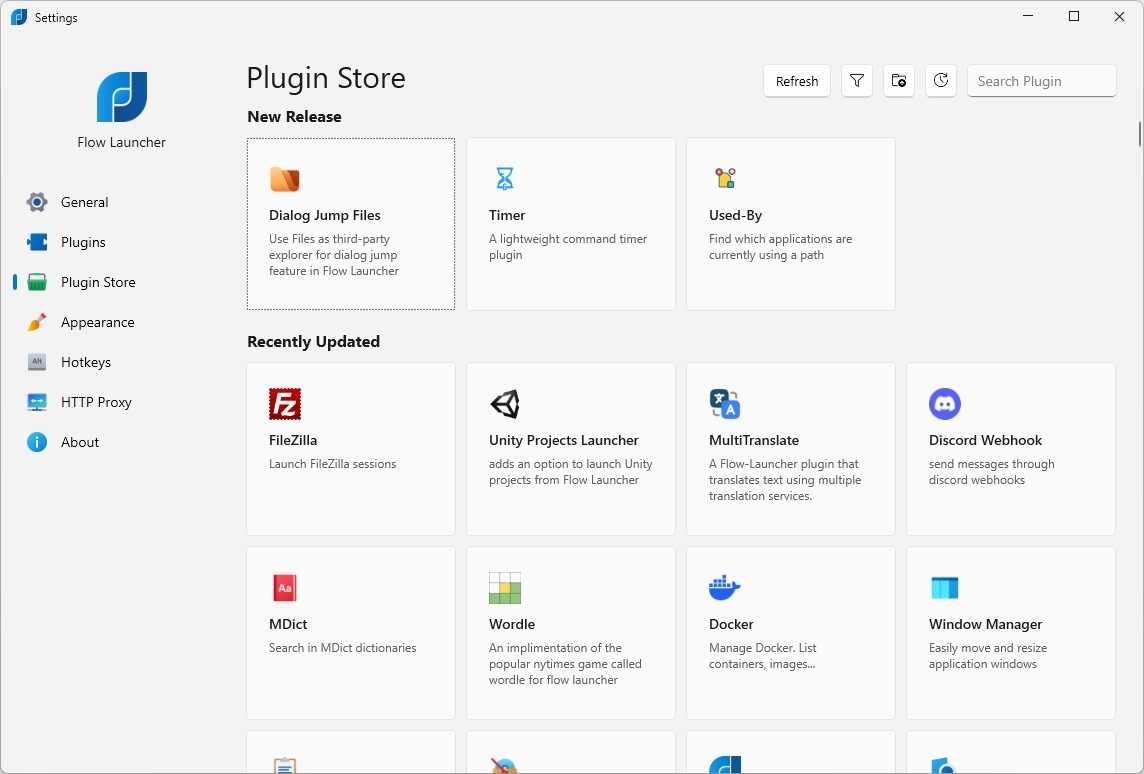
Additionally, Flow Launcher features its own store, offering a comprehensive list of plugins.
As a researcher, I’ve found this tool is incredibly flexible. The settings page lets me personalize almost everything – from how it looks to managing the plugins I use. I can even customize the keyboard shortcuts to best fit my workflow, which is a huge time-saver.
Install Flow Launcher
You can download and install Listary using one of the following methods:
- WinGet: Open Command Prompt or PowerShell and run:winget install –id Flow-Launcher.Flow-Launcher
- Download: Visit the official Flow Launcher page and download the appropriate installer for your system.
Get started with Flow Launcher
After installing and opening the app – either from the Start menu or by pressing “Alt + Space” for the first time – you’ll be guided through a helpful tutorial. This is a great feature, as it’s the only tool that offers this introductory experience.
Flow Launcher looks a lot like the Command Palette, but it has a smaller search bar and conveniently displays the current time.
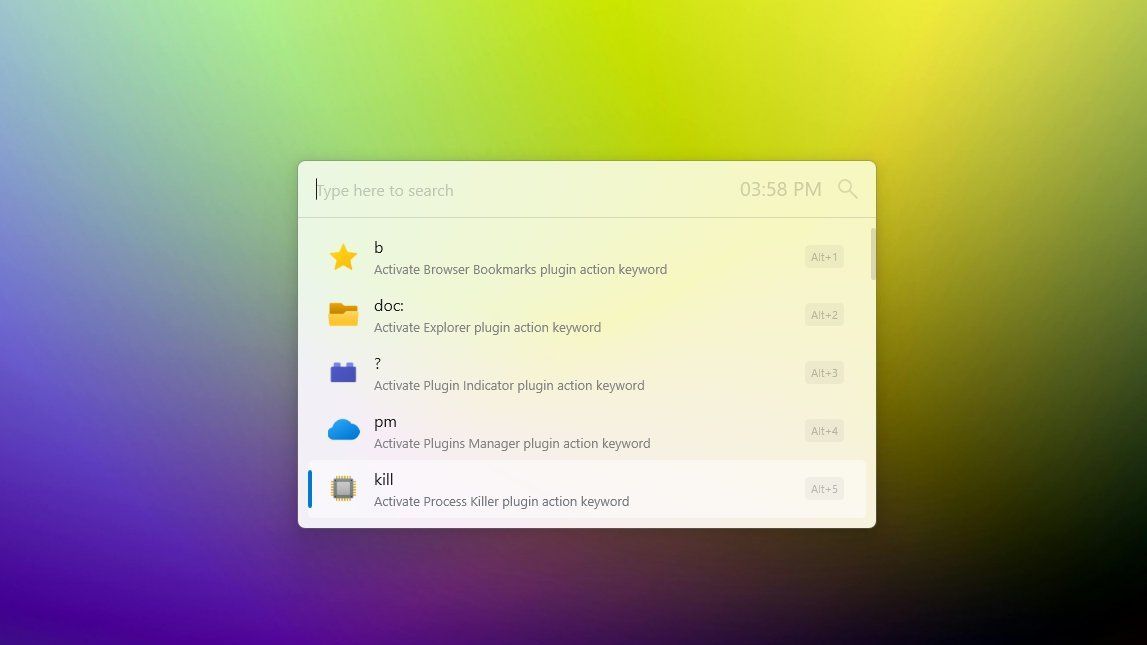
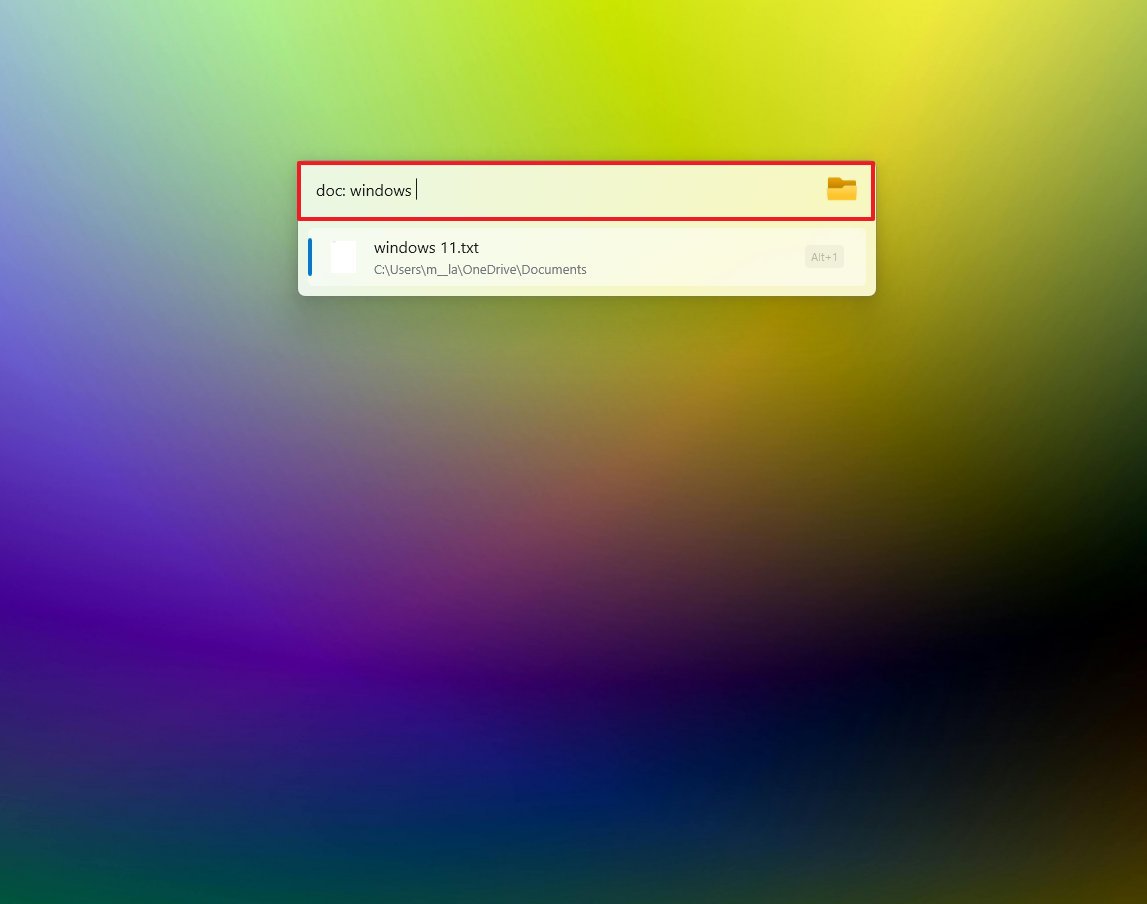
Just below the search bar, you’ll find helpful shortcuts to refine your searches. For instance, typing “doc:” before a keyword will only show results from documents. You can use “>” to execute commands directly in Command Prompt, and “s” to quickly access system settings.
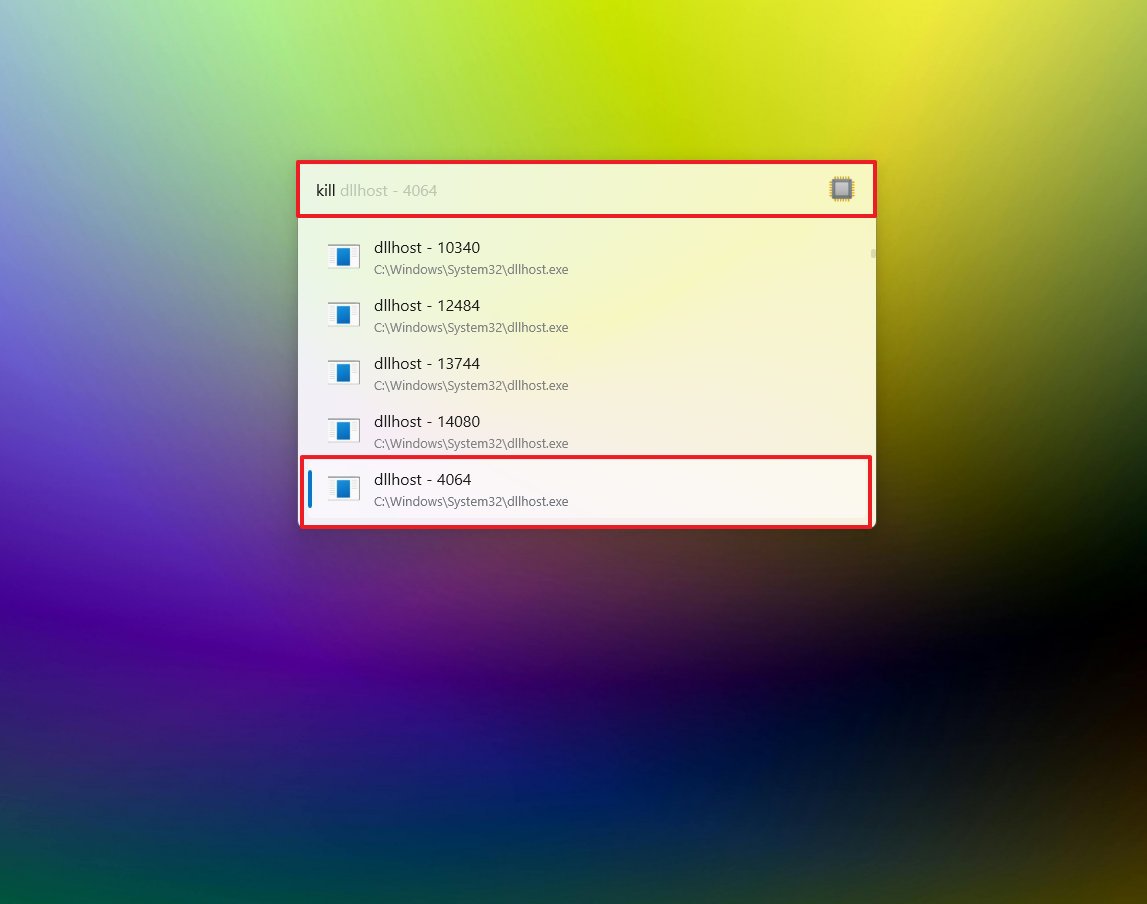
The Kill command lets you end system processes directly, without needing to open Task Manager.
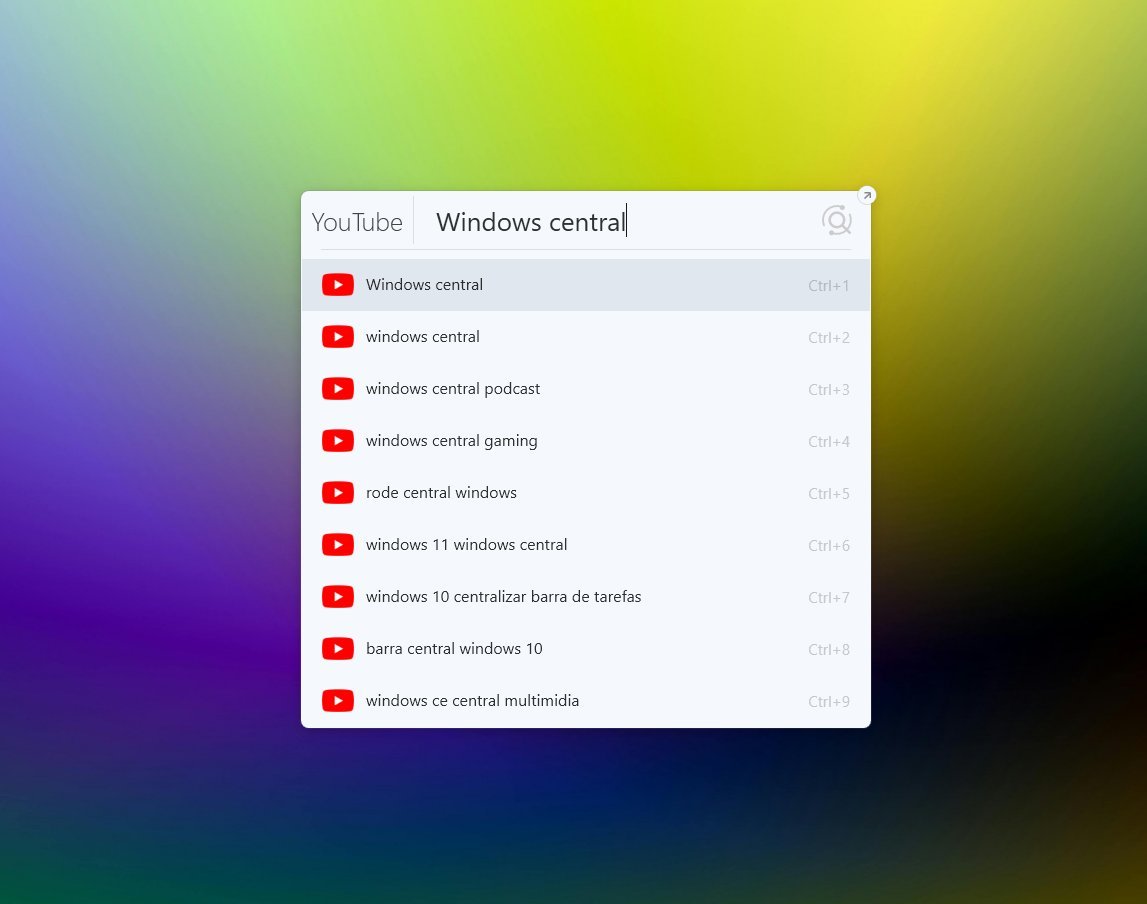
You don’t need to rely on shortcuts to begin a search. Simply type what you’re looking for, and Flow Launcher will instantly display results from all available categories.
To use Flow Launcher with the Everything search index, first install the Everything program. Then, within Flow Launcher, go to Settings > Plugins and ensure the “Explorer” plugin is both installed and turned on. This will allow Flow Launcher to use the Everything index for faster search results.
Bottom line
As a researcher exploring productivity tools, I’ve found Flow Launcher to be a really interesting alternative to the standard Windows 11 search. It aims to replicate the quick, unified search experience you get with Spotlight on macOS – letting you find files, folders, applications, and system settings almost instantly. What’s neat is that it doesn’t rely on Windows’ indexing process, which can sometimes be slow or incomplete. It works independently, offering a different approach to finding what you need.
This tool is also great because you can easily add new features with plugins. While other launchers offer some extensions, Flow Launcher has a much larger and more comprehensive library. You can find plugins to work with things like your files, FileZilla, Docker, weather updates, and a whole lot more.
Flow Launcher is a free program with its source code publicly available. You can download it either as a traditional installer or a portable version that doesn’t require installation.
6. RayCast
6. RayCast
Raycast is a macOS app that helps you quickly launch applications and boost your productivity, offering a different approach than the built-in Spotlight search. The developers are also currently working on a version for Windows.
Like the other tools in this guide, this one lets you do many things using only the keyboard – a mouse isn’t required.
RayCast lets you swiftly locate and launch applications, documents, and files on your computer.
It includes helpful features like a clipboard history, calculator, text snippet storage, and tools for managing windows.
Like Flow Launcher, RayCast works with a large collection of free, community-built extensions. These extensions let you connect RayCast to many popular services, such as GitHub, Spotify, and Jira.
RayCast stands out thanks to its built-in AI features. You can chat with AI and even automate tasks using commands powered by popular chatbots like ChatGPT, Perplexity, Mistral, Google Gemini, and many others.
Raycast has a free plan with lots of useful features. For even more capabilities – like keeping your data synced across devices, an unlimited clipboard, and powerful AI tools – you can upgrade to a paid “Pro” subscription.
Install RayCast
RayCast for Windows 11 is still in its testing phase (beta) and you need an invitation to download it.
After you join the waitlist, we’ll send you an email with a link to download and install the tool on your computer.
Get started with RayCast
After you install the RayCast app, a setup guide will appear to help you log in and record a keyboard shortcut. The default shortcut is Alt + Space.
After you start it, you can open the program either by pressing the keyboard shortcut you set up, or by clicking its icon in the system tray.
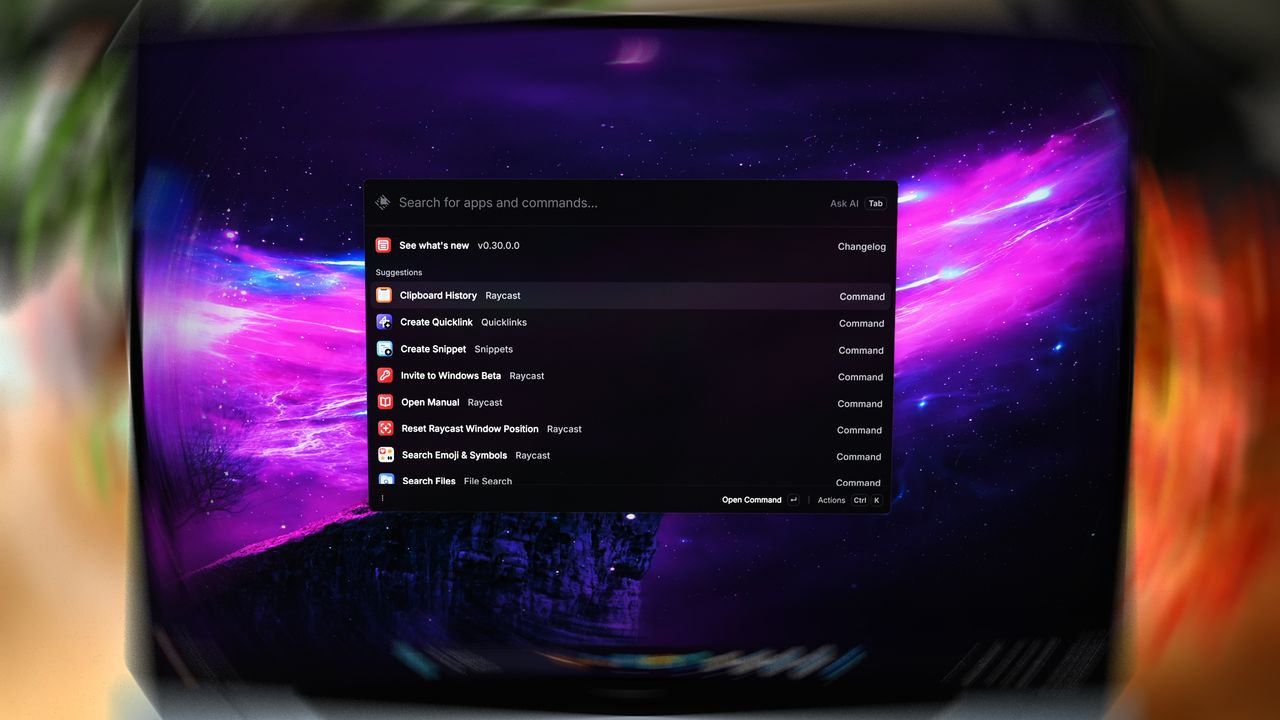
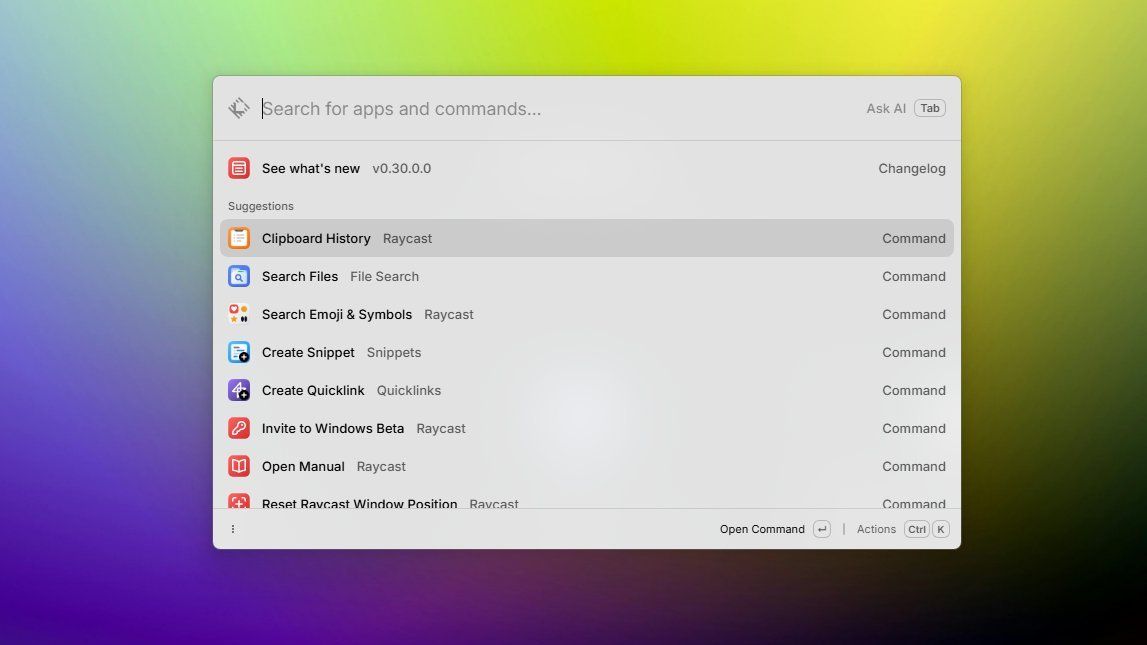
RayCast’s main bar looks and works a lot like those found in Command Palette and Flow Launcher. When you click it, a dropdown appears with suggestions for things you can do, like quickly accessing your clipboard history, finding emojis, searching files, or using pre-made snippets – and there are many other options available too.
You don’t need to use commands to begin searching for files, folders, apps, or settings. Just start typing, and the tool will display results grouped into categories.
The search function works well, but it can’t find your open browser tabs or browsing history. Unlike tools like Flow Launcher, it also doesn’t search within active windows or for elements inside apps, like tabs, buttons, and links.
RayCast includes a variety of pre-made commands, letting you easily perform actions like shutting down or restarting your computer, putting it to sleep, emptying the Recycle Bin, and controlling volume and mute settings.
This tool offers helpful commands, but unlike the Command Palette, it can’t directly run commands like ‘ping bing.com’ or ‘ipconfig’. For those, you’ll need to use the command console instead.
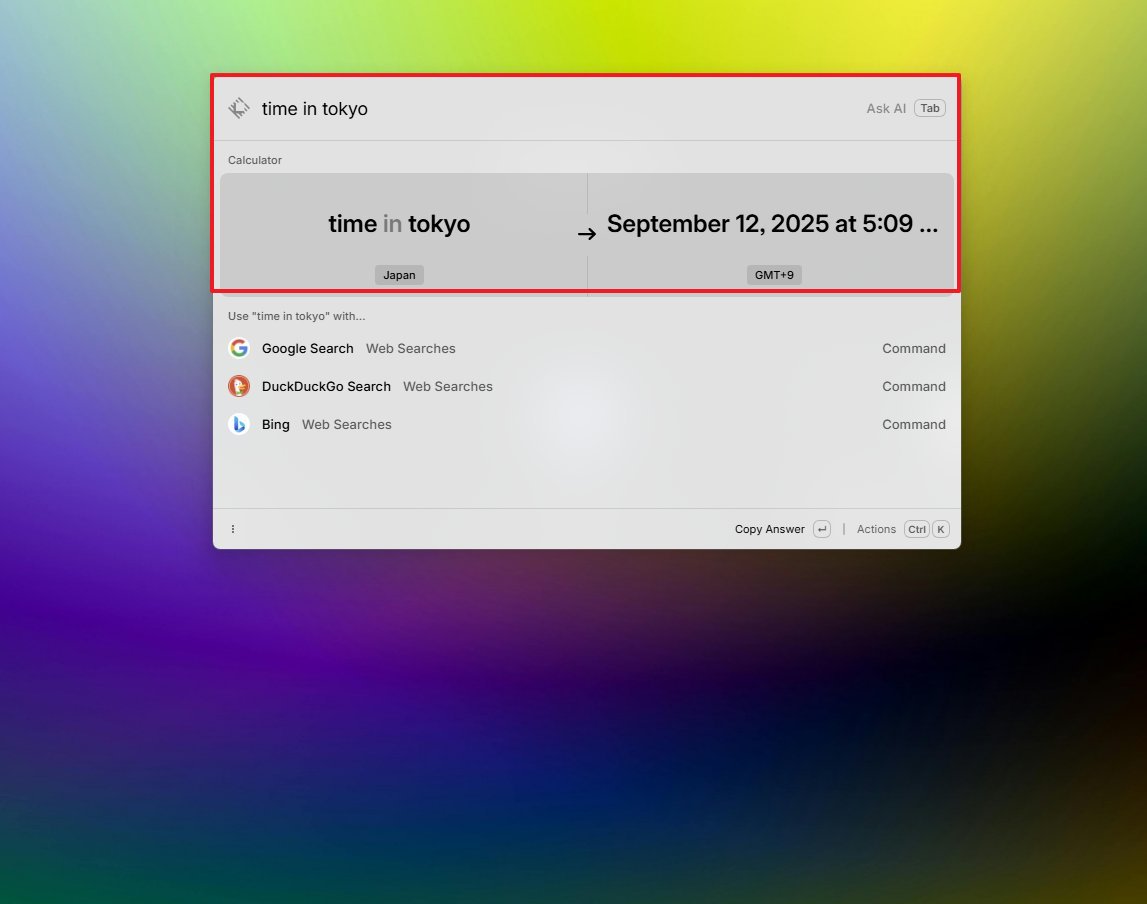
The calculator tool can handle many different tasks, including basic math, percentages, currency conversions, and checking times in other cities like Tokyo. You can also use it to figure out how many days are left until a specific date, such as Halloween.
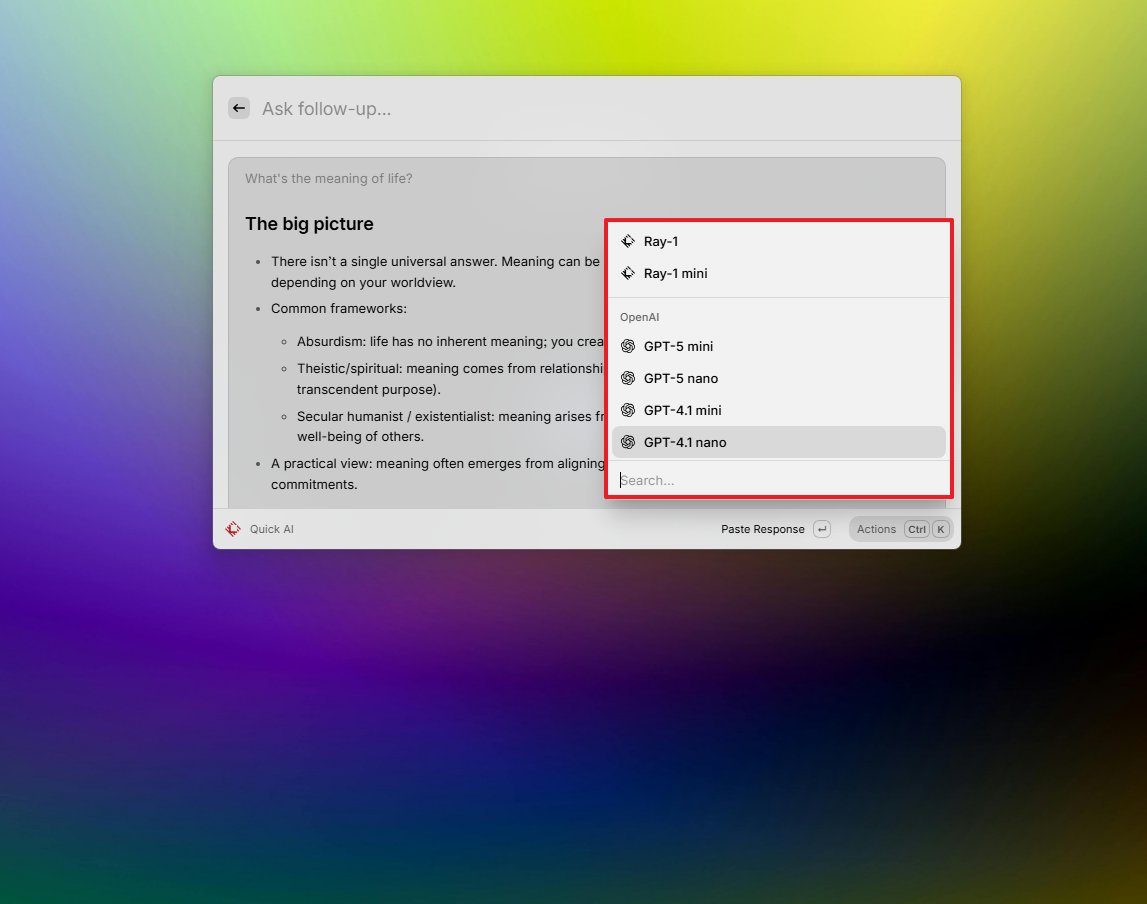
RayCast really stands out with its AI features. Pressing the “Tab” key turns the search bar into a chatbot where you can type questions and get quick, helpful answers.
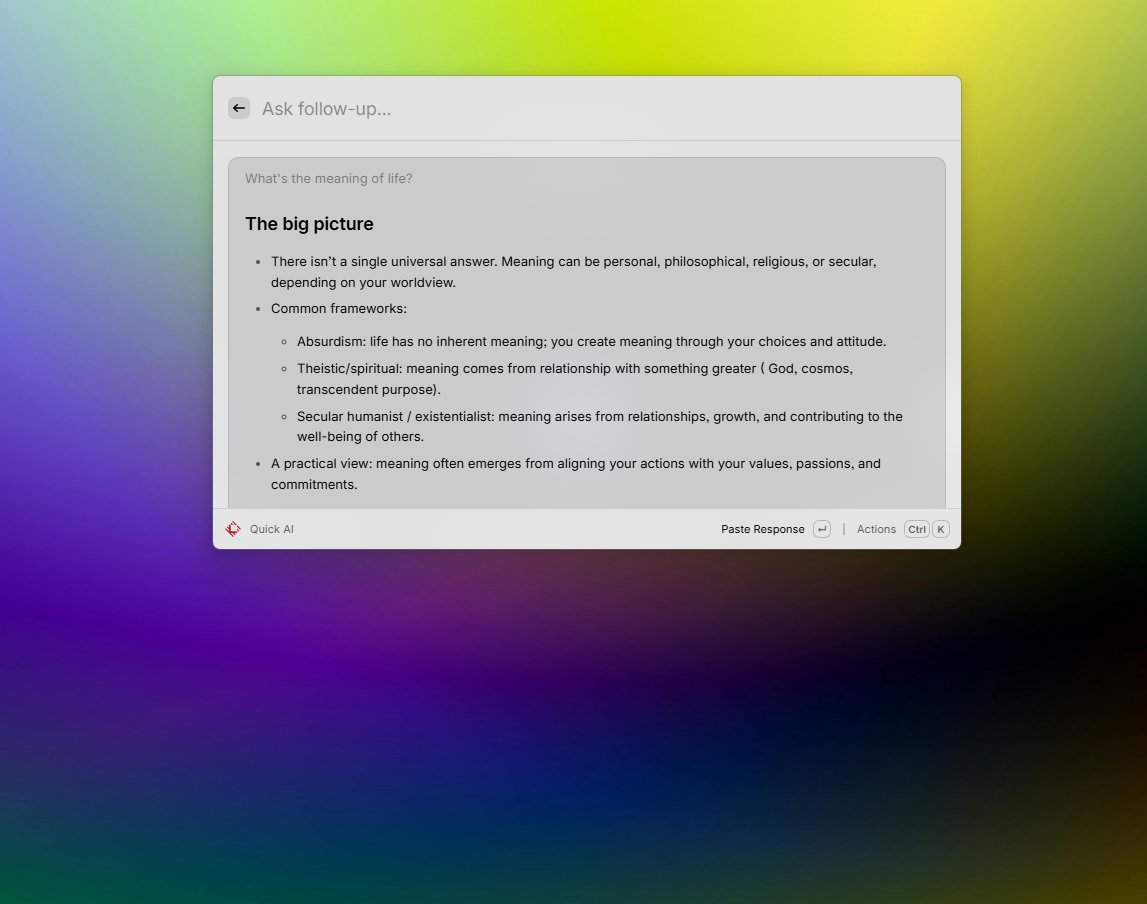
A helpful feature of this tool is the ability to quickly switch between AI models – like those from OpenAI, Google, and Perplexity – using the keyboard shortcut Ctrl + Shift + M.
RayCast has a built-in store where you can download extensions to add even more features. You’ll find helpful tools like integrations for GitHub Copilot, a way to quickly close applications without using Task Manager (Kill Process), a color picker, and a Spotify player – and that’s just a small sample of what’s available.

To personalize how RayCast works, right-click its icon in the System Tray and select “Settings”.
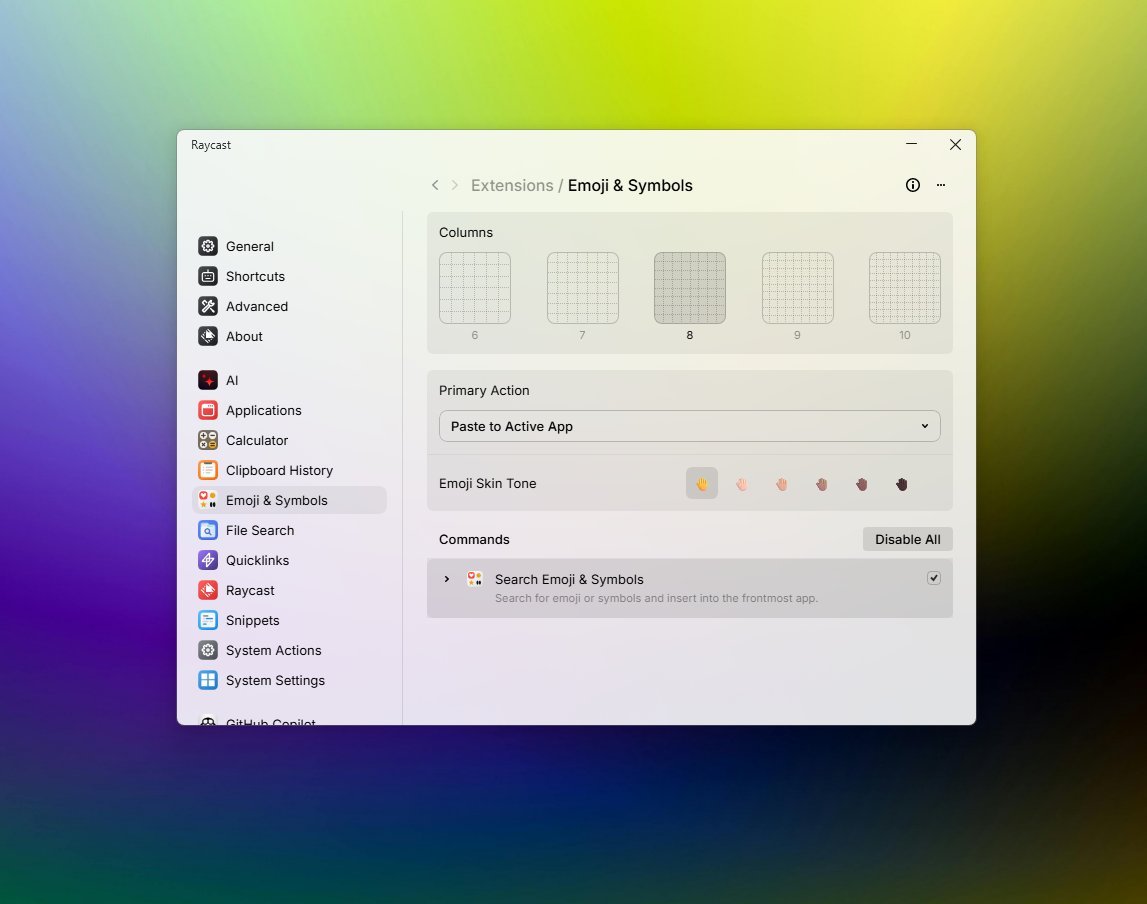
RayCast’s settings let you manage your account, customize how the app looks and behaves (like window size and keyboard shortcuts), adjust AI features, connect to other apps, and tweak the many built-in tools, including Calculator, Clipboard History, Emoji & Symbols, and System Actions.
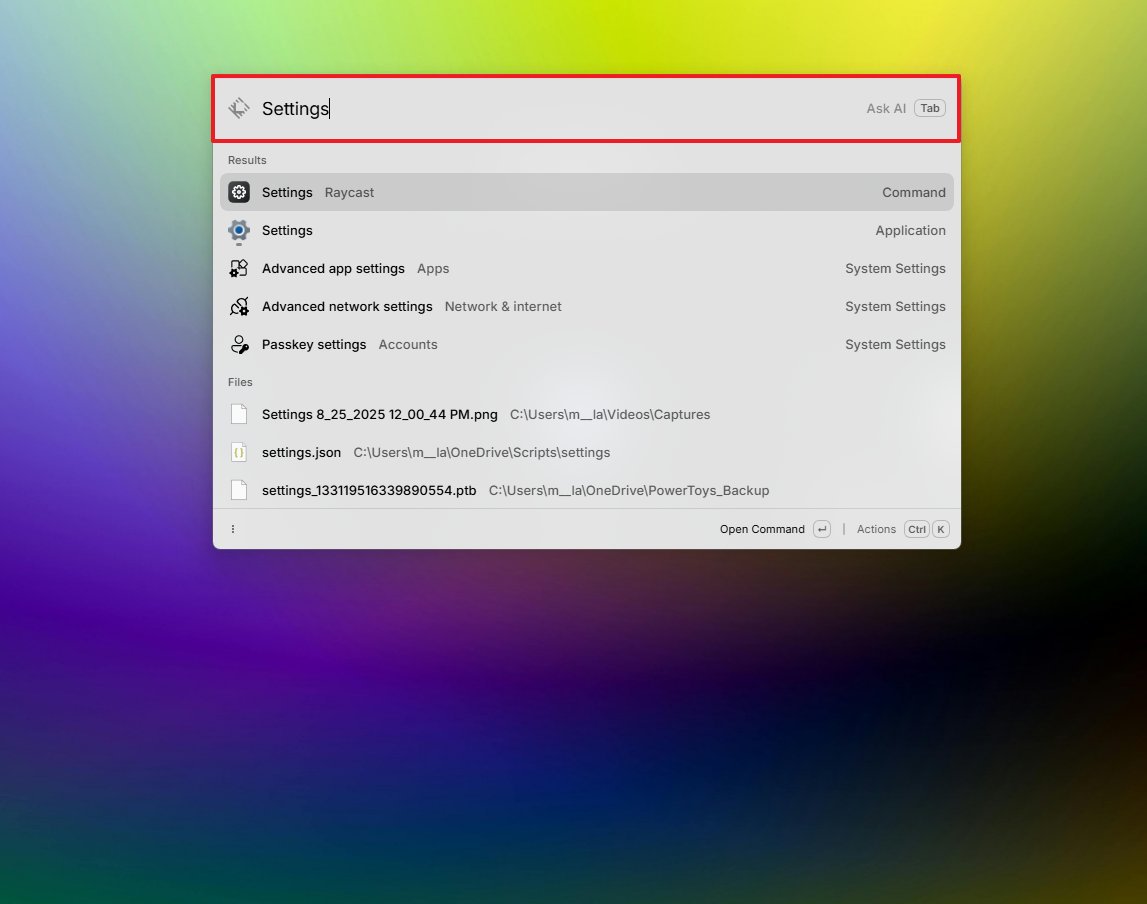
RayCast includes a built-in tool that quickly finds files, folders, applications, and settings on your system. You can customize how this search works in the “File Search” settings.
The page also has a tool called “Fast File Scanner” designed to make finding files quicker.
Bottom line
RayCast is a great way to quickly find files, folders, and apps, and open system settings – it’s a powerful replacement for your operating system’s built-in search.
RayCast is a powerful tool with many features. While it shares similarities with other launchers, its unique additions – like emoji support, clipboard history, customizable shortcuts, and AI integration – really make it stand out.
Our AI feature is being tested with all users as part of our beta program, but it’s ultimately a benefit for those with paid subscriptions.
There are a few important things to know about this tool. First, it’s still in beta testing, so you’ll need to sign up for the waitlist to get access.
RayCast has a free plan, but you’ll need to subscribe to RayCast Pro to unlock its more powerful features and AI capabilities when they’re released.
There’s also a “Pro + Advanced AI” plan that costs twice as much as the regular “Pro” plan, and it gives you access to even more AI features.
Third, although AI can be beneficial in many scenarios, not everyone wants this feature.
RayCast is a good choice if you’re looking for an alternative to Windows Search, you’re already using AI tools, and you don’t mind paying a monthly fee.
If you’re already a macOS user and also use Windows 11, this tool is worth checking out – it works on both platforms.
Which one should you choose?
This is answer is up to you since each of these tools has strengths depending on your needs:
- Everything: For everyday users who want fast, reliable file search with no configuration.
- Fluent Search: For power users who want indexing control, OCR, or plugin support.
- Listary: For deep integration in the operating system dialogs and File Explorer.
- Flow Launcher or Command Palette: For keyboard lovers and customization, plus plugin support.
- RayCast (Pro): For those who want AI and future-proof features (chat, model switching).
What launcher do you prefer? Let me know in the comments.
More resources
Read More
- Mark Zuckerberg & Wife Priscilla Chan Make Surprise Debut at Met Gala
- Elon Musk’s Mom Maye Musk Shares Her Parenting Philosophy
- 10 Greatest Manga Endings of All Time
- GBP CNY PREDICTION
- Forza Horizon 6 Car List So Far: Confirmed Highlights, Cover Cars, DLC, and Rewards
- Ranking the 5 Best Spring 2026 Anime So Far (Mid-Season Update)
- Review: Final Fantasy Tactics: The Ivalice Chronicles (PS5) – Still the Benchmark for Turn-Based Tactics
- 10 Best Free Games on Steam in 2026, Ranked
- Miranda Kerr Shares “Quick” Procedure She Got Before Met Gala 2026
- Elon Musk’s Ex Ashley St. Clair Reveals When Romance Became “Weird”
2025-09-17 17:48