It appears you’re planning to enhance your Legion Go SSD. Based on my personal upgrade encounter, I can assure you the procedure is quite straightforward and won’t consume much of your time.
I’ve provided a detailed guide with images on this page to assist you in backing up your SSD, followed by replacing your current Legion Go SSD with a higher-performance one. So, let’s get started!
Legion Go SSD upgrade: What you need
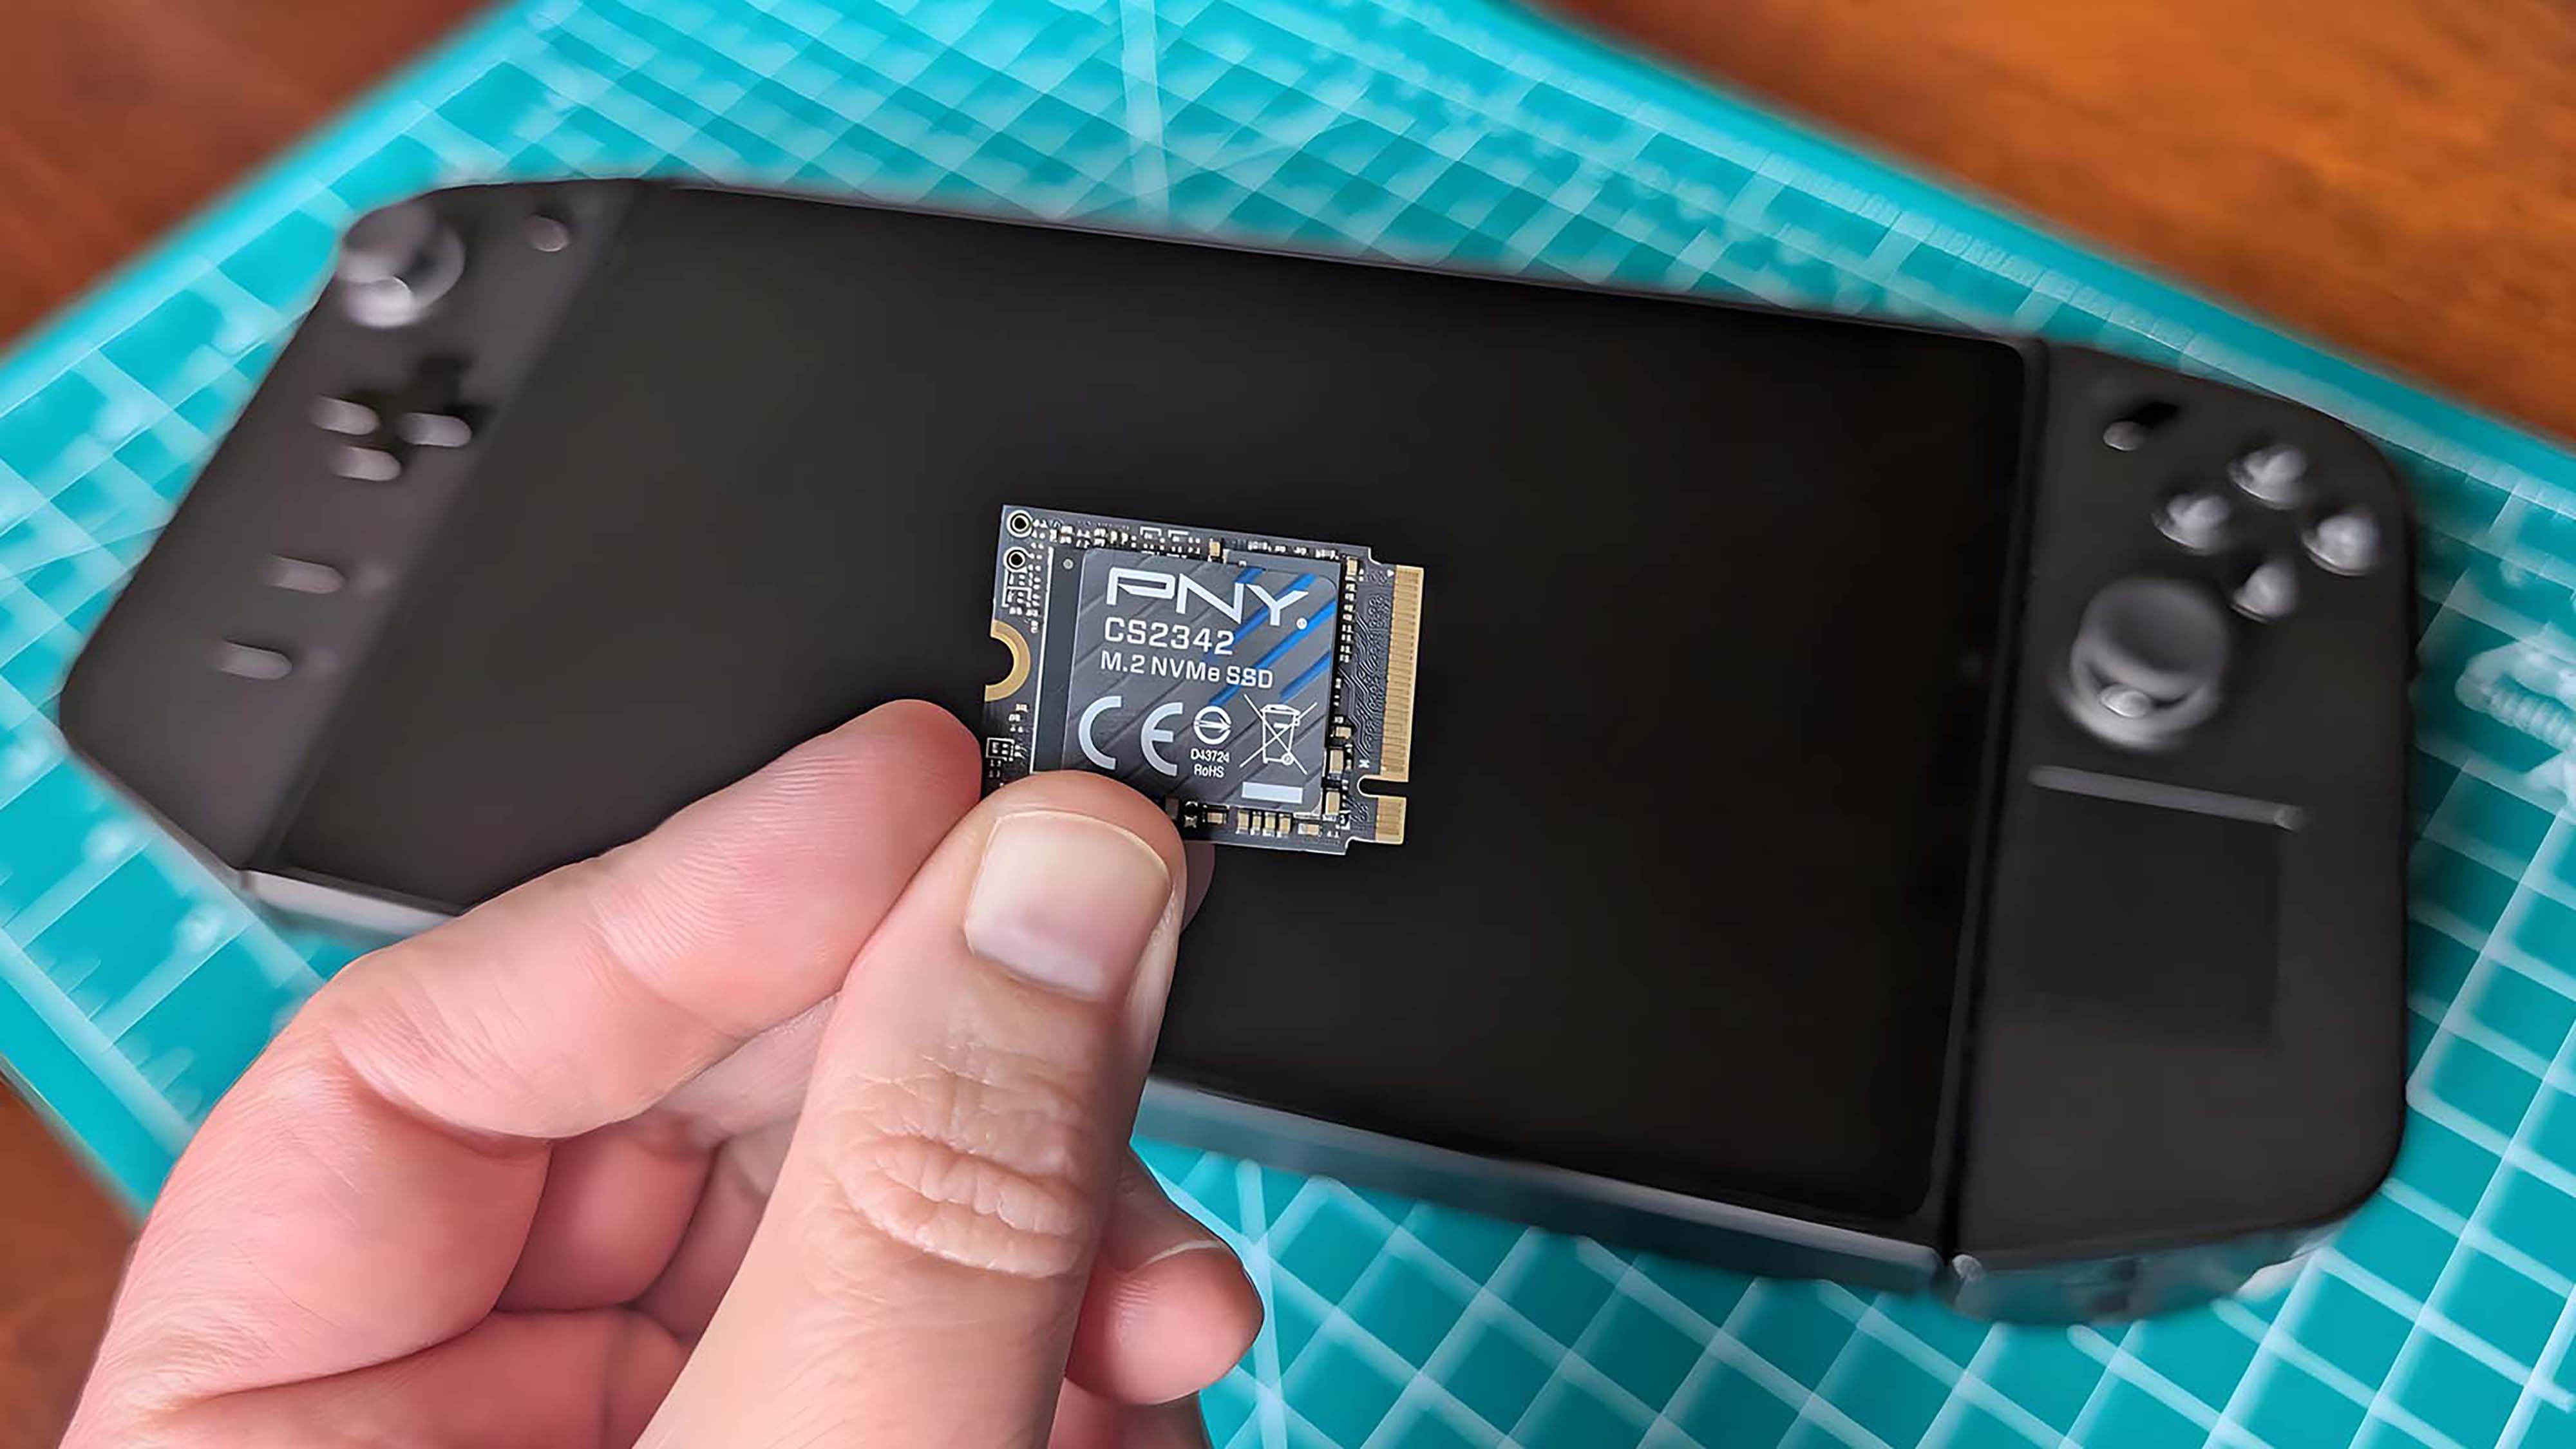
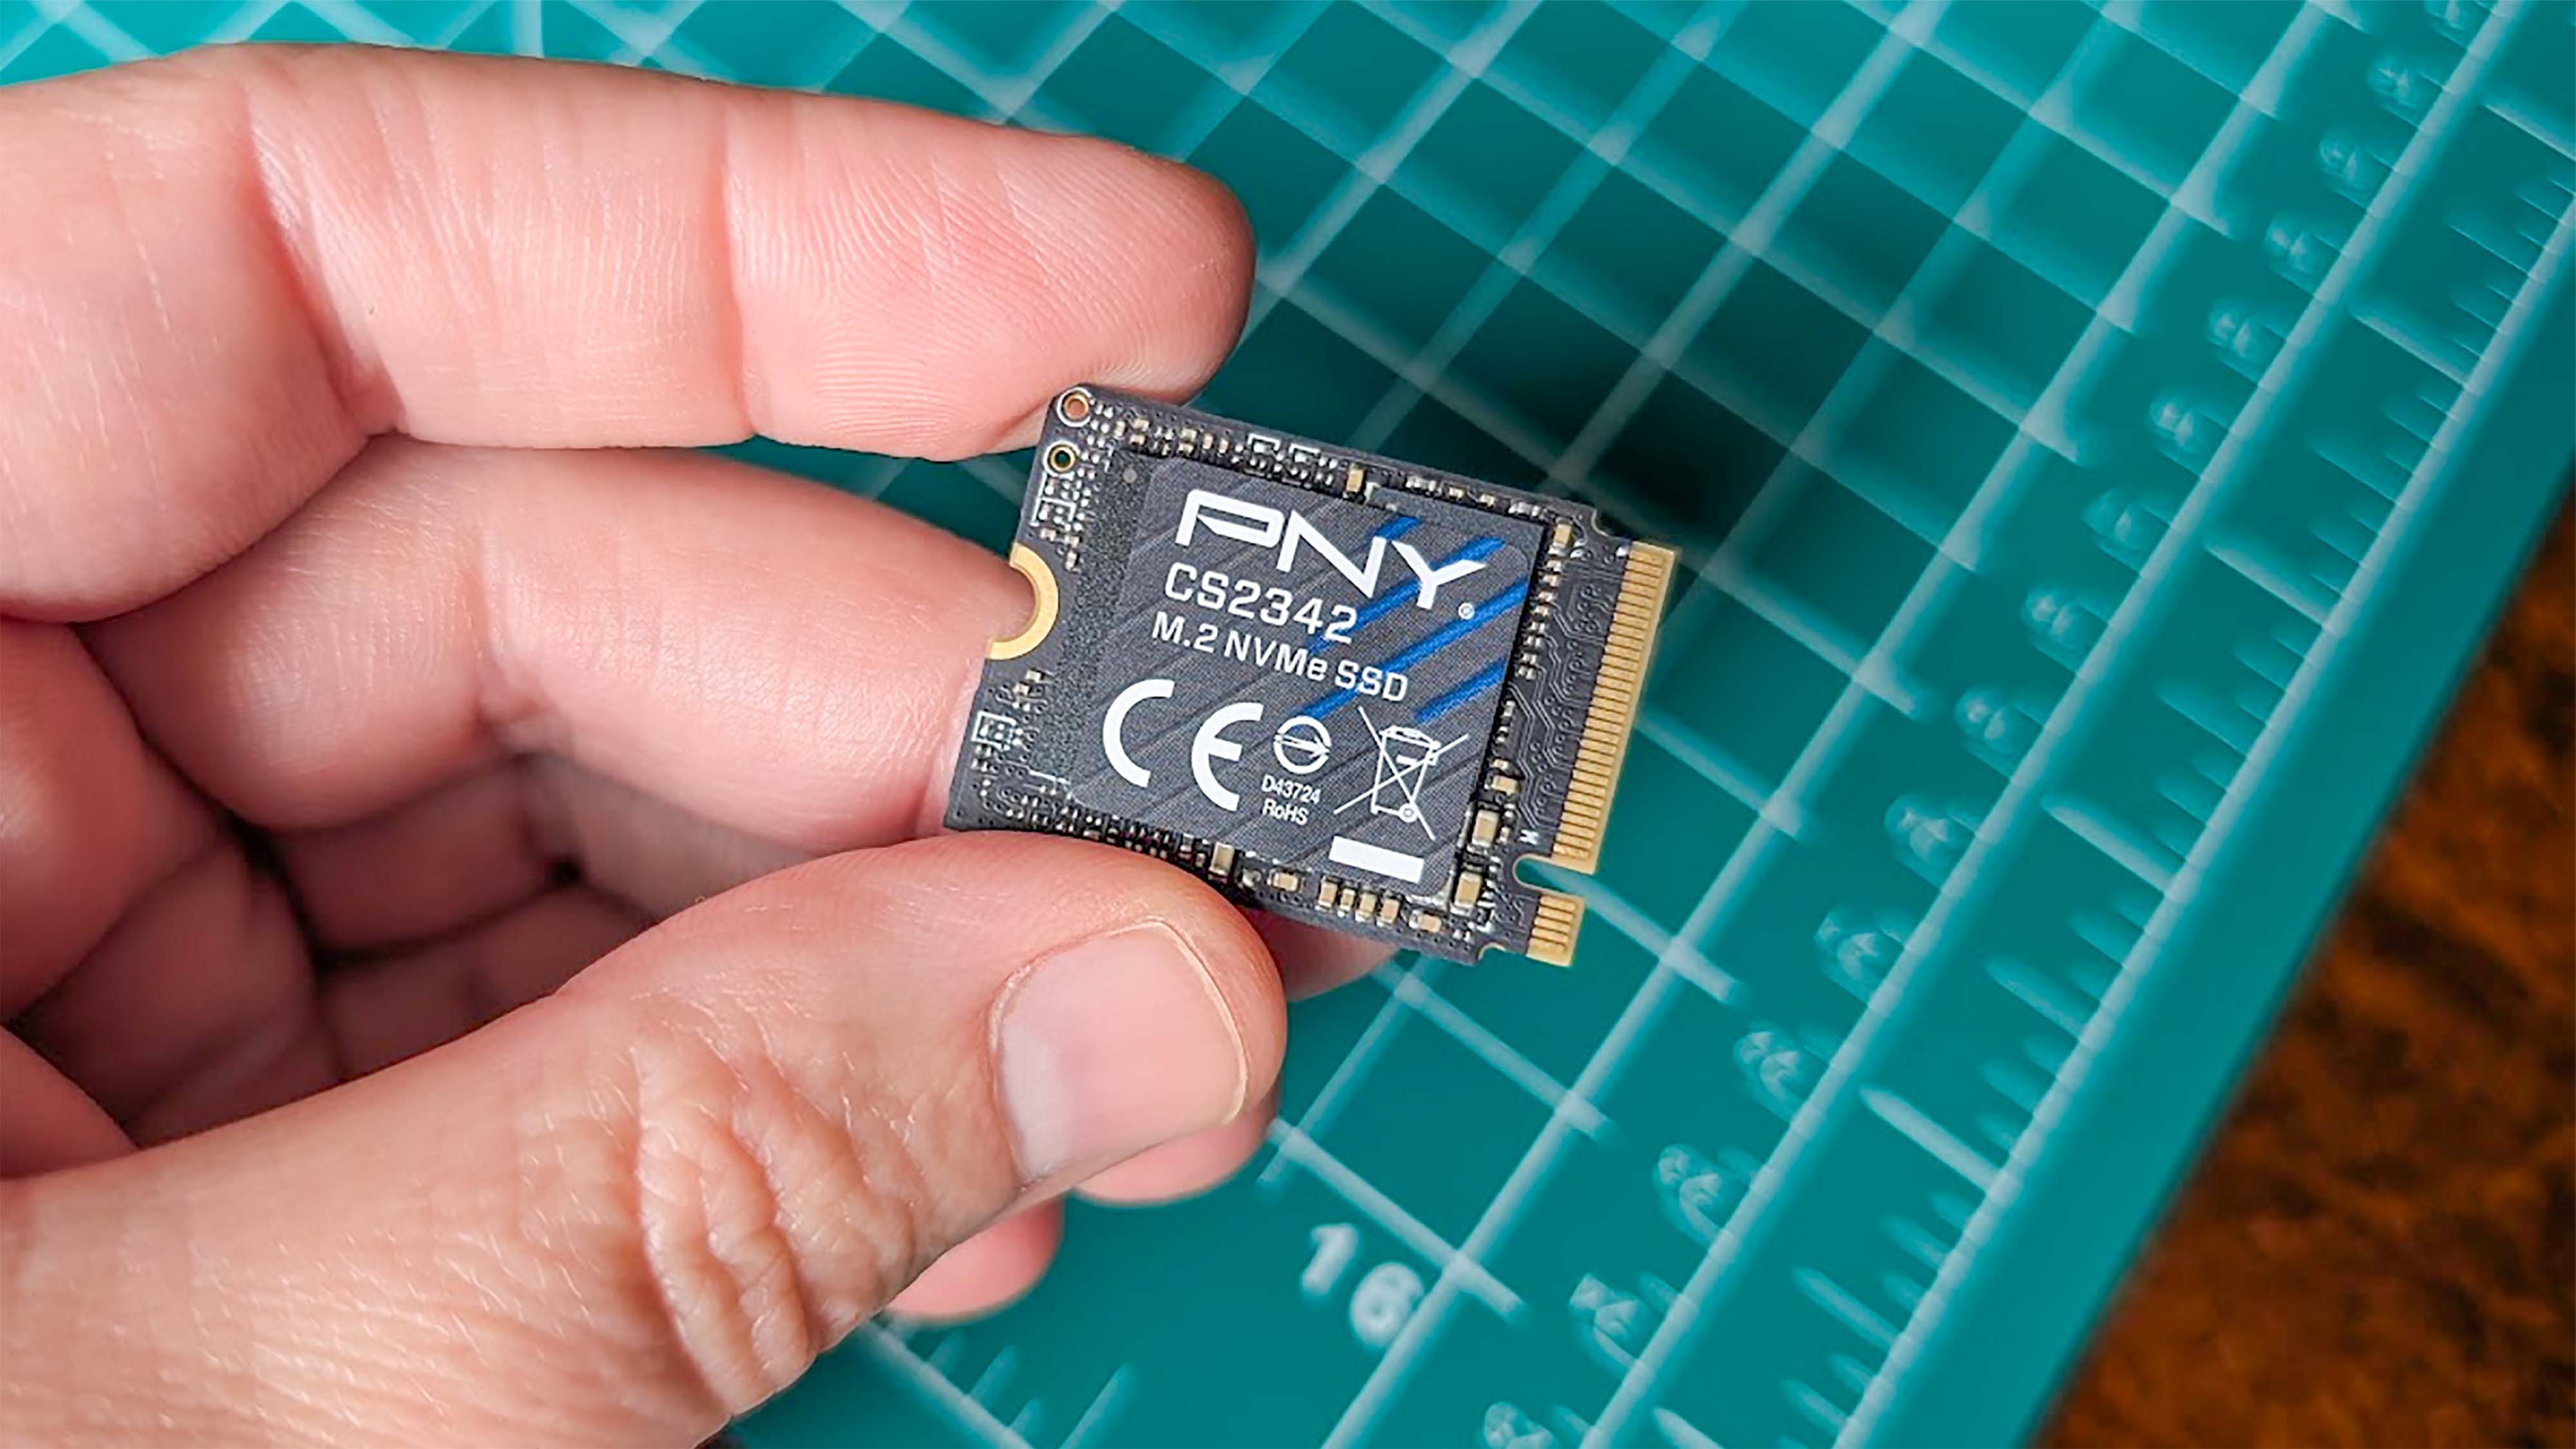
At least, you should consider obtaining a dependable 2TB Gen 4 PCIe NVMe M.2 2230 SSD like the PNY model I chose. This one delivers exceptionally high transfer rates, which makes it perfect for gaming.
However, you will need to get an SSD Extender Adapter since the Legion Go has an M.2 2242 SSD slot.
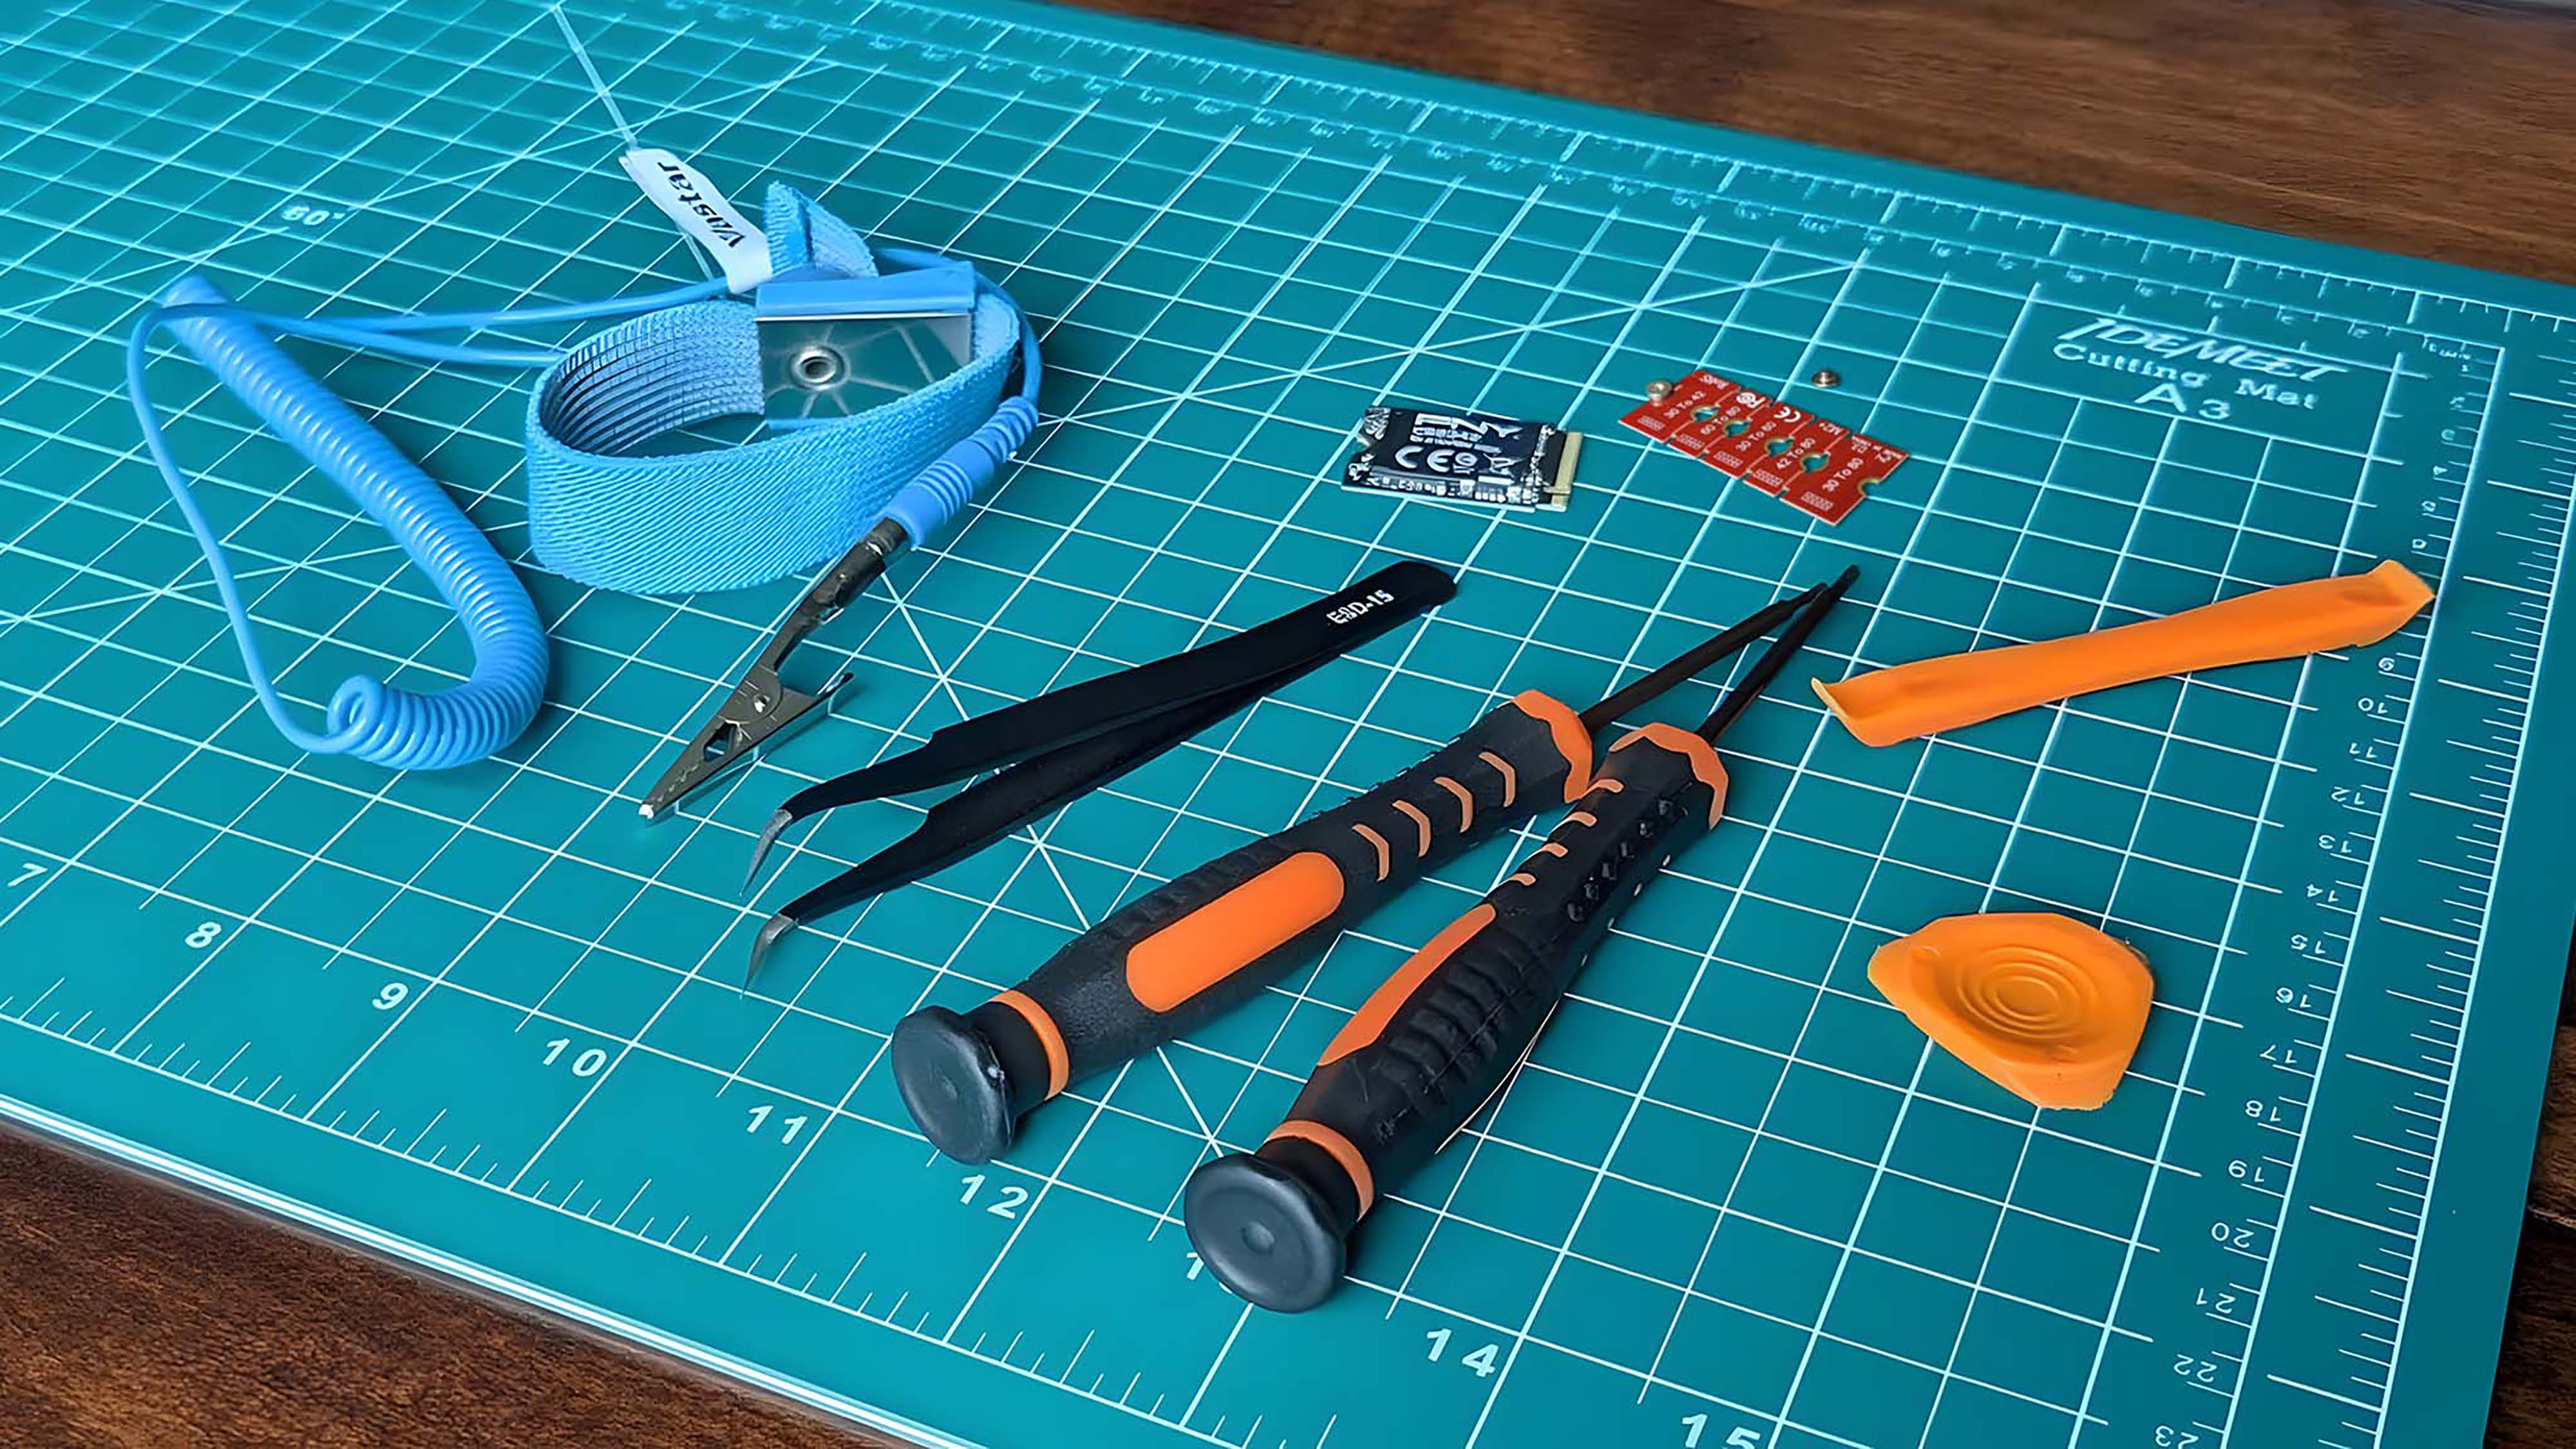
Additionally, you may find it useful to have some extra items on hand, such as an anti-static wrist strap or a static-free mat, especially if you don’t currently possess them. Here are the tools and materials I employed for this task:
IMPORTANT: Unlike Steam Deck and ROG Ally, the Legion Go doesn’t have cloud recovery, which means you must save your original SSD to ensure the device functions correctly. To achieve this, I suggest purchasing an SSD enclosure adapter and using the free 30-day trial of Macrium Reflect Home Edition software for backup purposes.
How to backup your Legion Go SSD
When it comes to backing up your SSD data, there are several options available. However, I prefer using an SSD enclosure adapter together with Macrium Reflect because it’s quite straightforward. Let me walk you through the process I followed:
1. Connect the SSD drive to the computer using the SSD enclosure adapter.
2. Install and launch Macrium Reflect on your computer.
3. Create a new backup job within the software, selecting the connected SSD drive as the source.
4. Choose an appropriate destination for the backup, such as another hard drive or an external storage device.
5. Set up any additional preferences for the backup, like scheduling and encryption.
6. Start the backup process by clicking on ‘Run Now’ or setting a schedule if preferred.
7. Monitor the progress of the backup, ensuring that all data is copied successfully to the destination drive.
8. Verify the integrity of the backup by restoring some files from the backup image to a temporary location.
9. Once satisfied with the backup, store the backup media safely for future use.
TIP: Performing backups on Legion Go is simplified when you connect a keyboard and mouse, though a dock or USB hub is necessary for this. Nonetheless, I managed to do it using only my fingers and the touchscreen.
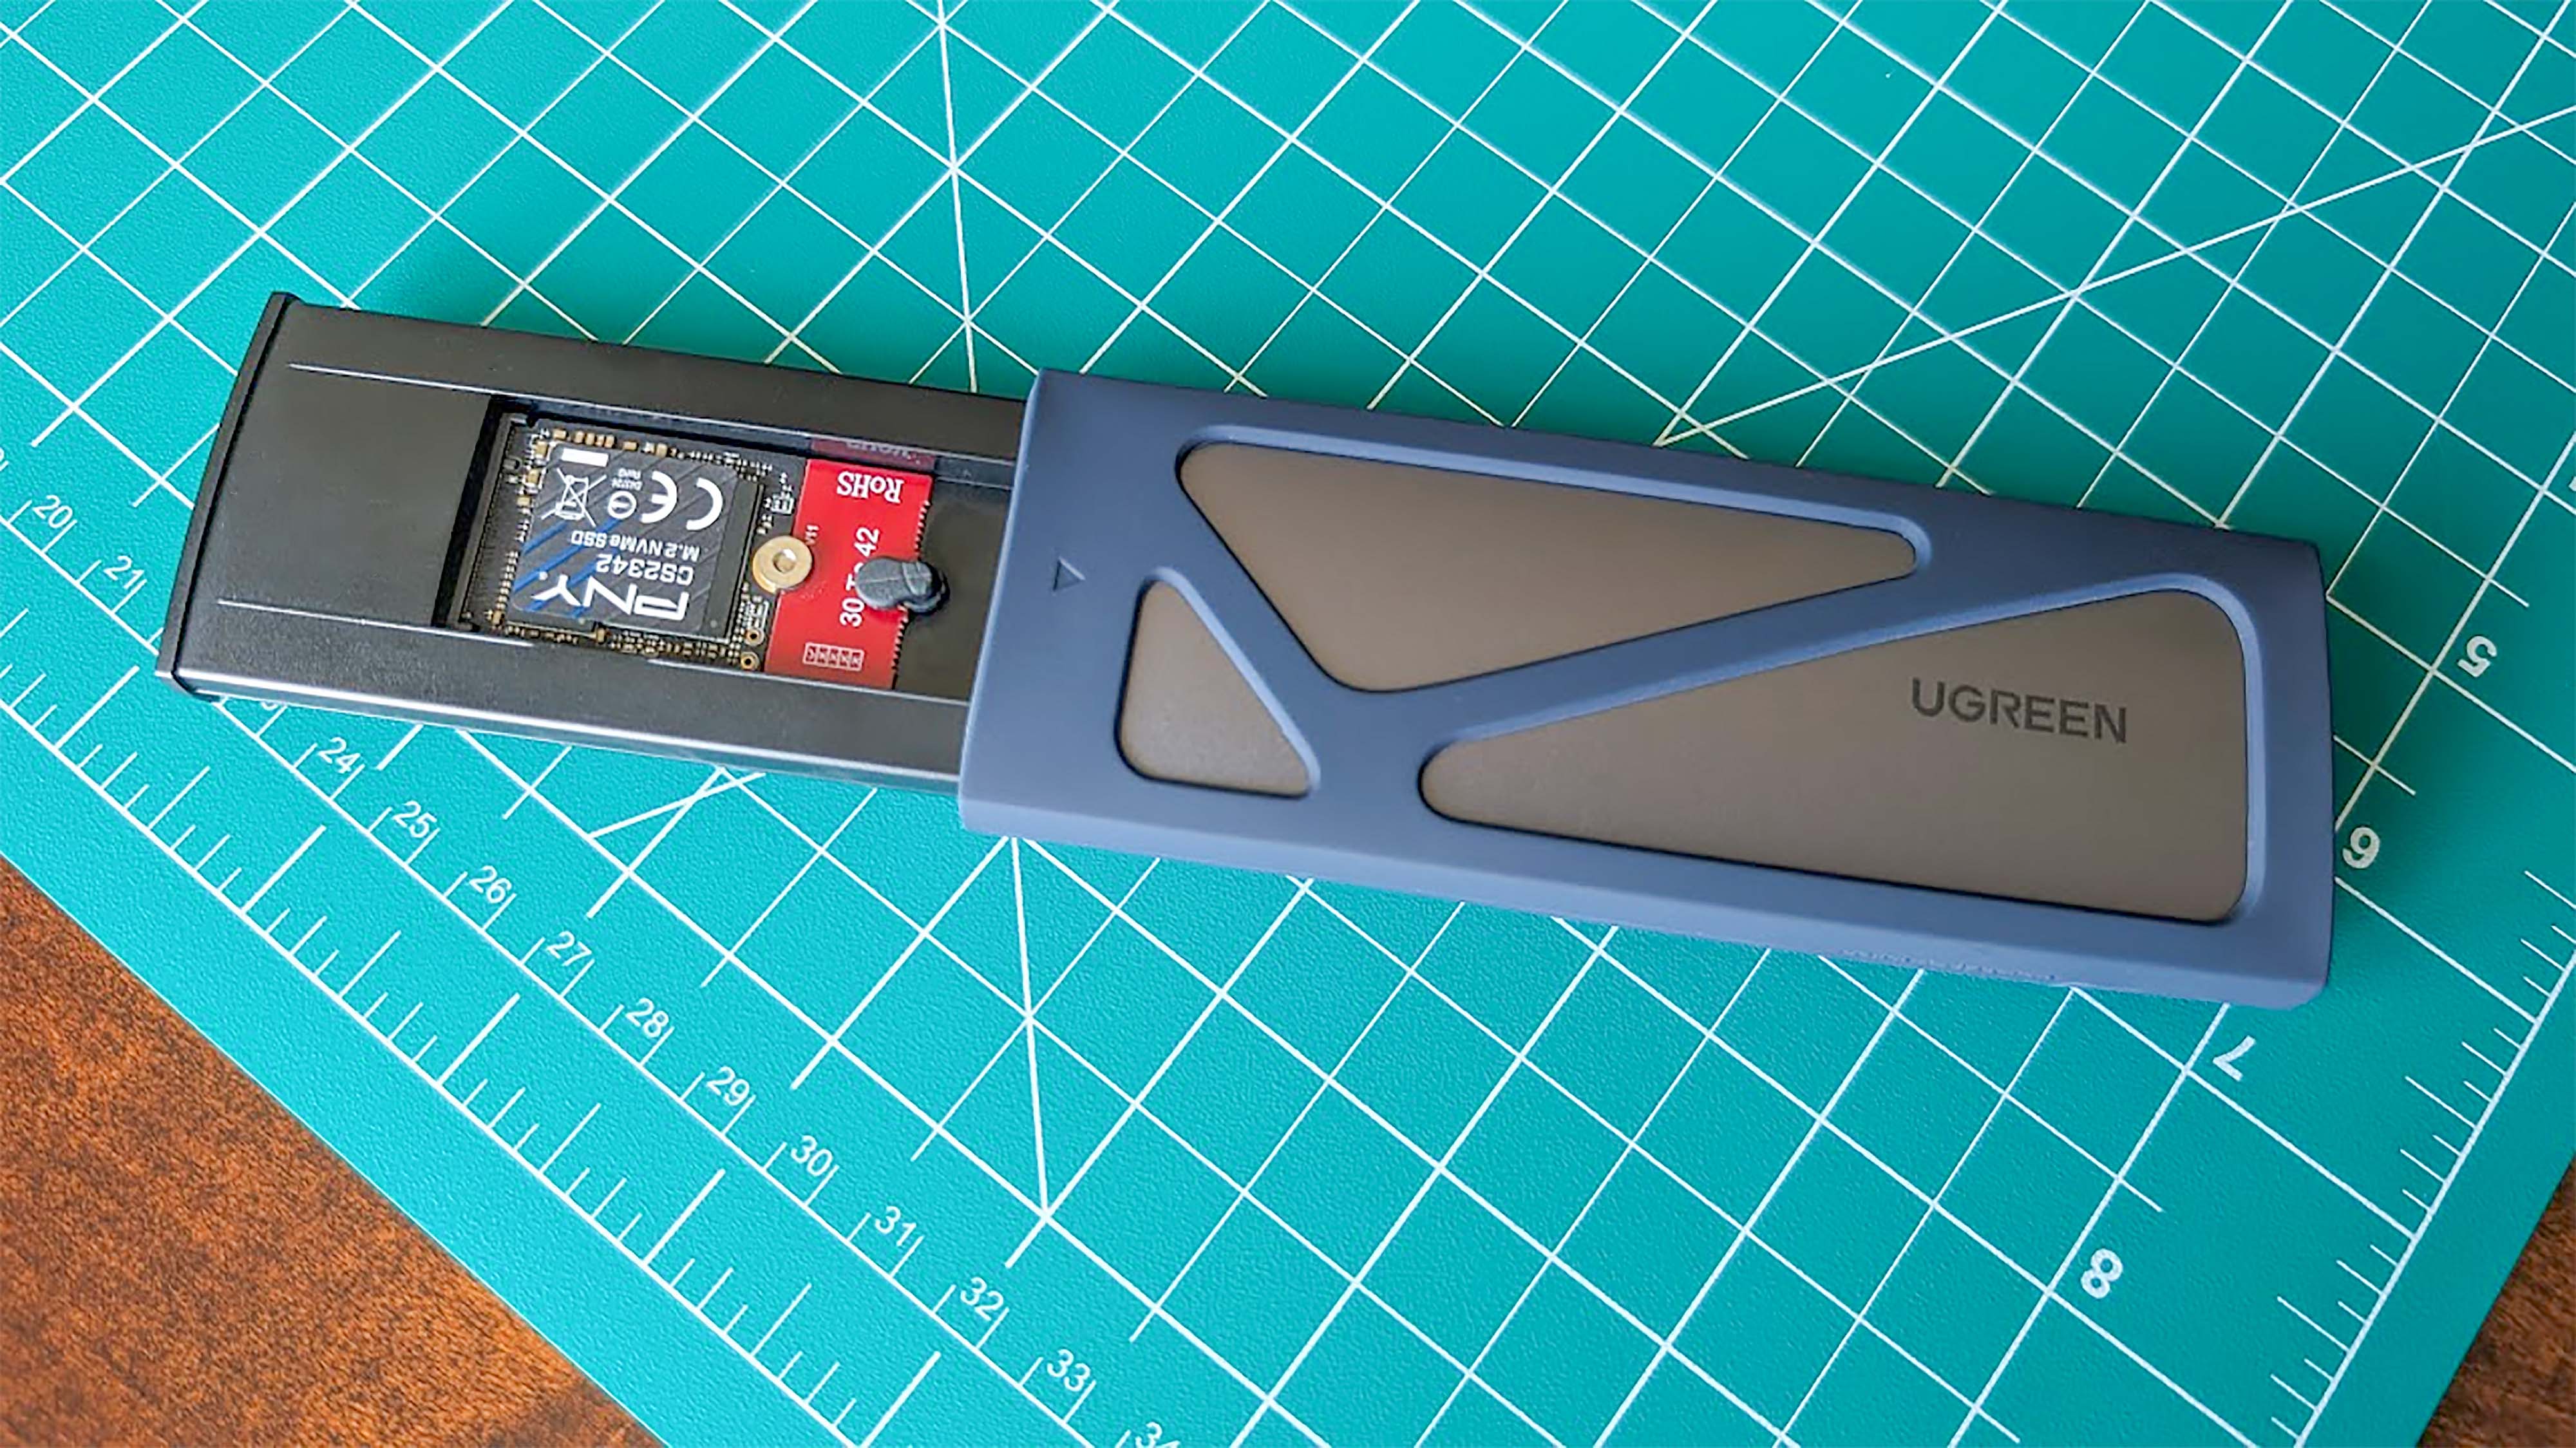
- If you have a 2230 SSD, take a moment to connect an SSD Extender to it so it will fit the Legion Go’s 2242 SSD slot.
- Place the new SSD into the SSD enclosure. You’ll need to make sure it’s pushed into the connection area and then secure it with the rubber nub.
- Close the SSD enclosure and then plug it into one of the Legion Go’s USB-C ports.
- Connect the power adapter into the Legion Go’s other USB-C port.

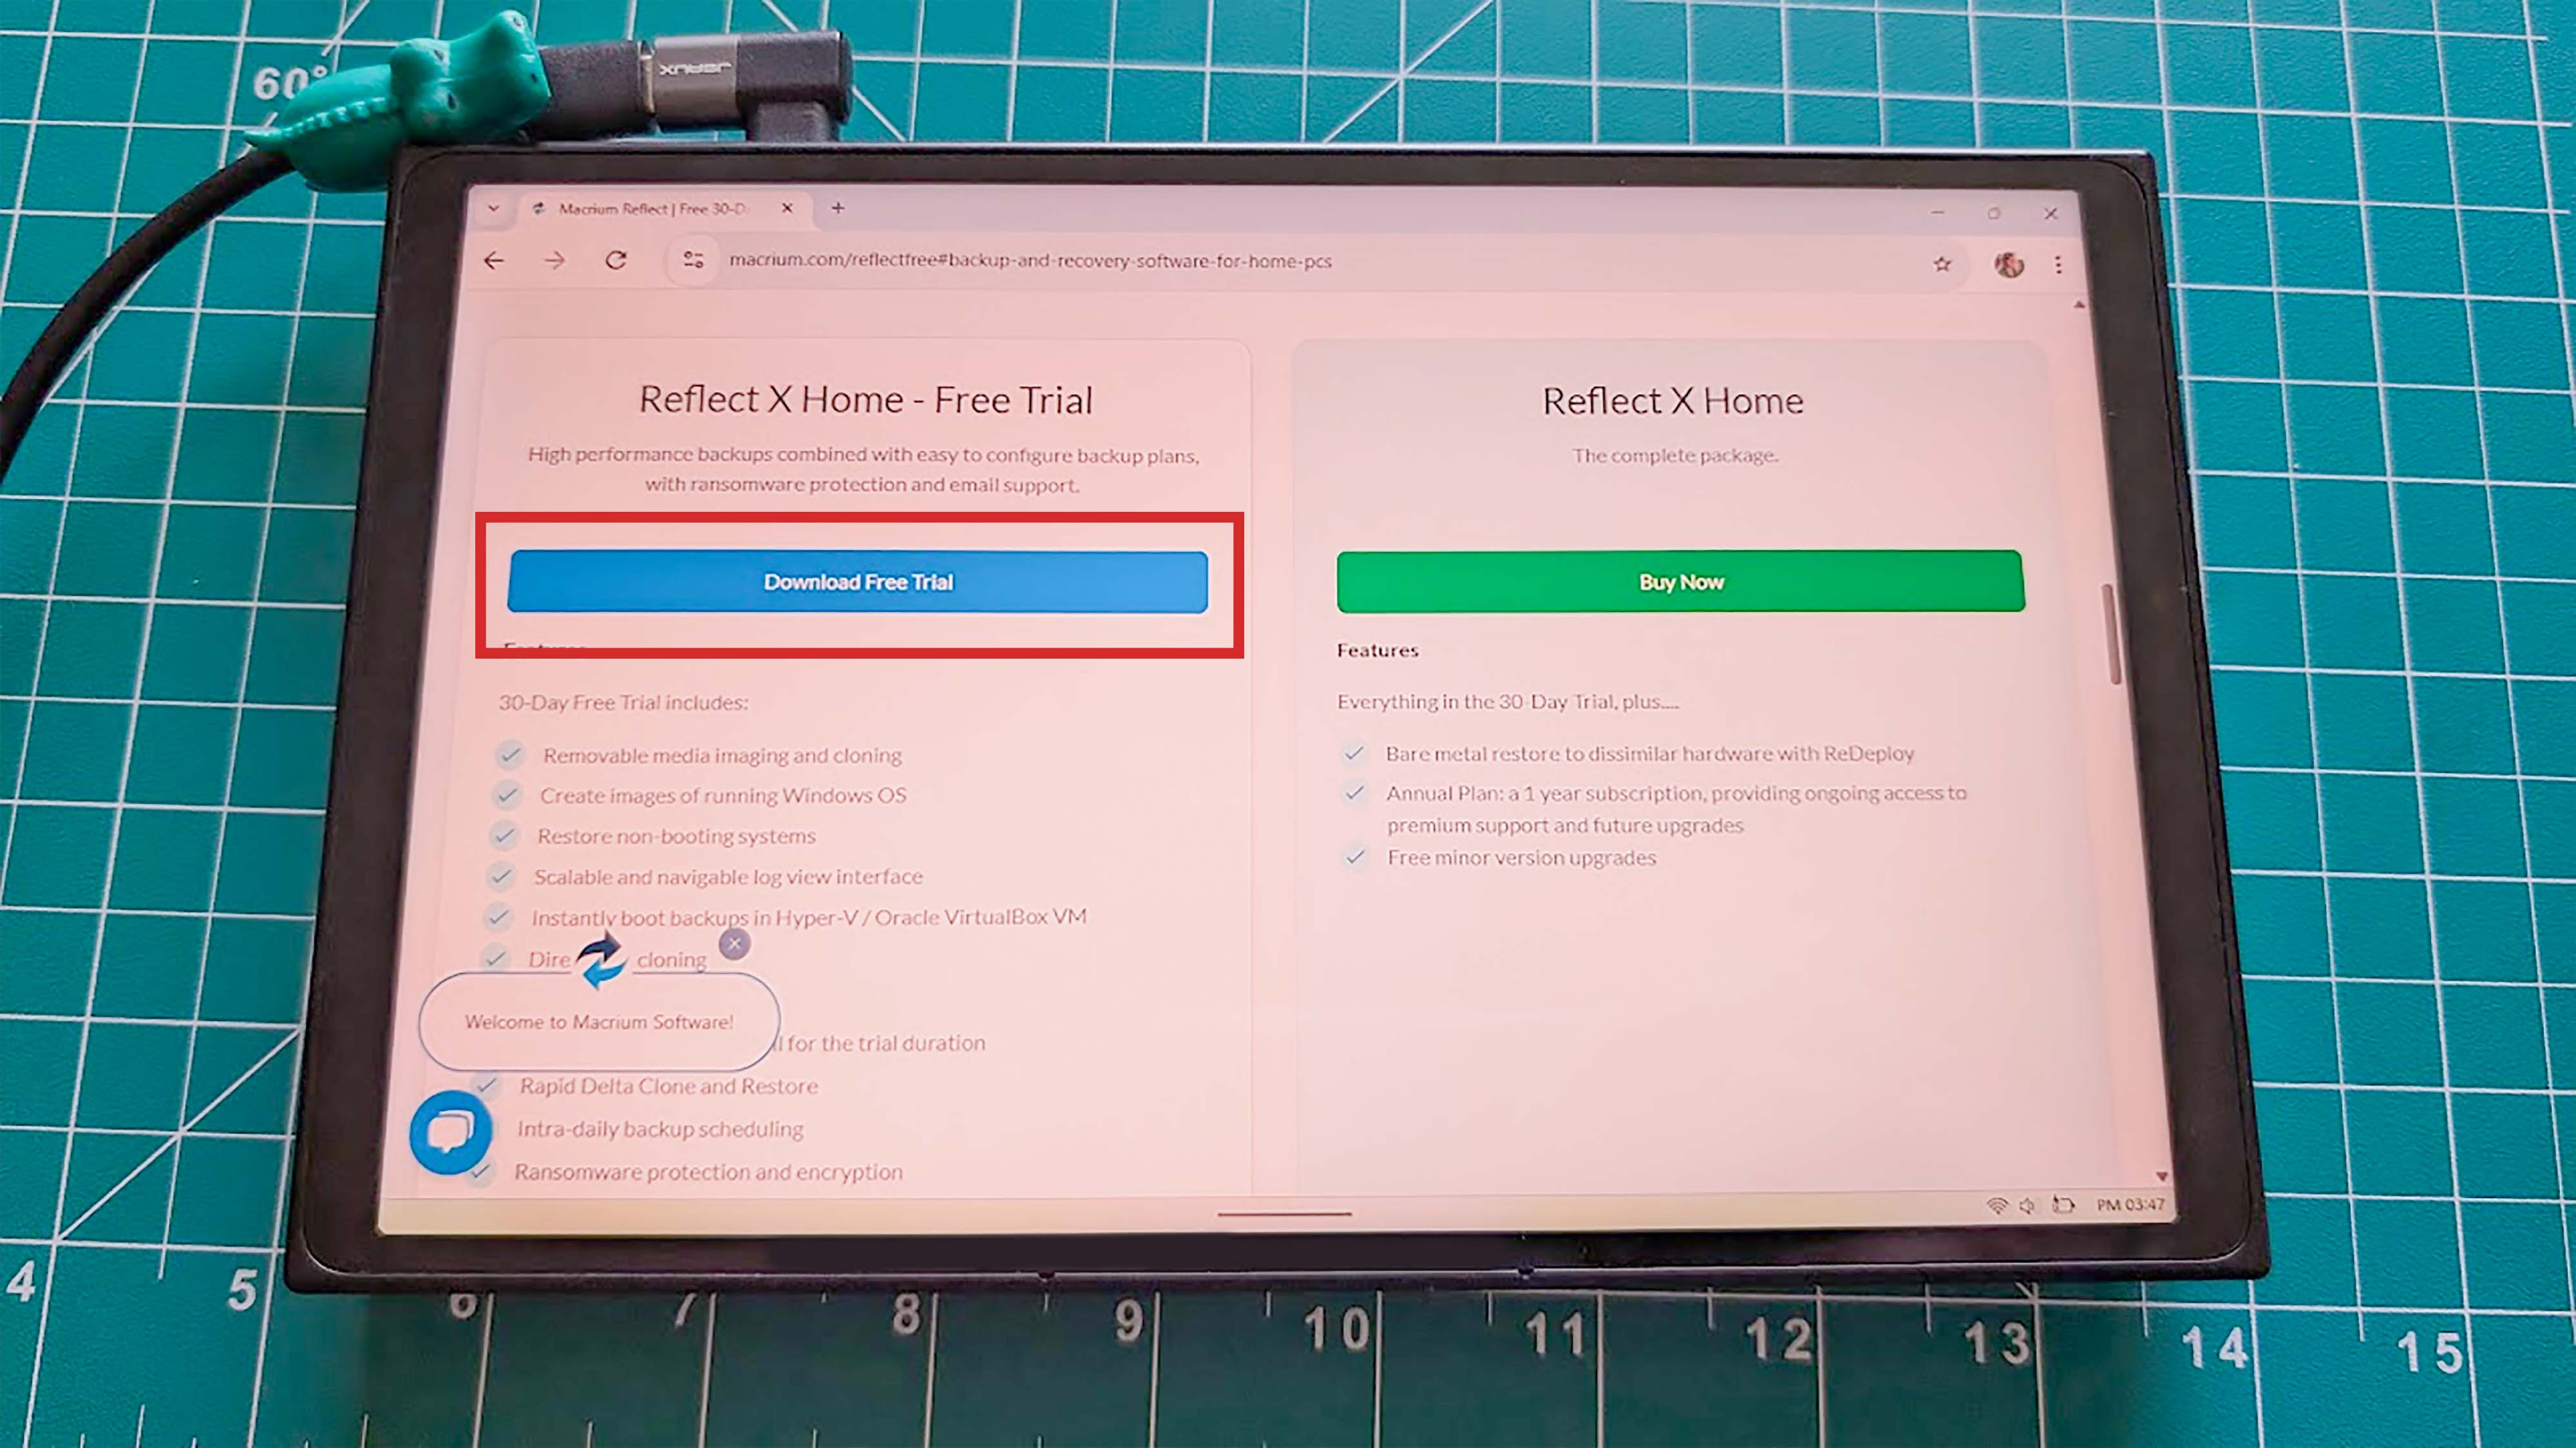
- On your Legion Go, go to the Macrium website (macrium.com/reflectfree).
- Scroll down and click on the free 30-day trial for Macrium Reflect Home Edition.
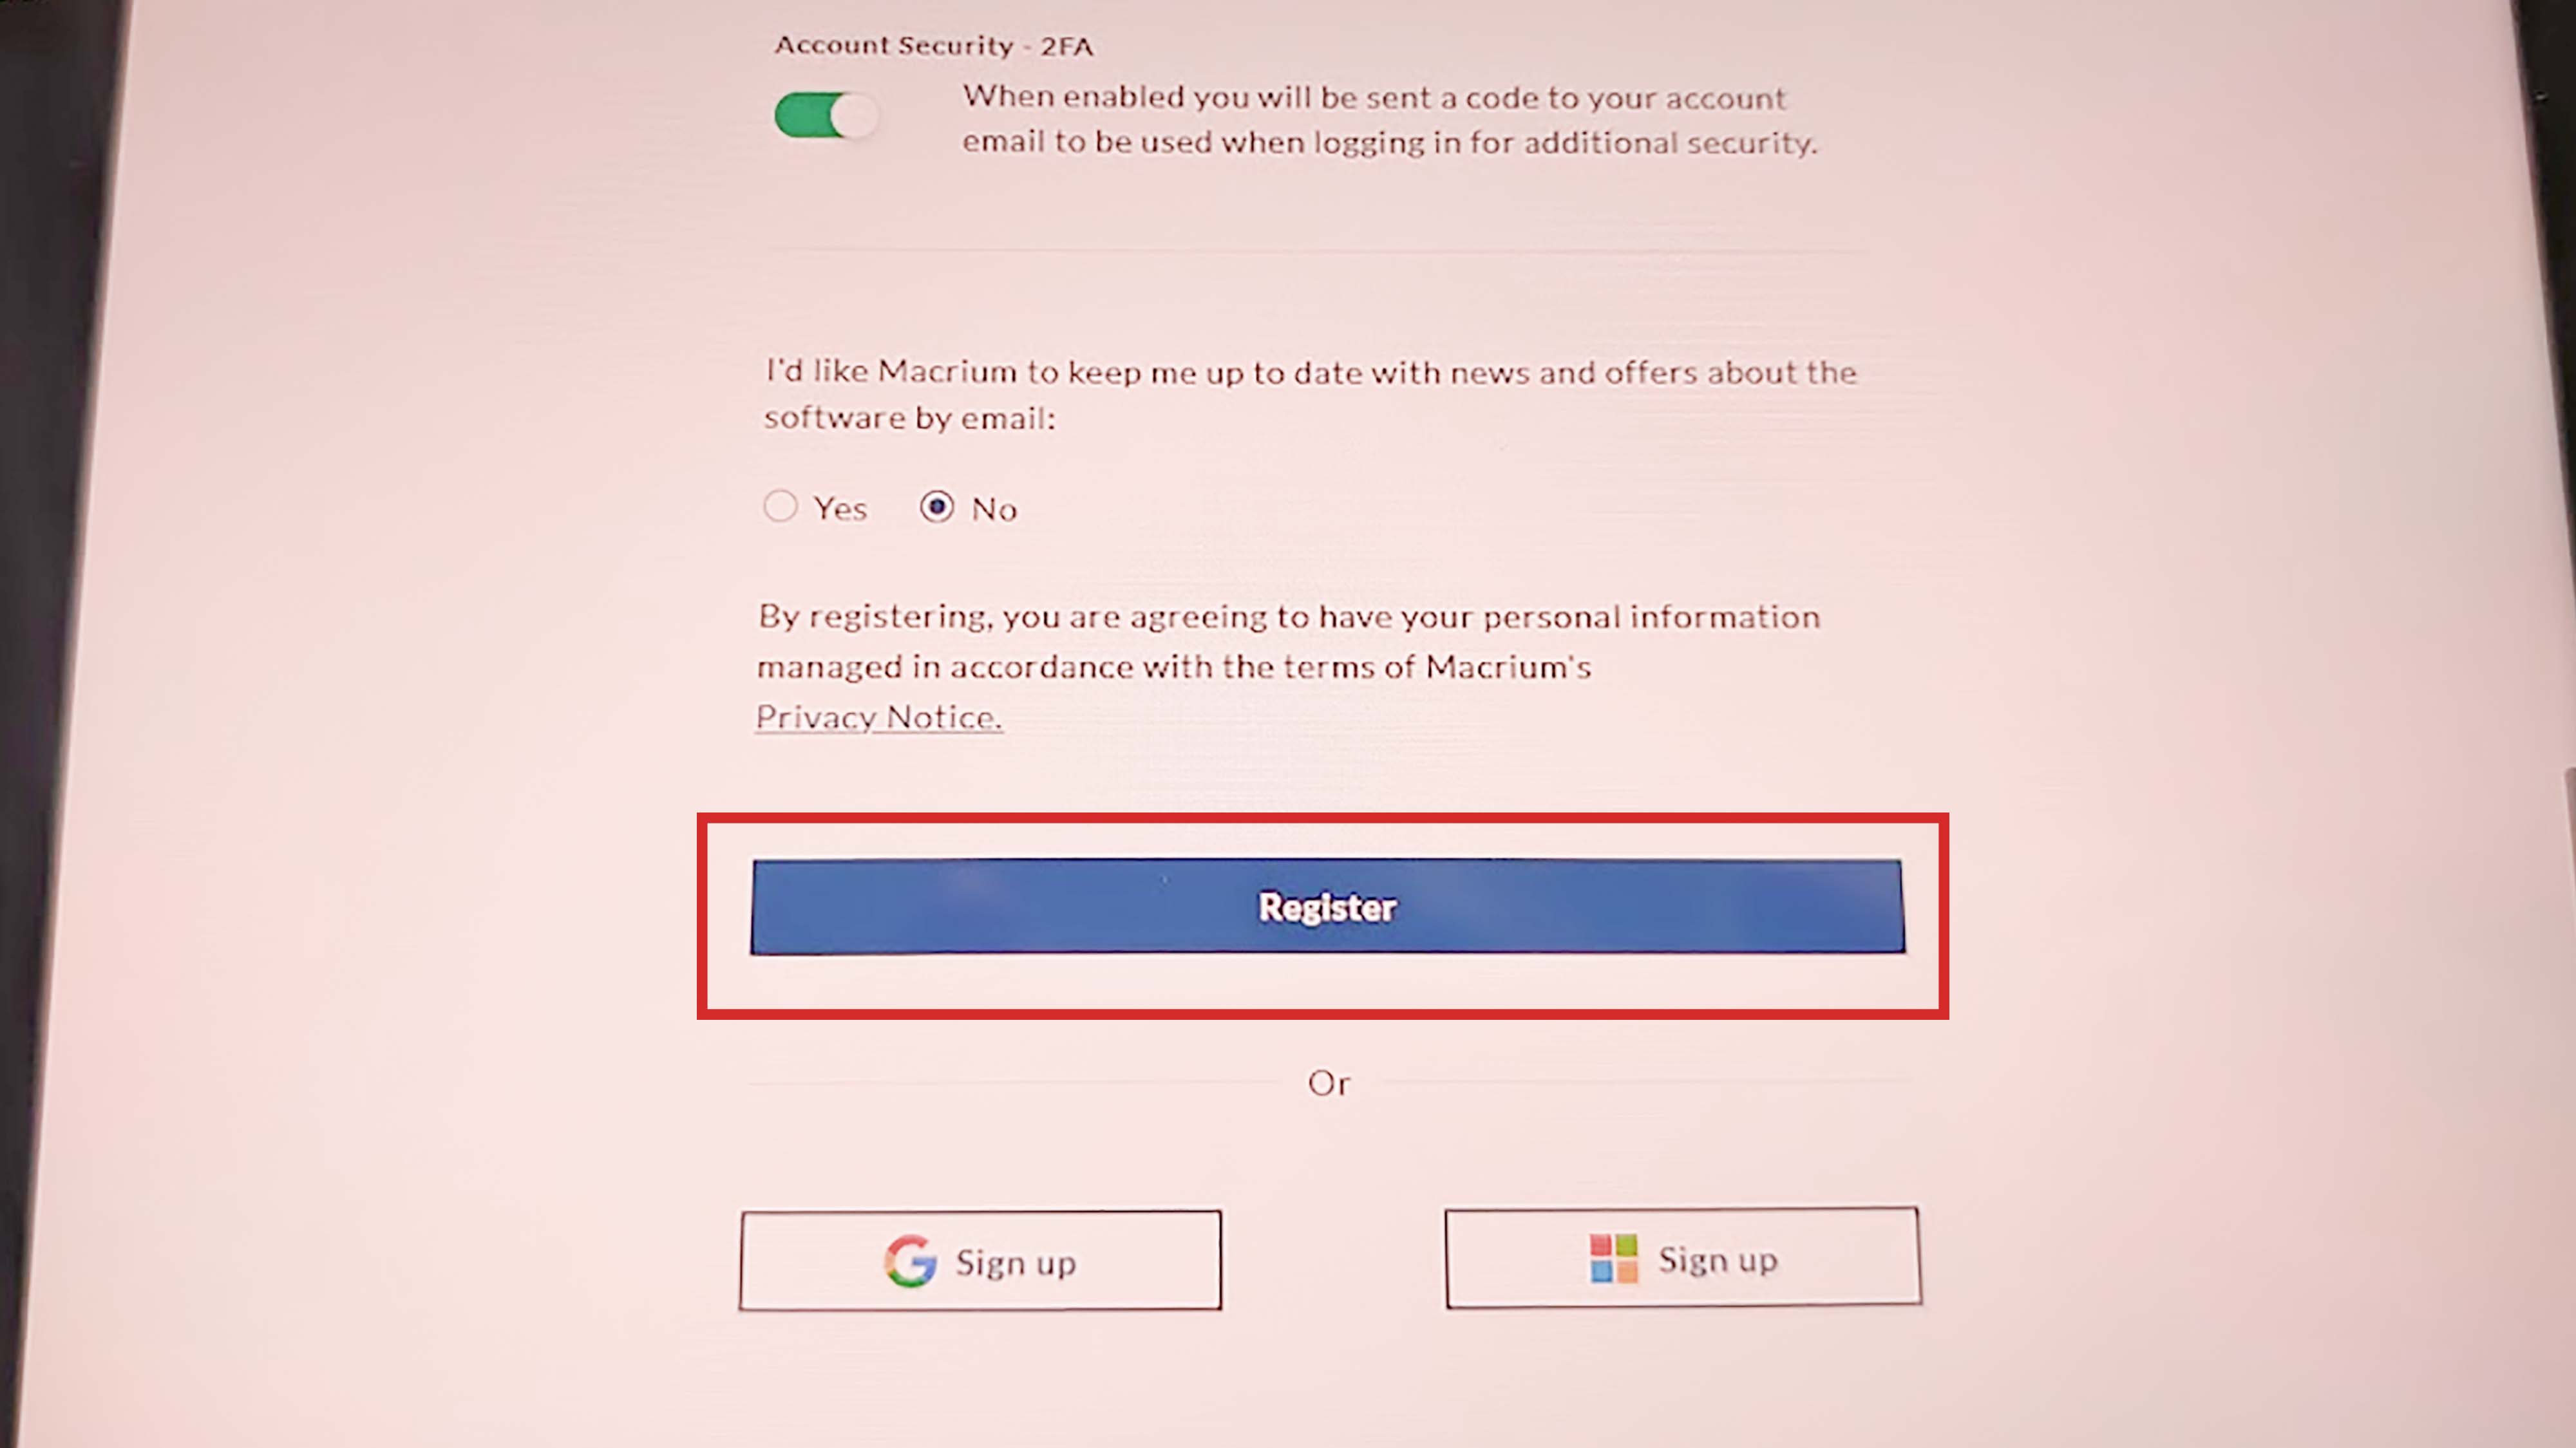
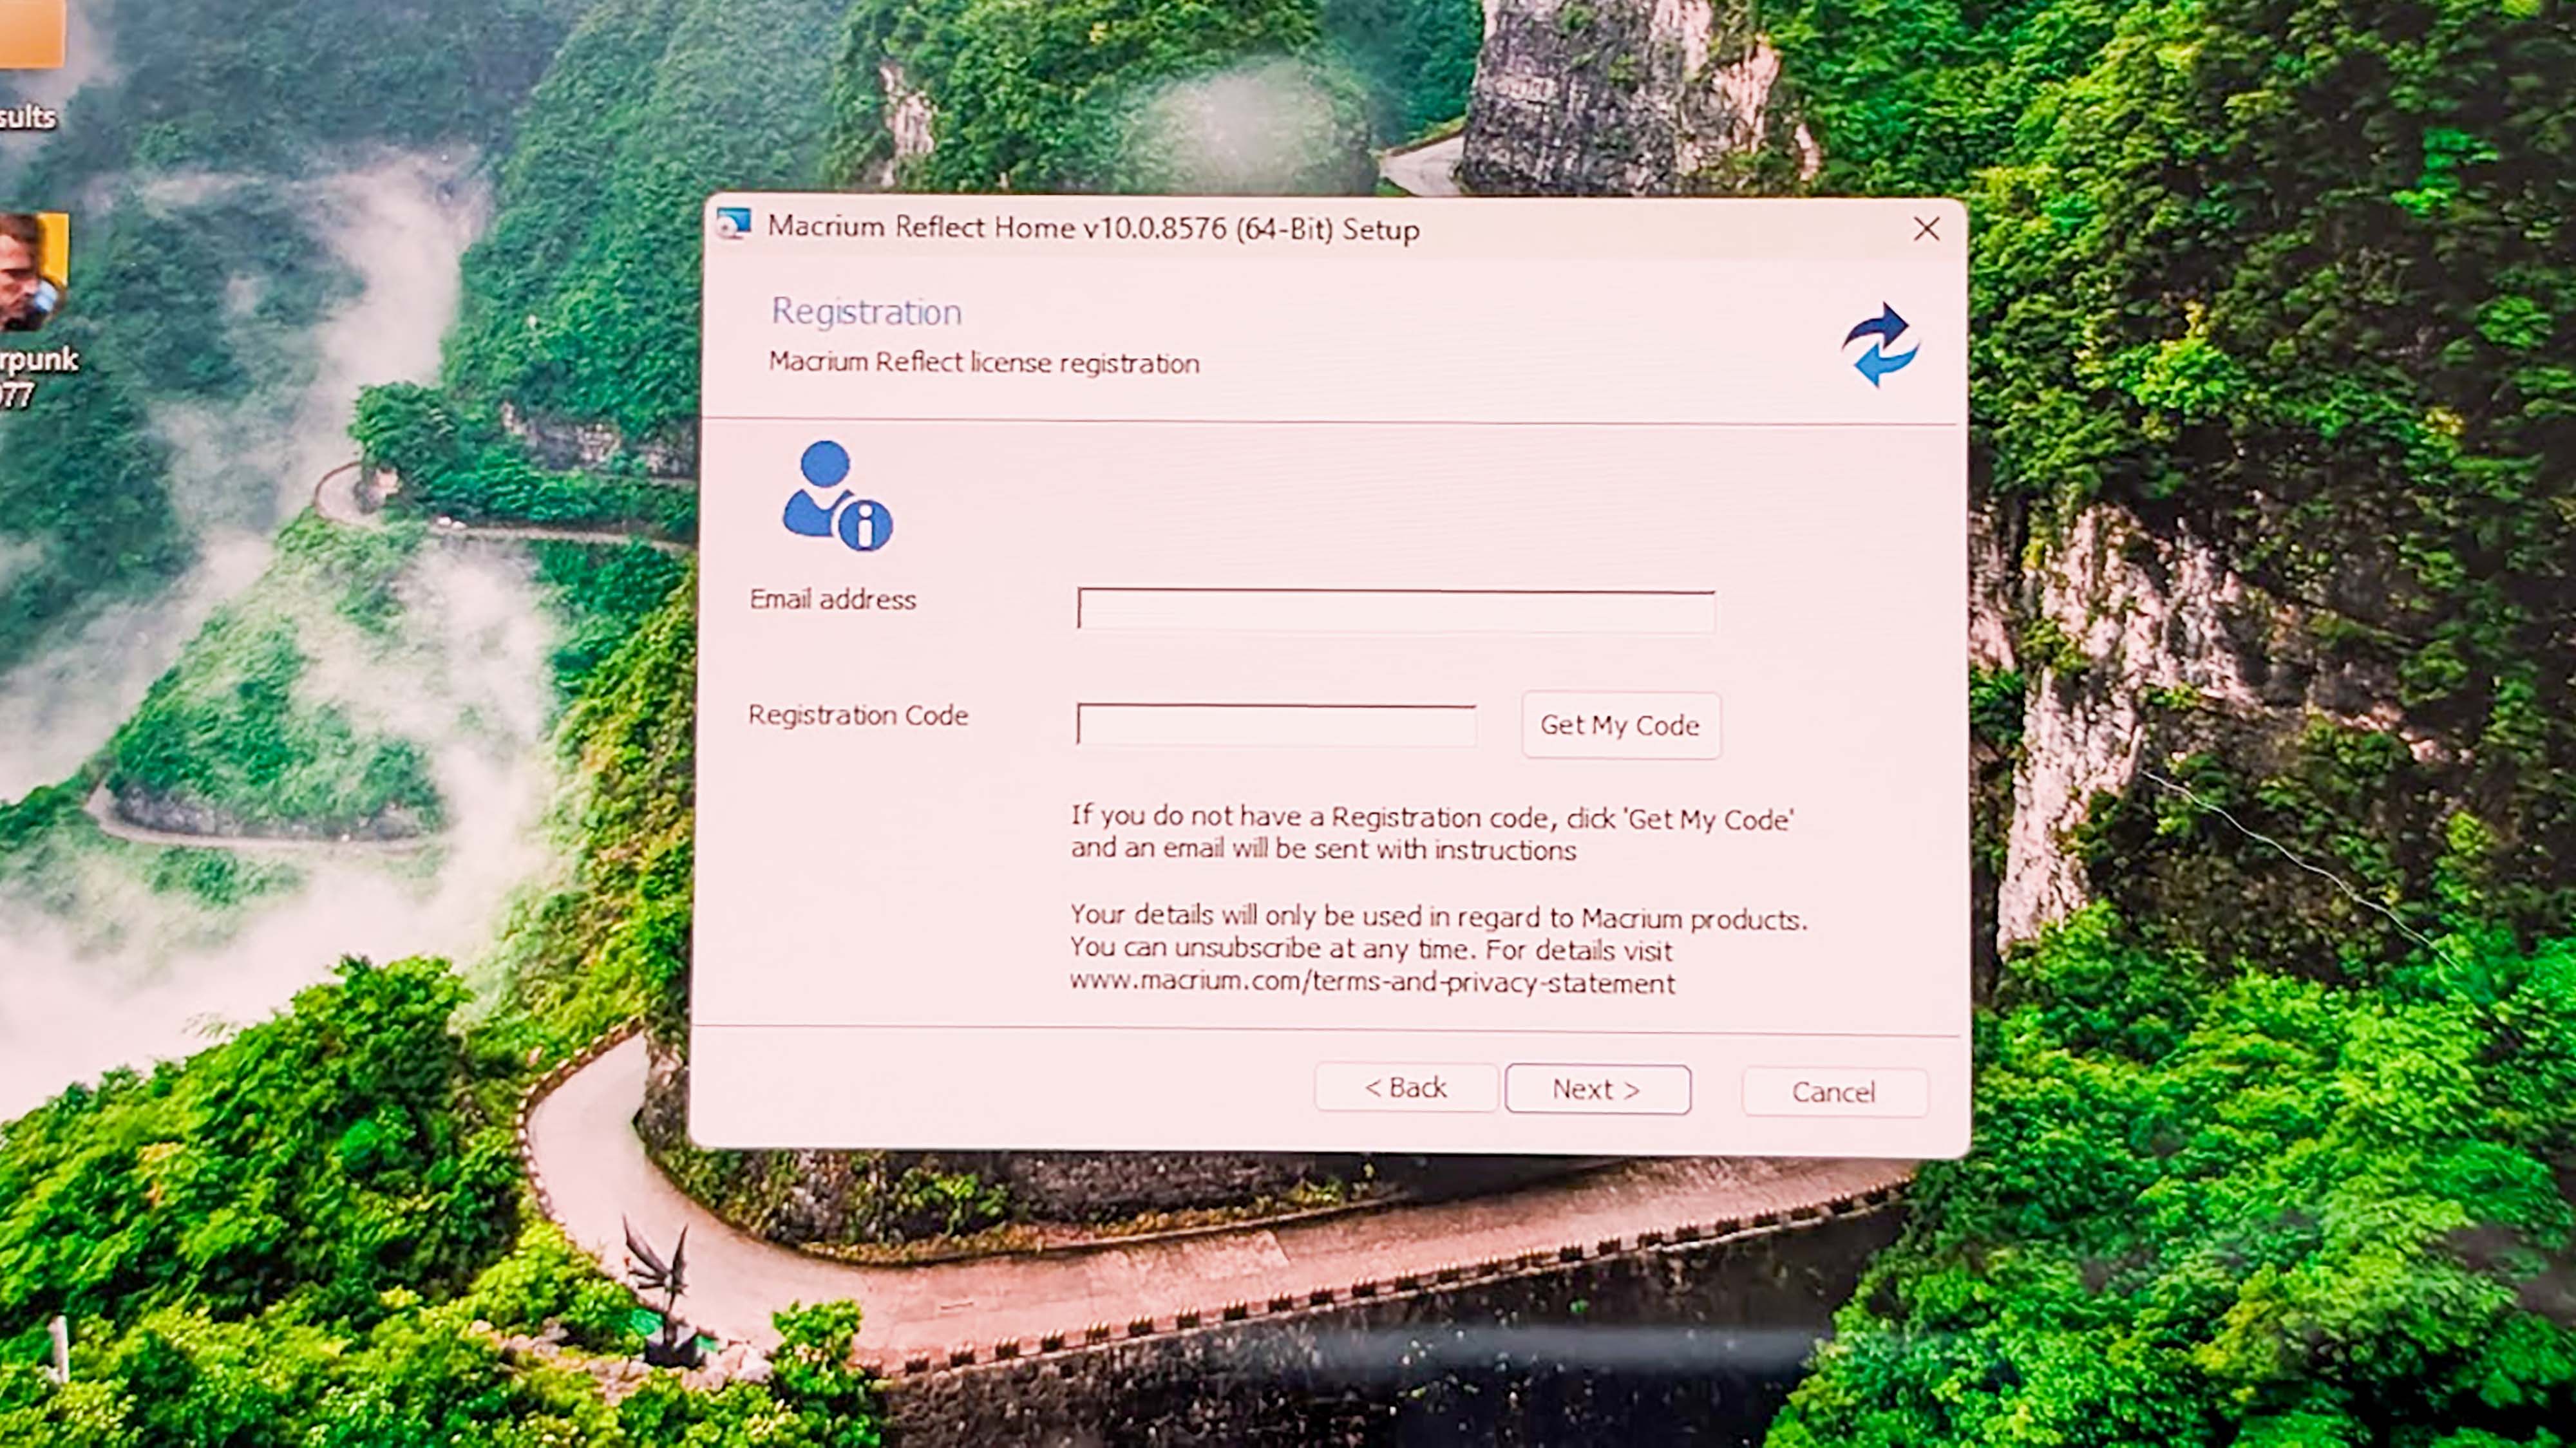
- Enter your information and then scroll down and press Register.
- Next, check your email and click on the registration link.
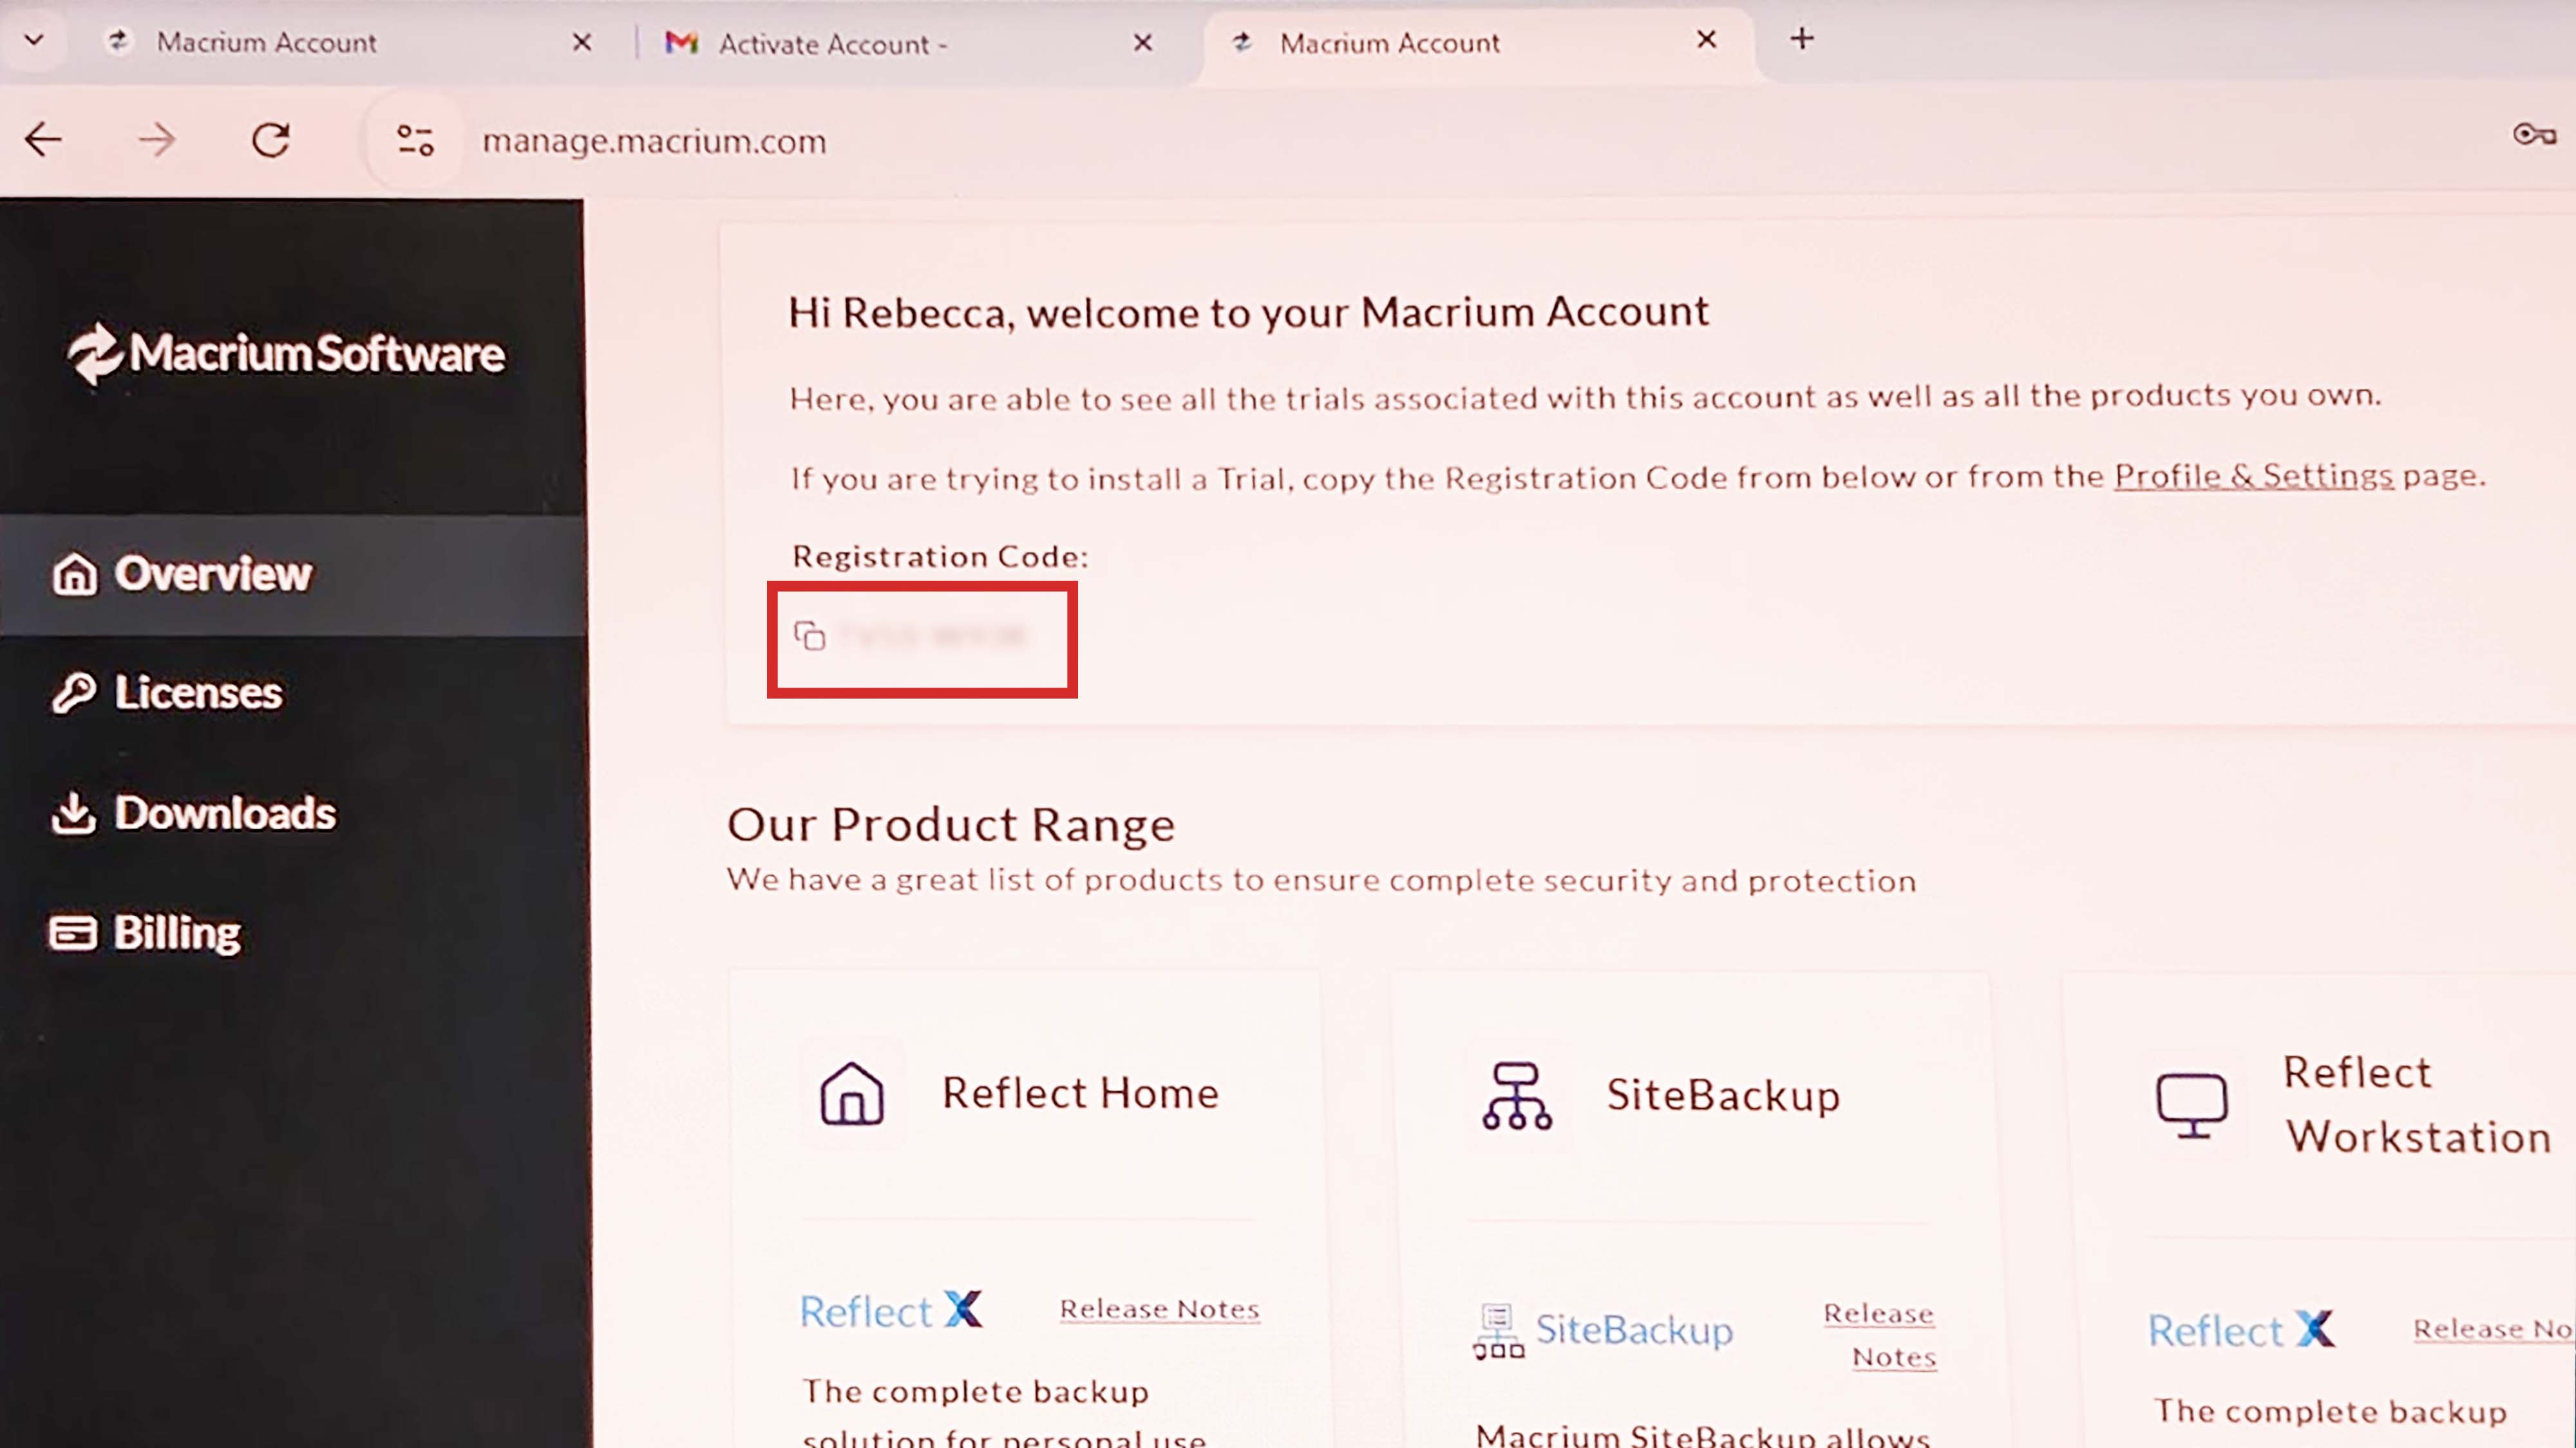
- Now, sign into your new Macrium account.
- The software will immediately start to download on your Legion Go. In the meantime, make sure you’re on Marium’s Overview tab and copy your Registration Code.
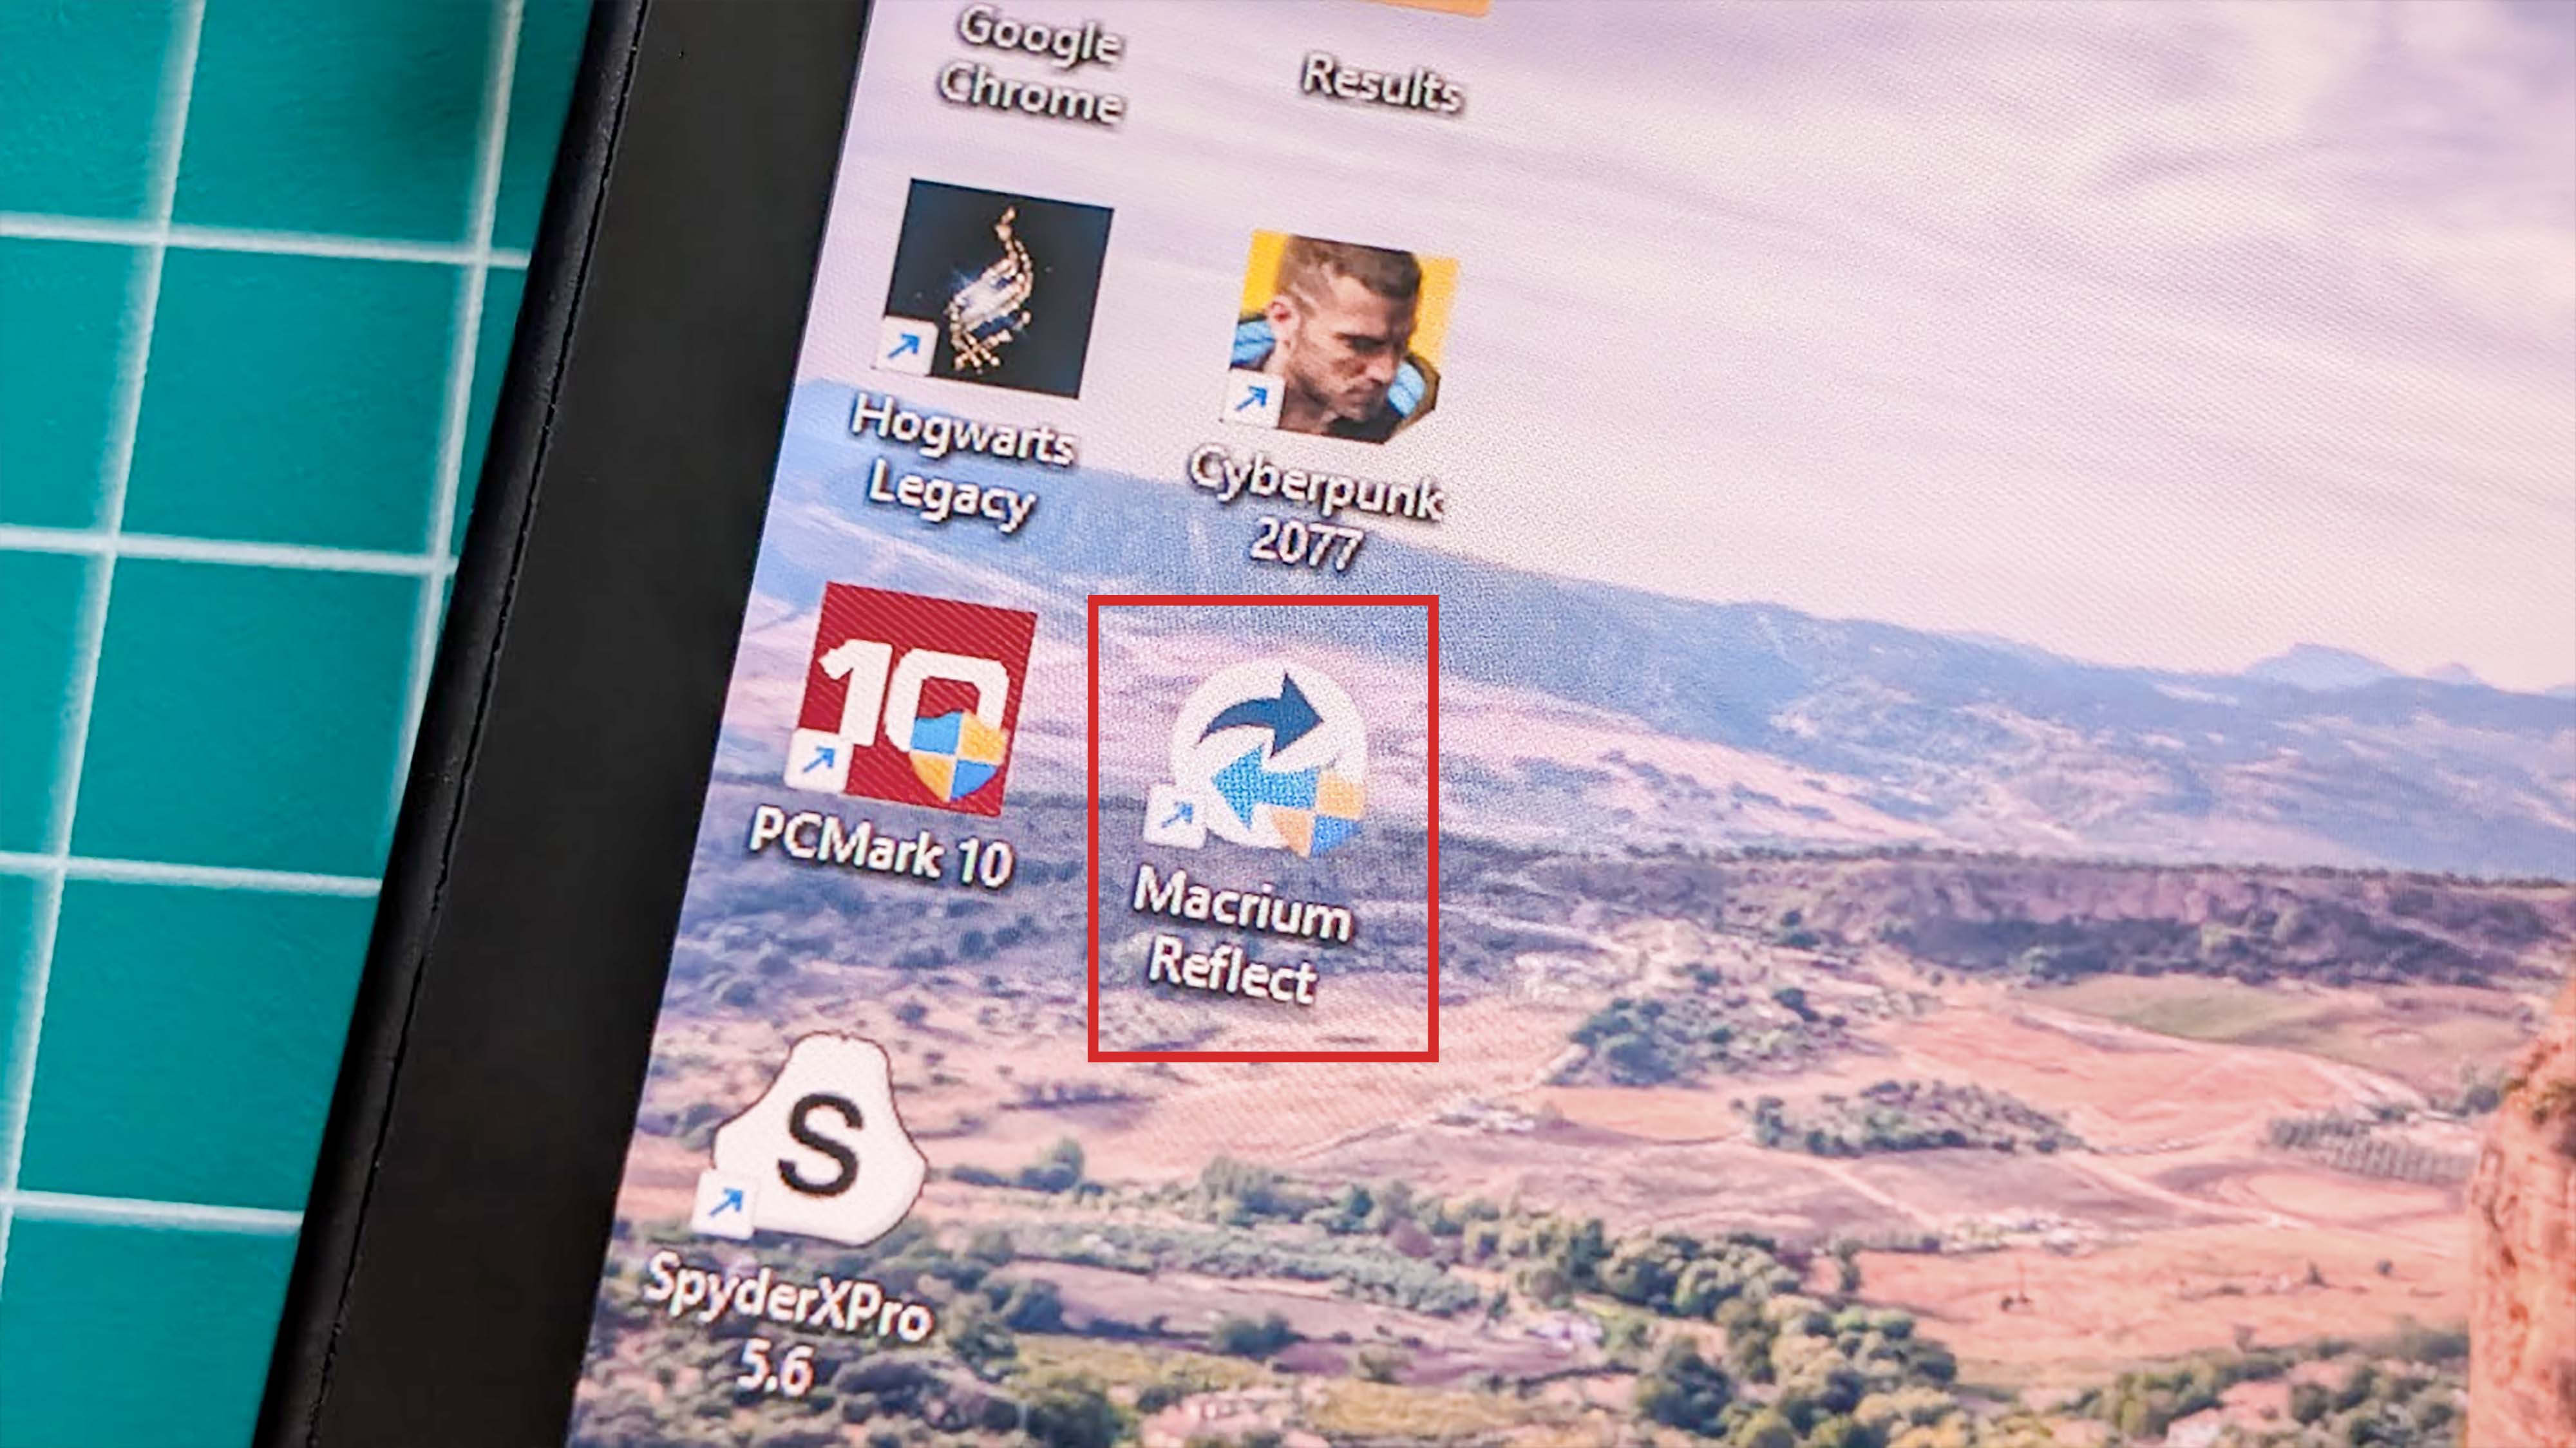
- When downloading finishes, go to your Downloads and install Macrium Reflect onto your Legion Go.
- A window will pop up asking you if you want to allow the app to make changes to your device. Select Yes.
- Select Next on the small window that pops up.
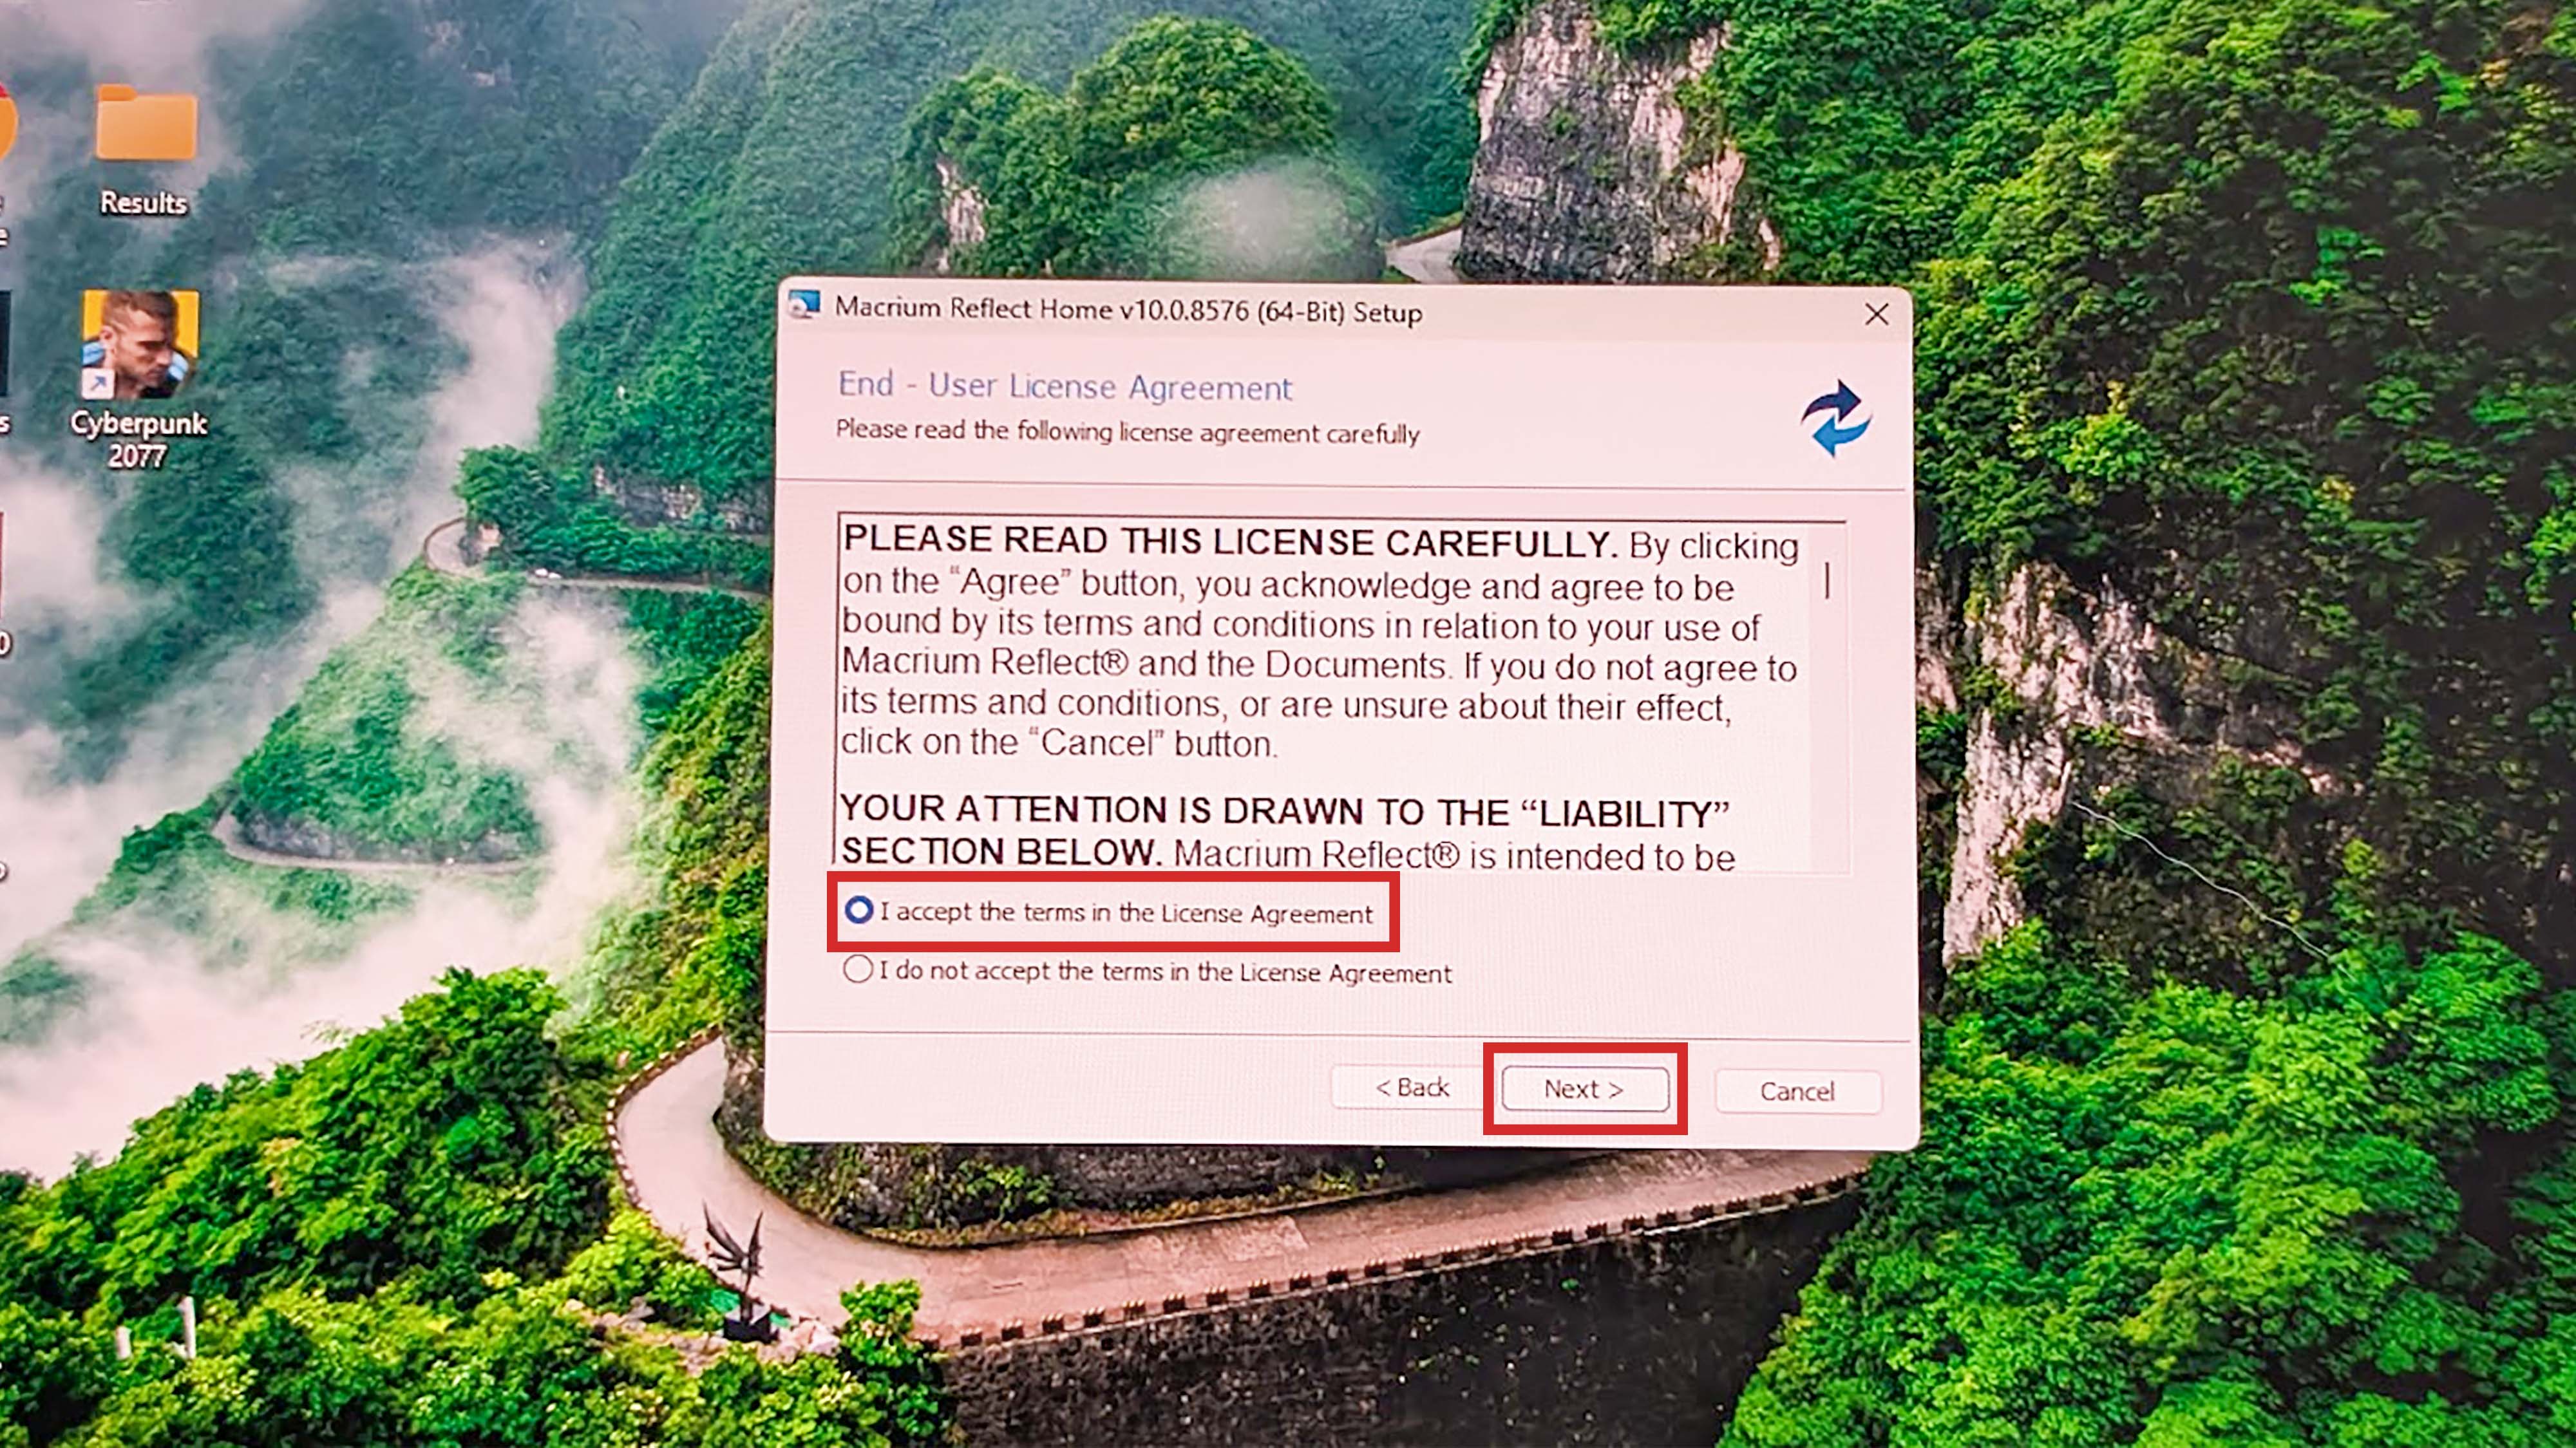
- Now read through the terms and conditions, and if you agree with them, accept and select Next.
- When the setup window shows up, enter the registration code you copied earlier (if it hasn’t auto-filled it) and select Next.
- Finish the installation process and then restart your Legion Go. It might take a few minutes to come back.
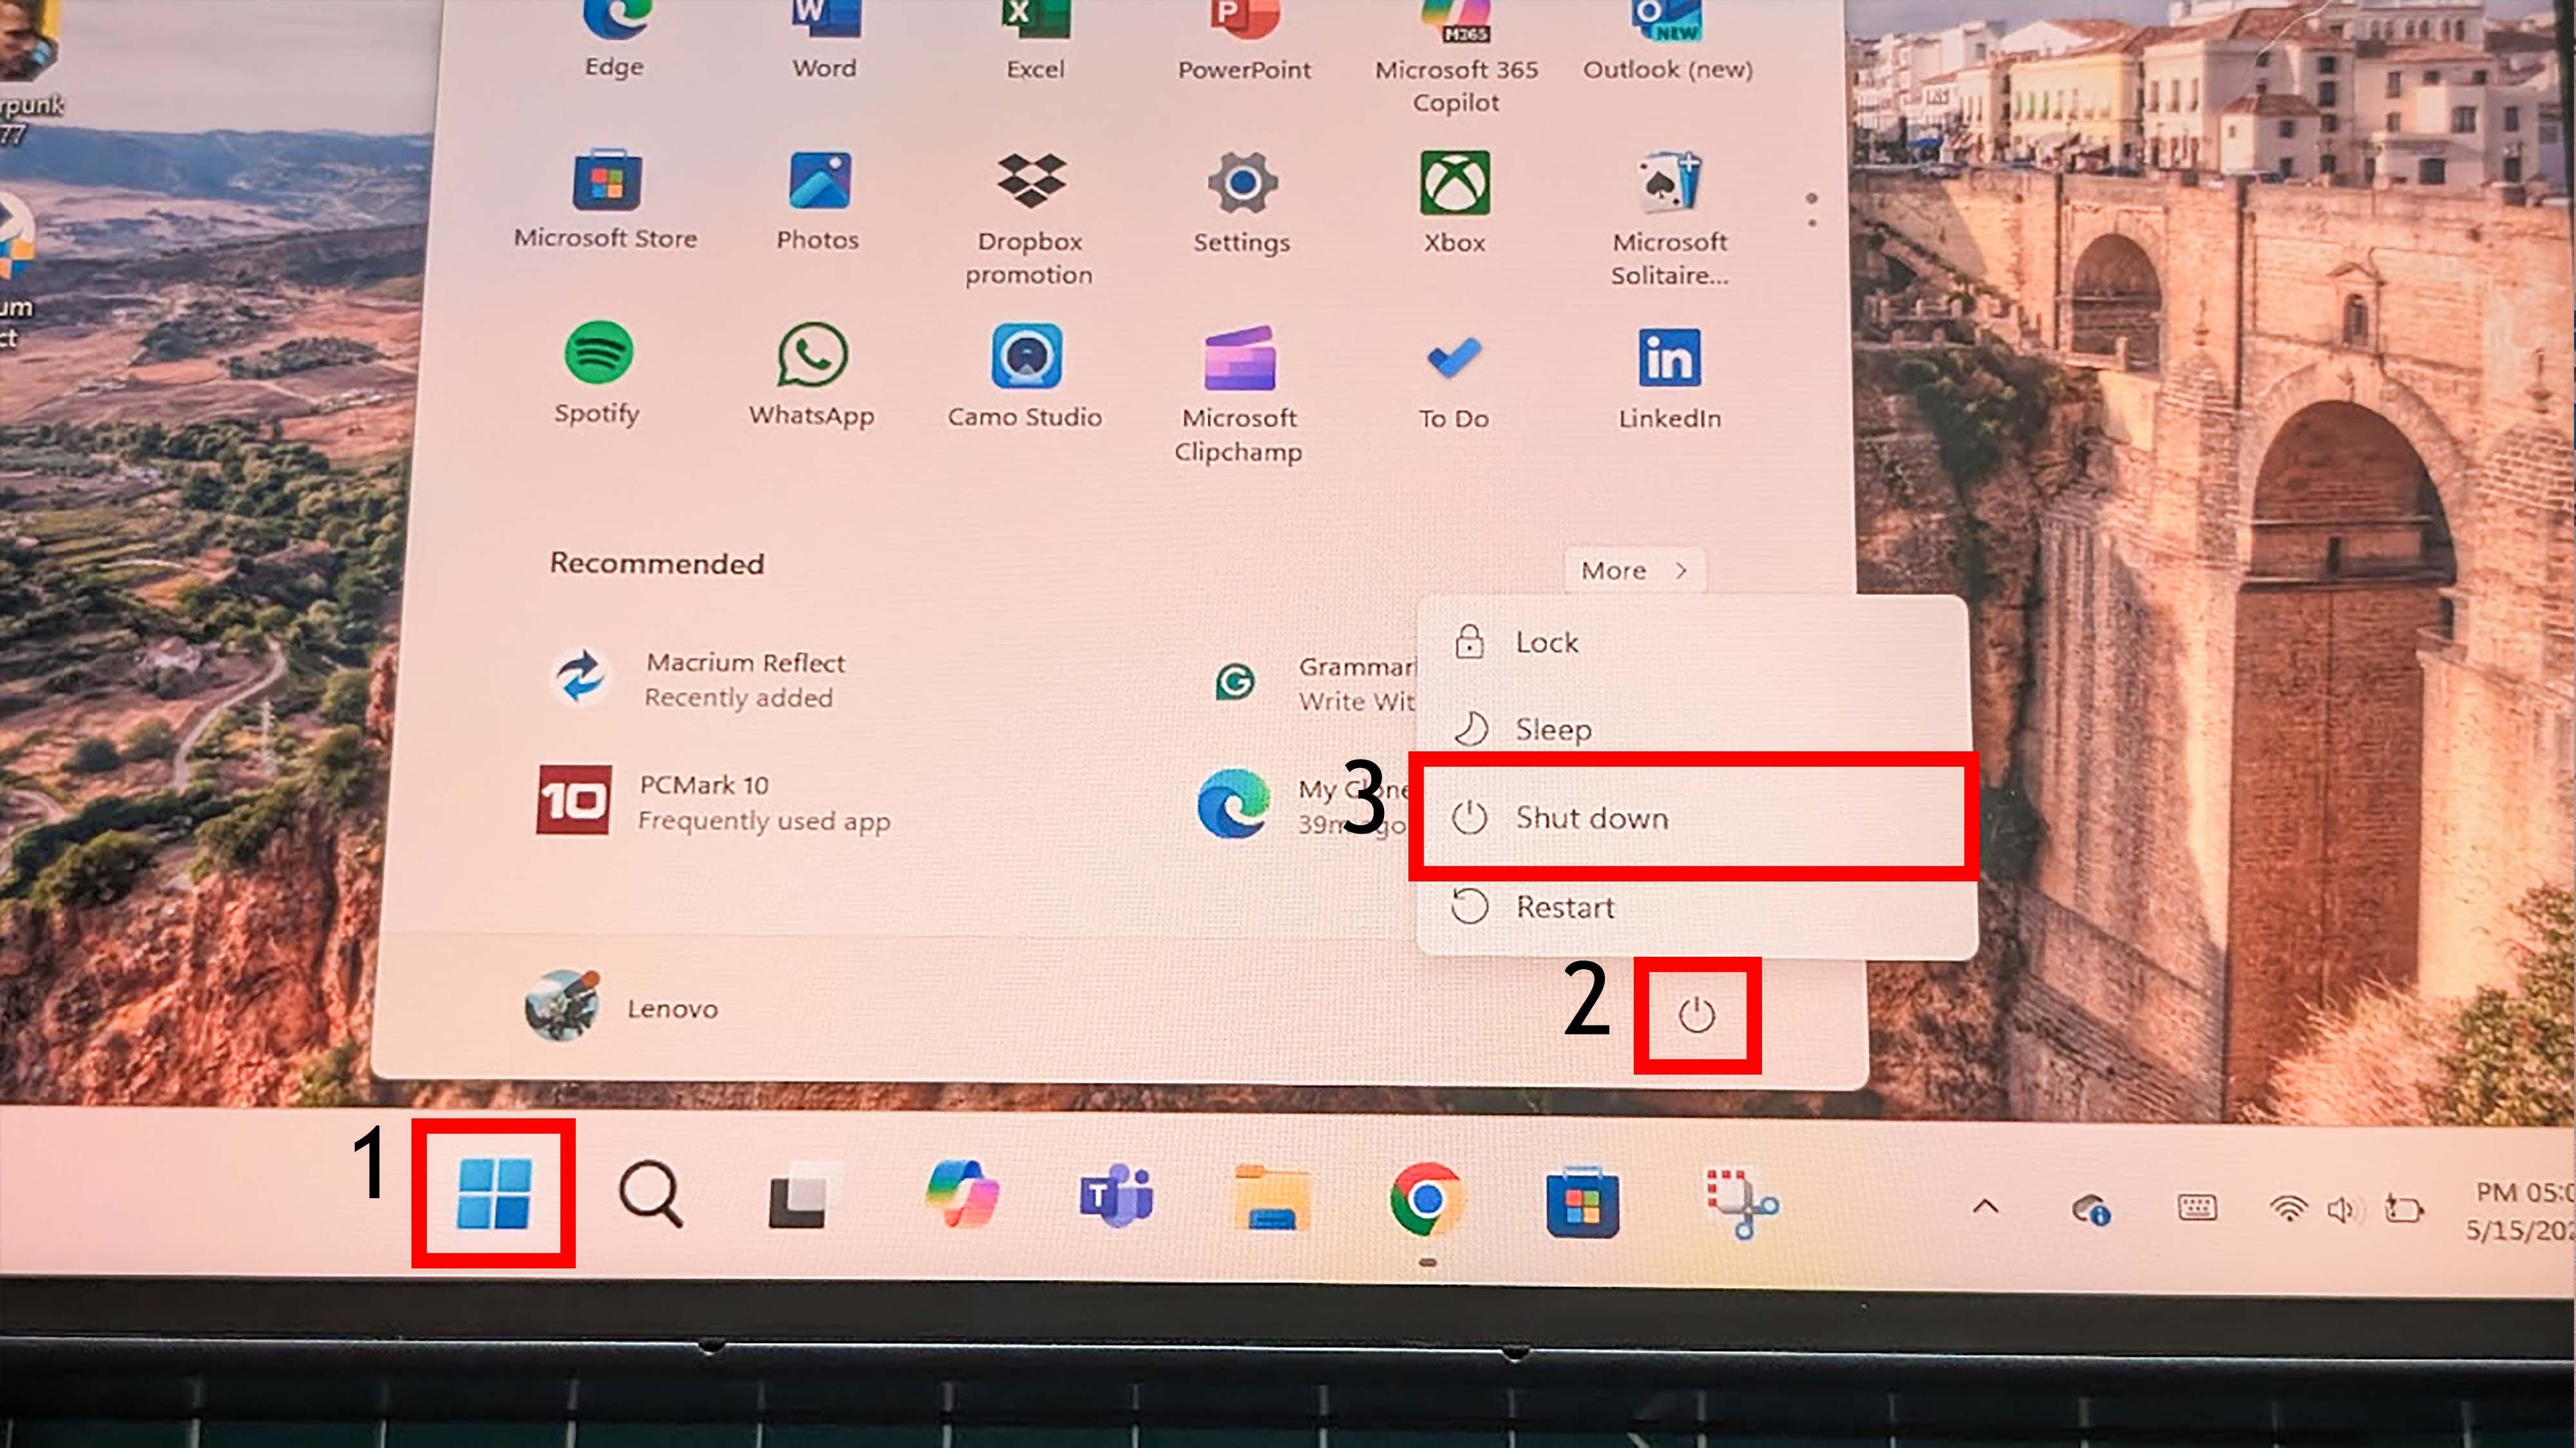
- Once your Legion Go is back up, open Macrium Reflect. It will ask you what theme you want to see. Pick whatever you want, I went with Light.
- Select Yes when the small window pops up.
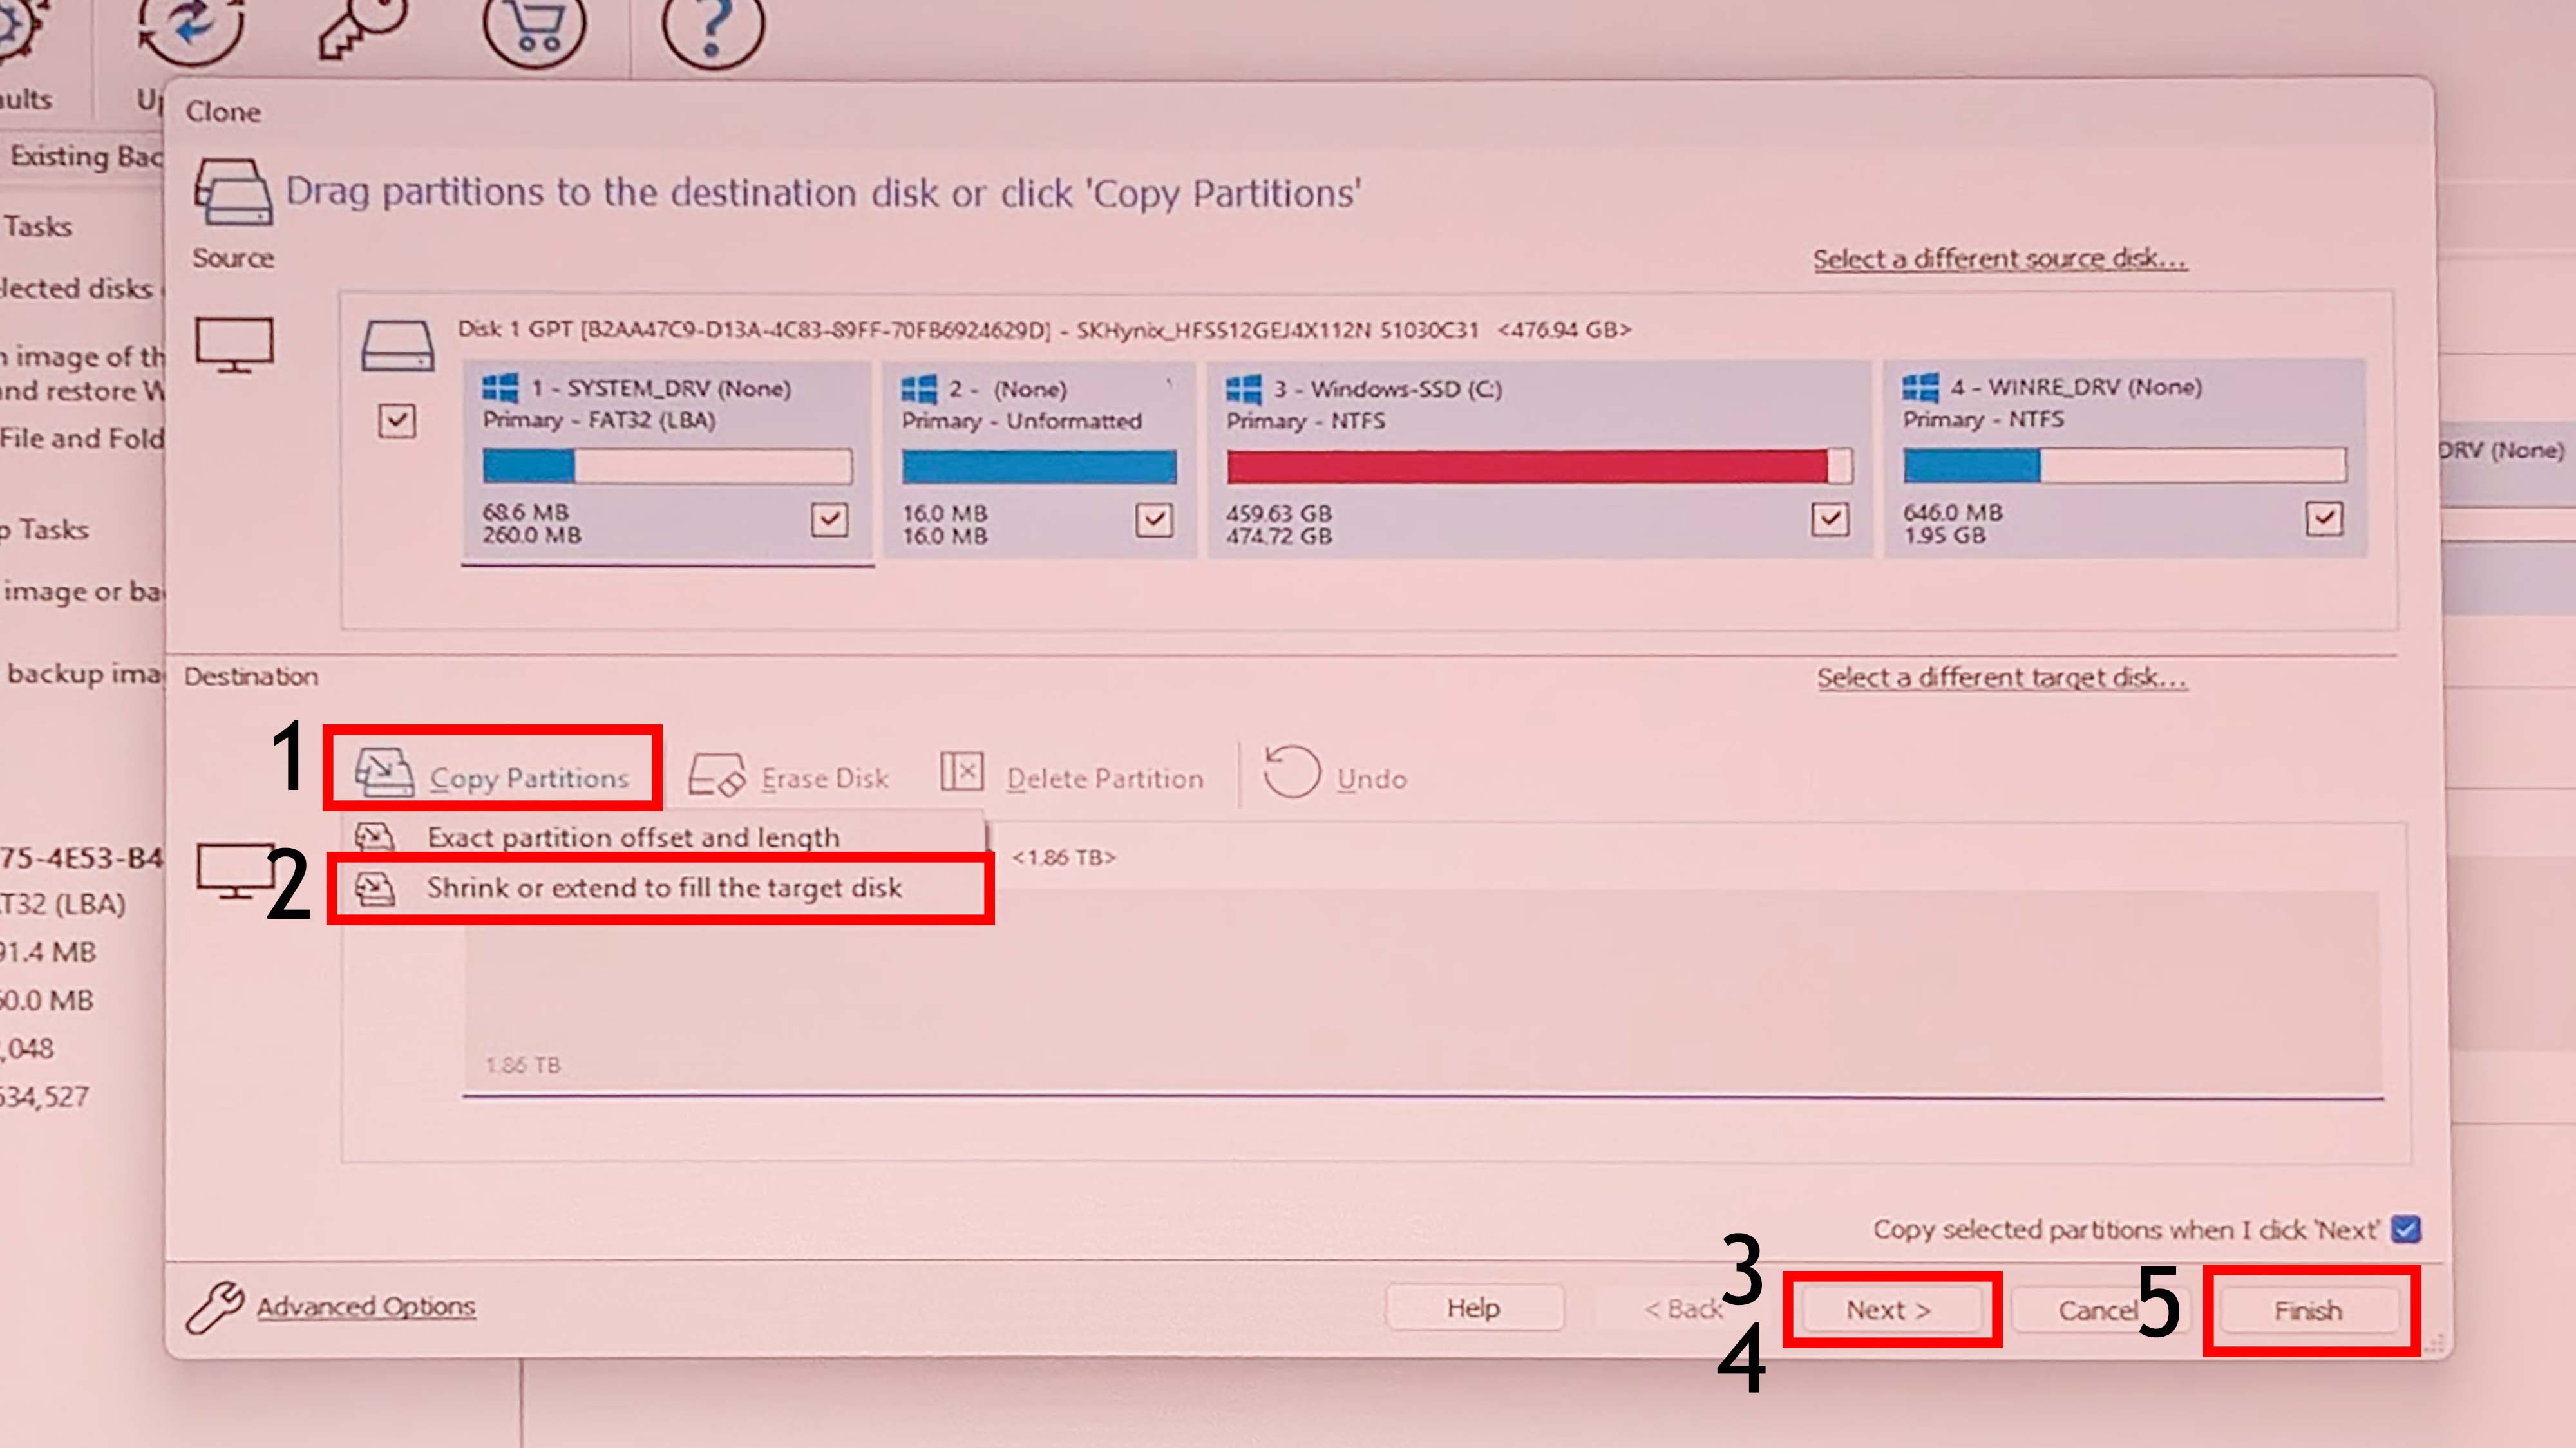
- Select Clone this Disc.
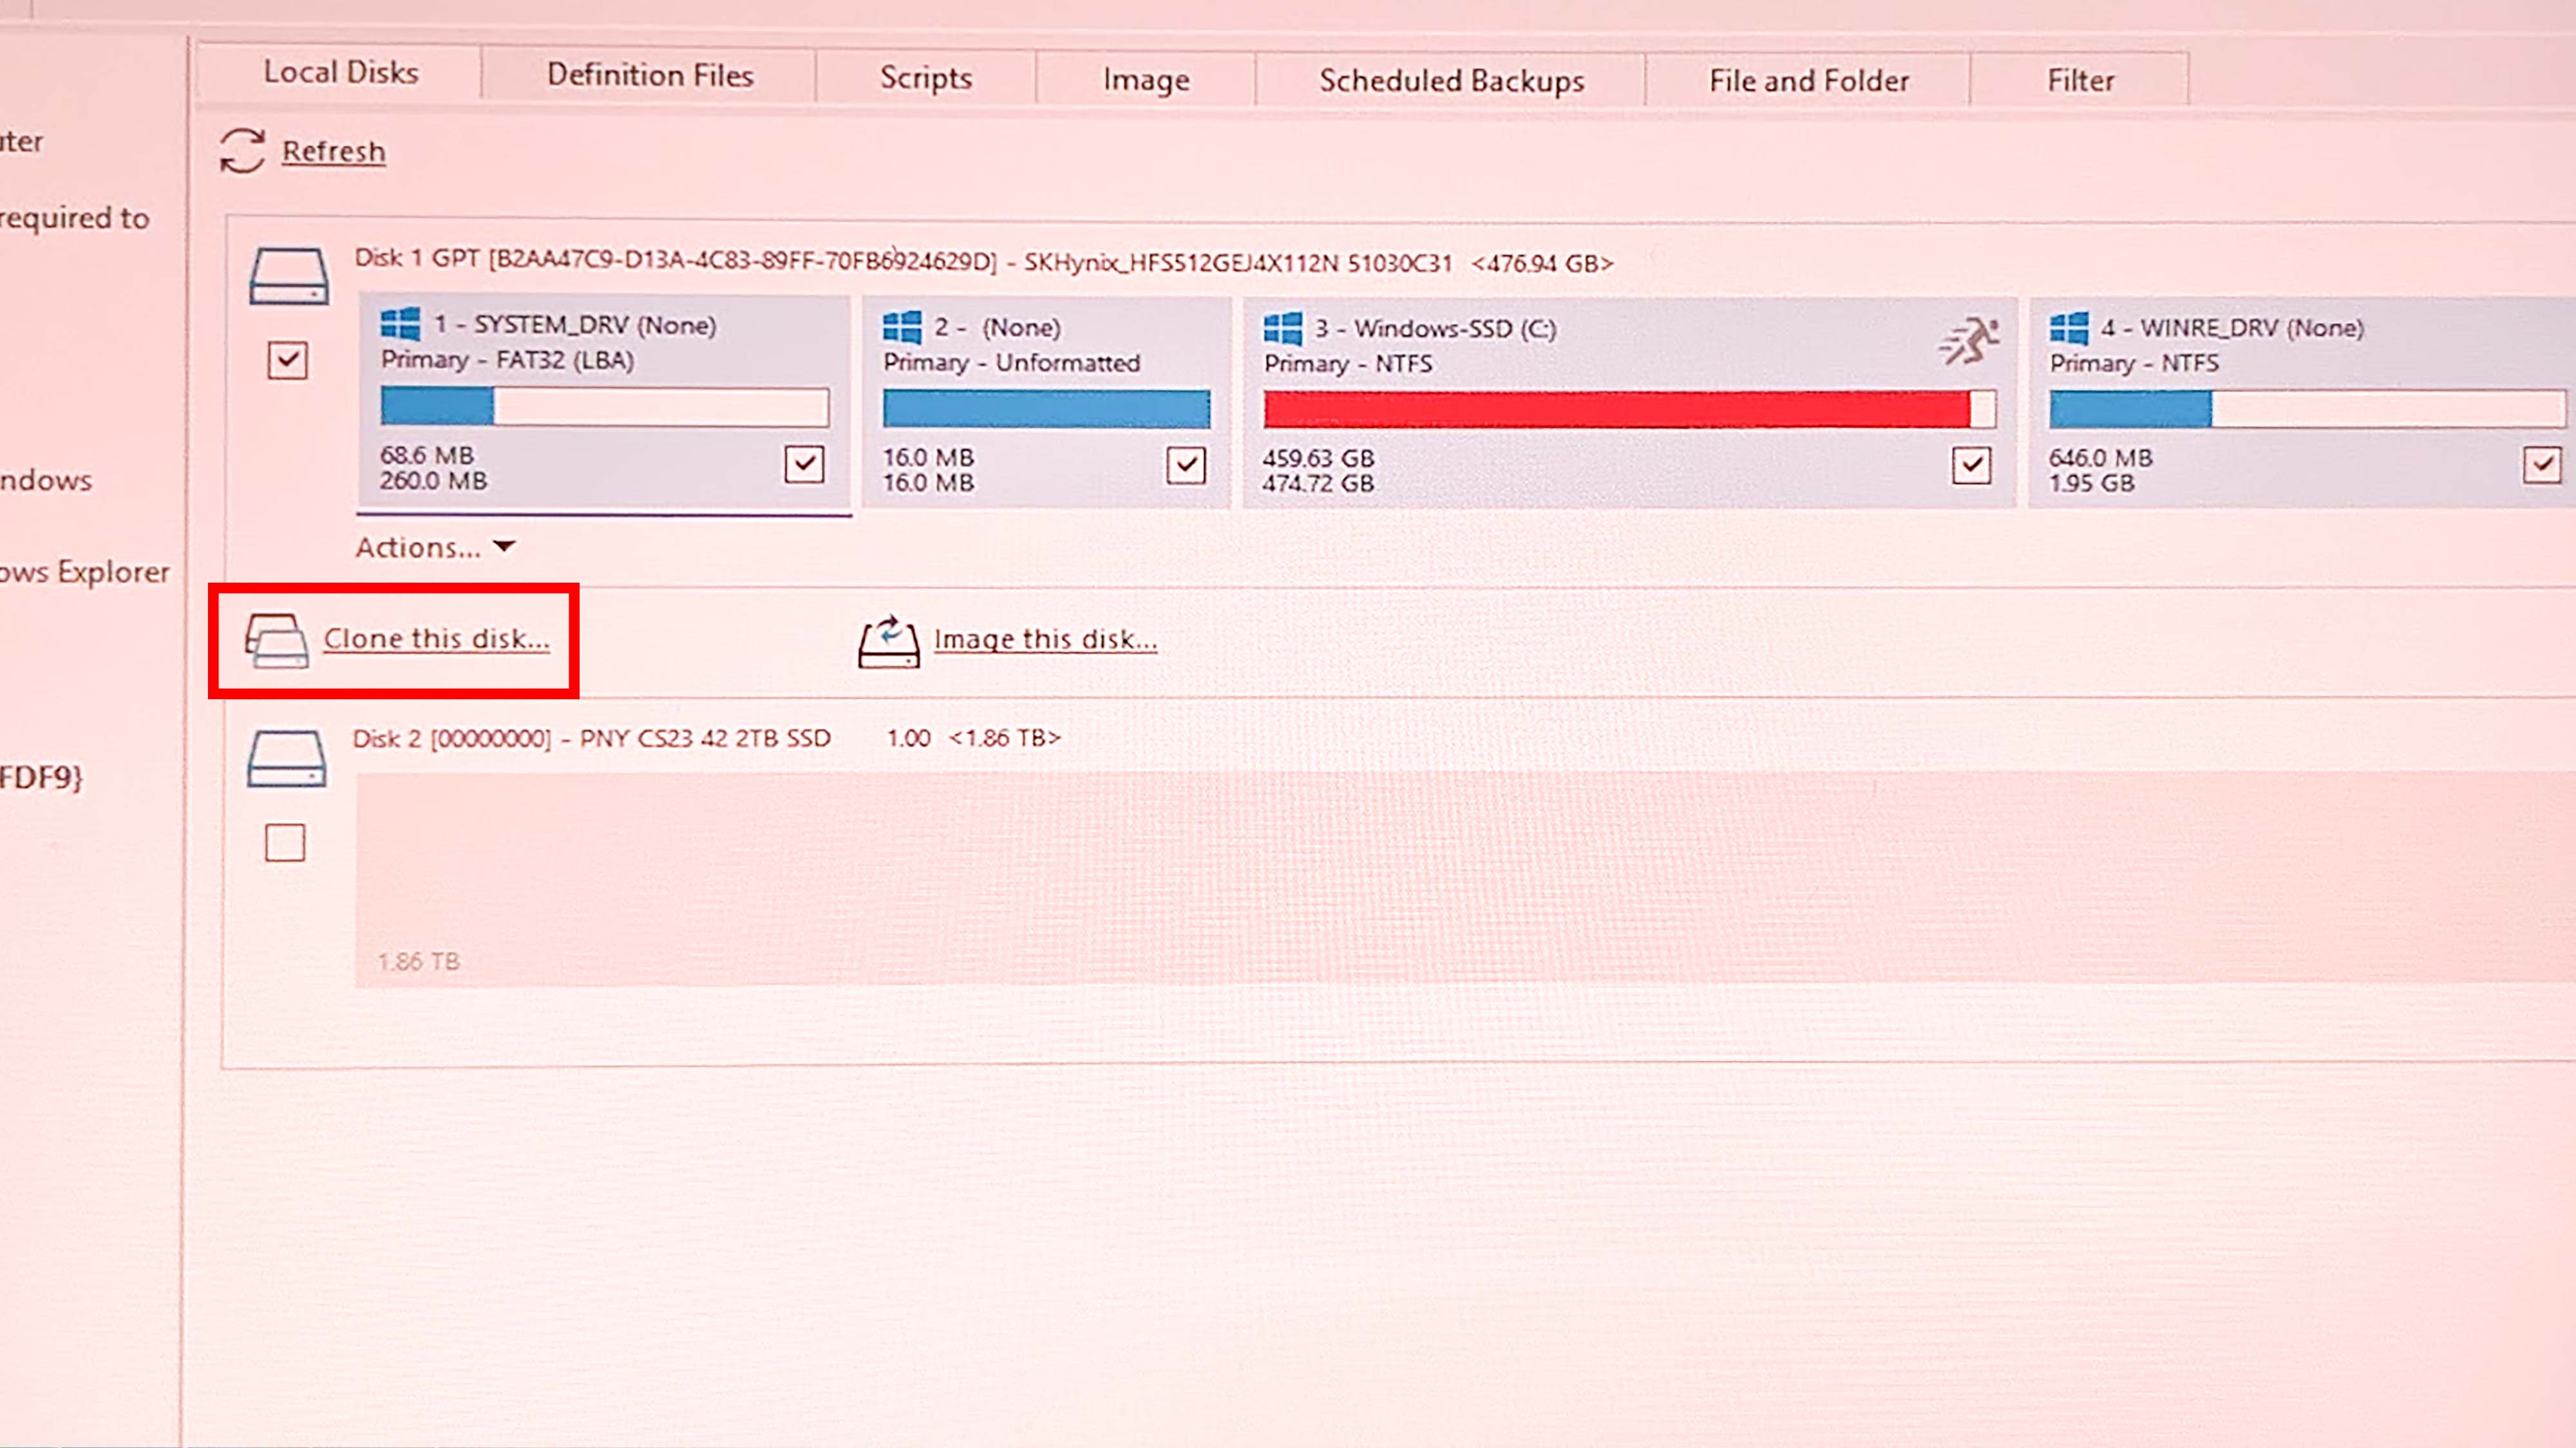
- In the window that pops up, click on Select a disk to clone to and choose the disk below that you want to use. In my case, I made sure it was the PNY 2TB SSD.
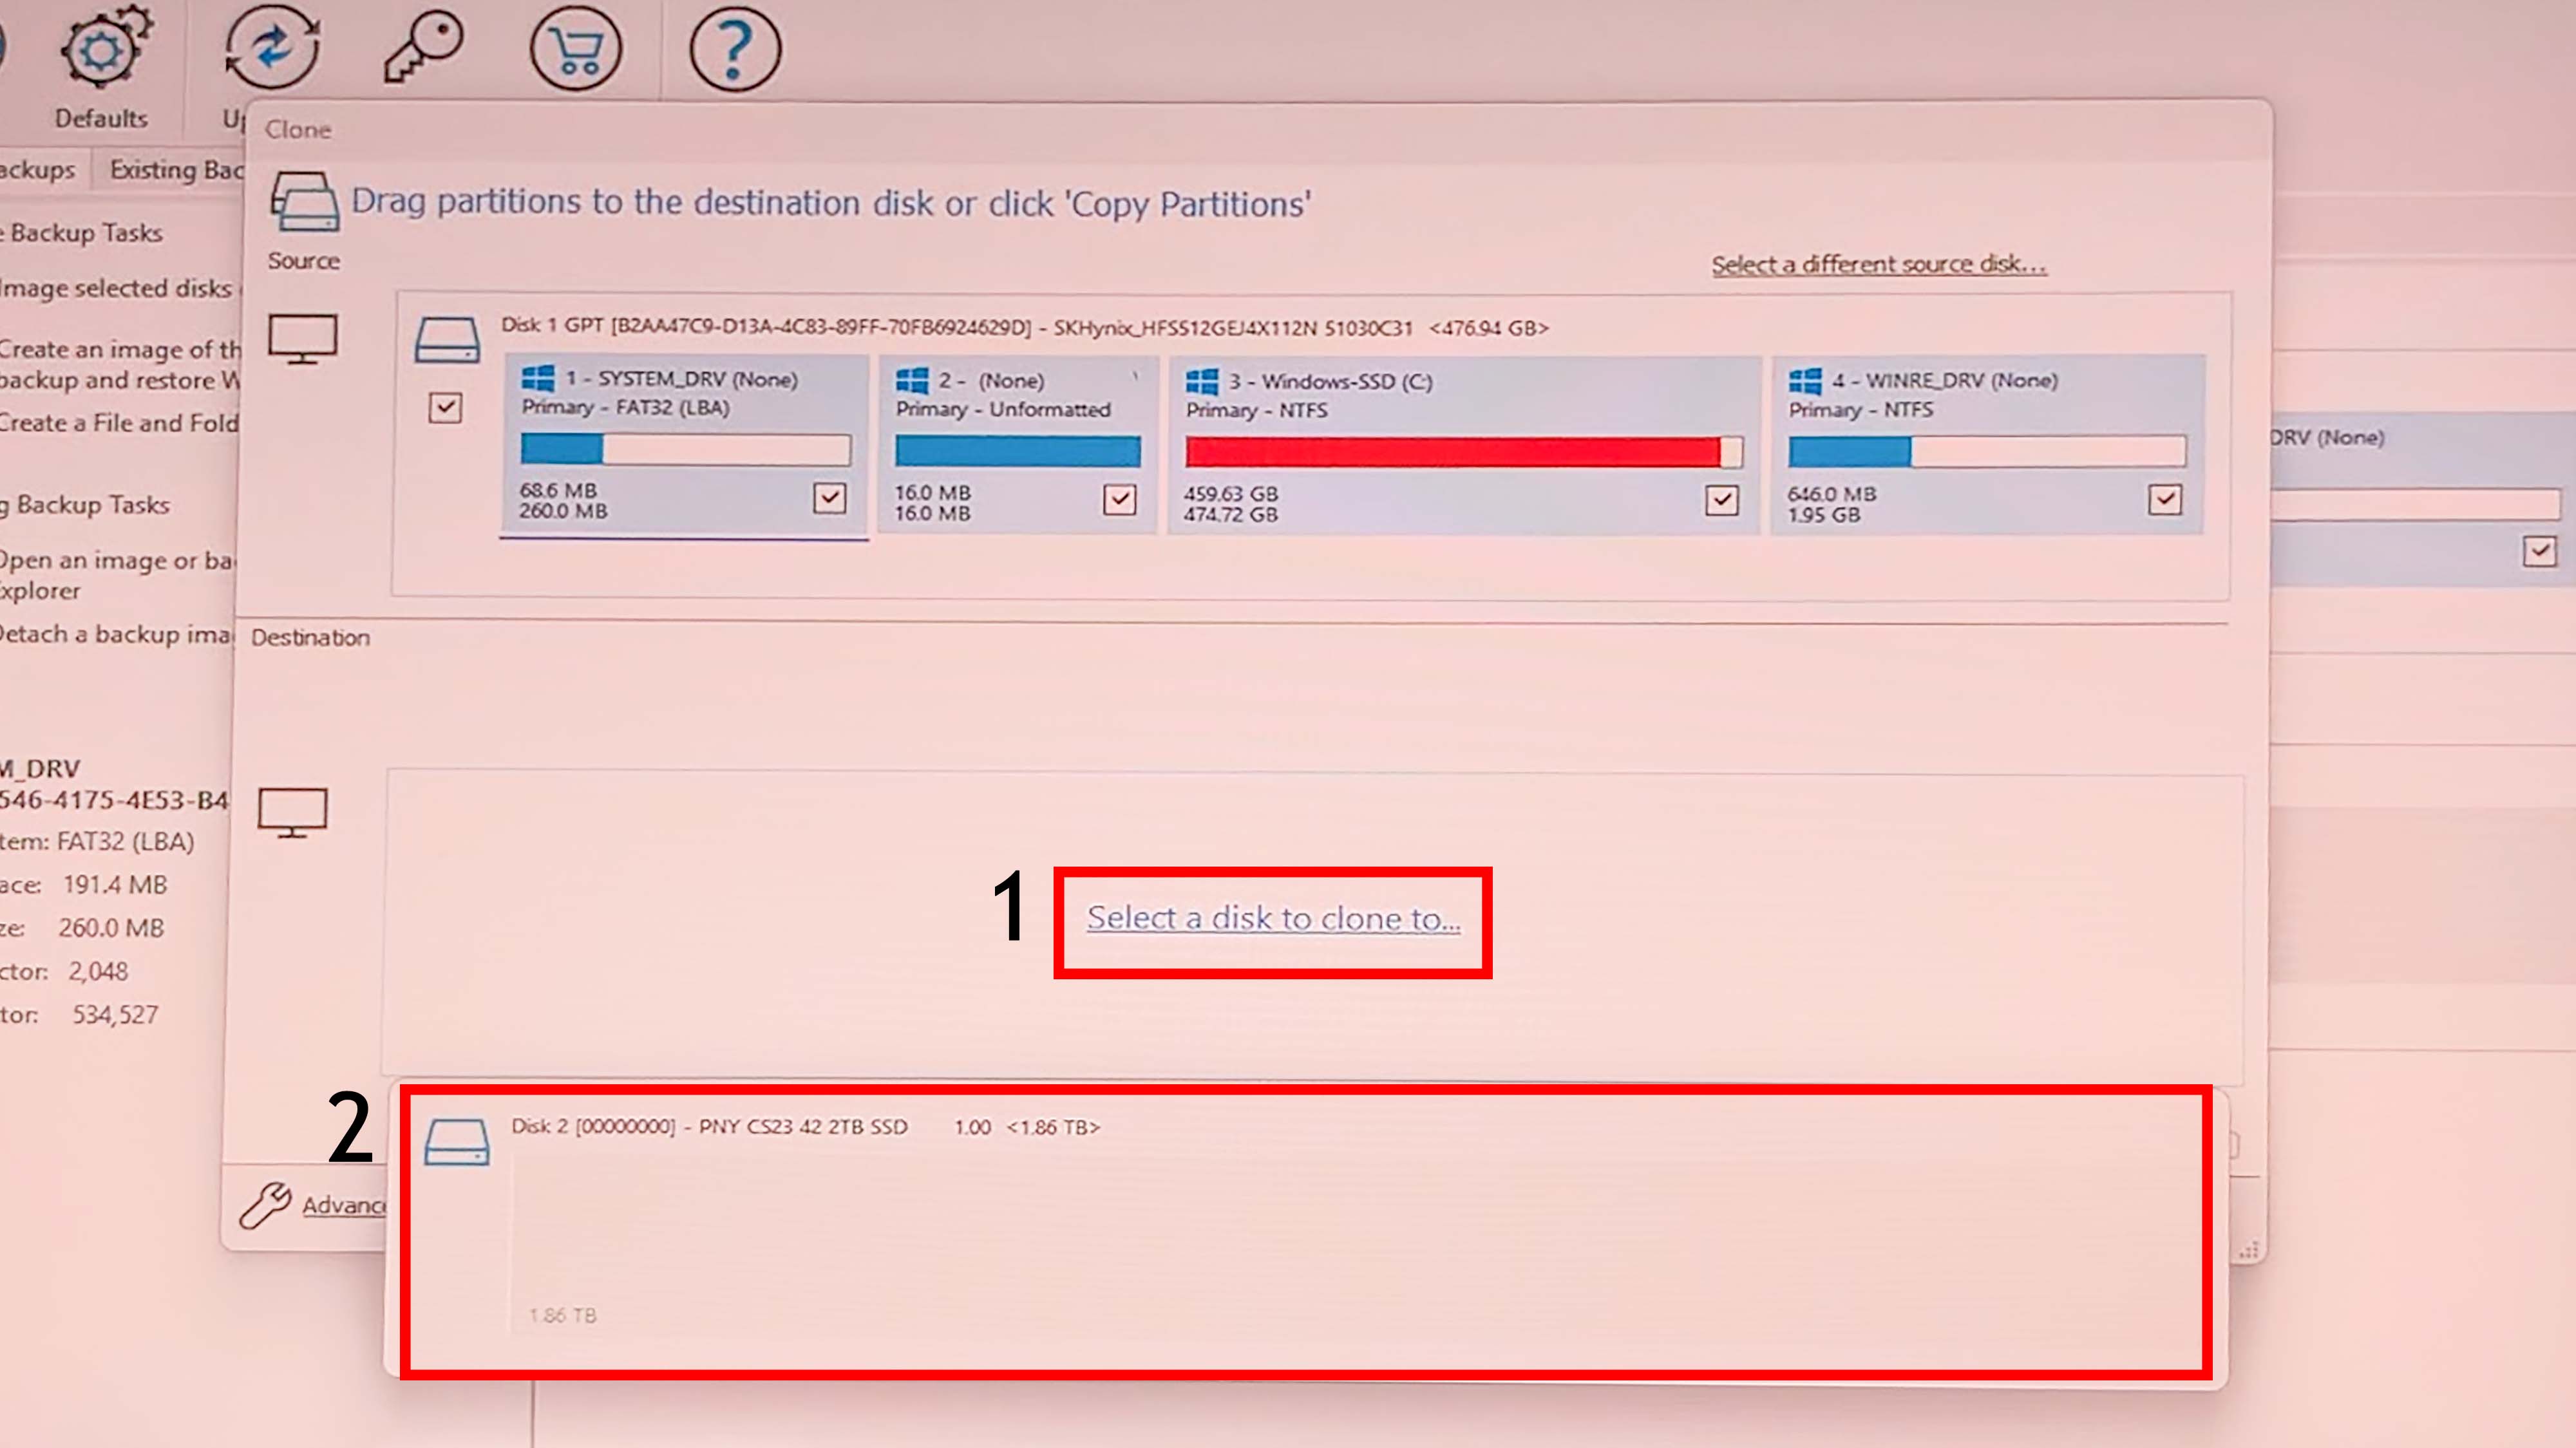
- Next, select Copy Partitions.
- Now click on Shrink or extend to fill the target disk.
- Select Next twice to review the cloning process you’re about to start
- If everything looks right, select Finish followed by OK to get things rolling.
- Leave the Legion Go alone while it clones your disk. This process took 35 minutes for me.
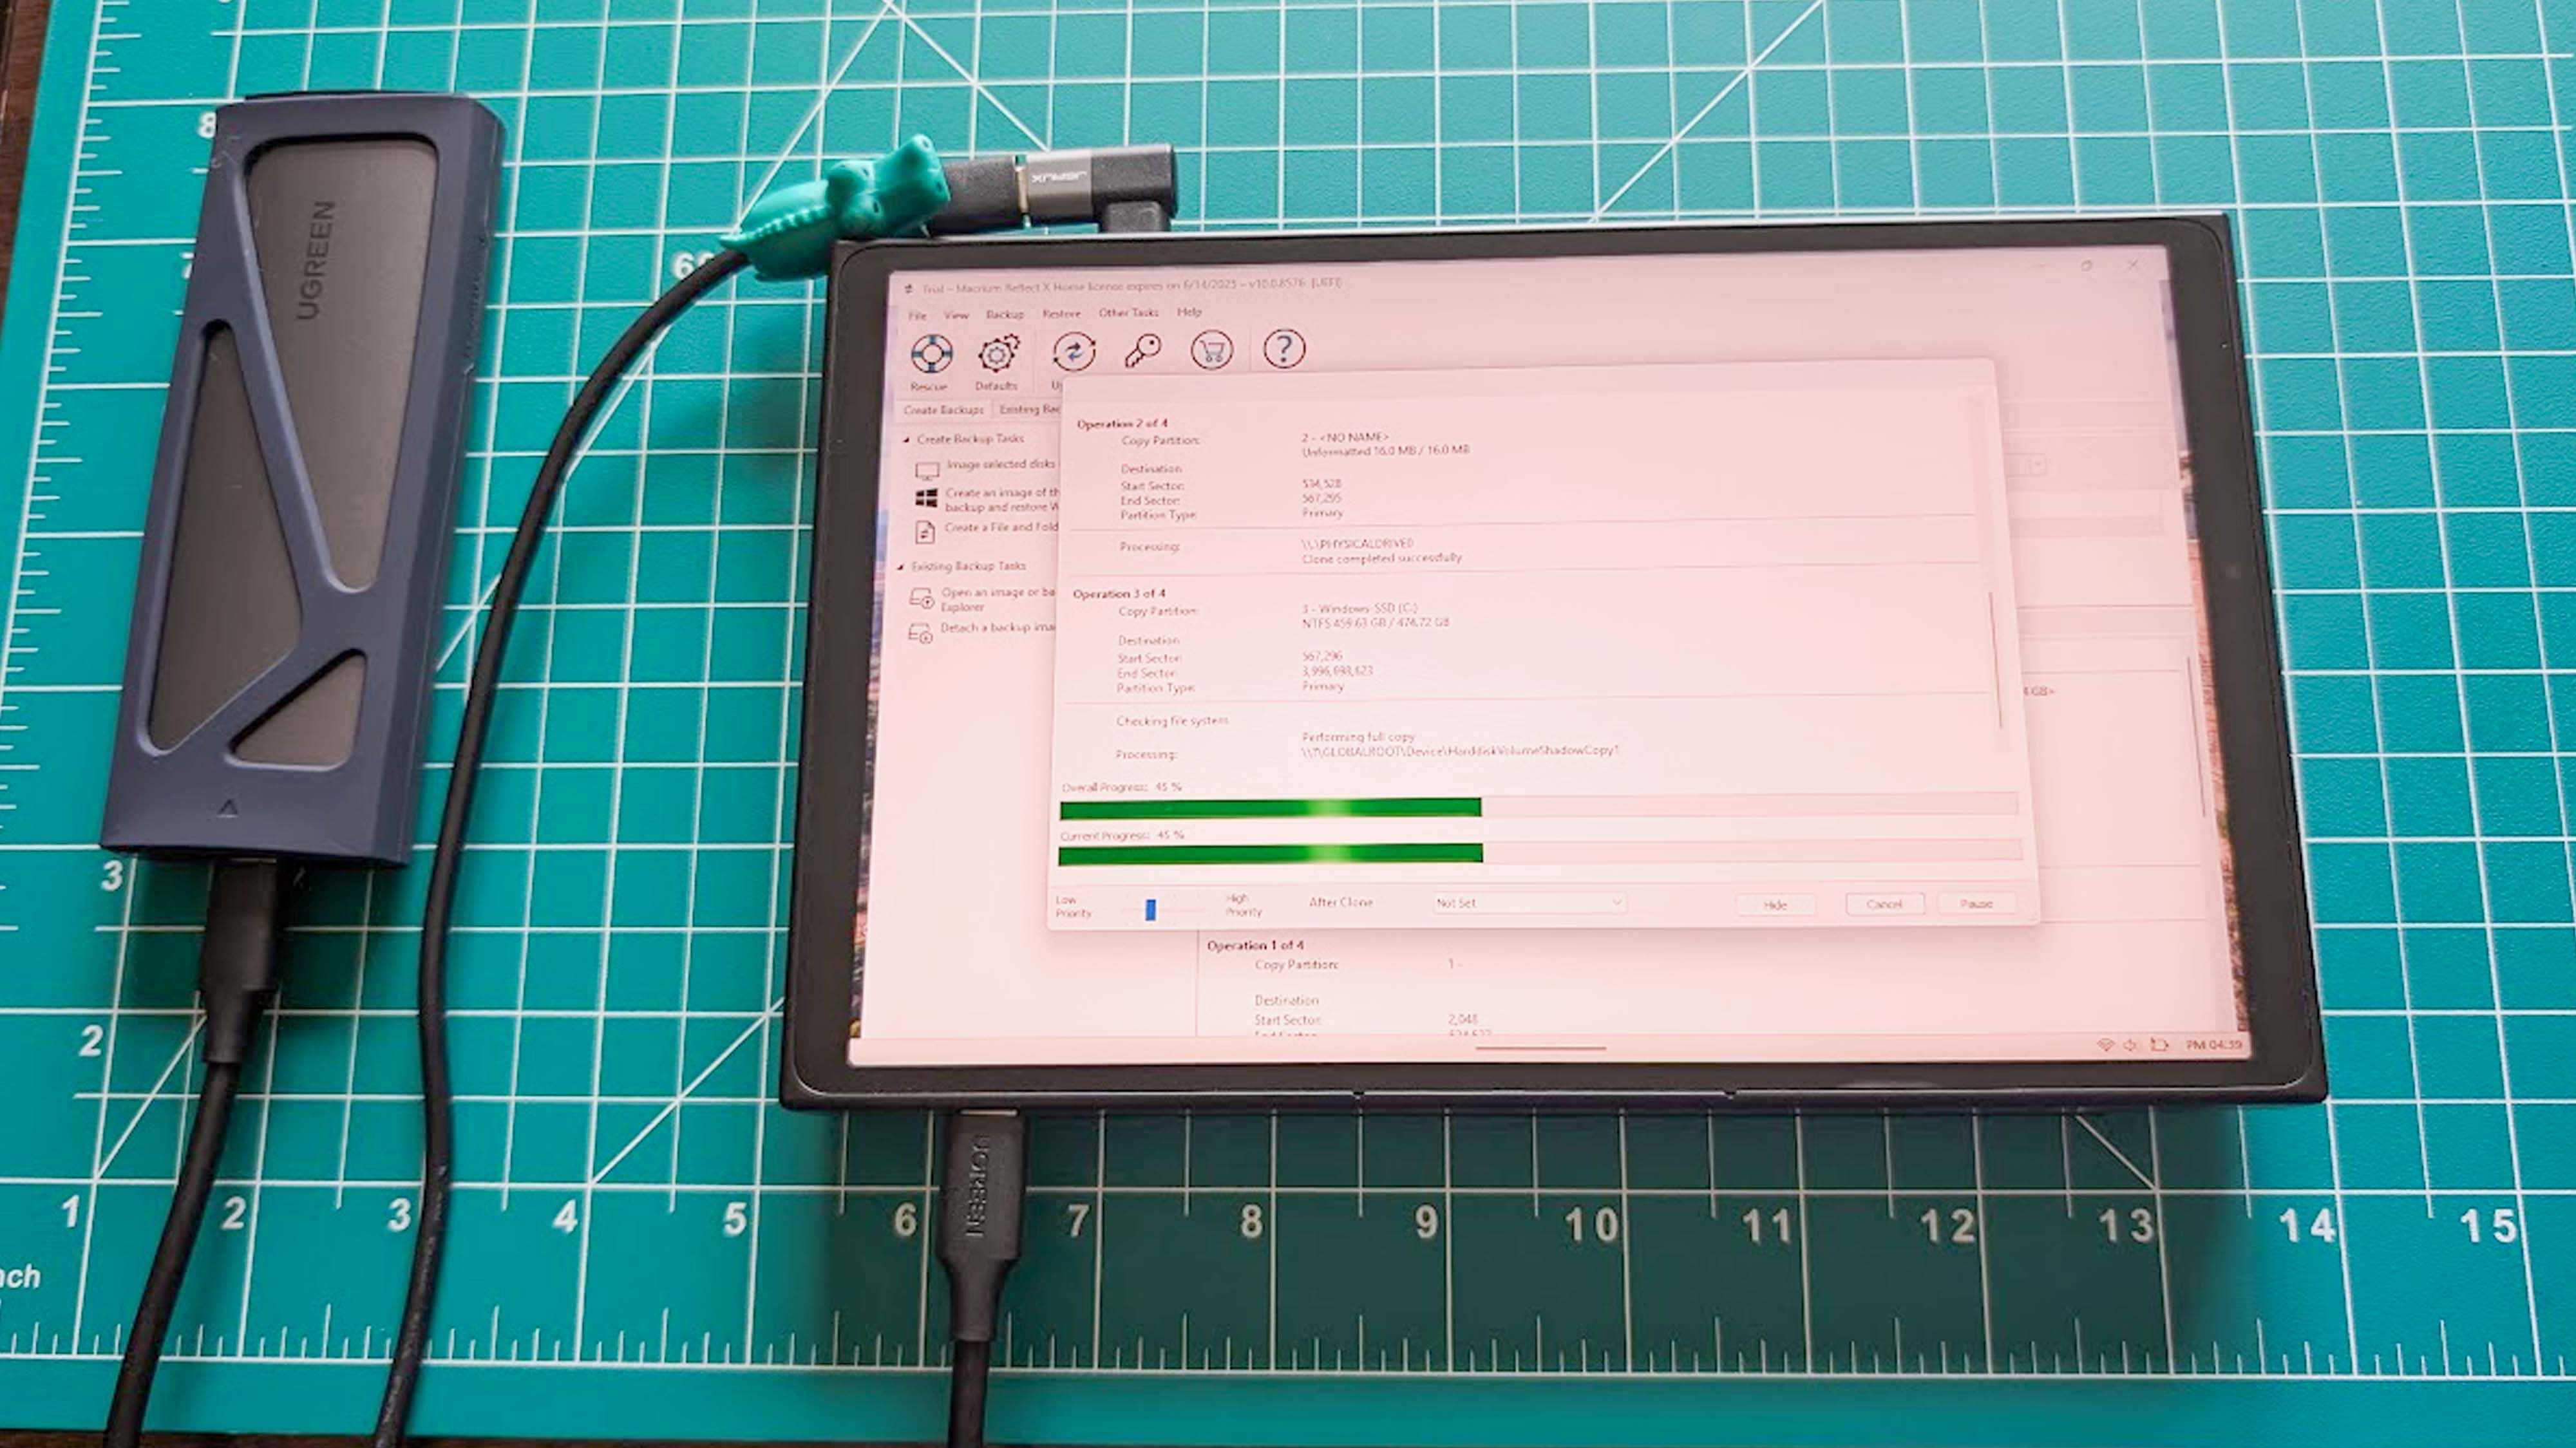
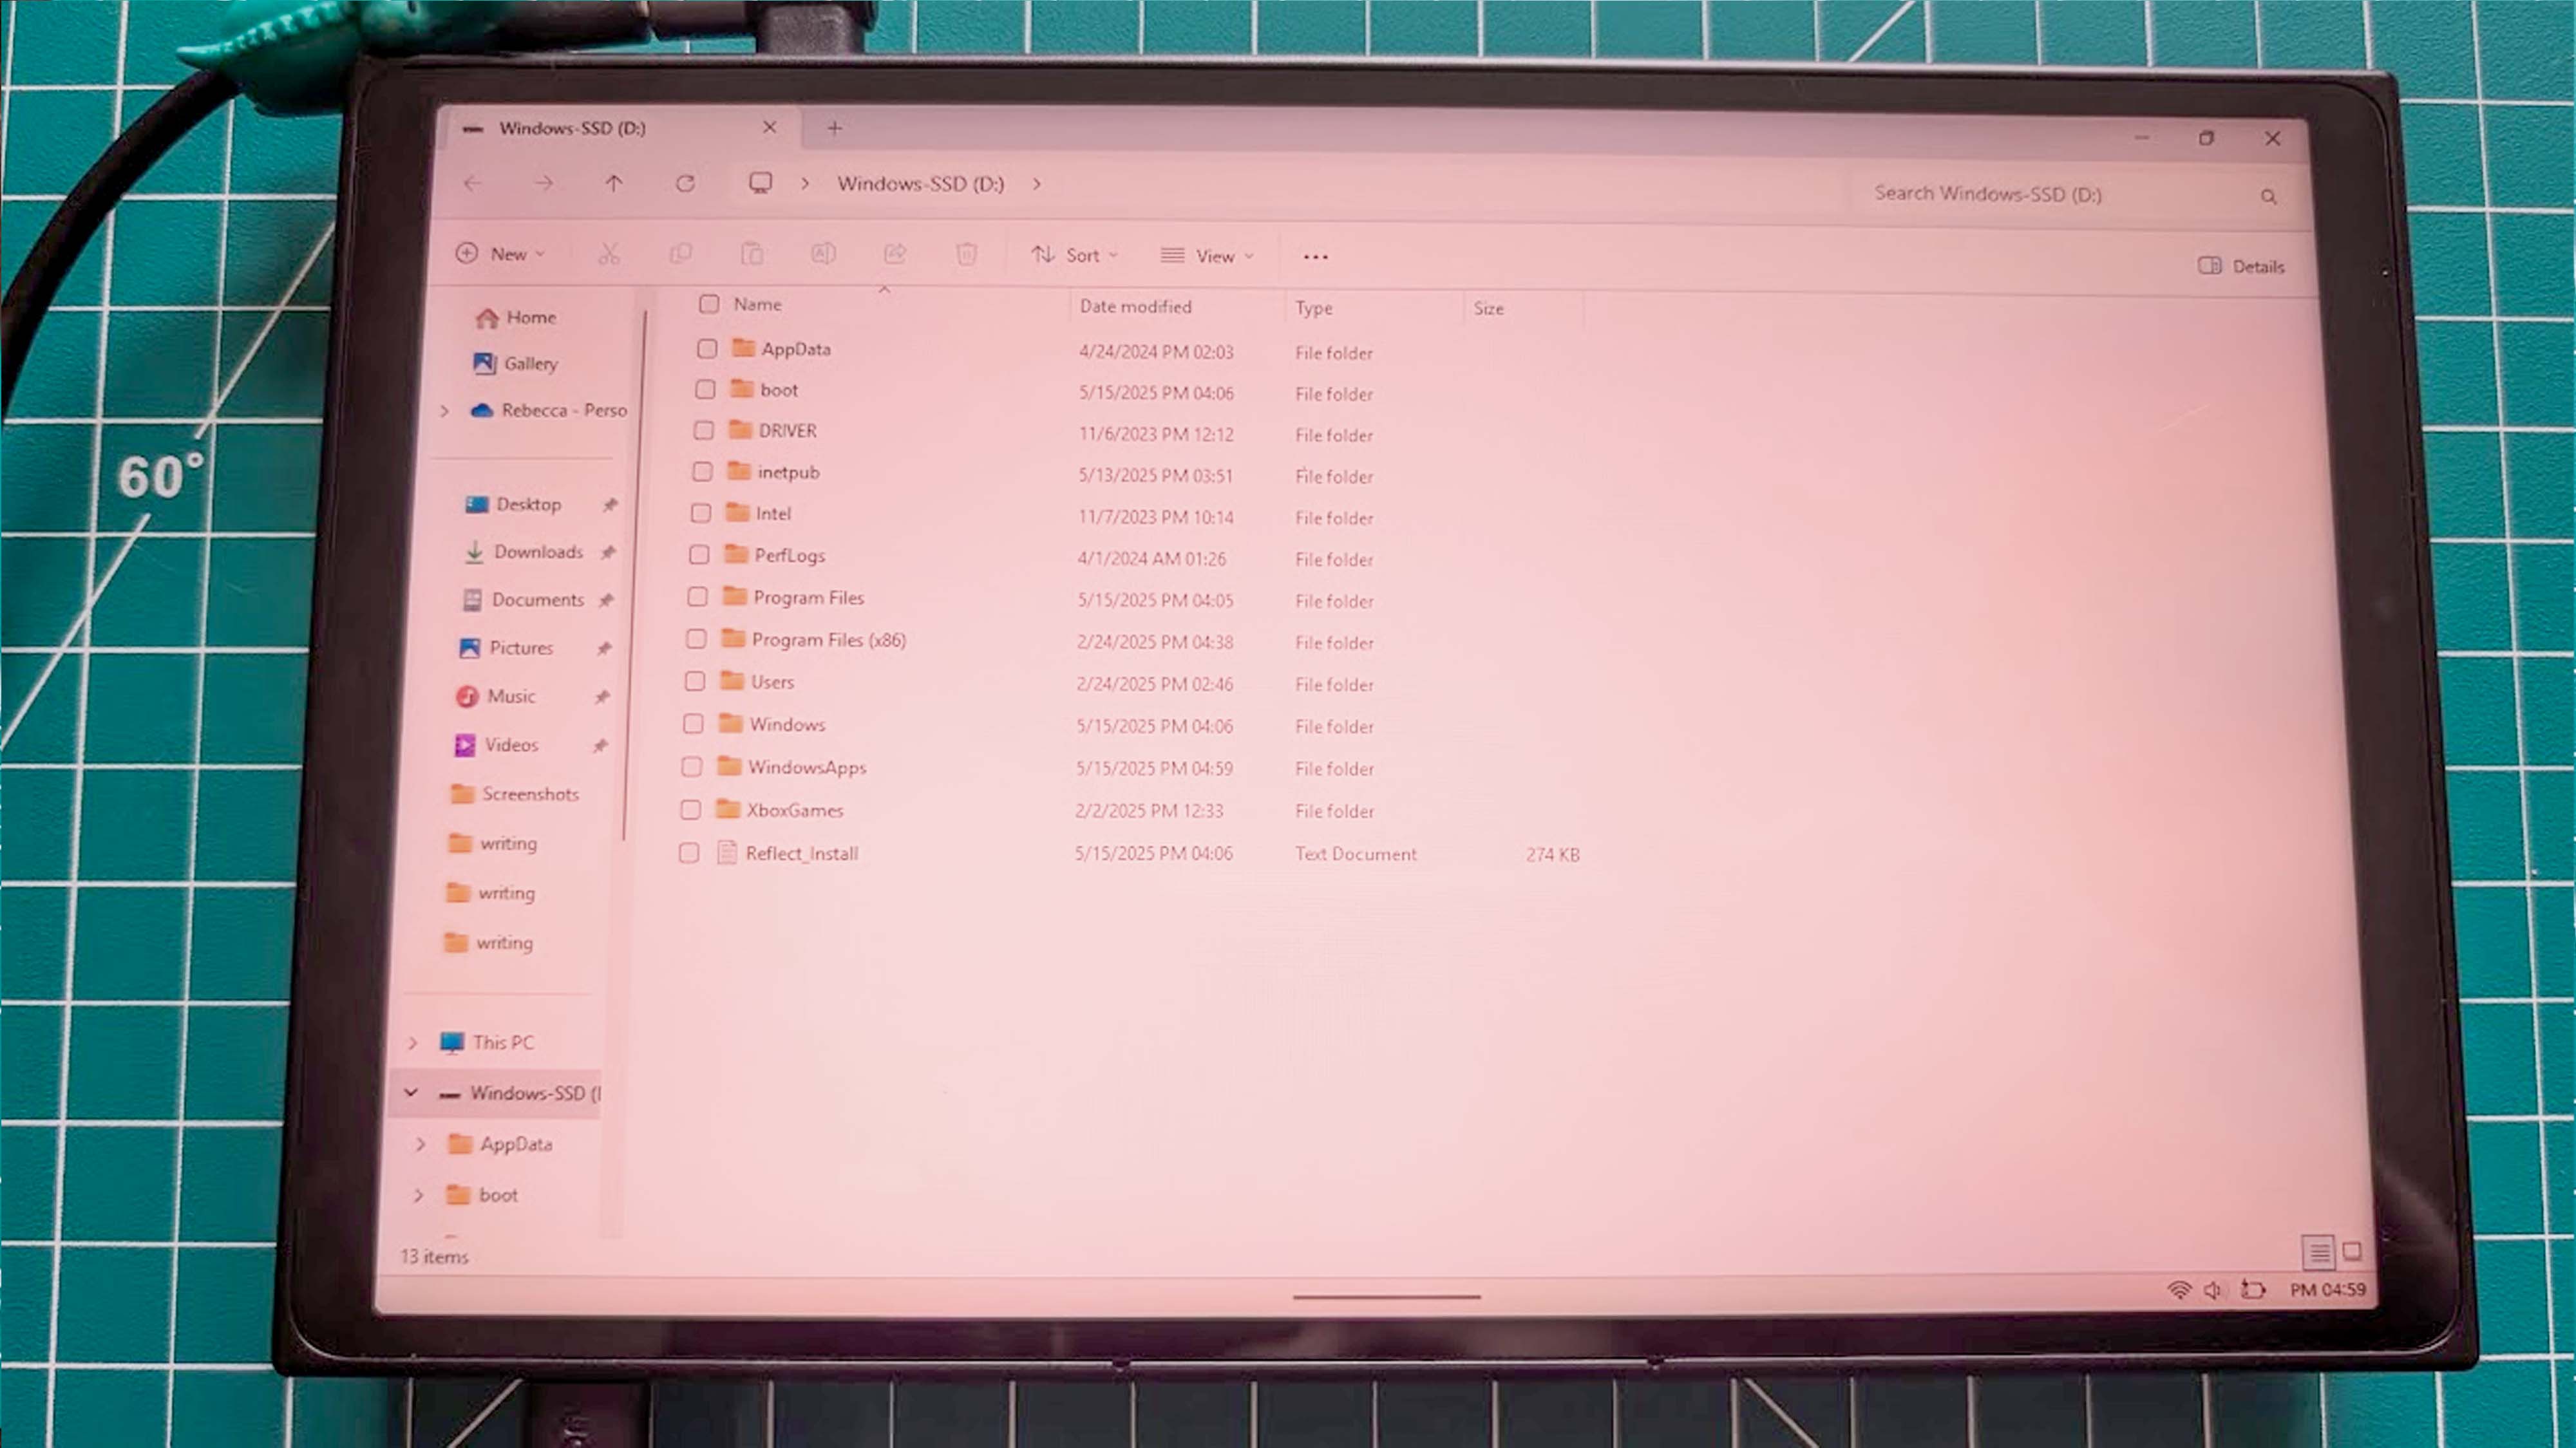
- Once the process finishes, File Explorer will pop up. Verify that all of the files have transferred to the new SSD.
- Now unplug the SSD enclosure from the Legion Go.
- Unplug the charging cable from the Legion Go.
- Next, carefully remove the SSD from the enclosure.
After copying the SSD from the Legion Go to the new one, you are now prepared to physically insert it into your portable gaming PC.
How to upgrade your Legion Go SSD
Upgrading the Legion Go SSD proved more challenging compared to upgrading either the Steam Deck SSD or ROG Ally SSD, mainly due to a tougher case to open and the requirement of an extension adapter for my 2230 M.2 SSD.
Here’s how to install a new SSD into the Legion Go.
- Completely power off your Legion Go.
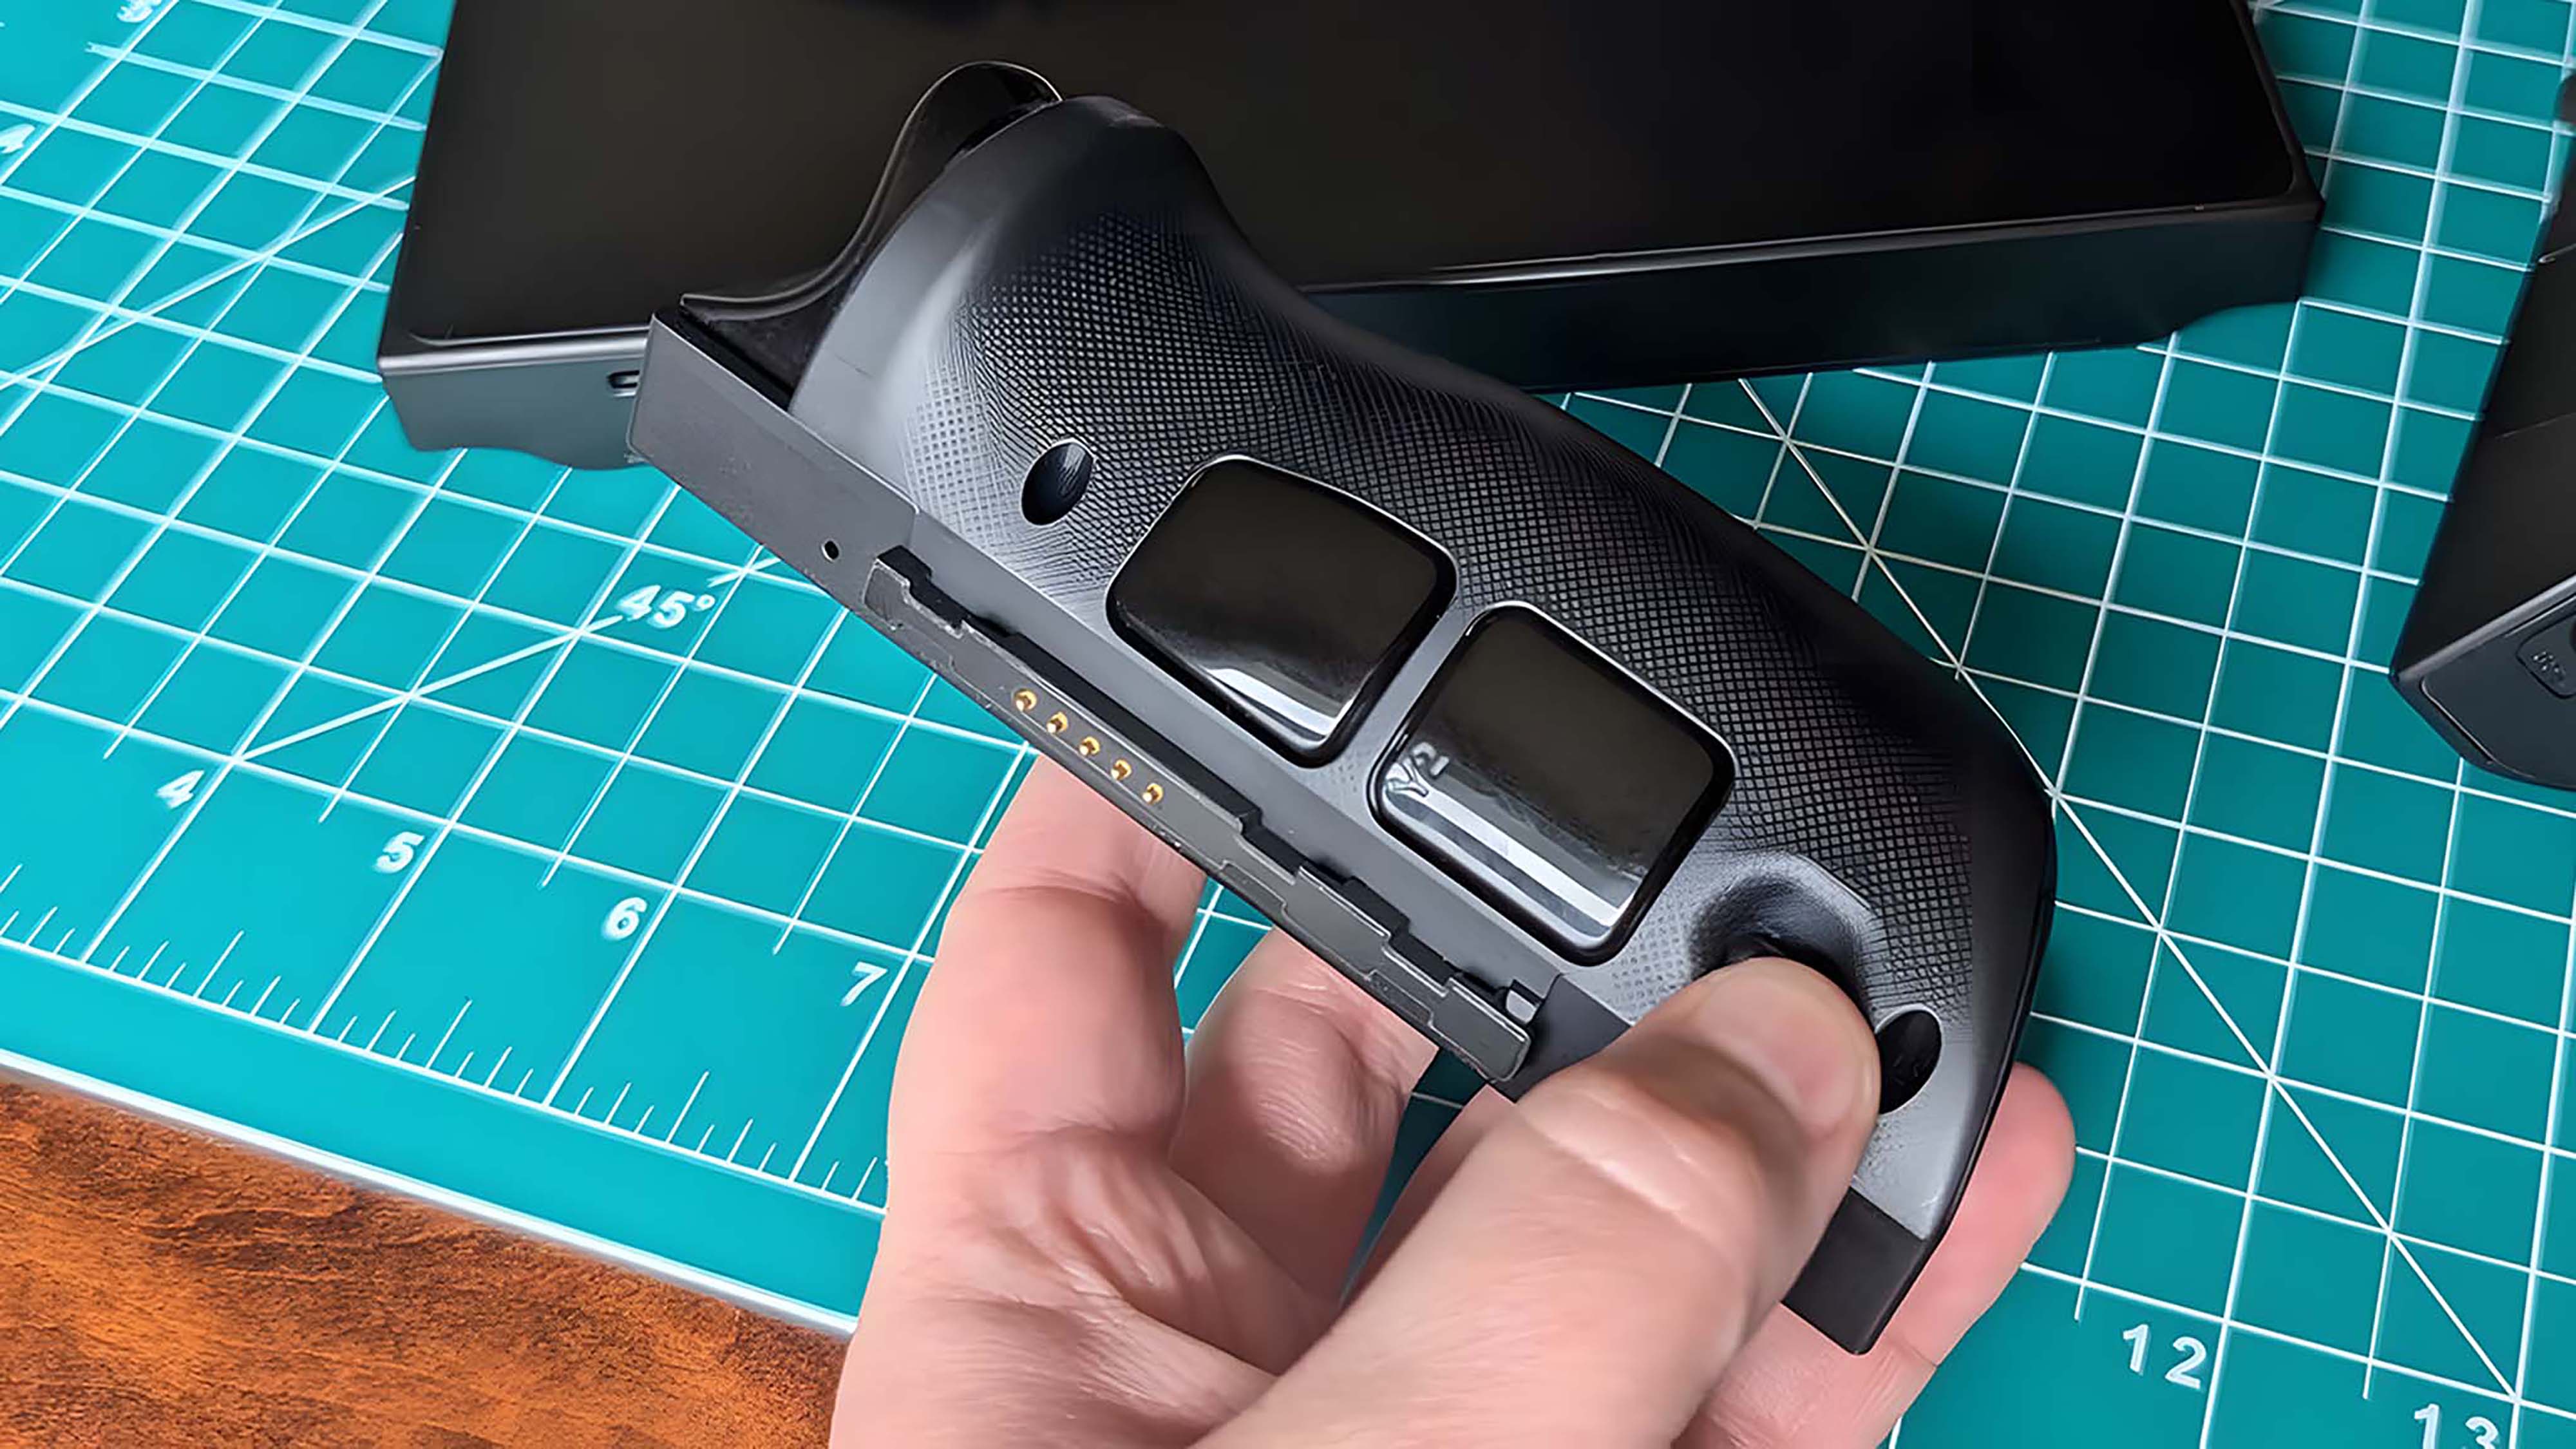
- Detach the controller halves from the Legion Go. They are removed by pressing in the backside buttons near the bottom and pulling the controllers downward.
- Place the Legion Go screen down on a clean, dry surface.
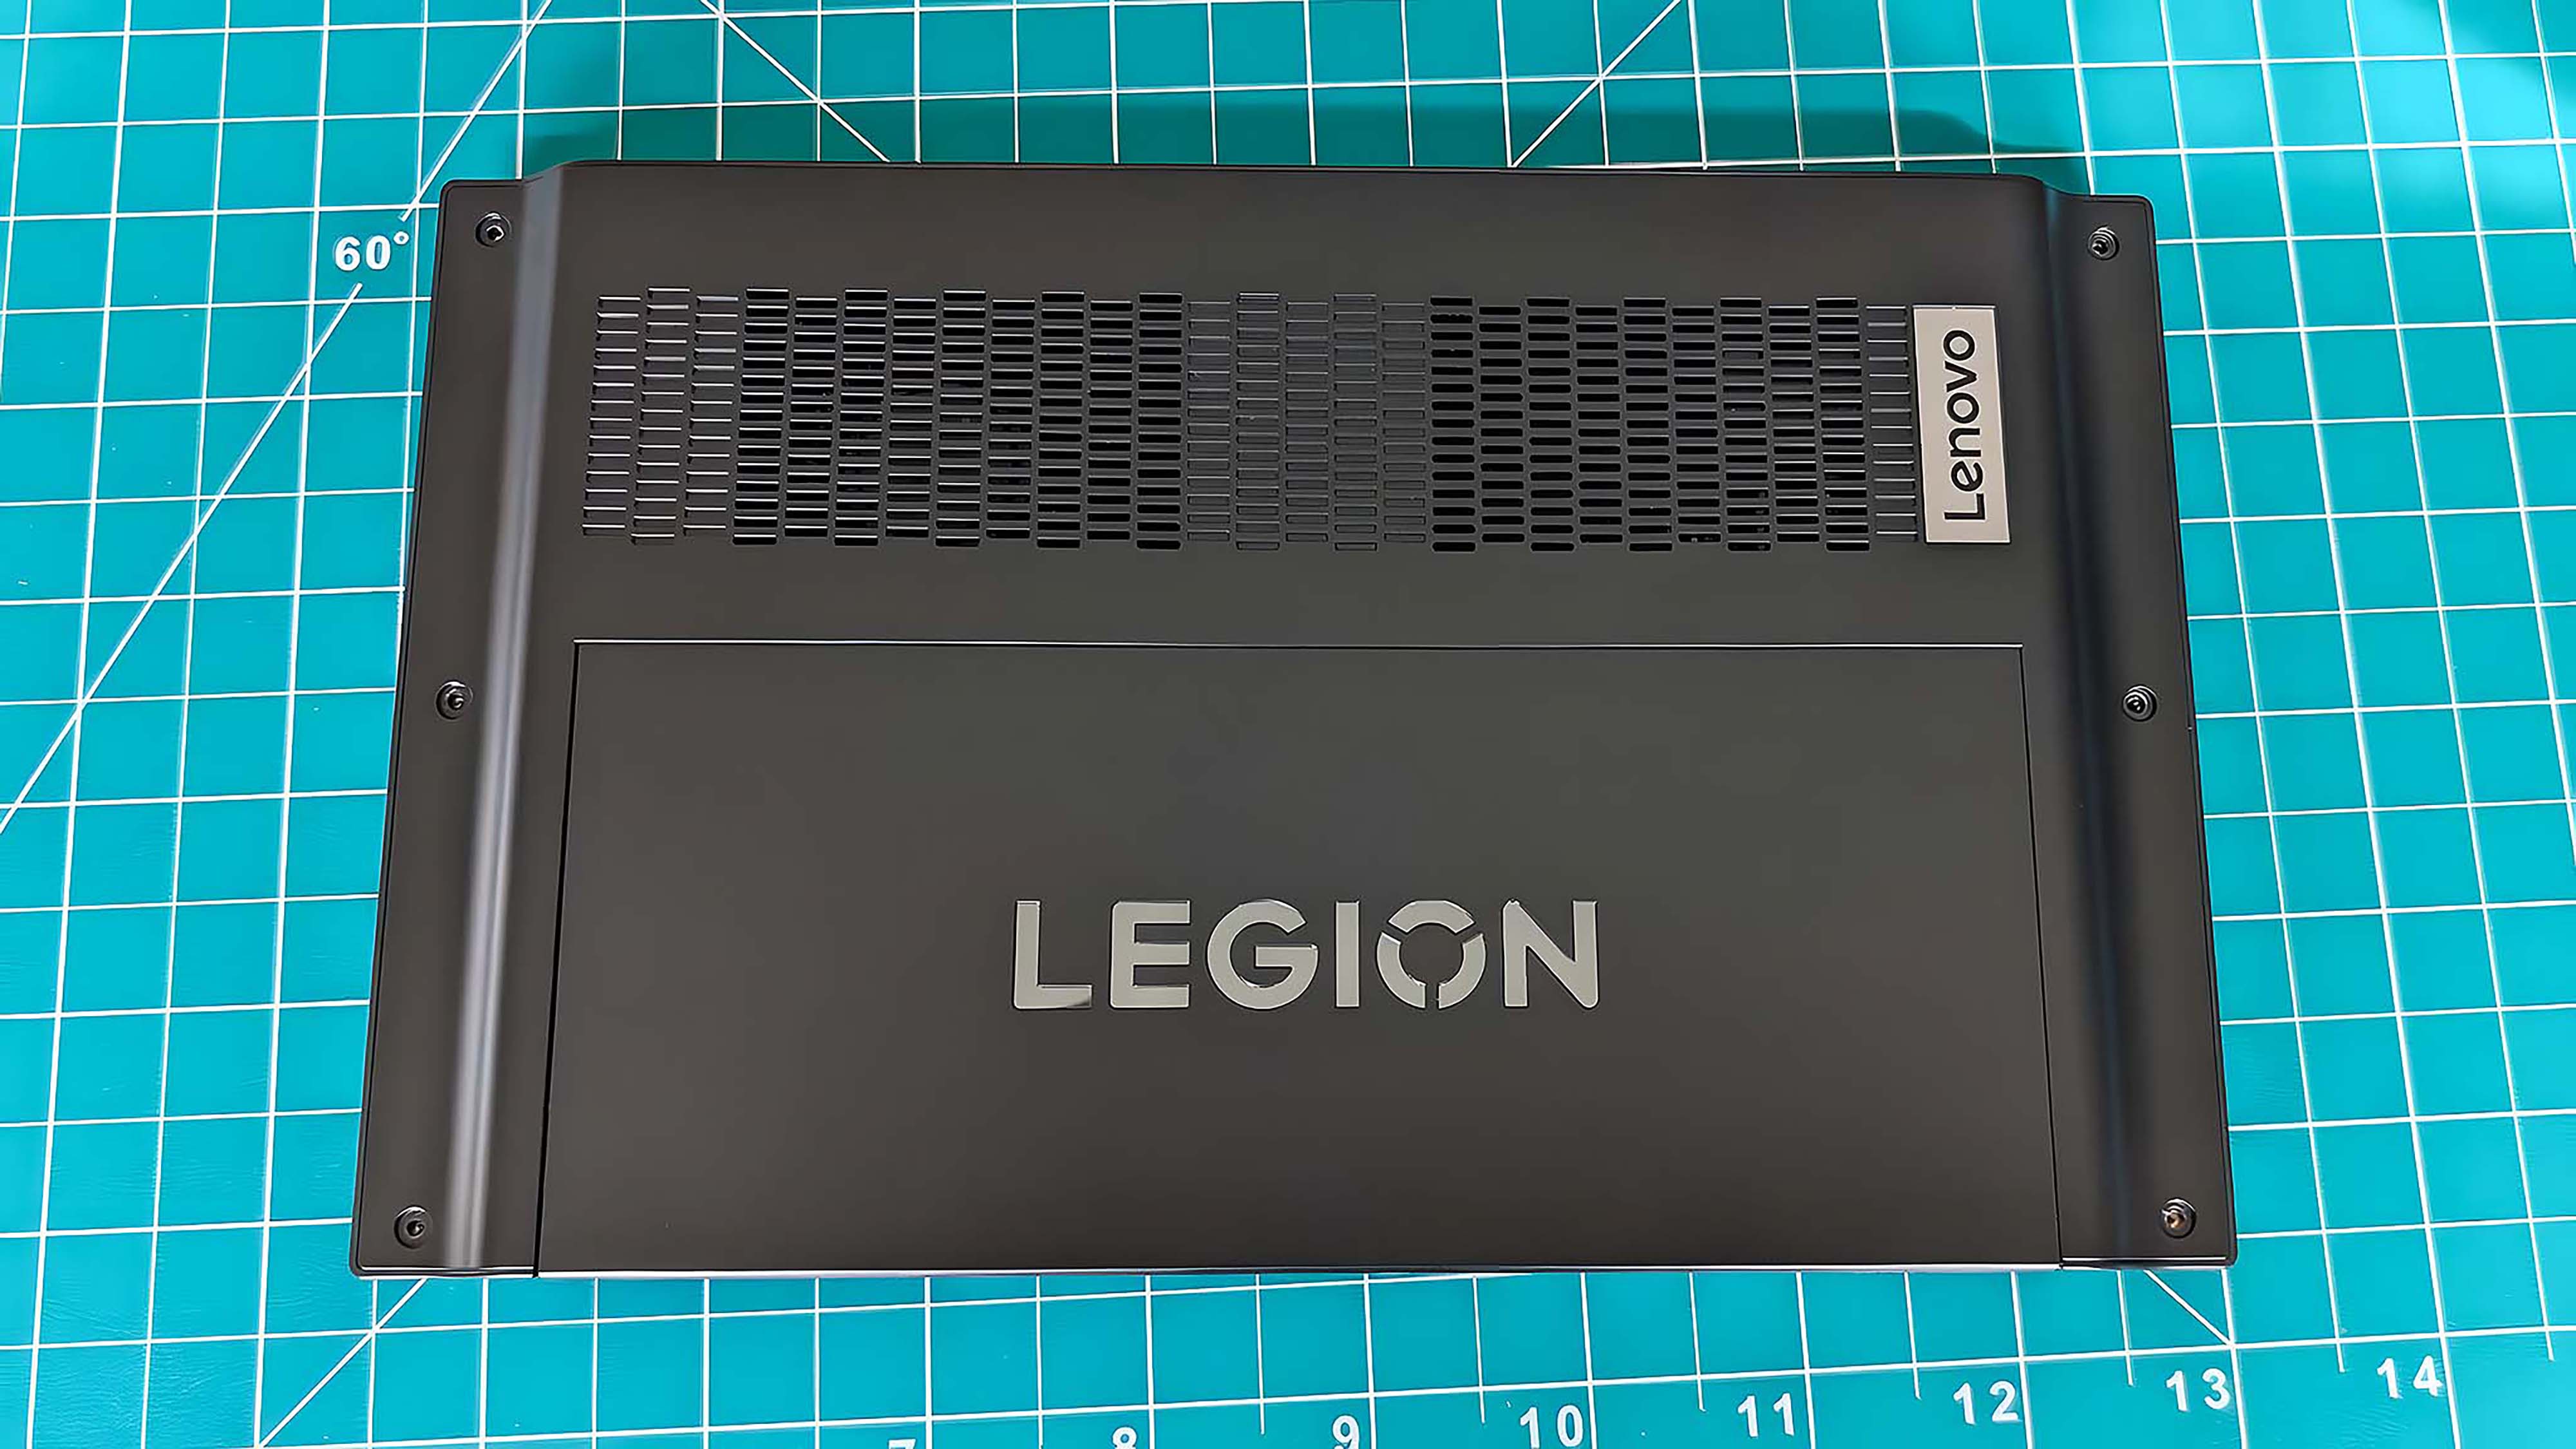
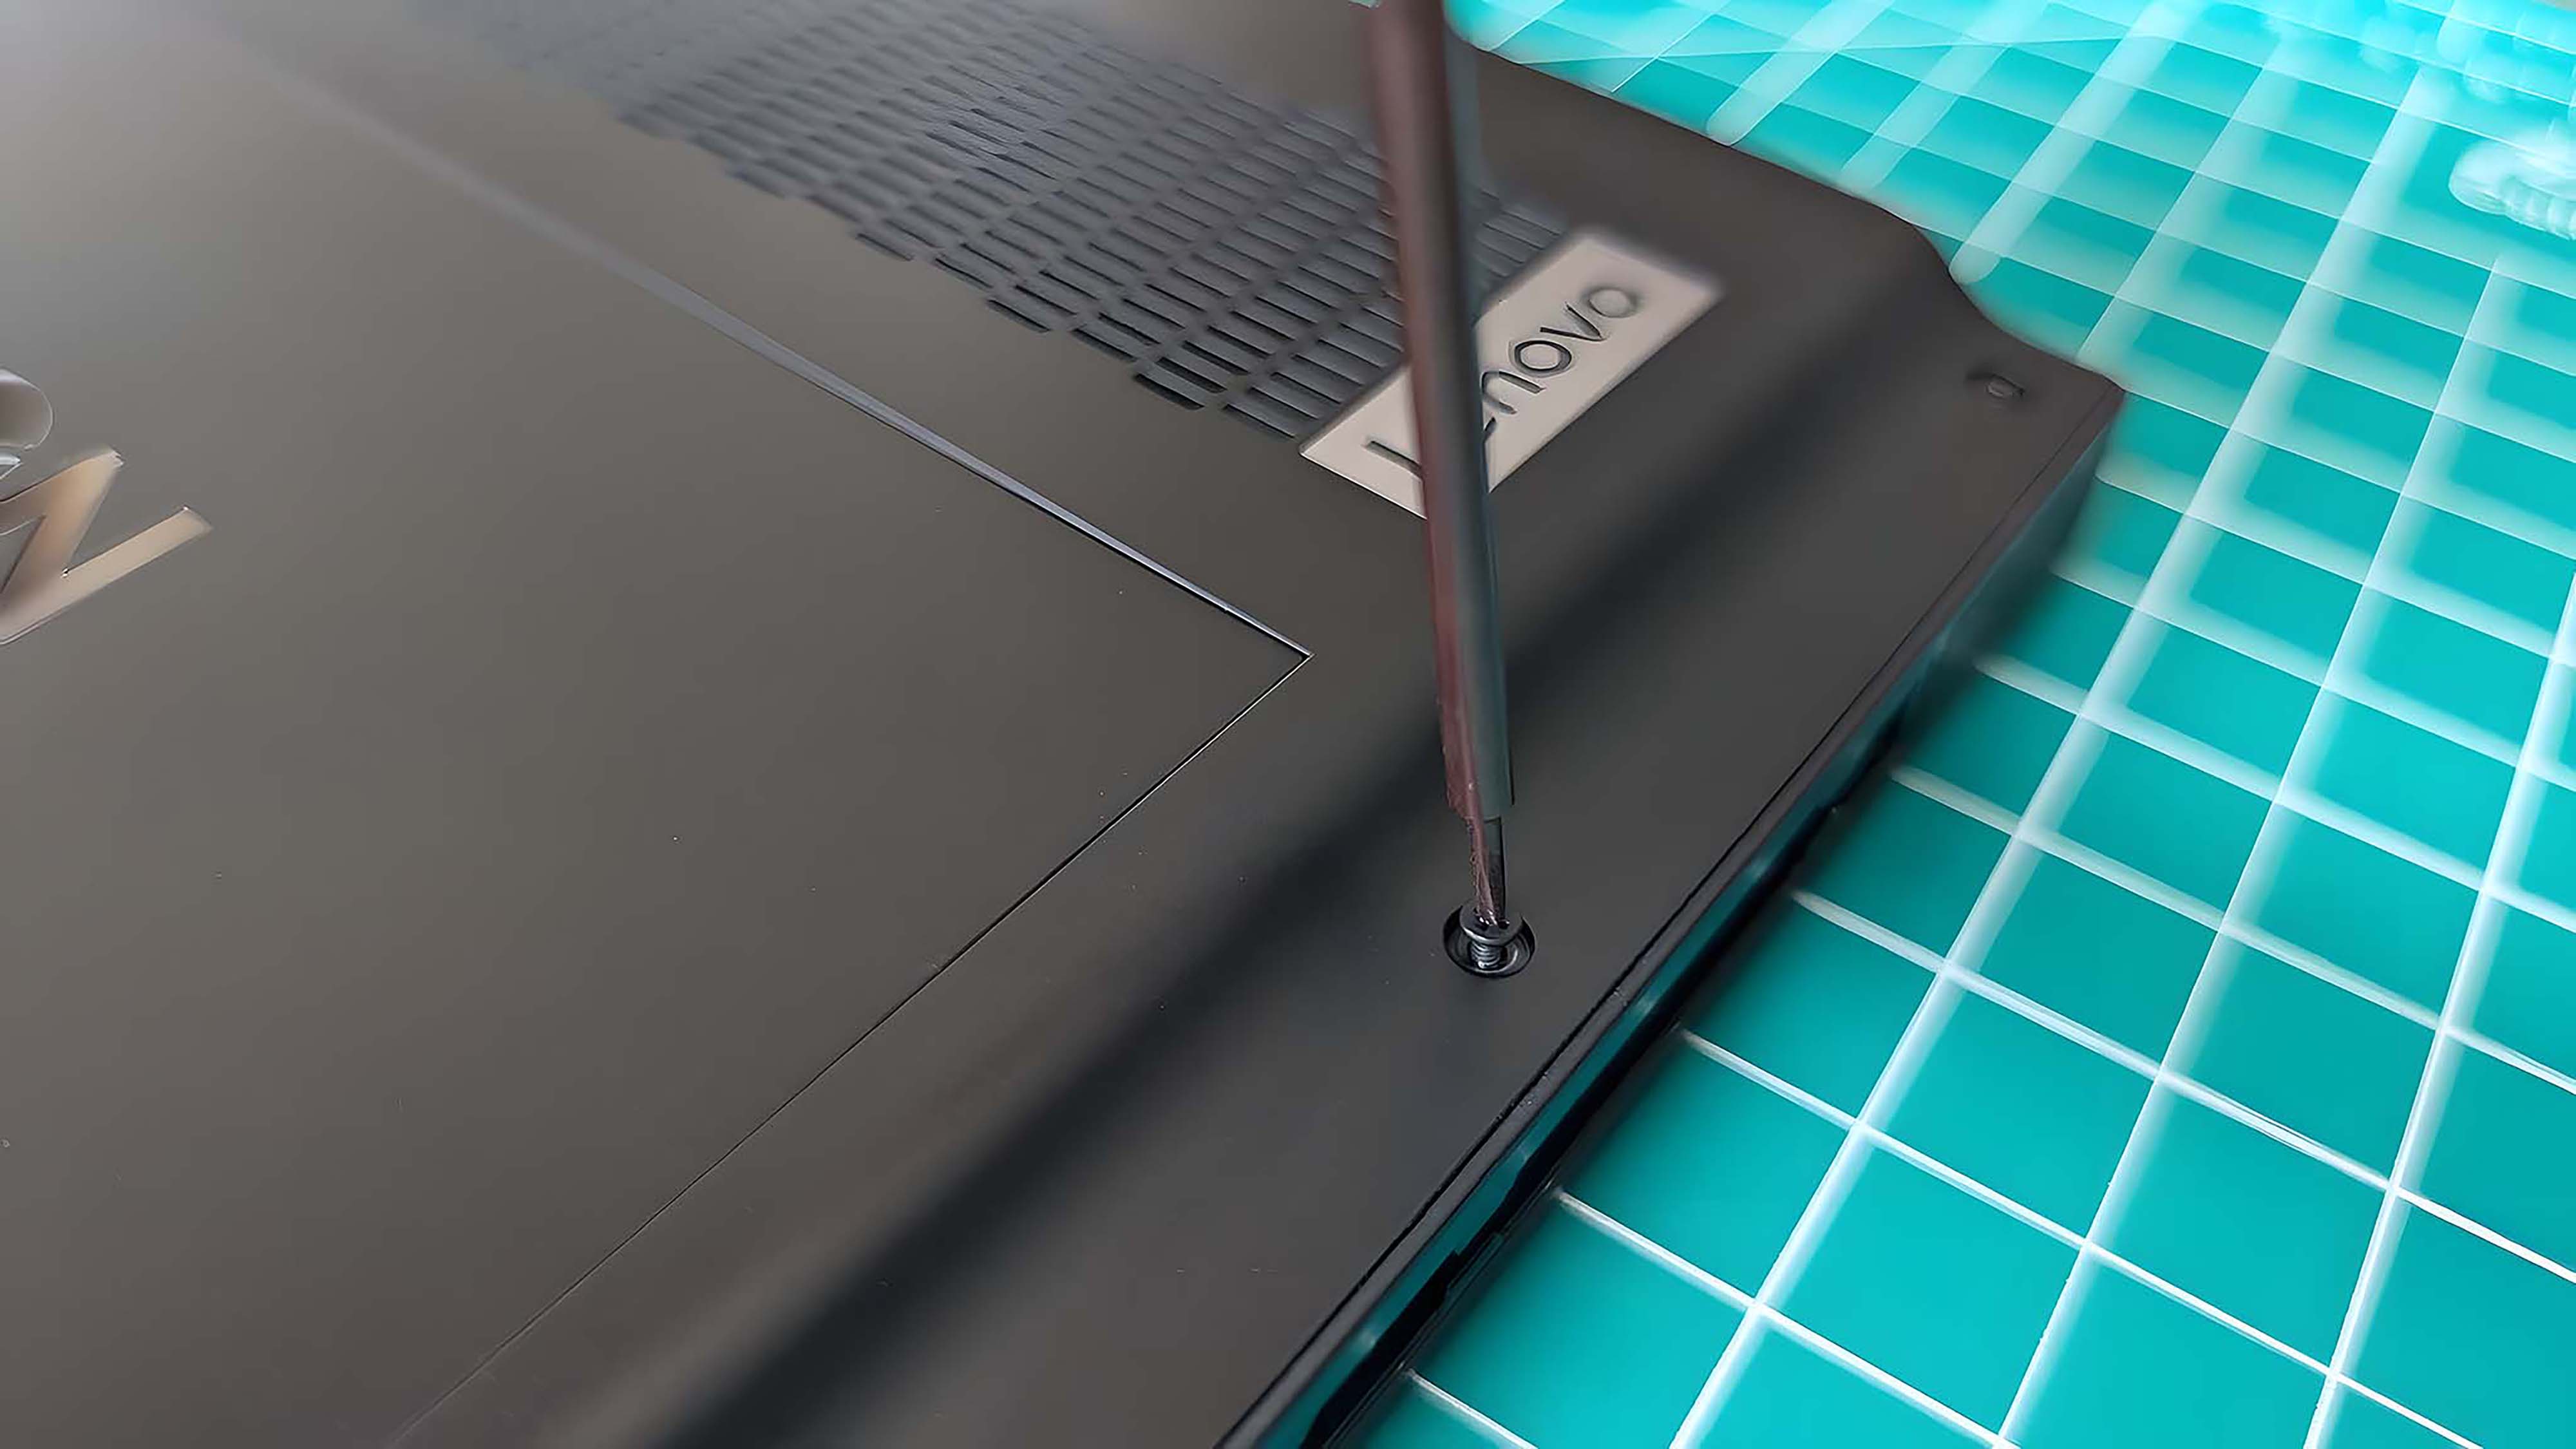
- Use a PH00 screwdriver to remove the six screws on the back of the Legion Go. Place the screws somewhere safe.

- Raise the kickstand and then use a plastic prying pick to gently lift the back casing off. You’ll need to be careful while doing this so as not to damage anything.
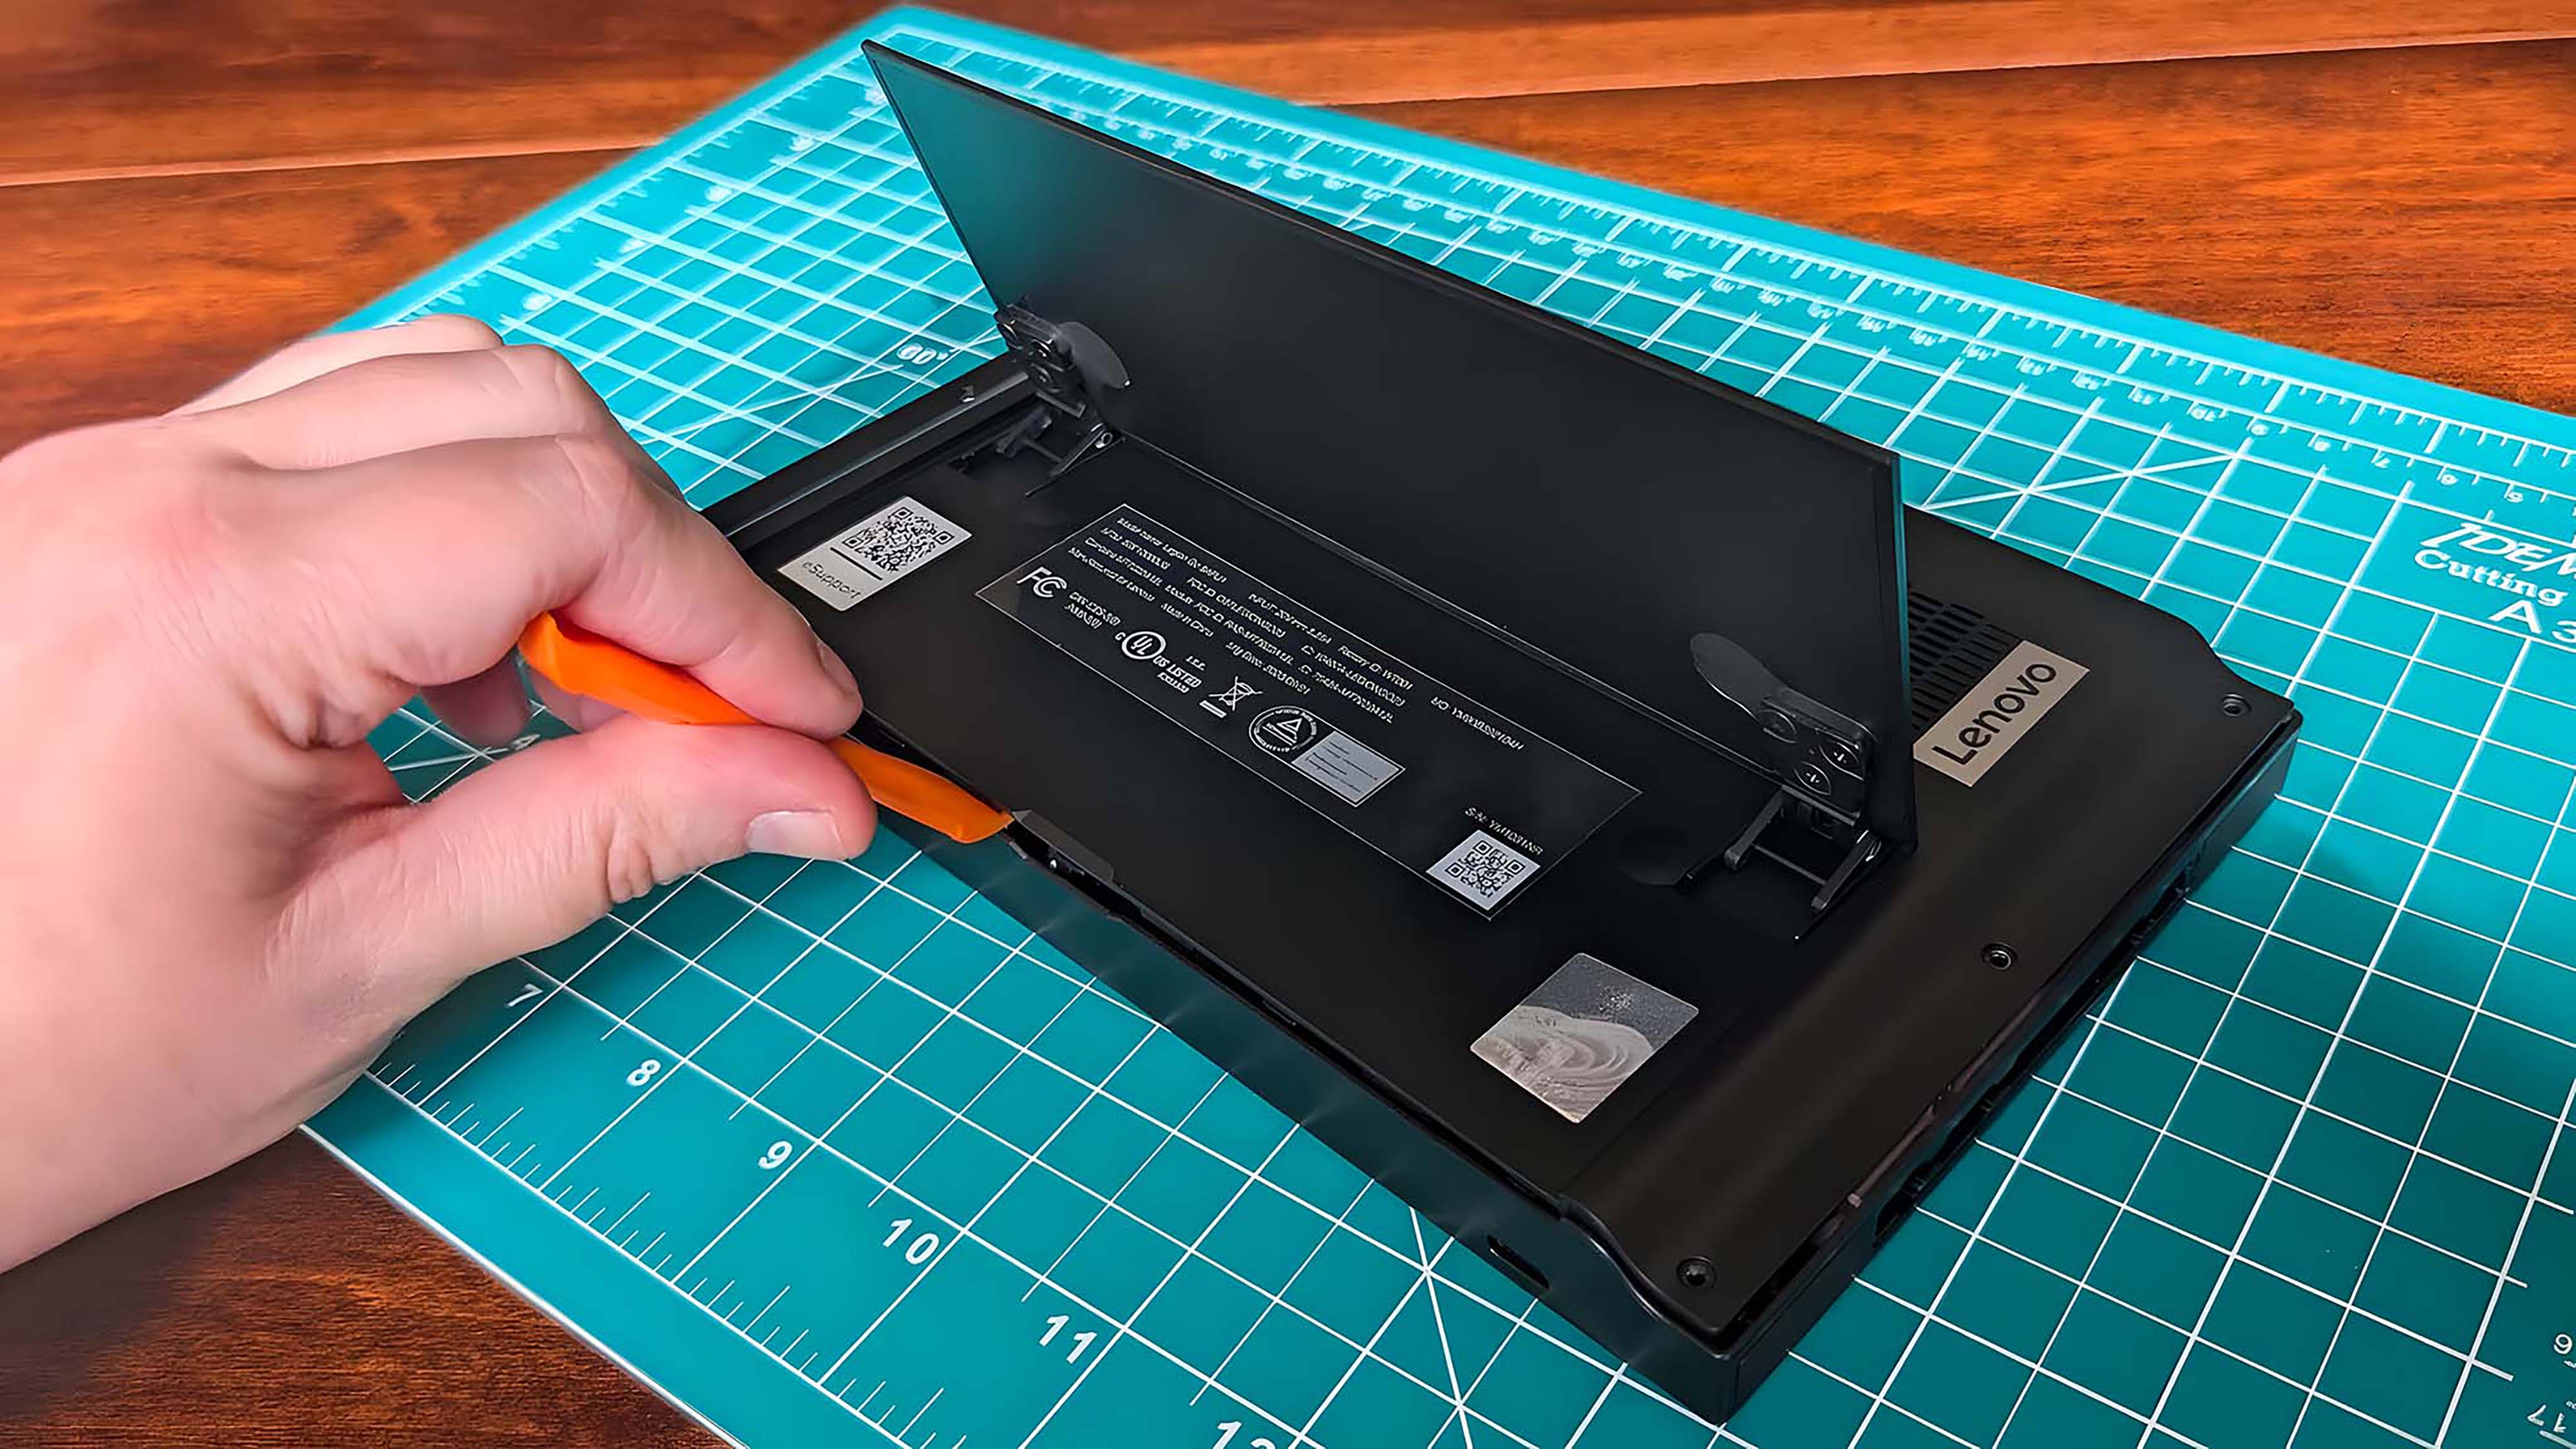
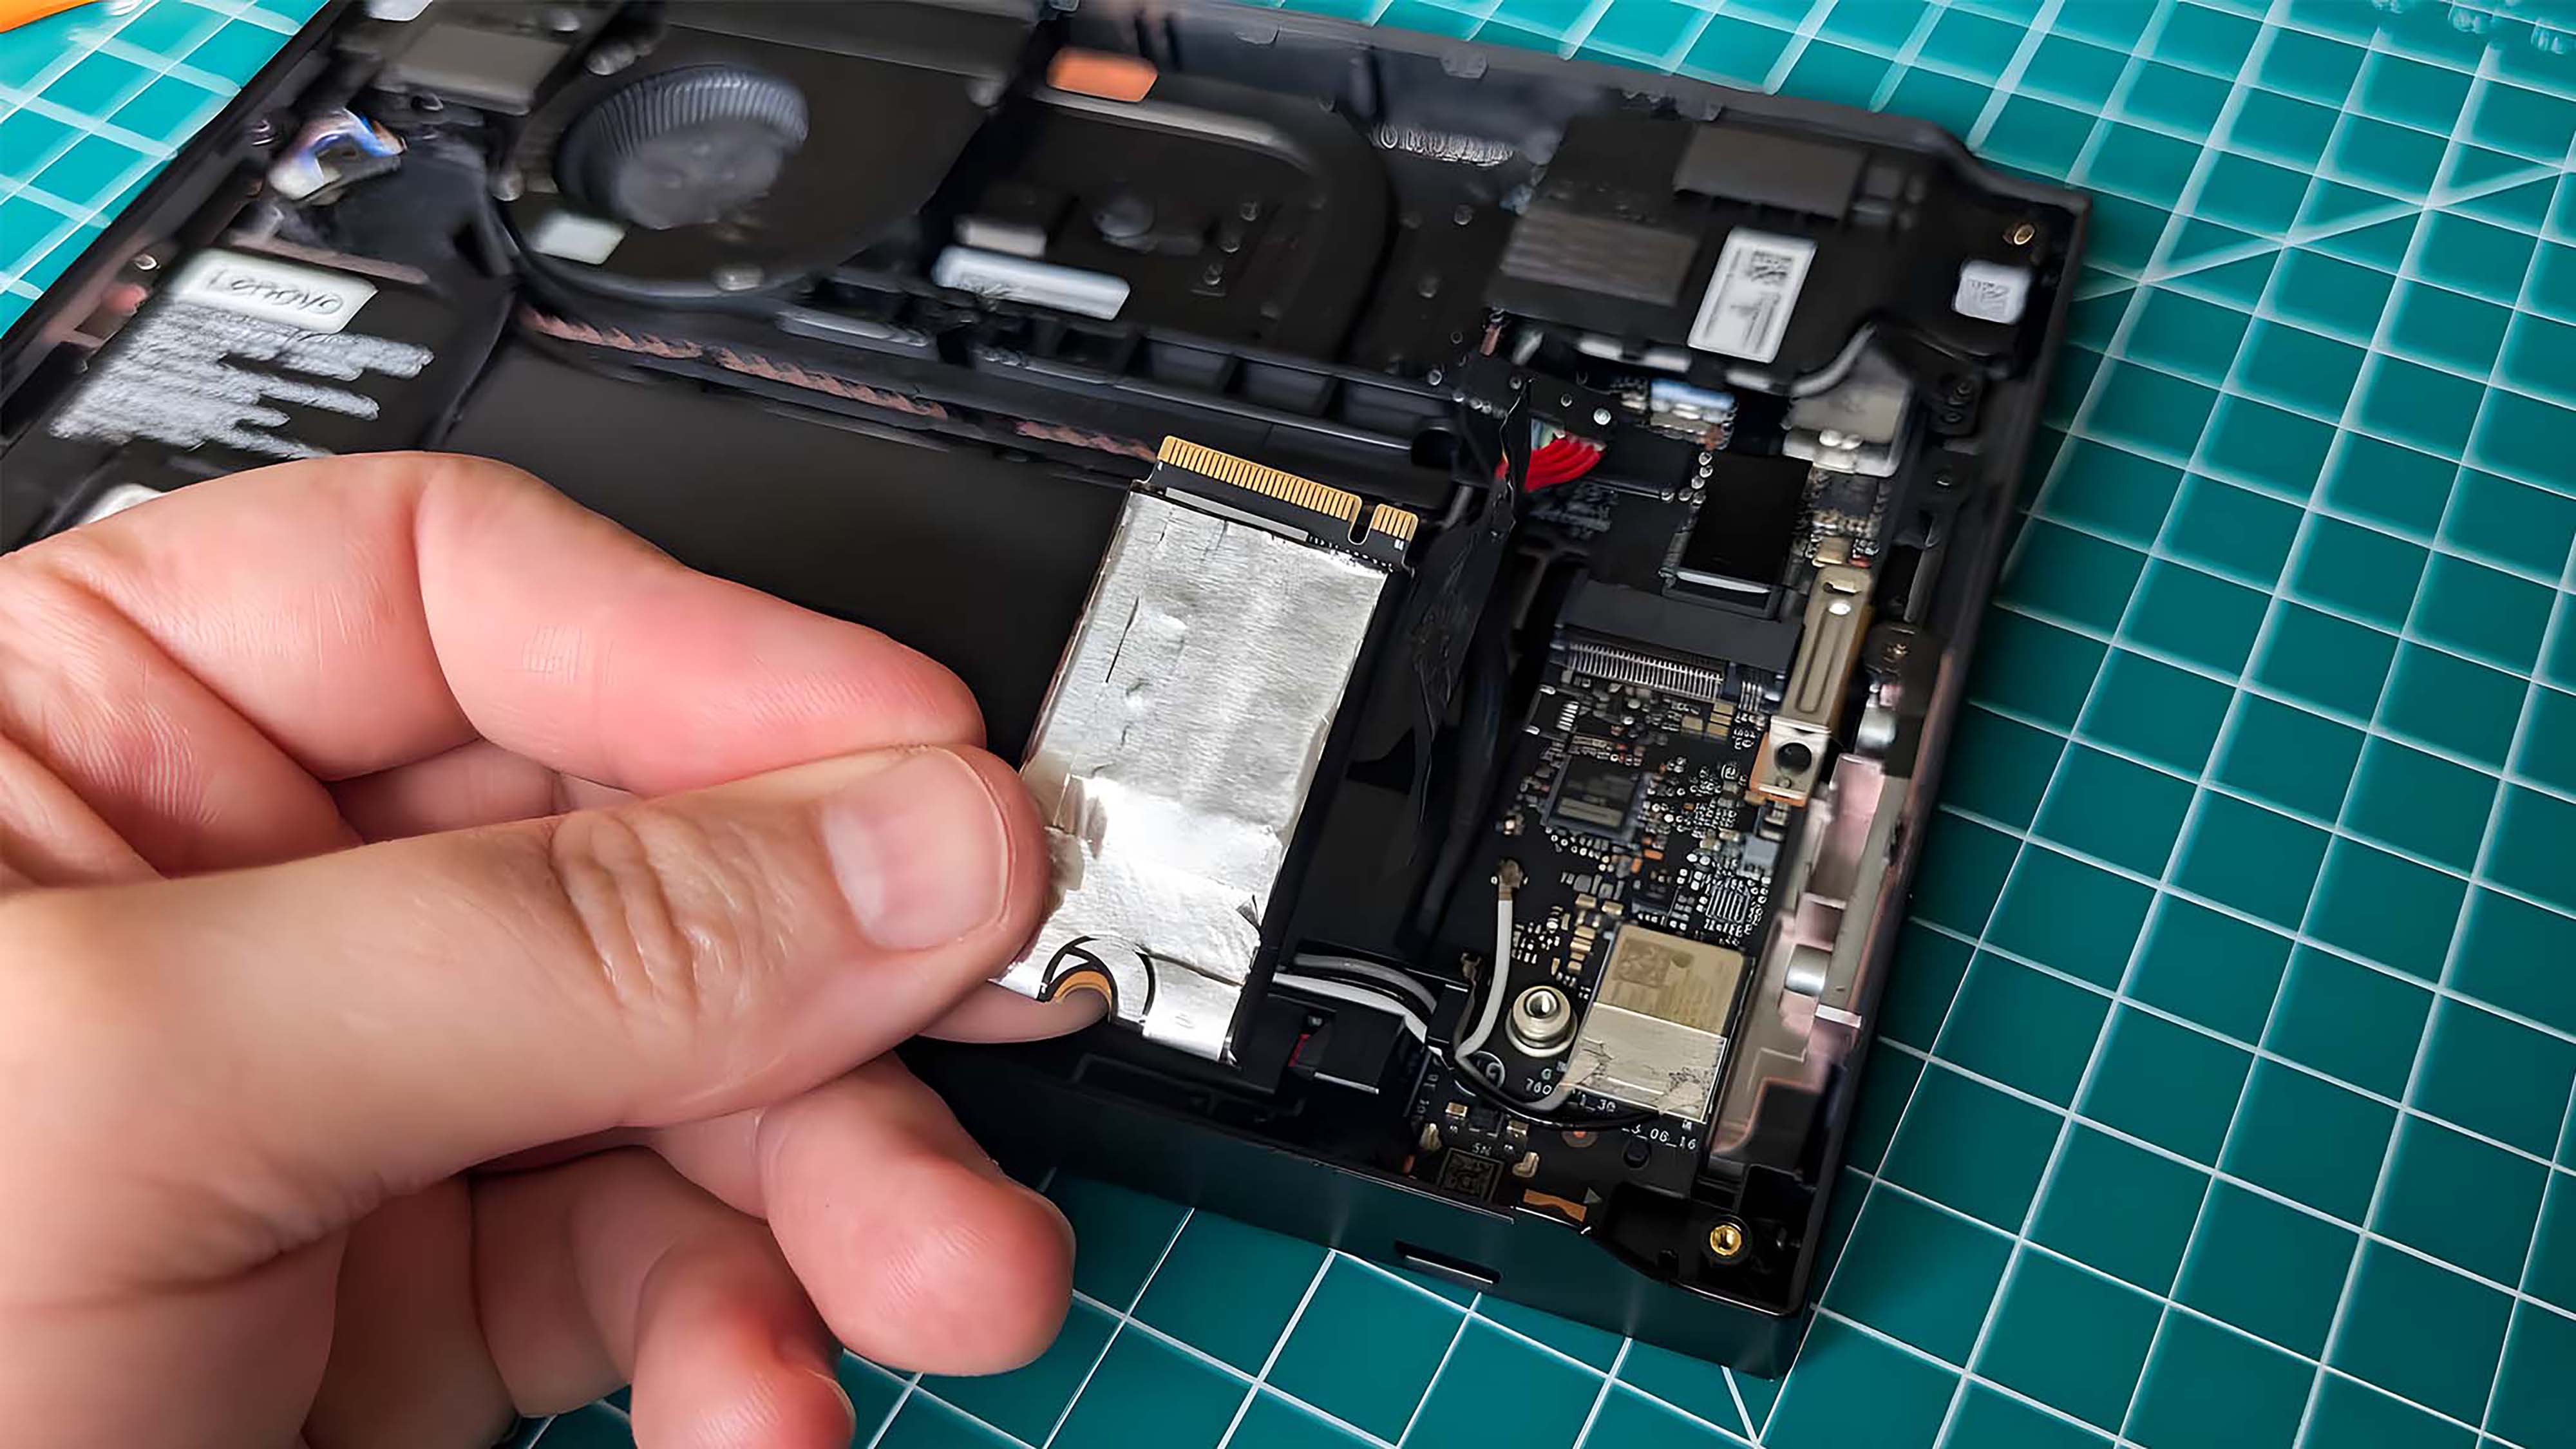
- Place the back casing somewhere clean and safe. Then, carefully peel the black sticker off the SSD and battery cable.
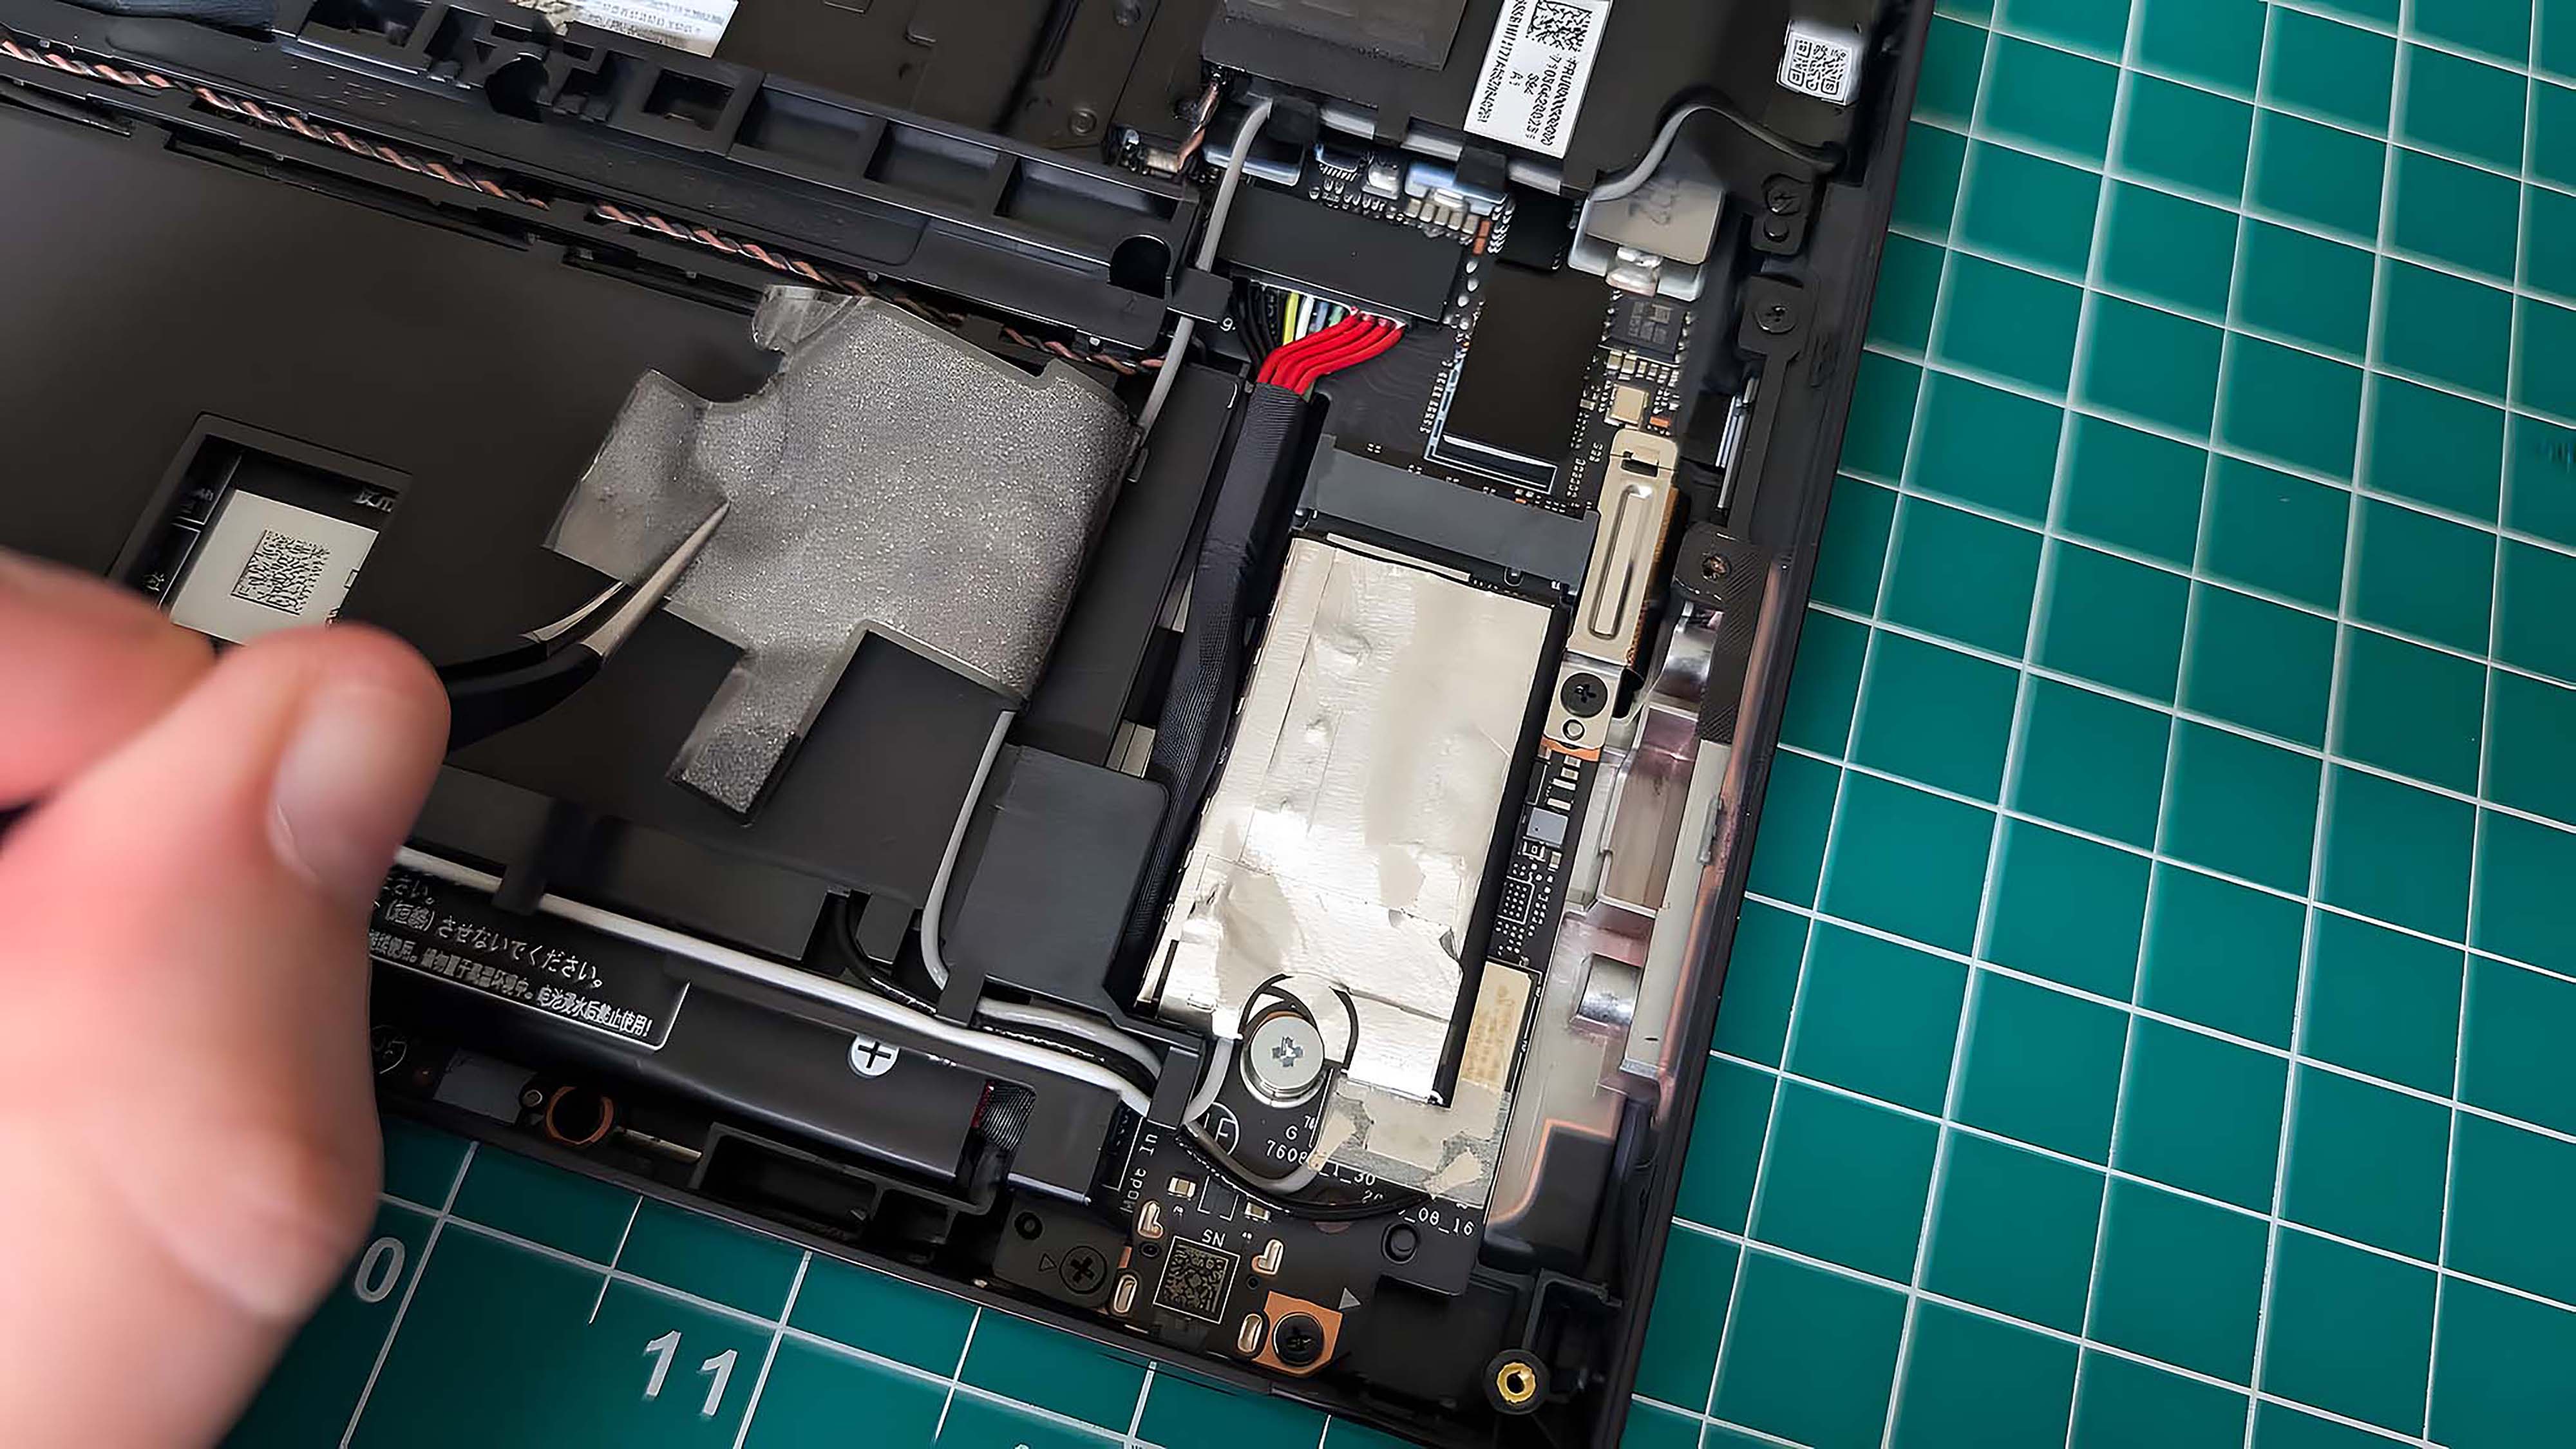
- Gently grab the battery cables and unplug them.
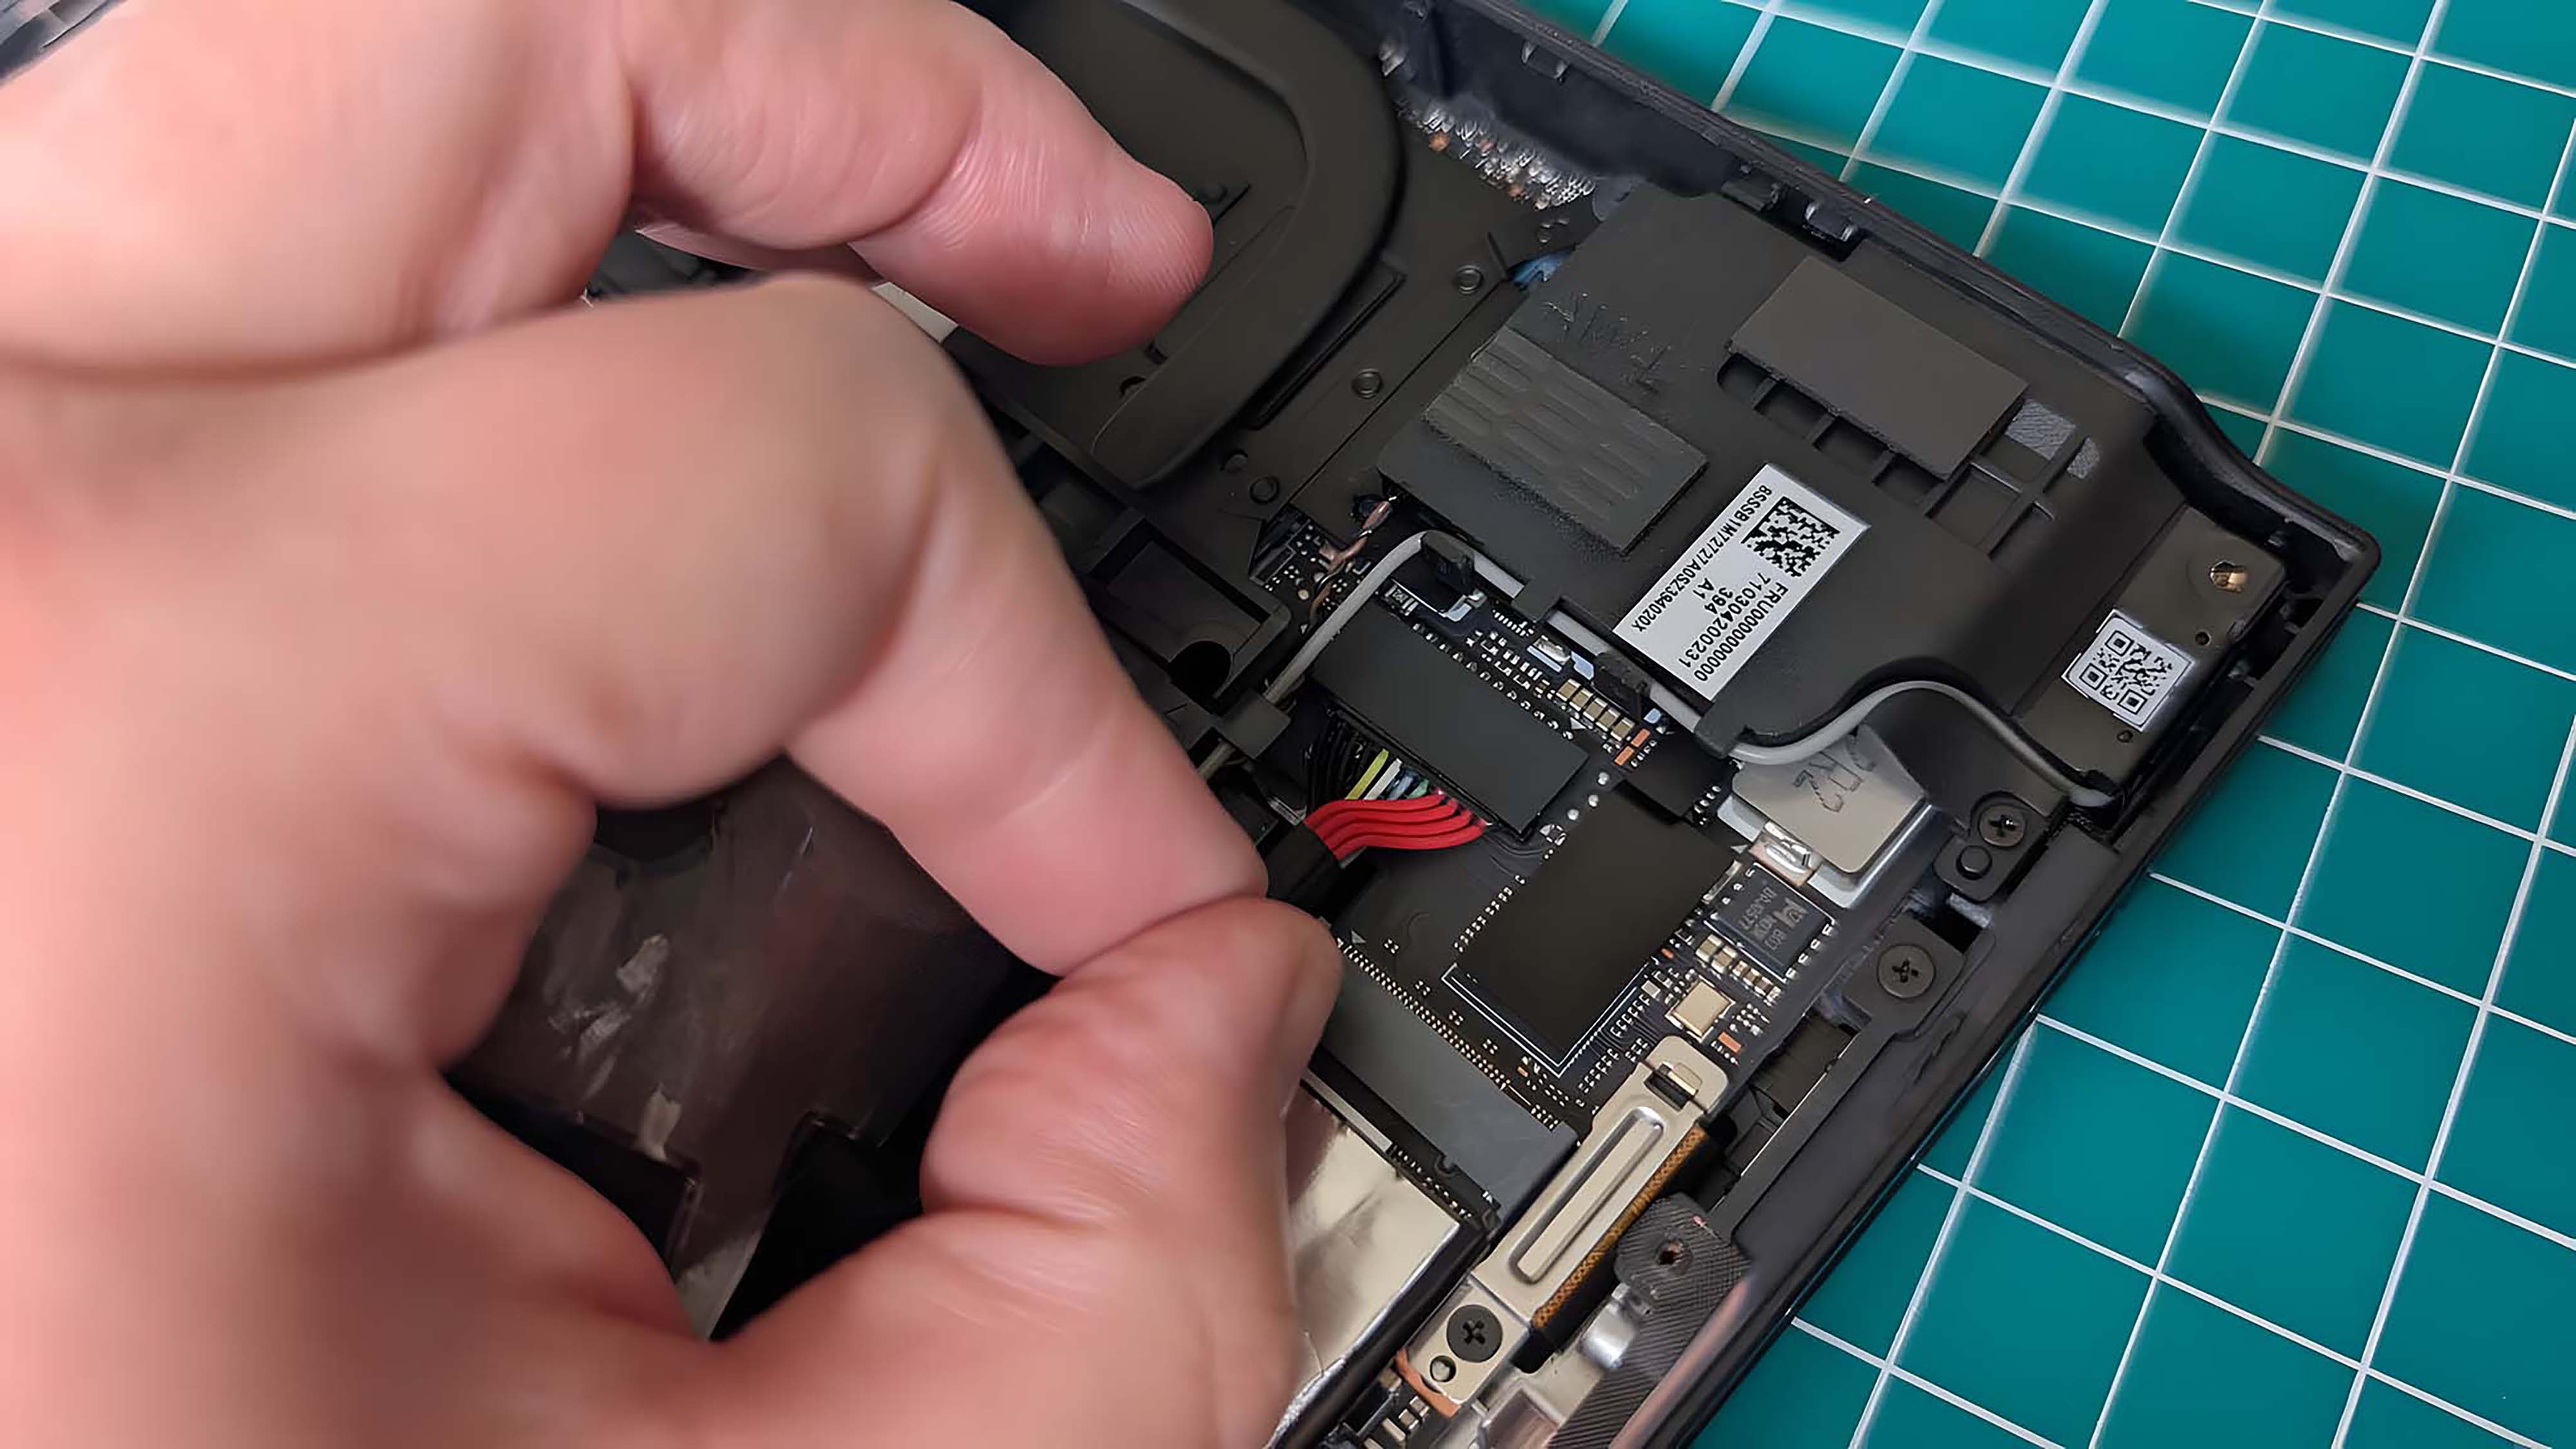
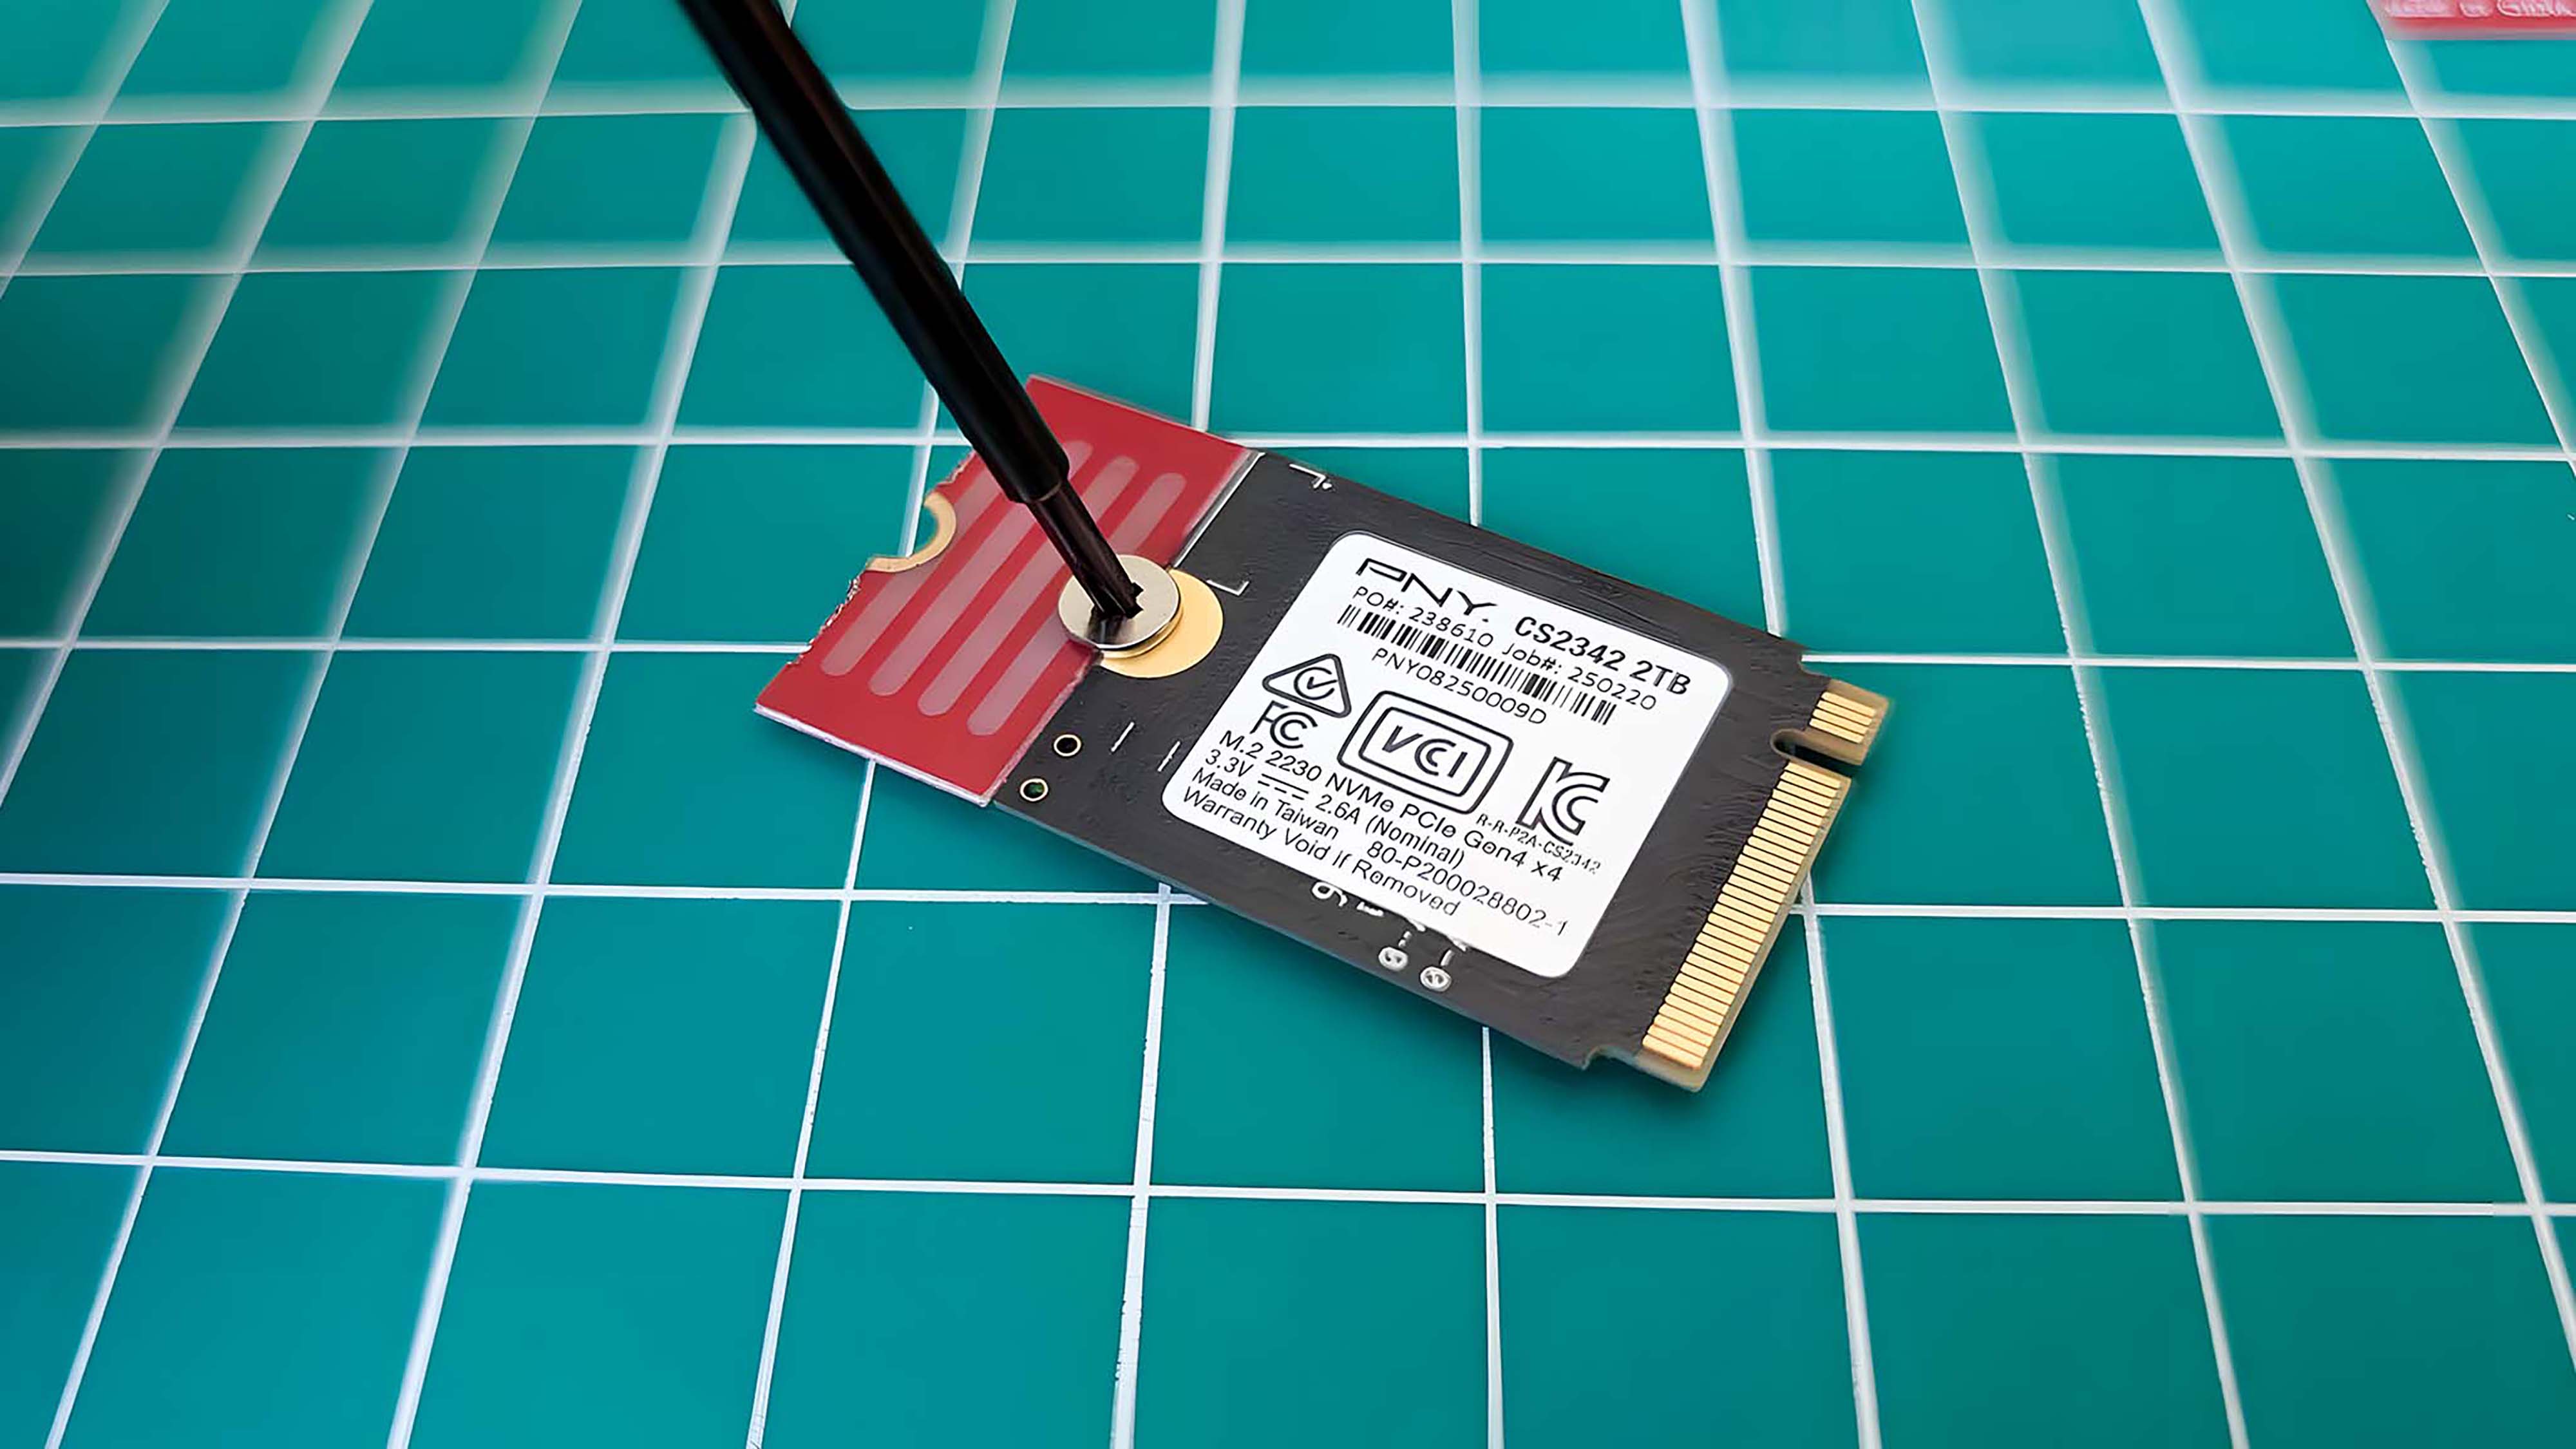
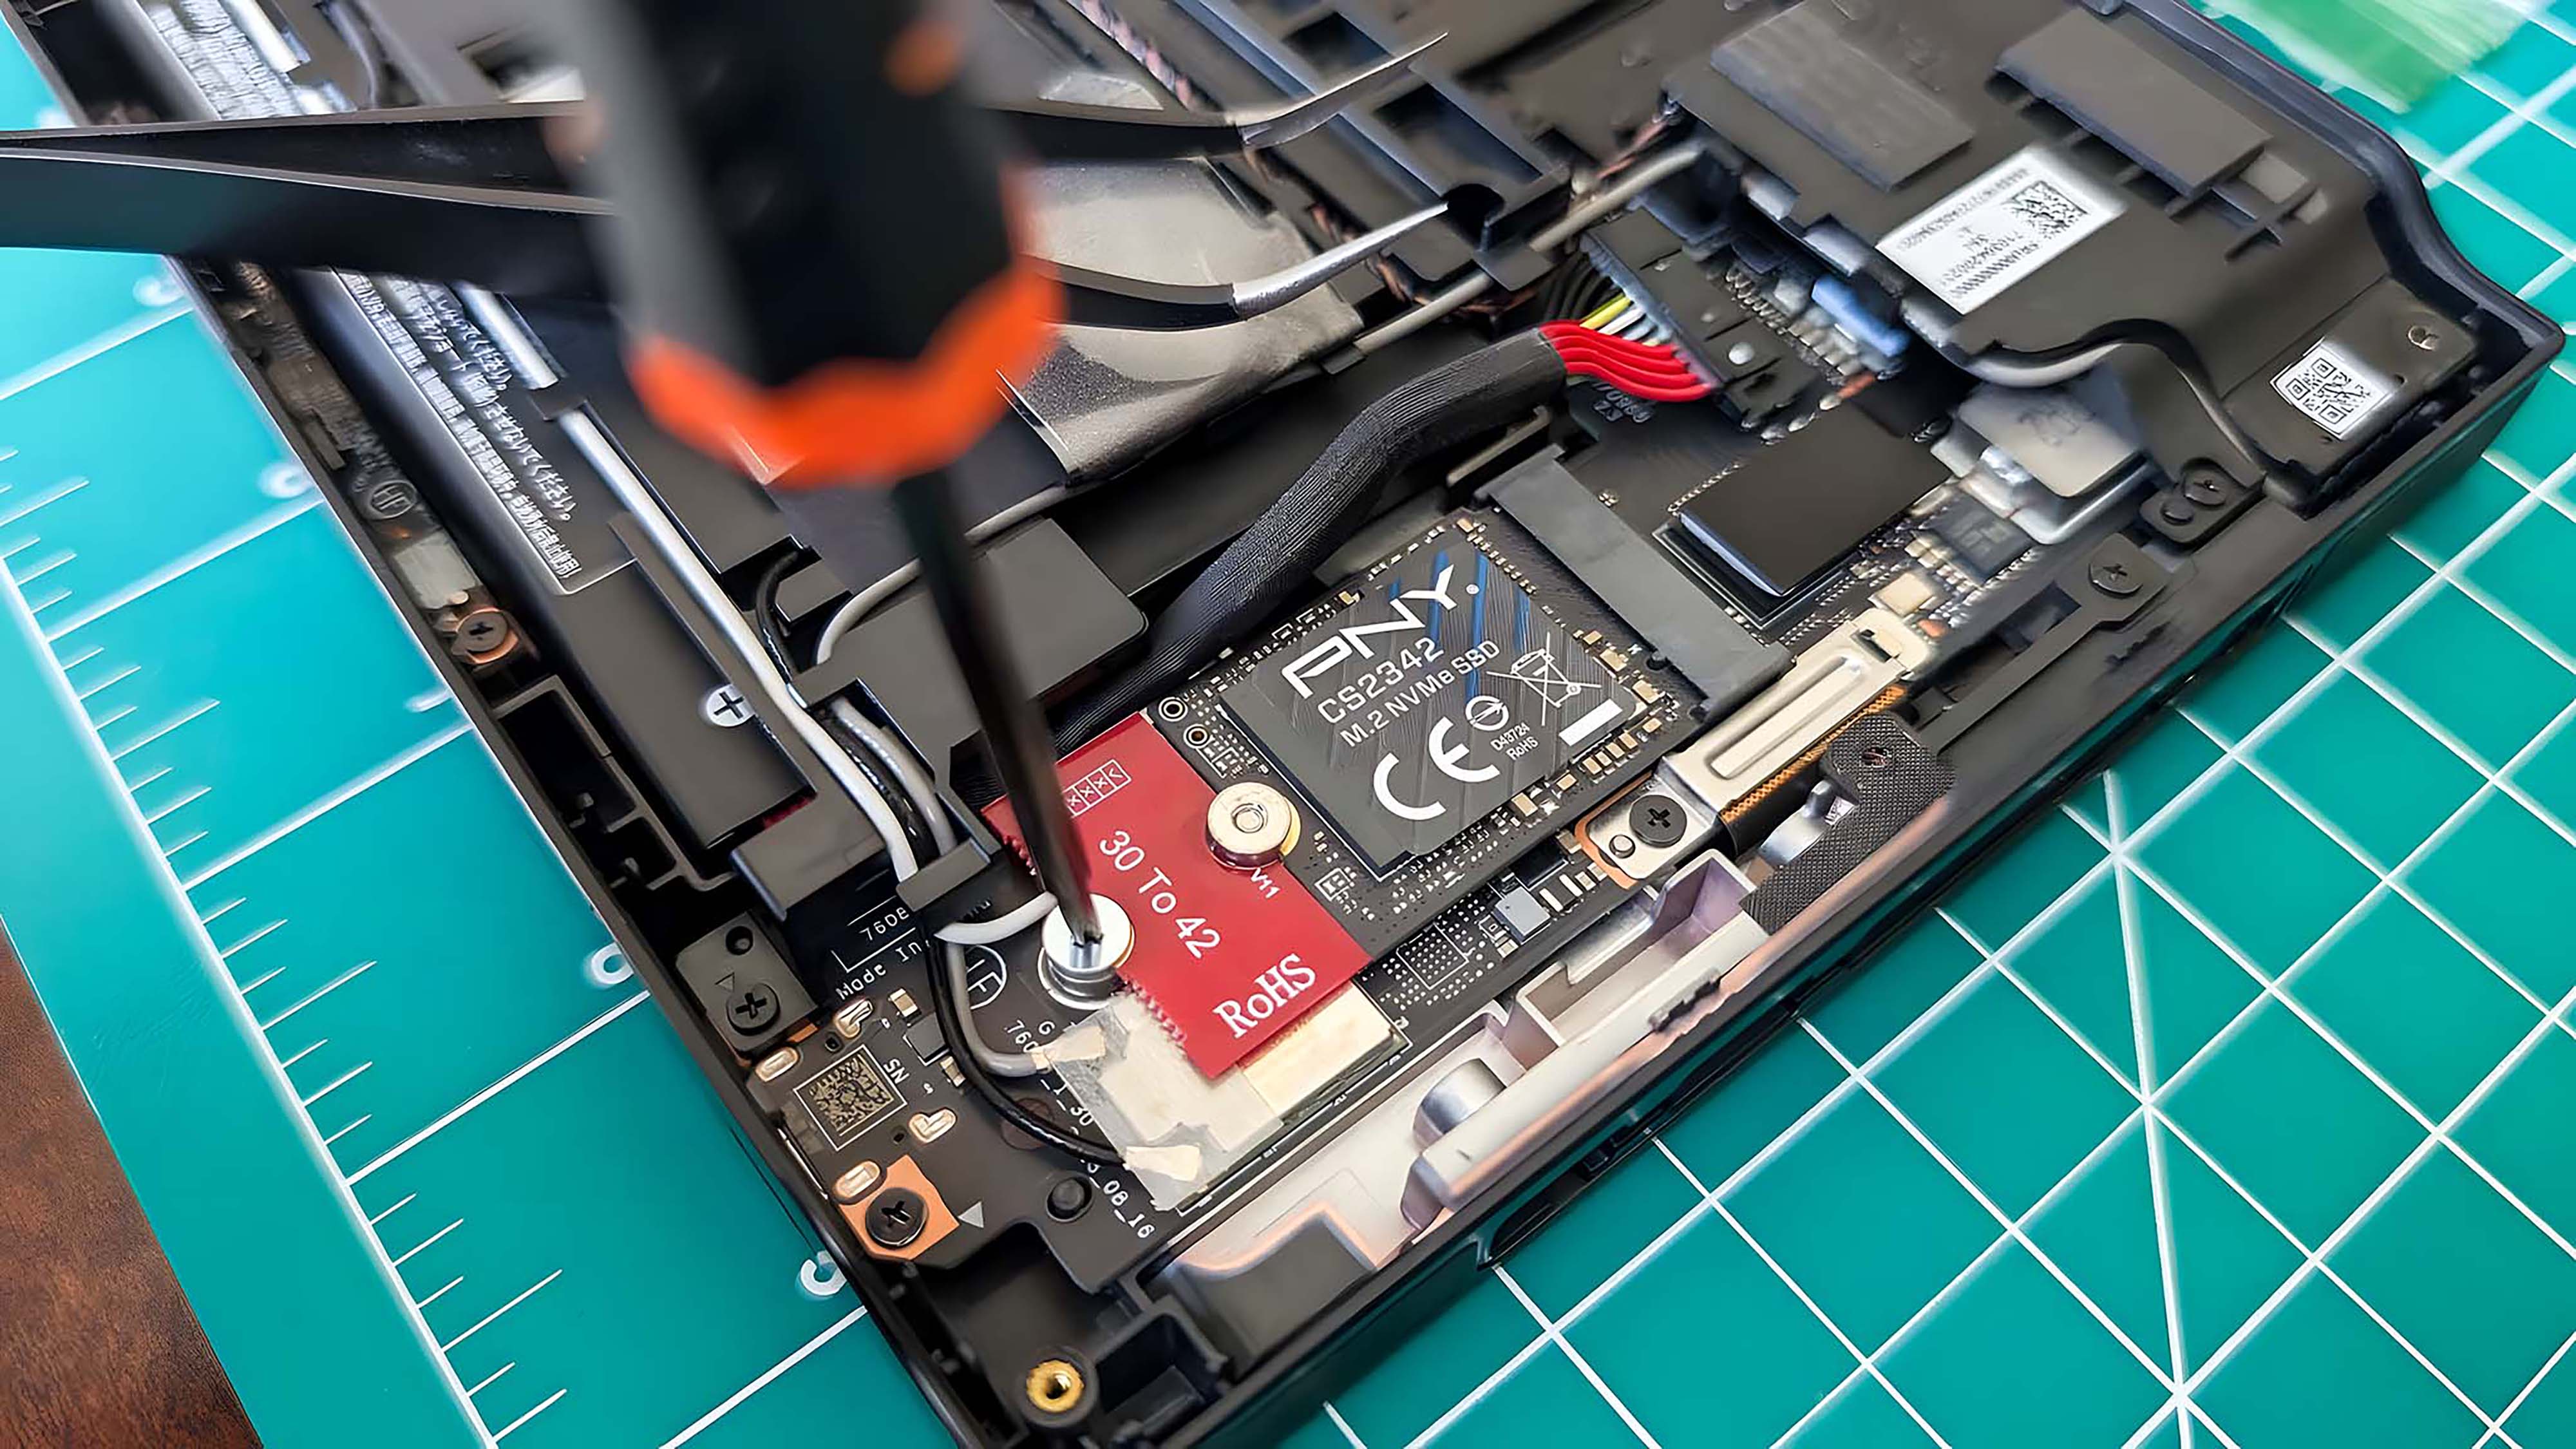
- Use a PH1 screwdriver to unscrew the SSD. Place the screw somewhere safe.
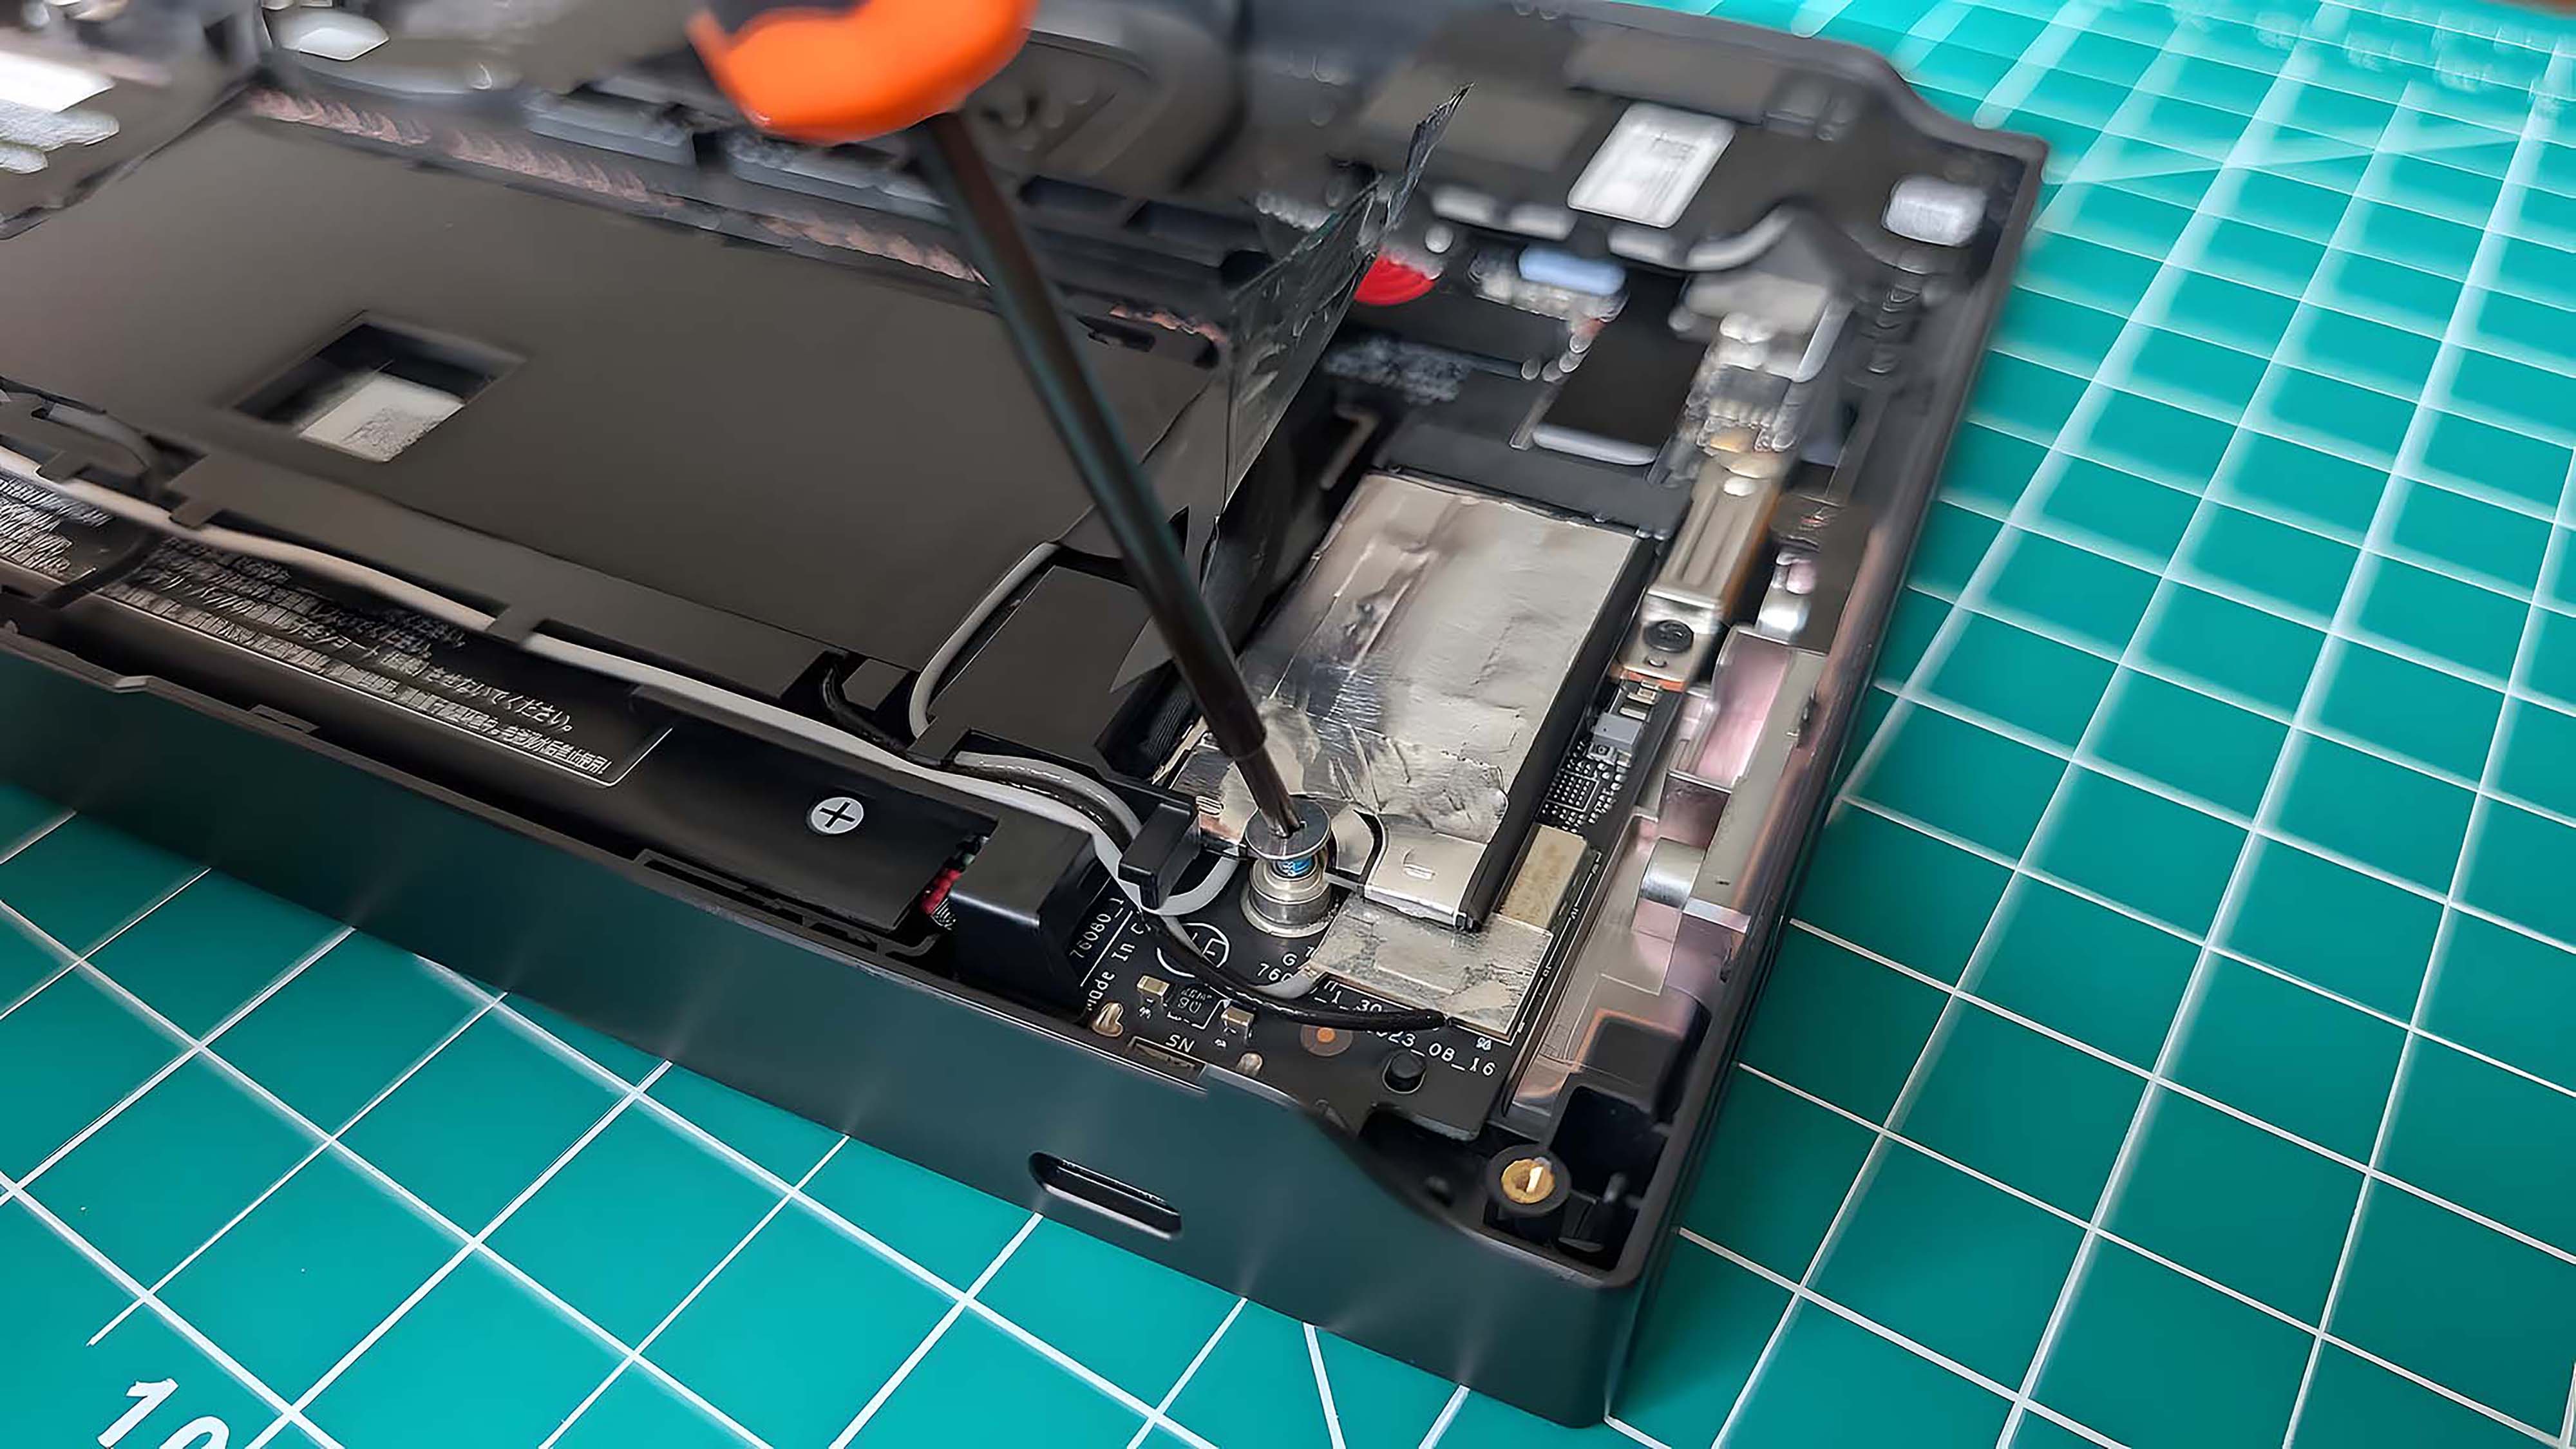
- Remove the original SSD by pulling upward and straight back from the connection area.
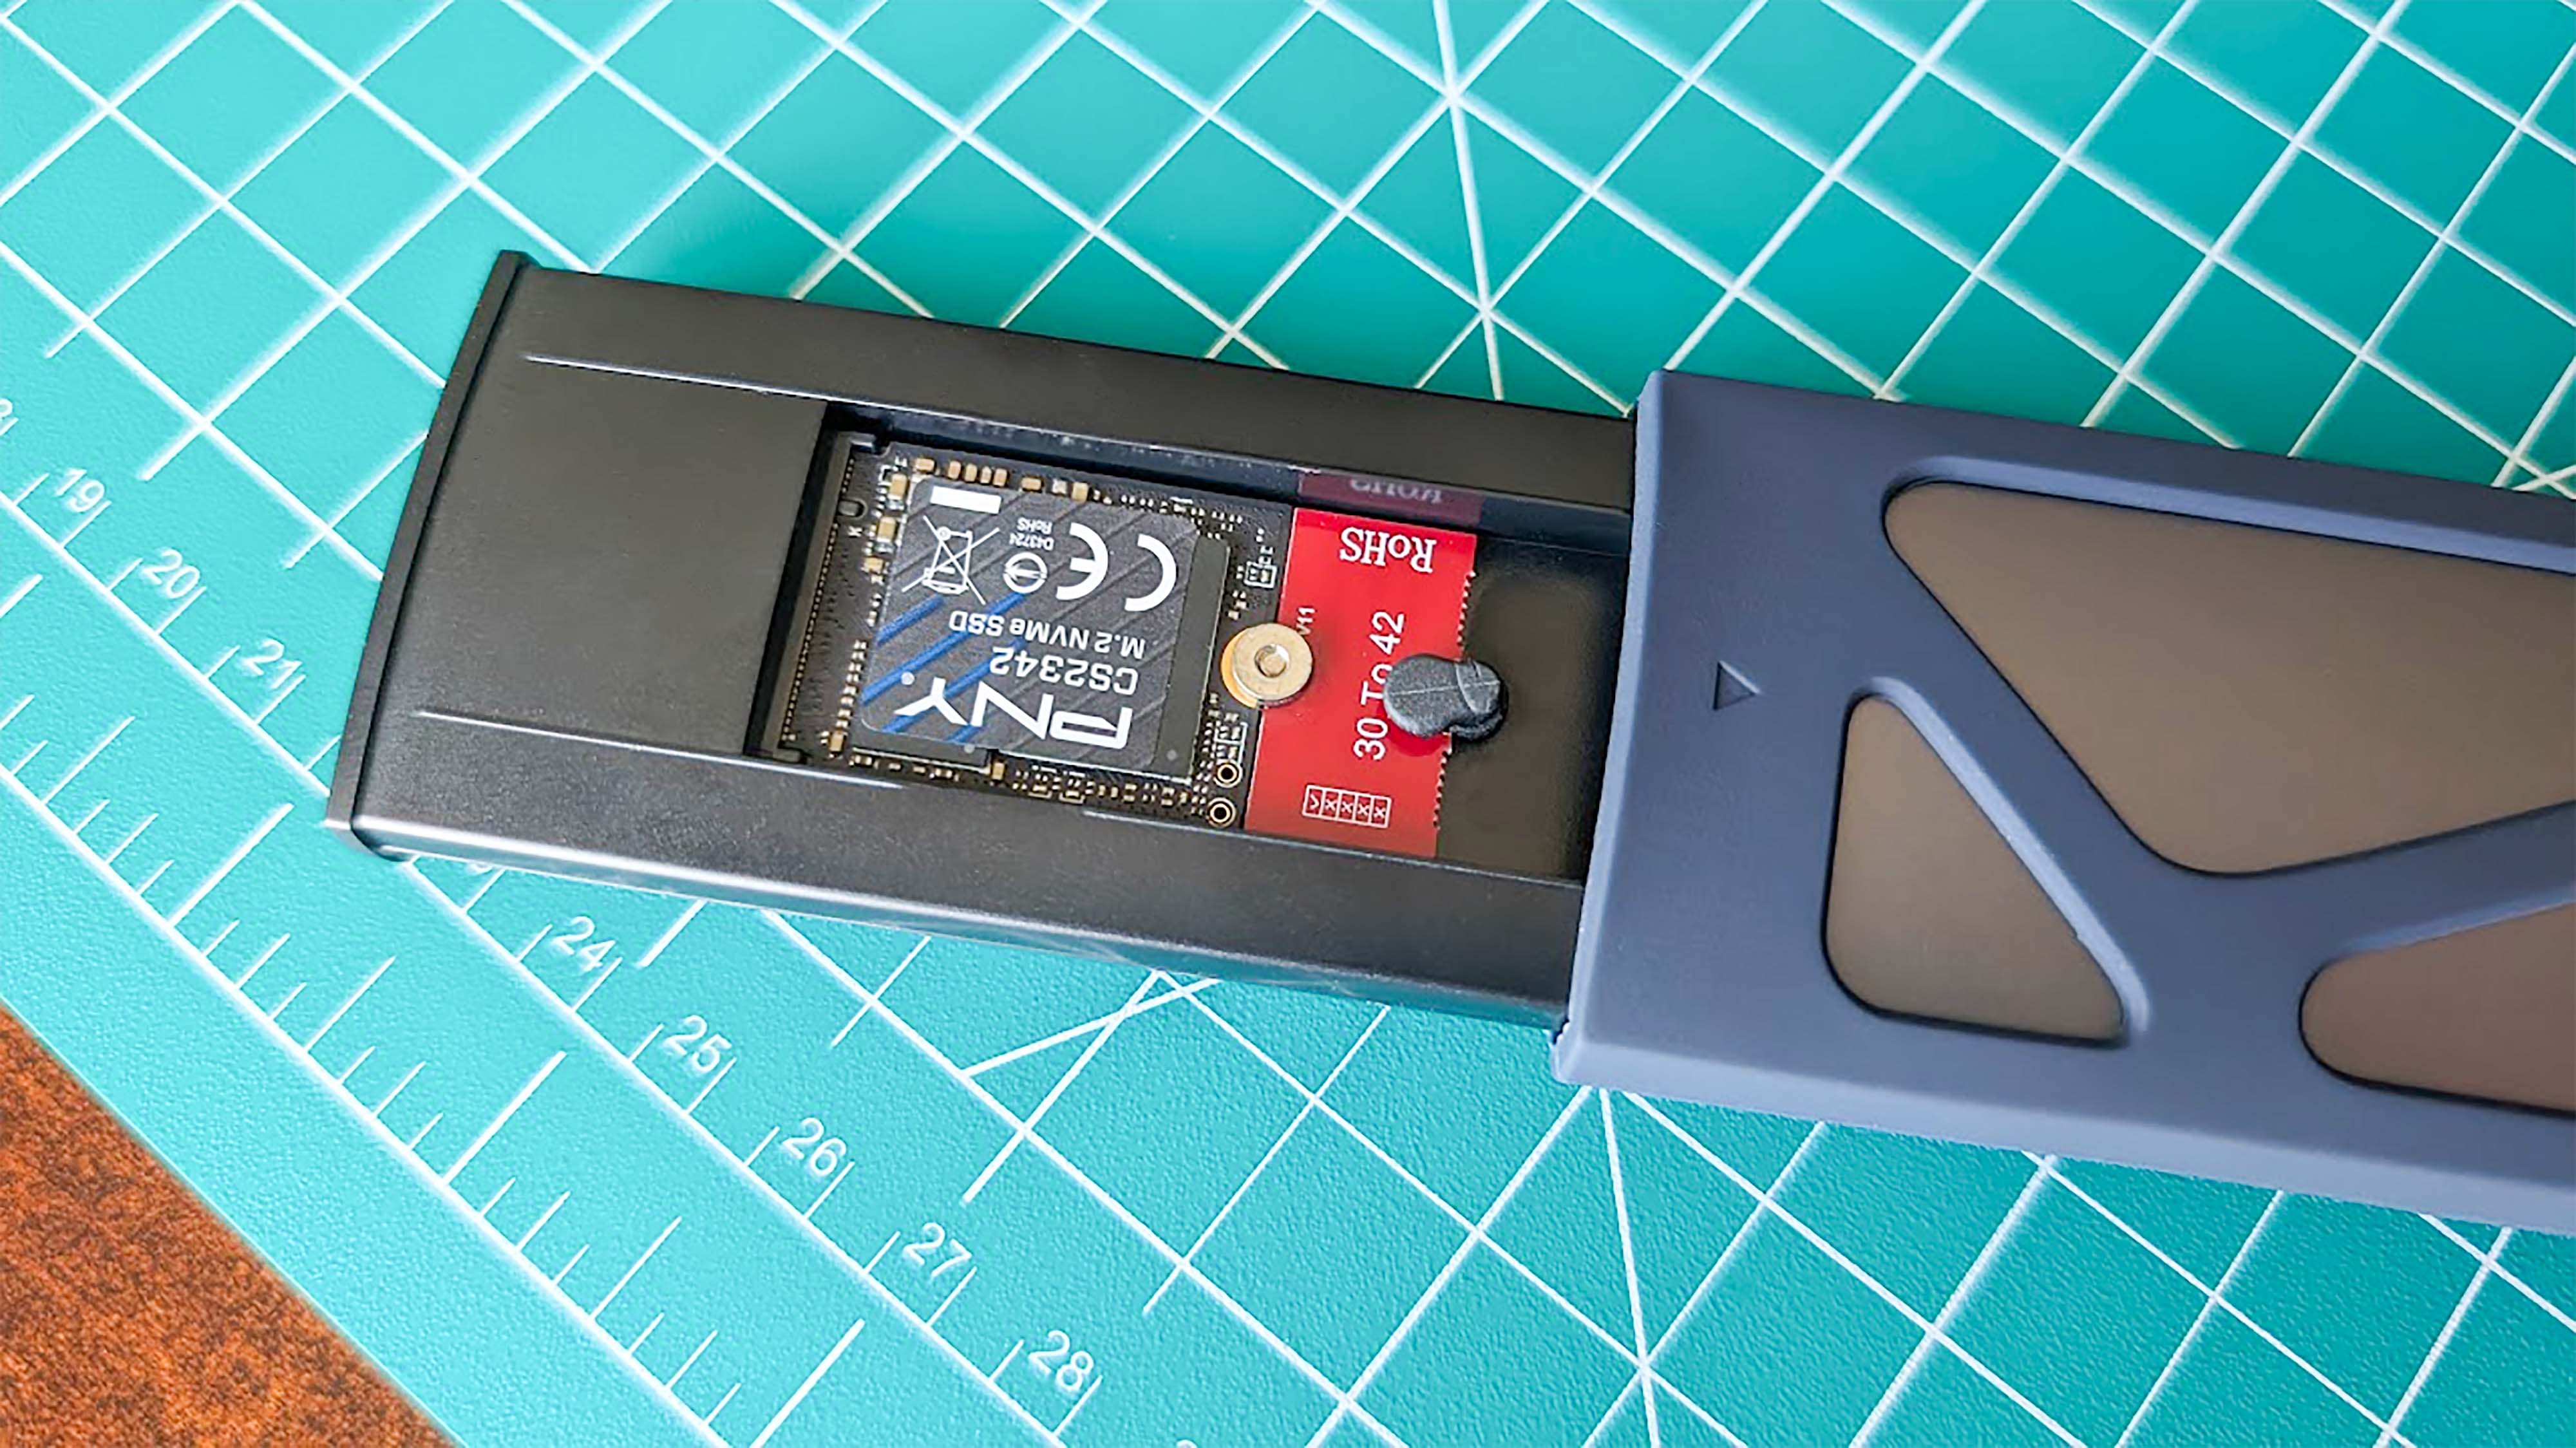
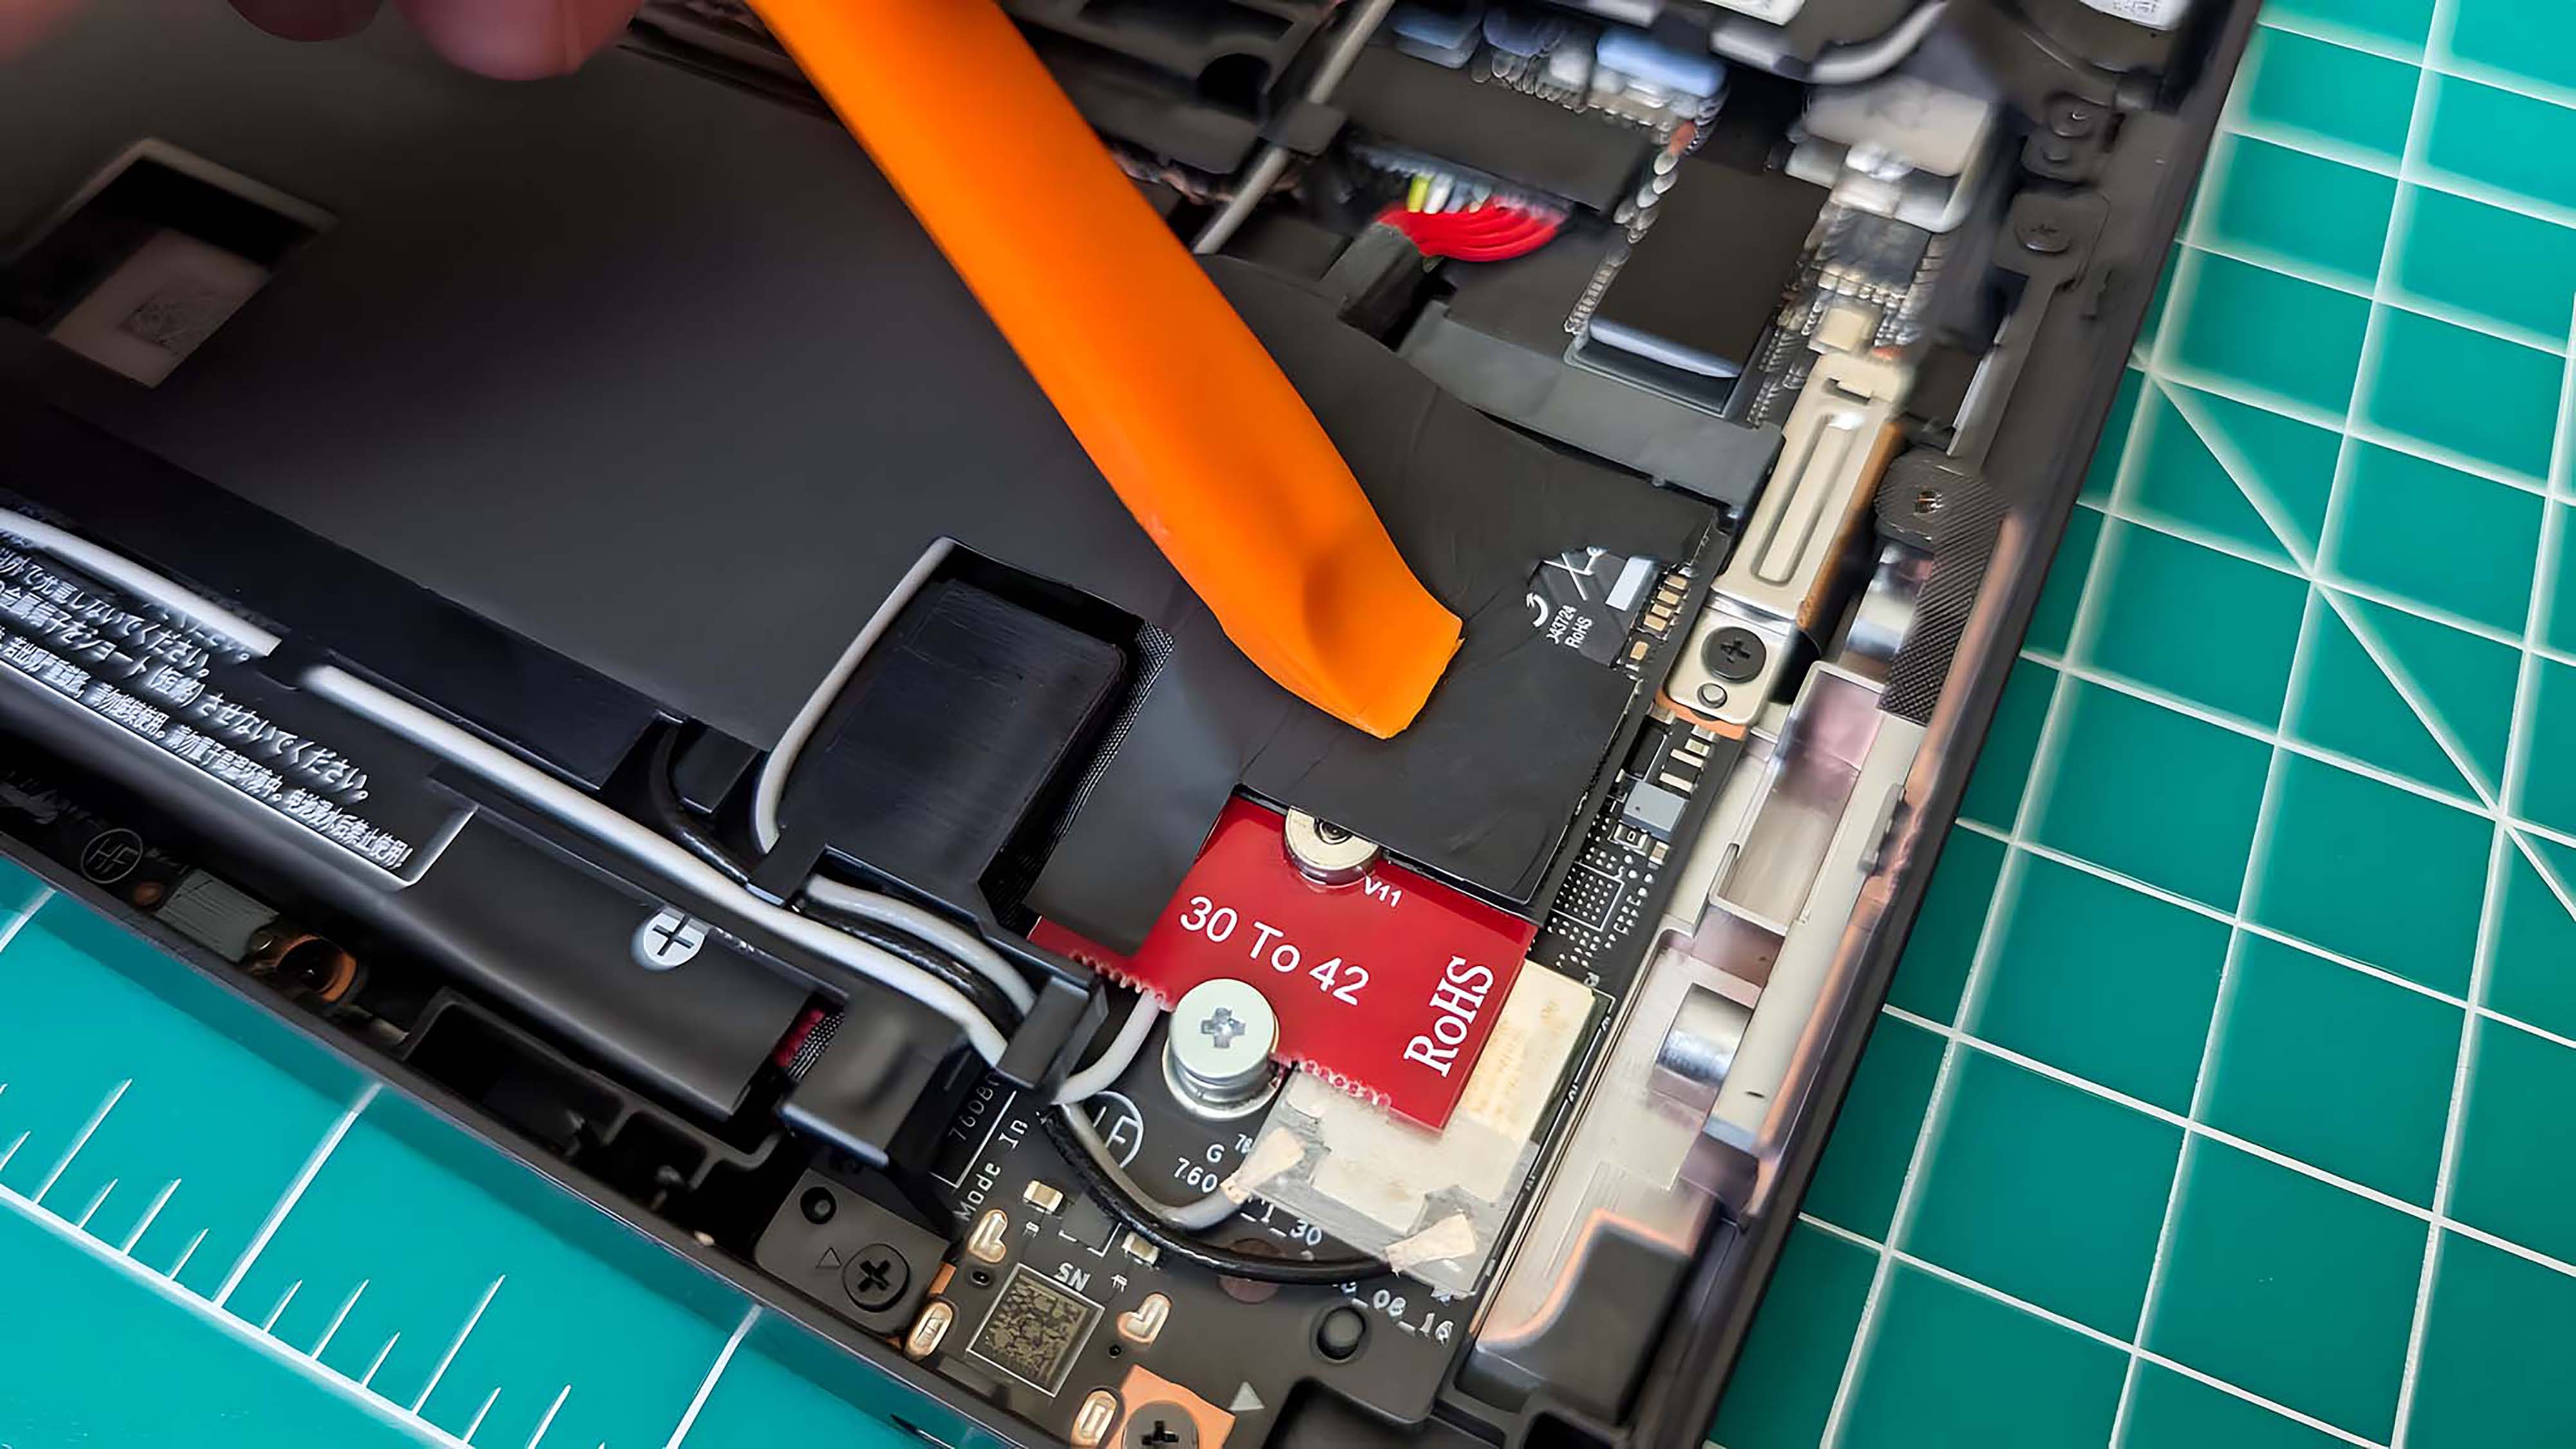
- If you’re using a 2230 M.2 SSD like the PNY, take a moment to slide the SSD into the extender adapter and then tighten the screw to secure the extender adapter to the SSD (if you haven’t done this already).
- Slide the new SSD in place and secure it with the PH1 screw.
- Plug the battery cable back in.
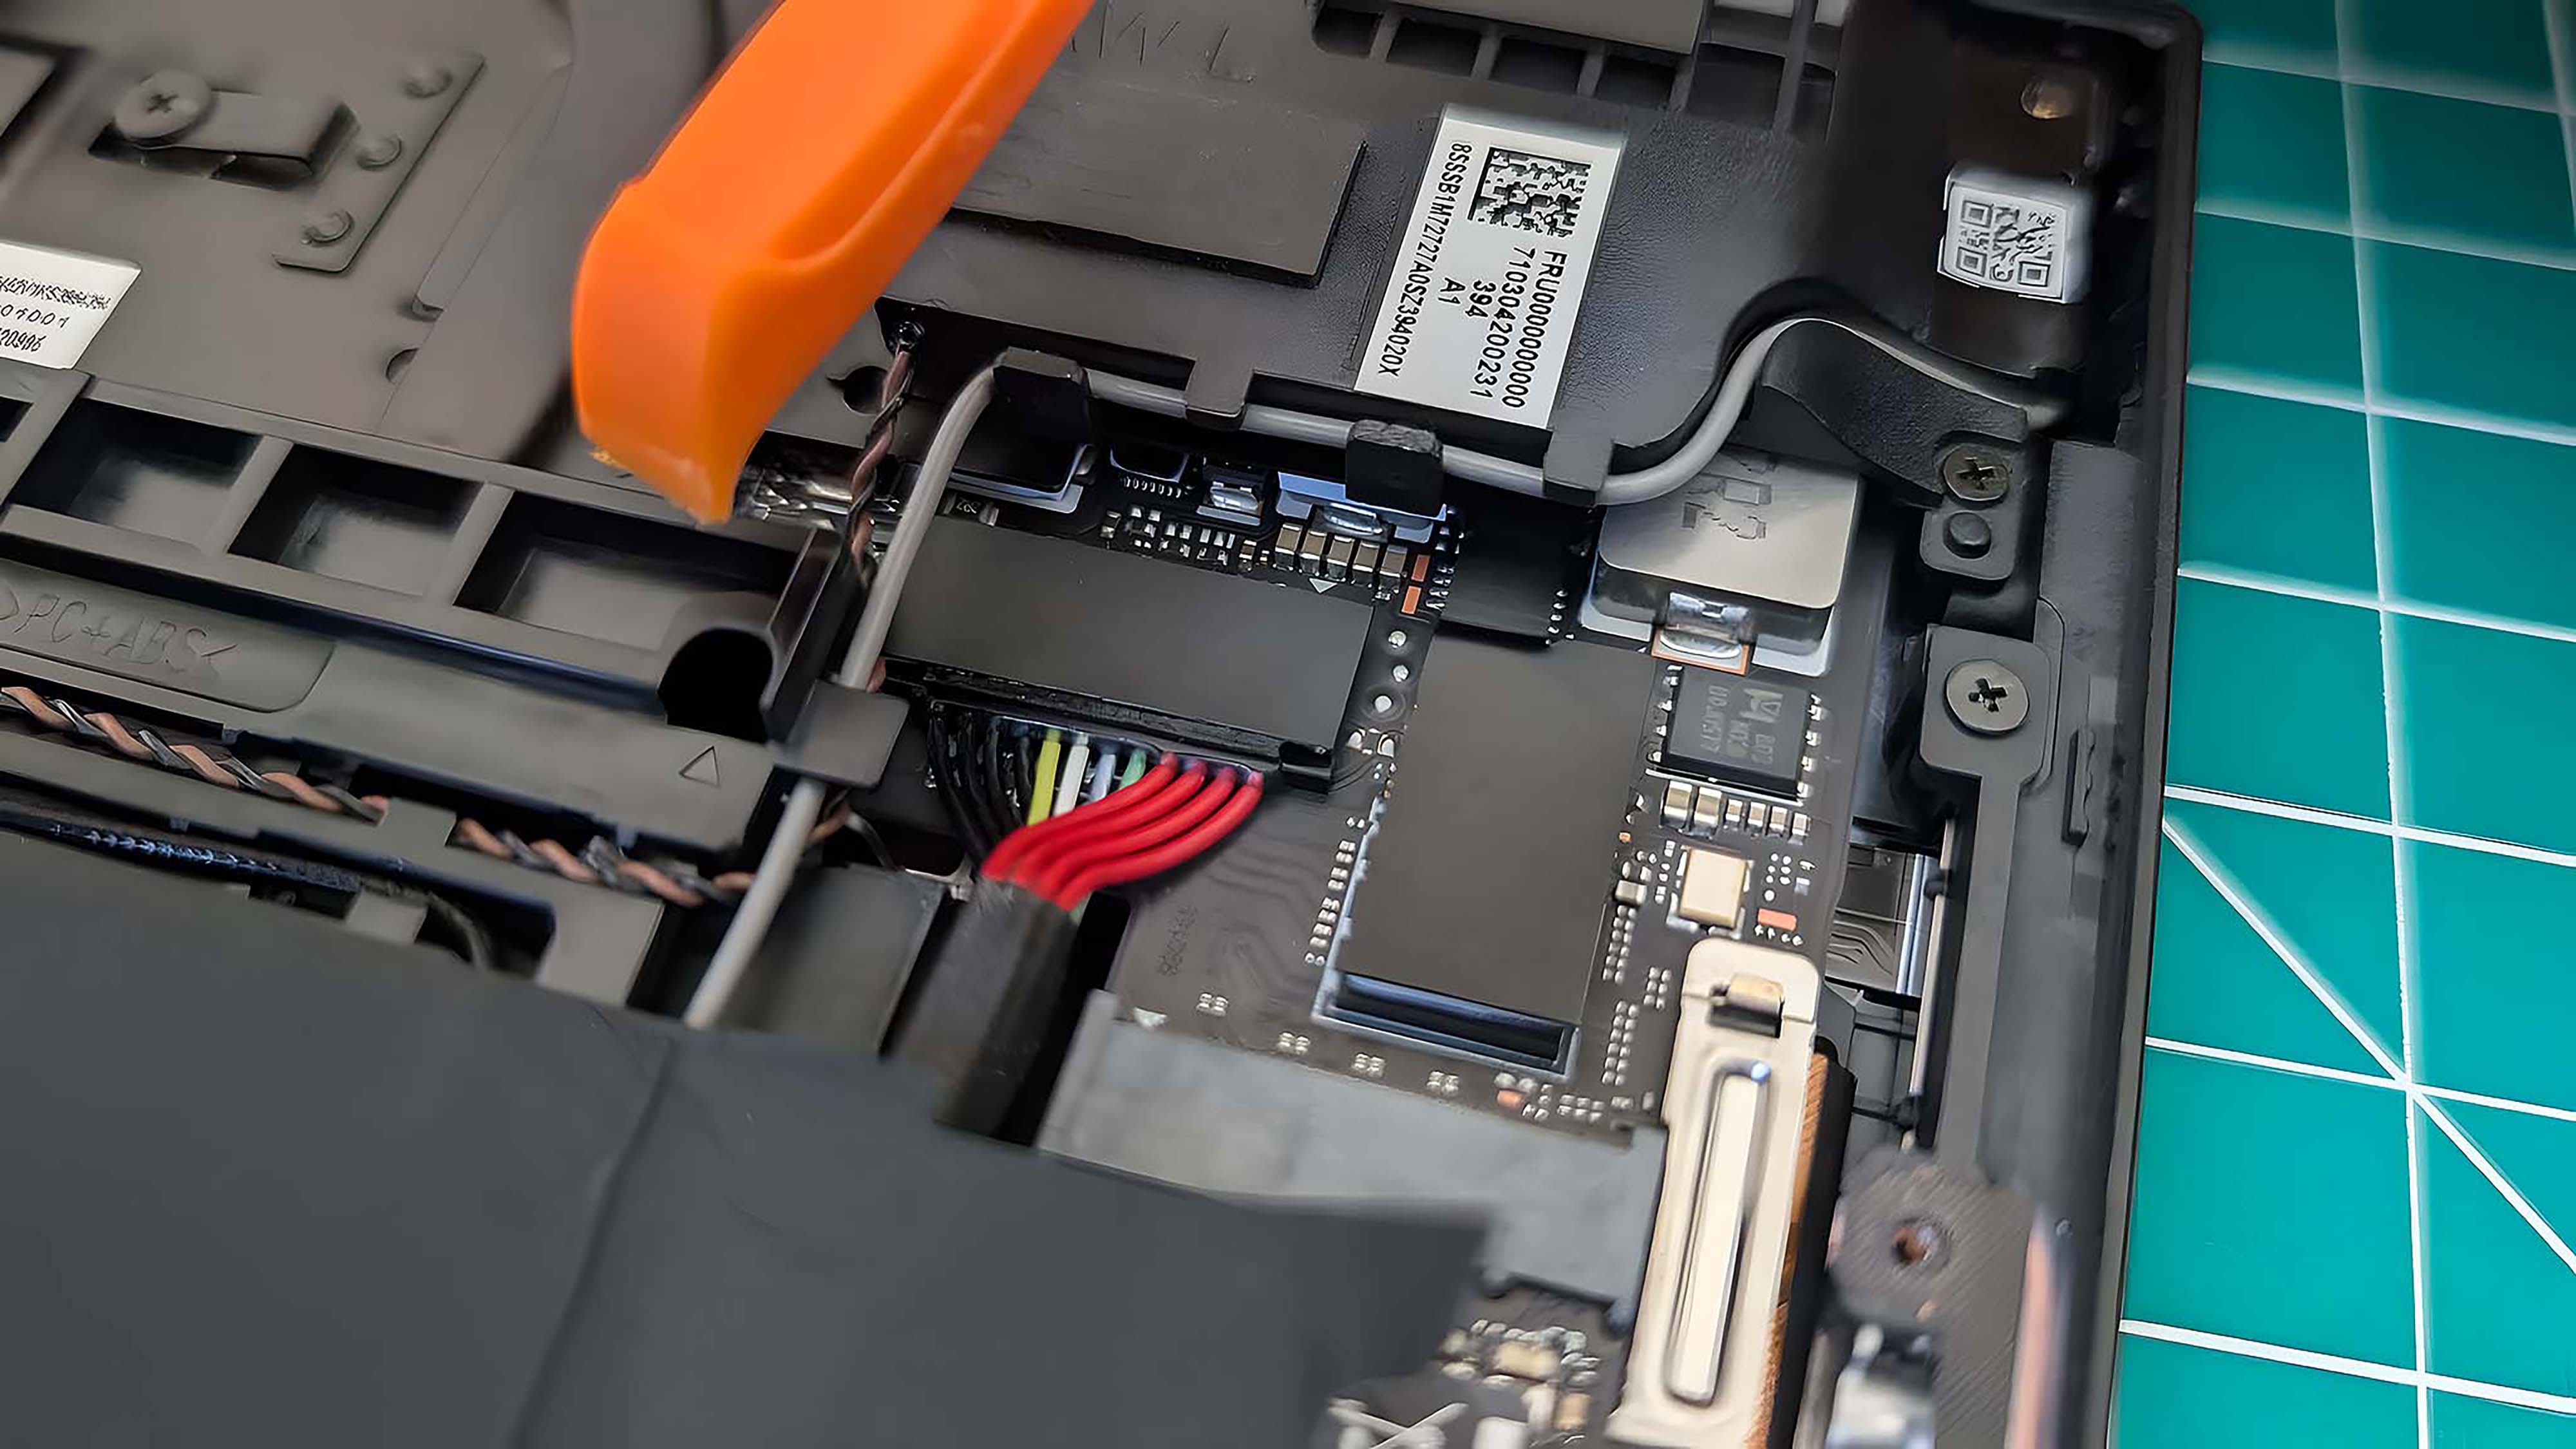
- Put the black sticker back in place over the battery cable and SSD.
- Gently press the Legion Go’s back cover back into place and pinch the plastic back together.

- Screw the six PH0 back screws back into the casing.
- When it’s all back together, press the power button.
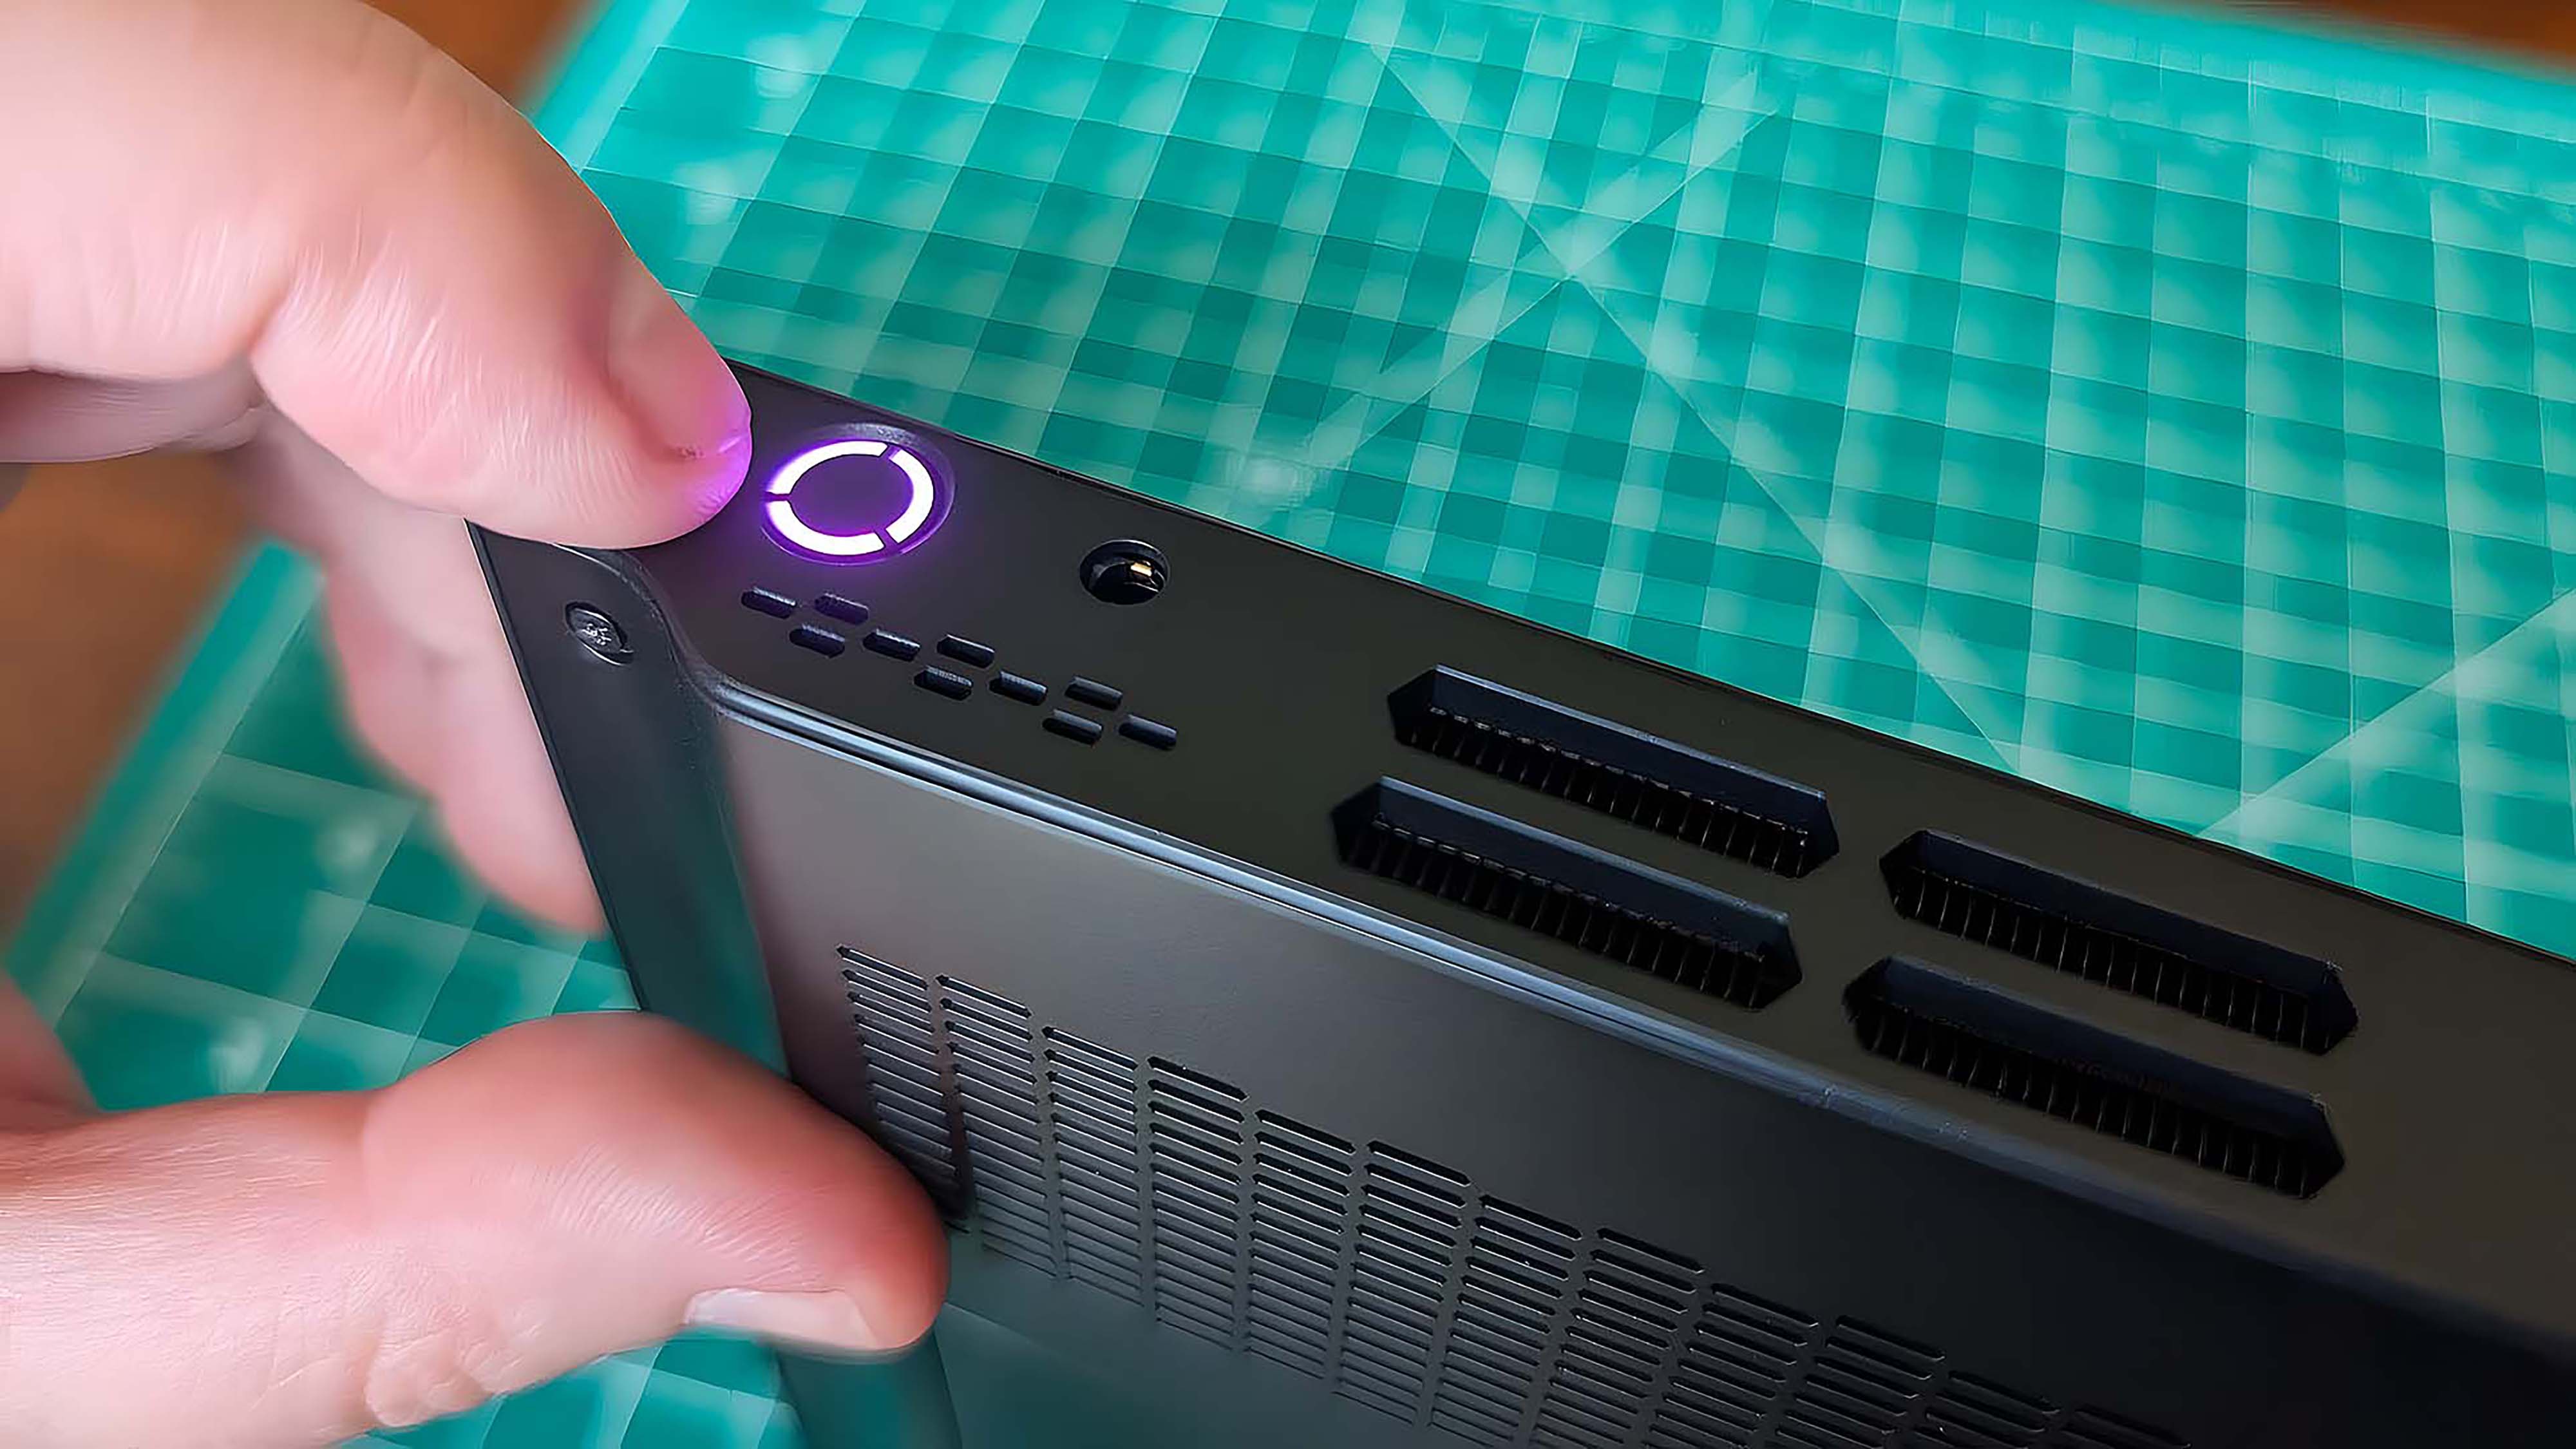
- Allow the Legion Go to boot up. Since you’ve just unplugged the battery and replaced the SSD, the Legion Go will take a few minutes longer to boot up than usual.
After finishing all the necessary steps, you’ve successfully installed your new SSD with your previous data on it. Now, you can use your Legion Go as you normally would.
Legion Go SSD FAQ
What are the transfer speeds of the original Legion Go SSD?
Based on my personal tests, the initial Legion Go SSD achieved a reading speed of approximately 5 GB per second and a writing speed of about 1.62 GB per second. While these speeds are respectable, faster M.2 NVMe SSDs for the Legion Go are available on the market.
Is a faster SSD better for gaming?
Absolutely! A speedier SSD (Solid State Drive) means your system will be able to retrieve and save data much more swiftly. Essentially, a drive with quicker reading and writing capabilities results in reduced load times as well as shorter periods for saving files.
What is an image backup?
An image backup works similarly to snapping a photo, where it creates a duplicate or copy of all the data on your system at the exact moment the backup process begins.
What is a partition?
A partition refers to a segment within a solid-state drive (SSD). By creating partitions, the device can more efficiently manage and retrieve data. Additionally, it simplifies the process of handling each segment distinctly.
Read More
- Marvel Officially Confirms Deadpool’s Most Brutal Redesign
- Nintendo Switch 2 Reportedly Getting Remake of One of the Best PS3 and Xbox 360 Games
- Welcome to Demon School! Iruma-kun season 4 release schedule: When are new episodes on Crunchyroll?
- Crunchyroll Confirms New Isekai Anime Releases for 2026 and Beyond (With Major Returns)
- Michael Jackson Biopic’s Record-Breaking Debut Unseats 2026’s Biggest Box Office Hit On U.S. Chart
- Taylor Sheridan’s Gritty 5-Part Crime Show Reveals New Final Season Villain
- 10 Movies That Were Banned in Different Countries For Random Reasons
- The Fairly OddParents’ Creator Reveals Who Timmy Ended Up With
- Invincible Creators Offer Promising Update on Season 5 Release Date
- The Boys Season 5, Episode 5 Ending Explained: Why Homelander Does THAT
2025-07-04 23:40