
The next Call of Duty game, Black Ops 7, is scheduled to release on November 14, 2025, for all gaming systems. The PC version will also include updated anti-cheat measures.
Activision’s RICOCHET anti-cheat system now requires both TPM 2.0 and Secure Boot to be enabled on your computer. If these features aren’t turned on, you’ll probably get a message saying you can’t play the game when it starts.
Most Windows 11 computers come with the necessary security features already turned on, but it’s a good idea to double-check before Call of Duty: Black Ops 7 launches. Here’s how to enable TPM 2.0 and Secure Boot on Windows 10 or 11 to make sure your system is ready.
How to check if TPM 2.0 and Secure Boot are already enabled in Windows 10 and Windows 11
To install Windows 11, your computer needs Secure Boot, but it might not be turned on automatically. Windows 10 doesn’t have this requirement at all.
Here’s a quick way to check if your PC already has Secure Boot enabled.
- Type msinfo into your Windows search bar and hit Enter. No search bar visible? Right-click the Start button and click Search before typing.
- Verify in the System Summary section that Secure Boot State reads On.
- Verify in the same System Summary section that BIOS Mode reads UEFI.
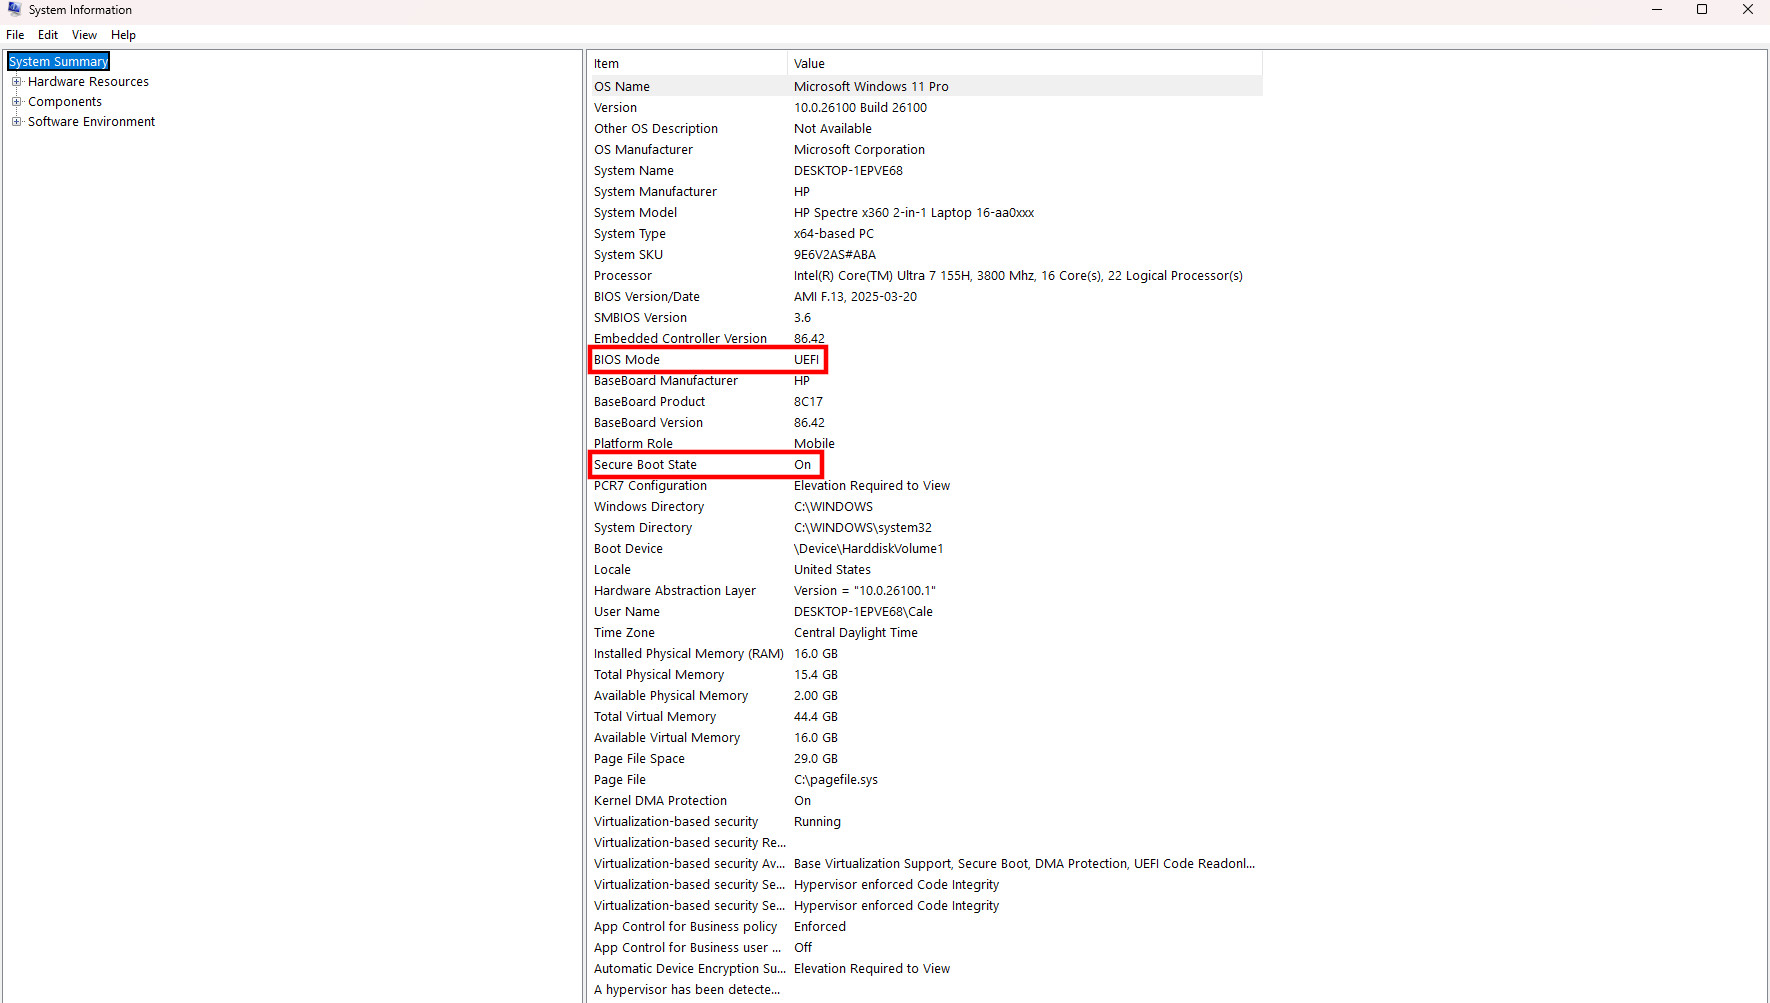
If your computer is using UEFI and Secure Boot is enabled, it meets the requirements for Black Ops 7 and its RICOCHET anti-cheat system.
If your computer indicates that Secure Boot is disabled and it’s using Legacy BIOS, please see the instructions for switching to UEFI mode.
If your computer is using UEFI but Secure Boot is turned off, please see the instructions on how to enable Secure Boot in Windows 10 or 11.
If your system displays “Unsupported” next to the Secure Boot State, I suggest checking your motherboard manufacturer’s website for BIOS updates or possible solutions.
How to change your PC BIOS mode to UEFI
To use the latest BIOS features on your computer, you need to have a TPM 2.0 chip turned on. First, let’s check if it’s currently enabled.
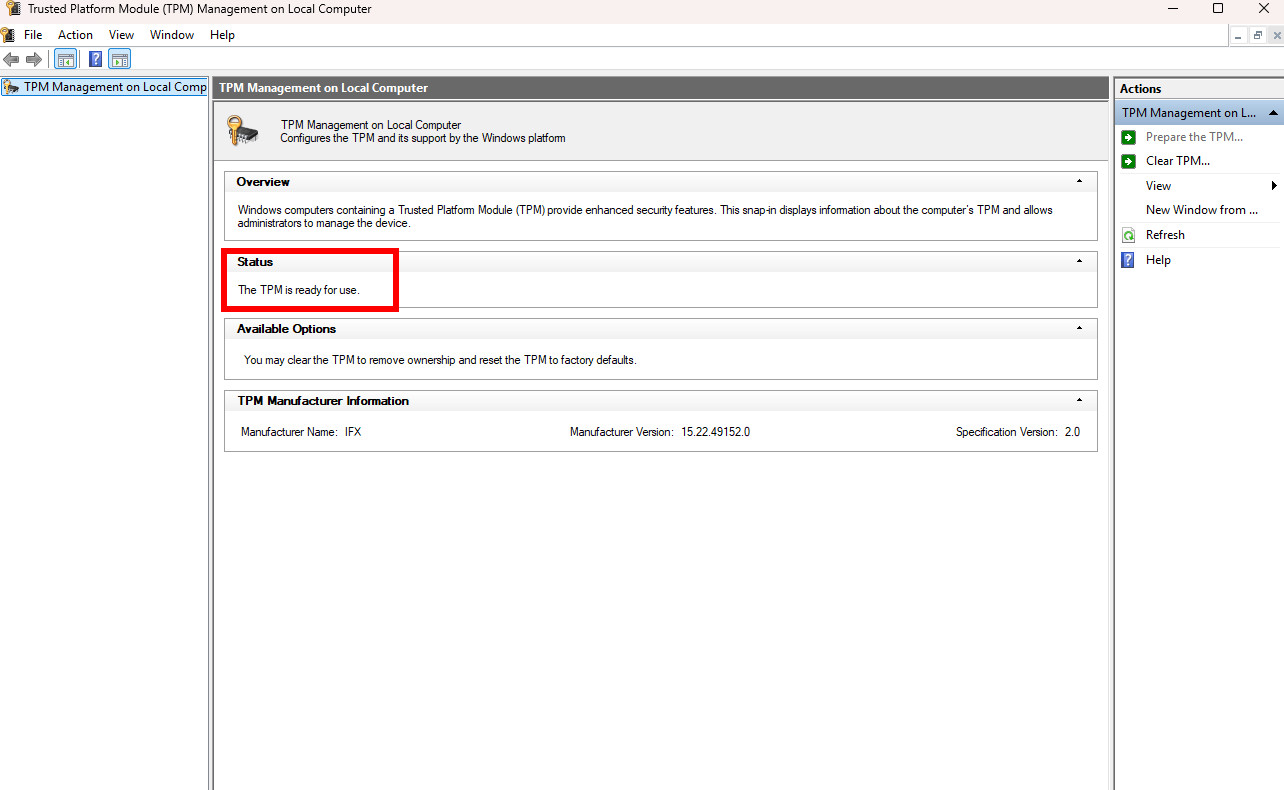
- Tap the Windows key + R shortcut to show the Run window.
- Type tpm.msc and hit Enter.
- Verify that the Status section in the middle window pane reads The TPM is ready for use.
If you’re getting a message that your computer’s TPM isn’t ready, the best first step is to check your motherboard manufacturer’s website for instructions on how to turn it on.
I’ve noticed that upgrading to Windows 11 requires a TPM 2.0 chip, so it seems like people who are still using Windows 10 might run into problems when they try to upgrade.
Now that you’ve confirmed your TPM 2.0 chip is working, the next thing to do is determine whether your Windows drive uses MBR or GPT. Here’s how to find out.
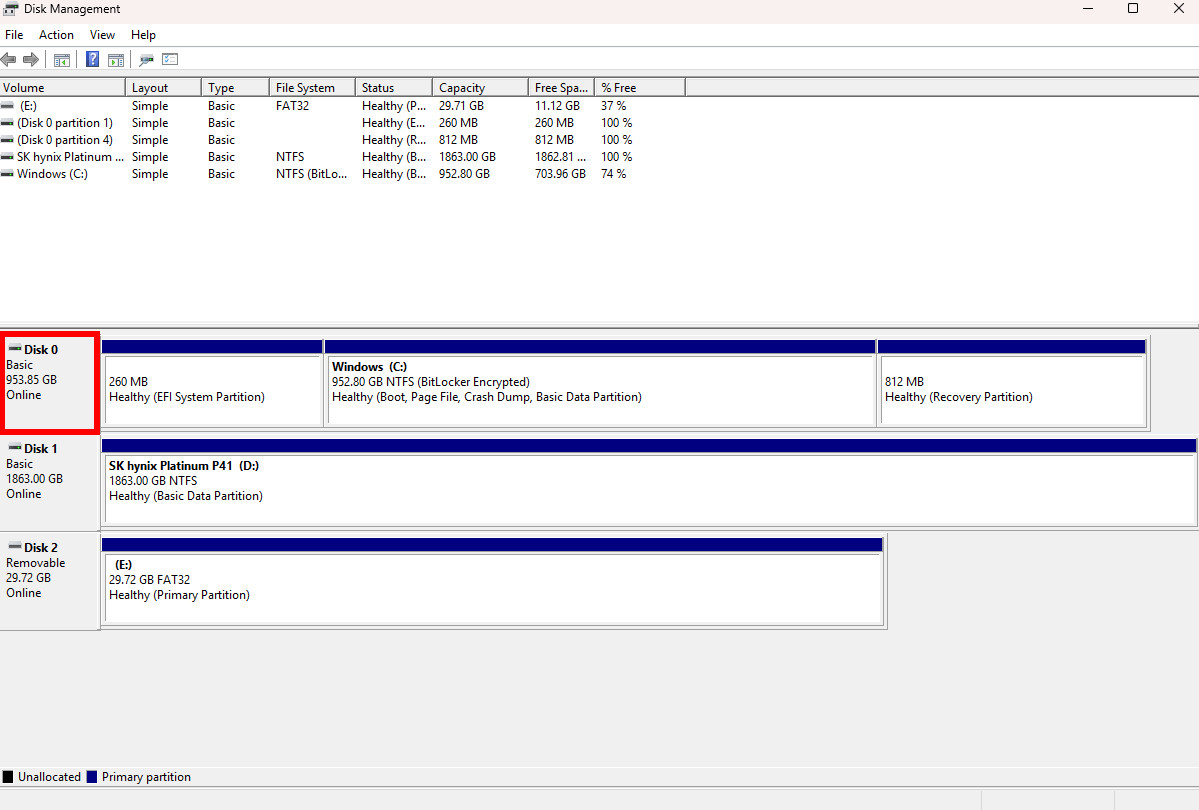
- Right-click the Start button and click Disk Management.
- Right-click the drive that includes the Windows (C:) partition in the bottom section of the Disk Management window. In my case, this reads Disk 0.
- Click Properties.
- Click the Volumes tab in the window that appears.
- Verify that the Partition style reads GPT.
If your Partition style is GPT, your PC should be ready to enable Secure Boot.
As a researcher, I’ve been looking into switching from MBR to GPT partition styles. If you’re currently using MBR, the process requires a few extra steps. Fortunately, my colleague Mauro Huculak has created a great guide on converting to GPT for UEFI in Windows 10 and 11, and I’ve also outlined the steps below for your convenience.
Only act on the following steps if your drive is currently using the MBR partition method.
- Tap the Windows key + R shortcut, type cmd, and hit Ctrl + Shift + Enter to launch the Command Prompt in admin mode.
- Type mbr2gpt /validate /disk:0 /allowFullOS. Note that your PC might have a different disk:0 value — this is seen in the Disk Management section I laid out above. Use whatever number is assigned to your Windows boot drive.
- Hit Enter to complete the command.
Okay, so the Command Prompt is checking my drive right now. It’s just making sure everything looks good before it switches it over from the old MBR style to the newer GPT, which will let me use all the space and is generally better, thankfully!
It’s really important to back up your drive before you continue, as the next step could potentially cause problems.
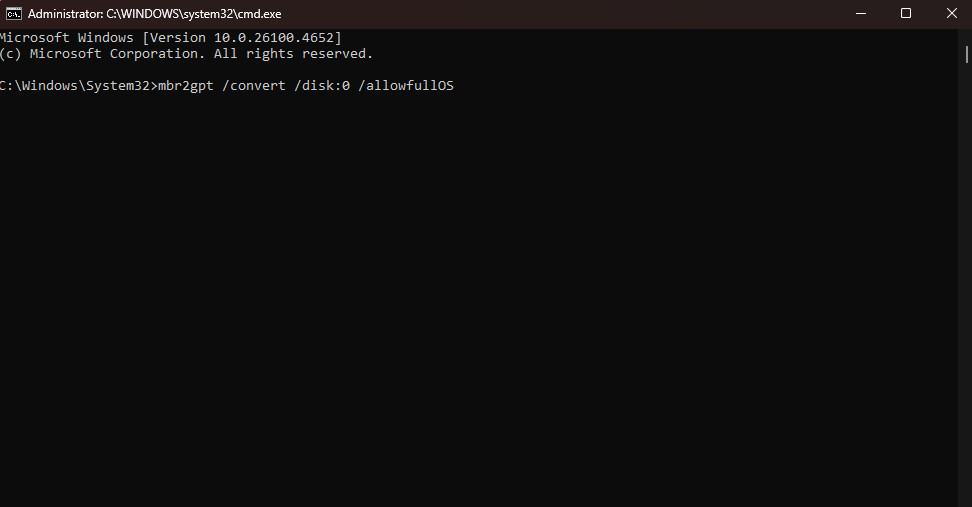
If you want to switch your hard drive from MBR to GPT, here’s how to do it using the Command Prompt you already have open.
- Type mbr2gpt /convert /disk:0 /allowfullOS. Again, use whatever disk number your PC lists in Disk Management.
- Hit Enter to run the command.
After the conversion is finished, your drive will be updated to GPT. You should see a “Completed Successfully” message to confirm.
If the conversion doesn’t work, the Command Prompt window will probably show you what steps to take to finish it.
You might need to switch to UEFI mode before you can finish the conversion. Here’s how to do it.
- Restart your PC and enter the BIOS by hitting the appropriate key on your keyboard (usually F11, F12, or Delete).
- Navigate to the Advanced mode in your motherboard’s BIOS.
- Navigate to the Boot menu in the BIOS.
- Find the Compatibility Support Module (CSM) section in the BIOS and disable it.
If your computer’s BIOS doesn’t have the necessary instructions, try updating it and then checking once more.
Disabling CSM will kick your PC into UEFI mode, and you should now be ready to enable Secure Boot.
How to enable Secure Boot in Windows 10 and Windows 11
Now that you’ve taken care of everything else mentioned earlier, you should be able to turn on Secure Boot on your computer.
The process is the same for Windows 10 and Windows 11; here’s how to do it.
- Restart your PC and enter the BIOS by hitting the appropriate key on your keyboard (usually F11, F12, or Delete).
- Navigate to the Advanced mode in your motherboard’s BIOS.
- Navigate to the Boot or Secure Boot menu in the BIOS.
- Ensure that the Secure Boot state is set to enabled. The status might also simply read Windows UEFI mode rather than mentioning anything about enabled or disabled.
- Save your BIOS changes and restart your PC.
Secure Boot is also a requirement for Battlefield 6
The highly anticipated Battlefield 6, a major rival to the upcoming Call of Duty: Black Ops 7, will be released on October 10, 2025.
Similar to Call of Duty, Battlefield 6 now needs Secure Boot and TPM 2.0 turned on in your computer to work with EA’s Javelin anti-cheat software.
Fortunately, checking if your computer can run Javelin is the same process as checking for RICOCHET. I’ve also created a separate guide to help you get Battlefield 6 ready to play when it comes out.

Stay up-to-date with the latest from Windows Central by following us on Google News! You’ll get all our news, insights, and features right in your feed.
Read More
- Everything You Need To Know About Nikki Baxter In Stranger Things’ Animated Spinoff
- ‘The Bride!’ Review: Jessie Buckley Breathes Life into a Monstrous Mess
- Welcome to Demon School! Iruma-kun season 4 release schedule: When are new episodes on Crunchyroll?
- The Boys Season 5, Episode 5 Ending Explained: Why Homelander Does THAT
- Miranda Kerr Shares “Quick” Procedure She Got Before Met Gala 2026
- 10 Movies That Were Banned in Different Countries For Random Reasons
- Tatyana Ali Says Son Was Pushed Back Inside Her During Traumatic Birth
- Blue Ivy Carter, 14, Makes Met Gala Debut as One of Youngest Guests
- See King Charles & Queen Camilla’s Royal Looks for State Dinner
- Black Clover: Every Romance Confirmed in Finale, Ranked By How Surprising They Are
2025-09-30 16:41