SteamOS already provides a fantastic, console-like experience for PC handhelds. It’s quick, easy to use, and much simpler than most traditional computer operating systems.
However, installing Windows alongside SteamOS offers a lot more freedom. With dual booting, you can play games and use programs that aren’t currently compatible with SteamOS, all while still enjoying the simple, console-like experience of SteamOS when you prefer it.
This guide provides a simple and safe method for installing both Windows and SteamOS on your handheld gaming device. It works on devices like the Steam Deck, Legion Go S, and Legion Go 2, and helps you avoid common errors that could cause data loss or a malfunctioning system.
Before you begin installing Windows 11, be careful during the setup process. You might see an option to “delete everything.” Do not choose this option, as it could erase your SteamOS installation and prevent you from being able to start either operating system.
Using a few helpful tools can simplify this process. Although some steps can be done directly on your device, having the right equipment will make things much smoother and prevent frustration.
To get Windows 11 set up, you’ll need a keyboard, mouse, and a USB drive. You’ll also need a USB hub that can handle at least three devices simultaneously, plus an Ethernet connection. Make sure you have at least 64GB of free storage space on your device – that’s just for the operating system itself, so you’ll want even more room if you plan to install games or apps.
While you can usually do everything directly on the handheld device, it’s often easier to create the necessary boot files using a Windows PC. If you have one available, it can speed up the process and help avoid problems during setup.
The USB-C hub that I use (and recommend) can be found here:
1: Update SteamOS to the latest beta (3.6.9 or later)
To ensure you have the newest features and improvements, please update to the latest SteamOS beta. Here’s how:
- To update to beta, press the Steam button or open the Steam menu.
- Select the Settings option.
- Go to the System option.
- Select Beta participation.
- Change the System update channel from Stable to Beta.
- Restart and apply the update.
2: Set your SteamOS user password
If you have already set a password before, you can skip this step.
Some tasks require a user password to grant administrator access. It’s a simple process – just follow the steps below.
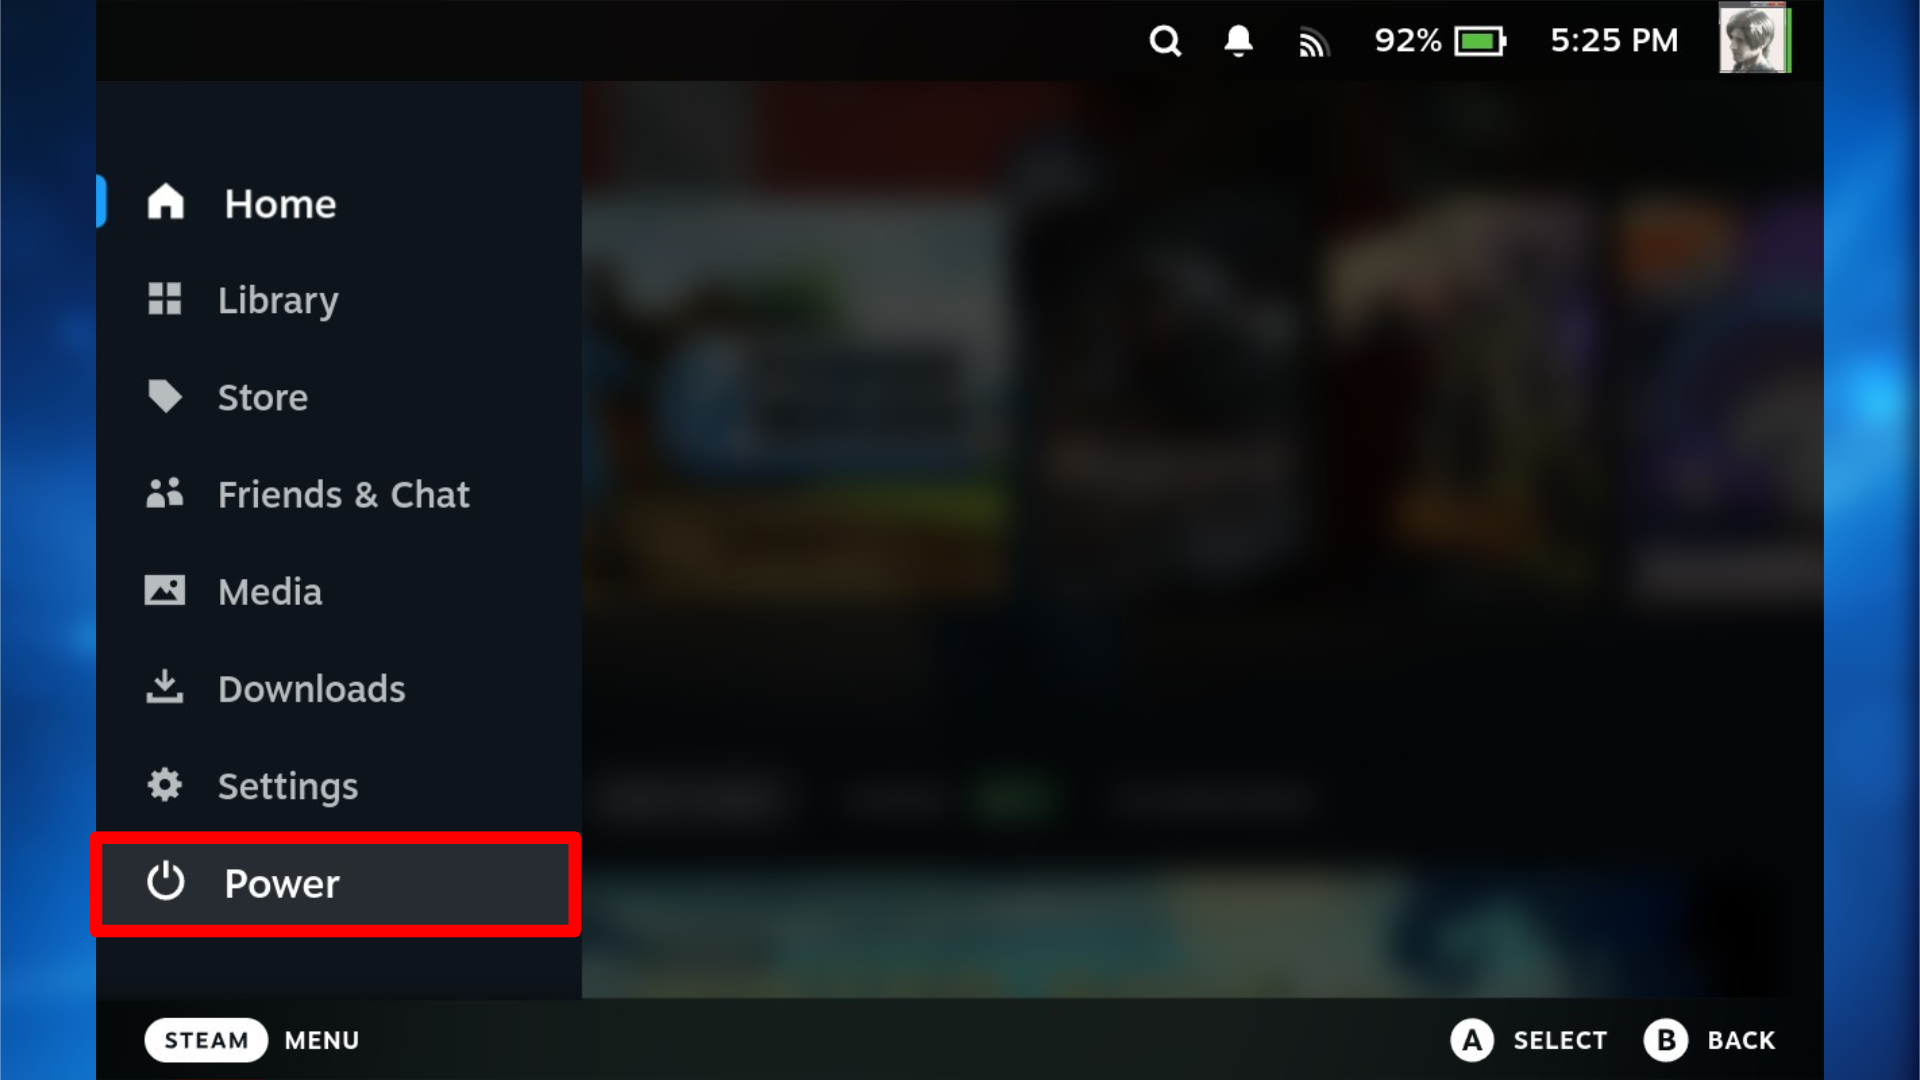
- Switch your Steam Deck to Desktop Mode.
- You can do this by pressing the Steam button, selecting Power, and choosing Switch to Desktop.
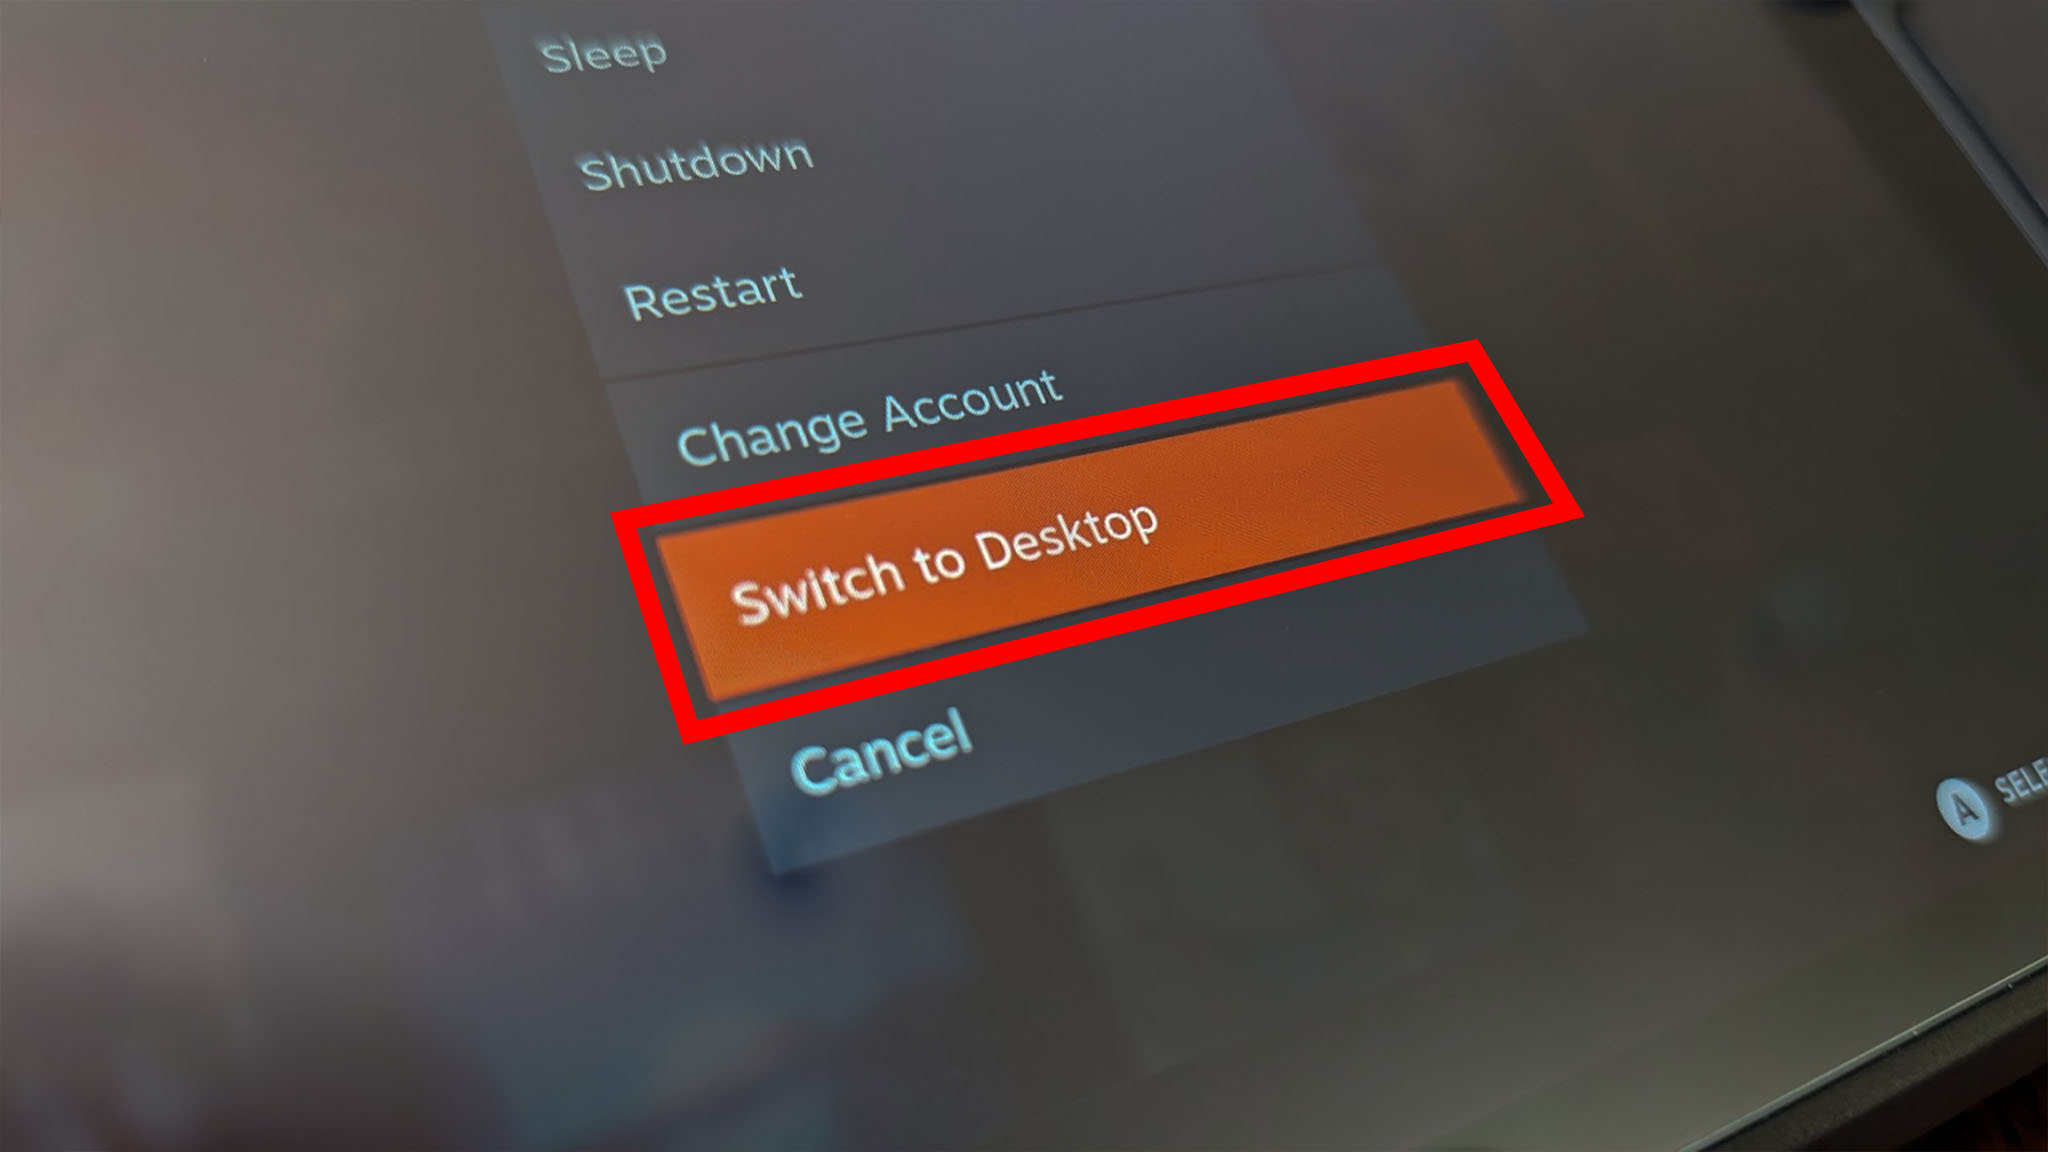
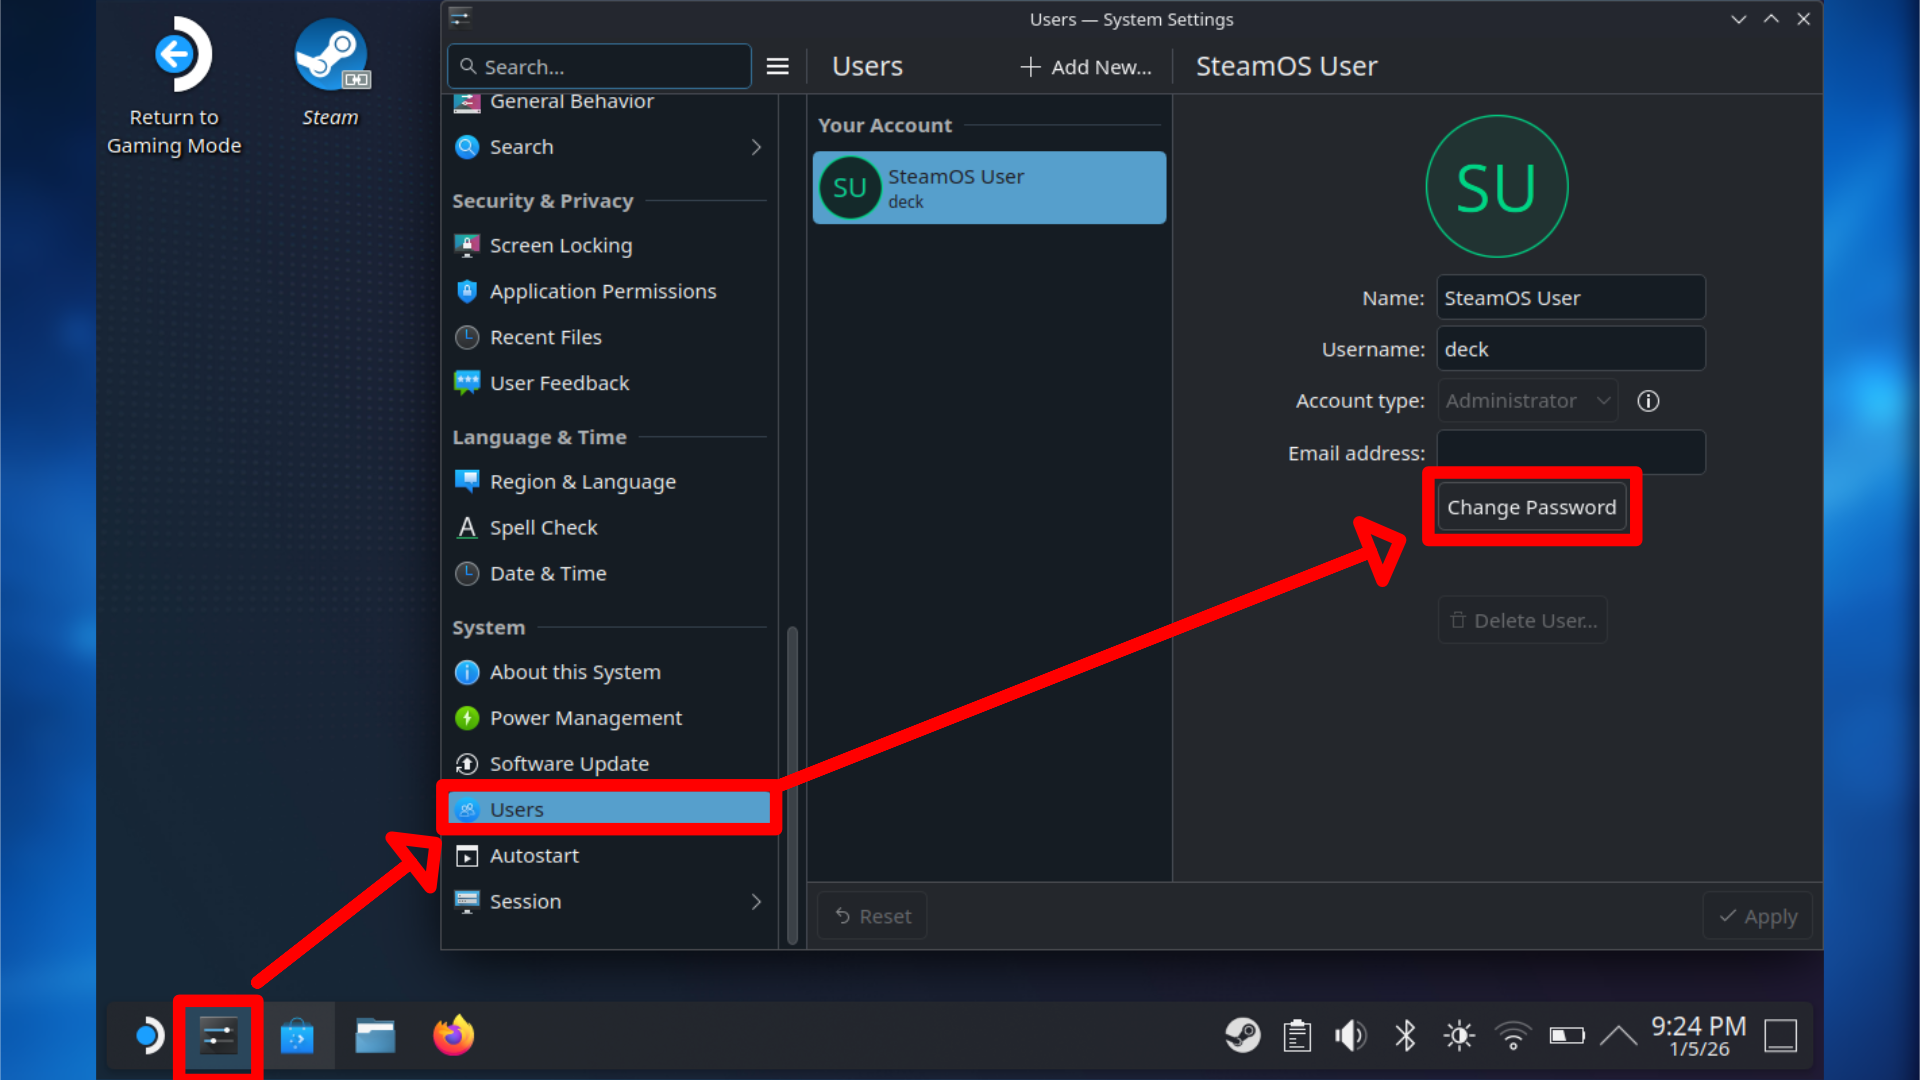
- Once on the desktop, open System Settings from the taskbar.
- Scroll down and select the Users section.
- Choose Change password.
- When prompted to enter a password, bring up the on-screen keyboard by pressing the Steam and X buttons together.
- Enter a password of your choice and confirm it.
- When asked to change additional options, leave everything else unchanged and confirm.
- Once complete, close System Settings and return to the desktop.
You might also find a keyboard useful going forward, and to keep costs down, I suggest getting an inexpensive keyboard and mouse set.
3: Create your SteamOS recovery media
This step is important because it prepares your hard drive for resizing later on. It won’t erase anything on your device and will simply help organize the storage space when SteamOS isn’t being used.
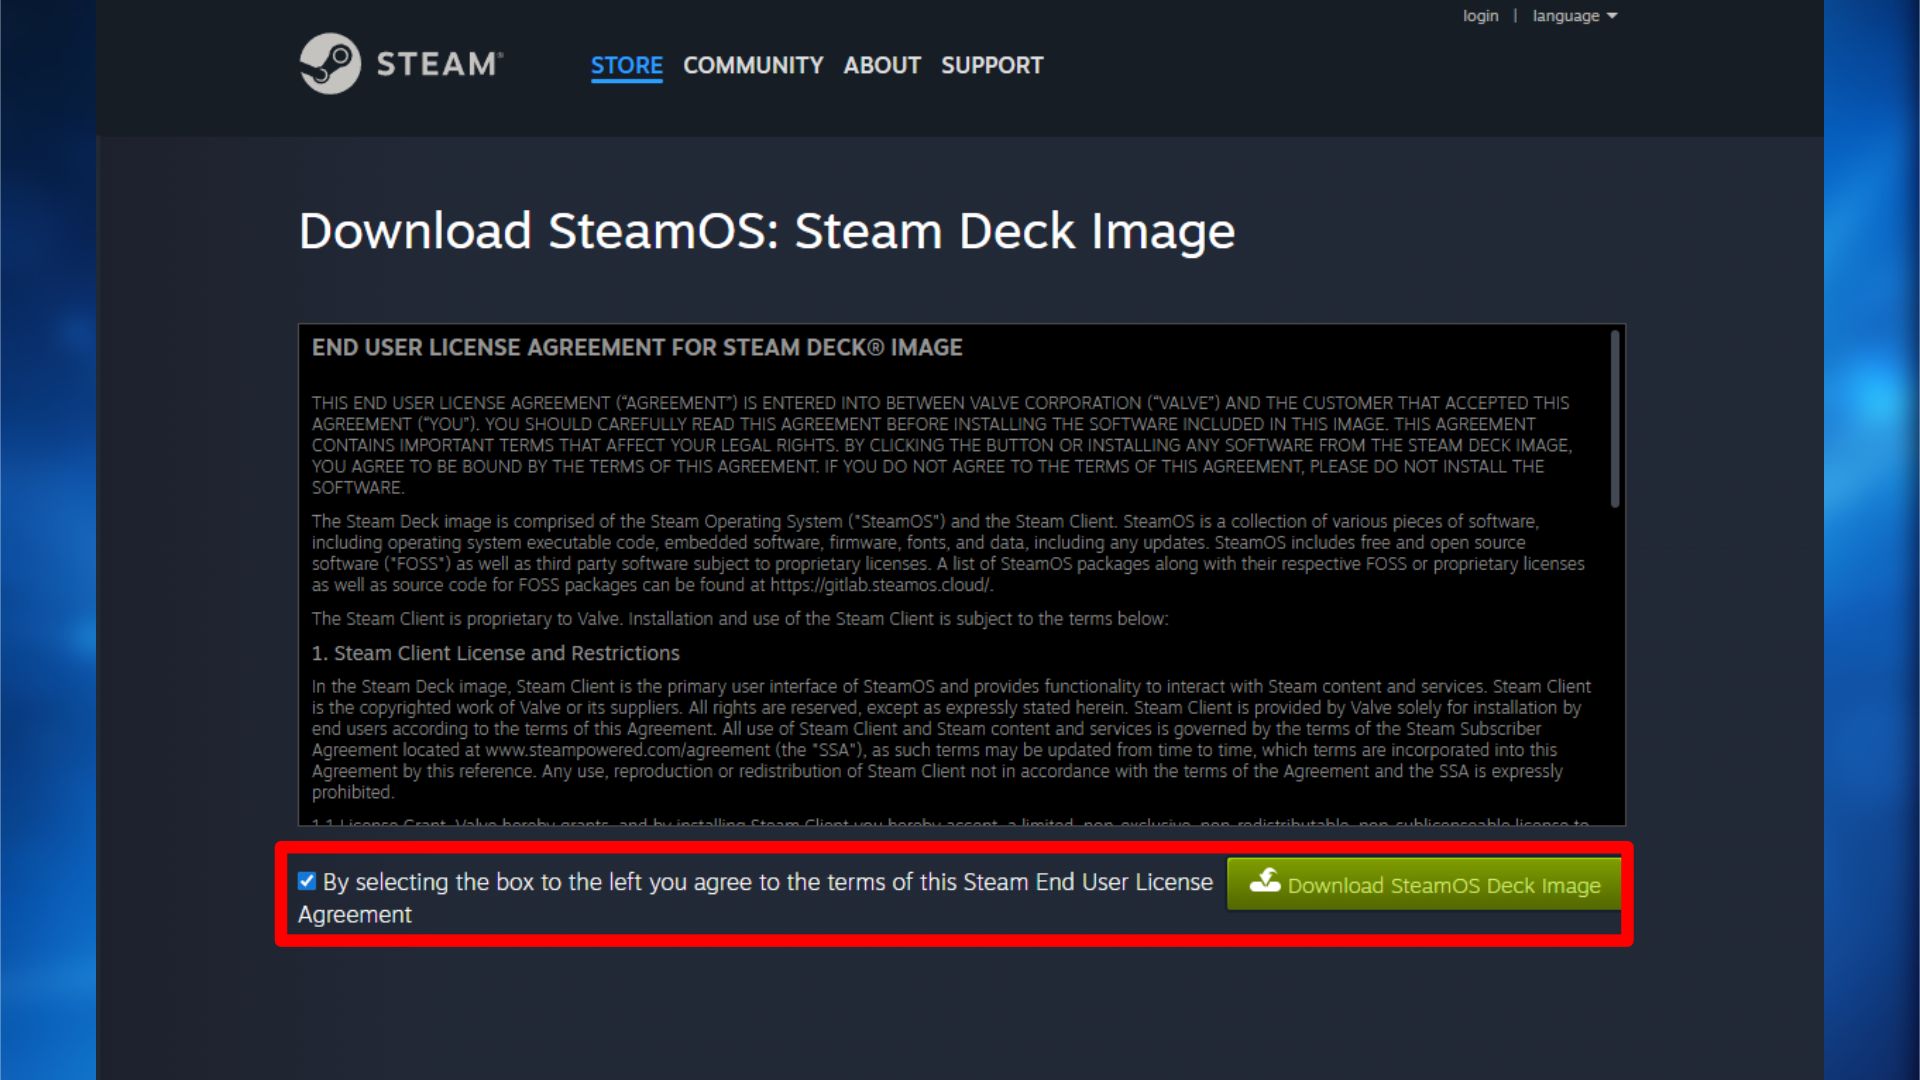
Valve offers an official SteamOS recovery image, and you can easily create a bootable drive using either SteamOS or Windows – just choose the operating system you’re most comfortable with.
You’ll need a USB flash drive or microSD card with at least 8GB of space. However, Windows suggests using a 16GB drive, so if you only have one, it’s best to get a 16GB one.
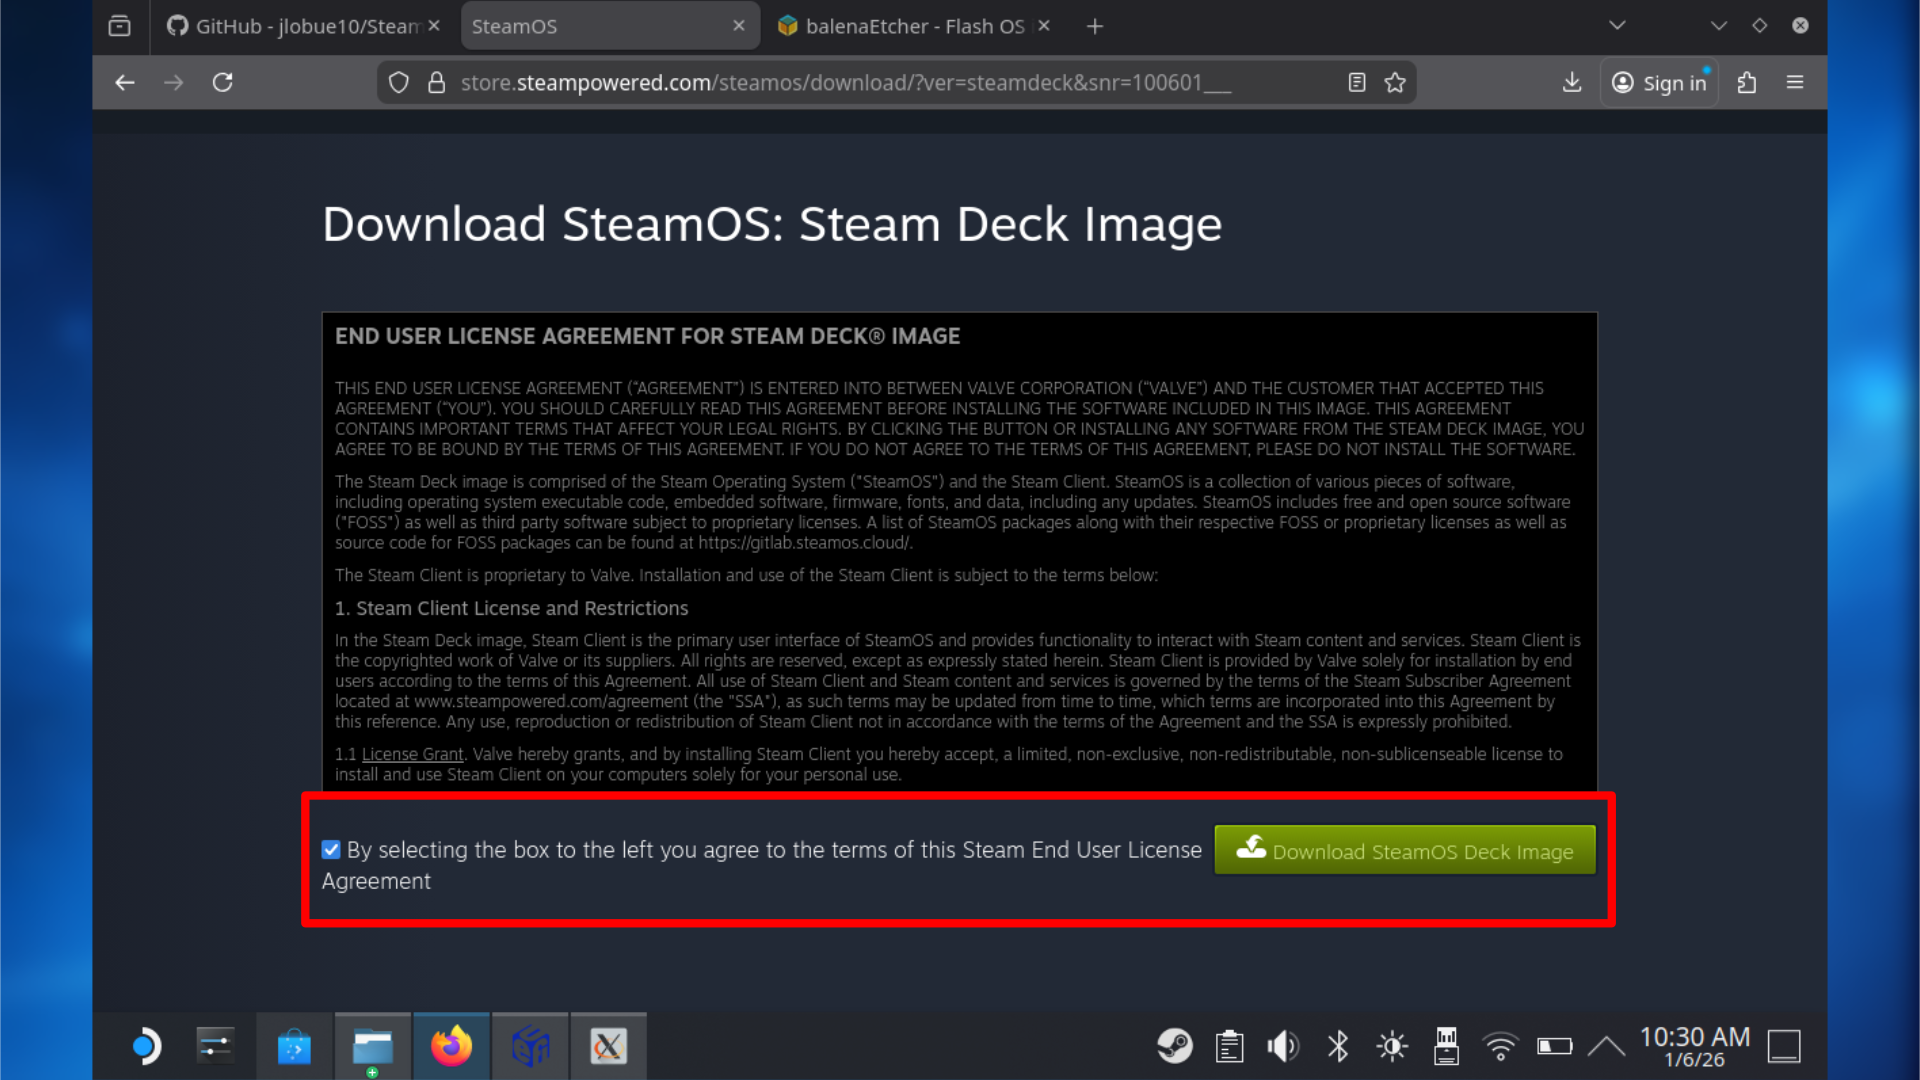
- Download the SteamOS image by clicking here.
- Insert your USB stick or microSD card.
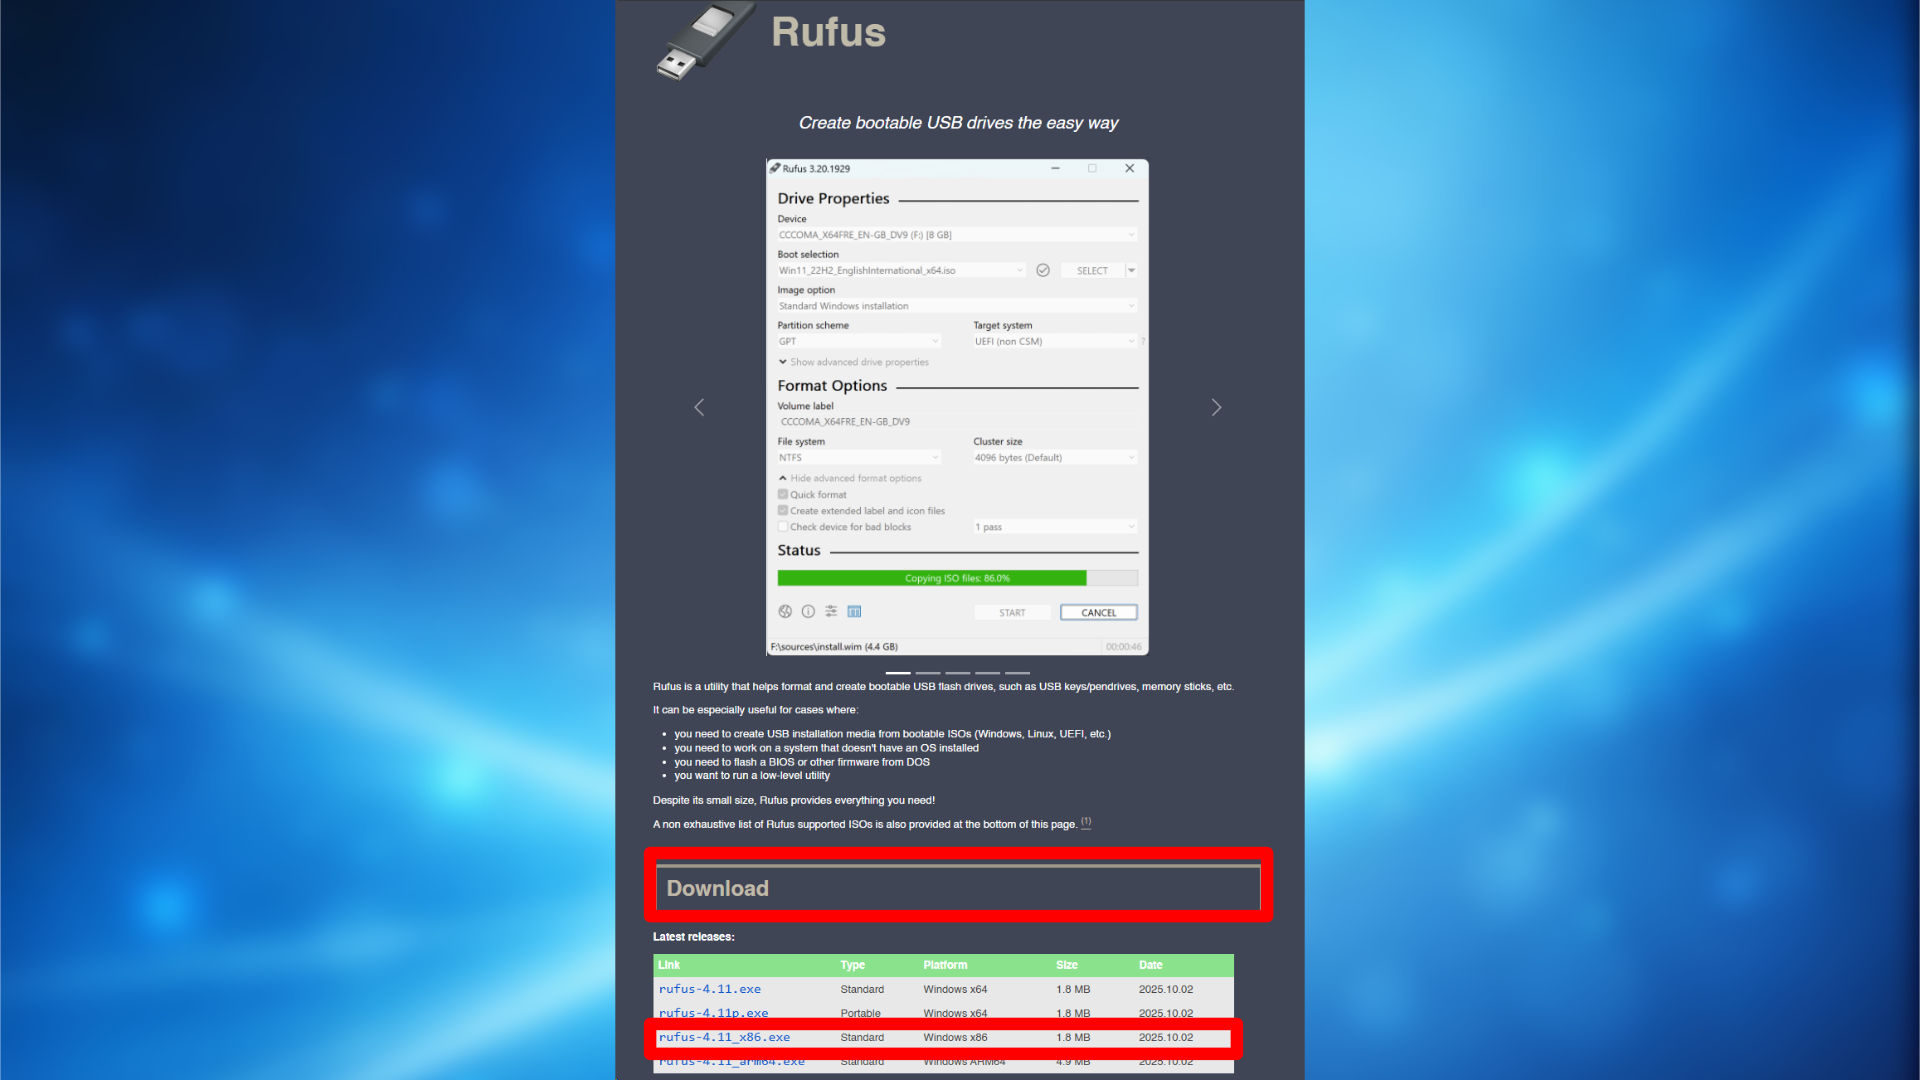
- On Windows, download and install Rufus from here.
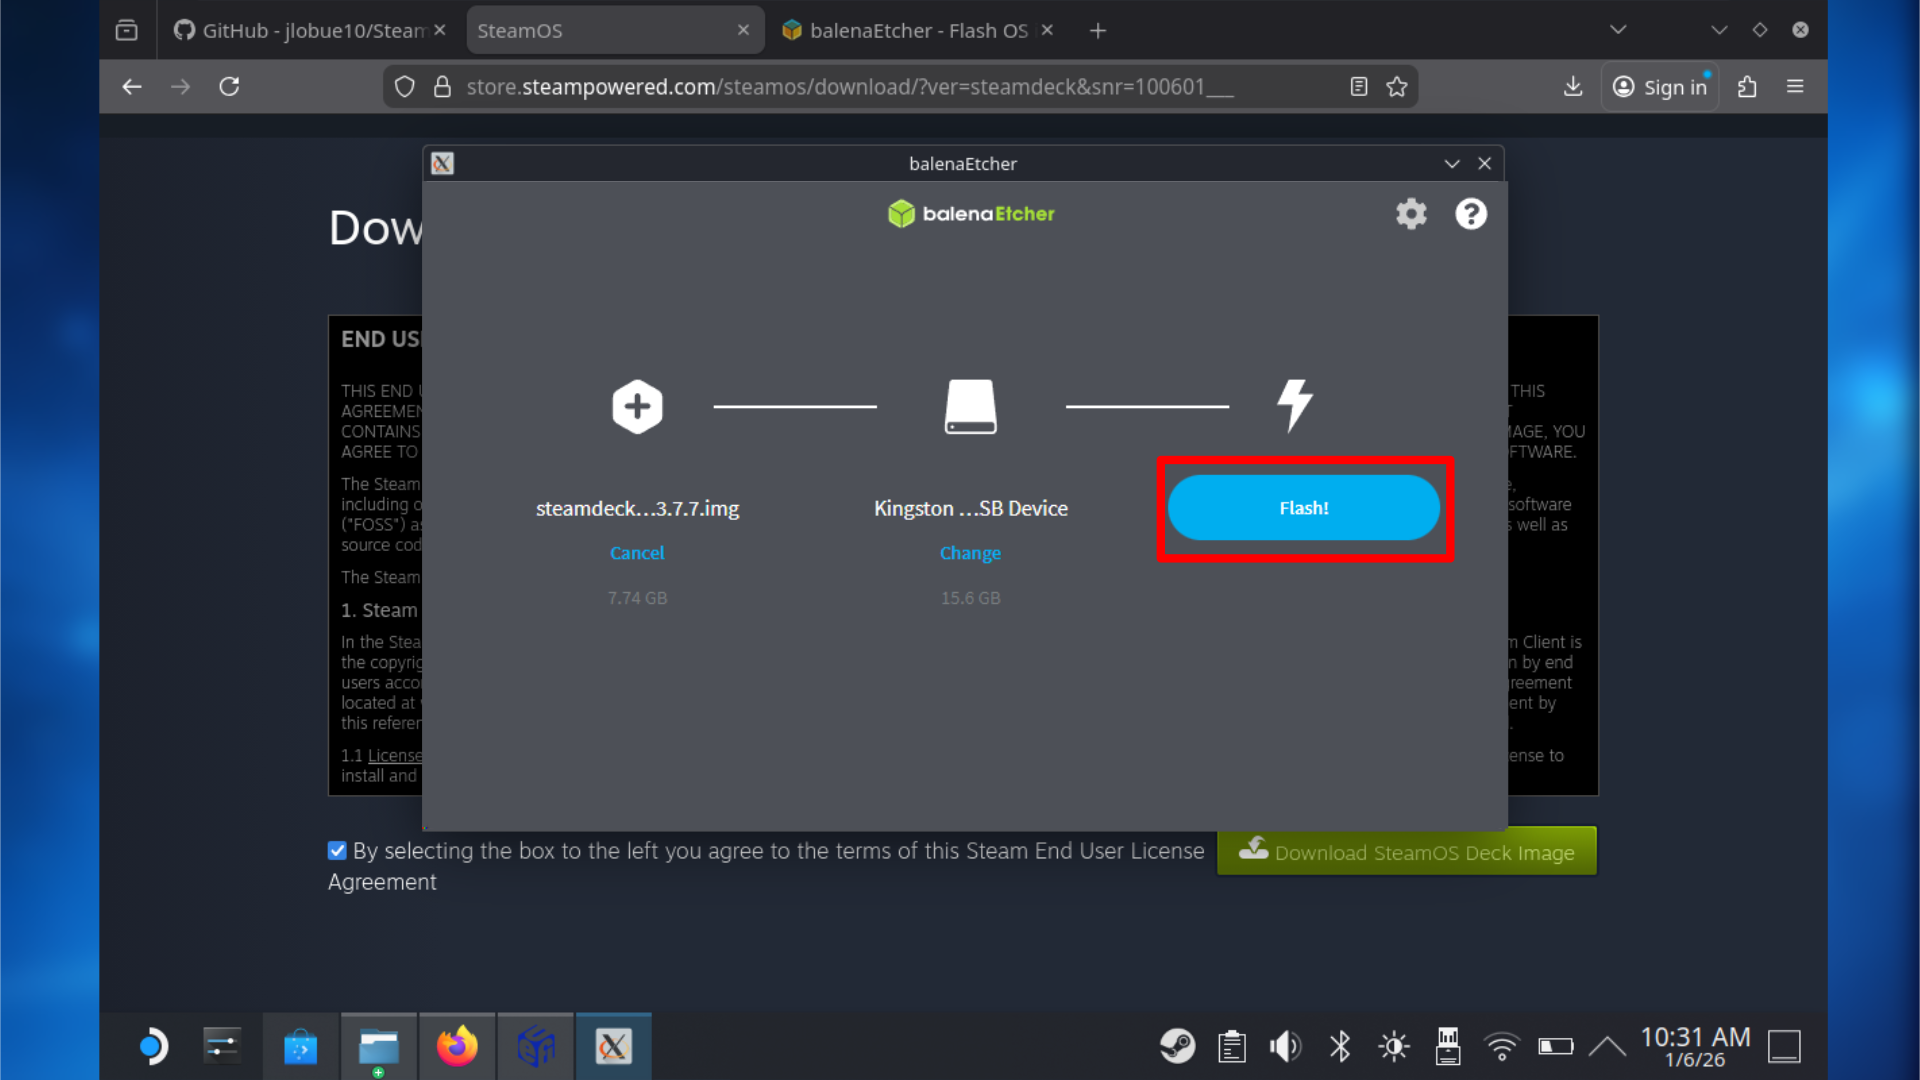
- On SteamOS or Linux, download and install Balena Etcher from here.
- If you are using Windows, follow the steps by clicking here.
- If you are on SteamOS or Linux, click here to follow the steps.
3a: Using Windows to create boot media
If you are using Windows to create your boot media, follow the steps below:
- Download the SteamOS image by clicking here.
- Insert your USB stick or microSD card.
- Download and install Rufus from here.
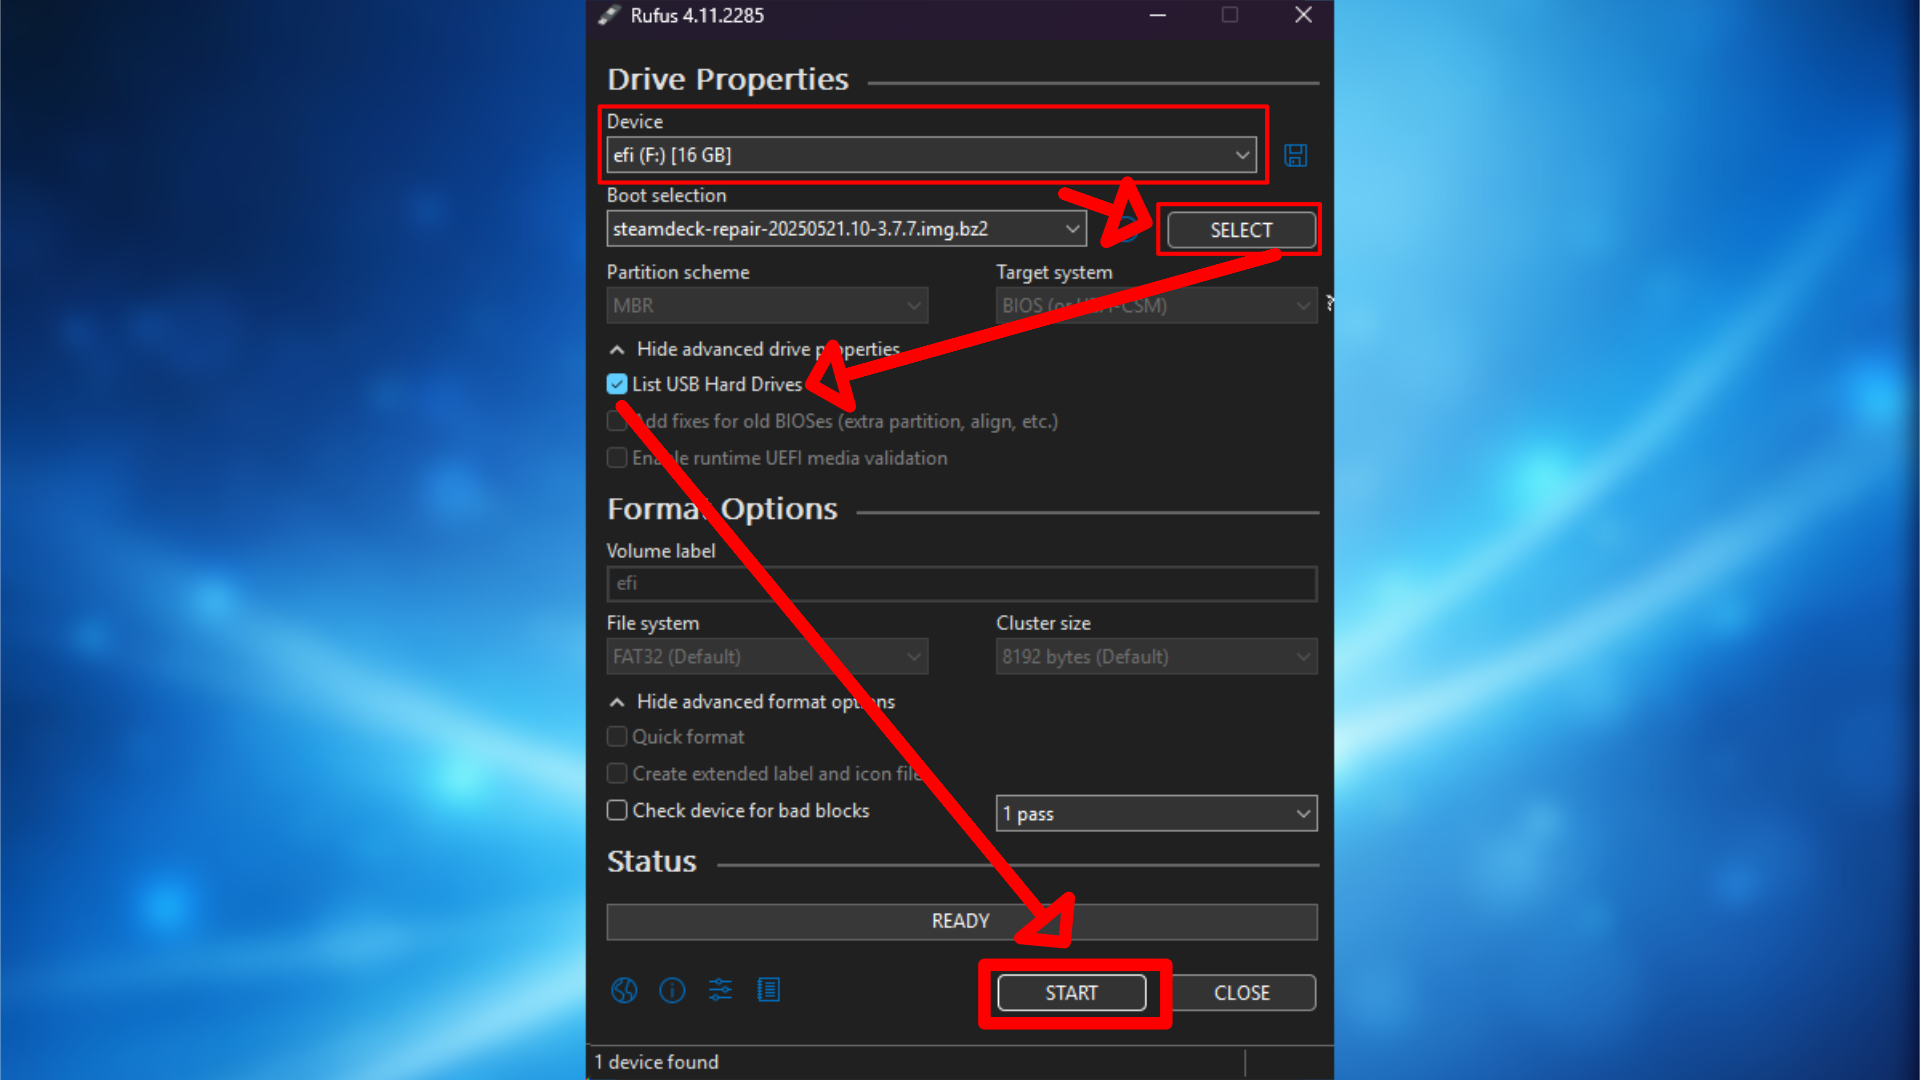
- Open Rufus.
- Ensure that your USB Drive is selected under Device.
- With Rufus open, select the Steamdeck_repair img file.
- Make sure that “List USB Hard Drives” is selected.
- Under “Partition scheme,” select MBR.
- Under the “Target system” option, select BIOS (or UEFI-CSM).
- Now press Start.
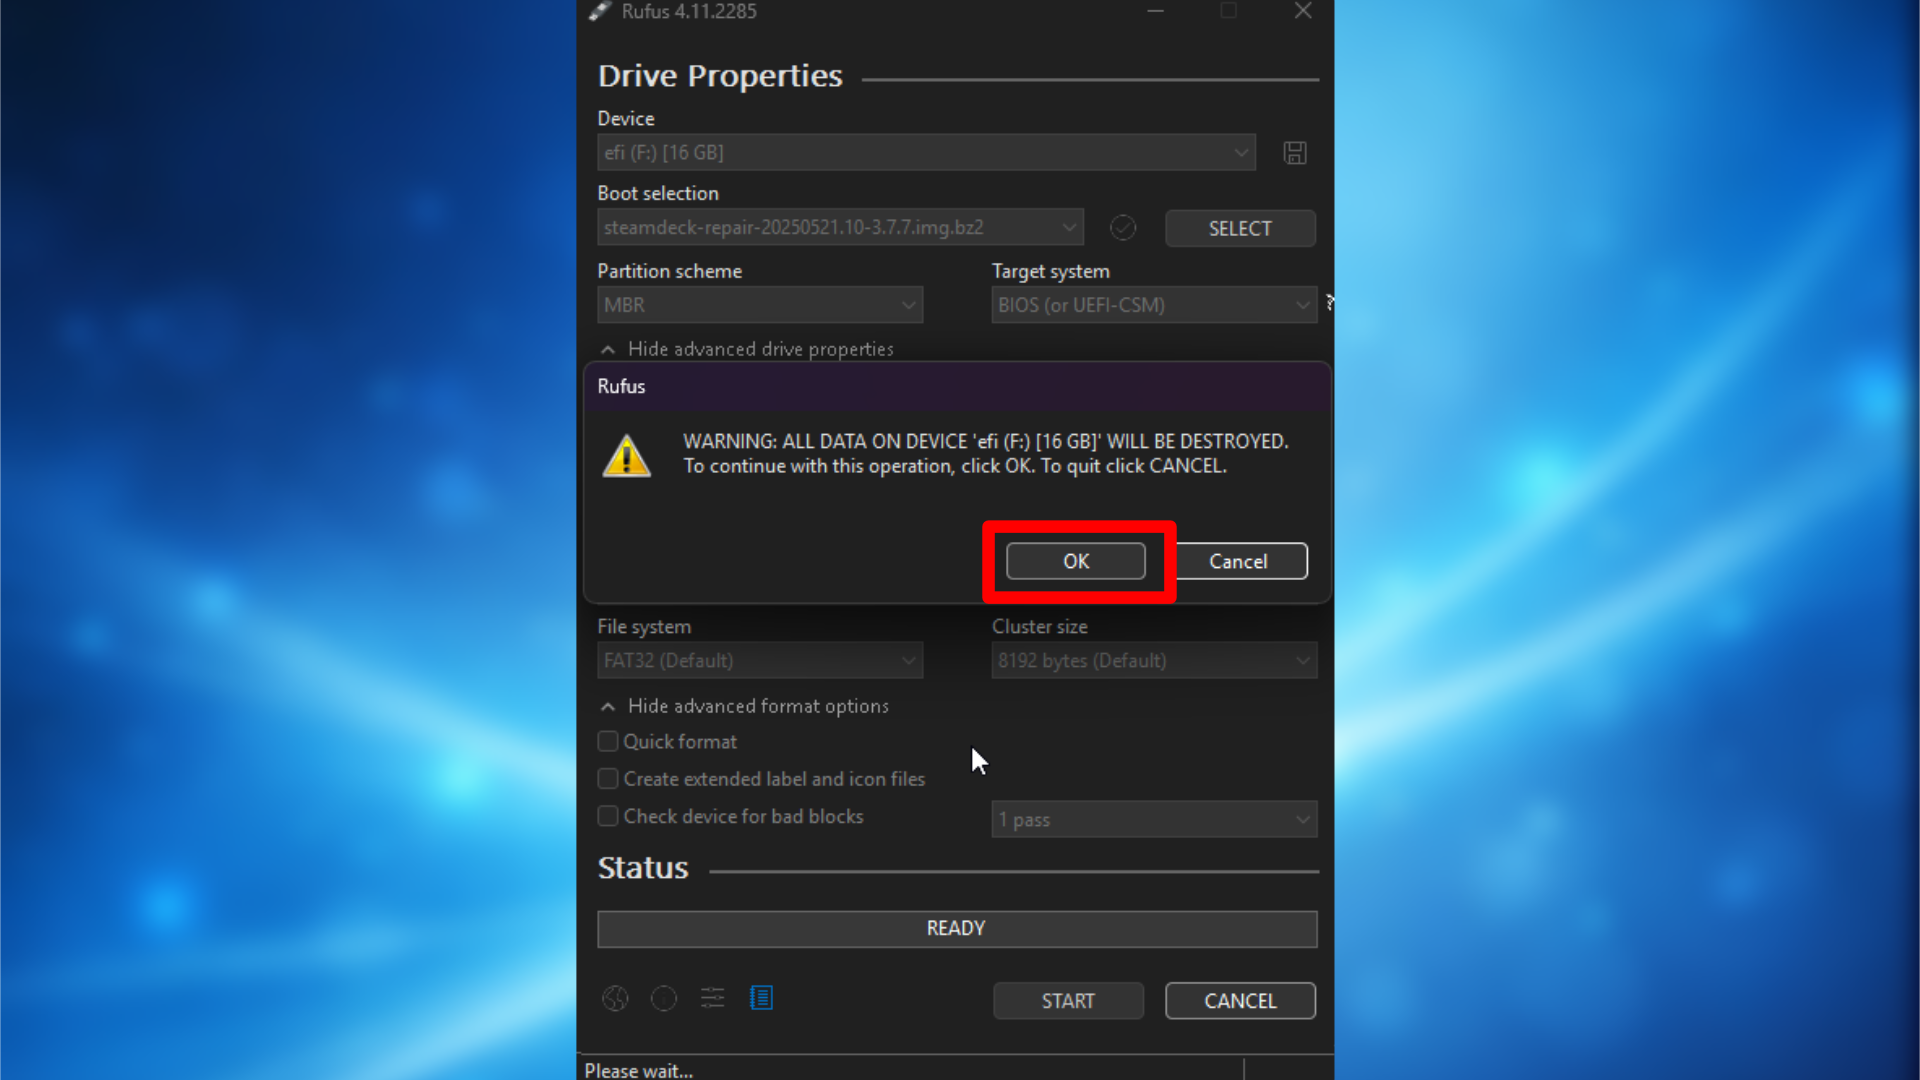
- Choose Ok when prompted that all data on the USB Drive will be lost.
3b: Using SteamOS/Linux to create boot media
If you’re using SteamOS or Linux instead of Windows, here’s how to create your recovery media:
- Download the SteamOS image by clicking here.
- Insert your USB stick or microSD card.
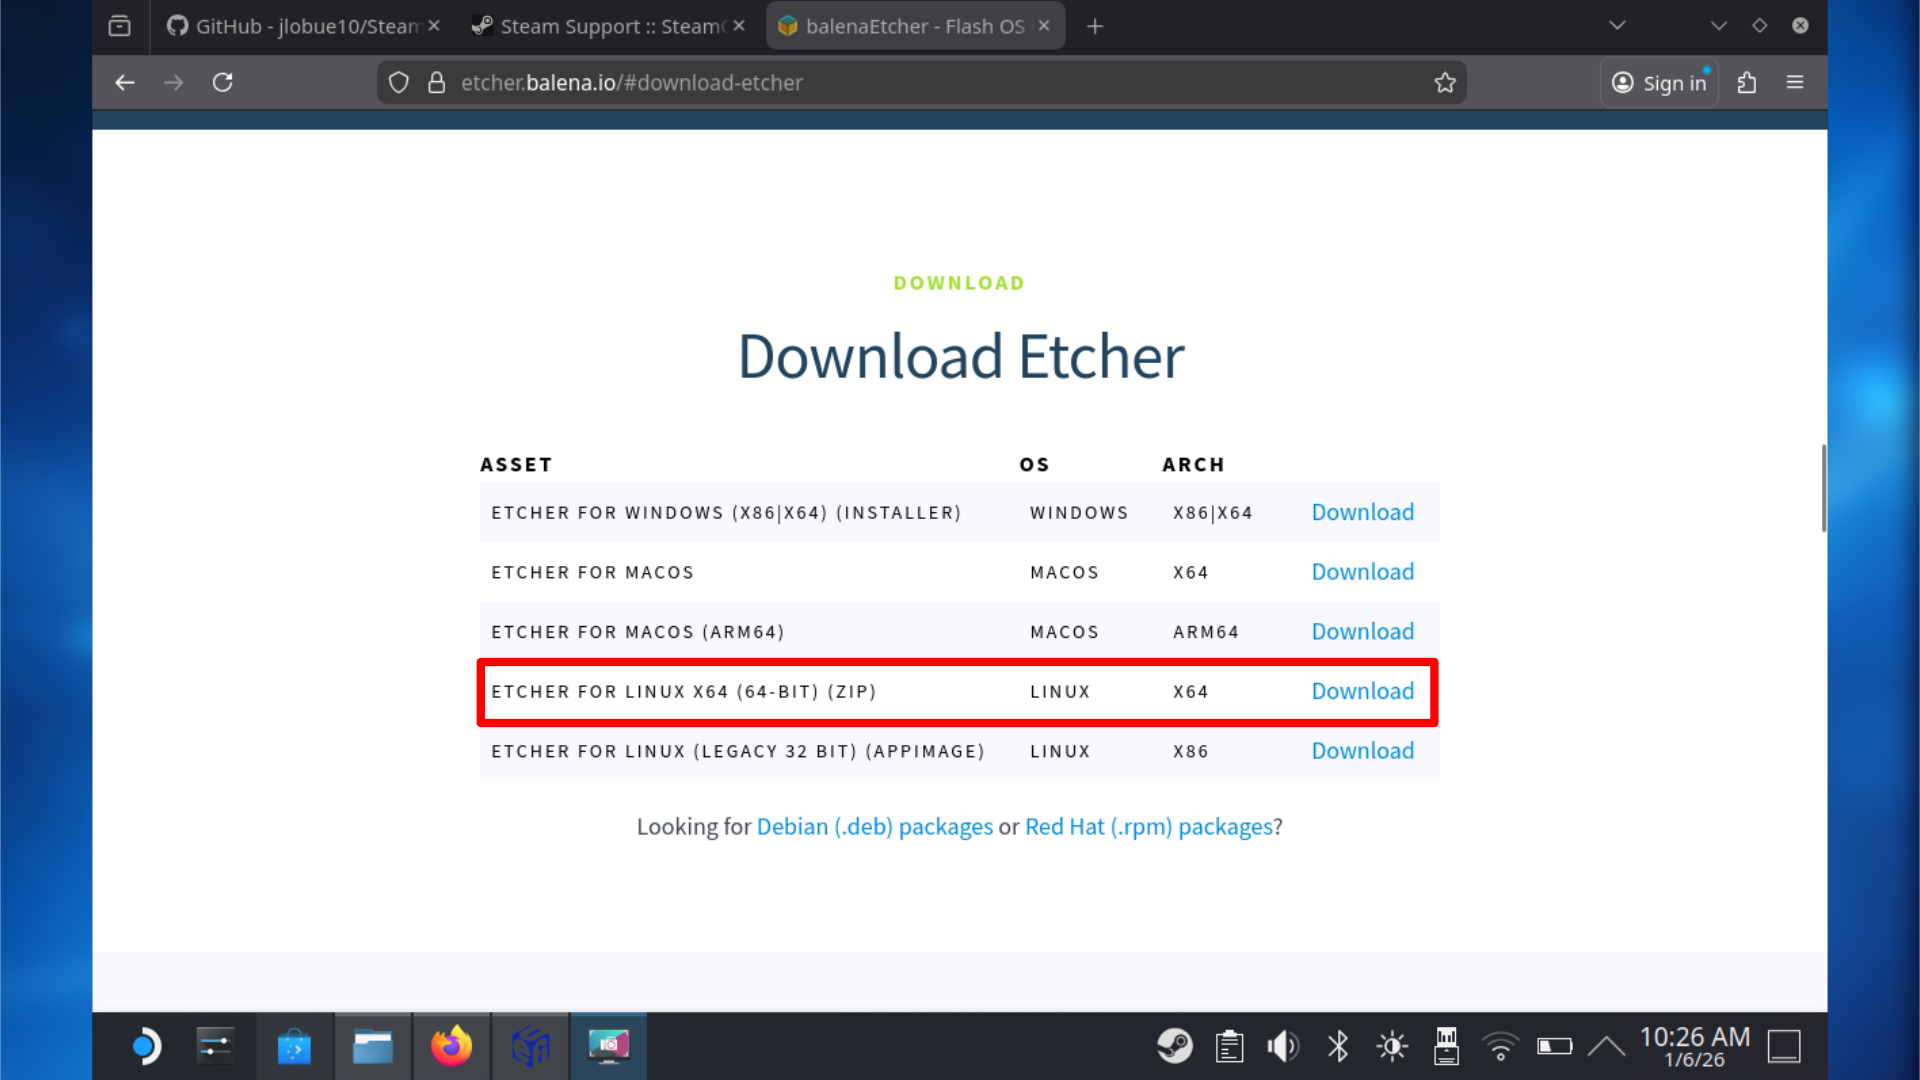
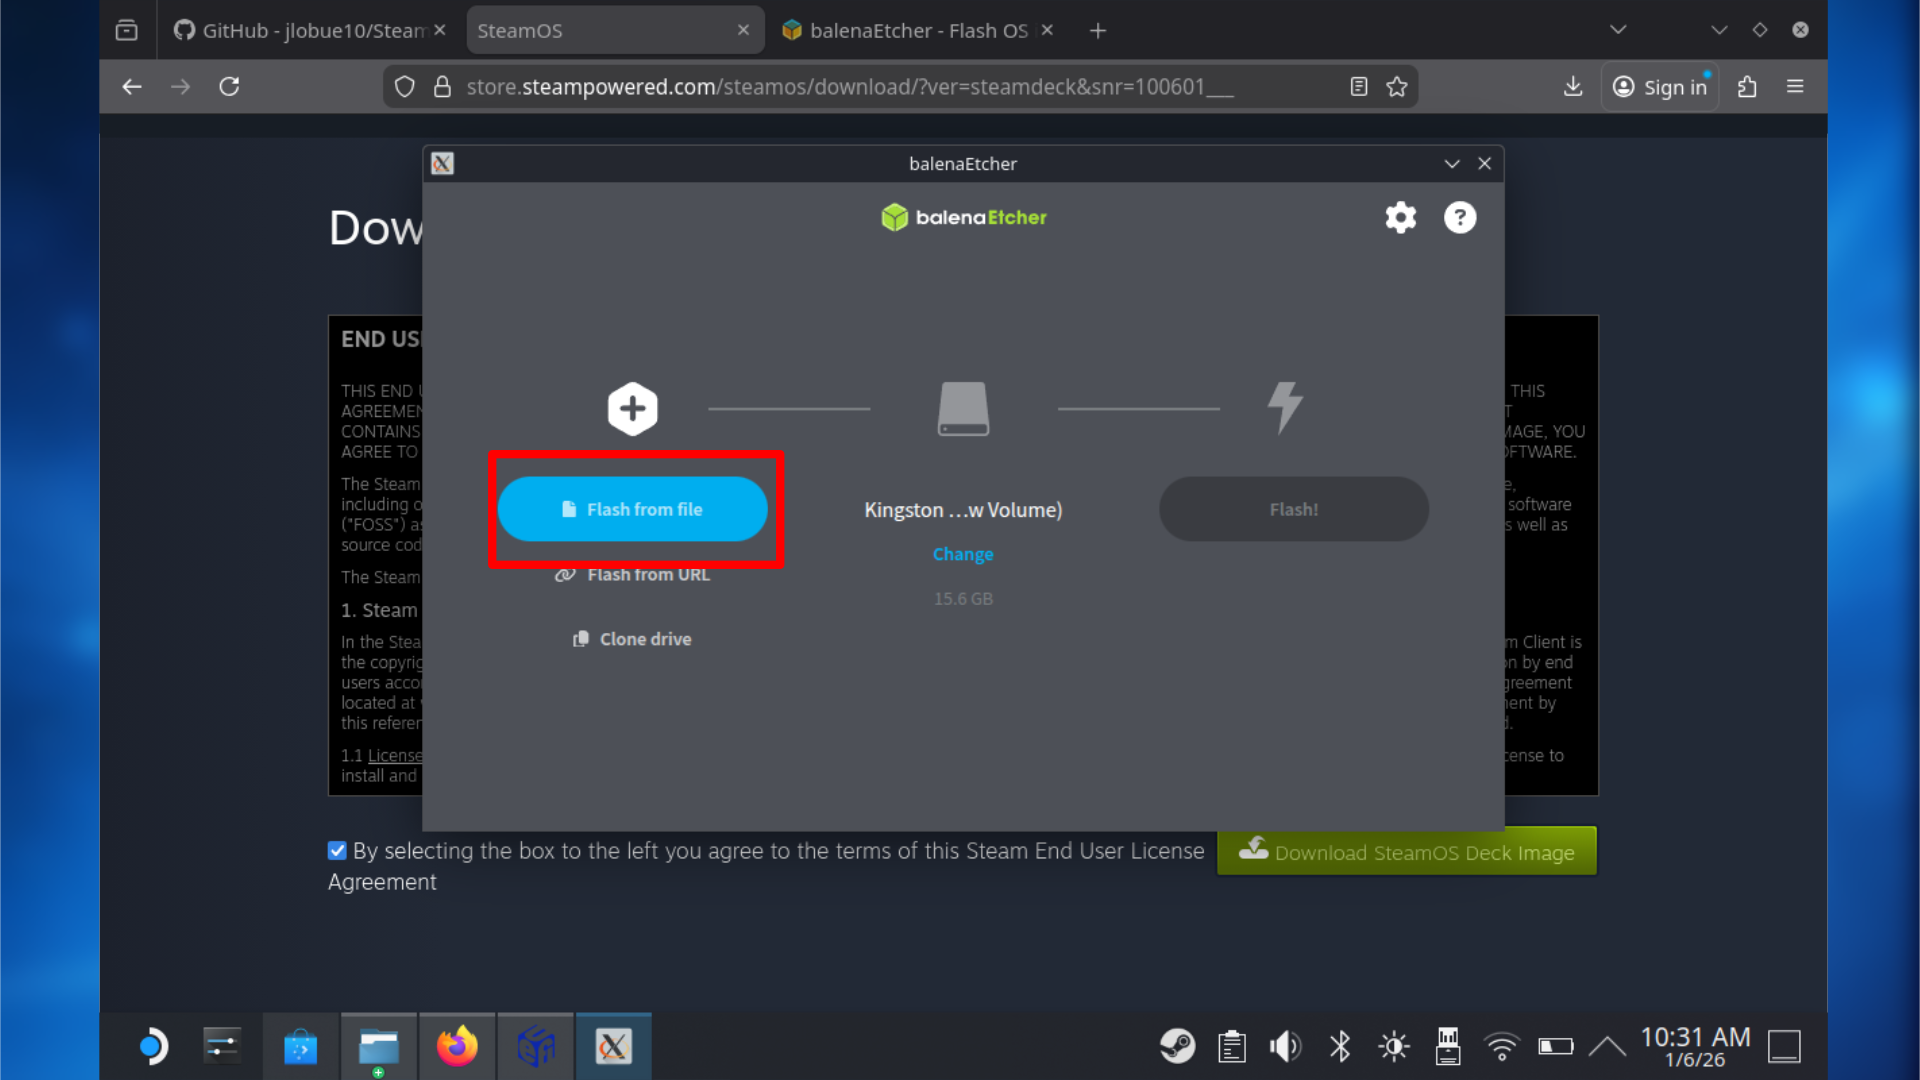
- Download Balena Etcher from here.
- Scroll down and choose the 64-bit option.
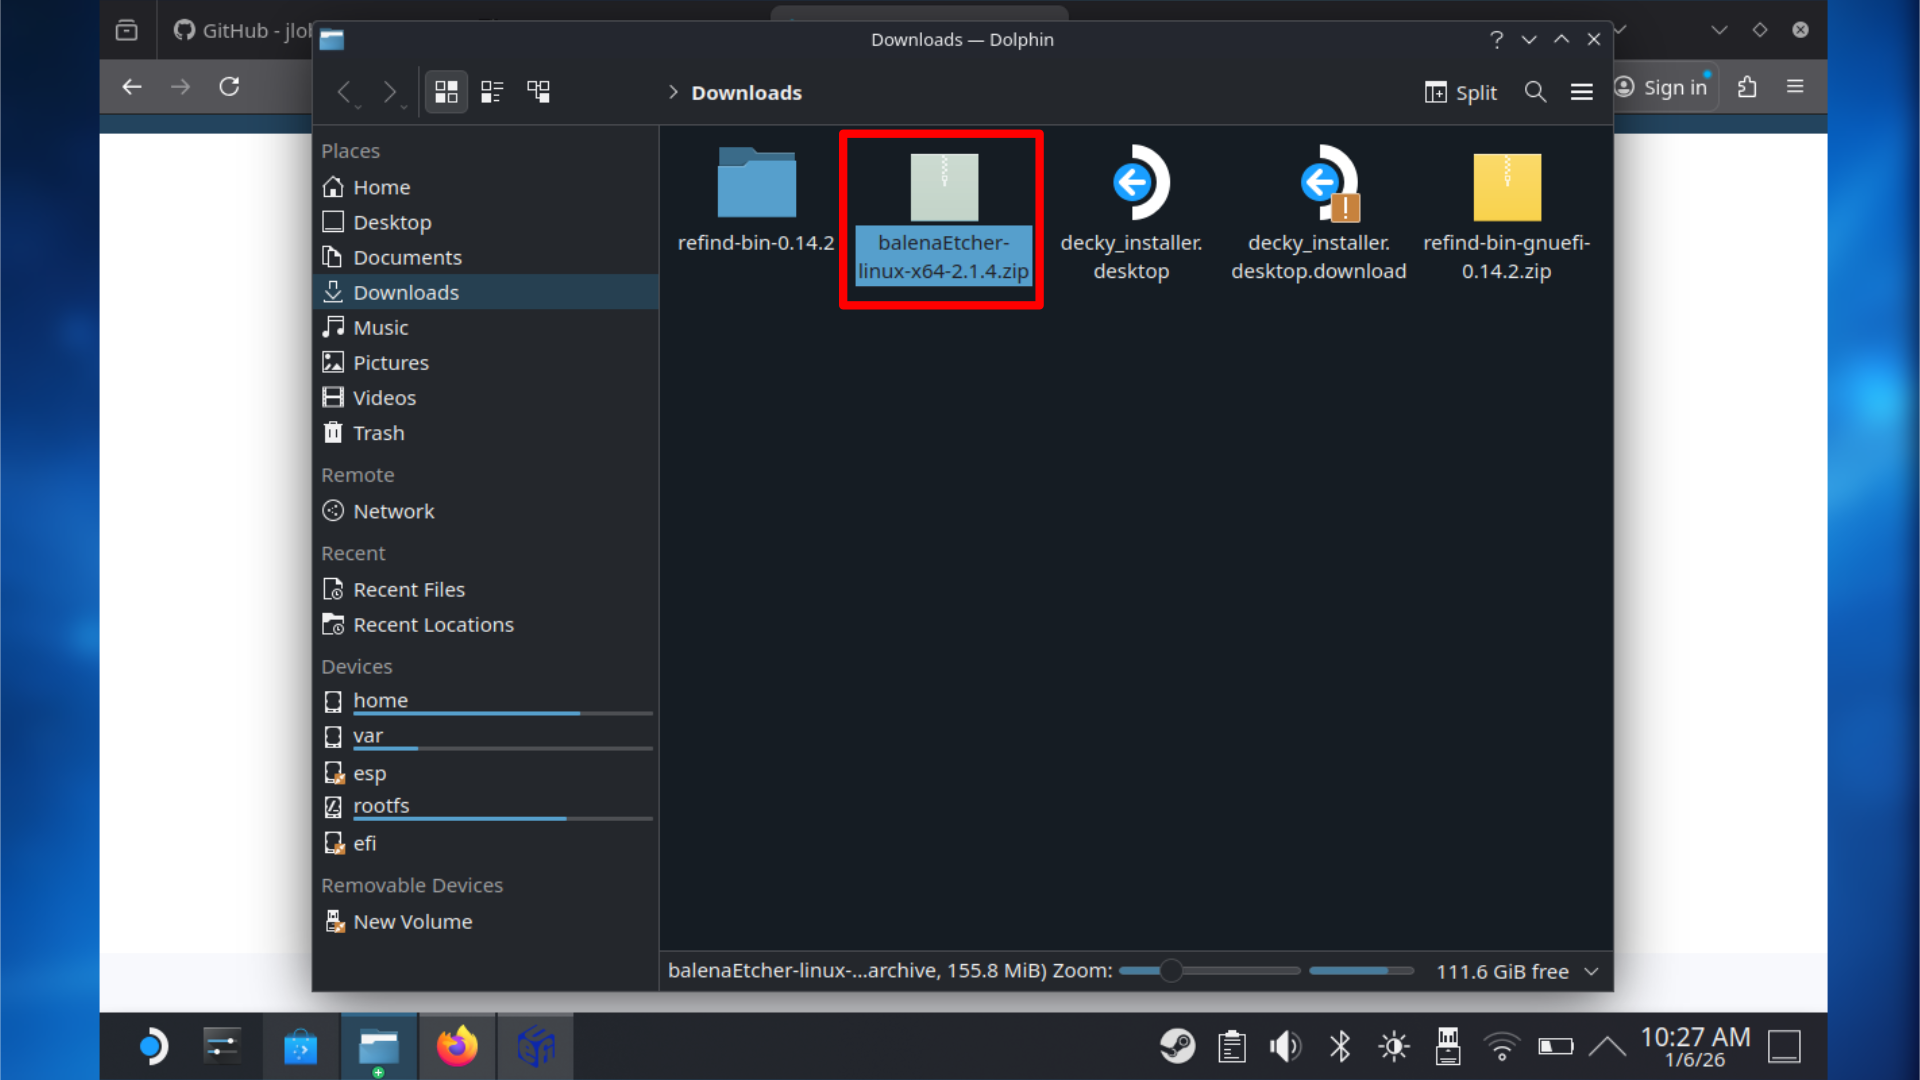
- Go to the download location, right-click on your Balena Etcher download, and select Extract.
- Extract somewhere easily accessible.
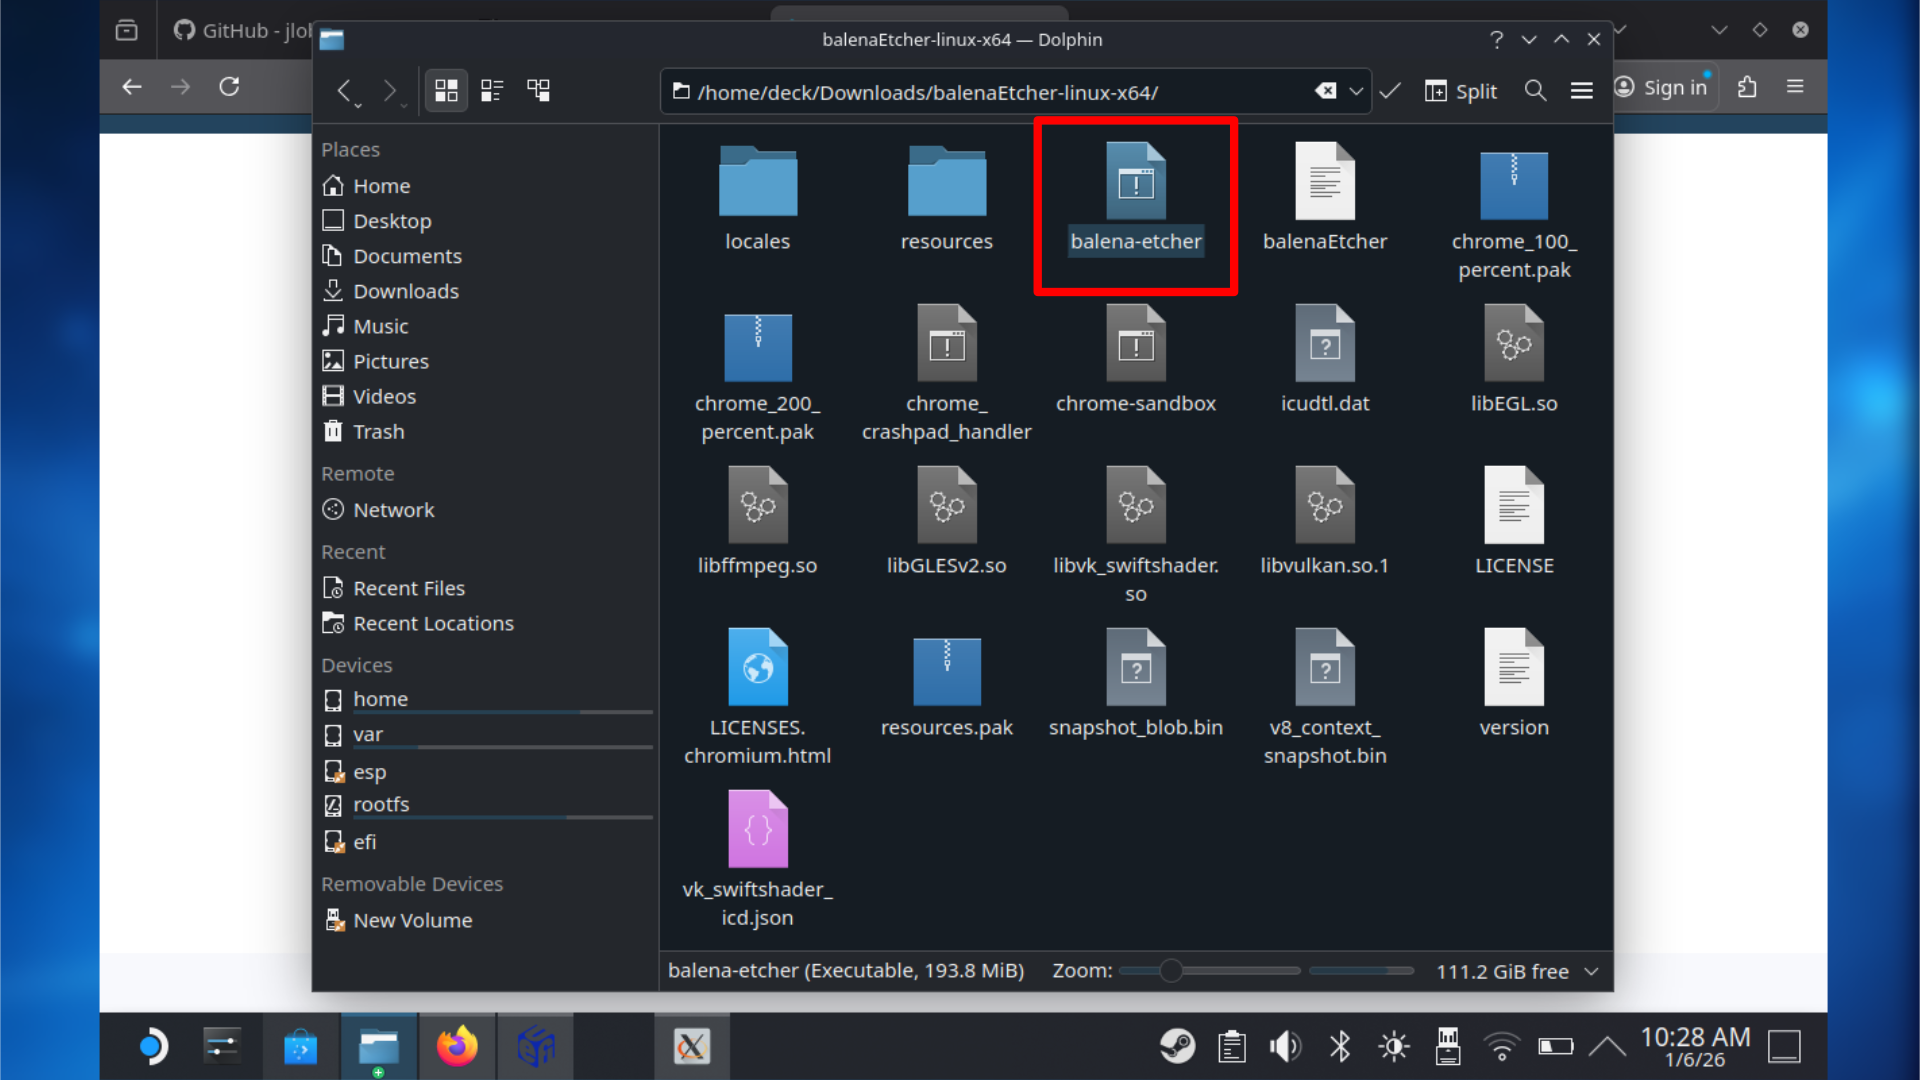
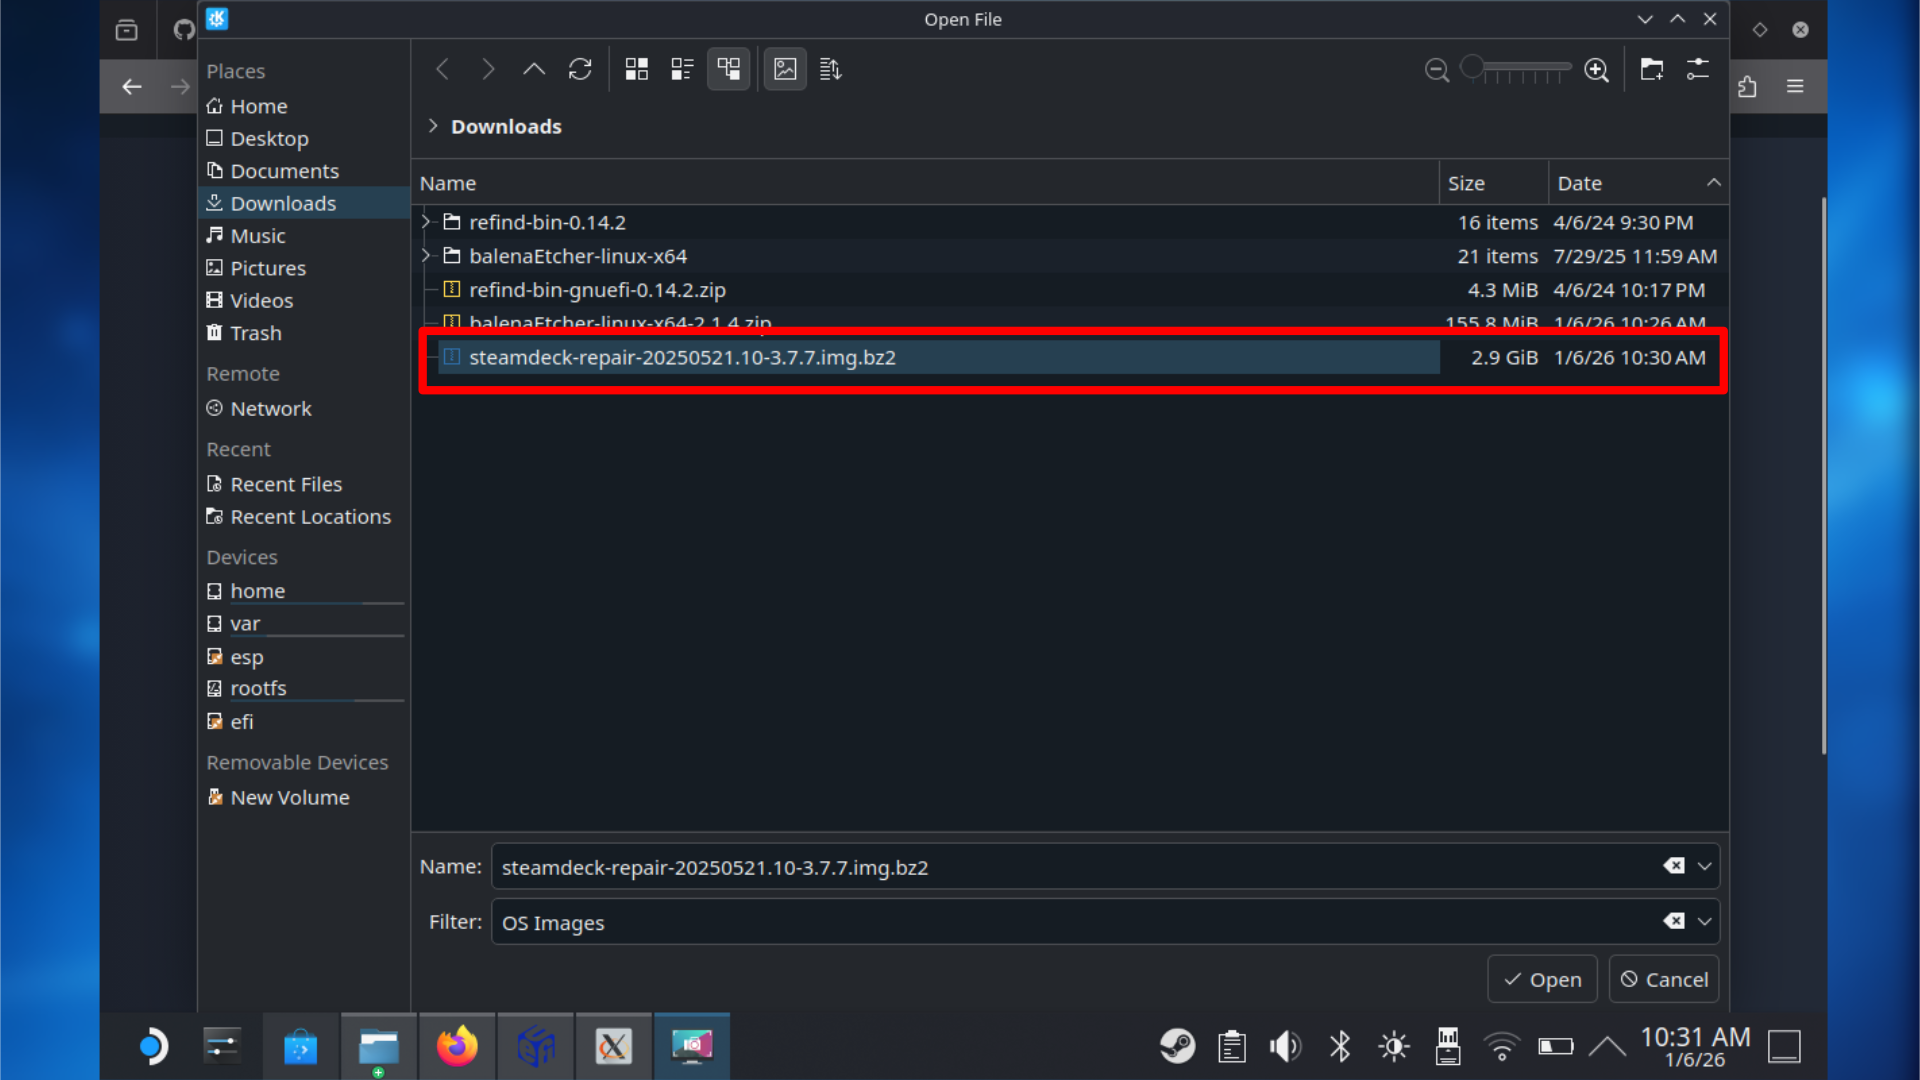
- Once extracted, open the extracted folder, and then select the balenca_etcher file.
- Choose the execute option.
4: Install the dual boot manager
This step is performed on your SteamOS device.
For a smooth and simple dual-boot experience, a boot manager is essential. It decides which operating system starts when you turn on your computer and stops Windows from automatically controlling the startup process.
This guide uses SteamDeck rEFInd, a special tool for SteamOS. It lets you easily choose between starting up SteamOS or Windows from a simple menu, and you can even customize how it looks with different icons and backgrounds later on.
To install it, follow these steps carefully:
- Make sure you are still in Desktop Mode on SteamOS.
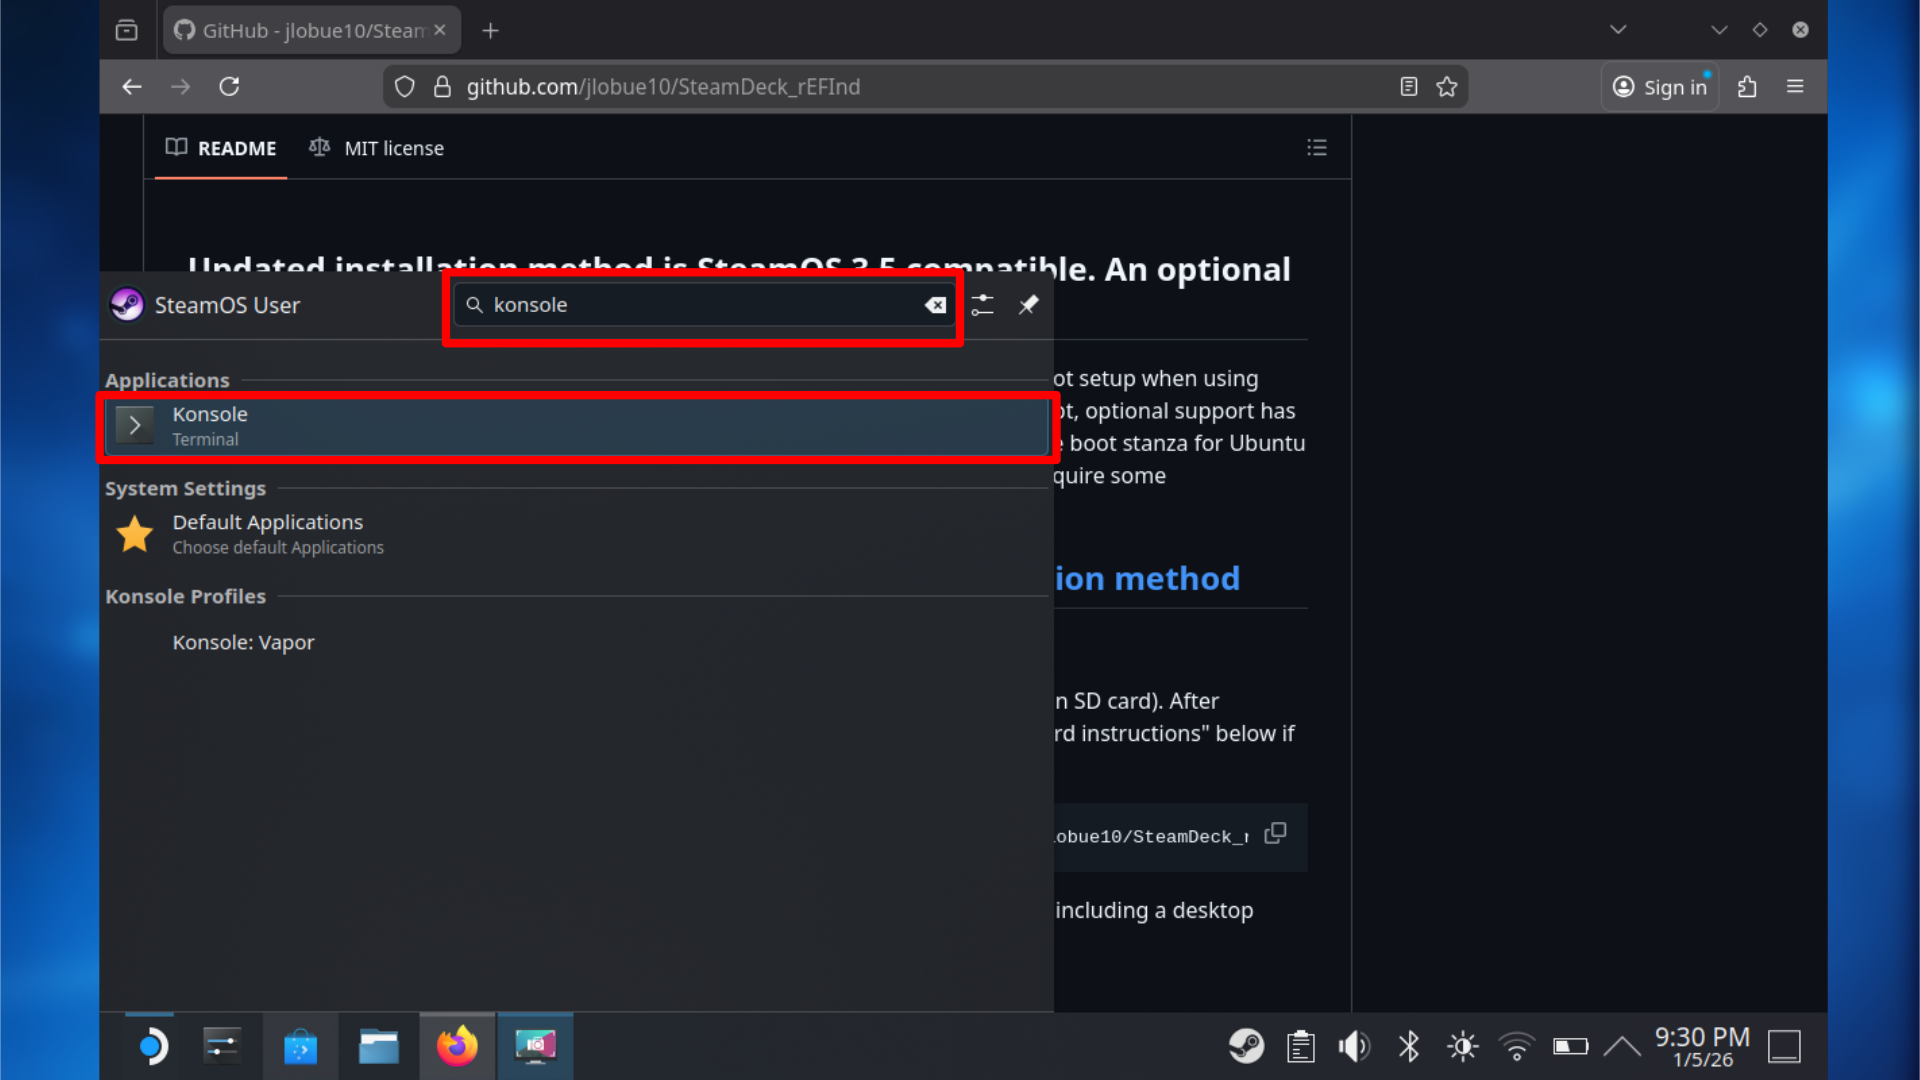
- Open the application launcher.
- Navigate to System and open Konsole.
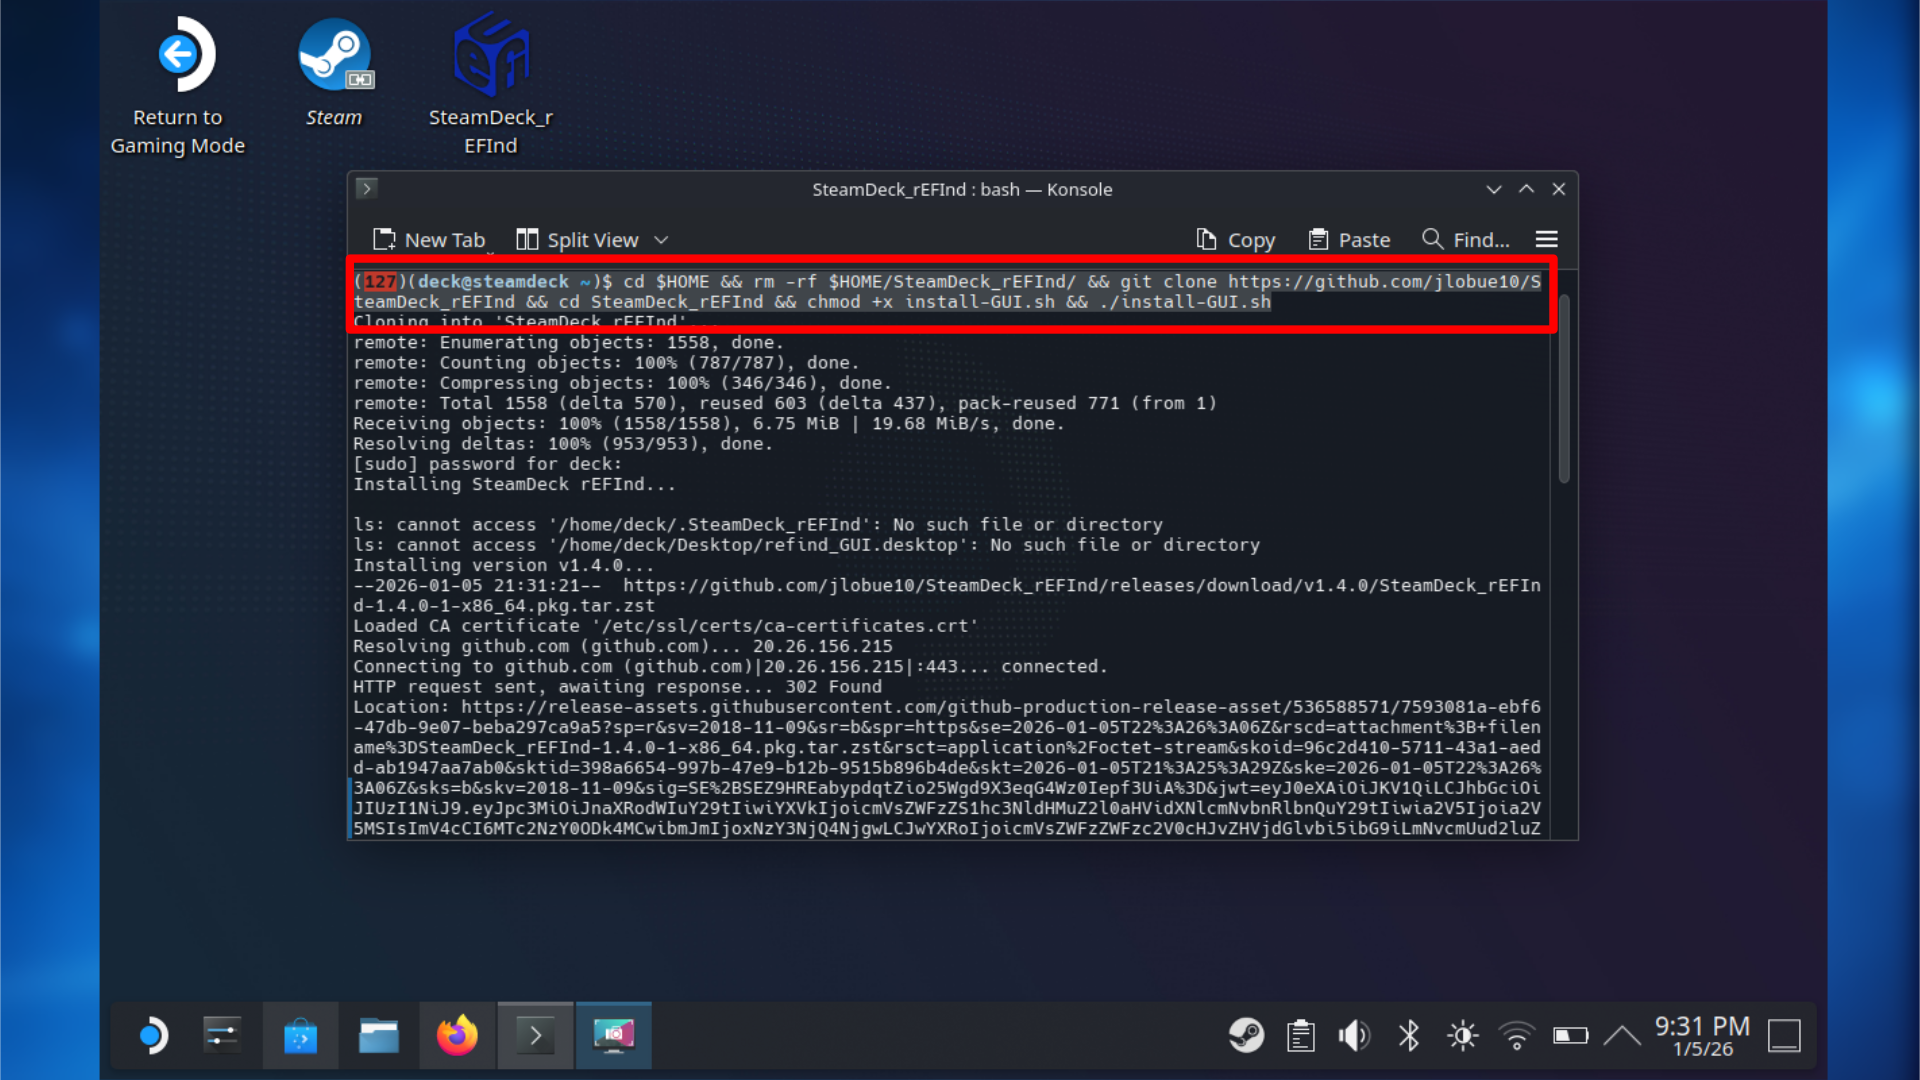
- I’d recommend visiting this guide on your SteamOS device, and copying this install command:
- cd $HOME && rm -rf $HOME/SteamDeck_rEFInd/ && git clone https://github.com/jlobue10/SteamDeck_rEFInd && cd SteamDeck_rEFInd && chmod +x install-GUI.sh && ./install-GUI.sh
- Paste the command into the Konsole window.
- Press Enter and type your SteamOS user password when prompted.
- Confirm when asked to proceed with the installation.
- Once installed, the application will appear on your desktop.
5: Dual boot GUI setup
After you install the application, launch it and take a look at the settings. Setting things up is generally simple, but let me quickly explain what you need to configure.
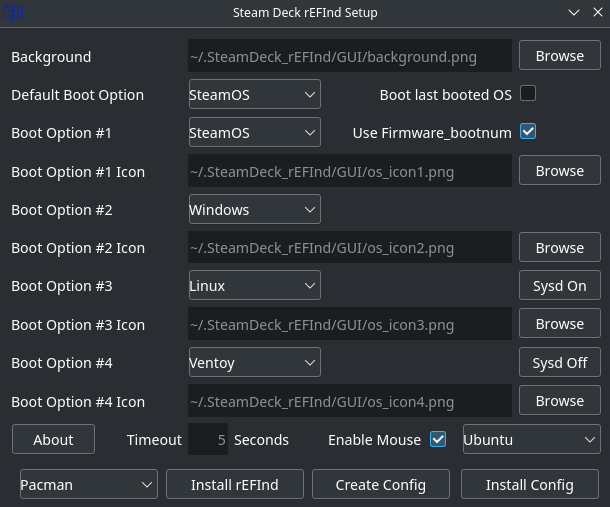
- Open SteamDeck_reEFIned on your desktop.
- I won’t change many settings here, but you want to make sure SteamOS is the default Boot option.
- Windows is already selected for Boot Option #2, so leave this as is.
- You can change other settings if you wish, such as the boot menu icons and boot menu background.
- Change the Timeout option to what you desire. I have chosen 10 seconds.
- Select the “Install rEFInd” option at the bottom of the GUI.
- Enter the password you created earlier.
- Then choose “OK” and wait for it to install.
- Then choose “Create Config,” especially if you make any other changes.
- Then select the option “Install Config.”
- Enter your password again.
- Restart your Steam Deck to see your custom boot screen.
6: Resize the internal drive for Windows
This process makes room for Windows by shrinking your SteamOS partition. It’s performed within the SteamOS recovery environment to prevent issues with files that are currently being used.
Don’t rush! Your changes won’t be saved until you confirm them, and carefully following the instructions will help prevent any lost data.
If you can’t load into the SteamOS recovery image, try a Micro SD Card or a different USB stick.

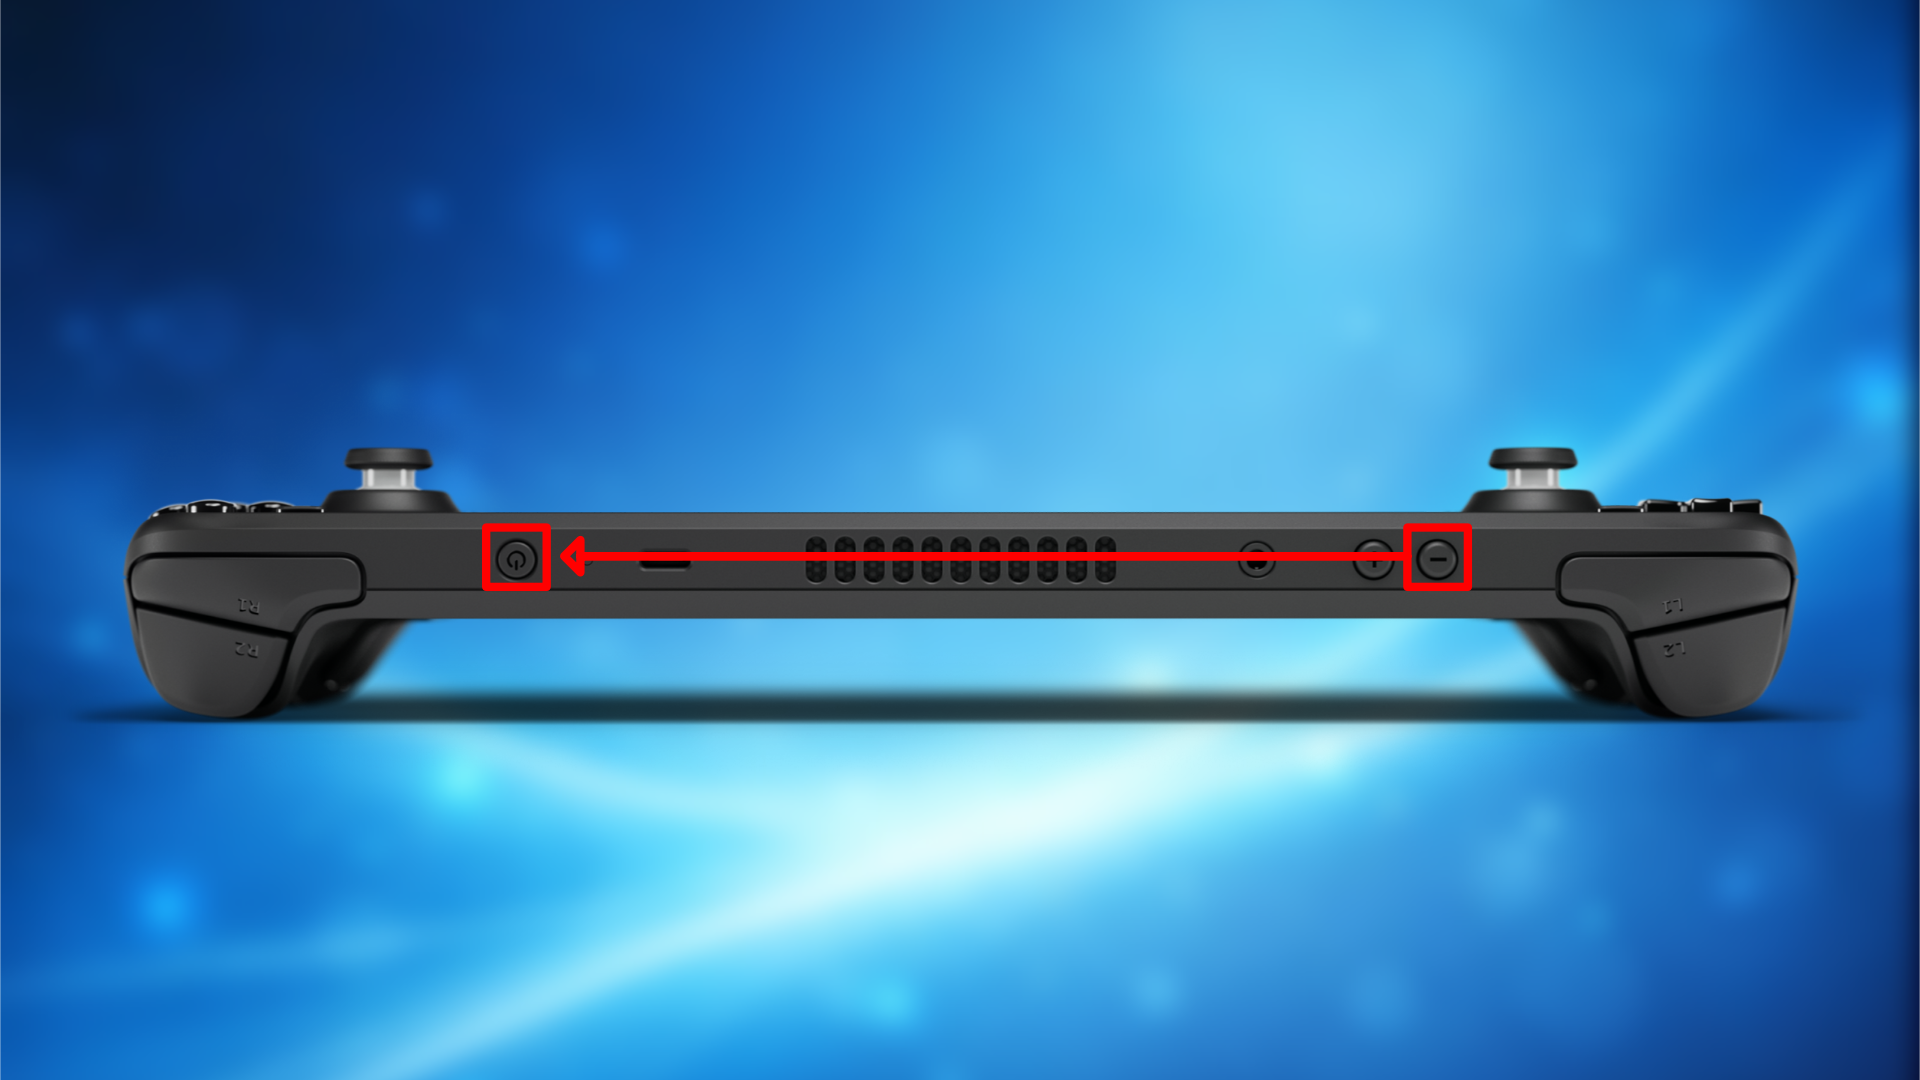
- To begin, make sure your Steam Deck is fully powered off.
- Insert your SteamOS recovery USB or microSD card.
- Hold the Volume Down button, then press and hold the Power button.
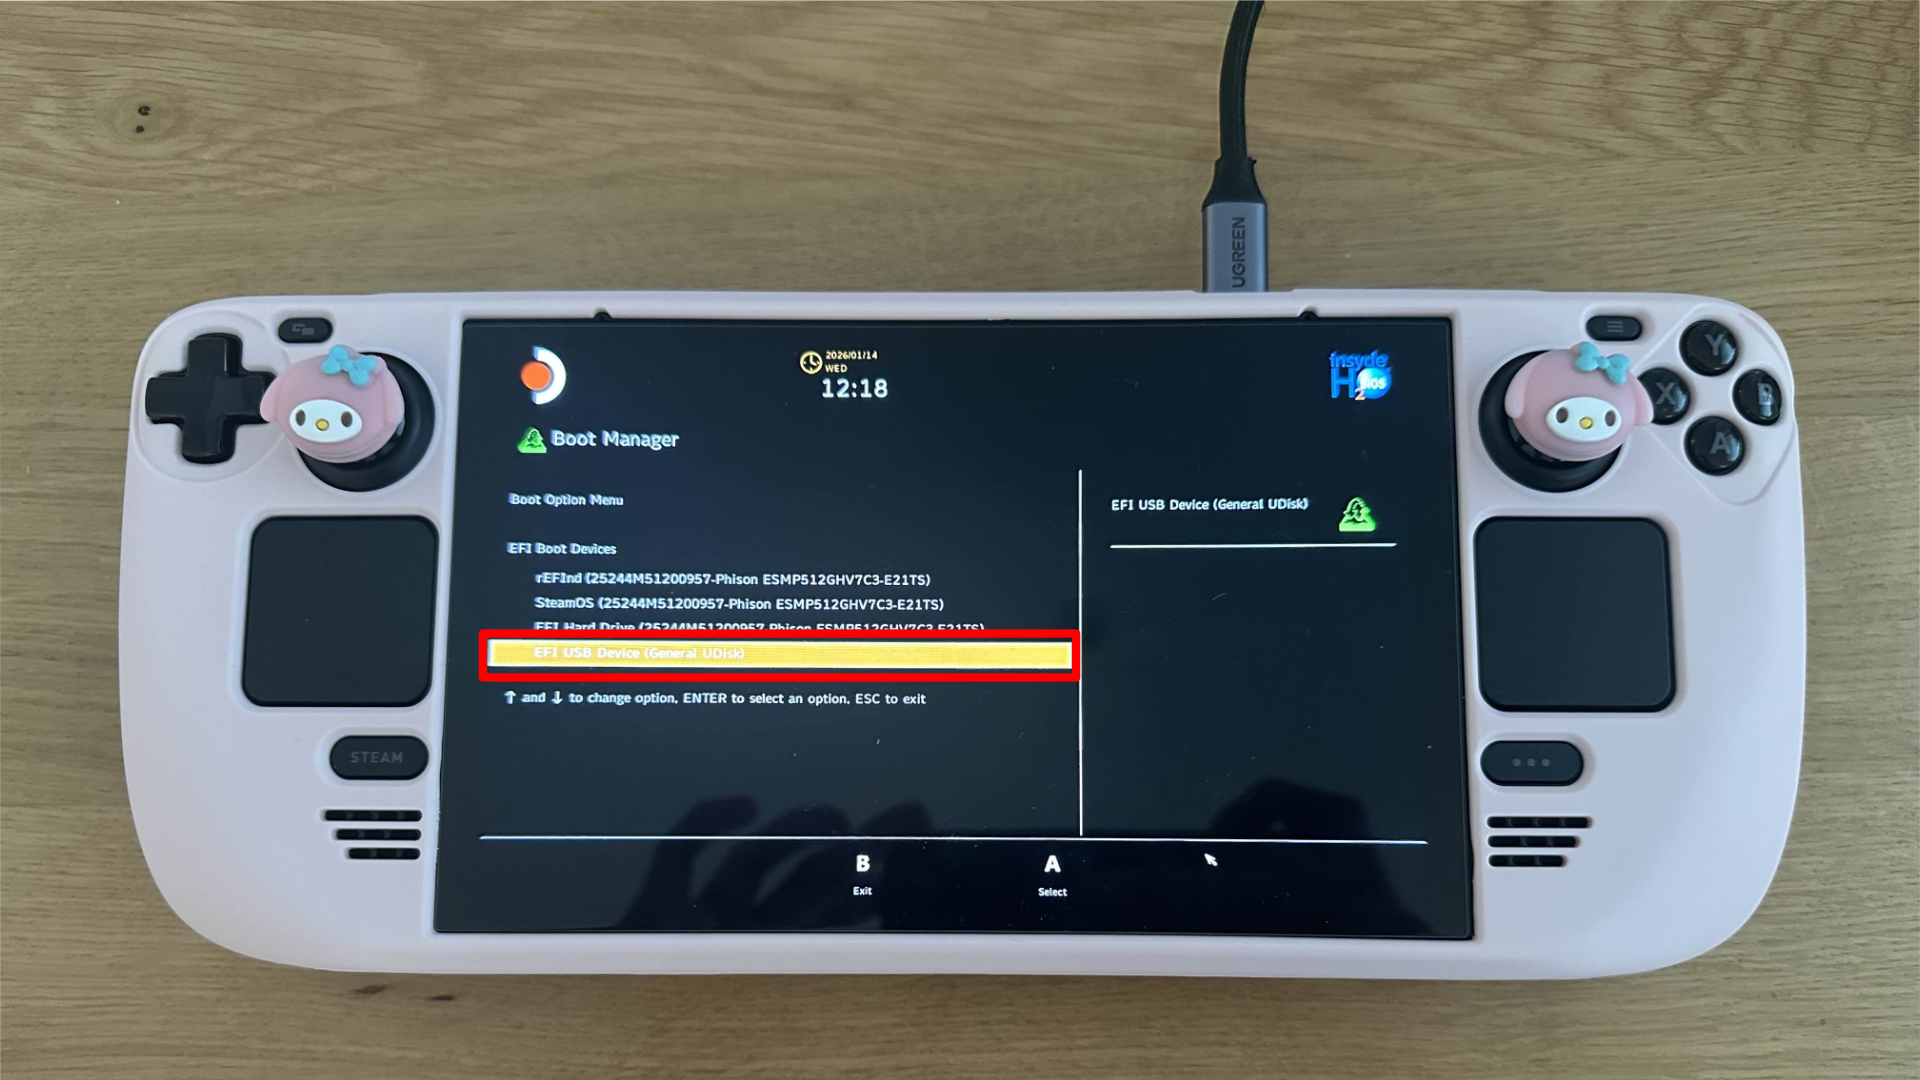
- Release both once the boot menu appears.
- Select your USB or microSD recovery media from the list.
- Wait for the SteamOS recovery desktop to load.
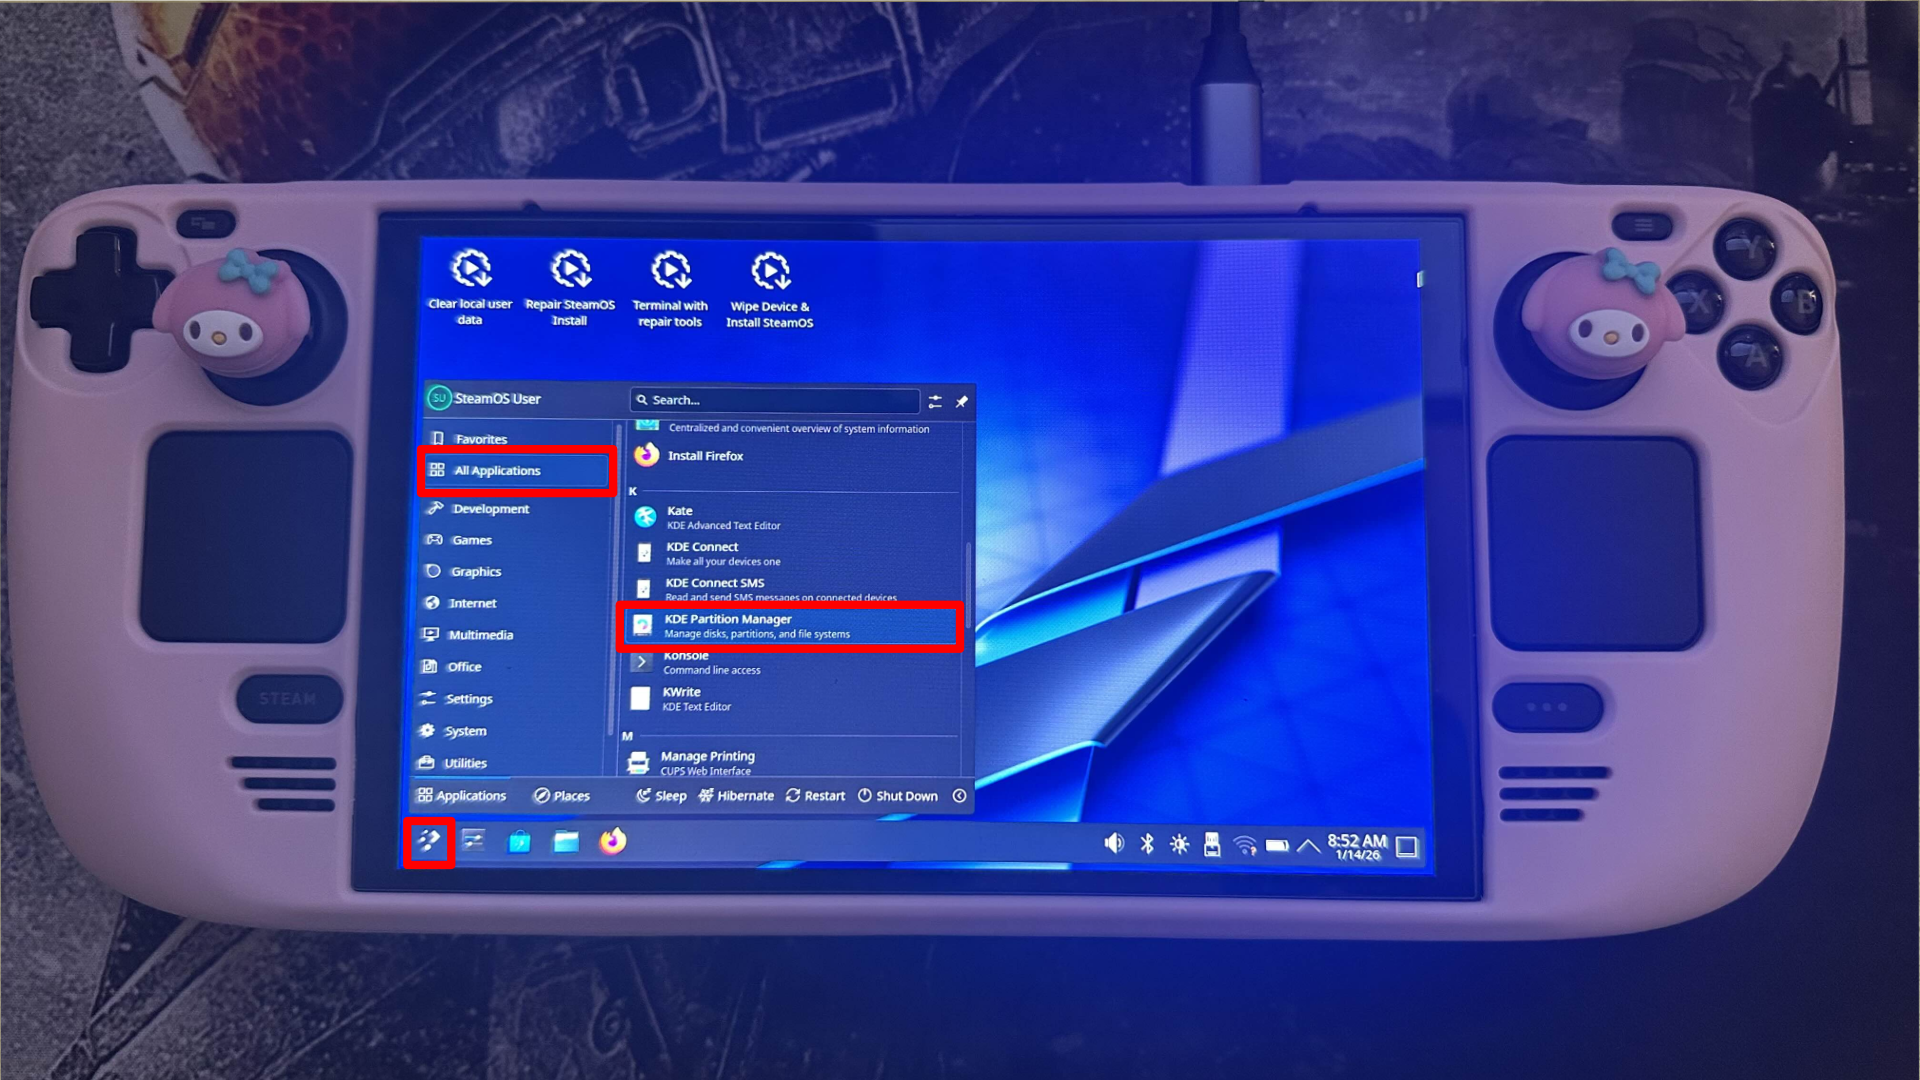
Once on the recovery desktop:
- Open the application launcher in the bottom left corner.
- Navigate to All Applications and scroll down.
- Open KDE Partition Manager.
- Select your internal drive from the list on the left side.
- Locate the ext4 home partition. This is where SteamOS is installed.
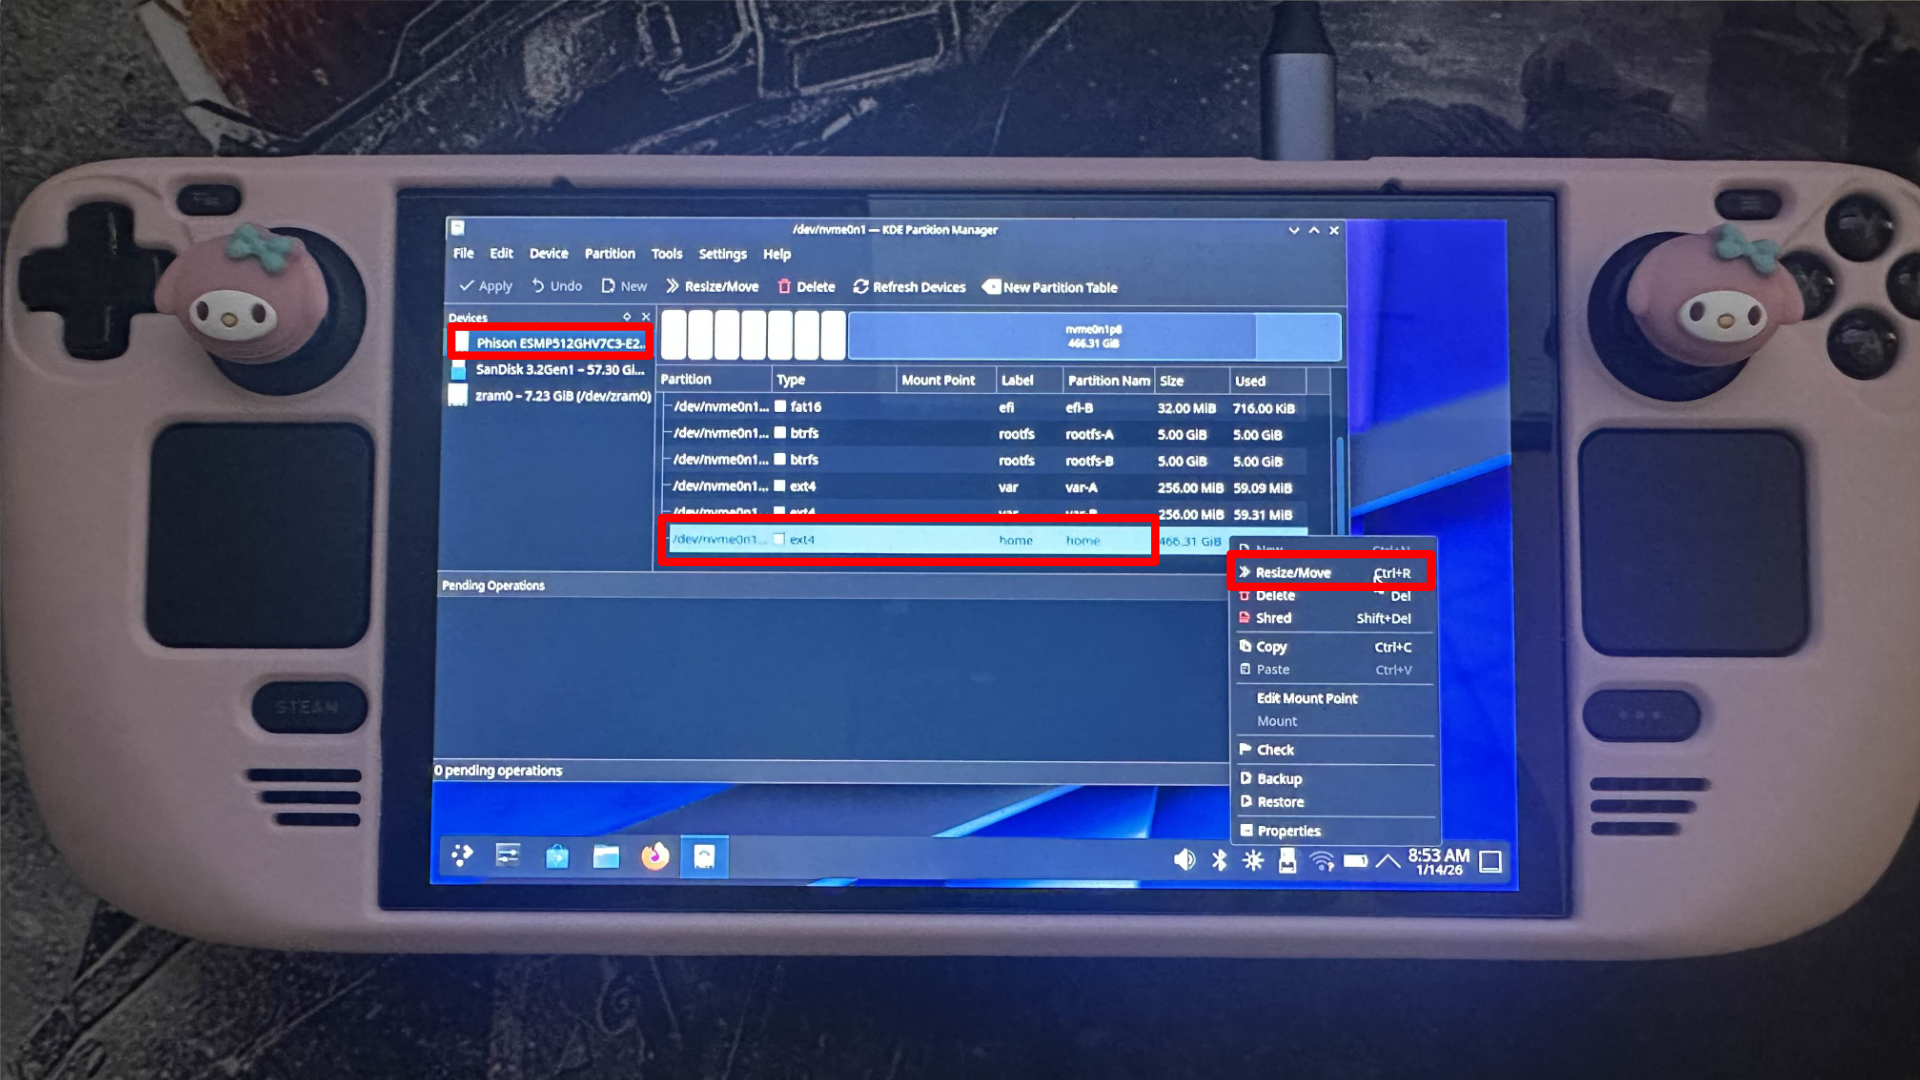
To resize the partition:
- Right-click the ext4 home partition.
- Select Resize/Move.
- Use the slider to reduce the partition size based on how much space you want to allocate to Windows.
- You can also type in how big you want your new partition size to be.
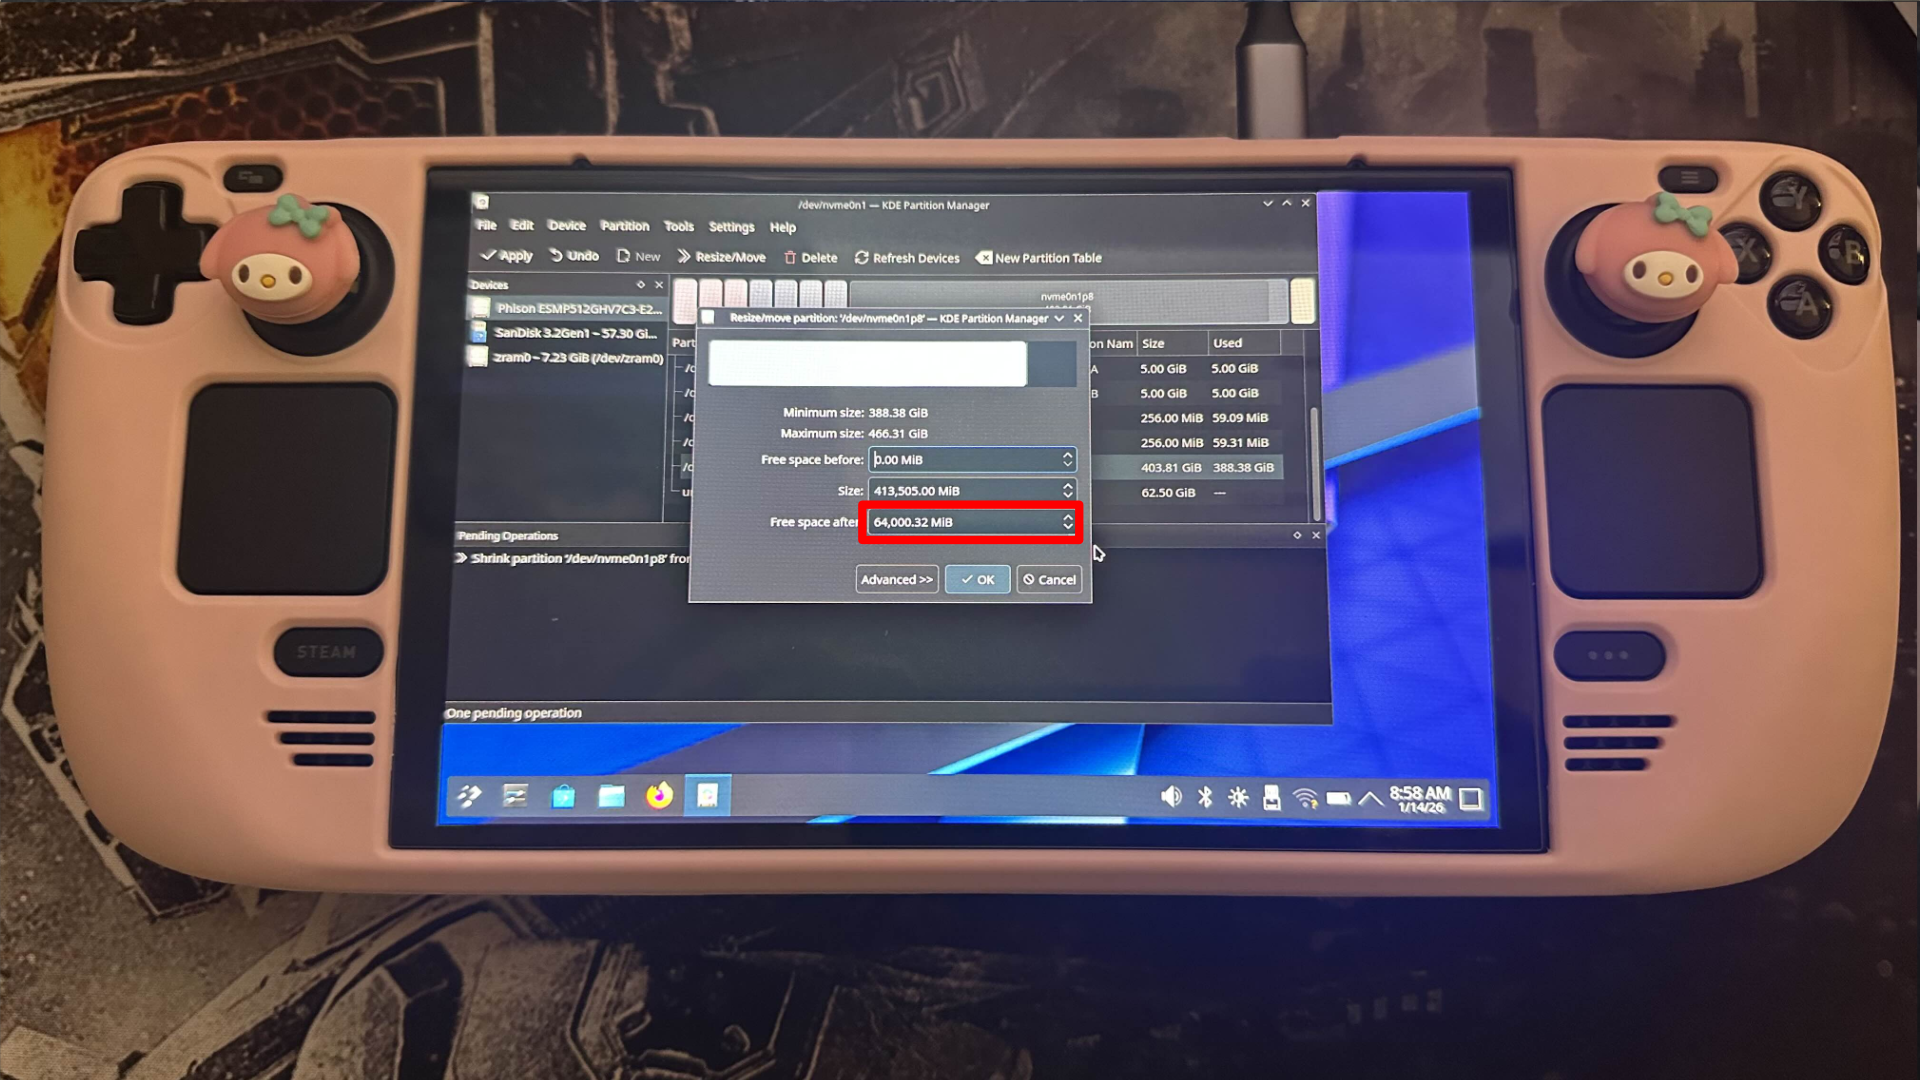
Once resized:
- Click OK to confirm the new size.
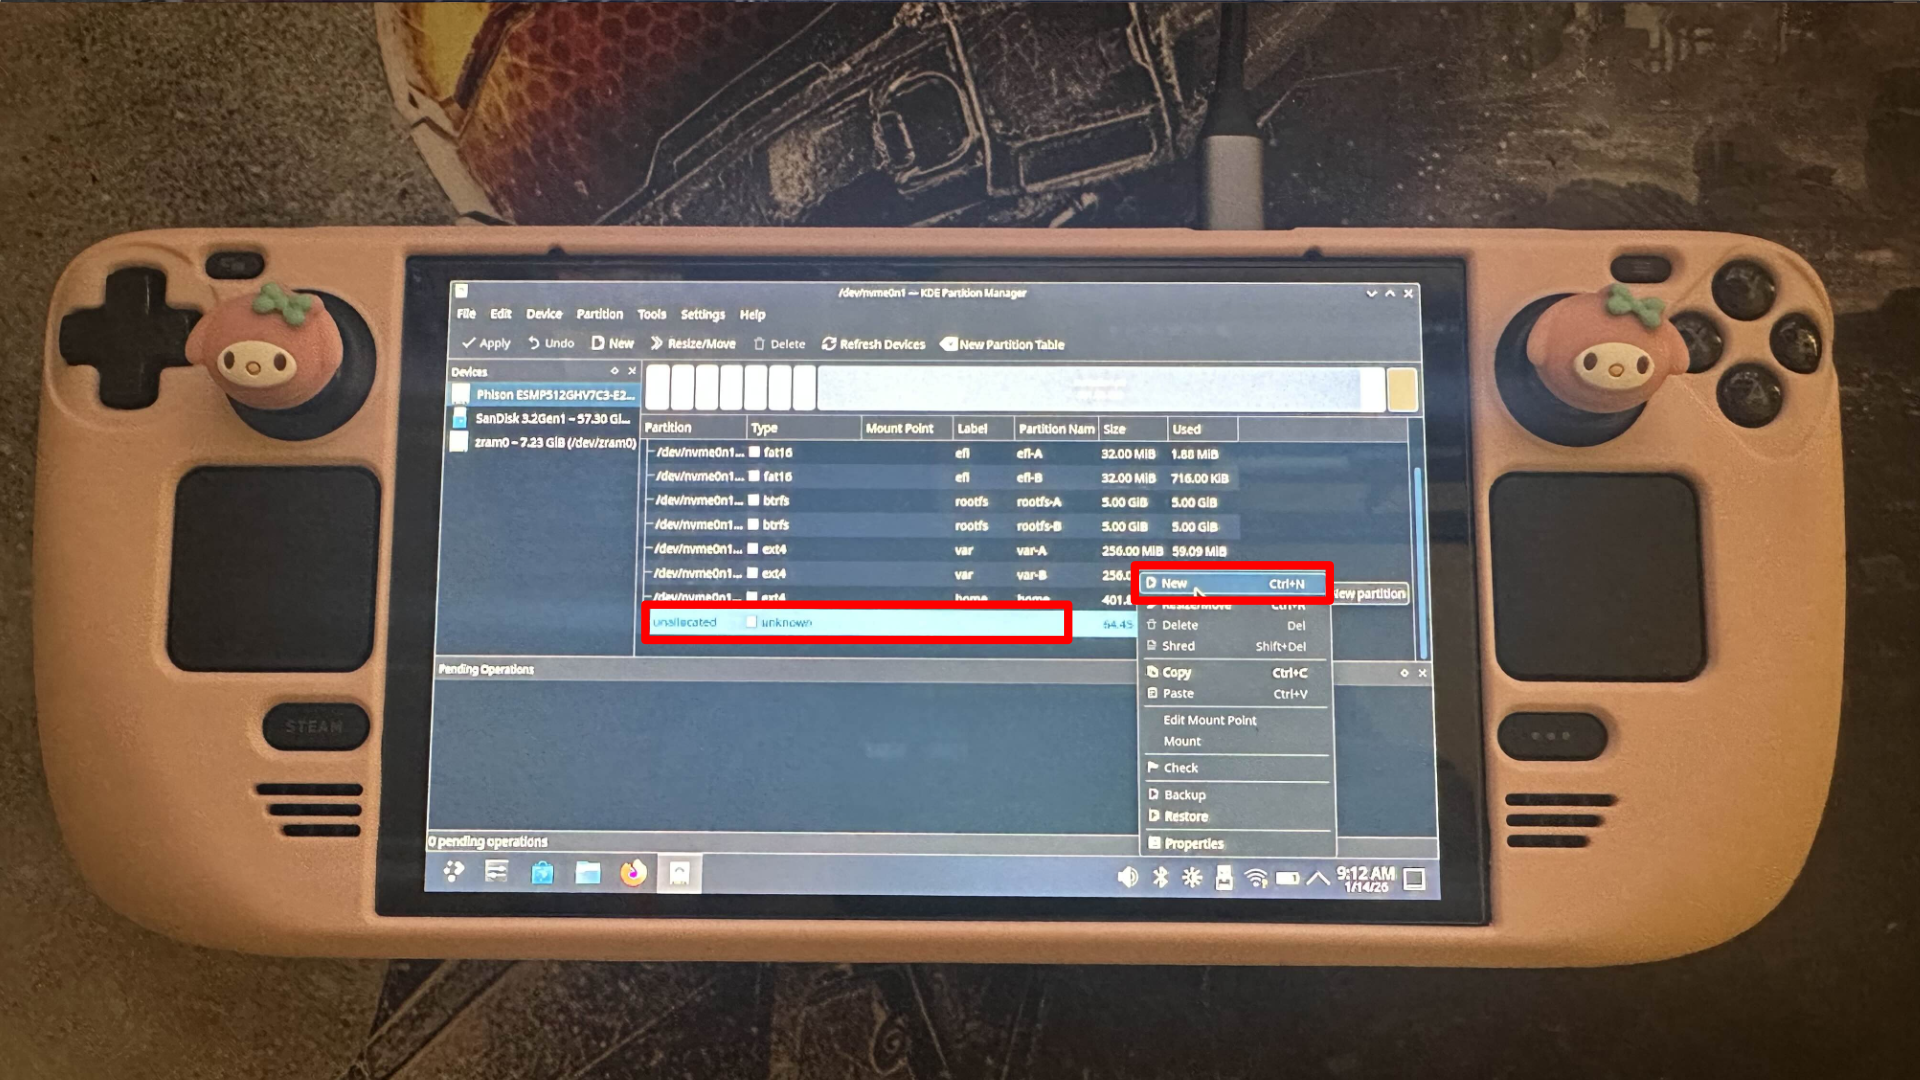
- You will now see unallocated space below the SteamOS partition.
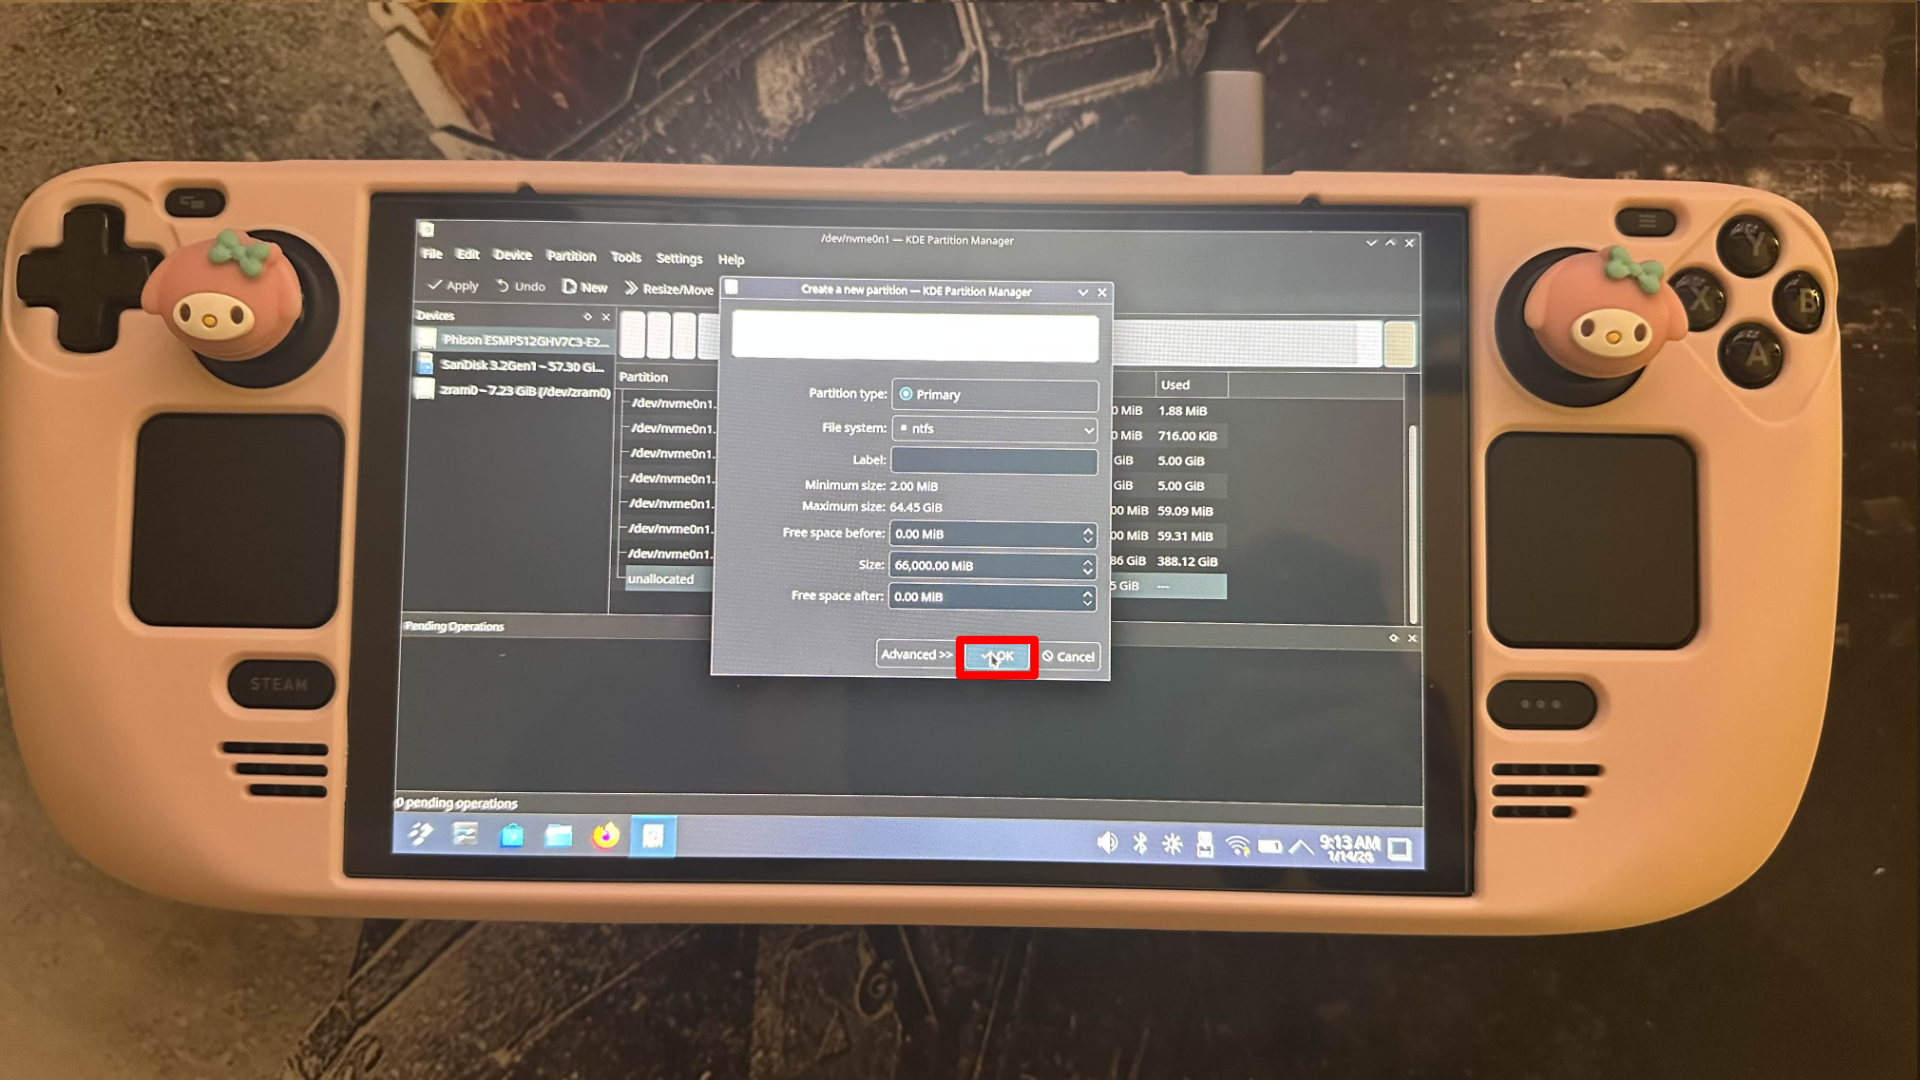
- Right-click the unallocated space and select New.
- Choose NTFS as the file system.
- Confirm the changes.
- Click Apply in the top left corner and wait for the process to finish.

Once finished, you’ll have a smaller SteamOS section and a new NTFS section prepared for Windows.
Turn off your Steam Deck and take out the SteamOS recovery drive. You’ll need the space it frees up for the next step – installing Windows.
7: Create your Windows boot media
This process is similar to creating a SteamOS recovery drive, except you’ll be making bootable media for Windows 11. The steps are essentially the same, you’re just using a different file.
This guide will explain how to do this on both Windows and SteamOS/Linux, as the process is nearly the same. If you’ve already completed Step 3, you’ll likely find these instructions easy to follow.
Now that the previous step is complete, you can go ahead and boot back into SteamOS. I needed to create Windows 11 installation media, so I used a different USB drive to do that, making sure not to overwrite my existing SteamOS recovery image.
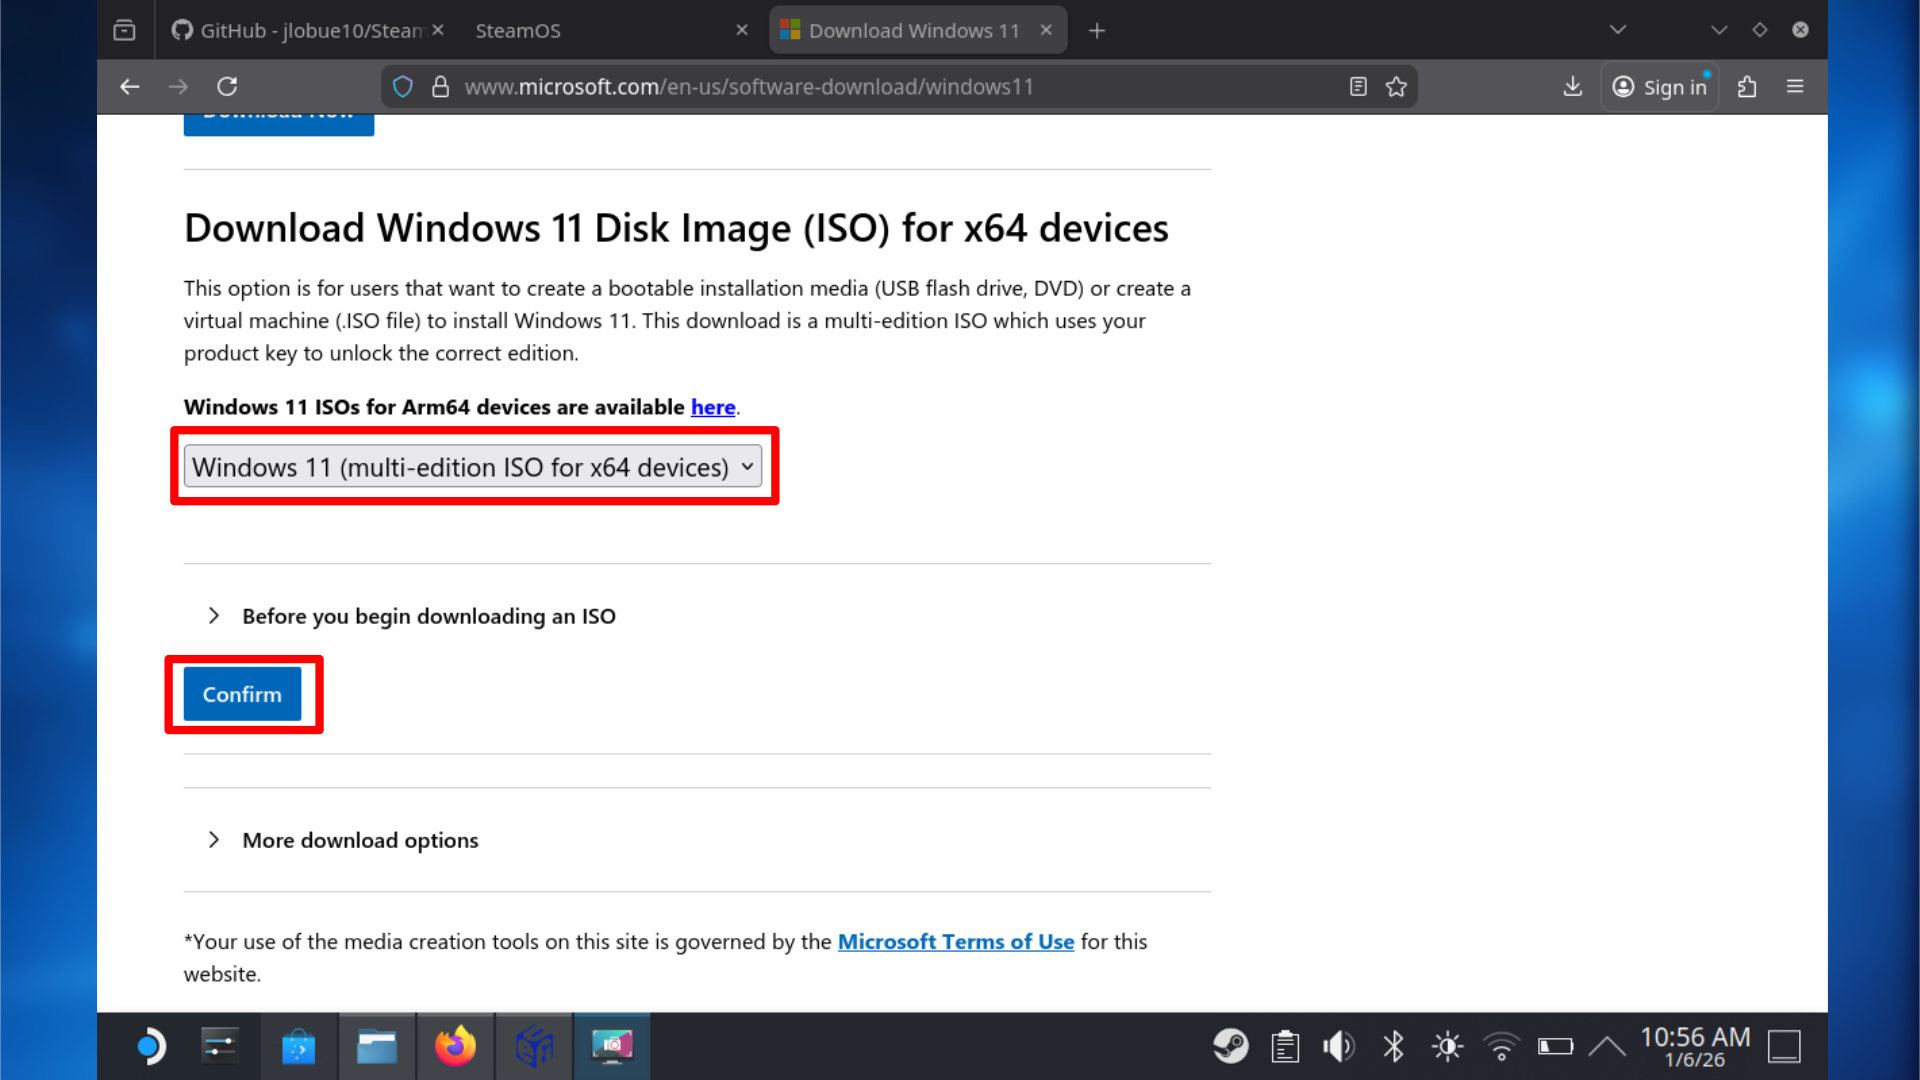
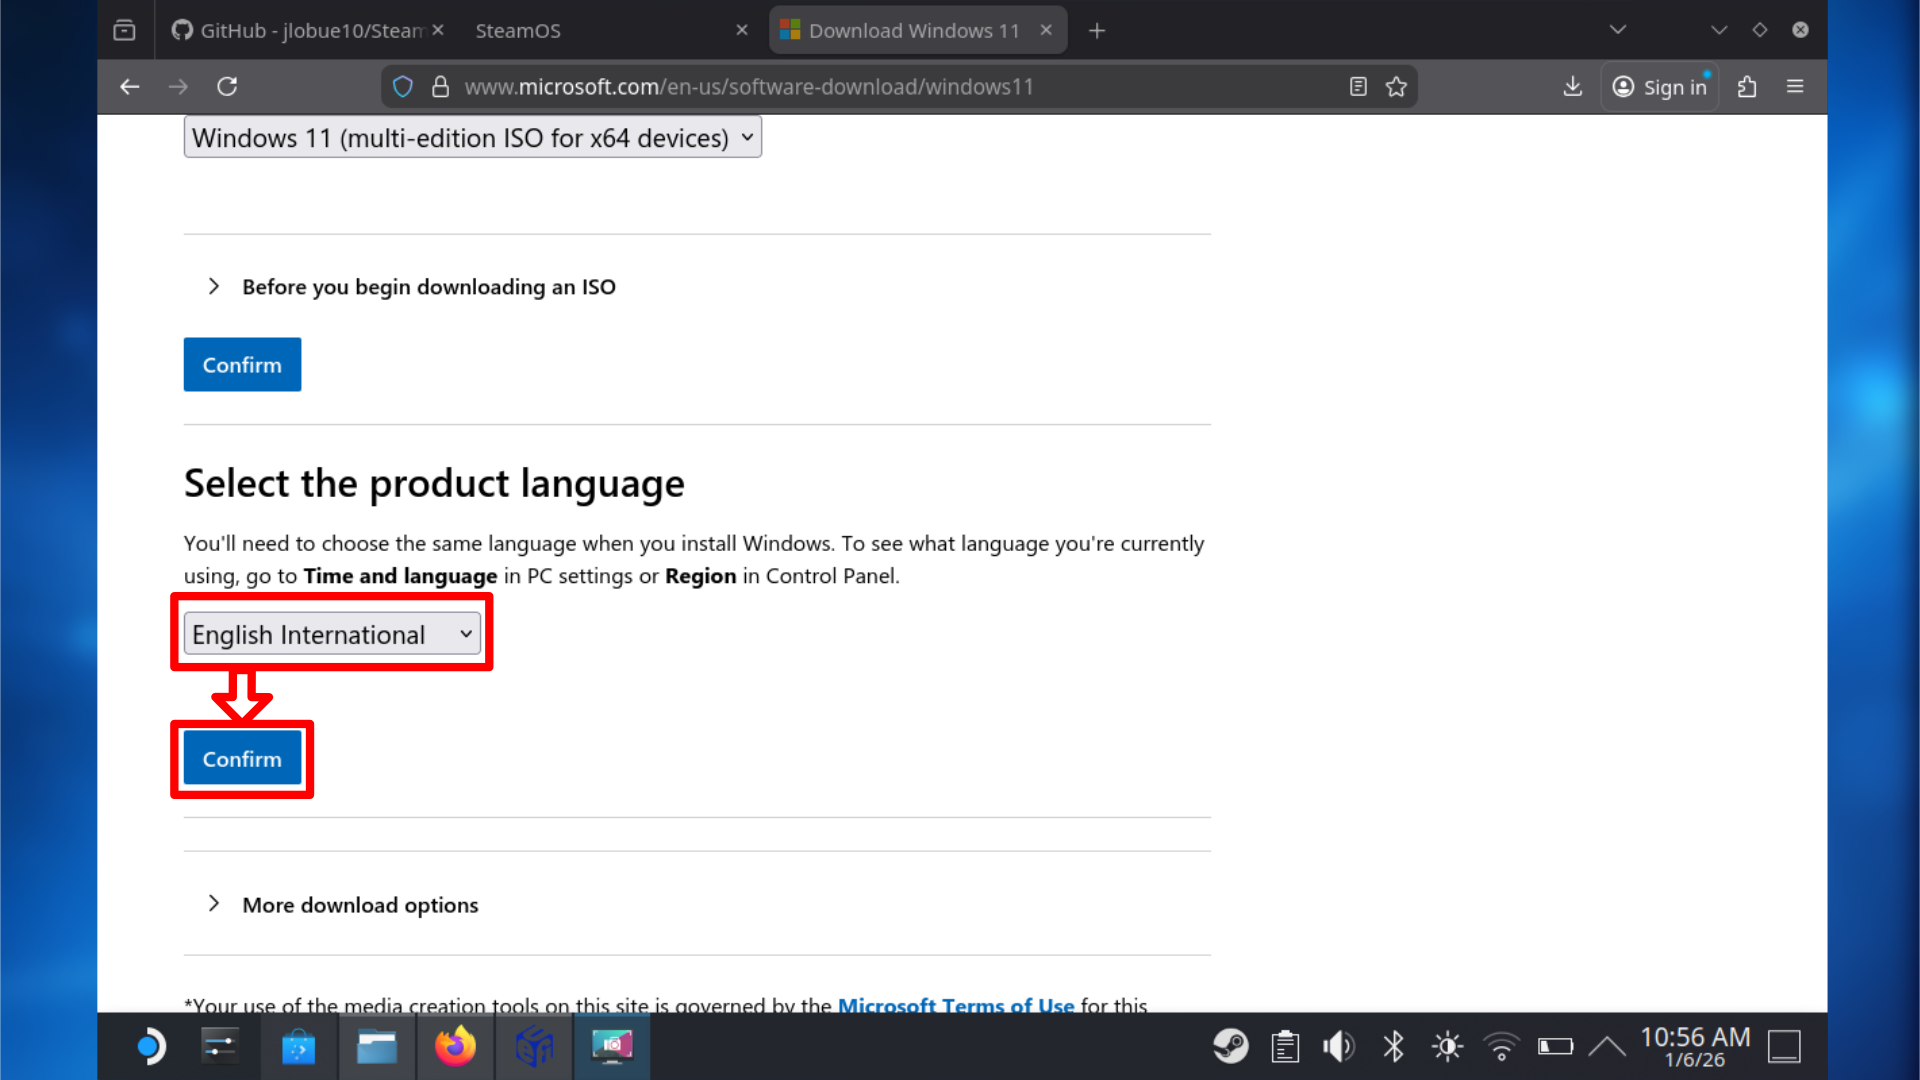
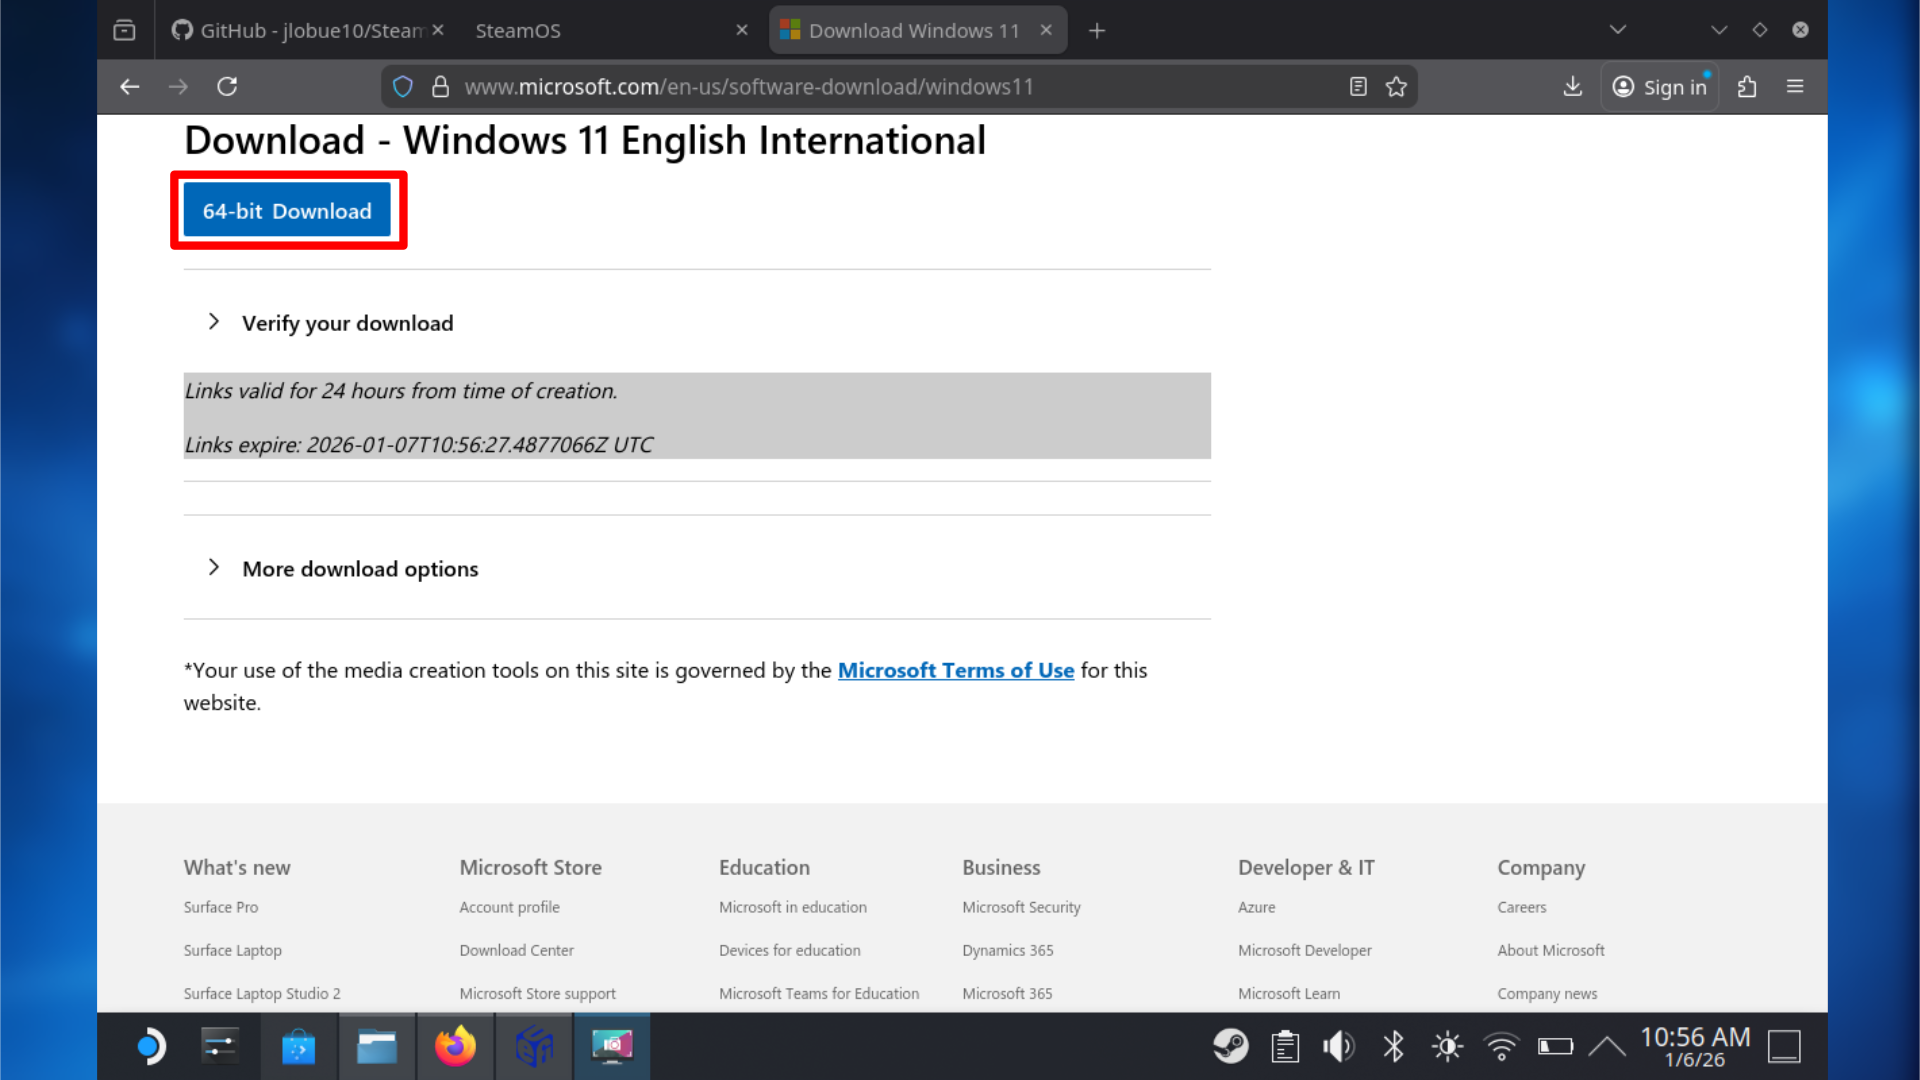
- Download the Windows 11 ISO from Microsoft’s official website.
- Insert your USB stick into your PC or SteamOS device.
- Download and install Rufus or Balena Etcher if it is not already installed.
- Open Rufus or Balena Etcher.
- Make sure your USB drive is selected under Device.
- Select the Windows 11 ISO file you downloaded.
- Leave the default settings unless prompted otherwise.
- Click Start.
- Confirm that all data on the USB drive will be erased when prompted.
Wait for the image writing process to finish. This can take several minutes.
After the process finishes, safely remove the USB drive. You’ll need this bootable USB drive in the next step to install Windows on the partition you previously made.
8: Installing Windows on Steam Deck
Now that you have your Windows installation media prepared and your hard drive set up, you can begin installing Windows on your Steam Deck. The process is generally simple, but pay close attention to one specific setting during installation.
- Power off your SteamOS device.
- Insert the Windows 11 boot media you created earlier.
- Hold the Volume Down button, then hold the Power button down.
- Release both once the boot menu appears
- Select your Windows USB drive from the list.
- Wait for the Windows installer to load; this can take some time.
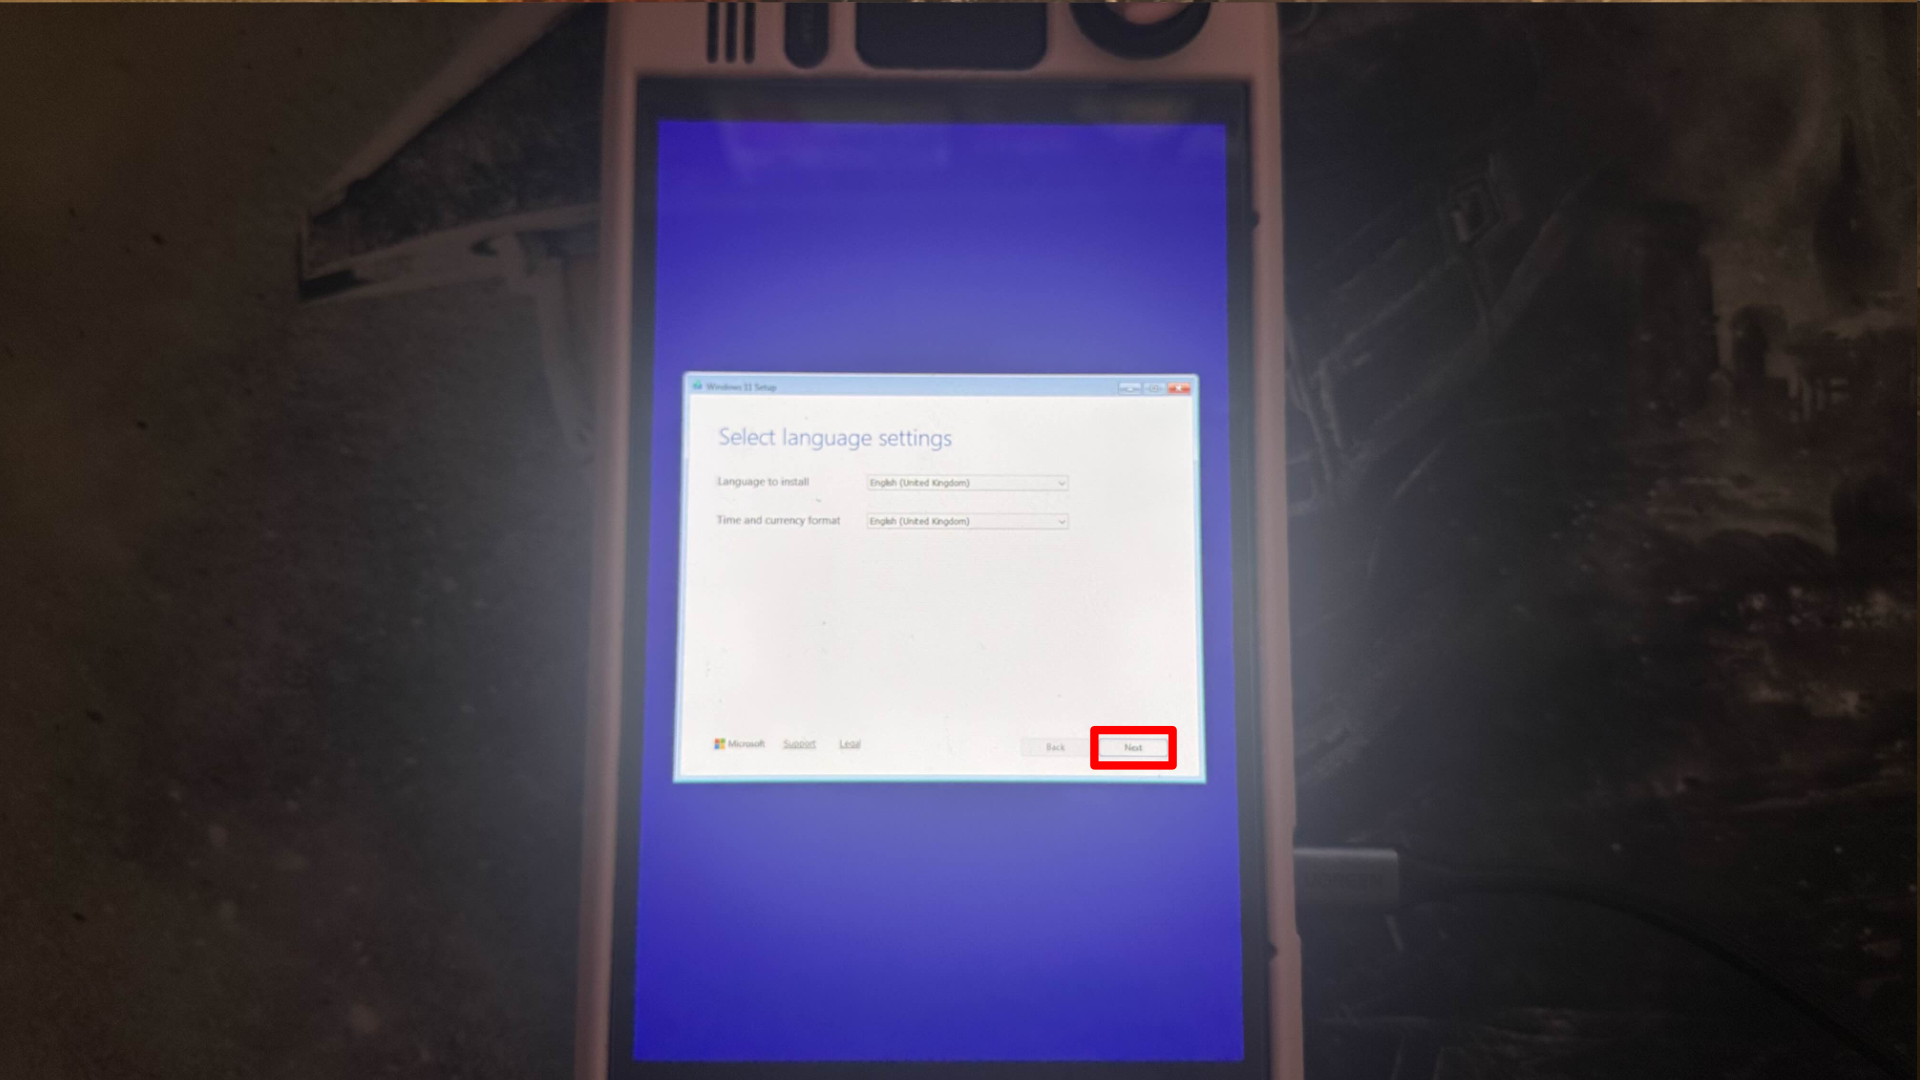
When the Windows installation window opens, turn your Steam Deck so it’s vertical (portrait mode). This will make the setup process much easier to navigate.
It is normal for Windows to be in portrait mode on boot and during setup.

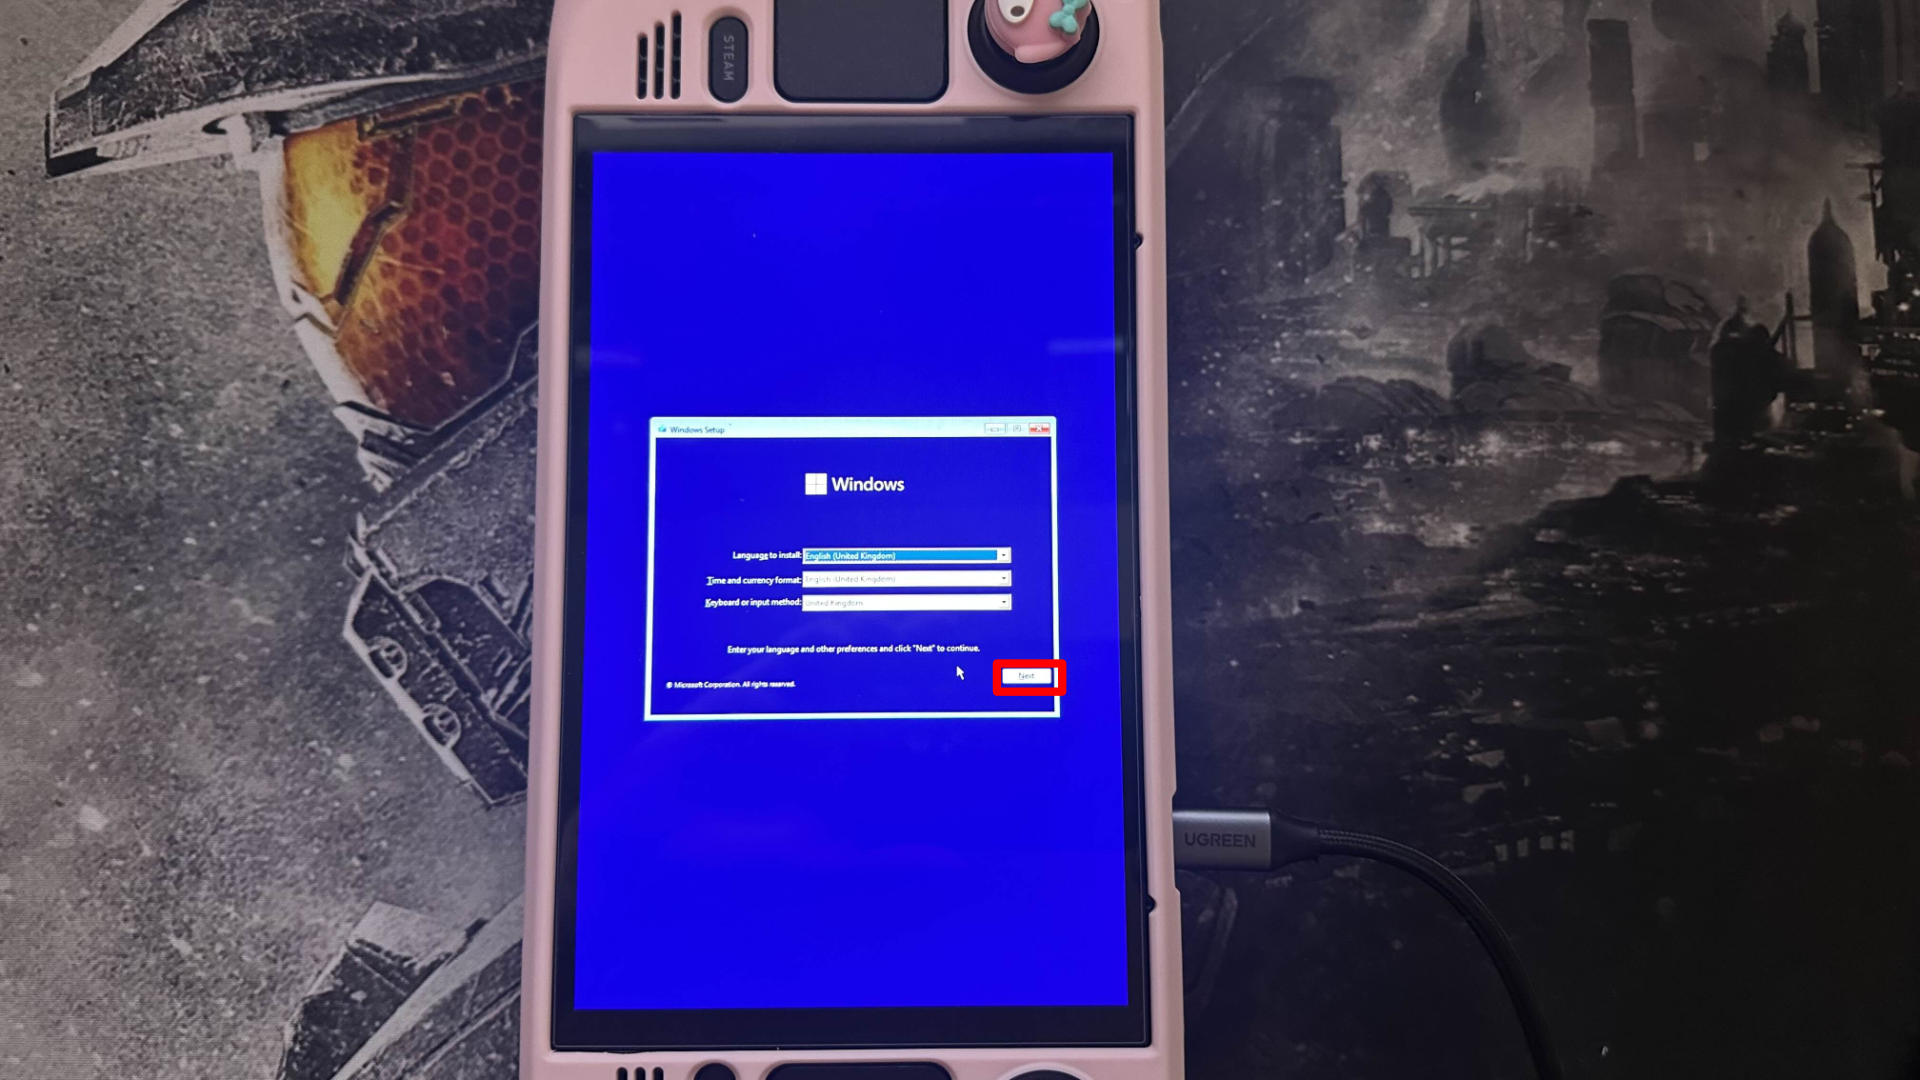

- Select Install Windows.
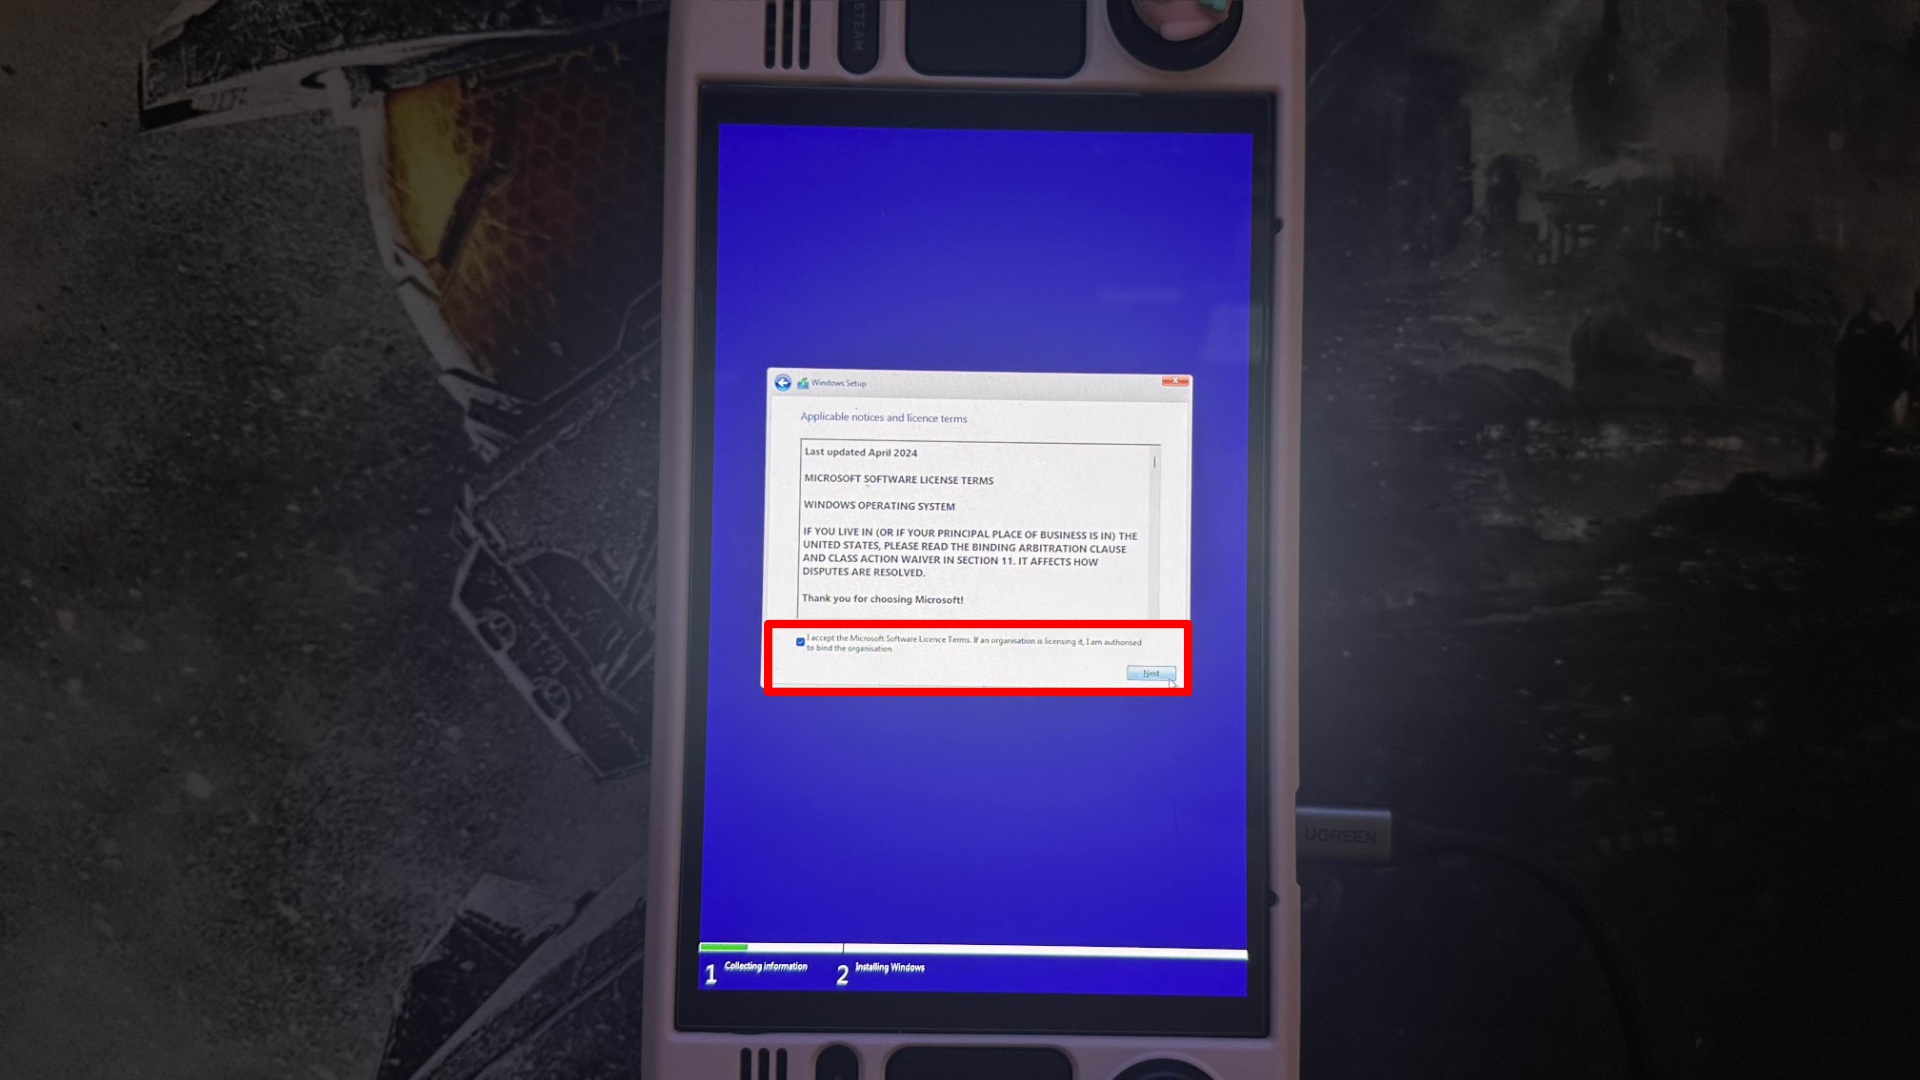
- Accept the license terms when prompted.
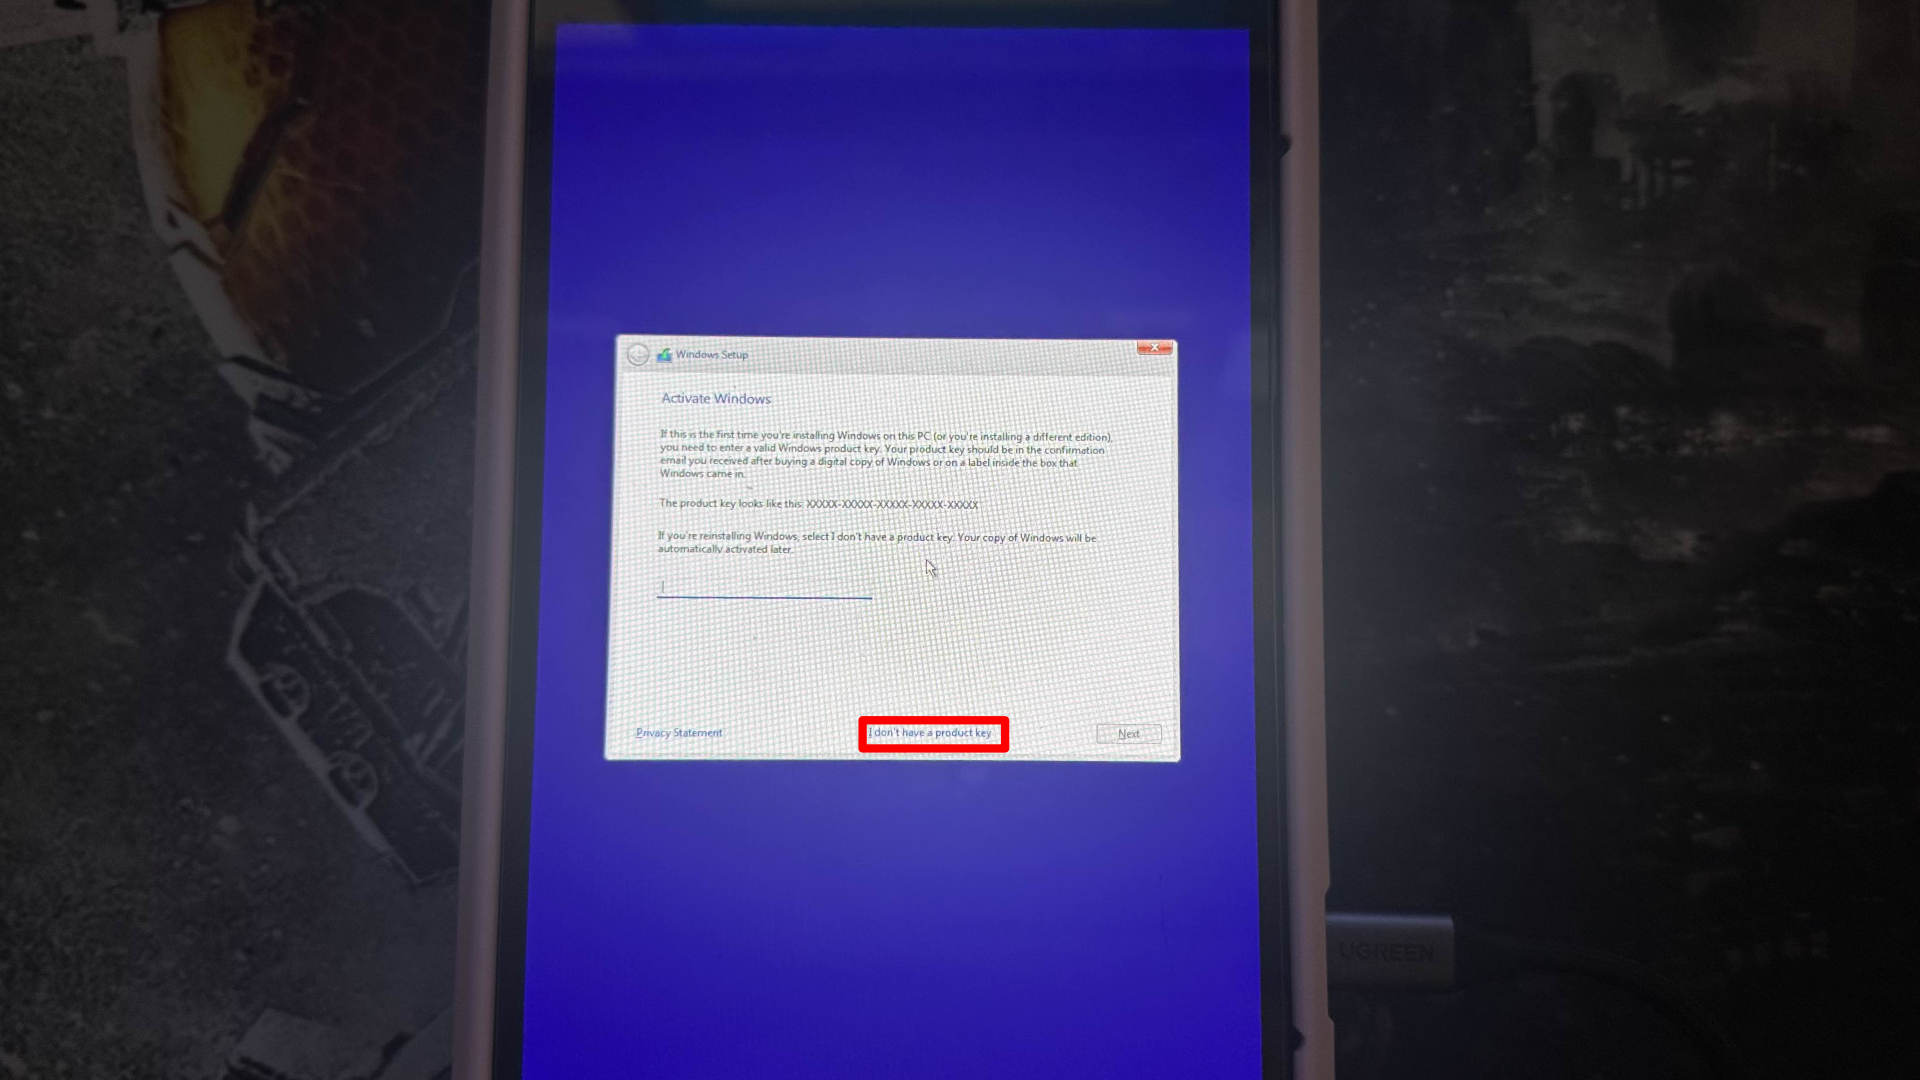
- If asked for a product key, select “I don’t have a product key.”
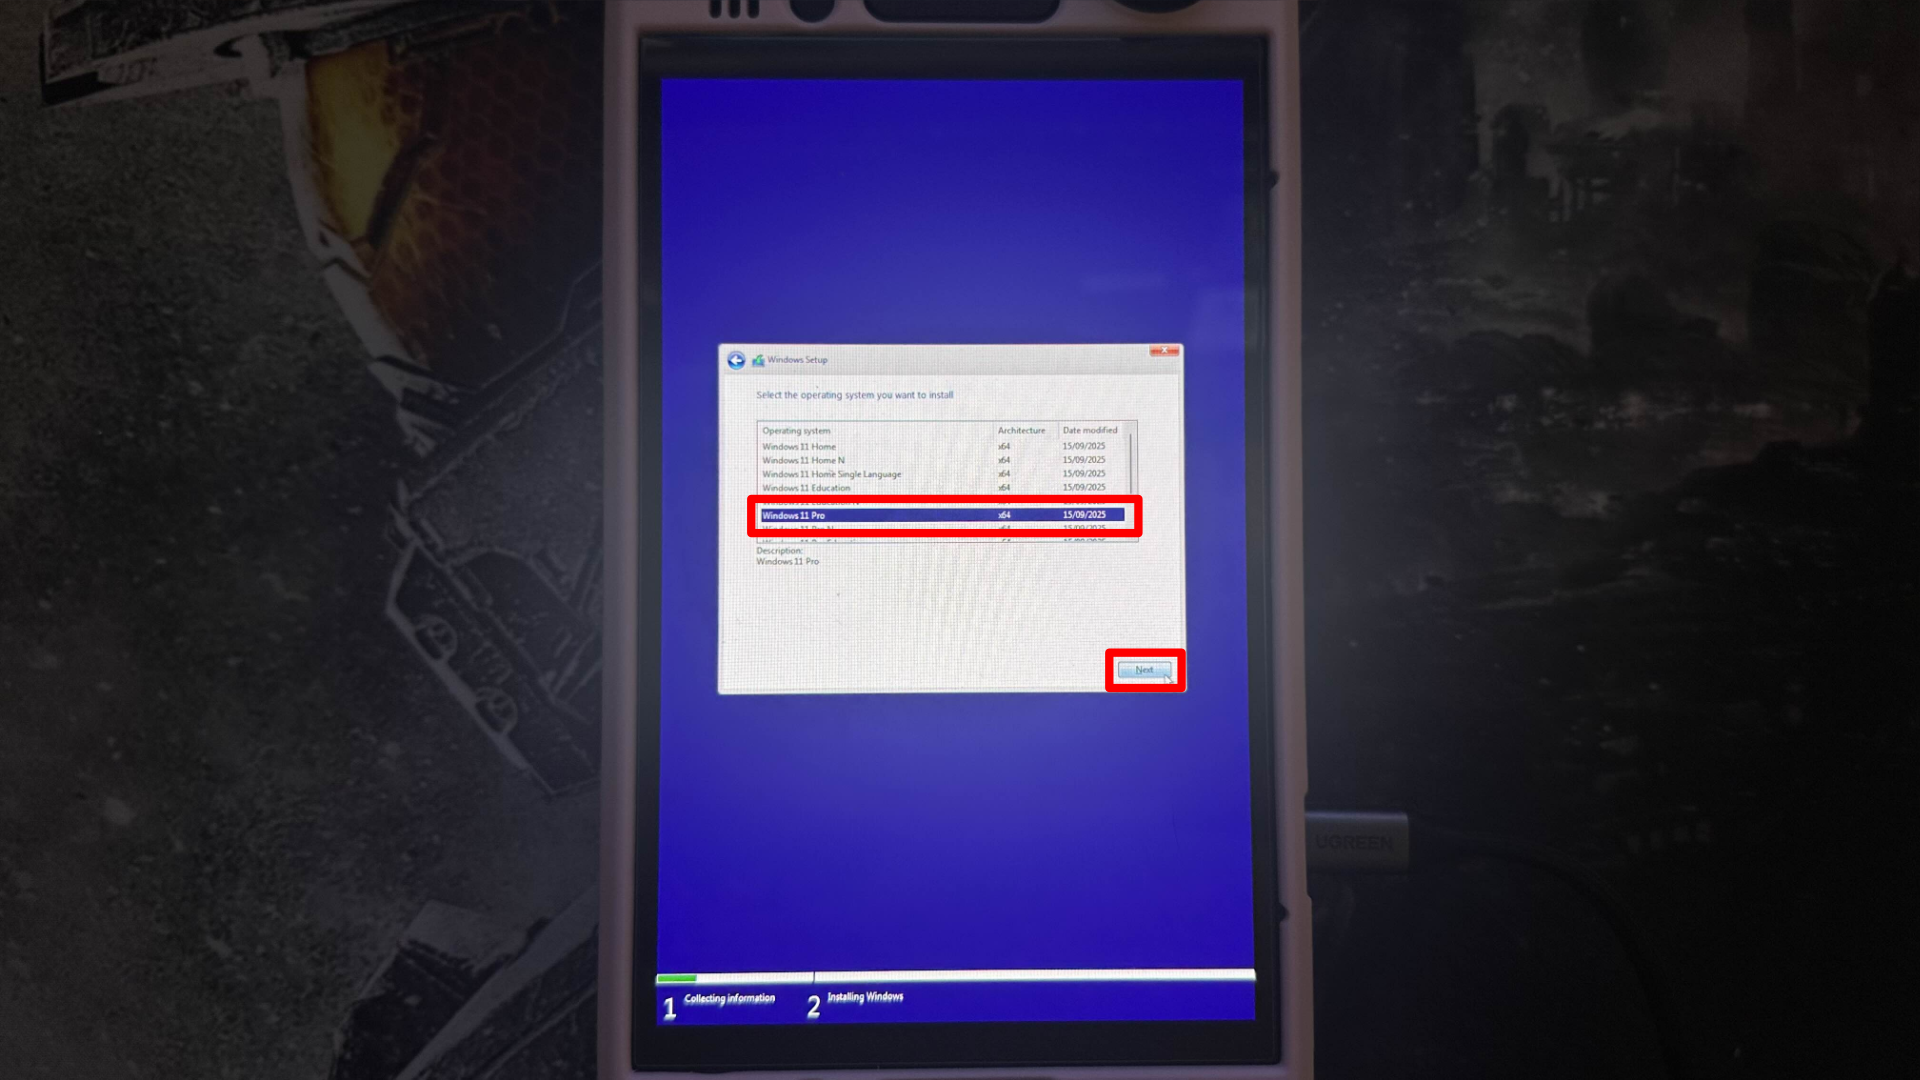
- Choose Windows 11 Pro when prompted, then select Next.
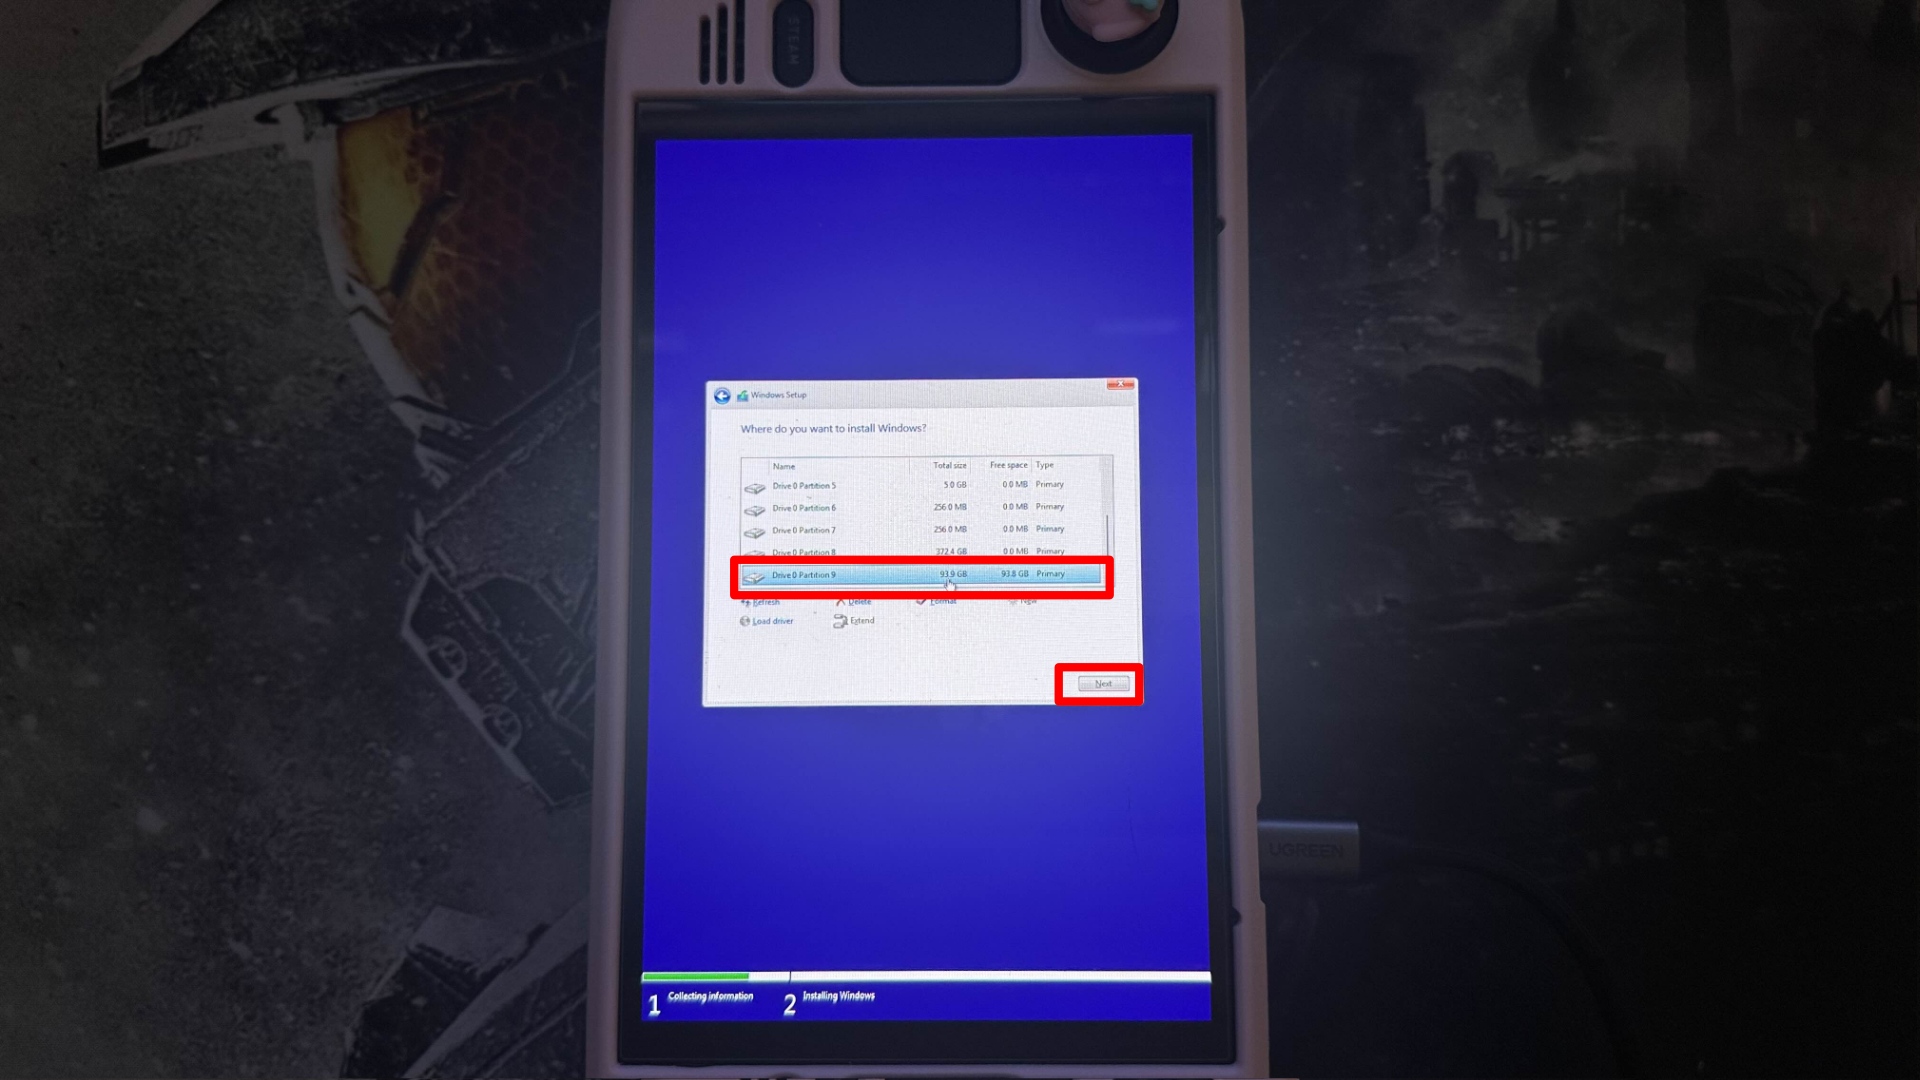
- Choose the option to install Windows only.
- Locate the NTFS partition you created earlier.
- Select this partition and choose Next.
- Do not delete or format any other partitions.
Windows setup is starting now. It should only take a few minutes, and your Steam Deck will restart on its own when it’s finished.
After the restart, the Windows setup process will continue.
- Connect to WiFi when prompted, if available, or connect via Ethernet using the USB-C hub.
- Alternatively, you can select the I don’t have internet option if available.
- Follow the install process, selecting your region, keyboard layout, etc.
After the installation finishes, Windows will start and show the desktop, probably rotated to the side. Don’t worry, this is normal and we’ll correct it in the next step.
9a: Downloading Windows drivers
As an analyst, I can confirm this instruction is specifically for Steam Deck users. If you’re using a different SteamOS-powered device, you likely don’t need to take any further action – you should already be set up.
Valve offers official Windows drivers for every Steam Deck, and these drivers are essential for Windows to function properly on your device. You can find instructions on how to install them here:
- Download all of the Windows drivers for your specific Steam Deck model from the official page.
- Once downloaded, extract each folder.
- Copy each driver folder to a USB drive and keep it somewhere easy to access.
- You will need this USB drive in the next steps when installing the drivers in Windows.
Don’t forget to download the Dual Boot Fix tool! It’s essential to keep Windows from skipping the dual-boot menu when you restart your computer.
Download the Dual Boot Fix from here and copy it to the same USB drive as your Steam Deck drivers.
If you’re having trouble with the download link, you can also find the tool on the SteamDeck rEFInd GitHub page. Just scroll down to the Windows section to locate it.
You’ll use this tool on your Windows computer later to make sure the rEFInd boot menu shows up as expected every time.
9b: Installing Steam Deck Drivers
As an analyst, I often see that after a fresh Windows installation, some key features won’t function as expected right away. This isn’t a problem – it simply means the necessary drivers haven’t been installed yet, and it’s a straightforward fix.
Before you begin, it’s important to check if you have a Steam Deck with an LCD screen or the newer OLED screen. The necessary drivers are a little different for each model.
It is also normal for Windows to be in portrait mode on boot and during setup.
You can download the drivers here if you haven’t already.
- Once the drivers are downloaded, extract each folder.
- Put the extracted folders onto your USB drive.
- Insert the USB drive containing the Steam Deck drivers into your Steam Deck.
- Next, I highly recommend following the instructions for your Steam Deck on Valve’s website, here.
Once all drivers are installed, restart Windows.
Once your device restarts, everything should be working as expected, including the screen, wireless connections, Bluetooth, sound, and SD card reader.
The next step focuses on fixing the dual-boot priority, so Windows does not bypass the boot menu.
10: Fixing problems introduced by Windows
This step prevents Windows from automatically starting up instead of showing the dual-boot menu after you restart your computer. Without it, Windows might ignore the menu and load on its own.
Make sure you’ve already downloaded the Dual Boot Fix tool and saved it to a USB drive, as you did in a previous step.
To apply the fix, follow these steps while booted into Windows:
- Insert the USB drive containing the Dual Boot Fix tool.
- Open the folder and locate the file named Setup_rEFInd_Windows_RunAsAdmin.
- Right-click the file and select Run as administrator.
- Confirm any prompts that appear.
The program will run quickly and then close on its own. It sets up a Windows scheduled task to make sure the rEFInd boot menu is always the first option when your computer starts up.
Once finished, leave Windows running and continue to the next step.
11: Final Windows configuration for Steam Deck
This step helps prevent graphical issues when booting into Windows.
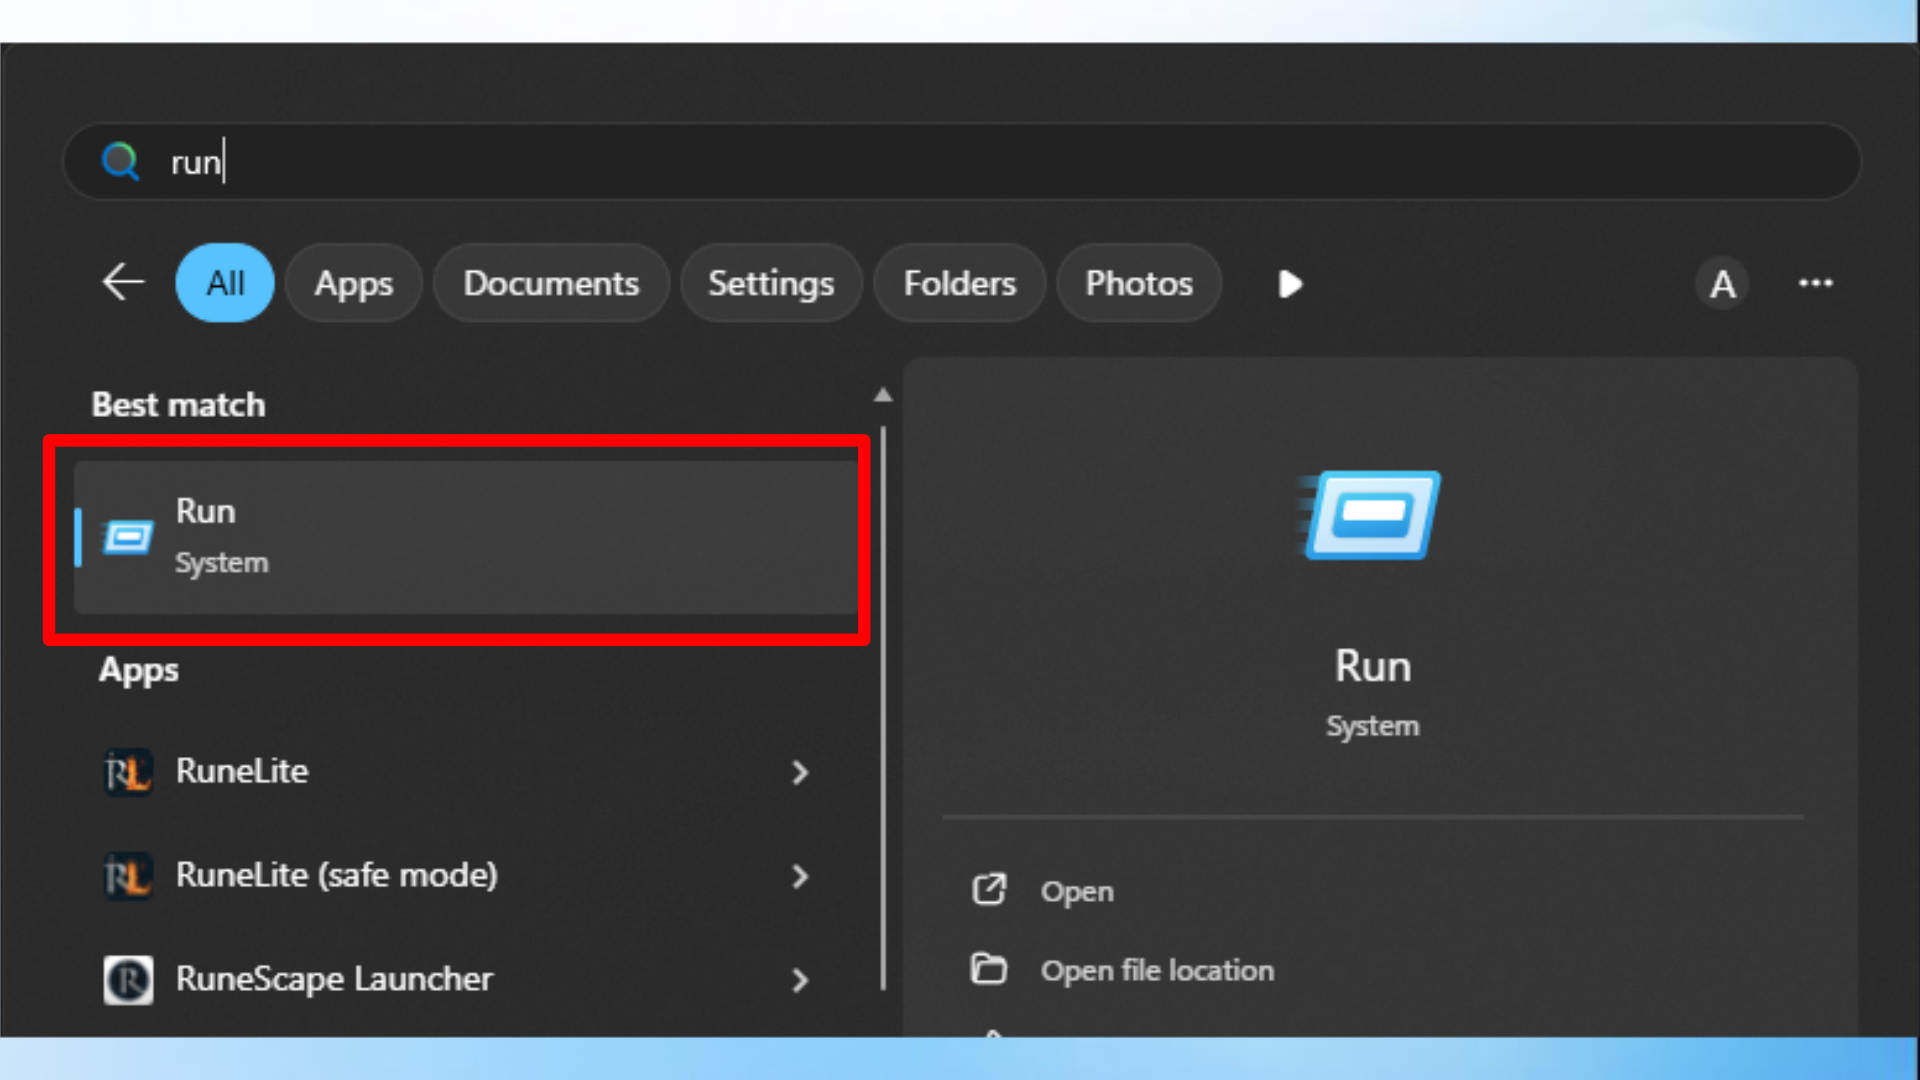
- Right-click the Start button and type Run and press Enter.
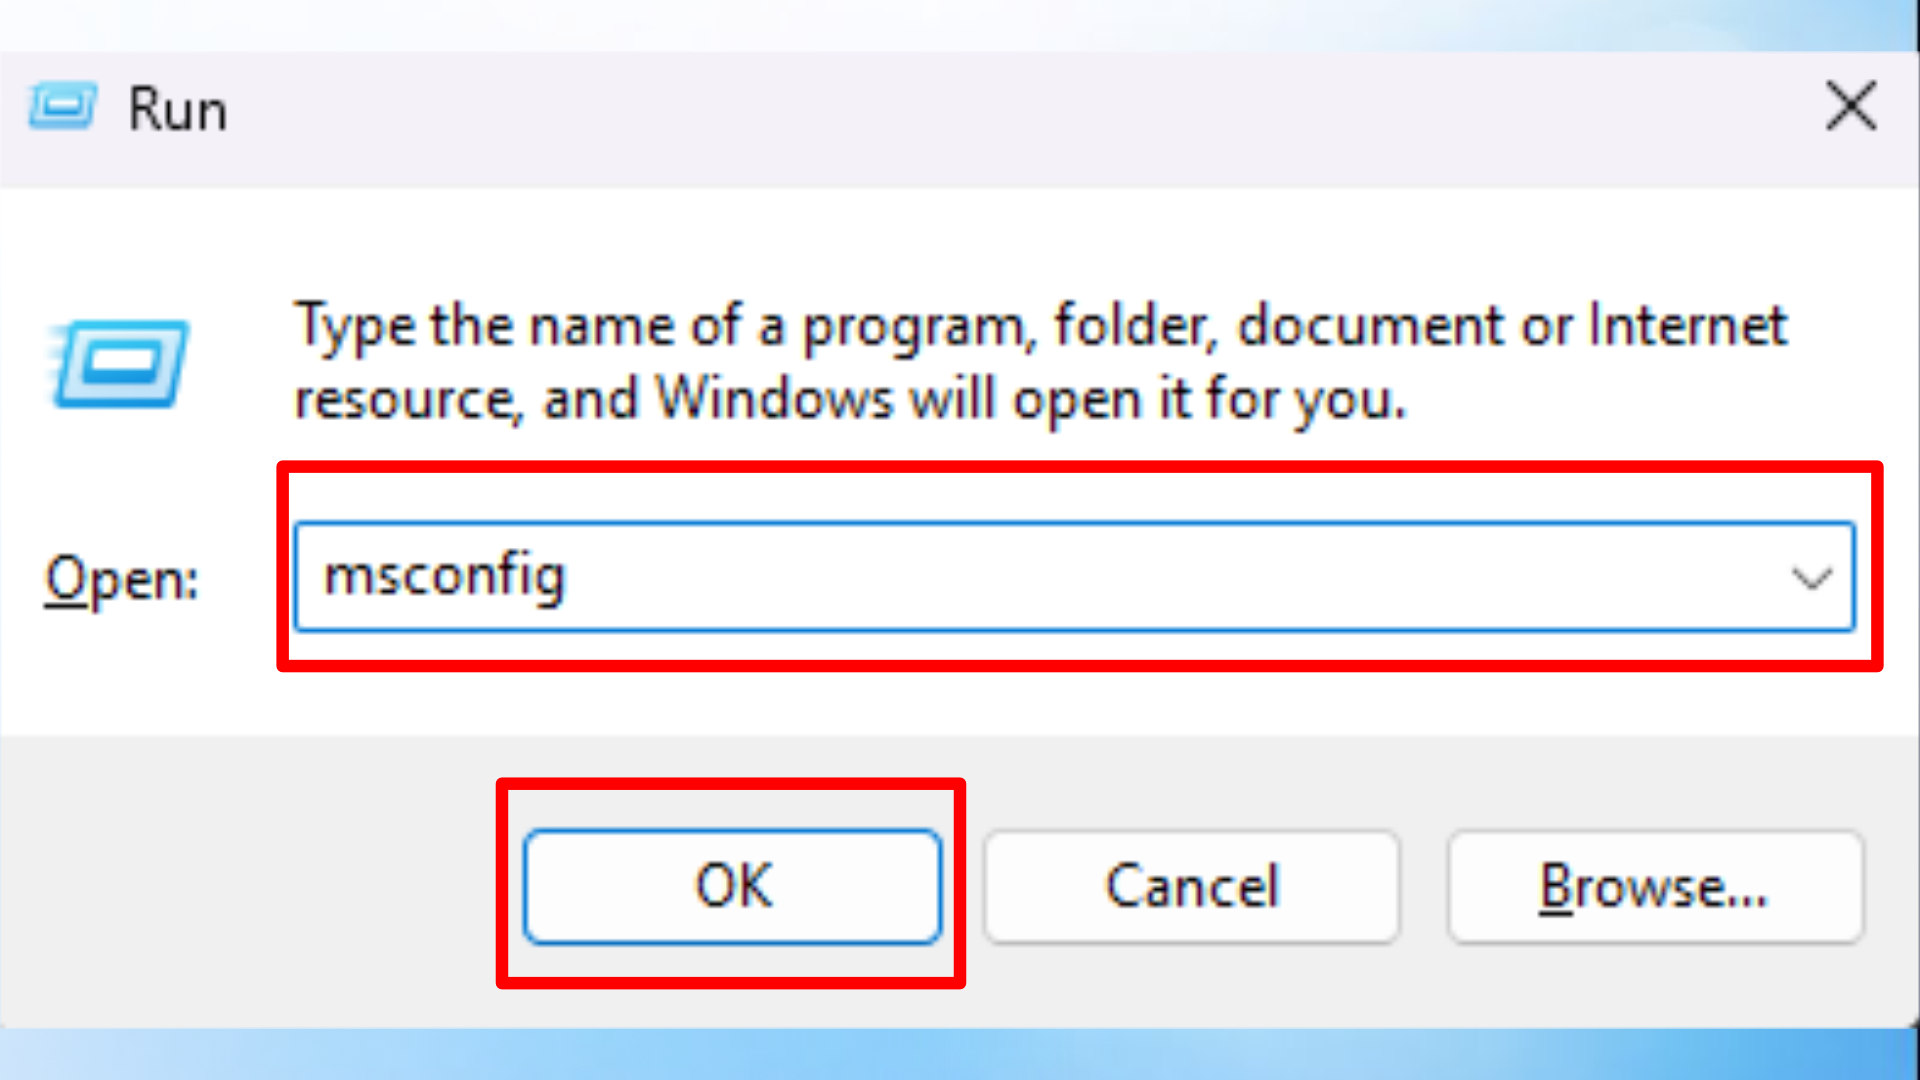
- With the Run dialog box open, type msconfig
- Press Enter or OK.
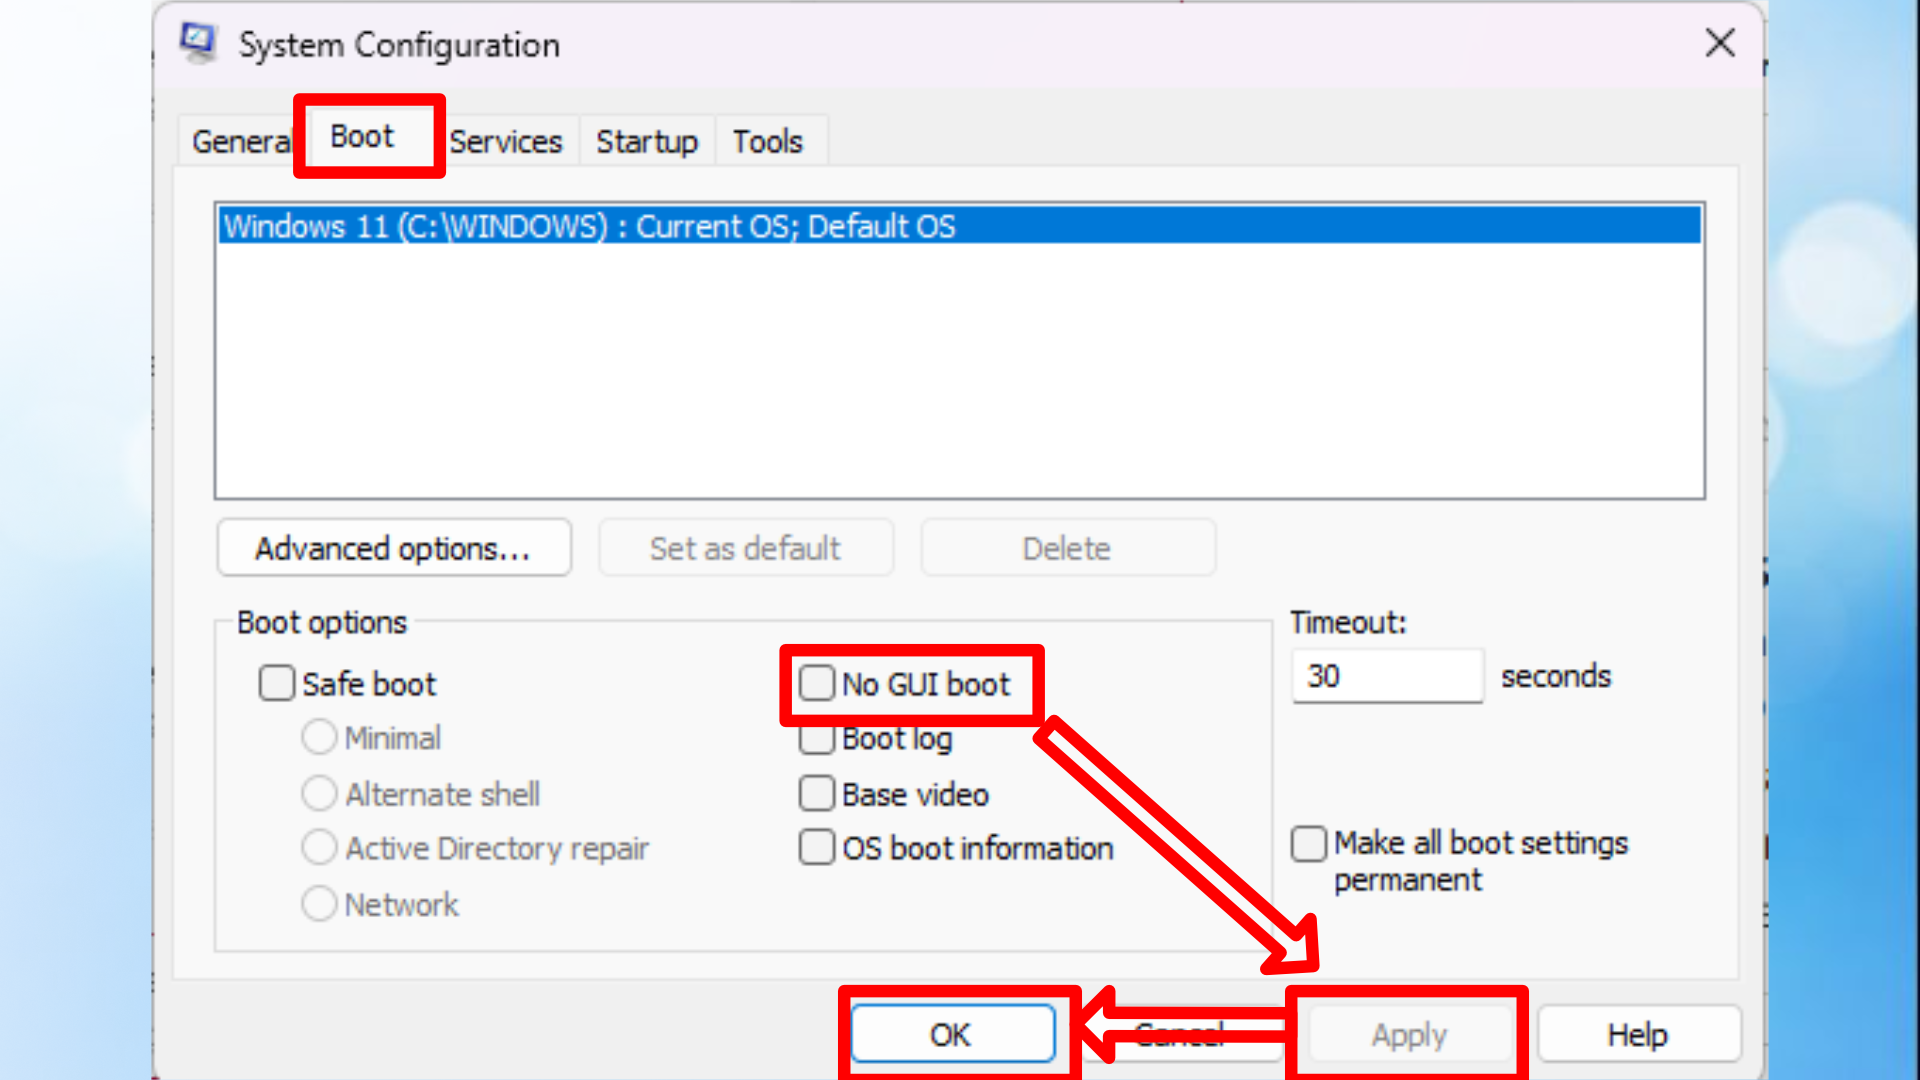
- Open the Boot tab.
- Check the option for No GUI boot.
- Select Apply, then OK.
Once this is done, shut down the Steam Deck completely.
Turn back on the device and load in to SteamOS and follow these instructions:
- Open the rEFInd GUI from the desktop.
- Select Create config.
- Select Install config and enter your password when prompted.
- Restart the Steam Deck.
After these steps, you should be able to start your computer and see a menu that lets you choose between SteamOS and Windows. Everything should be set up and working as expected.
This guide is inspired by a video from Deck Wizard, but it’s been completely updated to reflect the latest tools and best practices. Consider it a modern refresh of the original content.
Read More
- Forza Horizon 6 Car List So Far: Confirmed Highlights, Cover Cars, DLC, and Rewards
- Elon Musk’s Ex Ashley St. Clair Reveals When Romance Became “Weird”
- GBP CNY PREDICTION
- Mark Zuckerberg & Wife Priscilla Chan Make Surprise Debut at Met Gala
- Elon Musk’s Mom Maye Musk Shares Her Parenting Philosophy
- 10 Greatest Manga Endings of All Time
- Ranking the 5 Best Spring 2026 Anime So Far (Mid-Season Update)
- 20 K-Dramas That Nailed the Perfect Ending
- 10 Best Free Games on Steam in 2026, Ranked
- Miranda Kerr Shares “Quick” Procedure She Got Before Met Gala 2026
2026-01-19 15:15