Keeping your Windows 11 computer in good shape can help it last longer. This guide offers simple tips to ensure your device runs smoothly for years.
As a tech enthusiast, I’ve noticed something really frustrating lately: computer hardware isn’t getting any cheaper! Things like RAM are constantly going up in price, and storage costs are climbing too. Even building or buying a basic computer now costs way more than it did just a few years ago. It’s gotten to the point where replacing a perfectly good device feels like a major expense, not just a simple upgrade anymore.
Windows 11 has several built-in features that can help you keep your computer running well for longer. I’ll walk you through almost a dozen of these helpful methods.
In this how-to guide, I’ll dive into simple tips to help you keep your device for years to come.
Top 10 maintenance tips everyone should know on Windows 11
Here are 10 things you can do on Windows 11 to help your device last longer.
1. Software maintenance is a way to avoid costly upgrades
As a tech person, I’ve been noticing lately that when RAM and storage get pricey, even small inefficiencies really start to hurt. A system that’s full of unnecessary stuff just gobbles up memory and storage, and honestly, it can *feel* like your hardware is dying when it’s really just running out of space. It’s a frustrating situation!
A clean and stable operating system helps you get the most out of your computer’s memory and storage – meaning you’re fully utilizing what you’ve already purchased.
Control apps at startup
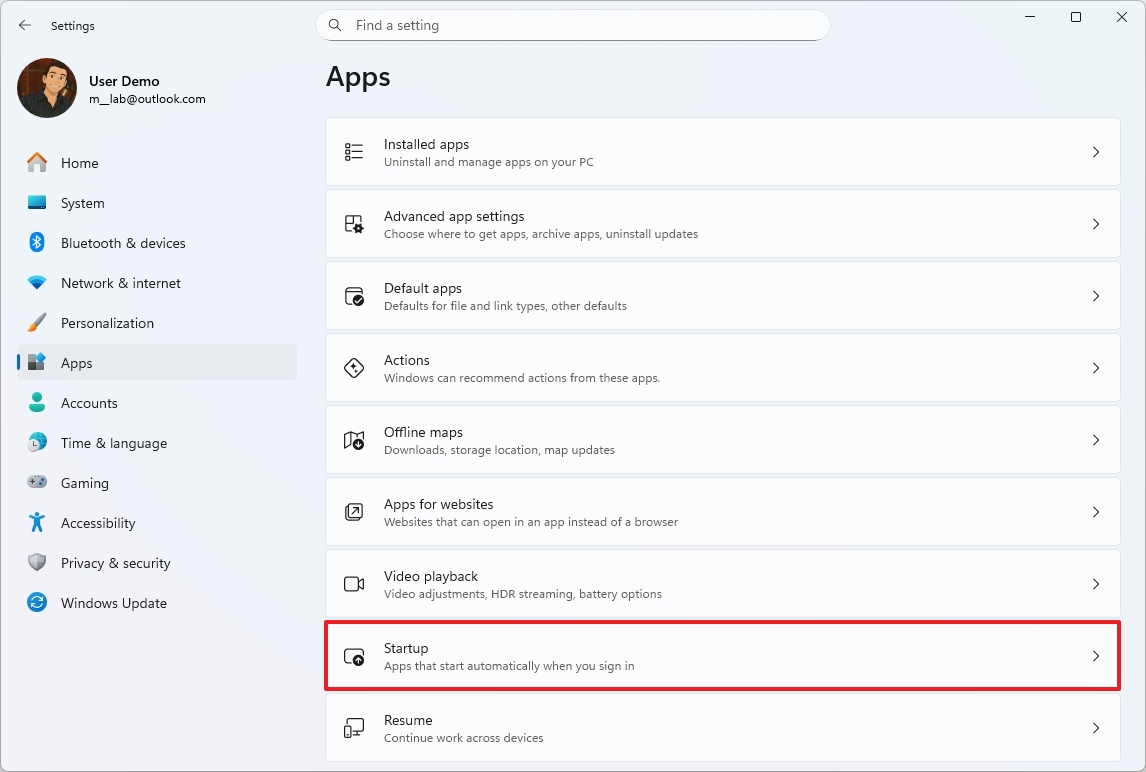
To prevent specific apps from running at startup, use these steps:
- Open Settings.
- Click on Apps.
- Click the Startup page on the right side.
- Select the Startup impact option in the “Sort by” setting.
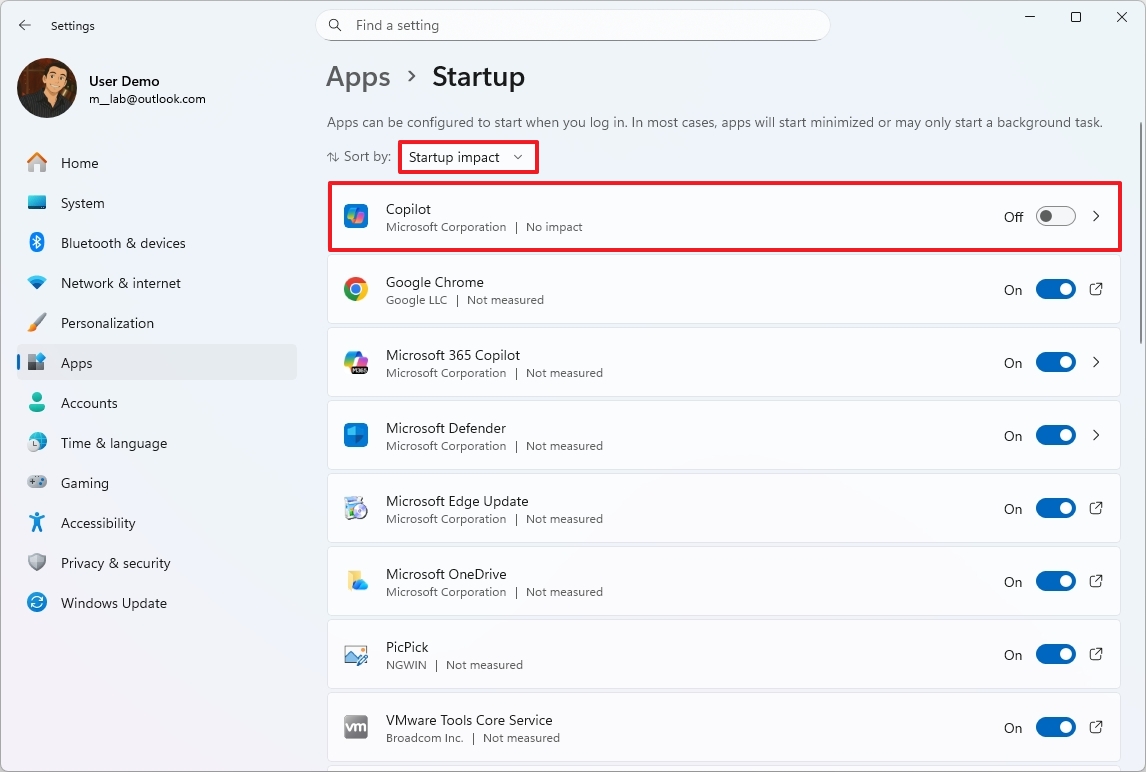
- Turn off the applications impacting the most performance.
Once you’ve finished these steps, your computer should run faster and more efficiently. This means it will have more power available for other programs, making everything feel smoother and more responsive. How much improvement you see will depend on how much unnecessary stuff you were able to remove.
You can also uninstall unnecessary apps, and I will show you how to do this in the steps below.
2. Keep Windows 11 updated to protect your hardware investment
As a tech person, I always make sure to keep my systems updated, and it’s not *just* about protecting my data. These updates actually fix weaknesses in the software that could mess things up – like corrupting important system files, causing drivers to fail, or even forcing me to completely reinstall my operating system. It’s a pain to deal with any of that, so staying current is key!
I understand this is a trade-off. While recent Windows 11 updates haven’t always been perfect and have sometimes caused problems, it’s still best to keep your device updated. Outdated systems are more vulnerable to security threats and can perform poorly. Ignoring updates can even lead to failures that force you to buy new hardware when you might not need to.
It’s much more cost-effective to prevent computer problems than to fix them by replacing hardware or making major upgrades.
Install system updates manually
While your operating system typically updates automatically, you can also check for updates yourself by following these instructions:
- Open Settings.
- Click on Windows Updates.
- Click the “Check for updates” button.
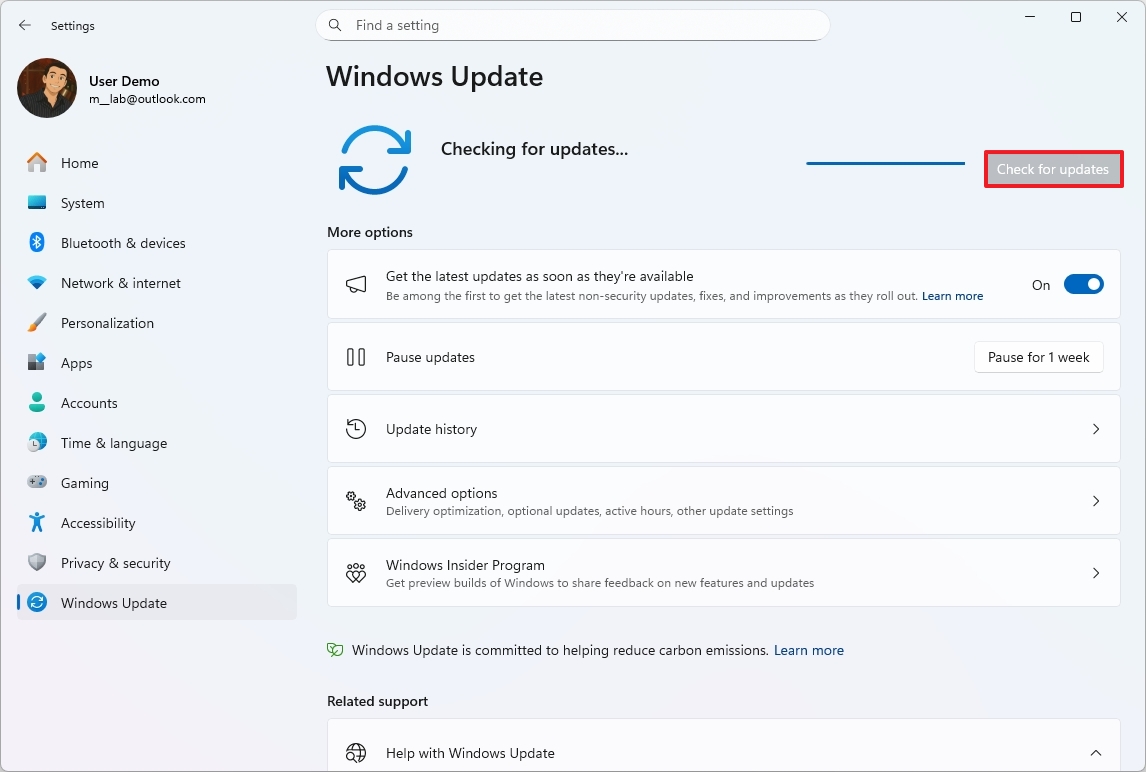
Once you complete the steps, the computer will download and install the latest update available.
You can also update Windows 11 by downloading and installing the necessary files directly from the Microsoft Update Catalog website.
3. Reduce memory usage by controlling startup apps
If your computer feels slow, high memory usage could be the cause. Often, this happens because lots of programs start up automatically and continue running in the background, using up valuable memory.
Windows 11 allows you to prevent unnecessary programs from automatically launching when you start your computer, without needing to remove them completely. You can also disable features within Windows and apps that you don’t need. If your computer is using a lot of memory, it could be a sign of a malware infection.
Remember that lowering RAM usage can delay the need for expensive memory upgrades.
Uninstall unused apps
Besides stopping apps from launching automatically, it’s a good idea to remove programs and games you don’t use anymore. This will give your computer more free space and help it run faster. Here’s how to do it:
- Open Settings.
- Click on Apps.
- Click the Installed app page on the right side.
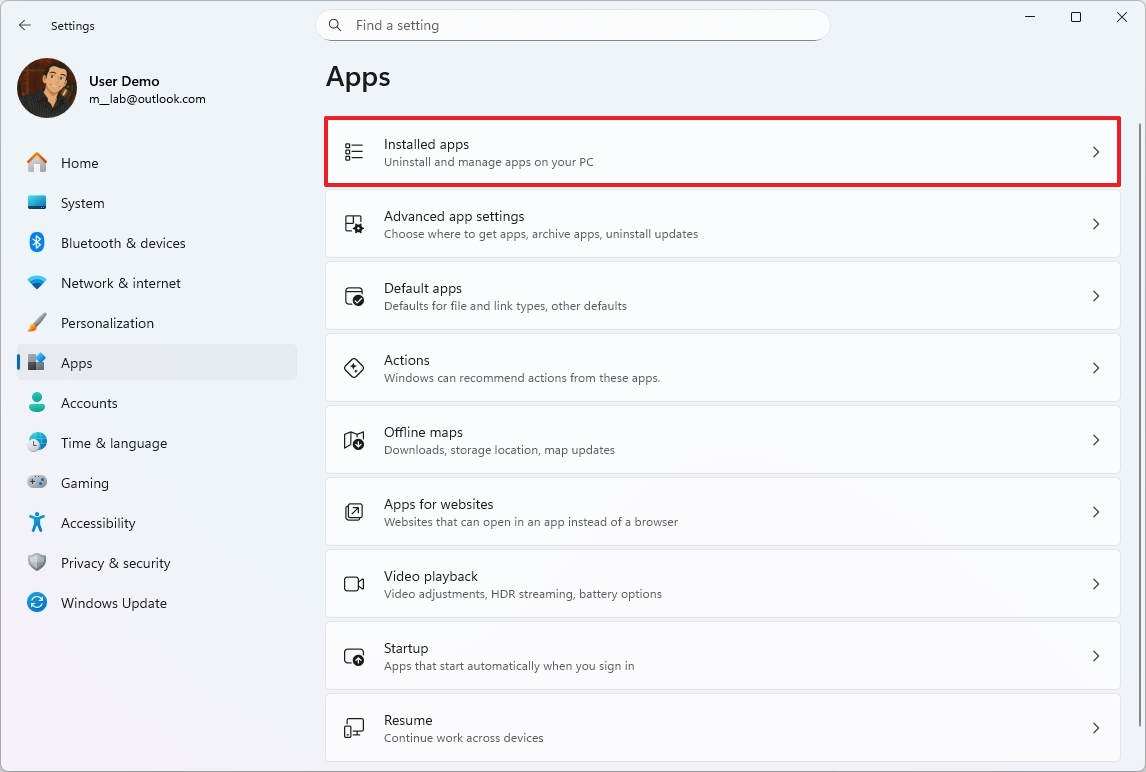
- Open the app’s menu from the right side and click the Uninstall option.
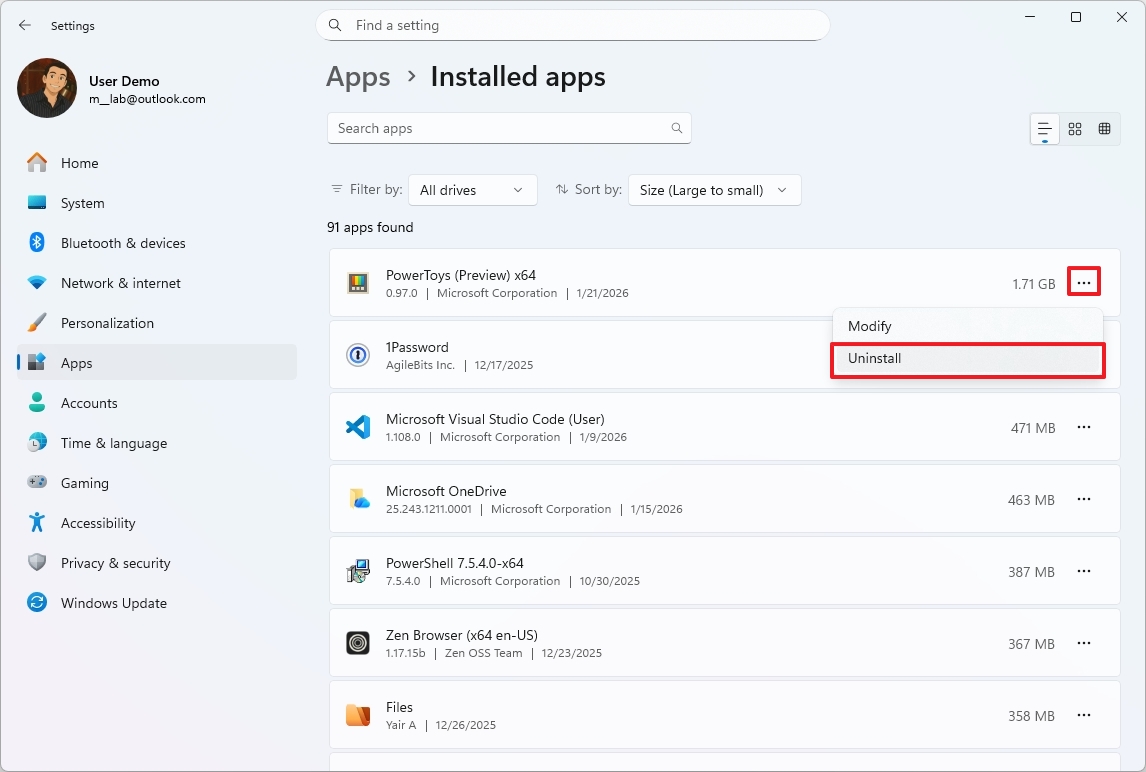
- Click the Uninstall option one more time.
- Continue with the on-screen directions (if applicable).
After finishing these steps, you might want to repeat them to remove any other apps or games you don’t need.
Full antivirus scan
To confirm that malware isn’t taking your system’s RAM hostage, use these steps:
- Open Start.
- Search for Windows Security and click the top result to open the app.
- Click on Virus & threat protection from the left pane.
- Click on Scan options.
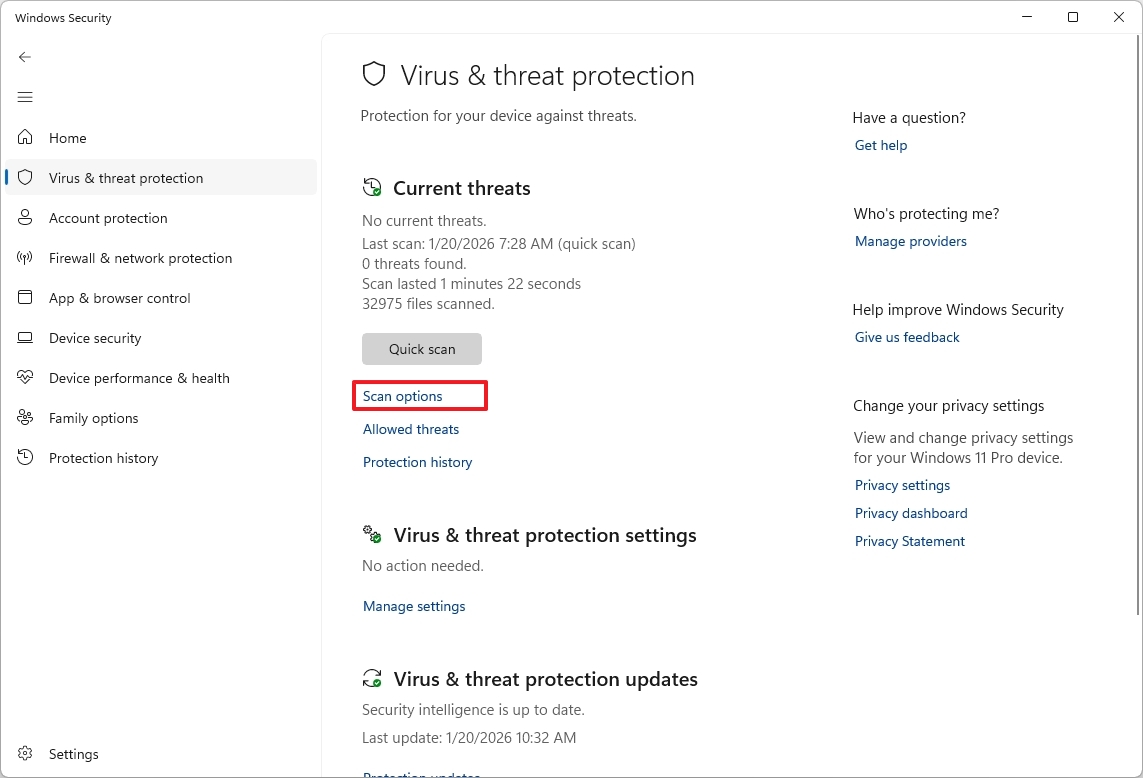
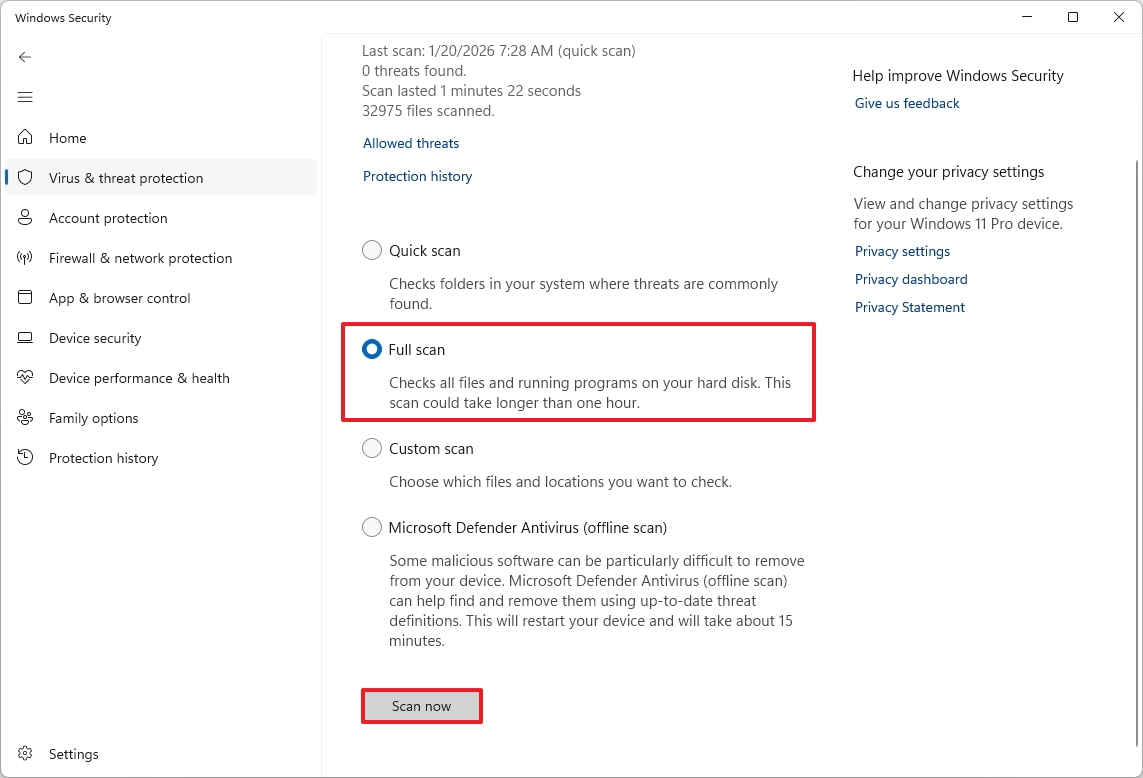
- Select the Full scan option.
- Click the Scan now button.
Once you finish the steps, the antivirus will check your device for harmful software, find it, and then get rid of it.
If your computer is still using a lot of memory after running a scan, and you think a virus might be the cause, try running a malware scan while your computer isn’t connected to the internet.
You can also take other actions to free up memory. For instance, disable any system services or features you don’t need, and consider using tools like Microsoft PC Manager, which has options to help reduce how much memory your system uses.
4. Reclaim storage that you cannot easily replace
It used to be affordable to add more storage, but that’s not as true anymore, particularly for speedy NVMe drives. Plus, all those apps you don’t use, temporary files, and things running in the background take up valuable space that your computer needs to run smoothly.
Deleting programs you don’t use and getting rid of temporary files can help free up space on your computer and keep it running smoothly. But be careful with overly aggressive cleaning tools – they might delete important files, causing problems that could require you to reinstall programs or even replace hardware.
When your storage fills up, it can slow down your device, cause updates to fail, and even force you to replace your hard drive sooner than expected.
Free up storage space
Windows 11 offers several ways to free up disk space, and the “Cleanup recommendations” feature is a great place to start. It automatically identifies files you can safely delete from your computer.
To free up space with Cleanup recommendations on Windows 11, use these steps:
- Open Settings.
- Click on System.
- Click the Storage page on the right side.
- Under the “Storage management” section, select the “Cleanup recommendations” setting.
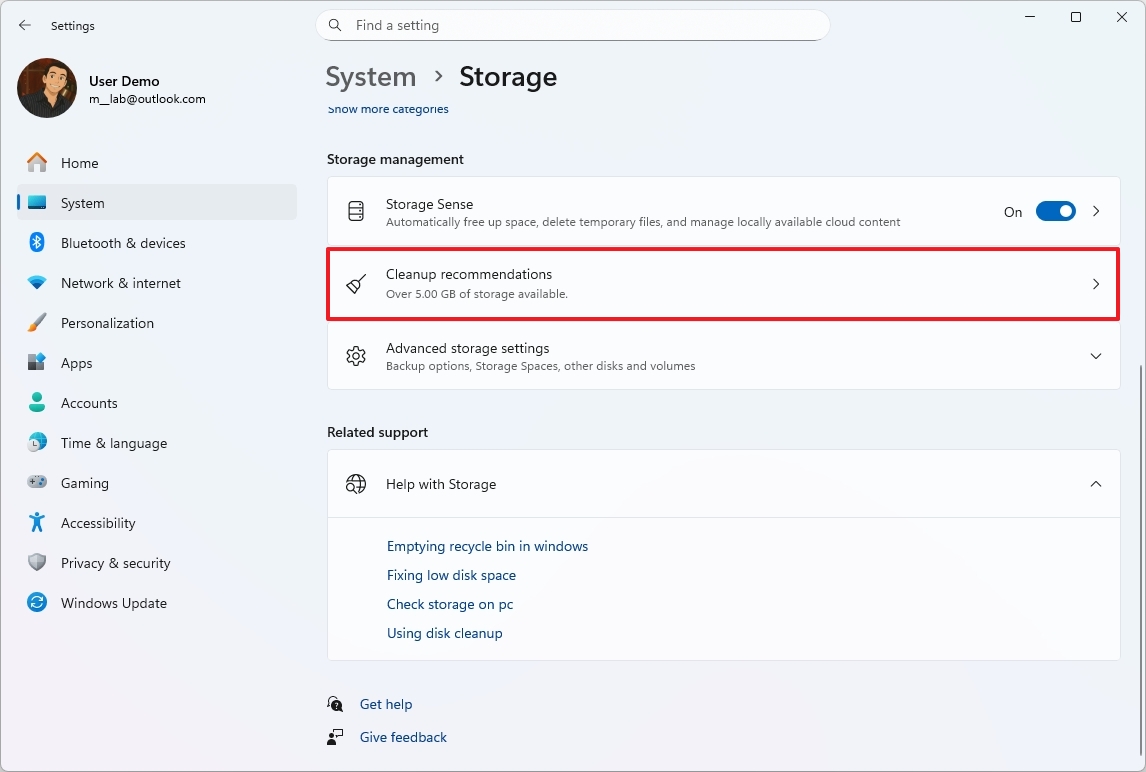
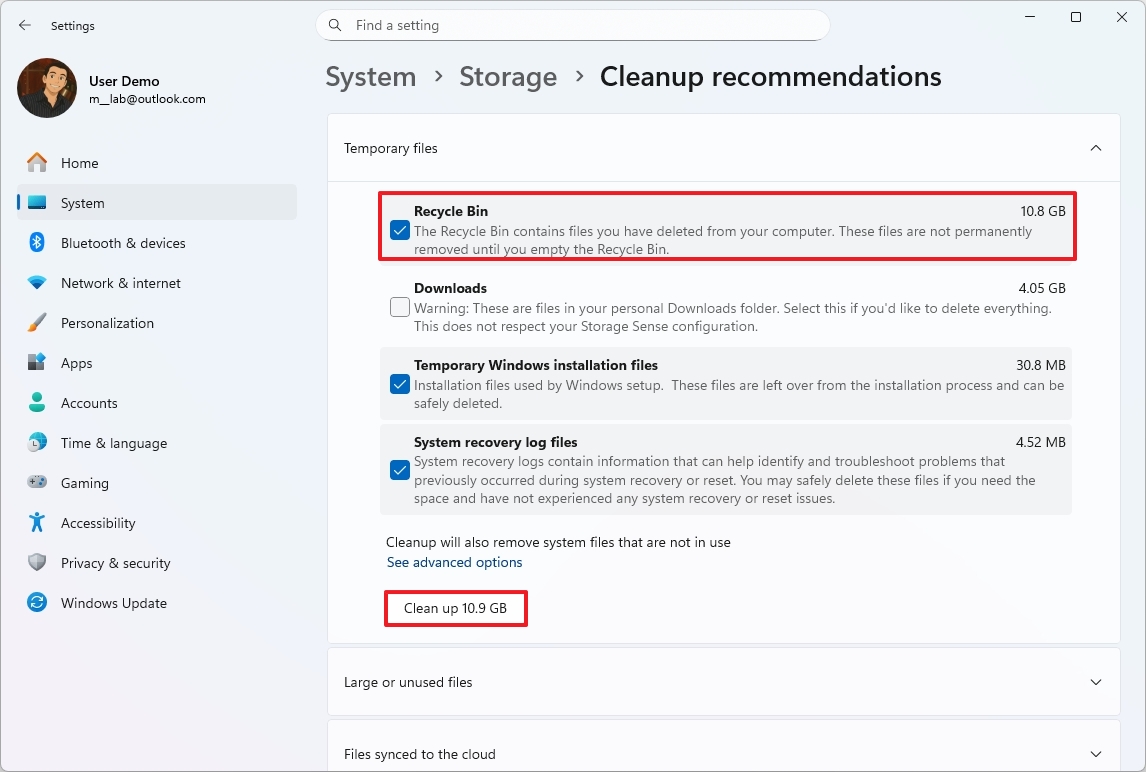
- Click on Temporary files.
- Select the files to delete to free up space.
- Click the Clean up button.
- Click on “Large or unused files.”
- Select the large and unused files to delete.
- Click the Clean up button.
- Click on “Files synced to the cloud.”
- Select the synced files that you can delete locally.
- Quick note: If you delete synced files, they will still be available on your OneDrive account.
- Click on Unused apps.
- Check the recommended apps that you can delete to free up space on Windows 11.
- Click the Clean up button.
After you finish these steps, the content will be removed, creating space for new files.
5. Preserve SSD health to avoid early replacement
Solid-state drives (SSDs) have a limited lifespan and can wear out quicker if they’re almost full or are constantly saving data they don’t need. This is because of how SSDs store information. Leaving plenty of free space and minimizing unnecessary activity can help them last longer by reducing the amount of writing they need to do.
To keep your SSD running smoothly and extend its lifespan, focus on minimizing unnecessary writing, regularly updating its software (firmware), and preventing factors that cause it to wear out quickly. Here’s how to do that:
Keep free space available
Solid state drives (SSDs) work best when they have some free space. To keep your SSD running smoothly and extend its lifespan, it’s generally best to avoid filling it more than 70% full.
Avoid unnecessary write-heavy tasks
Lots of small, random writes, detailed logging, and running benchmarks all contribute to increased write amplification. While rewriting large chunks of data puts more strain on the flash memory itself, it’s usually easier for the SSD to handle than many small, scattered updates, which force the drive to move data around internally.
Do not defragment a Solid-State Drive
Defragmenting a solid state drive (SSD) isn’t helpful and can actually reduce its lifespan by causing extra writing. Windows 11 uses a feature called TRIM instead, which efficiently tells the SSD which data is no longer needed, allowing it to clean up those blocks internally.
Windows 11 usually has TRIM turned on automatically, but it’s a good idea to make sure it’s working correctly. Here’s how to check and enable it:
- Open Start.
- Search for Command Prompt, right-click the top result, and choose the Run as administrator option.
- Type the following command to confirm whether TRIM is enabled or disabled and press Enter: fsutil behavior query disabledeletenotify
- Confirm the output, the “NTFS DisableDeleteNotify = 0” result means enabled, and the “NTFS DisableDeleteNotify = 1” means disabled.
- Type the following command to enable TRIM and press Enter: fsutil behavior set disabledeletenotify 0
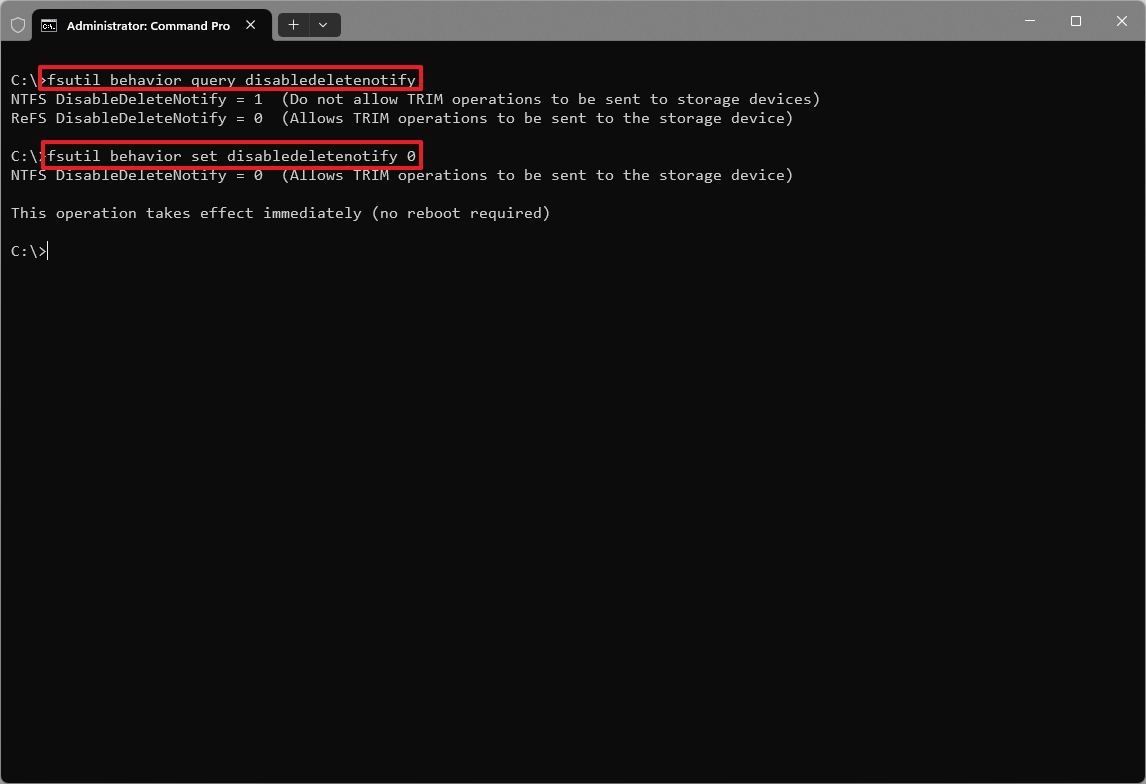
- Type the following command to confirm the state of the feature and press Enter: fsutil behavior query disabledeletenotify
Once you complete the steps, the TRIM feature will be enabled on Windows 11.
Keep firmware and system updates current
Updating the firmware on your solid state drive (SSD) usually makes it more reliable, faster, and better at managing wear and tear. Keeping your SSD updated can therefore help it last longer.
Because each manufacturer updates devices differently, it’s best to visit the manufacturer’s website to get the update tool and instructions specific to your device.
Honestly, I only recommend updating your storage’s firmware if the manufacturer specifically flags it as a really important, must-do update. And seriously, *always* back up everything on that storage before you even think about updating – you’ll thank yourself later!
Manage temperatures
Running a solid-state drive (SSD) in very hot or cold conditions can cause it to wear out faster. To help prevent this, make sure air can flow around the drive, avoid constantly saving large files without adequate cooling, and keep laptop vents clear.
To check the SSD temperature on Windows 11, use these steps:
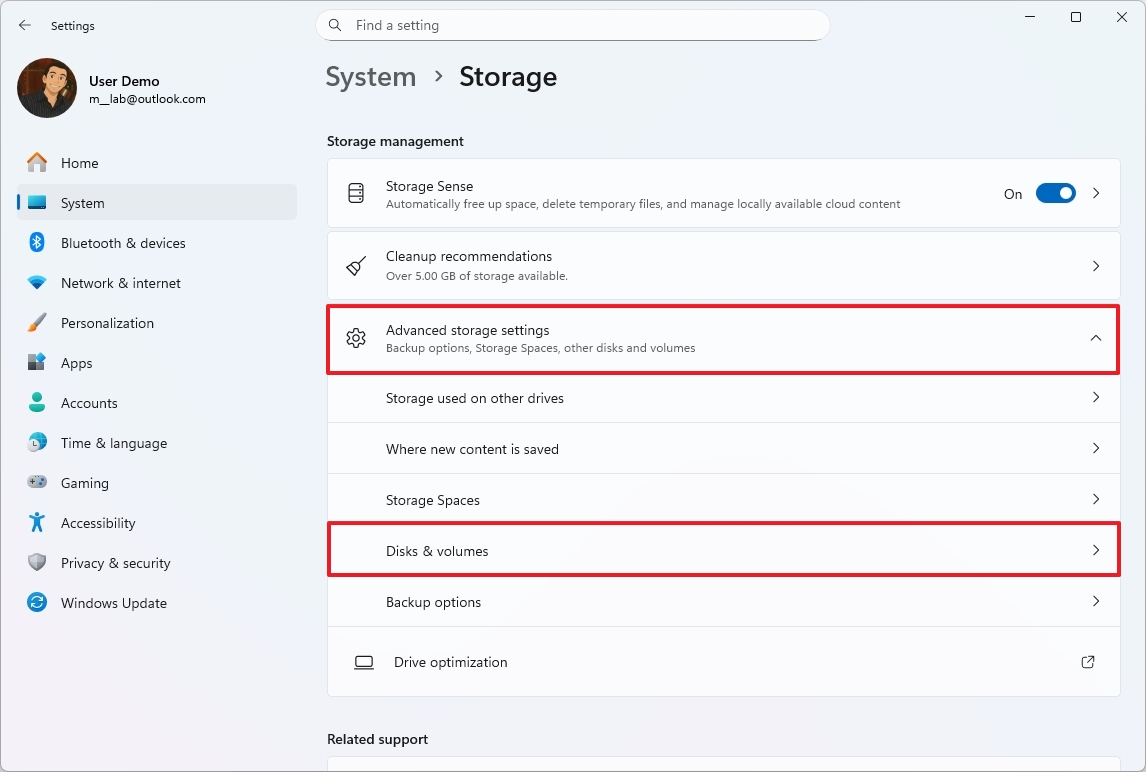
- Open Settings.
- Click on System.
- Click the Storage page on the right side.
- Select the “Advanced storage settings” option under the “Storage management” section.
- Click on Disks & volumes.
- Click the Properties button for the drive.
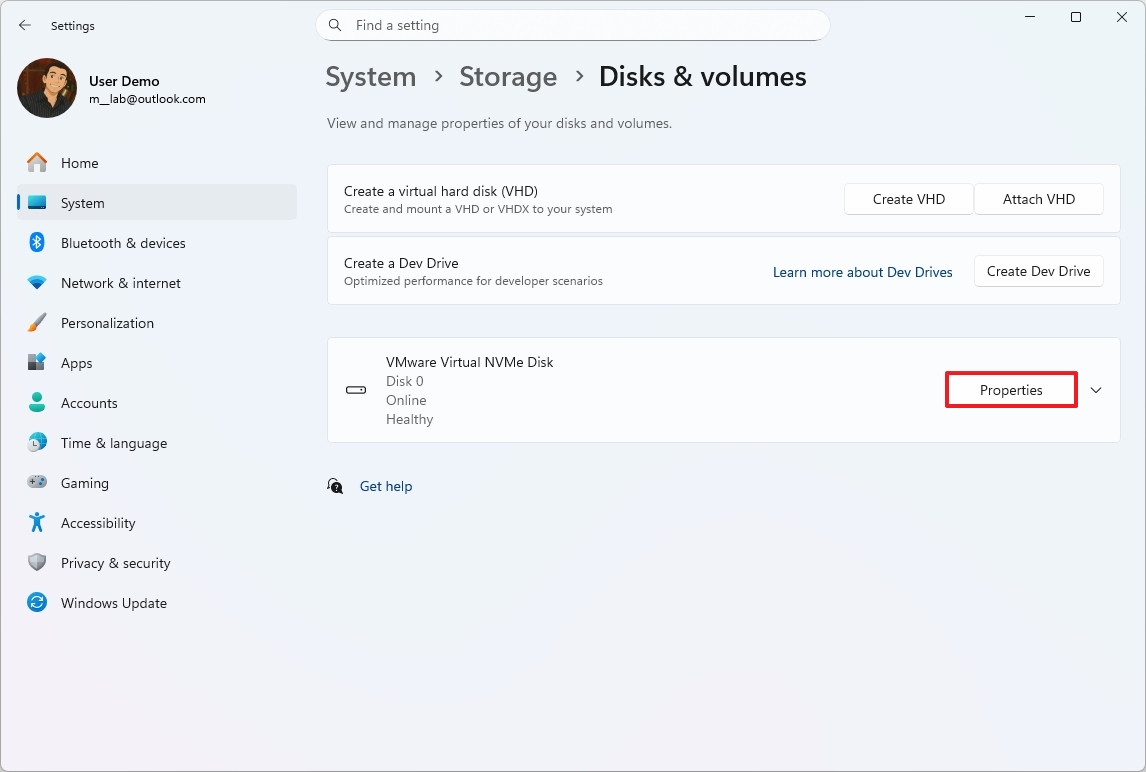
- Confirm the current temperature under the “Drive health” section.
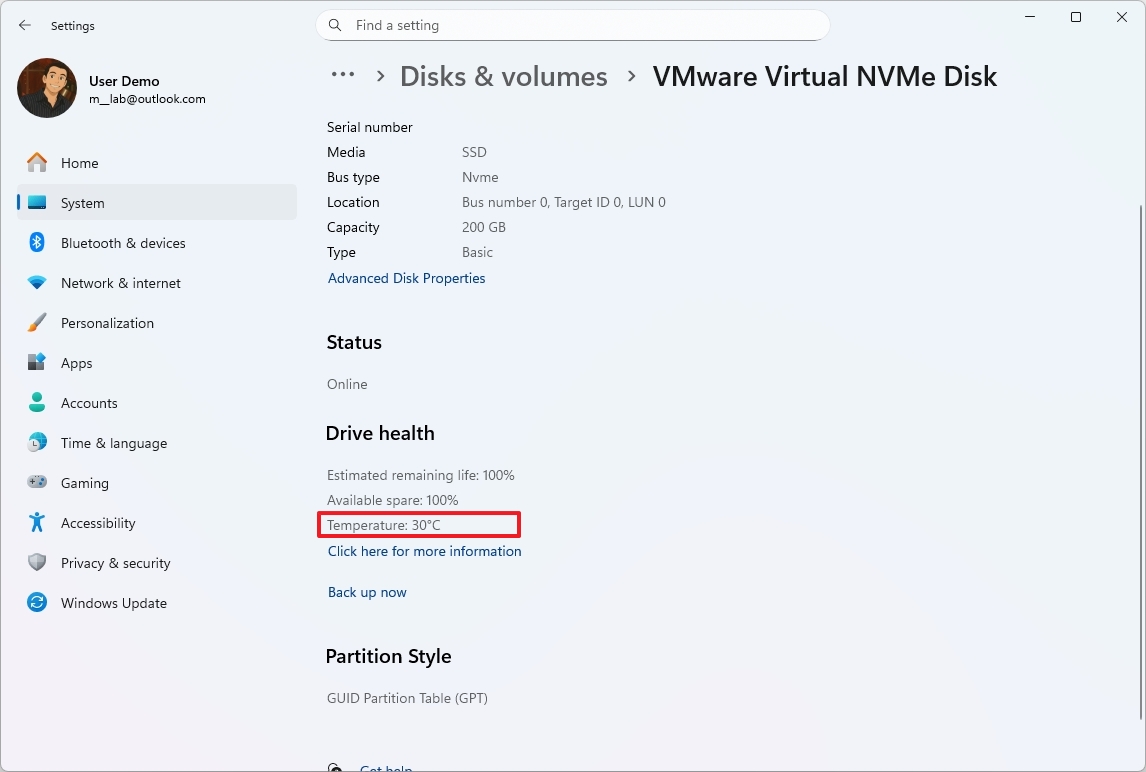
After you complete the steps, you’ll have an understanding of the drive temperature.
When the drive is working hard, a temperature below 70 degrees Celsius means it’s running within a normal range. Temperatures above 70 degrees Celsius are generally too high for typical drives.
Monitor drive health periodically
Check how much life is left in your drive, how much data it’s written, and if there are any errors using the drive maker’s software or S.M.A.R.T. technology. This can help you spot potential problems before the drive fails.
To check the drive SMART state with commands on Windows 11, use these steps:
- Open Start.
- Search for Command Prompt, right-click the top result, and choose the Run as administrator option.
- Type the following command to check the SMART feature on your drive and press Enter: Get-PhysicalDisk | Select-Object FriendlyName, HealthStatus, OperationalStatus
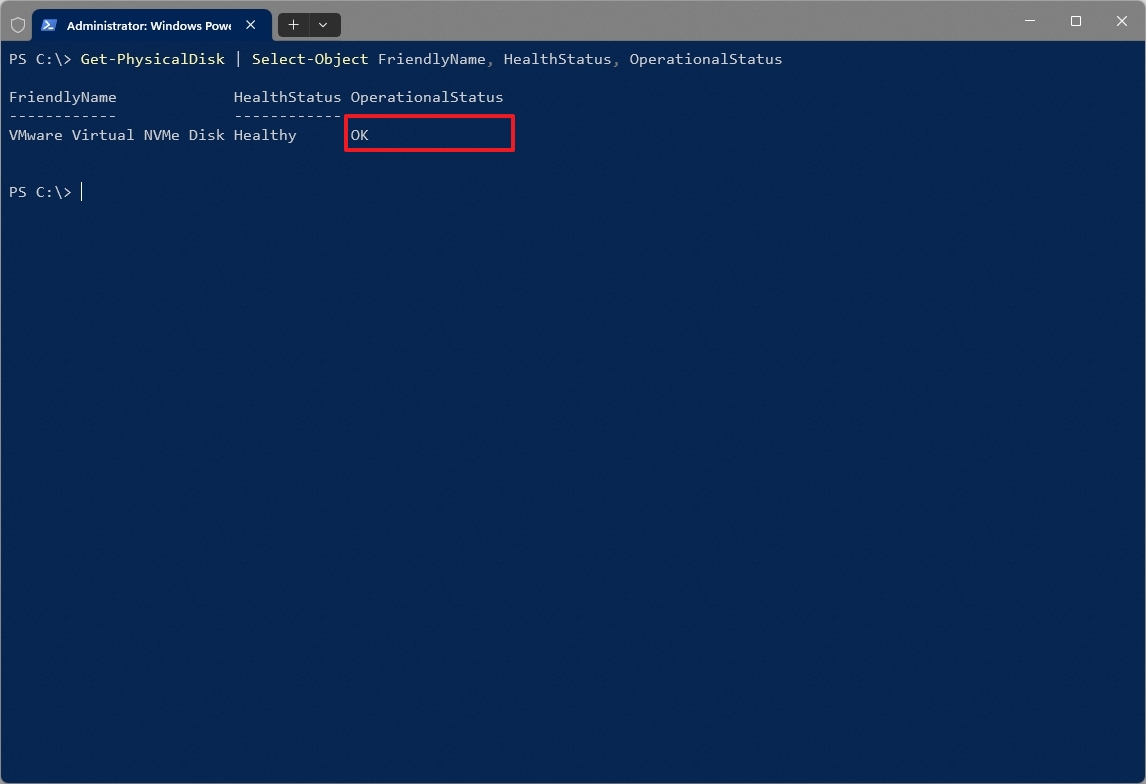
After completing the steps, the “HealthStatus” should show “Healthy.” Any other notification, like “Warning,” “Bad,” or “Caution,” means a hardware failure is likely to happen soon. If you see “OK,” it confirms the drive is functioning as expected.
Repair errors and bad sectors
Besides keeping an eye on your drive’s overall health, you can also use tools that come with your computer, like Check Disk, to find and repair problems with your files and any damaged areas on the drive.
- Open Start.
- Search for Command Prompt, right-click the top result, and choose the Run as administrator option.
- Type the following command to run the Check Disk tool on your computer and press Enter: chkdsk /f /r
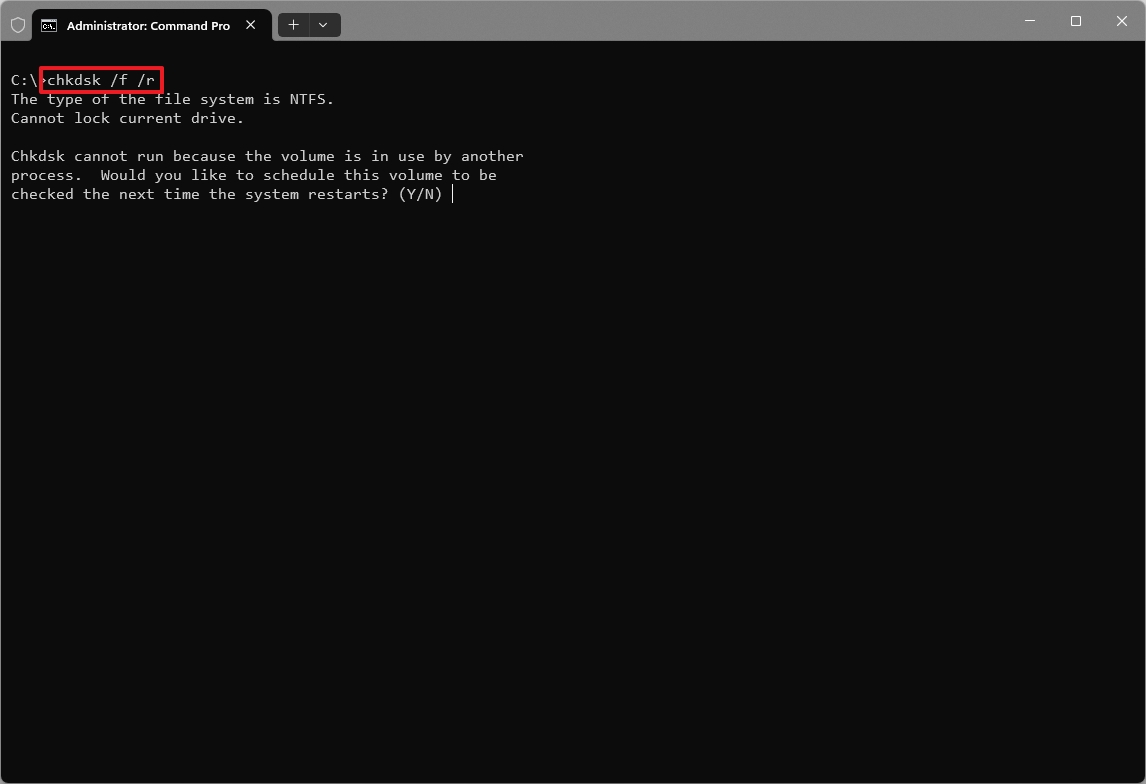
- Type “Y” to schedule a scan during the next reboot.
- Restart the computer.
Once you finish the setup, this tool will check your computer’s SSD for problems. It will find damaged areas on the drive, as well as errors in how your files are organized, which helps the operating system locate your data.
If you’re having trouble with your computer, you can use the DISM tool along with the SFC tool to help find and fix problems with your operating system.
6. Use power management properly
To keep your laptop battery working well for longer, it’s important to pay attention to how you charge it, keep it cool, and how much power you use. Following these simple steps can help prevent the battery from wearing out quickly and keep it lasting longer.
Avoid fully charging battery to 100 percent all the time
As a tech person, I’ve learned that lithium batteries actually degrade quicker if you constantly keep them at 100% charge. If your laptop lets you set a charging limit – and a lot of them do now – I highly recommend setting it to around 80%. This is *especially* useful if you’re the type of person who leaves their laptop plugged in most of the time. It really helps extend the battery’s lifespan!
Avoid deep discharges
Completely running down your battery can put extra strain on it. It’s better to start recharging when it gets to around 20-30 percent, rather than waiting until it’s empty.
Monitor battery health
Regularly check your device’s battery health information – most phones and computers have built-in tools for this. This helps you monitor how well your battery holds a charge and how it’s charging, so you can change how you use it before the battery starts to wear down significantly.
To create a report of the battery health on Windows 11, use these steps:
- Open Start.
- Search for Command Prompt, right-click the top result, and select the Run as administrator option.
- Type the following command to create a battery report on Windows 11 and press Enter: powercfg /batteryreport /output “C:\battery_report.html”
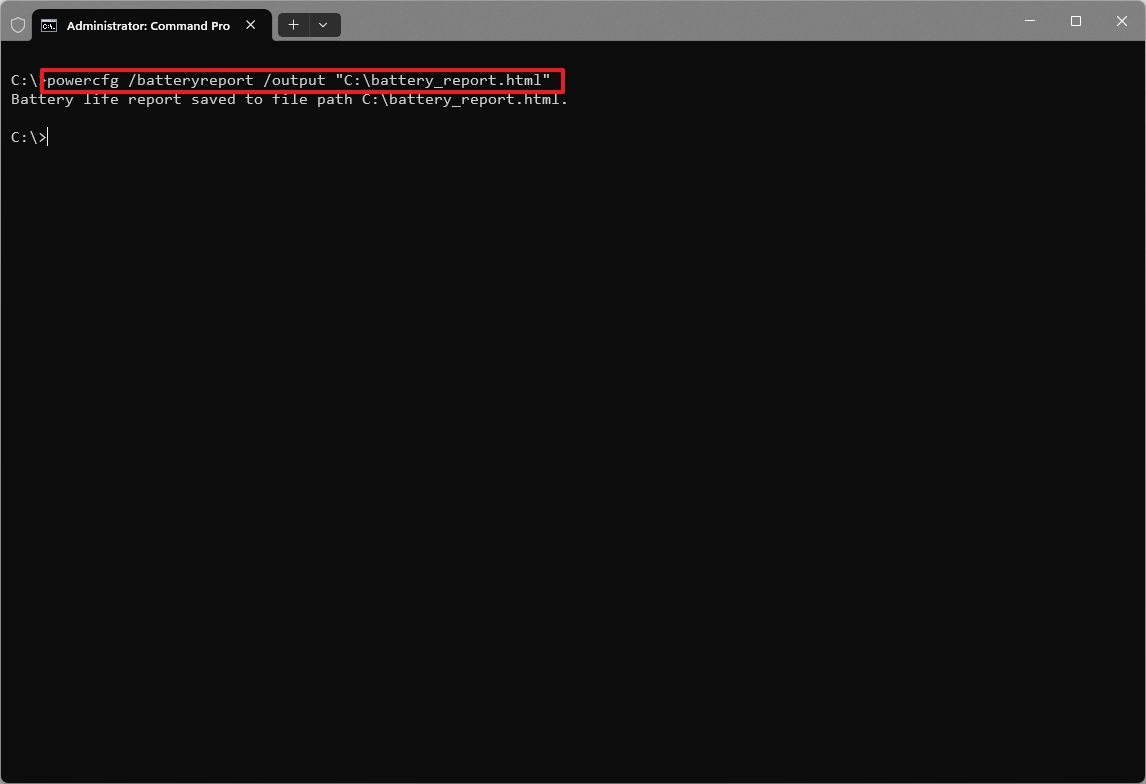
After finishing the steps, the command will create a report and save it to the main drive, typically the C: drive.
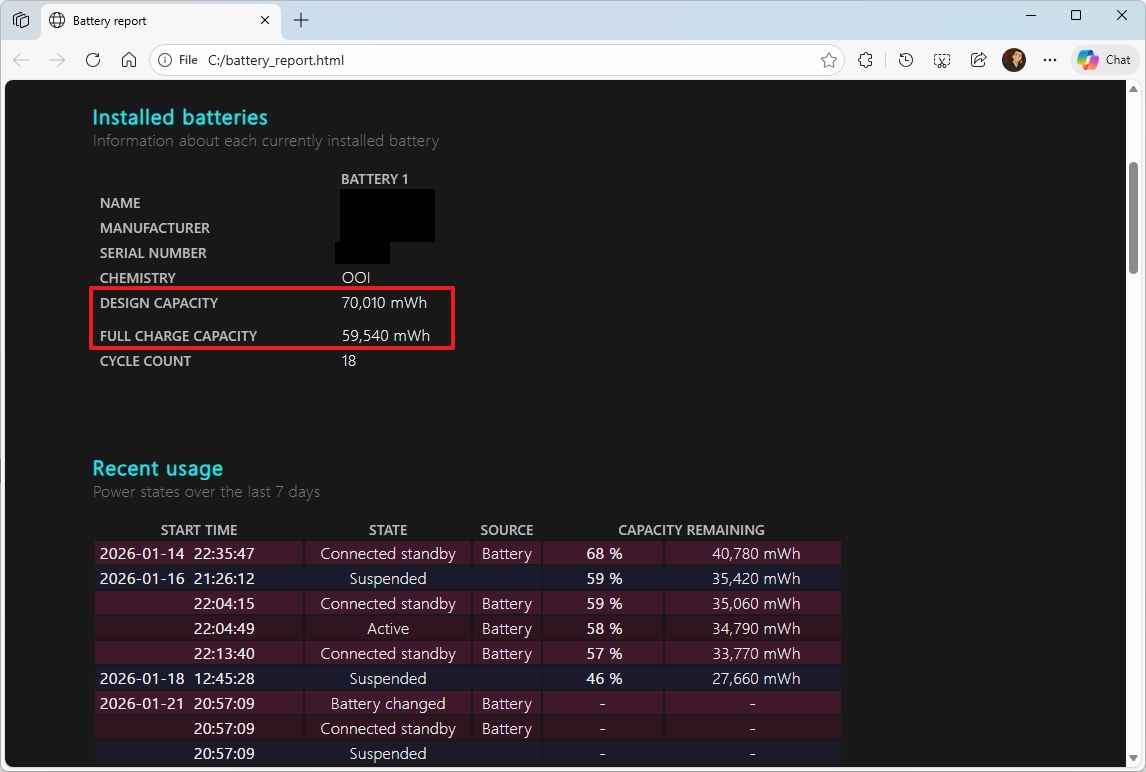
Open the “battery_report.html” file in your web browser. Look for the “design capacity” and “full charge capacity” values. If the “full charge capacity” is at or below 50%, you should think about replacing your battery.
Unexpected power outages can sometimes damage your data. To prevent this on desktop computers, use a reliable power supply or an uninterruptible power supply (UPS). For laptops, try to avoid shutting down the device while it’s saving or writing data.
7. Use the right drivers to prevent hardware stress
Problems with old or faulty drivers can lead to your computer crashing, freezing up, or using too much processing power. Over time, this can overheat your components, damage your hardware, and potentially require you to replace them sooner than expected.
To install driver updates manually on Windows 11, use these steps:
- Open Settings.
- Click on Windows Update.
- Click the Advanced options page on the right side.
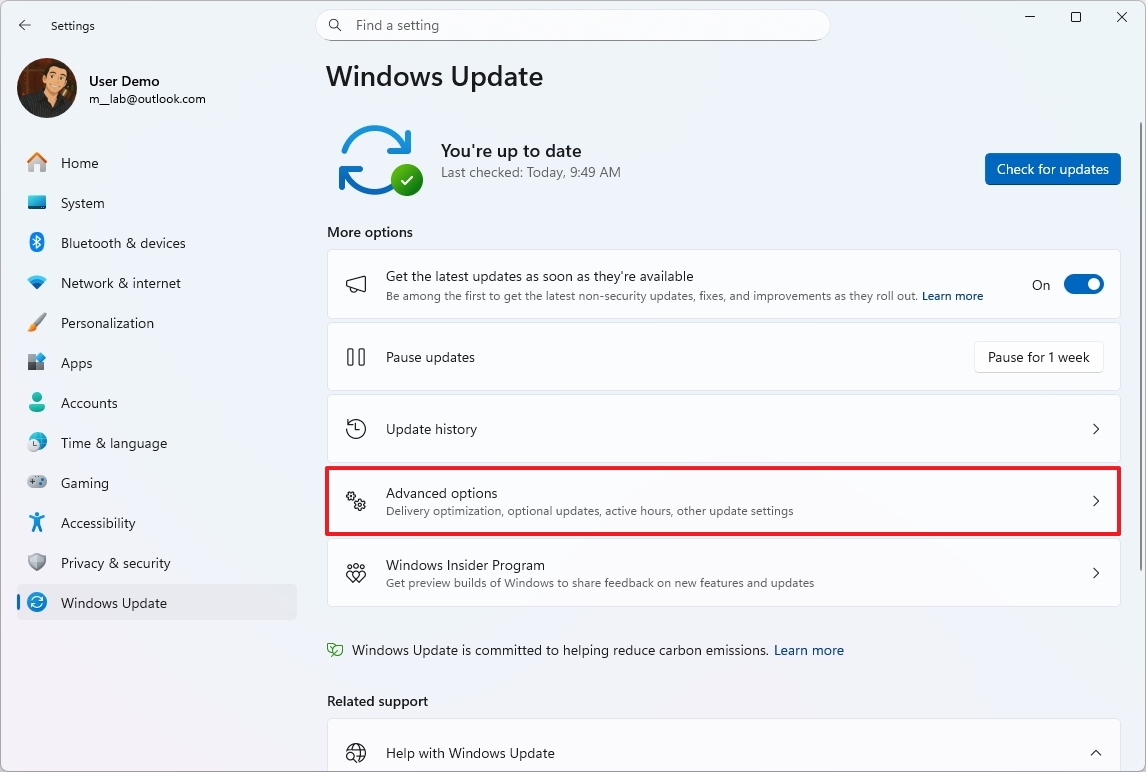
- Click the Optional updates setting under the “Additional options” section.
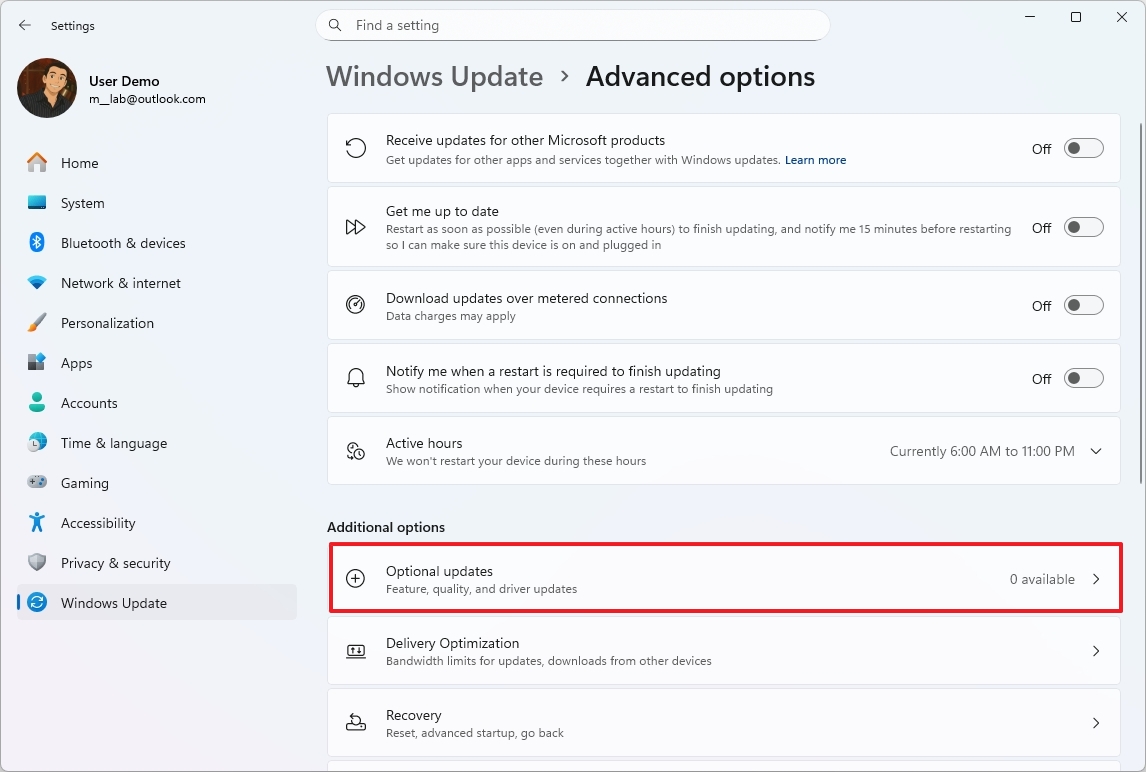
- Click the Driver updates setting.
- Check the drivers to install on your computer.
- Click the Download & install option.
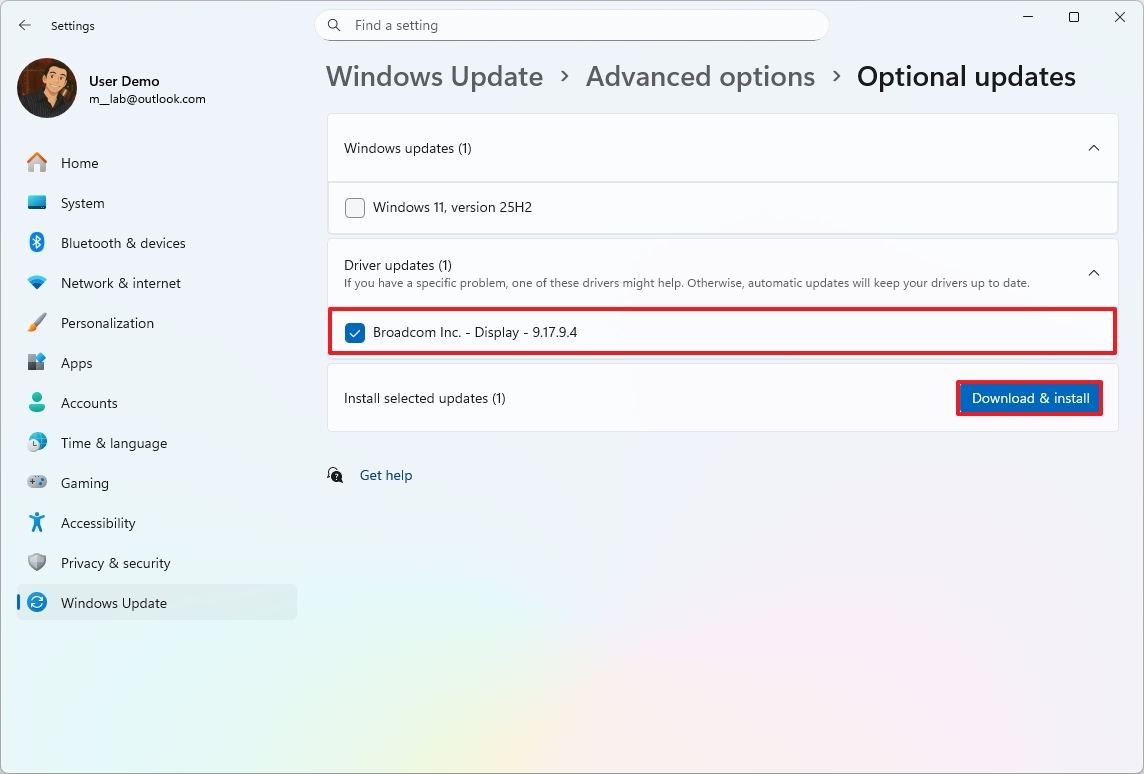
Once you complete the steps, the drivers will be downloaded and installed on your computer.
There are other ways to install drivers too, like through Device Manager or by using a tool provided by your computer’s manufacturer.
8. Rely on the system’s security instead of heavy third-party tools
Third-party antivirus programs can sometimes slow down your computer. Luckily, Windows 11 has built-in security features that effectively protect most users from viruses, malware, and online threats without using a lot of system resources.
As a tech enthusiast, I’ve found that simply using the security features already built into my devices can really help keep things running smoothly. It’s amazing – I can avoid slowdowns and keep my system usable for longer without having to spend money on upgrades or subscriptions! It’s a win-win.
Perform a virus scan
Your computer’s operating system automatically checks for viruses and other harmful software, but you can also run scans yourself whenever you like.
To perform a quick scan with the Defender Antivirus, use these steps:
- Open Start.
- Search for Windows Security and click the top result to open the app.
- Click on Virus & threat protection.
- Click the Scan options setting under the “Current threats” section.
- Select the Full Scan option.
- Click the Scan now button.
Once you’ve finished the steps, check the “Current threats” section on the main page to see if your antivirus detected any problems.
Perform an offline scan
If your antivirus can’t remove malware while Windows is running, you can try scanning offline. This restarts your computer and runs a scan in a special environment before Windows fully starts, which helps remove threats that are hard to detect while the system is active.
To perform an offline scan with the Microsoft Defender Antivirus, use these steps:
- Open Start.
- Search for Windows Security and click the top result to open the app.
- Click on Virus & threat protection.
- Click the Scan options setting under the “Current threats” section.
- Select the “Microsoft Defender Antivirus (offline scan)” option.
- Click the Scan now button.

After you finish the steps, the antivirus will scan your computer while offline and automatically get rid of any threats it finds, either by removing them or isolating them safely.
Microsoft Defender Antivirus offers a lot of extra security options and settings. I’ve created a detailed guide covering everything you need to know about the built-in antivirus on Windows 11.
Enable default system firewall
Microsoft Defender Firewall is usually turned on automatically, but it’s smart to double-check that it’s enabled and set to its best settings. You only need to skip this if you’ve intentionally customized it.
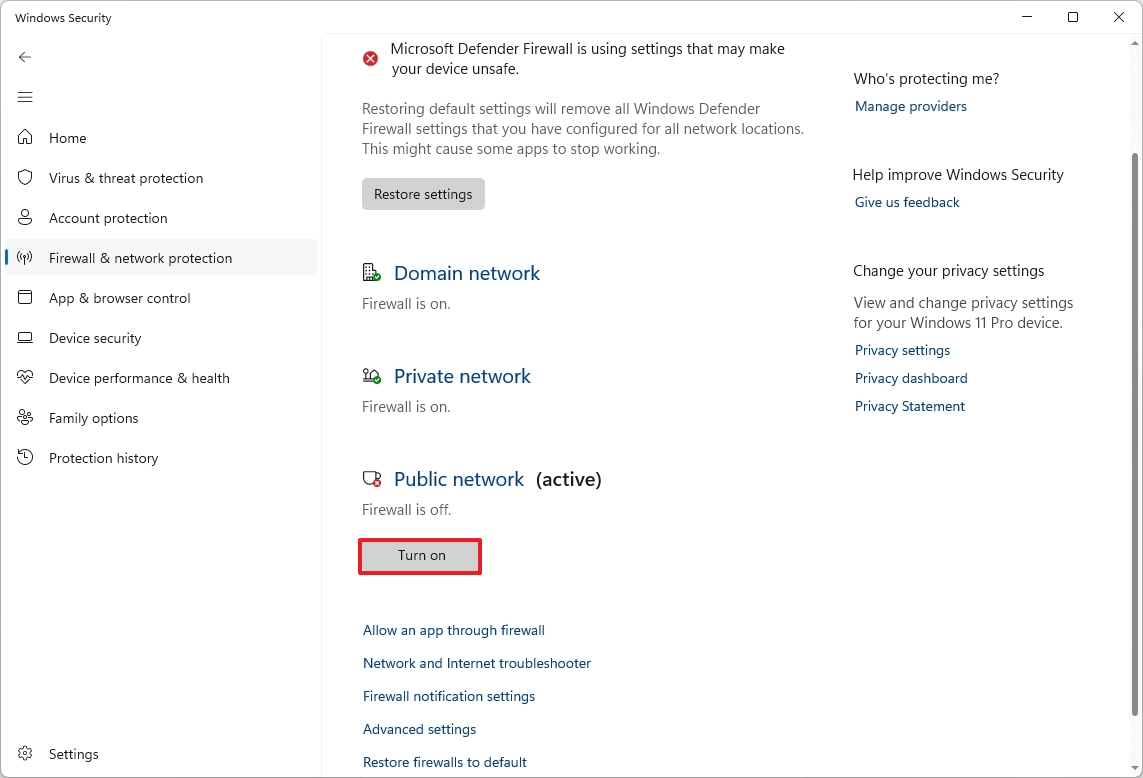
To check and enable the Defender Firewall on Windows 11, use these steps:
- Open Start.
- Search for Windows Security and click the top result to open the app.
- Click on Firewall & network protection from the left pane.
- Confirm that the network set as active has the firewall turned on.
- Click the Turn on button if the security feature is disabled.
- Click the “Restore firewalls to default” option (if applicable).
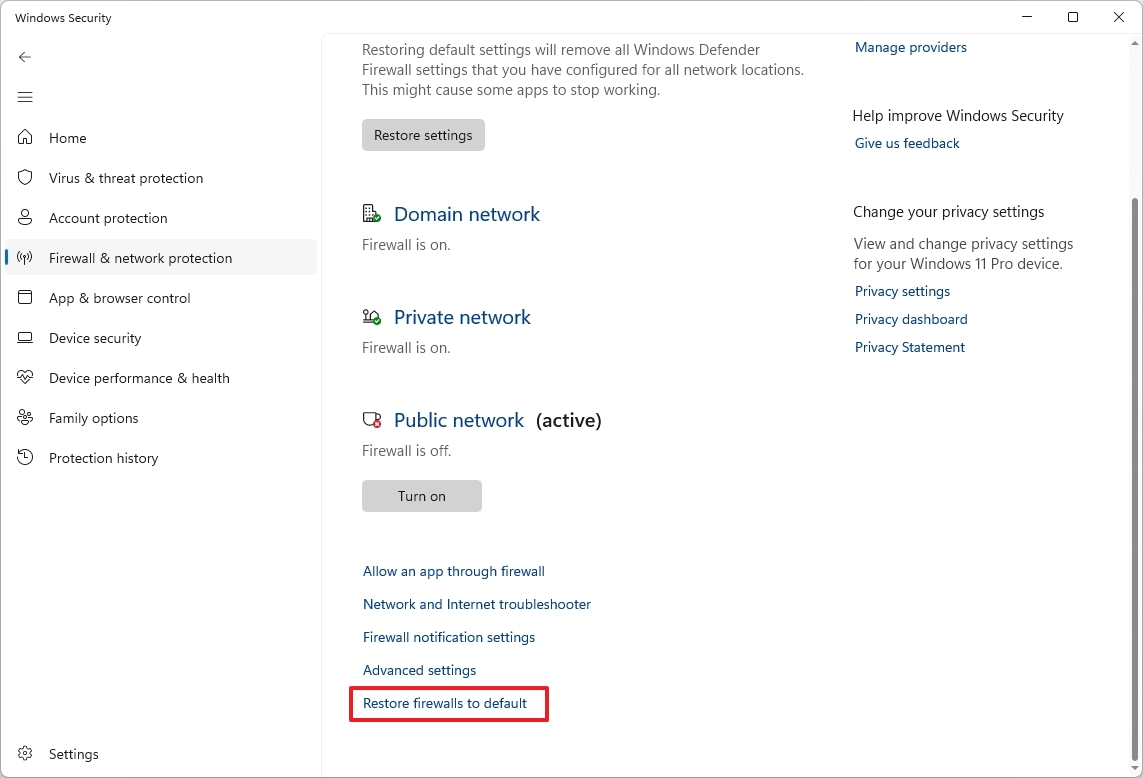
- Quick tip: If you’re not sure if the firewall is configured correctly, you can use these options to restore the original configuration that is optimal for most users. However, any changes you may have made will be deleted.
- Click the Restore defaults button.
- Click the Yes button.
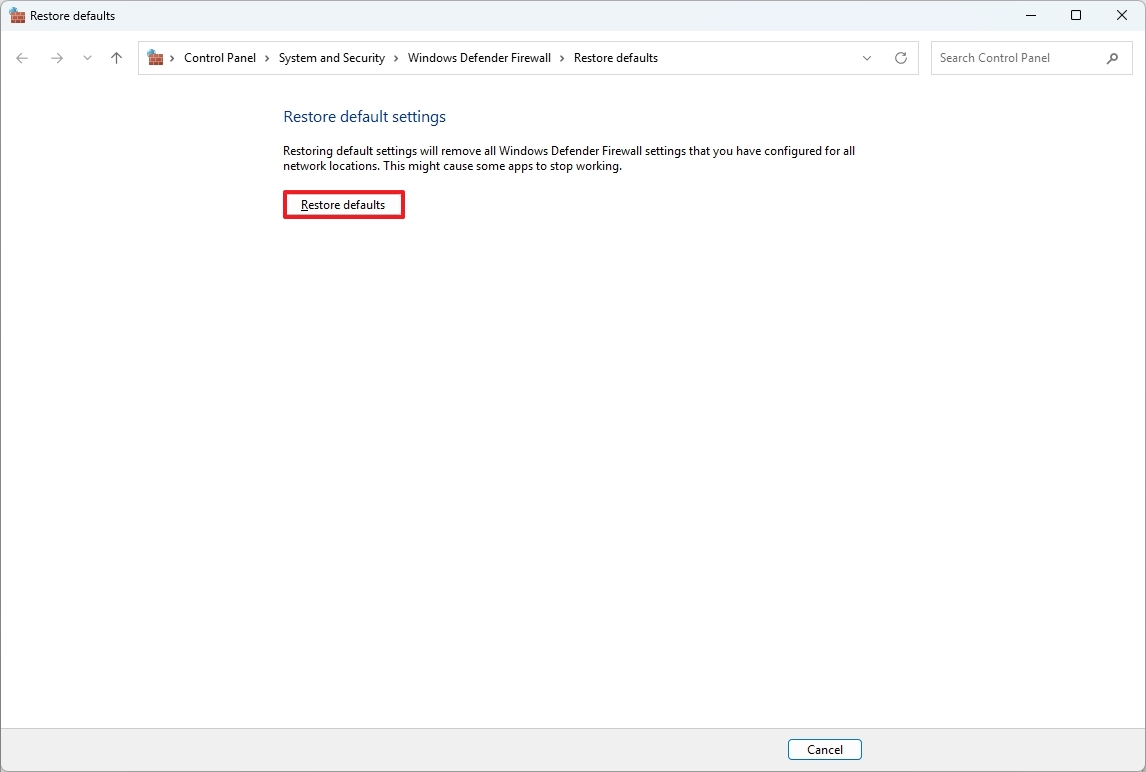
After finishing these steps, Microsoft Defender Firewall will turn on with the standard, suggested settings.
The Windows Security app offers a variety of tools and settings designed to make your computer more secure.
9. Create regular backups to protect against unexpected failures
Lots of people get a new computer when their storage breaks or Windows 11 starts acting up, worried they’ll lose important files. Backing up your data regularly solves that problem.
You can protect your files from loss or damage by using the backup features already on your device, or by using cloud storage services like OneDrive.
Having good backups gives you the breathing room to repair or restore your system, rather than scrambling to replace it immediately.
Create a backup on Windows 11
Windows 11’s Backup and Restore feature lets you save a complete copy of everything on your computer – your files, settings, programs, and the Windows operating system itself. If your hard drive fails, having a backup makes recovery quicker and less expensive, as you avoid the costs of professional data recovery services.
To create a full backup using the legacy Backup and Restore feature on Windows 11, use these steps:
- Open Start.
- Search for Control Panel and click the top result to open the app.
- Click on System and Security.
- Click the “Backup and Restore” setting.
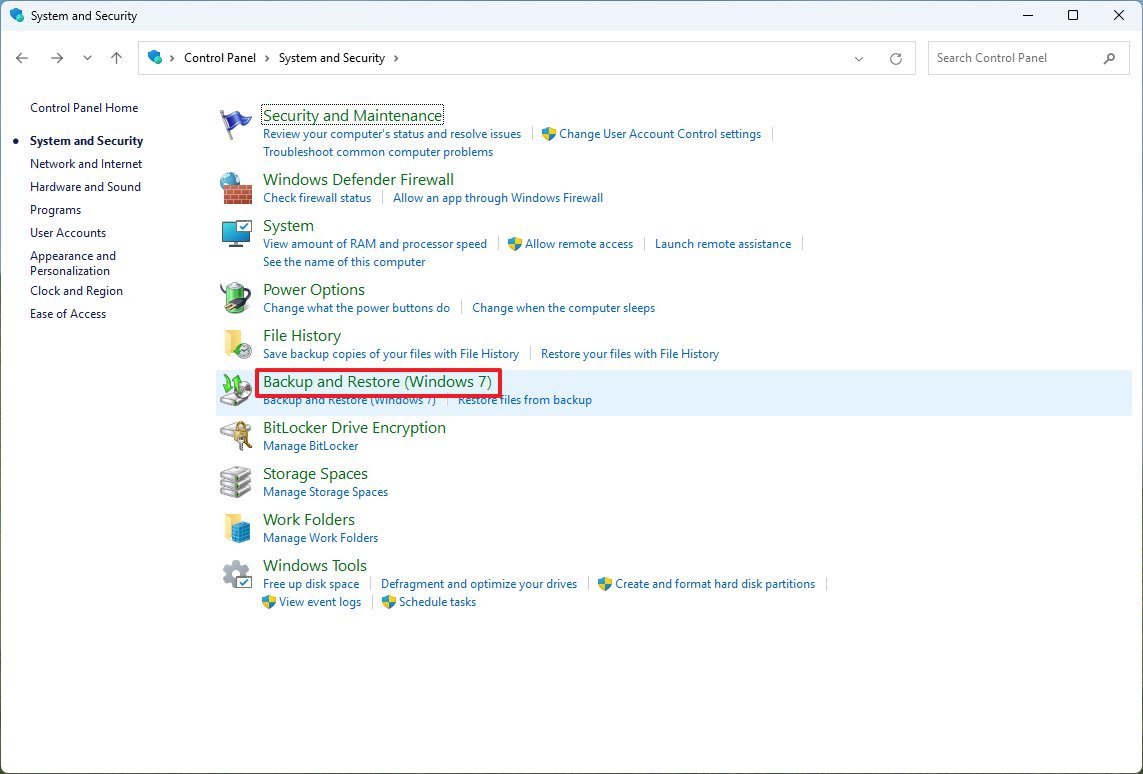
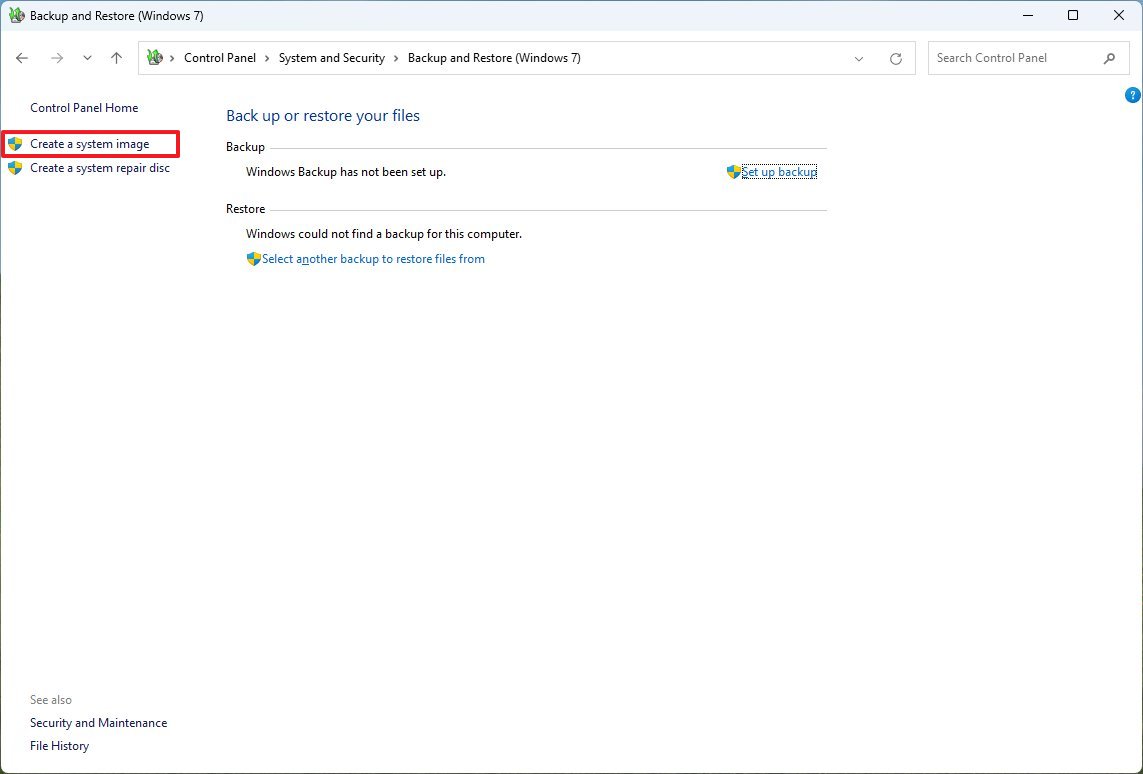
- Click the “System Image Backup” option from the bottom-left corner.
- Select the “On a hard disk” option.
- Use the “On a hard disk” drop-down menu and select the full backup destination.
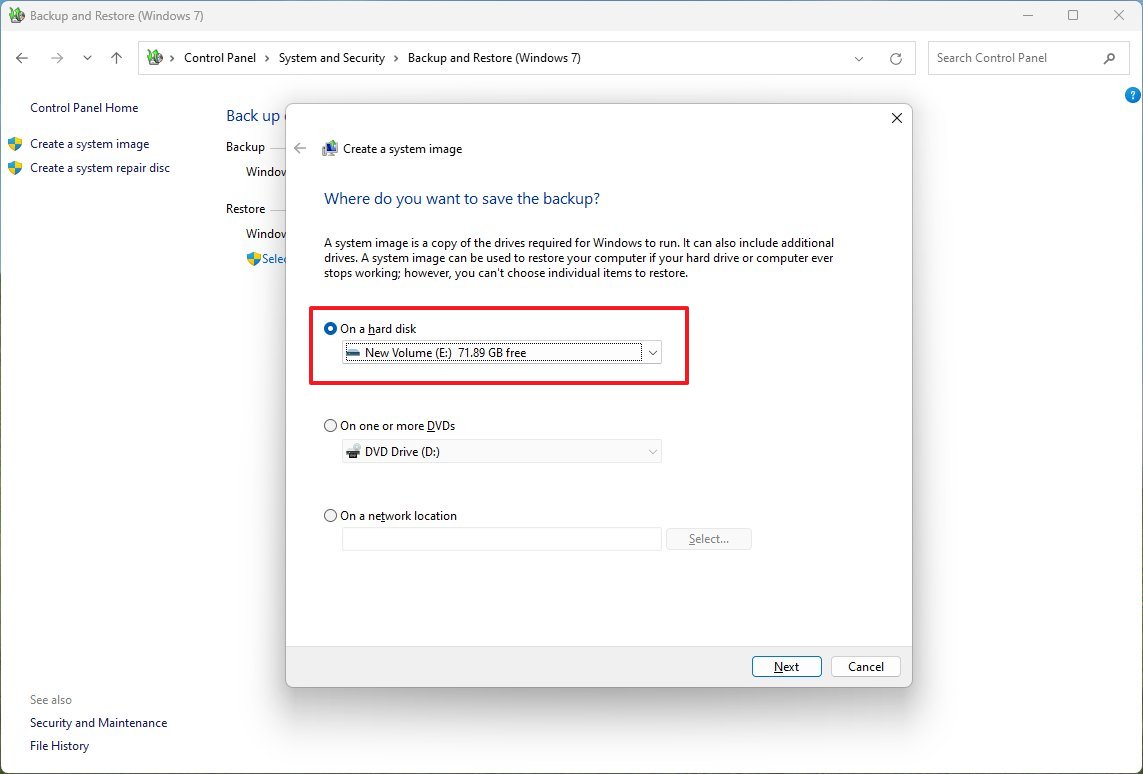
- Click the Next button.
- Select any additional drives to include in the backup (if applicable).
- Click the Next button.
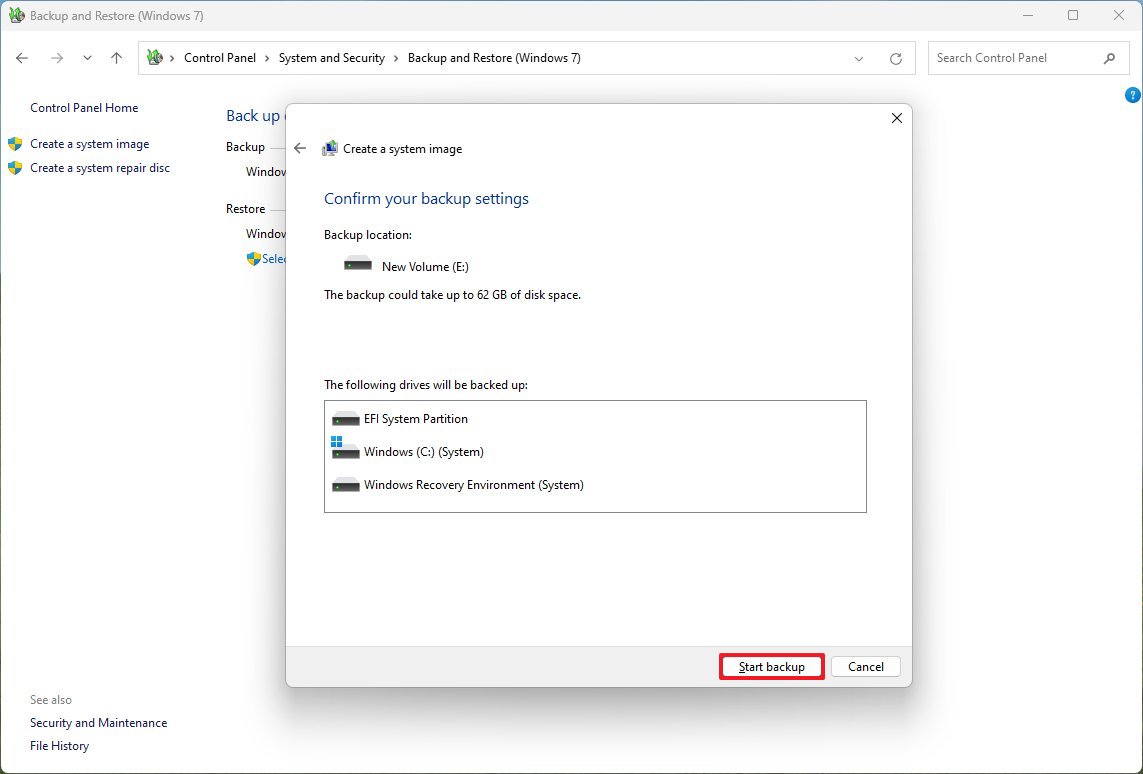
- Click the Start backup button.
- Click the No button.
- Click the Close button.
After you finish these steps, your computer will be fully backed up, saving everything from your main hard drive and any other drives you chose.
If you want to restore your device using a backup, or if you’d like more information, you can find detailed instructions in the Windows 11 backup tool.
10. Control heat to extend the life of expensive components
Okay, so this guide is mostly about getting more life out of your computer with software, but honestly, you really can’t ignore the hardware side of things. I’ve learned that dust is a *huge* problem. It builds up inside and restricts airflow, which can cause your system to slow down – what they call ‘throttling’ – and eventually damage components over time. Basically, keeping those vents clean and making sure air can flow freely is super important for keeping everything running smoothly for years to come.
While some newer laptops don’t need fans to stay cool, most still use them. If your laptop has a fan and vents, it’s important to clean them regularly to keep air flowing and prevent it from getting too hot.
To keep your computer running smoothly, regularly clean out any dust from the vents and filters. You can also help lower the temperature inside by adding more fans or improving the cooling system, which will help your computer’s parts last longer.
Listen for unusually loud fan noise, which could mean the internal bearings are wearing out and need to be replaced. If you notice overheating, reapplying thermal paste to the processor every 5 years or so can help improve cooling. Keeping components cool is important because excessive heat can damage your processor, graphics card, and storage drives – and these parts can be expensive to replace.
As computer parts get more expensive, making your current system last longer is a smart way to save money. Windows 11 offers features to help you take care of your device. Regularly using these tools can postpone the need for new hardware, reduce strain on your components, and keep your computer running smoothly for a long time.
FAQs about performing maintenance on Windows 11
These are common questions regarding the steps to maintain a computer running Windows 11.
Does regular maintenance really extend the life of a Windows 11 PC?
Regularly maintaining your software and hardware helps keep everything running smoothly. It prevents parts from wearing out quickly, avoids slowdowns, and reduces the chance of things breaking down – meaning you won’t have to replace working equipment as often.
Can high memory usage make a PC feel older than it is?
If your computer feels slow, it might not be because of old hardware. Programs that automatically start up, apps running in the background, or even malware can use up a lot of memory, causing performance issues.
How often should I clean up storage on Windows 11?
Check how much storage you’re using every month. If your device runs out of space, it can cause problems like failed software updates, a slowdown in performance, and can shorten the lifespan of your solid state drive.
Is it safe to use third-party cleanup and optimization tools?
Generally, it’s best to avoid aggressive cleanup tools. They can accidentally delete important system files or Registry information, causing your computer to become unstable and potentially requiring a fresh installation of Windows. Windows 11 already includes safe and effective storage and maintenance features that are usually all you need.
Does Windows 11 automatically take care of SSD maintenance?
Windows 11 takes care of SSDs by automatically optimizing their performance and lifespan with features like TRIM. Still, it’s a good idea to keep an eye on things like available storage space, drive temperature, and overall health to help prevent the drive from failing sooner than expected.
Can battery habits really affect a laptop’s lifespan?
As a tech person, I’ve learned that constantly topping up to 100% and letting your battery drain completely aren’t great for it. Plus, heat is a real enemy! I’ve started using features that limit charging to around 80-90%, and I try to avoid letting my battery get super low. It seems to be making a big difference in how long my battery lasts.
Is Microsoft Defender enough to protect Windows 11 long term?
Generally, yes. Microsoft Defender offers robust, real-time protection without slowing down your computer as much as some other antivirus programs, which can help keep your device running smoothly and extend its lifespan.
More resources

Stay up-to-date with the latest from Windows Central by following us on Google News! You’ll get our news, insights, and features right in your feed.
Read More
- 10 Most Powerful Versions of Superman, Ranked
- Gold Rate Forecast
- GBP CNY PREDICTION
- 10 Best Free Games on Steam in 2026, Ranked
- 007 First Light: Release Date, Story, Gameplay, Cast, Editions, and Platforms
- Superman’s 7 Best Power-Ups, Ranked
- Forza Horizon 6 Car List So Far: Confirmed Highlights, Cover Cars, DLC, and Rewards
- 10 Greatest Manga Endings of All Time
- DOGE PREDICTION. DOGE cryptocurrency
- The Boys Officially Sets Up 4 Supes for Jensen Ackles’ Soldier Boy Spinoff
2026-01-22 19:24