To carry out a clean installation or an in-place upgrade of Windows 11, it’s common to utilize the Microsoft Media Creation Tool. This tool effectively downloads the ISO file or generates an installation media as intended. However, you may opt for third-party tools instead, which often provide additional customization options.
Online, you’ll encounter various external software solutions. Yet, in terms of top-tier options comparable to the Media Creation Tool, just two applications truly shine – Rufus and Ventoy.
What’s the shared feature between these two programs? They simplify the process of installing Windows 11, not just on compatible systems, but also on those that aren’t officially supported.
In this step-by-step tutorial, I’ll assist you in picking and setting up the required software to make a USB stick bootable for installing Windows 11.
Caution: These applications function as described, but they aren’t endorsed by Microsoft. Therefore, their usage is on your own discretion and risk. Additionally, it’s imperative that you backup any files prior to this process, as it will wipe the USB flash drive clean.
How to create a Windows 11 bootable USB with Rufus
Rufus is a well-liked, free, and open-source tool that many tech-savvy users and network administrators consider an excellent alternative to the Media Creation Tool.
This tool allows you to design and prepare a USB flash drive as a bootable device for Windows 11 (and 10). Notably, Rufus includes two unique features that set it apart from other apps. Firstly, it enables users to download the operating system installation files directly within the tool itself. Secondly, it offers customization options for the flash drive.
Among the choices provided, some enable the circumvention of certain hardware specifications like TPM 2.0 and memory (RAM), while also offering an option to establish a local account without relying on a network or online account setup.
Create a Windows 11 bootable USB with Rufus
To make a working USB stick for Windows 11 installation, plug in a USB flash drive that has a minimum capacity of 8 gigabytes. Then, follow these steps:
1. Download and install Rufus on your computer if you haven’t already.
2. Launch the Rufus application.
3. Insert your USB drive into your computer.
4. Ensure the correct device is selected in the “Device” dropdown menu within Rufus.
5. Choose the Windows 11 ISO file from its location on your computer, using the “ISO image” option.
6. Set the boot selection to UEFI mode if your target system supports it, or to Legacy mode otherwise.
7. Click “Start” and wait for Rufus to finish preparing the USB stick.
8. Once completed, safely eject the USB drive from your computer.
9. Restart your target system and boot from the prepared USB drive to begin the Windows 11 installation process.
- Open the Rufus page.
- Click on the latest release Zip file available under the “Download” section.
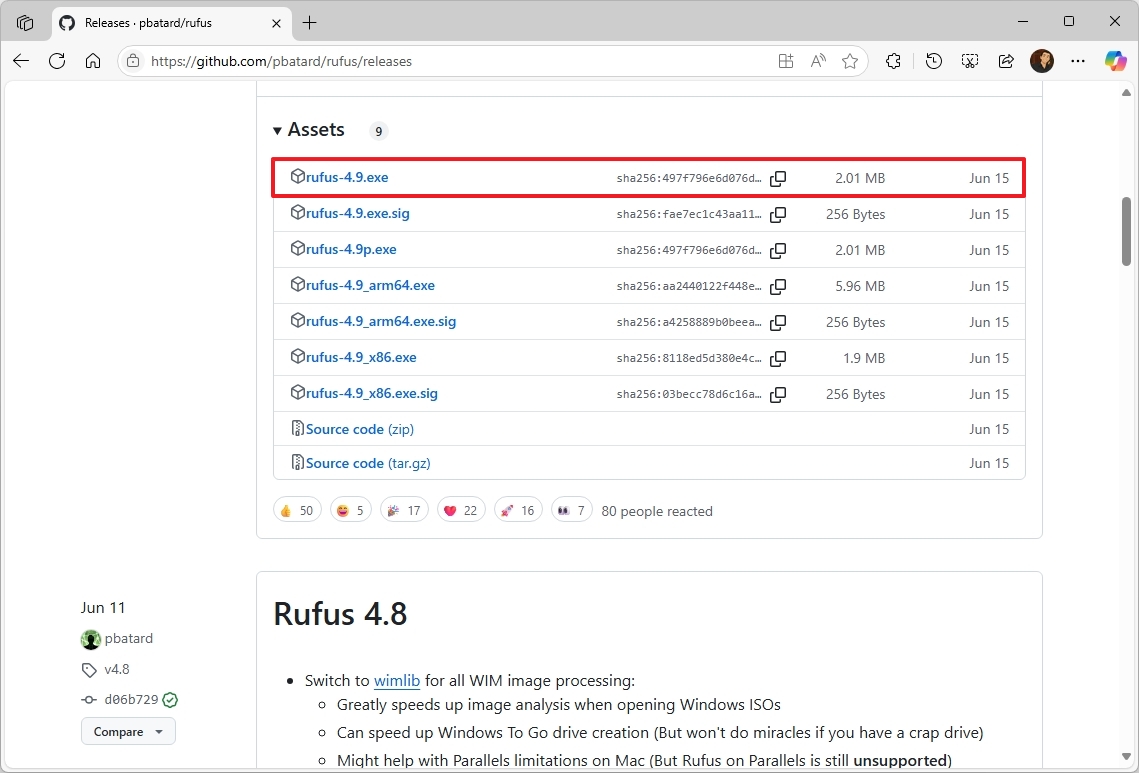
- Save the tool on your computer.
- Double-click the Rufus tool to launch it.
- Quick tip: If you receive an option to check for updates, click the “Yes” button, which will enable the option to download the ISO file from the cloud.
- (Optional) Choose the USB flash drive under the “Device” section.
- Click the down-arrow button (on the right side) and select the Download option.
- Quick tip: If you already have the ISO file, you can choose the “Select” button to open it, rather than downloading it again.
- Click the Download button.

- Select the Windows 11 option.
- Click the Continue button.
- Select the latest version available for the operating system.
- Click the Continue button.
- Select the Windows 11 Home/Pro/Edu option.
- Click the Continue button.
- Select the language for the installation.
- Click the Continue button.
- Select the x64 architecture option (or the ARM64, if you have a Windows on Arm PC).
- Click the Download button.

- Select the location where you want to save the Windows 11 ISO file.
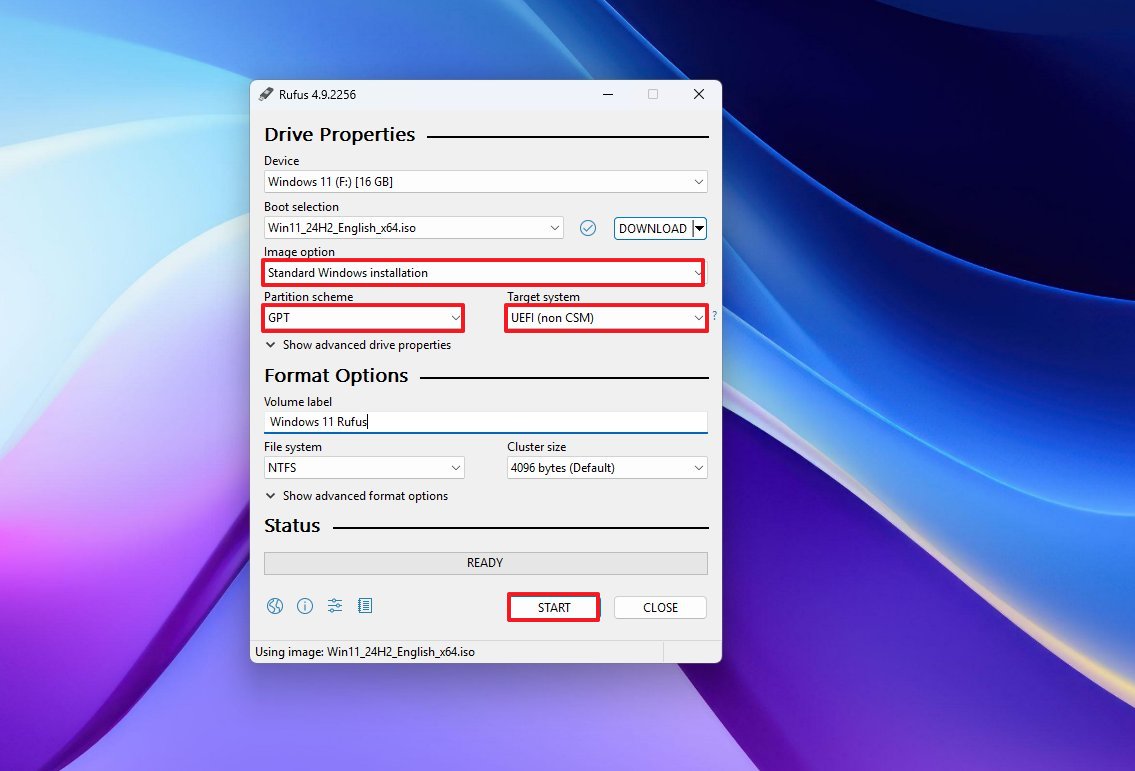
- Choose the “Standard Windows 11 Installation” option under the “Image option” setting.
- Select the GPT option for the “Partition Scheme” setting.
- Choose the UEFI (non CSM) option for the “Target system” setting.
- (Optional) Continue with the default settings.
- (Optional) Confirm a name for the drive under the “Volume label” setting.
- Click the Start button.
- (Option 1) Clear all the options from the “Windows User Experience” page to create an installation media for supported hardware.
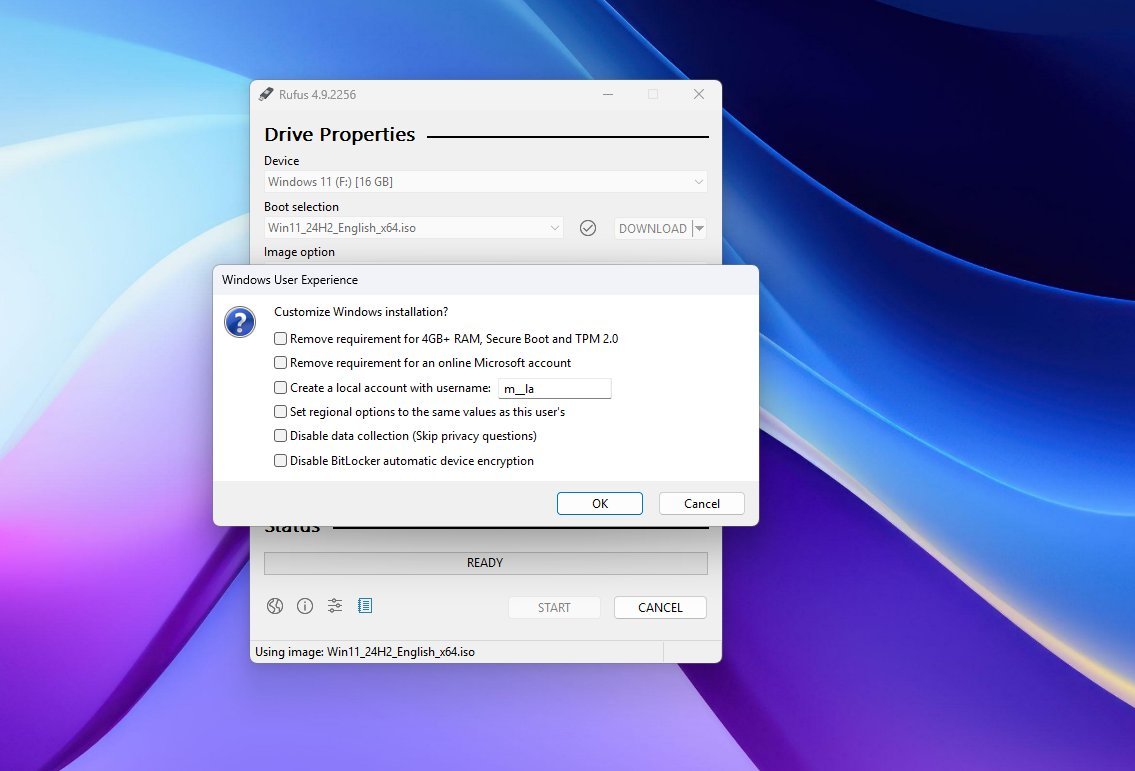
- (Option 2) Check the “Remove requirements for 4GB+ RAM, Secure Boot and TPM 2.0” option to bypass the hardware requirements.
- (Option 3) Select the “Remove requirement for an online Microsoft account” option to bypass the internet and online account requirements.
- Click the OK button.
Once you’ve finished the procedures, the Rufus tool will be responsible for crafting a personalized USB flash drive, suitable for installing an operating system.
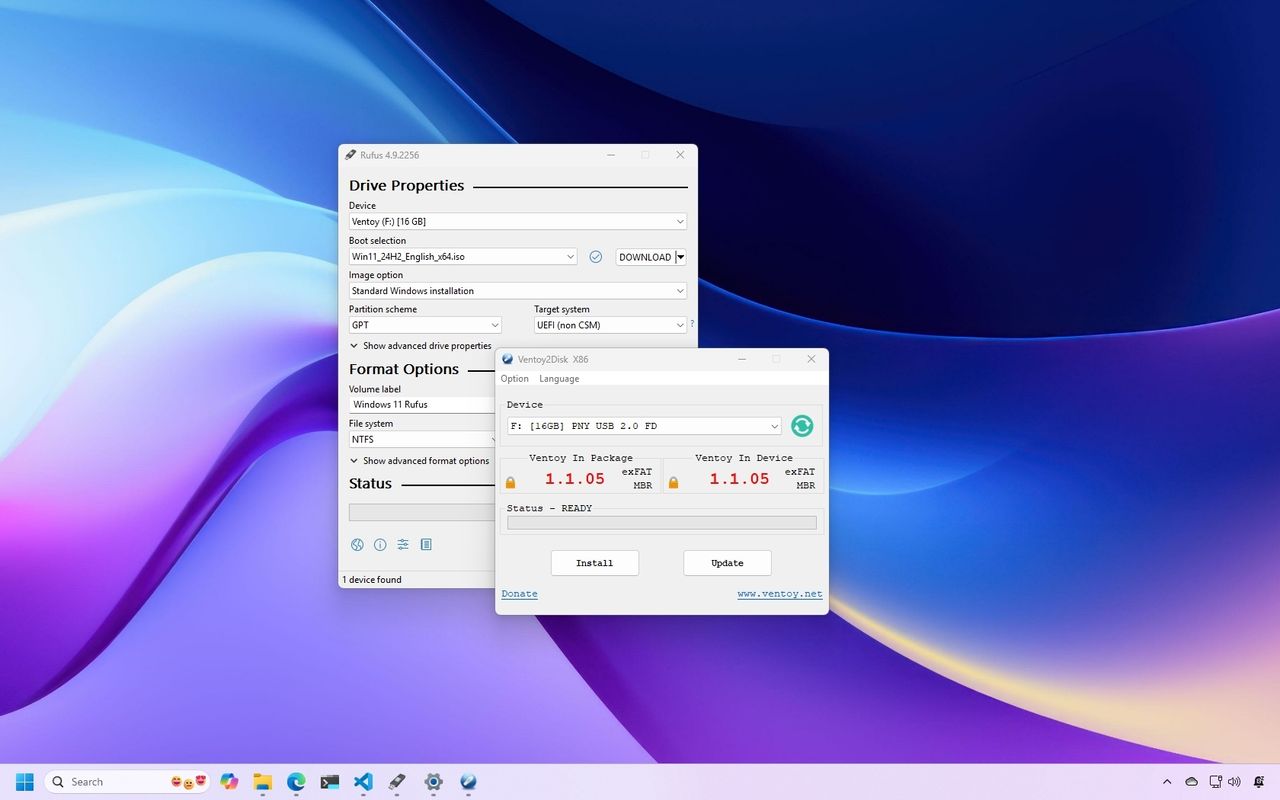
How to create a Windows 11 bootable USB with Ventoy
As a researcher exploring options for creating installation media, I’ve found Ventoy to be an outstanding alternative to the Media Creation Tool. Unlike the latter, Ventoy functions in a unique way, being an open-source utility that provides a different approach to the task at hand.
This tool won’t generate installation discs. Rather, it sets up your USB flash drive so it can boot up. After that, you’ll need to insert an ISO file of any operating system like Windows 11, 10, or Linux for use with the tool.
After placing all the ISO files, initiate your computer using the Ventoy program. From there, you’ll be presented with a boot menu by Ventoy, allowing you to choose the Windows 11 ISO file. Subsequently, the Windows Setup process will commence.
One great feature of Ventoy is its ability to adapt settings to overcome system limitations when it finds that the hardware isn’t in sync with the required operating system.
Create a Windows 11 bootable USB with Ventoy
To make a Windows 11 bootable USB drive with Ventoy, first, link a USB stick that is 8GB in size or larger. Then, follow these instructions to complete the process:
1. Download and install Ventoy software on your computer if you haven’t already.
2. Insert the connected USB flash drive into your computer.
3. Launch the Ventoy Resizer Tool.
4. Click on “Burn” and select the downloaded Windows 11 ISO file.
5. Choose the connected USB drive as the target device.
6. Begin the burning process, ensuring the software creates a bootable media for Windows 11.
7. Once the process is complete, safely remove the USB flash drive from your computer and you’re ready to use it to install Windows 11 on another system!
- Open the Ventoy page.
- Click on the latest release Zip file under the “Download” section.
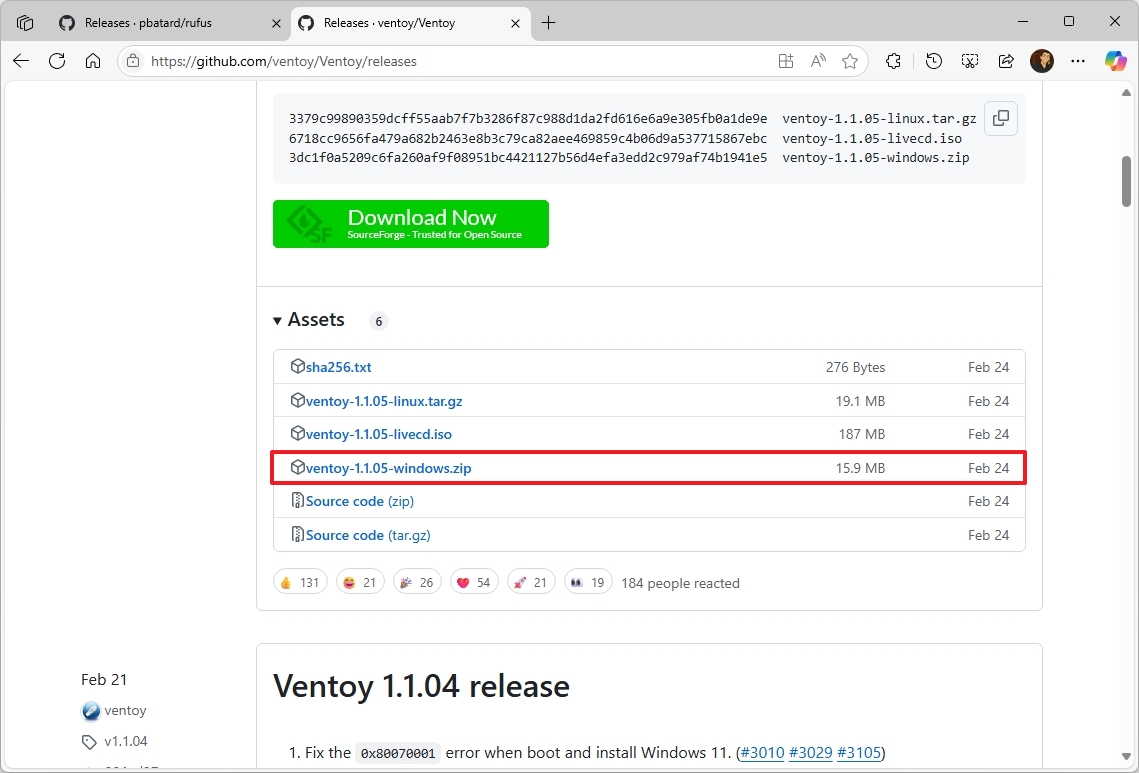
- Save the tool on your computer.
- Quick note: The browser may flag this download, but it’s a popular tool.
- Open File Explorer.
- Open the Zip folder location.
- Select the ventoy-x.x.xx-windows.zip file and click the Extract all button from the command bar.
- Click the Browse button.
- Select a location to extract the files.
- Click the Select Folder button.
- Click the Extract button.

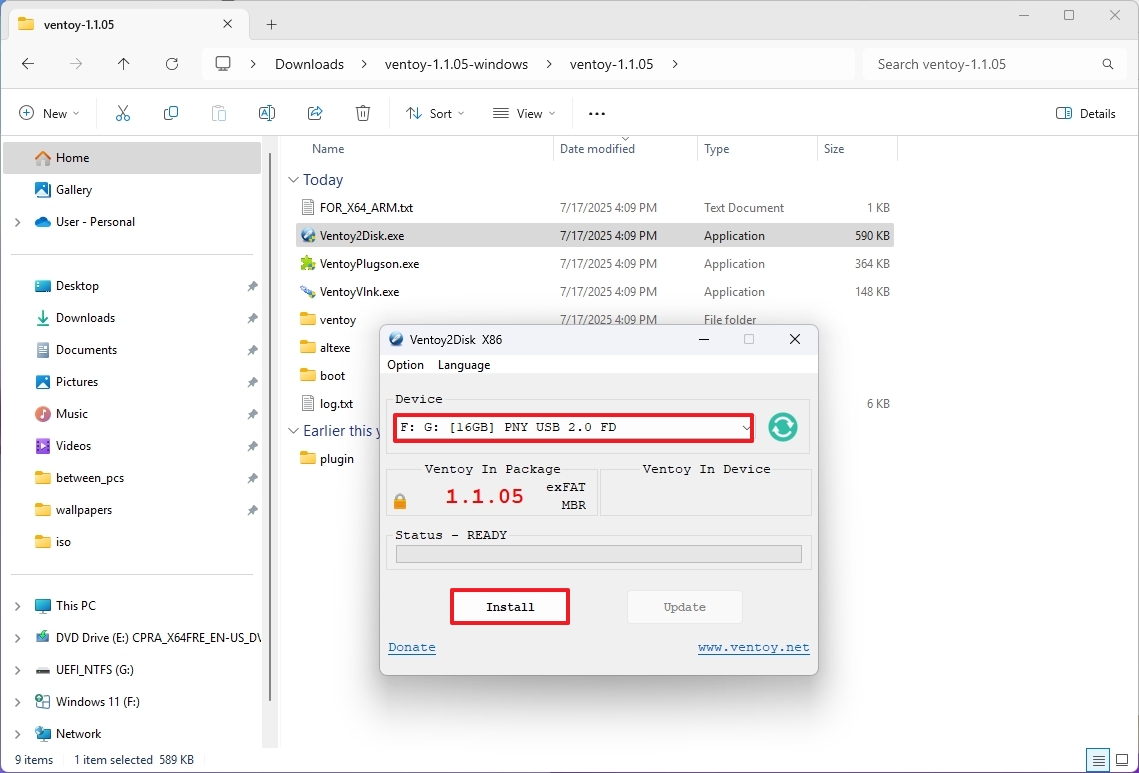
- Open the ventoy-x.x.xx folder.
- Right-click the Ventoy2Disk.exe file and choose the Open option.

- Select the flash drive from the “Device” setting.
- Click the Install button.
- Click the OK button.
- Click the Yes button.
- Click the Yes button (one more time).
- Click the OK button.
- Click on This PC from the left pane.
- Open the Ventoy drive.
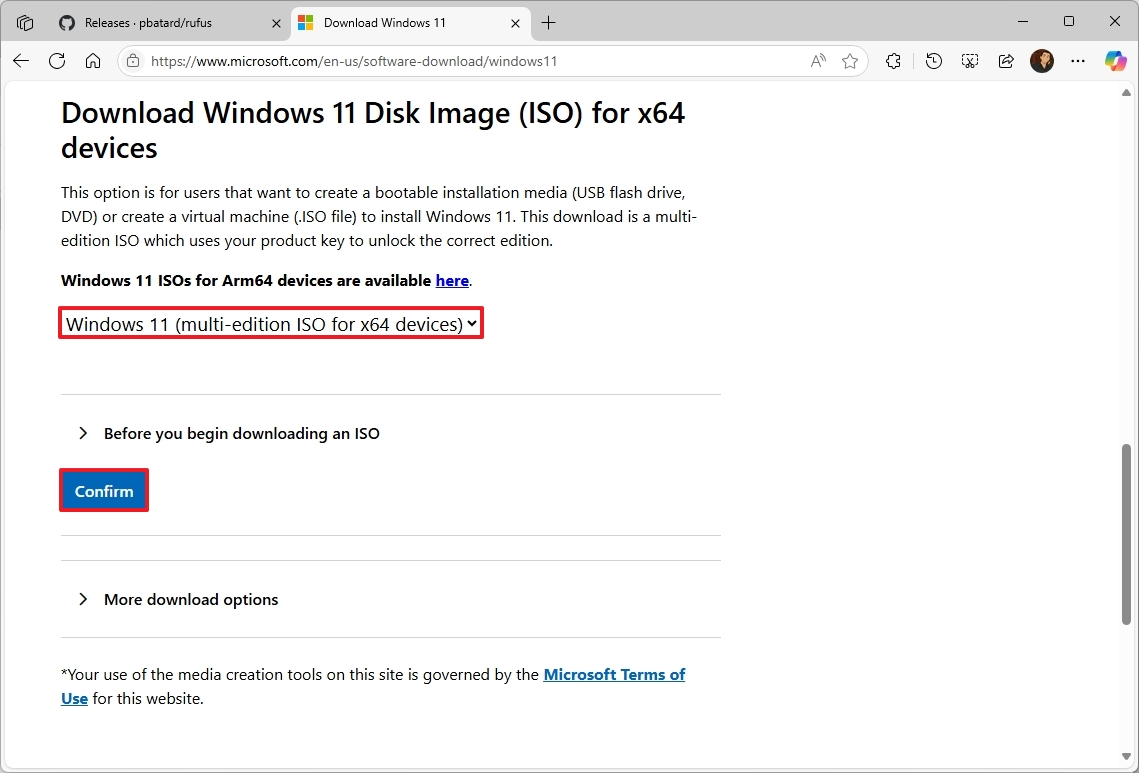
- Open the Microsoft Support website.
- Quick note: If you already have the ISO file, you can skip to step 24.
- Select the Windows 11 option under the “Download Windows 11 Disk Image (ISO)” section.
- Click the Confirm button.
- Select the installation language.
- Click the Confirm button.
- Click the Download button.
- Copy and paste the ISO file into the USB flash drive.
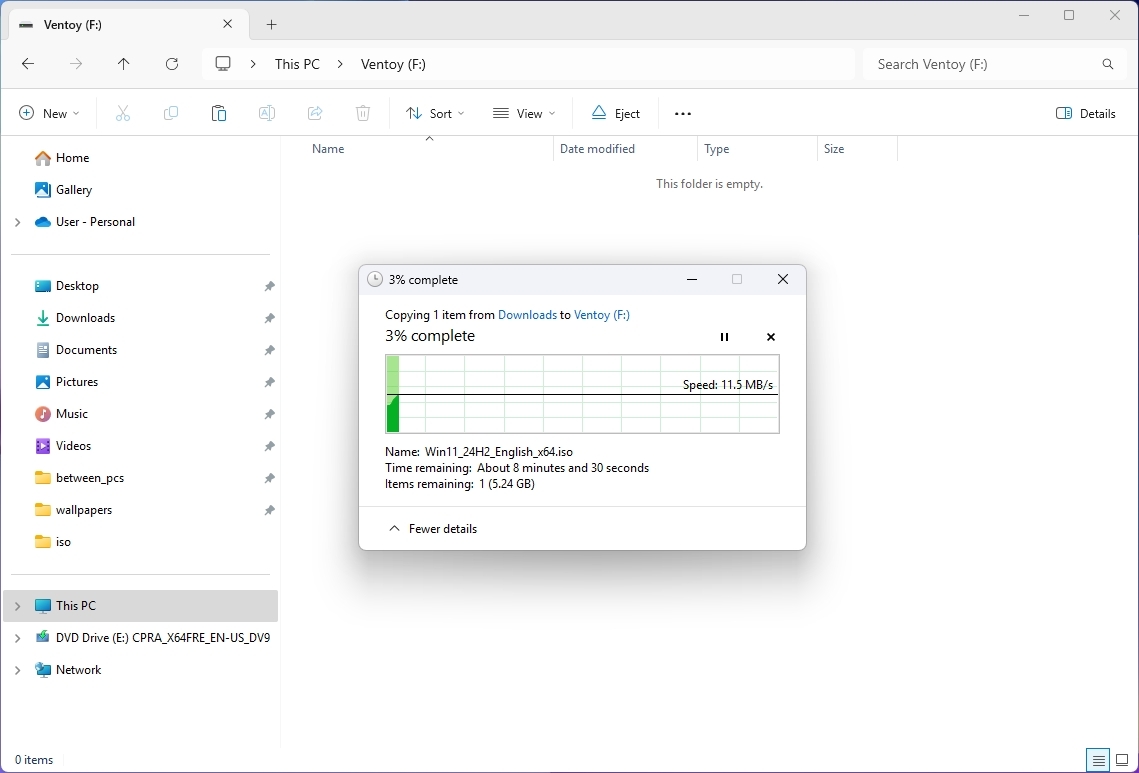
Once you complete the steps, Ventoy will make any ISO file on the flash drive bootable.
What are the differences between Rufus and Ventoy?
The primary distinction between these tools lies in their functionality. A USB flash drive generated using Rufus enables both clean installation and in-place upgrades directly from the desktop, whereas a medium prepared with Ventoy only facilitates booting the device for launching a specific setup process.
In contrast, while Rufus allows you to download an ISO file directly, Ventoy necessitates that you supply your own image file.
Nevertheless, Ventoy offers a simpler approach, enabling you to place multiple ISO files onto your USB flash drive, limited only by its storage capacity.
In a single instance, you might prefer using the Rufus tool. But if you often need to reformat your drive for installing various OS versions, then Ventoy could be more beneficial as it lets you boot your computer from several ISO files.
Have you given either Rufus or Ventoy a shot when it comes to setting up Windows 11? Which of these tools do you find more effective? Please share your thoughts below.
More resources
Read More
- Dialoop coming to Switch on June 17
- Gold Rate Forecast
- Adam Levine Looks So Different After Shaving His Beard Off
- 10 Movies That Were Banned in Different Countries For Random Reasons
- Steam Makes Sci-Fi Game 100% Free for 72 Hours
- Welcome to Demon School! Iruma-kun season 4 release schedule: When are new episodes on Crunchyroll?
- Nintendo Switch 2 Reportedly Getting Remake of One of the Best PS3 and Xbox 360 Games
- Tekken 8 Fans Furious as Tifa Tipped for Street Fighter 6 Instead
- See Kaia Gerber & Lewis Pullman’s Vanity Fair Oscars Party Date Night
- When Things Fall Apart: A New View of Phase Transitions
2025-07-20 00:10