
With Windows 10 and 11, you can easily connect a second monitor to your computer – whether it’s a laptop or desktop – to get more screen space for working with multiple applications, playing games, and more.
Connecting an external monitor is usually simple, but sometimes your computer might not recognize older monitors or a second screen. This can happen because of driver or hardware problems. Luckily, there are a few easy things you can try to fix it, like making sure the cables are connected properly and that you have the latest drivers installed.
This guide will help you fix problems that prevent your computer from automatically recognizing a second monitor. While the instructions are mainly for Windows 10, they can also be useful for Windows 11, and I’ve included a separate section with extra details for Windows 11 users.
These instructions were last updated on September 17, 2025. The updates improve accuracy, reflect changes to the operating system process, and include a new frequently asked questions section.
How to fix external monitor connection issues from hardware troubleshooting
If your computer isn’t recognizing a second monitor, the problem could be with the software, the cables connecting the monitors, or even the monitor itself.
If you can’t find your monitor in the settings, try these steps before changing any Windows configuration options.
- Confirm the monitor is receiving power – Confirm that the display is securely connected to a working power outlet and that the power cable is not damaged.
- Verify the monitor is turned on – Use the physical power button on the monitor to check if it’s powered on. Look for any LED indicators.
- Restart your computer – A simple reboot can refresh the hardware connections and resolve minor glitches.
- Check the input source on the monitor – Use the monitor’s built-in menu to ensure it’s set to the correct input port (for example, HDMI or DisplayPort).
- Inspect the signal cable connection – Check that the cable connecting the monitor to the graphics card is securely plugged in at both ends.
- Reconnect the signal cable – Disconnect the video cable from both the monitor and the computer, wait for 60 seconds, then reconnect it firmly.
- Swap the video cable – Use a different cable to rule out a faulty or incompatible one. Even small issues, such as bent pins or poor shielding, can screw up the signal.
- Check cable specifications – Ensure you’re using a cable that meets the monitor’s requirements. For example, DisplayPort 1.4 or HDMI 2.0/2.1 may be necessary for high resolutions or refresh rates. Refer to the manufacturer’s documentation for compatibility guidelines.
- Try different video ports – If your monitor and graphics card support multiple input and output ports, test each one to rule out port-specific issues.
- Connect the monitor to another computer – This will help determine if the issue lies with the display itself.
- Test a different monitor – Connect a known working monitor to your computer to check if the problem is related to your system’s graphics card or drivers.
- Disconnect all peripheral devices – Unplug printers, cameras, USB drives, and other accessories to eliminate potential conflicts.
- Surface devices using a docking station – Bypass the dock and connect the monitor directly to the device. This helps identify whether the dock is the cause of the problem.
- Update your monitor’s firmware – Although rare, outdated firmware can cause compatibility or performance issues. Check your manufacturer’s website for firmware updates and installation instructions.
If the simple fixes above don’t work, the problem might be caused by your software. Try the following steps to see if they help.
If you’re having trouble with your monitor, or if you’re looking to buy a new one, take a look at our guide to the best 4K monitors.
How to fix external monitor connection issues from Settings
If you’ve checked that your cables, monitor, and computer are working correctly, you can try using the Settings app to make your computer recognize the second monitor.
Force second display detection
To detect a second monitor manually on Windows 10, use these steps:
- Open Settings.
- Click on System.
- Click on Display.
- Click the Detect button to connect to the external monitor under the “Multiple displays” section.
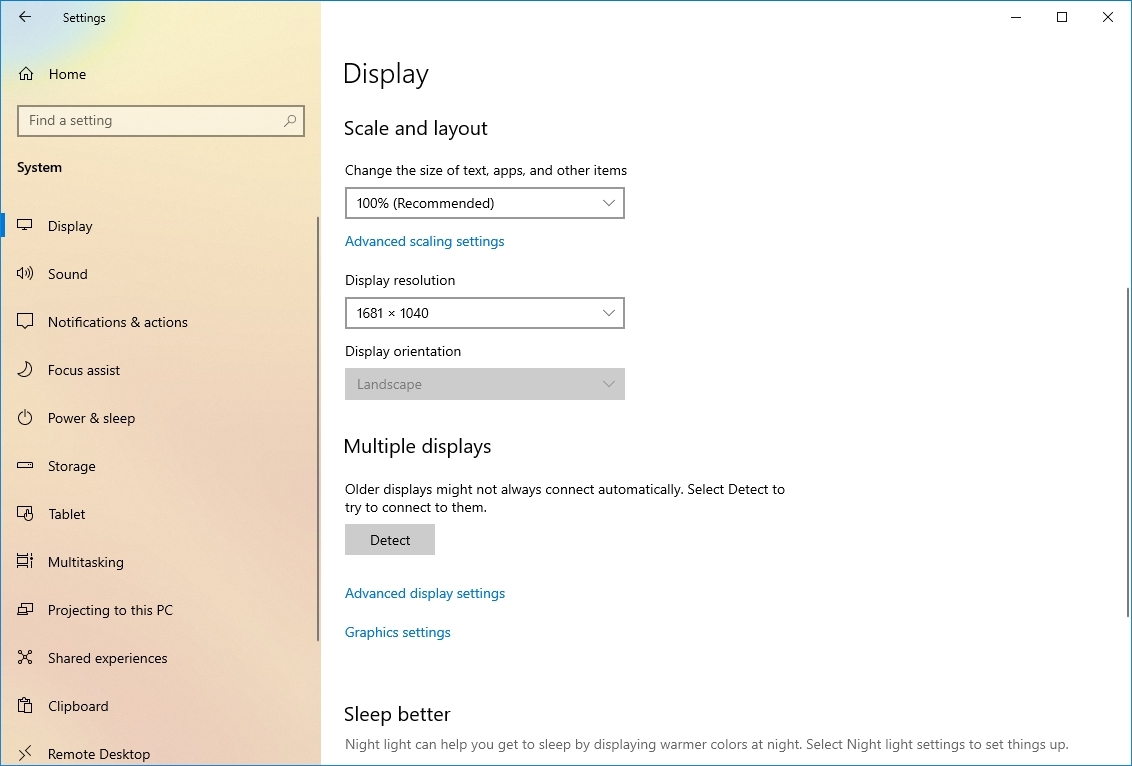
- (Optional) Click the Detect button in the bottom-right corner, under the “Rearrange your displays” section (if applicable).
- Quick note: If you have only one monitor, the option won’t be present since it’s only available when connecting multiple displays.
After following these steps, your computer should automatically recognize the external monitor.
Connect wireless external display
Here’s how to use a wireless display as a second screen with Windows 10:
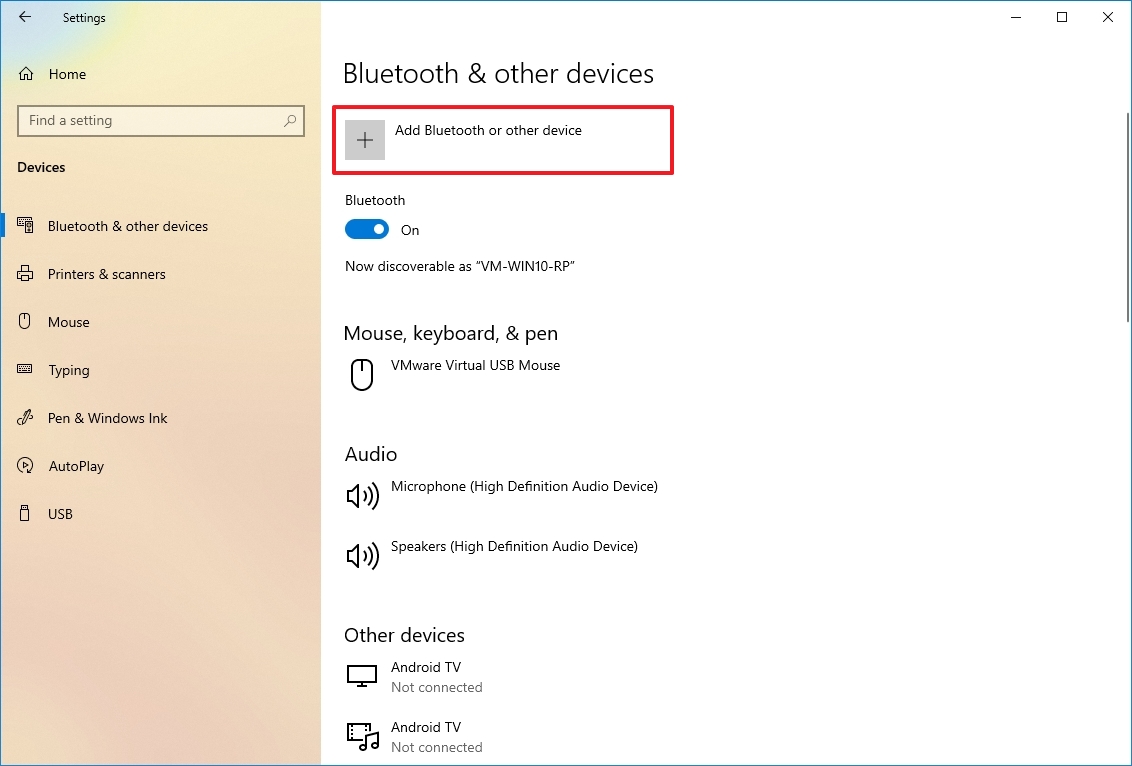
- Open Settings.
- Click on Devices.
- Click on Bluetooth & other devices.
- Turn on the Bluetooth toggle switch (if applicable).
- Click the “Add Bluetooth or other device” button.
- Select the “Wireless display or dock” option.
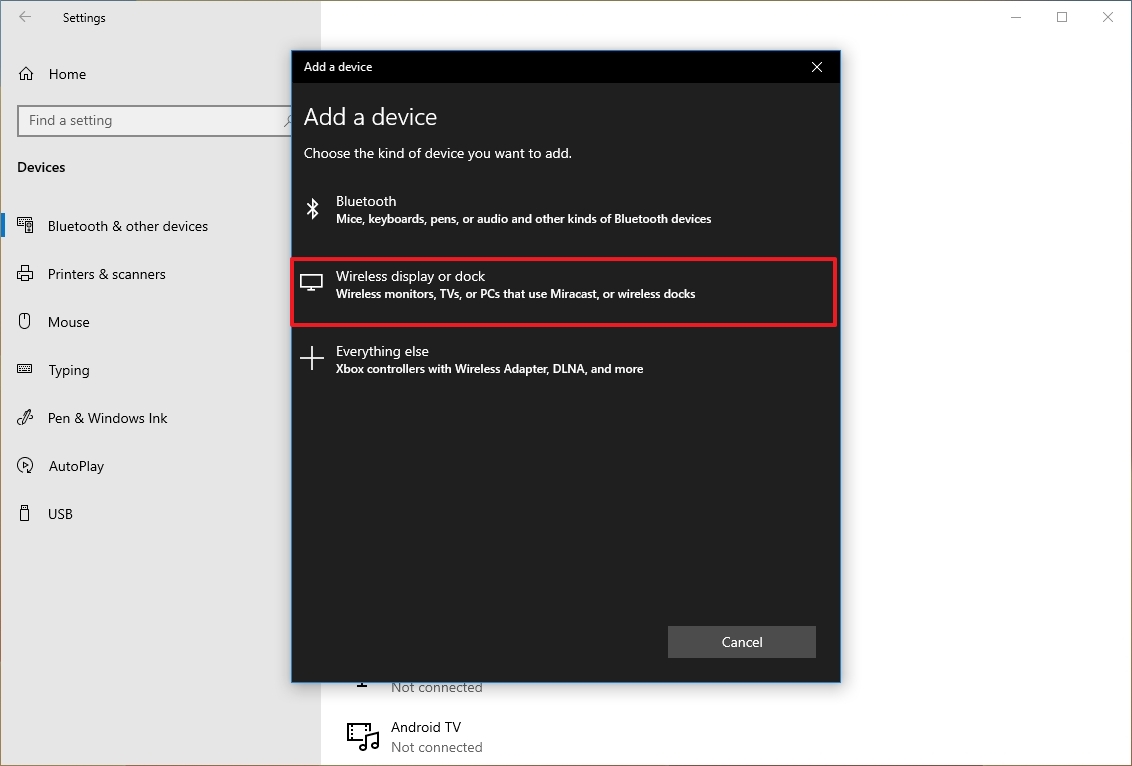
- Confirm the wireless display is on and discoverable (refer to device documentation).
- Select the display (wireless monitor, TV, or PC with Miracast support) from the list.
- Continue with the on-screen directions (if applicable).
After you complete the steps, the wireless display will be detected as a new external display.
How to fix external monitor connection issues from latest graphics drivers
If your computer isn’t recognizing a second monitor, it’s often because of an issue with the software that controls your graphics card. This software, called a graphics driver, might be old, damaged, or simply not working correctly. The simplest solution is usually to update this software, reinstall it, or try using an older version.
Update graphics driver
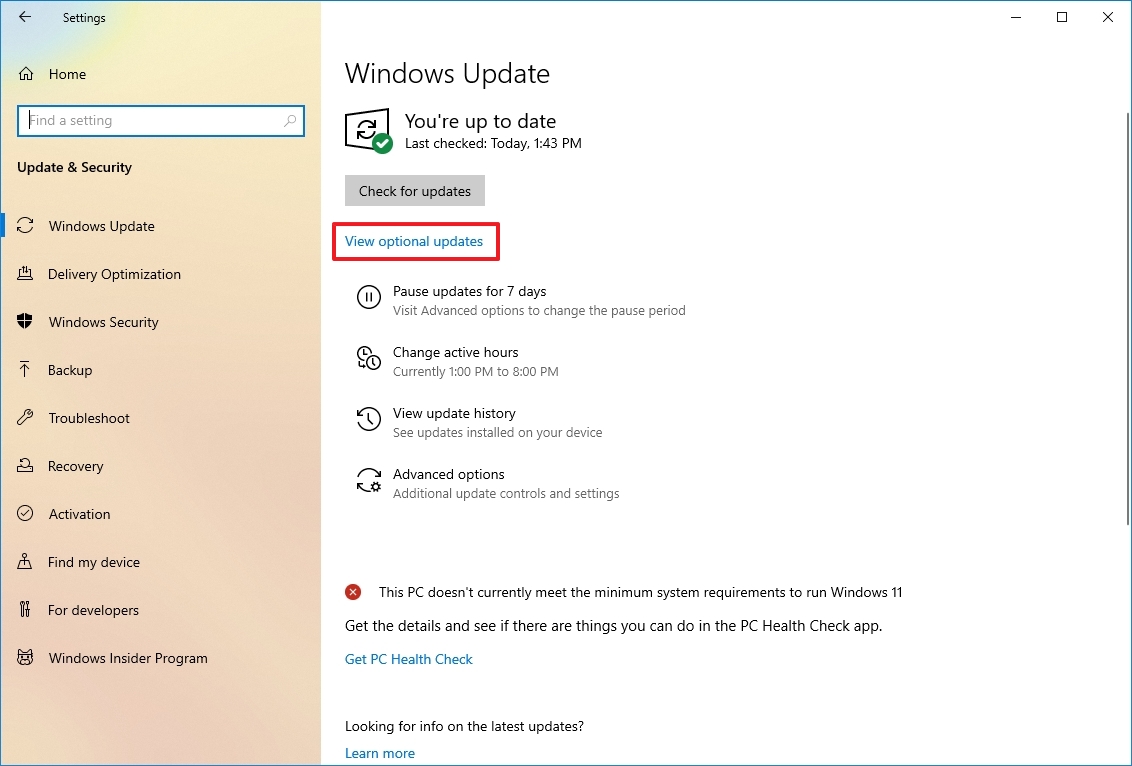
To update the graphics card driver through Windows Update, use these steps:
- Open Settings.
- Click on Update & Security.
- Click on Windows Update.
- Click the “View optional updates” option.
- Quick tip: If the option is not available, Windows Update does not have a newer driver available.
- Select the Driver updates setting.
- Check the graphics driver to update on Windows 10.
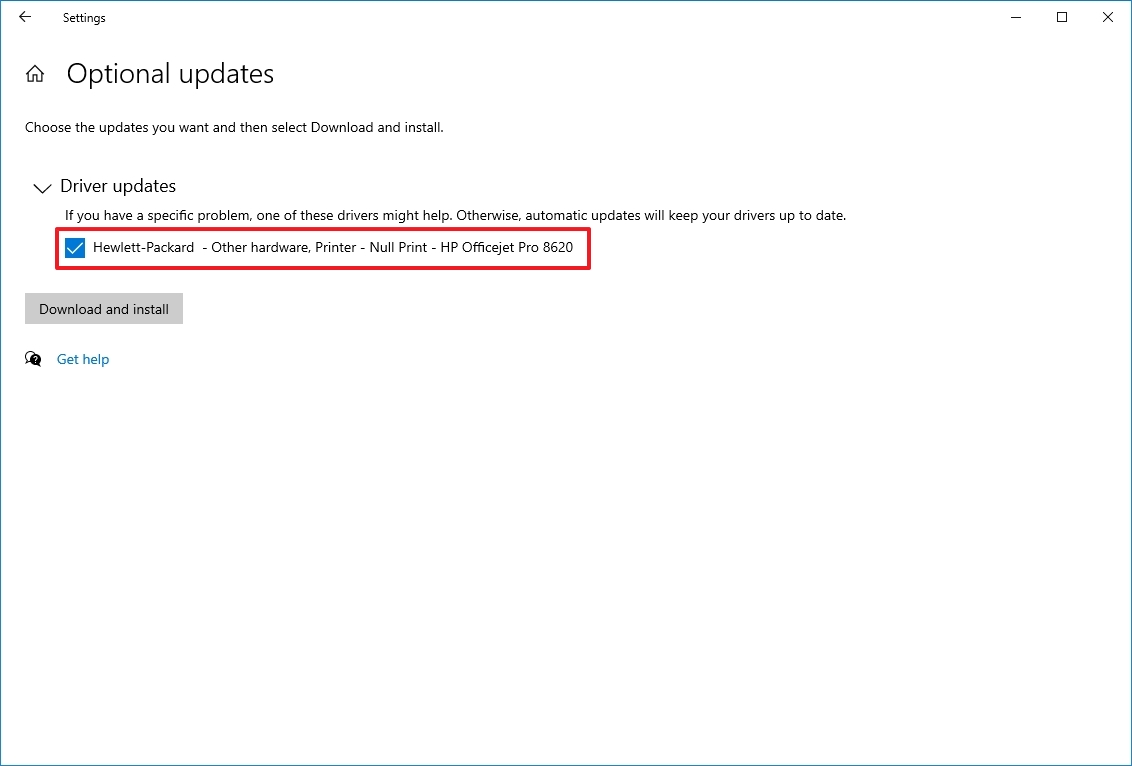
- Click the “Download and install” button.
After following these steps, Windows Update will install the graphics driver and resolve the issue where your external monitor isn’t being detected.
If Windows Update can’t find a newer driver, visit the manufacturer’s website to see if they have a more recent version you can download and install.
Reinstall graphics driver
To reinstall a corrupted video driver on Windows 10, use these steps:
- Open Start.
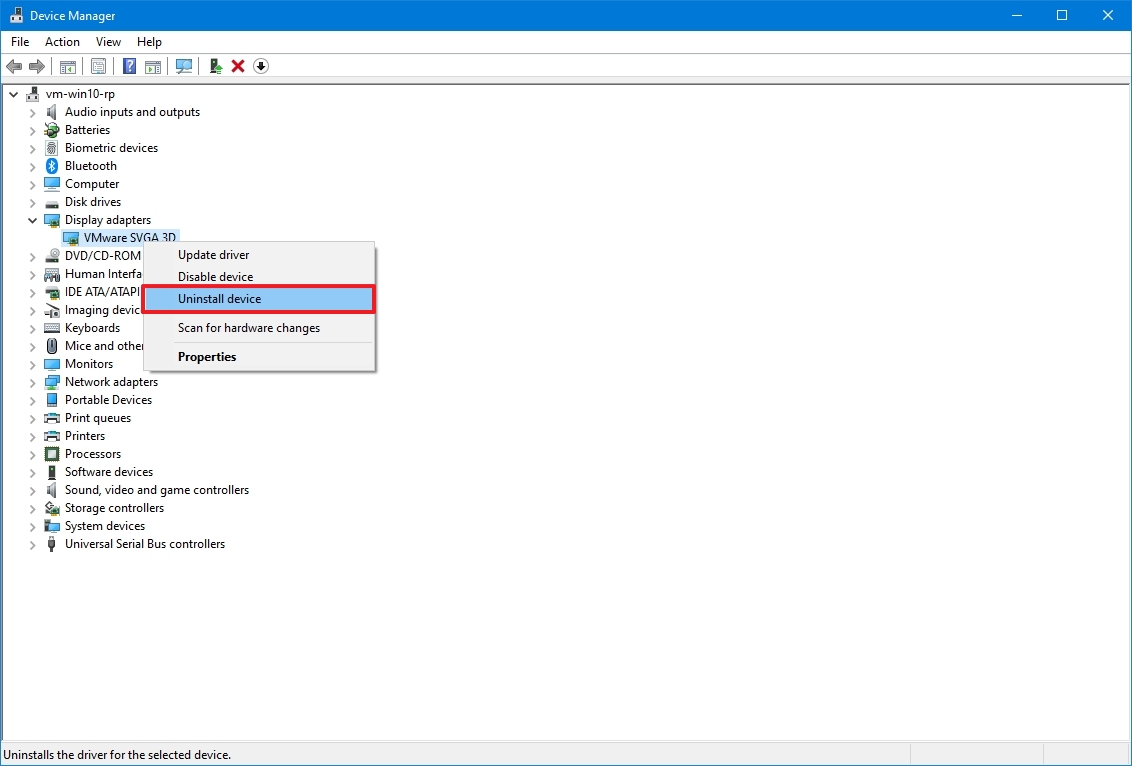
- Search for Device Manager and click the top result to open the app.
- Double-click to expand the Display adapters branch.
- Right-click the adapter and select the Uninstall device option.
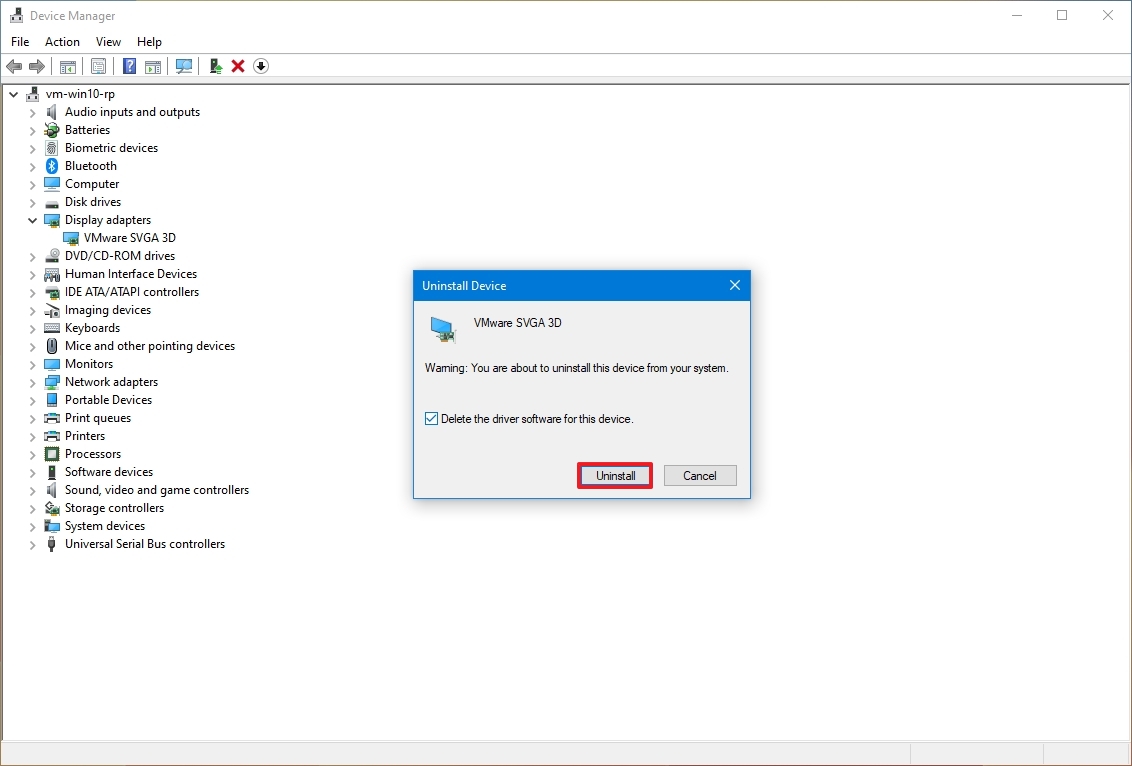
- Clear the “Delete the driver software from this device” option (if applicable).
- Click the Uninstall button.
- Restart the computer.
- Open Device Manager again.
- Quick note: The system should detect the monitor again automatically. If it’s not the case, you can scan for changes manually to reinstall the display.
- Right-click the computer name and select the “Scan for hardware changes” option.
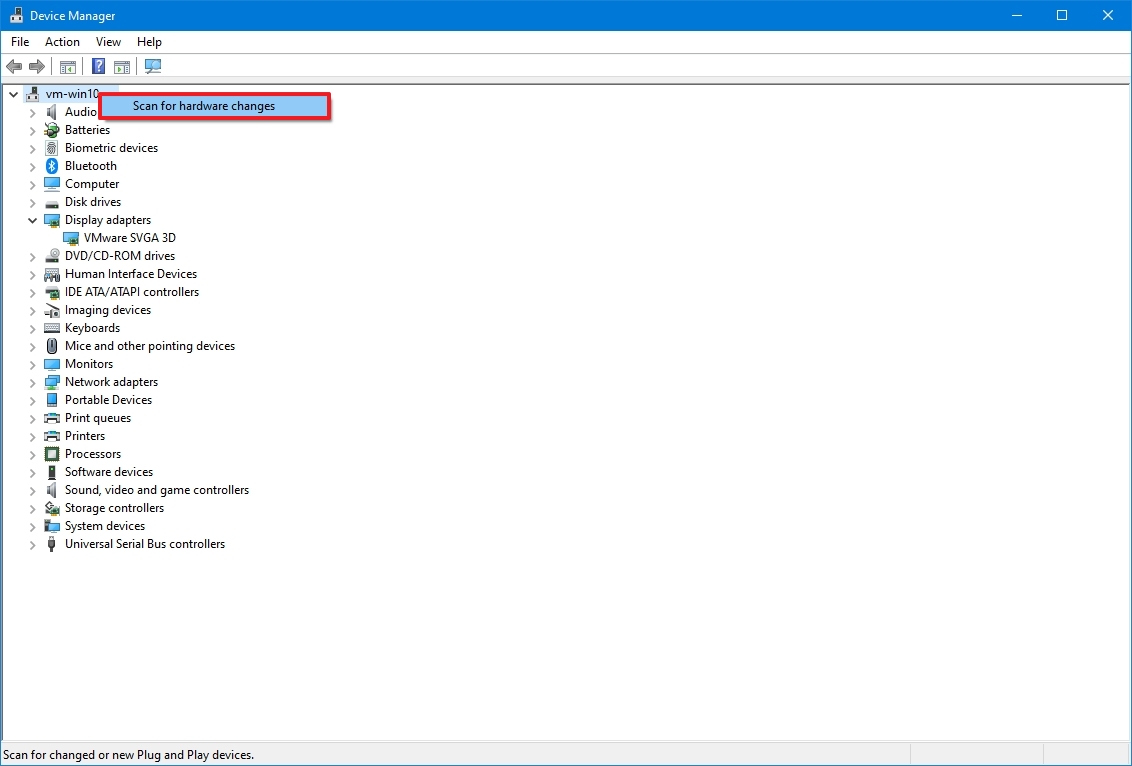
Once you’ve finished these steps, Windows 10 will reinstall the driver on its own. Following these instructions helps make sure the driver is installed properly.
Rollback graphics driver
If you recently updated your computer or manually changed your graphics driver, and your second monitor isn’t working, trying the older version of the driver might fix the problem.
To remove and reinstall an older version of a graphics driver on Windows 10, use these steps:
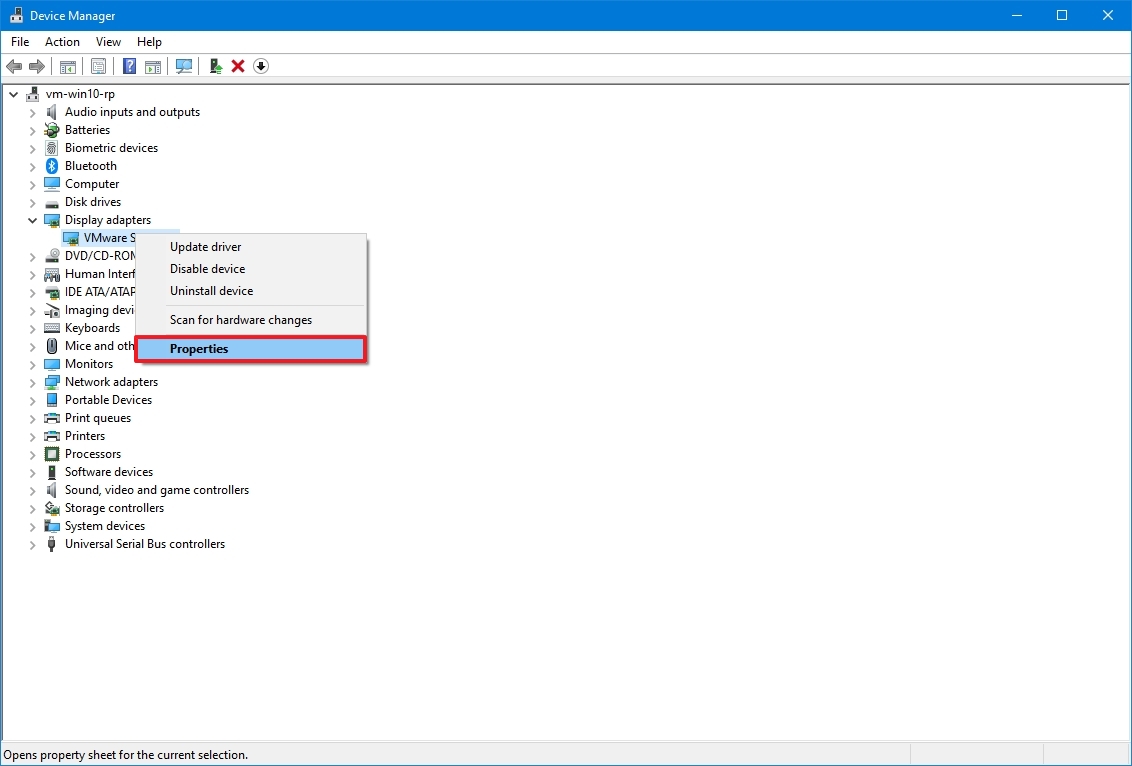
- Open Start.
- Search for Device Manager and click the top result to open the app.
- Double-click to expand the Display adapters branch.
- Right-click the graphics adapter and select the Properties option.
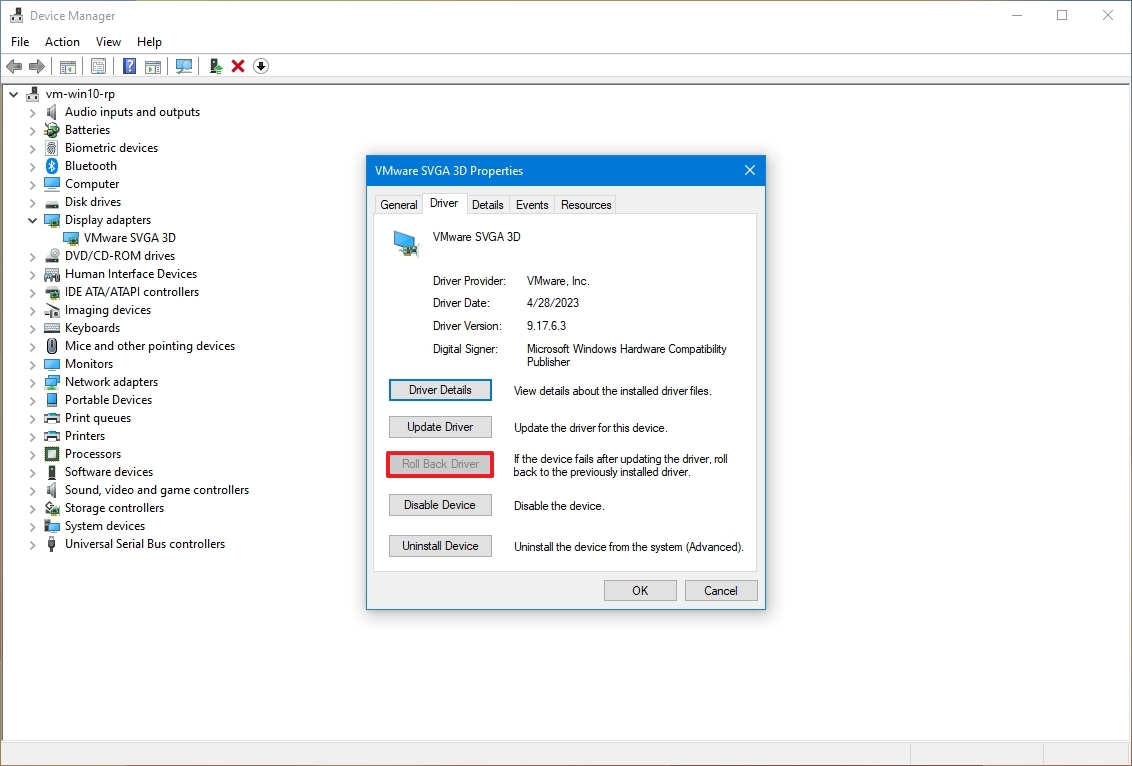
- Click the Driver tab.
- Click the Roll Back Driver button.
- Quick tip: You cannot use this rollback process if the option is unavailable. However, you may still be able to use an older version from the device manufacturer’s support website, if available.
- Select an option to answer the question.
- Click the Yes button.
- Restart the device.
Once you complete the steps, Windows 10 should start rendering content on the external monitor.
Update graphics driver with manufacturer control panel
Your computer’s operating system often installs graphics card drivers automatically, but these aren’t always the newest versions. If you need the latest drivers – which can help resolve issues with external monitors – you can download and install them directly from the graphics card manufacturer’s website, like NVIDIA, AMD, or Intel. They usually provide easy-to-use tools for updating.
Installing the manufacturer’s control panel app is easy. Just download the installer from the links provided and double-click it to begin. Then, simply follow the instructions on your screen to finish the installation and check if any updates are available.
Check manufacturer and driver version
To check the graphics card vendor and driver version on Windows 10, use these steps:
- Open Start.
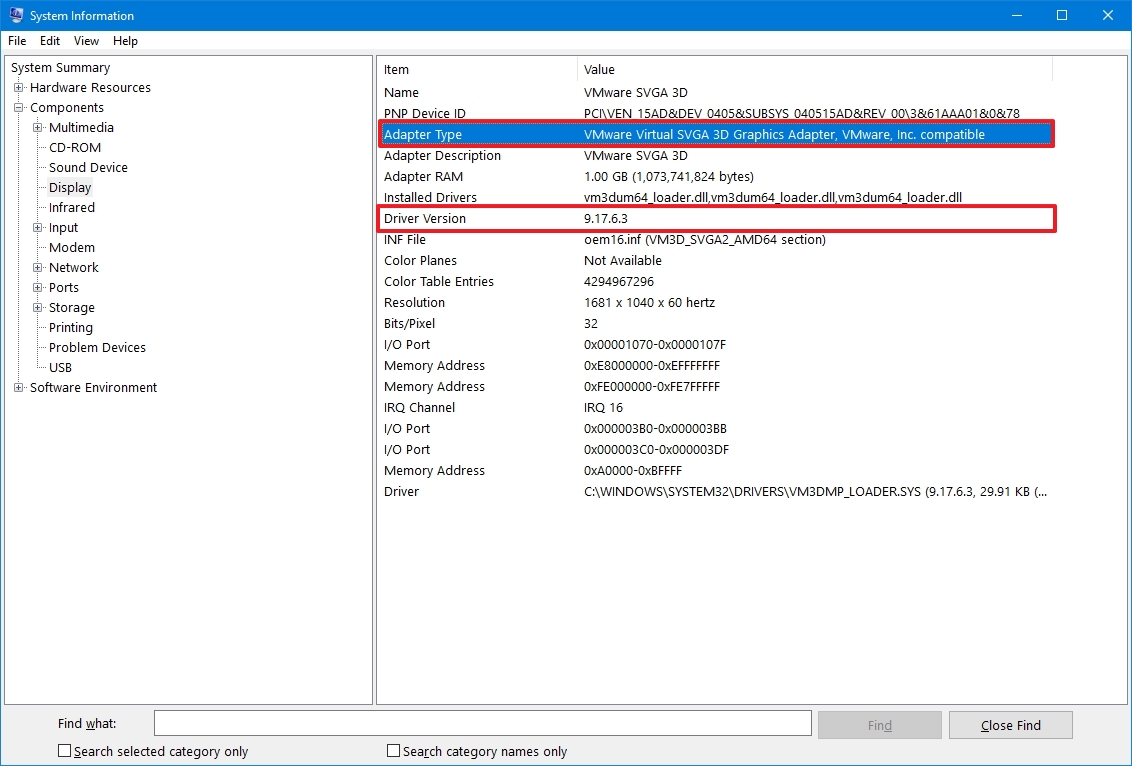
- Search for System Information and click the top result to open the app.
- Double-click to expand the Components branch on the left pane.
- Select the Display category.
- Confirm the Adapter Type and Driver Version information to determine the driver’s card model and current version.
After finishing these steps, use the links provided to locate, download, and install the driver you need.
Computer companies like Dell, HP, Razer, Acer, and Microsoft often customize drivers to work best with their specific machines. If you have a pre-built computer from one of these companies (also called an OEM computer), it’s generally a good idea to download the graphics driver from the computer manufacturer’s website first, before trying the driver directly from the graphics card maker. This can help prevent potential issues.
How to fix external monitor connection issues on Windows 11
These instructions work for both Windows 10 and Windows 11, but keep in mind that Windows 11 has a slightly different look, so some steps might vary.
Force external monitor detection
To detect an external monitor manually on Windows 11, use these steps:
- Open Settings.
- Click on System.
- Click the Display page on the right side.

- Click the Multiple displays setting.
- Click the Detect button.
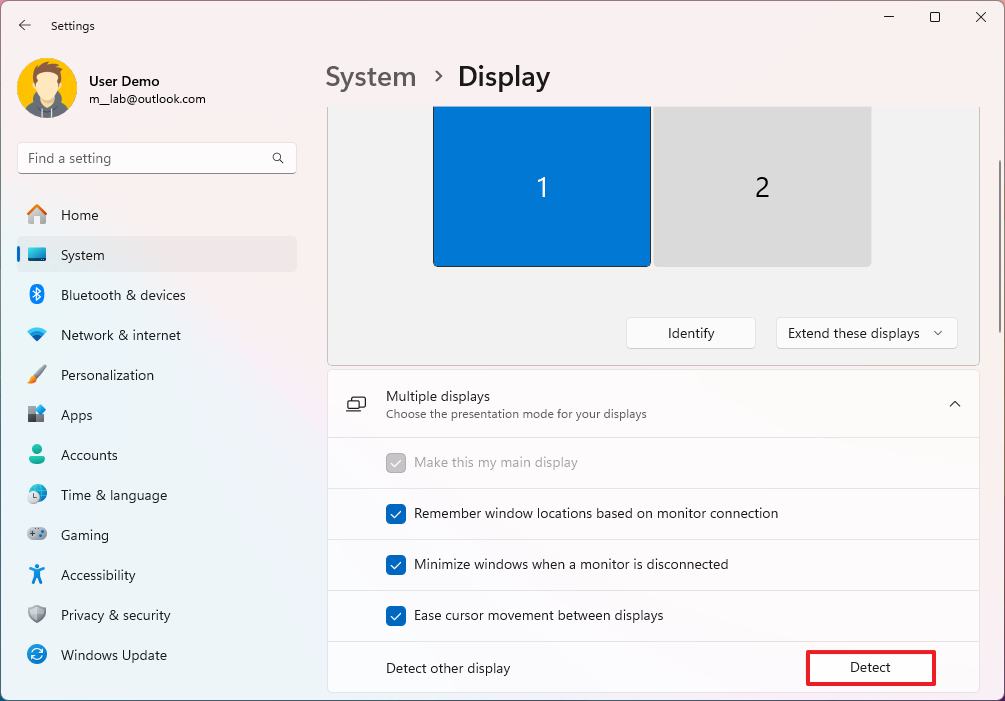
Once you complete the steps, the system should detect the external display.
Connect wireless external display
To connect a wireless display as a secondary screen, use these steps:
- Open Settings.
- Click on Bluetooth & devices.
- Turn on the Bluetooth toggle switch (if applicable).
- Click the Add device button.
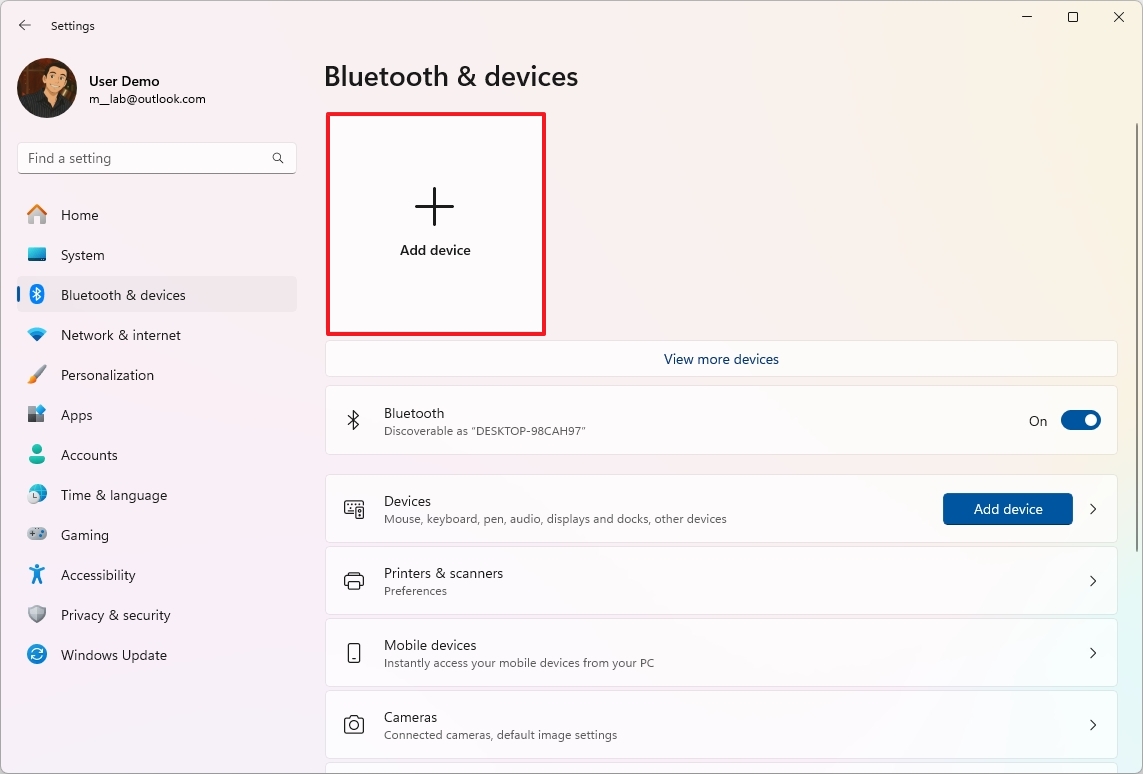
- Select the “Wireless display or dock” option.

- Confirm the wireless display is turned on and discoverable (refer to device documentation).
- Select the display (wireless monitor, TV, or PC with Miracast support) from the list.
- Continue with the on-screen directions (if applicable).
Once you’ve finished the setup, your computer will recognize the screen as a new monitor.
Update graphics driver
To update the graphics driver, use these steps:
- Open Settings.
- Click on Windows Update.
- Click the Advanced options page on the right side.
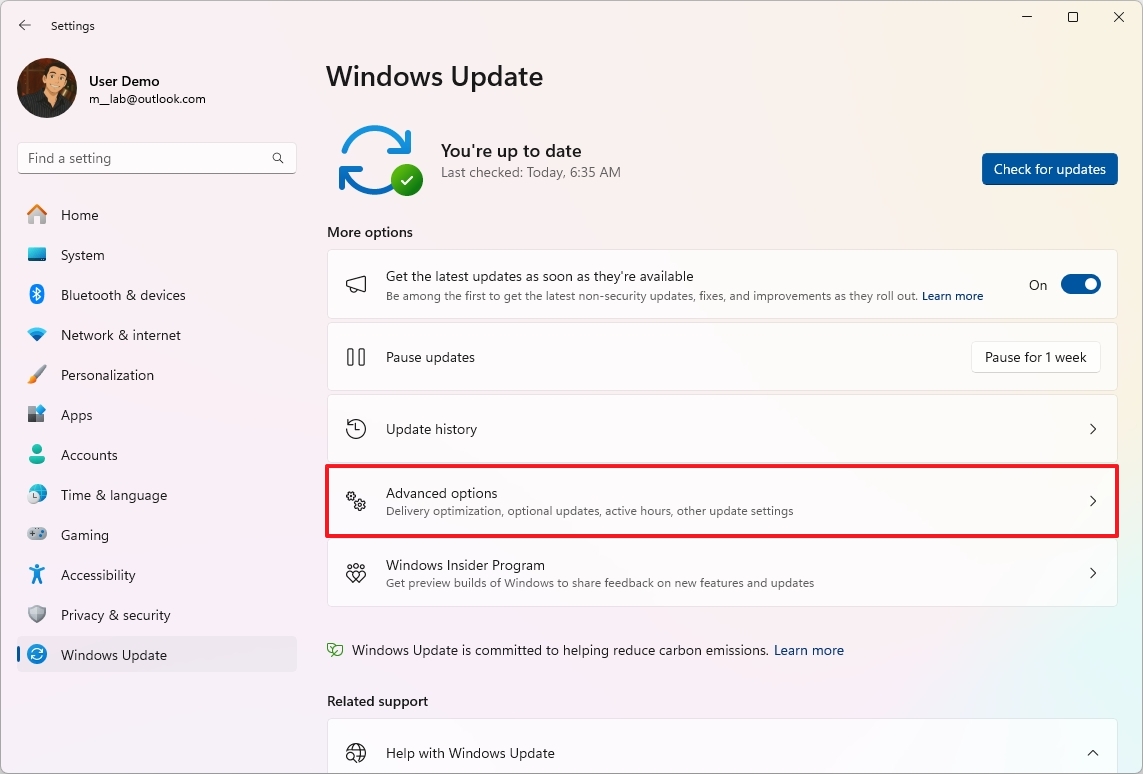
- Click the Optional updates option under the “Additional options” section.
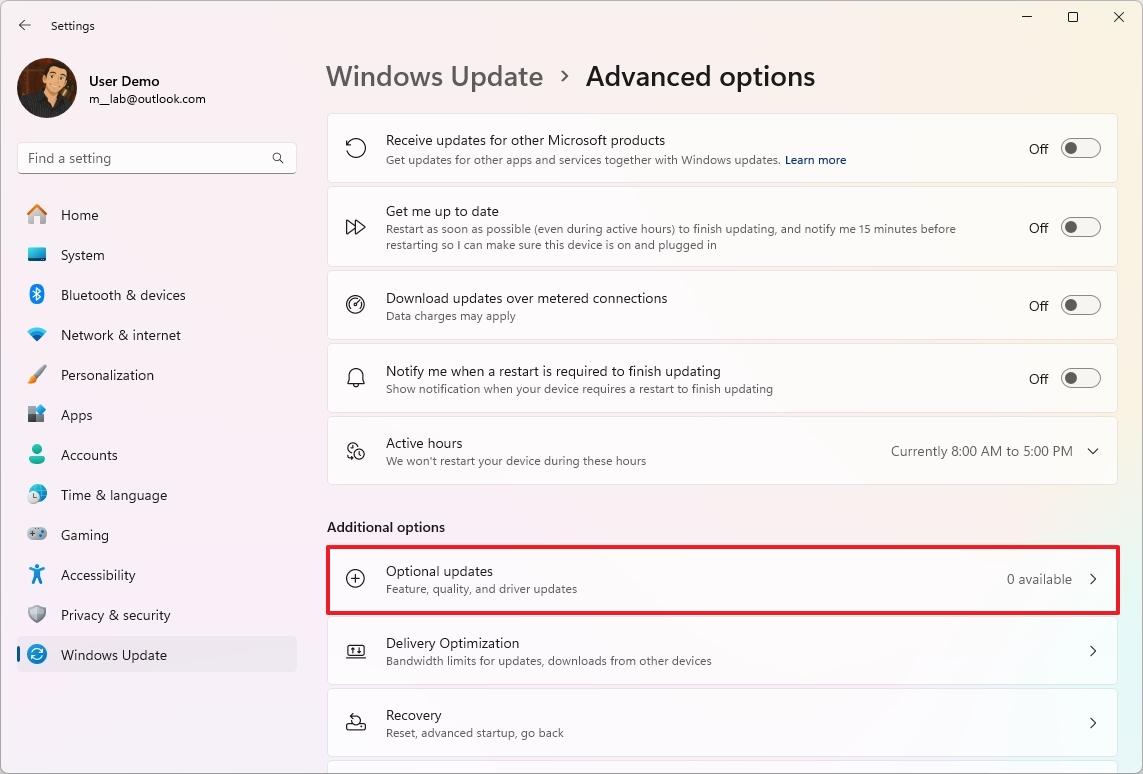
- Select the newer graphics driver to install on Windows 11.
- Click the “Download & install” button.
After finishing these steps, the system will automatically download and install the latest graphics driver update, which should resolve the issue with your external monitor not being detected.
FAQs
These are common questions when dealing with a multi-monitor setup on Windows 10.
How do I rotate my monitor on Windows 10?
To change how your monitor is displayed, right-click anywhere on your desktop and choose “Display settings.” Then, scroll down to the “Display orientation” menu and select your preferred view: Landscape, Portrait, Landscape (flipped), or Portrait (flipped).
How do I use dual monitors on Windows 10?
After plugging in your second monitor, press the Windows key and the letter P at the same time. This will open the Project menu, where you can choose how to display your screen. Your options are to show only on your computer, duplicate the display, extend the display across both screens, or show only on the second monitor.
You can customize your screens by going to Settings > System > Display. Here, you can rearrange your monitors, change how large things appear on each screen, and adjust other display settings.
How do I adjust monitor brightness on Windows 10?
You can adjust the screen brightness by going to the Settings app, then System, and then Display. From there, use the Brightness & color slider.
If you have a computer connected to an external monitor, you might need to adjust the brightness using the buttons on the monitor itself. Sometimes, your computer’s operating system can’t control the brightness of external displays.
How do I change the default monitor on Windows 10?
To change the default monitor, open Settings > System > Display, select the monitor you want to set as the default, then check “Make this my main display.”
How do I set a primary monitor on Windows 10?
Open the “Display” settings page, click on the monitor you want to make primary, and check the box “Make this my main display.”
How do I extend my monitor on Windows 10?
You can easily add a second monitor to your Windows 10 computer by pressing the Windows key and the letter P at the same time. A menu will appear – choose “Extend” to combine your screens into one larger workspace, letting you move windows between them.
How do I adjust monitor size on Windows 10?
You can change the size of items on your monitor by going to Settings > System > Display. Look for the “Scale and layout” section and adjust the percentage to make text, apps, and icons bigger or smaller. You can also change the display resolution in the same area to adjust the overall screen size and how clear things look.
How do I calibrate a monitor on Windows 10?
To adjust your monitor’s settings, type “Calibrate display color” into the Windows search bar and open the app. The program will guide you through steps to fine-tune the gamma, brightness, contrast, and color, which will make images and text look more accurate.
External monitors may also have built-in calibration options in their menus.
Can I have different wallpapers on dual monitors on Windows 10?
You can absolutely use a different wallpaper on each of your monitors. To do this, go to your computer’s Settings, then click on Personalize and then Background. Under ‘Choose your picture,’ simply right-click the image you want to use and select either ‘Set for monitor 1’ or ‘Set for monitor 2’ to apply it to the specific screen you choose.
More resources
Read More
- All 13 Smash Bros. Characters in the Super Mario Galaxy Movie
- Why is Tech Jacket gender-swapped in Invincible season 4 and who voices her?
- TV legend Carol Kirkwood reveals the reasons why she decided to retire after 28 years with BBC
- Welcome to Demon School! Iruma-kun season 4 release schedule: When are new episodes on Crunchyroll?
- Sydney Sweeney’s The Housemaid 2 Sets Streaming Release Date
- Highly Anticipated Strategy RPG Finally Sets Release Date (And It’s Soon)
- The Super Mario Galaxy Movie: 50 Easter Eggs, References & Major Cameos Explained
- Dune 3 Gets the Huge Update Fans Have Been Waiting For
- Digimon Is Getting a New RPG in 2026 (And You Probably Missed It)
- MOUSE: P.I. For Hire Loops in Caravan Palace for A Catchy New Track Ahead of April 16 Release
2025-09-17 18:15