You can use Copilot on Windows 11 either with its dedicated app or directly within other applications. This guide will show you how to start using it.
As a tech enthusiast, I’m really excited about Copilot! It’s basically a smart assistant – think of it like a next-gen Cortana – that understands what you’re asking in plain English and then gives you an answer or actually *does* something. What’s cool is that, unlike some other AI features built into Windows 11, Copilot doesn’t run entirely on your computer. It connects to powerful AI models in the Microsoft cloud to get the job done.
As I’ve been following Copilot’s development, I’ve noticed Microsoft is really working to weave it into the core of Windows. They’re not just leaving it as a separate app – they’re adding features like deeper connections to other apps, improved visual understanding, better file searching, and even hands-free control through the ‘Hey Copilot’ voice command. It’s clear they want it to feel like a natural part of the operating system.
You can also use Copilot directly within many apps, like Notepad, File Explorer, Photos, Paint, Microsoft 365 apps (such as Word and Excel), and Microsoft Edge.
This guide will show you how to start using Copilot on Windows 11.
How to navigate the Copilot app
The Copilot app on Windows 11 is simple and easy to use. You can open it in a few different ways and change a limited number of settings to customize it.
Sign in account
To log in to your account (if required), use these steps:
- Click the Sign in button at the bottom left.
- Quick tip: If you don’t see the option, click the “Open Sidebar” button in the top left corner.
- Click the Sign in button again.
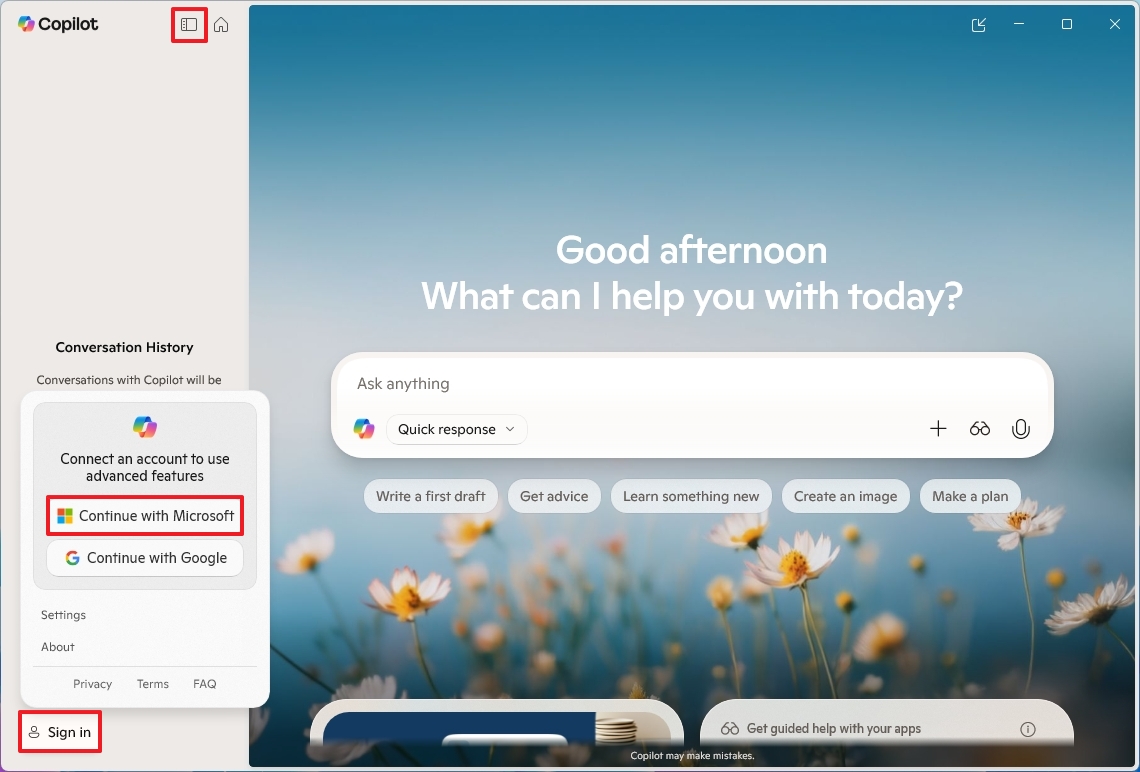
- Complete your credentials to access your account.
Once you complete the steps, you can start interacting with Copilot using natural language.
Launch Copilot
In addition to using the button in the Taskbar, you can launch the Copilot chatbot in several ways.
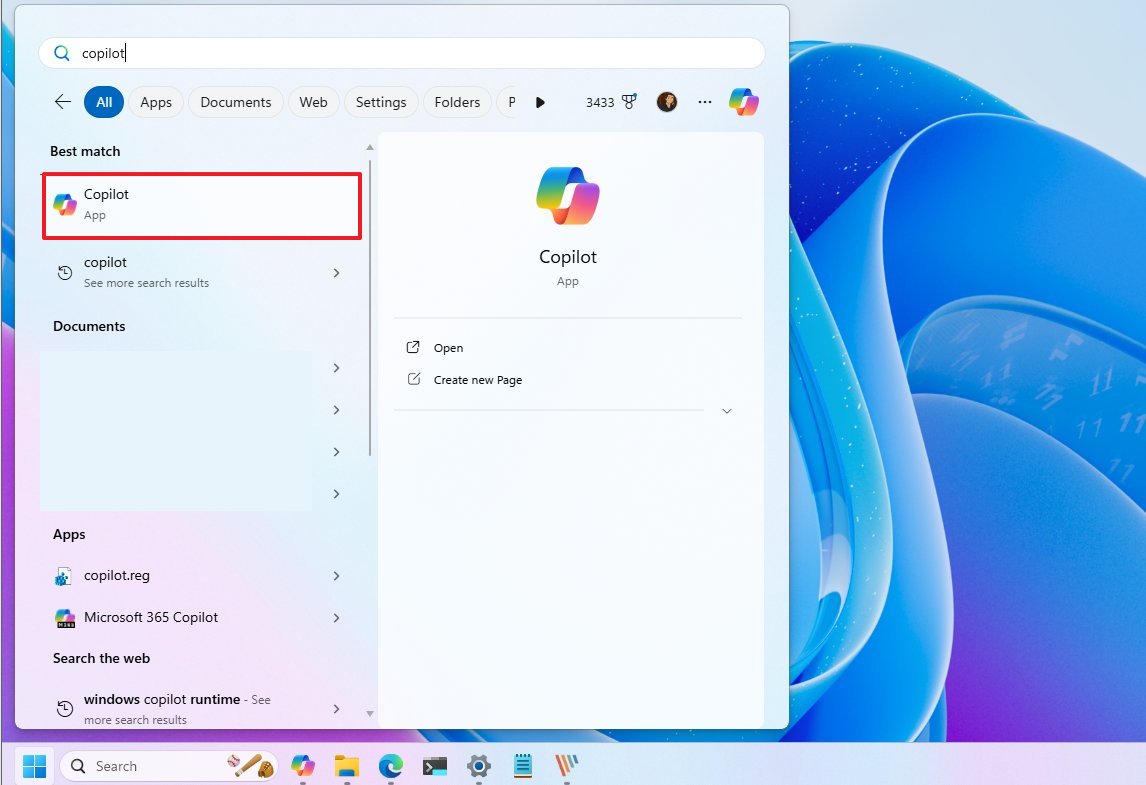
From Start
To launch the Copilot experience on Windows 11, use these steps:
- Open Start.
- Search for Copilot and click the top result to open the app.
The Copilot button might already be on your Taskbar. If you don’t see it there, open Copilot from the Start menu, right-click its button, and select ‘Pin to Taskbar’.
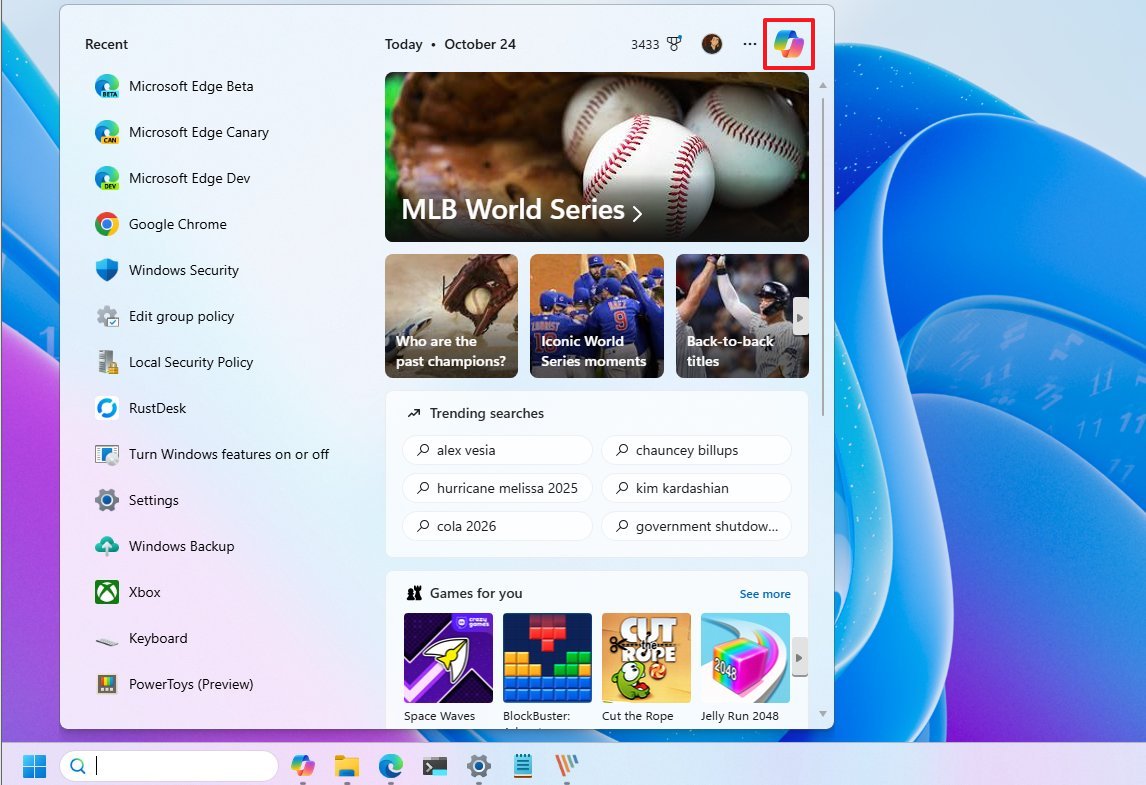
From Search
You can also start the chatbot by clicking the Copilot button while using Windows Search. This will open the chatbot in a new Microsoft Edge browser window at Copilot.Microsoft.com.
From voice command
If the “Listen for ‘Hey, Copilot'” feature is turned on, you can talk to the chatbot without using your hands by simply saying “Hey Copilot”.
Customize Copilot app experience
You can customize how Copilot works on Windows 11 through its settings. This includes controlling most of the chatbot’s features.
Control Copilot app on startup
To customize the experience of Copilot, use these steps:
- Click the account menu from the top left.
- Quick tip: If you don’t see the menu, click the top-left menu icon to open the sidebar.
- Click the Settings option.
- Under the “App” section, turn on the “Auto start on log in” toggle switch to launch the app automatically when the computer starts.
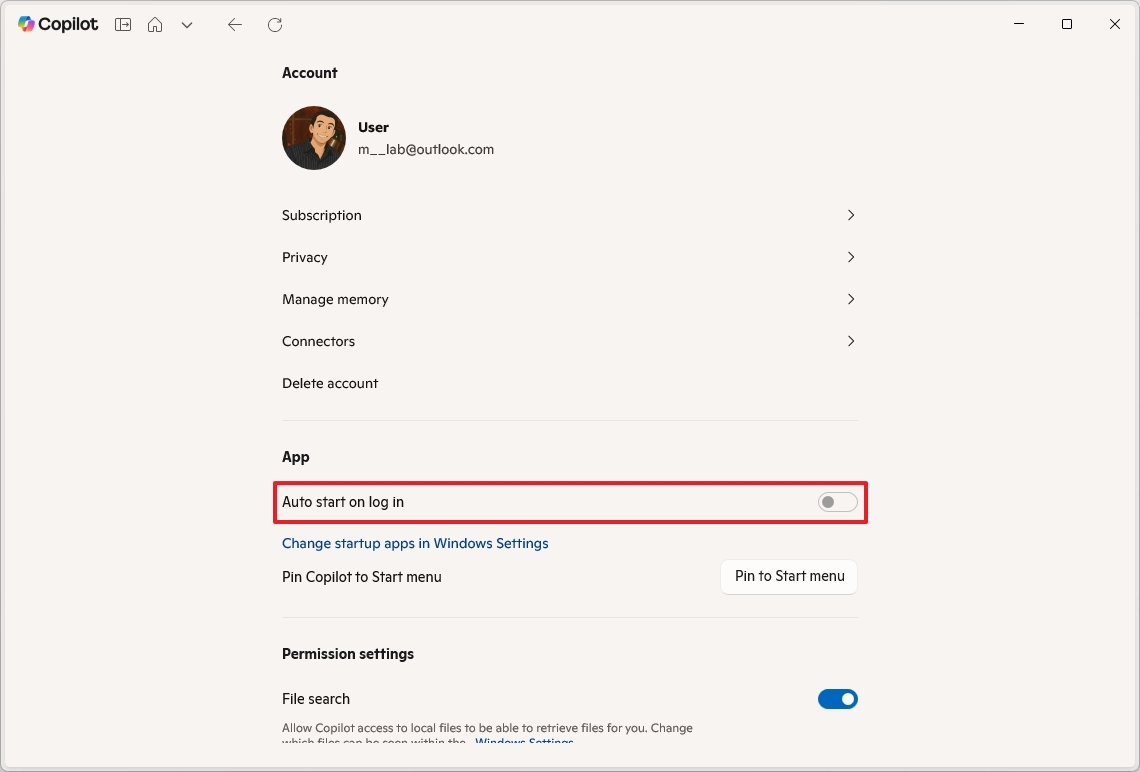
Once you complete the steps, Copilot will start minimizing during startup.
If the option is grayed out, open Settings > Apps > Startup, and turn Copilot on or off on startup.
Configure file search permissions
Okay, so I’ve been playing with Copilot on Windows 11, and it’s pretty cool. You can actually give it access to your files – think of it like a super-powered Windows Search, but instead of just finding things, it *understands* them using AI. It’s like having an AI assistant that knows what’s on your computer.
To enable search permissions in Copilot, use these steps:
- Click the account menu from the top left.
- Click the Settings option.
- Under the “Permission settings” section, turn on the “File search” toggle to allow access to local files.
- Turn on the “File read” toggle switch to give Copilot permission to analyze the data in the files to answer questions using AI.
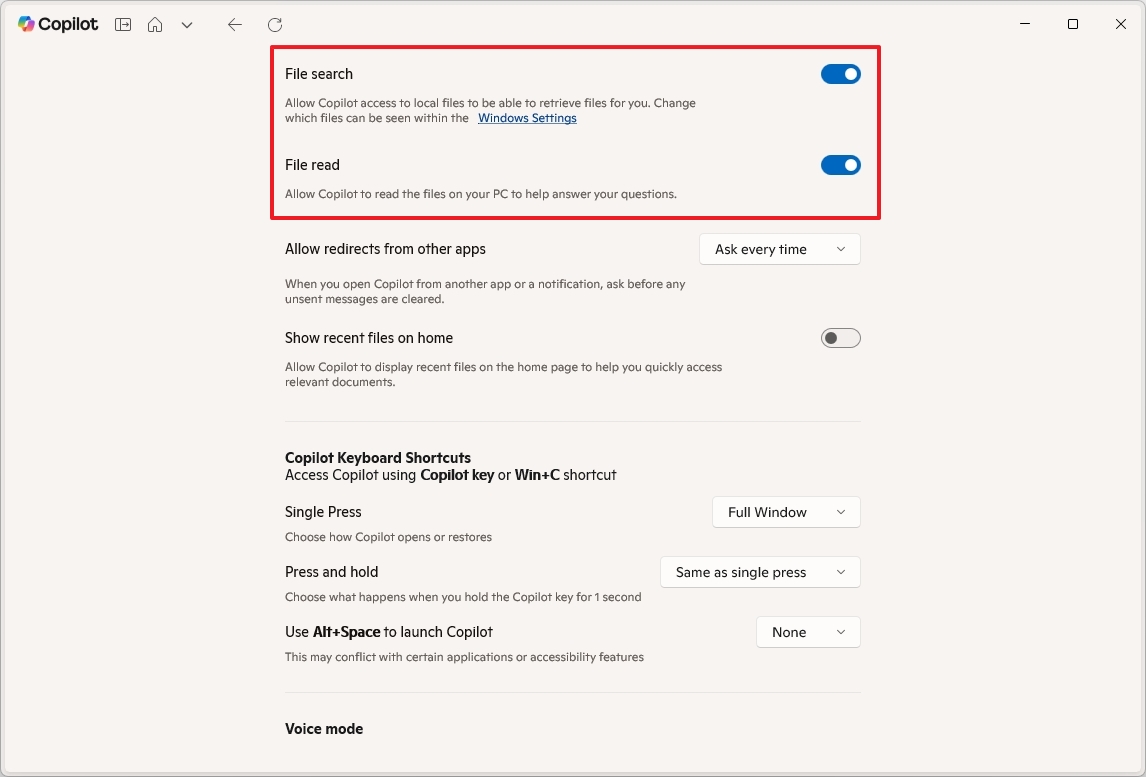
- (Optional) Turn off the “Show recent files on home” toggle switch to prevent the app from showing recent files on the main page.
Once you’ve finished these steps, the assistant will need to look for files saved on your computer.
Set up Copilot shortcut
You can also control the action for the keyboard shortcut that opens and closes the Copilot app.
To manage Copilot shortcut behaviors, use these steps:
- Click the account menu from the top left.
- Click the Settings option.
- Under the “Copilot Keyboard Shortcuts” section, choose what happens when opening and restoring the chatbot using the Copilot or “Windows key + C” keyboard shortcut. For example, a normal full window or compact view.
- Choose the “Press and hold” action when invoking the shortcut.
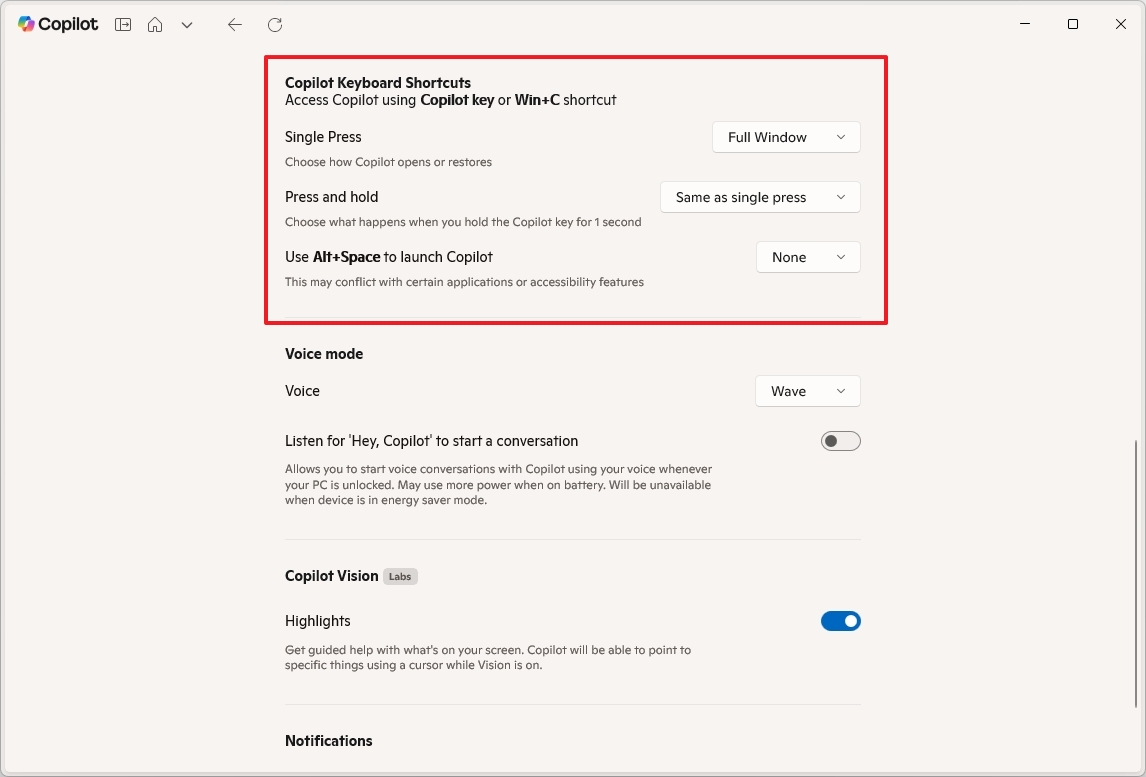
Once you complete the steps, the new configuration will apply to the Copilot shortcut behavior.
Enable Hey Copilot voice command
You can now talk to Microsoft’s Copilot just like you used to with Cortana, using everyday language instead of needing to type commands. This allows for a more natural way to interact with the AI assistant.
To enable the Hey Copilot command, use these steps:
- Click the account menu from the top left.
- Click the Settings option.
- (Option 1) Under the “Voice mode” section, turn on the “Listen ‘Hey Copilot’ to start a conversation” toggle switch.
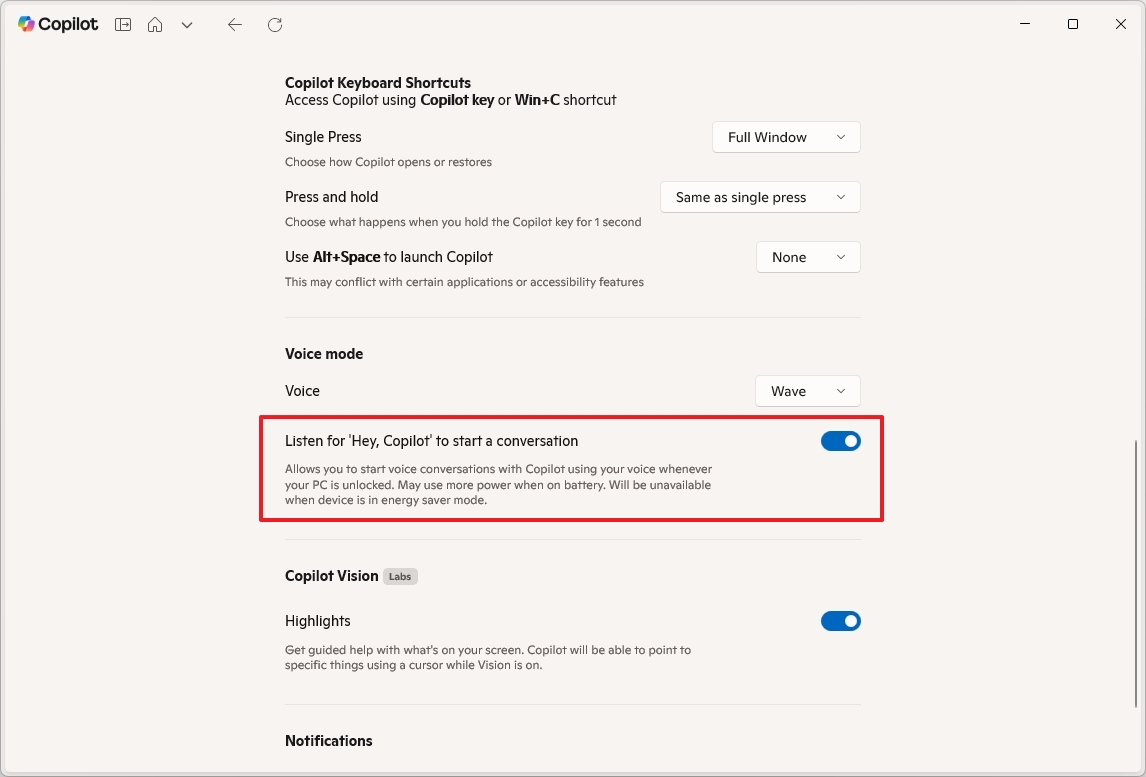
- (Option 2) Turn off the “Listen ‘Hey Copilot’ to start a conversation” toggle switch to disable the feature.
You can customize the chatbot’s voice during conversations using the “Voice” setting, though it’s not necessary.
Enable Copilot Vision
With Copilot Vision, you can share what’s on your screen with the Copilot app. After you allow access, Copilot can see and understand what’s displayed, letting it assist you with almost any task.
To enable Copilot Vision on Windows 11, use these steps:
- Click the account menu from the top left.
- Click the Settings option.
- (Option 1) Under the “Copilot Vision” section, turn on the “Highlights” toggle switch to enable the feature.
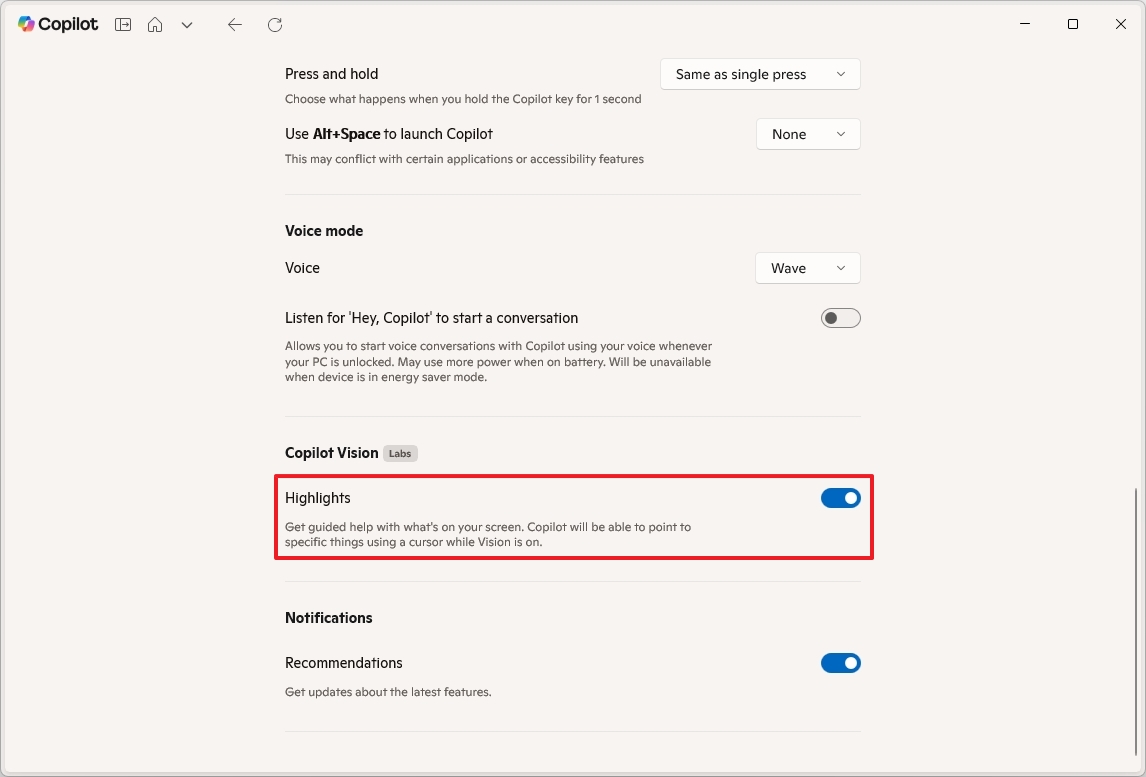
- (Option 2) Turn off the “Highlights” toggle switch to disable the feature.
After finishing the setup, a button will appear in the Copilot app that looks like a pair of goggles. Clicking this button lets you choose an app to connect with Copilot, and then control it using your voice.
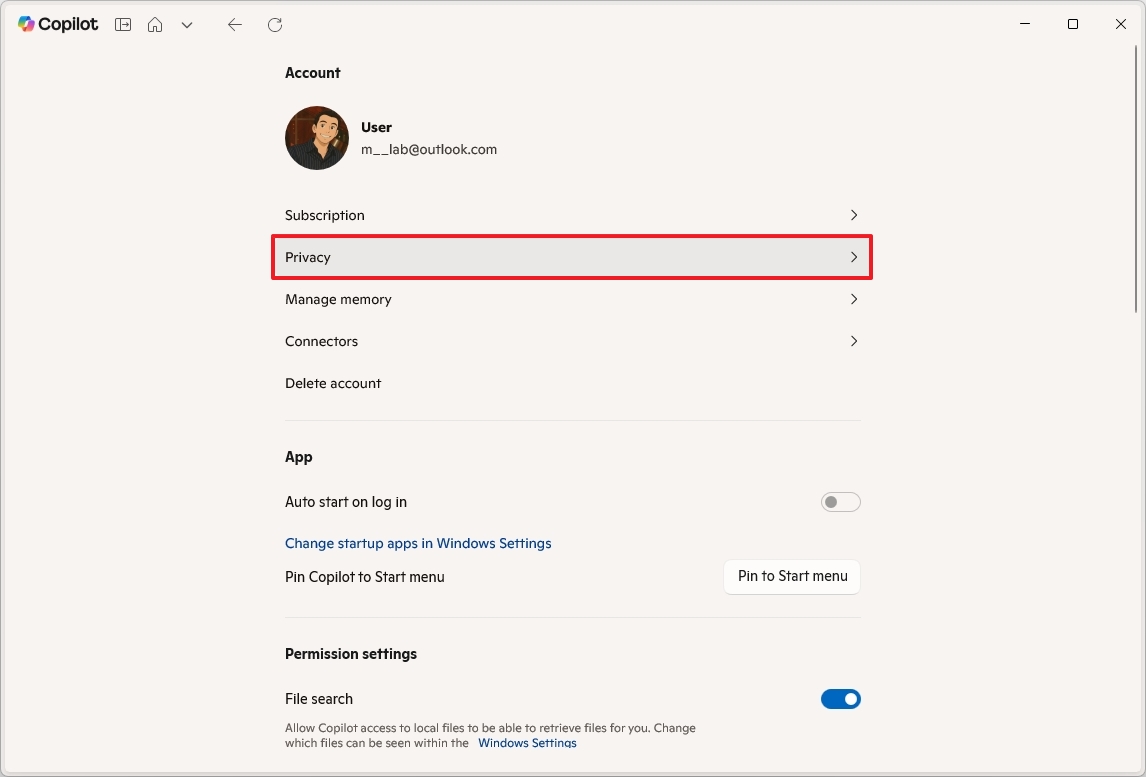
Change Copilot app privacy settings
To prevent Microsoft from using your data to train its AI models, use these steps:
- Click the account menu from the top left.
- Click the Settings option.
- Click the Privacy page.
- Turn off the “Diagnostic Data Sharing” toggle switch.
- Turn off the “Model training on text” toggle switch.
- Turn off the “Model training on voice” toggle switch.
- Turn off the “Personalization and memory” toggle switch.
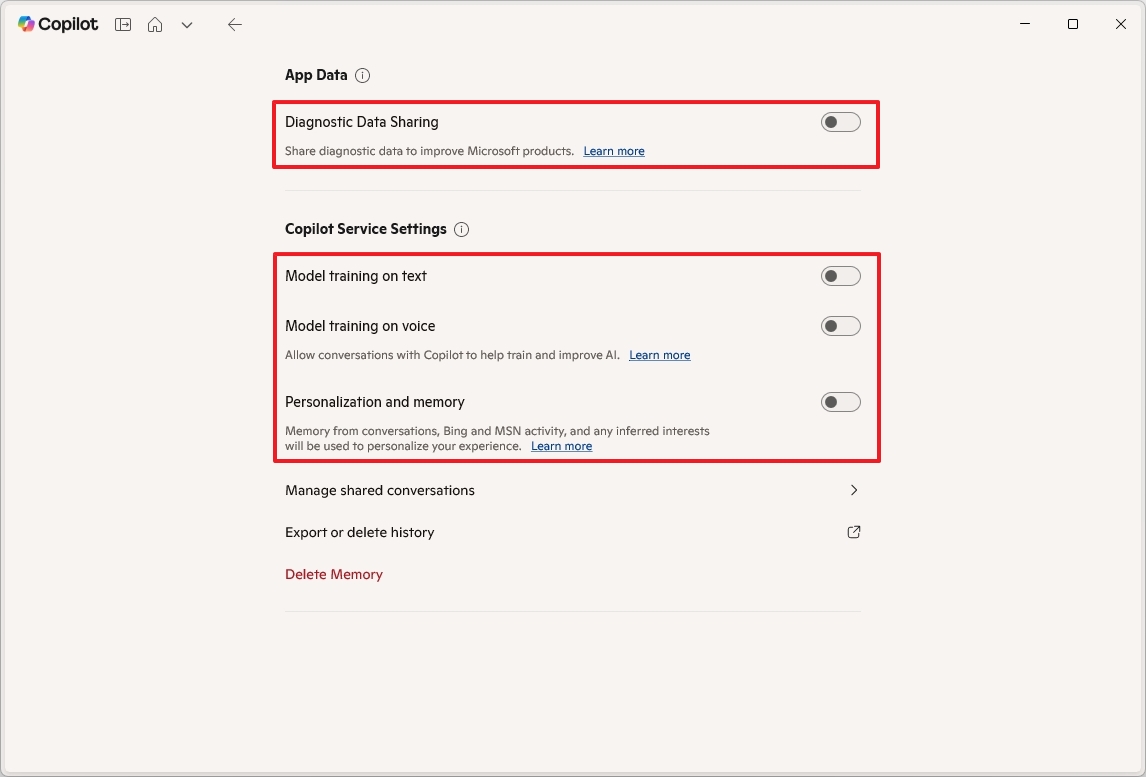
- (Optional) Click the Delete Memory to clear the information that the chatbot knows about you.
After you finish these steps, Copilot won’t send your data to Microsoft for training or to improve its personalization, no matter if you’re using it on Windows 11, your phone, or the web.
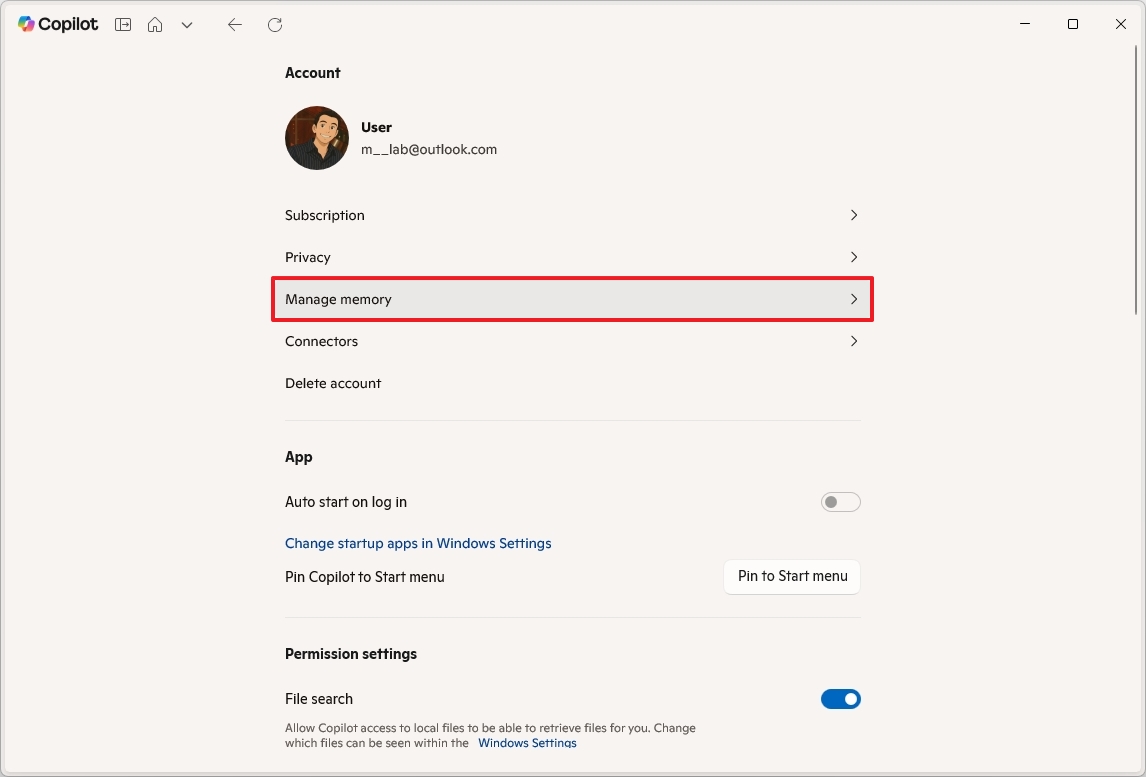
Manage Copilot’s memory
Like ChatGPT, Copilot remembers helpful information you share during conversations to give you more customized help. It’s best to share things like your name, what you like, your interests, or your goals, so it can better understand your needs and give you more relevant responses.
To add or remove items from memory, use these steps:
- Click the account menu from the top left.
- Click the Settings option.
- Click the Manage memory page.
- Quick note: This option is only available if the “Personalization and memory” option is turned on in the privacy settings.
- Click the delete button for the information you want Copilot to forget.

- (Optional) Click the “Add to memory” button to bring up the prompt to store more information you want the assistant to remember.
After you complete the steps, Copilot will only remember the information left in memory.
Configure Copilot Connectors
Copilot connectors are features that let the Copilot app on Windows 11 connect to and make sense of information from other places, like websites and apps.
Copilot can link to your accounts from services like OneDrive, Outlook, Google Drive, Gmail, and Google Calendar, letting you access your personal information.
To connect external services to Copilot, use these steps:
- Click the account menu from the top left.
- Click the Settings option.
- Click the Connectors page.
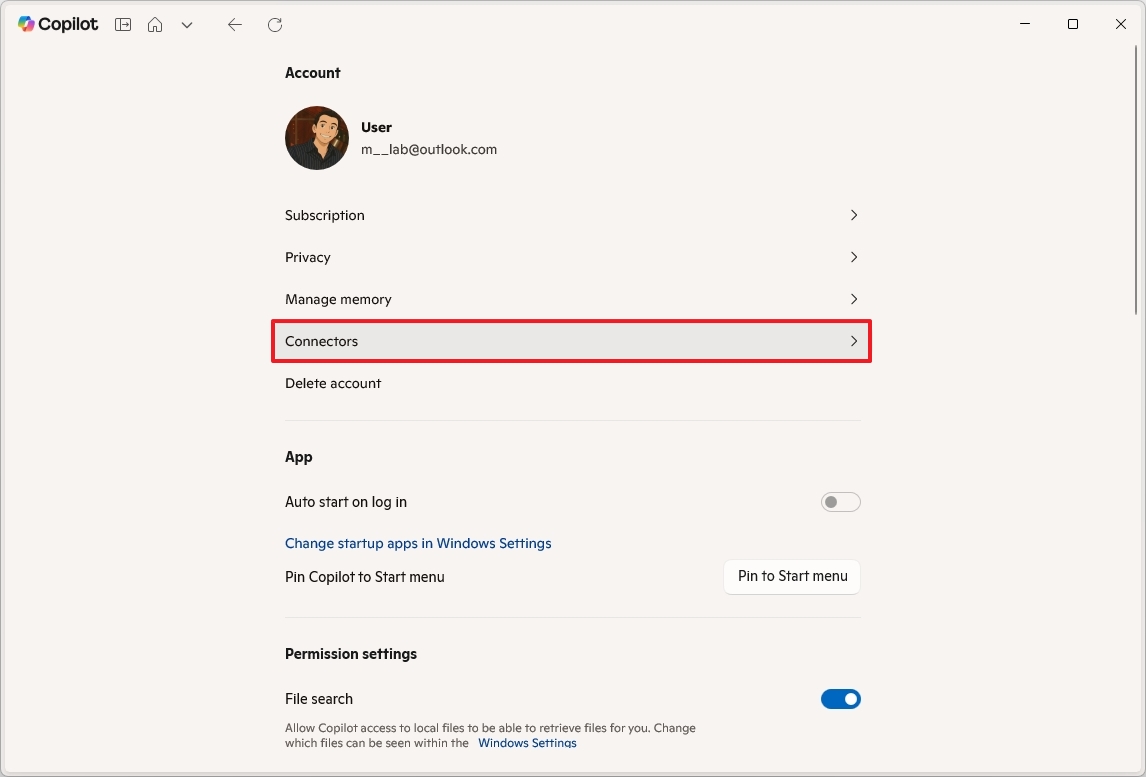
- Turn on the Microsoft services that you want Copilot to have access to, such as OneDrive and Outlook.
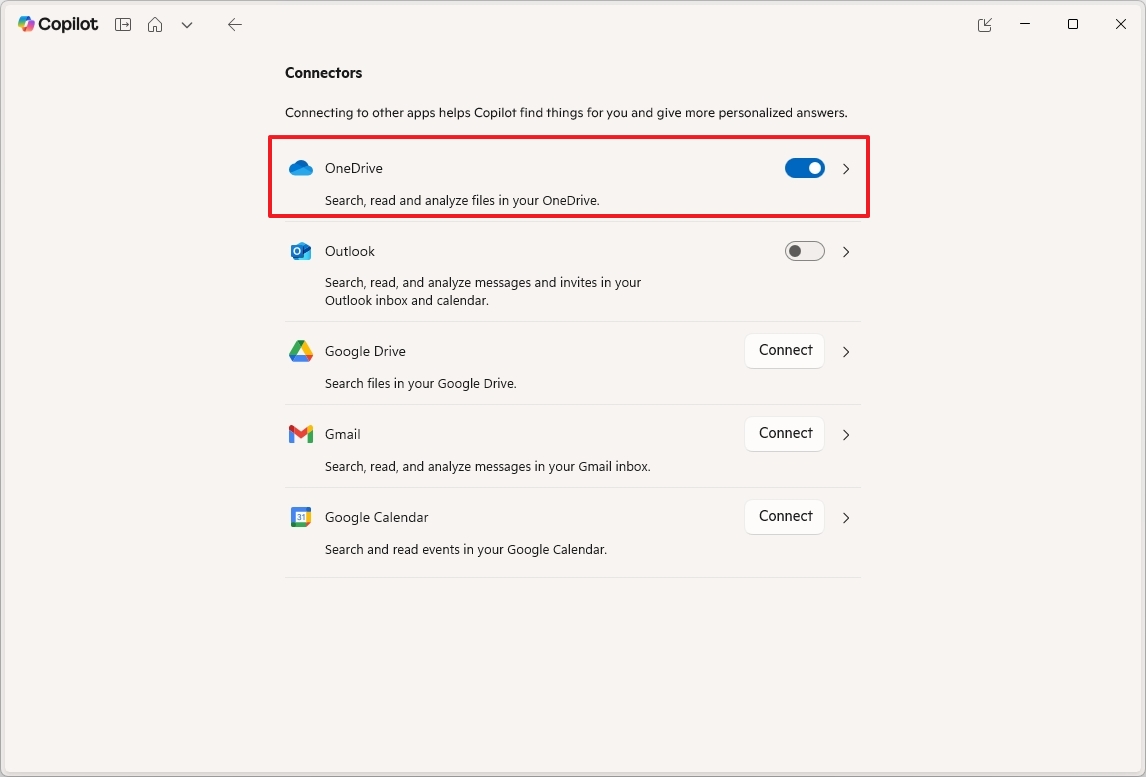
- Click the Connect button and continue with the on-screen directions to connect Google services.
Once I get everything set up, I’ll be able to just *talk* to Copilot and ask it questions about what’s happening in all my connected services – it’s like having a helpful assistant who understands everything!
How to interact with Copilot app
Copilot is now easier to use with a simpler, more inviting design featuring just a message box at the bottom of the screen. You’ll also find that you can no longer adjust the way Copilot responds to your prompts, as that option has been removed.
Text prompt
To use text prompts with Copilot, use these steps:
- Open the Copilot app.
- (Option 1) Choose the Quick response option for everyday questions.
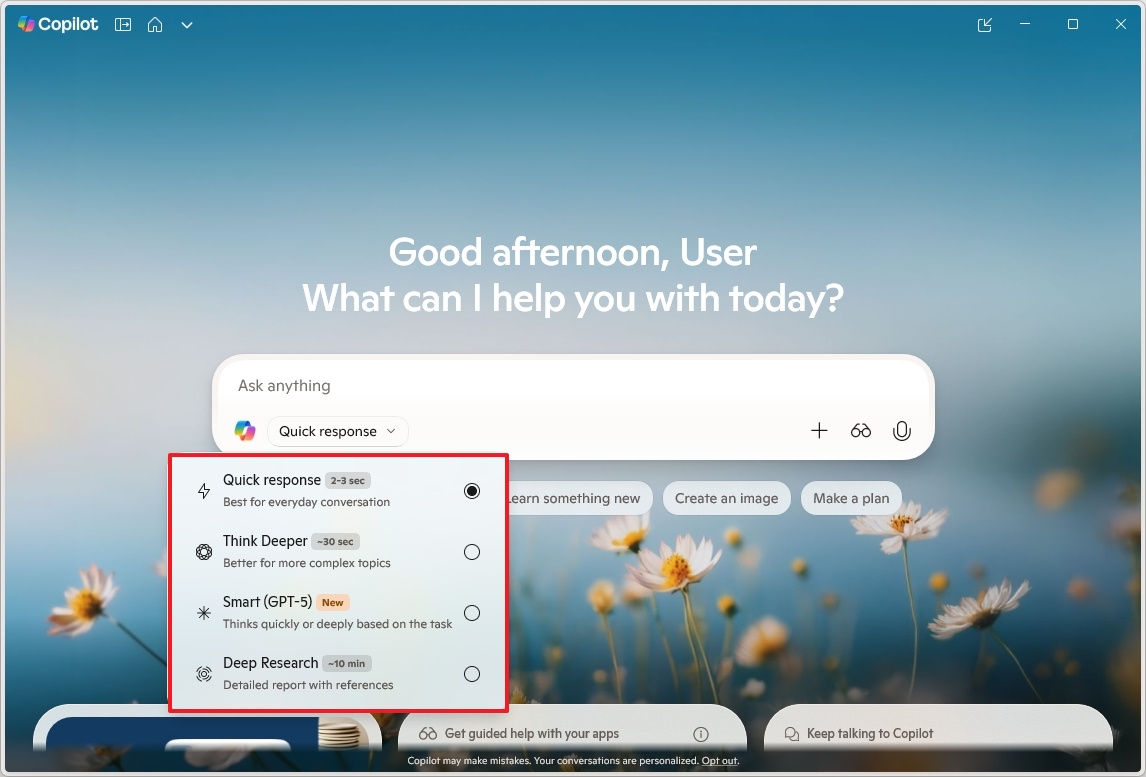
- (Option 2) Choose the Think Deeper option to allow the chatbot to create answers for more complex topics.
- (Option 3) Choose the Smart (GPT-5) option if you want the chatbot to adapt automatically for fast, simple tasks and deep for complex ones.
- (Option 4) Select the Deep Research option allows you to generate detailed reports, comparisons, or multi-source answers. This option is best when you need citations, context, and thorough exploration.
- Compose your prompt in the “Message Copilot” box and press Enter.
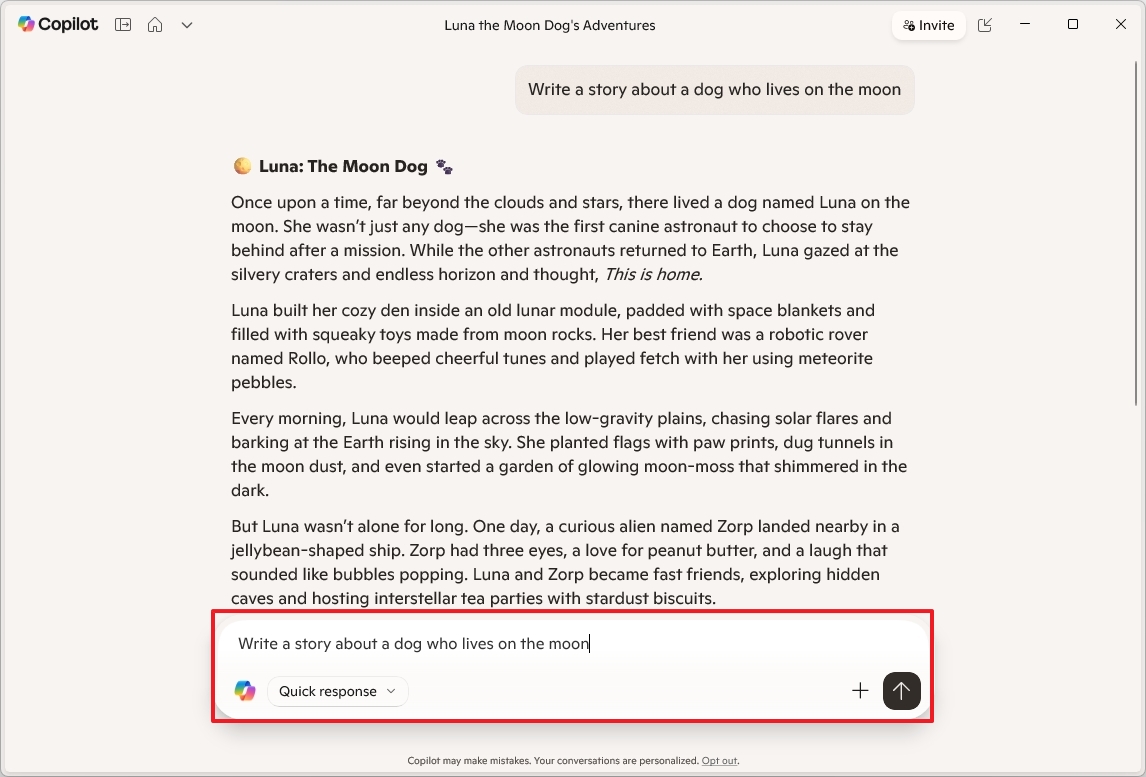
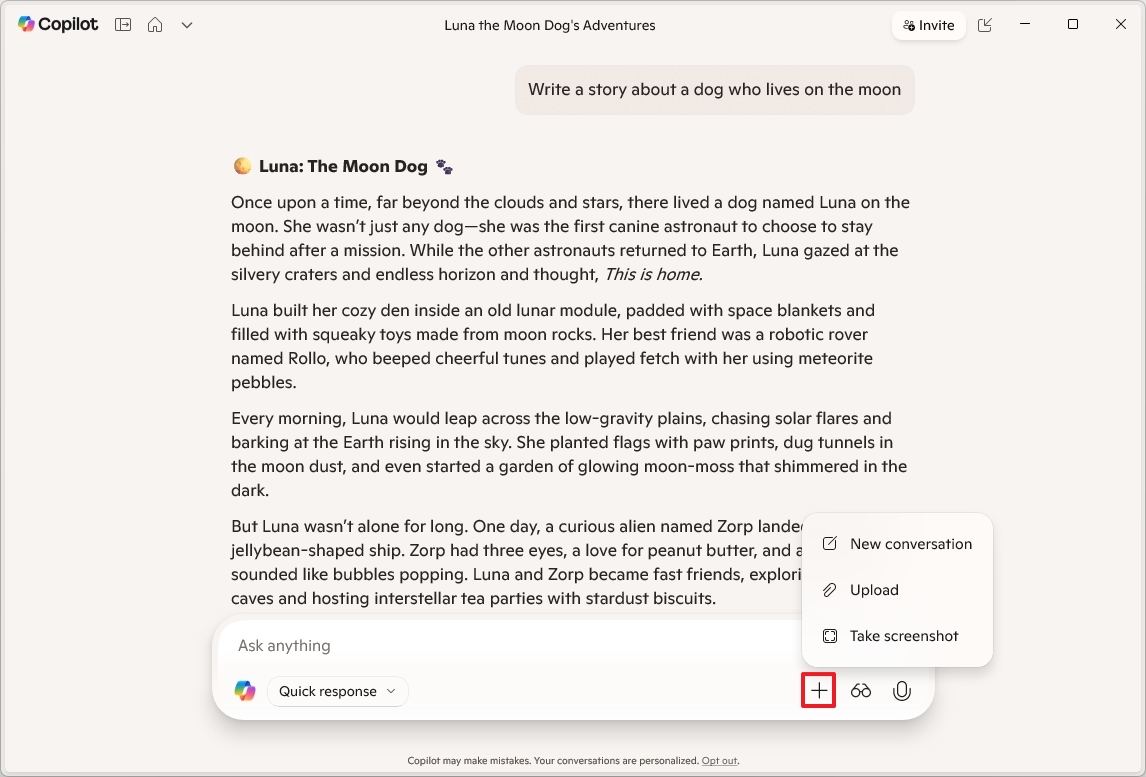
- Quick tip: In the box, you can ask anything using natural language. For instance, you can ask questions like “Make me a picture of a serene koi fish pond with lily pads,” “Write a story about a dog who lives on the moon,” or “Create a five-day itinerary to visit Chicago in November.”
- Copilot understands the context, so you can ask additional questions about the same topic without repeating specific keywords.
- Click the plus (+) button to upload an image to the AI, and then you can ask it for more information about that piece of content.
Once you complete the steps, it’s recommended to check the answer, as AI usually makes mistakes.
When using Copilot Mode in Microsoft Edge, the most advanced option, labeled “Smart (GPT-5)”, will simply show as “Smart”. This is also how it’s set up by default.
The app also includes a “Real Talk” mode for getting straightforward answers, and a “Study and Learn” option designed for more structured learning and educational purposes.
Voice prompt
To start a voice conversation with Copilot, follow these steps:
- Open the Copilot app.
- Click the microphone button.
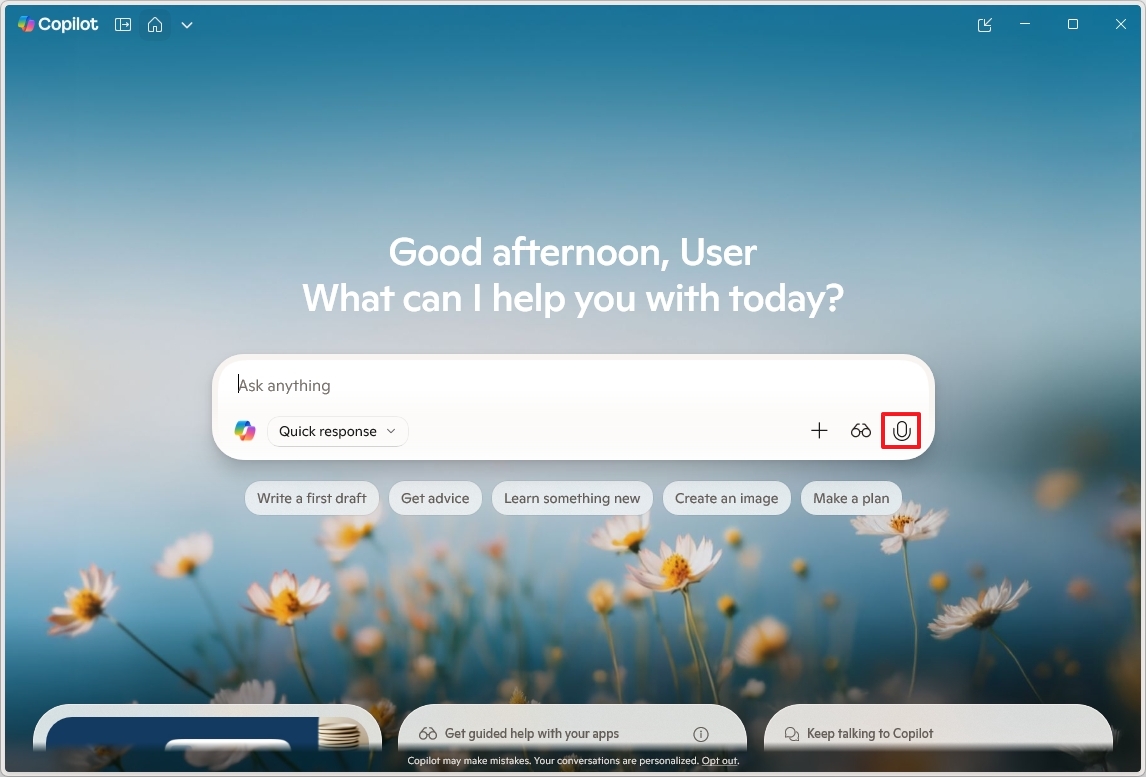
- Quick note: Although it might be obvious, this feature requires access to a microphone. If your device doesn’t have one, you won’t be able to use it.
- Start a conversation using natural language with the chatbot.
- (Optional) Click the Settings (gear) button to change the chatbot’s voice.
- Click the Close (X) button to open the main interface again.
Feel free to ask the chatbot anything at all, and you can even jump in and interrupt it just like you would when talking to a person.
Copilot Vision on the desktop
Copilot Vision allows you to show the chatbot what’s on your screen, so it can help you with almost anything you’re working on.
To get started with Vision on Copilot while working on an application, use these steps:
- Open the Copilot app.
- Click the glasses button.
- Click the Share button to request that the AI assist you.
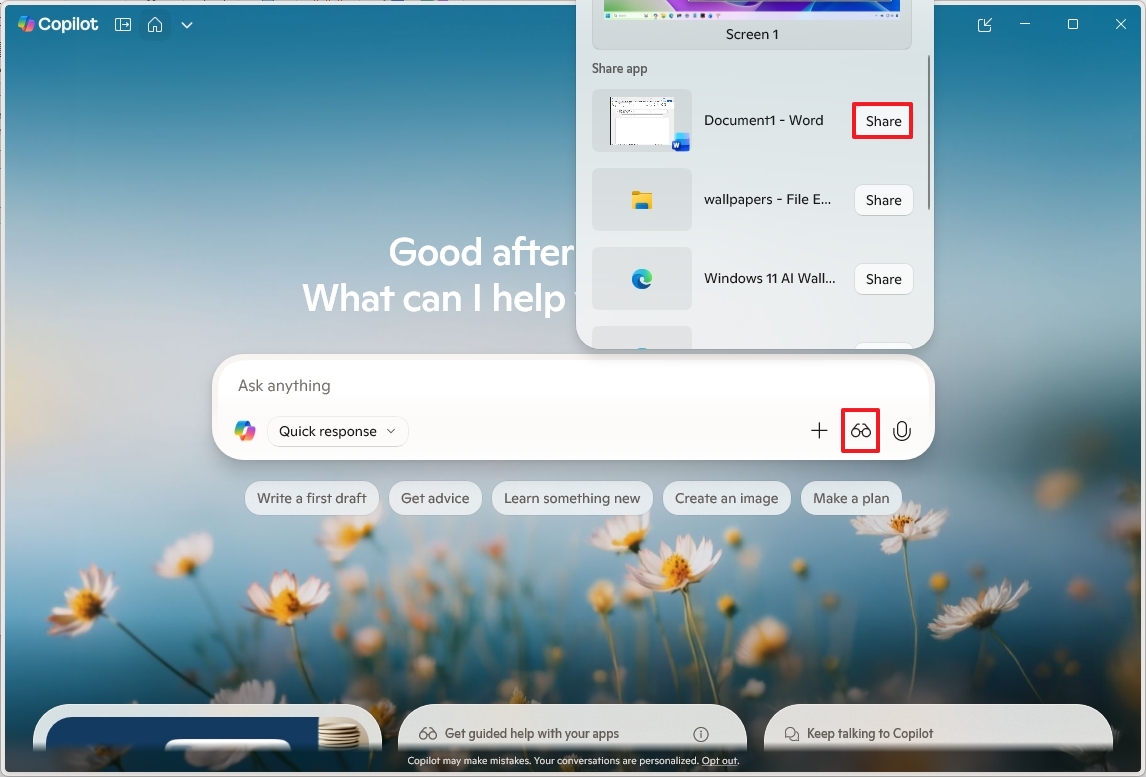
- Chat with the chatbot to get assistance with the application.
For instance, while using the Settings app, you could ask Copilot, “Can you show me where I can check for system updates?” Copilot will then pinpoint the exact location within the settings to find what you’re looking for.
The chatbot can help you step-by-step, but it needs you to actually perform the actions yourself.
Also, even though the technology is impressive, in my experience, it’s not very accurate.
File Search with Copilot
Copilot can also find files on your computer, offering an alternative to Windows Search, but you’ll need to turn this ability on first.
To allow Copilot to search files locally stored on your device, use these steps:
- Open the Copilot app.
- Compose your search query using natural language. For example, what files did I work on this week? And the chatbot should be able to surface the files you’re looking for.
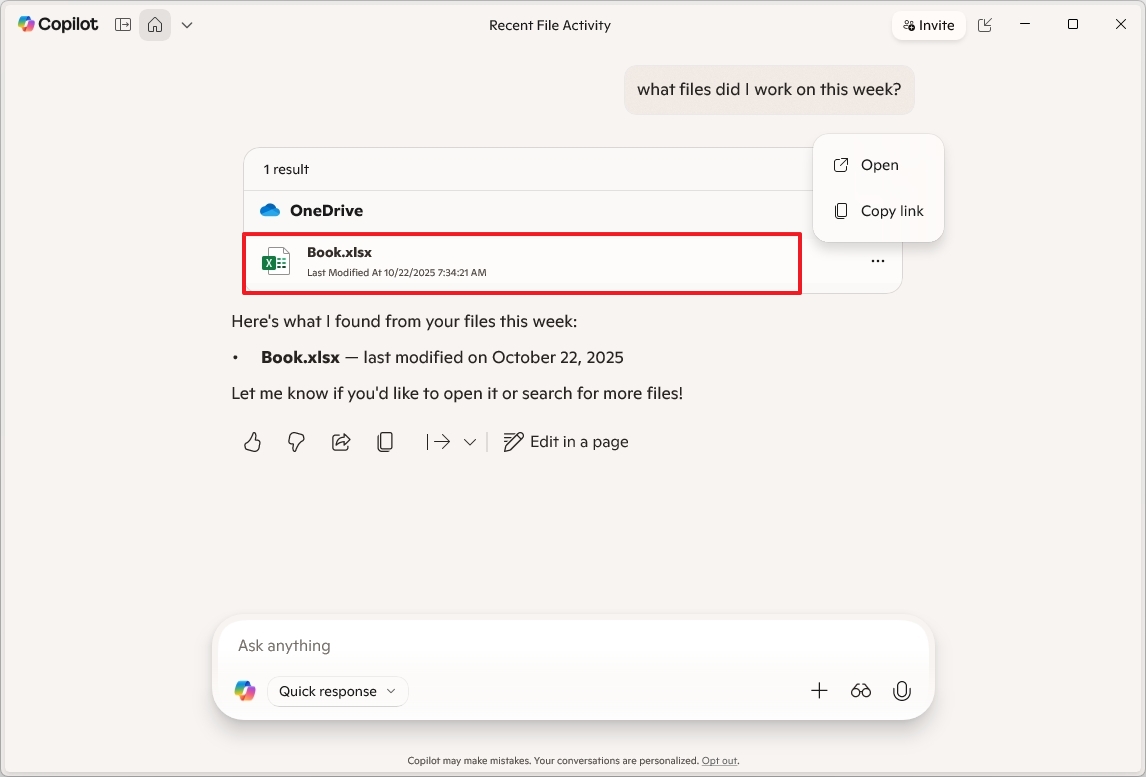
Clicking a file will open it in the appropriate program. If you see a “View all files” button, you can click it to open the search results in File Explorer.
How to get started with inbox apps Copilot integration
Copilot works seamlessly with popular apps like Notepad, File Explorer, Paint, Photos, and Click to Do.
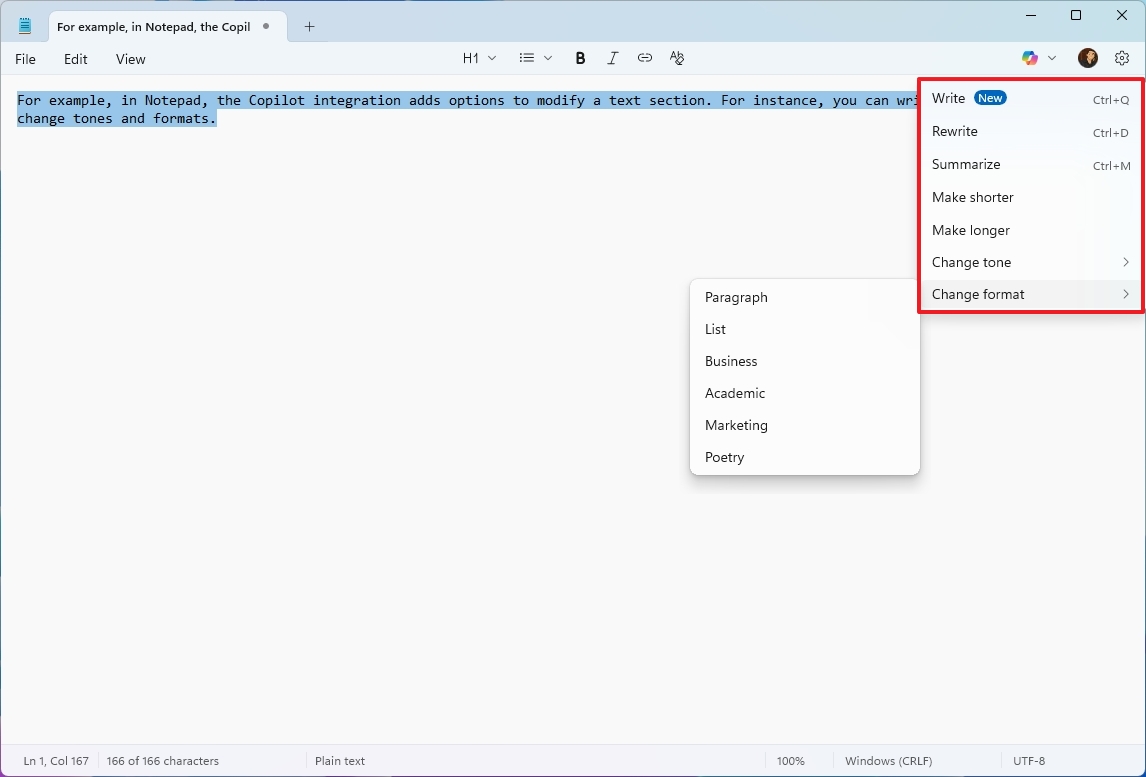
With Copilot in apps like Notepad, you can easily edit text. It lets you do things like rewrite sections, summarize content, and change the writing style and how it looks.
Within File Explorer, you’ll find a handy “Ask Copilot” feature in the right-click menu. This lets you easily send images or documents to Copilot and ask questions about them.
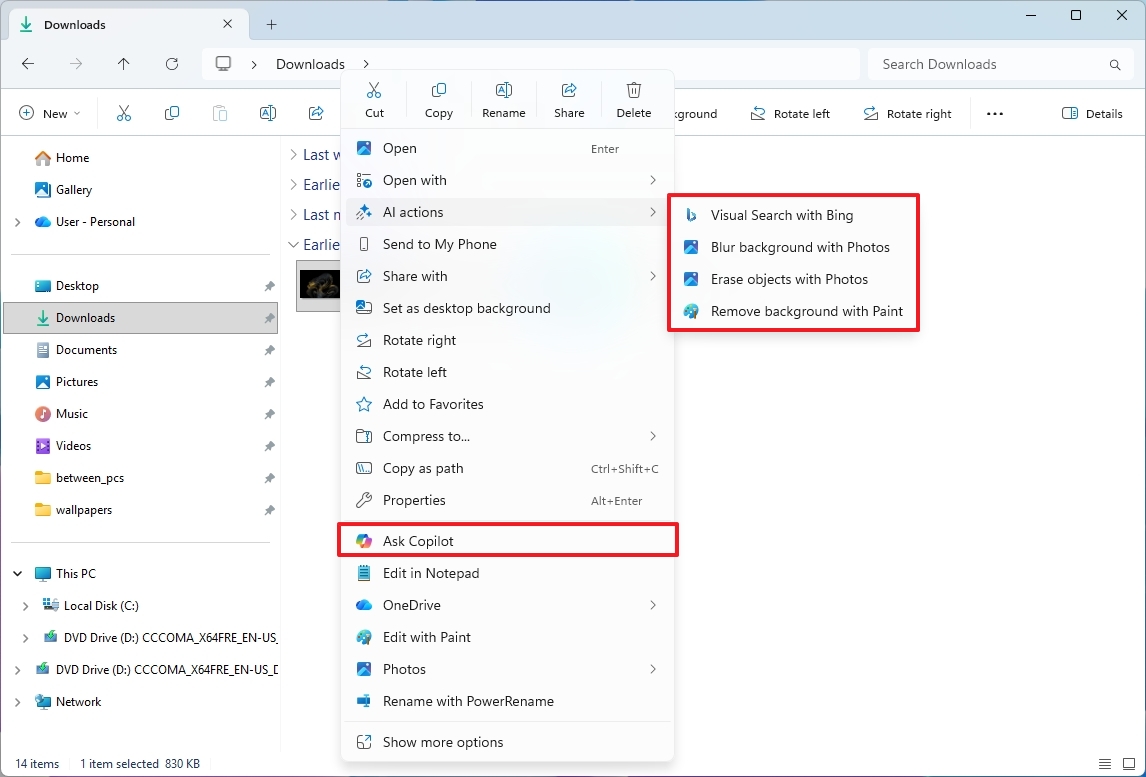
File Explorer now has built-in AI features that allow you to do things like edit images and work with Office documents in new ways.
The updated Paint app now works even better with Copilot. You can simply describe the image you want, and Copilot will create it for you. Plus, it’s now incredibly easy to remove backgrounds or erase anything from a picture with just one click.
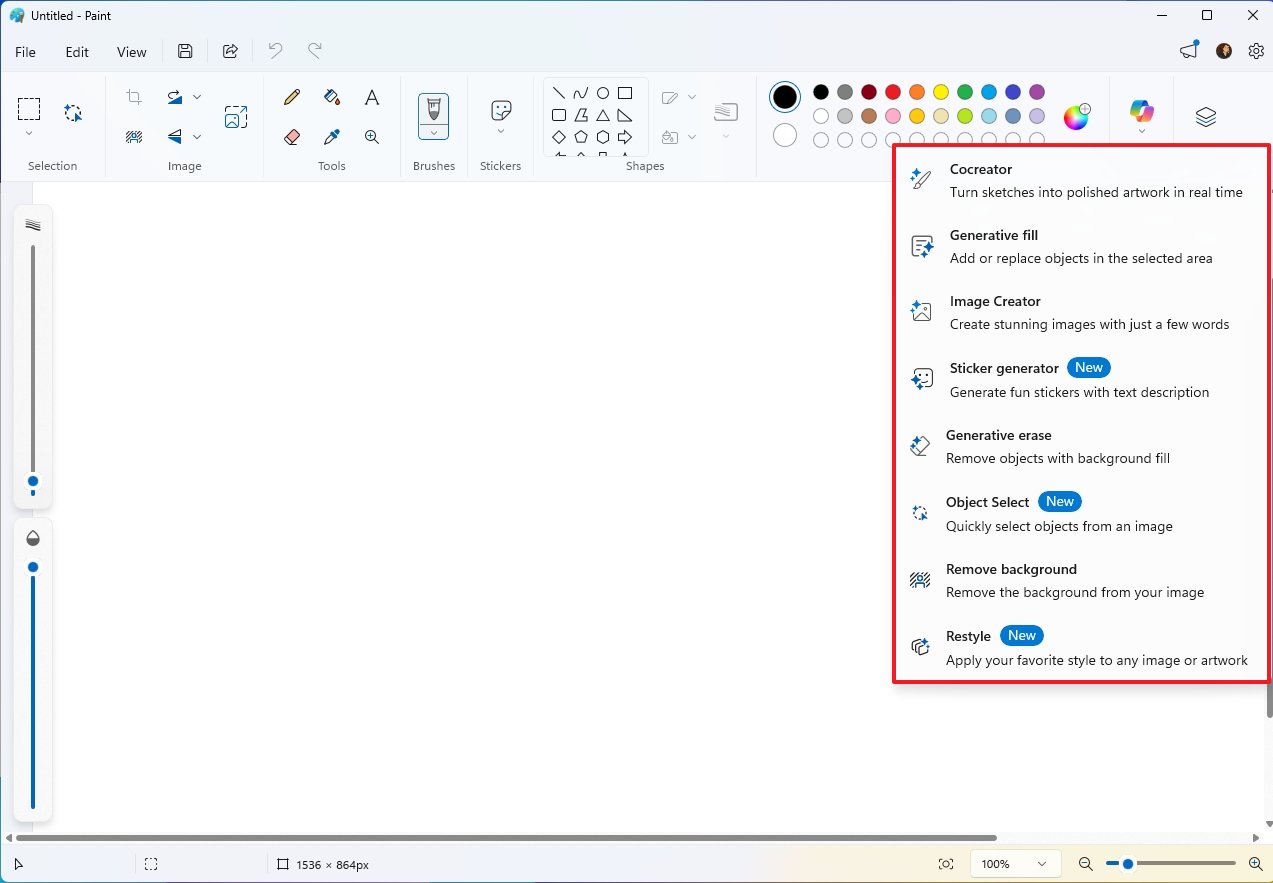
If you have a Copilot+ PC, you can use the “Cocreator” feature to instantly transform your sketches into finished artwork.
I’m really excited about the new AI features in the app! My favorite so far is definitely the sticker generator – it’s so cool to be able to create custom stickers with AI. And the ‘Restyle’ feature is awesome too; I can take an image I’ve already added and completely change its look and feel. It’s like having a digital artist right in the app!
As a researcher, I’ve been exploring the new Copilot+ PCs, and I’ve found a really useful feature called Click to Do. It lets me easily access various Copilot actions, and one that stands out is the “Ask Copilot” button. With it, I can simply select any text or object and send it directly to the Copilot app for further assistance.
You can also easily rewrite, shorten, or turn any text into a bulleted list.
On the other hand, if you’re selecting an object, the options will be slightly different.
How to get started with inbox apps Copilot integration
Copilot is also available within the Microsoft 365 apps you already use, like Word, Excel, PowerPoint, and OneNote.
To use Copilot in Word, use these steps:
- Open Microsoft Word.
- Click the Home tab.
- Click the Copilot button.
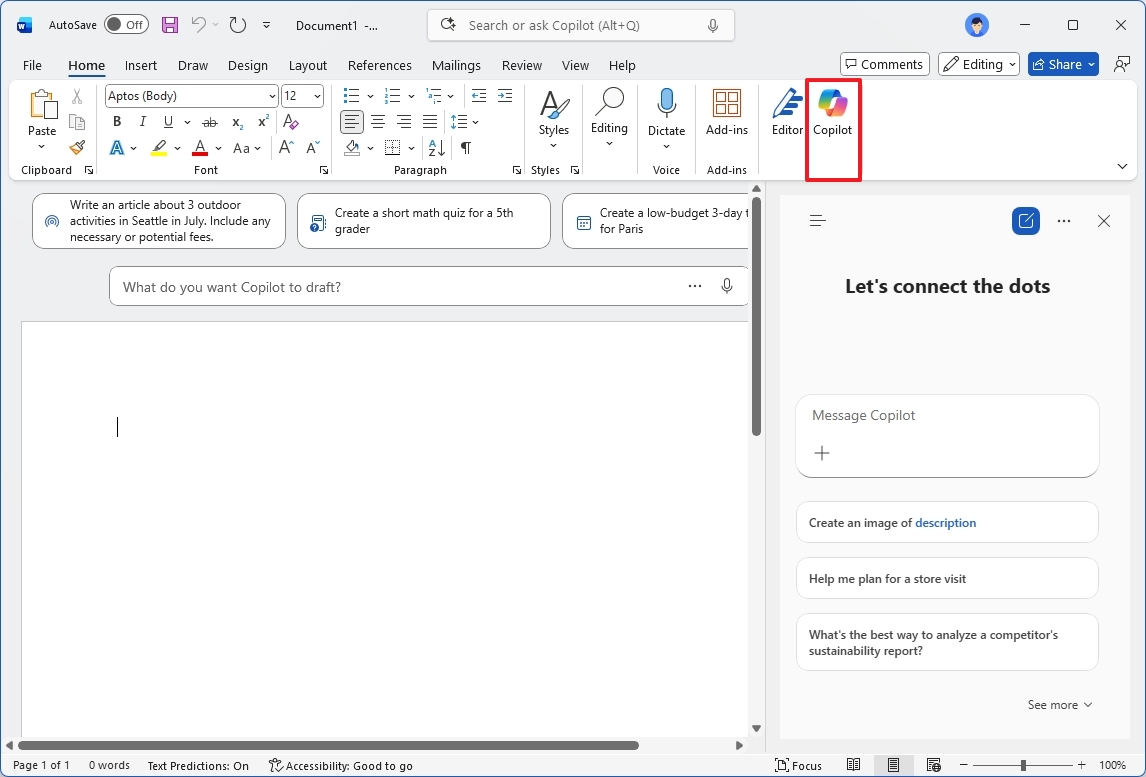
- Compose the prompt for the task you want the AI to assist you with.
You can use the chatbot in many ways, such as getting a summary of a document, having it read the document aloud, or even creating a picture from a description you provide.
Using Copilot in Excel, OneNote, and PowerPoint is very similar across all three programs. The main difference is that Copilot will adjust its responses to fit the specific application you’re working in.
How to manage the Copilot integration on Windows 11
How you control Copilot in Windows 11 varies depending on which app you’re using it with.
If you remove the Copilot app, it will uninstall the app and stop the “Ask Copilot” feature from appearing in most places. But within Microsoft 365 apps and the Edge browser, you can only disable the feature – you can’t completely remove it.
When using Copilot AI with Notepad, its features are limited. You can’t have a conversation with the AI, and to disable it, you need to adjust the settings directly within Notepad.
Remove Copilot integration
To completely remove Copilot from your computer and all its apps, you’ll need to do more than just uninstall the program. This is because Copilot is deeply connected to various parts of the operating system and applications.
Uninstall Copilot app
To uninstall the Copilot app, use these steps:
- Open Settings.
- Click on Apps.
- Click the Installed apps page on the right side.
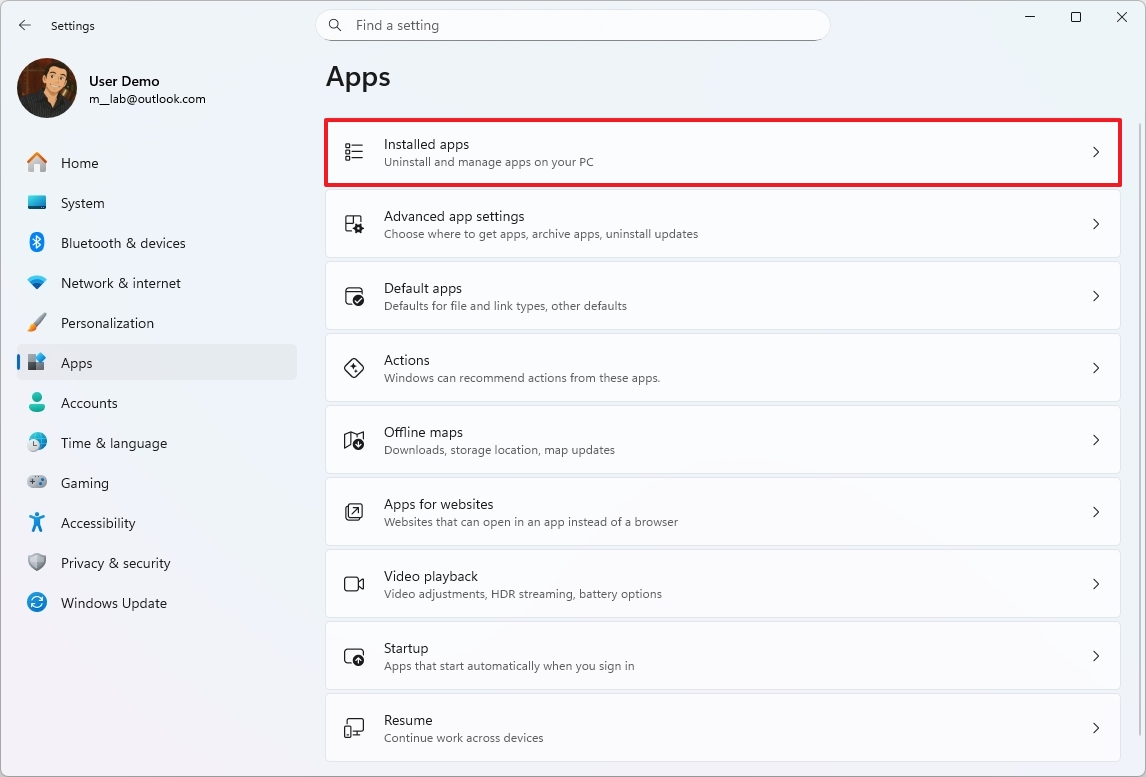
- Open the main menu (three dots) to the right of the Copilot app.
- Click the Uninstall button.
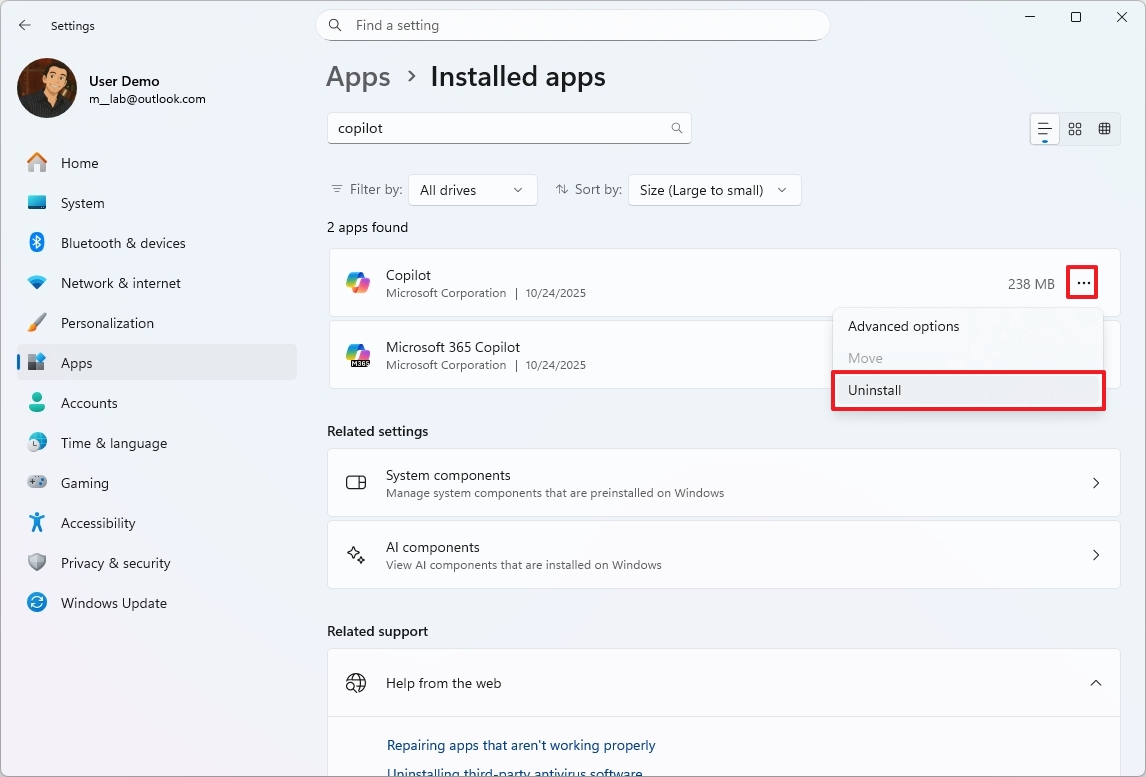
- Click the Uninstall button again.
- (Optional) Open the main menu (three dots) to the right of the Microsoft 365 Copilot app.
- Click the Uninstall button to uninstall the Copilot app for Microsoft 365 apps..
After you finish these steps, the Copilot app will be uninstalled from your computer. You’ll still see the Copilot button within Windows Search on your taskbar, though.
Disable Copilot on Microsoft Edge
The Copilot feature in Microsoft Edge works separately from the Copilot app that comes with Windows. Here’s how to disable it:
- Open Microsoft Edge.
- Open the “Settings and more” (three dots) menu and choose the Settings option.
- Click on Copilot and sidebar.

- Click the Copilot setting.
- Turn off the “Show Copilot button on the toolbar” toggle switch.
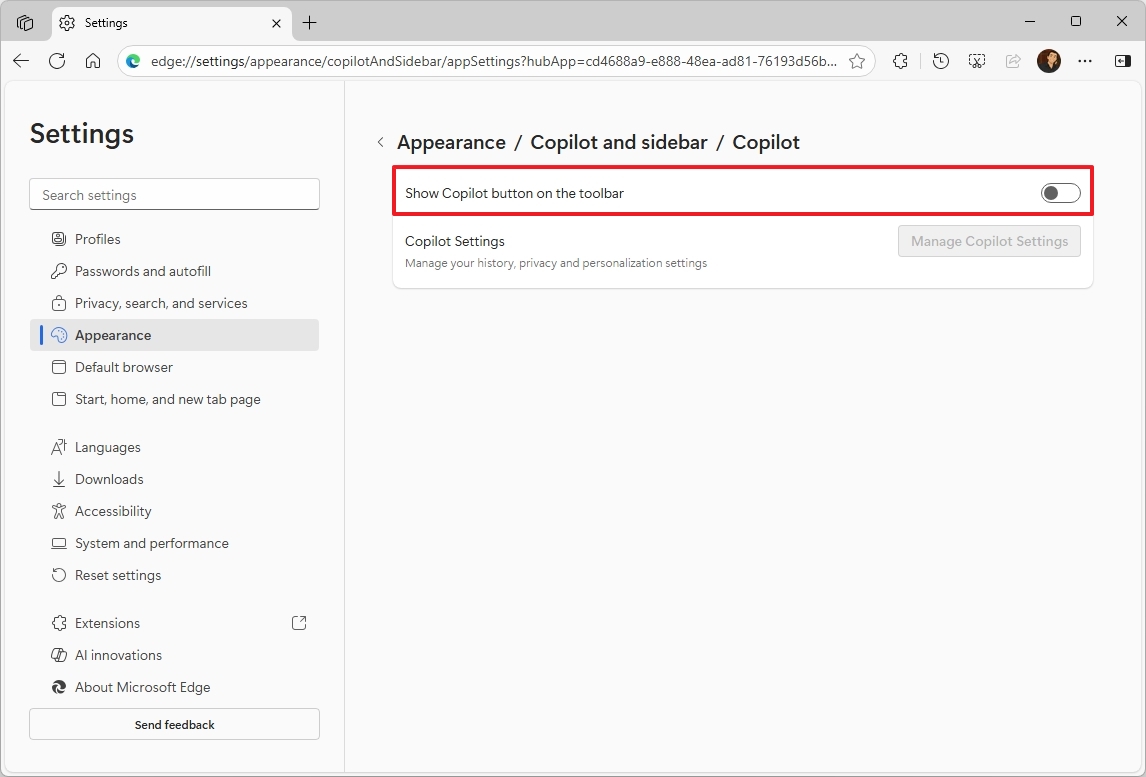
After you complete the steps, the assistant will no longer be available through the web browser.
Disable Copilot on Notepad
If you don’t want to use Copilot in Notepad, use these steps:
- Open Notepad.
- Click the Settings button.
- Turn off the Copilot toggle switch.
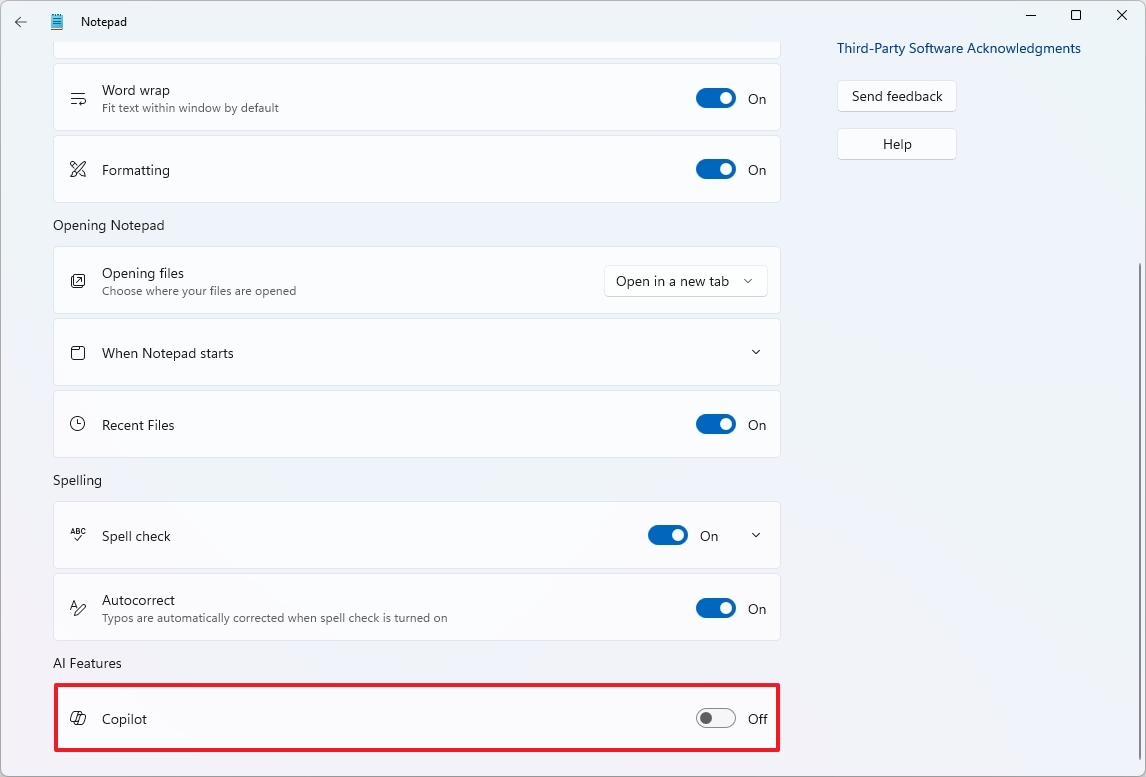
Once you complete the steps, Copilot and the profile menu will be disabled from Notepad.
Disable Copilot on Microsoft 365 apps
You can also disable Copilot from the Microsoft 365 apps with these steps:
- Open Word, Excel, OneNote, or PowerPoint.
- Click on File.
- Click on Options.
- Clear the Enable Copilot option.
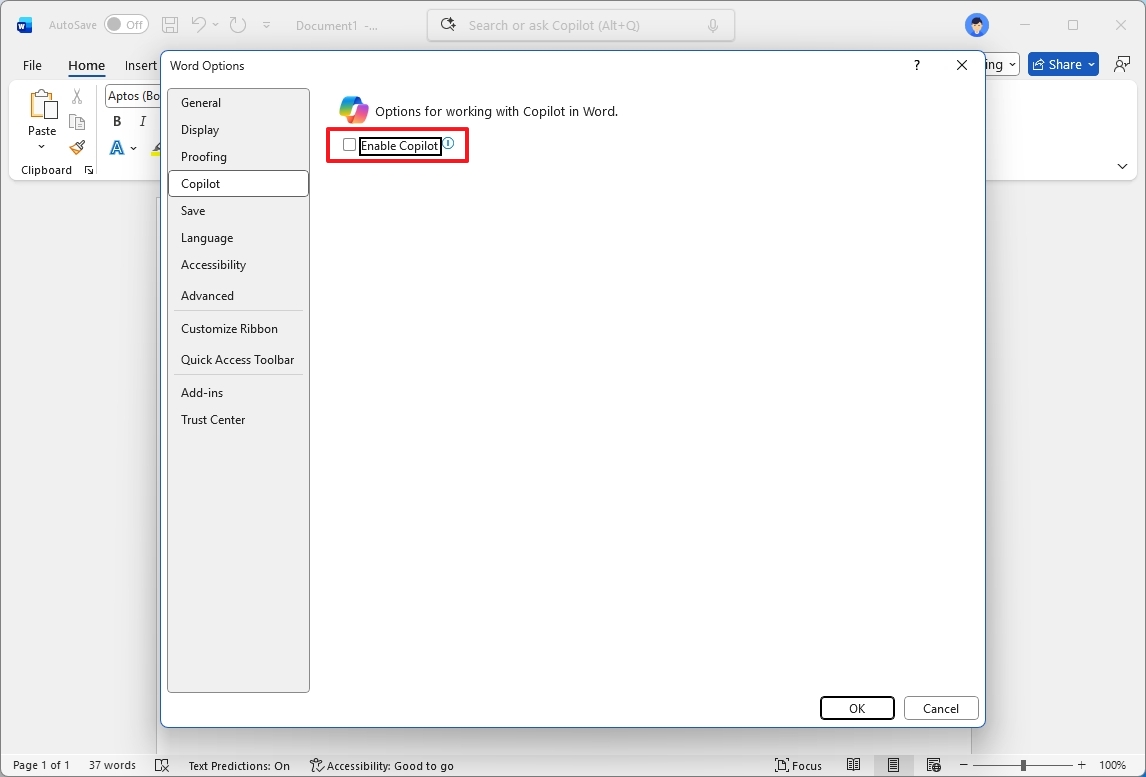
- Click the OK button.
- Restart the app.
Once you finish these steps, Copilot will be turned off within the current application. However, you’ll need to repeat these steps for each separate application where you want to disable the chatbot.
Re-enable Copilot integration
You can always reinstall the Copilot app to turn the chatbot and its features back on whenever you need to.
Install the Copilot app
To install the Copilot app, use these steps:
- Open the Copilot app page.
- Click the “View in Store” button.
- Click the Get (or Install) button.
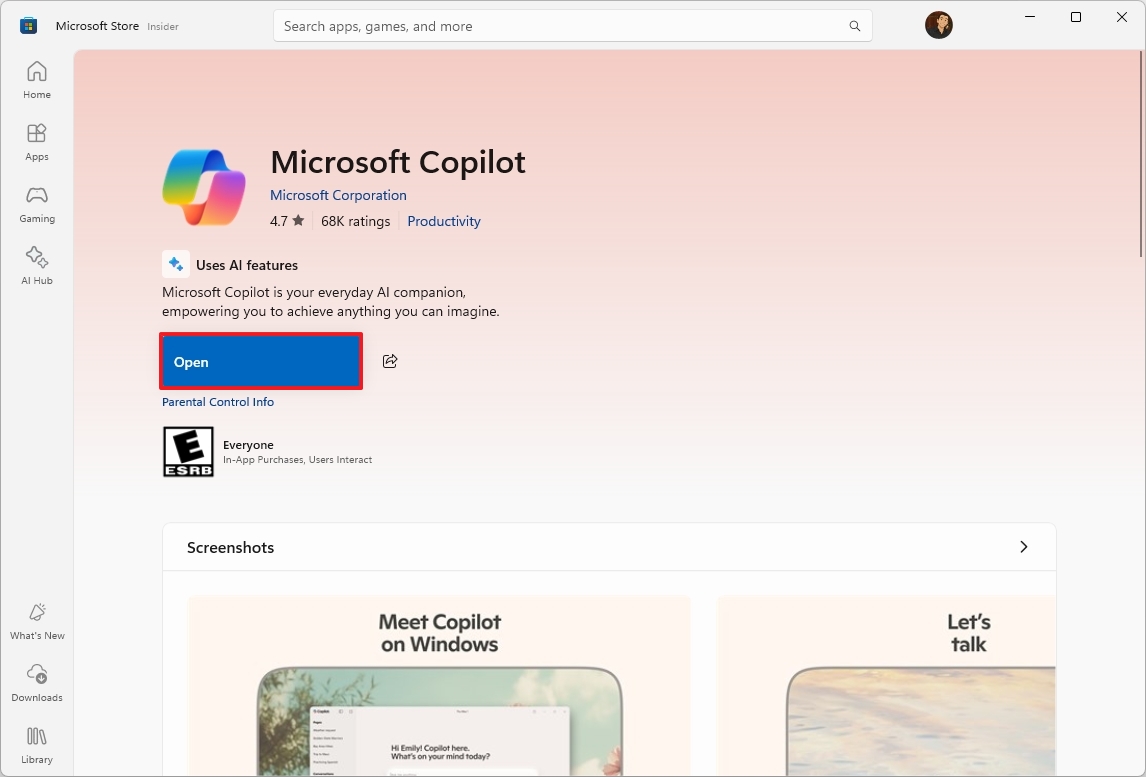
Once you complete the steps, the Copilot will be available from the Start menu.
Re-enable Copilot on Microsoft Edge
To enable the chatbot on the browser, use these steps:
- Open Microsoft Edge.
- Open the “Settings and more” (three dots) menu and choose the Settings option.
- Click on Appearance.
- Click the “Copilot and sidebar” setting under the “Other appearance settings” section.
- Click the Copilot setting.
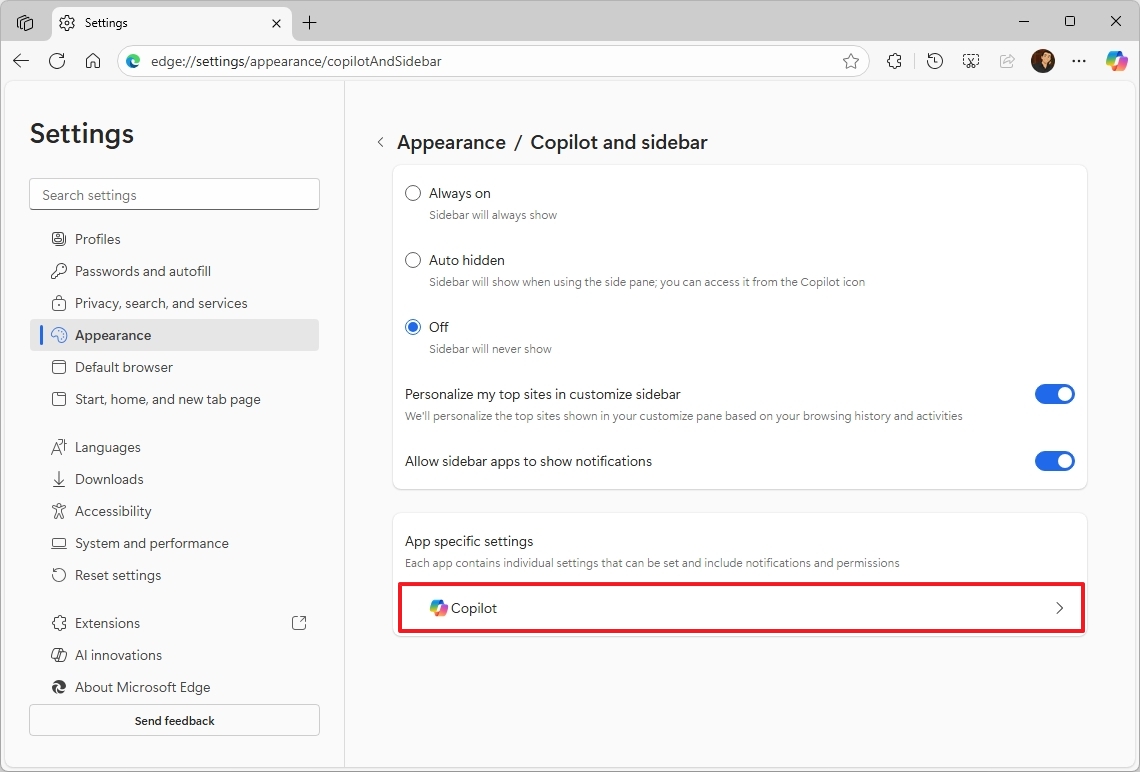
- Turn on the “Show Copilot button on the toolbar” toggle switch.
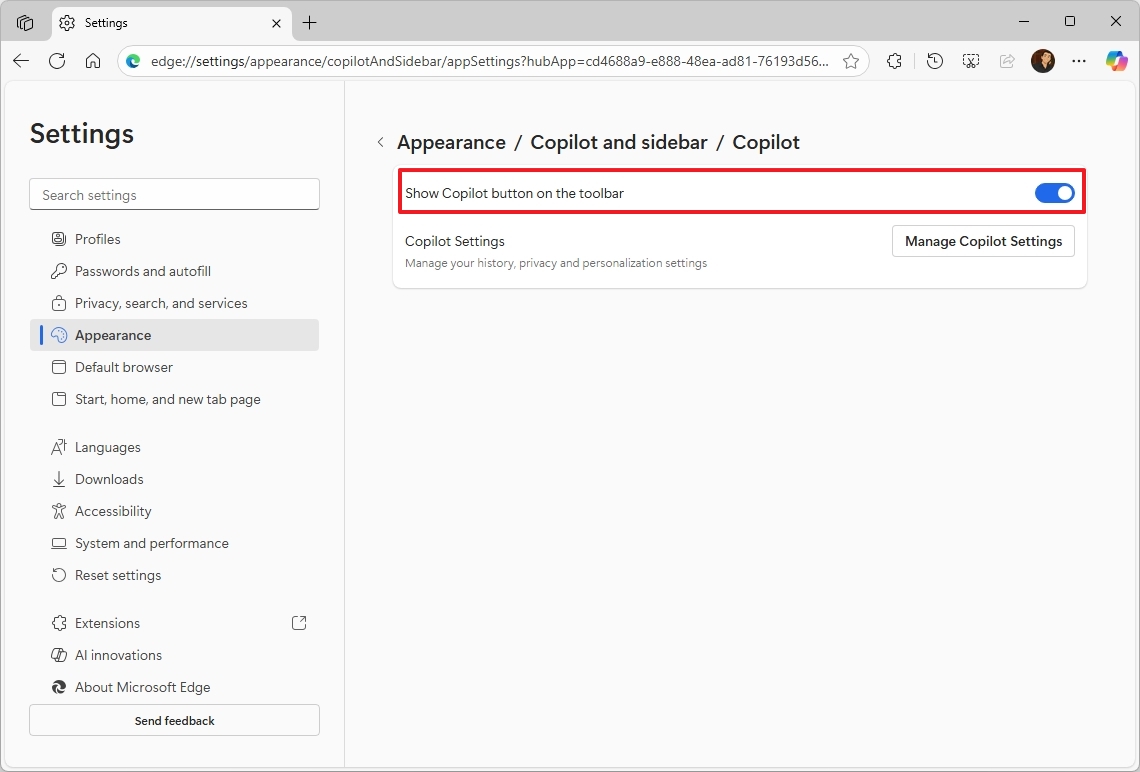
After you complete the steps, the chatbot will be enabled again on the web browser.
Re-enable Copilot on Notepad
To re-enable the Copilot actions in Notepad, use these steps:
- Open Notepad.
- Click the Settings button.
- Turn on the Copilot toggle switch.
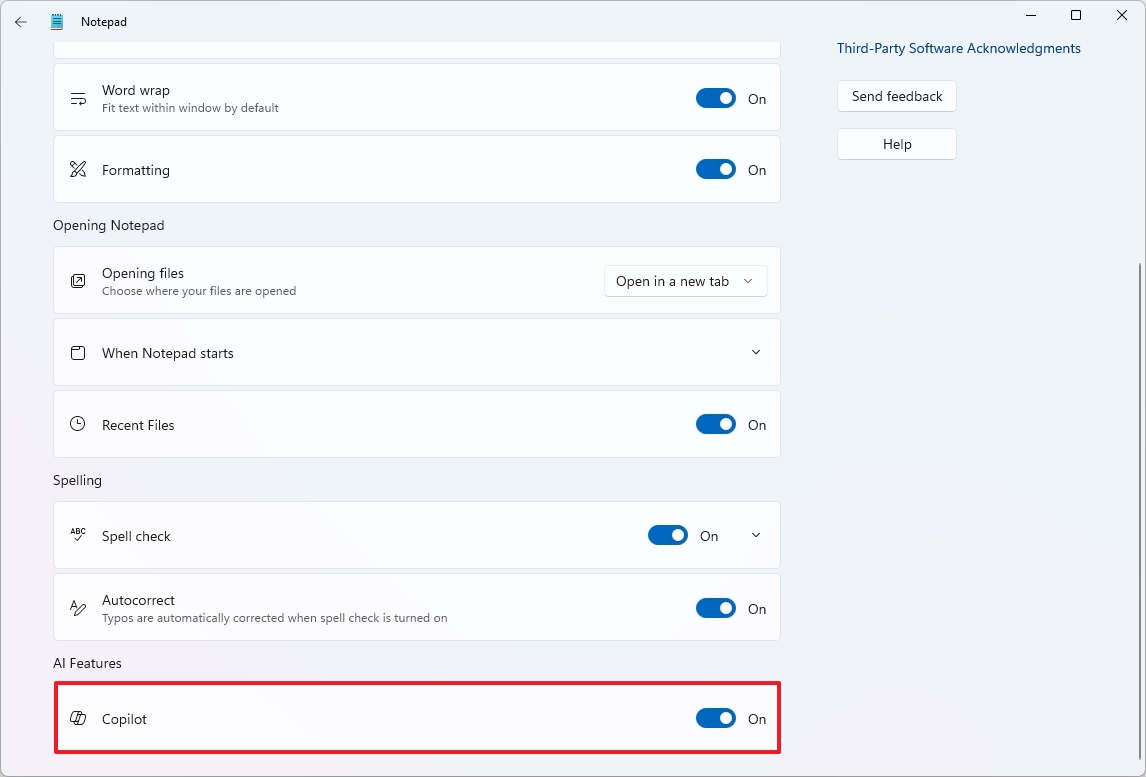
Once you complete the steps, the AI actions will enable one more time in Notepad.
How to access Copilot on Microsoft Edge
Copilot works a bit differently in Microsoft Edge. It’s designed to give you a more personalized experience while you browse the web.
Before you begin, make sure “Copilot Mode” is turned on in your browser. You can do this by going to the settings page for AI – just type “edge://settings/ai” in your browser’s address bar – and then activating the AI experience for both browsing and the new tab page. You can also enable it directly on this Microsoft webpage.
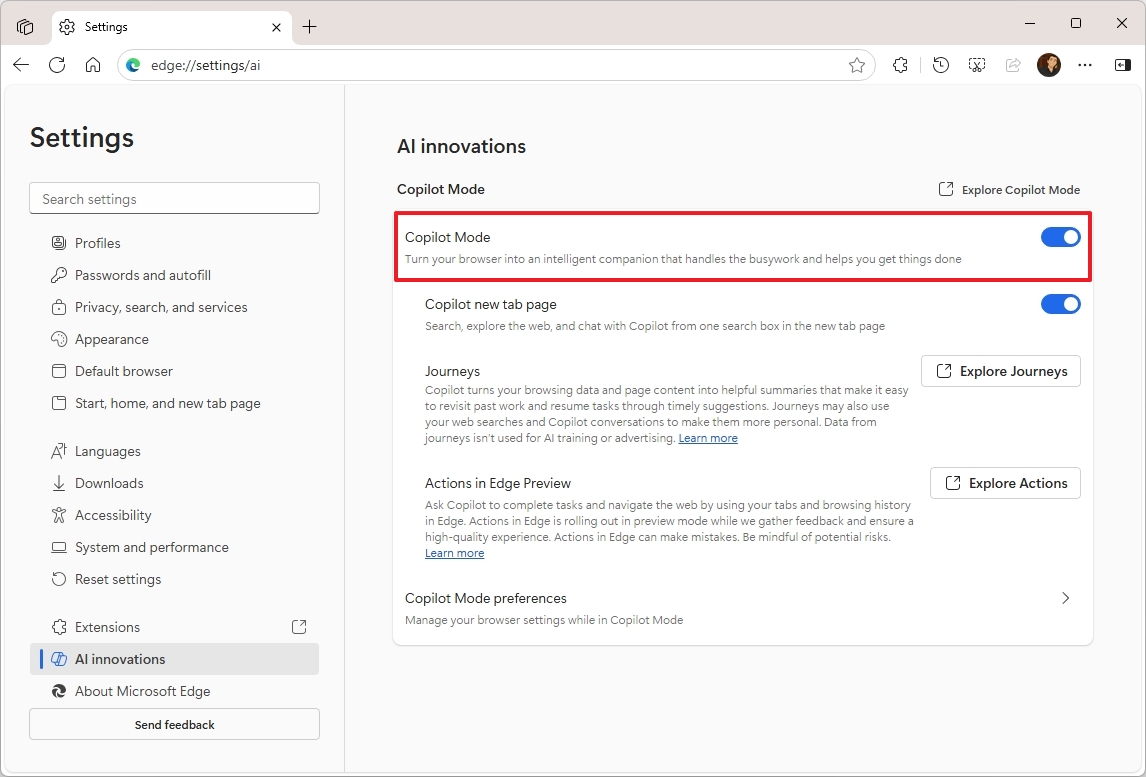
After turning on the new experience, you’ll find additional features on the “AI innovations” page, like Journeys and Actions. You can activate each one by simply clicking on it. Please note that Journeys and Actions are currently available to a limited number of users as part of a preview program.
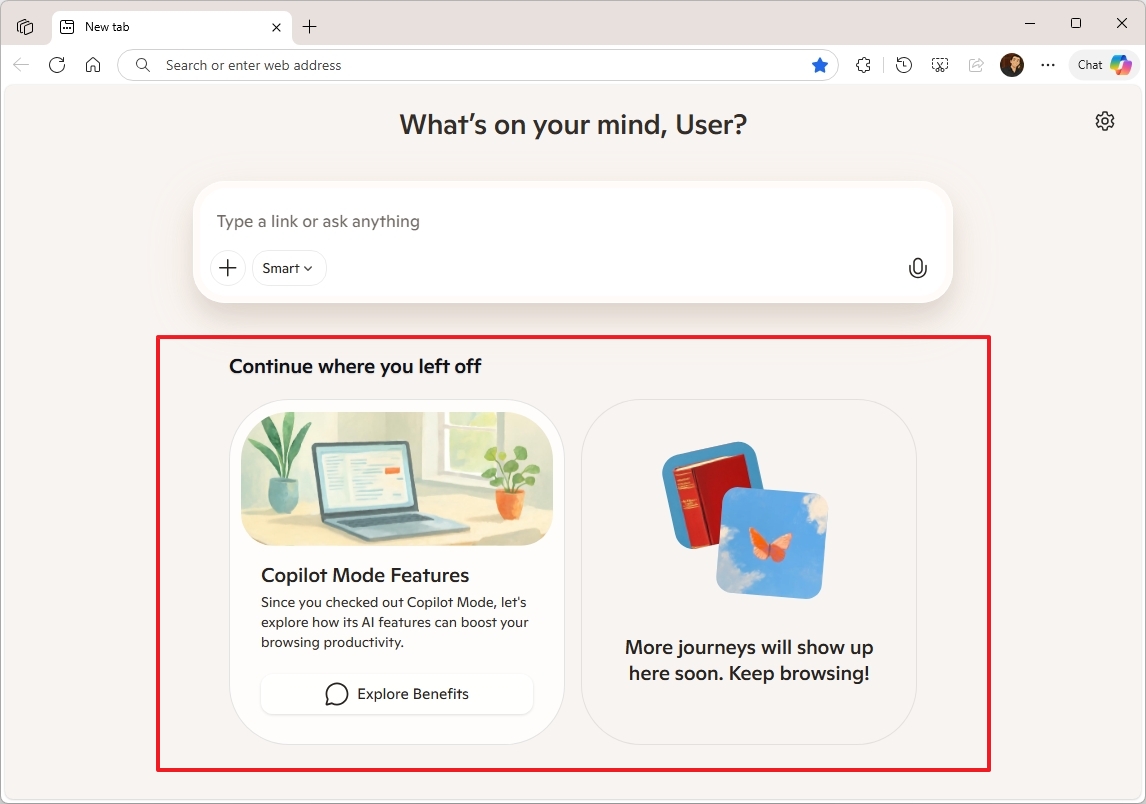
New tab page with Copilot
Copilot Mode changes your new tab page to an AI-powered chat window, just like the Copilot website.
This prompt box can figure out what you need – whether it’s a web search, a website link, or an AI-powered answer.

By default, the system is set to “Smart” mode, which automatically determines what you’re trying to do and uses the powerful GPT-5 model to help.
The “Think Deeper” option allows the chatbot to create answers for more complex topics.
The “Deep Research” feature creates comprehensive reports, compares information, or combines answers from multiple sources. Use it when you require sources, background information, and a detailed analysis.
I’m really excited about the different ways you can use this! There’s a “Real Talk” mode when you want straight answers, and then a “Study and Learn” option that’s more like a helpful tutor, guiding you through things and making it educational.
The “Quick response” option is best suited for everyday conversation.
Copilot Vision on Edge
Copilot now works with Microsoft Edge, and includes a feature called Vision that can help you with anything you’re viewing online.
To get started with Vision on Copilot, use these steps:
- Open Microsoft Edge.
- (Option 1) Open a new tab page to access the Copilot prompt.
- (Option 2) Click the Chat button in the top-right.
- Click the microphone button.
Once I finish setting everything up, Vision will be live, and I’ll be able to ask it questions about anything visible on the screen. It’s like having a visual assistant!
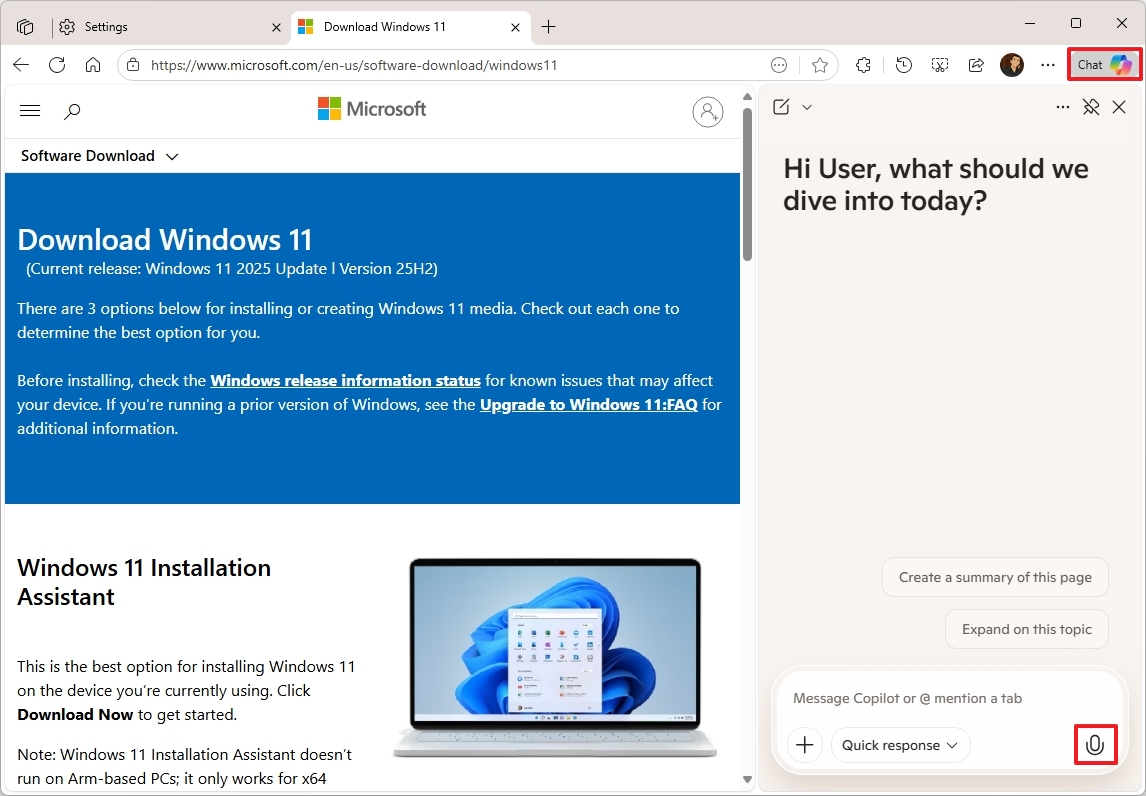
Chat with Copilot on a web page
I’ve found that I can easily get Copilot’s help on pretty much any website I’m browsing. All I do is click the “Chat” button in the top-right corner, and it pops up – super convenient!
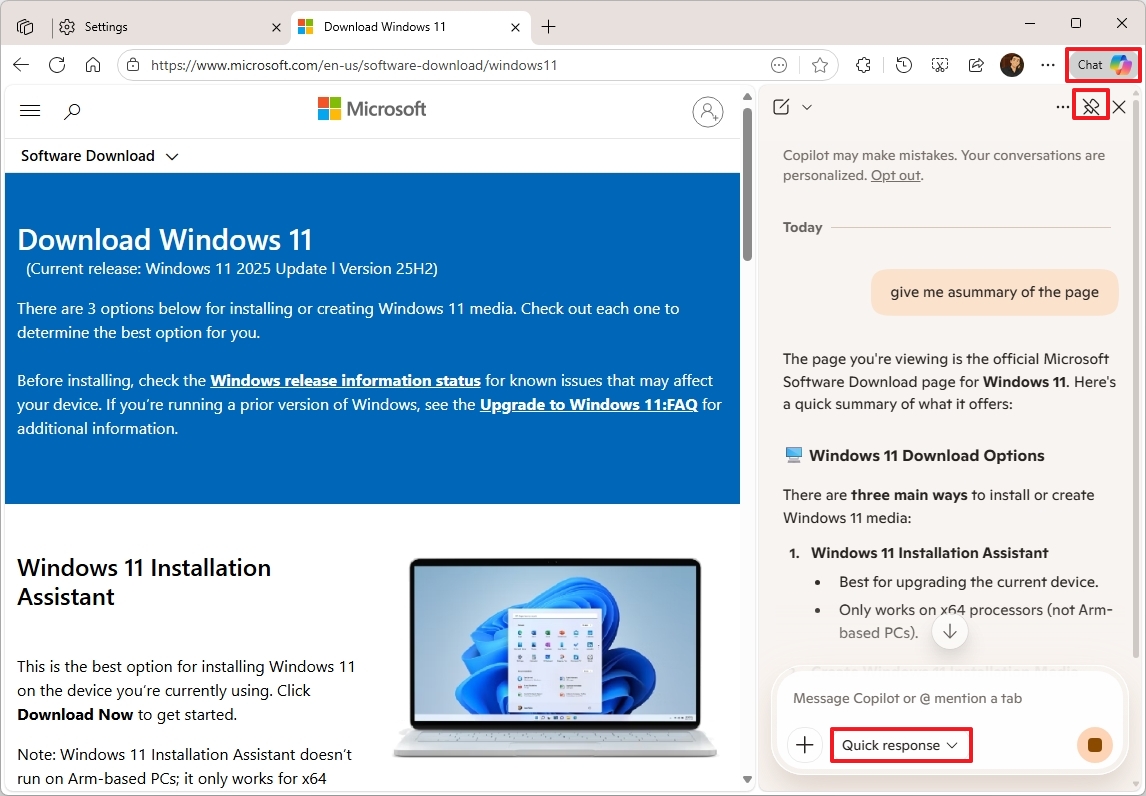
Feel free to ask the chatbot any questions you have about what you’re seeing.
I noticed that if the pop-up window seems too small, you can click the “Pin” button to keep it visible on the side of the screen.
The prompt box is set to “Quick response” by default, and this setting works well for most regular chats.
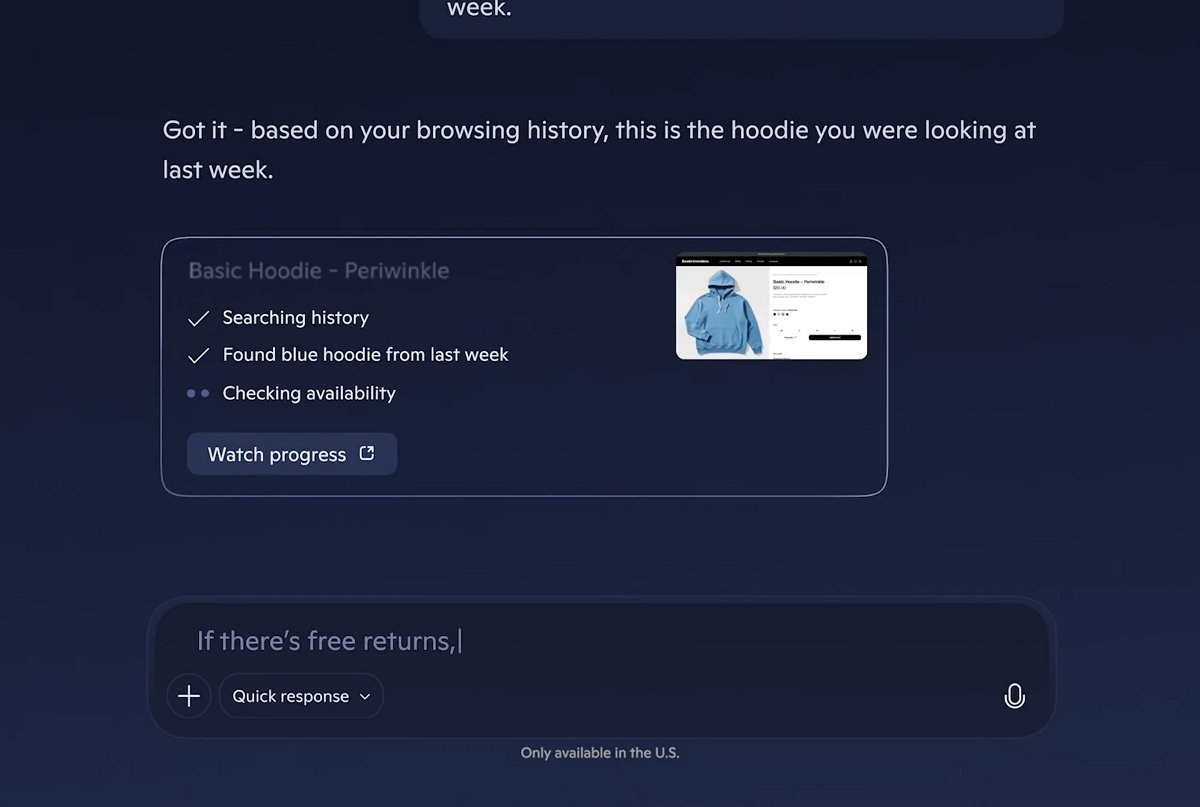
Copilot Journeys
Copilot’s “Journeys” feature intelligently groups your previous browsing sessions based on your online activity. It automatically organizes related browsing history into focused storylines, making it easier to revisit past projects and tasks.
With this feature enabled, the assistant will automatically summarize every webpage you browse and keep track of details like the page’s title, web address, your searches, and chat history, among other things.
This feature allows you to easily resume your work, and it actually makes bookmarking even better.
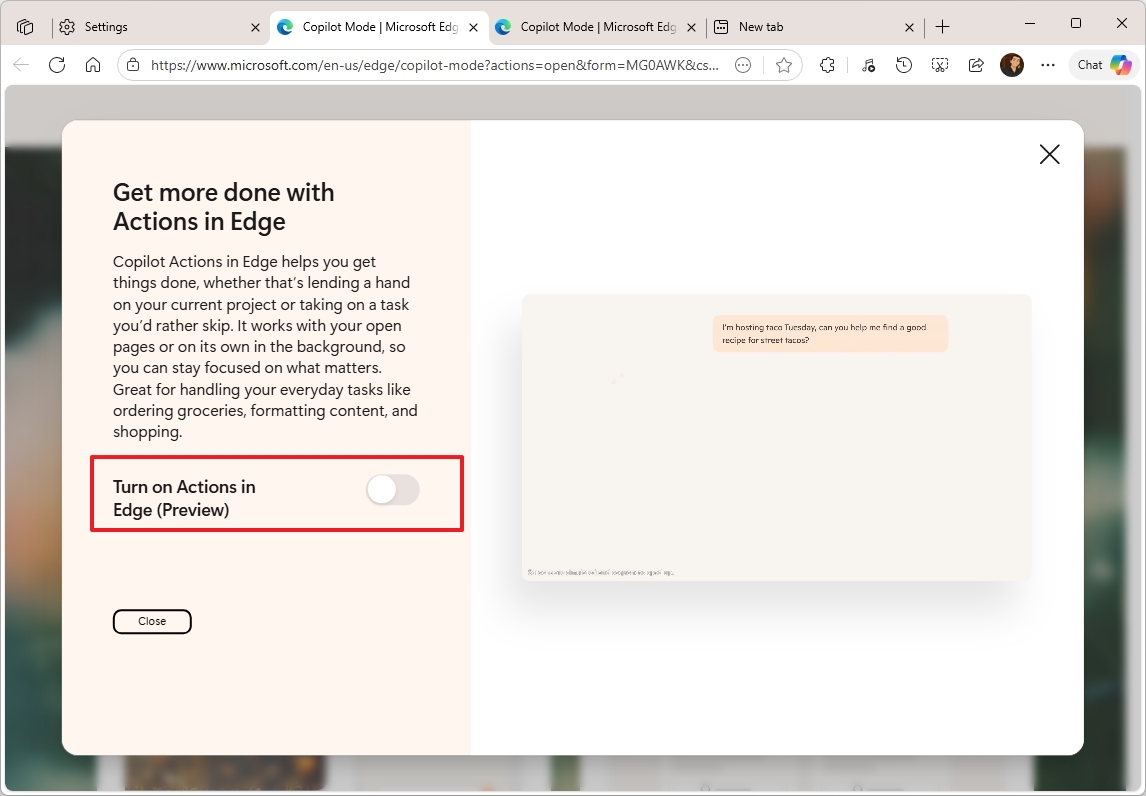
Copilot Actions
The ‘Actions’ feature lets the AI do more than just create text or provide summaries. It allows it to actually perform tasks for you.
In Microsoft Edge, this feature lets AI act as a helper, working with websites and the browser to finish tasks that involve several steps.
Copilot Actions is a new feature still being worked on, but it already lets you do things like make restaurant reservations or cancel email subscriptions, and it will be able to do even more in the future.
Journeys and Actions are turned off by default and need your explicit approval before anything happens – this is to keep your account safe and respect your choices. Just a reminder that these features are currently being tested and are only available to users in the U.S.
FAQs about getting started with Copilot
These are common questions regarding Copilot on Windows 11.
What is Copilot on Windows 11?
Copilot is an AI helper already included in Windows 11. It uses powerful technology in the cloud to understand what you ask in plain language and give helpful responses. It can do things like create content, answer your questions, and work with apps you already use, such as Notepad, Paint, File Explorer, and Microsoft Edge.
How can I open Copilot on Windows 11?
I’ve been playing around with Copilot, and it’s so easy to get started! You can open it by clicking the Copilot button right on the Taskbar, finding it in the Start menu, or even using the Windows + C keyboard shortcut. If you’ve set it up, you can just say “Hey Copilot” to launch it with your voice – it’s super convenient!
Can I use Copilot hands-free with my voice?
Yes, you can use voice commands if you turn on “Hey Copilot” in Copilot’s settings. Once enabled, you can talk to Copilot naturally without using your hands.
How do I enable or disable Copilot’s auto-start feature?
To have Copilot automatically launch when you log in, open the Copilot app and go to your account menu, then select Settings. From there, turn on the “Auto start on log in” option. If you can’t click this option, you can manage startup apps through your computer’s Settings, then Apps, and finally Startup.
What are Copilot Connectors?
Connectors let Copilot work with your online accounts – things like OneDrive, Outlook, Gmail, Google Drive, and Google Calendar – so it can understand your information better and give you more helpful, personalized answers.
Can Copilot search my local files?
You can allow the assistant to search and read your local files by going to the account menu, then Settings, and then Permissions. From there, turn on both “File search” and “File read” to enable this feature. This will allow the assistant to find and understand your files when you ask questions about them.
What is Copilot Vision?
Copilot Vision lets the AI assistant understand what’s displayed on your screen. It can examine apps, point out specific items, and offer help with steps, but it won’t automatically do things for you.
How do I control what data Copilot collects?
You can control your privacy within Copilot by going to Settings then Privacy. There, you can disable features like sharing diagnostic data, using your text and voice to improve the model, and personalized experiences. You also have the option to delete any data Copilot has saved about you.
Does Copilot remember my information?
If the “Personalization and memory” feature is enabled, Copilot can remember things to give you more tailored responses. You can see, add to, or delete these memories in Copilot’s Settings under “Manage memory”.
How do I uninstall the Copilot app?
To remove Copilot from Windows 11, go to Settings, then Apps, and select Installed apps. Find Copilot in the list, click the three-dot menu next to it, and choose “Uninstall.” Keep in mind that you might also need to uninstall Microsoft 365 Copilot as a separate app. Also, if Copilot is integrated into other apps like Edge or Notepad, you’ll need to disable those integrations individually.
How do I disable Copilot in Microsoft Edge?
To hide the Copilot button in Microsoft Edge, go to Settings, then select ‘Copilot and sidebar’. From there, toggle off the option that says ‘Show Copilot button on the toolbar.’ You can turn it back on whenever you like by returning to the same settings menu.
What is Copilot Mode in Microsoft Edge?
Copilot Mode unlocks the full power of AI within Microsoft Edge. It transforms your new tab page into a place where you can directly ask AI questions, and adds helpful tools like Journeys (which analyzes your browsing history), Vision (which understands what’s on your screen), and Actions (which helps automate tasks). You can turn it on by going to *edge://settings/ai* in your browser.
Does Copilot work offline?
Copilot needs internet access to work because it completely depends on AI models hosted in Microsoft’s cloud.
Is Copilot free to use on Windows 11?
Copilot itself is free to use, but accessing its features within Microsoft 365 apps like Word and Excel requires a Microsoft 365 subscription.
More resources

Stay up-to-date with the latest from Windows Central by following us on Google News! You’ll get all our news, insights, and features right in your feed.
Read More
- What Song Is In The New Supergirl Trailer (& What It Means For The DC Movie)
- Gold Rate Forecast
- One of Hulu’s Best New Shows Lands on Disney+ Ahead of Season 2
- Eurogamer Gives ARC Raiders 2/5 Over AI Voices, Dropping Metacritic Score from 94 to 84
- Ubisoft’s Best Game From the Last 5 Years Is Surprising
- This One Stranger Things Theory Explains a 9-Year-Old Season 1 Mystery, Sets Up the Finale, & is the Key to Future Spinoffs
- Netflix Just Surprise Added a Fantasy Movie Perfect for Jackie Chan Fans
- Invincible Season 4 Confirms a Major Atom Eve Change From the Comics
- The OG Resident Evil 1, 2 and 3 Are Now Available on Steam With a Heavy Discount (and DRM)
- Why Gideon Emerges as Resident Evil Requiem’s Most Compelling Character
2025-10-28 15:21