
Windows Recall uses artificial intelligence to keep track of everything you do on your computer. It’s available on the newest Copilot+ PCs with the latest version of Windows 11, helping you remember what you’ve worked on.
This feature is like having a photographic memory for your device. It constantly captures screenshots of what you’re doing, then uses artificial intelligence to understand the content and make it easily searchable through the “Recall” app, using everyday language.
This feature is generally easy to use, but taking a few moments to learn the interface and settings will help you get the best results.
Just so you know, this cool feature isn’t available on *every* PC. It’s specifically for Copilot+ PCs – the ones running on the newest AI processors from Qualcomm, AMD, and Intel. And when you first get your hands on one, it’s actually turned off by default, so you’ll need to enable it.
This guide will show you how to get started with the Windows Recall feature on Windows 11, explaining everything you need to know to use it effectively.
How to configure and manage settings on Windows Recall
With a Copilot+ PC, you can easily control Windows Recall through the settings menu. You can turn the feature on or off, adjust how much storage it uses, delete saved snapshots, and choose which apps and websites are included.
Enable Windows Recall
Windows 11 doesn’t enable its AI features automatically. You’ll need to choose to turn them on yourself.
To turn Windows Recall on or off, use these steps:
- Open Settings.
- Click on Privacy & security.
- Click the Recall & snapshots page from the right side.
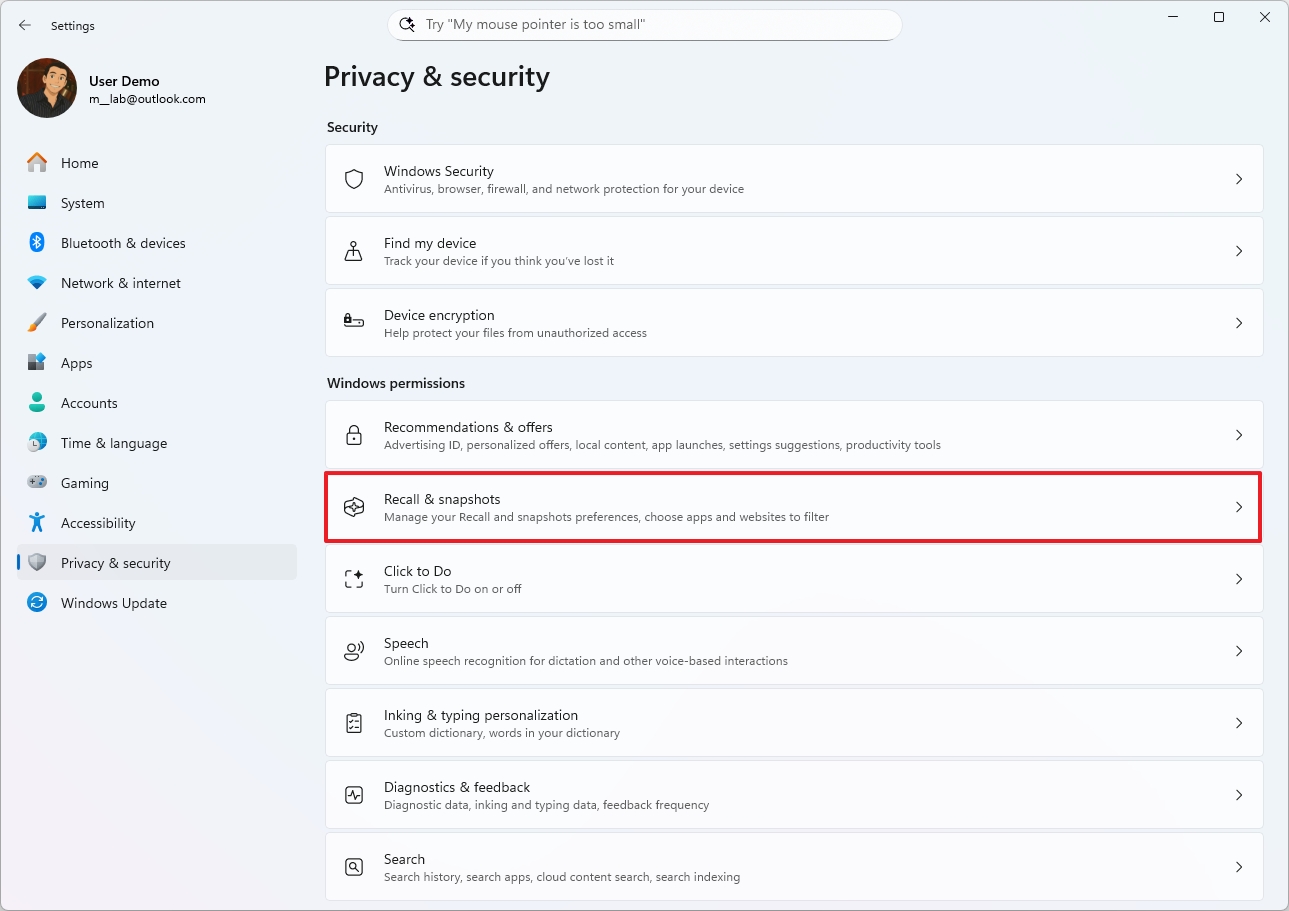
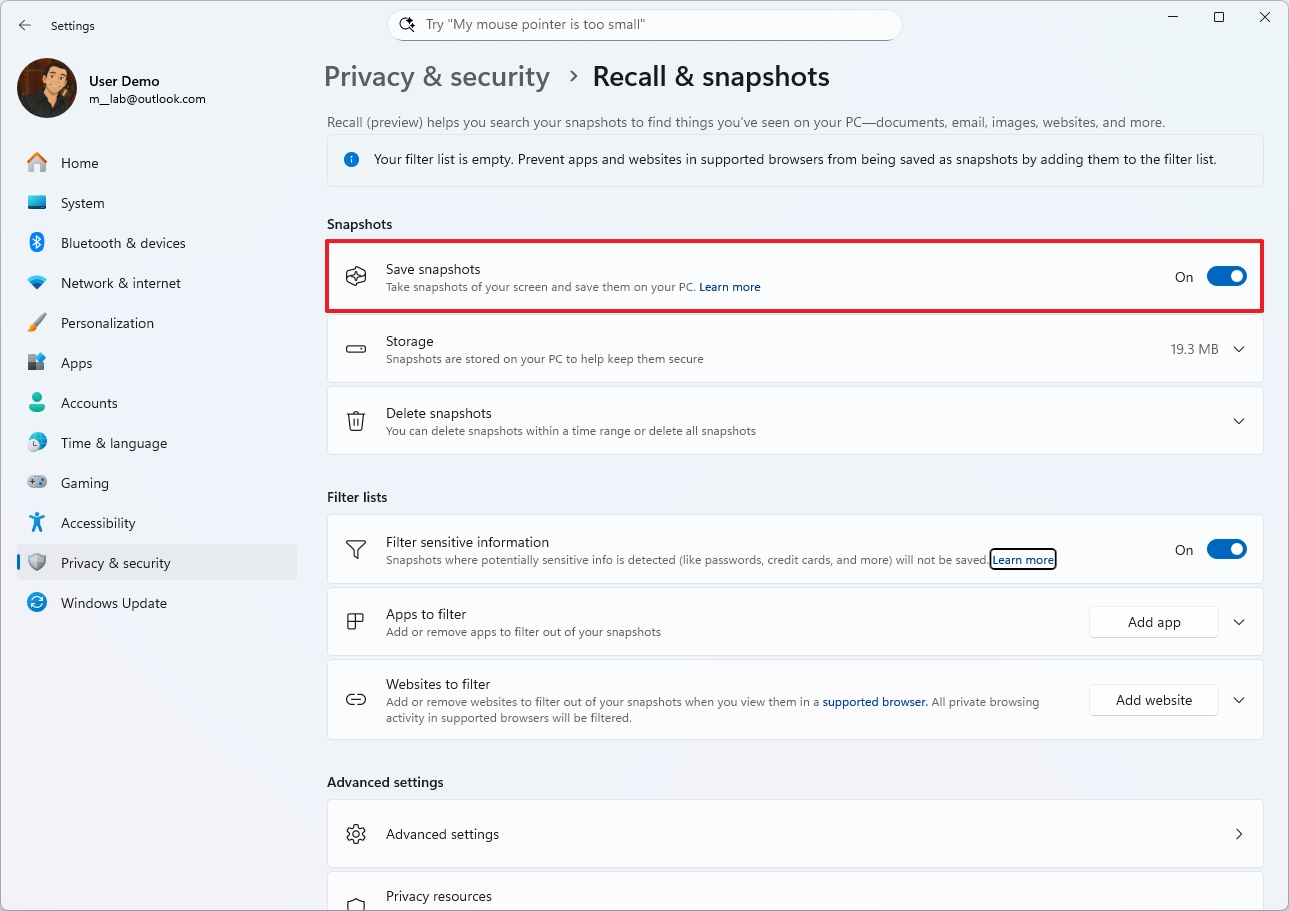
- Turn on the “Save snapshots” toggle switch to enable the feature.
Once you complete the steps, the feature will start tracking your activities on your computer.
You can also enable this feature by opening the “Recall” app and choosing to save snapshots to your computer.
To use this feature, you need to have a device set up with Windows Hello and BitLocker turned on.
Change storage settings
I’ve been playing around with Windows Recall, and it’s pretty interesting. One thing to know is it takes up a decent chunk of storage. By default, it reserves 25GB if you have a 256GB SSD, 75GB for a 512GB SSD, and 150GB if you’re rocking a 1TB SSD. But the good news is, you *can* adjust how much space it uses if you need to, and I’ve found instructions on how to do that if you’re curious.
To change the storage allocation for Windows Recall, use these steps:
- Open Settings.
- Click on Privacy & security.
- Click the Recall & snapshots page from the right side.
- Click the Storage setting.
- Choose the storage allocation size using the “Maximum storage for snapshots” setting.
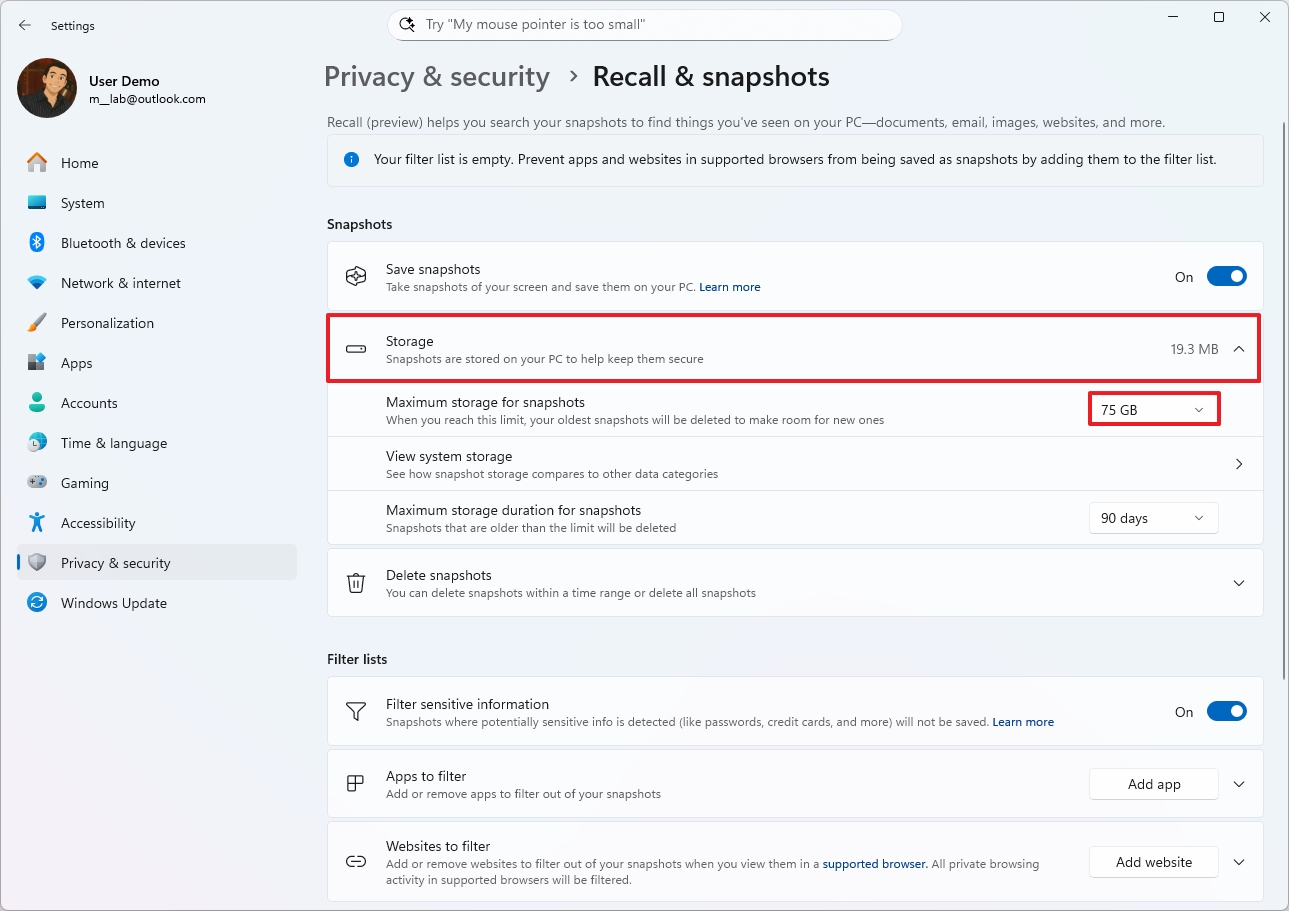
- (Optional) Click the “View system storage” settings to open the Storage settings to view the drive usage of Recall AI.
- Quick tip: The Storage settings in the “Recall & snapshots” page show this information.
- Choose the data retention time range (Unlimited, 30, 60, 90, or 180 days) in the “Maximum storage duration for snapshots” setting.
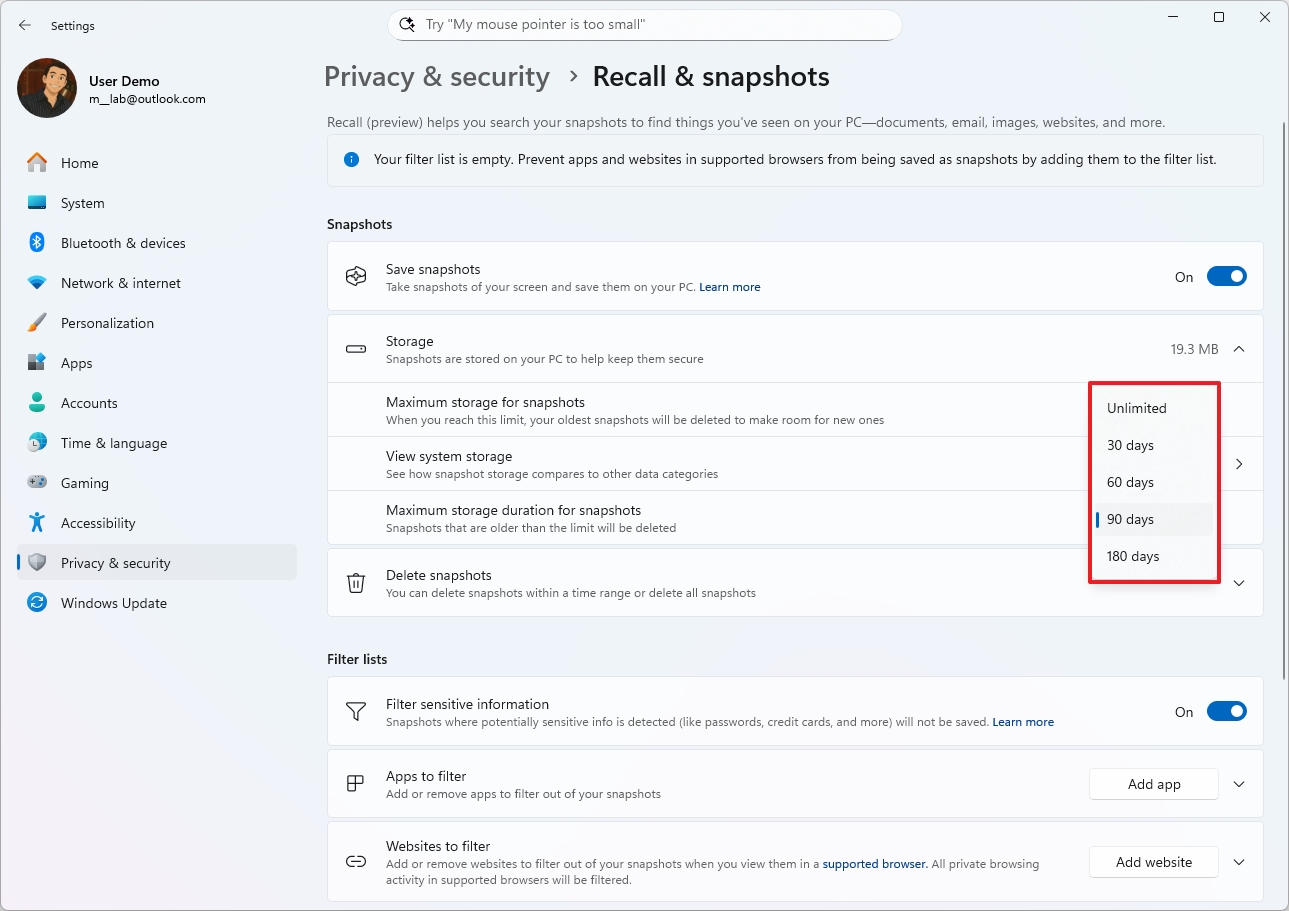
- Quick note: The default value is 90 days.
After you complete the steps, the system will apply the new storage allocation.
Delete snapshots
Windows Recall constantly takes screenshots to help you search for things on your computer. Because these screenshots could include private information, Microsoft lets you delete some or all of them and save them locally on your device.
To delete Windows Recall snapshots on Windows 11, use these steps:
- Open Settings.
- Click on Privacy & security.
- Click the Recall & snapshots page from the right side.
- Click the Delete snapshots setting.
- (Option 1) Choose the timeframe to delete snapshots from the “Delete snapshots from a specific timeframe” setting.
- Click the Delete snapshots button.
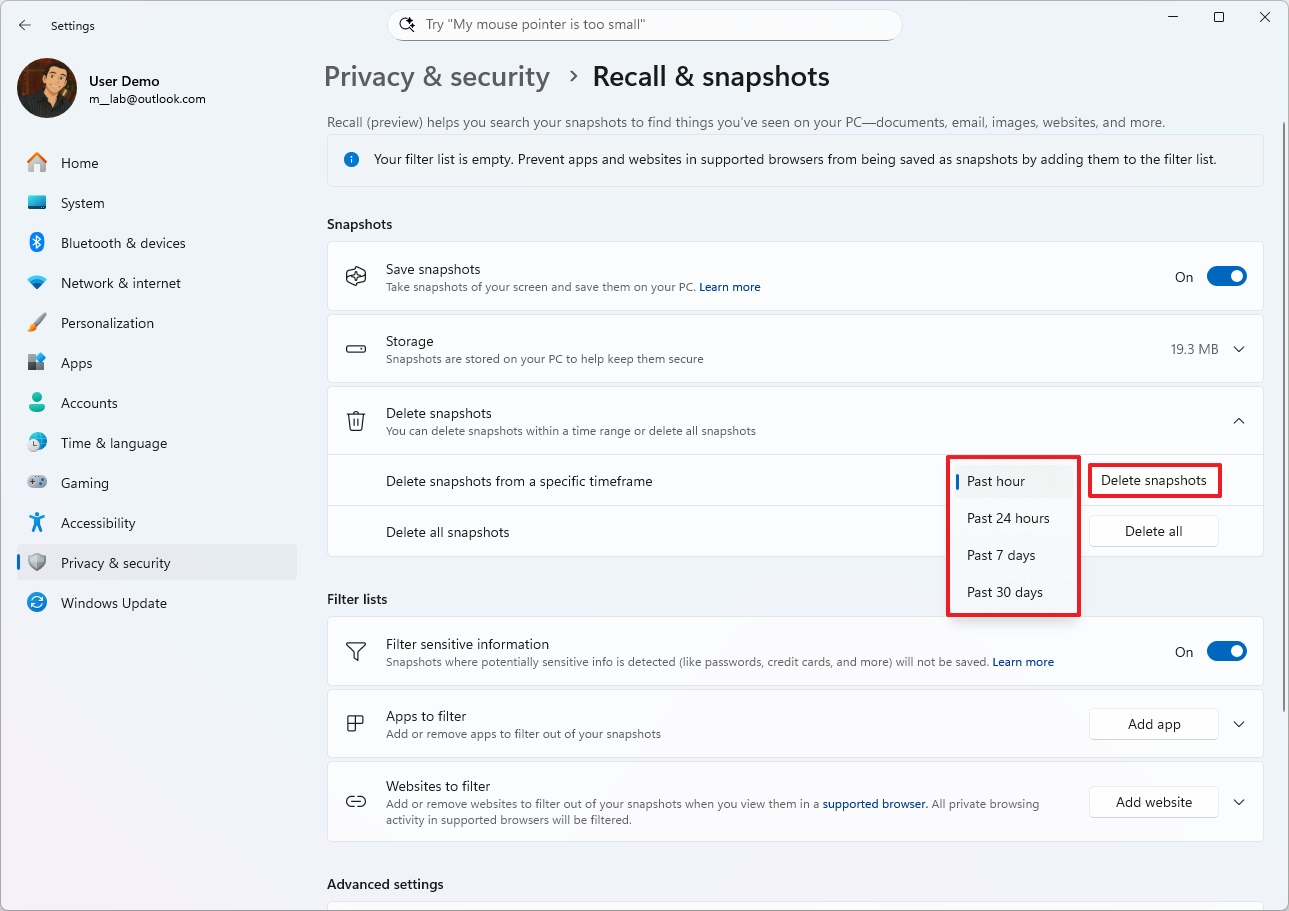
- Click the Delete button again to confirm.
- (Option 2) Click the “Delete all” button to remove the snapshots stored on your computer.

- Click the Delete button again to confirm.
After you finish the setup, any data collected by this feature will be removed as you’ve instructed.
Filter sensitive information
To help protect your privacy and security, this AI feature automatically identifies and removes sensitive information like passwords and credit card numbers. It’s enabled by default, but you can adjust this setting in the “Recall & snapshots” menu.
To enable or disable the filter for sensitive information, use these steps:
- Open Settings.
- Click on Privacy & security.
- Click the Recall & snapshots page from the right side.
- (Option 1) Turn on the “Filter sensitive information” toggle switch to enable the feature.
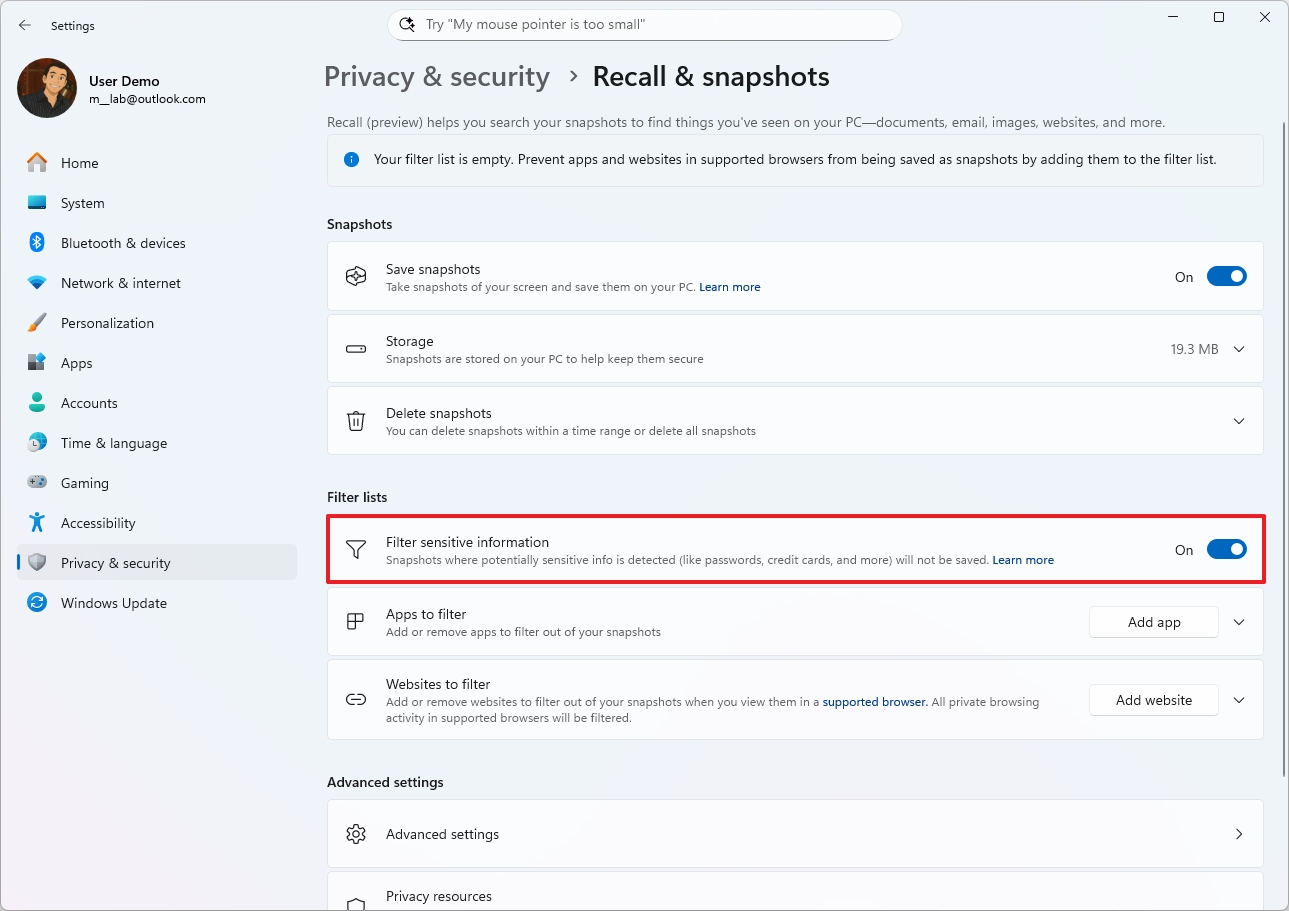
- (Option 2) Turn off the “Filter sensitive information” toggle switch to disable the feature.
After finishing these steps, the feature will no longer save any private information to your computer.
Apps to filter by Recall
Windows Recall keeps track of almost everything you do on your computer, but Microsoft is including options to prevent certain apps and websites from being recorded.
By default, Windows Recall won’t track what you do while browsing in private modes like InPrivate (Microsoft Edge) or Incognito (Google Chrome), or when using browsers like Firefox and Opera. It also won’t capture anything protected by digital rights management (DRM).
To exclude apps from being recorded by Windows Recall, use these steps:
- Open Settings.
- Click on Privacy & security.
- Click the Recall & snapshots page from the right side.
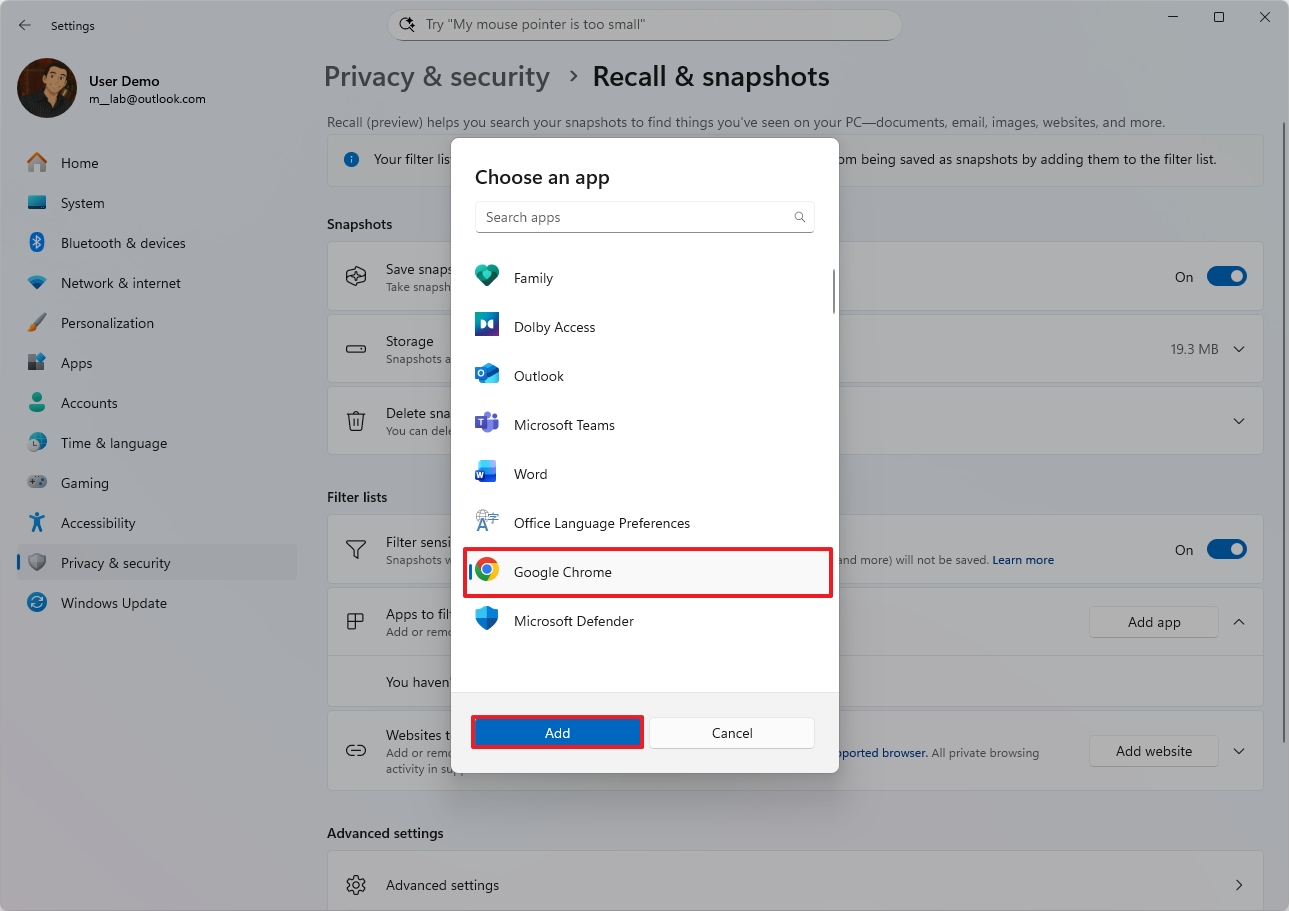
- Click the Add app button to filter an app.
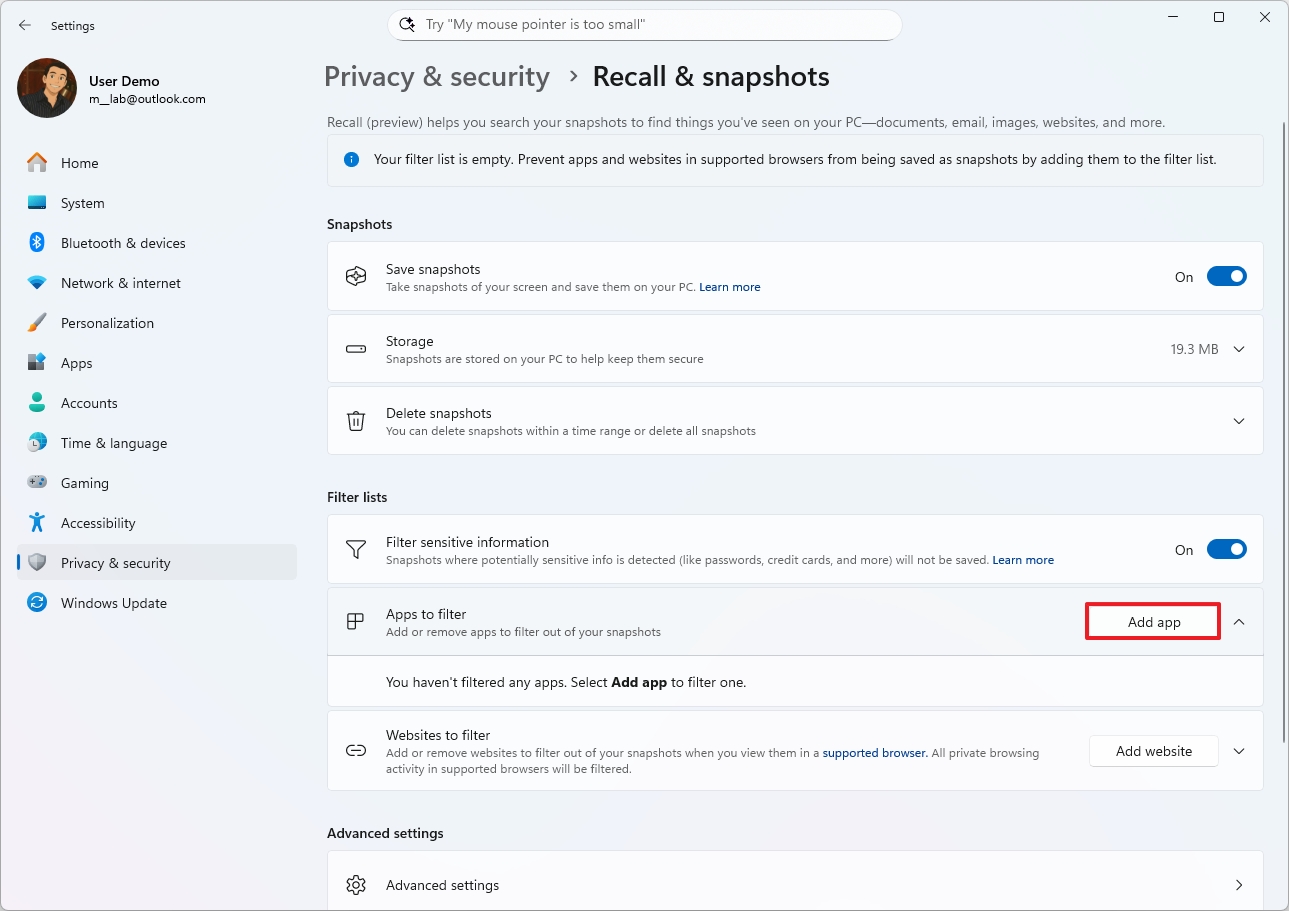
- Select the app from the list.
- Click the Add button.
To delete apps, follow the same steps as removing filters. When you get to step 4, instead of choosing a filter, click the “Apps to filter” option, then select the “Remove” button next to the app you want to get rid of.
Websites to filter by Recall
To exclude websites from being recorded by Windows Recall, use these steps:
- Open Settings.
- Click on Privacy & security.
- Click the Recall & snapshots page from the right side.
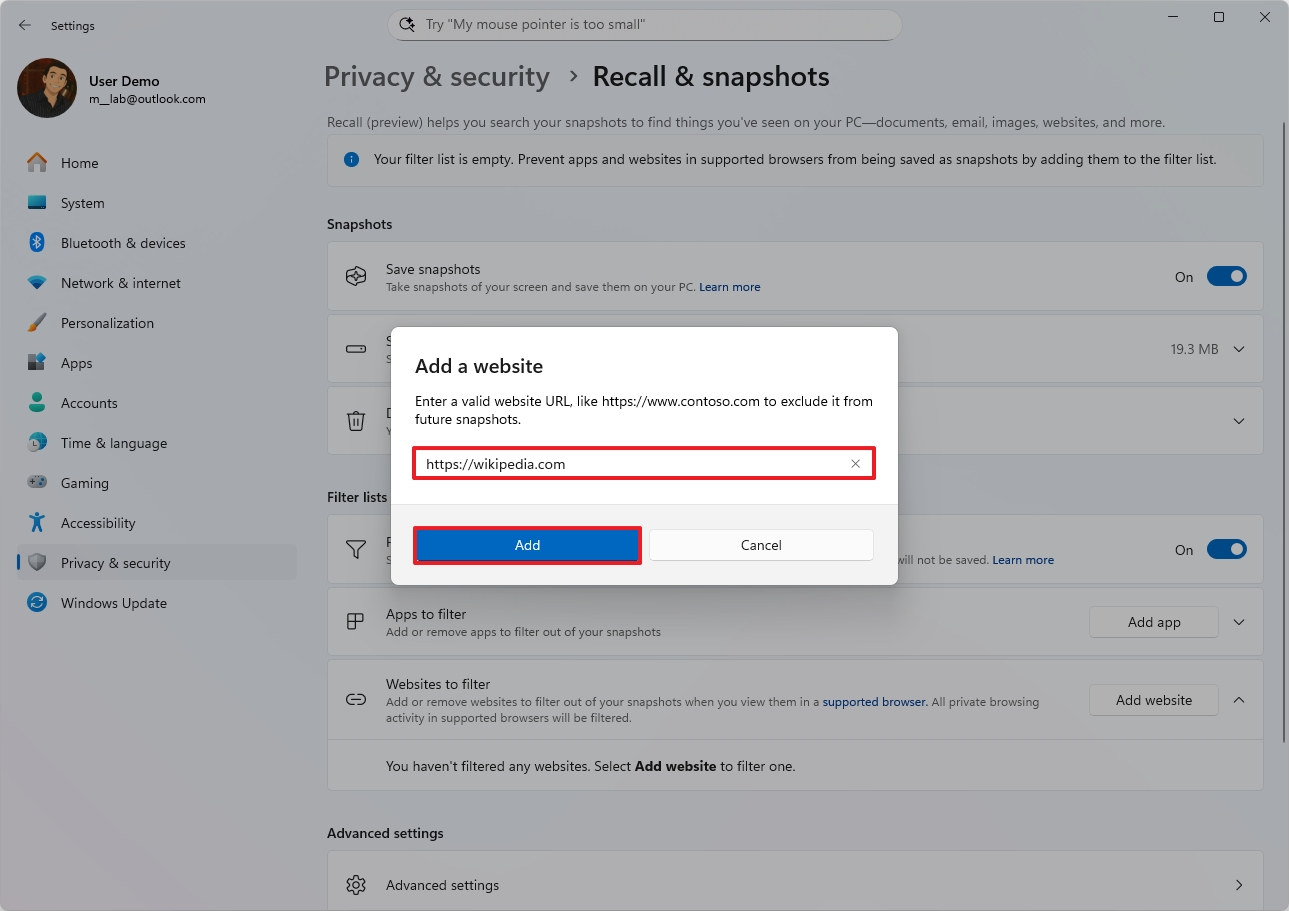
- Click the Add website button to filter an app.
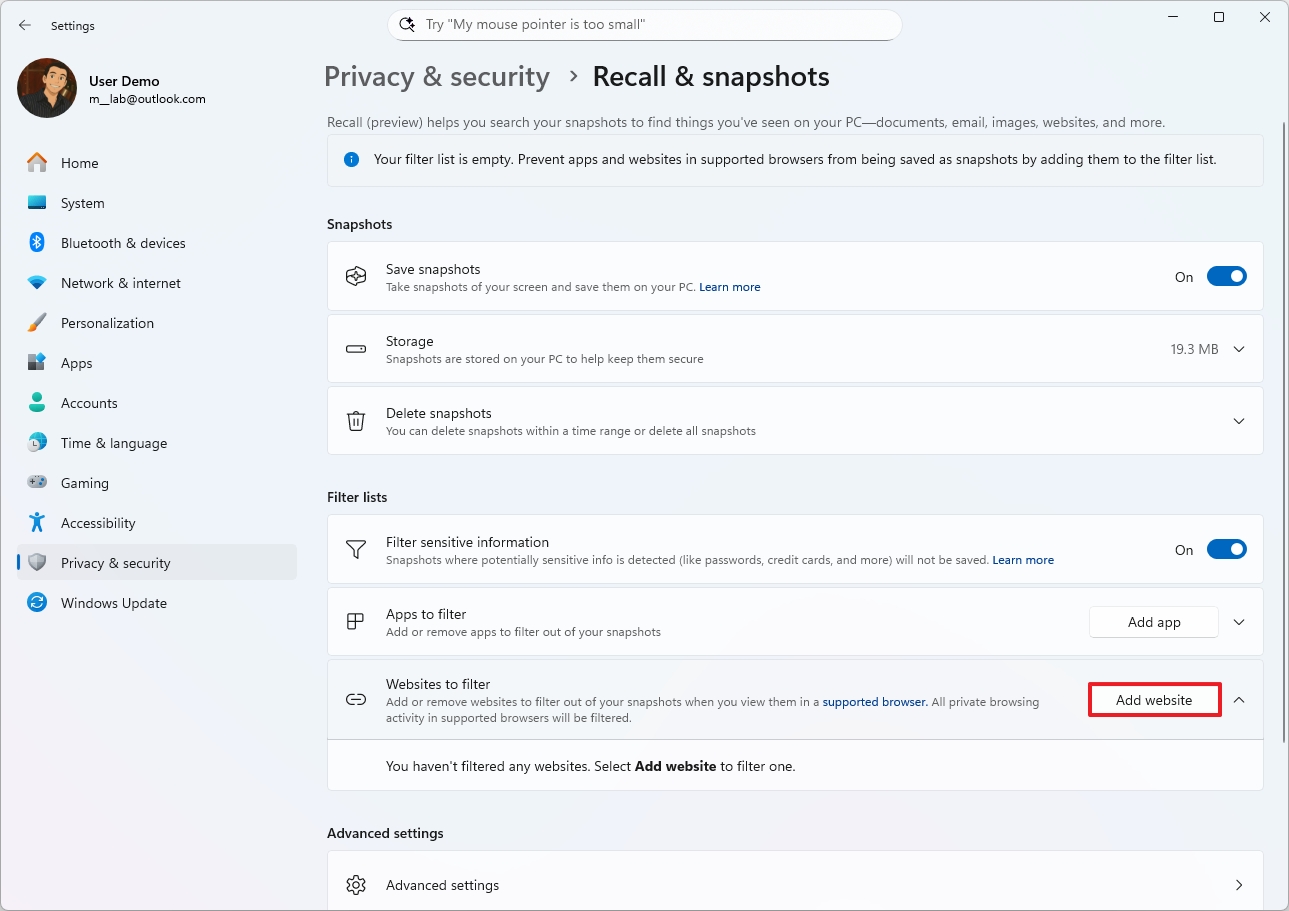
- Confirm the website to exclude.
- Click the Add button.
To remove apps, follow the same steps as before, but in step 4, select the “Websites to filter” option, and then click the “Remove” button next to the website you want to delete.
Pause and resume
It’s also possible to pause and resume the feature with these instructions:
- Click the Windows Recall button from the System Tray.
- (Option 1) Click the “Pause until tomorrow” button to turn off the feature until the next day at 12AM.
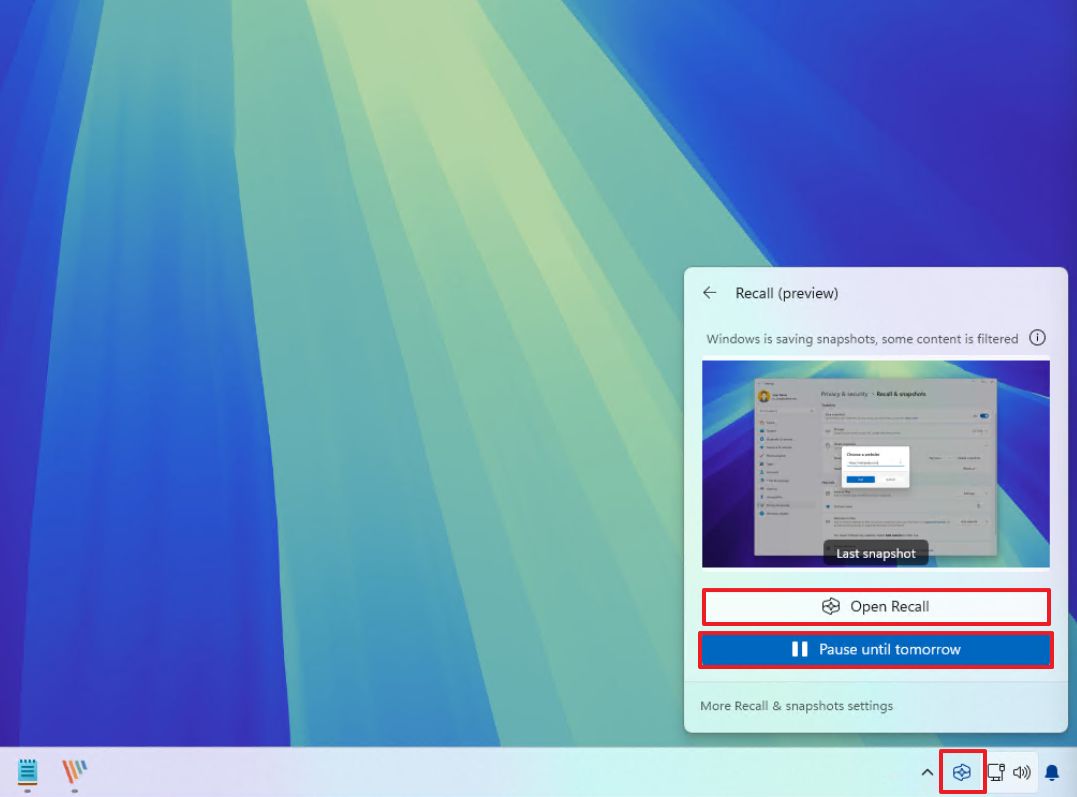
- (Option 2) Click the “Resume snapshots” button to manually turn on the feature.
The Recall menu also shows you the most recent backup it created, along with whether that backup is ready to use.
You can also tap “More Recall & snapshots settings” to access the feature’s settings page.
Reset and disable Windows Recall
If you’re not happy with Recall or it’s not working as expected, you can easily reset it to begin again, or disable it completely.
To reset Windows Recall, use these steps:
- Open Settings.
- Click on Privacy & security.
- Click the Recall & snapshots page from the right side.
- Click on Advanced settings.

- Click the Reset Recall button.
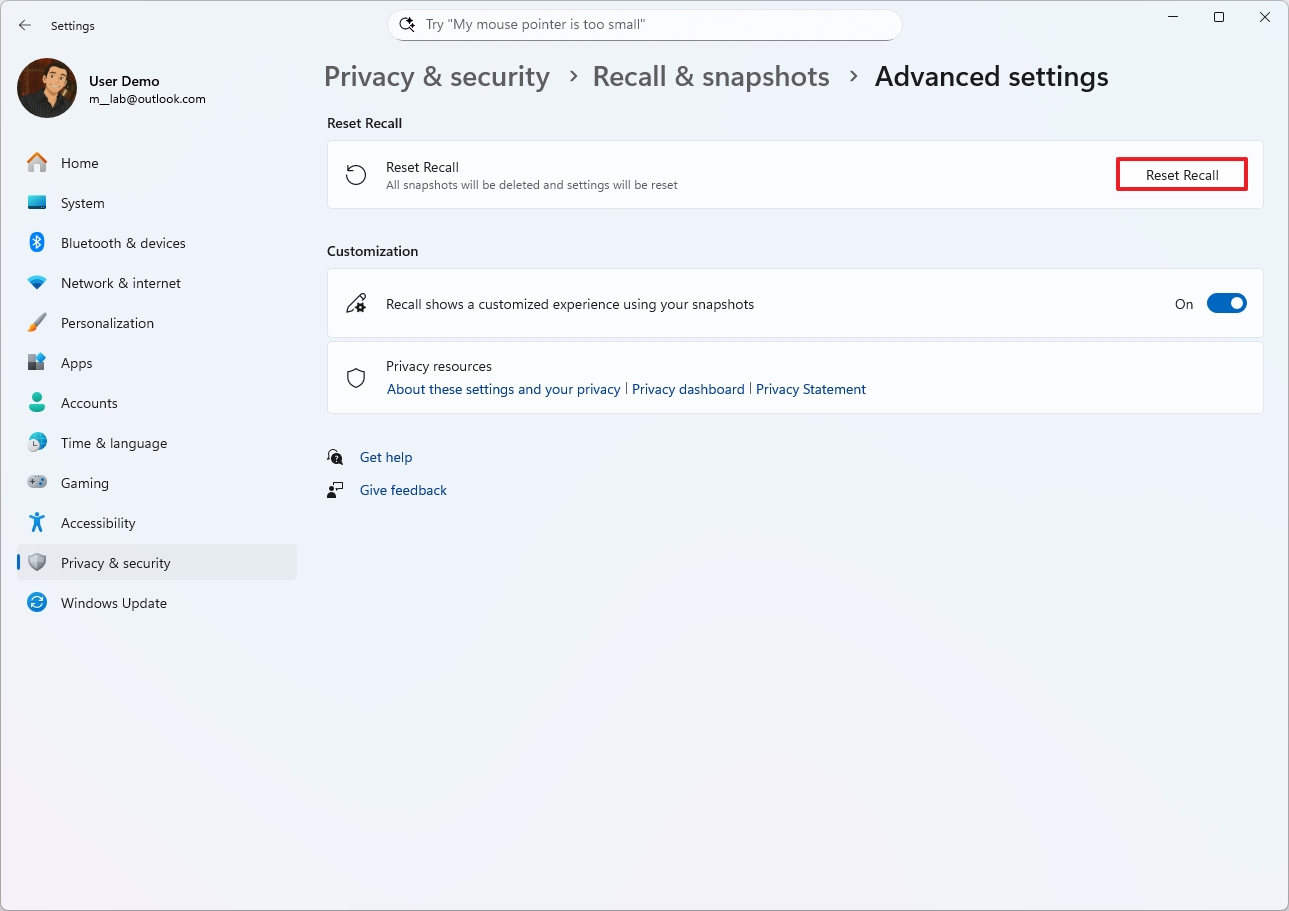
- Click the Reset button again.
After you finish these steps, all data related to the Recall feature will be erased, and its settings will return to their original factory state. This will also turn off the Recall feature, as it’s disabled by default.
Export data from Windows Recall
As a researcher, I’m pleased to share that users within the European Economic Area (EEA) now have the ability to export their data from Windows Recall. This allows them to share this information with other websites and applications if they choose to.
When you initially enable this feature on your Copilot+ PC, you’ll get a special code from the “Advanced settings” menu. You can use this code to back up or transfer your data.
Because your data is protected with encryption, this unique code is essential for accessing your saved snapshots and allowing other apps or websites to use them. Microsoft emphasizes that this code isn’t saved on their servers, meaning you won’t be able to recover it if it’s lost.
To get a new export code, you’ll need to reset the feature, effectively starting over. This means all your current data – like saved snapshots, settings, and everything else associated with it – will be erased.
To use this feature, follow these instructions:
- Open Settings.
- Click on Privacy & security.
- Click the Recall & snapshots page from the right side.
- Click on Advanced settings.
- Click the Export snapshots setting.
- (Option 1) Click the Export button to export your data from last week, last month, or all your snapshots.
- (Option 2) Turn on the “Export snapshots from now on” toggle switch to continue exporting data from the time you turn it on.

Microsoft explains that when you download your data, it’s saved with encryption for security. You’ll need a special code to unlock and use it in other applications or on different websites.
How to search and find activities on Windows Recall
Once you set it up, Windows Recall is easy to use, but it’s helpful to understand how it works first.
Home in Recall
When you open the app, you’ll land on the Home page. Think of it like the new tab page you see in most web browsers.
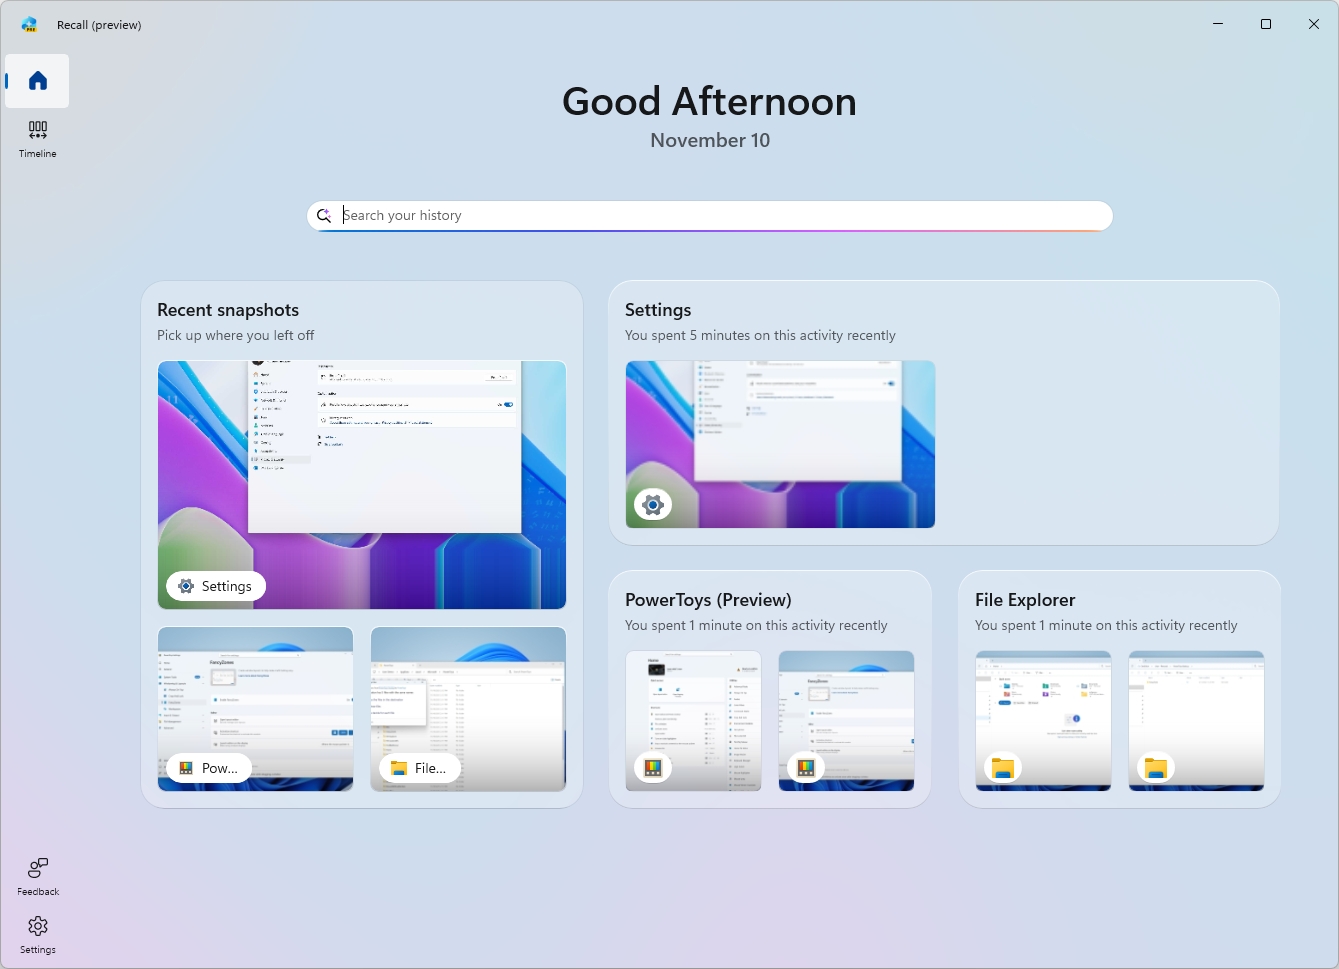
The Recall app opens with a friendly greeting and today’s date. Below that, you’ll find a search box powered by AI to easily discover activities.
Then, the page groups your recent activities and top-used content to make it easier to find.
The “Recent Snapshots” section shows your latest saved moments. Clicking the main card will take you to the Timeline, where you can view them all. If you click on an individual snapshot icon, it will directly open the app related to that snapshot.
Clicking on a different group will show you all the saved images for that specific app.

This feature organizes your snapshots into logical groups and shows you how much time you spent on each activity.

At the bottom of the left panel, you’ll find a menu button. Clicking it lets you pause the feature, adjust settings, delete your search history, or completely disable search history tracking.
Start a search
To use search with Recall AI, use these steps:
- Click the Windows Recall button in the System Tray.
- Sign in with your Microsoft account credentials to access the app.
- Click the Open Recall button.
- Quick tip: You can also find the app from the Start menu, and you can right-click the app and pin it to the Taskbar.
- (Option 1) Use the search box to search for an activity using natural language.
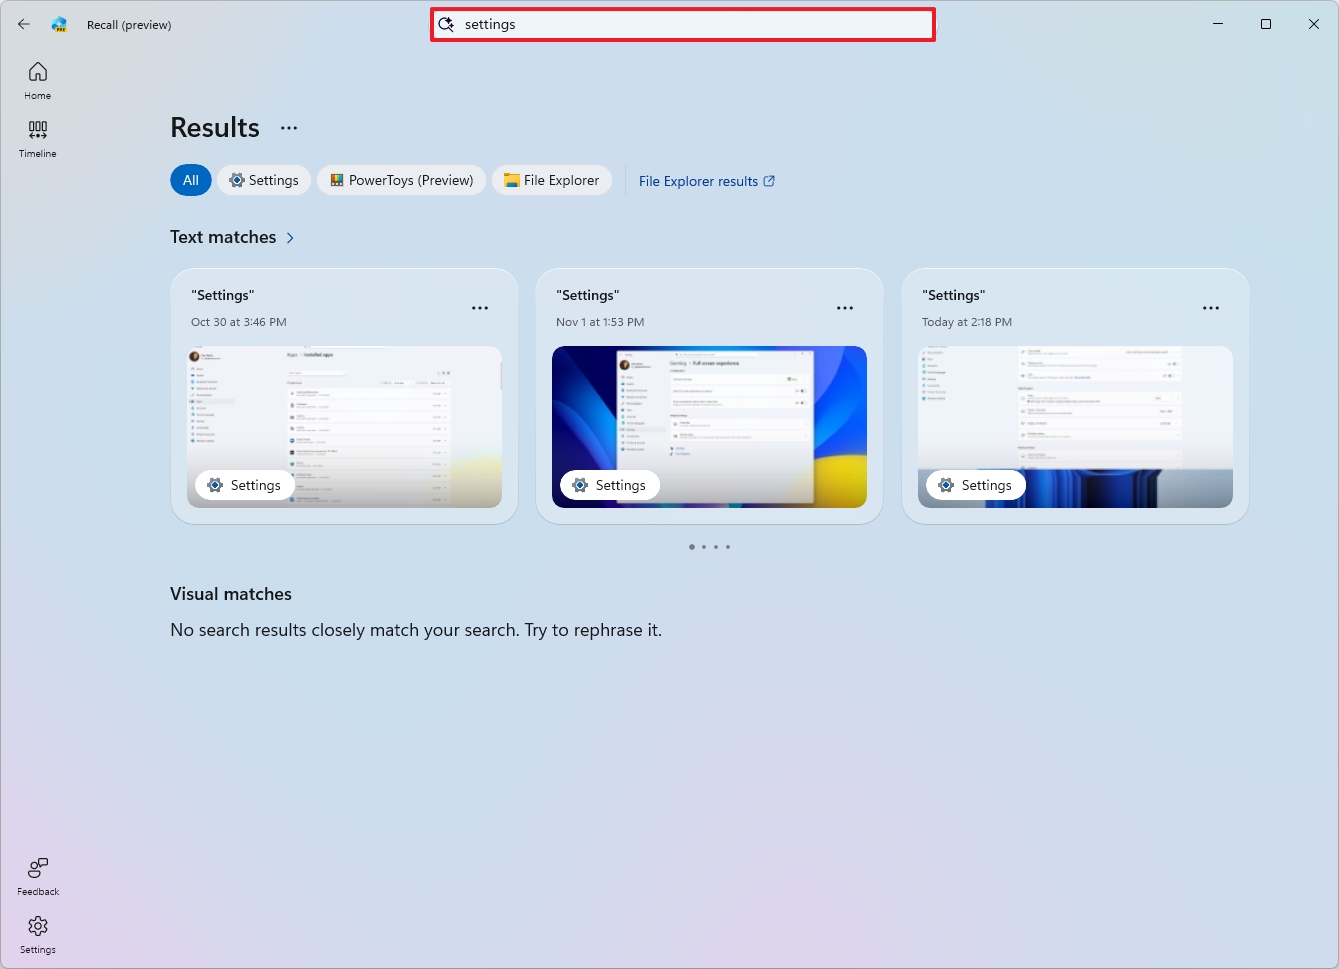
- Select the snapshot from the result.
- Quick tip: If the feature can’t find any matches, you can click the “File Explorer results” option to perform a traditional Windows Search.
- (Option 2) Use the slider to scroll back in time to find a particular snapshot.
You can type questions into the search box just like you’d ask a friend. For instance, try something like, “find the PowerToys setting for FancyZones.”
Pressing Enter will show you a summary of what you were recently doing, including when I was looking at the FancyZones settings.
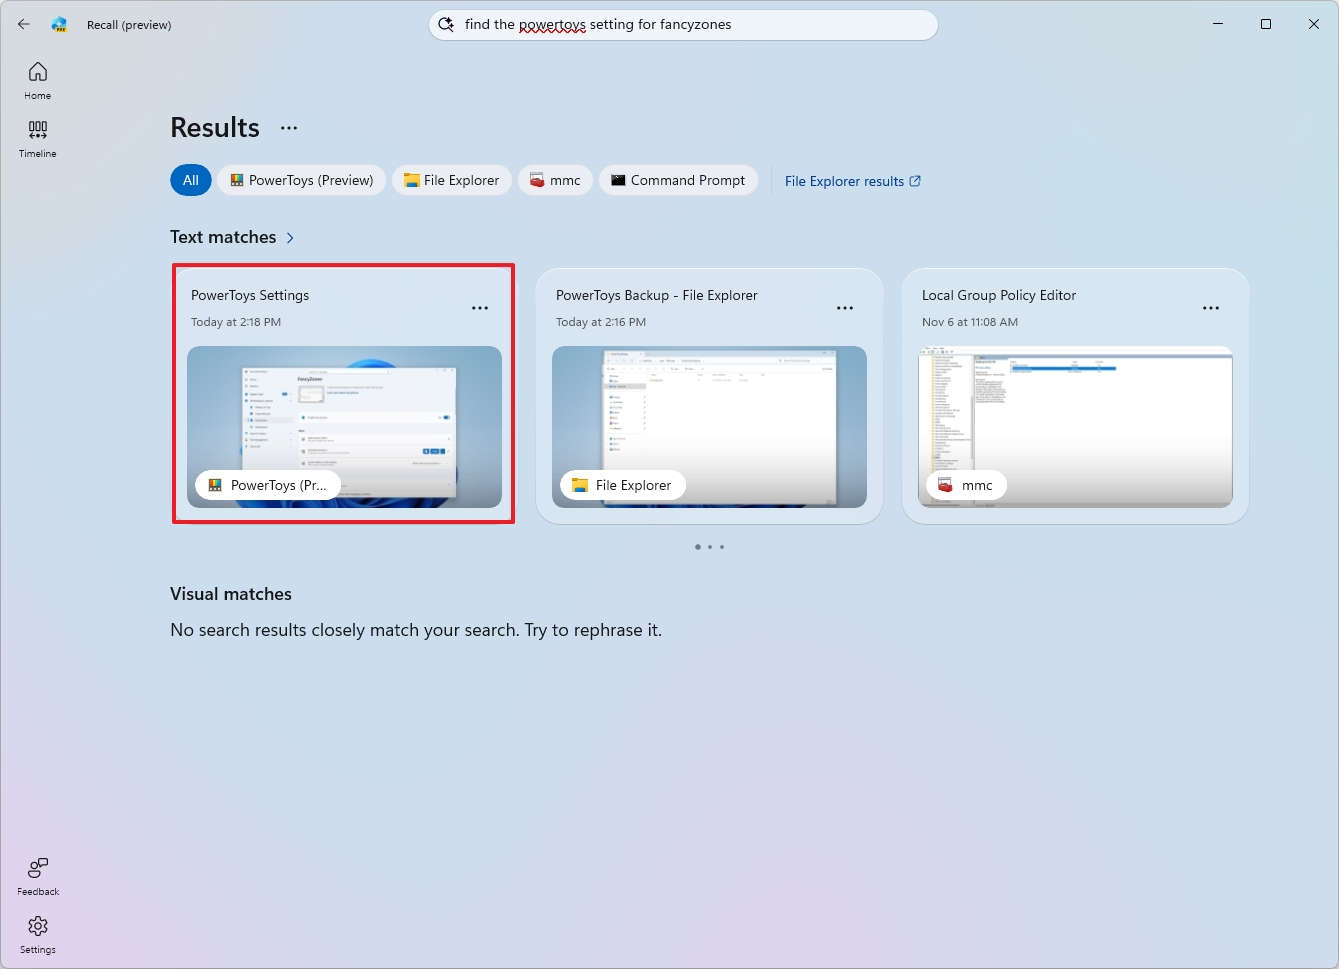
By default, the search shows results from every app. You can use the filters and options provided to refine your search and find what you’re looking for.
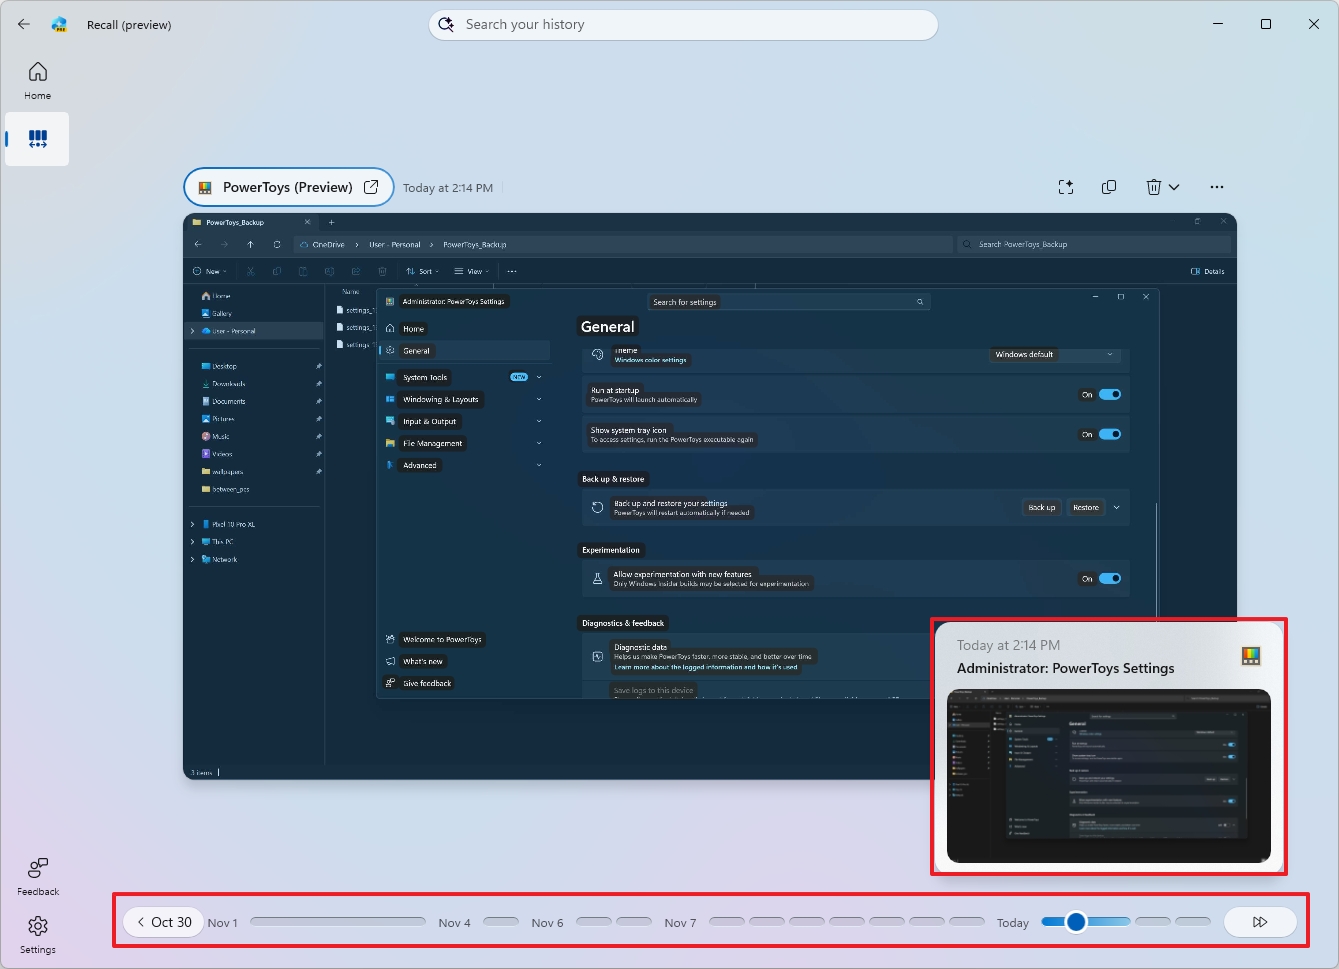
The timeline lets you easily jump back to see exactly when you did something. It’s broken down into sections and timeframes, and you can move your mouse over it to get a quick preview of what happened during each period. If you don’t see the timeline slider, just click the “Timeline” button near the search bar.
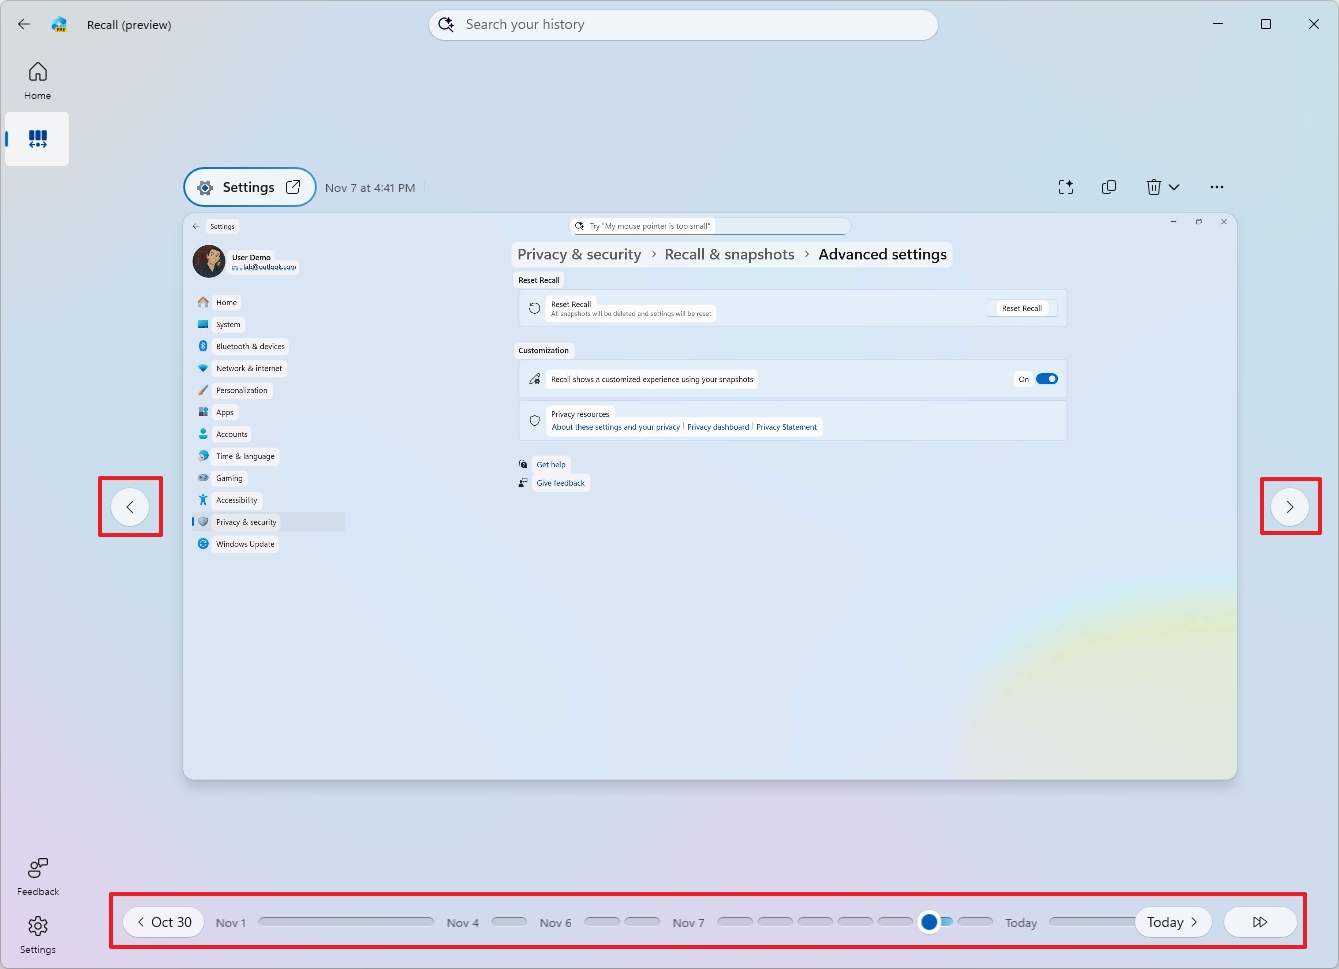
You can also use the navigation buttons on either side of the app to go between snapshots.
Windows Recall displays a saved snapshot when you choose a moment in time or a particular activity.
Interact with snapshots (Click to Do)
Just so you know, when you work with snapshots, you’re really using our “Click to Do” tool.
Click to Do lets you interact with what you see in screenshots. It uses artificial intelligence on your device to recognize text and objects, then offers helpful actions you can take directly within the image.
To interact with a Recall snapshot with Click to Do, use these steps:
- Open the Windows Recall app.
- Sign in using Windows Hello to access the app.
- Perform a search with a text prompt or the timeline slider.
- Select the snapshot from the result.
- In the snapshot, you will notice an animation around the element. This is the Click to Do feature, analyzing the contents of the element. The snapshot also includes a date and time stamp in the bottom-right corner.
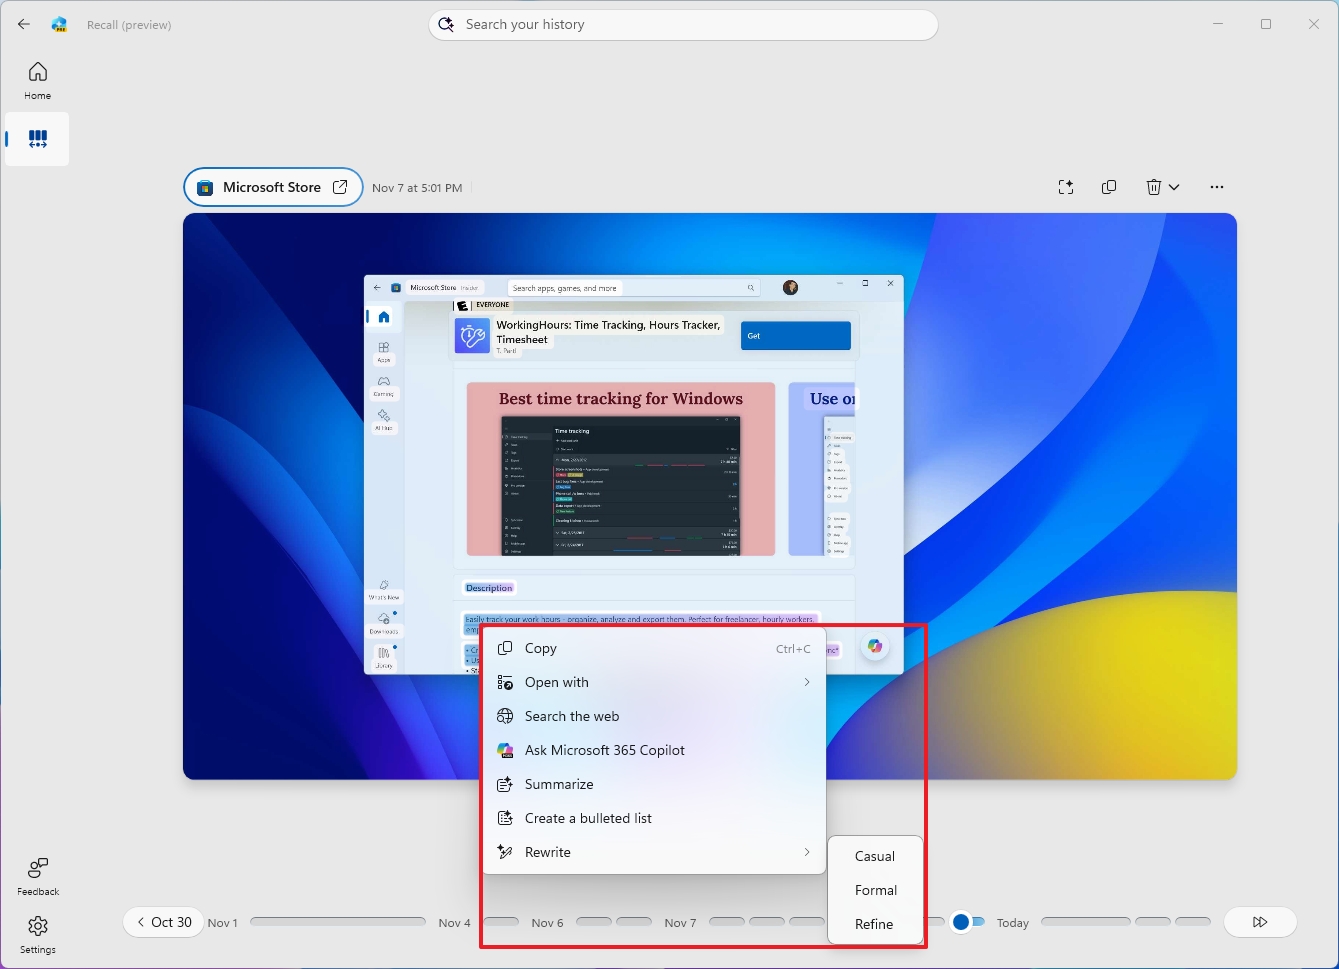
Now, Click to Do offers different actions, depending on the object you’re selecting.
When you select something, you’ll see options for common tasks like copying, sharing, saving, and opening it with another app. You can also use the “Ask Microsoft 365 Copilot” feature to send what you’ve selected to Copilot and ask it questions.
Click to Do also offers an option to describe the image with AI and do a Bing visual search.
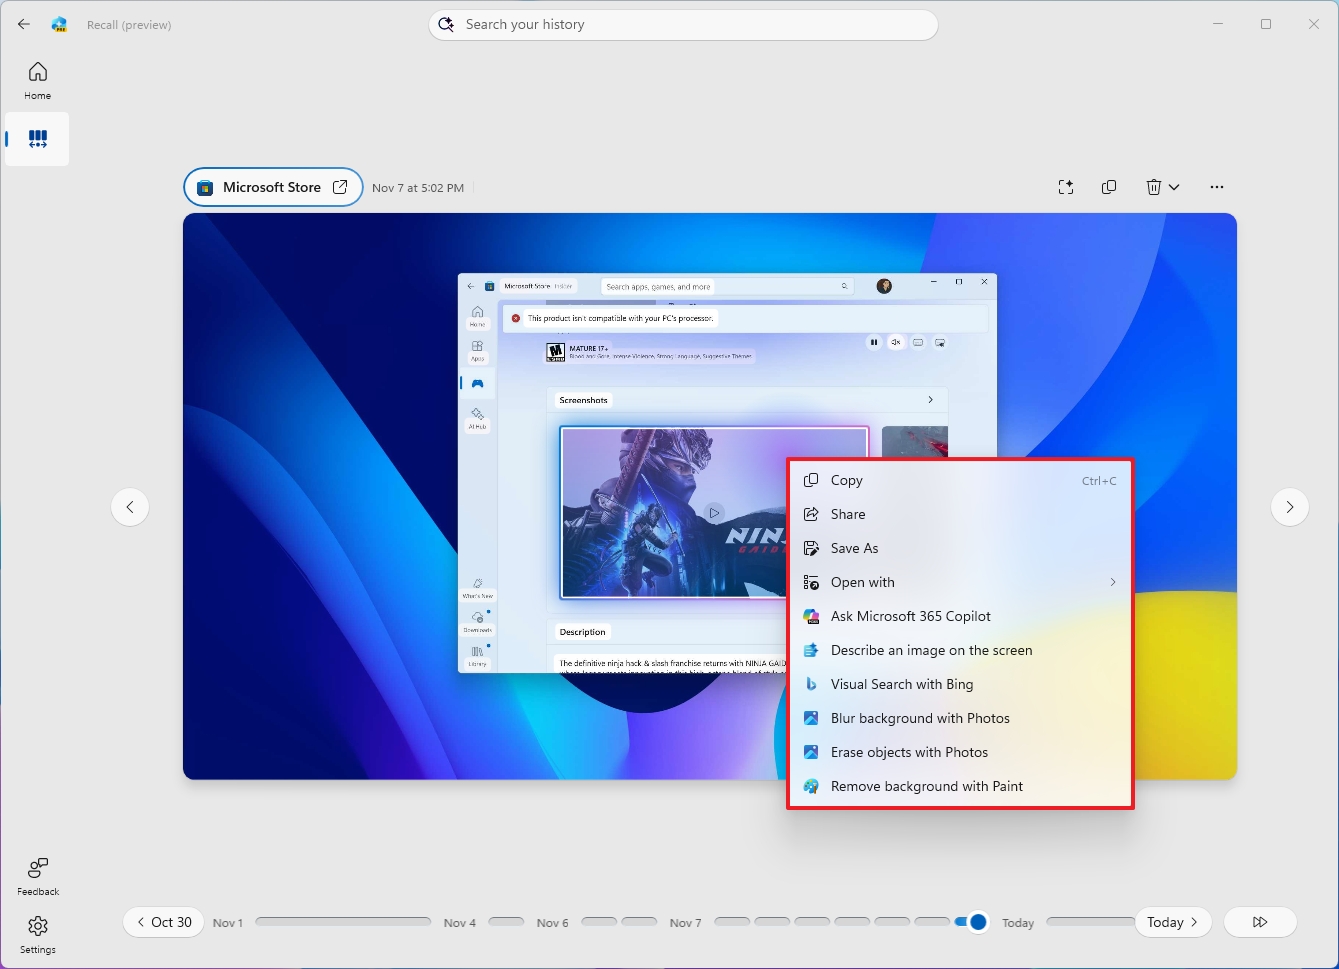
Finally, you’ll notice actions to add blur, remove background, and erase objects.
If you use the Click to Do feature on something, blurring or erasing the background will open the image in the Photos app. Removing the background will open it in Microsoft Paint.
You can also manage things right from the snapshot itself. For instance, the top-left corner lets you open the app that created the snapshot, and it also shows you when the snapshot was taken.

In the upper-right corner, you can toggle the Click to Do feature on or off for each snapshot. You can also copy, delete, or open the snapshot using the Snipping Tool from that same area.
This guide focuses on Windows Recall, but a recent update to Click to Do introduces new ways to select items on your screen. These are called “Selection Modes” and include options like freeform selection, rectangle selection, and using Ctrl + Click for easier object selection.
Other details about Windows Recall
Now that you’ve learned the basics of Windows Recall, let’s cover a few extra things you should be aware of.
This feature works only when you’re actively using your device. If your computer is left idle, the feature will automatically pause until you start using it again. You’ll know it’s paused because the Recall icon in the system tray will become grayed out.
The Windows Recall icon in your system tray shows that the feature is turned on. Like the icon that appears when an app uses your location, this icon can’t be moved or hidden.
As an analyst, I’ve found that disabling the Windows Recall feature is a permanent action. Once turned off, the Recall icon disappears from your System Tray, and the Recall application itself is removed from the Start menu. There’s no simple way to re-enable it without potentially resetting your system.
Turning off this feature won’t erase any data already saved on your device. When you turn it back on, your past activity will still be there.
If you want to disable and clear the data at the same time, you want to use the reset feature.
This feature is only available on Copilot+ PCs and isn’t turned on automatically. When you first set up a new PC or reinstall the operating system, you’ll be asked if you want to enable it.
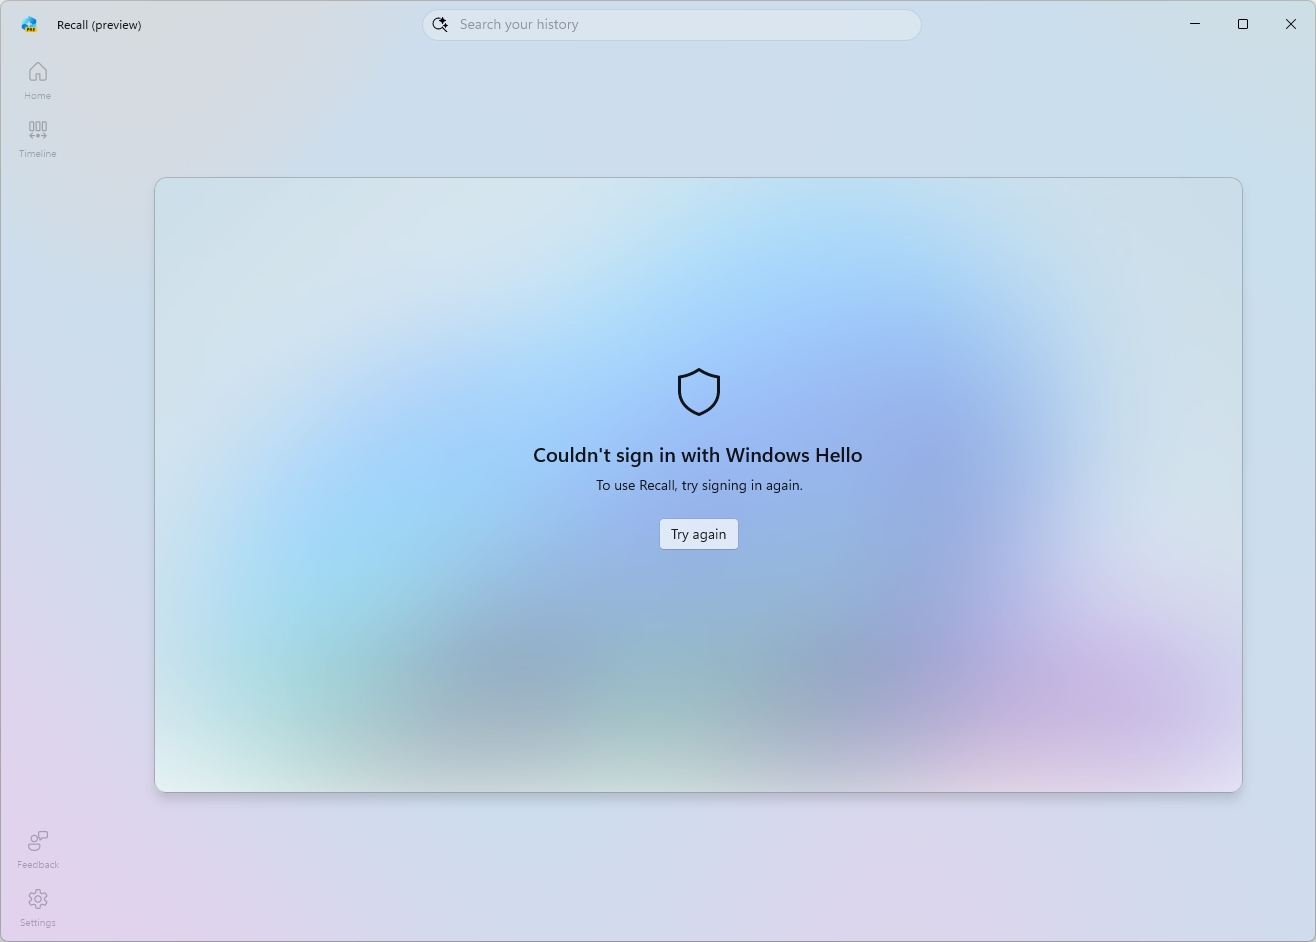
You can only enable this feature if your computer has BitLocker (or Device Encryption) turned on, and if you sign in using a Windows Hello PIN, facial recognition, or fingerprint.
Microsoft promises that all information gathered by Recall will remain on your device – it won’t be sent to the cloud, and won’t be used to improve their AI.
More resources
Read More
- Gold Rate Forecast
- Hazbin Hotel Secretly Suggests Vox Helped Create One of the Most Infamous Cults in History
- 22 actors who were almost James Bond – and why they missed out on playing 007
- Every Creepy Clown in American Horror Story Ranked
- Jason Statham’s Hit Creature Feature Is Heading to Streaming for Free
- Blue Protocol Star Resonance: Goblin Lair Dungeon Guide
- Kingdom Come: Deliverance 2 – Legacy of the Forge DLC Review – Cozy Crafting
- Jack Osbourne Shares Heartbreaking Tribute to Late Dad Ozzy Osbourne
- Arknights: Endfield – Everything You Need to Know Before You Jump In
- Chill with You: Lo-Fi Story launches November 17
2025-11-11 15:50