Just got a new Copilot+ PC? Great! The first thing to do is customize it to work best for you. While the basic setup is easy, unlocking the full potential of this new technology takes a little extra effort beyond just signing in and using the standard settings.
Once your new Copilot+ PC finishes its initial setup, it’s a good idea to uninstall any pre-installed apps you won’t use and make sure Windows 11 has all the latest updates. Then, install the programs you need, transfer your files from your old device, and customize your settings to get the performance and appearance you prefer.
Spending a little time setting things up initially can help you create a more customized and efficient experience right away.
In this how-to guide, I’ll outline the process for setting up a new Copilot+ PC.
How to set up Copilot+ PC installation on Windows 11
There are a couple of ways to set up your Copilot+ PC. You can keep your current setup and continue with the initial setup process, or you can completely reinstall Windows 11 for a fresh start.
Out-of-box experience (OOBE)
To set up your new laptop running Windows 11, use these steps:
- Select your region.
- Click the Yes button.
- Select your keyboard layout.
- Click the Yes button.
- Click the Skip button.
- Click the Accept button (if applicable).
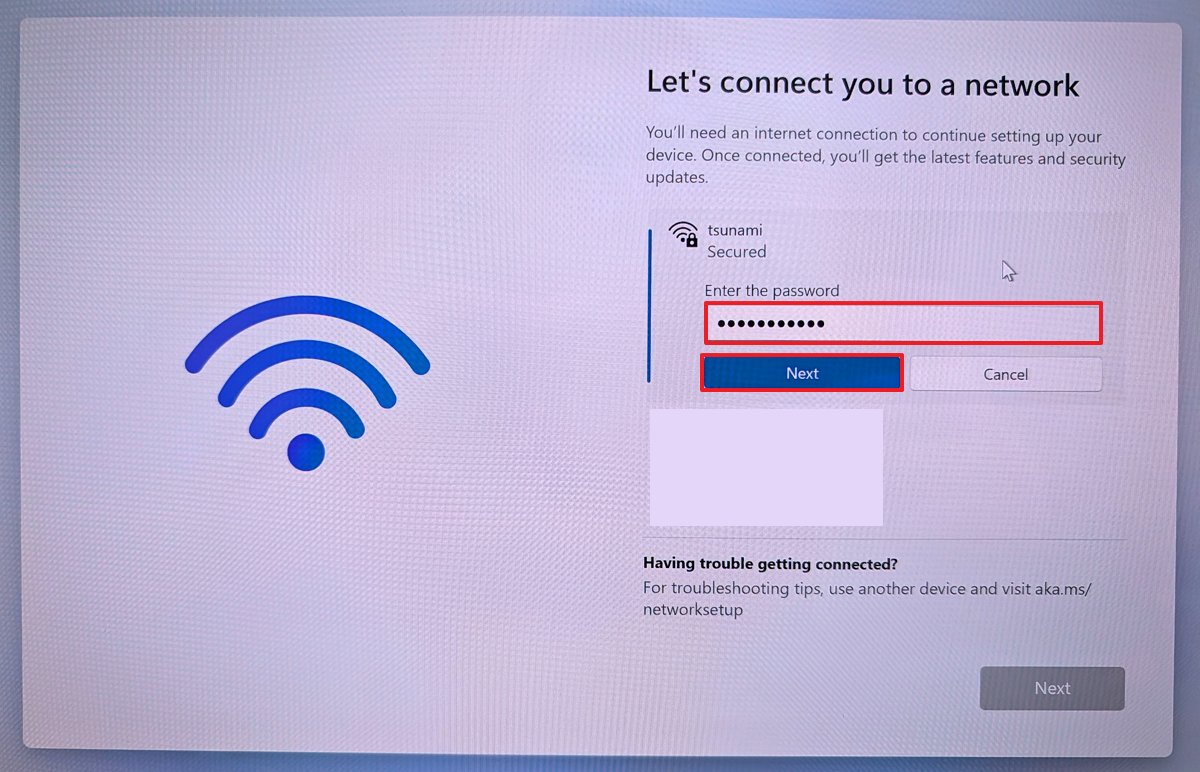
- Select the wireless network.
- Confirm the Wi-Fi password.
- Click the Next button.
- Click the Next button one more time.
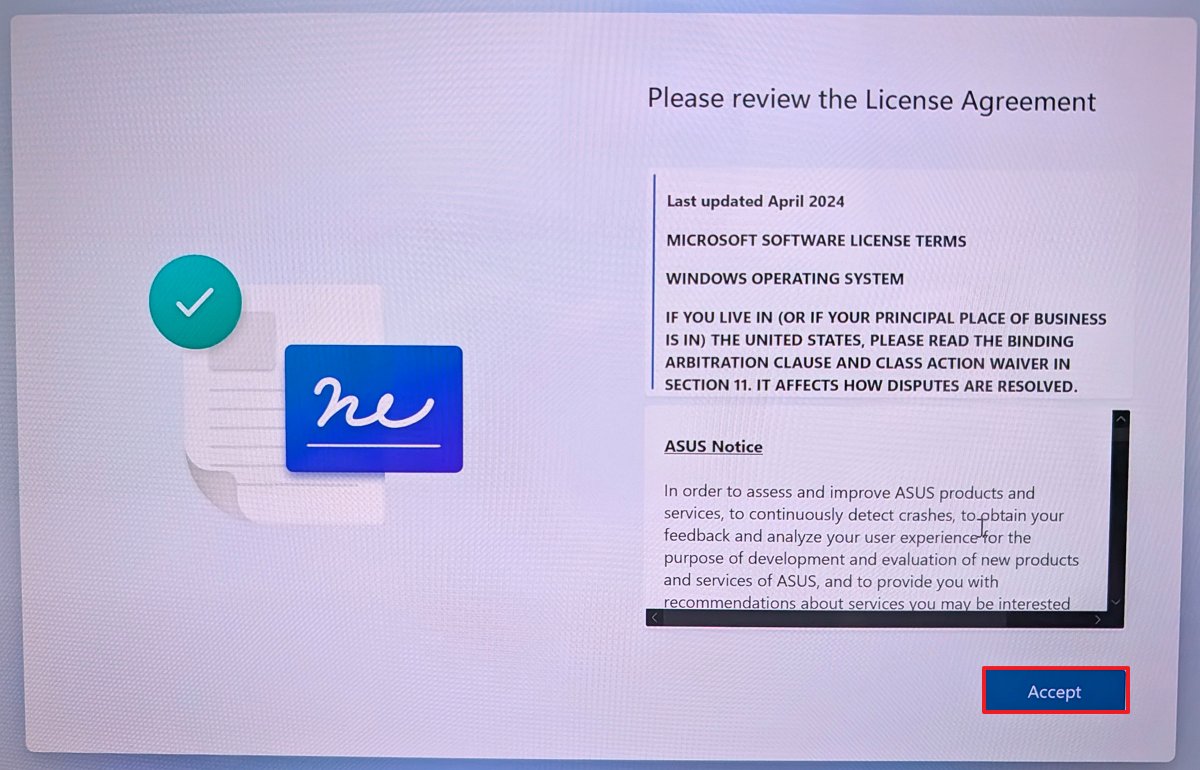
- Click the Accept button to accept the agreement (if applicable).
- Specify a name for the laptop (spaces are not allowed in the name).
- Quick tip: While assigning a name isn’t a requirement, I find this step important to make the computer easier to find in the network and on a Microsoft account.
- Click the Next button. (This action will cause the device to restart.)
- Select the “Set up for personal use” option for Windows 11 Pro. On the “Home” edition, this option is not available.

- Click the Next button.
- Click the Sign in button.
- Sign in with your email address to set up the primary Windows 11 account.
- Click the Next button.
- Confirm your account password.
- Click the Next button.
- Click the “Yes, set up” button to configure the Windows Hello Face authentication method.

- Click the Next button.
- Click the Create PIN button to configure Windows Hello PIN authentication if face recognition fails.
- Confirm the four-digit PIN.
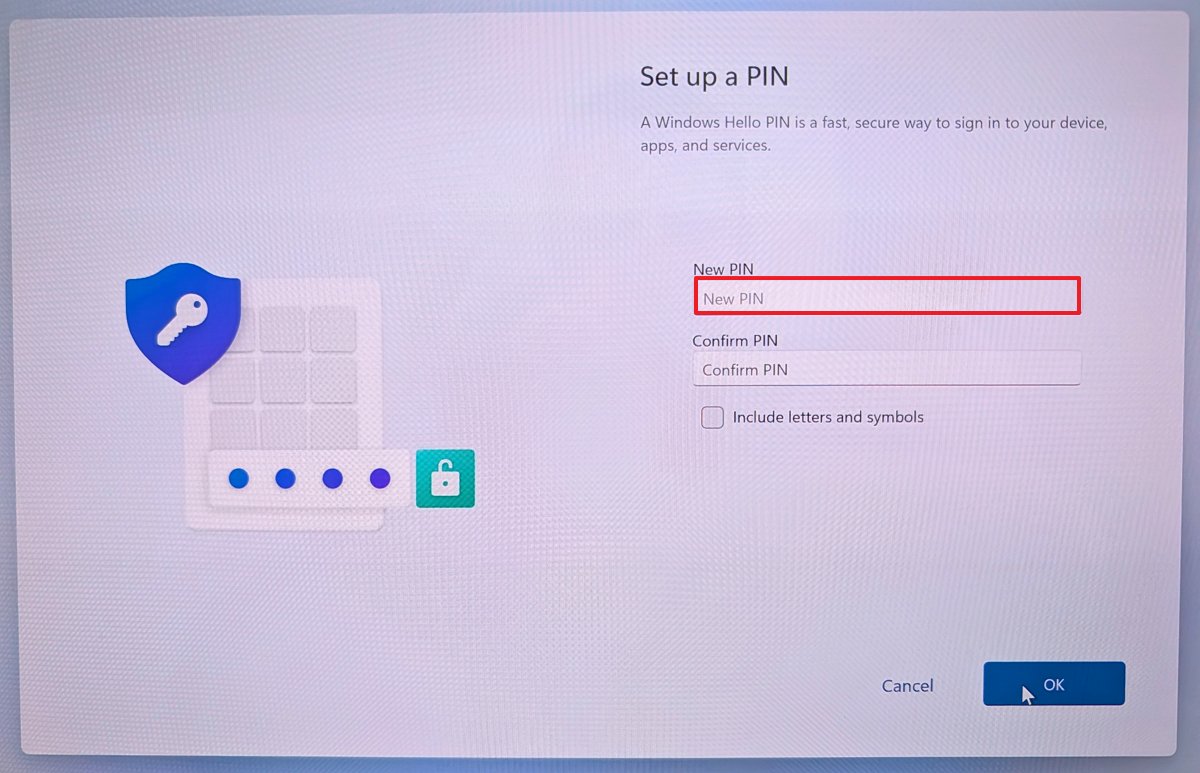
- Click the OK button.
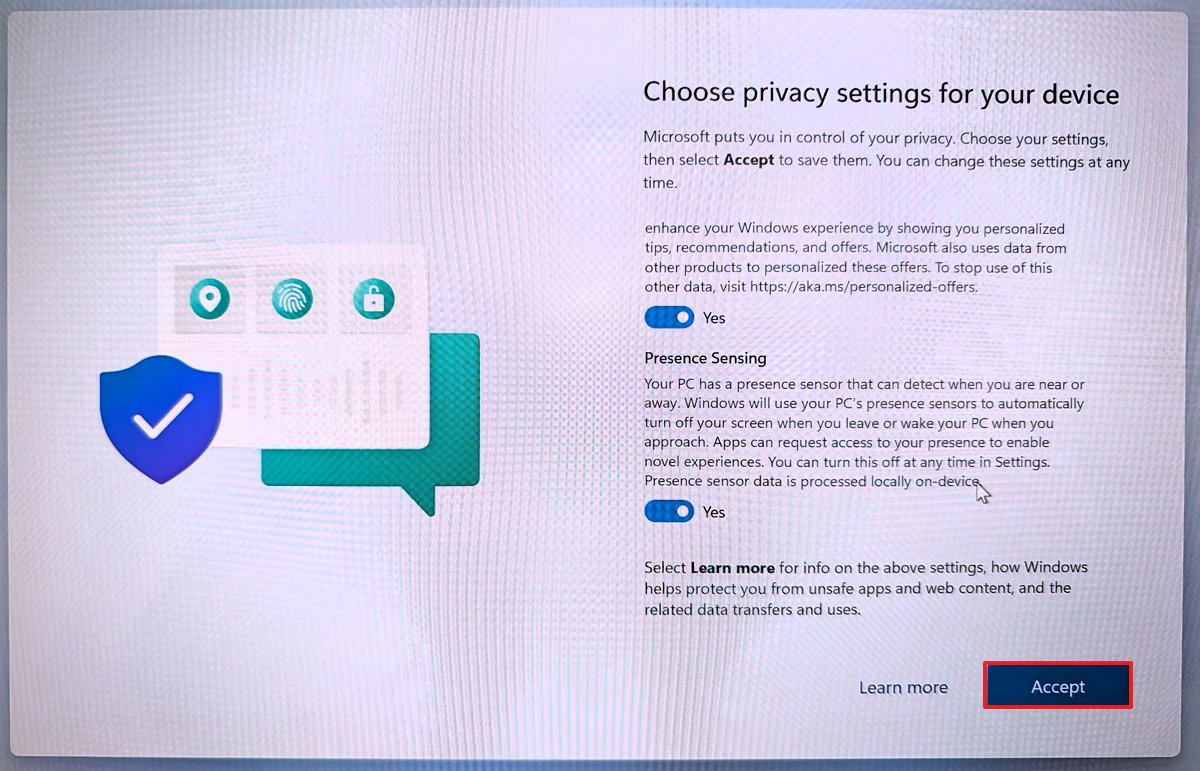
- Choose your privacy preferences (as applicable).
- Click the Accept button.
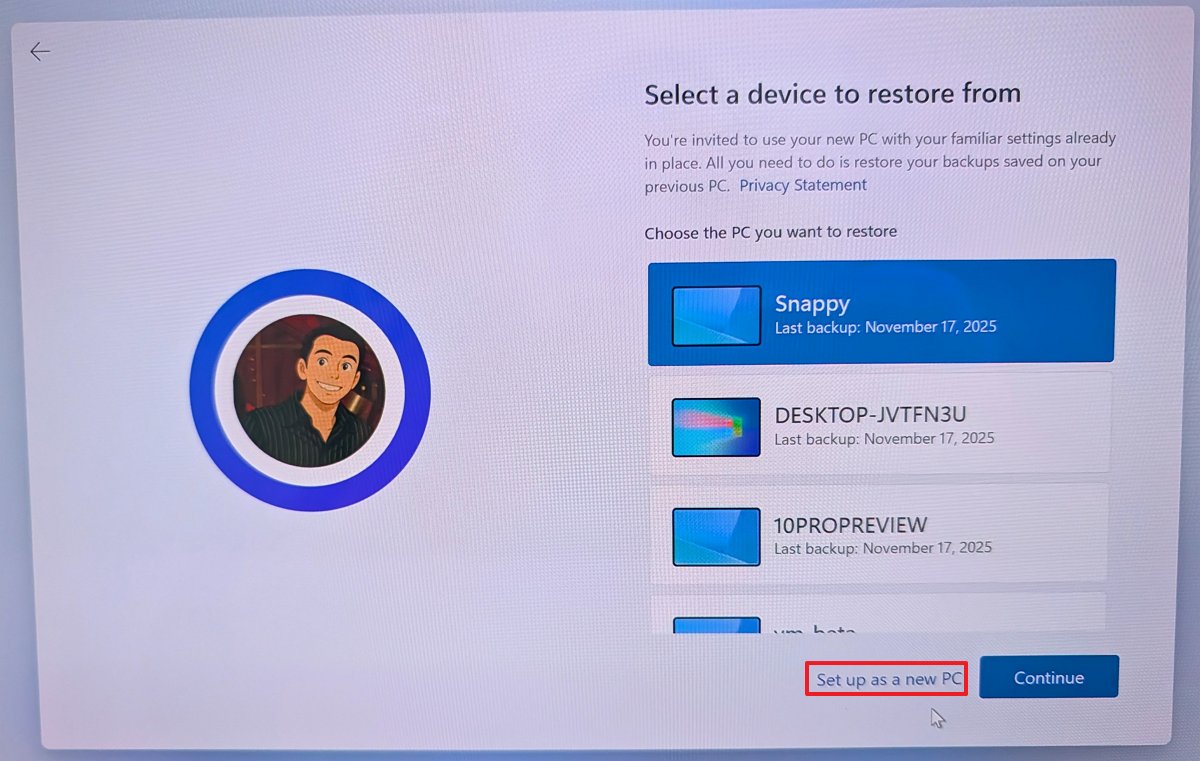
- Click the More options setting.
- Quick note: In this part of the setup, you can store your settings, credentials, OneDrive folders, and apps from the Microsoft Store you may have had on a previous device using the “Restore from this PC” option. However, I always prefer starting with a clean configuration, even more so on a new computer.
- Click the “Set up as a new PC” option.
- (Optional) Clear your information from the registration form.
- Quick note: Usually, manufacturers want you to register your device with them, but that’s optional. You can always clear all the information and click the Next button to continue.
- Clear all manufacturer’s options (if applicable).

- Click the Next button.
- (Optional) Select the different ways you plan to use your computer to allow the system to suggest tools and services.
- Click the Skip or Accept button if you selected any of these options.
- Click the Next button to skip the Microsoft 365 subscription.
- Click the Skip option to skip the mobile phone setup option.
- Click the Skip option again to skip the option to download OneDrive on your phone.
- Click the “Not now” button to prevent the operating system from importing your browser data to Microsoft Edge.
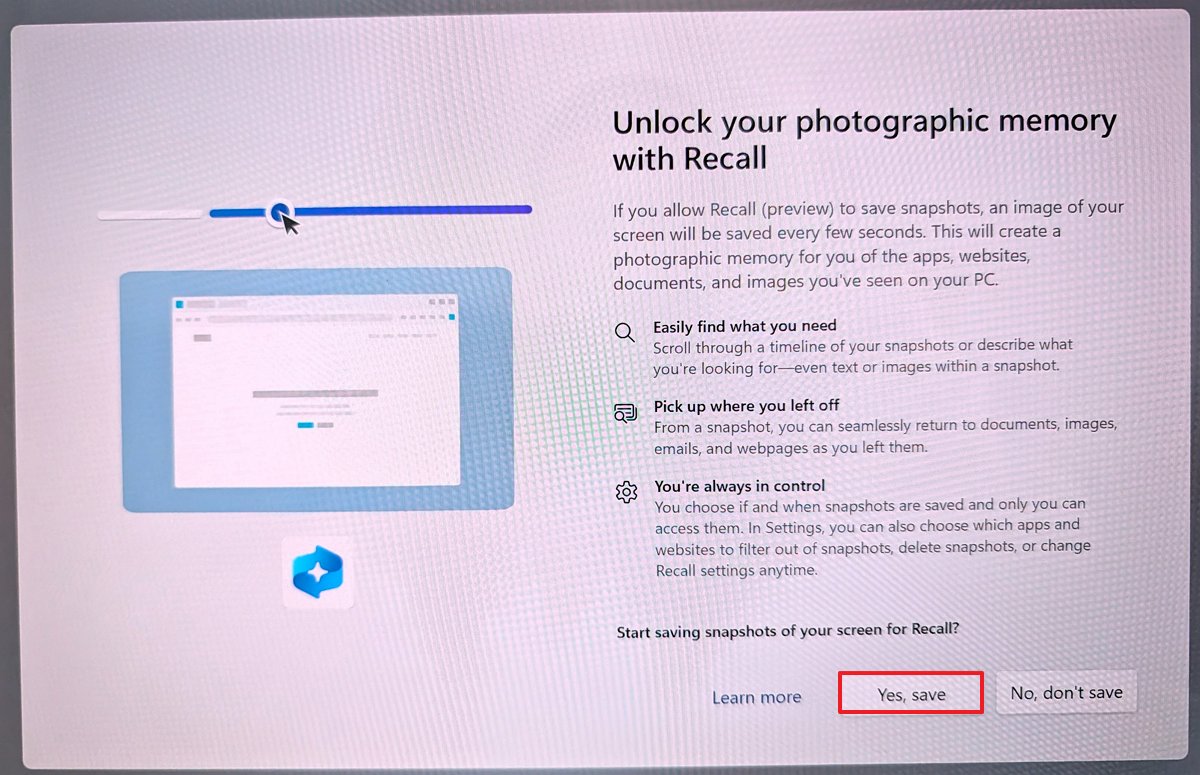
- (Optional) Click the “Yes, save” button to activate Windows Recall, or click the “No, don’t save” button to keep the feature disabled.
After you finish the setup steps, your Copilot+ PC will complete the process on its own, and you’ll be taken to your desktop.
These instructions are based on what most people using Copilot+ PCs with the 25H2 version will experience. While the exact steps might vary slightly depending on your specific PC or operating system version, the overall process should remain the same.
If you’d like to stick with your current settings, follow the steps below to remove any apps you don’t use. Or, if you prefer a fresh start, you can choose to reinstall Windows 11 completely.
Uninstall unwanted applications
If you’re planning to continue using your current setup, it’s a good idea to remove any pre-installed apps that came with your computer. This will free up storage space and help your system run more smoothly.
To uninstall pre-installed apps on Windows 11, use these steps:
- Open Settings.
- Click on Apps.
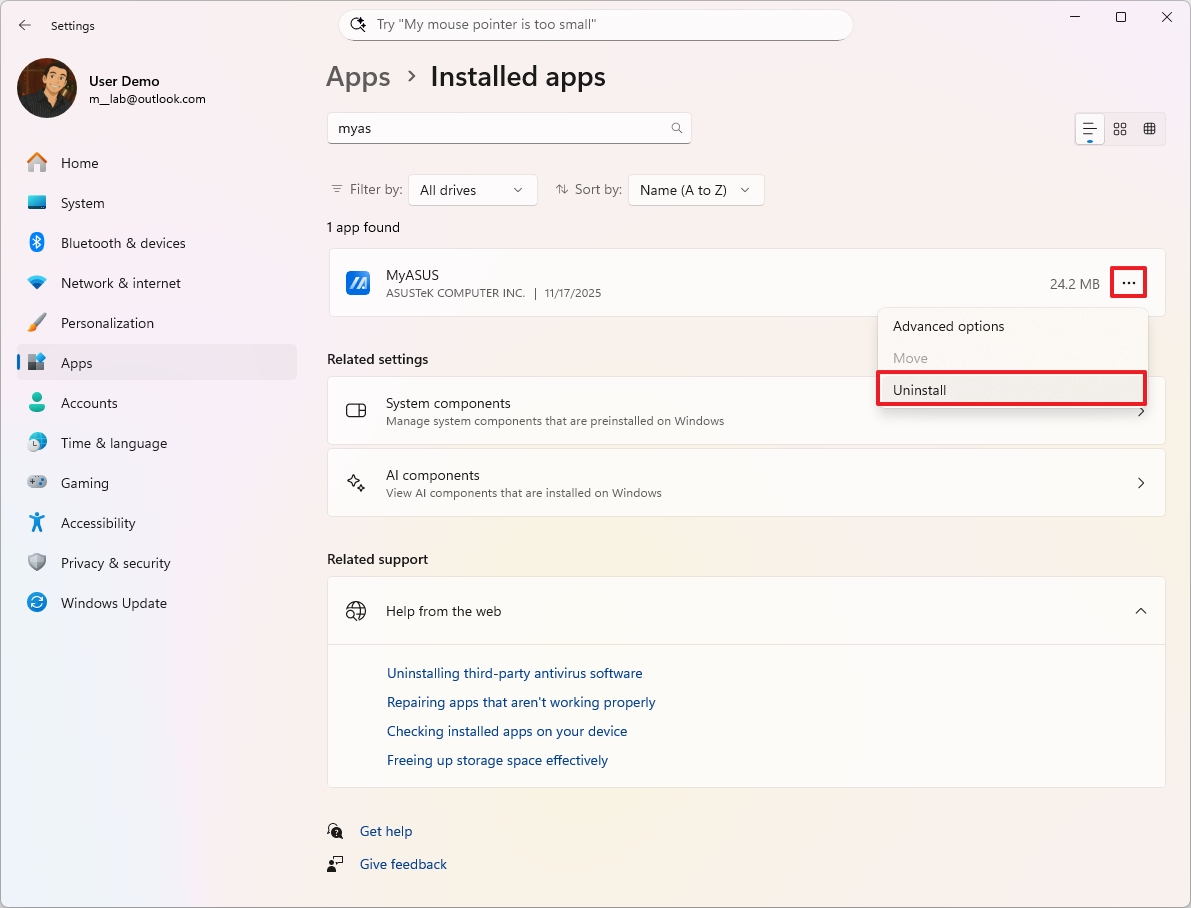
- Click the Installed apps page on the right side.
- Select the unwanted app, click the (three-dotted) menu button on the right, and select the Uninstall button.
- Click the Uninstall button again.
- Continue with the on-screen directions (if applicable).
After you complete the steps, you should repeat the instructions to uninstall other unwanted apps.
Clean installation set up
While the initial setup might come with some things you don’t need, it should work for most people. For the best results, though, it’s recommended to reset everything and install a clean copy of the operating system.
The main downside of starting with a fresh installation is that you’ll likely need to spend extra time setting up your devices and preferences again.
To start fresh with a clean installation on your new Copilot+ PC, use these steps:
- Open Settings.
- Click on System.
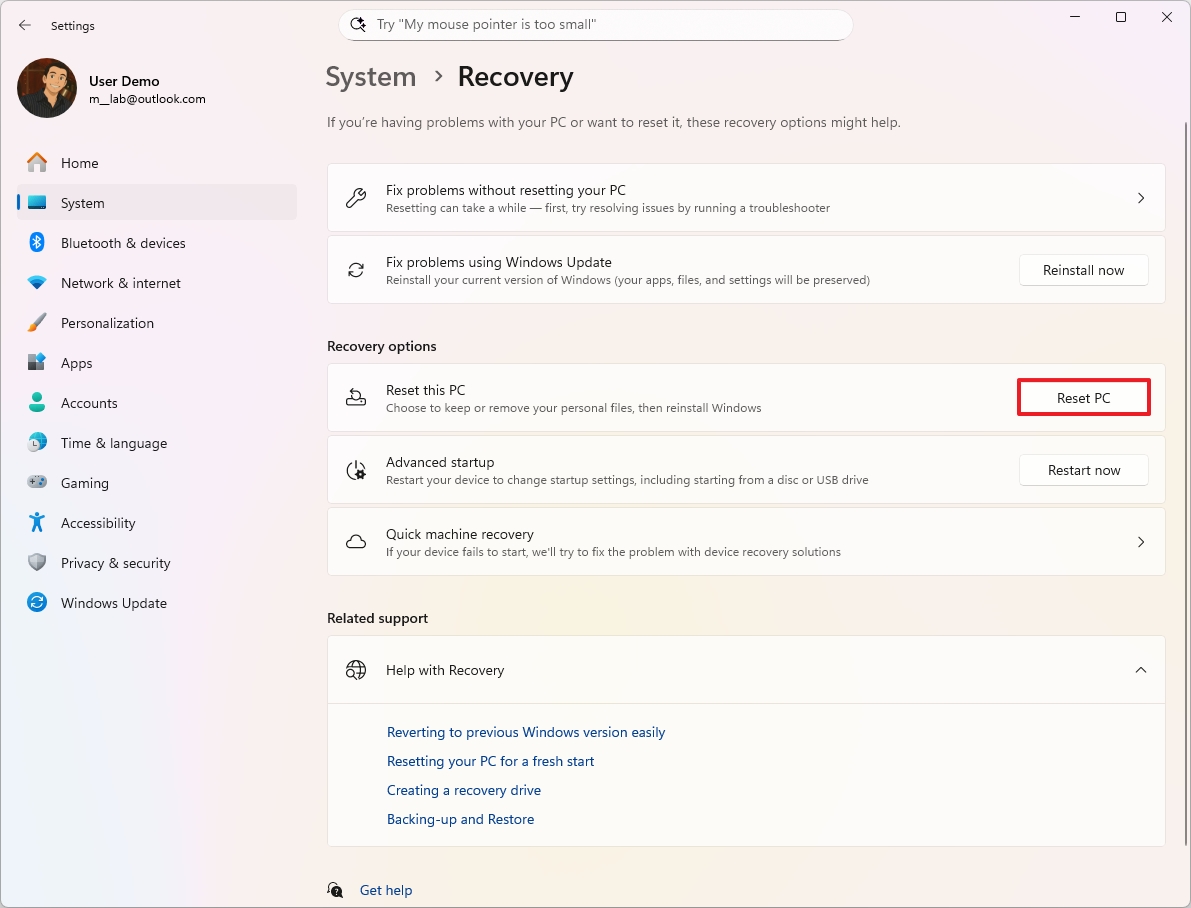
- Click the Recovery page on the right side.
- Click the Reset PC button for the “Reset this PC” feature under the “Recovery options” section.
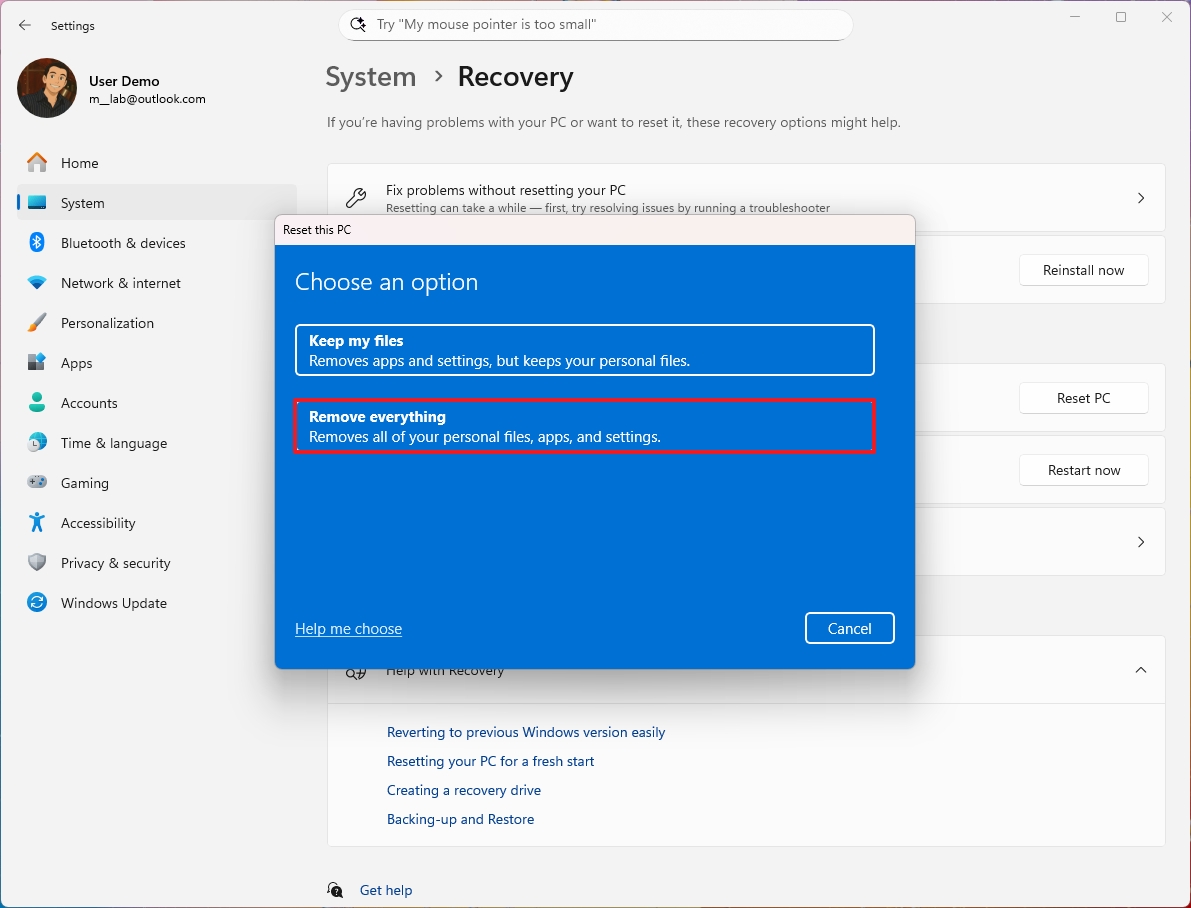
- Click the Remove everything option.
- Click the Cloud download option.
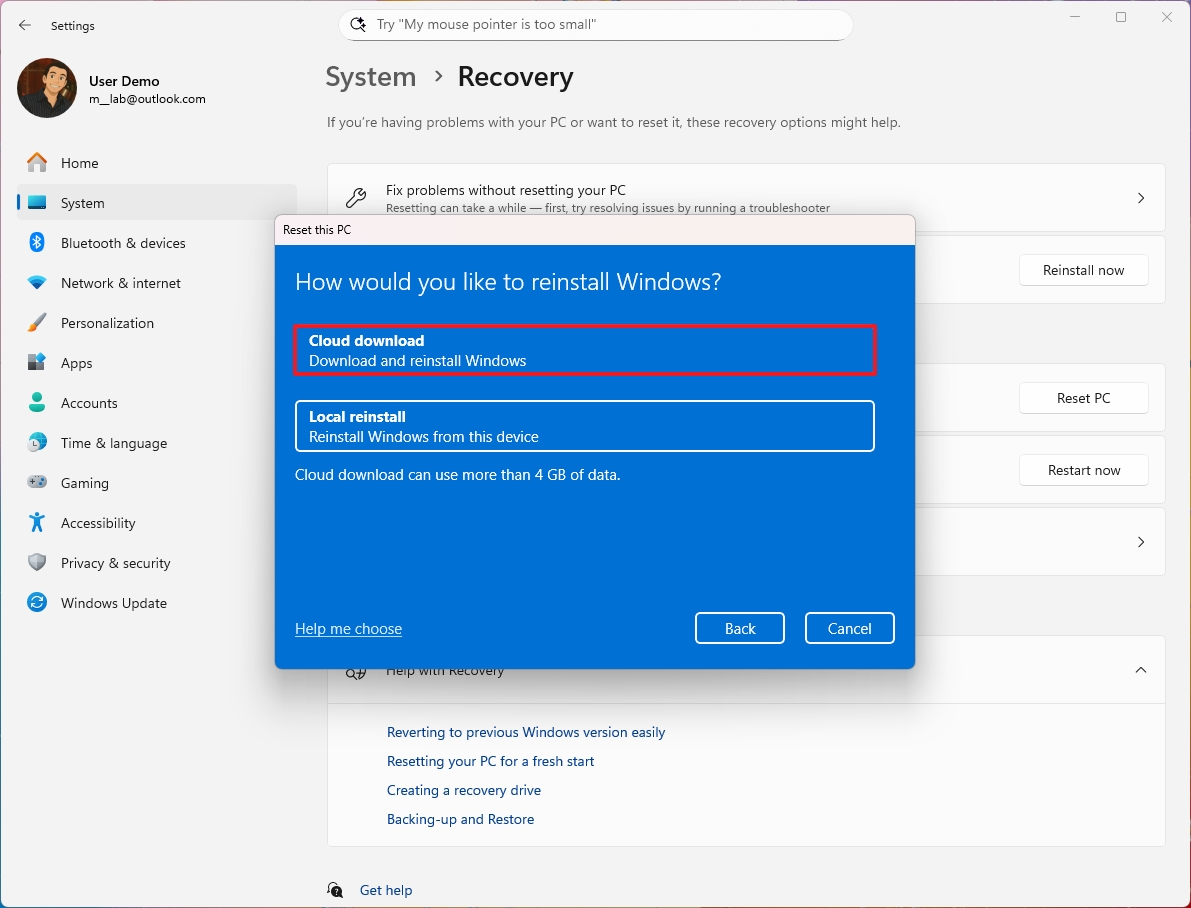
- Click the Next button.
- Click the Reset button.
After you finish the steps, the system will download a new version of the operating system directly from Microsoft and begin a fresh installation.
Okay, so once you’ve installed it, you’ll need to do a quick setup. It’s pretty straightforward – you just get to pick how you want things to work and create your main account, just like the instructions showed earlier.
How to install updates on a Copilot+ PC
Windows 11 automatically downloads and installs updates, but it’s still a smart move to check for updates yourself to make sure your device has everything it needs.
To update your new computer running Windows 11, use these steps:
- Open Settings.
- Click on Windows Update.
- Click the “Check for updates” button.
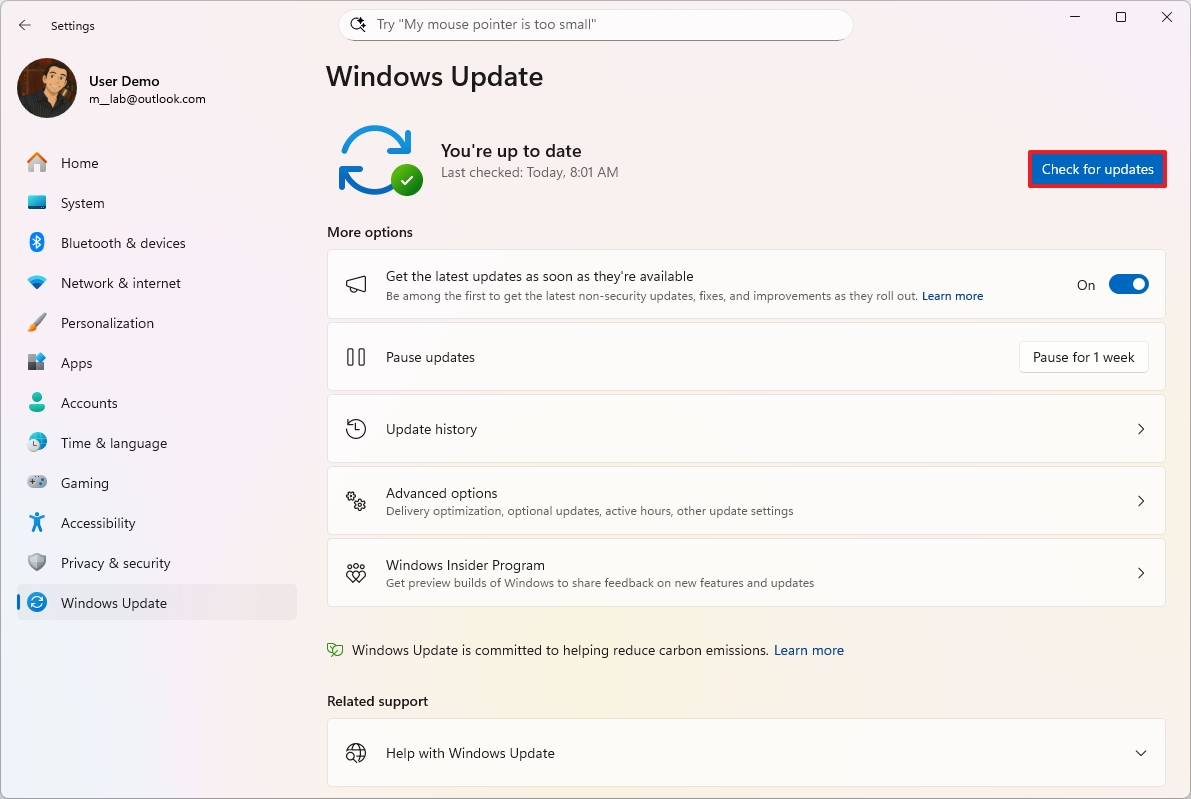
- Click the Restart now button.
Once you finish these steps, any available updates will download and install themselves automatically.
How to check drivers on a Copilot+ PC
During setup, make sure all parts and devices are installed properly.
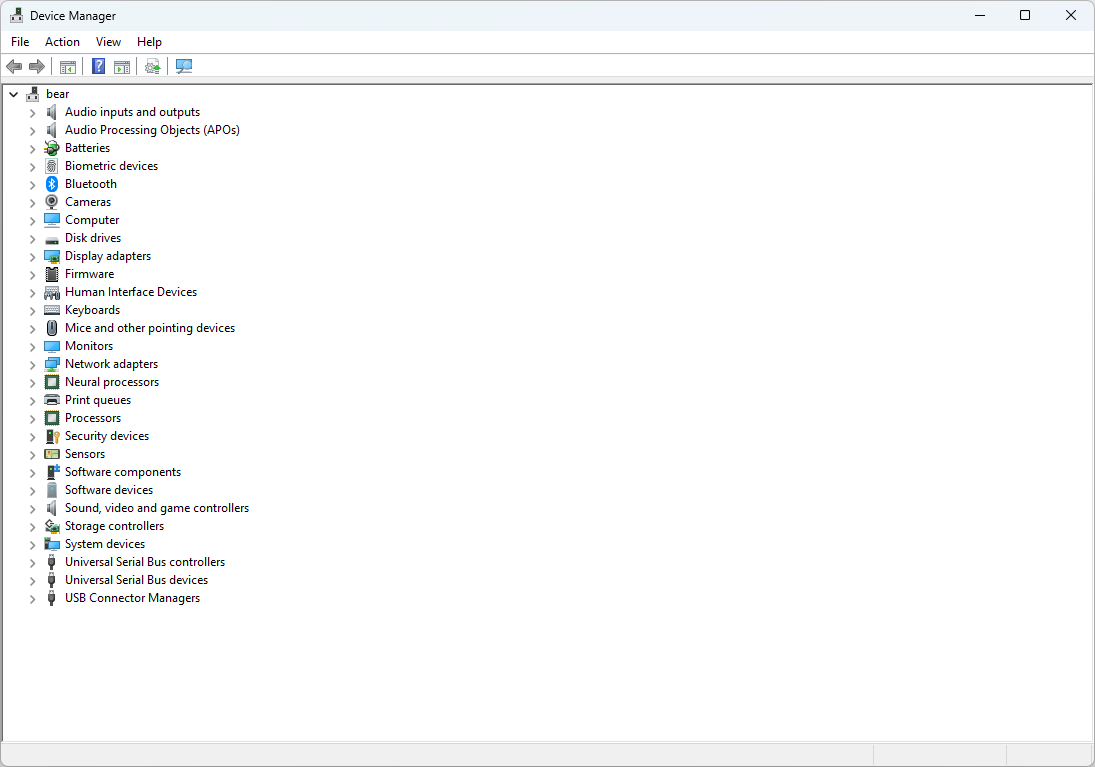
Device Manager
To check that none of the devices are missing or having problems with drivers, use these steps:
- Open Start.
- Search for Device Manager and click the top result to open the app.
- Confirm that none of the devices have a yellow or red mark, and confirm that nothing shows up as unknown.
If certain parts of your computer aren’t working correctly, you might need to update their drivers. You can find the newest drivers on the support website for your computer’s brand.
Windows Update
If you’re having trouble with a driver on your Copilot+ PC, or if it’s missing, Windows Update can often resolve the problem.
To install or update drivers on Windows 11, use these steps:
- Open Settings.
- Click on Windows Update.
- Click the Advanced options page on the right side.
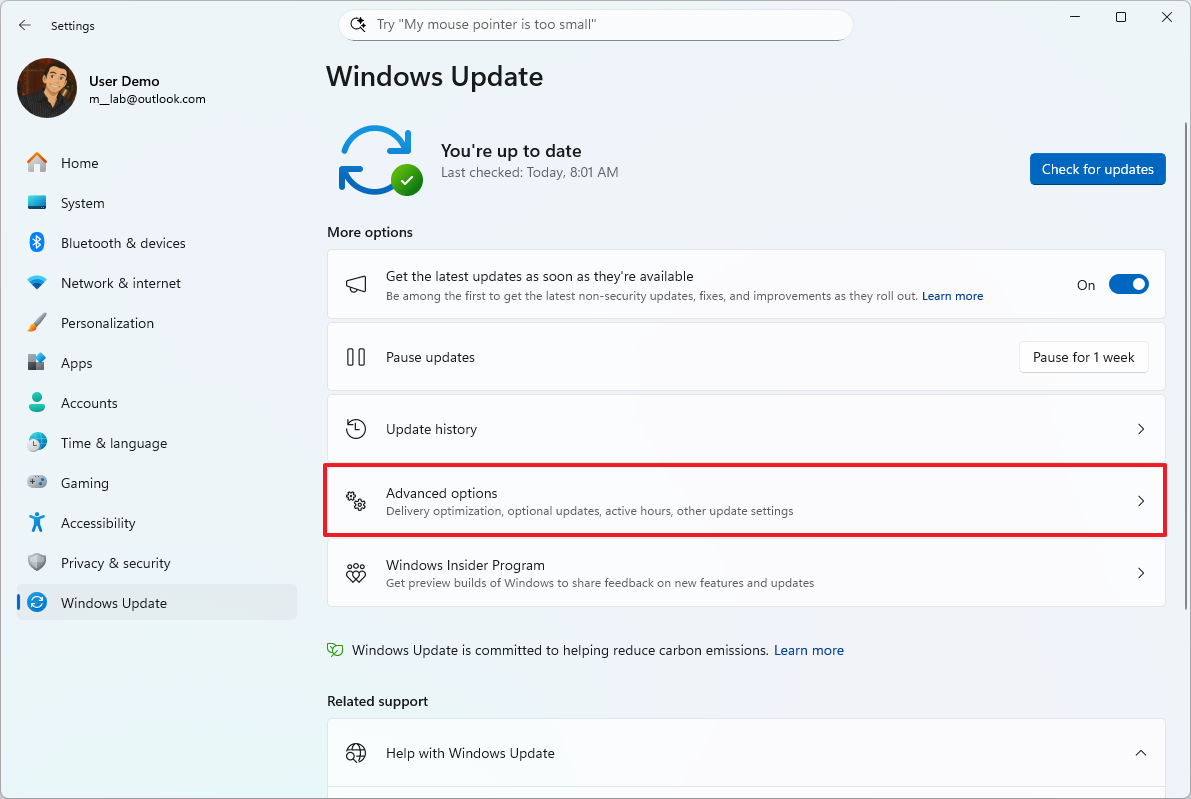
- Select the Optional updates setting under the “Additional updates” section.
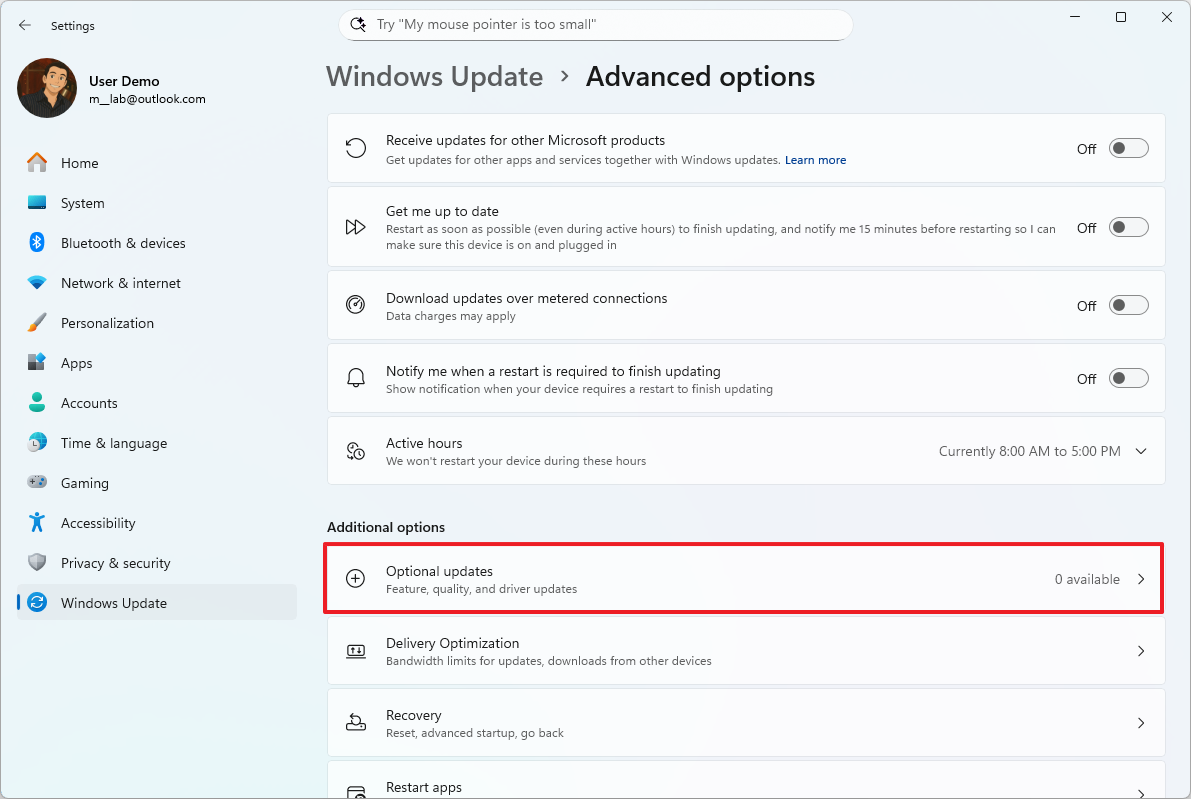
- Select the Driver updates section.
- Check which drivers to install in the new Windows 11 setup.
- Quick note: If the page shows no driver updates, it means that Microsoft doesn’t have any additional updates for your specific hardware configuration at that particular time.
- Click the Download and install button.
Once you complete the steps, Windows Update will automatically download and install the drivers.
As an analyst, I often advise users that if Device Manager flags an issue with a piece of hardware and Windows Update doesn’t offer a solution, the next best step is to visit the manufacturer’s website. They usually have the latest drivers available for direct download.
How to personalize desktop on a Copilot+ PC
Once everything is set up and updated, you can customize your computer to fit how you like to work. This includes things like changing your wallpaper, choosing a light or dark mode, picking a favorite color scheme, and arranging the Start menu and Taskbar to help you be more efficient.
Change theme
A theme lets you easily customize how your desktop and apps look by changing the colors and images.
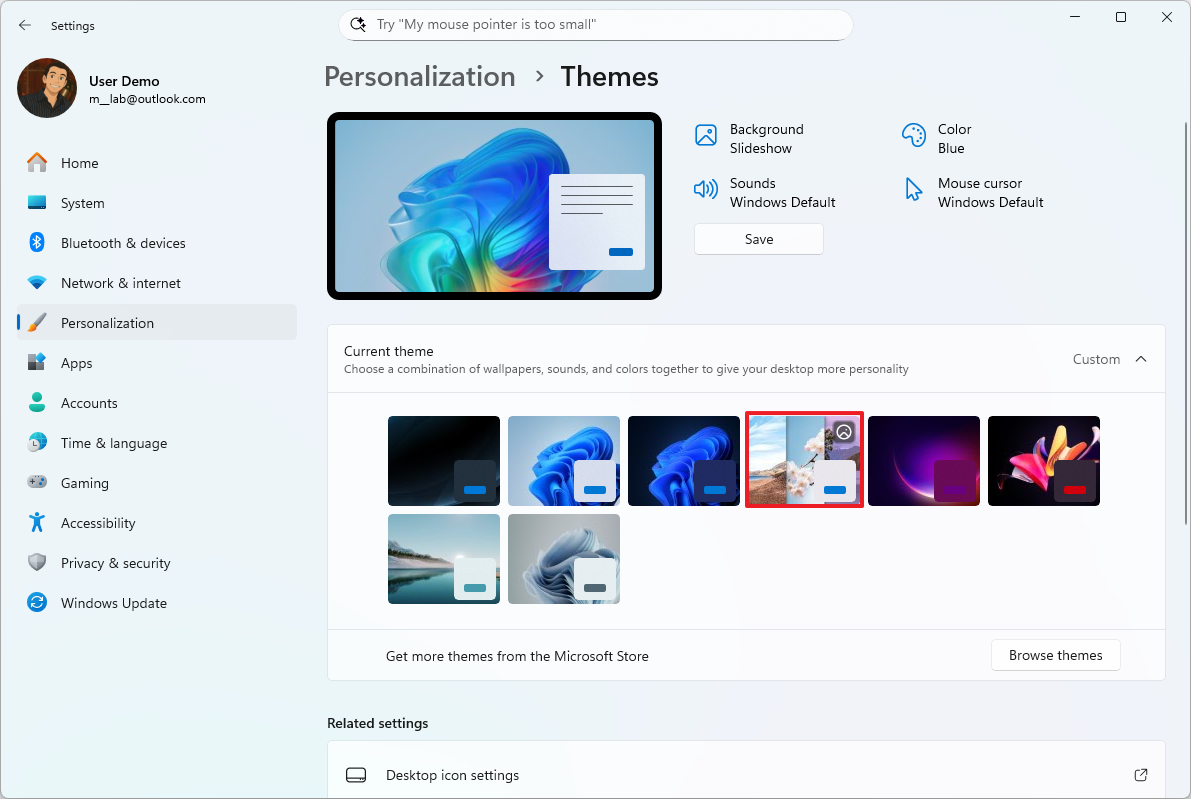
To change the theme, use these steps:
- Open Settings.
- Click on Personalization.
- Click the Themes page on the right side.
- Choose one of the available themes to apply it.
After you finish setting it up, the theme will automatically adjust your computer’s colors and background to match its design.
Install themes
To add more themes to your device, use these steps:
- Open Settings.
- Click on Personalization.
- Click the Themes page on the right side.
- Click the Browse themes button under the “Current theme” section.

- Select the theme to download.
- Click the Get button.
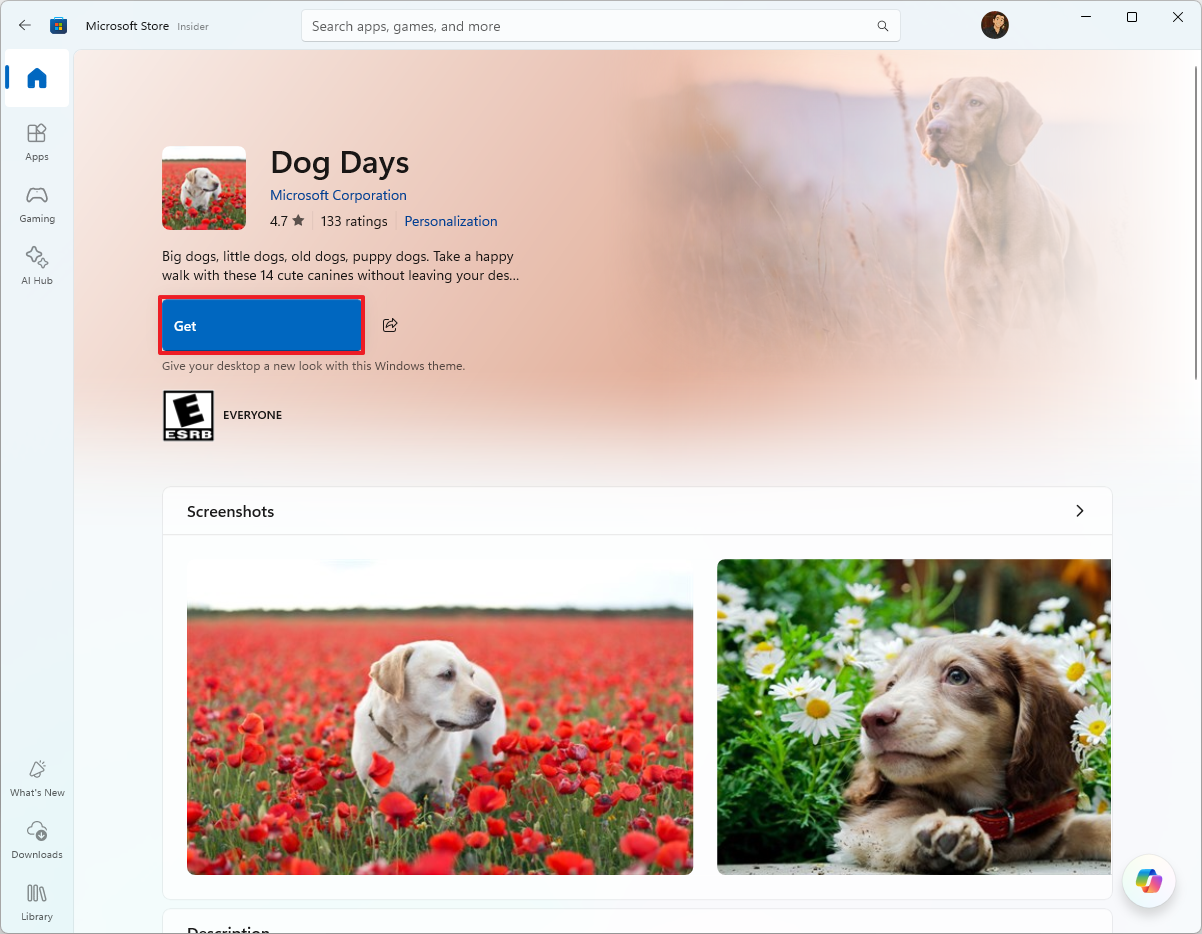
- Click the Open button.
- Choose one of the available themes to apply it.
After you complete the steps, the theme will be downloaded and applied to your desktop.
Change color mode
Windows 11 lets you choose between a light and a dark color scheme. Dark Mode is especially helpful when you’re working in dim environments.
To change the color mode on your Copilot+ PC, use these steps:
- Open Settings.
- Click on Personalization.
- Click the Colors page on the right side.
- Use the “Choose your mode” drop-down menu and select one of the available options.
- Light – Applies a light color scheme across the system and apps.
- Dark – Applies a dark color scheme across the system and apps.
- Custom – Allows you to decide the color mode for apps and the system separately.
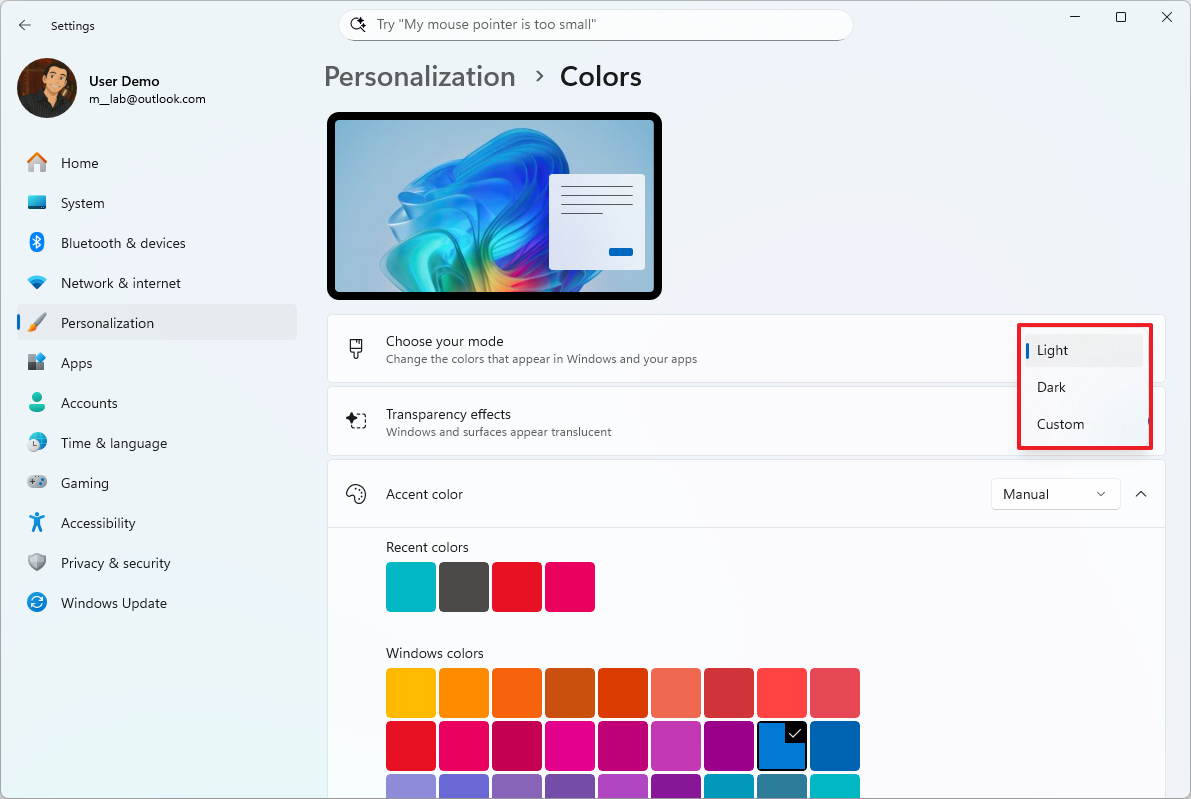
After you finish the steps, your Start menu, Taskbar, and other interface elements will change to the color you’ve chosen.
Change accent color
The accent color feature allows you to choose a color that complements your current theme for things like buttons and highlights.
To change the system accent color on your Copilot+ PC, use these steps:
- Open Settings.
- Click on Personalization.
- Click the Colors page on the right side.
- Select the accent color for the experience under the “Accent color” section.
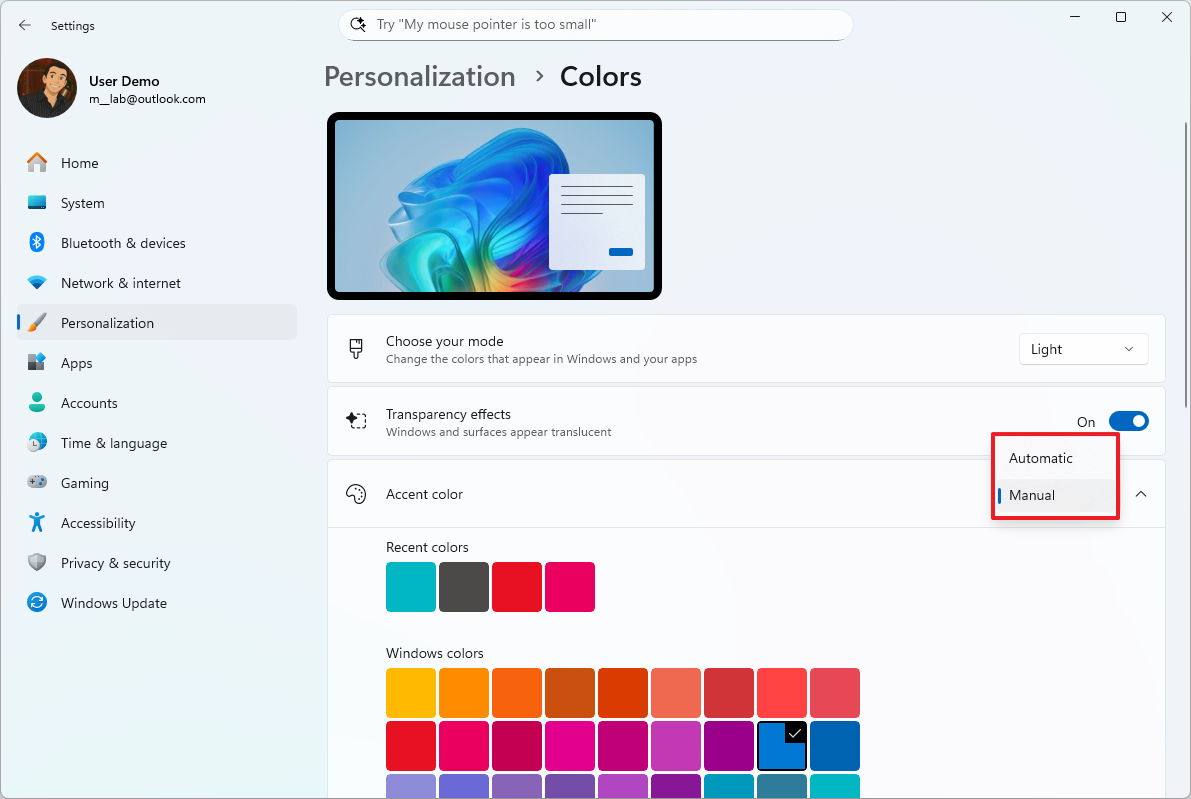
- Quick tip: You can use the Custom color setting to create a custom accent color.
- (Optional) Select the Automatic option under the “Accent color” section to let the system set a color scheme based on the wallpaper’s colors.
- (Optional) Turn on the “Show accent color on Start and taskbar” toggle switch to show different colors in the Start menu and Taskbar elements.
- Quick note: This option is only available when using the “Custom” option for the “Choose your mode” setting and you select the “Dark” option for the “Choose your default Windows mode” setting.
- (Optional) Turn on the “Show accent color on title bars and window borders” toggle switch to show different colors around the application frame.
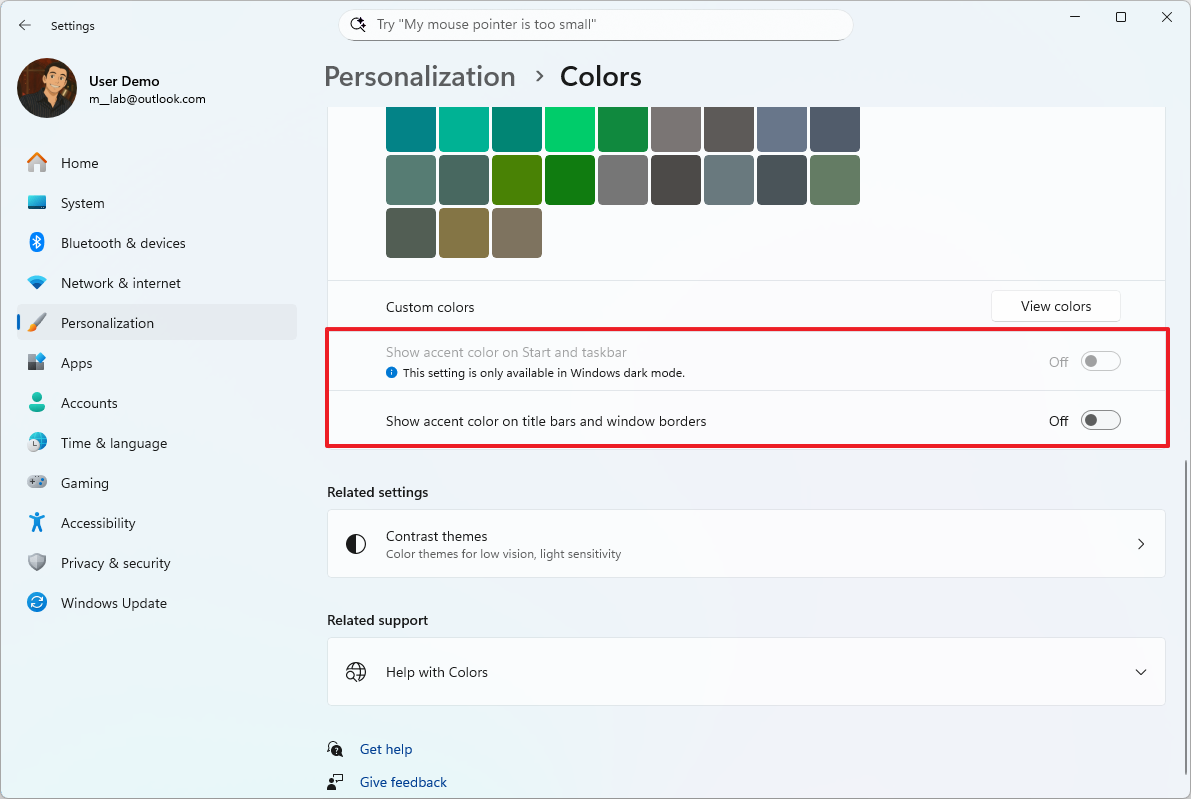
Once you’ve finished the setup, things like buttons, links, and icons will change to match the new accent color you’ve chosen. If you’ve turned on the setting to show accent colors on window title bars and borders, you’ll also see the new color in those areas, as well as in the Start menu and Taskbar. You can find this setting on the Colors page in Settings.
Custom or dynamic background images
In Windows 11, you can personalize your desktop background by choosing your own pictures or by using the Spotlight feature, which automatically updates your wallpaper with new images.
Custom image
To use a custom background image on your Copilot+ PC, use these steps:
- Open Settings.
- Click on Personalization.
- Click the Background page on the right side.
- Select the Picture option from the “Personalize your background” menu.
- Click the Browse photos button to select an image.
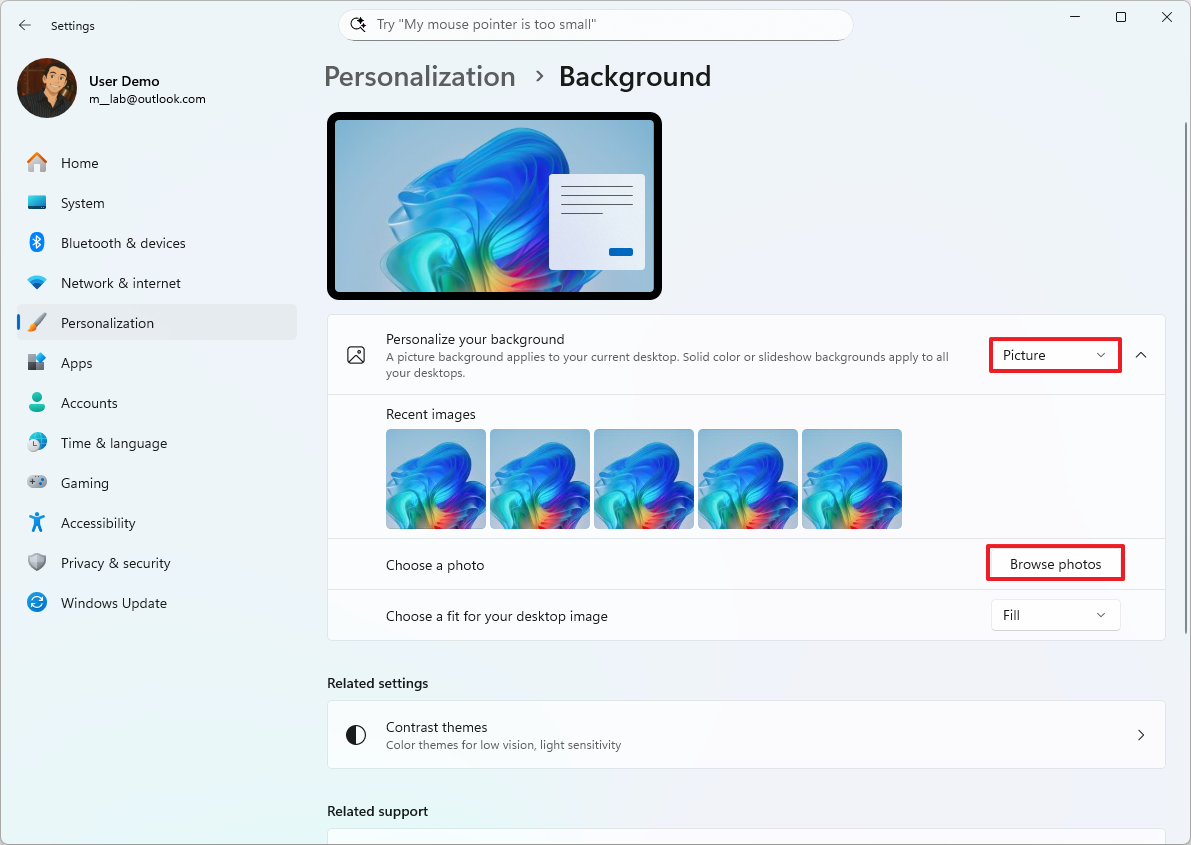
- Select the fit that best suits the images from the “Choose a fit for your desktop image” menu, including Fill, Fit, Stretch, Center, or Span.
Once you complete the steps, the new custom image will appear in the desktop background.
Dynamic images with Spotlight
To enable Spotlight on Windows 11, use these steps:
- Open Settings.
- Click on Personalization.
- Click the Background page on the right side.
- Select the “Windows Spotlight” option from the “Personalize your background” menu.
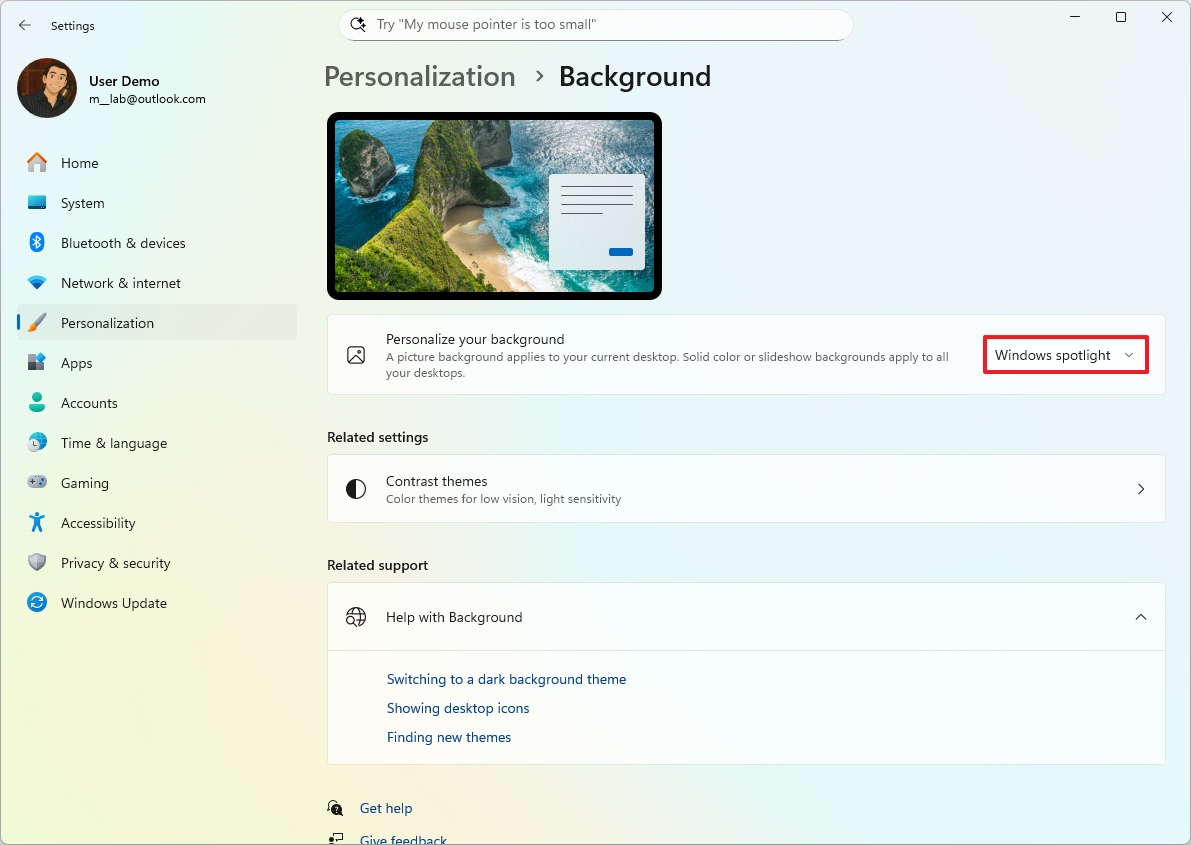
Once you’ve finished the setup, your desktop background will automatically change throughout the day.
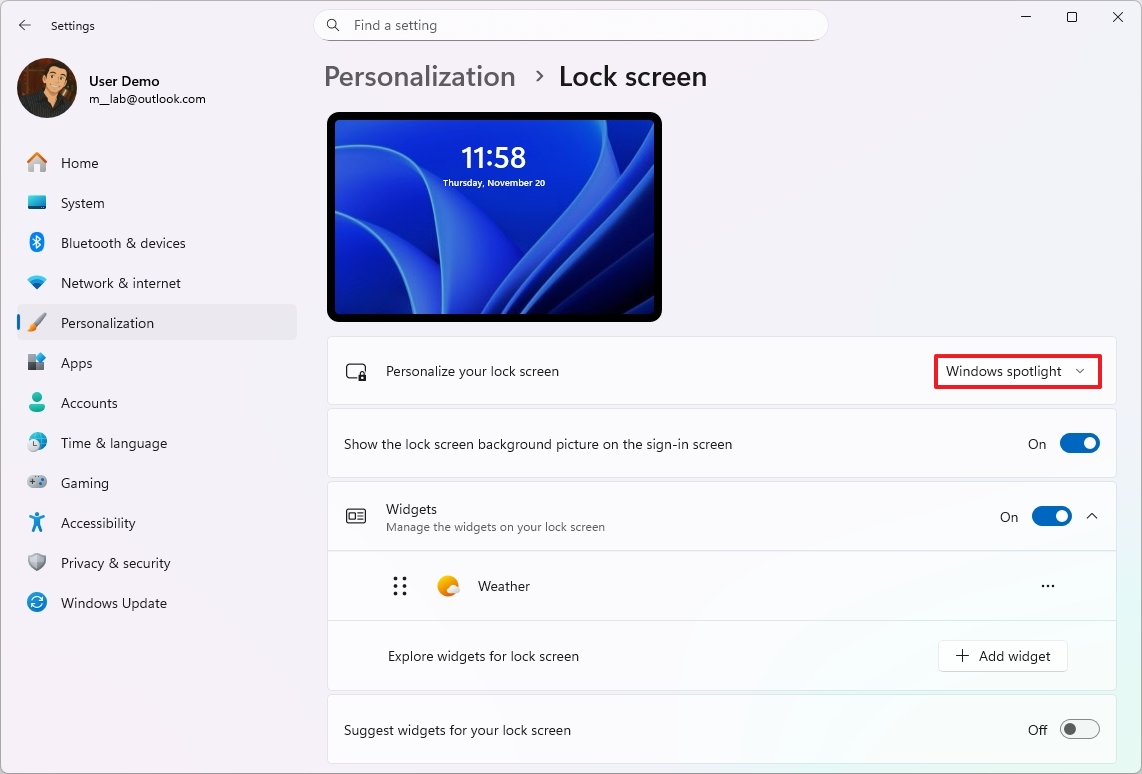
Customize Lock screen
You can also customize the Lock screen background and widgets.
To customize the Lock screen on your new Copilot+ PC, use these steps:
- Open Settings.
- Click on Personalization.
- Click the Lock screen page on the right side.
In the Lock screen settings, you can customize the background image and widgets.
By default, your lock screen features Windows Spotlight, which automatically changes the background image each time you sign in. But you can easily personalize it! You can choose a single image you like using the “Picture” option, or create a rotating collection of favorites with the “Slideshow” option.
If you choose the “Slideshow” option for your Lock screen, Windows 11 will automatically start with the pictures in your “Pictures” folder. But you can easily customize which folders are included – add new ones or remove existing ones. If you have a Copilot+ PC or use OneDrive, you can also include photos from your camera roll.
You can also set up a slideshow to appear on your Lock screen when you’re not using your device.
The Lock Screen normally displays widgets with information like the weather and news. If you prefer, you can easily turn this off by toggling the “Widgets” switch.
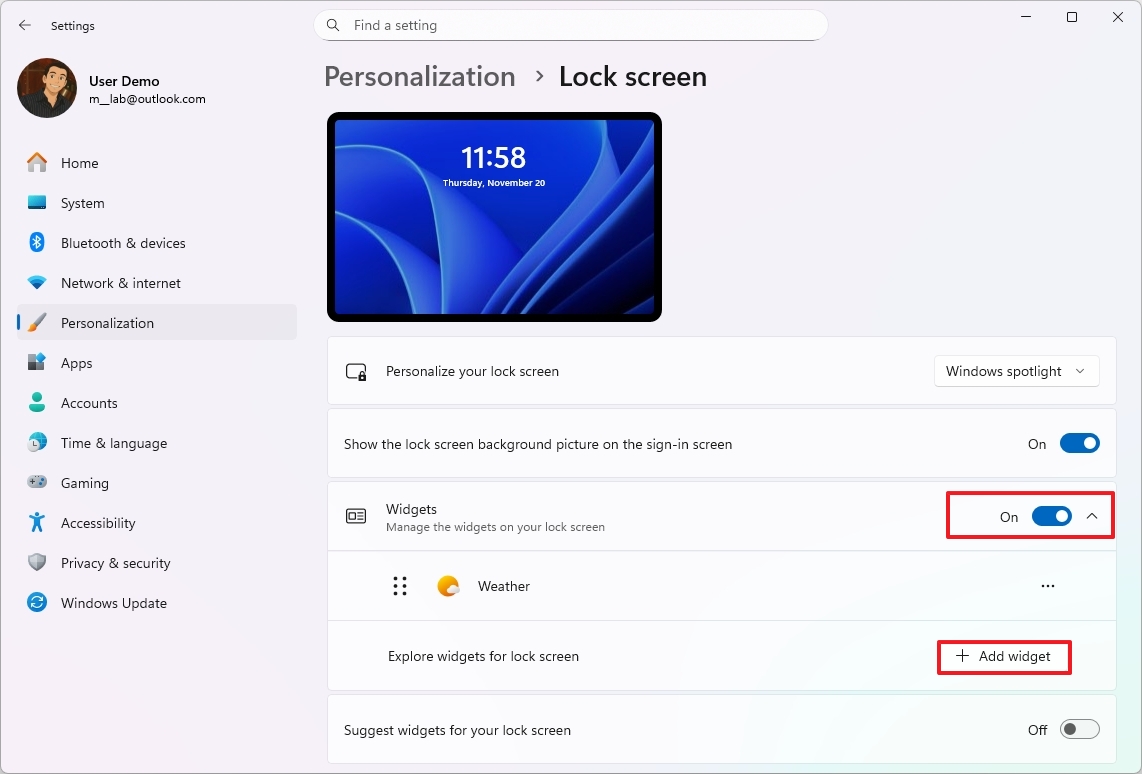
You can also customize what appears on your lock screen by adding or removing widgets. Use the “Add widget” button to include new ones, or the “Remove” option in a widget’s menu to take them away.
Customize Start menu
Beginning with the November 2025 update, Windows 11 will feature a fresh Start menu look and updated settings. You’ll now have the option to hide the ‘Recommended’ section if you prefer.
Recommendations
Windows 11 now lets you hide recently opened apps and files from the Start menu, and also turn off suggestions for apps from the Microsoft Store. Here’s how to do it:
- Open Settings.
- Click on Personalization.
- Click the Start page on the right side.
- Turn off the “Show recently added apps,” “Show recommended files in Start, recent files in File Explorer, and items in Jump lists,” “Show recommendations for tips, shortcuts, new apps, and more,” and “Show websites from your browsing history” toggle switches to disable the “Recommended” section.
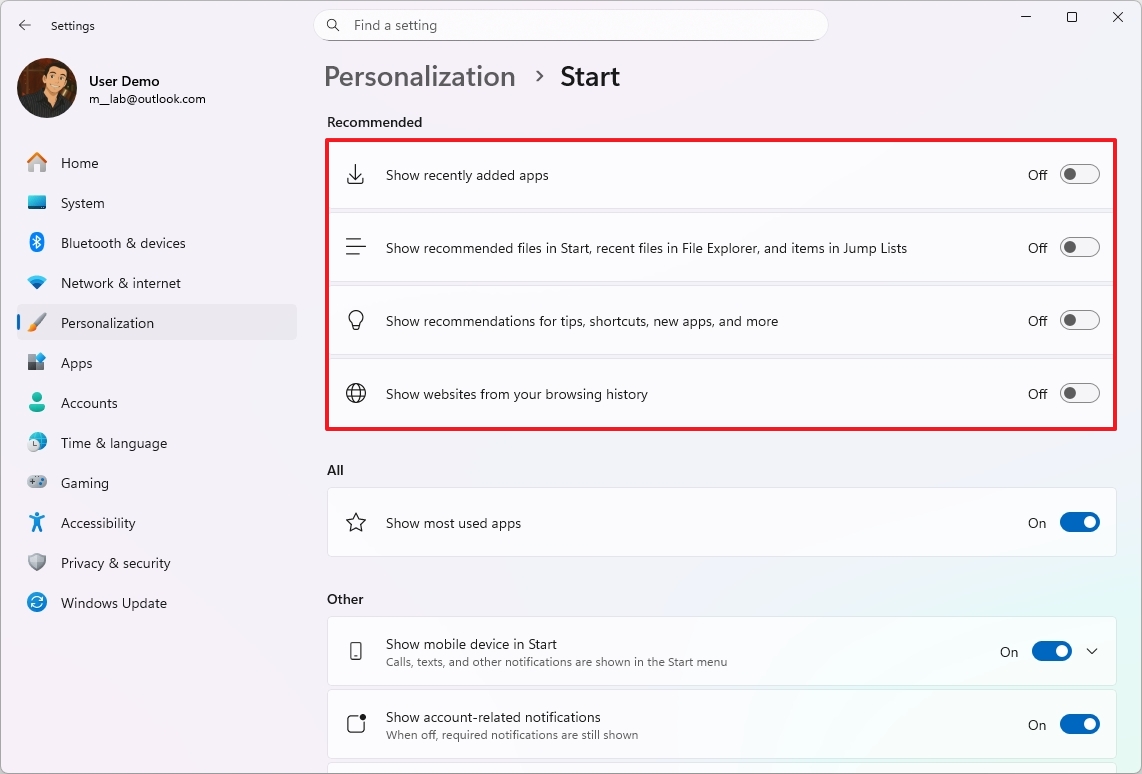
Once you complete the steps, the Start menu will stop showing recommendations for files and apps.
Folders
In the Start menu, you can create folders to organize your apps in groups, and here’s how:
- Open Start.
- Drag an app on top of another app to create a folder.
- Continue dragging more apps to add them to the folder.

- Click the folder to open it.
- Click on Edit name.
- Confirm a name for the folder and press Enter.

You can change the order of apps within a folder to refresh how it looks. To delete the folder, simply drag each app out of it, one at a time.
Pins
The Start menu’s “Pinned” section lets you list your favorite apps for quick access.
To organize apps in the “Pinned” section, use these steps:
- Open Start.
- Right-click the app for the “All” section and select the “Pin to Start” option.
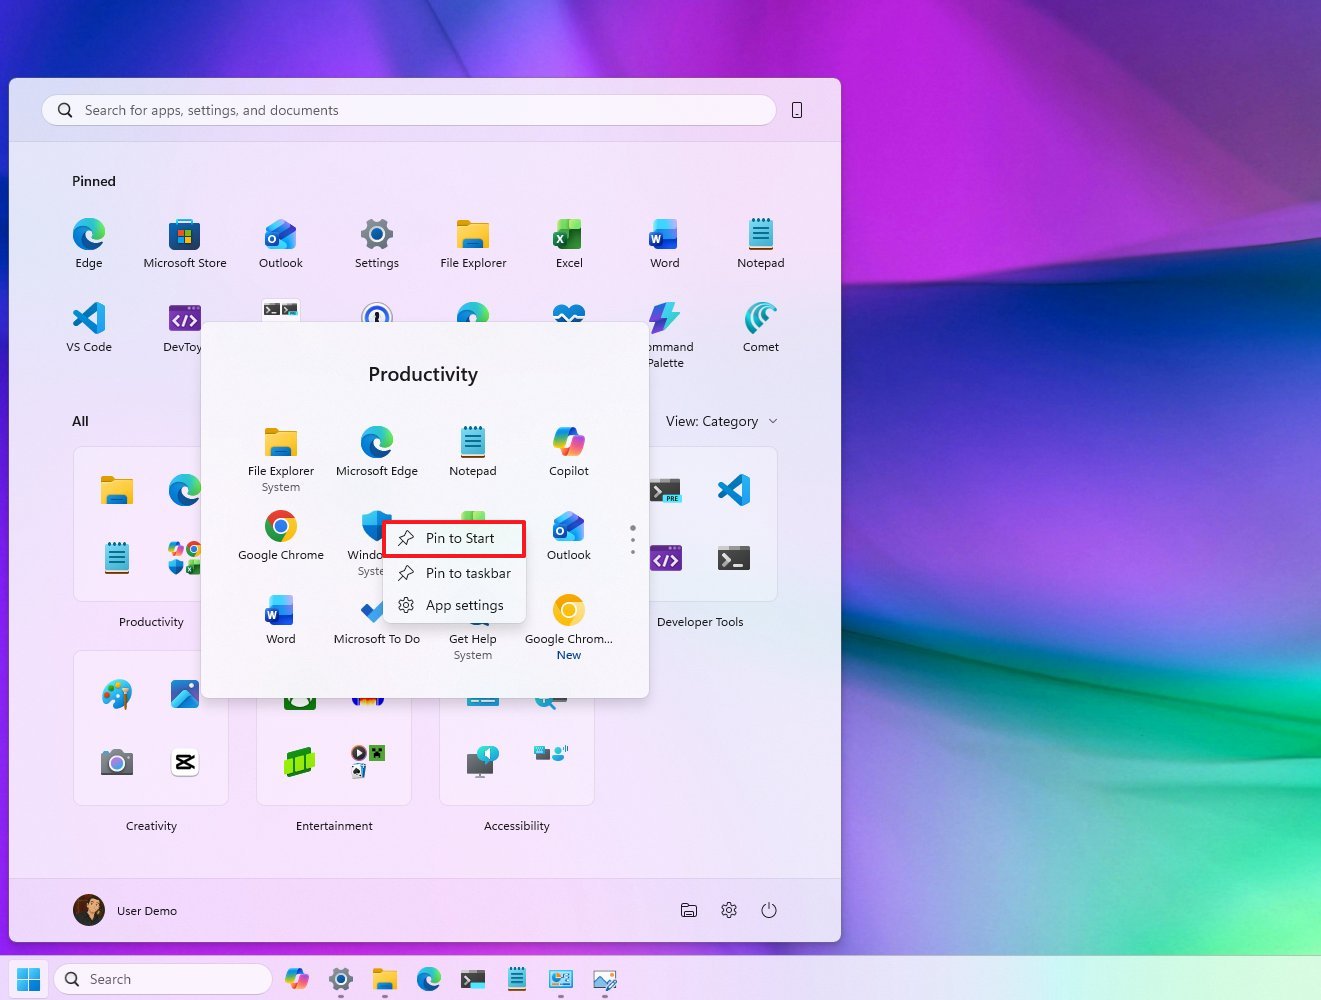
- Repeat step 3 to pin more apps.
- Right-click an app and select the “Unpin from Start” option to remove the app pin.
After you complete the steps, the menu will only show your favorite apps in the “Pinned” section.
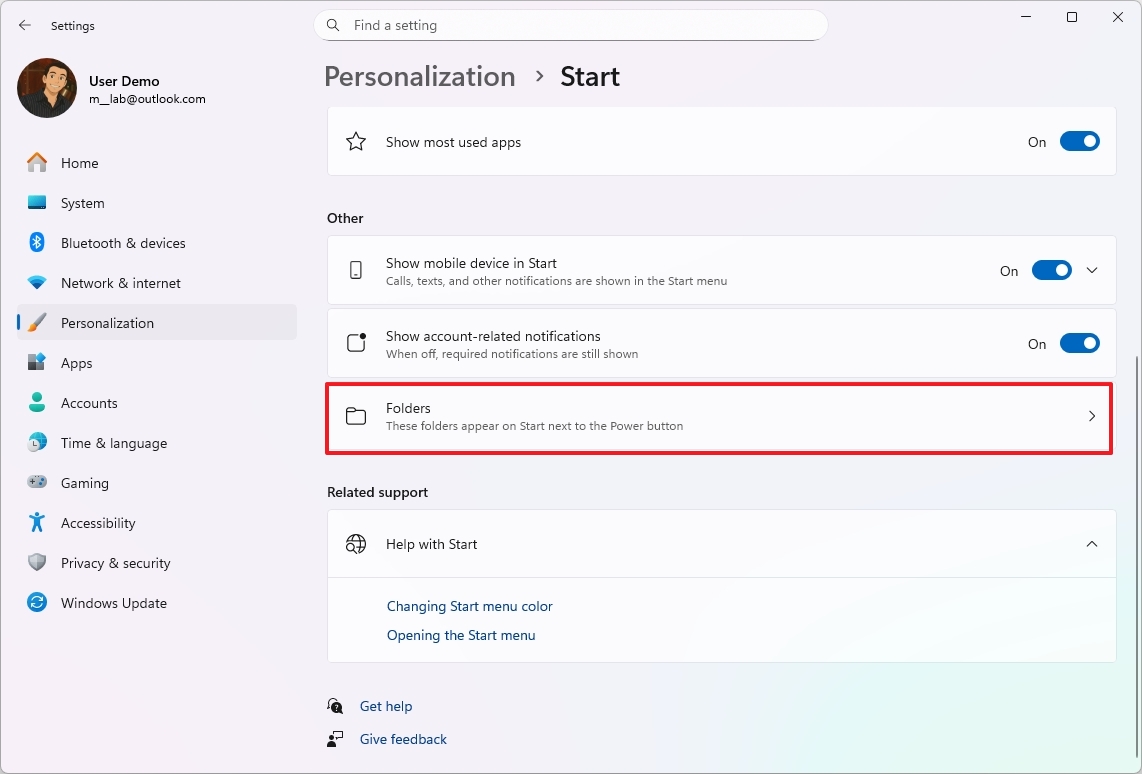
Quick access
You can also pin frequently used folders – like Settings, File Explorer, Documents, and Downloads – to the Start menu, right next to the power button. Here’s how to do it:
- Open Settings.
- Click on Personalization.
- Click the Start page on the right side.
- Click the Folders setting.
- (Option 1) Turn on the toggle switches to add items to the Start menu next to the Power button.
- (Option 2) Turn off the toggle switches to remove items from the Start menu.
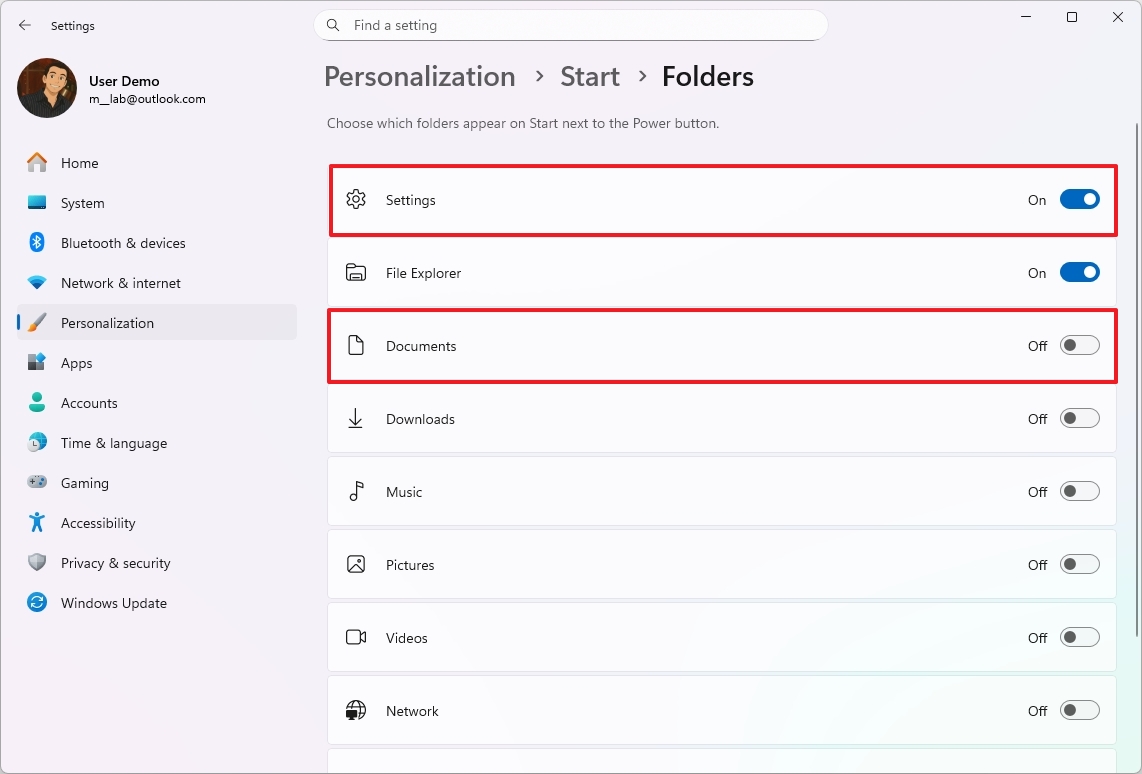
After you complete the steps, the items will appear next to the power button in the Start menu.
Customize Search
Okay, so Windows Search isn’t the most customizable thing out there, but I recently figured out how to ditch the news and info feed on the Home screen in Windows 11. It’s a nice little cleanup if you’re not really using those updates right on your desktop.
To turn off the highlights feature from Search, use these steps:
- Open Settings.
- Click on Privacy & security.
- Click the Search setting.
- Turn off the “Show search highlights” toggle switch.
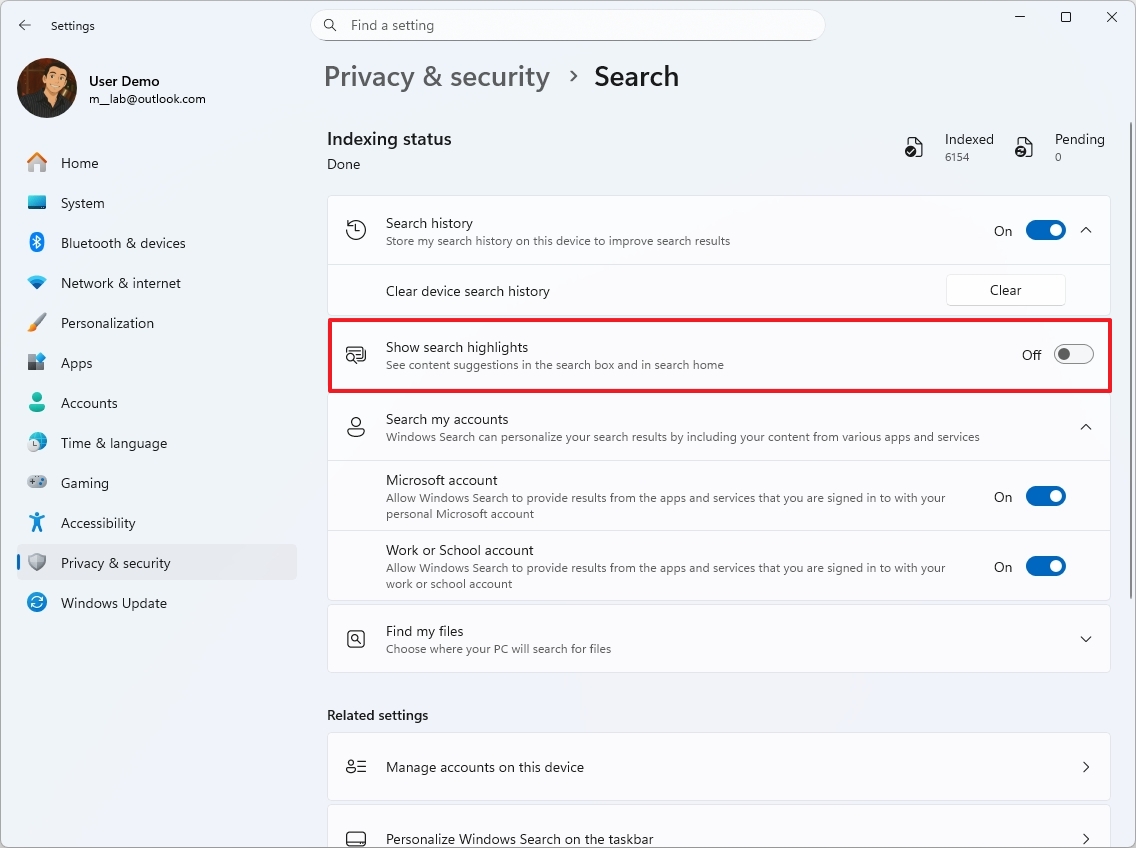
After following these steps, I’ve found that Windows Search changes to prioritize what *I* actually need. Instead of showing me news or trending topics, it now displays quick access to my settings and a list of the apps I use most often. It’s a much more useful setup, honestly.
Customize Taskbar
Even though Windows 11 doesn’t let you move the Taskbar to the top of the screen, you can still customize it by aligning icons to the left, getting rid of things you don’t need, and making the icons smaller.
Left icon alignment
If you prefer a more traditional look on Windows 11, you can move the Start menu and taskbar icons to the left. Here’s how to do it:
- Open Settings.
- Click on Personalization.
- Click the Taskbar page on the right side.
- Click the Taskbar behaviors setting.
- Select the Left option in the “Taskbar alignment” setting.
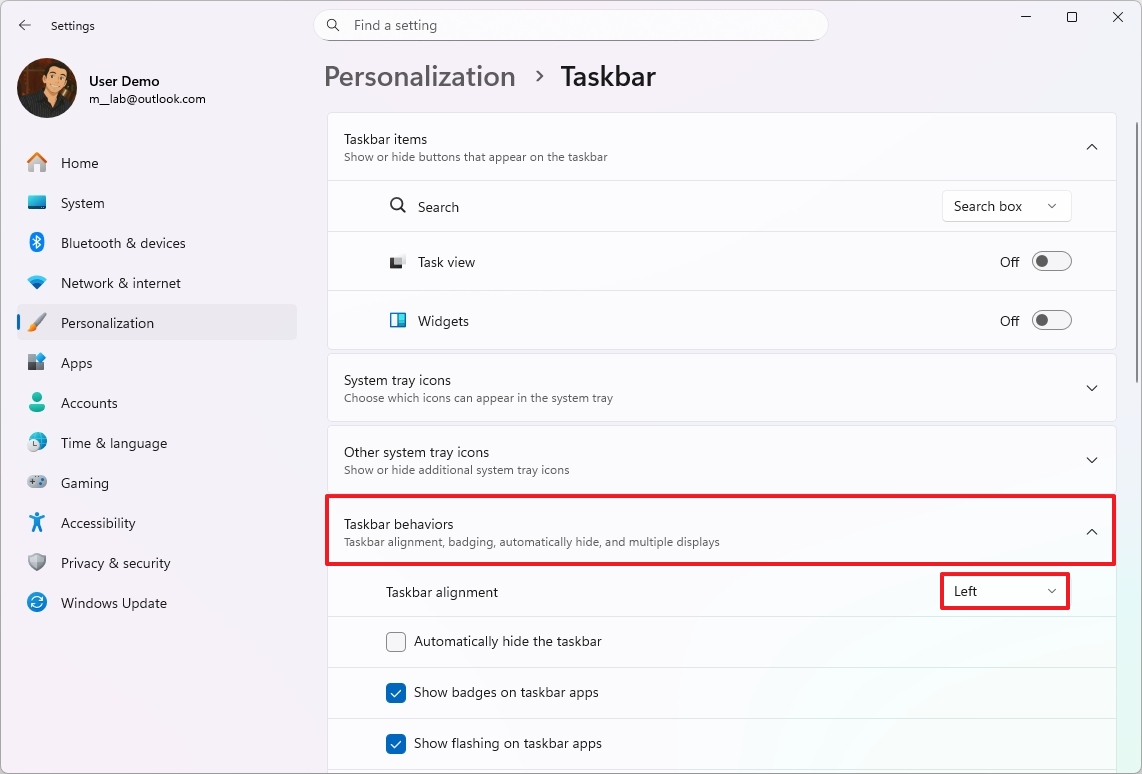
After you complete the steps, the icons and Start menu will align to the left.
Remove items
To remove unnecessary icons from the Taskbar, use these steps:
- Open Settings.
- Click on Personalization.
- Click the Taskbar page on the right side.
- Turn off the feature you prefer not to have in the Taskbar, including Search (with the Hide option), Task View, and Widgets under the “Taskbar items” section.
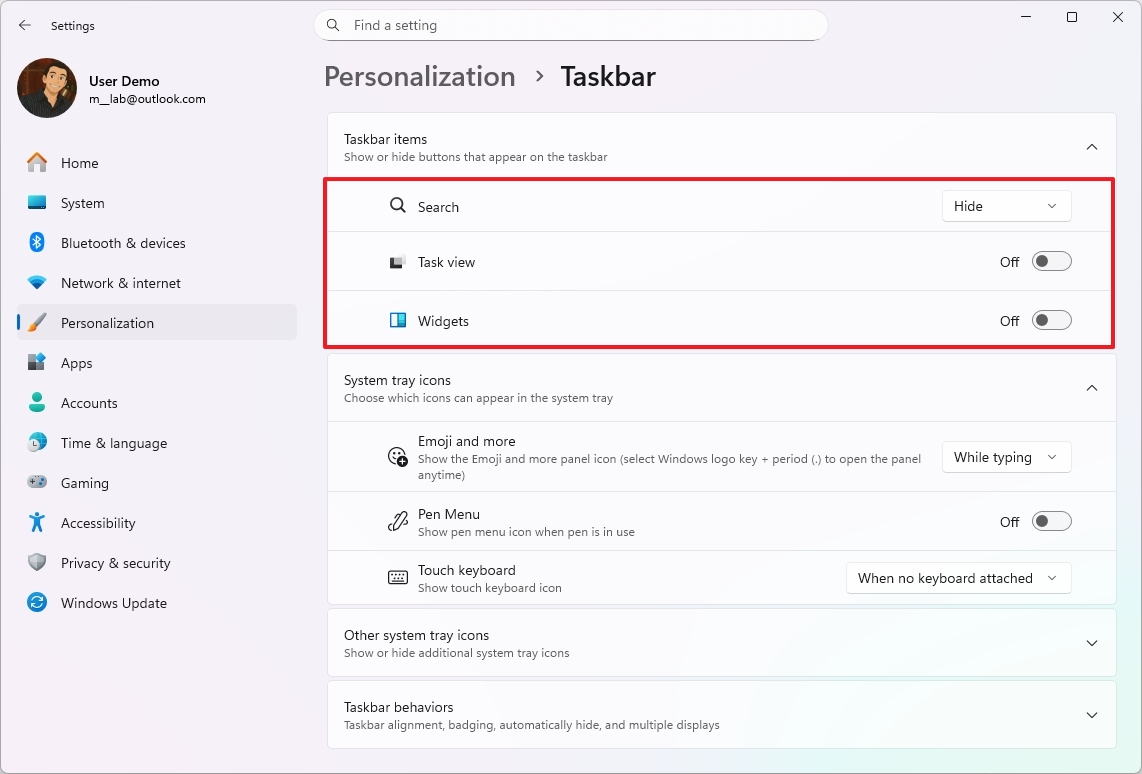
After finishing these steps, the icons will disappear from your Taskbar. You can still search using the Start menu, or by pressing the “Windows key + S” or “Windows key + W” keys to open the Widgets panel.
Show smaller icons
To show smaller icons to fit more apps when the Taskbar is full, use these steps:
- Open Settings.
- Click on Personalization.
- Click the Taskbar page on the right side.
- Click the Taskbar behaviors setting.
- Select the “When the task is full” or “Always” option to decide when smaller icons should appear in the Taskbar.
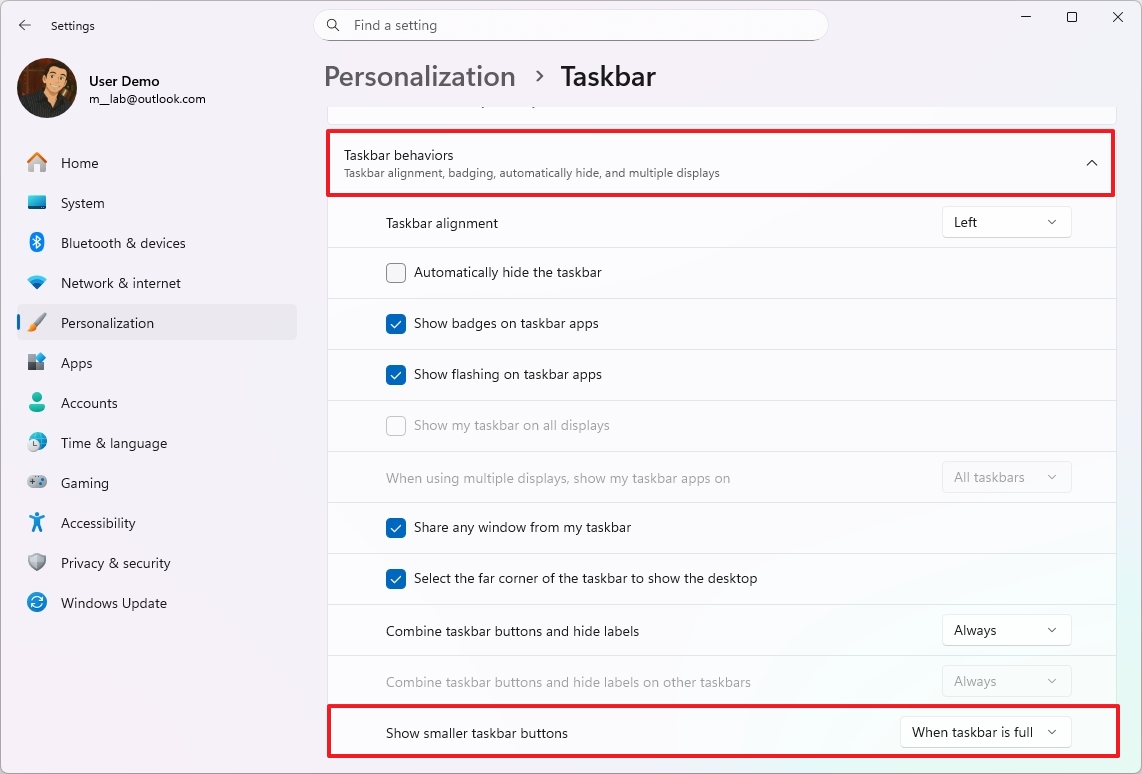
Once you finish these steps, the icons on your Taskbar will appear smaller, based on how you’ve set things up, but the Taskbar itself will stay the same size.
Customize Windows Recall settings
When you enable Windows Recall, it will usually start with standard settings. But you can customize how much storage it uses and set filters to control what information the AI can access.
To change the Windows Recall settings, use these steps:
- Open Settings.
- Click on Privacy & security.
- Click the Recall & snapshots setting.
- Click the Storage setting.
- Select the amount of storage to reserve for snapshots using the “Maximum storage for snapshots” setting.
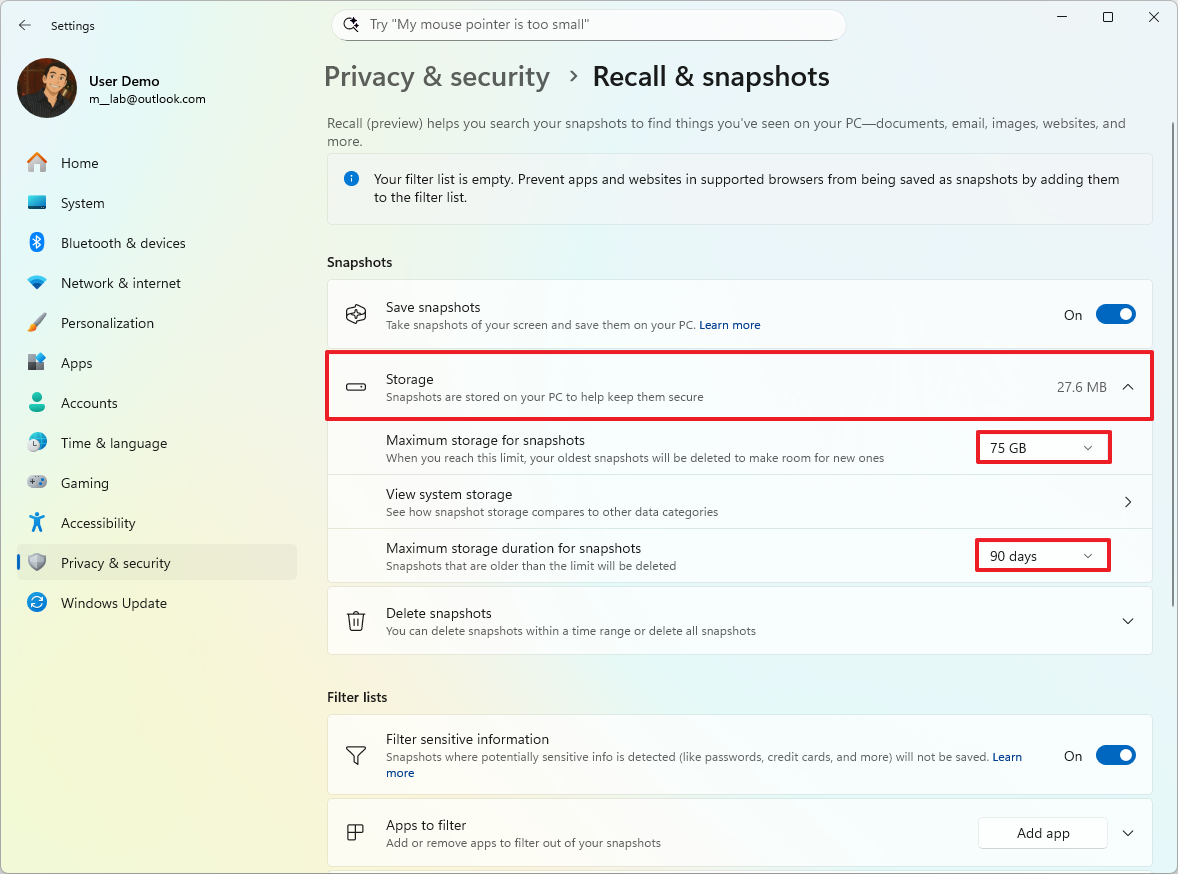
- (Optional) Choose the snapshot retention before deletion using the “Maximum storage duration for snapshots” setting.
- Turn on the “Filter sensitive information” toggle switch (if applicable).
- Click the Add app button to filter applications from being recorded by Recall in the “Apps to filter” setting.
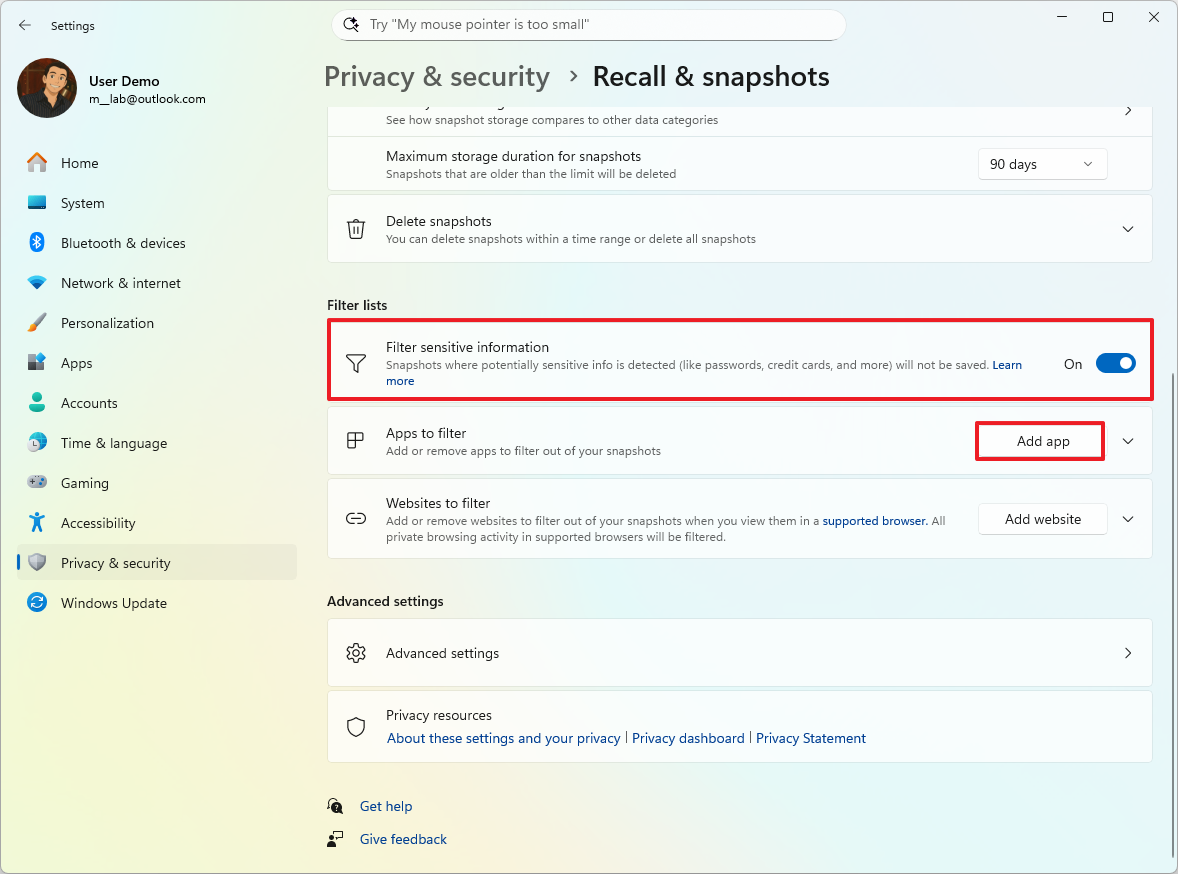
- Click the Add website button to filter websites from being recorded by Recall in the “Websites to filter” setting.
Once you complete the steps, your preferred preferences will be applied to Windows Recall.

If you want to stop using Recall, go to Settings > Privacy & security > Recall & snapshots > Advanced settings and click the “Reset Recall” button. This will remove all your Recall data and turn the feature off.
Microsoft Edge with Copilot Mode
If you own a Copilot+ PC, you’ll probably want to explore its AI capabilities, especially the features built into Microsoft Edge.
To fully unlock the AI capabilities of Microsoft Edge, use these steps:
- Open Microsoft Edge.
- Click the Settings and more menu (three dots) and choose the Settings option.
- Click on AI innovations from the left pane.
- Turn on the “Copilot Mode” toggle switch.
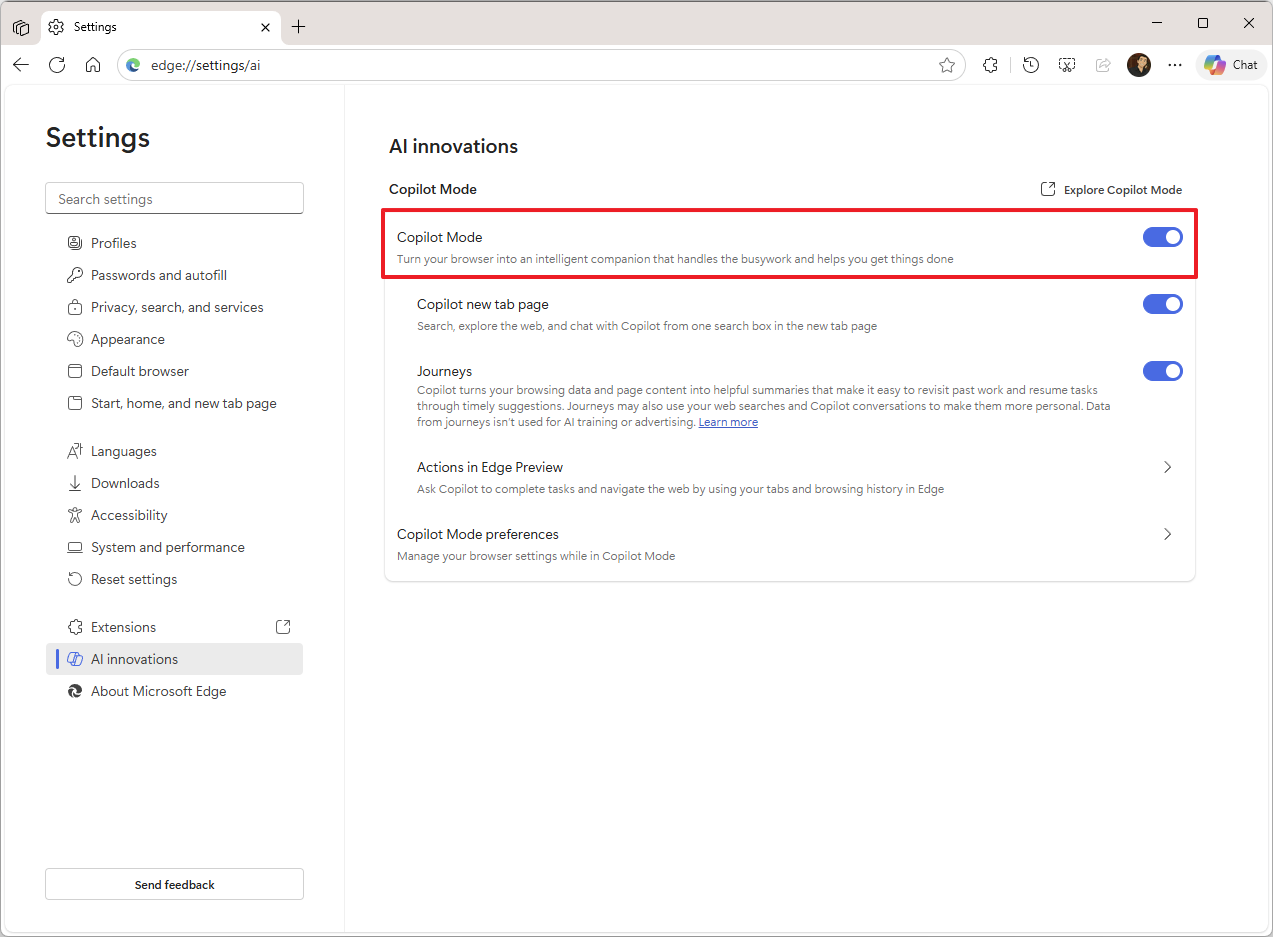
Turning on Copilot Mode automatically activates three additional features: the Copilot new tab page, Journeys, and Actions.
Copilot Mode adds AI-powered help right into the Edge browser. It can answer questions, quickly summarize webpages, and generally make using the internet simpler and more efficient.
Journeys helps you keep track of the websites you visit by automatically organizing them into groups based on what you were doing. This makes it simpler to manage research, plan projects, and handle online content – it’s like a super-powered bookmark system.
Actions allow you to get things done right within your browser, like making a restaurant reservation or placing an online order. It’s a feature that lets the system act on your behalf.
How to optimize system performance on a Copilot+ PC
Programs that launch automatically when you turn on your new Copilot+ PC can slow it down. Once you’ve installed the apps you need, check your startup settings and turn off any that aren’t essential to help your PC run faster and smoother.
Control startup apps
To disable apps on the Windows 11 startup, use these steps:
- Open Settings.
- Click on Apps.
- Click the Startup page on the right side.
- Turn off the toggle switch to disable apps at startup.
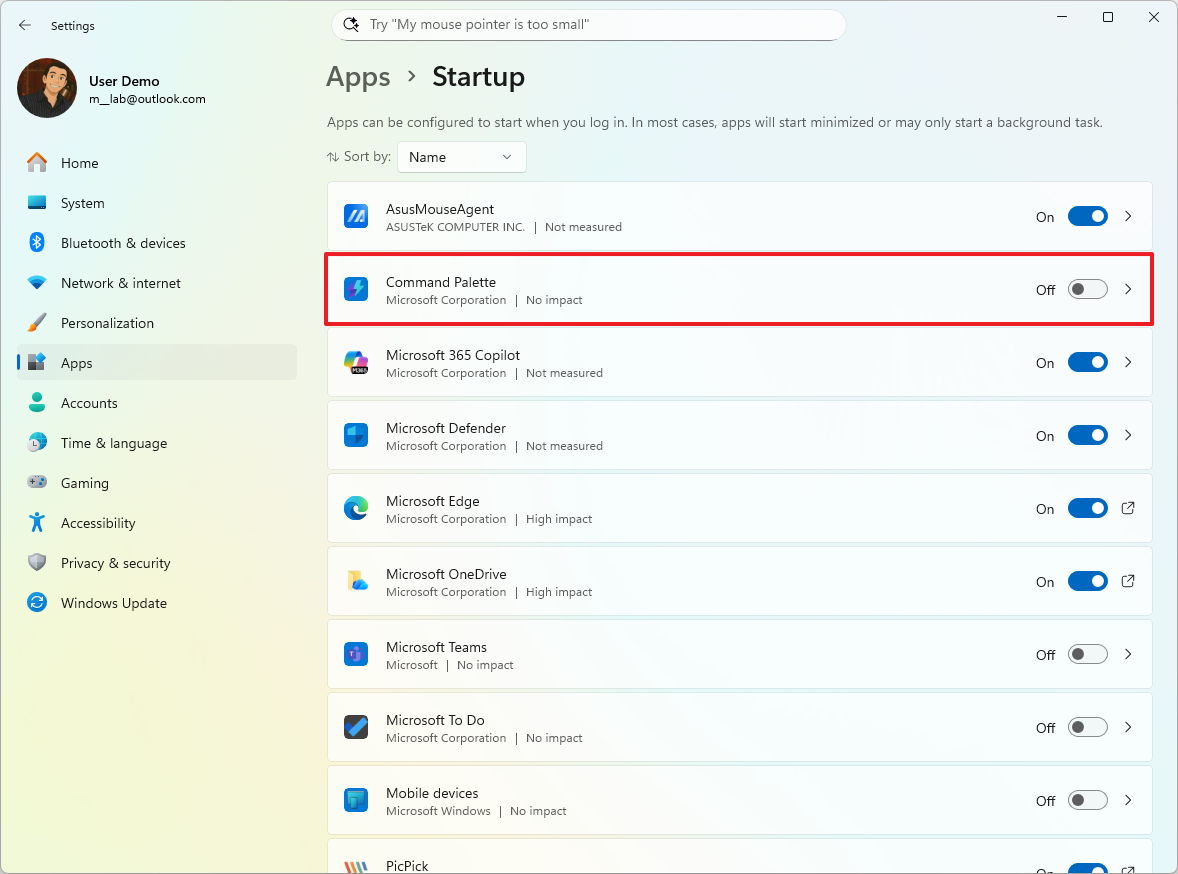
After you complete the steps, the startup process should be noticeably faster.
Change power modes
If you have a Copilot+ PC, you can extend your battery life by checking and changing the power settings.
To change the power settings on your AI-powered laptop, use these steps:
- Open Settings.
- Click on System.
- Click the Power & battery page on the right side.
- Click the Power Mode setting.
- Choose the power mode for “Plugged in” and “On battery” settings.

- Click the “Screen, sleep, & hibernate timeouts” setting.
- Select when the device should turn off the display or enter into sleep mode while “Plugged in” and “On battery.”
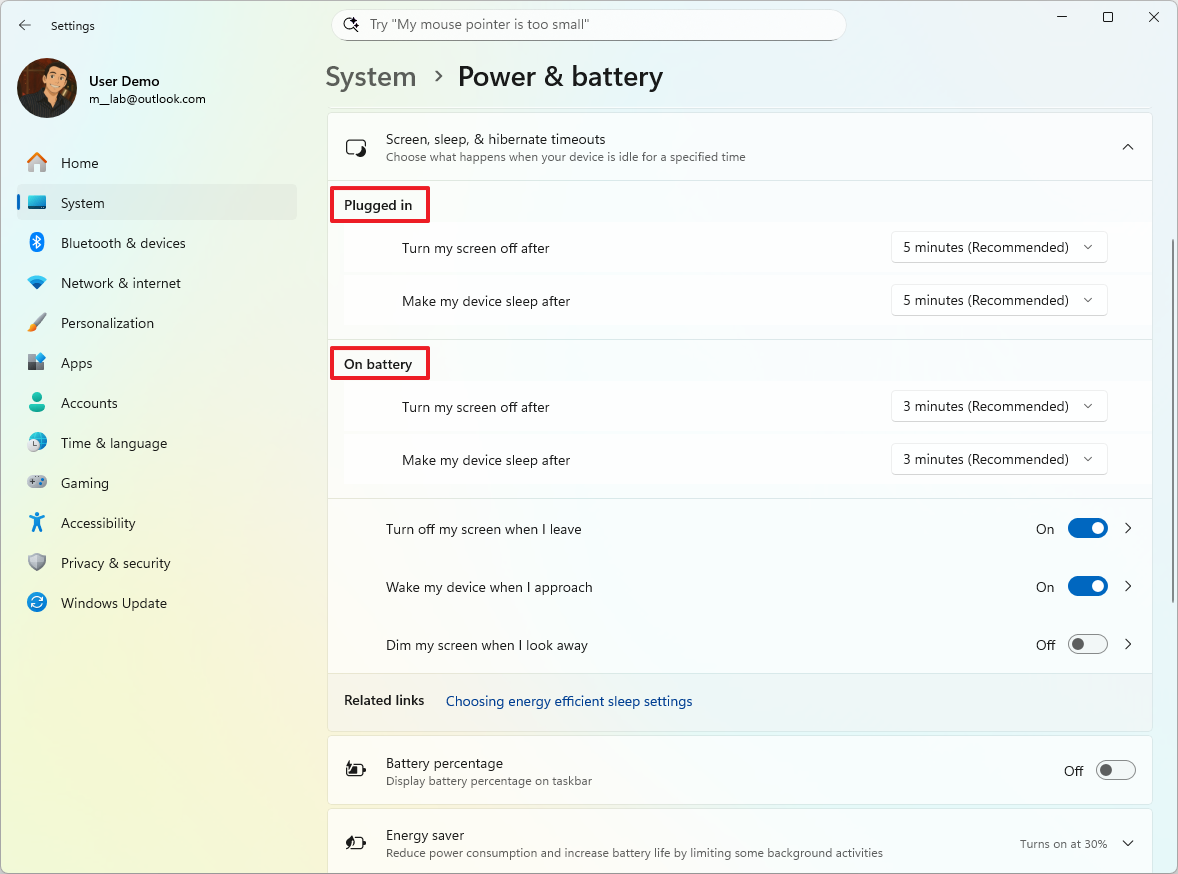
Once you complete the steps, the Copilot+ PC will apply the new power settings.
Enable night light
Windows 11’s Night light feature lowers the amount of blue light emitted from your screen in the evening. It shifts to warmer colors to make it easier on your eyes and help you sleep, especially if you spend a lot of time working on your computer.
To enable night light on Windows 11, use these steps:
- Open Settings.
- Click on System.
- Click the Display page on the right side.
- Turn on the Night light toggle switch to enable the feature under the “Brightness & color” section.

- (Optional) Turn off the Night light toggle switch to disable the feature.
- (Optional) Select the Night light setting.
- Change the color temperature using the “Strength” slider.
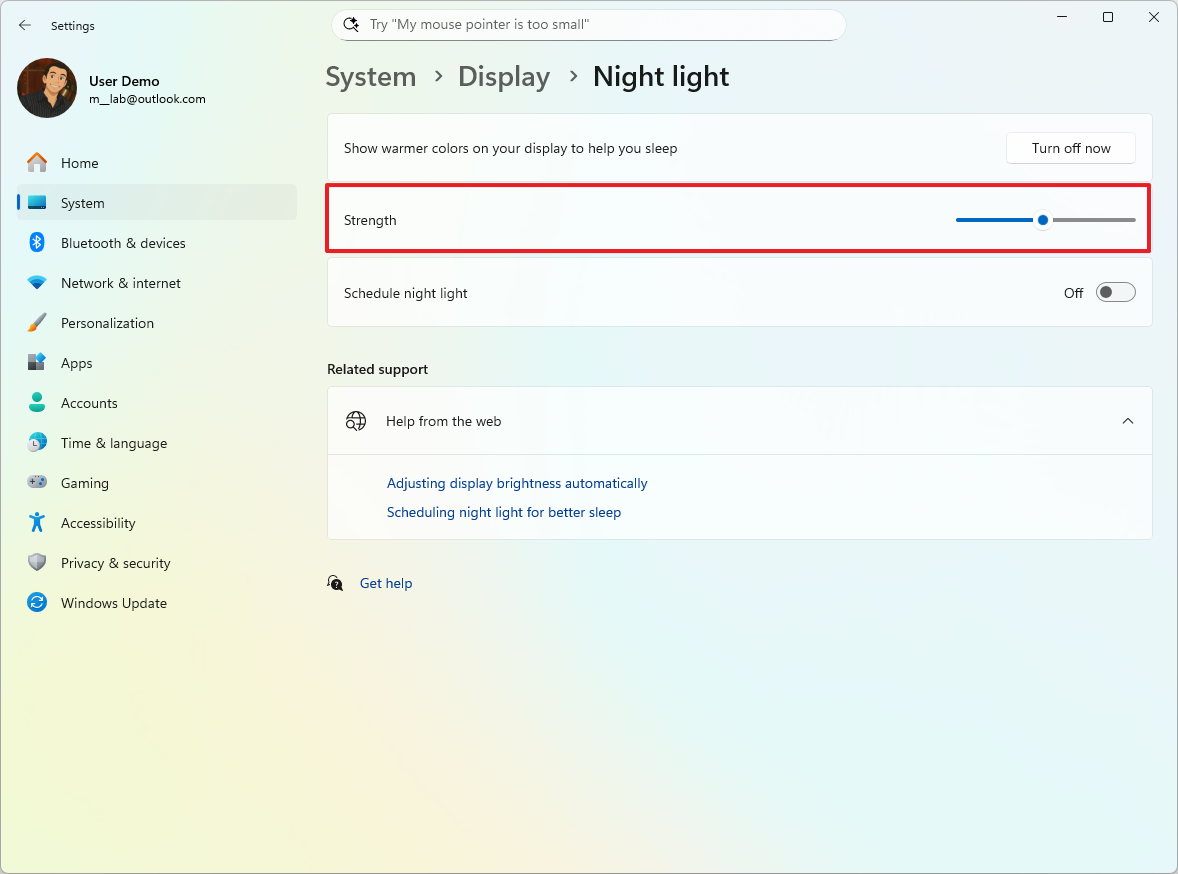
- (Optional) Click the “Turn on now” button to enable the feature on demand, outside of the scheduled time.
Once you finish setting it up, this feature will display warmer colors on your screen, reducing eye strain when you’re working in the dark.
How to set up apps on a Copilot+ PC
I’ve noticed that even though people choose different apps, we all generally need a similar set of basic programs set up on our computers. For instance, most of us use a web browser – something like Google Chrome, Firefox, Opera, or Edge – to get online. And if you’re a student or working professional, you almost certainly need a suite of office applications like Word, Excel, and PowerPoint.
You can install almost any app on a Copilot+ PC. However, if your device uses an ARM processor, older-style (Win32) apps will run through a system called Microsoft Prism, which might cause a small decrease in how quickly they run.
I’ve noticed something interesting when downloading apps on my Copilot+ PC. If I’m not getting the app from the Microsoft Store, I’m now being prompted to specifically choose the version designed for ARM processors – that’s the one my PC uses, since it’s powered by Qualcomm. It seems like the system is now making sure I get the right version during the download process.
Install browser
Even though Microsoft Edge is a great browser for people who use Windows, you might prefer using a different one, like Google Chrome or Firefox.
To install a new browser on Windows 11, use these steps.
- Open the Chrome or Firefox official page.
- Click the Download Chrome button.
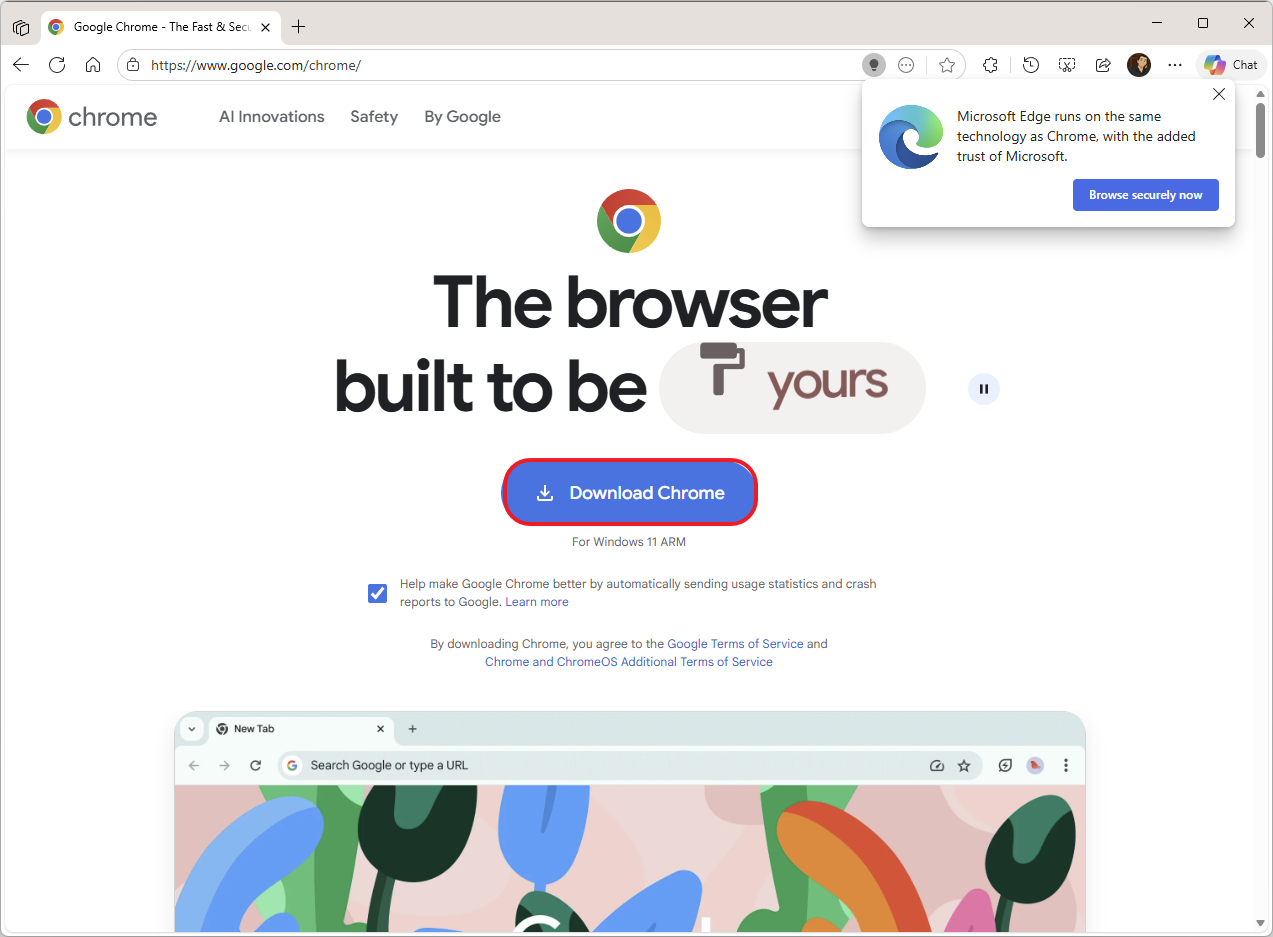
- Double-click the installer to launch the setup.
- Continue with the on-screen directions to complete the installation.
After you complete the steps, the browser will install on your Copilot+ PC.
Change default browser
To change the default browser on your device, use these steps:
- Open Settings.
- Click on Apps.
- Click the Default apps page on the right side.
- Select the browser to use as the new default on Windows 11. For example, Google Chrome.
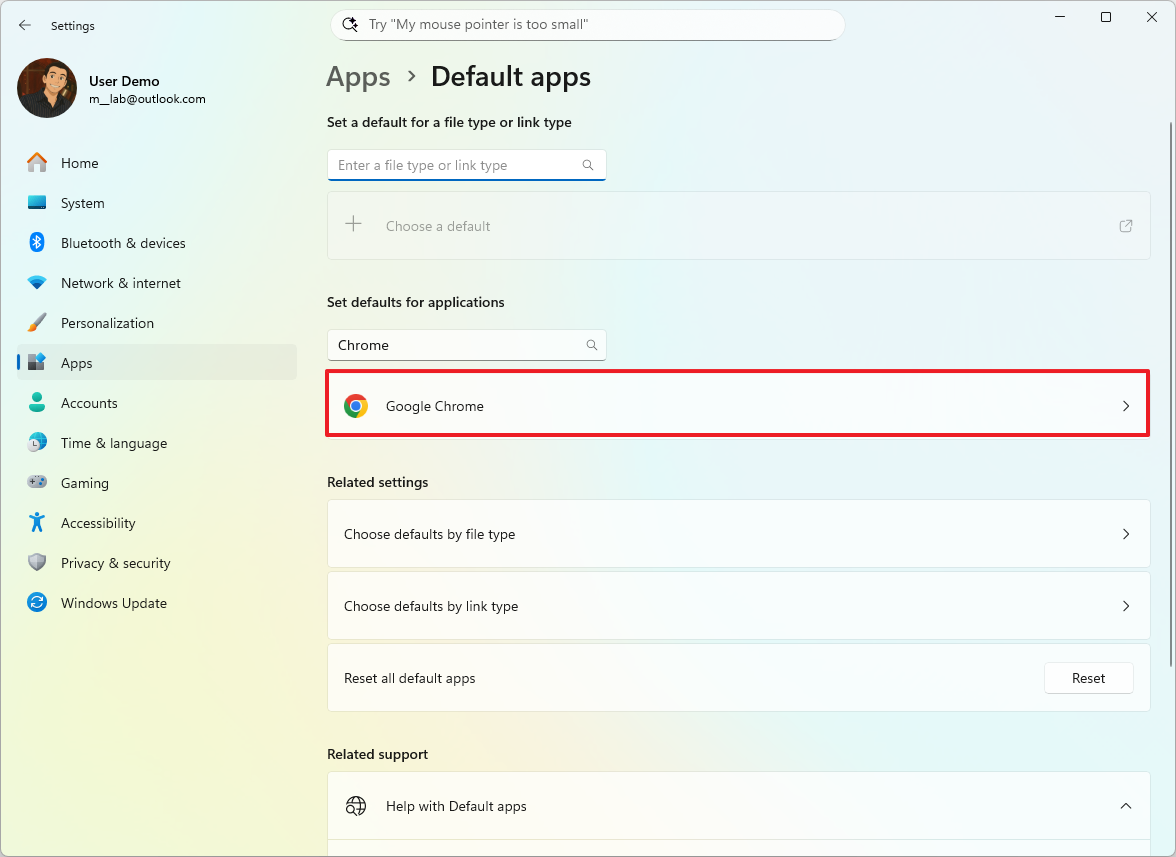
- Click the Set default button.
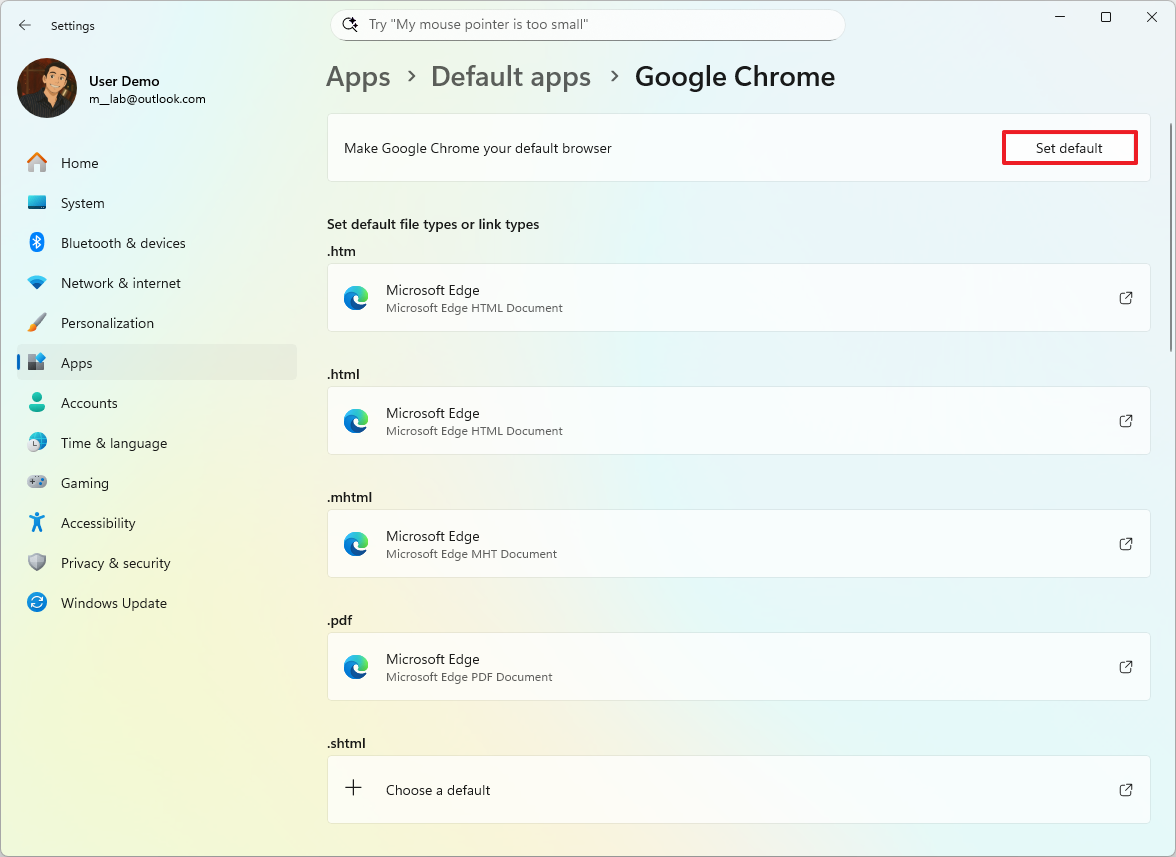
- (Optional) Click the .pdf default application and select the Chrome option to open PDFs with Chrome.
- Click the Set default button.
Once you complete the steps, the computer will set the new browser as the default.
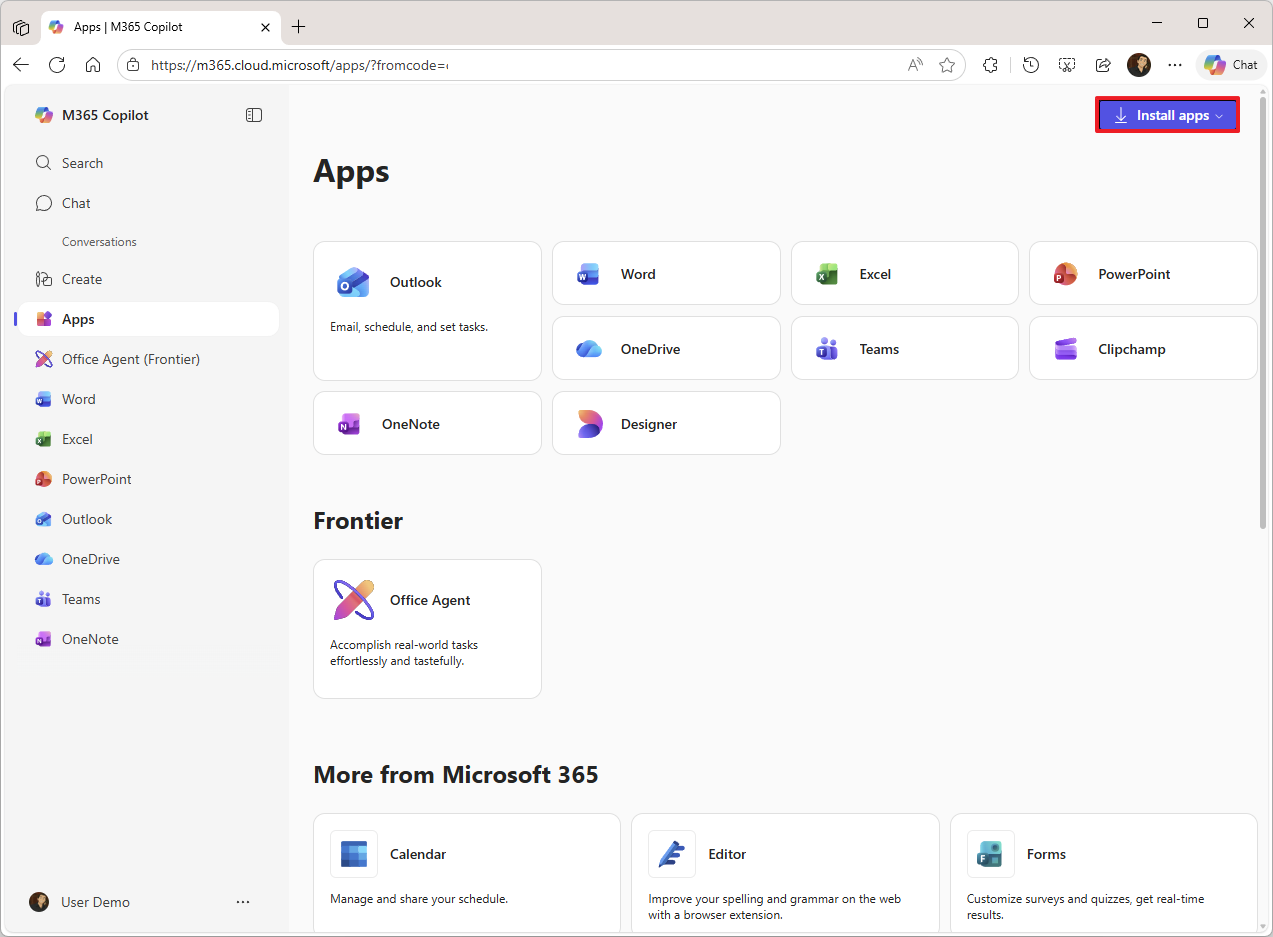
Install the Microsoft 365 apps
To install Office from Microsoft 365, use these steps:
- Open the Microsoft 365 (Office) website.
- Sign in with a Microsoft account (if applicable).
- Click on Apps from the left pane.
- Click the Install Apps button.
- Click the Install button in the “Microsoft 365 apps for your devices” section.
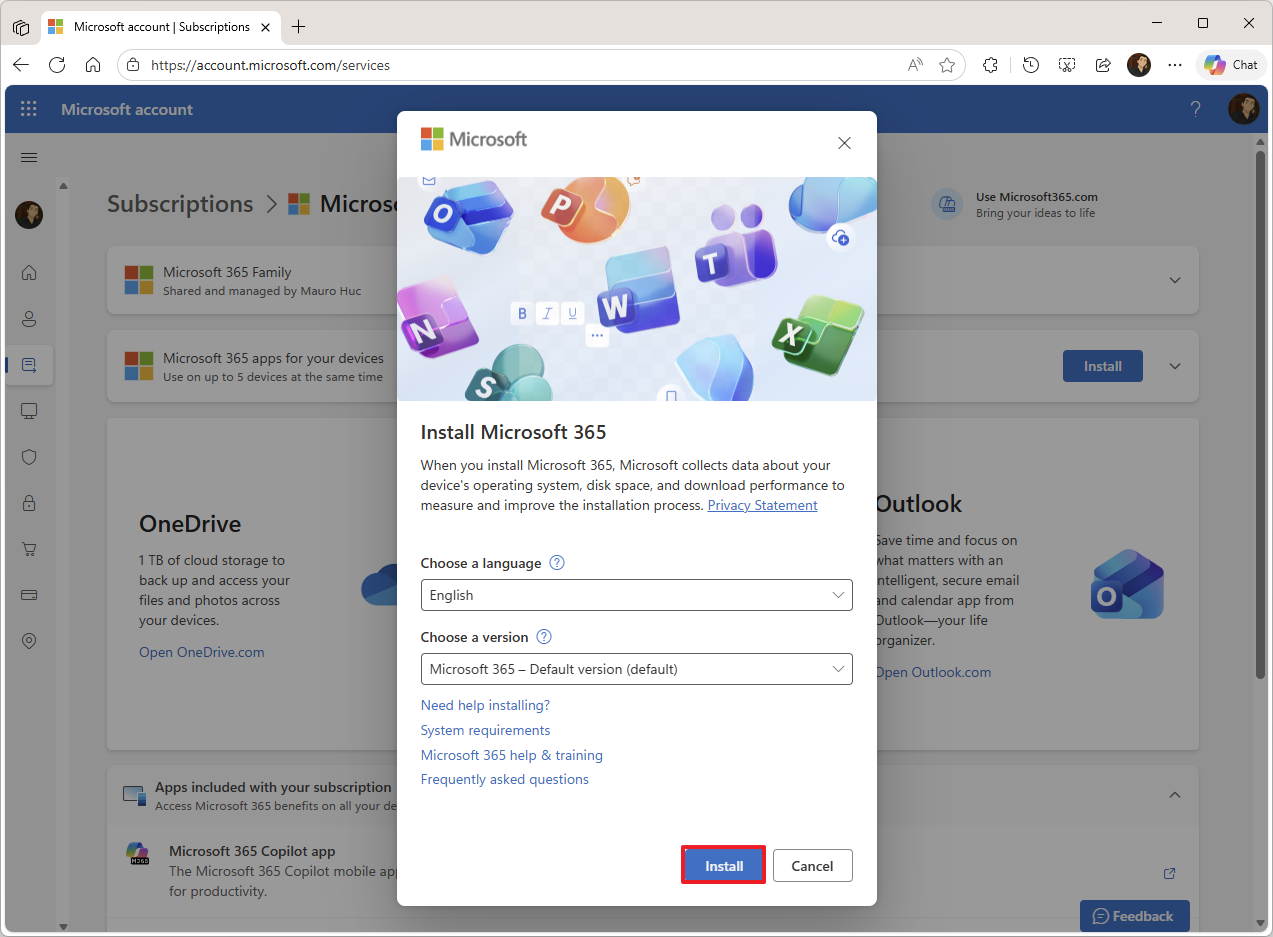
- Click the Install button using the default options.
- Continue with the on-screen directions to complete the setup as necessary.
Once you finish the setup process, apps like Word, Excel, Outlook, and PowerPoint, along with other features, will be installed on your Copilot+ PC.
How to transfer files on a Copilot+ PC
When you get a new computer, you might need to move files from your old one. Luckily, it’s usually simple! You can use cloud services like OneDrive for quick access to your files, or if you have a lot of data – several terabytes – a portable hard drive is a good option.
Transfer files from OneDrive
If you’re already using OneDrive, you can skip these steps. Your files will be available automatically once you connect your Microsoft account.
To transfer documents and other files to the new Copilot+ PC, use these steps on the old laptop:
- Open File Explorer.
- Browse to the folder with the files to transfer.
- Select the files.
- Quick tip: You can select items individually or all contents using the “Ctrl + A” keyboard shortcut.
- Right-click the selection and select the Copy option.
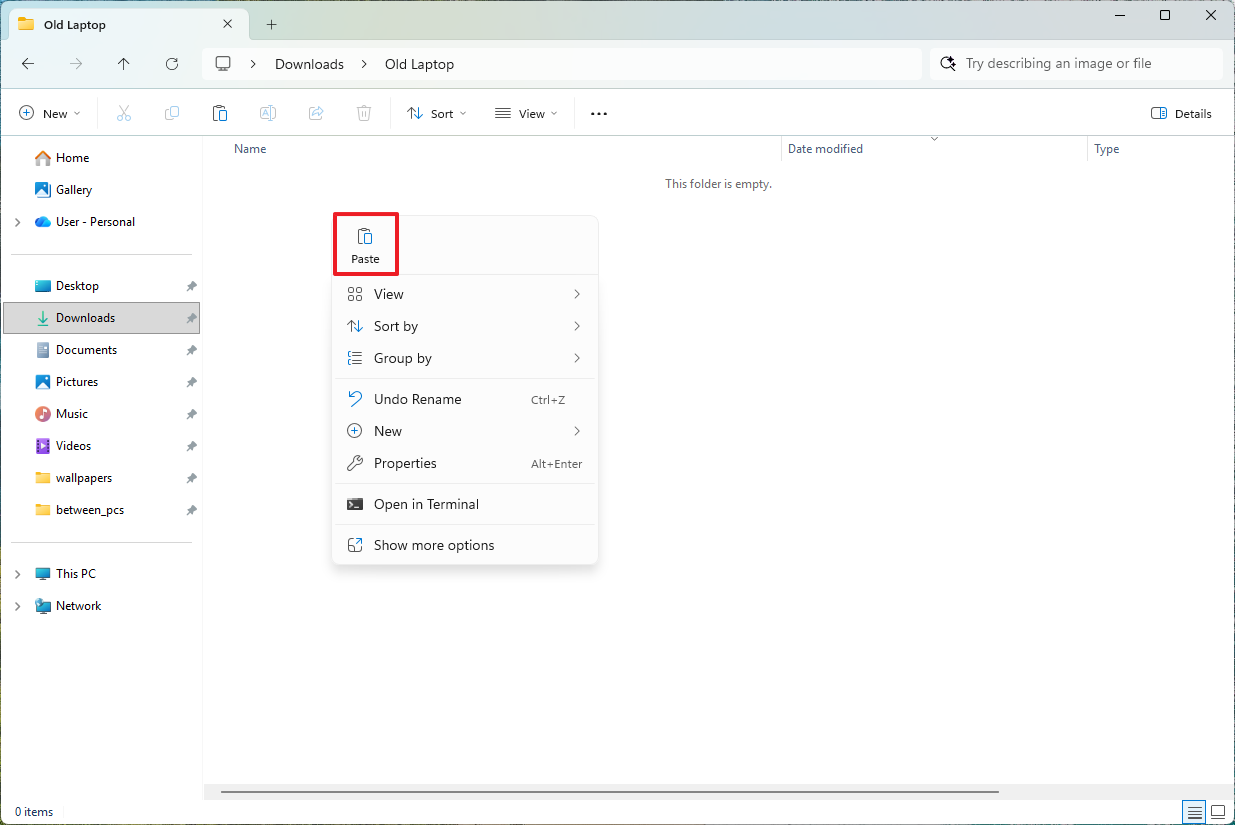
- Open the OneDrive folder.
- Use the “Ctrl + Shift + N” keyboard shortcut to create a new folder.
- Confirm a name for the folder, such as “Old Laptop Backup.”
- Open the newly created folder.
- Right-click inside the folder and select the Paste option.
It may take a moment for your files to finish uploading to OneDrive after you’ve completed the steps. Once the upload is done, you’ll be able to find them in your OneDrive folder on the new computer.
Transfer files from an external drive
If you’re moving a lot of files, a good option is to copy them to an external USB hard drive and then transfer them to your new computer.
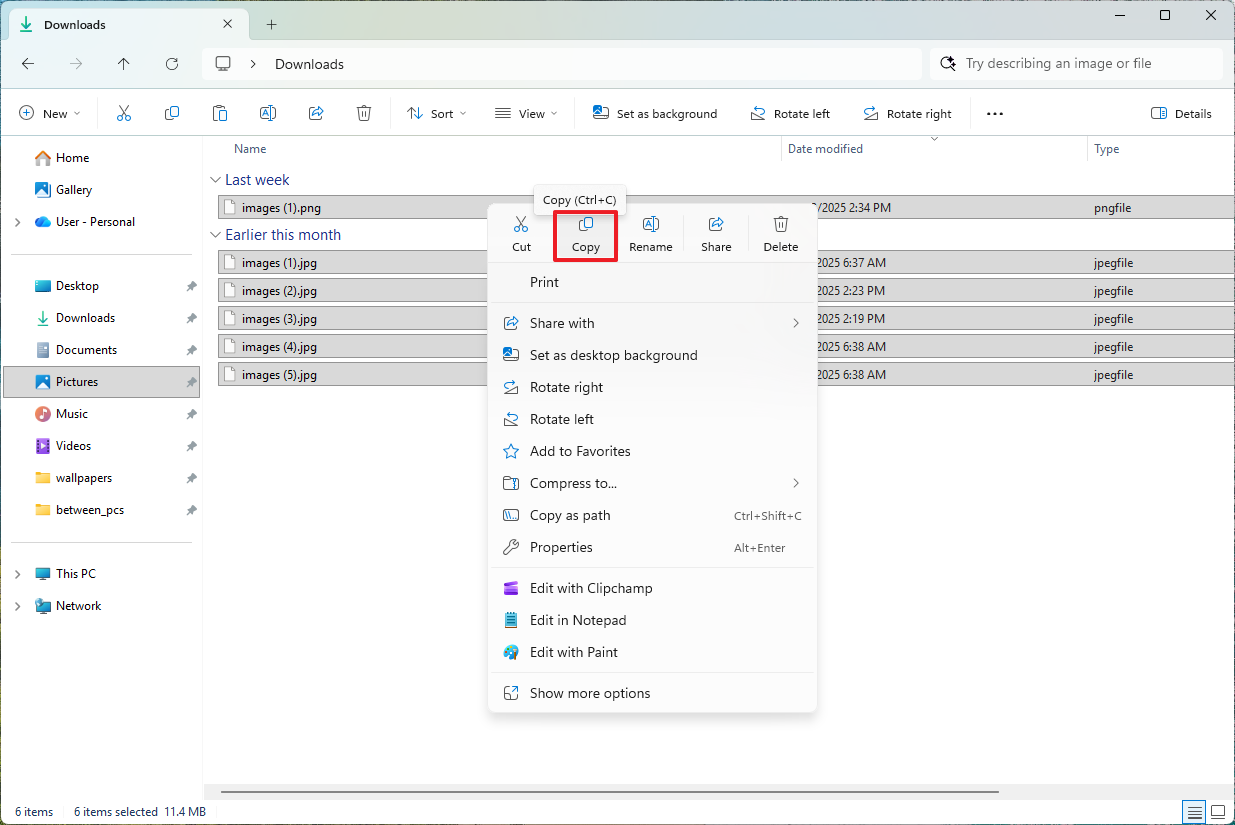
On the old laptop, connect an external hard drive with enough space, and use these steps:
- Open File Explorer.
- Browse to the folder with the files to transfer.
- Select the files to move to the new computer.
- Right-click the selection and select the Copy option.
- Open the external storage.
- Use the “Ctrl + Shift + N” keyboard shortcut to create a new folder.
- Confirm a name for the folder, such as “Old Laptop Backup.”
- Open the newly created folder.
- Right-click inside the folder and select the Paste option.
- Disconnect the drive from the old computer and connect it to the new computer.
- Open File Explorer.
- Browse to the folder location with the files.
- Right-click the selection and select the Copy option.
- Open the folder location to download the files.
- Right-click inside the folder and select the Paste option.
Once you complete the steps, the files will be transferred to the new computer.
How to create full backup on Windows 11
Once I got the device all set up to my liking, I made a complete backup of the system. It just felt smart to do that, in case something goes wrong – like a hardware issue, a virus, or if files get messed up. It’s good to have that safety net.
While many backup programs are available, you can still use the built-in Windows 11 tool to create a complete backup to an external hard drive. You can then disconnect this drive and keep it safe.
As a researcher, I’ve found that Microsoft is no longer actively supporting its backup feature. However, it’s still possible to create a full backup, though it should be considered a temporary solution.
To back up everything on your Copilot+ PC, plug in a storage drive that has enough free space, then follow these instructions:
- Open Start.
- Search for Control Panel and click the top result to open the console.
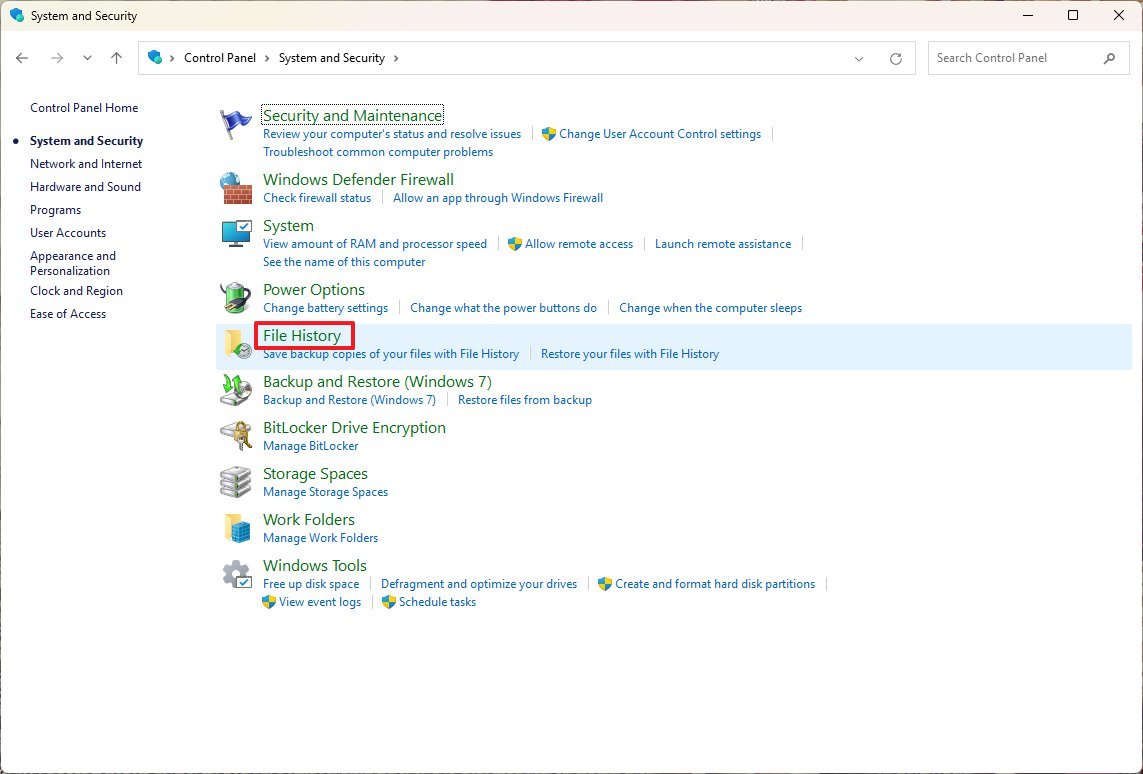
- Click on System and Security.
- Click the File History setting.
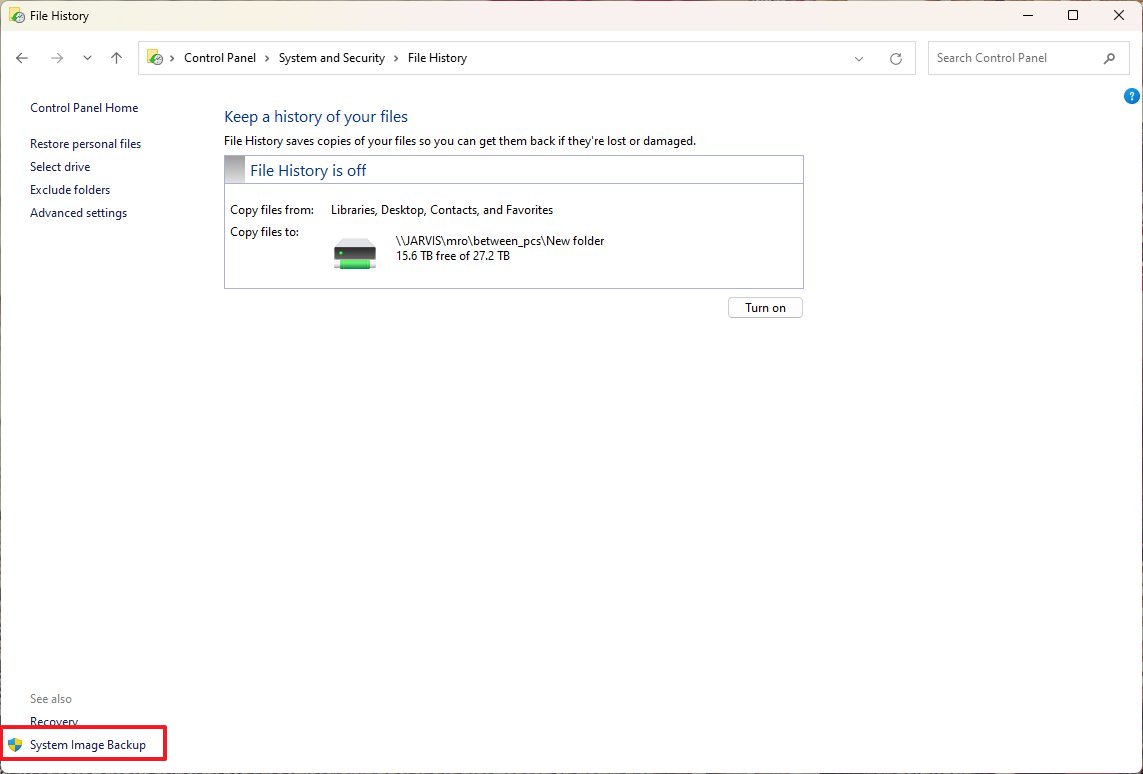
- Click the “System Image Backup” option from the bottom-left corner.
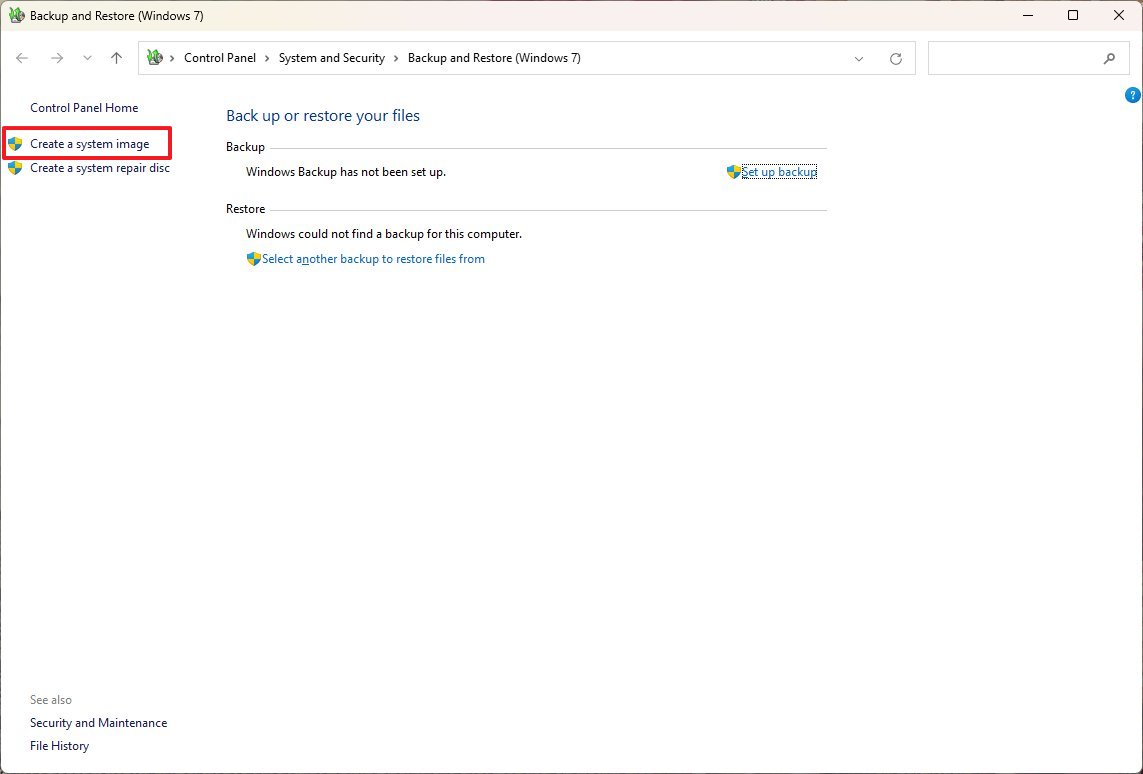
- Click the “Create a system image” option from the left navigation pane.
- Select the “On a hard disk” option.
- Use the “On a hard disk” menu and select the Copilot+ PC backup destination.
- Click the Next button.

- (Optional) Select any additional drive to include in the full backup.
- Click the Next button.
- Click the Start backup button.
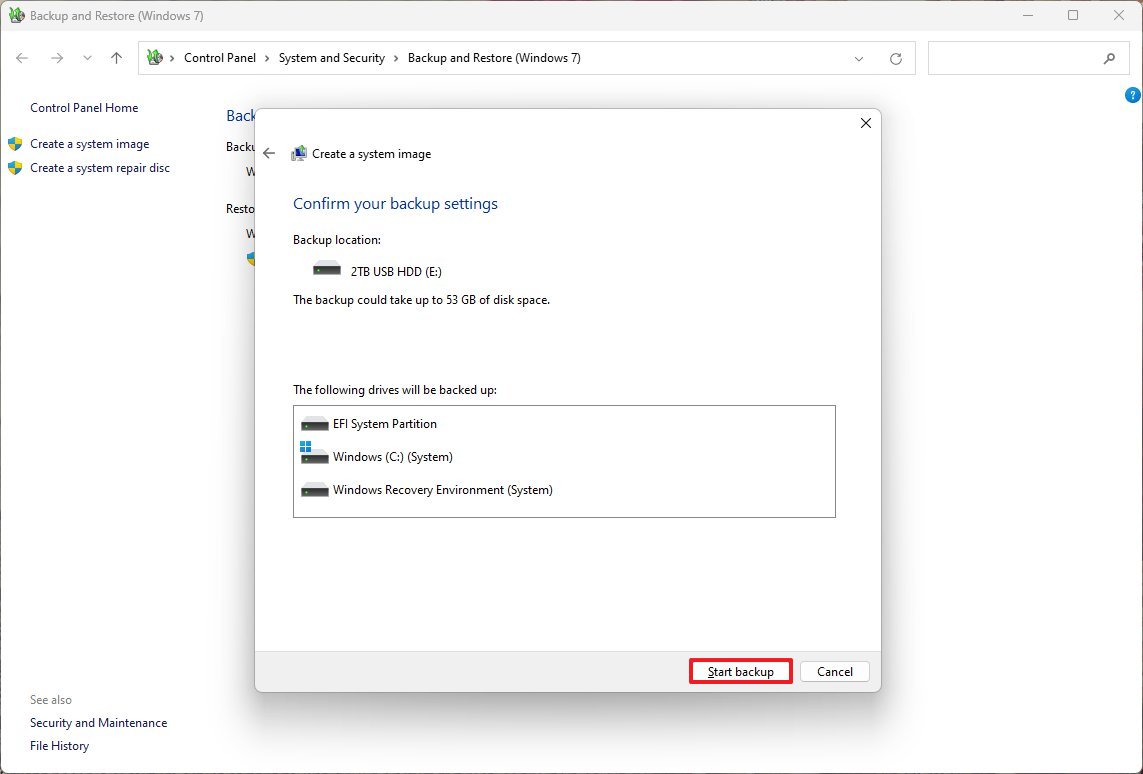
- Click the No button.
- Click the Close button.
After you finish the setup, the tool will automatically save everything from your Copilot+ PC. Once it’s done, unplug and store the external drive in a safe place.
Just keep in mind that this tool can only revert to the most recent backup I have. Anything I added or changed *after* that backup won’t be recovered, unfortunately.
For keeping just your files safely backed up, cloud storage options like OneDrive are a better choice.
FAQs about setting up a Copilot+ PC
These are common questions regarding the setup of a Copilot+ PC.
What are the two primary methods for setting up a new Copilot+ PC?
As an analyst, I’ve found there are generally two approaches to setting up Windows 11. You can use the existing installation and go through the initial setup process – what Microsoft calls the Out-of-Box Experience – or you can opt for a completely clean start by reinstalling the operating system from scratch.
What security features are configured during the Out-of-Box Experience (OOBE)?
As part of the initial Windows setup, you’ll be asked to set up Windows Hello, which lets you sign in with your face. You’ll also create a four-digit PIN as a backup sign-in option.
What is the recommended way to remove unwanted apps (bloatware) from a new Copilot+ PC?
If you want to remove a program but keep the original installation, go to your device’s Settings, then select Apps, and choose “Installed apps.” Find the program you don’t need and tap the “Uninstall” button.
What is the simplest method to perform a clean installation?
The easiest way to reinstall Windows is through the “Reset this PC” feature. You can find it in the Settings app under “System” and then “Recovery.” Choose the “Remove everything” option, and when prompted, select “Cloud download” to get a clean copy of Windows directly from Microsoft.
How can I ensure all essential components have the correct drivers installed after the setup?
First, open Device Manager to check for any devices with warning signs (yellow) or errors (red). If you find any problems, look in Windows Update’s “Optional updates” section, or visit your computer manufacturer’s website to download and install the latest drivers.
Where can I find the settings to manage which apps launch automatically when my Copilot+ PC starts up?
To manage which apps automatically start when you turn on your computer, go to Settings, then Apps, and click on “Startup”. From there, you can turn off any apps you don’t need to start automatically, which can help your computer start up faster.
How do I enable the enhanced AI features within the Microsoft Edge browser on a Copilot+ PC?
To unlock more powerful AI features in Microsoft Edge, switch on “Copilot Mode” in the browser’s Settings. You’ll find it under the “AI innovations” section. Turning this on also activates Journeys and Actions.
What steps are required to change the desktop wallpaper to a dynamically refreshing image collection?
To use dynamic images on your desktop, open Settings and click on “Personalization.” Then, select “Background” and choose “Windows Spotlight” as your background option.
How do I access the advanced configuration options for Windows Recall, such as filtering certain content?
Windows Recall settings, including controls for snapshot storage limits, filtering sensitive information, and excluding specific apps or websites from recording, are located in Settings under “Privacy & security,” in the “Recall & snapshots” section.
What is the most efficient way to transfer a large volume of files from an old computer to the new Copilot+ PC?
The fastest way to move several terabytes of data is to copy the files to an external hard drive from your old computer, and then connect that drive to your new Copilot+ PC to complete the transfer.
More resources
Read More
- Gold Rate Forecast
- Dune 3 Gets the Huge Update Fans Have Been Waiting For
- Looks Like SEGA Is Reheating PS5, PS4 Fan Favourite Sonic Frontiers in Definitive Edition
- Arknights: Endfield – Everything You Need to Know Before You Jump In
- Pluribus Star Rhea Seehorn Weighs In On That First Kiss
- Jack Osbourne Shares Heartbreaking Tribute to Late Dad Ozzy Osbourne
- Every Upcoming Transformers Movie: Release Dates, Details, & Everything We Know
- Disney Promotes Thomas Mazloum To Lead Parks and Experiences Division As Josh D’Amaro Prepares To Become CEO
- 5 Weakest Akatsuki Members in Naruto, Ranked
- Kelly Osbourne Slams “Disgusting” Comments on Her Appearance
2025-11-21 16:27