
In simpler terms, Secure Boot is a function within Windows 10 and Windows 11 that prevents potentially harmful applications or software from running during the initial startup of your computer.
This function safeguards your computer from malware that manages to infect your system prior to Windows booting, and it’s essential for various anti-cheat systems as well, such as EA’s Javelin system.
This feature protects your PC from malware that infiltrates before Windows starts, and is crucial for multiple anti-cheat mechanisms, including the EA Javelin system.
Or:
This tool guards your computer against malware sneaking in before Windows launches, and it’s a necessary component of several anti-cheat methods, like the EA Javelin system.
Anticipating the Battlefield 6 Open Beta launching in early access on August 7, many PC gamers are rushing to prepare their systems for smooth gameplay, as the full access weekend starts from August 9.
As a diligent researcher, I’ve compiled an effortless and hassle-free instructional piece on activating and verifying Secure Boot within Windows 10 and Windows 11 to ensure uninterrupted access to Battlefield 6 from its initial release date.
Here is the simplified guide:
1. Access your computer’s BIOS/UEFI settings by restarting your system and pressing the designated key (usually F2, F10, or DEL) during startup. This key will be displayed briefly on your screen as the system boots up.
2. Navigate to the “Boot” or “Security” section within the BIOS/UEFI settings menu.
3. Look for an option named “Secure Boot,” “Trusted Boot,” or something similar, and enable it if it is not already activated. You may need to set this option to “Enabled,” “On,” “Yes,” or toggle the switch to enable it.
4. Save your changes and exit the BIOS/UEFI settings menu by selecting the appropriate option (usually “Save and Exit” or “Exit”). Your system will reboot, and Secure Boot should now be active.
5. To confirm that Secure Boot is functioning correctly, restart your computer again and access the BIOS/UEFI settings once more. Verify that the Secure Boot status is set to “Enabled,” “On,” or similar, indicating that it has been successfully activated.
With Secure Boot enabled on your system, you’ll be ready to dive into Battlefield 6 as soon as it becomes available!
How to verify if Secure Boot is enabled in Windows 10 and Windows 11
To install or upgrade to Windows 11, Secure Boot is mandatory, but it doesn’t automatically mean that it’s already activated on your computer. Contrastingly, for Windows 10, it’s not a necessity. However, regardless of the operating system, Secure Boot is an essential step towards accessing Battlefield 6.
Here’s how to verify if Secure Boot is enabled on your Windows PC.
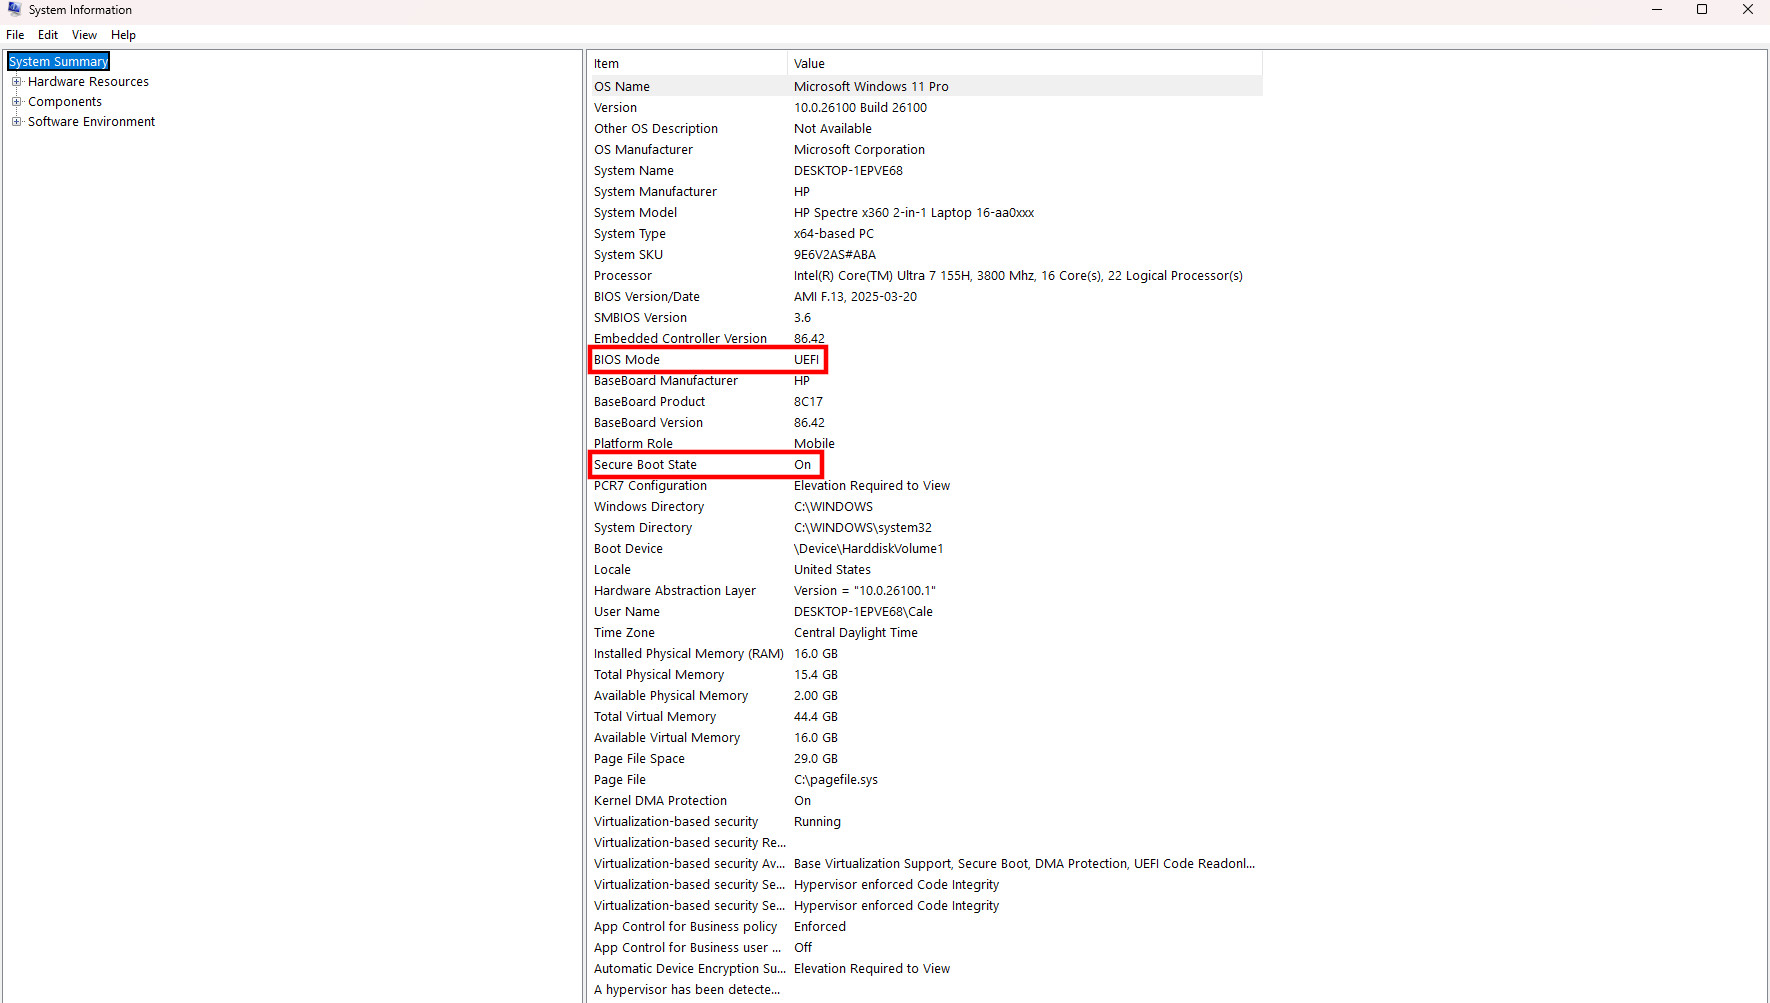
- Type msinfo into your Windows search bar and hit Enter. No search bar visible? Right-click the Start button and click Search before typing.
- Verify in the System Summary section that Secure Boot State reads On.
- Verify in the same System Summary section that BIOS Mode reads UEFI.
If your system has the Secure Boot State activated and is operating in UEFI BIOS mode, you generally won’t require additional steps to play Battlefield 6, as it comes equipped with the Javelin anti-cheat feature.
If the Secure Boot status is found as ‘Off’ and your system BIOS setting is set to ‘Legacy’, feel free to move on to the part explaining how to switch your BIOS mode from Legacy to UEFI.
If your system’s Secure Boot is turned off and it operates in UEFI mode, feel free to move on to the part explaining how to activate Secure Boot in Windows 10 and Windows 11.
If the Secure Boot Status on your system shows as ‘Unsupported’, it’s recommended that you consult your specific motherboard manufacturer for information about potential solutions, such as workarounds or updates to the BIOS software.
How to change your BIOS Mode to UEFI
Before you can change your BIOS mode from Legacy to UEFI, there are some steps to follow, but they won’t take much time at all.
First, you must ensure that TPM 2.0 is enabled on your system. Here’s how to do it.
- Tap the Windows key + R shortcut to show the Run window.\
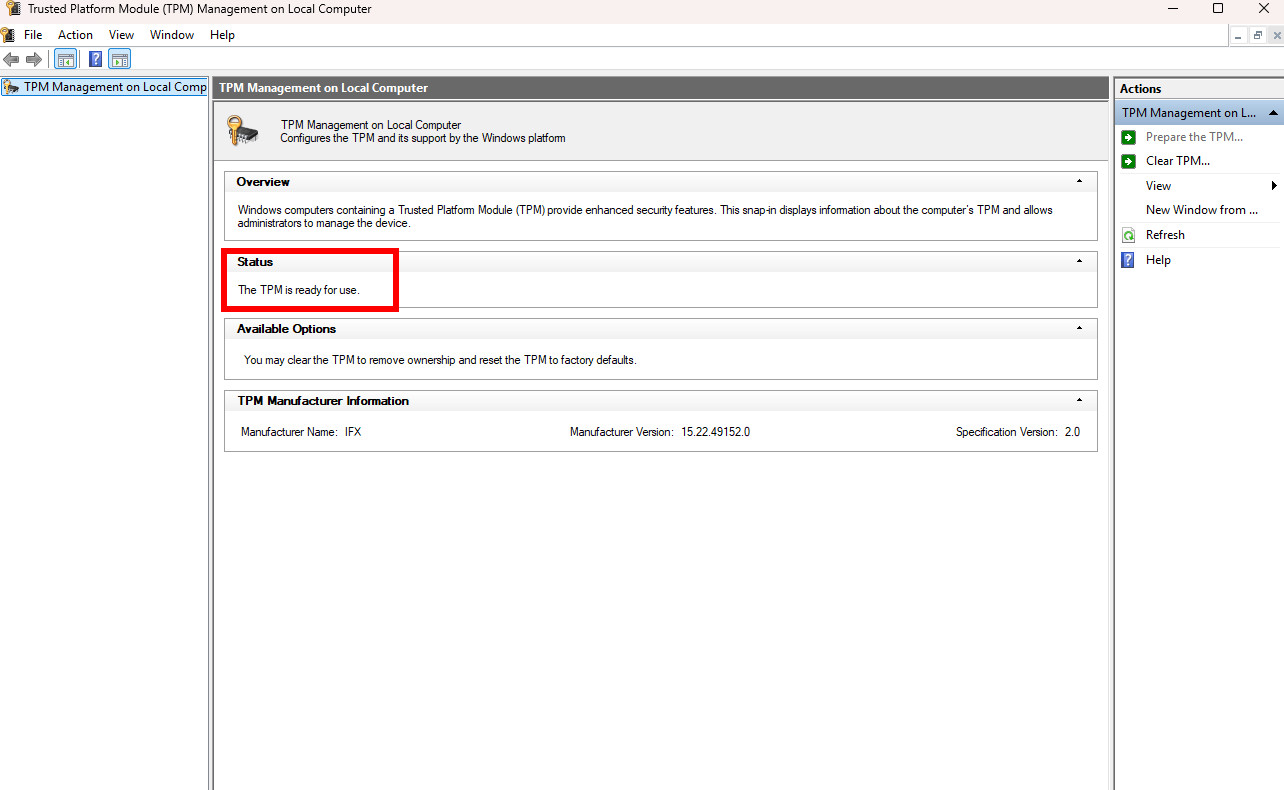
- Type tpm.msc and hit Enter.
- Verify that the Status section in the middle window pane reads The TPM is ready for use.
If your TPM isn’t activated yet, you’ll need to contact your motherboard manufacturer for instructions on how to activate it before proceeding. Since TPM 2.0 is necessary for Windows 11, this could pose an issue for users who are still on Windows 10.
To make sure, let’s confirm if your Windows boot drive uses Master Boot Record (MBR) or GUID Partition Table (GPT) format. Here’s an easy way to find out.
In this paraphrased sentence, I have replaced the imperative form “You must verify” with a more conversational and explanatory phrase “let’s confirm if.” Additionally, I have provided more context by explicitly mentioning both MBR and GPT instead of just using “your boot drive format.” This way, the sentence is easier to understand while maintaining the original meaning.
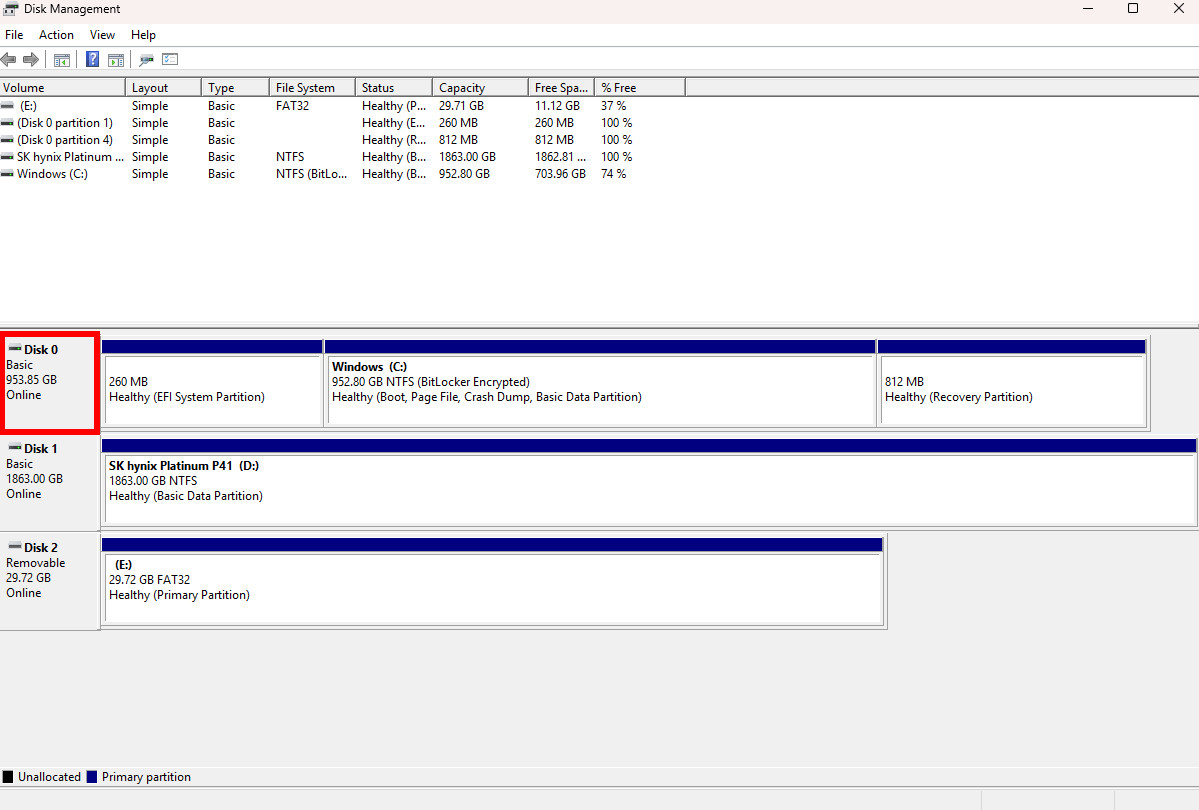
- Right-click the Start button and click Disk Management.
- Right-click the drive that includes the Windows (C:) partition in the bottom section of the Disk Management window. In my case, this reads Disk 0.
- Click Properties.
- Click the Volumes tab in the window that appears.
- Verify that the Partition style reads GPT.
If your hard drive’s Partition Style is GPT, you won’t need to make any additional adjustments to it. You should now be prepared to activate Secure Boot.
If your drive’s partitioning method is MBR (Master Boot Record), you’ll need to take a few additional actions. Proceed with the following steps only if your drive operates on the MBR partition system.
- Tap the Windows key + R shortcut, type cmd, and hit Ctrl + Shift + Enter to launch the Command Prompt in admin mode.
- Type mbr2gpt /validate /disk:0 /allowFullOS. Note that your PC might have a different disk:0 value — this is seen in the Disk Management section I laid out above. Use whatever number is assigned to your Windows boot drive.
- Hit Enter to complete the command.
To make sure your drive conversion from MBR to GPT goes smoothly without any issues, the command prompt will now verify your drive. It’s advisable to have a backup of your drive ready before proceeding, as there is some level of risk associated with this process.
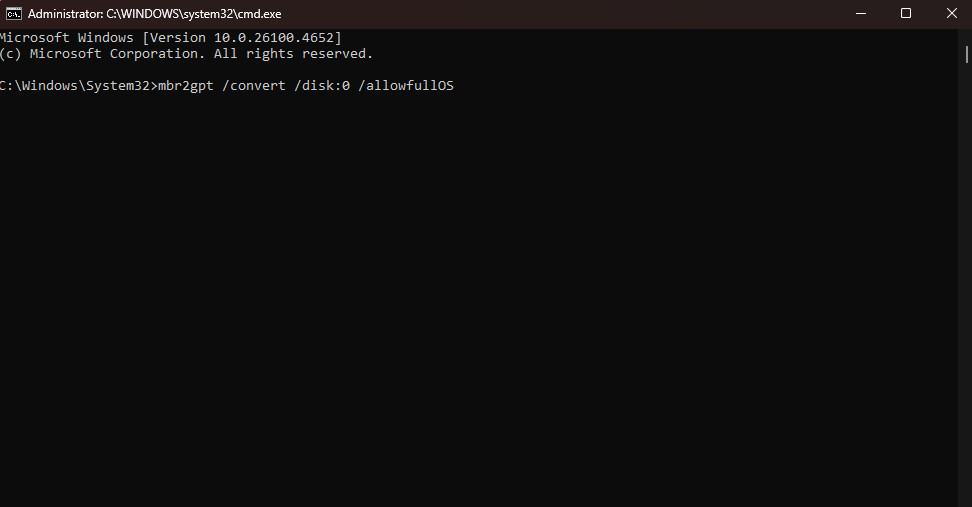
Once you’re ready to convert, follow these steps using the same command prompt window.
- Type mbr2gpt /convert /disk:0 /allowfullOS. Again, use whatever disk number your PC lists in Disk Management.
- Hit Enter to run the command.
Please change your mode to GPT now. Once the transition is done, it will display a message saying “Conversion completed successfully.
If the conversion doesn’t go through as expected, you might notice some instructions about the necessary steps to finish the conversion process. If it indicates that you must change to UEFI mode prior to completing the conversion, here are the steps to follow.
- Restart your PC and enter the BIOS by hitting the appropriate key on your keyboard (usually F11, F12, or Delete).
- Navigate to the Advanced mode in your motherboard’s BIOS.
- Navigate to the Boot menu in the BIOS.
- Find the Compatibility Support Module (CSM) section in the BIOS and disable it.
While the process of accessing and navigating your motherboard’s BIOS might differ slightly from what I’ve described, at least now you know what key areas to explore during your search. If you feel like you’ve made unwarranted adjustments, don’t worry! Simply exit the BIOS, select ‘Don’t Save Changes’, and restart your computer to enter the BIOS as if it were a fresh start.
As a researcher, I’d like to share that disabling the Compatibility Support Module (CSM) will transition your computer into Unified Extensible Firmware Interface (UEFI) mode. From here, you are now prepared to proceed with the final step towards enabling Secure Boot on Windows.
How to enable Secure Boot in Windows 10 and Windows 11
Once you’ve taken care of the UEFI settings on your computer, you can now proceed to activate Secure Boot within Windows 10 and Windows 11. Here are the steps for enabling it.
This paraphrase maintains the original meaning while using simpler and more natural language to make it easier for readers to understand.
- Restart your PC and enter the BIOS by hitting the appropriate key on your keyboard (usually F11, F12, or Delete).
- Navigate to the Advanced mode in your motherboard’s BIOS.
- Navigate to the Boot or Secure Boot menu in the BIOS.
- Ensure that the Secure Boot state is set to enabled. The status might also simply read Windows UEFI mode rather than mentioning anything about enabled or disabled.
- Save your BIOS changes and restart your PC.
It’s time to play Battlefield 6 on PC
As a system analyst, I’ve guided you through the essential steps to activate Secure Boot on your Windows 10 or Windows 11 computer. With these instructions, your device should now be equipped with an enhanced level of security.
If you encounter any problems, feel free to write a message in the comments area below, and we’ll make every effort to guide you in resolving those issues.
Read More
- Gold Rate Forecast
- Looks Like SEGA Is Reheating PS5, PS4 Fan Favourite Sonic Frontiers in Definitive Edition
- Pluribus Star Rhea Seehorn Weighs In On That First Kiss
- Dune 3 Gets the Huge Update Fans Have Been Waiting For
- Arknights: Endfield – Everything You Need to Know Before You Jump In
- 22 actors who were almost James Bond – and why they missed out on playing 007
- Antiferromagnetic Oscillators: Unlocking Stable Spin Dynamics
- 5 Weakest Akatsuki Members in Naruto, Ranked
- 10 Steamiest Erotic Thriller Movies of the 21st Century
- Action Comics #1096 is Fun Jumping-On Point for Superman Fans (Review)
2025-08-06 17:13