Microsoft will stop supporting Windows 10 on October 14, 2025, after a decade of service. This means it will no longer receive security updates, technical assistance, or general maintenance.
When Microsoft stops supporting Windows 10, your computer won’t immediately stop working. However, continuing to use it will eventually put your device at risk from security problems and could cause issues with new software and hardware. To keep your computer safe and working smoothly, you’ll need to take steps like paying for continued security updates, upgrading to a computer that can run Windows 11, or finding other solutions for older devices.
This guide will show you three ways to keep using your current computer with either Windows 10 or Windows 11.
Important: Before upgrading your computer with new hardware – whether it’s officially supported or not – always create a complete backup. This will allow you to restore your computer to its previous state if any problems occur during the upgrade.
1. Enroll PC in the Extended Security Updates program
To keep using your current computer, the simplest option is to sign up for the ESU program. This will provide support for it until October 13, 2026.
Microsoft offers three options for joining the program:
- Free – You can enroll for free if you’re backing up files to OneDrive, regardless of whether you have a Microsoft 365 subscription.
- Microsoft Rewards – You can also redeem 1,000 points if you’re enrolled in the rewards program.
- Paid – Alternatively, you can pay $30 to access the program.
As a big fan, I just learned that no matter which plan you pick, you can connect up to 10 devices using the same Microsoft account. And it’s important to remember you need to be logged in *with* that Microsoft account, because that’s where all your device info is saved.
Please ensure your computer is using Windows 11 version 22H2 and has all the latest updates installed through the Windows Update settings.
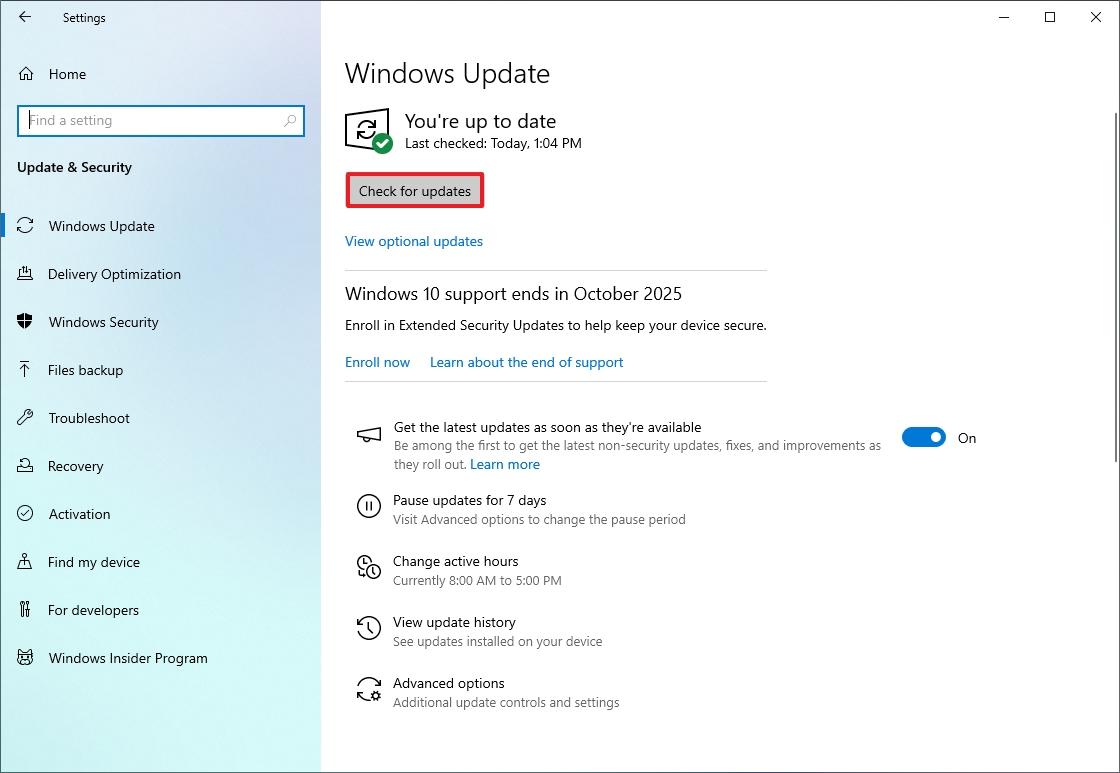
To sign up your Windows 10 PC in the Extended Security Updates (ESU) program, use these steps:
- Open Settings.
- Click on Update & Security.
- Click on Windows Update.
- Click the “Check for updates” button to ensure the device has the latest updates, and the enrollment option becomes available.
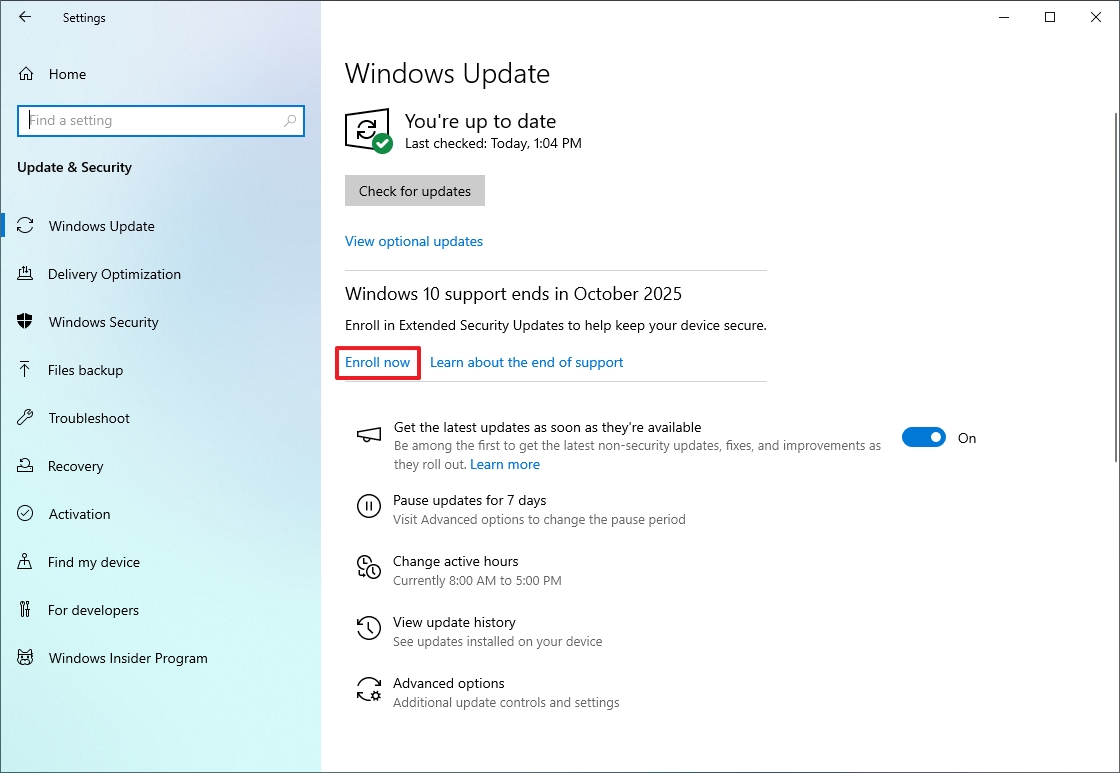
- Click the Enroll now option under the end of support notification.
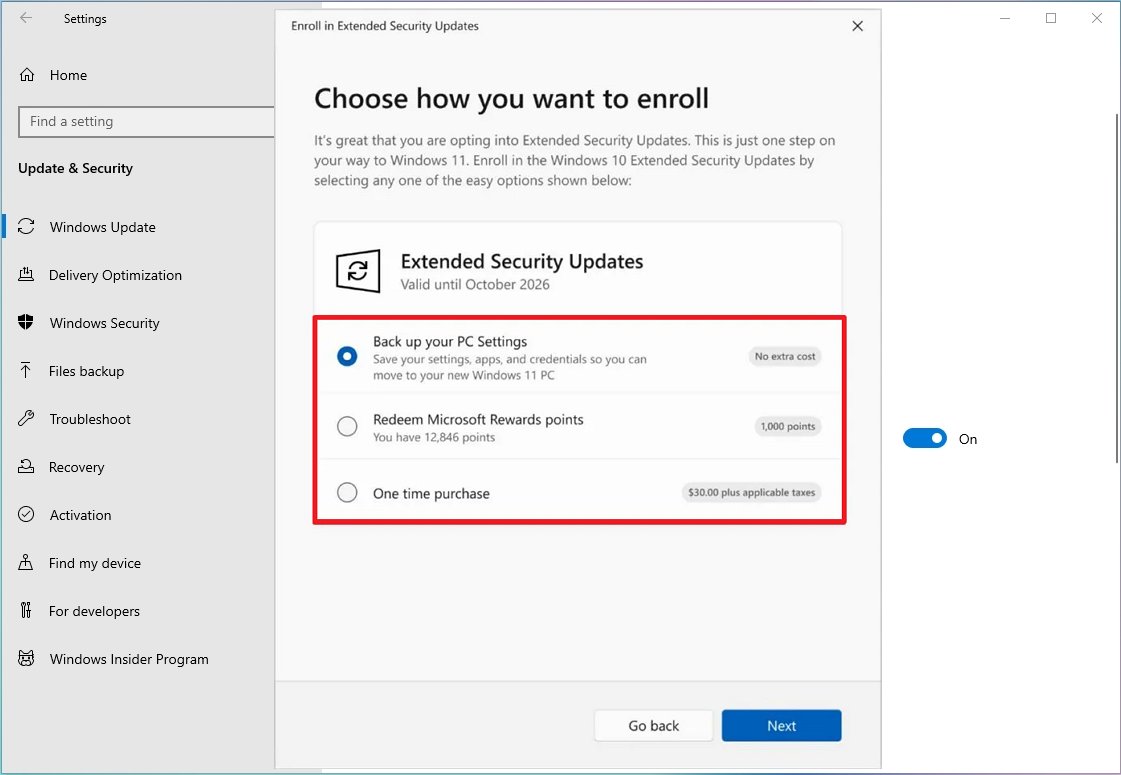
- Click the Next button.
- Select the option to enroll your device, including “Back up your PC settings,” “Redeem Microsoft Rewards points,” or “One time purchase.”
- Quick note: If the system detects that you’re already backing up files to the cloud, you’ll see the “Enroll” option immediately. If you’re adding a second device, you’ll see the “Add device” option instead.
- Click the Next button.
- Continue with the on-screen directions.
- Click the Done button.
- Check for the “Your PC is enrolled to get Extended Security Updates” message in the Windows Update settings to confirm the enrollment.
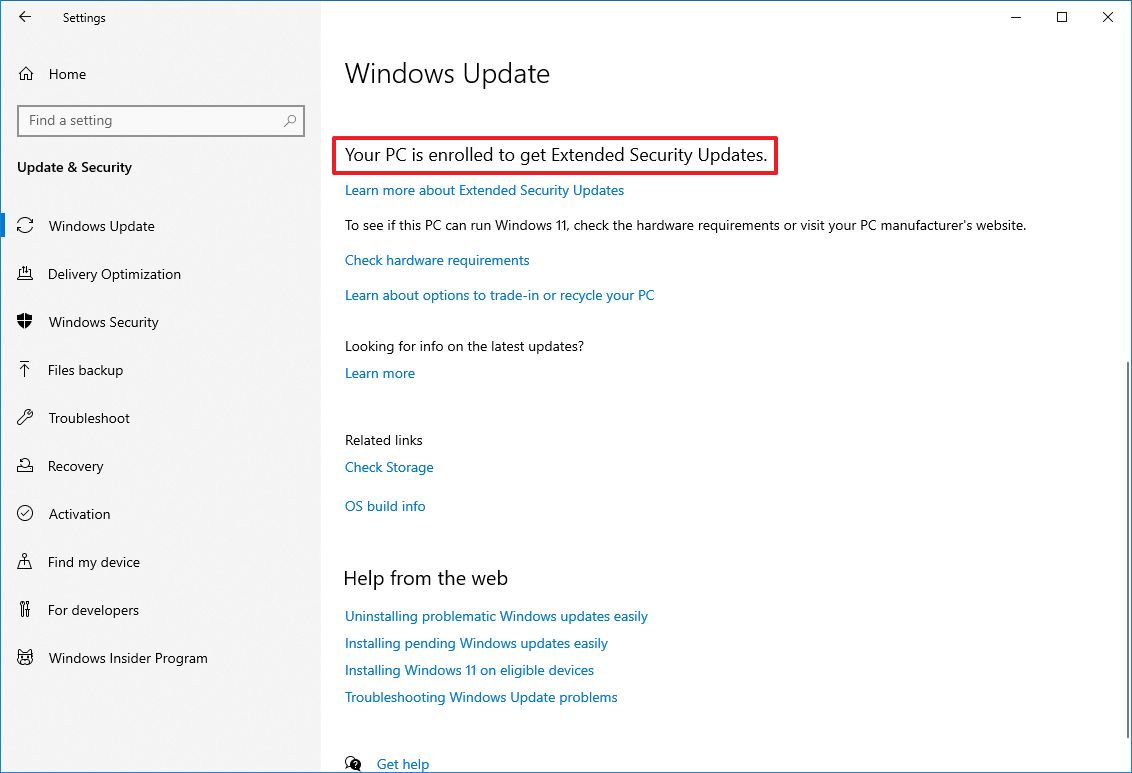
After you finish these steps, your Windows 10 computer will continue to receive important security and quality updates until October 2026.
This program won’t receive improvements or new features, and it doesn’t come with help from Microsoft’s technical support team.
2. Upgrade a supported PC to Windows 11
The easiest way to continue using your current computer is to upgrade from Windows 10 to Windows 11 by checking for updates in your settings.
You can upgrade your system directly on or after October 14, 2025, when support for the current operating system ends.
Whether or not you can upgrade directly depends on your computer’s hardware. Besides having a compatible processor, enough memory, and sufficient storage, your computer needs to use UEFI and have the Trusted Platform Module (TPM) turned on.
As a fan of smooth installations, I’ve learned that Secure Boot is a really good idea, but thankfully, it’s not something you *have* to enable to get the operating system up and running. It’s recommended for extra security, but it won’t stop you from installing if you can’t or don’t want to use it.
If your computer uses the older BIOS system, you need to change from the MBR to GPT partition style before switching to the newer UEFI mode. The MBR2GPT tool can do this easily without deleting your files. If you don’t make this change first, your computer won’t start up when UEFI is enabled.
Upgrade PC with required components already enabled
Okay, so I’m trying to upgrade from Windows 10 to 11, and thankfully my computer meets the requirements – it uses UEFI and already has TPM 2.0 turned on. Here’s what I’ve found you need to do using Windows Update to actually get the upgrade installed.
- Open Settings.
- Click on Update & Security.
- Click on Windows Update.
- Click the Check for updates button.
- Click the “Download and install” button.
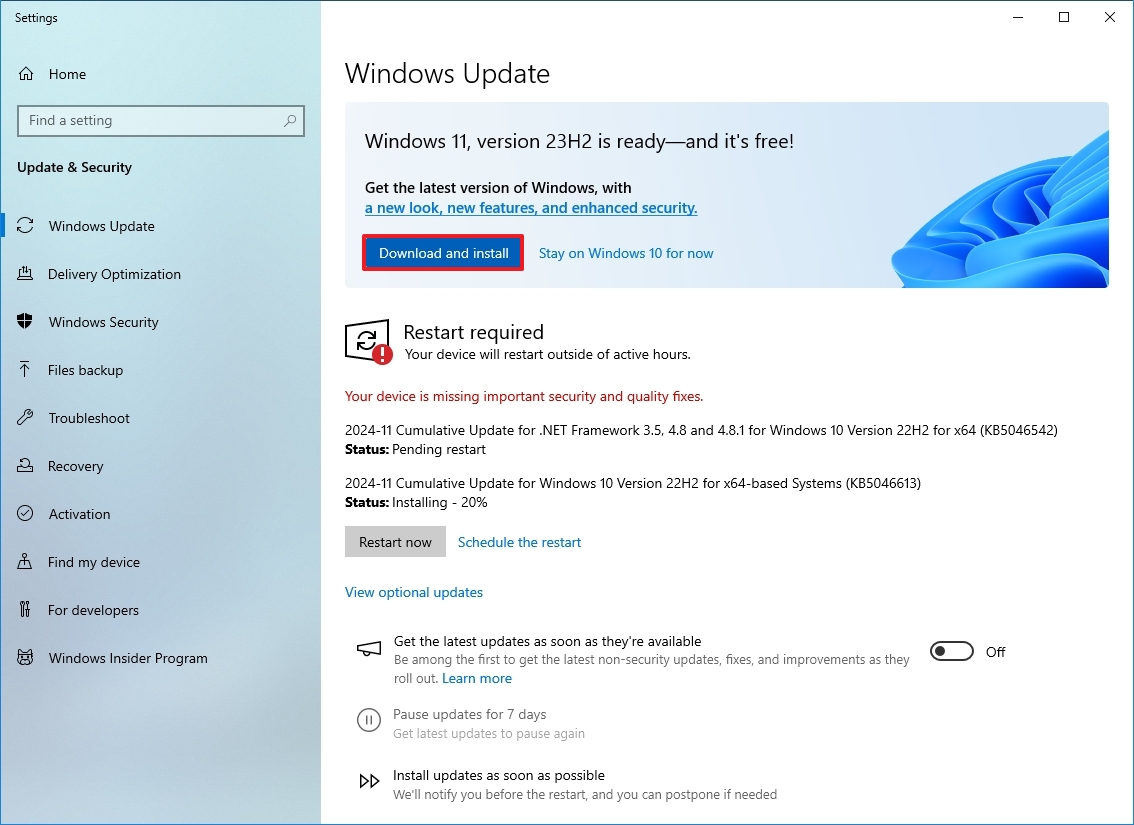
- Click the Restart now button.
Once you finish the steps, your computer will restart and automatically begin upgrading to the new operating system version.
To upgrade to Windows 11, you can use the Installation Assistant or an ISO file – just follow the instructions below. If you prefer a fresh start, you can also perform a clean installation using the same instructions.
Upgrade PC with required components disabled
If your computer meets the system requirements but still uses the older BIOS and MBR partitioning, you’ll need to convert to GPT partitioning, then switch to UEFI and turn on TPM 2.0.
Convert MBR to GPT partition style
To convert a drive using MBR to GPT on Windows 10, use these steps:
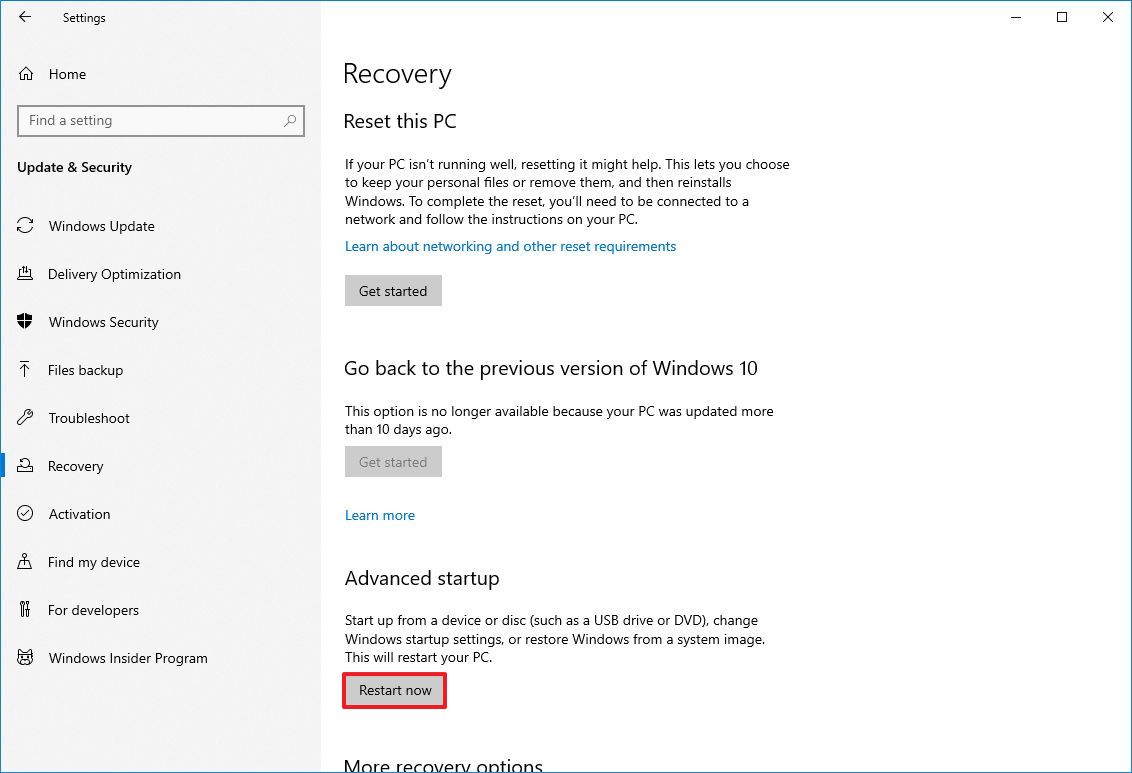
- Open Settings.
- Click on Update & Security.
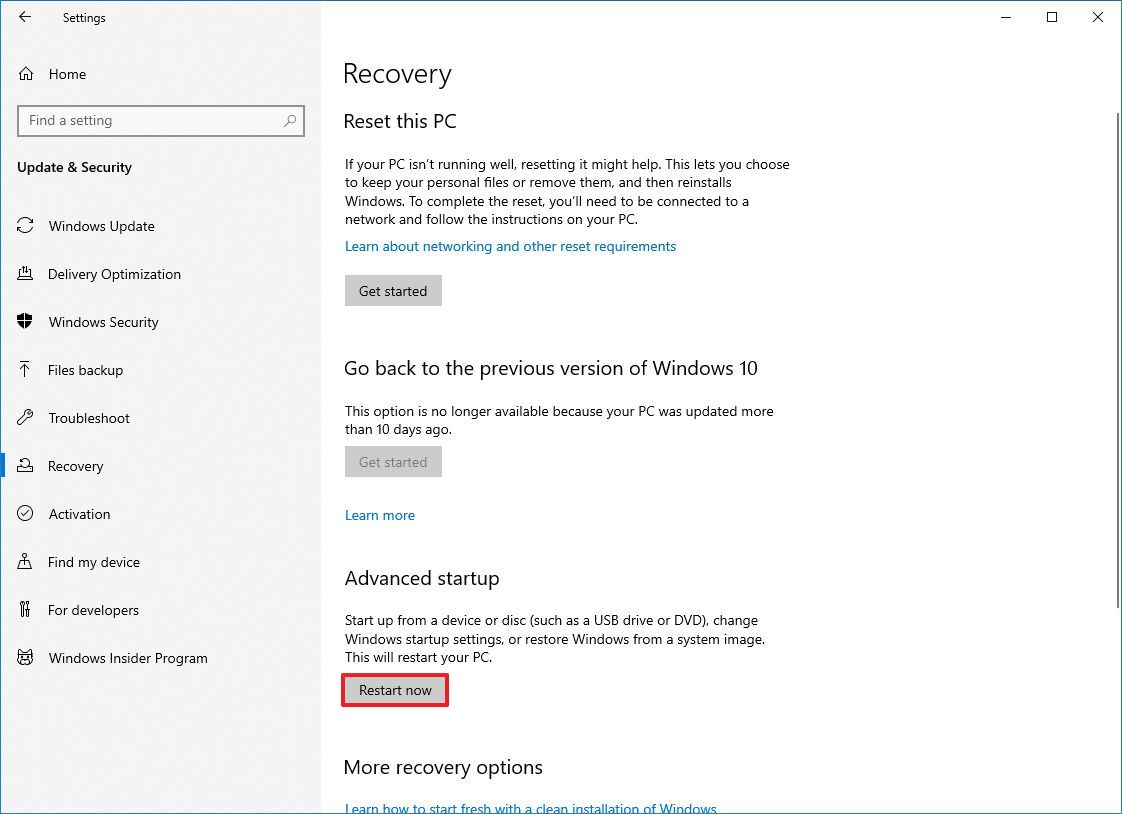
- Click on Recovery.
- Click the Restart now button under the “Advanced startup” section.
- Click the Troubleshoot option.
- Click on Advanced options.
- Click the Command Prompt option.
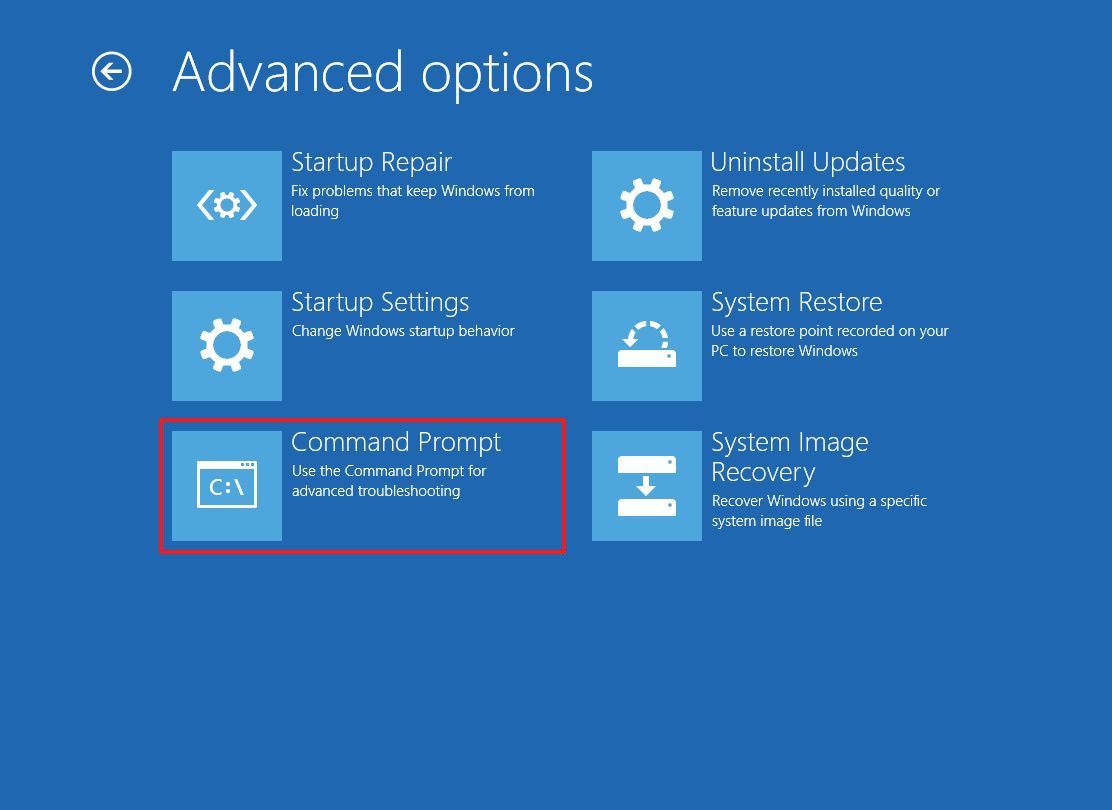
- Select your administrator account and sign in (if applicable).
- Type the following command to validate the drive’s requirements and press Enter: mbr2gpt /validate
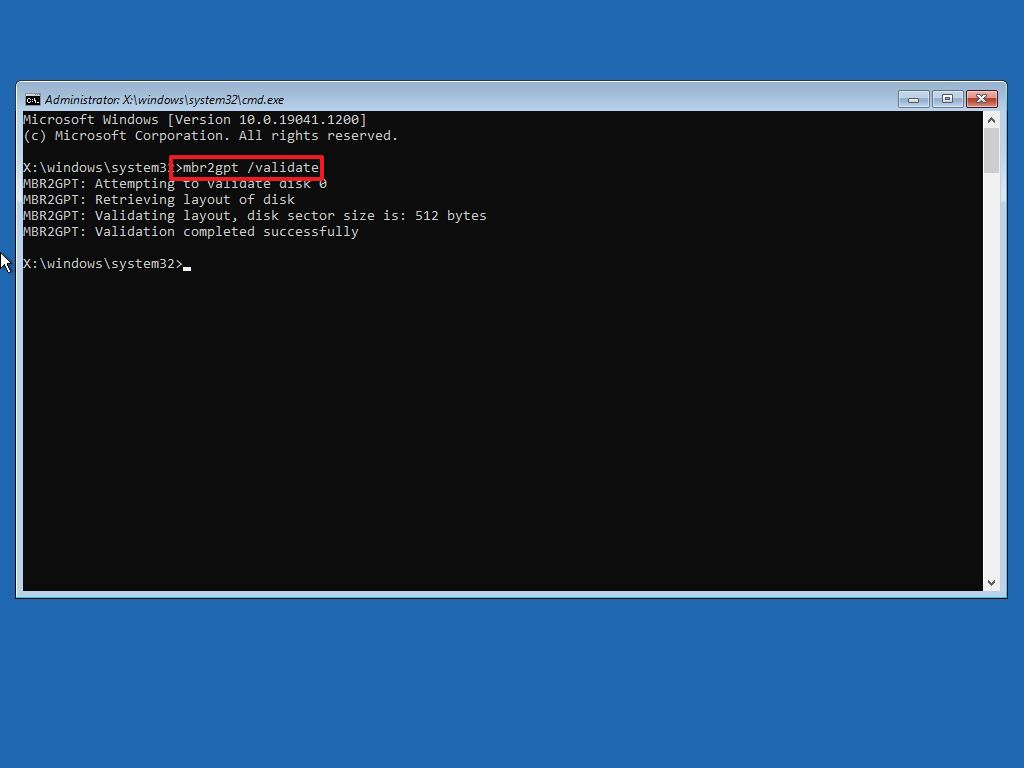
- Type the following command to convert the drive from MBR to GPT and press Enter: mbr2gpt /convert
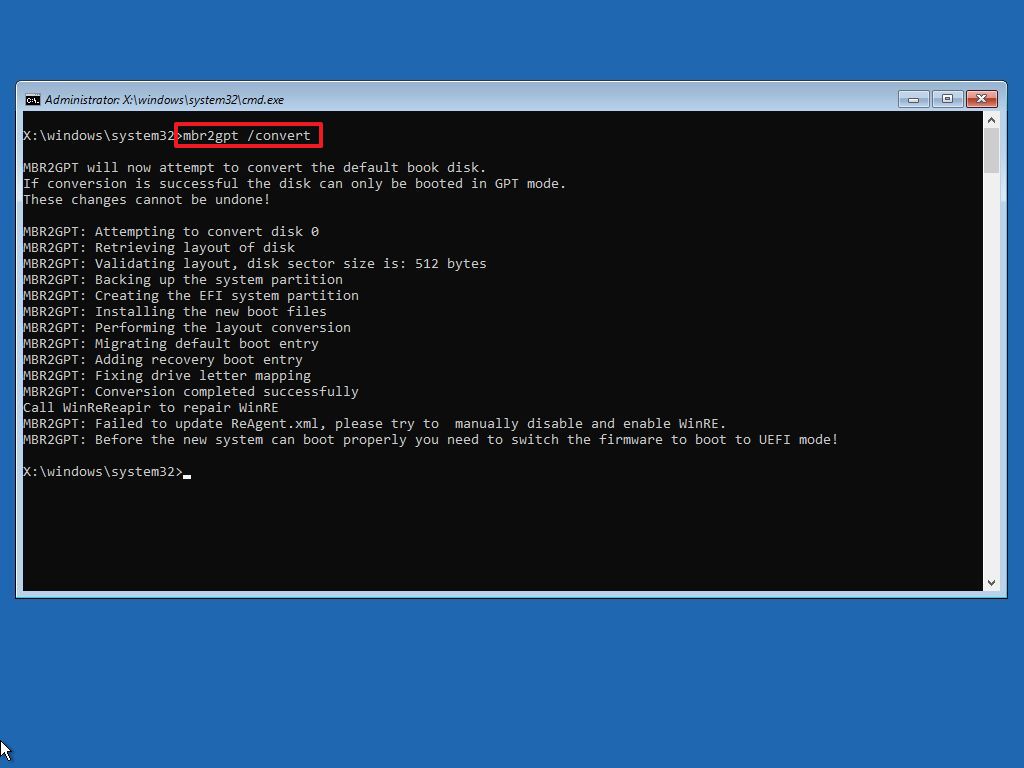
- Quick note: The command output in this image indicates that the conversion has completed successfully, but there was an issue with the Windows Recovery Environment. If this happens, once you’re in the desktop, run then the reagentc /disable and reagentc /enable commands from Command Prompt (admin).
- Click the Close button.
- Click the “Turn off your PC” option.
After finishing these steps, the partition will change to GPT format. This will prevent your computer from starting up normally, as you’ll need to change your system’s firmware to UEFI to fix it.
Switch from BIOS to UEFI
To change the firmware type on your computer, use these steps:
- Press the power button to start the computer.
- Press the key as indicated on the screen to access the firmware.
- Quick note: These steps are different depending on the computer model and manufacturer, but usually you have to press the Delete, Esc, or one of the Function keys to access the firmware.
- Open the boot menu (depending on your motherboard).
- Select the option to switch from BIOS to UEFI.
- Save the changes.
After completing the steps, the computer should start normally.
Enable TPM 2.0 inside UEFI
To enable TPM 2.0 on your computer, use these steps:
- Open Settings.
- Click on Update & Security.
- Click on Recovery.
- Click the Restart now button under the “Advanced Startup” section.
- Click the Troubleshoot button.
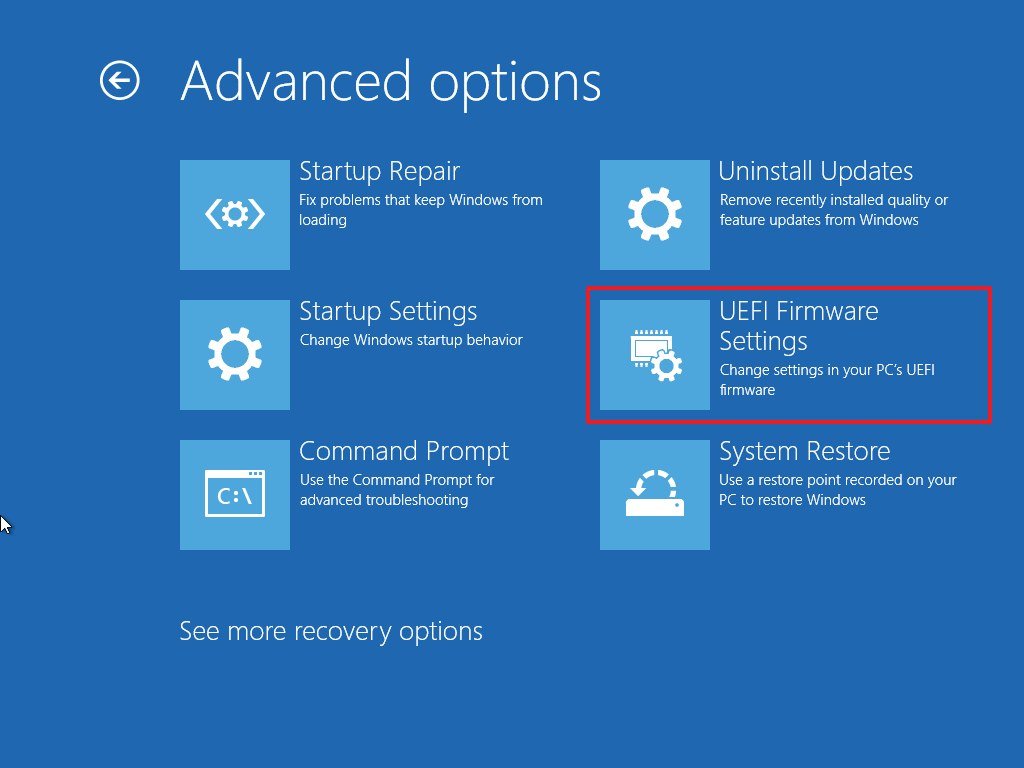
- Click on Advanced options.
- Click the “UEFI Firmware Settings” option.
- Click the Restart button.
- Open the Security page.
- Enable the “Trusted Platform Module (TPM)” option (if applicable).
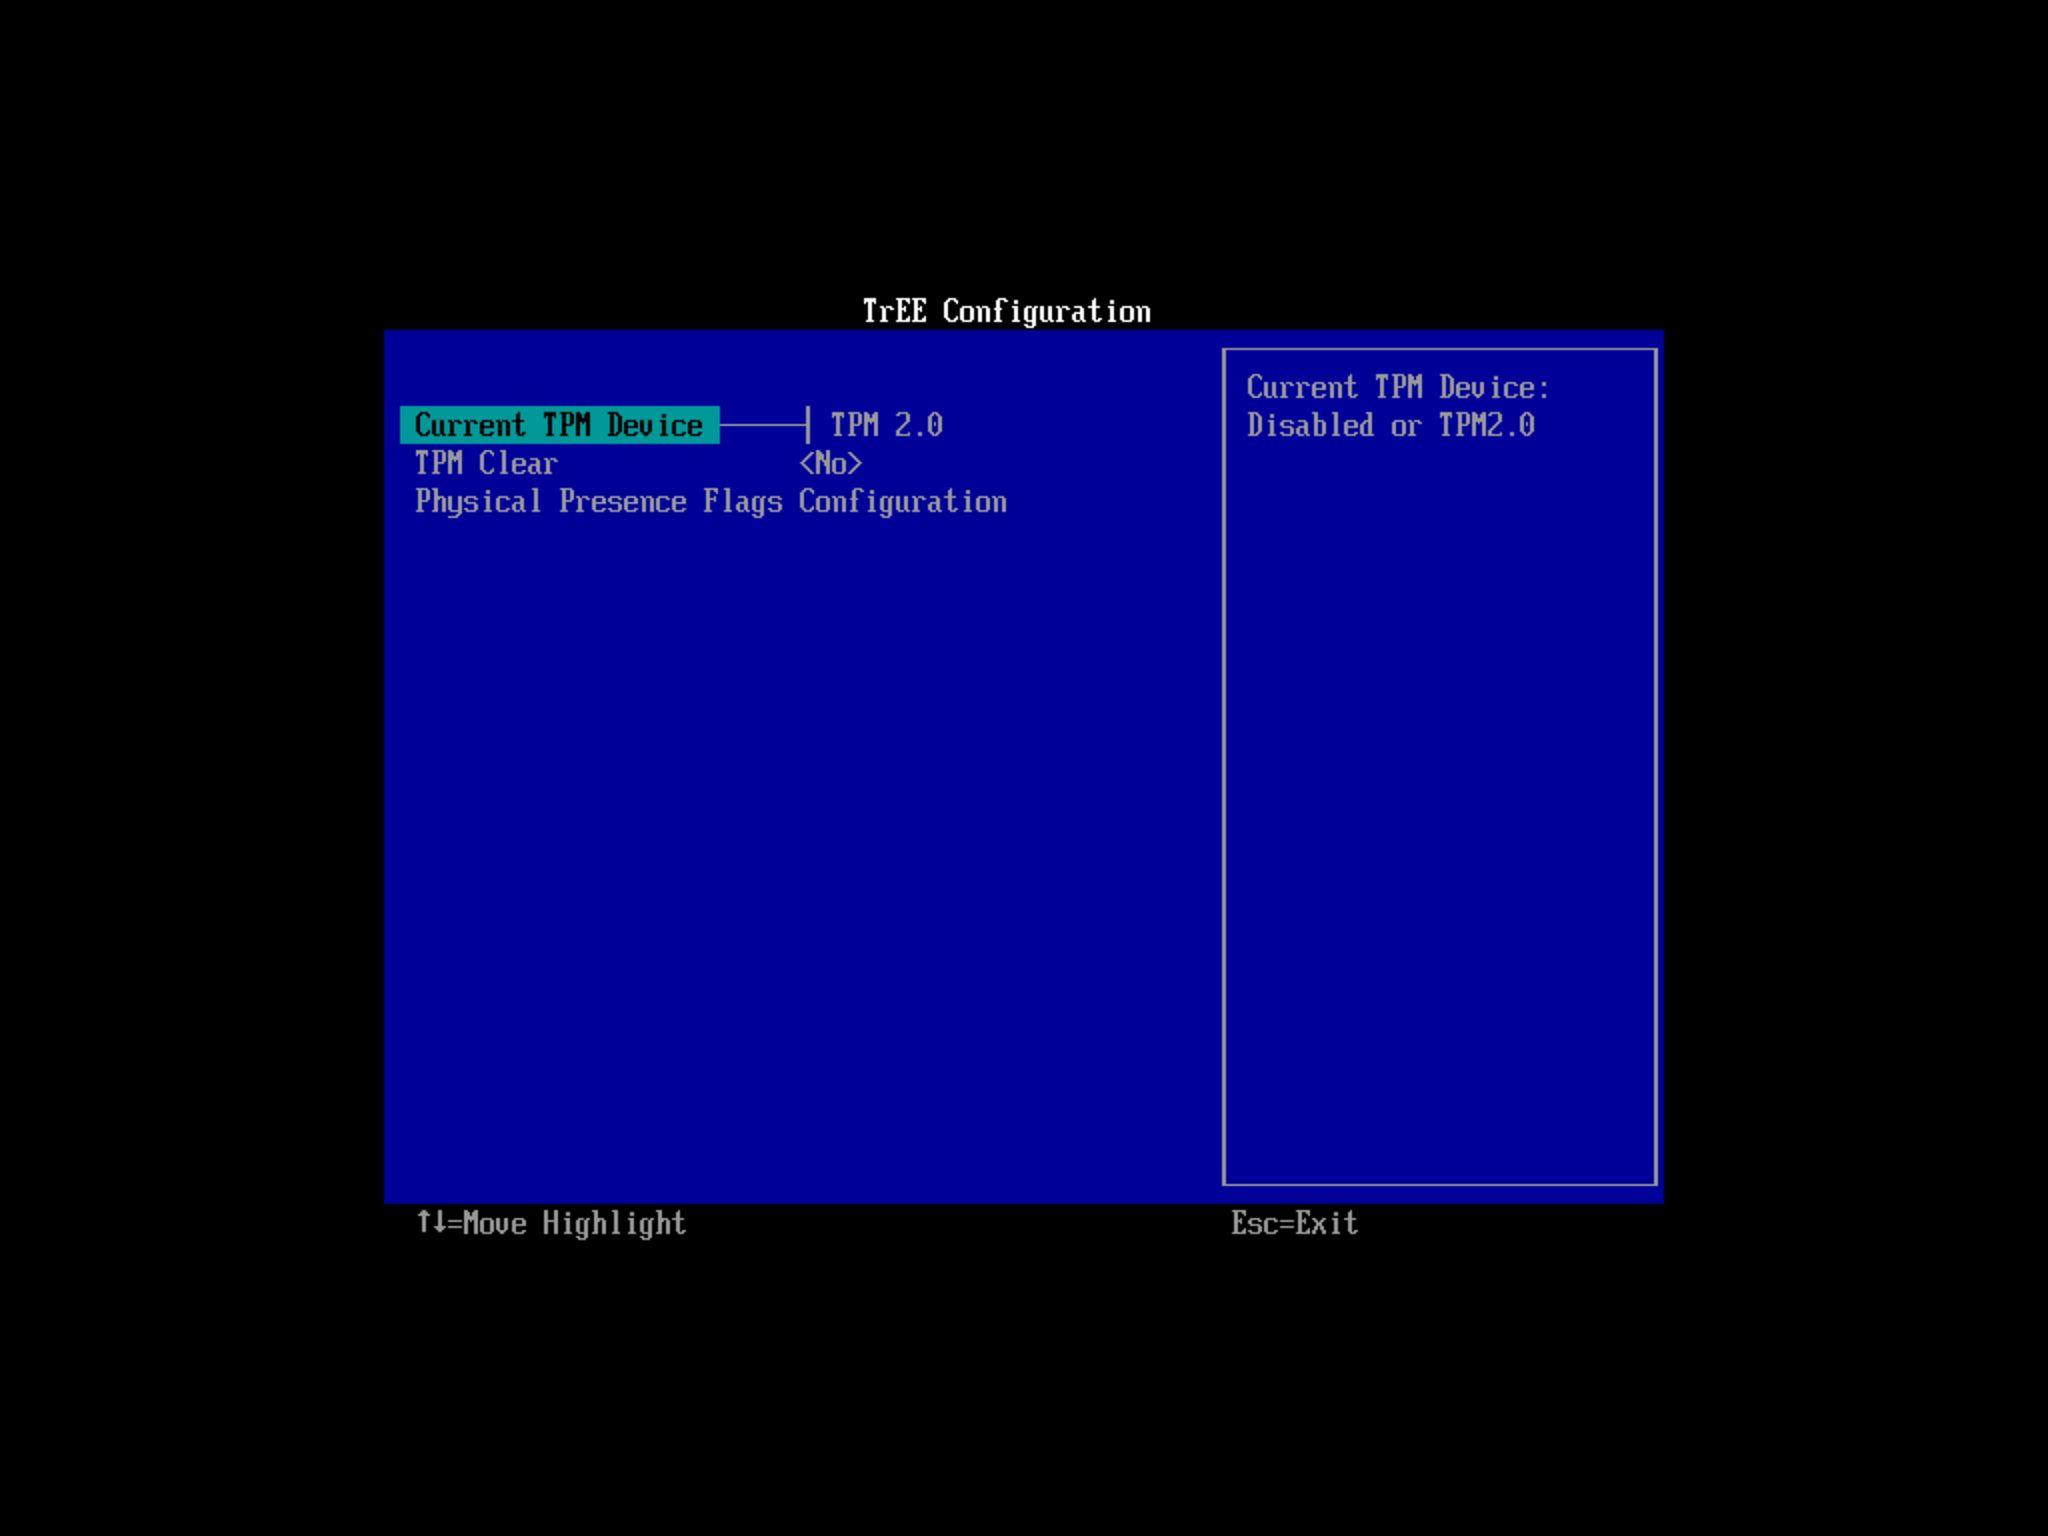
- Enable the Secure Boot option (if applicable).
- (Optional) Open the Boot page.
- Set the boot order to start from the USB flash drive with the Windows 11 installation files (if necessary).
- Save the changes.
Once you complete the steps, you can proceed with the upgrade to the latest version of Windows 11.
Upgrade to Windows 11
To upgrade to Windows 11 from Windows 10, use these steps:
- Open Settings.
- Click on Update & Security.
- Click on Windows Update.
- Click the Check for updates button.
- Click the “Download and install” button.
- Click the Restart now button.
Once you finish the steps, your computer will restart and automatically begin upgrading to the new operating system, keeping all of your files safe.
3. Upgrade an unsupported PC to Windows 11
Even though Windows 11 officially needs certain hardware, you might still be able to upgrade from an older version of Windows directly on your computer, even if it doesn’t meet those requirements, by creating a special installation USB drive.
Just a heads-up: installing Windows 11 on a computer that doesn’t meet the system requirements isn’t recommended. Microsoft won’t offer support for those systems, and while you might still get updates, they may not work correctly. It’s best to make sure your hardware is compatible before upgrading.
Using the operating system without key security features like TPM 2.0 and Secure Boot can leave your system vulnerable to threats.
Download Windows 11 media files
To download and create a Windows 11 USB installation media, use these steps:
- Open the Microsoft download website.
- Select the only Windows 11 option.
- Click the Confirm button under the “Download Windows 11 Disk Image (ISO) for x64 devices” section to save the file to your device.
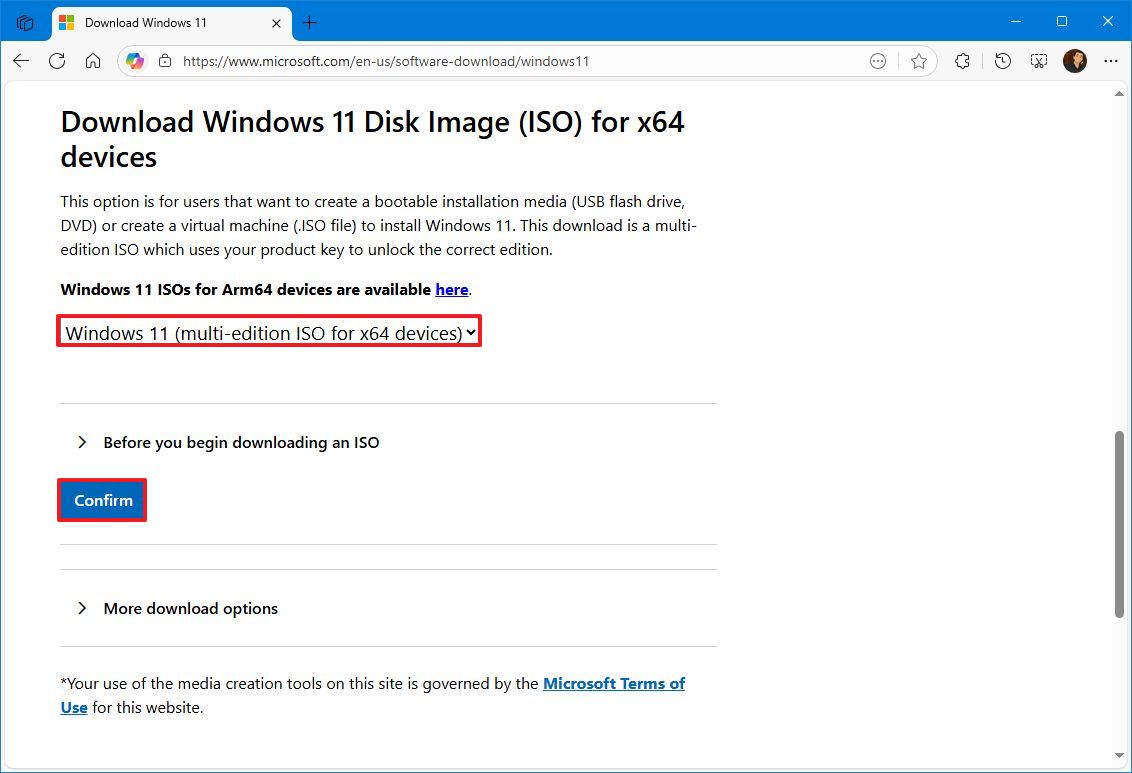
- Choose the installation language.
- Click the Confirm button.
- Click the “64-bit Download” button.
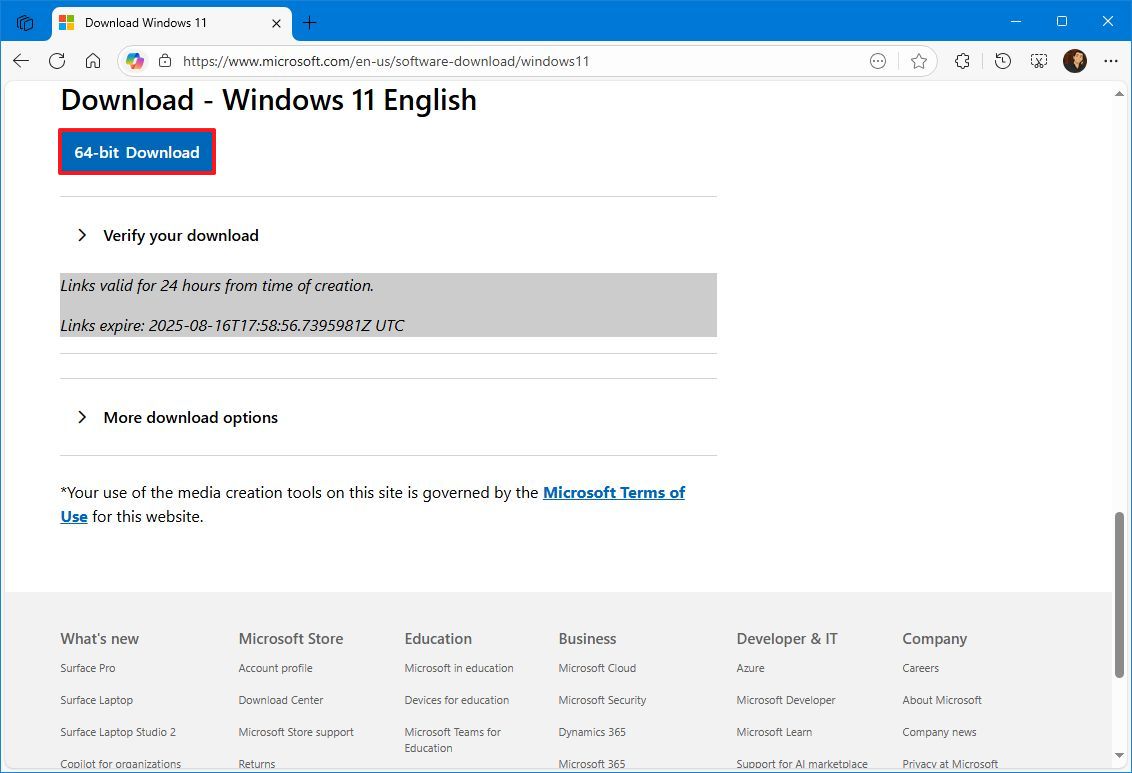
After finishing these steps, you’ll be able to create a bootable USB drive that works even if your computer doesn’t meet the usual hardware specifications.
Create Windows 11 USB installer
To create a USB bootable media, connect a flash drive of at least 8GB of space and use these steps:
- Open the Rufus download page.
- Click the Rufus-4.x.exe (standard) option and save the file on your computer under the “Download” section.
- Double-click the Rufus-x.x.exe file to launch the tool.
- Select the USB flash drive under the “Device” section.
- Click the Select button on the right side.
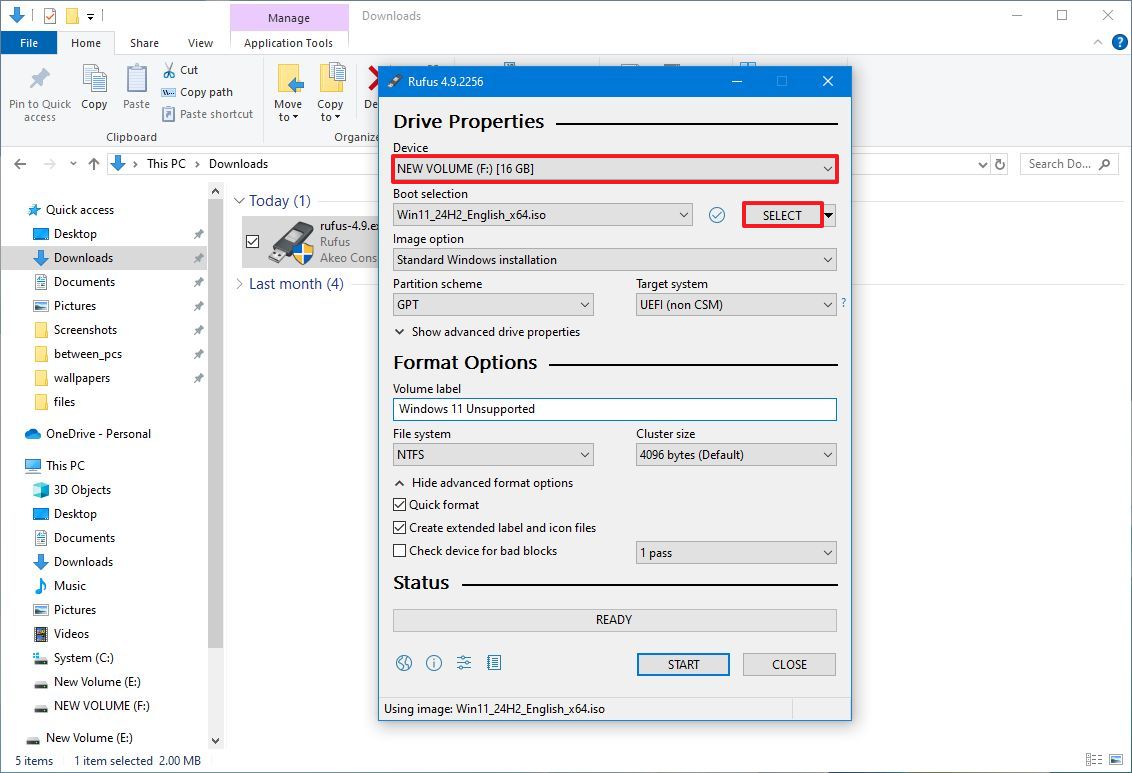
- Select the Windows 11 ISO file from the folder location.
- Click the Open button.
- Select the “Standard Windows Installation” option in the “Image option” setting.
- Select the GPT option in the “Partition scheme” setting.
- Select the “UEFI (non CSM)” option in the “Target system” setting.
- Under the “Show Advanced drive properties” section, do not change the default settings (unless you know what you are doing).
- Under the “Volume label” field, confirm a name for the bootable media — for example, “Windows 11 Unsupported.”
- In the “File system” and “Cluster size” options, do not change the default settings.
- Click the “Show advanced format options” button.
- Check the Quick format option.
- Check the “Create extended label and icon files” option.
- Click the Start button.
- Check the “Remove requirement for 4GB+RAM, Secure Boot and TPM 2.0” option to create a USB flash drive for unsupported devices.
- (Optional) Check the “Remove requirement for an online Microsoft account” option to set up an installation with a local account.
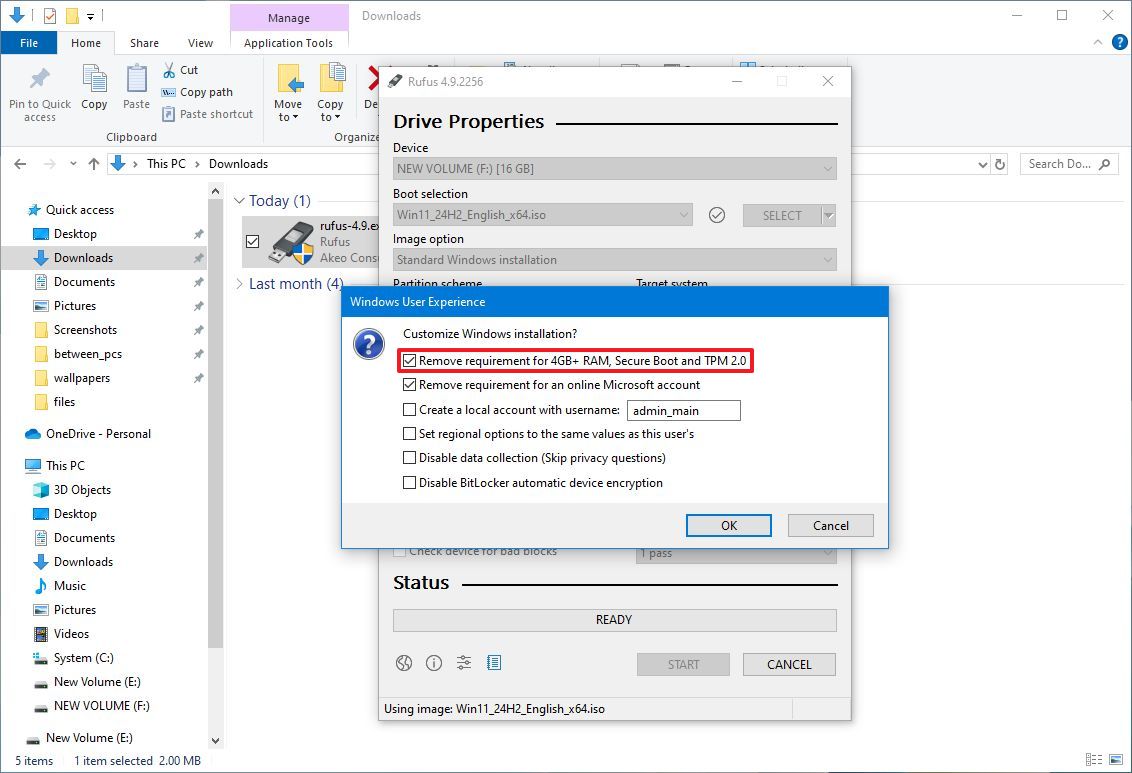
- Click the OK button to confirm.
- Click the Close button.
Once you finish these steps, you’ll be able to install Windows 11 on computers that don’t meet the usual requirements for processor type or TPM 2.0.
Upgrade to Windows 11 from 10
If your Windows 10 computer isn’t officially supported for upgrading to Windows 11, you can still try by using a USB drive with the Windows 11 installation files. Here’s how:
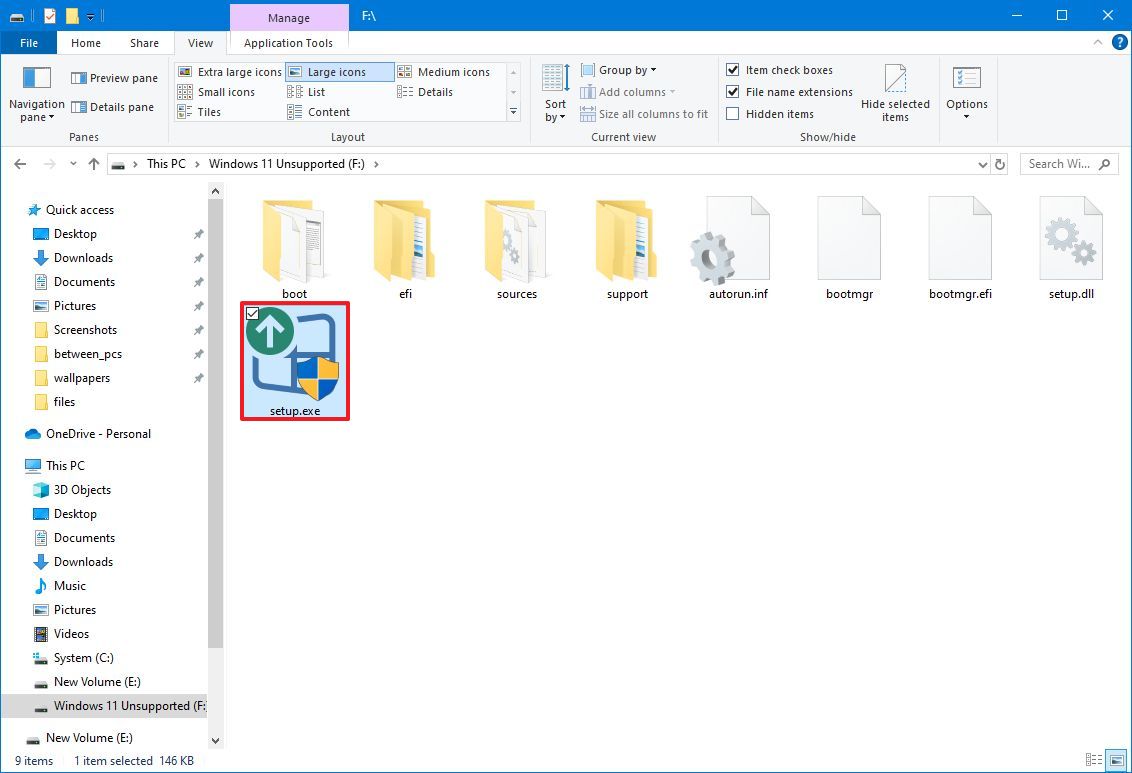
- Open File Explorer.
- Click on This PC from the left pane.
- Open the USB installation media under the “Devices and drives” section.
- Double-click the setup.exe file to begin the upgrade process.
- Click the Next button.
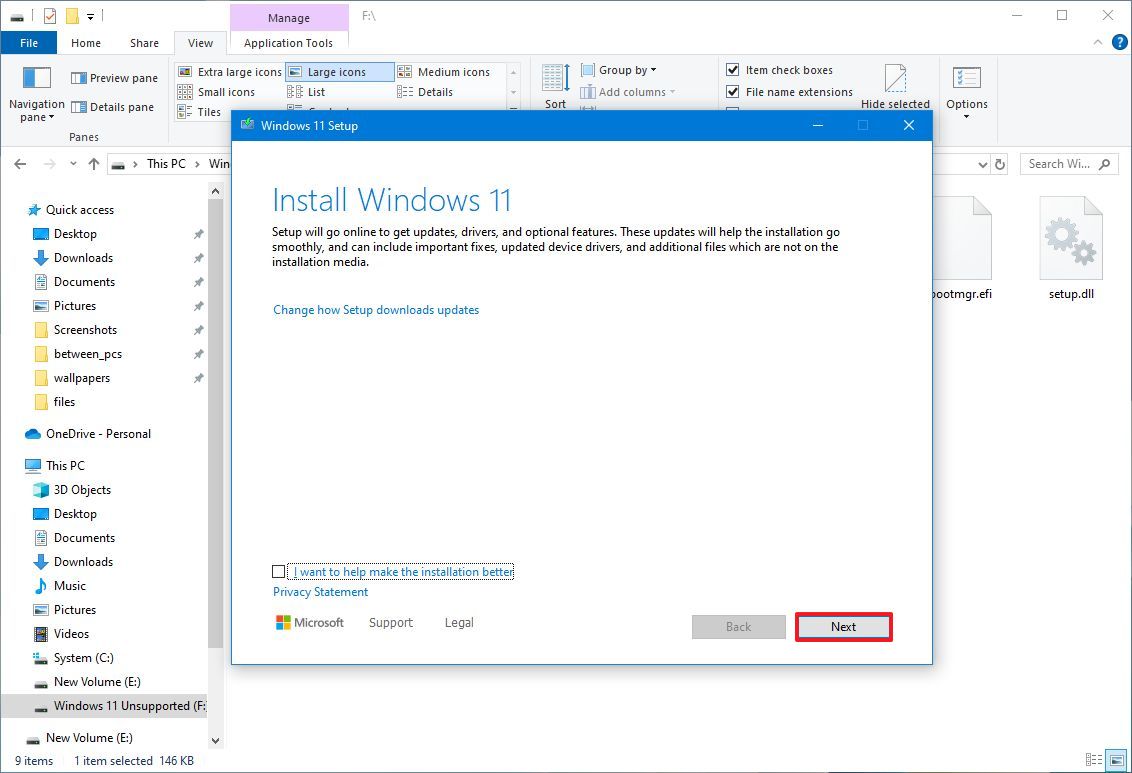
- Click the Accept button.
- Click the Install button.
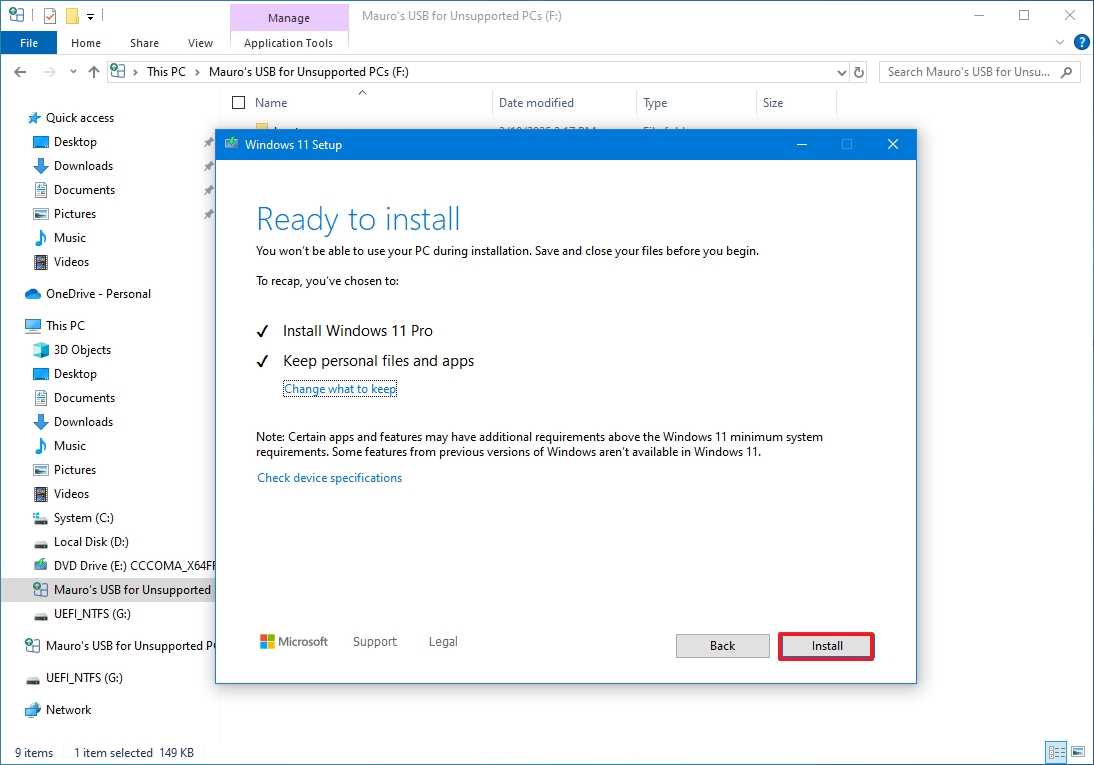
Once you complete the steps, the computer should upgrade to Windows 11, bypassing the requirements.
If the upgrade isn’t going smoothly, it’s best to back up your entire computer first. Copy all your important files to an external drive, then do a clean installation of the operating system. After that, you can copy your files back onto the newly installed system.
There are several methods for installing Windows 11 even on computers it doesn’t officially support. You can do a fresh install, or use tools like Ventoy and Flyoobe to help with the process.
FAQs about Windows 10 end of life
These are common questions regarding the Windows 10 end of support.
What type of updates will I get using the Extended Security Updates program?
As an analyst, I can tell you the ESU program is really focused on bare-bones security. It delivers only the essential updates needed to protect your system, and that’s it. Don’t expect any new functionality or improvements – it’s strictly about maintaining a basic level of security.
When is the last day to enroll my device in the ESU program?
You can register your computer for this program either before or after Windows 10 support ends, but it won’t give you continued support beyond the program’s end date. The program will conclude on October 13, 2026, no matter when you sign up.
What are the requirements to enroll my PC in the ESU program?
To sign up for Extended Security Updates, your computer needs to be running Windows 10 version 22H2 and have all the latest updates installed.
This program also needs you to sign in with a Microsoft account. If you currently use a local account, you’ll be asked to connect it to a Microsoft account to continue.
Can I skip the enrollment and use an antivirus to stay protected?
As a researcher in cybersecurity, I’ve found that while antivirus software is essential, it’s simply not enough on its own to keep your devices secure. System updates are equally important; they address vulnerabilities that antivirus might miss. Think of it as a layered approach – you need both to have comprehensive protection.
Is upgrading to Windows 11 free?
If your computer is compatible, you can upgrade to Windows 11 for free through the Windows Update feature.
What happens if my PC doesn’t meet Windows 11 requirements?
While it’s possible to install Windows 11 on older or incompatible computers using special methods, it’s generally not a good idea. Doing so can create security risks and make your system unstable, and Microsoft won’t provide updates for these unsupported setups.
Even so, it remains a practical method for running a compatible operating system even if your computer isn’t officially supported.
Will I lose my files if I upgrade to Windows 11?
Okay, so if I upgrade my operating system directly, everything I have – my files, my apps, all of it – *should* stay put. But honestly, I’m a firm believer in being prepared, so I always make a complete backup first. You just never know what could happen, and it’s way better to be safe than sorry!
More resources

Stay up-to-date with the latest from Windows Central by following us on Google News! You’ll get all our news, insights, and features right in your feed.
Read More
- 4 TV Shows To Watch While You Wait for Wednesday Season 3
- Gold Rate Forecast
- All 6 Takopi’s Original Sin Episodes, Ranked
- Every Creepy Clown in American Horror Story Ranked
- 40 Inspiring Optimus Prime Quotes
- 10 Most Memorable Batman Covers
- PlayStation Plus Game Catalog and Classics Catalog lineup for July 2025 announced
- Chill with You: Lo-Fi Story launches November 17
- Best X-Men Movies (September 2025)
- 10 Best Buffy the Vampire Slayer Characters Ranked
2025-09-21 01:14