Your ASUS ROG Ally is more than just a gaming handheld—it’s a complete Windows 11 computer. This gives you the freedom to customize it just like any other PC to optimize your gaming experience and performance.
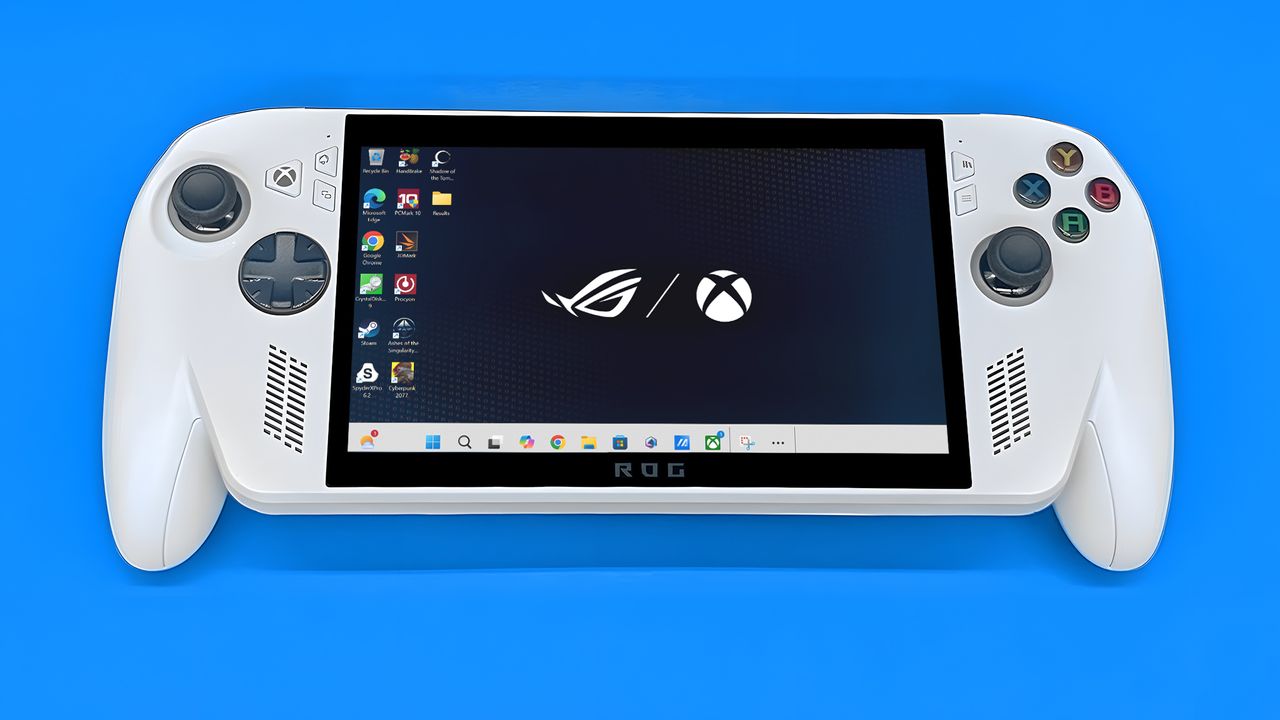
The Xbox Ally is a portable gaming PC created through a partnership between ASUS’s ROG division and Microsoft’s Xbox team. It’s designed to combine the power of a PC with the Xbox gaming experience in a handheld device.
This device is available in two versions: the standard Ally and the more powerful Ally X. The Ally has an AMD Ryzen Z2 A processor (with 4 cores and integrated graphics) and 16GB of memory. The Ally X steps things up with an AMD Ryzen AI Z2 Extreme processor (8 cores, improved graphics, and a dedicated AI processing unit) and 24GB of memory.
This handheld device takes full advantage of the immersive, full-screen Xbox experience coming with the Windows 11 2025 Update (version 25H2). It feels and plays more like a dedicated gaming console, making it easier to launch and enjoy your games.
Full-screen mode isn’t just a simple console view; it also optimizes your system for better performance. It does this by temporarily pausing unnecessary background processes, freeing up resources and reducing energy use. The result is smoother gameplay and extended battery life.
Even though it’s already well-optimized, you can still tweak a few settings to improve your experience even further.
This guide will show you how to customize your ROG Xbox Ally (which runs Windows 11) to improve its performance.
Best tweaks for ROG Xbox Ally running Windows 11
Your Xbox handheld automatically comes set up for gaming with features like ‘Game Mode’ and a full-screen display, but you can still customize things further to get the perfect experience.
1. Check and download updates
It might sound familiar, but Microsoft and device makers regularly release updates to improve how your operating system and devices work. These updates are important for keeping everything running smoothly and efficiently.
To help improve performance, please check for and install the latest updates for Windows 11, Armoury Crate SE, AMD drivers, and any other relevant software.
Check for Windows 11 updates
To update Windows 11, use these steps:
- Open Settings.
- Click on Windows Update.
- (Optional) Turn on the “Get the latest updates as soon as they’re available” toggle switch.
- Click the “Check for updates” button.
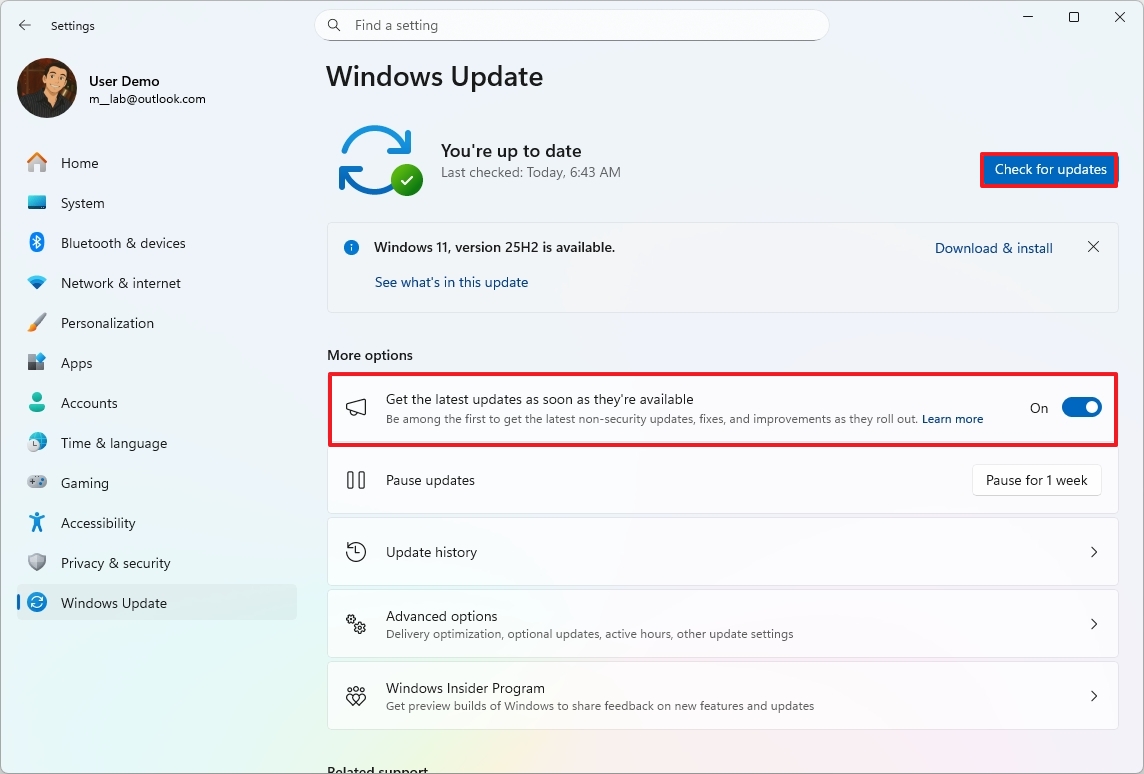
- Click the Restart now button.
- (Optional) Open Settings.
- Click the Advanced options page on the right side.
- Click the Optional updates setting.
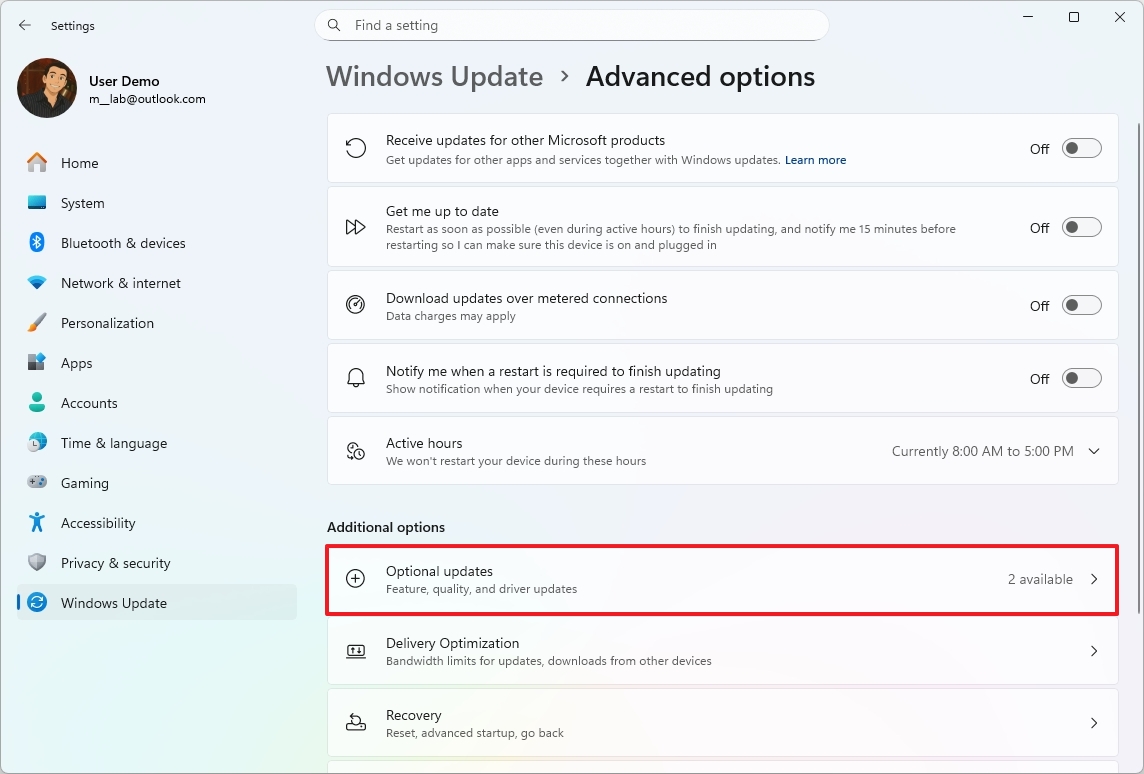
- Click the Driver updates setting.
- Select the available drivers with updates.
- Click the “Download & install” button.
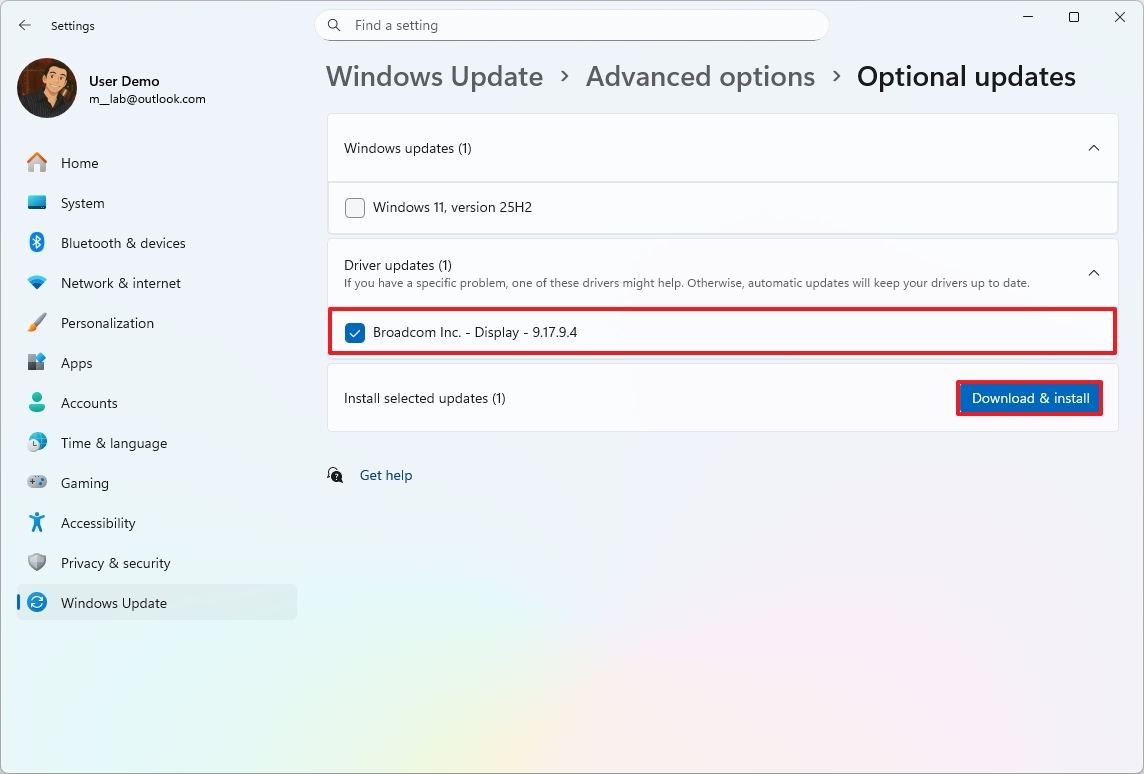
After finishing the steps, your device will download any available updates, and you might need to restart it.
Check for Armoury Crate SE updates
To update the ASUS Armoury Crate SE software, use these steps:
- Open Armoury Crate SE.
- Click the Settings tab.
- Click on Update Center.
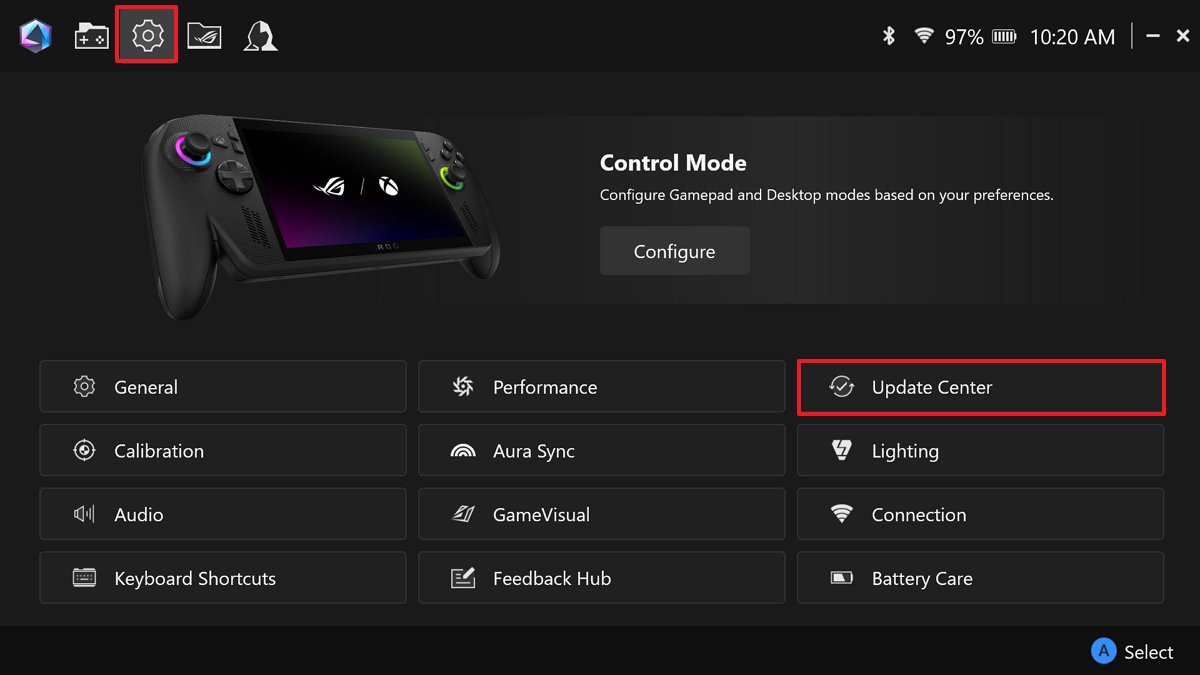
- Check and download all the available updates.

Once the process is finished, Armoury Crate and all its parts will be updated to the newest version.
Check for AMD software and driver updates
To check for AMD software and driver updates, use these steps:
- Open the AMD Software app.
- Click the Home tab.
- Check the “Driver & Software” window on the right side of the screen.
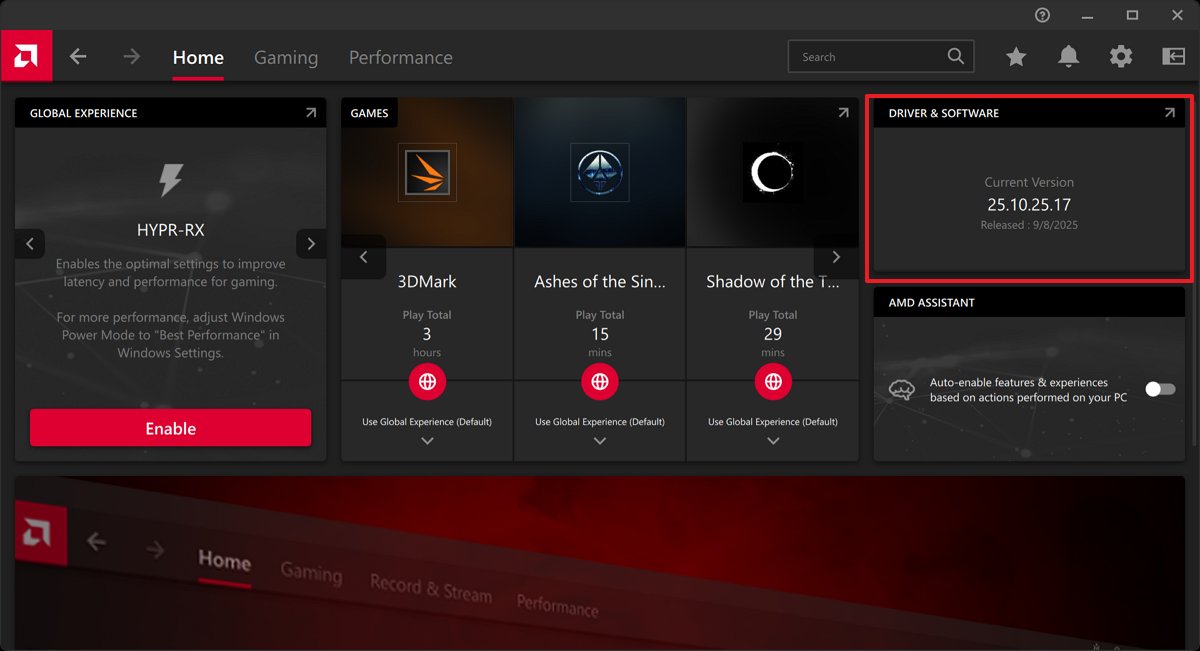
If you see a notification about an update, click the button within it to install the newest version of the software. After the installation finishes, you’ll be running the latest version. If there aren’t any updates, you won’t see an update button on the main screen.
You can also find updates through the MyASUS app. Just open MyASUS, go to System Update, and click the “Check for Updates” button.
Finally, you can always download the drivers and software manually from the AMD website.
Check for app updates
To update apps and system components from the Microsoft Store, use these steps:
- Open Microsoft Store.
- Click on Downloads.
- Click the “Check for updates” button.
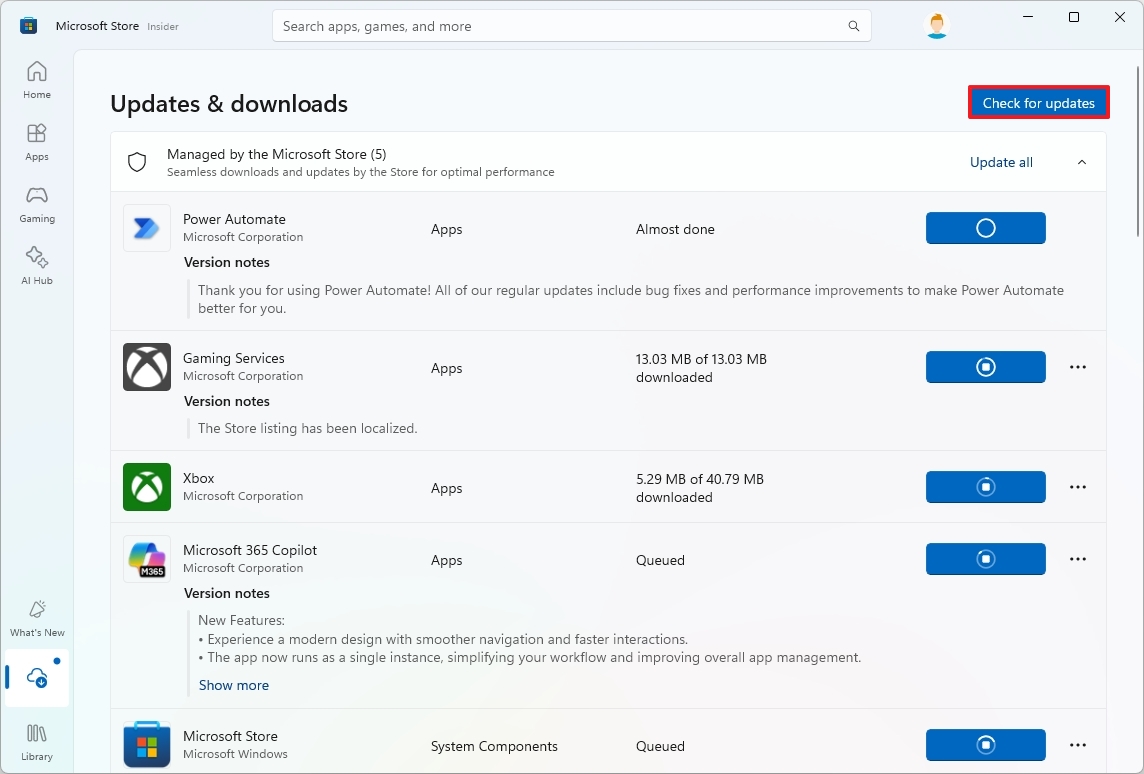
- Click the Update all button (if applicable).
Once you finish the process, the Microsoft Store will automatically update all your apps to the newest versions, giving you access to new features, better performance, and bug fixes with each update.
2. Disable specific gaming-impacting features
If your game isn’t running smoothly, it could be caused by security features called Memory Integrity and Virtual Machine Platform. These features are designed to protect your system, but sometimes they can affect game performance.
To get the best gaming performance from your computer, it’s a good idea to temporarily disable this feature and then re-enable it when you’re finished playing.
Disable Memory Integrity
To disable Memory Integrity on Windows 11, use these steps:
- Open Windows Security.
- Click on Device Security.
- Click the “Core isolation details” option.
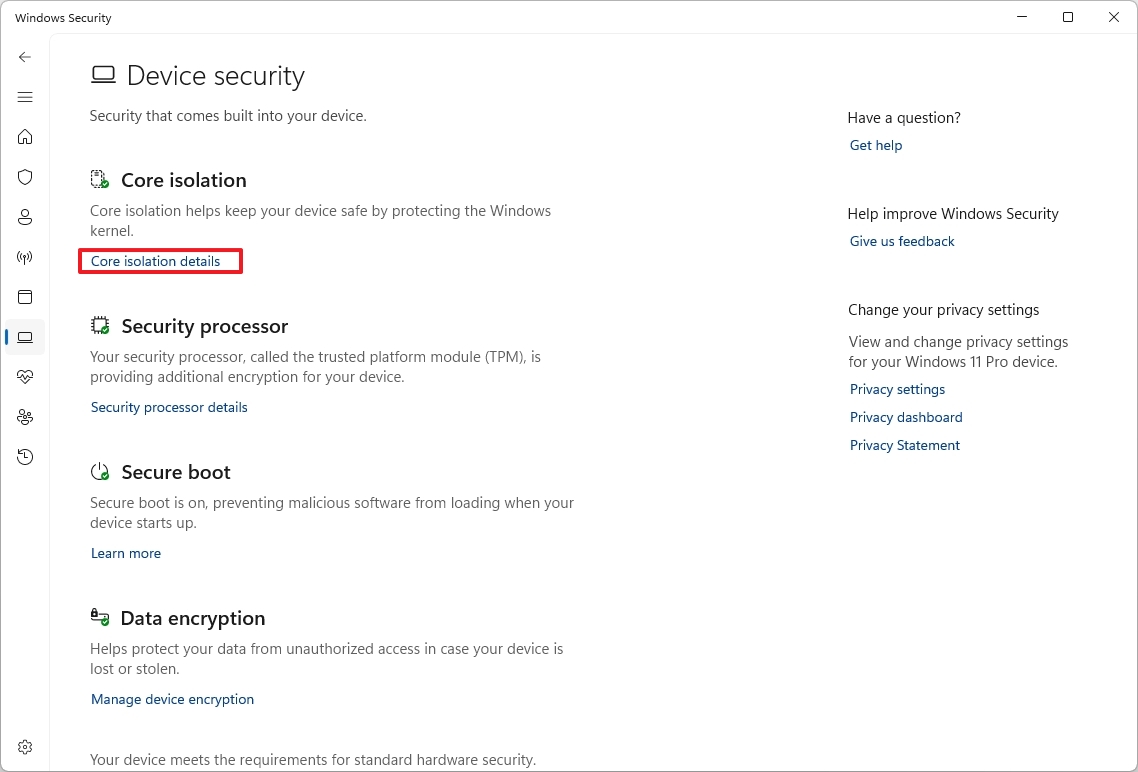
- Turn off the Memory Integrity toggle switch to disable the feature.
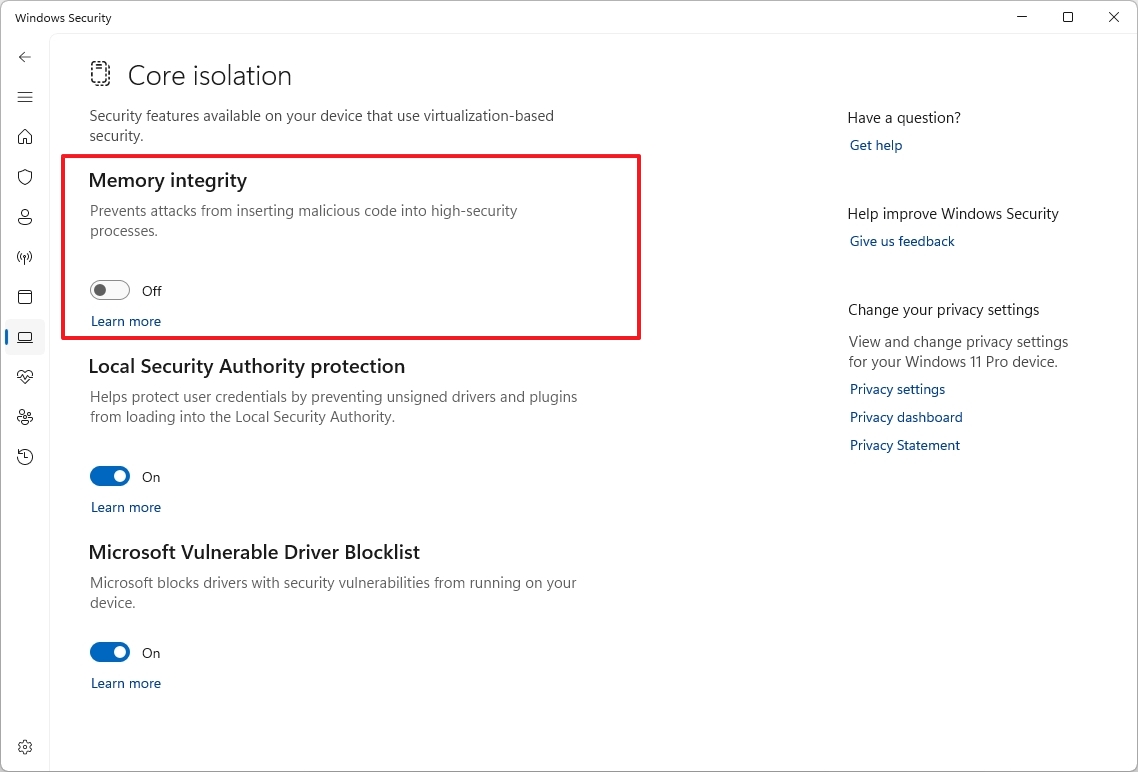
- Restart the computer.
Once you complete the steps, your games should experience a performance boost.
Disable Virtual Machine Platform
To turn off virtualization on Windows 11, use these steps:
- Open Settings.
- Click on System.
- Click the Optional features page on the right side.
- Click the “More Windows features” setting.
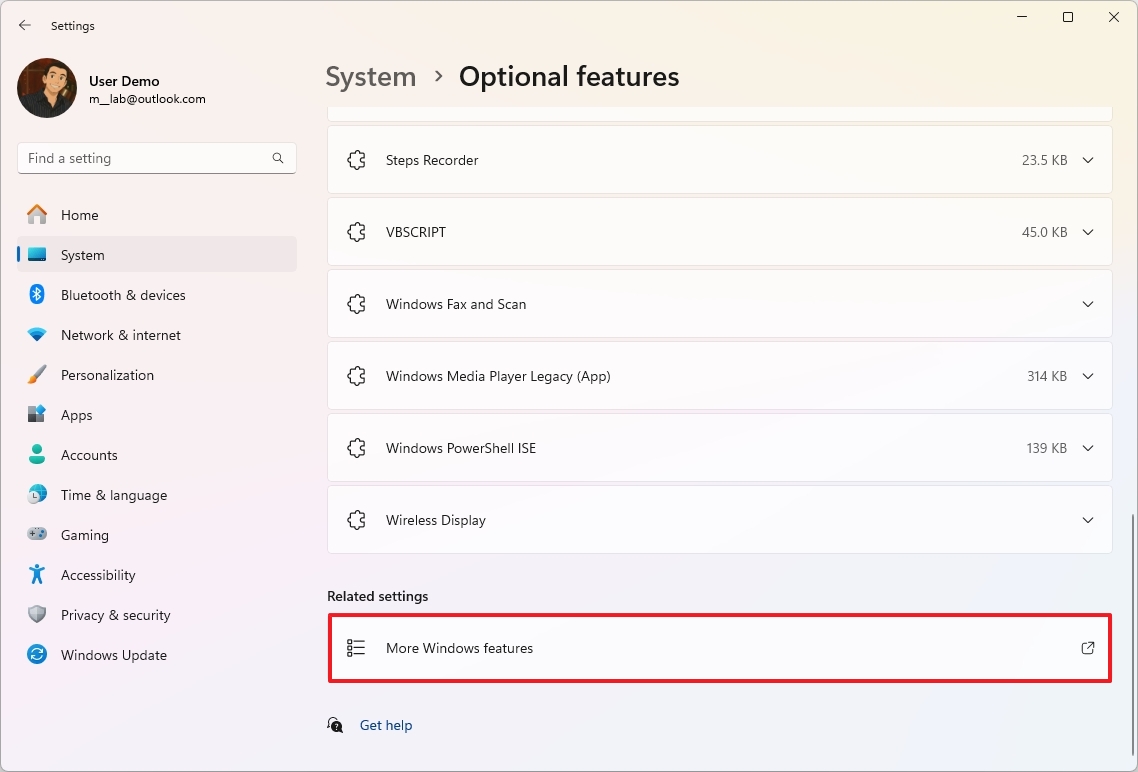
- Clear the “Virtual Machine Platform” option to disable the feature.
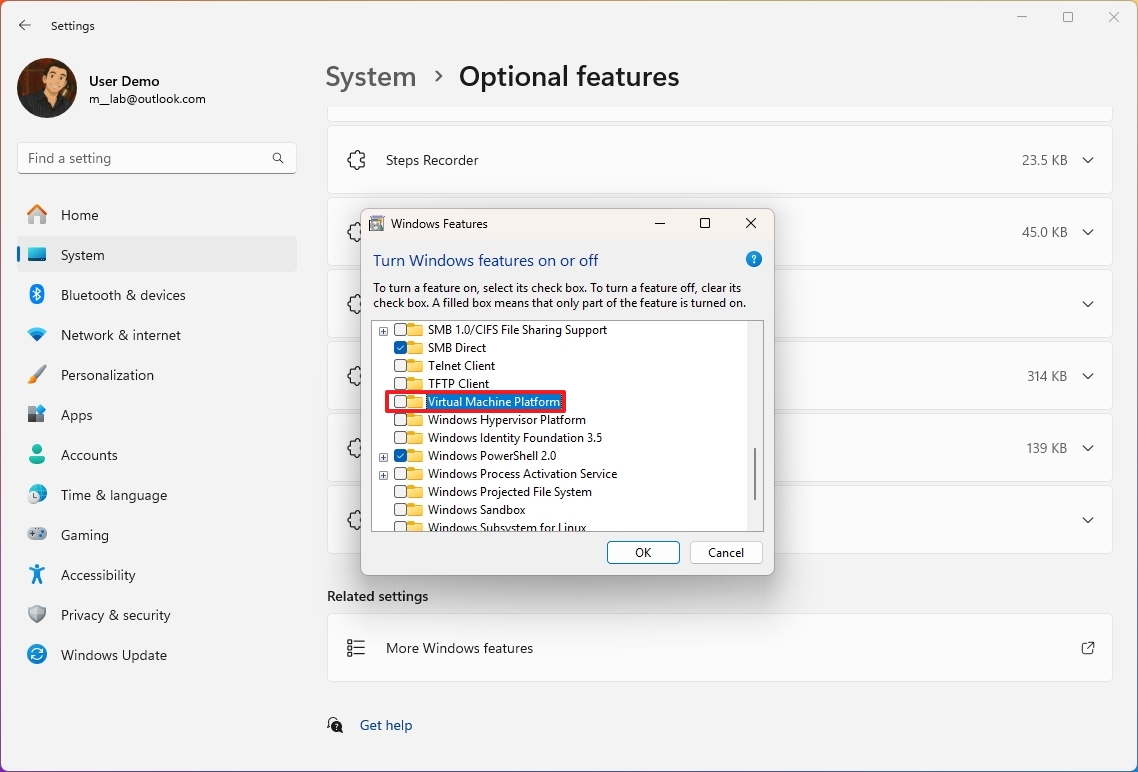
- Click the OK button.
- Restart the computer.
After you complete these steps, your games should experience a performance boost.
As a researcher, I’ve found that Microsoft advises turning these features back on if you aren’t actively gaming. They seem to offer benefits for general use, but can impact performance while playing games.
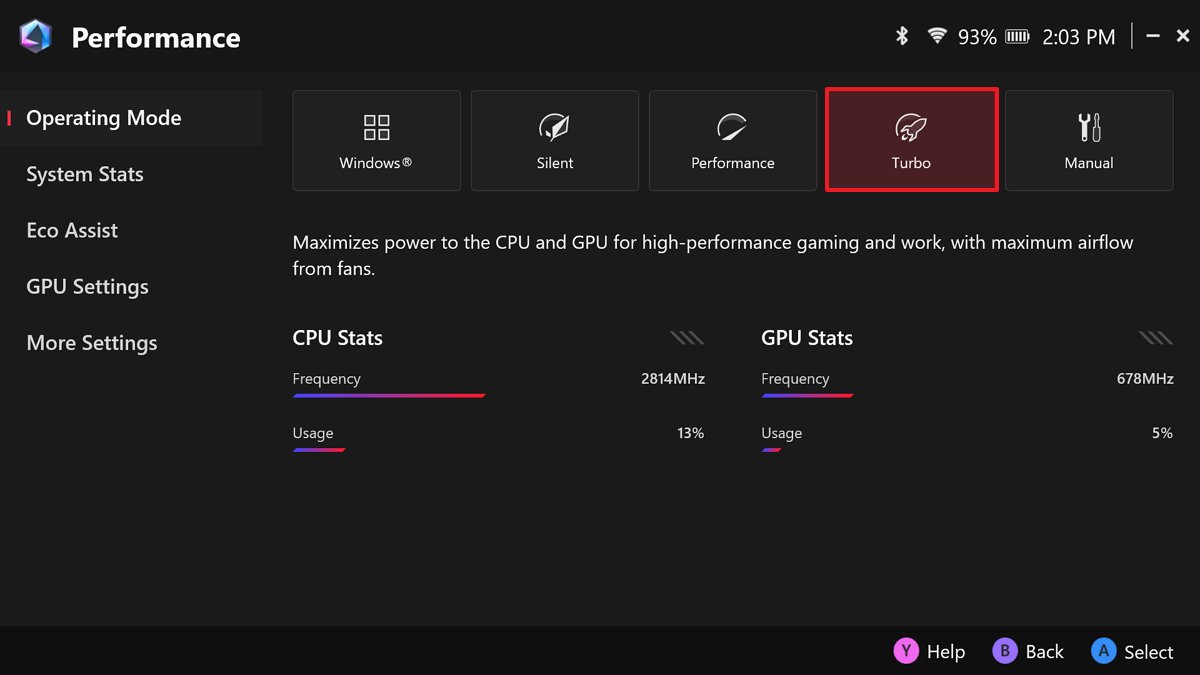
3. Change power mode
It’s often best to select “High Performance” mode, as this prioritizes giving all computer parts the power they need for the smoothest and fastest experience.
To change the power mode on Windows 11, use these steps:
- Open Settings.
- Click on System.
- Click the “Power & battery” (or Power) page on the right side.
- Click the Power Mode setting.
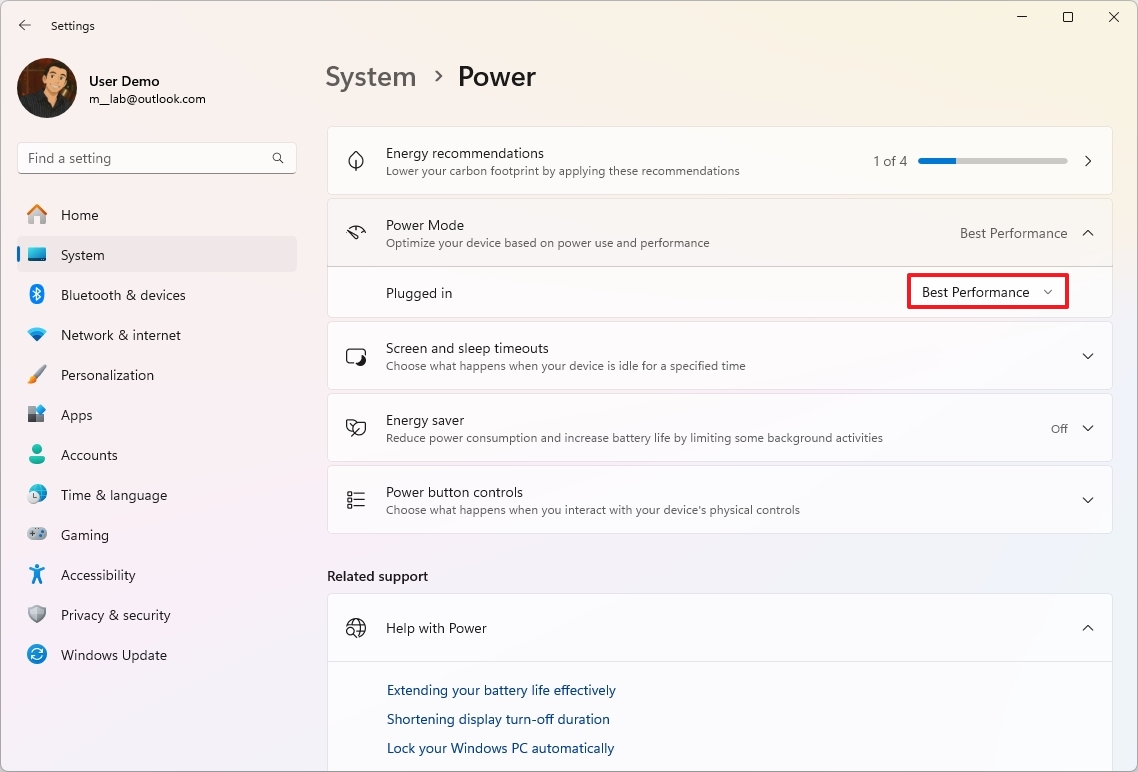
- Choose the Best Performance option for the “Plugged in” and “On battery” settings.
You can switch to Turbo mode on your Xbox Ally through the Armoury Crate software. Open Armoury Crate, then go to Settings (the cog icon), select Performance, and then choose Operating Mode. From there, select “Turbo”.
4. Enable optimization for windowed games
The “Optimizations for windowed games” feature helps games run faster and smoother when played in a window, instead of full screen.
This improvement updates games that use older display methods (like those found in DirectX 10 and 11) to a newer system. This allows games to send images directly to the screen, bypassing Windows’ usual display management, resulting in smoother performance similar to true fullscreen mode.
This feature should be turned on by default, but you can always use these steps to confirm:
- Open Settings.
- Click on System.
- Click the Display page on the right side.
- Click on Graphics.
- Turn on the “Optimizations for windowed games” toggle switch.
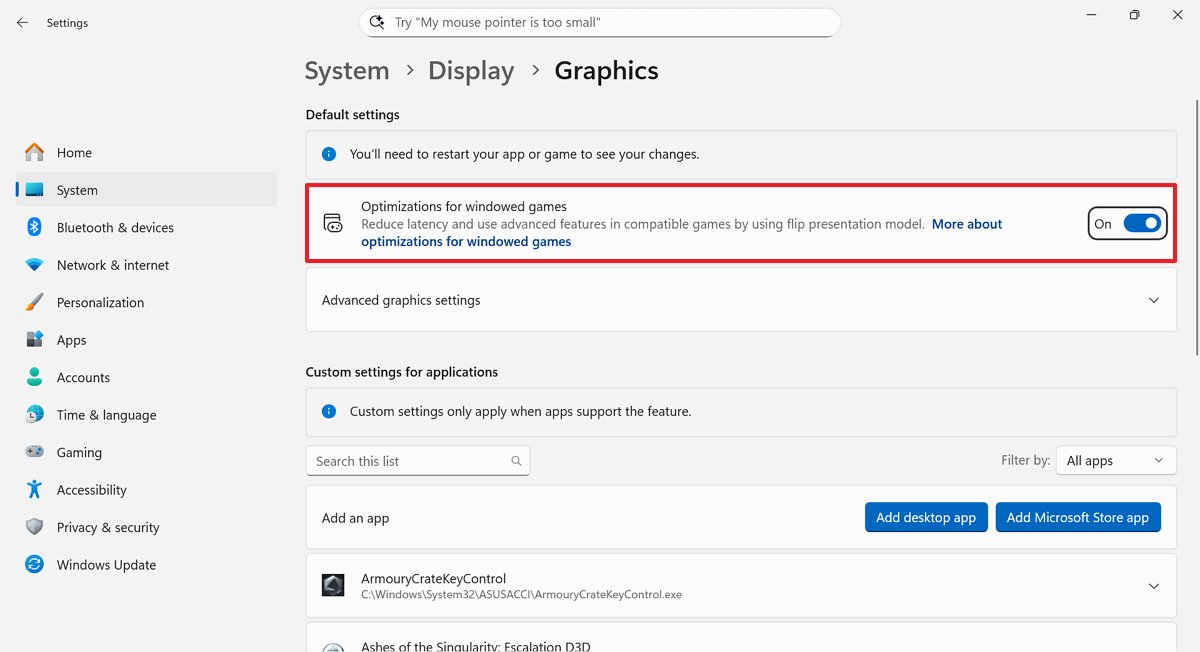
Once you complete the steps, games should be able to take advantage of this feature.
5. Increase the refresh rate
Changing your monitor’s refresh rate can dramatically improve how your games look and feel. A higher refresh rate means the screen updates more often, displaying new images more frequently and making movement appear much smoother, particularly in fast-action games. This also makes the game respond quicker to your actions and reduces visual distortions like screen tearing.
To set your system to the highest refresh rate, use these steps:
- Open Settings.
- Click on System.
- Click the Display page on the right side.
- Click the Advanced display setting at the bottom of the page.
- Select the highest rate using the “Choose a refresh rate” setting.
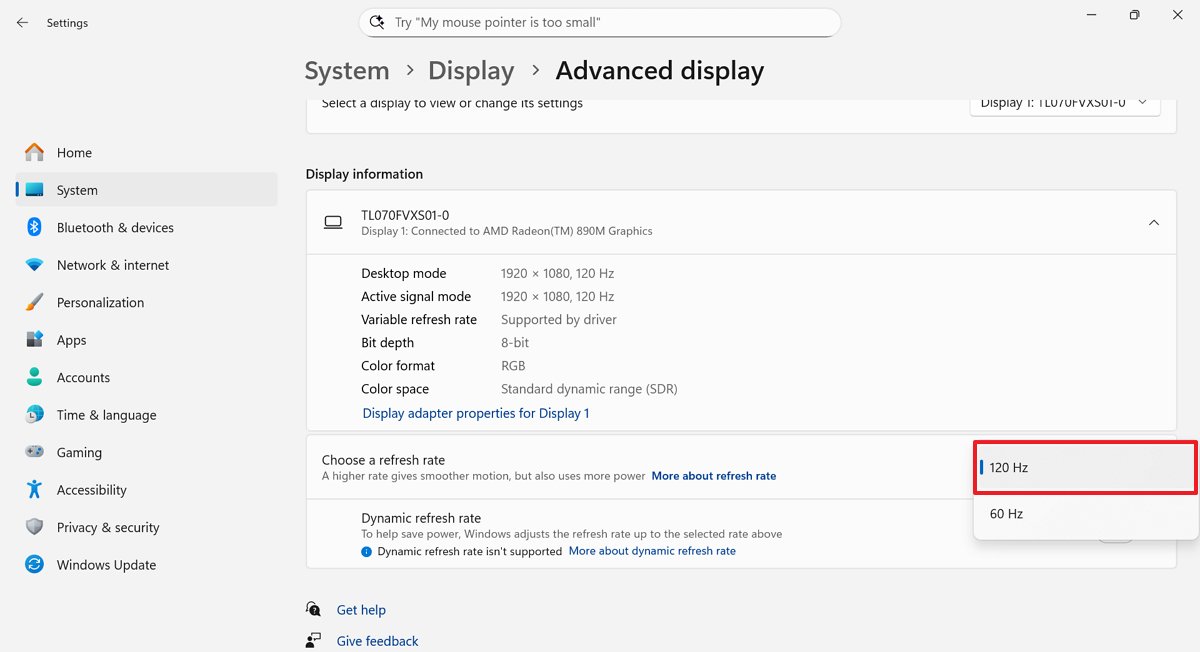
- Quick note: In this system, you should be able to choose between 60Hz and 120Hz (recommended).
You can adjust the refresh rate through the Armoury Crate app by using the Command Center menu.
6. Enable Variable Refresh Rate
Variable Refresh Rate (VRR) on Windows 11 automatically adjusts your screen’s refresh rate to match what your graphics card is producing. This helps to make games look smoother by increasing frame rates and eliminating screen tearing.
To enable this VRR on your handheld, use these steps:
- Open Settings.
- Click on System.
- Click the Display page on the right side.
- Click on Graphics.
- Click on Advanced graphics settings at the bottom of the page.
- Turn on the “Variable Refresh Rate” toggle switch.
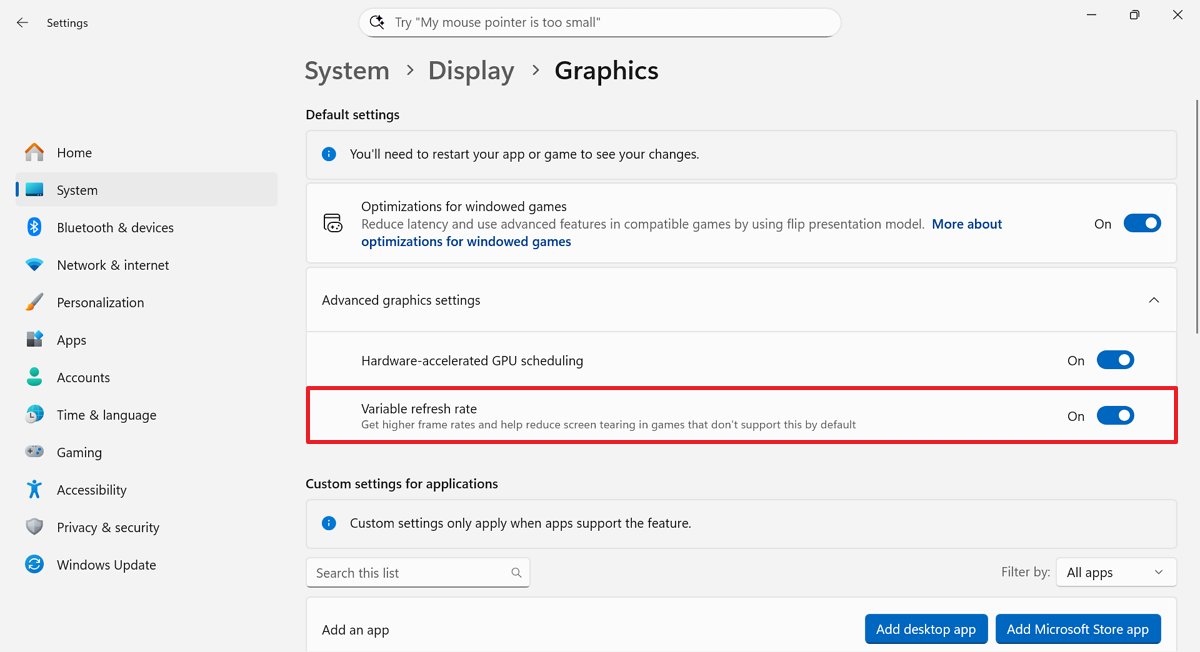
Once you finish the setup, the device will automatically change how often the screen updates to match what your graphics card is displaying.
7. Disable startup apps
If you’re using an Xbox Ally (or Series X), you’ll likely focus on gaming, meaning you probably won’t need to worry about a lot of apps automatically starting up.
If many apps automatically start when you turn on your device, it can slow down the startup process. These apps also use system resources in the background, which might make games run less smoothly.
To keep startup apps to a minimum, use these steps:
- Open Settings.
- Click on Apps.
- Click the Startup page on the right side.
- Choose the Startup impact option in the “Sort by” menu.
- Turn off the most impactful apps running on your system.
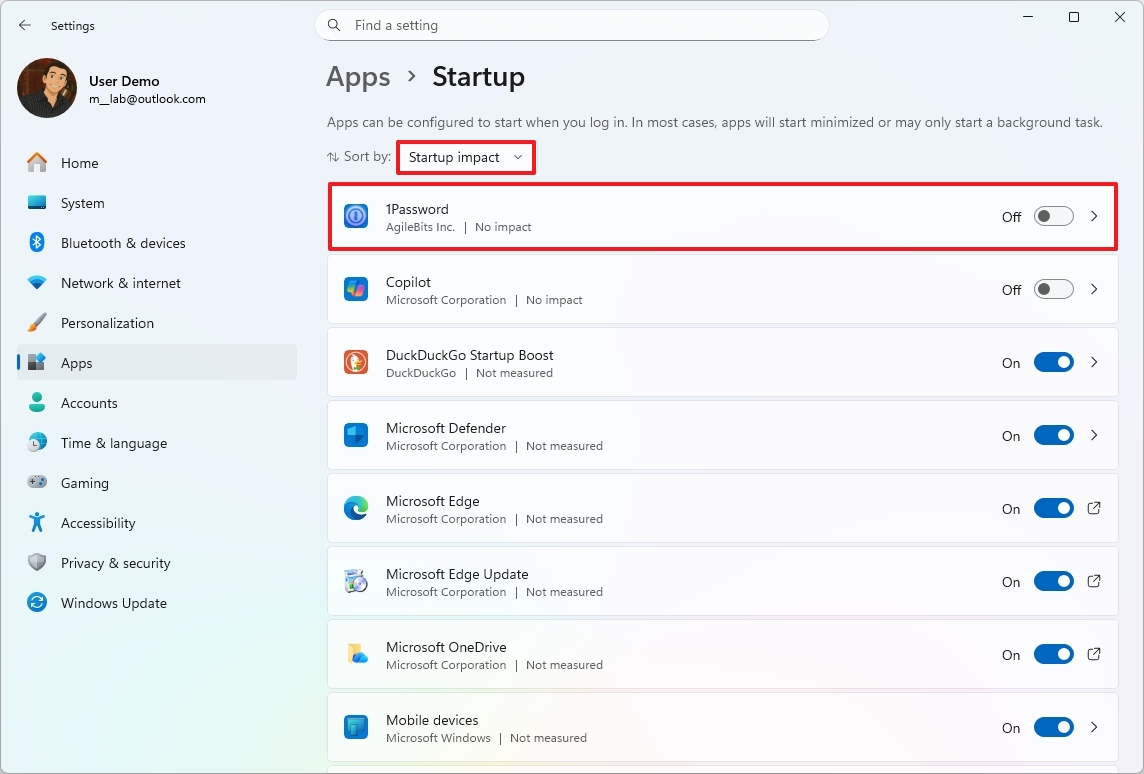
After finishing the setup, you should see improved gaming performance, especially in the app you selected at the beginning.
8. Uninstall unnecessary apps
As a researcher focusing on handheld gaming devices, I’ve found that keeping unnecessary apps to a minimum is crucial for optimal performance. While most users likely won’t be installing many extra apps on a dedicated gaming device, it’s still important to remember that too many apps can slow things down and negatively impact your gaming experience. I always recommend streamlining the software to keep things running smoothly.
To keep your device running smoothly, it’s best to uninstall any apps you don’t really need.
To uninstall unused apps from Windows 11, use these steps:
- Open Settings.
- Click on Apps.
- Click the “Installed apps” page on the right side.
- Select the app, click the menu (three dots) button, and choose the Uninstall option.
- Click the Uninstall button again to confirm.
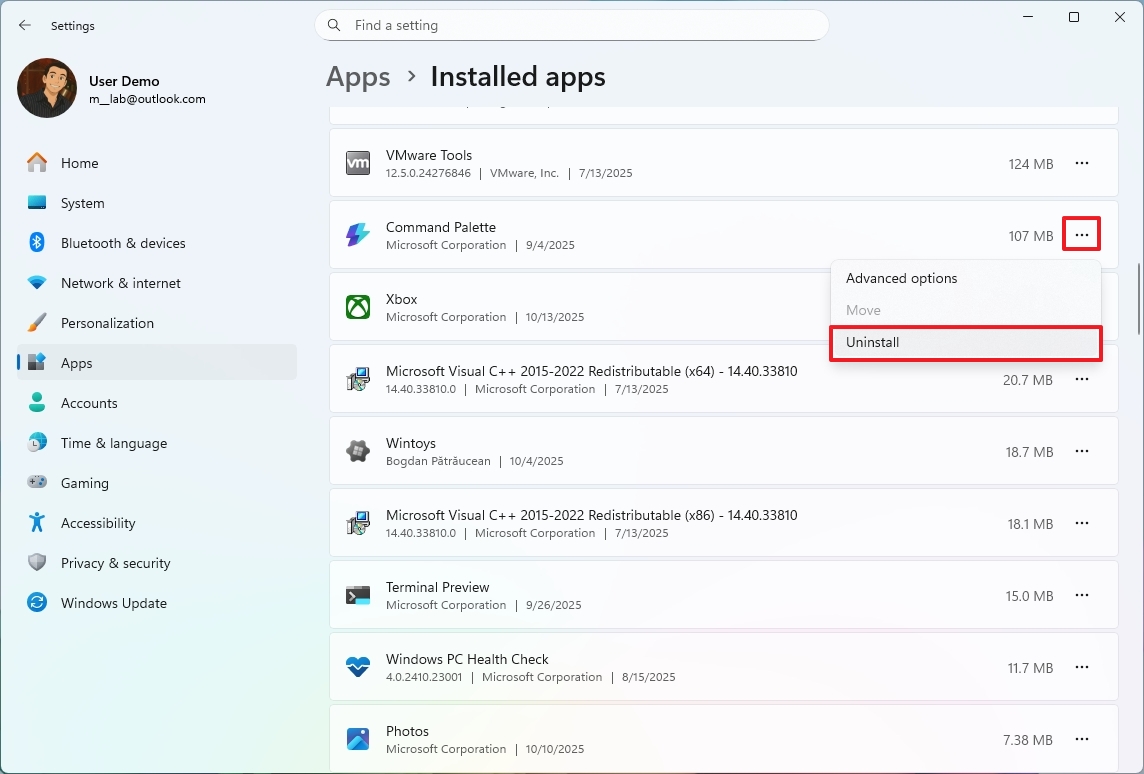
- Continue with the on-screen directions (if applicable).
After completing the steps, you may need to repeat them to remove any additional applications.
9. Enable GPU scheduling
GPU scheduling, when boosted by hardware acceleration, can make your computer run faster and feel more responsive. It does this by letting the graphics card handle some of the tasks usually done by the processor, freeing up the CPU for other things.
This feature is usually turned on automatically, but if needed, you can easily check its status and turn it on yourself by following these steps:
- Open Settings.
- Click on System.
- Click the Display page on the right side.
- Click the Graphics setting.
- Click on Advanced graphics settings at the bottom of the page.
- Turn on the “Hardware-accelerated GPU scheduling” toggle switch.
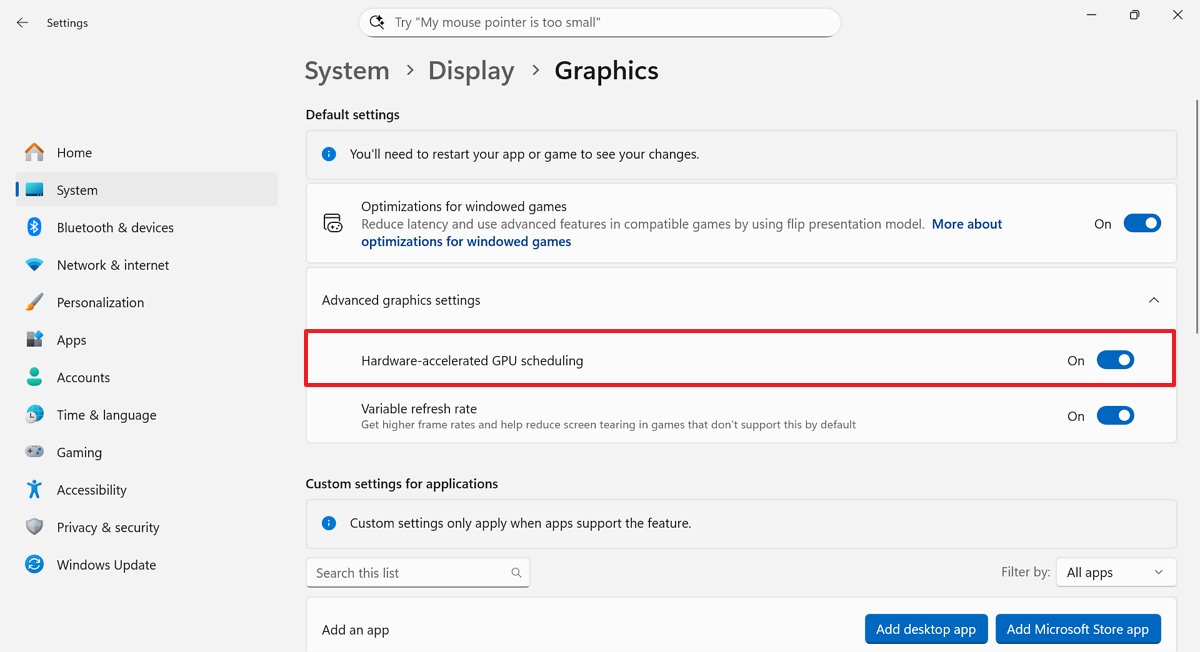
After finishing the setup, I noticed the system started handling graphics work using the graphics card instead of the main processor. It seemed to free up a lot of processing power!
10. Configure GPU-specific settings
Both versions of the handheld let you adjust performance settings using AMD software. This includes features like Radeon Super Resolution (RSR), AMD Fluid Motion Frames (AFMF), Radeon Anti-Lag, and Radeon Boost. You can also control how much memory the system uses for graphics to optimize performance.
To configure the AMD performance-enhancing features, use these steps:
- Open Armoury Crate SE.
- Click on Settings Cog.
- Click the Performance tab.
- Click the GPU Settings tab from the left pane.
Once you complete the steps, you can proceed to configure the features as outlined below.
Memory Assigned to GPU
The Xbox Ally relies on integrated graphics, meaning its graphics processing unit (GPU) doesn’t have its own dedicated memory. Instead, it uses the same memory as the rest of the system – the RAM.
This handheld device has 16GB of total memory, which is shared between the processor for everyday functions and the graphics processor for visuals.
The “Memory Assigned to GPU” setting lets you choose a specific amount of your computer’s RAM to be dedicated solely to the integrated GPU as video memory (VRAM).
Generally, it’s about finding a good balance. Increasing the amount of video memory (VRAM) reduces the memory available for your processor and other system functions.
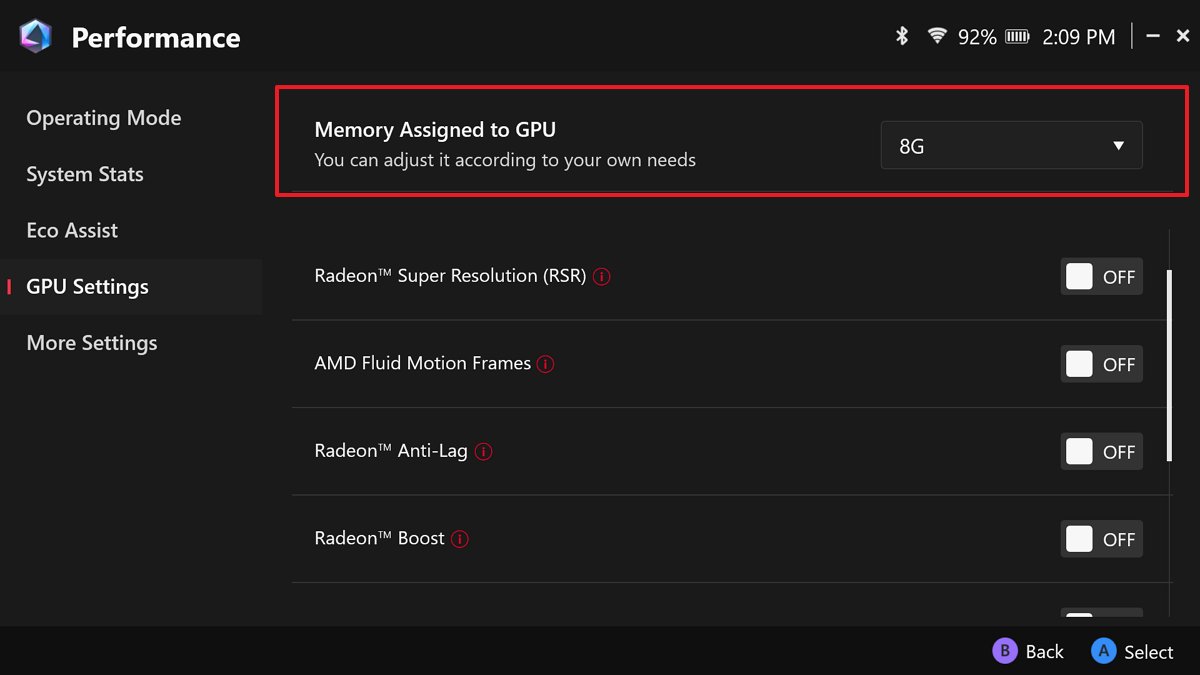
If you own the Ally with 16GB of RAM, begin by allocating 6GB. Only increase this to 8GB if a particular game requires it – like if it crashes when starting up.
As an analyst, I recommend if you’re using the Ally X with 24GB of RAM, you should initially set it to 8GB and stick with that. This configuration provides the best balance of performance and system stability.
Radeon Super Resolution (RSR)
This technology improves game performance by running games at a lower resolution and then intelligently scaling the image up to match your screen. It uses a similar process to AMD’s FidelityFX Super Resolution (FSR), providing a boost in frames per second (FPS) while maintaining better image quality than simple stretching techniques.
AMD Fluid Motion Frames (AFMF)
This technology is built into AMD graphics drivers and improves performance by generating extra frames. It does this by creating frames that are inserted between the ones actually rendered by your graphics card, making the experience smoother.
AMD Fluid Motion Frames (AFMF) boosts the number of frames shown per second, resulting in noticeably smoother gameplay. It works with most games that use DirectX 11 or 12.
Radeon Anti-Lag
This feature minimizes the delay between your actions and what you see on screen. It works by carefully managing how quickly the processor sends instructions to the graphics card, preventing the processor from getting too far ahead. This keeps everything synchronized, resulting in a smoother and more responsive experience.
From my analysis, this feature really improves how quickly the game reacts to player input. That’s particularly noticeable – and crucial – in fast-action games and similar situations where timing is everything.
Radeon Boost
This technology helps maintain smooth gameplay during fast action. When the game detects quick camera or character movements, the ‘Boost’ feature slightly reduces the screen resolution. Because these movements are happening so quickly, you likely won’t notice the small change in visual quality. This temporary resolution decrease frees up the graphics card to deliver a performance boost, resulting in higher and more stable frame rates and a more responsive experience.
After changing these settings, you may need to restart the handheld to apply the changes.
Radeon Chill
Radeon Chill is a smart feature that automatically adjusts your game’s frame rate to save power and reduce heat. It monitors what you’re doing in the game – if you’re not actively playing or moving much, it lowers the frame rate to minimize power usage, heat, and fan noise. When the action picks up, it quickly increases the frame rate back to its maximum setting for a smooth experience.
Radeon Chill saves power, extending battery life on laptops and other portable devices. It also keeps your system cooler and quieter without making games or applications feel sluggish, even during fast-paced action.
Radeon Image Sharpening (RIS)
Radeon Image Sharpening is a feature that enhances details and edges in images after they’ve been processed. It works by intelligently sharpening areas where there’s a lot of contrast, making the image look clearer and more defined.
This technology mainly helps bring back sharpness and detail that can be lost when using lower resolutions or certain anti-aliasing methods. It does this without significantly affecting performance.
11. Change settings on specific games
You can customize individual games with specific settings through AMD Software. Here’s how to do it:
To check for AMD Software updates, use these steps:
- Open the AMD Software app.
- Click the Gaming tab.
- Click the Games tab.
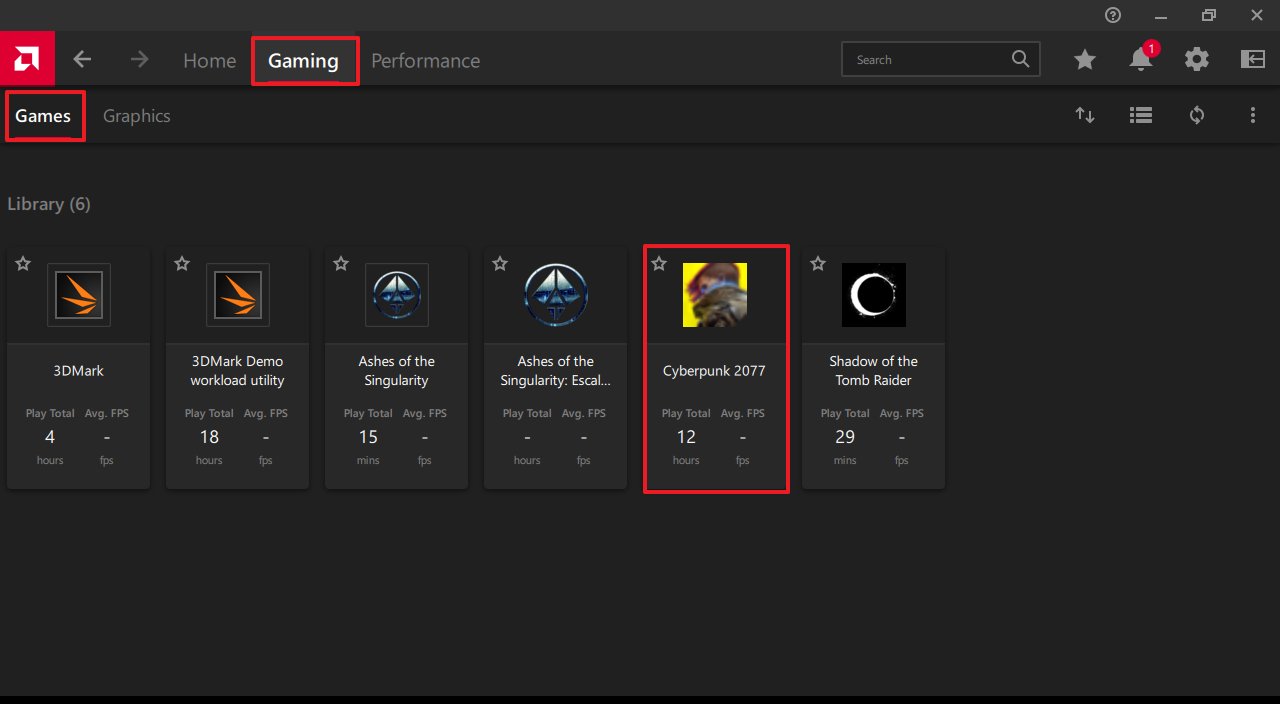
- Click on the game you want to customize.
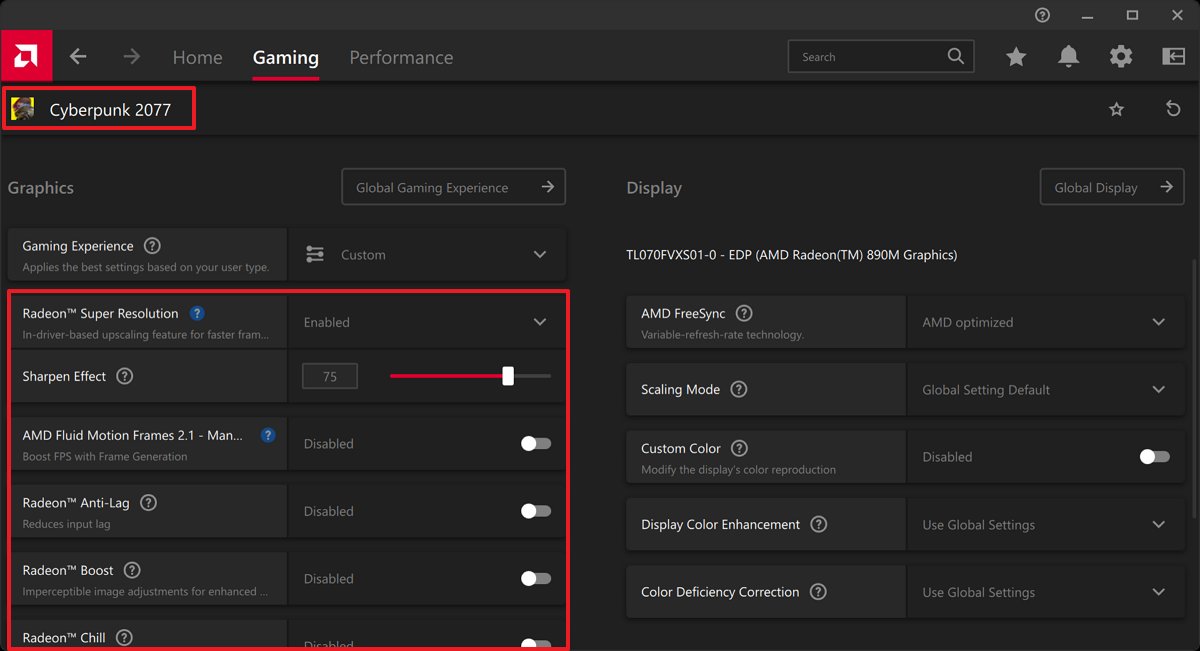
This page lets you customize settings for your AMD graphics card, like Radeon Super Resolution, AMD Fluid Motion Frames, Anti-Lag, Radeon Boost, and Radeon Chill. You’ll find options to improve performance and visual quality here.
You can also adjust how your screen looks on this page, including settings for AMD FreeSync, scaling, color enhancement, and colorblindness correction.
12. Configure global graphics settings with one option
AMD Software lets you select graphics settings that will be used for all your games, making it easy to customize your overall gaming experience.
To choose the best graphics experience, use these steps:
- Open the AMD Software app.
- Click the Gaming tab.
- Click the Graphics tab.
- Enable HYPR-RX.

We recommend the “HYPR-RX” setting for the best gaming experience, but it’s only available on the Xbox Ally X. If you have the standard Xbox Ally, you won’t see the “HYPR-RX” option. Instead, you can choose the “Performance” setting.
Here, you can adjust various graphics options that will affect all your games. These include features like Radeon Super Resolution, AMD Fluid Motion Frames, Anti-Lag, and Radeon Boost 2, among others.
What tweaks are you making to your Xbox Ally handheld gaming device? Let me know in the comments.
More resources

Stay up-to-date with the latest from Windows Central by following us on Google News! You’ll get our news, insights, and features right in your feed.
Read More
- The Super Mario Galaxy Movie: 50 Easter Eggs, References & Major Cameos Explained
- All 13 Smash Bros. Characters in the Super Mario Galaxy Movie
- Highly Anticipated Strategy RPG Finally Sets Release Date (And It’s Soon)
- Welcome to Demon School! Iruma-kun season 4 release schedule: When are new episodes on Crunchyroll?
- Sydney Sweeney’s The Housemaid 2 Sets Streaming Release Date
- TV legend Carol Kirkwood reveals the reasons why she decided to retire after 28 years with BBC
- Why is Tech Jacket gender-swapped in Invincible season 4 and who voices her?
- Dune 3 Gets the Huge Update Fans Have Been Waiting For
- Supergirl Director Breaks Down Kara Zor-El & Superman’s ‘Older-Sibling Dynamic’
- How Blake Lively & Ryan Reynolds’ Kids Pranked Her on April Fool’s Day
2025-10-16 16:18