
On Windows 11, Microsoft enforces regular monthly system updates aimed at fixing security loopholes, enhancing system functionality, and introducing fresh features. Yet, these updates sometimes lead to unexpected issues as well.
Once the August 2025 Security Update (KB5063878) was rolled out by the company, many Windows 11 version 24H2 users started experiencing storage problems soon after. These users reported that the update would cause their Solid State Drive or Hard Disk Drive to become undetectable when trying to write large amounts of data.
Restarting your computer might help in recovering the drive, but it carries the risk of data corruption or loss. Simultaneously, during the same Patch Tuesday release, the company urgently issued an Out-of-band (OOB) update for versions 23H2 and 22H2 to tackle a critical glitch affecting the reset and recovery functions.
There’s ongoing uncertainty about whether the August 2025 update for version 24H2 is indeed leading to SSDs and HDDs malfunctioning. Phison, after testing over 4,500 hours of the suspected drivers, couldn’t reproduce the problem. Microsoft, through Bleeping Computer, has also been unable to replicate the issue and is now gathering customer feedback to ascertain if there’s a genuine operating system fault. Given that update-related problems are not unusual, it’s advisable to always be prepared for potential issues.
Despite being an unusual occurrence for all users, it’s quite common that at least one annual cumulative update leads to significant reliability issues for certain users. Given the unpredictable nature of system updates causing problems, and disregarding these patches entirely not being advisable, there are some proactive measures you can take to ensure quick recovery and minimize data loss when such an issue arises.
As a devoted Windows 11 user, it’s crucial to understand that although you aren’t required to install new feature updates immediately, they will eventually be automatically downloaded and installed on your system if it’s not approaching the end of its support lifecycle. In this helpful guide, I’ll share some methods to secure your computer and prevent any updates from causing potential issues within Windows 11.
Or in a more conversational style:
Hey there! If you’re using Windows 11, it’s good to know that new feature updates might automatically install on your system unless it’s close to the end of its support period. In this tutorial, I’ll share some tips and tricks on how to shield your computer from any updates that could potentially cause trouble in Windows 11. Enjoy!
How to protect your PC from buggy updates on Windows 11

1. Enable System Restore
The System Restore function works by taking saved copies of your computer’s current operational status, which are called “restore points.” In case the system runs into trouble, you have the option to revert back to one of these restore points, allowing you to undo any changes (including rollback of a recent update) without disturbing your files.
Initially, this particular setting was activated automatically, but currently, you need to adjust it manually to your preferences.
To ensure that you can reverse any unwanted changes following the installation of a faulty update, it’s crucial to activate System Restore manually and establish a restoration point prior to applying the cumulative update.
Turn on System Restore
To enable System Restore on Windows 11, use these steps:
- Open Start.
- Search for Create a restore point and click the top result to open the System Properties page.
- Select the main “System” drive under the “Protection Settings” section.
- Click the Configure button.

- Select the “Turn on system protection” option.

- Click the Apply button.
- Click the OK button.
Once you complete the steps, the feature will be enabled on your computer.
While the system is designed to generate backup points when certain events occur, like updating the system or drivers, it doesn’t always do so reliably. Therefore, for your peace of mind, it’s advisable to make a manual backup prior to modifying the system.
Create a restore point
To create a restore point before installing a cumulative update, use these steps:
- Open Start.
- Search for Create a restore point, and click the top result to open the System Properties page.
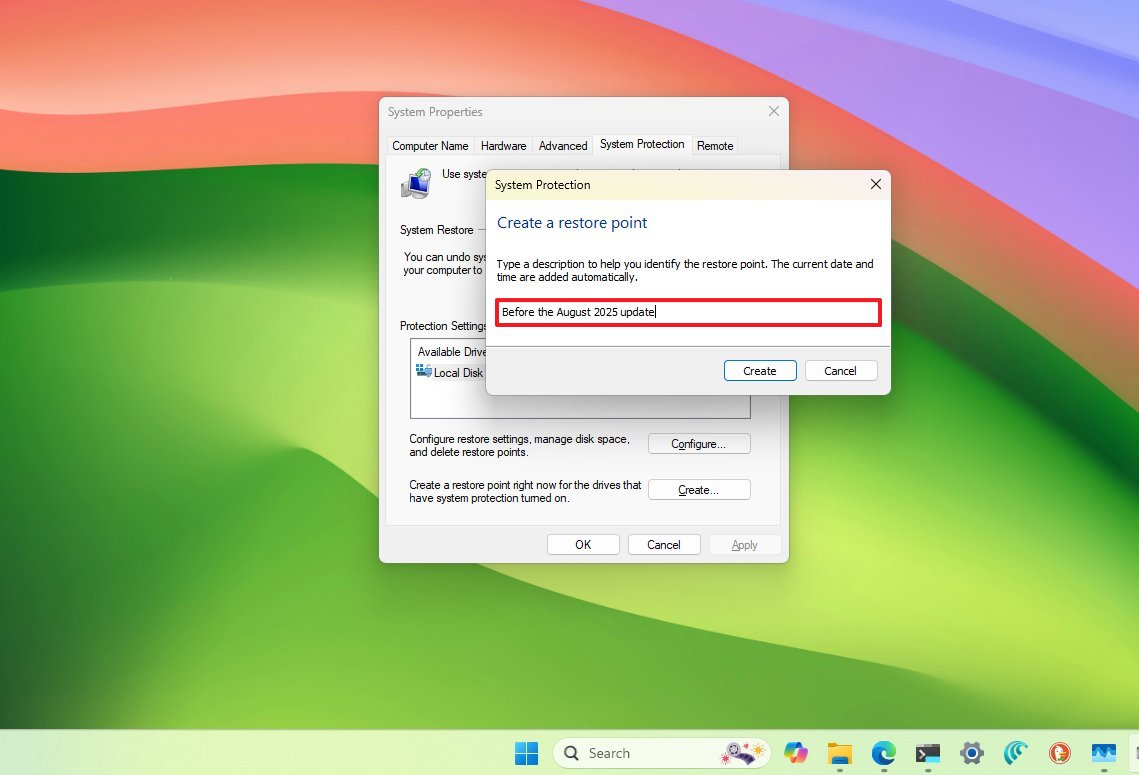
- Click the Create button under the “Protection Settings” section.
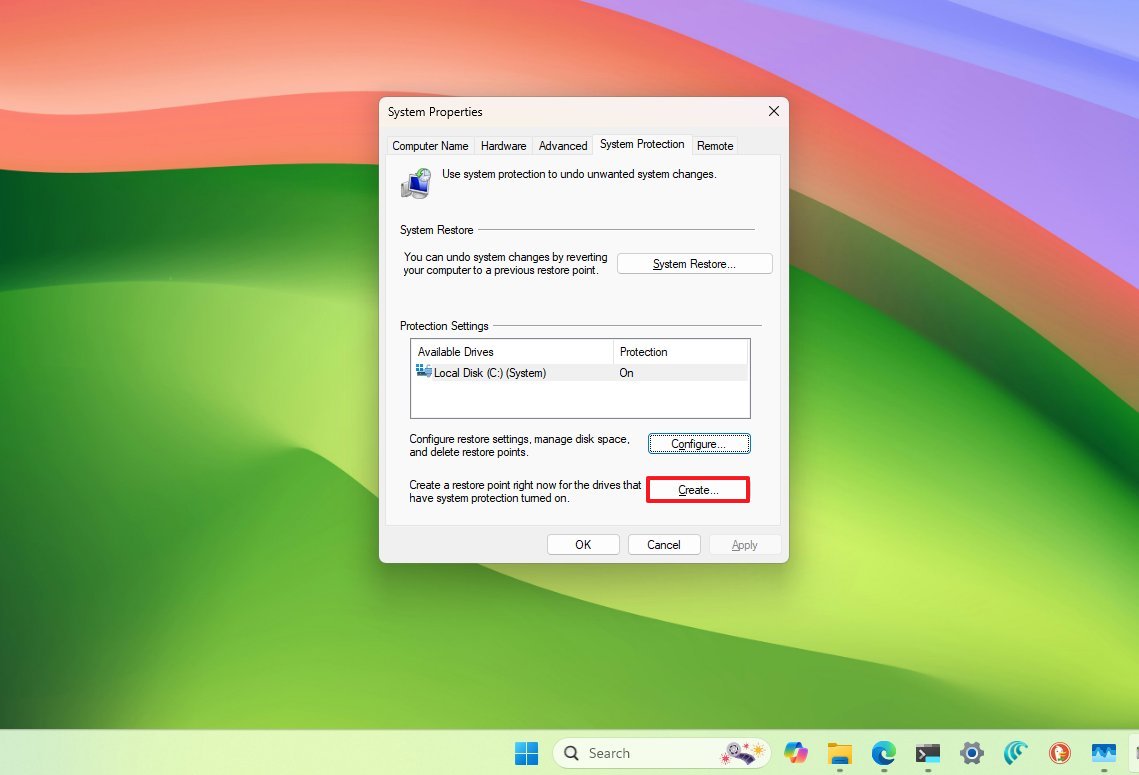
- Confirm a descriptive name for the restore point – for example, Before the August 2025 update.
- Click the Create button.
- Click the Close button.
- Click the OK button.
- Click the Close button.
Once you’ve finished the outlined steps, you’re all set to install the latest update. Rest assured, if any issues arise, you have the option to revert the changes made.
Should you need to revert the modifications, I recommend consulting my earlier tutorial on how to use System Restore to set up and restore your computer.
2. Enable Quick Machine Recovery
Swift Machine Restoration Tool (SMRT), a recently developed technology, is specifically designed for promptly rescuing your computer during severe startup malfunctions.
Simply put, once the feature is activated, if the device fails to start due to a faulty update or booting issue, the system automatically connects to the internet, sends the log files to the cloud for analysis, and if a solution is available, it downloads it via Windows Update.
Since the August 2025 Security Update, this feature is accessible in versions 24H2 and above. In Windows 11 Home, it’s activated automatically, but for the “Pro” edition, you need to turn it on manually.
To configure the Quick Machine Recovery feature on Windows 11, use these steps:
- Open Settings.
- Click on System.
- Click the Recovery page on the right side.
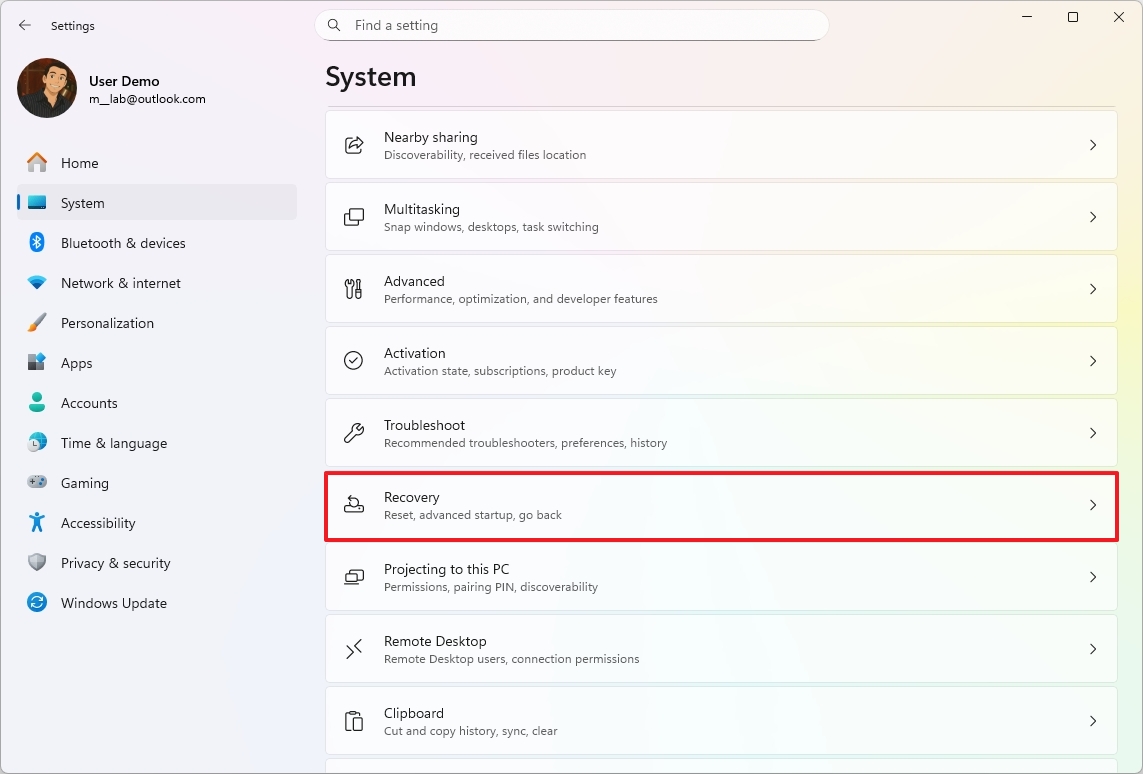
- Click the Quick machine recovery setting.
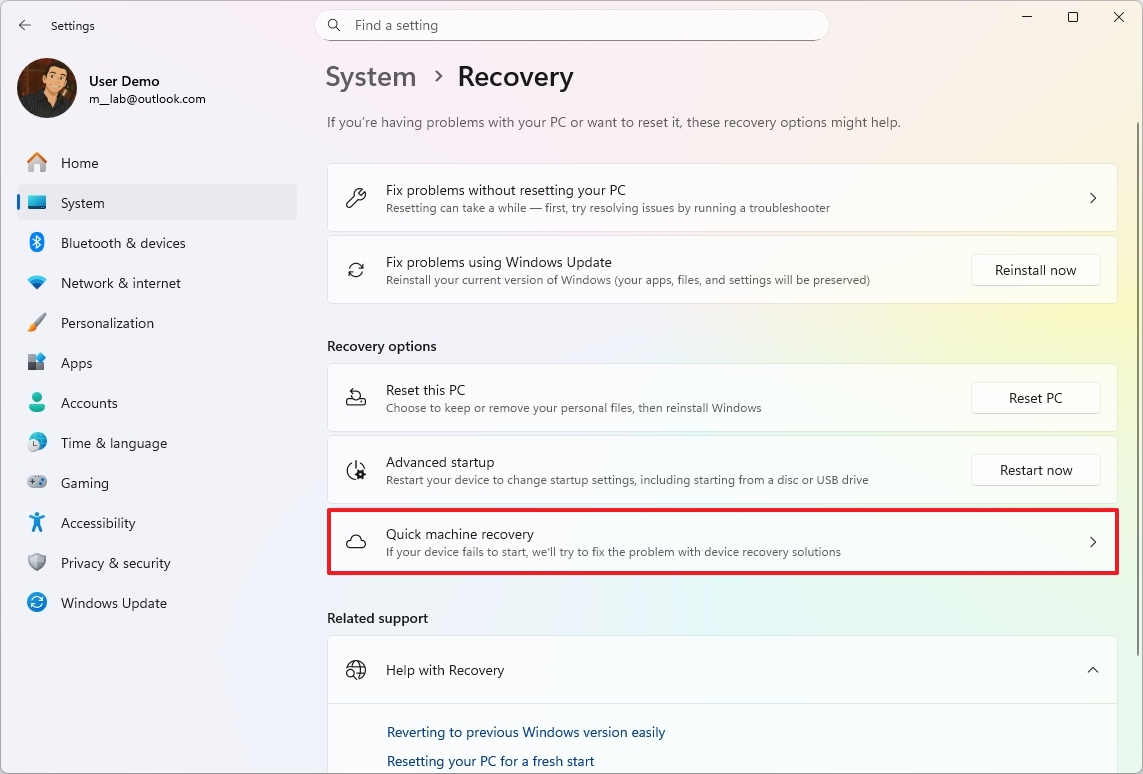
- Turn on the “Quick machine recovery” toggle switch to enable the feature.
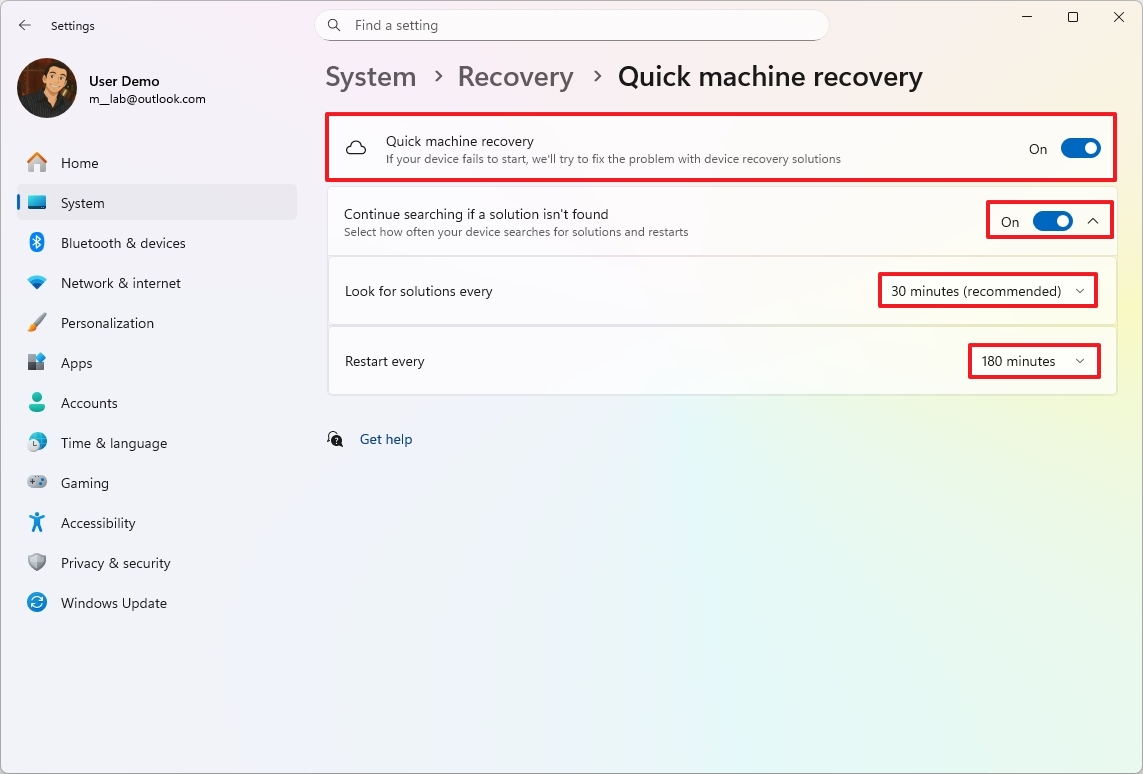
- Turn on the “Continue search if a solution isn’t found” toggle switch to control the feature behavior.
- Choose how long the system has to wait before checking for fixes using the “Look for solutions every” setting.
- Select when to restart the device to repeat the process using the “Restart every” setting.
After following the given instructions, if an issue arises where the incorrect update prevents your computer from booting properly, the Quick Machine Recovery function will activate automatically. This action initiates the process of downloading and implementing any relevant solutions (should they be available).
Microsoft explains that this function operates with the highest level of dedication, but it may not be effective in resolving all booting issues.
You can also check my comprehensive guide to set up and use Quick Machine Recovery on Windows 11.
3. Uninstall problematic update
If it’s discovered that a recent update is causing problems on your desktop, and you can still access it, try removing the problematic update temporarily. A long-term fix should become available soon.
On Windows 11, you can uninstall a cumulative update from the desktop or recovery environment.
From Settings
If you still have access to the desktop, use these steps:
- Open Settings.
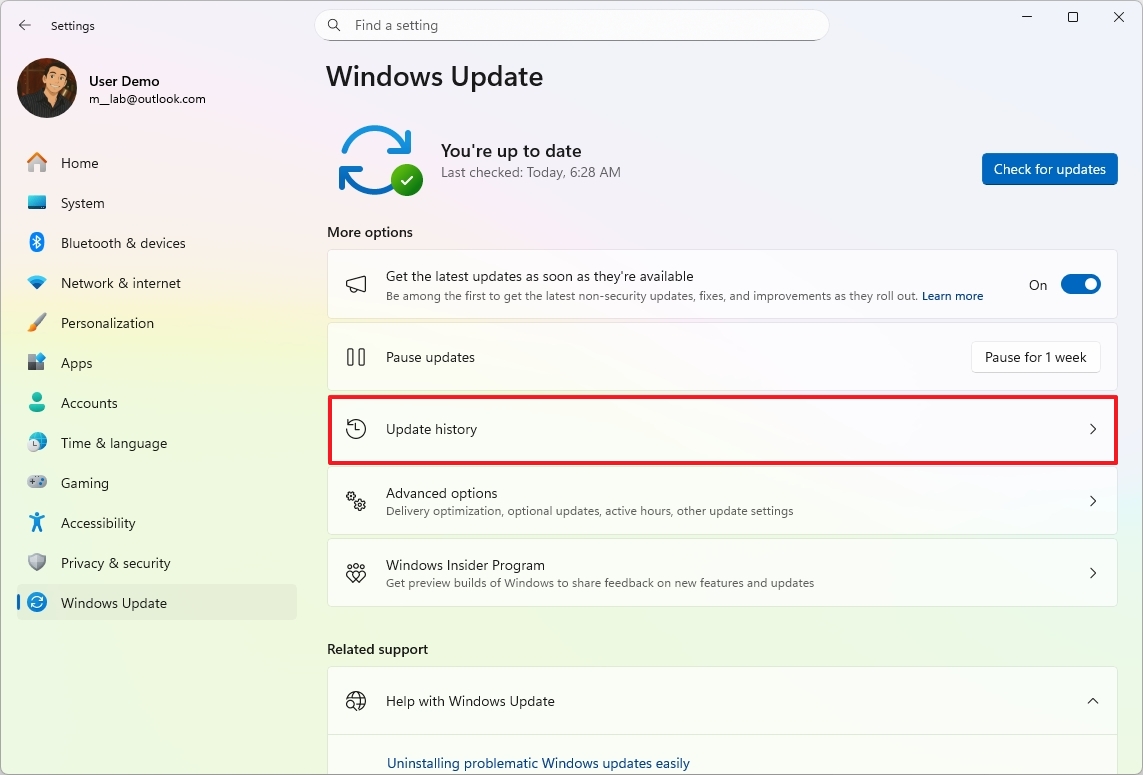
- Click on Windows Update.
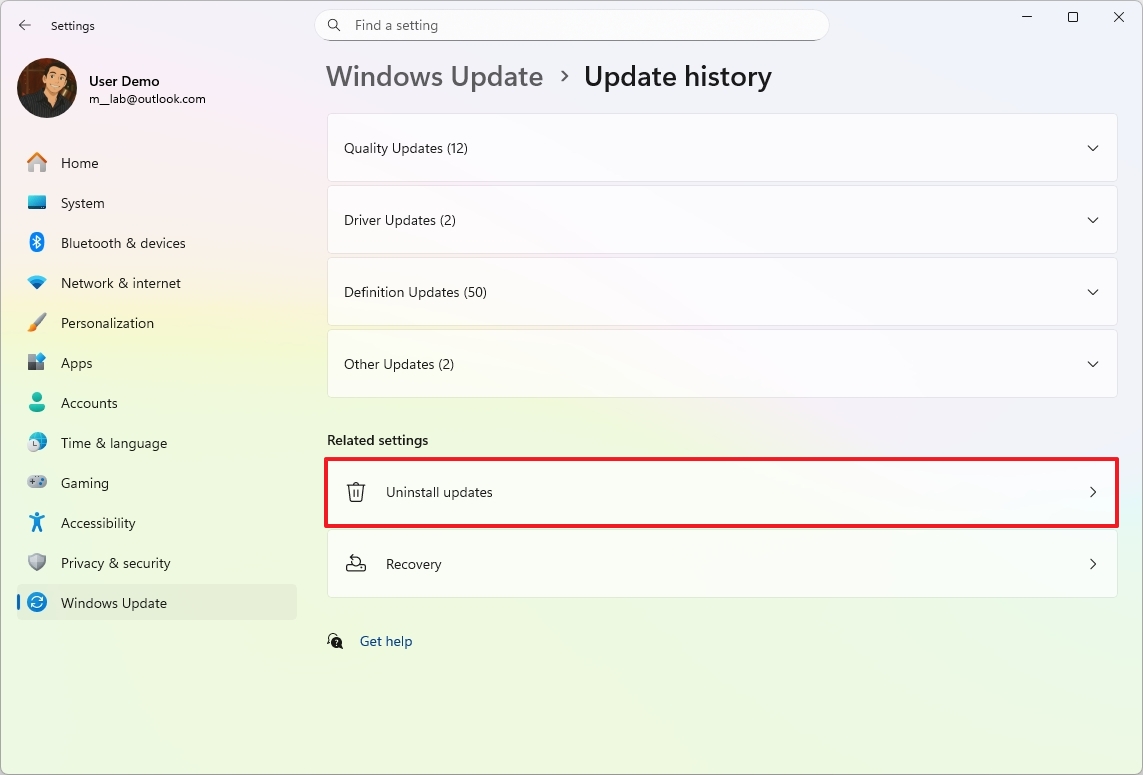
- Click the Update history page.
- Click the Uninstall updates setting under the “Related settings” section.
- Click the Uninstall option for the buggy update.
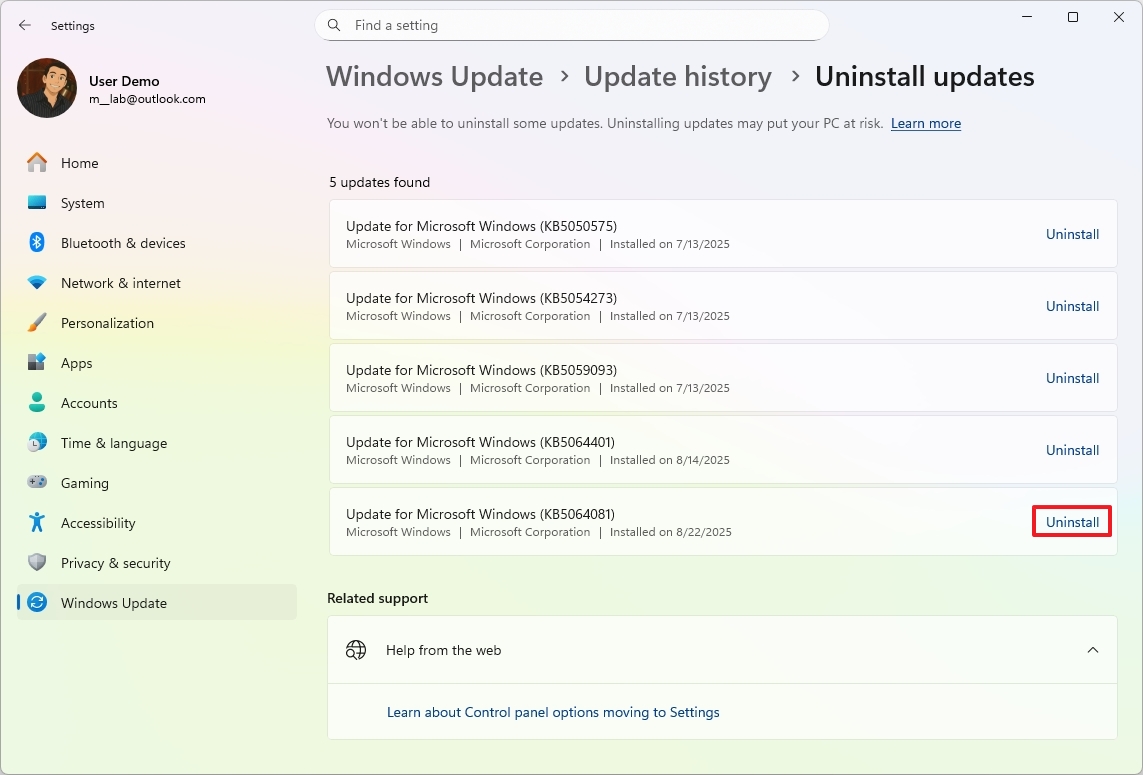
- Click the Restart now button (if applicable).
After finishing the given steps, revisit the “Windows Update” page once more by navigating through the Settings app. Within the “More options” section, find and click on the “Pause for a week” option to halt your system from reinstalling the same update repeatedly. If available, opt for the longest duration, which could be around four to five weeks.
From Windows Recovery Environment (WinRE)
As a tech-savvy individual, if you find yourself without a desktop and the Quick Machine Recovery feature isn’t an option, here’s how you can uninstall the latest update manually:
1. Boot your computer in safe mode (usually by pressing F8 or F12 during startup).
2. Navigate to the Control Panel.
3. Look for the “Programs” section and click on it.
4. Search for the recently updated program and right-click on it.
5. Choose the option to uninstall the program, then follow the prompts.
6. Restart your computer in normal mode once done.
- Start PC.
- As soon as the Windows logo appears, press and hold the power button to interrupt the boot sequence.
- Repeat steps 1 and 2 two more times.
- Click the Advanced Startup option.
- Click the Troubleshoot option.
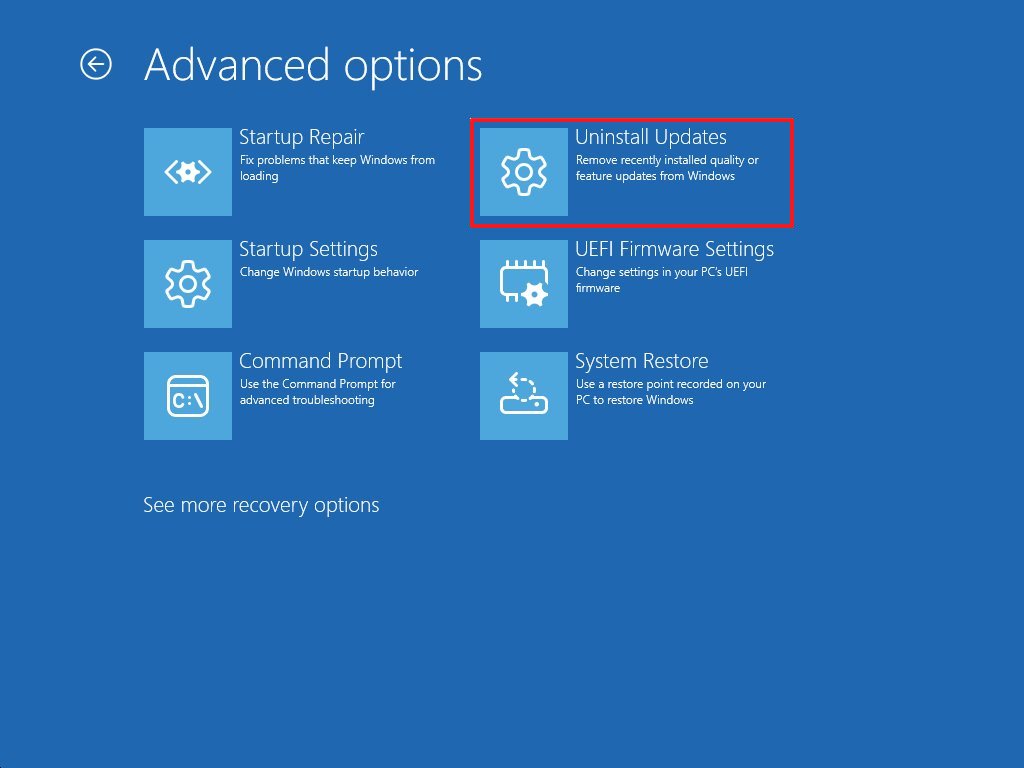
- Click on Advanced options.
- Click the Uninstall Updates option.
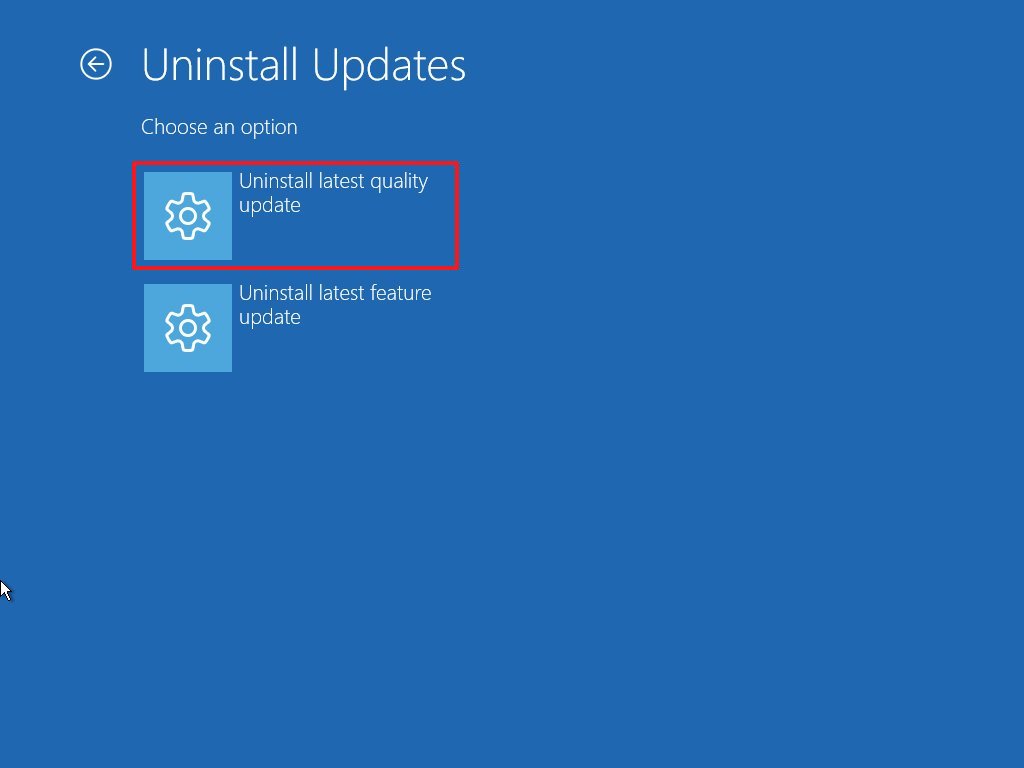
- Click the “Uninstall latest quality update” option.
- Sign in using your administrator credentials (if applicable).
- Click the “Uninstall quality update” button.
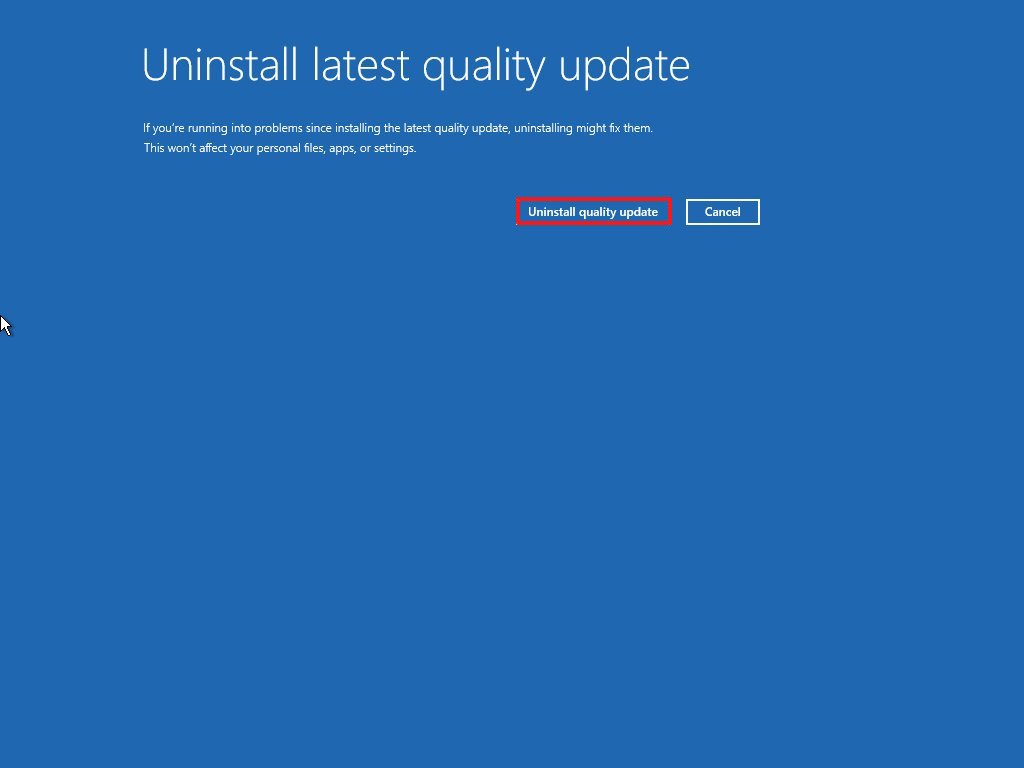
As a researcher, upon finishing the outlined procedures, I can assure you that the system will roll back the latest software update, which appears to be the culprit behind the issue at hand.
4. Disable automatic updates
On Windows 11, there are at least three methods to halt updates. One approach is through the “Pause Updates” option within the “Windows Update” settings, which temporarily stops your system from downloading updates. Another choice is to disable the automatic update feature entirely and instead choose to initiate the update process whenever you prefer.
From Settings
To temporarily disable automatic updates, use these steps:
- Open Settings.
- Click on Windows Update.
- Click the “Pause for 1 week” button to turn off automatic updates.
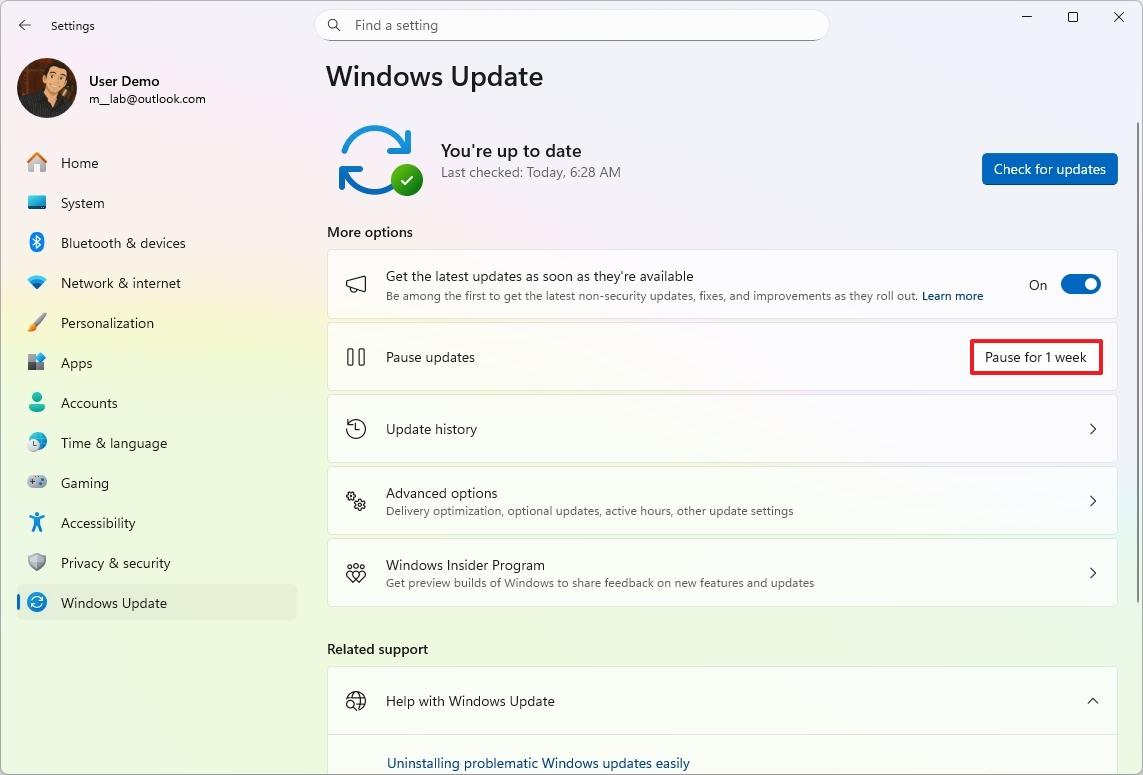
Once you’ve finished the steps, Windows 11 will pause automatic update downloads for a minimum of one week. This period might allow for a new update to tackle the present problem.
From Group Policy
To turn off automatic Windows 11 updates permanently from Group Policy, use these steps:
- Open Start.
- Search for gpedit.msc and click the top result to launch the Local Group Policy Editor.
- Navigate to the following path: Computer Configuration > Administrative Templates > Windows Components > Windows Update > Manage end user experience
- Double-click the “Configure Automatic Updates” policy on the right side.
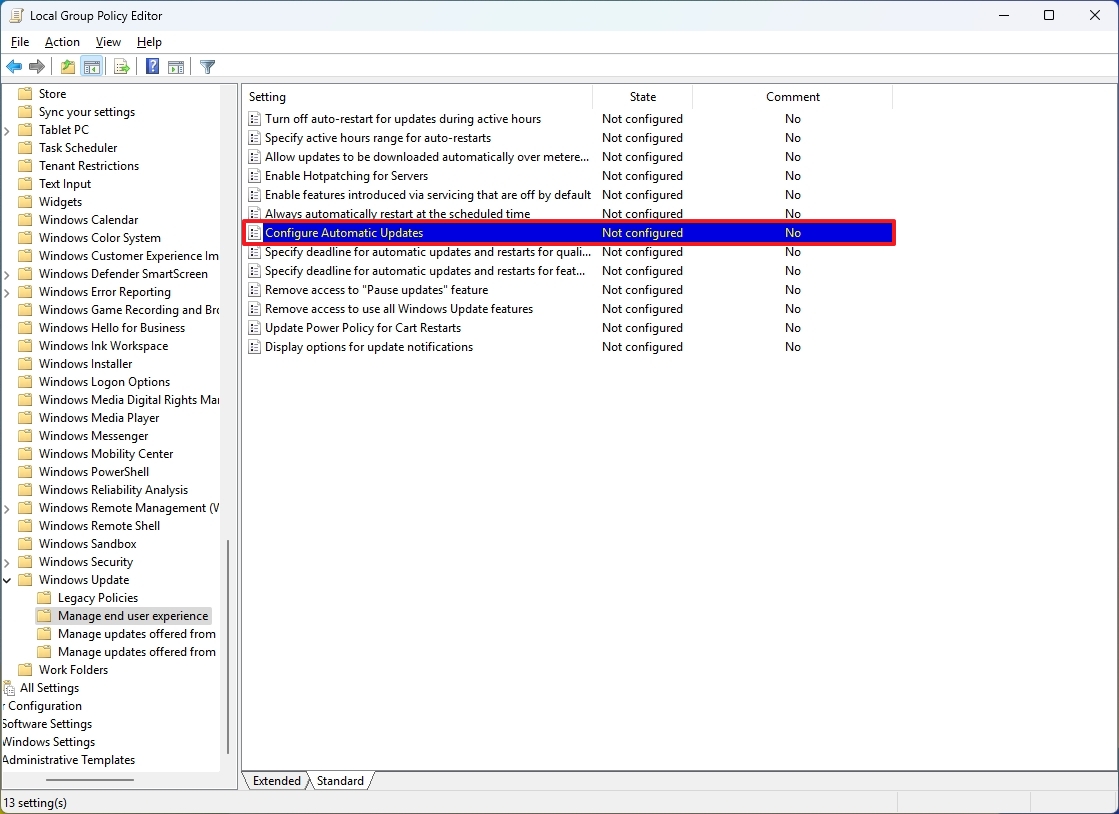
- Check the Disabled option to turn off automatic updates permanently on Windows 11.
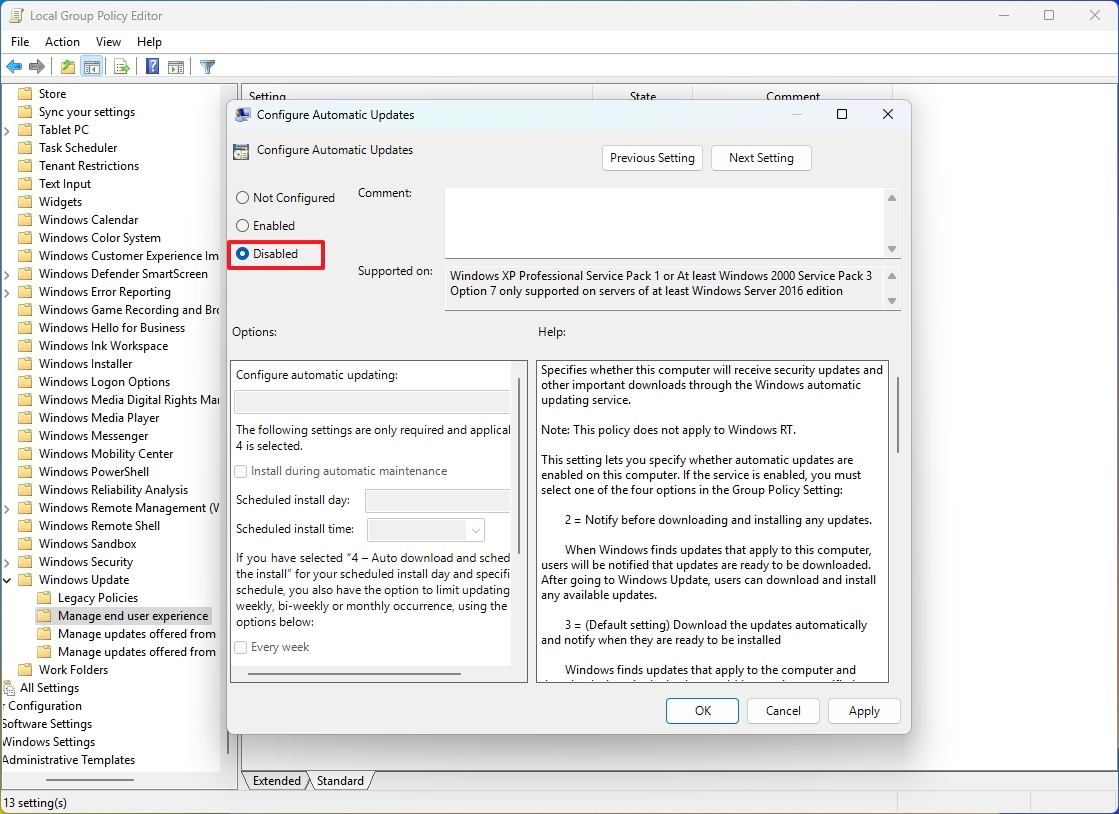
- Click the Apply button.
- Click the OK button.
Once you complete the steps, Windows 11 will stop automatically downloading and installing updates.
Whenever you wish, you can manually update the system by navigating to Settings > Windows Update, then pressing the “Check for updates” button.
I’ve tried to make it more conversational and easier to understand!
To turn on automatic updates again, follow the instructions given earlier, but in step 5, opt for the “Unconfigured” or “Off” setting instead.
If you find yourself needing to modify settings that typically require the Group Policy Editor but aren’t accessible in Windows 11 Home or if you prefer using the Registry instead, I recommend taking a look at my extensive guide on disabling Windows Update on your system.
5. Create full computer backup
Another effective method for safeguarding your system and data is regularly setting up preventive backups on your computer.
As a tech enthusiast, I always ensure to carry out a complete backup of my computer before installing the latest updates. It just feels safer that way!
Should you be using additional software from other developers, you can utilize that for your purpose. In case you don’t have such software, you can opt for the traditional System Image Backup feature found in Windows 11, which allows you to make a comprehensive backup onto an external storage device instead.
- Open Start.
- Search for Control Panel and click the top result to open the app.
- Click on System and Security.
- Click the “Backup and Restore” setting.
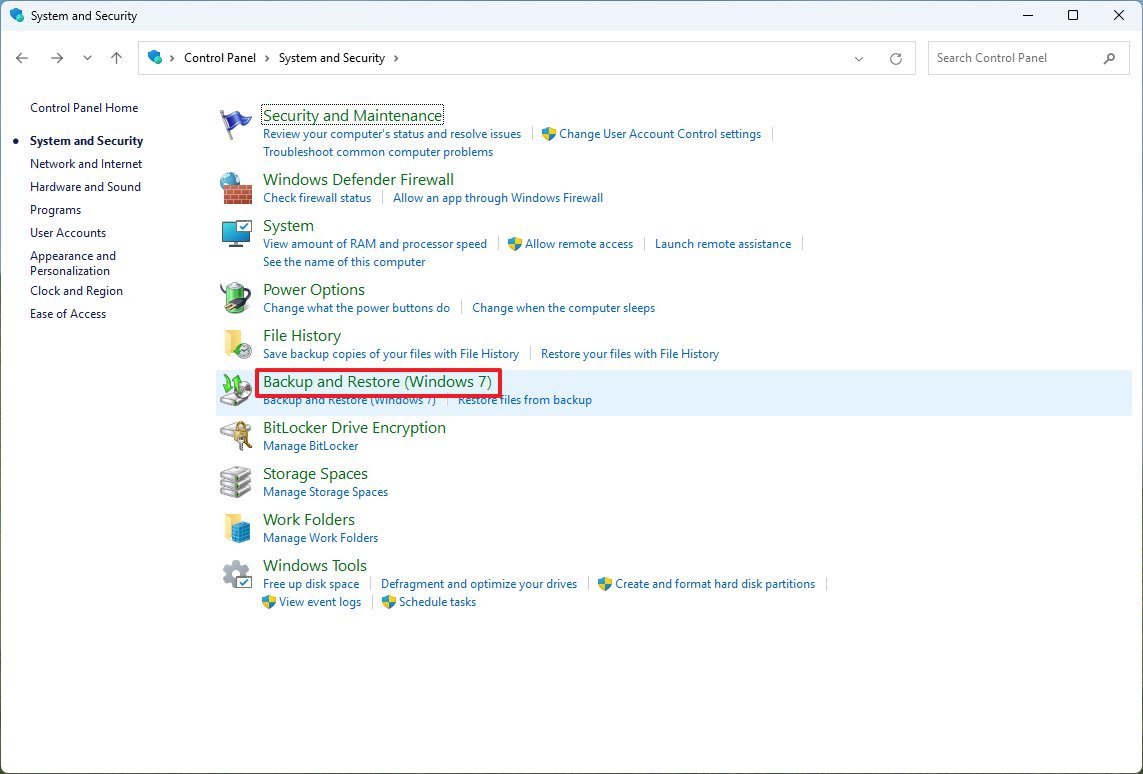
- Click the “System Image Backup” option from the bottom-left corner.
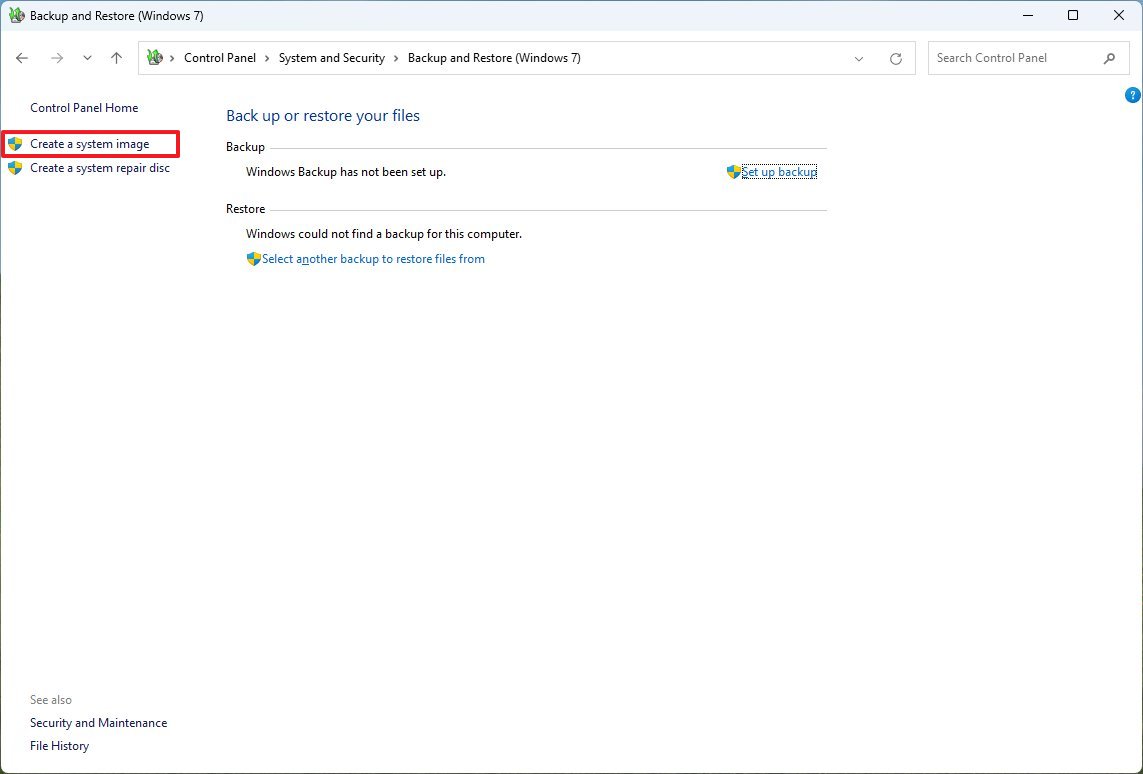
- Select the “On a hard disk” option.
- Use the “On a hard disk” drop-down menu and select the Windows 11 full backup destination.
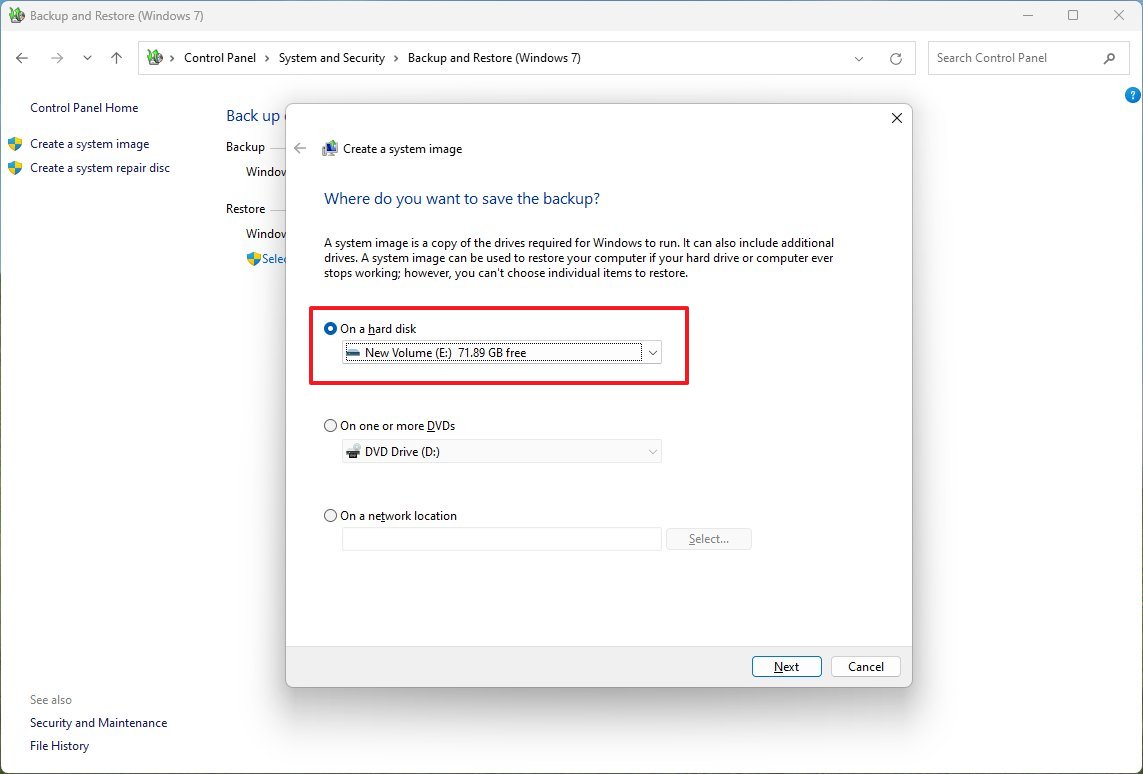
- Click the Next button.
- (Optional) Select any additional drives to include in the backup.
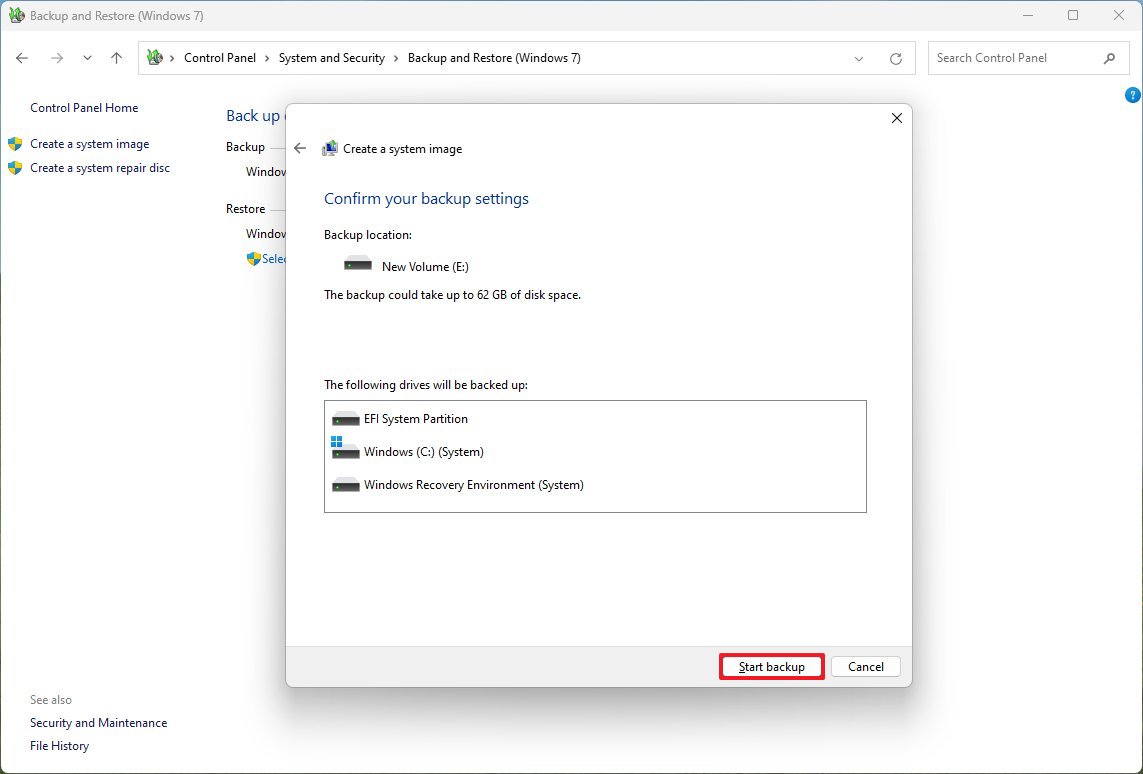
- Click the Next button.
- Click the Start backup button.
- Click the No button.
- Click the Close button.
Once you’ve finished the outlined procedures, you’ll possess a method for restoring your computer and its files if an update causes the installation to malfunction.
Should an unexpected event occur that requires restoration from a prior backup, I’d recommend consulting the guide I previously wrote on backing up and restoring data within a Windows 11 system.
Aside from employing the System Image tool, another option is utilizing the “Backup and Restore” function. This useful feature on Windows 11 enables the creation of daily automated backups for both the operating system and your data files.
As a tech-savvy individual, after setting it up, I can assure you that this system will kick off by performing a complete backup initially. Post that, it will adhere to the schedule you’ve chosen and continually create incremental backups to keep your data safe and up-to-date!
In addition, it’s highly recommended to enhance your recovery strategy by implementing regular file backups. This task can effortlessly be achieved through the use of cloud services such as OneDrive or other similar platforms.
Absolutely, you have two options when it comes to transferring your files:
1. Manually copy the files to an external storage device.
2. Employ third-party software for assistance with this task.
Additional tips for updating the system
Delaying an update for a fortnight might be wise if it’s not addressing a major security flaw in your operating system or application. It’s safer to confirm first that the new release won’t pose any potential risks to your computer before installing it.
As an analyst, I would recommend taking a proactive approach by manually pausing the feature through the Windows Update settings page. If you choose to disable automatic updates, refrain from clicking the “Check for updates” button until you have confirmed that the latest release does not contain any known issues.
You’re welcome to regularly visit the Windows Release Health Dashboard, which provides information on identified problems and any updates that are currently being blocked.
Additionally, if an update becomes available, you have the option to delay the restart by several days as well. In case the update encounters any issues, pushing back the reboot could provide you with extra time to save your data and complete necessary tasks before any potential problems arise.
More resources
Read More
- Pluribus Star Rhea Seehorn Weighs In On That First Kiss
- Kelly Osbourne Slams “Disgusting” Comments on Her Appearance
- Gold Rate Forecast
- Looks Like SEGA Is Reheating PS5, PS4 Fan Favourite Sonic Frontiers in Definitive Edition
- Arknights: Endfield – Everything You Need to Know Before You Jump In
- Goat 2 Release Date Estimate, News & Updates
- ‘Marty Supreme’ Ending, Explained
- Hideo Kojima Says He Was Never Told About The Matrix Creators Wanting Him to Make a Game
- Dune 3 Gets the Huge Update Fans Have Been Waiting For
- ’90s Cartoon Reboot & TMNT Connection!
2025-08-30 16:12